Euro-Pro 380A Manual de usuario
- Categoría
- Máquinas de coser
- Tipo
- Manual de usuario
La página se está cargando ...
La página se está cargando ...

3
INSTRUCCION DE SEGURIDAD IMPORTANTE
“Cuando usar una máquina eléctrica, la precaucion basica hay que
slempre se seguido, incluiendo el sequito.”
“Leer todas instrucción antes de usar esa máquina de coser.”
“Esta máquina de coser esta diseñada por el uso casero.”
“PELIGRO”
“Reducir riesgo del choque eléctrico.”
1. “Una máquina de coser debe nunca esta desligada cuando esta
enchufada. Siempre no enchufar esta máquina de coser desde la
salida eléctrica èn seguida déspues de usar y antes de limpiar.”
2. “Usar esta máquina de coser solamente por el uso prometido como
se describe en ese manual. Usar solamente los accessories
recomendados por el fabricante que se contiene en ese manual.”
3. “Nunca operar esta máquina de coser si la cuerda o el enchufe esta
dañado, si la máquina de coser no trabaja oportunamente, si ella ha
sido caida o dañada, o caido en aguá.”
4. “Nunca dirigir la máquina de coser con la abertura del aire obstruido.
Quedar la ebertura del aire fuera de hilas, pelo y ropa.”
5. “Nunca caer o insertar alguno abjeto en alguna obertura.”
6. “No usar al aire libre.”
7. “No operar a dónde el productos pulverulentos están usados o
oxygeno se administra.”
8. “Para desconectar, carrar todos dominados a la posición “0”,
entonces quitar el enchufe desde la salida.”
9. “No desenchufar por sacar sobre la cuerda. Agarrar el enchufe
pero no agarrar la cuerda.”
“CONSERVAR LOS INSTRUCCIONES DE
LA ADVERTENCIA”
A. La máquina de coser.
a. “Reemplazar la bombilla con el tipo mísmo con is vatio.”
b. “Tener dedos alejado desde tatas piezas motriz. Cuidado
especial esta necesitado alrededor la aguja de la máquina
de caser.”
c. “Siempre usar el plato de la aguja propla. El plato falso
puede causar la aguja romper.”
d. “No usar la aguja forcida.”
e. “No sacar o I peler la tela cuando coer. Ello puedo desviar la
aguja romper.”
f. “Desconectar la máquina de coser a “0” cuando hace alguno
ajuste en la area de la aguja, tal como enhebrar la aguja,
cambiar la aguja, enhebrar el carrete, o cambiar
prensatelas.”
g. “Siempre desenchufar la máquina de coser desde la salida
cuando quitat la cubierta, lubricar o cuando ajustar.”

4
Congratulations:
As the owner of a new sewing machine, you will enjoy precision
quality stitching on all types of fabrics, from multiple layers of
denim to delicate silks.
Your sewing machine offers the ultimate in simplicity and ease of
operation. For your safety and to fully enjoy the many advantages
and ease of operation of your sewing machine, we recommend that
you read all the important safeguards and use and care
instructions in this instruction book.
May we suggest that before you start to use your sewing machine,
you discover the many features and advantages by going through
this instruction book, step by step, while seated at your sewing
machine.
Estimado Cliente:
Le felicitamos muy cordialmente por su nueva máquina de
coser.
Vd. Acaba de comprar un producto de calidad que ha sido
fabricado con máximo cuidado. Su máquina de coser ed
fácil de usar pero naturalmente hay que seguir las reglas. Y
estas las hemos especificado en este manual de
instrucciones. Si Vd. les presta atención entonces realizará
sus trabajos perfectamente desde el comienzo.
Por supuesto que Vd. Tendrá algunas preguntas que en
este manual no hemos podido agotar del todo. En este
caso el representante de nosotro estará siempre a su
disposición, para cualquier pregunta qu Vd. pueda tener.
Le deseamos buen divertimiento con su hobby. De rienda
suelta a su máquina de coser y a su fantasía.

5
Principal parts / Detalles de la máquina
1. Pattern selector dial
2. Take up lever
3. Thread tension dial
4. Thread guide for upper threading
5. Presser foot
6. Shuttle cover
7. Extension table
8. Spool pin
9. Top cover
10. Stitch length dial
11. Reverse button
1. Boton selector de puntos
2. Take up lever
3. Tensión del hilo
4. Thread guide for upper threading
5. Prensstela
6. La tapa con charnela
7. Mesa plana corrediza y coja de accesorios
8. Devanadera
9. Top cover
10. Disco de la longitud de puntada
11. Reverse button
La página se está cargando ...

7
Accessories / Accesorios
Standard Accessories
1. Bobbins (3)
2. Felt (2)
3. Machine oil
4. Seam ripper
5. Screw driver
6. Set of needles
7. Zigzag foot (on machine)
Bonus Feet
A. buttonhole foot
B. Button sewing foot
C. Zipper foot
D. Blind stitch foot
12 3
45 6
7
BA
CD
Standard Accesorios
1. Canillas (3)
2. Fieltro (2)
3. Aceitera
4. Corta-ojales
5. Destornillador
6. Agujas
7. Pie universal
Bonus Feet
A. Pie para ojales
B. Pie para coser botones
C. Pie para cremallera
D. Pie para punto invisible

8
Threading the upper thread / Enhebrado del hilo superior
Caution: Before threading, turn the power switch to “Off”.
• Raise the needle bar to its highest position.
• Follow exactly the lettered threading sequence illustrated. If you skip a
step or fail to properly engage the thread in any of the thread guides, the
machine will not sew properly.
• Continue to draw the thread down and into the needle bar thread guide.
• Insert the thread though the eye of the needle from front to back.
• Leave about 4” (10cm) of thread loose behind the needle.
• Enhebre la aguja por las siguientes posiciones.: Guiahilos de tapa superior,
regulador de tensión, muelle de tirahilos, palanca tirahilos, guiahilo del
brazo, guiahilo de la barra de aguja.
• Enhebre la aguja pasando el hilo desde el frente hacia el reverso por el ojo
de la aguja y deje más a menos 4 pulgadas (10 cm) hilo.
Atención: El interruptor principal tiene que estar a “off”.
Subir la prensatela.

9
Twin needle (not included) / Agujas gemelas (no incluso)
• Turn stitch length dial to the desired stitch length.
•Turn stitch selector to straight stitch.
• Make sure that the two threads used to thread the twin needle are of
the same weight. You can use one or two colors.
• Insert the twin needle in the same way as a single needle. Flat side
should face away from you.
• Follow instructions for single needle threading. Thread each needle
separately.
Please Note: When sewing with twin needle, always proceed
slowly, and make sure to maintain a low speed to
insure quality stitching.
• Regular la máquina según la ilustración.
• Su máquina de coser esta construida especialmente para tener la
opción de coser con agujas gemelas (no incluso) colocando otro eje
de carretas en el hoyo que está en la parte superior de la máquina,
puede usar uno o dos colores de hilo.
• Asgúrese que los hilos sean del mismo peso. Si los hilos no son del
mismo peso la puntada no será correcta.
• Eje portacarrete extra.
Como poner la aguja gemela (no incluso)
• Póngala de la misma manera que la aguja simple, con el lado plao
hacia atrás y la ranura hacia usted.
Como enhebrar agujas gemelas (no incluso)
• Siga las instrucciones para enhebrar aguja sencilla pero hebre cada
aguja separadamente. La ranura debe de estar hacia usted.

10
Fitting the snap-in sewing table / Ajusta la snap-in mesa plana corrediza
Hold the snap-in sewing table horizontally and push it in
the direction of the arrow. (See fig. 1)
The inside of the snap-in sewing table can be used as
an accessory box.
To open, pull up at the point of the arrow as shown.
Giarda la horizontalidad de la snap-in mesa plana
corrediza y lo empuje a la dirección de la saeta. (Mirar
figura 1)
El interior de la snap-in puede utilizar como una caja
accesoria.
Levante le tapa desde el puntomde la saeta para abrir.

11
Connecting machine to power source / Conecta la máquina al fuente eléctrico
This machine is equipped with a polarized plug which must be used with
an appropriate electrical outlet.
Connect the machine to a power source as illustrated below.
The power switch is located above the terminal box. Your machine will
not operate unless this switch is “On”.
Sewing light turns on automatically when the main switch is “On”.
To start the machine, press on the foot control.
The speed of the machine is regulated by the amount of pressure
exerted on the foot control.
(See fig. 1)
CAUTION:
Always make sure that the machine is unplugged from power
source and the main switch is on “Off” when the machine is not in
use and before inserting or removing parts.
ATENCION:
Desenchufe la máquina del toma corriente
cuando no la use.
Conecte la máquina a un fuente eléctrico según la ilustración.
Este dispositivo tiene un enchufe polarizado para lo que le instale el toma
apropiado
.
Pedal de control
El pedal de control puede regular ;a velocidad de coser.
Alumbrado de trabajo
Conectar el interruptor principal “C” para le eléctrica y la luz. (Mirar figura 1)
Fig. 1
IMPORTANT NOTICE
This appliance has a polarized plug (one
blade is wider than the other). To reduce
the risk of electric shock, this plug will fit in
a polarized outlet only one way. If the plug
does not fit fully in the outlet, reverse the
plug. If it still does not fit, contact a
qualified electrician. Do not modify the
plug in any way.

12
Changing the bulb / Cambio de la bombilla
• Open face cover in direction of arrow.
(See fig. 1)
• Remove bulb by unscrewing it anti-
clockwise.
• Install a new bulb by screwing it in
clockwise.
• Use a screw type bulb with 15W (Max).
• El interruptor de la luz se encuentra en dentro
de la tapa frontal. (Mirar figura 1)
• Para cambiar el bombillo
Para remover - Destornille
Para reponerm - Atornille
• El bombillo
Use un bombillo de 15 vatios.
Fig. 1
CAUTION:
Make sure to disconnect the electrical
supply from the wall outlet before changing
the bulb.
ATENCIÓN:
Desenchufar la máquina de la red eléctrical.

13
Two-step presser foot lever / Palanca alza-prensatelas con dos escalones
When sewing several layers of thick fabric, the presser foot can be
raised to a second higher level to facilitate the placement of the fabric
“A”. (See fig. 1)
Para coser ropas extremamente gruesas se puede ensanchar el pasaje
de la ropa del pie subiendo la palanca del alza-prensatelas de un escalón
“A”. (Mirar figura 1.)
Fig. 1
Adjusting the presser foot pressure / Adjuste de la presion del pie prensatia
Open the face cover to readjust the presser foot
pressure regulator.
1. Move the lever up or down for the desired
pressure. For light fabrics set lever at 1, set at 2 for
medium fabrics and 3 for heavy fabrics. (See fig. 2.)
2. Insufficient pressure may cause poor feeding,
skipped stitches or difficulty in guiding the fabric.
3. When darning or sewing freehand embroidery,
release the pressure by setting the lever on “0”.
(See fig. 3.)
Fig. 2
Fig. 3
La presiõn del pie prensatela de la máquina ha sido
preseleccionada y no requiere especiales ajustes de
acuerdo con el tipo de tejido (liviano o pesdo). (Mirar
figura 2 & 3)

14
Drop Feed Control / Control De Gota
A. Push feed dog lever down to drop feed dog below needle plate for
darning, embroidery and button sewing.
B. Push feed dog lever up to raise feed dog above needle plate for
normal sewing. (See fig. 1)
A. Gira el control de alimento de gota a la derecha (bajar el gancho).
(Mirar figura 1)
Fig. 1
La página se está cargando ...

16
Winding the bobbin / Embobinado del hilo inferior
1. Release clutch by turning clutch knob toward you.
2. Draw thread from spool through bobbin winder tension disc
from front to back as shown.
3. Pull end of thread through hole in bobbin as shown.
4. Place bobbin onto bobbin winder shaft with end of thread
coming from the top of the bobbin. Push bobbin winder
shaft to the right until it clicks.
5. Wind thread until winder stops. Remove bobbin and clip
thread.
6. Tighten clutch knob.
1. Suelte el embrague girando la perilla del embrague hacia usted.
2. Pase el hilo del carretel por el disco de tensión de la devanadora de
adelante a atrás como lo indica la ilustración.
3. Pase el extremo del hilo por el orificio de la bobina, como se ilustra.
4. Coloque la bobina en el eje de la devanadora que el extremo del hilo
salga por la parte superior de la bobina. Empuje el eje de la devanadora
hacia la derecha hasta que encaje haciendo un “clic”.

17
Inserting the bobbin / Colocación de la canilla
Attention: Turn the power switch to “off” before inserting or
removing the bobbin.
When inserting or removing the bobbin, the needle must be raised to its
highest position. (Fig. 1)
• Open the hinged cover (1).
• Hold the bobbin case with one hand. Insert the bobbin so that the thread
runs in a clockwise direction (arrow) (2).
• Pull the thread through the slot, down and to the left until it enters the
delivery eyelet (rectangular opening) under the tension spring (3).
• Hold the bobbin case by the hinged latch (4).
• Insert the bobbin case fully into the shuttle race and release the latch.
Make sure that the metal finger fits into the notch at the top of the race
cover (5).
Fig. 1
La aguja tiene que estar siempre arriba del todo al poner y sacar la canilla.
(Fig. 1)
Abrir la tapa con charnela (1).
Sujetar el porta-canilla con una mano. Poner la canilla de manera que el hilo
se devane en el sentido de las agujas del reloj (flecha) (2).
Pasar el hilo por la ranura y por debajo del muelle (3).
Introducir el porta-canilla en el carril de la lanzadera sujetando la charnela con
el pulgar y el indice (4/5).
Attentión: El interruptor principal tiene que estar a “off”.

18
Changing the needle (System 130/750H) / Colocación de la aguja (sistems 130/750H)
Caution: Turn power switch to “Off” before inserting or removing
the needle.
Replace the needle at the first sign of thread breakage or skipped stitches.
Select the correct type and size of needle for the fabric to be sewn.
Turn the balance wheel towards you until the needle is at its highest position.
Loosen the needle clamp screw “A” and tighten again after inserting the new needle.
(Fig. 1)
The flat side of the needle shaft should be facing away from you “B”.
Push the needle up “C” into the needle clamp as far as it will go “D”.
Tighten the needle clamp screw firmly.
The sewing needle must always be straight and sharp for smooth sewing.
Replace the needle
(Fig. 2) if it bent “A”, blunt “B” or the point is damaged
“C”.
Fig. 1
Fig. 2
Cambiar la aguja con frecuencia, sobre todo cuando aparazcan las primeras
dificultadas en el cosido.
Montar la aguja según la ilustración:
A Aflojar el tornillo del porta-agujas y después de haber solocado
la aguja, apretarlo de nuevo (Fig. 1)
B El lado plano tiene que estar hacia atrás.
C/D Introducir la aguja hasta el tope.
Attentión: El interruptor principal tiene que estar a “off”.
La aguja tiene que estar impecable. (Fig. 2)
Problemas en el cosido se manifestan si:
A La aguja estáa torcida
B La aguja estáa despuntada
C La punta tiene garfios.

19
Thread tension / Tensión del hilo
Note: The bobbin thread tension has been adjusted at the factory
and readjustment is usually not required.
Lower thread tension
To test the bobbin thread tension, remove the bobbin case and bobbin from the machine
and hold the bobbin case suspended by the thread. Shake it once or twice. If the tension
is correct, the thread will unwind by about an inch or two. If the tension is too tight, it will
not unwind. If the tension is too loose, the thread will unwind for more than two inches.
To adjust, turn the small screw on the side of the bobbin case (Fig. 1).
Upper thread tension
Basic thread tension setting: 4 (Fig. 2).
To increase the tension, turn the dial up to a higher number. To reduce the tension, turn
the dial to a lower number.
“A” Normal thread tension.
“B” Thread tension too loose.
“C” Thread tension too tight.
Fig. 1
Tensión del hilo inferior
Para controlar la tensión del hilo inferior coger el porta-canillas lleno por la punta del hilo
y dejarlo colgado en el aire. Si la canilla no se desenrolla mientras el porta-canillas se
oscila ligeramente, entoces la tensión es demasiado fuerte. Pero si en cmbio se cae al
suelo o se devana muy facilmente, entoces la tensión es muy floja. La tensión es correcta
cuando el porta-cnillas baja unos 10 cm y después se para colgado al hilo. (fig. 1)
Atención: Normalmente no es necesario cambriar la tensión del
hilo inferior.
Tensió del hilo superior
Regulación de base de la tensión del hilo:4 (fig. 2)
Para aumla tensión del hilo superior hay que girar el botón de regulación hacia un
número más alto.
Para aflojar la tensión del hilo se gira dicho botón hacia un número más bajo.
A Tensió del hilo normal.
B Tensión del hilo superior muy floja.
C.. Tensión del hilo superior demasiado fuerte.
Fig. 2

20
Bringing up the lower thread / Subir el hilo inferior
Hold the upper thread with your left hand. Turn the handwheel towards you with
your right hand until the needle goes down and comes up again to its highest
position (Fig. 1).
• Lightly draw up the needle thread forming a loop with the bobbin thread. The
upper thread should have caught the lower thread in a loop.
• Pull the needle thread toward you and the lower thread will come up from the
bobbin in a large loop (Fig. 2).
• Pull about 6” (15 cm.) of both threads away from you under the presser foot.
Fig. 1
Fig. 2
Sujetar la punta del hilo superior con la mano. Girar el volante hacia adelante
hasta que la aguja esté de nuevo en su posición más alta.
Tirar del hilo superior con lo que se hace subir el hilo inferior a través del
agujero de la placa de la aguja. Llevar los dos hilos hacia atrás por debajo
del pie.

21
Reverse sewing / Coser hacia atrás
Reverse sewing is used for locking the end of seams and where
reinforcement is needed.
At the end of a seam, press down the reverse sewing lever
(Fig 1) and touch the foot control lightly. Sew a few reverse stitches.
(Fig. 2) Release lever and the machine will sew forward again.
Al final de la costura apretar el botón de retroceso. (Fig. 1) Coser algunos
puntos hacia atrás. (Fig. 2) Apenas se suelta el botón, la máquina cose de
nuevo hacia adelante
.
Removing the work / Como sacar la labor de la máquina
Turn the handwheel towards you to bring the thread take up lever to its highest
position.
Raise the presser foot and draw the fabric away from you. (Fig. 3)
Colocar la palanca tensora del hilo en su posición más (girar el volante hacia
adelante), levantar el pie y retirar la labor tirando hacia atrás. (Fig. 3)
Fig. 1
Fig. 2
Fig. 3
La página se está cargando ...

23
Guía de seleción de aguja / tejdo / hilo
12 (80)
14 (90)
16 (100)
18 (110)
TAMAÑO DE AGUJA TEJIDO HILO
9-11 (65-75)
Tejido de peso lígero-Algodón delgado, voile, Sarga, Seda
Muselina, Quiana, Traba, Tejedura de algodón, Tricot, Jersey,
Crepes, Tejido poliestérico, Camisa & Tejido de blusa.
Hilo de derecho lígero en algodón,
nilon o poliestero.
Tejido de peso medio-Algodón, Raso, Lona, Tejedura
doble, Tejido de lana de peso lígero.
Tejido de peso medio-Algodón de dril, Tejido de lana,
Tejedura más pesada, Dril de algodón.
Tejido pesado-Lienzos, Tejido de lana, Dril de
algodón, Material de tapiceria (lígero hasta medio).
Tejido de lana pesado, Tejido de abrigo, Tejido de
tapiceria, unos cueros y vinilo.
La mayor parte de hilo son medio tamaño
de aguja. Si usa el hilo de poliestero en
materiales sintéticos, algodón y tejido
natural, obtendrá la buena resulta.
Siempre usa el mismo hilo en el hilo
superior y bajo.
Hilo de derecho pesado, hilo de
alfomba (usa la prensatela pesada-
grande número).
SELECCIÓN DE AGUJA Y TEJIDO
15x1/705H (SUK)
130 PCL
AGUJAS EXPLICACIÓN TIPO DE TEJIDO
HAx1
15x1
Agujas normales. Extensión de tamaño delgado a
grande. 9 (65) to 18 (110)
Tejido natural-Lana, algodón Seda, etc.
Semi-pelota punto aguja. 9 (65) to 18 (110)
Pleno pelota punto aguja. 9 (65) to 18 (110)
Aguja de cuero. 12 (80) to 18 (110)
15x1/705H
Tejido natural y tejido sintético,
Mixture poliestérica. Tejidura
poliestérica, Triba, Tejedura singular
& doble.
Tejedura de chaqueta de lana, Tela
de traje de natación, Elástica.
Cuero, Vinilo, Tejido de tapiciera.

24
Fabric - Thread - Needle Table / Tabla de Telas - Hilos - Agujas
TELAS
FABRIC
HILOS
THREAD
AGUJAS
NEEDLES
La presión del
pie prensatela
Pressure of
Presser Foot
Longitud del Puntadas
Length of Stiches
Indicator de
Tensión
Indication of
Tension
Recto / ST.
Zig Zag / ZZ
La presión
regulación
Pressure
regulation
Stitch length dial
Selector longtitud pontada
FINAS
LIGHT
NILON
NYLON
TRICOT
TRICOT
SEDA
SILK
SEDA DE LANA
WOOL SILK
80 ALGODÓN
80 COTTON
60 ELASTICA FIBRA
60 S. FIBRE
50 SEDA
50 SILK
50 ELASTICA FIBRA
SEDA
50 S/ FIBRE-SILK
9
11
1-3 1-4
MEDIANAS
MEDIUM
GUINGA
GINGHAM
FINA JERSEY
THIN JERSEY
GABARDINA
GABARDINE
60-80 ALGODÓN
60-80 COTTON
60 ELASTICA FIBRA
60 S. FIBRE
50 SEDA
50 SILK
11-14
11
0.5-3 0.5-4
PESADAS
HEAVY
DENIM
DENIM
JERSEY
JERSEY
PAPO DE LANA
TWEED
50 ALGODÓN
50 COTTON
50 ELASTICA FIBRA
50 S. FIBRE
50 SEDA
50 SILK
14-16
11-14
11-14
0.5-3 0.5-4

25
Sewing (Pattern Selector) & Operation / Coser (Selector de Modelo) Y Tabla de Función
PONTADA
STITCH NO.
EL MODELOS
STITCH PATTERNS
LONGITUD DEL PUNTA
STITCH LENGTH
DEL PIE PRENSATELA
PRESSER FOOT
LA PANACA
DROP FEED
1
2
3
4
7
6
5
PUNTADA RECTO
STRAIGHT STITCH
COSTURA INVISIBLE
BLIND HEM
zigzag
zigzag
3-PASOS zigzag
3-STEP zigzag STITCH
OVERLOCK ELASTICA
SLANT OVEREDGE
TRIPLE COSTURA RECTA
STRAIGHT STRETCH STITCH
OSALES
BUTTONHOLE
AGUJA DOBLE
DOUBLE NEEDLE
BORDADO
FREEHAND EMBROIDERY
EXCEPT BUTTONHOLE
NOT NECESSARY

26
Put the Foot Pressure Regulator to position 2. (see fig. 1)
Position the work under the foot. Place the button on the marked position
and lower the foot. Set the pattern selector knob on and sew a few
securing stitches. Select the zigzag stitch width according to the distance
between the two holes of the button. Turn the handwheel to check if the
needle goes into the right and the left hole of the button without any
obstruction (adjust the stitch width according to the button). Slowly sew on
the button with about 10 stitches. Pull the upper threads under the fabric and
tie a knot.
If shank is required, place a darning needle on top of the button and sew
(fig.3). For button with 4 holes, sew through the front two holes first (fig. 2).
Push work forward and then sew through the back two holes as described
(fig. 3).
Sewing on buttons / Coser botones
Puesto el presion de pie en posicion.
Poner la labor del pie. Colocar el botón en el sitio marcado. Bajar el pie. Y
coser primero unos puntos de remate. Regular el ancho de la puntada. Hacer
un punto de prueba dándole al volante con la mano hasta que la aguja entre
exactemente en el agujero (según el botón puede variar el ancho de la
puntada). Coser el botón. Y hacer algunos puntos de remate.
Para coser un botón que quede separado del tejido (con cuello), colocar una
aguja sobre el botón y coser por encima de ella. (3) en caso de botones con 4
agujeros, empezar siempre con los dos anteriores (2). Después correr el
cosido hacia adelante y continuar el trabajo como indicado anteriormente. (3)
Fig. 2 Fig. 3
Button foot
Fig. 1
La página se está cargando ...

28
Zippers and piping / Colocación de cremalleras
Set the pattern selector dial to straight stitch as shown in Fig. 1.
Set the stitch length control between 1-4 (according to thickness of fabric).
The zipper foot can be inserted to the right or left, depending on which side
of the zipper you want to sew. (Fig. 2)
To sew past the zipper pul, lower the needle into the fabric, raise the presser
foot and push the zipper pull behind the presser foot. Lower the foot and
continue to sew.
It is also possible to use the zipper foot to sew piping into a bias strip to form
a welt. (Fig. 3)
Regular la máquina según la ilustración. (Fig. 1.)
Con el pie para cremalleras se puede coser por la derecha o por la
izquierda. (Fig. 2)
Para evitar el cursor de la cremallera, clavar la aguja en el tejido, levantar el
pie y correr el cursor de la cremallera por debajo del pie. Bajar el pie y
continuar a coser. (Fig. 3)
la prensatela para cremallera tambien puede utilizar para coser el cierre de
cuerda.
Zipper Foot
Pie Para Cremalleras
Stitch Length Dial
Disco de Longitud de Puntada
Pattern Selector
Selector el Modelos
Fig. 1
Fig. 2
Fig. 3

29
Darning / Remiendos
• Turn stitch length dial to the desired length.
• Turn stitch selector to straight stitch.
• Position the fabric to be darned under the presser foot together with
the underlaying fabric to be used.
• Lower the presser foot and alternately sew forward or reverse using
the lever.
• Repeat this motion until the area to be darned is filled with rows of
stitching.
For reverse sewing instructions, see page 18.
• Regular la máquina según la ilustración.
• Coloque la parte que va a remendar bajo el pisacostura.
• Baje el pisacostura.
• Cosa alternadamente hacia adelante y hacia atrás tal como se indica
en la figura.
• Repita esta procedumiento hasta que la parte que va a zurcir esté
llena de hileras de puntadas.
Para coser hacia atrás, vea páeina 18.
All purpose foot
Pie universal
Stitch length dial
Disco de longitud de puntada
Pattern Selector
Selector el Modelos

30
Attaching lace / Como pegar encajes
• Turn stitch length dial to the desired length.
• Turn stitch selector to straight stitch.
• Fold in the edge of the fabric (approximately 1/4” or 6mm.)
• Place the lace under the folded edge of the fabric allowing it to
underlap the fabric slightly as required by the pattern of the lace.
• Sew on the edge of the fabric fold.
• You can add a decorative touch by using the satin stitch to sew the
lace.
• Regular la máquina según la ilustración.
• Ponga el encaje abajo de le tela dejando la sobrar 6mm (1/4 pulgada).
• Ponga abajo el pisacostura y empiece a coser.
Nota
: Si se usa puntada de realce para coser el encaje, será más attractivo.
All purpose foot
Pie universal
Pattern Selector
Selector el Modelos
Stitch length dial
Disco de longitud de puntada

31
All purpose foot
Pie universal
Stitch length dial
Disco de longitud de puntada
Appliqué / Aplicación
• Turn stitch length dial to the desired length.
• Turn pattern selector dial to small zigzag width.
• Cut out the appliqué design and baste is to the fabric.
• Sew slowly around the edge of the design.
• Trim excess material outside the stitching. Make sure not to cut any
stitches.
• Remove basting thread.
• Tie top and bottom thread under the appliqué to avoid unravelling.
• Regular la máquina según la ilustración.
• Estre char el amplitud de puntada de zigzag.
• Hilvane el diseño sobre la superficie de la tela.
• Empieze a coser con cuidado según el diseño.
• Recorte la tela que rebase la costura.
• Saque las puntadas de hilvanar.
Nota
: Vuelva a coser as puntadas finales e inciales con putada recta para
reforzar.
Pattern Selector
Selector el Modelos

32
Monogramming and embroidering with embroidery hoop* / Monogramas borados usando el aro de bordas*
• Set the machine as illustrated in fig. 1.
• Remove the presser foot and the presser foot holder.
• Attache the darning plate.
• Lower the presser foot lever before starting to sew.
• Adjust the stitch width according to the size of lettering or design.
Presser foot regulator
Presion de Pie
Stitch length dial
Disco de longitud de puntada
Fig. 1
Preparation for Monogramming & Embroidering*
• Draw the desired lettering or design on the right side of the fabric.
• Stretch the fabric between embroidery hoop* as firmly as possible.
• Place the fabric under the needle. Make sure the presser foot bar is
down on its lowest position.
• Turn the balance wheel towards you to bring up the lower thread
through the fabric. Sew a few securing stitches at the starting point.
• Hold the hoop* with thumb and forefingers of both hands while
pressing the material with the middle and third fingers and
supporting the outside of the hoop* with smaller finger.
*Note: Embroidery hoop is not included with the machine.
• Regular la máquina según la ilustración. (Fig. 1)
• Quitar el pie y el porta-pie.
• Bajar la barra prensatelas antes de coser.
• Regular el ancho dela puntada según la amplitud de las letras
o el pise nó.
Preparacion Para Monogramas Y Bordados*
• Prepára la máquina de coser como se indica en las instrucciones.
• Dibuje las letras (para monogramas) o el diseño (para bordados) en la
parte derecha de la tela.
• Estire firmamente la tela entre los aros de bordár.
• Coloque la tela bajo la aguja y baje la barra del pisacostura.
• Hale el hilo inferior através de la tela a la posición de partida girando el
volante y haga unas puntadas para asegurar.
• Sostenga el bastidór con los dedos pulgar e indice de la mano derecha e
izquierda aprisionando al mismo tiempo la tela con los dedos del medio y
aguantándo la parte de afuera del bastidor con el meñique.
*Nota: El aro de bordas no inchuso com el máquina.
Pattern Selector
Selector el Modelos

33
Monogramming and embroidering (continued) / Monogramas y bordados (continue)
Monogramming
• Sew, moving the hoop* slowly along the lettering. Make sure that you
maintain a constant speed.
• When the letter is finished, secure the threads with a few straight stitches.
*Note: Embroidery hoop is not included with the machine.
Embroidering
• Stitch along the outline of the design by moving the embroidery
hoop*. Make sure to maintain a constant speed.
• Fill in the design working from the outline towards the inside. Keep
the stitches close together.
You will get longer stitches by moving the hoop* faster and shorter
stitches by mving the hoop* more slowly.
*Note: Embroidery hoop is not included with the machine.
Monogramas
• Cosa, moviendo el aro despacio por las letras a una velocidad constante.
• Asegúre con unas pocas puntadas rectas.
Nota: Estas instrucciones también para bordados.
Bordados
• Cosa unas puntadas en la orilla del diseño moviendo el bastidor de
bordar.
• Cosa de afuera hacia adentro y de adentro hacia afuera. Haga las
puntadas bien unidas sin dejar espacios intermedios.
Nota: Para coser puntadas largas, mueva el bastidor de
bordar rápidamente. Para coser puntadas cortas, muévalo
lentamente..

34
3-Step zigzag / Zigzag cosido
Sewing on lace and elastic, darning, mending, reinforcing edges.
• Set the machine as illustrated. Pattern selector on-
• Place patch in position. The stitch length can be shortened to
produce very close stitches. (Fig. 1)
• When mending tears, it is advisable to use a piece of backing fabric to
reinforce. The stitch density can be varied by adjusting the stitch
length. First sew over the center and then overlap on both sides.
Depending on the type of fabric and damage, sew between 3 and 5
rows. (Fig. 2)
Para aplicar elásticos y puntillas, colocar remiendos,
remendar rasgones, reforzar los bordes.
• Regular la máquina según la ilustración.
• Aplicar el remiendo. El largo de la puntada puedo reducirse hasta
que los puntos estén bien juntos. (Fig. 1)
• Cuando se remendan rasgones es aconsehable poner debajo del la
labor un tejido (refuerzo). El espesor de los puntos se puedoe vairar
cambiando el largo de la puntada. Primero coser en el centro y
despúes sobrepasar un poco los dos lados. Según el tejido y e daño
coser de 3 a 5 filas. (Fig. 2)
Stitch length dial
Disco de longitud de puntada
All purpose foot
Pie universal
Fig. 1 Fig. 2
Pattern Selector
Selector el Modelos

35
Overlock stitches / Puntos overlock
Seams, neatening, visible hems. Turn stitch length dial to position 4.
Stretch overlock position on selction dial.
For fine knits, jerseys, neck, edges, ribbing.
All overlock stitches are suitable for sewing and neatening edges and visible
seams in one operation.
When neatening, the needle should just go over the edge of the fabric.
Todos los puntos overlock son adecuados para coser y
sobrehilar bordes y dobladillos visibles en usa sóla fase de
trabajo.
En el sobrehilado la aguja tiene que apenas sobrepasar el borde de la
ropa.
Attention: Use new needles or ball point needles or stretch needle.
Attención: Usar una aguja nueva o una aguja con punta esférical.
Overlock elástico
Para terminar dobladillos, costuras, edcorativas. Adecuado para doblidillos y
costura decorativas en materiales elásticos.
Stitch length dial
Disco de longitud de puntada
Stitch display
Ventana de puntada
All purpose foot
Pie universal

36
Blind hem - lingerie stitch / Costura invisible - punto de lenceria
For hems, curtains, trousers, skirts, etc.
Blind hem/lingerie for fine fabrics.
Set the machine as illustrated. (1)
Note: It takes practice to sew blind hems. Always make a sewing test first.
• Fold the fabric as illustrated with the wrong side uppermost.. (2)
• Place the fabric under the foot. Turn the handwheel forwards by hand
until the needle swings fully to the left. It should just pierce the fold of the
fabric. If it does show, adjust the foot guide. (3)
• Adjust the guide (4) by turning the knob (5) so that the guide just rests
against the fold.
• Sew slowly, guiding the fabric carefully along the edge of the guide.
• Turn the speed control to Minimum!
Para dobladillos, cortinas, pantalones, faldas, etc.
Costura invisible/punto de lenceria para tejidos fuertes.
Regular la máquina según la ilustración. (1)
Atención: Se necesita un poco de práctica para que la costura invisible salga
bien. Lo mejor es hacer siempre antes una prueba.
• Doblar la ropa como en la ilustración cón el revés hacia arriba. (2)
• Poner la ropa doblada debajo del pie. Girar el volante a mono hacia
adelante hasta que la aguja se encuentre al extremo izquierdo. La
agujatiene que picar sólo un poco en el pliegue de la ropa. Si no es el
caso, entoces hay que corregir la anchura de la ropa. (3)
• Poner la regla de borde (4) en el pliegue girando el botón. (5)
• Coser lentamente y guair la ropa cuidafosamente para que la regla de
borde no cambie su posición.
• Ajustar el botón regulador de la velocidad al minimo.
Stitch length dial
Disco de longitud de puntada

37
Stitch selection / Elección del punto
Triple straight stitch. Pattern selector see Fig. 1.
For hard wearing seams.
• Turn the stitch length dial to 4. See Fig. 1.
• The machine sews two stitches forwards and one stitch backwards.
This gives triple reinforcement.
For hardwearing seams, hems and decorative seams.
Punto recto triple Fig. 1.
Para costuras muy resistentes.
• Ajustar el botón selector del largo de la puntada en la posición. See Fig. 1.
• La máquina cose dos puntos hacia adelante y un punto hacia atrás lo que
por resultado un refuerzo triple.
Para costuras muy resistentes, dobladillos y costuras decorativas.
Stitch length dial
Disco de longitud de puntada
Fig. 1

38
Cutting the thread / Cortar el hilo
Cutting the thread:
• Turn the handwheel till the needle is in its upper most highest
position.
• Lift the foot up.
• Pull the fabric out and attach the thread around the cutter (see
fig. at right).
• Pull down on the thread to cut it.
Sujetar los hilos las dos manos detrás de la prensatela.
Hacerlos entrar en la ranura “A” de la barra prensatelas y tirar
los hilos hacia abajo hasta que se corten.

39
Maintenance / Manutención de la máquina
Caution: Always make sure that the machine is
unplugged from the power source and the
main switch us on “Off” (0) before inserting
or removing any parts and before cleaning.
Remove the stitch plate:
Turn the handwheel until the needle is fully raised. Open the hinged front
cover and unscrew the needle plate screw with the screw driver. (Fig. 1)
Cleaning the feed dog:
Remove the bobbin case and use a brush to clean the whole area. (Fig. 2)
Cleaning and lubricating the hook:
Remove the bobbin case. Snap the two hook retaining arms “3” outwards.
Remove the hook race cover “4” and the hook “5” and clean with a soft
cloth. Lubricate at point “6” (1-2 drops) with sewing machine oil. Turn the
handwheel until the hook race “7” is in the left position. Replace the hook
“5”. Replace the hook race cover and snap back the two hook retaining
arms. Insert the bobbin case and bobbin and replace the stitch plate.
Important: Fabric fluff and threads must be removed regularly. Your
machine should be serviced at regular intervals at one of our service
agencies.
Atención: Antes de la limpieza desconectar la máquina
quitando el enchufe de la red eléctrica.
Quitar la placa de la aguja:
Girar el volante hasta que la aguja este en el punto más alto. Abrir la tapa con
charnela y sacar el tornillo de la placa de aguja por el destornillador. (Fig. 1)
Limpieza del transportador:
Sacar el porta-canillas. Limpiar bien toda la zona con un pincel. (Fig. 2)
Limpieza y aceitado de la lanzadera:
Sacar el porta-canillas. Girar los dos gatillos de sujeción hacia afuera como
en la ilustración. Sacar la tapa del carril (4) y la lanzader (5). Limpiar todo
con un paño suave. Poner 1-2 gotas de aceite de máquina de coser en el
(6). Girar el volante hasta que el carril de la lanzadera (7) esté en la
izquierda. Poner la lanzadera (5) y la tapa del carril (4). Cerrar de nuevo los
dos gatillos de sujeción (3). Meter de nuevo el porta-canillas y la placa de la
aguja.
Importante: De vez en cuando se deben quitar los residuos de hilo y el
polvo. Para que su máquina de coser esté siempre en buenas condiciones,
es recomenable un control periódico. Por nuestra asistancia técnica.
La página se está cargando ...

41
Eliminación de averias
PROBLEMA CAUSA CORRECCIÓN
El hilo superior se
rompe
1. La máquina estámal enhebrada
2. La tension del hilo es demasiado fuerte.
3. El hilo es demsiado grueso para la aguja.
4. La aguja no estácolocada correctamente.
5. El hilo se ha enredado en el portabobinas.
6. La aguja está torcida o despuntada.
1. Enhebrar la máquina correctamente.
2. Disminuir la tension del hilo superior (número menor).
3. Usar una aguja más gruesa.
4. Colocar lamaguja correctamente (el lado plano hacia atrás).
5. Sacar la bobina y devanar el hilo.
6. Cambiar la aguja.
El hilo inferior de
rompe
1. El porta-canillas no está bien montado.
2. El porta-canillas no está bien enhebrado.
3. La tensión del hilo inferior es demasiado fuerto.
1. Montar nuevamente el porta-canillas y tirar del hilo. Este
tiene que desenrollarse fácilmente.
2. Controlar la canilla y el porta-canillas.
3. Corregir la tensión del hilo inferior conforme las
instrucciones.
Falta de puntos
1. La aguja no está colocada correctamente.
2. La aguja está torcida o despuntada.
3. Se ha montado una aguja errada.
4. Se ha montado un pie errado.
1. Colocar la aguja correctamente (el lado plano hacia atrás).
2. Cambiar la aguja.
3. Adaptar la aguja al tejido y al hilo.
4. Controlar si se ha montado el pie adecuado.
La aguja se rompe
1. La aguja está torcida o despuntada.
2. La aguja no está colocada correctamente.
3. Ropa demasiado gruesa/grosor incorrecto de la aguja.
4. Se ha montado un pie errado.
1. Cambiar la aguja.
2. Colocar la aguja correctamente (el lado plano hacia atrás).
3. Adaptar la aguja al tejido y al hilo.
4. Usar el pie correcto.
Durante la costura
se forman lazos
1. La máquina está ma enhebrada.
2. El porta-canillas está mal enhebrado.
3. La relación aguja/ropa/hilo no es correcta.
4. La tensión del hilo no es correcta.
1. Enhebrar la máquina correctamente.
2. Enhebrar el porta-canillas conforme las instrucciones.
3. El grosor de la aguja tiene que coincidir con el hilo y la ropa.
4. Corregir la tensión del hilo.
La costura se
encoge, la tela se
frunce
1. La aguja es demasiado gruesa para el tejido.
2. El largo de la puntada está mal regulado.
3. La tensión del hilo es demasiado fuerte.
1. Usar una aguja más fina.
2. Regular correctamente el largo de la puntada.
3. Controlar la tensión del hilo.
Los puntos y el
transporte de la
ropa son irreglares
1. El hilo es demasiado débil.
2. El porta-canillas no está bien enhebrado.
3. Se ha tirado de la tela durante la costura.
1. Usar un hilo de mejor calidad.
2. Enhebrar de nuevo el porta-canillas y colocario
correctamente.
3. No tirar de la ropa. Esta viene transportada
automáticamente.
La maquina hace
ruido y cose
duramente
1. Hay que lubrificar la máquina.
2. Pelusa y trazos de aceite se hn pegado en la lanzadera o
en barra prensatelas.
1. Lubrificar la máquina según las instrucciones.
2. Limpiar la lanzadera y el transportador conforme las
instrucciones.
Transcripción de documentos
INSTRUCCION DE SEGURIDAD IMPORTANTE “Cuando usar una máquina eléctrica, la precaucion basica hay que slempre se seguido, incluiendo el sequito.” “Leer todas instrucción antes de usar esa máquina de coser.” “Esta máquina de coser esta diseñada por el uso casero.” 8. “Para desconectar, carrar todos dominados a la posición “0”, entonces quitar el enchufe desde la salida.” “PELIGRO” “CONSERVAR LOS INSTRUCCIONES DE LA ADVERTENCIA” “Reducir riesgo del choque eléctrico.” 1. “Una máquina de coser debe nunca esta desligada cuando esta enchufada. Siempre no enchufar esta máquina de coser desde la salida eléctrica èn seguida déspues de usar y antes de limpiar.” 9. “No desenchufar por sacar sobre la cuerda. Agarrar el enchufe pero no agarrar la cuerda.” A. La máquina de coser. a. “Reemplazar la bombilla con el tipo mísmo con is vatio.” 2. “Usar esta máquina de coser solamente por el uso prometido como se describe en ese manual. Usar solamente los accessories recomendados por el fabricante que se contiene en ese manual.” b. “Tener dedos alejado desde tatas piezas motriz. Cuidado especial esta necesitado alrededor la aguja de la máquina de caser.” 3. “Nunca operar esta máquina de coser si la cuerda o el enchufe esta dañado, si la máquina de coser no trabaja oportunamente, si ella ha sido caida o dañada, o caido en aguá.” c. “Siempre usar el plato de la aguja propla. El plato falso puede causar la aguja romper.” 4. “Nunca dirigir la máquina de coser con la abertura del aire obstruido. Quedar la ebertura del aire fuera de hilas, pelo y ropa.” e. “No sacar o I peler la tela cuando coer. Ello puedo desviar la aguja romper.” 5. “Nunca caer o insertar alguno abjeto en alguna obertura.” f. 6. “No usar al aire libre.” 7. “No operar a dónde el productos pulverulentos están usados o oxygeno se administra.” d. “No usar la aguja forcida.” “Desconectar la máquina de coser a “0” cuando hace alguno ajuste en la area de la aguja, tal como enhebrar la aguja, cambiar la aguja, enhebrar el carrete, o cambiar prensatelas.” g. “Siempre desenchufar la máquina de coser desde la salida cuando quitat la cubierta, lubricar o cuando ajustar.” 3 Congratulations: Estimado Cliente: As the owner of a new sewing machine, you will enjoy precision quality stitching on all types of fabrics, from multiple layers of denim to delicate silks. Le felicitamos muy cordialmente por su nueva máquina de coser. Your sewing machine offers the ultimate in simplicity and ease of operation. For your safety and to fully enjoy the many advantages and ease of operation of your sewing machine, we recommend that you read all the important safeguards and use and care instructions in this instruction book. Vd. Acaba de comprar un producto de calidad que ha sido fabricado con máximo cuidado. Su máquina de coser ed fácil de usar pero naturalmente hay que seguir las reglas. Y estas las hemos especificado en este manual de instrucciones. Si Vd. les presta atención entonces realizará sus trabajos perfectamente desde el comienzo. May we suggest that before you start to use your sewing machine, you discover the many features and advantages by going through this instruction book, step by step, while seated at your sewing machine. Por supuesto que Vd. Tendrá algunas preguntas que en este manual no hemos podido agotar del todo. En este caso el representante de nosotro estará siempre a su disposición, para cualquier pregunta qu Vd. pueda tener. Le deseamos buen divertimiento con su hobby. De rienda suelta a su máquina de coser y a su fantasía. 4 Principal parts / Detalles de la máquina 1. 2. 3. 4. 5. 6. 7. 8. 9. 10. 11. Pattern selector dial Take up lever Thread tension dial Thread guide for upper threading Presser foot Shuttle cover Extension table Spool pin Top cover Stitch length dial Reverse button 1. 2. 3. 4. 5. 6. 7. 8. 9. 10. 11. Boton selector de puntos Take up lever Tensión del hilo Thread guide for upper threading Prensstela La tapa con charnela Mesa plana corrediza y coja de accesorios Devanadera Top cover Disco de la longitud de puntada Reverse button 5 Accessories / Accesorios Standard Accessories Bonus Feet 1. Bobbins (3) 2. Felt (2) 3. Machine oil 4. Seam ripper 5. Screw driver 6. Set of needles 7. Zigzag foot (on machine) A. buttonhole foot B. Button sewing foot C. Zipper foot D. Blind stitch foot 1 2 3 Standard Accesorios Bonus Feet 4 5 6 1. Canillas (3) 2. Fieltro (2) 3. Aceitera 4. Corta-ojales 5. Destornillador 6. Agujas 7. Pie universal A. Pie para ojales B. Pie para coser botones C. Pie para cremallera D. Pie para punto invisible A B C D 7 7 Threading the upper thread / Enhebrado del hilo superior Caution: Before threading, turn the power switch to “Off”. • Raise the needle bar to its highest position. • Follow exactly the lettered threading sequence illustrated. If you skip a step or fail to properly engage the thread in any of the thread guides, the machine will not sew properly. • Continue to draw the thread down and into the needle bar thread guide. • Insert the thread though the eye of the needle from front to back. • Leave about 4” (10cm) of thread loose behind the needle. Atención: El interruptor principal tiene que estar a “off”. Subir la prensatela. • Enhebre la aguja por las siguientes posiciones.: Guiahilos de tapa superior, regulador de tensión, muelle de tirahilos, palanca tirahilos, guiahilo del brazo, guiahilo de la barra de aguja. • Enhebre la aguja pasando el hilo desde el frente hacia el reverso por el ojo de la aguja y deje más a menos 4 pulgadas (10 cm) hilo. 8 Twin needle (not included) / Agujas gemelas (no incluso) • Turn stitch length dial to the desired stitch length. •Turn stitch selector to straight stitch. • Make sure that the two threads used to thread the twin needle are of the same weight. You can use one or two colors. • Insert the twin needle in the same way as a single needle. Flat side should face away from you. • Follow instructions for single needle threading. Thread each needle separately. Please Note: When sewing with twin needle, always proceed slowly, and make sure to maintain a low speed to insure quality stitching. • Regular la máquina según la ilustración. • Su máquina de coser esta construida especialmente para tener la opción de coser con agujas gemelas (no incluso) colocando otro eje de carretas en el hoyo que está en la parte superior de la máquina, puede usar uno o dos colores de hilo. • Asgúrese que los hilos sean del mismo peso. Si los hilos no son del mismo peso la puntada no será correcta. • Eje portacarrete extra. Como poner la aguja gemela (no incluso) • Póngala de la misma manera que la aguja simple, con el lado plao hacia atrás y la ranura hacia usted. Como enhebrar agujas gemelas (no incluso) • Siga las instrucciones para enhebrar aguja sencilla pero hebre cada aguja separadamente. La ranura debe de estar hacia usted. 9 Fitting the snap-in sewing table / Ajusta la snap-in mesa plana corrediza Hold the snap-in sewing table horizontally and push it in the direction of the arrow. (See fig. 1) The inside of the snap-in sewing table can be used as an accessory box. Giarda la horizontalidad de la snap-in mesa plana corrediza y lo empuje a la dirección de la saeta. (Mirar figura 1) El interior de la snap-in puede utilizar como una caja accesoria. To open, pull up at the point of the arrow as shown. Levante le tapa desde el puntomde la saeta para abrir. 10 Connecting machine to power source / Conecta la máquina al fuente eléctrico CAUTION: Always make sure that the machine is unplugged from power source and the main switch is on “Off” when the machine is not in use and before inserting or removing parts. This machine is equipped with a polarized plug which must be used with an appropriate electrical outlet. Connect the machine to a power source as illustrated below. The power switch is located above the terminal box. Your machine will not operate unless this switch is “On”. ATENCION: Desenchufe la máquina del toma corriente cuando no la use. Conecte la máquina a un fuente eléctrico según la ilustración. Este dispositivo tiene un enchufe polarizado para lo que le instale el toma apropiado. Pedal de control El pedal de control puede regular ;a velocidad de coser. Sewing light turns on automatically when the main switch is “On”. Alumbrado de trabajo To start the machine, press on the foot control. The speed of the machine is regulated by the amount of pressure exerted on the foot control. (See fig. 1) Conectar el interruptor principal “C” para le eléctrica y la luz. (Mirar figura 1) IMPORTANT NOTICE This appliance has a polarized plug (one blade is wider than the other). To reduce the risk of electric shock, this plug will fit in a polarized outlet only one way. If the plug does not fit fully in the outlet, reverse the plug. If it still does not fit, contact a qualified electrician. Do not modify the plug in any way. Fig. 1 11 Changing the bulb / Cambio de la bombilla CAUTION: Make sure to disconnect the electrical supply from the wall outlet before changing the bulb. • Open face cover in direction of arrow. (See fig. 1) • Remove bulb by unscrewing it anticlockwise. • Install a new bulb by screwing it in clockwise. • Use a screw type bulb with 15W (Max). ATENCIÓN: Desenchufar la máquina de la red eléctrical. • El interruptor de la luz se encuentra en dentro de la tapa frontal. (Mirar figura 1) • Para cambiar el bombillo Para remover - Destornille Para reponerm - Atornille • El bombillo Use un bombillo de 15 vatios. Fig. 1 12 Two-step presser foot lever / Palanca alza-prensatelas con dos escalones When sewing several layers of thick fabric, the presser foot can be raised to a second higher level to facilitate the placement of the fabric “A”. (See fig. 1) Para coser ropas extremamente gruesas se puede ensanchar el pasaje de la ropa del pie subiendo la palanca del alza-prensatelas de un escalón “A”. (Mirar figura 1.) Fig. 1 Adjusting the presser foot pressure / Adjuste de la presion del pie prensatia Open the face cover to readjust the presser foot pressure regulator. 1. Move the lever up or down for the desired pressure. For light fabrics set lever at 1, set at 2 for medium fabrics and 3 for heavy fabrics. (See fig. 2.) 2. Insufficient pressure may cause poor feeding, skipped stitches or difficulty in guiding the fabric. 3. When darning or sewing freehand embroidery, release the pressure by setting the lever on “0”. (See fig. 3.) Fig. 2 Fig. 3 La presiõn del pie prensatela de la máquina ha sido preseleccionada y no requiere especiales ajustes de acuerdo con el tipo de tejido (liviano o pesdo). (Mirar figura 2 & 3) 13 Drop Feed Control / Control De Gota A. Push feed dog lever down to drop feed dog below needle plate for darning, embroidery and button sewing. B. Push feed dog lever up to raise feed dog above needle plate for normal sewing. (See fig. 1) A. Gira el control de alimento de gota a la derecha (bajar el gancho). (Mirar figura 1) Fig. 1 14 Winding the bobbin / Embobinado del hilo inferior 1. Release clutch by turning clutch knob toward you. 2. Draw thread from spool through bobbin winder tension disc from front to back as shown. 3. Pull end of thread through hole in bobbin as shown. 4. Place bobbin onto bobbin winder shaft with end of thread coming from the top of the bobbin. Push bobbin winder shaft to the right until it clicks. 5. Wind thread until winder stops. Remove bobbin and clip thread. 6. Tighten clutch knob. 1. Suelte el embrague girando la perilla del embrague hacia usted. 2. Pase el hilo del carretel por el disco de tensión de la devanadora de adelante a atrás como lo indica la ilustración. 3. Pase el extremo del hilo por el orificio de la bobina, como se ilustra. 4. Coloque la bobina en el eje de la devanadora que el extremo del hilo salga por la parte superior de la bobina. Empuje el eje de la devanadora hacia la derecha hasta que encaje haciendo un “clic”. 16 Inserting the bobbin / Colocación de la canilla Attention: Turn the power switch to “off” before inserting or removing the bobbin. When inserting or removing the bobbin, the needle must be raised to its highest position. (Fig. 1) • Open the hinged cover (1). • Hold the bobbin case with one hand. Insert the bobbin so that the thread runs in a clockwise direction (arrow) (2). • Pull the thread through the slot, down and to the left until it enters the delivery eyelet (rectangular opening) under the tension spring (3). • Hold the bobbin case by the hinged latch (4). • Insert the bobbin case fully into the shuttle race and release the latch. Make sure that the metal finger fits into the notch at the top of the race cover (5). Fig. 1 La aguja tiene que estar siempre arriba del todo al poner y sacar la canilla. (Fig. 1) Abrir la tapa con charnela (1). Sujetar el porta-canilla con una mano. Poner la canilla de manera que el hilo se devane en el sentido de las agujas del reloj (flecha) (2). Pasar el hilo por la ranura y por debajo del muelle (3). Introducir el porta-canilla en el carril de la lanzadera sujetando la charnela con el pulgar y el indice (4/5). Attentión: El interruptor principal tiene que estar a “off”. 17 Changing the needle (System 130/750H) / Colocación de la aguja (sistems 130/750H) Caution: Turn power switch to “Off” before inserting or removing the needle. Replace the needle at the first sign of thread breakage or skipped stitches. Select the correct type and size of needle for the fabric to be sewn. Turn the balance wheel towards you until the needle is at its highest position. Loosen the needle clamp screw “A” and tighten again after inserting the new needle. (Fig. 1) The flat side of the needle shaft should be facing away from you “B”. Push the needle up “C” into the needle clamp as far as it will go “D”. Tighten the needle clamp screw firmly. The sewing needle must always be straight and sharp for smooth sewing. Replace the needle (Fig. 2) if it bent “A”, blunt “B” or the point is damaged “C”. Fig. 1 Cambiar la aguja con frecuencia, sobre todo cuando aparazcan las primeras dificultadas en el cosido. Montar la aguja según la ilustración: A Aflojar el tornillo del porta-agujas y después de haber solocado la aguja, apretarlo de nuevo (Fig. 1) B El lado plano tiene que estar hacia atrás. C/D Introducir la aguja hasta el tope. Attentión: El interruptor principal tiene que estar a “off”. La aguja tiene que estar impecable. (Fig. 2) Fig. 2 Problemas en el cosido se manifestan si: A La aguja estáa torcida B La aguja estáa despuntada C La punta tiene garfios. 18 Thread tension / Tensión del hilo Note: The bobbin thread tension has been adjusted at the factory and readjustment is usually not required. Lower thread tension To test the bobbin thread tension, remove the bobbin case and bobbin from the machine and hold the bobbin case suspended by the thread. Shake it once or twice. If the tension is correct, the thread will unwind by about an inch or two. If the tension is too tight, it will not unwind. If the tension is too loose, the thread will unwind for more than two inches. To adjust, turn the small screw on the side of the bobbin case (Fig. 1). Upper thread tension Basic thread tension setting: 4 (Fig. 2). To increase the tension, turn the dial up to a higher number. To reduce the tension, turn the dial to a lower number. “A” Normal thread tension. “B” Thread tension too loose. “C” Thread tension too tight. Fig. 1 Fig. 2 Tensión del hilo inferior Para controlar la tensión del hilo inferior coger el porta-canillas lleno por la punta del hilo y dejarlo colgado en el aire. Si la canilla no se desenrolla mientras el porta-canillas se oscila ligeramente, entoces la tensión es demasiado fuerte. Pero si en cmbio se cae al suelo o se devana muy facilmente, entoces la tensión es muy floja. La tensión es correcta cuando el porta-cnillas baja unos 10 cm y después se para colgado al hilo. (fig. 1) Atención: Normalmente no es necesario cambriar la tensión del hilo inferior. Tensió del hilo superior Regulación de base de la tensión del hilo:4 (fig. 2) Para aumla tensión del hilo superior hay que girar el botón de regulación hacia un número más alto. Para aflojar la tensión del hilo se gira dicho botón hacia un número más bajo. A Tensió del hilo normal. B Tensión del hilo superior muy floja. C.. Tensión del hilo superior demasiado fuerte. 19 Bringing up the lower thread / Subir el hilo inferior Hold the upper thread with your left hand. Turn the handwheel towards you with your right hand until the needle goes down and comes up again to its highest position (Fig. 1). • Lightly draw up the needle thread forming a loop with the bobbin thread. The upper thread should have caught the lower thread in a loop. • Pull the needle thread toward you and the lower thread will come up from the bobbin in a large loop (Fig. 2). • Pull about 6” (15 cm.) of both threads away from you under the presser foot. Fig. 1 Sujetar la punta del hilo superior con la mano. Girar el volante hacia adelante hasta que la aguja esté de nuevo en su posición más alta. Tirar del hilo superior con lo que se hace subir el hilo inferior a través del agujero de la placa de la aguja. Llevar los dos hilos hacia atrás por debajo del pie. Fig. 2 20 Reverse sewing / Coser hacia atrás Reverse sewing is used for locking the end of seams and where reinforcement is needed. At the end of a seam, press down the reverse sewing lever (Fig 1) and touch the foot control lightly. Sew a few reverse stitches. (Fig. 2) Release lever and the machine will sew forward again. Al final de la costura apretar el botón de retroceso. (Fig. 1) Coser algunos puntos hacia atrás. (Fig. 2) Apenas se suelta el botón, la máquina cose de nuevo hacia adelante. Fig. 2 Fig. 1 Removing the work / Como sacar la labor de la máquina Turn the handwheel towards you to bring the thread take up lever to its highest position. Raise the presser foot and draw the fabric away from you. (Fig. 3) Colocar la palanca tensora del hilo en su posición más (girar el volante hacia adelante), levantar el pie y retirar la labor tirando hacia atrás. (Fig. 3) Fig. 3 21 Guía de seleción de aguja / tejdo / hilo TAMAÑO DE AGUJA 9-11 (65-75) TEJIDO Tejido de peso lígero-Algodón delgado, voile, Sarga, Seda Muselina, Quiana, Traba, Tejedura de algodón, Tricot, Jersey, Crepes, Tejido poliestérico, Camisa & Tejido de blusa. 12 (80) Tejido de peso medio-Algodón, Raso, Lona, Tejedura doble, Tejido de lana de peso lígero. 14 (90) Tejido de peso medio-Algodón de dril, Tejido de lana, Tejedura más pesada, Dril de algodón. 16 (100) Tejido pesado-Lienzos, Tejido de lana, Dril de algodón, Material de tapiceria (lígero hasta medio). 18 (110) Tejido de lana pesado, Tejido de abrigo, Tejido de tapiceria, unos cueros y vinilo. HILO Hilo de derecho lígero en algodón, nilon o poliestero. La mayor parte de hilo son medio tamaño de aguja. Si usa el hilo de poliestero en materiales sintéticos, algodón y tejido natural, obtendrá la buena resulta. Siempre usa el mismo hilo en el hilo superior y bajo. Hilo de derecho pesado, hilo de alfomba (usa la prensatela pesadagrande número). SELECCIÓN DE AGUJA Y TEJIDO AGUJAS HAx1 15x1 15x1/705H 15x1/705H (SUK) 130 PCL EXPLICACIÓN Agujas normales. Extensión de tamaño delgado a grande. 9 (65) to 18 (110) TIPO DE TEJIDO Tejido natural-Lana, algodón Seda, etc. Semi-pelota punto aguja. 9 (65) to 18 (110) Tejido natural y tejido sintético, Mixture poliestérica. Tejidura poliestérica, Triba, Tejedura singular & doble. Pleno pelota punto aguja. 9 (65) to 18 (110) Tejedura de chaqueta de lana, Tela de traje de natación, Elástica. Aguja de cuero. 12 (80) to 18 (110) Cuero, Vinilo, Tejido de tapiciera. 23 Fabric - Thread - Needle Table / Tabla de Telas - Hilos - Agujas TELAS FABRIC HILOS THREAD AGUJAS NEEDLES La presión del pie prensatela Pressure of Presser Foot Pressure regulation La presión regulación FINAS LIGHT MEDIANAS MEDIUM NILON NYLON 80 ALGODÓN 80 COTTON TRICOT TRICOT SEDA SILK 60 ELASTICA FIBRA 60 S. FIBRE Longitud del Puntadas Length of Stiches Recto / ST. Zig Zag / ZZ Indicator de Tensión Indication of Tension Stitch length dial Selector longtitud pontada 9 50 SEDA 50 SILK SEDA DE LANA WOOL SILK 50 ELASTICA FIBRA SEDA 50 S/ FIBRE-SILK 11 GUINGA GINGHAM 60-80 ALGODÓN 60-80 COTTON 11-14 FINA JERSEY THIN JERSEY 60 ELASTICA FIBRA 60 S. FIBRE 1-3 1-4 0.5-3 0.5-4 0.5-3 0.5-4 11 PESADAS HEAVY GABARDINA GABARDINE 50 SEDA 50 SILK DENIM DENIM 50 ALGODÓN 50 COTTON 14-16 JERSEY JERSEY 50 ELASTICA FIBRA 50 S. FIBRE 11-14 PAPO DE LANA TWEED 50 SEDA 50 SILK 11-14 24 Sewing (Pattern Selector) & Operation / Coser (Selector de Modelo) Y Tabla de Función PONTADA STITCH NO. 1 2 EL MODELOS STITCH PATTERNS LONGITUD DEL PUNTA STITCH LENGTH DEL PIE PRENSATELA PRESSER FOOT LA PANACA DROP FEED PUNTADA RECTO STRAIGHT STITCH zigzag zigzag COSTURA INVISIBLE BLIND HEM 3 3-PASOS zigzag 3-STEP zigzag STITCH OVERLOCK ELASTICA SLANT OVEREDGE 4 TRIPLE COSTURA RECTA STRAIGHT STRETCH STITCH 5 OSALES BUTTONHOLE 6 AGUJA DOBLE DOUBLE NEEDLE 7 BORDADO FREEHAND EMBROIDERY EXCEPT BUTTONHOLE NOT NECESSARY 25 Sewing on buttons / Coser botones Put the Foot Pressure Regulator to position 2. (see fig. 1) Position the work under the foot. Place the button on the marked position and lower the foot. Set the pattern selector knob on and sew a few securing stitches. Select the zigzag stitch width according to the distance between the two holes of the button. Turn the handwheel to check if the needle goes into the right and the left hole of the button without any obstruction (adjust the stitch width according to the button). Slowly sew on the button with about 10 stitches. Pull the upper threads under the fabric and tie a knot. If shank is required, place a darning needle on top of the button and sew (fig.3). For button with 4 holes, sew through the front two holes first (fig. 2). Push work forward and then sew through the back two holes as described (fig. 3). Button foot Fig. 1 Puesto el presion de pie en posicion. Poner la labor del pie. Colocar el botón en el sitio marcado. Bajar el pie. Y coser primero unos puntos de remate. Regular el ancho de la puntada. Hacer un punto de prueba dándole al volante con la mano hasta que la aguja entre exactemente en el agujero (según el botón puede variar el ancho de la puntada). Coser el botón. Y hacer algunos puntos de remate. Para coser un botón que quede separado del tejido (con cuello), colocar una aguja sobre el botón y coser por encima de ella. (3) en caso de botones con 4 agujeros, empezar siempre con los dos anteriores (2). Después correr el cosido hacia adelante y continuar el trabajo como indicado anteriormente. (3) Fig. 2 Fig. 3 26 Zippers and piping / Colocación de cremalleras Set the pattern selector dial to straight stitch as shown in Fig. 1. Set the stitch length control between 1-4 (according to thickness of fabric). The zipper foot can be inserted to the right or left, depending on which side of the zipper you want to sew. (Fig. 2) To sew past the zipper pul, lower the needle into the fabric, raise the presser foot and push the zipper pull behind the presser foot. Lower the foot and continue to sew. It is also possible to use the zipper foot to sew piping into a bias strip to form a welt. (Fig. 3) Zipper Foot Pie Para Cremalleras Stitch Length Dial Disco de Longitud de Puntada Regular la máquina según la ilustración. (Fig. 1.) Con el pie para cremalleras se puede coser por la derecha o por la izquierda. (Fig. 2) Fig. 1 Pattern Selector Selector el Modelos Para evitar el cursor de la cremallera, clavar la aguja en el tejido, levantar el pie y correr el cursor de la cremallera por debajo del pie. Bajar el pie y continuar a coser. (Fig. 3) la prensatela para cremallera tambien puede utilizar para coser el cierre de cuerda. Fig. 2 Fig. 3 28 Darning / Remiendos • Turn stitch length dial to the desired length. • Turn stitch selector to straight stitch. • Position the fabric to be darned under the presser foot together with the underlaying fabric to be used. • Lower the presser foot and alternately sew forward or reverse using the lever. • Repeat this motion until the area to be darned is filled with rows of stitching. For reverse sewing instructions, see page 18. • Regular la máquina según la ilustración. • Coloque la parte que va a remendar bajo el pisacostura. • Baje el pisacostura. • Cosa alternadamente hacia adelante y hacia atrás tal como se indica en la figura. • Repita esta procedumiento hasta que la parte que va a zurcir esté llena de hileras de puntadas. All purpose foot Pie universal Pattern Selector Selector el Modelos Para coser hacia atrás, vea páeina 18. Stitch length dial Disco de longitud de puntada 29 Attaching lace / Como pegar encajes • Turn stitch length dial to the desired length. • Turn stitch selector to straight stitch. • Fold in the edge of the fabric (approximately 1/4” or 6mm.) • Place the lace under the folded edge of the fabric allowing it to underlap the fabric slightly as required by the pattern of the lace. • Sew on the edge of the fabric fold. • You can add a decorative touch by using the satin stitch to sew the lace. • Regular la máquina según la ilustración. • Ponga el encaje abajo de le tela dejando la sobrar 6mm (1/4 pulgada). • Ponga abajo el pisacostura y empiece a coser. Nota: Si se usa puntada de realce para coser el encaje, será más attractivo. All purpose foot Pie universal Pattern Selector Selector el Modelos Stitch length dial Disco de longitud de puntada 30 Appliqué / Aplicación • Turn stitch length dial to the desired length. • Turn pattern selector dial to small zigzag width. • Cut out the appliqué design and baste is to the fabric. • Sew slowly around the edge of the design. • Trim excess material outside the stitching. Make sure not to cut any stitches. • Remove basting thread. • Tie top and bottom thread under the appliqué to avoid unravelling. All purpose foot Pie universal Pattern Selector Selector el Modelos • Regular la máquina según la ilustración. • Estre char el amplitud de puntada de zigzag. • Hilvane el diseño sobre la superficie de la tela. • Empieze a coser con cuidado según el diseño. • Recorte la tela que rebase la costura. • Saque las puntadas de hilvanar. Nota: Vuelva a coser as puntadas finales e inciales con putada recta para reforzar. Stitch length dial Disco de longitud de puntada 31 Monogramming and embroidering with embroidery hoop* / Monogramas borados usando el aro de bordas* Pattern Selector Selector el Modelos Fig. 1 Presser foot regulator Presion de Pie • Set the machine as illustrated in fig. 1. • Remove the presser foot and the presser foot holder. • Attache the darning plate. • Lower the presser foot lever before starting to sew. • Adjust the stitch width according to the size of lettering or design. • Regular la máquina según la ilustración. (Fig. 1) • Quitar el pie y el porta-pie. • Bajar la barra prensatelas antes de coser. • Regular el ancho dela puntada según la amplitud de las letras o el pise nó. Stitch length dial Disco de longitud de puntada Preparation for Monogramming & Embroidering* • Draw the desired lettering or design on the right side of the fabric. • Stretch the fabric between embroidery hoop* as firmly as possible. • Place the fabric under the needle. Make sure the presser foot bar is down on its lowest position. • Turn the balance wheel towards you to bring up the lower thread through the fabric. Sew a few securing stitches at the starting point. • Hold the hoop* with thumb and forefingers of both hands while pressing the material with the middle and third fingers and supporting the outside of the hoop* with smaller finger. *Note: Embroidery hoop is not included with the machine. Preparacion Para Monogramas Y Bordados* • Prepára la máquina de coser como se indica en las instrucciones. • Dibuje las letras (para monogramas) o el diseño (para bordados) en la parte derecha de la tela. • Estire firmamente la tela entre los aros de bordár. • Coloque la tela bajo la aguja y baje la barra del pisacostura. • Hale el hilo inferior através de la tela a la posición de partida girando el volante y haga unas puntadas para asegurar. • Sostenga el bastidór con los dedos pulgar e indice de la mano derecha e izquierda aprisionando al mismo tiempo la tela con los dedos del medio y aguantándo la parte de afuera del bastidor con el meñique. *Nota: El aro de bordas no inchuso com el máquina. 32 Monogramming and embroidering (continued) / Monogramas y bordados (continue) Monogramming • Sew, moving the hoop* slowly along the lettering. Make sure that you maintain a constant speed. • When the letter is finished, secure the threads with a few straight stitches. *Note: Embroidery hoop is not included with the machine. Embroidering • Stitch along the outline of the design by moving the embroidery hoop*. Make sure to maintain a constant speed. • Fill in the design working from the outline towards the inside. Keep the stitches close together. You will get longer stitches by moving the hoop* faster and shorter stitches by mving the hoop* more slowly. *Note: Embroidery hoop is not included with the machine. Monogramas • Cosa, moviendo el aro despacio por las letras a una velocidad constante. • Asegúre con unas pocas puntadas rectas. Nota: Estas instrucciones también para bordados. Bordados • Cosa unas puntadas en la orilla del diseño moviendo el bastidor de bordar. • Cosa de afuera hacia adentro y de adentro hacia afuera. Haga las puntadas bien unidas sin dejar espacios intermedios. Nota: Para coser puntadas largas, mueva el bastidor de bordar rápidamente. Para coser puntadas cortas, muévalo lentamente.. 33 3-Step zigzag / Zigzag cosido Sewing on lace and elastic, darning, mending, reinforcing edges. • Set the machine as illustrated. Pattern selector on• Place patch in position. The stitch length can be shortened to produce very close stitches. (Fig. 1) • When mending tears, it is advisable to use a piece of backing fabric to reinforce. The stitch density can be varied by adjusting the stitch length. First sew over the center and then overlap on both sides. Depending on the type of fabric and damage, sew between 3 and 5 rows. (Fig. 2) Stitch length dial Disco de longitud de puntada Para aplicar elásticos y puntillas, colocar remiendos, remendar rasgones, reforzar los bordes. • Regular la máquina según la ilustración. • Aplicar el remiendo. El largo de la puntada puedo reducirse hasta que los puntos estén bien juntos. (Fig. 1) • Cuando se remendan rasgones es aconsehable poner debajo del la labor un tejido (refuerzo). El espesor de los puntos se puedoe vairar cambiando el largo de la puntada. Primero coser en el centro y despúes sobrepasar un poco los dos lados. Según el tejido y e daño coser de 3 a 5 filas. (Fig. 2) All purpose foot Pie universal Fig. 1 Pattern Selector Selector el Modelos Fig. 2 34 Overlock stitches / Puntos overlock Seams, neatening, visible hems. Turn stitch length dial to position 4. Stretch overlock position on selction dial. For fine knits, jerseys, neck, edges, ribbing. All overlock stitches are suitable for sewing and neatening edges and visible seams in one operation. When neatening, the needle should just go over the edge of the fabric. Attention: Use new needles or ball point needles or stretch needle. Todos los puntos overlock son adecuados para coser y sobrehilar bordes y dobladillos visibles en usa sóla fase de trabajo. En el sobrehilado la aguja tiene que apenas sobrepasar el borde de la ropa. Stitch length dial Disco de longitud de puntada Stitch display Ventana de puntada All purpose foot Pie universal Attención: Usar una aguja nueva o una aguja con punta esférical. Overlock elástico Para terminar dobladillos, costuras, edcorativas. Adecuado para doblidillos y costura decorativas en materiales elásticos. 35 Blind hem - lingerie stitch / Costura invisible - punto de lenceria For hems, curtains, trousers, skirts, etc. Blind hem/lingerie for fine fabrics. Set the machine as illustrated. (1) Stitch length dial Disco de longitud de puntada Note: It takes practice to sew blind hems. Always make a sewing test first. • Fold the fabric as illustrated with the wrong side uppermost.. (2) • Place the fabric under the foot. Turn the handwheel forwards by hand until the needle swings fully to the left. It should just pierce the fold of the fabric. If it does show, adjust the foot guide. (3) • Adjust the guide (4) by turning the knob (5) so that the guide just rests against the fold. • Sew slowly, guiding the fabric carefully along the edge of the guide. • Turn the speed control to Minimum! Para dobladillos, cortinas, pantalones, faldas, etc. Costura invisible/punto de lenceria para tejidos fuertes. Regular la máquina según la ilustración. (1) Atención: Se necesita un poco de práctica para que la costura invisible salga bien. Lo mejor es hacer siempre antes una prueba. • Doblar la ropa como en la ilustración cón el revés hacia arriba. (2) • Poner la ropa doblada debajo del pie. Girar el volante a mono hacia adelante hasta que la aguja se encuentre al extremo izquierdo. La agujatiene que picar sólo un poco en el pliegue de la ropa. Si no es el caso, entoces hay que corregir la anchura de la ropa. (3) • Poner la regla de borde (4) en el pliegue girando el botón. (5) • Coser lentamente y guair la ropa cuidafosamente para que la regla de borde no cambie su posición. • Ajustar el botón regulador de la velocidad al minimo. 36 Stitch length dial Disco de longitud de puntada Stitch selection / Elección del punto Triple straight stitch. Pattern selector see Fig. 1. For hard wearing seams. • Turn the stitch length dial to 4. See Fig. 1. • The machine sews two stitches forwards and one stitch backwards. This gives triple reinforcement. For hardwearing seams, hems and decorative seams. Punto recto triple Fig. 1. Para costuras muy resistentes. Fig. 1 • Ajustar el botón selector del largo de la puntada en la posición. See Fig. 1. • La máquina cose dos puntos hacia adelante y un punto hacia atrás lo que por resultado un refuerzo triple. Para costuras muy resistentes, dobladillos y costuras decorativas. 37 Cutting the thread / Cortar el hilo Cutting the thread: • Turn the handwheel till the needle is in its upper most highest position. • Lift the foot up. • Pull the fabric out and attach the thread around the cutter (see fig. at right). • Pull down on the thread to cut it. Sujetar los hilos las dos manos detrás de la prensatela. Hacerlos entrar en la ranura “A” de la barra prensatelas y tirar los hilos hacia abajo hasta que se corten. 38 Maintenance / Manutención de la máquina Caution: Always make sure that the machine is unplugged from the power source and the main switch us on “Off” (0) before inserting or removing any parts and before cleaning. Remove the stitch plate: Turn the handwheel until the needle is fully raised. Open the hinged front cover and unscrew the needle plate screw with the screw driver. (Fig. 1) Cleaning the feed dog: Remove the bobbin case and use a brush to clean the whole area. (Fig. 2) Cleaning and lubricating the hook: Remove the bobbin case. Snap the two hook retaining arms “3” outwards. Remove the hook race cover “4” and the hook “5” and clean with a soft cloth. Lubricate at point “6” (1-2 drops) with sewing machine oil. Turn the handwheel until the hook race “7” is in the left position. Replace the hook “5”. Replace the hook race cover and snap back the two hook retaining arms. Insert the bobbin case and bobbin and replace the stitch plate. Important: Fabric fluff and threads must be removed regularly. Your machine should be serviced at regular intervals at one of our service agencies. Atención: Antes de la limpieza desconectar la máquina quitando el enchufe de la red eléctrica. Quitar la placa de la aguja: Girar el volante hasta que la aguja este en el punto más alto. Abrir la tapa con charnela y sacar el tornillo de la placa de aguja por el destornillador. (Fig. 1) Limpieza del transportador: Sacar el porta-canillas. Limpiar bien toda la zona con un pincel. (Fig. 2) Limpieza y aceitado de la lanzadera: Sacar el porta-canillas. Girar los dos gatillos de sujeción hacia afuera como en la ilustración. Sacar la tapa del carril (4) y la lanzader (5). Limpiar todo con un paño suave. Poner 1-2 gotas de aceite de máquina de coser en el (6). Girar el volante hasta que el carril de la lanzadera (7) esté en la izquierda. Poner la lanzadera (5) y la tapa del carril (4). Cerrar de nuevo los dos gatillos de sujeción (3). Meter de nuevo el porta-canillas y la placa de la aguja. Importante: De vez en cuando se deben quitar los residuos de hilo y el polvo. Para que su máquina de coser esté siempre en buenas condiciones, es recomenable un control periódico. Por nuestra asistancia técnica. 39 Eliminación de averias PROBLEMA CAUSA CORRECCIÓN 1. 2. 3. 4. 5. 6. Enhebrar la máquina correctamente. Disminuir la tension del hilo superior (número menor). Usar una aguja más gruesa. Colocar lamaguja correctamente (el lado plano hacia atrás). Sacar la bobina y devanar el hilo. Cambiar la aguja. 1. Montar nuevamente el porta-canillas y tirar del hilo. Este tiene que desenrollarse fácilmente. Controlar la canilla y el porta-canillas. Corregir la tensión del hilo inferior conforme las instrucciones. El hilo superior se rompe 1. 2. 3. 4. 5. 6. La máquina estámal enhebrada La tension del hilo es demasiado fuerte. El hilo es demsiado grueso para la aguja. La aguja no estácolocada correctamente. El hilo se ha enredado en el portabobinas. La aguja está torcida o despuntada. El hilo inferior de rompe 1. 2. 3. El porta-canillas no está bien montado. El porta-canillas no está bien enhebrado. La tensión del hilo inferior es demasiado fuerto. 2. 3. Falta de puntos 1. 2. 3. 4. La aguja no está colocada correctamente. La aguja está torcida o despuntada. Se ha montado una aguja errada. Se ha montado un pie errado. 1. 2. 3. 4. Colocar la aguja correctamente (el lado plano hacia atrás). Cambiar la aguja. Adaptar la aguja al tejido y al hilo. Controlar si se ha montado el pie adecuado. La aguja se rompe 1. 2. 3. 4. La aguja está torcida o despuntada. La aguja no está colocada correctamente. Ropa demasiado gruesa/grosor incorrecto de la aguja. Se ha montado un pie errado. 1. 2. 3. 4. Cambiar la aguja. Colocar la aguja correctamente (el lado plano hacia atrás). Adaptar la aguja al tejido y al hilo. Usar el pie correcto. Durante la costura se forman lazos 1. 2. 3. 4. La máquina está ma enhebrada. El porta-canillas está mal enhebrado. La relación aguja/ropa/hilo no es correcta. La tensión del hilo no es correcta. 1. 2. 3. 4. Enhebrar la máquina correctamente. Enhebrar el porta-canillas conforme las instrucciones. El grosor de la aguja tiene que coincidir con el hilo y la ropa. Corregir la tensión del hilo. La costura se encoge, la tela se frunce 1. 2. 3. La aguja es demasiado gruesa para el tejido. El largo de la puntada está mal regulado. La tensión del hilo es demasiado fuerte. 1. 2. 3. Usar una aguja más fina. Regular correctamente el largo de la puntada. Controlar la tensión del hilo. Los puntos y el transporte de la ropa son irreglares 1. 2. 3. El hilo es demasiado débil. El porta-canillas no está bien enhebrado. Se ha tirado de la tela durante la costura. 1. 2. Usar un hilo de mejor calidad. Enhebrar de nuevo el porta-canillas y colocario correctamente. No tirar de la ropa. Esta viene transportada automáticamente. 1. 2. Hay que lubrificar la máquina. Pelusa y trazos de aceite se hn pegado en la lanzadera o en barra prensatelas. La maquina hace ruido y cose duramente 3. 1. 2. Lubrificar la máquina según las instrucciones. Limpiar la lanzadera y el transportador conforme las instrucciones. 41-
 1
1
-
 2
2
-
 3
3
-
 4
4
-
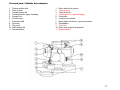 5
5
-
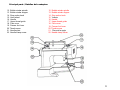 6
6
-
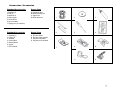 7
7
-
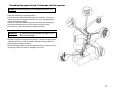 8
8
-
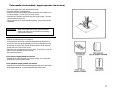 9
9
-
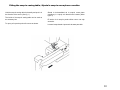 10
10
-
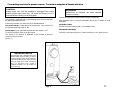 11
11
-
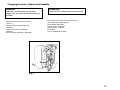 12
12
-
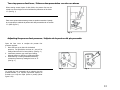 13
13
-
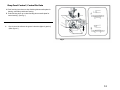 14
14
-
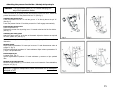 15
15
-
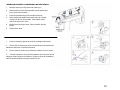 16
16
-
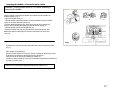 17
17
-
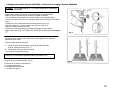 18
18
-
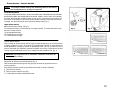 19
19
-
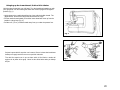 20
20
-
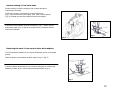 21
21
-
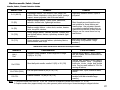 22
22
-
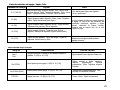 23
23
-
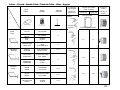 24
24
-
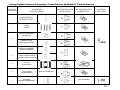 25
25
-
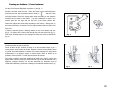 26
26
-
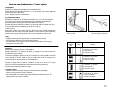 27
27
-
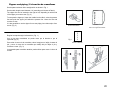 28
28
-
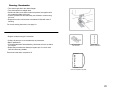 29
29
-
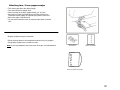 30
30
-
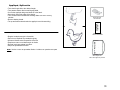 31
31
-
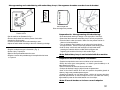 32
32
-
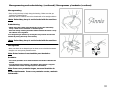 33
33
-
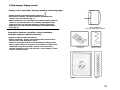 34
34
-
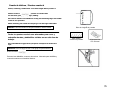 35
35
-
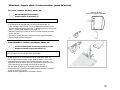 36
36
-
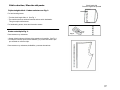 37
37
-
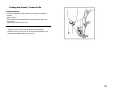 38
38
-
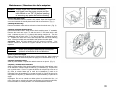 39
39
-
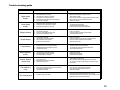 40
40
-
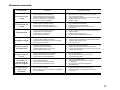 41
41


Euro-Pro 380A Manual de usuario
- Categoría
- Máquinas de coser
- Tipo
- Manual de usuario
En otros idiomas
- English: Euro-Pro 380A User manual
Documentos relacionados
-
 Euro-Pro 420 Manual de usuario
-
 Euro-Pro 6130A2 Manual de usuario
-
 Euro-Pro 6130A Manual de usuario
-
 Euro-Pro 7500 Manual de usuario
-
 Euro-Pro 8260L El manual del propietario
-
 Euro-Pro 420 Manual de usuario
-
 Euro-Pro 8135H El manual del propietario
-
 Euro-Pro Euro-Pro 7133 Manual de usuario
-
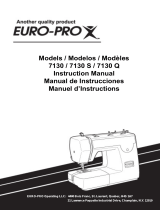 Euro-Pro 7130 Q Manual de usuario
-
 Euro-Pro 9025 Manual de usuario


Otros documentos
-
White W445 Manual de usuario
-
Emerio SEW-121820 Sewing Machine Manual de usuario
-
-
Brother 2340CV Instrucciones de operación
-
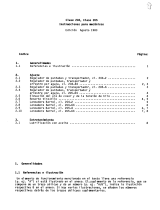 Duerkopp Adler 205 Manual de usuario
-
 Duerkopp Adler 204-2 Instrucciones de operación
-
Bernina Toolbox Bundle El manual del propietario

