
PW-100 v5.0
PLEASE READ BEFORE USING THE EQUIPMENT
EN 1.0
INSTALLATION AND OPERATION MANUAL
English

PW-100 v5 PW-100 v5
2 3
PW-100 v5
2
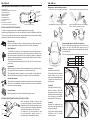
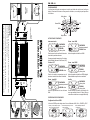
COMPONENTS AND RECOMMENDED LOCATIONS IN THE VEHICLE
(1) Electronic unit
(1) Digital keyboard & internal microphone
(1) 100W loudspeaker
(2) External microphones
(1) Internal speaker
(1) Keyboard harness
(1) Power cable (battery)
(1) Fuse 15A
(1) Speaker extension cables
(1) Loudspeaker and auxiliary load harness
INSTALLATION AND ELECTRIC DIAGRAM
To install the equipment, see the installation diagram shown on page 4.
Avoid leaving visible cables in the cabin to maintain the vehicle’s aesthetics unaffected.
If there are any cables left disconnected, insulate them with tape; disconnected cables
making an undesired contact can cause a malfunction.
Electronic Unit
Place it on a hidden location for aesthetic purposes. Make sure that the
location allows some ventilation into the unit to avoid overheating.
Digital Keyboard
To facilitate the handling of the equipment, place the keyboard on a
location within the driver’s reach, such as the console of the vehicle. Clean
the surface where the keyboard is to be sticked to ensure an adequate
adherence. Remove the protective liner from the adhesive pad in the back
side and stick it to the surface.
To clean the keyboard, gently wipe it with a dry cloth. Do not use water or
any solvent.
Loudspeaker
When selecting the location for the loudspeaker, keep in mind that while
this component is water resistant, it is not immersion-proof.
The loudspeaker must be placed as far as possible from the keyboard
(where the internal microphone is located) in order to avoid feedback.
External Microphones
The microphones require an assembly procedure, shown on the next page.
There are 3 recommended locations to place them, see the installation
instructions on the next page.
Internal Speaker
Place the speaker out of view, without affecting the sound.
EXTERNAL MICROPHONES INSTALLATION INSTRUCTIONS
Each microphone includes a shell to hold
it in place and protect it from the elements.
Depending on the installation procedure, it can
be more convenient to assemble microphone
and shell either before or after the wiring.
For instance, if the wiring requires to pull
the cable through a narrow space, it is
recommended to assemble after wiring.
Shell
Microphone
Mounting
tape
DIGITAL KEYBOARD
& INTERNAL MIC
ELECTRONIC UNIT
PW-100
EXTERNAL MIC
EXTERNAL MICINTERNAL SPEAKER
100W
LOUDSPEAKER
PW-100 v5
3
Microphone + shell assembly procedure
1. Insert the cable in the shell by pressing it with your fi nger. 2. Push the microphone into the shell (do not pull the cable!).
3. Remove the liner from the tape and stick it to the shell. 4. Stick the shell on the selected surface, previously cleaned
with a 1:1 solution of isopropyl alcohol in water.
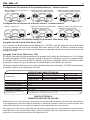
Recommended spots to install the microphones
There are three recommended spots in the vehicle (see
fi gure to the left), they differ with regard to ease of
installation, volume of the sound reception and visibility
(see table below).
You can select a location according to your preferences.
Location A
Inside the rearview mirror.
This location offers the highest
sound volume, yet the most
time consuming installation, as
it requires to take parts of the
vehicle apart.
Location B
In the gap of the front doors.
Select a surface to place the
microphone, so that it faces to
the exterior from inside the gap.
Once the surface is selected,
the installation is fairly easy.
Location C
Between the windshield and
the hood (at the right-most and
left-most locations).
This location offers the fastest
installation, yet the lowest
sound reception.
Rapid installation
Hidden YES YES NO
Sound volume
A B C

PW-100 v5
5
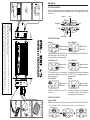
EXTERNAL MIC (L - R)
WARNING!
Gently handle the wires during the installation; pressing or forced bending of the wires can cause
internal damage and subsequent malfunction.
Avoid placing the wires near from noise sources such as alternators, high tension wires, etc.
If there are any cables left disconnected, insulate them with tape; disconnected cables making an
undesired contact can cause malfunction.
AUXILIARY
LOAD
Red
Black
Grey
White
EXTERNAL
LOUDSPEAKER
LEFT
SIDE VIEW
RIGHT
SIDE VIEW
BATTERY
+ 12 V
Grey
INTERNAL SPEAKER
DIGITAL
KEYBOARD
WIRING DIAGRAM
PW-100 v5
PW-100 v5
5
OPERATING PROCEDURES
All of the equipment’s functions are managed through a six button keyboard (see fi gure
below). Operate the keyboard with your fi ngertips, do not use foreign objects to press
the buttons.
MIC
Volume DOWN
PTT
HORN
Manual WAIL INTER
SIRENVolume UP
AUX
ACTIVATING FUNCTIONS
Intercom Siren - HORN tone
ON: press & release
OFF: press & release
ON: press & hold
OFF: release
Enables the hearing of the exterior through
the interior speakers. Turns off after 5 min
of inactivity (Automatic Shut Down, ASD).
Activates the reproduction of the HORN tone.
Public Address “PA” Siren - SIREN tone
ON: press & hold
OFF: release
ON: press & release
OFF: press & release
PTT enables the driver to communicate
with the exterior through the microphone
located in the keypad.
Activates the reproduction of the tone selected
for SIREN. The tone changing procedure is
explained ahead.
Siren - WAIL tone Auxiliary
ON: press & hold
OFF: release
ON: press & release
OFF: press & release
Activates the reproduction of the WAIL
siren tone.
AUX allows to change the activation state
of an auxiliary load up to 15 Amp (useful to
manage a light set or other devices).
SETTING UP FUNCTIONS
Setting up SIREN
SIREN function allows to choose among 4 different tones: WAIL, Hi-Lo, PHASER & YELP.
1. Press and hold SIREN (5 s) until the
siren sound briefly pauses.
2. Press HORN to choose among tones. 3. Press SIREN to fi nish setup.

PW-100 v5
6
PW-100 v5
6
Setting the volume of the internal speakers, “internal volume”
1. While INTER is on, press and hold
INTER.
2. While INTER is held, press WAIL to
increase volume.
3. While INTER is held, press HORN to
decrease volume.
Setting the volume of the external loudspeaker, “external volume”
1. Press and hold PTT. 2. While PTT is held, press WAIL to
increase volume.
3. While PTT is held, press HORN to
decrease volume.
ENERGY SAVING FEATURES (Automatic Shut Down, ASD)
Partial Shut Down (PSD)
If the incoming voltage is below 12.6VDC, after 20 seconds of inactivity the equipment
activates PSD mode. This change is indicated by the turning off the keyboard’s backlights.
While on PSD mode, upon pressing any key the respective function will execute normally
and the equipment will return to normal energy consumption mode.
Total Shut Down (TSD)
The equipment constantly tracks the incoming voltage status. If the incoming voltage
goes below 12VDC, the equipment will automatically shut down any function and
auxiliary load. While on TSD, upon pressing any key the backlights will blink 3 times and
the function controlled by the pressed key will not execute.
Once the equipment detects that the incoming voltage exceeds 12.5VDC again, the
equipment will return to its normal operation.
TECHNICAL SPECIFICATIONS
DIMENSIONS
Electronic Unit 3.7 H x 10.9 W x 19.8 D cm 1.5’’H x 4.3’’W x 7.8’’D
Loudspeaker 13.3 H x 20.4 W x 15.5 D cm 5.2’’H x 8.0’’W x 6.1’’D
Digital Keyboard 2.5 H x 0.7 W x 5.4 D cm 1.0’’H x 0.3’’W x 2.1’’D
Internal Speakers 8.0 H x 5.6 W x 9.5 D cm 3.2’’H x 2.2’’W x 3.7’’D
INPUT VOLTAGE 12 - 14.9 VDC
INPUT CURRENT 12 Amps @ 13.6 VDC (100W Loudspeaker)
STAND BY CURRENT <25 mA
AUDIO FREQUENCY 330Hz - 5600 kHz
OUTPUT POWER 93W RMS - 8 Ohm
SIREN FREQUENCY 440 - 1750 Hz
LOW VOLTAGE SHUTDOWN
If voltage drops below 12V for 5 seconds or longer, the equipment will cease to work and
resume operation when system voltage exceeds 12.5V
B&G ELECTRONICS
ONE YEAR LIMITED WARRANTY
BYG Electrónica S.A.S. guarantees that this product leaves the factory free from defects related to materials and
manufacturing. If for any reason a failure related to materials and manufacturing were to occur during the period
of one year after the date of purchase, BYG Electrónica S.A.S. would repair or replace the failing equipment free
of charge.
This warranty shall be voided if the product is modifi ed, tampered with, misused, or subjected to abnormal working
conditions. This warranty does not cover physical damage to the product surface. This warranty does not apply
when the malfunction results from the use of this product in conjunction with accessories, other products, or
peripheral equipment not designed by BYG Electrónica S.A.S.
PW-100 v5.0
FAVOR LEER ESTE MANUAL ANTES DE USAR EL EQUIPO
ES 1.0
MANUAL DE INSTALACIÓN Y OPERACIÓN
Español

PW-100 v5 PW-100 v5
8 9
PW-100 v5
2
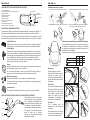
COMPONENTES Y UBICACIÓN DENTRO DEL VEHÍCULO
(1) Unidad electrónica
(1) Teclado digital de control y micrófono interno
(1) Bocina de 100W
(2) Micrófonos exteriores
(1) Parlante interno
(1) Arnés de teclado
(1) Arnés de potencia (batería)
(1) Fusible 15A
(1) Cable de salida del parlante
(1) Arnés de bocina y carga auxiliar
INSTALACIÓN Y DIAGRAMA ELÉCTRICO
Para instalar el equipo consulte el diagrama de instalación, mostrado en la página 10.
Evite dejar cables visibles dentro de la cabina que afecten la estética del vehículo.
En caso de que queden cables desconectados, aísle los cables con cinta eléctrica; cables
desconectados que hagan contactos no deseados podrían provocar fallas en el equipo.
Unidad Electrónica
Debe ubicarse en un sitio oculto por motivos estéticos. Asegúrese de elegir
una ubicación con sufi ciente ventilación para evitar sobrecalentamiento.
Teclado Digital
Para facilitar el manejo del equipo, ubique el teclado en un sitio al alcance
de la mano del conductor. Limpie la superfi cie donde se ubicará el teclado
para asegurar una adecuada adherencia. Retire la película de protección
de la cinta adhesiva ubicada al respaldo y fi je a la superfi cie elegida.
Para realizar la limpieza del teclado, frote suavemente con un paño seco.
No utilice agua ni solventes sobre el teclado.
Bocina
Al elegir la ubicación para la bocina, tenga en cuenta que este componente
es resistente al agua pero no a la inmersión.
La bocina debe ubicarse lo más lejos posible del teclado (donde se
encuentra el micrófono interno) para evitar la retroalimentación.
Micrófonos exteriores
Requieren ensamblaje, como se explica en la siguiente página.
Se recomiendan 3 ubicaciones para su instalación, en la siguiente página
se explican en detalle.
Parlante Interno
Procure ubicar el parlante fuera de la vista, sin que se afecte el sonido.
INSTRUCCIONES DE INSTALACIÓN PARA LOS MICRÓFONOS EXTERNOS
Cada micrófono incluye una carcasa
para sujetarlo en su sitio y protegerlo
de la intemperie. Dependiendo del
proceso de instalación, puede ser más
conveniente ensamblar micrófono y
carcasa antes o después de cablear.
Por ejemplo, si el cableado requiere
pasar el cable por un espacio
estrecho, se recomienda ensamblar
después del cableado.
Carcasa
Micrófono
Cinta
adhesiva
TECLADO DIGITAL
Y MICRÓFONO INTERNO
UNIDAD ELECTRÓNICA
PW-100
MICRÓFONO EXTERIOR
MICRÓFONO EXTERIORPARLANTE INTERNO
BOCINA
100W
PW-100 v5
3
Ensamblaje micrófono + carcasa
1. Inserte el cable en la carcasa presionando con el dedo. 2. Empuje el micrófono dentro de la cacasa (¡no tire el cable!).
3. Retire el protector de la cinta y pegue la cinta a la carcasa. 4. Pegue a la superfi cie seleccionada, limpiada previamente
con una solución 1:1 de alcohol isopropílico y agua.
Ubicaciones recomendadas para instalar los micrófonos
Se recomiendan tres puntos en el vehículo (ver fi gura a
la izquierda), se diferencian con respecto a la facilidad
de instalación, el volumen de la recepción de sonido, y la
visibilidad (ver tabla debajo).
Puede elegir una ubicación de acuerdo a sus preferencias.
Rapidez de instalación
Oculto
SÍ SÍ NO
Volumen del sonido
A B C
Ubicación A
Dentro del espejo retrovisor.
Esta ubicación ofrece el mayor
volumen de sonido, pero el
tiempo de instalación más largo,
ya que requiere desarmar partes
del vehículo.
Ubicación B
En la ranura de la puerta frontal.
Elija una superfi cie para ubicar
el micrófono, de tal forma que
éste apunte al exterior desde
dentro de la ranura. Una vez
seleccionada la superfi cie, la
instalación es bastante fácil.
Ubicación C
En el empalme entre el
parabrisas y el capó (extremos
exteriores).
Esta ubicación ofrece el tiempo
más rápido de instalación, pero
el menor volumen de sonido.

PW-100 v5
11
¡ADVERTENCIA!
Manipule los cables con cuidado durante la instalación; presionar o doblar forzadamente los cables
podría causar daños internos y ocasionar fallos.
Evite ubicar los cables cerca de fuentes de ruido como alternadores, cables de alta tensión, etc.
Si algún cable quedara desconectado, aísle el cable con cinta. Cables sueltos haciendo contactos
indeseados podrían ocasionar fallos.
CARGA
AUXILIAR
Rojo
Negro
Gris
Blanco
MICRÓFONOS
EXTERNOS (L - R)
BOCINA
EXTERIOR
VISTA
LATERAL IZQUIERA
VISTA
LATERAL IZQUIERDA
BATERÍA
+ 12 V
Gris
PARLANTE INTERNO
TECLADO
DIGITAL
DIAGRAMA ELÉCTRICO
PW-100 v5
PW-100 v5
5
FUNCIONAMIENTO
Las funciones del equipo se manejan a través de un teclado de seis botones (ver fi gura
debajo). Presione los botones con las yemas de los dedos; no use objetos para presionar
los botones.
MIC
Bajar volumen
PTT
HORN
INTER
SIRENSubir volumen
AUX
Manual WAIL
ACTIVACIÓN DE FUNCIONES
Intercomunicador Sirena - tono HORN
ENCENDER:
pulsar y soltar
APAGAR:
pulsar y soltar
ENCENDER:
mantener presionado
APAGAR: soltar
Permite escuchar los sonidos del exterior a
través de los parlantes internos.
Se apaga automáticamente tras 5 minutos
de inactividad (Automatic Shut Down, ASD).
Activa la reproducción del tono HORN.
Perifoneo “PA” Sirena - tono SIREN
ENCENDER:
mantener presionado
APAGAR: soltar
ENCENDER:
pulsar y soltar
APAGAR:
pulsar y soltar
Permite al conductor comunicarse con el
exterior a través del micrófono del teclado.
Activa la reproducción del tono SIREN elegido.
Más adelante se explica cómo cambiarlo.
Sirena - tono WAIL Auxiliar
ENCENDER:
mantener presionado
APAGAR: soltar
ENCENDER:
pulsar y soltar
APAGAR:
pulsar y soltar
Activa la reproducción del tono de sirena
WAIL.
Permite cambiar el estado de activación de
una carga auxiliar de hasta 15 Amp (útil para
controlar un set de luces o un equipo adicional).
CONFIGURACIÓN DE FUNCIONES
Confi guración del tono SIREN
La función SIREN permite elegir entre 4 tonos diferentes: WAIL, Hi-Lo, PHASER y YELP.
1. Pulsar y sostener SIREN (5 s) hasta
que la sirena pause brevemente.
2. Pulsar HORN para elegir entre los
tonos disponibles.
3. Pulsar SIREN para fi nalizar la
confi guración.

PW-100 v5
12
PW-100 v5
6
Confi guración del volumen de los parlantes internos, “volumen interno”
1. Mientras INTER está activo, pulsar y
sostener INTER.
2. Mientras mantiene INTER pulsado,
pulsar WAIL para subir el volumen.
3. Mientras mantiene INTER pulsado,
pulsar HORN para bajar el volumen.
Confi guración del volumen de la bocina externa, “volumen externo”
1. Pulsar y sostener PTT. 2. Mientras mantiene PTT pulsado, pulse
WAIL para subir el volumen.
3. Mientras mantiene PTT pulsado, pulse
HORN para bajar el volumen.
CARACTERÍSTICAS DE AHORRO ENERGÍA (Automatic Shut Down, ASD)
Apagado Parcial (Partial Shut Down, PSD)
Si el voltaje de alimentación está debajo de 12.6VDC, tras 20 segundos de inactividad
el equipo apaga las luces del teclado. Mientras está en PSD, al pulsar cualquier botón
la función respectiva se activa normalmente y el equipo retorna a modo de consumo de
energía normal.
Apagado Total (Total Shut Down, TSD)
El equipo monitorea constantemente el estado del voltaje de alimentación. Si el voltaje
cae por debajo de 12VDC, el equipo apaga y desactiva cualquier función y carga auxiliar.
En estado TSD la luz del teclado se apaga, y al pulsar cualquier botón la luz del teclado
parpadea 3 veces sin que la función controlada por dicho botón se ejecute.
Una vez el equipo detecte que el voltaje de alimentación está sobre 12.5VDC nuevamente,
el equipo retorna a su operación normal.
ESPECIFICACIONES TÉCNICAS
DIMENSIONES
Unidad Electrónica 3.7 A x 10.9 L x 19.8 P cm 1.5’’A x 4.3’’L x 7.8’’P
Bocina 13.3 A x 20.4 L x 15.5 P cm 5.2’’A x 8.0’’L x 6.1’’P
Teclado de Control 2.5 A x 0.7 L x 5.4 P cm 1.0’’A x 0.3’’L x 2.1’’P
Parlantes internos 8.0 A x 5.6 L x 9.5 P cm 3.2’’A x 2.2’’L x 3.7’’P
ALIMENTACIÓN ELÉCTRICA 12 - 14.9 VDC
CONSUMO 12 Amps @ 13.6 VDC (Bocina de 100W)
CONSUMO MODO ESPERA <25 mA
FRECUENCIA DE AUDIO 330Hz - 5600 kHz
POTENCIA 93W RMS - 8 Ohm
FRECUENCIA DE SIRENA 440 - 1750 Hz
APAGADO AUTOMÁTICO POR
BAJO VOLTAJE
Si el voltaje cae por debajo de 12V por 5 segundos o más, el equipo cesa su operación y
la reanuda una vez el voltaje sea superior a 12.5V
B&G ELECTRÓNICA
GARANTÍA LIMITADA DE UN AÑO
BYG Electrónica S.A.S. garantiza que este producto sale de fábrica libre de defectos de materiales y manufactura.
Si por algún motivo presentara fallas por materiales o manufactura durante el periodo de un año después de la
compra, BYG Electrónica S.A.S. reparará o cambiará la parte dañada libre de costo adicional.
Esta garantía no cubre daños ocasionados por mal manejo, mala operación o mala instalación. Esta garantía no
cubre daños físicos a la superfi cie del producto, o daños ocasionados por el uso del producto en conjunto con otros
productos o accesorios no diseñados por BYG Electrónica S.A.S.
-
 1
1
-
 2
2
-
 3
3
-
 4
4
-
 5
5
-
 6
6
-
 7
7


en otros idiomas
- English: B&G PW-100 Operating instructions
Otros documentos
-
Cobra Bridge 4100 Guía de instalación
-
 Code 3 Emergency Systems 2021 Guía del usuario
-
PRESIDENT Taylor FCC El manual del propietario
-
-
-
Eton FR1000 Manual de usuario
-
PRESIDENT JOHNSON II El manual del propietario
-
Optimus A-480MZ Manual de usuario
-
-
 President Electronics USA 2AEOCUT411 Manual de usuario

