
QUICK START GUIDE
VIDEO MOTION SECURITY LIGHT
This guide is not comprehensive. It shows a common installation. For complete information and instructions, download the PDF of the owner’s manual
at www.homedepot.com.
PLANNING INSTALLATION
Before installing the light xture, ensure that all parts are present (see Hardware Included and Package Contents). If any part is missing or damaged, do
not attempt to assemble, install, or operate this light xture.
Estimated installation time: 30 minutes
TOOLS REQUIRED
Phillips screwdriver Flathead screwdriver Wire strippers/cutters Circuit tester Mobile device
Work gloves Silicone sealant Ladder Safety goggles
HARDWARE INCLUDED
AA BB CC
DD
EE
FRONT
FF GG
PACKAGE CONTENTS
Part Description Quantity
AA Rubber plug 1
BB Mounting bracket screw 2
CC Mounting bracket screw 2
DD Large mounting bolt 1
EE Small mounting bolt (pre-installed) 1
FF Mounting bracket (not to scale) 1
GG Mini screwdriver (not to scale) 1
Part Description Quantity
A Lamp head 2
B Light xture 1
C Motion sensor 1
D Mounting plate 1
E Camera 1
Questions, problems, missing parts? Before returning to the store,
call Deant Customer Service 8 a.m. - 5 p.m., CST, Monday - Friday
1-844-760-3644
HOMEDEPOT.COM
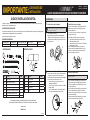
Installation
1
Installing the mounting bracket
WARNING: Turn the power off at the circuit breaker or fuse. Place tape over the
circuit breaker switch and verify power is off at the light xture.
□ Remove the existing light xture.
□ Install the mounting bracket (FF) with the stamped word “FRONT”
facing away from the junction box. Use the mounting bracket
screws (BB or CC) that best t the junction box.
FRON T
FRONT
2
Installing the mounting plate
□ Loosen the small mounting bolt (EE) on the front of the light
xture (B) and remove the mounting plate (D) from the rear of the
light xture.
□ Route the junction box wires through the hole in the mounting
plate (D).
□ Place the mounting plate (D) against the junction box.
□ When mounting to a wall, the “UP” arrow must point upward.
□ When mounting to an eave, the “UP” arrow must point toward
the building.
□ Insert the large mounting bolt (DD) through the mounting plate (D)
hole located below the threaded hole, and thread it into the center
hole of the mounting bracket (FF). Tighten the bolt (DD) securely.
FRONT
N (White/
Blanc/Blanco)
GND
Terre
Tierra
UP/Haut/Arriba
L (Black/
Noir/Negro)
FRO NT
N (White/
Blanc/Blanco)
GND
Terre
Tierra
UP/Haut/Arriba
L (Black/
Noir/Negro)
3
Making the electrical connections
□ Insert the junction box wires into the side of the terminal block
and around the ground screw. Tighten terminal block screws
using the mini-screwdriver (GG) and ground screw to secure the
wires.
□ Insert the white wire from the junction box into the terminal
marked “N (White)”.
□ Insert the black wire from the junction box into the terminal
marked “L (Black)”.
□ Connect the bare or green ground wire from the junction box
to the ground screw (marked with “GND”).
N (White/
Blanc/Blanco)
GND
Terre
Tierra
UP/Haut/Arriba
L (Black/
Noir/Negro)
4
Mounting the light fixture
NOTICE: The two pins on the rear of the light xture must be inserted into the terminal
block for the light to work.
□ Align the bottom edge of the light xture (B) with the bottom edge of
the mounting plate(D). Tilt the light xture (B) toward the mounting
plate (D), making sure the light xture (B) is centered on the
mounting plate (D).
□ Tighten the small mounting bolt (EE) securely through the center
of the mounting plate(D). Do not overtighten.
□ Push the rubber plug (AA) rmly into the mounting bolt hole on
the light xture (B).
□ Caulk around the mounting plate (D) and mounting surface with
silicone sealant (not included).
BB or CC
FF
HOMEDEPOT.com Please contact 1-844-760-3644 for further assistance.
EE
AA
D
B
D
D
DD
FF
208810-02A
IMPORTANT:
READ BEFORE
INSTALLATION
Item # 1001814036
Model # DFI-5892-WH
C
A
E
D
B

HOMEDEPOT.com Please contact 1-844-760-3644 for further assistance. HOMEDEPOT.com Please contact 1-844-760-3644 for further assistance.
Operation
1
Downloading the mobile app
□ Download the Noti™ mobile app. Search for the “Noti Video
Solutions” app.
□ iOS Devices – Download the app from the App Store
SM
.
□ Android Devices – Download the app from the Google Play™
store.
2
Connecting the light to the mobile app
NOTICE: The network password will be required to complete this process.
□ Ensure the power to the light is turned ON. Allow 60 seconds for
system boot-up.
□ On the mobile device, go to Settings > Wi-Fi and select “Noti_
Video_SecurityXXXX” (“XXXX” represents the unique MAC address
of each light xture) from the available Wi-Fi networks.
□ Once connected, open the Noti app. The app will detect the new
light.
□ Select “Yes” to start the setup and the app will guide you through
the remaining steps.
NOTE: When creating a new Noti account, the username and password must be
a minimum of 4 characters and a maximum of 12 characters. Alpha-numeric and/
or special characters may be used.
3
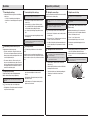
Understanding the motion detection process
This light has dual motion detection technologies.
□ The light is controlled by a 180° PIR (passive infra-red) sensor.
This sensor detects a temperature difference moving in front of it.
When motion is detected after dark, the light will come on at the
selected “Full Bright Intensity” level.
□ The camera uses both the 180° PIR sensor as well as a 100°
image sensor located within the camera software. The camera’s
image sensor will not activate unless the PIR sensor rst detects
a moving temperature difference within the detection zone. The
camera will record motion day or night.
4
Receiving notifications
Tap > Feature Settings > Notications to select the notication
settings.
If notications are turned on, an email and/or push notication is sent
each time the camera senses motion. Tap on the notication to be taken
to the live-view video screen (Basic service) or the Event video (Premium
service).
5
Adjusting the light settings
The light settings allow you to adjust the full bright duration, the
DualBrite
®
duration, and the percentages of light intensity.
NOTE: Changes made to one light’s settings will not affect another light’s
settings.
Tap > Feature Settings > Light to select the light settings.
□ Full Bright Duration – This adjusts the amount of time the light will
stay ON after all motion has stopped.
□ DualBrite Duration – This adjusts the amount of time the light
stays ON at a reduced brightness level when no motion is
detected.
□ Full Bright Intensity – This adjusts the intensity level of the light
when motion is detected.
□ DualBrite Dimming Level – This adjusts the intensity level of the
light when no motion is detected.
Operation (continued)
6
Adjusting the camera settings
The camera settings allow you to adjust the motion detection sensitivity,
motion detection zones, and video quality.
NOTE: Changes made to one camera’s settings will not affect another camera’s
settings.
NOTE: The higher the “Sensitivity” setting, the greater the possibility of false
triggering. To reduce false triggering, select a lower setting.
Tap > Feature Settings > Camera to select the camera settings.
□ Motion Detection – This adjusts the camera’s sensitivity to motion
in its eld of view.
□ Motion Detection Zones – This adjusts the camera’s detection area
to include or exclude zones in its eld of view.
□ Auto Adjust – Disabling this setting allows manual adjustments of
the video’s quality settings. For best performance, leave the Auto
Adjust ON.
7
Setting the sensor for testing
NOTE: The light xture will operate during the day or night during testing. The
light will stay on for 5 seconds after all motion is stopped.
NOTE: The light requires a 60-second boot-up period before the camera will be
fully operational.
Tap > Feature Settings > Camera > Motion Detection to select the
motion detection settings.
The light xture will automatically enter “Test” mode whenever the
“Motion Detection” option is selected. The light xture will remain in
“Test” until one of the following actions occurs:
□ The “Save” or “Cancel” option is selected.
□ No movement during the testing process for 30 seconds.
□ Three minutes have passed without changing one of the on-
screen settings.
8
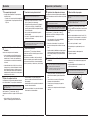
Adjusting the motion sensor detection zone
NOTE: The camera’s (E) detection zone is inside of the light’s detection zone.
When the motion sensor (C) for the light is adjusted, the camera’s (E) motion
sensor will also be adjusted.
If motion is detected outside the camera’s detection zone, the light may turn on
but the camera will not record an event.
□ Perform a “walk test”: walk in an arc across the front of the
motion sensor (C).
□ Watch the light. The light will come on and the red LED will ash
indicating motion has been detected.
□ Stop, wait for the light to turn off, and then begin walking again.
□ Continue this process until the detection zone has been
established.
□ If needed, gently grasp the motion sensor (C) and move it from
side to side or up and down to adjust the detection zone.
□ Adjust the “Motion Detection” sensitivity to High, Medium, or Low
as needed.
NOTE: The motion sensor (C) is more sensitive to motion moving across the front
of the sensor. The motion sensor (C) is less sensitive to motion moving directly
toward the front of the sensor.
C and E
C
E

Esta guía no es completa. Se muestra solo una instalación común. Para obtener una completa información e instrucciones, descargue el PDF del
manual del propietario en www.homedepot.com.
PLANIFICACIÓN DE LA INSTALACIÓN
Antes de instalar el aparato de luz, esté seguro que estén todas las piezas (vea Ferretería incluida y Contenidos del paquete). Si cualquier pieza falta o
está dañada, no intente ensamblar, instalar ni operar este aparato de luz.
Tiempo estimado para la instalación: 30 minutos
HERRAMIENTAS REQUERIDAS
Destornillador phillips Destornillador plano Peladores/cortadores de cables Probador de circuitos Aparato móvil
Guantes de trabajo Sellador de silicona Escalera Gafas de seguridad
FERRETERÍA INCLUIDA
AA BB CC
DD
EE
FRONT
FF GG
CONTENIDO DEL PAQUETE
Pieza Descripción Cantidad
AA Tapón de caucho 1
BB Tornillo del soporte de montaje 2
CC Tornillo del soporte de montaje 2
DD Tornillo grande de montaje 1
EE Tornillo pequeño de montaje (pre-instalado) 1
FF Soporte de montaje (no está a escala) 1
GG Mini-destornillador (no está a escala) 1
Pieza Descripción Cantidad
A Cabezal de lámpara 2
B Artefacto de luz 1
C Detector de movimiento 1
D Placa de montaje 1
E Cámara 1
¿Tiene preguntas, problemas o piezas faltantes? Antes de la devolución al almacén
llame al Servicio al Cliente de Deant de 8 a.m.-5 p.m., Hora del Central, de lunes a viernes.
1-844-760-3644
HOMEDEPOT.COM
HOMEDEPOT.com Por favor, póngase en contacto al 1-844-760-3644 para obtener más ayuda.
Instalación
1
Instalación del soporte de montaje
ADVERTENCIA: Desconecte la energía eléctrica en el disyuntor o en el fusible.
Coloque cinta aislante sobre el interruptor disyuntor y compruebe que no haya
energía eléctrica en el aparato de luz.
□ Retire el aparato de luz existente.
□ Instale el soporte de montaje (FF) con la palabra estampada
“FRENTE” en dirección contraria a la caja de conexiones. Use los
tornillos del soporte de montaje (BB o CC) que mejor encajen con
la caja de conexiones.
FRON T
FRONT
2
Instalación de la placa de montaje
□ Aoje el tornillo de montaje pequeño (EE) en la parte frontal del
aparato de luz (B) y retire la placa de montaje (D) de la parte
trasera del aparato de luz.
□ Pase los cables de la caja de conexiones por el agujero que está
en la placa de montaje (D).
□ Coloque la placa de montaje (D) contra la caja de conexiones.
□ Cuando la instale sobre una pared, la echa “UP” (Hacia
Arriba) debe apuntar hacia arriba.
□ Cuando la instale sobre un alero, la echa “UP” (Hacia Arriba)
debe apuntar hacia el edicio.
□ Inserte el tornillo grande de montaje (DD) por el agujero de
la placa de montaje (D) situado debajo del agujero roscado, y
enrósquelo en el agujero central del soporte de montaje (FF).
Apriete el perno (DD) de forma segura.
FRONT
N (White/
Blanc/Blanco)
GND
Terre
Tierra
UP/Haut/Arriba
L (Black/
Noir/Negro)
FRO NT
N (White/
Blanc/Blanco)
GND
Terre
Tierra
UP/Haut/Arriba
L (Black/
Noir/Negro)
3
Cómo hacer las conexiones eléctricas
□ Inserte los cables de la caja de conexiones en el lado del bloque
de terminales y al rededor del tornillo de tierra. Apriete los
tornillos del bloque de terminales utilizando el mini-destornillador
(GG) y el tornillo de tierra para asegurar los cables.
□ Inserte el cable blanco de la caja de conexiones en el
terminal marcado “N (White)”.
□ Inserte el cable negro de la caja de conexiones en el terminal
marcado “L (Black)”.
□ Conecte el alambre desnudo o verde de tierra de la caja de
conexiones al tornillo de tierra (marcado con “GND”).
N (White/
Blanc/Blanco)
GND
Terre
Tierra
UP/Haut/Arriba
L (Black/
Noir/Negro)
4
Montaje del aparato de luz
AVISO: Las dos clavijas de la parte posterior de la lámpara se deben insertar en el bloque de
terminales para que la luz funcione.
□ Alinee el borde inferior de la lámpara (B) con el borde inferior de
la placa de montaje (D). Incline la lámpara (B) hacia la placa de
montaje (D), asegurándose de que la lámpara (B) esté centrada
en la placa de montaje (D).
□ Apriete el tornillo pequeño de montaje (EE) en forma segura por el
centro de la placa de montaje (D). No apriete excesivamente.
□ Empuje con fuerza el tapón de caucho (AA) en el oricio del perno
de montaje de la lámpara(B).
□ Calafatee alrededor de la placa de montaje (D) y de la supercie
de montaje con un sellador de silicona (no incluido).
BB o CC
FF
GUÍA DE INSTALACIÓN RÁPIDA
Articulo # 1001814036
Modelo # DFI-5892-WH
LUZ DE SEGURIDAD DETECTORA DE MOVIMIENTO CON VÍDEO
EE
AA
D
B
D
D
DD
FF
208810-02A
IMPORTANTE:
LEER ANTES DE
INSTALACIÓN
C
A
E
D
B

HOMEDEPOT.com Por favor, póngase en contacto al 1-844-760-3644 para obtener más ayuda. HOMEDEPOT.com Por favor, póngase en contacto al 1-844-760-3644 para obtener más ayuda.
Operación
1
Descargando la aplicación móvil
□ Descargue la aplicación móvil Noti™. Busque la aplicación
“Noti Video Solutions”
□ Dispositivos iOS – Descargue la aplicación desde App Store
SM
.
□ Dispositivos Android – Descargue la aplicación desde Google
Play™ store.
2
Conexión de la luz a la aplicación del móvil
AVISO: La contraseña de red será requerida para completar este proceso.
□ Asegúrese que la energía eléctrica de la luz esté encendida.
Espere 60 segundos a que el sistema arranque.
□ En el dispositivo móvil, vaya a Settings > Wi-Fi (Conguración
> Wi-Fi) y seleccione “Noti_vídeo_SecurityXXXX” (“XXXX”
representa la única dirección MAC de cada aparato de luz) desde
las redes Wi-Fi disponibles.
□ Una vez conectado, abra la aplicación Noti. La aplicación
detectará la nueva luz.
□ Seleccione “Yes” (Sí) para iniciar la conguración y la aplicación
le guiará por los pasos restantes.
NOTA: Cuando cree una nueva cuenta Noti, el nombre de usuario y la
contraseña deberán tener mínimo 4 caracteres y un máximo de 12. Pueden usarse
caracteres alfanuméricos y/o caracteres especiales.
3
Comprensión del proceso de detección de
movimiento
La luz tiene dos tecnologías de detección de movimiento.
□ La luz es controlada por un detector PIR (Infrarrojo pasivo) de
180°. Este detector capta una diferencia de temperaturas del
movimiento frente a él. Cuando se detecta movimiento luego
de la obscuridad, la luz se encenderá al nivel “Intensidad total”
seleccionado.
□ La cámara utiliza tanto el detector PIR de 180° como el detector
de imagen de 100° que está dentro del software de la cámara. El
detector de imagen de la cámara no se activará a menos que el
detector PIR detecte primero una diferencia de temperatura del
movimiento dentro de la zona de detección. La cámara grabará el
movimiento durante el día o la noche.
4
Recepción de notificaciones
Golpee ligeramente en > Feature Settings > Notications (>
Conguración de característica > Noticaciones) para seleccionar las
conguraciones de noticación.
Si la noticaciones son encendidas, un e-mail y /o una noticación
automática es enviada cada vez que la cámara detecta movimiento.
Golpee ligeramente en la noticación a ser llevada a la pantalla vídeo
vista en vivo (servicio básico) o el vídeo del evento ( servicio Premium).
5
Ajuste de la configuración de la luz
Las conguraciones de la luz le permiten regular la duración del brillo
total, la duración DualBrite
®
y los porcentajes de la intensidad de luz.
NOTA: Los cambios hechos en la conguración de una luz no afectarán la
conguración de otra luz.
Golpee ligeramente en > Feature Settings > Light ( >
Conguraciones de característica > Luz) para seleccionar los ajustes de
la luz.
□ Duración del brillo total – Esto regula el tiempo que la luz
permanece encendida luego que todo movimiento ha cesado.
□ Duración del DualBrite – Esto regula el tiempo que la luz
permanece encendida a un nivel reducido de brillo cuando no se
detecta movimiento.
□ Intensidad del brillo total – Esto regula el nivel de intensidad de la
luz cuando es detectado el movimiento.
□ Nivel de atenuación DualBrite – Esto regula el nivel de intensidad
de la luz cuando no es detectado movimiento.
Operación (continuación)
6
Regulación de las configuraciones de la cámara
Las conguraciones de la cámara le permiten regular la sensibilidad de
detección de movimiento, zonas de detección de movimiento, y la calidad
del vídeo.
NOTA: Los cambios realizados en las conguraciones de una cámara no
afectarán a los parámetros de otra cámara.
NOTA: Cuanto mayor sea el ajuste de “Sensibilidad”, mayor es la posibilidad de
falsas alarmas. Para reducir las falsas alarmas, seleccione un ajuste más bajo.
Golpee ligeramente en > Feature Settings > Camera ( >
Conguraciones de característica > Cámara) para seleccionar las
conguraciones de la cámara.
□ Detección de movimiento – Esto regula la sensibilidad de la
cámara al movimiento en su campo visual.
□ Zonas de detección de movimiento – Esto regula el área de
detección de la cámara para incluir o excluir zonas de su campo
visual.
□ Regulación automática – Inhabilitando esta conguración permite
regulaciones manuales de las conguraciones de la calidad de
vídeo. Para un mejor desempeño, deje la regulación automática
encendida.
7
Calibración del detector para prueba
NOTA: La lámpara funcionará durante el día o la noche durante la prueba. La
luz permanecerá encendida 5 segundos después que todo movimiento se ha
detenido.
NOTA: La luz requiere un período de arranque de 60 segundos antes que la
cámara esté completamente operacional.
Golpee ligeramente en > Feature Settings > Camera > Motion
Detection ( > Conguraciones de característica > Cámara > detección
de movimiento) para seleccionar las conguraciones de detección de
movimiento.
El aparato de luz entrará automáticamente en la fase “Prueba” (“Test”)
siempre que la opción “Detección de movimiento” sea seleccionada. La
lámpara se quedará en “Test” hasta que ocurra una de las siguientes
acciones:
□ Se seleccione la opción “Guardar” o “Cancelar”.
□ No hay movimiento por 30 segundos durante el proceso de
prueba.
□ Han pasado tres minutos sin cambiar ninguna de las
conguraciones en pantalla.
8
Regulación de la zona de detección del detector de
movimiento
NOTA: La zona de detección (E) de la cámara está dentro de la zona de detección
de la luz. Cuando se regula el detector de movimiento (C) para la luz, el detector
de movimiento (E) de la cámara será también regulado.
Si el movimiento es detectado fuera de la zona de acción de la cámara, la luz
puede encenderse, pero la cámara no grabará el evento.
□ Haga una “prueba caminando”: camine transversalmente a la parte
frontal del detector de movimiento (C) siguiendo la trayectoria de un
arco.
□ Observe la luz. La luz se encenderá y el LED rojo destellará
indicando que se ha detectado movimiento.
□ Deténgase, espere que la luz se apague, y luego empiece a
caminar de nuevo.
□ Continúe este proceso hasta que la zona de detección haya sido
establecida.
□ Si es necesario, sujete suavemente el detector de movimiento (C)
y muévalo de lado a lado o de arriba hacia abajo para ajustar la
zona de detección.
□ Regule la sensibilidad de “detección de movimiento” a alta,
media o baja según se necesite.
NOTA: El detector de movimiento (C) es más sensible al movimiento transversal
a la parte frontal del detector. El detector de movimiento (C) es menos sensible al
movimiento que se dirige directamente hacia la parte frontal del detector.
C y E
C
E
-
 1
1
-
 2
2
-
 3
3
-
 4
4


en otros idiomas
- English: Defiant DFI-5892-WH User guide
Artículos relacionados
-
Defiant DFI-5892-WH Instrucciones de operación
-
-
-
-
-
-
