Babyauto More Lennox 01 Guía de instalación
- Categoría
- Asientos de carro
- Tipo
- Guía de instalación

MANUAL DE
INSTALACIÓN
INSTALLATION
MANUAL
0-18 kg
0 1
+

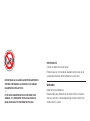
NO INSTALAR LA SILLA EN EL ASIENTO DELANTERO EN
SENTIDO CONTRARIO A LA MARCHA SI LOS AIRBAGS
DELANTEROS ESTÁN ACTIVOS.
—
IF THE CAR IS EQUIPPED WITH ACTIVE FRONT SEAT
AIRBAGS, IT IS PROHIBITED TO PLACE A CHILD IN A
REAR-FACING SEAT IN THE FRONT OF THE CAR.
IMPORTANTE:
Conservar para futuras consultas.
Procure que las instrucciones puedan conservarse en el
sistema de retención infantil durante su ciclo vital.
WARNING:
Keep for future reference.
Please kindly pay attention to the state of the instructions
manual, so that it can be kept during the life cycle of the
child restraint system.

Español
—
MANUAL DE INSTALACIÓN - Sistema de retención infantil
Grupo 0+/1. De 0 a 18 kg (de 0 a 3 años aprox.)
P. 4
P. 16English
—
INSTALLATION MANUAL - Child safety seat
Group 0+/1. From 0 to 18 kg (from 0 to 3 years approx.)

4
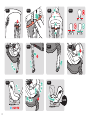
• Vista general • Overview
1
A
B
C
D
E
F
G
L
O
N
M
H
I
J
K
P

5
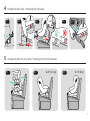
• Puestos de instalación en el vehículo • Positions in the vehicle
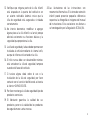
• Uso de la silla • Car seat usage
2
3
1
2
G
CLICK
3.1.1 3.1.2 3.2.23.2.1

6
CLICK
K
F
O
H
1 5 4 3 2 1
3.3.1
3.4.1
3.5.2
3.3.2
3.4.2
3.6.1
3.3.3
3.4.3
3.6.2
3.3.4
3.5.1

7
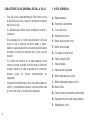
4.4
5.1
4.1 4.3
5.2
4.2
L
• Instalación del niño en la silla • Fastening the child to the seat
G. 0+ (0-13 kg) G. 1 (9-18 kg)
• Instalación de la silla • Installing the child seat
5
4
5.3
4.5

8
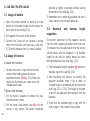
1. Esta silla infantil debe utilizarse CON el sistema
de arnés para niños entre 0 y 18 Kg. (de 0 a 4
años aproximadamente).
2. Por favor lea cuidadosamente las instrucciones
porque una instalación incorrecta podría causar
serios daños. En ese caso el fabricante no tendrá
ningún tipo de responsabilidad.
3. Este es un SISTEMA DE RETENCIÓN INFANTIL
ISOFIX clasificado como “Semi Universal”. Ha
sido homologado con arreglo a la normativa
europea ECE R44/04, para su utilización general
en vehículos equipados con sistemas de anclaje
ISOFIX.
4. Debe instalarse en vehículos equipados con
sistemas homologados de anclaje ISOFIX (como
se indica en el manual de instrucciones del
vehículo), en función de la categoría del asiento
infantil y del aparato.
5. El grupo de peso y la clase de tamaño ISOFIX
para los que está destinado el dispositivo son:
Grupo 0+, para niños de 0 a 13 kg. Grupo 1, para
niños de 9 a 18 kg. Sistema de retención B1 y D.
6. Bajo ninguna circunstancia se debe instalar la
silla de seguridad en el asiento delantero del
vehículo en sentido contrario de la marcha si va
equipado con un airbag activo.
7. Por favor nunca utilice la silla de seguridad sin la
funda y sin los protectores del arnés.
8. La instalación del niño con ropa de abrigo puede
reducir la eficacia del sistema de retención.
9. Proteja la silla de seguridad infantil del contacto
directo con la luz solar, porque la silla podría
calentarse y lastimar al niño.
10. La silla o accesorios del arnés que estén dañados
o hayan sido utilizados incorrectamente deberán
ser reemplazados.
11. No deje objetos pesados en el interior del coche,
porque en caso de accidente podrían lesionar al
niño.
12. Compruebe que la hebilla está correctamente
cerrada, porque en caso de emergencia el niño
podrá ser liberado rápidamente.
Lea detenidamente estas instrucciones.
Guárdelas siempre a mano en el bolsillo
de la silla de seguridad.

9
13. Verifique que ninguna parte de la silla infantil
está atrapada en la puerta del vehículo o en
un asiento reclinable. Además revise que la
silla de seguridad está asegurada e instalada
correctamente.
14. No intente desmontar, modificar o agregar
alguna pieza a la silla infantil o al arnés porque
afectaría seriamente sus funciones básicas y la
seguridad que proporciona la silla.
15. La silla de seguridad y la base deben permanecer
instaladas al vehículo mediante el sistema Isofix,
aunque el niño no esté sentado en la silla.
16. El niño nunca debe ser desatendido mientras
está sentado en la silla de seguridad, tampoco
cuando esté fuera del vehículo.
17. Si tuviese alguna duda sobre el uso o la
instalación de la silla de seguridad, por favor
contacte con el servicio telefónico de asistencia
al cliente +34 943 833 013.
18. Por favor mantenga la silla de seguridad lejos de
productos corrosivos.
19. El fabricante garantiza la calidad de sus
productos, pero no la calidad de los productos
de segunda mano u otras marcas.
20. Las ilustraciones de las instrucciones son
meramente informativas. El sistema de retención
infantil puede presentar pequeñas diferencias
respecto a las fotografías o imágenes del manual
de instrucciones. Estas variaciones no afectan a
su homologación por la Regulación ECE 44/0
4.

10
CARACTERÍSTICAS GENERALES DE LA SILLA
• Estasillatienelacapacidaddegirar360ºsobresubase
lo que facilita el acesso y hace más cómoda la instalación
del niño en la silla.
• Su reducido peso ofrece mayor facilidad de manejo y
transporte.
• Estaequipadaconunsistemade conectoresIsofix que
anclan la silla al vehículo de forma rápida y segura.
Además su pata de apoyo funciona como punto de apoyo
evitando el movimiento rotacional de la silla en caso de
impacto.
• Su sistema de refuerzo en el reposacabezas actúa
como un escudo, aislando y minimizando el efecto del
choque. Además ha sido ensayada contra impactos
laterales segun los últimos requerimientos en
seguridad.
• Suprotectoresdehombroydelazonapúbicaaportan
confort y comodidad evitando el contacto directo de
las cintas del arnés y la hebilla de seguridad.
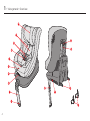
1. VISTA GENERAL
A. Reposacabezas.
B. Protectores de hombro.
C. Cintas del arnés.
D. Hebilla del cinturón.
E. Botón de ajuste del arnés.
F. Botón de reclinado.
G. Cinta de ajuste del arnés.
H. Palanca de giro 360°.
I. Pata de apoyo.
J. Indicador de seguridad.
K. Botón regulador de la pata .
L. Botón desbloqueo brazos Isofix.
M. Brazos Isofix.
N. Conector de los protectores de hombro.
O. Regulador de altura del reposacabezas.
P. Adaptadores Isofix.

11
2. PUESTOS DE INSTALACIÓN EN EL VEHÍCULO
DÓNDE:
En los asientos traseros del vehículo
CÓMO:
GRUPO 0+/ Instalar en sentido contrario a la marcha.
GRUPO 1 / Instalar en sentido a la marcha.
En asientos con:
Anclajes ISOFIX (entre el asiento y el respaldo).
Atención:
Solamente puede ser utilizado en este asiento SI el vehículo dispone anclajes ISOFIX.
NO instalar en los asientos delanteros salvo en estos casos concretos:
1. Cuando el vehículo no disponga de asientos traseros.
2. Cuando todos los asientos traseros estén ya ocupados por menores de edad de estatura igual
o inferior a 135 centímetros.
3. Cuando no sea posible instalar en los asientos traseros todos los sistemas de retención infantil.
2
1
*Nota: Segun la legislación española sobre sistemas de retención infantil (Real Decreto 667/2015).

12
3
. USO GENERAL DE LAS PARTES DE LA
SILLA
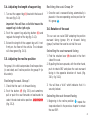
3.1. Uso de la hebilla del arnés
1. Abra el arnés de seguridad pulsando el botón de
apertura y retire las cintas hacia los lados. (fig.
3.1.1).
2. Acerque los dos cierres del broche.
3. Encájelos antes de introducirlos en la hebilla del
arnés. Deberá oír un clic (fig. 3.1.2) que indica el
cierre correcto de la hebilla.
3.2. Uso y ajuste del arnés
Aojar las cintas del arnés
1. Para destensar las cintas del arnés tire de ellas de
la parte pectoral de estas a la vez que presiona
el botón de ajuste del arnés (E) (fig. 3.2.1).
Atención tire solo de las cintas del arnés y no de
los protectores de hombro (B).
Tensar el arnés
1. Tire hacia adelante de las cintas del arnés para
eliminar la holgura de las cintas.
2. Tire de la cinta de ajuste del arnés (G) para dar la
tensión y el ajuste adecuado al cuerpo del niño (fig.
3.2.2).
3. Cuando el niño este instalado en la silla, asegúrese
el arnés queda bien ceñido al cuerpo pero sin
oprimirlo.
3.3. Ajuste de la altura del reposacabezas y
del arnés
El ajuste correcto del reposacabezas y el arnés
garantizan la correcta instalación del niño en la silla.
Debe de ajustarse de modo que el arnés de la silla
(que se desplaza junto con el reposacabezas) quede
al nivel de los hombros del niño o ligeramente por
encima, nunca por detrás de la espalda o a la altura
de las orejas (fig. 3.3.4).
1. Localice el regulador de altura del reposacabezas
(O) situado en la parte trasera de la silla
(fig. 3.3.1).
2. Despues de haber aflojado el arnés, tire del
regulador hacia usted y sin soltarlo, muévalo
hacia arriba o abajo para regular la altura del
reposacabezas en función de la altura del niño
(fig. 3.3.2 y 3.3.3). El arnés se regulará en altura
simultáneamente junto con el reposacabezas.

13
3. Compruebe que la altura seleccionada es la
correspondiente la altura del niño. Si no lo es,
reajuste la altura del reposacabezas.
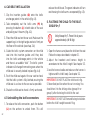
3.4. Ajuste de la altura de la pata de apoyo
1. Despliegue la pata de apoyo (I) situada en la
parte inferior de la base de la silla (fig. 3.4.1)
2. Manteniendo pulsado el botón regulador de la
pata (K) regule la longitud en función de sus
necesidades (fig. 3.4.2).
3. Extienda la pata hasta que apoye firmemente
en el suelo del vehículo. El indicador de apoyo
de color verde aparecerá indicando el apoyo
correcto del soporte (fig. 3.4.3).
3.5. Ajustar el reclinado de la silla
Esta silla tiene 5 posiciones de reclinado para el
grupo 1 (marcadas en color rojo) y una posición
independiente para el grupo 0+ (marcada en color
azul).
Reclinado grupo 1
1. Compruebe que la silla está orientada en sentido
a la marcha del vehículo.
2. Pulse el botón (F) (fig. 3.5.1) y sin dejar de hacerlo,
tire o empuje el asiento hacia abajo o hacia arriba
para seleccionar la posición reclinado que desee
5 4 3 2 1
(fig. 3.5.2).
Reclinado grupo 0+
1. Un vez que el asiento de silla esté orientado
en sentido contrario a la marcha del vehículo,
la silla adoptará la posición de reclinado
correspondiente a este grupo
1
.
3.6. Ajustar la orientación de la silla
Esta sillatiene la capacidadde girar360º sobresu
base para orientar el asiento en sentido contrario a la
marcha (grupo 0+) o en sentido a la marcha (grupo 1)
sin necesidad de desinstalarla del asiento del vehículo.
Orientar el asiento en sentido contrario a
la marcha
1 Localice la palanca de giro (H) situada parte
frontal de la silla.
2. Tire de la palanca hacia arriba y sin soltarla,
ayudándose de la otra mano gire el asiento 180°
para colocarlo orientado en sentido contrario a la
marcha del vehículo (fig. 3.6.1 y fig. 3.6.2).

14
3. Deberá oir un “click” que indica que el asiento
queda correctamente encajado en la nueva
posición.
Orientar el asiento en sentido a la marcha
1. Partiendo de la posición de reclinado
1
, repita
los pasos descritos en el punto anterior para girar
el asiento 180°.
4
. INSTALACIÓN DE LA SILLA
Consulte el capítulo 3.6 para orientar la silla en el
sentido que corresponda.
1. Coloque los adaptadores de ayuda (Q) en las
guías Isofix del vehículo (fig. 4.1).
2. Extraiga los brazos Isofix (M). Pulse el botón
de desbloqueo de los brazos Isofix (L) a ambos
lados de la silla y sin soltarlos tire para desplagar
completamente los brazos isofix (fig. 4.2).
3. Coloque la silla sobre el asiento del coche
asegurándose que la pata de apoyo está
correctamente desplegada y firme contra el suelo
(ver cap. 3.4)
4. Enganche los conectores de sistema
Isofix
de la
sillita insertándolos dentro de los adaptadores de
ayuda hasta que se agarren en las guías
Isofix
del
vehículo y se cierren haciendo “click” (fig. 4.3). El
indicador de cierre seguro del sistema
Isofix
de la
silla cambiará de rojo a verde (fig. 4.4)
5. Empuje la silla contra el vehículo del asiento para
replegar el sistema Isofix y que la silla quede lo
más pegada posible al asiento.
6. Sacuda la silla infantil de seguridad para
asegurarse de que está anclada de forma segura
y no hay error en la instalación.
4.1 Desinstalación de los conectores Isofix
1. Pulse los botones de desbloqueo (L) a ambos lados
de la silla desinstalar el sistema Isofix. El indicador
de color cambiará de verde a rojo señalando que el
conector Isofix está abierto (fig. 4.5).

15
5
. INSTALACIÓN DEL NIÑO EN LA SILLA.
GRUPO 0+/1
Solamente para uso de Grupo 0+/1. De
0 a 4 años aproximadamente. (0-18 Kg)
1. Abra el arnés y siente al niño en la silla siguiendo
los pasos descritos en el capítulo 3.1.
2. Ajuste la altura del reposacabezas y del arnés en
relación a la altura del niño tal y como indica el
capítulo 3.3.
3. Cierre y ajuste el arnés al cuerpo del niño tal
como indica el capítulo 3.2.
IMPORTANTE: NO inicie la marcha con la silla en la
posición que aparece en la fig. 5.1. Deberá de girar la
silla a la posición para el grupo 0+ o grupo 1 depués
de instalar al niño (fig. 5.2 y 5.3).
IMPORTANTE: NO utilice la silla orientada en sentido
a la marcha del coche antes de que el niño supere
los 9 kg de peso.
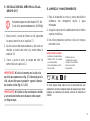
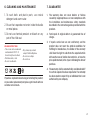
6. LIMPIEZA Y MANTENIMIENTO
1. Para el lavado de las cintas y partes de plástico
enjabonar con detergente neutro y agua
templada.
2. Asegúrese que no entra jabón dentro de la hebilla
o piezas metálicas.
3. No utilice productos químicos o lejía en ninguna
parte de la silla.
INSTRUCCIONES DE LAVADO:
· La funda es desmontable y
lavable a 30°, sólo se debe
secar al aire libre.
· Lavar en máquina, en frio.
· No usar lejía.
· Limpieza en seco,
cualquier disolvente
excepto tricloroetileno.
· No usar secadora.
· No planchar.
30 °C
Si tiene alguna duda sobre el uso o colocación de este
producto o necesita cualquier pieza de repuesto, por favor
póngase en contacto con nuestro servicio de atención al
cliente.

16
7. GARANTÍA
1. Quedan excluidos los defectos o averías producidas
por uso inadecuado, o el incumplimiento de las
normas de seguridad de instalación y mantenimiento
descritas en las hojas de instrucciones que acompañan
los productos.
2. Garantizada la reparación totalmente gratuita de
defectos originarios.
3. En los supuestos en que la reparación efectuada
no fuera satisfactoria y el producto no revistiese
las condiciones óptimas para cumplir el uso a que
estuviese destinado, el titular de la garantía tendrá
derecho a la sustitución del artículo adquirido por
otro de similares características o a la devolución del
precio pagado, en los 2 años siguientes a la fecha.
4. La garantía se considerará automáticamente
cancelada si el artículo adquirido hubiera sido
reparado o hubiera intentado repararlo una persona
no autorizada por nuestra empresa.
1. This child seat must be used WITH the harness
system for children weighing between 0 kg and 18
kg. (from 0 to 4 years of age approximately).
2. Please read the instructions carefully, as incorrect
installation could result in serious injury. If any
injuries should occur as a result of incorrect
installation, the manufacturer will accept no
liability.
3.
This is an ISOFIX CHILD RESTRAINT SYSTEM
classfied as “Semi universal”. It has been
certified under European regulation ECE R44/04
for general use in vehicles fitted with ISOFIX
anchorage systems.
4.
It may only be fitted in vehicles with certified
ISOFIX anchorage systems (as indicated in the
owner manual for the vehicle), depending on the
category of the child seat and the device.
5. The ISOFIX weight group and size class for which
the device has been designed are: Group 0+, for
children between 0 and 13 kg. Group 1, for children
between 9 and 13 kg. B1 y D restraint system.
Please read the following instructions
carefully before installing the product.

17
6.
Under no circumstances should the safety seat be
installed in the front seat of the car opposite the
direction of travel if the car is equipped with an
active airbag.
7.
Please never use the safety seat without its cover
or without the harness protectors.
8. Fastening a child dressed in outerwear could reduce the
efficiency of the restraint system.
9.
Make sure to protect the child safety seat from
direct sunlight as it could heat up and hurt the
child.
10.
Child seats or harness accessories that are
damaged or have been used incorrectly must be
replaced.
11.
Do not leave heavy objects inside the car, as these
may injure the child in the event of an accident.
12.
Make sure that the buckle is correctly fastened
so that the child can be quickly freed in case of
emergency.
13. Ensure that no part of the child seat is caught in the
door of the vehicle or in a reclining seat. In addition,
ensure that the safety seat is correctly installed and
secured.
14. Do not disassemble, modify, or add any piece to
the child seat or harness, as this would seriously
affect its basic functioning and the safety that the
child seat provides.
15.
The safety seat must remain installed in the
vehicle with the safety belt, even if the child is not
seated in the child seat.
16.
The child must never be left unattended while
seated in the safety seat, not even outside the
vehicle.
17.
If you are in any doubt as to the use or installation
of the child seat, please contact our Customer
Services by calling +34 943 833 013.
18.
Keep the safety seat away from corrosive
products.
19. The manufacturer guarantees the quality of its
products, but not the quality of second-hand
products or products belonging to other companies..
20.
Instruction illustrations are for informational
purposes only. The child restraint system may
contain small differences compared to the
photographs or images in the instruction manual.
These variations do not affect its certification
under ECE Regulation R44/04
.

18
CAR SEAT GENERAL FEATURES
• The biggest feature of this car seat is a 360°
rotation of the child restraint system, wich greatly
reduces the difficulty of installing the child.
• The light weight of the product makes it more
convenient for parents to install and carry.
• ThisproductequipswithIsofixsysteminstalled
on the car seat using Isofic anchorage which is
more convenience, more steady and safer. This
product also equips with an anti-rotation decive.
The decive consist of spport leg which intended
to limit the rotation of the restraint system in
case of frontal impact.
• With side impact protection system to protect
the child’s head, enhance damping flanking
advanced anti-side impact, and it meets the
latest side impact requirements.
• The system have soft and anti-skid pad in the
hasp and chest wich makes child feel more
comfort. The fabric cover can be washed, flame
retardant eviromental protection and fashion.
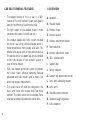
1. OVERVIEW
A. Headrest.
B. Shoulde rpads.
C. Harness straps.
D. Harness buckle.
E. Harness adjustment button.
F. Recline button.
G. Harness adjustment strap.
H. 360 ° rotation lever.
I. Support leg.
J. Safety indicator.
K. Support leg adjustment button.
L. Isofix arms unlocking button.
M. Isofix arms.
N. Shoulder pads connector.
O. Headrest height regulator.
P. Isofix adapters.

19
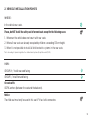
2. VEHICLE INSTALLATION POINTS
WHERE:
In the vehicle rear seats.
HOW:
GROUP 0+ / Install rearward facing.
GROUP 1 / Install forward facing.
On seats with:
ISOFIX anchors (between the seat and the backrest).
Notice:
The child seat must only be used in this seat IF it has Isofix connectors.
Please, do NOT install the safety seat in forward seats except for the following cases:
1. Wheneverthevehicledoesnotcountwithrearseats.
2.Whenallrearseatsarealreadyoccupiedbychildrenexceeding135cmheight.
3.Whenitisnotpossibletoinstallallchildrestraintssystemsintherearseats.
2
1
*Note: According to Spanish legislation for child restraint systems (Royal Decree 667/2015).

20
3
. CAR SEAT PARTS USAGE
3.1. Usage of buckle
1. Open the harness buckle by pressing the red
button on the buckle and put the the harness on
both sides of the seat.(fig. 3.1.1).
2. Put together the 2 parts of the fastener.
3.
Connect the 2 parts of the fastener, inserting
them into the buckle until you hear a click
(fig.
3.1.2∫)
which indicates that it is securely locked.
3.2.Usage of harness
Loosen the harness
1. To loose the harness straps Strech the chest
section while holding down the harness
adjustment button (E) (fig. 3.2.1). Make sure
to pull only by the harness straps not by the
shoulder pads straps.
Tighten the harness
1. Pull the harness upwards to remove the slack
from the harness straps
2. Pull the harness adjustment strap
(G)
until the
harness is fully tighten. The harness should be
adjusted as tightly as possible without causing
discomfort to the child (fig. 3.2.2).
3.
Remember that in order to guarantee the child’s
safety, harness must be well-tightened
.
3.3. Headrest and harness height
regulation
The correct adjustment of the headrest ensures
that the child is properly fastened into the car seat.
The headrest must be adjusted so that the harness
(which moves with the headrest) is at shoulder
height on the child or slightly above, but never
behind the back or at ear level (fig. 3.3.4).
1. Find the headrest height regulator (O) located in
the back side of the seat (fig. 3.3.1).
2. After loosening the harness, by pulling the
regulator outwards move it up or down to
shoulder height in accordance with the size of the
child. (fig. 3.3.2 y 3.3.3). The height of shoulder
strap will also adjusted simultaneously with the
headrest.
3. Check that the selected heigth is right with the
child’s height. If not, readjust the headrest.

21
3.4. Adjusting the length of support leg
1. Turn out the support leg (I) located in the base of
the seat (fig. 3.4.1)
Important: You will hear a click that means the
support leg is in the right angle.
2. Push the support leg adjusting button (K) and
regulate the length of the leg (fig. 3.4.2).
3. Extend the length of the support leg until it rest
firmly on the floor of the vehicle. The indicator
will show green (fig. 3.4.3).
3.5. Adjusting the recline position
For group 1, this child seat provides 5 recline positions
(in red color) and 1 recline position for group 0+ (in
blue color).
Reclining the seat. Group 1
1. Check that the seat is in forward facing.
2. Push the button (F) (fig. 3.5.1) and sametime,
pull or push the seat forwards or backwards to
select the desired recline position
5 4 3 2 1
(fig. 3.5.2).
Reclining the seat. Group 0+
1. Once the seat is rearward facing, automatically is
placed in the corresponding recline position for
this group
1
.
3.6. Rotation of the seat
This car seat can swivel 360° adopting the position
rearward facing (group 0+) or forward facing
(group 1) without the need to uninstall the seat.
Swivelling the seat rearward facing
1. Find the rotation lever (H) located in the front
side of the seat.
2. By pulling the lever upwards, with the other hand,
push to rotate 180° and place the seat rearward
facing in the opposite direction of travel. (fig.
3.6.1 y fig. 3.6.2).
3.
You will hear a “click” which indicates that it is
securely locked
.
Swiveling the seat forward facing
1. Beginning in the recline position
1
, repeat the
steps described in the previous chapter to rotate
the seat 180°.

22
4
. CAR SEAT INSTALLATION
1. Clip the insertion guides (Q) onto the Isofix
anchorage points in the vehicle (fig. 4.1).
2. Take completely out the Isofix arms
(M)
by
pressing the button
(L)
in both sides of the seat
and pulling out the arms (fig. 4.2).
3. Place the child seat on the car seat
. Make sure the
support leg is in the right angle and rests firmly
on
the floor of the vehicle (see chap. 3.4)
4. Guide the Isofix system connectors on the child
seat into the insertion guides until they lock
into the Isofix anchorage points in the vehicle
and there is an audible “click”. The Isofix system
indicator will change from red to green when the
child seat is securely locked in place (fig. 4.4)
5. Push the child seat against the car seat to check
that the Isofix system is fully latched, ensuring the
child seat is as close to the car seat as possible.
6. Shake the child seat to check is firmly anchored.
4.1 Uninstalling the Isofix connectors
1. To release the isofix connectors, push the button
(L) on the anchors to unlock them. This will
release the child seat. The green indicator will turn
red showing the Isofix arms are opened (fig. 4.5).
5
. FASTENIG THE CHILD TO THE SEAT.
GROUP 0+/1
Only Group 0+/1. From 0 to 4 years
approximately. (0-18 Kg)
1. Open the harness and place the child on the seat
Follow the steps described in chapter 3.1.
2. Adjust the headrest and harness height in
accordance to the child’s height. See chapter 3.3.
3. Lock the harness buckle and make sure the harness is
tighten and fits child’s body. See chapter 3.2.
IMPORTANT: DO NOT PLACE the child seat in fig.
5.1 described position when the car is moving. You
should turn it to the driving status (group 0+ or
group 1) after fastening the child to the seat.
IMPORTANT: DO NOT USE forward facing installation
before the child’s weight exceeds 9 kg.

23
6. CLEANING AND MAINTENANCE
1. To wash belts and plastic parts, use neutral
detergent and warm water.
2. Ensure that soap does not enter inside the buckle
or metal pieces.
3.
Do not use chemical products or bleach on any
part of the child seat.
WASHING INSTRUCTIONS:
- The cover can be removed
and washed at 30°C. It
should only be air-dried.
- Machine wash, cold.
- Do not use bleach.
- Dry clean, any solvent
except trichlorethylene.
- Do not use a dryer.
- Do not iron.
30 °C
If you have any doubts about using or installing this product,
or you need a replacement part, please get in touch with our
customer service team.
7. GUARANTEE
1. The warranty does not cover defects or failures
caused by inappropriate use or non-compliance with
the installation and maintenance safety standards
described in the instruction guides provided with the
products.
2. Total repair of original defects is guaranteed free of
charge.
3. If repairs carried out are not satisfactory and the
product does not meet the optimal conditions for
fulfilling its intended use, the holder of the warranty
shall have the right to substitute the acquired article
with another one of similar characteristics, or have the
price paid returned, in the 2 years following the date of
purchase.
4. The warranty shall be automatically considered void if
the article acquired has been repaired or if an attempt
has been made to repair it by an individual that is not
authorised by our company.

Parque Empresarial Zuatzu
Edicio Donosti, 2ª planta Ocina 3
20018 San Sebastián (Gipuzkoa), SPAIN
T. +34 943 833 013 / F. +34 943 833 004
www.more-babyauto.eu
-
 1
1
-
 2
2
-
 3
3
-
 4
4
-
 5
5
-
 6
6
-
 7
7
-
 8
8
-
 9
9
-
 10
10
-
 11
11
-
 12
12
-
 13
13
-
 14
14
-
 15
15
-
 16
16
-
 17
17
-
 18
18
-
 19
19
-
 20
20
-
 21
21
-
 22
22
-
 23
23
-
 24
24


Babyauto More Lennox 01 Guía de instalación
- Categoría
- Asientos de carro
- Tipo
- Guía de instalación
en otros idiomas
Artículos relacionados
Otros documentos
-
CYBEX Sirona Manual de usuario
-
Foppapedretti Rolling Fix Assembly Instructions Manual
-
 Jole VERSO Manual de usuario
-
Axkid Rekid Manual de usuario
-
-
BEBE CONFORT Beryl El manual del propietario
-
-
-
Lionelo Braam Baby car seat Manual de usuario
-
Hikoki UJ 18DSL Manual de usuario
