Silvercrest 337781 El manual del propietario
- Tipo
- El manual del propietario

Lidl US LLC.
Arlington, VA22202
Status of information · Estado de las informaciones:
VACUUM SEALER SV 125 B3
SELLADORA AL VACÍO SV 125 B3
IAN 337781_1910 IAN 337781_1910
SELLADORA AL VACÍO
Manual de instrucciones
US-ES
VACUUM SEALER
Copy of the operating instructions
US-EN
05/2020 ID: SV 125 B3_20_V1.2
US-EN US-ES
__337781_1910_B9.book Seite 1 Montag, 18. Mai 2020 11:29 11

English ..................................................................................... 2
Español.................................................................................. 22
__337781_1910_B9.book Seite 2 Montag, 18. Mai 2020 11:29 11

Overview / Vistageneral
13
9
2
B
6
23
10
11
15
13
17
14
12
16
7
7
A
18
8
19
20 21 22
ABC
45
__337781_1910_B9.book Seite 3 Montag, 18. Mai 2020 11:29 11

2 US-EN
Contents
1. Overview ............................................................................ 3
2. Intended purpose ................................................................ 4
3. IMPORTANT SAFEGUARDS .................................................... 5
4. IMPORTANT SAFETY INSTRUCTIONS ..................................... 6
5. Items supplied ................................................................... 10
6. Power supply .................................................................... 10
7. Advantages of vacuum-packed food ................................. 10
7.1 Durability............................................................................... 10
7.2 Sous-Vide - gentle cooking method in a vacuum bag................... 10
8. Preparation ....................................................................... 11
8.1 Setting up the device............................................................... 11
8.2 Requirements on the film/bags ................................................. 11
8.3 Producing a bag..................................................................... 11
9. Use ................................................................................... 12
9.1 Overview of the functions ........................................................ 12
9.2 Vacuum-packing vacuum containers and bags (with valve) .......... 12
9.3 Filling bags (without valves) ..................................................... 13
9.4 Activating the Wet function...................................................... 14
9.5 Activating the Soft function....................................................... 14
9.6 Sealing bags (without valves) ................................................... 14
9.7 Vacuum-packing and sealing bags (without valves)..................... 15
10. Cleaning and storage ........................................................ 16
10.1 Cleaning ............................................................................... 17
10.2 Storage ................................................................................. 17
11. Disposal ............................................................................ 17
12. Troubleshooting ................................................................. 18
13. Technical specifications ...................................................... 18
14. FCC hint ............................................................................. 19
15. 3 year limited warranty .................................................... 19
__337781_1910_B9.book Seite 2 Montag, 18. Mai 2020 11:29 11

3
US-EN
1. Overview
1 Button and LED for the Wet function (for moist food)
2 Button and LED for the Vacuum function (for containers and bags with
the valve above the connection8)
3 Button and LED for the Seal film function (no vacuum)
4 Button and LED for the Vacuum + Seal film function
5 Button and LED for the Soft function (for pressure-sensitive food)
6Power cord with power plug
7Opening for the power cord on the underside of the device
8Connection for vacuum tubes19
9Button for opening the lid (left and right)
10 Sealing strip
11 Upper sealing ring
12 Lid
13 Rear reference ridge
14 Suction nozzle (for the Vacuum + Seal film function)
15 Side reference ridge
16 Lower sealing ring
17 Welding wire
18 Collector for liquids (removable)
Figure A:
19 Vacuum tubes (23.622in)
20 Adapter A (e.g. for Ernesto containers* and FoodSaver lunchboxes**)
21 Adapter B (e.g. for FoodSaver freshness containers**)
22 Adapter C (e.g. for CASO containers** and FoodSaver storage
boxes**)
* not included in the items supplied
** Containers from other manufacturers - not included in the items sup-
plied.
CASO is a registered brand of Caso Holding GmbH
FoodSaver is a registered brand of Sunbeam Products, Inc.
Figure B:
23 Cable spool on the underside of the device
__337781_1910_B9.book Seite 3 Montag, 18. Mai 2020 11:29 11

4 US-EN
Thank you for your trust!
Congratulations to your new vacuum
sealer.
For a safe handling of the product and
in order to get to know the entire scope
of features:
• Thoroughly read these oper-
ating instructions prior to ini-
tial use.
• Above all, observe the safety
instructions!
• The device should only be
used as described in these
operating instructions.
• Keep these operating instruc-
tions for information purpos-
es.
• If you pass the device on to
someone else, please include
these operating instructions.
The operating instructions are
a part of the product.
We hope you enjoy your new
vacuum
sealer!
Symbols on your appliance
The food-safe material of de-
vices with this symbol will not
change the taste or smell of
food.
2. Intended purpose
Use the device exclusively for the bag
sealing or vacuum-packing and bag
sealing of food.
The device is designed for private home
use and must not be used for commer-
cial purposes.
The device must only be used indoors.
Foreseeable misuse
Risk of material damage
~Only use special plastic films suited
for the use with bag sealers. Com-
ply with the notes on the packaging
of the plastic films.
CAUTION
__337781_1910_B9.book Seite 4 Montag, 18. Mai 2020 11:29 11

5
US-EN
3. IMPORTANT SAFEGUARDS
To reduce the risk of burns, electrocution, fire, or injury to persons:
READ ALL INSTRUCTIONS BEFORE USING
1. Close supervision is necessary when this appliance is used by, on, or near
children or individuals with certain disabilities.
2. Use this appliance only for its intended use as described in this manual. Do
not use attachments not recommended by the manufacturer.
3. Never operate this appliance if it is not working properly or if it has been
dropped, damaged, or dropped into water. Return the appliance to a service
center for examination and repair.
4. Do not use outdoors.
SAVE THESE INSTRUCTIONS
WARNING
__337781_1910_B9.book Seite 5 Montag, 18. Mai 2020 11:29 11

6 US-EN
4. IMPORTANT SAFETY INSTRUCTIONS
If necessary, the following symbols and
warnings will be used in this copy of the
user instructions:
Safety Alert Symbol
This is the safety alert symbol.
It is used to alert you to poten-
tial personal injury hazards.
Obey all safety messages that
follow this symbol to avoid
possible injury and death.
Meaning of the signal words
DANGER indicates a hazardous situa-
tion that, if not avoided, will result in
death or serious injury.
WARNING indicates a hazardous situ-
ation that, if not avoided, could result in
death or serious injury.
CAUTION indicates a hazardous situa-
tion that, if not avoided, could result in
minor or moderate injury.
NOTICE
indicates a situation which could lead
to property damage.
TIP
indicates circumstances and specifics
that should be observed when handling
the device.
Terminology
As used in this instruction manual in
general and with regard to safety infor-
mation, safety information and safety
messages and warnings in particular,
the following words have the following
means:
- May: This word is understood to be
permissive.
- Shall: This word is understood to be
mandatory.
- Should: This word is understood to
be advisory.
DANGER
WARNING
CAUTION
__337781_1910_B9.book Seite 6 Montag, 18. Mai 2020 11:29 11

7
US-EN
INSTRUCTIONS FOR SAFE OPERATION
~
This product is not intended for use by persons (including children)
with reduced physical, sensory or mental capabilities or lacking ex-
perience and knowledge unless supervised or instructed in safe
product use by a person responsible for their safety. Children
should be supervised to ensure they do not play with the product.
~
Cleaning and user maintenance must not be performed by children.
~
Children must be kept away from the device and the power cord.
~
Never leave the device unattended while it is plugged in.
~
If the power cord of this device should become damaged, it must
be replaced by the manufacturer, the manufacturer's customer ser-
vice department or a similarly qualified specialist, in order to avoid
any hazards.
~This device is not intended to be operated using an external timer
clock or a separate remote control system.
Risk for babies and children
~To avoid danger of suffocation,
keep this plastic bag away from ba-
bies and children. Do not use this
bag in cribs, beds, carriages, or
playpens. This bag is not a toy.
Risk to or from pets and
livestock
~Electrical devices can also represent
a hazard to pets and livestock. In
addition, animals can also cause
damage to the device. For this rea-
son you should keep animals away
from electrical devices at all times.
Risk of electric shock due to
moisture
~Protect the device from moisture,
water drops and water splashes.
~The device, the power cord and the
power plug must not be immersed
in water or any other liquids.
~If liquid gets into the device, remove
the power plug immediately. Have
the device checked before reusing.
~If the device has fallen into water,
pull out the power plug immediate-
ly, and only then remove the device
from the water. Do not use the de-
vice again, and have it checked by
a specialist workshop.
~Never touch the device with wet
hands.
WARNING
WARNING
WARNING
WARNING
__337781_1910_B9.book Seite 7 Montag, 18. Mai 2020 11:29 11

8 US-EN
Risk of electric shock
~This appliance has a polarized plug
(one blade is wider than the other).
To reduce the risk of electric shock,
this plug is intended to fit in a polar-
ized outlet only one way. If plug
does not fit fully in the outlet, re-
verse the plug. If it still does not fit,
contact a qualified electrician. Do
not attempt to defeat this safely fea-
ture.
~Do not use the device if the device
or the power cord has any visible
damage, or if the device has previ-
ously been dropped.
~Lay the power cord such that no one
can step on it, get caught on it, or
trip over it.
~Only connect the power plug to a
properly installed and easily acces-
sible wall socket whose voltage cor-
responds to the specifications on the
rating plate. The wall socket must
continue to be easily accessible af-
ter the device is plugged in.
~Ensure that the power cord cannot
be damaged by sharp edges or hot
points. Do not wrap the power cord
around the device (Danger! Risk of
cable damage!). Use the cable
spool at the bottom of the device.
~Let the device cool down completely
before winding up the power cord.
~Ensure that the power cord cannot
be trapped or crushed.
~To pull the power plug out of the
wall socket, always pull on the pow-
er plug, and never on the power
cord.
~Disconnect the power plug from the
wall socket …
…after every use,
…if there is a fault,
…when you are not using the de-
vice,
…before you clean the device and
…during thunderstorms.
Fire hazard
~Never leave the device unattended
while it is plugged in.
~Use the device on a stable, level
and heat-resistant surface.
~Never cover the device when con-
nected due to possible overheating
and fire hazard!
~Do not use the device in the vicinity
of flammable materials or flamma-
ble gases.
Risk of injury through
burning
~The welding wire becomes very hot
during operation. Do not touch the
hot welding wire.
~Allow the device to cool down com-
pletely before you clean it or put it
away.
WARNING
WARNING
WARNING
__337781_1910_B9.book Seite 8 Montag, 18. Mai 2020 11:29 11

9
US-EN
Risk caused by insufficient
hygiene
~For a carefree enjoyment of your
vacuum-sealed food, you should al-
ways comply with the following hy-
giene tips:
- During the preparation and pack-
aging of the food make sure that
the entire equipment is perfectly
clean.
- After use, clean the bag sealer
and the entire equipment thor-
oughly as soon as possible.
- Perishable food shall be cooled or
frozen immediately after sealing.
- After thawing or heating perish-
able food, this must be consumed
immediately.
Risk of material damage
~Observe the specified operating
time of the device. After the sealing
or vacuuming process, the device
must cool down for at least 80 sec-
onds.
~Only use special plastic films suited
for the use of bag sealers.
~Never place the device on hot sur-
faces (e.g. hot plates) or near to
heat sources or open fire.
~Ensure that no liquid is sucked in
during the extraction of air.
~The device is fitted with non-slip sili-
con feet. Because furniture can be
coated with a wide variety of var-
nishes and plastics, and treated
with various care products, the pos-
sibility cannot be excluded that
some of these substances have in-
gredients that may attack and soften
the silicon feet. If necessary, place a
non-slip mat under the device.
~Do not use any astringent or abra-
sive cleaning agents.
WARNING
CAUTION
__337781_1910_B9.book Seite 9 Montag, 18. Mai 2020 11:29 11

10 US-EN
5. Items supplied
1 vacuum sealer
1 spare sealing ring for the lower seal-
ing ring16
1 roll of vacuum bagging tube
2 vacuum tubes (23.622in)19
1 adapter A (e.g. for Ernesto containers
and FoodSaver Lunchboxes)20
1 adapter B (e.g. for FoodSaver fresh-
ness containers)21
1 adapter C (e.g. for CASO containers
and FoodSaver storage boxes)22
1 collector for liquids18 (inserted)
1 operating instructions
Before using for the first time
• Remove all packing material.
• Check that the device is undam-
aged.
6. Power supply
Only connect the power plug6 to a
properly installed and easily accessible
wall socket whose voltage corresponds
to the specifications on the rating plate.
The wall socket must continue to be eas-
ily accessible after the device is
plugged in.
1. Unwind the required length of
power cord6 from the cable
spool23.
2. Lead the power cord6 through the
opening7 on the underside of the
device.
3. Connect the power plug6 with the
wall socket.
7. Advantages of
vacuum-packed food
7.1 Durability
Vacuum-packed food keeps fresh for a
significantly longer period. This is due
to the fact that during the vacuum pack-
ing process the oxygen is removed from
the food package.
Furthermore, high-quality films and the
vacuum packing protect well against
freezer burn.
7.2 Sous-Vide - gentle
cooking method in a
vacuum bag
The dream of every hobby cook: a steak
that is pink and juicy on the inside, crispy
on the outside. But unfortunately it does
not always work using conventional
methods, or it requires exact timing.
Sous-vide makes cooking easier, and al-
most always yields perfect results.
In principle, sous-vide is nothing more
than the slow cooking of vacuum-sealed
food.
On the one hand, sous-vide is a very
simple method for achieving excellent
results when preparing food. On the
other hand, sous-vide is a clear rejec-
tion of the "quick quick" attitude of our
age.
Professional cooks have been using this
method for many years. With the new
Sous-Vide Cooker, this cooking method
is now also affordable for hobby cooks
at home.
__337781_1910_B9.book Seite 10 Montag, 18. Mai 2020 11:29 11

11
US-EN
8. Preparation
8.1 Setting up the device
Place the device on a dry, level and
heat-resistant surface.
8.2 Requirements on the
film/bags
TIP: Note the following requirements
when buying additional film bags/film
bag rolls.
- You can use tubular film or complete
bags.
- The film must not be wider than 11 in.
- The film must be provided with
dots/knobs or grooves on one side.
Smooth films are not suited for seal-
ing.
- Thickness should be between 0.007
and 0.011 in (170 - 290 μ).
- When buying the film, check the tem-
perature range it is suited for. The
ideal range is between -4 °F and
+230 °F. Such films can be deep-fro-
zen or boiled. The film included in
the delivery is suited for this applica-
tion.
- You will find those data on the pack-
age of the film or bag.
8.3 Producing a bag
If you use finished bags, these steps do
not apply.
1. Unwind the length of film from the
roll you require for your bag.
Regarding the length of the bag,
remember that a space of approx.
2.5 in towards the top should be
left after filling.
2. Use scissors to cut the piece of film
as straight as possible.
3. For sealing the bag (see “Sealing
bags (without valves)” on page 14).
__337781_1910_B9.book Seite 11 Montag, 18. Mai 2020 11:29 11

12 US-EN
9. Use
9.1 Overview of the
functions
Risk of material damage
~After the sealing and/or vacuuming
process, the device needs to cool
down for at least 80 seconds.
To protect the device, an automatic
lock is briefly activated between
two sealing processes.
The functions 2, 3 and 4 stop
automatically when the process is com-
plete. Pressing the function button again
can cancel the process sooner.
Before vacuum-packing and/or seal-
ing, the functions Wet 1 and Soft5
can be activated. Pressing the button
again deactivates the function.
9.2 Vacuum-packing
vacuum containers and
bags (with valve)
This function allows you to vacuum-pack
vacuum containers and bags with
valves from various different manufac-
turers. For the different valves, the fol-
lowing adapters are included in the
items supplied:
Risk of electric shock due to
moisture
~Ensure that no liquid is sucked in
during the extraction of air. If this
nevertheless occurs, immediately in-
terrupt the process by pressing the
active function button2 again.
~Please comply with the manufactur-
ers’ instructions regarding the fill-
ing levels for containers and bags.
TIP: The vacuum containers and bags
are not included in the items supplied.
Button Function
1
Activate/deactivate the
Wet function for moist
and juicy food.
2
Start/cancel vacuum-
packing using the connec-
tion8 with a vacuum
tube19 and an adapt-
er20/21/22
3Start/cancel sealing (with-
out vacuum)
4
Start/cancel vacuum-
packing and sealing the
film bag
5
Activate/deactivate the
Soft function (for pres-
sure-sensitive food, e.g.
berries, cakes)
CAUTION
Adapter e.g. suitable for
Adapter A20 Ernesto, FoodSaver
Lunchboxes
Adapter B21 FoodSaver fresh-
ness containers
Adapter C22 CASO, FoodSaver
storage boxes
WARNING
__337781_1910_B9.book Seite 12 Montag, 18. Mai 2020 11:29 11

13
US-EN
Vacuum containers
1. Fill the vacuum container to the
maximum filling level and close the
container lid.
2. Press one end of the vacuum
tube19 into the connection8 on
the right of the device.
3. Fit the adapter20/21/22 suit-
able for the valve onto the other
end of the vacuum tube19.
4. Press the adapter A20 or B21
onto the valve of the vacuum con-
tainer. Hold the adapter firmly in
place.
Or:
Insert adapter C22 into the valve of
the vacuum container.
5. Press the button 2. The LED
lights up. The vacuum-packing pro-
cess starts.
6. After the vacuum-packing process,
the LED goes out and the vacuum-
packing process is complete.
7. Remove the vacuum tube19 and
the adapter20/21/22 from the
vacuum container and repeat the
process if necessary with another
container.
8. After you have finished vacuum-
packing, remove the vacuum
tube19 from the connection8.
Vacuum bags with valves
1. Place the prepared food into the
vacuum bag. Ensure that there is
no food under the valve.
2. Carefully close the vacuum bag.
3. Place the vacuum bag flat on a
level surface with the valve point-
ing upwards.
4. Proceed as for vacuum containers,
starting at step 2 (see “Vacuum
containers” on page 13), and use
adapter A20.
9.3
Filling bags (without
valves)
NOTICE:
~No food or liquids must be present
at the top edge, where you want to
seal the bag. That area must be
clean and dry. Otherwise, it is im-
possible to produce a proper weld-
ing seam.
• Fill the bag only up to a level of
2.5 in below the top edge.
8
19
21
8
19
22
__337781_1910_B9.book Seite 13 Montag, 18. Mai 2020 11:29 11

14 US-EN
9.4 Activating the Wet
function
Risk of electric shock due to
moisture
~For vacuum-packing, no liquids
must be inside the bag.
~Ensure that no liquid is sucked in
during the extraction of air. If this
nevertheless occurs, immediately in-
terrupt the process by pressing the
active function button again.
If the bag contains moist food (e.g. mar-
inaded meat/fish, ready-to-use cut veg-
etables/fruit), this can result in
incomplete seals. Activating the
Wet 1 function increases the seal-
ing time in order to obtain a better weld-
ing seam.
•Press the 1 button before vacu-
um-packing/sealing to activate the
function. The LED lights up.
• To deactivate the function, press the
button 1 again.
• When the vacuum-packing/sealing
process is completed or has been
cancelled, the LED goes out and the
function is automatically deactivated.
• During the vacuum-packing/seal-
ing process, the Wet 1 function
can neither be activated nor deacti-
vated.
TIP:
This function is not suitable for vacu-
um-packing liquids, e.g. soup. These need
to be frozen before vacuum-packing.
9.5 Activating the Soft
function
The Soft5 function reduces the vacuum
pressure slightly, so that pressure-sensi-
tive food (e.g. berries or cake) is not
compressed.
•Press the Soft5 button before vacu-
um-packing/sealing to activate the
function. The LED lights up.
• To deactivate the function, press the
Soft5 button again.
• When the vacuum-packing/sealing
process is completed or has been
cancelled, the LED goes out and the
function is automatically deactivat-
ed.
• During the vacuum-packing/seal-
ing process, the Soft5 function
can neither be activated nor deacti-
vated.
9.6 Sealing bags (without
valves)
1. Smooth the bag where it is to be
sealed.
2. Open the lid12. If necessary,
press the buttons9 first.
3. Place the bag in the device. For this
purpose, the end of the film bag
must be positioned just before the
rear reference ridges13 and the
side reference ridges15.
WARNING
__337781_1910_B9.book Seite 14 Montag, 18. Mai 2020 11:29 11

15
US-EN
4. Ensure again that there are no
creases in the film bag - especially
in the area above the welding
wire17.
5. Close the lid12.
6. Use both hands to press firmly on
the edges of the lid12. They must
audibly click into place.
7. Press the button 3. The LED
lights up. The film bag is being
sealed.
After approx. 5 - 7 seconds, the LED
goes out and the sealing process is
complete.
TIP: If you have activated the Wet 1
function, the sealing process takes a
few seconds longer.
8. Simultaneously press buttons9 in
order to release the lock of the
lid12.
9. Open the lid12 and remove the
bag.
10.Check the welding seam. It should
be a smooth creaseless seam.
9.7 Vacuum-packing and
sealing bags (without
valves)
Risk of electric shock due to
moisture
~For vacuum-packing, no liquids
must be inside the bag.
~Ensure that no liquid is sucked in
during the extraction of air. If this
nevertheless occurs, immediately in-
terrupt the process by pressing the
active function button4 again.
TIP: When vacuum-packing film bags,
there must not be any vacuum tube19
plugged into the connection8.
1. Smooth the bag where it is to be
sealed.
2. Open the lid12.
3. Place the bag in the device. For this
purpose, the end of the film bag
must be positioned just before the
rear reference ridges13 and the
side reference ridges15.
4. Ensure again that there are no
creases in the film bag - especially
in the area above the welding
wire17.
WARNING
__337781_1910_B9.book Seite 15 Montag, 18. Mai 2020 11:29 11

16 US-EN
5. Close the lid12.
6. Use both hands to press firmly on
the edges of the lid12. They must
audibly click into place.
7. Press the button 4. The LED
lights up. The film bag is first vac-
uum-packed and then sealed.
The LED goes out when the process
is complete.
TIP: If the LED4 does not go out and
the noise of the vacuum pump does not
stop, despite the fact that no further air
is being sucked out of the film bag, can-
cel the process. Check that the film bag
is in the correct position in the device,
and check for leaks.
8. Simultaneously press buttons9 in
order to release the lock of the
lid12.
9. Open the lid12 and remove the
bag.
10. Check the welding seam. It should
be a smooth creaseless seam.
10. Cleaning and
storage
Risk of injury through burning/
scalding
~Allow the device to cool down com-
pletely before you clean it or put it
away.
~The welding wire17 becomes very
hot during operation. Do not touch
the hot welding wire17.
Risk of electric shock
~Prior to cleaning, disconnect the
power plug6 of the device.
Risk of electric shock due to
moisture
~
The device, the power cord and the
power plug
6
must not be immersed
in water or any other liquids.
Risk of material damage
~Do not use any astringent or abra-
sive cleaning agents.
WARNING
WARNING
WARNING
CAUTION
__337781_1910_B9.book Seite 16 Montag, 18. Mai 2020 11:29 11

17
US-EN
10.1 Cleaning
In order to ensure the proper function
and the full capacity of your device,
clean it regularly.
• Wipe down the housing of the de-
vice with a damp cloth.
• Prior to the next use, the device must
be completely dry.
Collector
1. Grasp the center or both outer
ridges with your fingers and care-
fully lift the collector for liquids18
out upwards.
2. Drain the liquid.
3. Rinse the collector18 under warm
dishwater or place it in the dish-
washer. Make sure it is dry before
inserting it.
4. Insert the collector18 into the
device from above.
Sealing ring
1. Grasp the sealing ring16 with two
fingers and lift it off upwards.
2. Rinse the sealing ring16 under
warm dishwater. Make sure it is
dry before inserting it.
3. Replace the sealing ring16 in the
respective form inside the device.
Ensure that it lies in smooth contact
and is not wavy.
TIP: The sealing ring16 is a wearing
part. Due to the high contact pressure, it
will lose its shape over time. In this
case, replace it with a new one (includ-
ed in the items supplied).
10.2 Storage
Risk of material damage
~During storage, the lid12 must not
be locked, but only loosely closed.
Permanent locking could damage
sealing rings11 and16.
•Figure B: Wind the power cord6
around the cable spool23 at the
underside of the device.
• Store the device protected against
dust and dirt and out of the reach of
children.
11. Disposal
This appliance must not be disposed of
as household garbage.
If the electrical appliance is no longer
be used, it must be handed over to the
relevant local public waste authorities
for disposal.
As a rule, these waste disposal authori-
ties run special reception units for elec-
trical appliances (recycling centers,
materials recovery centers etc.).
For further information, see:
www.epa.gov
CAUTION
__337781_1910_B9.book Seite 17 Montag, 18. Mai 2020 11:29 11

18 US-EN
12. Troubleshooting
If your device fails to function as re-
quired, please try this checklist first. Per-
haps there is only a minor problem, and
you can solve it yourself.
Risk of electric shock
~Do not attempt to repair the device
yourself under any circumstances.
13. Technical
specifications
Subject to technical modification.
Fault Possible causes /
Action
No func-
tion
• Has the device been
connected to the pow-
er supply?
Seams are
not tight
• Ensure that the film
bag is positioned
smoothly between the
sealing strip10 and
the welding wire17.
• The film was damp or
contaminated at the
seam.
• For moist food, acti-
vate the Wet 1
function.
Device
does not
seal several
bags in a
row.
• To protect the device,
an automatic lock is
briefly activated be-
tween two sealing pro-
cesses.
WARNING
Model: SV 125 B3
Power voltage: 120 V ~ 60 Hz
Power rating: 125 W
Power cord: 18AWGx2C, 300V
Operating
pause: at least 80 seconds
after each use
__337781_1910_B9.book Seite 18 Montag, 18. Mai 2020 11:29 11

19
US-EN
14. FCC hint
NOTE: This equipment has been tested
and found to comply with the limits for a
Class B digital device, pursuant to part
15 of the FCC Rules. These limits are de-
signed to provide reasonable protection
against harmful interference in a residen-
tial installation. This equipment gener-
ates, uses and can radiate radio
frequency energy and, if not installed
and used in accordance with the instruc-
tions, may cause harmful interference to
radio communications. However, there is
no guarantee that interference will not oc-
cur in a particular installation. If this
equipment does cause harmful interfer-
ence to radio or television reception,
which can be determined by turning the
equipment off and on, the user is encour-
aged to try to correct the interference by
one or more of the following measures:
- Reorient or relocate the receiving
antenna.
- Increase the separation between the
equipment and receiver.
- Connect the equipment into an out-
let on a circuit different from that to
which the receiver is connected.
- Consult the dealer or an experi-
enced radio/TV technician for help.
CAUTION: To comply with the limits of
the Class B digital device, pursuant to
Part 15 of the FCC Rules, this device is
to comply with Class B limits. All periph-
erals must be shielded and grounded.
Operation with non-certified peripher-
als or non-shielded cables may result in
interference to radio or reception.
MODIFICATION: Any changes or mod-
ifications not expressly approved by the
grantee of this device could void the us-
er‘s authority to operate the device.
15. 3 year limited
warranty
What does this warranty
cover?
The warranty covers:
- Damage, breakage, or inoperabili-
ty due to defect.
- Damage not caused by normal
wear and tear or failure to follow
the safety and maintenance instruc-
tions provided in the user manual.
What is not covered by the
warranty?
The warranty does not cover damage
caused by:
- Normal wear and tear of the prod-
uct, including fragile parts (such as
switches, glass, etc.);
- Improper use or transport;
- Disregarding safety and mainte-
nance instructions;
- Accidents or acts of nature (e.g.,
lightening, fire, water, etc.);
- Tampering with the product (such as
removing cover, unscrewing screws
etc.).
Consequential and incidental damages
are also not covered under this warran-
ty. However, some states do not allow
the exclusion or limitation of incidental
or consequential damages, so this limi-
tation or exclusion may not apply to
you.
__337781_1910_B9.book Seite 19 Montag, 18. Mai 2020 11:29 11

20 US-EN
What is the period of
coverage and warranty
resolution?
The warranty is for 3 years from the date
of purchase. At our discretion, product
will either be refunded or replaced.
What will we not do?
We will not:
- Start a new warranty period upon
product exchange;
- Repair product.
How to process the
warranty?
To initiate, please:
- Call customer service at
1 (844) 543-5872
- Visit the Website Customer Service
Platform at www.lidl.com/contact-us
or
- Visit a LIDL store for further assistance
To ensure the quickest warranty return
process, please have the following avail-
able:
- The original sales receipt that in-
cludes the date purchased;
- The product and manual in the orig-
inal package;
- A statement of the problem.
What must you do to keep the
warranty in effect?
- Retain the original receipt;
- Follow all product instructions;
- Do not repair or modify the product.
How does state law relate to
this warranty?
This warranty gives you specific legal
rights, and you may also have other
rights which vary from state to state. All
implied warranties are limited by the du-
ration and terms of this warranty. Some
states do not allow limitations on how
long an implied warranty lasts, so the
above limitation may not apply to you.
Distributor: Lidl US LLC.
Arlington,
VA22202
Country of origin: China
Customer Service:
Service hotline:
(free of charge in
USA) 1-844-543-5872
Contact page:
www.lidl.com/contact-us
__337781_1910_B9.book Seite 20 Montag, 18. Mai 2020 11:29 11

21
US-EN
__337781_1910_B9.book Seite 21 Montag, 18. Mai 2020 11:29 11

22 US-ES
Indice
1. Vista general....................................................................23
2. Uso adecuado ..................................................................24
3. MEDIDAS IMPORTANTES DE SEGURIDAD ...........................25
4. INSTRUCCIONES IMPORTANTES DE SEGURIDAD ................26
5. Volumen de suministro .....................................................30
6. Suministro de corriente eléctrica .......................................30
7. Ventajas de los alimentos al vacío ....................................30
7.1 Conservación.......................................................................30
7.2 Cocción al vacío: el método para cocinar con una bolsa
de vacío sin dañar los alimentos.............................................31
8. Preparación......................................................................31
8.1 Instalación del aparato..........................................................31
8.2 Requisitos del film/las bolsas .................................................31
8.3 Cómo hacer bolsas...............................................................32
9. Uso ..................................................................................32
9.1 Resumen de las funciones ......................................................32
9.2 Empacar al vacío recipientes y bolsas de vacío (con válvula).....33
9.3 Llenado de la bolsa (sin válvula).............................................34
9.4 Activación de la función Wet.................................................34
9.5 Activación de la función Soft..................................................35
9.6 Sellar bolsas (sinválvula).......................................................35
9.7 Empacar al vacío y sellar bolsas (sinválvula)...........................36
10. Limpieza y conservación...................................................37
10.1 Limpieza..............................................................................38
10.2 Conservación.......................................................................38
11. Manejo de desechos .........................................................38
12. Solución de problemas .....................................................39
13. Datos técnicos ..................................................................39
14. Consejos de FCC ...............................................................39
15. Garantía limitada de 3 años.............................................40
__337781_1910_B9.book Seite 22 Montag, 18. Mai 2020 11:29 11

23
US-ES
1. Vista general
1 Tecla y LED para la función Wet (para alimentos húmedos)
2 Tecla y LED para la función Vacío (para recipientes y bolsas con vál-
vula a través de la conexión8)
3 Tecla y LED para la función Sellar el film (sin vacío)
4 Tecla y LED para la función Vacío + Sellar el film
5 Tecla y LED para la función Soft (para alimentos sensibles a la presión)
6Cable de alimentación con enchufe
7Abertura para el cable de conexión en la parte inferior del aparato
8Conexión para tubos de vacío19
9Teclas para la apertura de la tapa (izquierda y derecha)
10 Franja selladora
11 Junta selladora superior
12 Tapa
13 Guías traseras
14 Boquilla de aspiración (para la función Vacío + Sellar el film)
15 Guías laterales
16 Junta selladora inferior
17 Filamento de sellado
18 Bandeja recolectora de líquidos (extraíble)
Ilustración A:
19 Tubos de vacío (23.622in)
20
Adaptador
A
(p. ej., para recipientes Ernesto* y loncheras FoodSaver**)
21
Adaptador
B
(p. ej., para recipientes para alimentos frescos FoodSaver**)
22
Adaptador
C
(p. ej., para recipientes CASO** y cajas de almacenaje
FoodSaver**)
* no incluido en el volumen de suministro
** Recipientes de otros fabricantes, no incluidos en el volumen de sumi-
nistro.
CASO es una marca registrada de Caso Holding GmbH
FoodSaver es una marca registrada de Sunbeam Products, Inc.
Ilustración B:
23 Guardacable en la parte inferior del aparato
__337781_1910_B9.book Seite 23 Montag, 18. Mai 2020 11:29 11

24 US-ES
¡Muchas gracias por su
confianza!
Le felicitamos por haber adquirido esta
selladora al vacío.
Para un manejo seguro del producto y
para conocer todas sus prestaciones:
• Antes de poner en marcha el
aparato por primera vez, lea
este manual de instrucciones
detenidamente.
• Sobre todo, siga las indica-
ciones de seguridad.
• El aparato solo se debe em-
plear de la manera descrita
en este manual de instruccio-
nes.
• Conserve este manual de ins-
trucciones como información
para el futuro.
• En caso de que entregue este
aparato a otras personas,
adjunte el manual de instruc-
ciones. El manual de instruc-
ciones forma parte del
producto.
¡Esperamos que disfrute de su nueva
se-
lladora al vacío
!
Símbolos en el aparato
Este símbolo indica que los
materiales señalados de esta
forma no alteran el sabor ni
el olor de los alimentos.
2. Uso adecuado
Utilice el aparato únicamente para se-
llar o para poner al vacío y sellar ali-
mentos.
El aparato está concebido para el uso
doméstico y no es apto para fines indus-
triales.
El aparato solo deberá utilizarse en el
interior.
Posible uso indebido
Riesgo de daños materiales
~Utilice exclusivamente un film de
plástico especial adecuado para el
uso de envasadoras por sellado.
Siga las indicaciones que figuren
en el embalaje del film de plástico.
ATENCIÓN
__337781_1910_B9.book Seite 24 Montag, 18. Mai 2020 11:29 11

25
US-ES
3. MEDIDAS IMPORTANTES DE
SEGURIDAD
Para reducir el riesgo de quemaduras, electrocución, incendio o lesiones a perso-
nas:
LEA TODAS LAS INSTRUCCIONES ANTES DE USAR EL APARATO
1. Es necesario que se supervise atentamente cuando los niños o las personas
con algunas discapacidades usen este aparato, o cuando este se ponga en
funcionamiento sobre o cerca de ellos.
2. Use este aparato solo para su uso previsto tal como se describe en este
manual. No use accesorios que el fabricante no recomiende.
3. No use nunca este aparato si no funciona adecuadamente o si se cayó, se
averió o cayó en el agua. Devuelva el aparato a un centro de servicio para
que lo revisen y lo reparen.
4. No lo use en exteriores.
CONSERVE ESTAS INSTRUCCIONES
ADVERTENCIA
__337781_1910_B9.book Seite 25 Montag, 18. Mai 2020 11:29 11

26 US-ES
4. INSTRUCCIONES IMPORTANTES
DE SEGURIDAD
De ser necesario, se utilizarán los si-
guientes símbolos y advertencias en
esta copia del manual de instrucciones
de uso:
Símbolo de alerta de seguridad
Este es el símbolo de adver-
tencia de seguridad. Se usa
para advertirle de posibles
riesgos de lesiones persona-
les. Acate todos los mensajes
de seguridad que acompa-
ñen a este símbolo para evi-
tar posibles lesiones o la
muerte.
Significado de las palabras de
advertencia
PELIGRO indica una situación de riesgo
que, si no se evita, puede ocasionar la
muerte o heridas graves.
ADVERTENCIA indica una situación de
riesgo que, si no se evita, podría oca-
sionar la muerte o heridas graves.
ATENCIÓN indica una situación de
riesgo que, si no se evita, podría oca-
sionar heridas leves o moderadas.
AVISO
Indica una situación que podría ocasio-
nar daños materiales.
SUGERENCIA
Indica circunstancias y detalles que de-
ben vigilarse cuando use el dispositivo.
Terminología
Las siguientes palabras, de la forma en
que se utilizan en este manual de ins-
trucciones en general y en particular
con respecto a la información de segu-
ridad, los mensajes de seguridad y las
advertencias, tienen los siguientes signi-
ficados:
- Puede: se entiende que esta pala-
bra es de permiso.
- Debe: se entiende que esta palabra
es de obligación.
- Debería: se entiende que esta pala-
bra es de consejo.
PELIGRO
ADVERTENCIA
ATENCIÓN
__337781_1910_B9.book Seite 26 Montag, 18. Mai 2020 11:29 11

27
US-ES
INSTRUCCIONES DE
FUNCIONAMIENTO SEGURO
~
Este producto no está indicado para su uso por personas (incluidos
niños) con capacidades físicas, sensoriales o mentales disminui-
das, o que carezcan de la experiencia o los conocimientos necesa-
rios, a menos que cuenten con la supervisión de una persona
responsable de su seguridad o reciban de ella las instrucciones
oportunas para el uso seguro del producto. Los niños deben estar
bajo supervisión para evitar que jueguen con el producto.
~
Los niños no deben encargarse de la limpieza ni del mantenimiento
del producto.
~
Los niños deben permanecer alejados del dispositivo y del cable
de alimentación.
~
No deje nunca el aparato enchufado sin supervisión.
~
Si el cable de conexión de red del aparato presenta desperfectos,
deberá ser sustituido únicamente por el fabricante, el servicio pos-
venta u otras personas igualmente cualificadas, para evitar peligros.
~Este aparato no está concebido para funcionar con un tempori-
zador externo o con un sistema de control remoto separado.
Para los bebés y niños
~Para evitar el riesgo de asfixia,
mantenga esta bolsa plástica lejos
de bebés y niños. No utilice esta
bolsa en cunas, camas, cochecitos
de bebé o corrales. Esta bolsa no
es un juguete.
Para o debido a los animales
de compañía y de granja
~Los aparatos eléctricos pueden pre-
sentar peligros también para los
animales de compañía y de granja.
Además, los animales también pue-
den ocasionar daños en el aparato.
Por ello, como regla general man-
tenga a los animales alejados de
los aparatos eléctricos.
Riesgo de descarga eléctrica
debido a la humedad
~Proteja el aparato de la humedad y
de las gotas o las salpicaduras de
agua.
~El aparato, el cable de conexión y
el enchufe no se pueden sumergir
en agua ni en ningún otro líquido.
ADVERTENCIA
ADVERTENCIA
ADVERTENCIA
ADVERTENCIA
__337781_1910_B9.book Seite 27 Montag, 18. Mai 2020 11:29 11

28 US-ES
~Si penetraran líquidos en el apara-
to, desenchúfelo inmediatamente.
Haga revisar el aparato antes de
volver a utilizarlo de nuevo.
~Si no obstante el aparato cae al
agua, desenchúfelo inmediatamen-
te y, sólo después de hacerlo, sá-
quelo del agua. En este caso no
utilice más el aparato y hágalo revi-
sar por un taller especializado.
~No utilice el aparato con las manos
mojadas.
Riesgo de descarga eléctrica
~Este aparato tiene un enchufe pola-
rizado (una clavija es más ancha
que la otra). Para reducir el riesgo
de descarga eléctrica, este enchufe
debe encajar en un tomacorriente
polarizado de una forma solamen-
te. Si el enchufe no encaja comple-
tamente en el tomacorriente,
voltéelo. Si aun así no encaja, co-
muníquese con un electricista califi-
cado. No intente desactivar esta
característica de seguridad.
~No ponga en funcionamiento el
aparato si éste o el cable de cone-
xión presentan daños visibles o si el
aparato se ha caído antes al suelo.
~Coloque el cable de conexión de
modo que nadie lo pise, se engan-
che o tropiece con él.
~Conecte el enchufe sólo a una toma
de corriente correctamente instala-
da y fácilmente accesible y cuya
tensión corresponda a la especifica-
ción indicada en la placa de carac-
terísticas. La toma de corriente debe
seguir siendo fácilmente accesible
tras la conexión.
~Asegúrese de que el cable de cone-
xión no resulte dañado por cantos
vivos o superficies calientes. No en-
rolle el cable de conexión alrededor
del aparato (peligro de rotura del
cable). Utilice el guardacable situa-
do en la parte inferior.
~Deje que el aparato se enfríe com-
pletamente antes de enrollar el cable
de conexión.
~Procure que el cable de conexión
no se presione ni se aplaste.
~Para sacar el enchufe de la toma de
corriente, tire siempre del enchufe,
nunca del cable de conexión.
~Saque el enchufe de la toma de co-
rriente…
…después de cada uso,
…si se produce una avería,
…cuando no utilice el aparato,
…antes de limpiarlo y
…en caso de tormenta.
Riesgo de incendio
~No deje nunca el aparato enchufa-
do sin supervisión.
~Utilice el aparato sobre una superfi-
cie plana, estable y resistente al ca-
lor.
~¡No cubra nunca el aparato mien-
tras esté conectado para evitar un
posible sobrecalentamiento y peli-
gro de incendio!
~No utilice el aparato cerca de ga-
ses o materiales inflamables.
ADVERTENCIA
ADVERTENCIA
__337781_1910_B9.book Seite 28 Montag, 18. Mai 2020 11:29 11

29
US-ES
Riesgo de lesiones por
quemaduras
~El filamento de sellado se calienta
mucho durante su uso. No toque el
filamento de sellado mientras esté
caliente.
~Deje enfriar por completo el apara-
to antes de limpiarlo o guardarlo.
En caso de falta de higiene
~Para poder disfrutar sin preocupa-
ciones de sus alimentos envasados
al vacío, es indispensable que siga
los siguientes consejos de higiene:
- Al preparar y envasar los alimen-
tos, procure que todos los instru-
mentos de trabajo estén
absolutamente limpios.
- Procure limpiar a fondo la enva-
sadora por sellado y todos los ins-
trumentos de trabajo después de
cada uso.
- Los alimentos perecederos se de-
ben refrigerar o congelar inme-
diatamente después de
envasarlos.
- Una vez descongelados o calen-
tados, los alimentos perecederos
deben consumirse de inmediato.
Riesgo de daños materiales
~Respete el tiempo de funcionamien-
to determinado para el aparato.
Después de un proceso de sellado o
puesta al vacío, el aparato debe en-
friarse durante al menos 80 segun-
dos.
~Utilice exclusivamente un film de
plástico especial adecuado para el
uso de envasadoras por sellado.
~No coloque el aparato sobre super-
ficies calientes (p. ej. placas de co-
cina) o cerca de fuentes de calor o
del fuego.
~Al aspirar el aire, procure no suc-
cionar ningún líquido.
~El aparato lleva soportes de silico-
na antideslizantes. Dado que los
muebles están recubiertos con una
gran variedad de lacas y plásticos,
y que se tratan con diferentes pro-
ductos de conservación, puede que
algunos de esos materiales conten-
gan componentes que ataquen y re-
blandezcan los soportes de
silicona. En caso necesario, colo-
que debajo del aparato una base
de apoyo antideslizante.
~No utilice detergentes abrasivos o
que produzcan arañazos.
ADVERTENCIA
ADVERTENCIA
ATENCIÓN
__337781_1910_B9.book Seite 29 Montag, 18. Mai 2020 11:29 11

30 US-ES
5. Volumen de
suministro
1 selladora al vacío
1 junta selladora de repuesto para la
junta selladora inferior16
1 rollo de tubo de film
2 tubos de vacío (23.622in)19
1 adaptador A (p. ej., para recipientes
Ernesto y loncheras FoodSaver)20
1 adaptador
B
(p. ej., para recipientes
para alimentos frescos FoodSaver)
21
1 adaptador C (p. ej., para recipientes
CASO y cajas de almacenaje Food-
Saver)22
1 bandeja recolectora de líquidos18
(insertada)
1 manual de instrucciones
Antes del primer uso
• Retire todo el material de embalaje.
• Compruebe que el aparato no pre-
senta daños.
6. Suministro de
corriente eléctrica
Conecte el enchufe6 sólo a una toma
de corriente correctamente instalada y
fácilmente accesible y cuya tensión co-
rresponda a la especificación indicada
en la placa de características. La toma
de corriente debe seguir siendo fácil-
mente accesible tras la conexión.
1. Desenrolle la longitud de cable de
conexión6 que necesite del guar-
dacable23.
2. Pase el cable de conexión6 a tra-
vés de la abertura7 de la parte
inferior del aparato.
3. Inserte el enchufe6 en una toma
de corriente.
7. Ventajas de los ali-
mentos al vacío
7.1 Conservación
Los alimentos al vacío se mantienen
frescos mucho más tiempo. Esto se
debe a que al poner al vacío el emba-
laje que contiene los alimentos, se retira
la mayor parte del oxígeno.
Además, un film de calidad y el proce-
so al vacío protegen bien contra las
quemaduras por congelación.
__337781_1910_B9.book Seite 30 Montag, 18. Mai 2020 11:29 11

31
US-ES
7.2 Cocción al vacío: el
método para cocinar
con una bolsa de vacío
sin dañar los alimentos
El sueño de todo cocinero aficionado:
un filete rosado y jugoso por dentro y
tostado por fuera. Sin embargo, por
desgracia esto no siempre se consigue
con los métodos habituales, o requiere
una regulación exacta del tiempo. La
cocción al vacío hace que cocinar sea
más fácil y consigue resultados casi
siempre perfectos.
Básicamente, la cocción al vacío no es
otra cosa que cocer a fuego lento ali-
mentos sellados al vacío.
Por una parte, la cocción al vacío es un
método muy sencillo para obtener exce-
lentes resultados al preparar alimentos.
Por otra parte, la cocción al vacío es
una forma de decir claramente "no" a
la obsesión por la rapidez de nuestro
tiempo.
Los cocineros profesionales utilizan este
método desde hace ya muchos años.
Con la nueva máquina de cocción al
vacío, este método de cocción está aho-
ra también al alcance del cocinero afi-
cionado en su casa.
8. Preparación
8.1 Instalación del aparato
Coloque el aparato sobre una superficie
seca y lisa que no sea sensible al calor.
8.2 Requisitos del film/las
bolsas
SUGERENCIA: tenga en cuenta los si-
guientes requisitos cuando compre bol-
sas plásticas/rollos de bolsas plásticas
adicionales.
- Puede utilizar film de tubo o bolsas
prefabricadas.
- El film no debe tener una anchura
superior a 11 in.
- El film debe tener puntos/nudos o
estrías por un lado. Un film liso no
es adecuado para el sellado.
- El espesor debe estar entre 0.007 y
0.011 in (170 - 290 μ).
- Al comprar el film, preste también
atención al margen de temperatura
en el que puede emplearse. Lo
ideal es un intervalo entre
-4 °F
y
+230 °F
. Un film de este tipo se pue-
de congelar o cocer. El film incluido
en el suministro resulta adecuado
para ello.
- Encontrará estas indicaciones en el
embalaje del film o las bolsas.
__337781_1910_B9.book Seite 31 Montag, 18. Mai 2020 11:29 11

32 US-ES
8.3 Cómo hacer bolsas
Si usa bolsas prefabricadas, los si-
guientes pasos no se aplican.
1. Desenrolle tanto film del rollo como
necesite para su bolsa. Al determi-
nar la longitud de la bolsa, tenga
en cuenta que una vez llena deben
quedar unos 2.5 in de espacio en
la parte de arriba.
2. Separe el trozo de film con unas
tijeras cortando todo lo recto que
pueda.
3. Para el sellado de la bolsa (Véase
“Sellar bolsas (sinválvula)” en la
página35).
9. Uso
9.1 Resumen de las
funciones
Riesgo de daños materiales
~Después de un proceso de sellado
y/o empacado al vacío, el aparato
debe enfriarse durante al menos
80segundos.
Para proteger el aparato, se ha pre-
visto un breve bloqueo automático
entre dos procesos de sellado.
Tecla Función
1
Activar/desactivar la fun-
ción Wet para alimentos
húmedos y jugosos
2
Iniciar/cancelar el empa-
cado al vacío a través de
la conexión8 con un
tubo de vacío19 y un
adaptador20/21/22
3Iniciar/cancelar el sella-
do (sin vacío)
4
Iniciar/cancelar el empa-
cado al vacío y el sellado
de bolsas de film
5
Activar/desactivar la fun-
ción Soft (para alimentos
sensibles a la presión,
como bayas, tortas, etc.)
ATENCIÓN
__337781_1910_B9.book Seite 32 Montag, 18. Mai 2020 11:29 11

33
US-ES
Las funciones 2, 3 y 4 se de-
tienen automáticamente cuando el pro-
ceso ha concluido. Al pulsar de nuevo
la tecla de función, el proceso puede in-
terrumpirse antes.
Antes de empacar y/o sellar al vacío,
puede activar las funciones Wet 1 y
Soft5. Pulsando de nuevo la tecla se
desactiva la función.
9.2 Empacar al vacío
recipientes y bolsas de
vacío (con válvula)
Con esta función puede empacar al va-
cío recipientes y bolsas de vacío con
válvulas de distintos fabricantes. Para
las distintas válvulas encontrará los si-
guientes adaptadores en el volumen de
suministro:
Riesgo de descarga eléctrica de-
bido a la humedad
~Al aspirar el aire, procure no suc-
cionar ningún líquido. Si esto ocu-
rriera, interrumpa inmediatamente
el proceso pulsando de nuevo la te-
cla de función2 activa.
~Tenga en cuenta las indicaciones
del fabricante con respecto al nivel
de llenado de los recipientes y las
bolsas.
AVISO: los recipientes y bolsas de va-
cío no están incluidos en el volumen de
suministro.
Recipientes de vacío
1. Llene el recipiente de vacío hasta
el nivel de llenado máximo y cierre
la tapa del recipiente.
2. Inserte a presión un tubo de
vacío19 por uno de los extremos
en la conexión8 a la derecha del
aparato.
3. Introduzca el adaptador20/21/
22 adecuado para la válvula en el
otro extremo del tubo de vacío19.
4. Inserte el adaptador A20 o B21
sobre la válvula del recipiente de
vacío. Sujete con firmeza el adap-
tador en ese punto.
Adaptador p. ej.,
adecuado para
Adaptador A20 Ernesto, lonche-
ras FoodSaver
Adaptador B21 Recipientes para
alimentos frescos
FoodSaver
Adaptador C22 CASO, cajas de
almacenaje Food-
Saver
ADVERTENCIA
8
19
21
__337781_1910_B9.book Seite 33 Montag, 18. Mai 2020 11:29 11

34 US-ES
O bien:
Introduzca el adaptador C22 en
la válvula del recipiente de vacío.
5. Pulse la tecla 2. El LED se
ilumina. Empieza el empacado al
vacío.
6. Tras el empacado al vacío, el LED
se apaga y el proceso de empa-
cado al vacío habrá finalizado.
7. Retire el tubo de vacío19 y el
adaptador20/21/22 del reci-
piente de vacío y, dado el caso,
repita el proceso con otro reci-
piente.
8. Cuando termine empacado al
vacío, retire el tubo de vacío19
de la conexión8.
Bolsas de vacío con válvula
1. Añada los alimentos preparados a
la bolsa de vacío. Procure que no
haya ningún alimento debajo de la
válvula.
2. Cierre cuidadosamente la bolsa de
vacío.
3. Coloque la bolsa de vacío plana
sobre una superficie lisa con la vál-
vula hacia arriba.
4. Proceda a continuación como con
los recipientes de vacío a partir del
paso 2 (Véase “Recipientes de
vacío” en la página33) y utilice el
adaptador A20.
9.3
Llenado de la bolsa (sin
válvula)
AVISO:
~En la parte de la bolsa que desee
sellar no debe haber alimentos ni lí-
quidos. Esta área deberá estar lim-
pia y seca. De lo contrario no será
posible hacer una unión de sellado
correcta.
• Llene la bolsa dejando un espacio
de al menos 2.5 in por debajo del
borde superior.
9.4 Activación de la función
Wet
Riesgo de descarga eléctrica de-
bido a la humedad
~Para empacar una bolsa al vacío,
no debe haber ningún líquido den-
tro de la bolsa.
~Al aspirar el aire, procure no suc-
cionar ningún líquido. Si esto ocu-
rriera, interrumpa inmediatamente
el proceso pulsando de nuevo la te-
cla de función activa.
Pueden producirse uniones de sellado
defectuosas si en la bolsa se encuentran
alimentos húmedos (p. ej., carne/pesca-
do marinado, verdura/fruta cortada y
lista para cocinar). Activando la función
Wet 1, se alarga el tiempo de sella-
do para lograr una mejor unión de se-
llado.
8
19
22
ADVERTENCIA
__337781_1910_B9.book Seite 34 Montag, 18. Mai 2020 11:29 11

35
US-ES
• Antes de empacar/sellar al vacío,
presione la tecla 1 para activar
la función. El LED se ilumina.
• Para desactivar la función, vuelva a
presionar la tecla 1.
• Cuando haya finalizado o se haya
cancelado el proceso de sellado/
empacado al vacío, se apagará el
LED y la función se desactivará au-
tomáticamente.
• Durante el proceso de sellado/em-
pacado al vacío, la función Wet
1 no puede activarse ni desacti-
varse.
AVISO: esta función no es la apropia-
da para empacar al vacío líquidos
como p. ej. sopas. Antes de empacar-
los al vacío, se deben congelar.
9.5 Activación de la función
Soft
Con la función Soft5 se reduce algo la
bajada de presión, para no ejercer pre-
sión sobre los alimentos sensibles a esta
(por ej. bayas o tortas).
• Antes de empacar/sellar al vacío,
presione la tecla Soft5 para acti-
var la función. El LED se ilumina.
• Para desactivar la función, vuelva a
presionar la tecla Soft5.
• Cuando haya finalizado o se haya
cancelado el proceso de sellado/
empacado al vacío, se apagará el
LED y la función se desactivará au-
tomáticamente.
• Durante el empacado/sellado al
vacío, la función Soft5 no puede
activarse ni desactivarse.
9.6 Sellar bolsas
(sinválvula)
1. Alise la parte de la bolsa que vaya
a sellar.
2. Abra la tapa12. Si es necesario,
presione primero para ello las
teclas9.
3. Coloque la bolsa en el aparato. Al
hacerlo, el extremo del film debe
quedar situado poco antes de las
guías traseras13 y entre las guías
laterales15.
4. Asegúrese de que no haya plie-
gues en el film, especialmente en
la zona que está por encima del
filamento de sellado17.
5. Cierre la tapa12.
6. Presione firmemente con ambas
manos sobre las esquinas de la
tapa12. Debe oírse cómo enca-
jan.
7. Pulse la tecla 3. El LED se ilu-
mina. Se sella el film.
Pasados aprox. 5 o 7 segundos, el
LED se apagará, finalizando el pro-
ceso de sellado.
__337781_1910_B9.book Seite 35 Montag, 18. Mai 2020 11:29 11

36 US-ES
SUGERENCIA: si tiene activada la fun-
ción Wet 1, el proceso de sellado
durará algunos segundos más.
8. Presione simultáneamente las
teclas9 para soltar el bloqueo de
la tapa12.
9. Abra la tapa12 y retire la bolsa.
10. Compruebe la unión de sellado.
Debe ser una franja lisa y sin plie-
gues.
9.7 Empacar al vacío y
sellar bolsas
(sinválvula)
Riesgo de descarga eléctrica de-
bido a la humedad
~Para empacar una bolsa al vacío,
no debe haber ningún líquido den-
tro de la bolsa.
~Al aspirar el aire, procure no suc-
cionar ningún líquido. Si esto ocu-
rriera, interrumpa inmediatamente
el proceso pulsando de nuevo la te-
cla de función4 activa.
SUGERENCIA: al empacar al vacío
bolsas de film no se debe insertar nin-
gún tubo de vacío19 en la cone-
xión8.
1. Alise la parte de la bolsa que vaya
a sellar.
2. Abra la tapa12.
3. Coloque la bolsa en el aparato. Al
hacerlo, el extremo del film debe
quedar situado poco antes de las
guías traseras13 y entre las guías
laterales15.
4. Asegúrese de que no haya plie-
gues en el film, especialmente en
la zona que está por encima del
filamento de sellado17.
5. Cierre la tapa12.
6. Presione firmemente con ambas
manos sobre las esquinas de la
tapa12. Debe oírse cómo enca-
jan.
7. Pulse la tecla 4. El LED se ilu-
mina. La bolsa de film se empaca
al vacío primero y después se
sella.
El LED se apaga cuando el proceso
haya finalizado.
SUGERENCIA: si el LED4 no se apa-
ga y el ruido de la bomba de vacío no
cesa a pesar de que el aire en la bolsa
de film haya dejado de succionarse, in-
terrumpa el proceso. Compruebe que la
bolsa de film esté correctamente situa-
da en el aparato y que no presente fu-
gas.
ADVERTENCIA
__337781_1910_B9.book Seite 36 Montag, 18. Mai 2020 11:29 11

37
US-ES
8. Presione simultáneamente las
teclas9 para soltar el bloqueo de
la tapa12.
9. Abra la tapa12 y retire la bolsa.
10.Compruebe la unión de sellado.
Debe ser una franja lisa y sin plie-
gues.
10. Limpieza y
conservación
Riesgo de lesiones por quema-
duras/escaldaduras
~Deje enfriar por completo el apara-
to antes de limpiarlo o guardarlo.
~
El filamento de sellado
17
se calienta
mucho durante su uso. No toque el fi-
lamento de sellado
17
mientras esté
caliente.
Riesgo de descarga eléctrica
~Antes de la limpieza, retire el en-
chufe6 del aparato.
Riesgo de descarga eléctrica de-
bido a la humedad
~El aparato, el cable de conexión y
el enchufe6 no se pueden sumergir
en agua ni en ningún otro líquido.
Riesgo de daños materiales
~No utilice detergentes abrasivos o
que produzcan arañazos.
ADVERTENCIA
ADVERTENCIA
ADVERTENCIA
ATENCIÓN
__337781_1910_B9.book Seite 37 Montag, 18. Mai 2020 11:29 11

38 US-ES
10.1 Limpieza
Para garantizar el perfecto funciona-
miento y la eficiencia plena de su apa-
rato, límpielo periódicamente.
• Limpie el aparato con un paño lige-
ramente humedecido.
• Antes de volver a usarlo, el aparato
debe estar totalmente seco.
Bandeja recolectora
1. Coja la lengüeta del centro o las
dos lengüetas exteriores con los
dedos y extraiga la bandeja reco-
lectora de líquidos18 con cui-
dado hacia arriba.
2. Vierta el líquido.
3. Enjuague la bandeja recolec-
tora18 bajo agua de lavado
caliente o introdúzcala en el lava-
vajillas. Séquela antes de colo-
carla.
4. Inserte la bandeja recolectora18
en el aparato desde la parte supe-
rior.
Junta selladora
1. Coja la junta selladora16 con dos
dedos y extráigala hacia arriba.
2. Enjuague la junta selladora16
bajo agua de lavado caliente.
Séquela antes de colocarla.
3. Vuelva a colocar la junta sella-
dora16 correctamente en el apa-
rato. Procure que esté ajustada en
plano y no presente ondulaciones.
AVISO: la junta selladora16 es una
pieza que se desgasta. La elevada pre-
sión hace que pierda su forma con el
tiempo. En ese caso sustitúyala por una
nueva (incluida entre los elementos pro-
vistos).
10.2 Conservación
Riesgo de daños materiales
~Al almacenar el aparato, la ta-
pa12 no debe quedar bloqueada,
sino solamente suelta y cerrada. Un
bloqueo duradero podría dañar las
juntas selladoras11 y16.
•Ilustración B: enrolle el cable de
conexión6 alrededor del guarda-
cable23 en la parte inferior del
aparato.
• Guarde el aparato protegido del
polvo y la suciedad y fuera del al-
cance de los niños.
11. Manejo de desechos
Este producto no se debe desechar
como residuo común del hogar.
Si no seguirá usando el aparato eléctri-
co, deberá entregarlo a las autoridades
locales de desechos públicos pertinen-
tes para su eliminación.
Como norma, estas autoridades de eli-
minación de desechos dirigen unida-
des especiales para recibir aparatos
eléctricos (centros de reciclaje, centros
de recuperación de materiales, etc.).
Para más información, consulte:
www.epa.gov
ATENCIÓN
__337781_1910_B9.book Seite 38 Montag, 18. Mai 2020 11:29 11

39
US-ES
12. Solución de problemas
Si en algún momento el aparato no fun-
ciona como es debido, consulte en pri-
mer lugar la siguiente lista. Es posible
que se trate de un problema sin impor-
tancia que usted mismo pueda solucio-
nar.
Riesgo de descarga eléctrica
~No intente reparar el aparato usted
mismo en ningún caso.
13. Datos técnicos
Queda reservado el derecho a realizar
modificaciones técnicas.
14. Consejos de FCC
AVISO: este equipo ha sido sometido a
pruebas, y se determinó que cumple
con los límites de Clase B de dispositi-
vos digitales, de conformidad con la
parte 15 de las normas de la Comisión
Federal de Comunicaciones, (Federal
Communications Commission, FCC).
Estos límites están diseñados para pro-
porcionar una protección razonable
contra interferencias perjudiciales en
una instalación residencial. Este equipo
genera, usa y puede radiar energía de
radiofrecuencia y, de no ser instalado y
usado de acuerdo con las instrucciones,
puede causar interferencias perjudicia-
les a las radiocomunicaciones. Sin em-
bargo, no se puede garantizar que no
habrá interferencia en una instalación
en particular. Si este equipo causa inter-
ferencias perjudiciales a la recepción
de radio o televisión, lo que puede com-
probarse encendiendo y apagando el
equipo, se anima al usuario a que trate
de corregir la interferencia con una o
varias de las siguientes medidas:
Avería Posibles causas /
Medidas a adoptar
No funciona • ¿Funciona el suminis-
tro de corriente eléc-
trica?
Las uniones
no son her-
méticas
• Procure que el film
quede colocado bien
plano entre la franja
selladora10 y el fila-
mento de sella-
do17.
• El film estaba húme-
do o sucio en el pun-
to de sellado.
• Cuando trate alimen-
tos húmedos, active
la función Wet 1.
El aparato
no puede
sellar varias
veces conse-
cutivas.
• Para proteger el apa-
rato, se ha previsto
un breve bloqueo au-
tomático entre dos
procesos de sellado.
ADVERTENCIA
Modelo: SV 125 B3
Tensión de la
red:
120 V ~ 60 Hz
Potencia: 125 W
Cable de
alimentación: 18AWGx2C, 300 V
Tiempo de
pausa:
mín. 80 segundos
después de cada uso
__337781_1910_B9.book Seite 39 Montag, 18. Mai 2020 11:29 11

40 US-ES
- Reoriente o reubique la antena re-
ceptora.
- Aumente la distancia entre el equi-
po y el receptor.
- Conecte el equipo en un tomaco-
rriente de un circuito distinto al que
esté conectado el receptor.
- Solicite ayuda al distribuidor o a un
técnico experto de radio/TV.
ATENCIÓN: para cumplir con los lími-
tes de la Clase B de dispositivos digita-
les, de conformidad con la parte 15 de
las normas de la FCC, este dispositivo
debe cumplir con los límites de la clase
B. Todos los accesorios deben estar pro-
tegidos y anclados. El funcionamiento
con accesorios no certificados o cables
no protegidos puede ocasionar interfe-
rencia con la radio o con la recepción.
MODIFICACIÓN: cualquier cambio o
modificación que no esté expresamente
aprobada por el cedente de este dispo-
sitivo puede anular el derecho del usua-
rio para utilizar el dispositivo.
15. Garantía limitada de
3 años
Lo que cubre la presente
garantía
La garantía incluye:
- Daños, quebraduras o incapacidad
para funcionar debido a defectos.
- Daños que no hayan sido causados
por el desgaste propio del uso o
por no seguir las instrucciones de
seguridad y mantención incluidas
en el manual para el usuario.
Lo que no cubre esta garantía
La garantía no cubre daños causados por:
- El desgaste propio del uso del pro-
ducto, incluidas las partes frágiles
(como interruptores, piezas de vi-
drio, etc.).
- Uso o transporte no indicado del
producto.
- Desatención a las instrucciones de
seguridad y mantención.
- Accidentes o causas de fuerza ma-
yor (e.g. relámpagos, incendio,
inundación, etc.).
- Manipulación mal intencionada del
producto (retirar la cubierta, tornillos,
etc.).
La presente garantía tampoco cubre da-
ños indirectos o emergentes. Sin embar-
go algunos estados no permiten la
exclusión o limitación de daños indirec-
tos o emergentes, por lo que dicha ex-
clusión o limitación pudiera no
aplicarse en su caso.
Período de cobertura y
resolución de la garantía
La garantía es válida por 3 años a par-
tir de la fecha de compra. La empresa,
según lo estime conveniente, devolverá
el dinero o repondrá el producto.
__337781_1910_B9.book Seite 40 Montag, 18. Mai 2020 11:29 11

41
US-ES
La empresa no:
- Dará inicio a un nuevo período de
garantía al hacerse el cambio del
producto.
- Reparará el producto.
¿Cómo se tramita la
garantía?
Recomendamos que primero usted:
- Llame al Servicio de atención al
cliente al 1 (844) 543-5872.
- Visite el Portal de atención al cliente
en www.lidl.com/contact-us
- Visite una de nuestras tiendas LIDL
en caso de cualquier inquietud.
A fin de acelerar el trámite de la garan-
tía, tenga a bien contar con lo siguiente:
- Recibo de venta original que inclu-
ya la fecha de compra.
- Producto y manual en su empaque
original.
- Descripción del problema.
¿Qué debe hacer usted para
mantener la garantía vigente?
- Guardar el recibo original.
- Seguir todas las instrucciones para
el uso del producto.
- No realizar ninguna reparación ni
alteración al producto.
¿De qué manera influyen las
leyes estatales con esta
garantía?
La presente garantía le otorga derechos
legales específicos, y pudiera usted
contar con otros derechos los cuales va-
rían de un estado a otro. Todas las ga-
rantías implícitas se encuentran
limitadas a la duración y términos de la
presente garantía. Algunos estados no
permiten limitaciones al período de
tiempo y términos de la garantía implí-
cita, por lo que dichas limitaciones pu-
dieran no aplicarse en su caso.
Distribuidor: Lidl US LLC.
Arlington,
VA22202
País de origen: China
Atención al cliente:
Línea directa de
atención: (gratuita
en Estados Unidos) 1-844-543-5872
Página de contacto:
www.lidl.com/contact-us
__337781_1910_B9.book Seite 41 Montag, 18. Mai 2020 11:29 11
-
 1
1
-
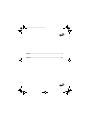 2
2
-
 3
3
-
 4
4
-
 5
5
-
 6
6
-
 7
7
-
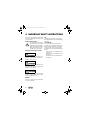 8
8
-
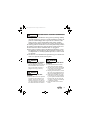 9
9
-
 10
10
-
 11
11
-
 12
12
-
 13
13
-
 14
14
-
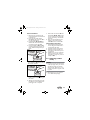 15
15
-
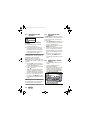 16
16
-
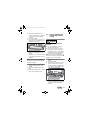 17
17
-
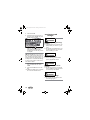 18
18
-
 19
19
-
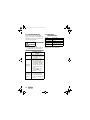 20
20
-
 21
21
-
 22
22
-
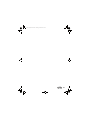 23
23
-
 24
24
-
 25
25
-
 26
26
-
 27
27
-
 28
28
-
 29
29
-
 30
30
-
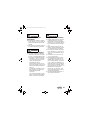 31
31
-
 32
32
-
 33
33
-
 34
34
-
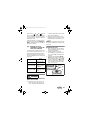 35
35
-
 36
36
-
 37
37
-
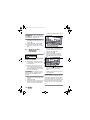 38
38
-
 39
39
-
 40
40
-
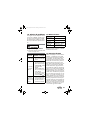 41
41
-
 42
42
-
 43
43


Silvercrest 337781 El manual del propietario
- Tipo
- El manual del propietario
en otros idiomas
- English: Silvercrest 337781 Owner's manual


