Atlantis A03-PS1000 Manual de usuario
- Tipo
- Manual de usuario

1

2
ITALIANO
Questo prodotto è coperto da garanzia Atlantis On-Site della durata di 2 anni. Per
maggiori dettagli in merito o per accedere alla documentazione completa in Italiano
fare riferimento al sito www.atlantis-land.com.
ENGLISH
This product is covered by Atlantis On-Site 2 years warranty. For more detailed
informations please refer to the web site www.atlantis-land.com.
For more detailed instructions on configuring and using this device, please refer to
the online manual.
FRANÇAIS
Ce produit est couvert par une garantie Atlantis On-Site de 2 ans. Pour des
informations plus détaillées, référez-vous svp au site Web www.atlantis-land.com.
DEUTSCH
Dieses Produkt ist durch die Atlantis On-Site 2 Jahre Garantie gedeckt. Für weitere
Informationen, beziehen Sie sich bitte auf Web Site www.atlantis-land.com.
ESPAÑOL
Este producto esta cubierto por Atlantis On-Site con una garantía de 2 años. Para
mayor información diríjase a nuestro sitio Web www.atlantis-land.com.

3
ITALIANO
Manuale d’Uso .................................................................................... 9
1.1 Introduzione al prodotto ........................................................... 9
1.2 Verifica Iniziale ......................................................................... 9
1.3 Contenuto della confezione ....................................................... 9
1.4 Collocazione ........................................................................... 10
1.5 Connessione al Carico ............................................................. 10
1.6 Test di Funzionamento ............................................................ 11
1.7 Pannello frontale .................................................................... 12
1.8 Le prese schuko ..................................................................... 13
1.9 Sostituzione Batterie ............................................................... 13
APPENDICE A: Risoluzione dei problemi e Supporto ............................. 15
A.1.1 Problematiche dell’UPS ......................................................... 15
A.1.2 Batterie e ICS ...................................................................... 16
A.1.3 Varie ............................................................................. 17
A.1.4 Supporto Offerto ................................................................. 17
ENGLISH
Manual ............................................................................................. 20
1.1 Important Safety Instructions .................................................. 20
1.2 Inspection .............................................................................. 20
1.3 Package Contents ................................................................... 20
1.4 Placement .............................................................................. 20
1.5 Connect the loads ................................................................... 21
1.6 Operation Test ....................................................................... 22
1.7 Front Panel Explanations ......................................................... 22
1.8 Rear Panel Explanations .......................................................... 23
1.9 Replacing the Battery .............................................................. 24
APPENDIX A: TROUBLE SHOOTING & SUPPORT ................................. 25
A.1.1 UPS .............................................................................. 25
A.1.2 Battery and ICS ................................................................... 25
A.1.3 Support ............................................................................... 26
FRANÇAIS
Manuel Utilisateur ............................................................................. 29
1.1 Introduction ........................................................................... 29
1.2 Vérification ............................................................................. 29

4
1.3 Dans la boîte .......................................................................... 29
1.4 Mise en place ......................................................................... 30
1.5 Reliez les charges ................................................................... 31
1.6 Opérations de Test ................................................................. 31
1.7 Facade ............................................................................... 32
1.8 Face arrière ............................................................................ 32
1.9 Changement de Batterie ......................................................... 33
APPENDICE A: Problèmes .................................................................. 34
A.1.1 Problèmes ........................................................................... 34
A.1.2 Batterie et ICS ..................................................................... 34
A.1.3 Support ............................................................................... 35
ESPAÑOL
Manual de Uso .................................................................................. 39
1.1 Introducción del producto ....................................................... 39
1.2 Prueba inicial .......................................................................... 39
1.3 Contenidos de la caja .............................................................. 39
1.4 Colocación.............................................................................. 39
1.5 Conexión de la carga .............................................................. 41
1.6 Prueba de funcionamiento ....................................................... 41
1.7 Panel frontal ........................................................................... 42
1.8 Los puertos posteriores ........................................................... 43
1.9 Sustitución de las baterías ....................................................... 43
APENDICE A: Solución de problemas y soporte ................................... 45
A.1.1 Problemas del UPS(SAI) ....................................................... 45
A.1.2 Vario .............................................................................. 46
DEUTSCH
Handbuch ......................................................................................... 47
1.1 Installation und Lagerung/ Aufladen der Batterie ...................... 49
1.2 Anschluss der Lasten .............................................................. 50
1.3 Ein-/Ausschalten der Einheit .................................................... 50
1.4 Tabelle mit der Beschreibung der Kontrollleuchten und der Alarme
50
1.5 Problemlösung........................................................................ 51
1.6 Garantie ............................................................................... 52

5
APPENDIX
Technical Features ............................................................................ 53
Backup TIME & Battery ...................................................................... 54
A03-PS1000_MX01(Rel 21.0)(10-2021)

ITA
6
AVVERTENZE
Abbiamo fatto di tutto al fine di evitare che nel testo, nelle immagini e nelle tabelle
presenti in questo manuale, nel software e nell'hardware fossero presenti degli errori.
Tuttavia, non possiamo garantire che non siano presenti errori e/o omissioni. Infine,
non possiamo essere ritenuti responsabili per qualsiasi perdita, danno o
incomprensione compiuti direttamente o indirettamente, come risulta dall'utilizzo del
manuale, software e/o hardware.
Il contenuto di questo manuale è fornito esclusivamente per uso informale, è soggetto
a cambiamenti senza preavviso (a tal fine si invita a consultare il sito
www.atlantisland.it o www.atlantis-land.com per reperirne gli aggiornamenti) e non
deve essere interpretato come un impegno da parte di Atlantis che non si assume
responsabilità per qualsiasi errore o inesattezza che possa apparire in questo
manuale. Nessuna parte di questa pubblicazione può essere riprodotta o trasmessa
in altra forma o con qualsiasi mezzo, elettronicamente o meccanicamente, comprese
fotocopie, riproduzioni, o registrazioni in un sistema di salvataggio, oppure tradotti in
altra lingua e in altra forma senza un espresso permesso scritto da parte di Atlantis.
Tutti i nomi di produttori e dei prodotti e qualsiasi marchio, registrato o meno,
menzionati in questo manuale sono usati al solo scopo identificativo e rimangono
proprietà esclusiva dei loro rispettivi proprietari.
ATTENZIONE!
Questo apparato può essere installato da chiunque, previa un’attenta lettura di questo
manuale. La garanzia decade se non vengono rispettate tutte le norme e le
prescrizioni indicate nel presente manuale operativo.
L’UPS può essere riparato solo da personale qualificato.
La garanzia della batteria è di 1 anno a partire dalla data di acquisto.
Attenzione: per garantire l’integrità ed il corretto funzionamento del gruppo di
continuità, non collegare mai all’uscita dell’UPS fotocopiatrici, stampanti laser, utensili
elettrici o qualsiasi altro tipo di carico diverso da un Personal
Computer/monitor/registratori di cassa. Il non rispetto di queste indicazioni porterà
all’immediato decadimento della garanzia.
Attenzione: La presa di rete dell’UPS (ingresso) va collegata direttamente ed
esclusivamente alla rete elettrica (220Vac, 50Hz). Non collegare la presa di rete
dell’UPS a generatori, gruppi elettrogeni, inverter o altri apparati. Questo invalida la
garanzia.
Attenzione: La presa di rete cui l’UPS è collegato deve essere dotata di connessione
di terra.

ITA
7
Attenzione: Al fine di evitare rischi di incendi o shock elettrici, disporre l’apparato in
ambiente indoor con temperatura ed umidità controllate e privo di agenti conduttori
di ogni genere.
Attenzione: La principale precauzione da osservare è quella di spegnere il gruppo
se, per pause lavorative o festive, viene disinserita la rete di alimentazione principale,
per evitare la scarica totale delle batterie (situazione di black-out prolungato).
Lasciare caricare l’UPS per almeno 8 ore, ogni 3 mesi, in caso sia scollegato dalla rete
elettrica (condizioni ambientali non standard possono accelerale lo scarico delle
batterie).
Attenzione: Non rimuovere i pannelli esterni al fine di evitare il rischio di shock
elettrico. Per ogni dubbio o perplessità rivolgersi a personale qualificato.
Attenzione: Nell’UPS è installata una batteria di accumulatori che è fonte di energia,
per cui all’interno del gruppo vi sono delle tensioni pericolose presenti anche a gruppo
spento e/o scollegato dalla rete elettrica.
Attenzione: Prima di effettuare una qualunque operazione di manutenzione e/o
spostamento dell’apparato è opportuno spegnere il dispositivo e scollegare il pacco
batterie interno. I condensatori presenti possono comunque aver accumulato energia,
prestare quindi la massima attenzione.
Attenzione: Non collegare all’UPS un carico il cui assorbimento in Watt sia
maggiore dell’85% del massimo valore supportato.
Attenzione: Il gruppo contiene batterie e pertanto all’uscita dell’UPS può esserci una
tensione di 220V anche quando il gruppo è scollegato dalla rete e/o questa è assente.
Attenzione: L’UPS può generare una corrente di dispersione. Qualora questo
fenomeno faccia scattare il salvavita è opportuno contattare l’elettricista per far
controllare il proprio impianto elettrico e dimensionare, eventualmente, il differenziale
(solitamente correnti di dispersioni dell’ordine di 30mA sono sufficienti a far scattare
il salvavita).
Attenzione: In un ambiente domestico il dispositivo può causare interferenze radio,
in questo caso è opportuno prendere le adeguate contromisure.
Attenzione: Non installare in luoghi in cui il dispositivo sia sotto irraggiamento solare
diretto.
Attenzione: Non bloccare/ostruire per alcuna ragione le bocche di
ventilazione/ventole e assicurarsi che queste distino almeno 15cm dalla superficie più
vicina.
Attenzione: Non scollegare mai il cavo dalla presa a muro quando l’UPS è acceso.
Questo toglierebbe la protezione della messa a terra all’UPS ed a tutti i carichi
collegati.
Attenzione: Non introdurre mai liquidi di nessun genere all’interno della macchina.
Attenzione: Collegare al dispositivo esclusivamente apparati e cavi certificati CE.

ITA
8
Attenzione: Atlantis non è responsabile di danni causati a prodotti terzi imputabili
all’utilizzo, all’installazione in ambienti non ignifughi o non idonei, alla rottura o al
malfunzionamento di prodotti Atlantis.
Restrizioni di responsabilità
Il software di controllo, ove presente, è dato in licenza. Atlantis non offrirà supporto
sull’utilizzo né potrà essere ritenuta responsabile per malfunzionamenti e/o perdita di
dati da questo generati. Atlantis non fornirà supporto all’installazione/configurazione
per Linux/MAC OS X.
Questo apparato, per limiti esclusivi dovuti alla corrente di
picco, potrebbe non essere adatto ad apparati con PFC attivo
(correzione del fattore di potenza attivo). Verificare
preventivamente la tipologia di alimentatore montata dal
PC/Server.
T
utte le condizioni di utilizzo e clausole contenute in
questo manuale e nella garanzia si intendono note ed
accettate. Si prega di restituire immediatamente
(entro 7 giorni dall’acquisto) il prodotto qualora
queste non siano accettate.
Per usufruire delle condizioni di
g
aranzia mi
g
liorative
associate al prodotto è opportuno provvedere alla
registrazione dello stesso sul sito www.atlantis-
land.com entro e non oltre 15 giorni dalla data di
acquisto. La mancata registrazione entro il termine di
sopra farà sì che il prodotto sia coperto
esclusivamente dalle condizioni standard di garanzia.
Trasporto
Utilizzare esclusivamente l’imballo originale fornito col dispositivo. Questo è stato
costruito per proteggere l’UPS da shock meccanici da impatto.
Preparazione
È possibile che si verifichi della condensazione se l’UPS è spostato da ambienti con
temperature/umidità diverse. L’UPS deve essere assolutamente asciutto prima della
sua accensione. Aspettare almeno 4 ore per favorire l’evaporazione di eventuale
condensa.
Manutenzione e Cambio Pacco Batterie
Solo personale qualificato e specializzato può svolgere la manutenzione del dispositivo
(ad esempio il cambio batterie). Consultare l’apposita sezione nel manuale.

ITA
9
Manuale d’Uso
La ringraziamo per aver scelto un apparato Atlantis. Si consiglia la lettura di questo
documento al fine di un corretto utilizzo del prodotto.
1.1 Introduzione al prodotto
Seguire attentamente tutte le istruzioni durante l’installazione. Leggere attentamente
l’intero manuale prima di iniziare l’installazione del dispositivo. Questo manuale va
conservato per consultazioni future.
1.2 Verifica Iniziale
Controllare immediatamente il dispositivo. Rivolgersi al rivenditore qualora il
dispositivo fosse danneggiato. La confezione in cartone è in materiale riciclabile e
andrebbe conservata e utilizzata per proteggere il prodotto durante eventuali
spedizioni. Nel caso in cui il prodotto venga riconsegnato in un imballo non
originale o palesemente non adatto e/o integro il materiale viaggia a
rischio e pericolo del Consumatore. Eventuali danni dovuti alla spedizione
saranno interamente a carico del Consumatore.
1.3 Contenuto della confezione
Una volta aperta la confezione in cartone dovrebbero essere presenti i seguenti
componenti:
OnePower UPS.
Manuale di installazione multilingua.
Tagliando di Garanzia.
Qualora mancasse uno qualsiasi di questi componenti rivolgersi immediatamente al
rivenditore.

ITA
10
1.4 Collocazione
Al fine di evitare rischi di incendi o shock elettrici, disporre l’apparato in ambiente
indoor con temperatura e umidità controllate e privo di agenti conduttori di ogni
genere. Si ricorda inoltre che:
L’UPS è da usarsi esclusivamente in ambienti chiusi (indoor).
Deve essere collocato lontano da qualsiasi fonte di calore.
Non deve essere esposto direttamente ai raggi solari.
Deve essere collocato in ambienti con umidità controllata.
È opportuno lasciare almeno 15 cm dalle feritoie al fine di consentire un’opportuna
areazione.
Non va collocato in ambienti infiammabili (va messo lontano da legno, parquet,
tappeti e superfici simili).
Assicurarsi che il cavo di alimentazione non sia schiacciato dall’UPS o da altri oggetti
pesanti.
Il cavo che connette i carichi all’UPS non deve superare i 10 metri di lunghezza.
1.5 Connessione al Carico
Anzitutto collegare il carico alle uscite dell’UPS. Collegare quindi il cavo di
alimentazione nella presa di rete a muro. Sono disponibili 6 diverse prese schuko:

ITA
11
3 Schuko (Surge). Sono 3 prese solo in protezione, quando la batteria interviene
queste prese non sono alimentate. Usate per carichi non critici.
3 Schuko (Surge & Battery). Sono 3 prese sia in protezione che backup, pertanto
quando la batteria interviene queste prese sono alimentate. Usare per connettere
carichi critici.
Accendere l’UPS dopo che tutti i carichi sono stati già accesi.
Per
g
arantire l’inte
g
rità ed il corretto funzionamento del
gruppo di continuità, non collegare mai all’uscita dell’UPS
fotocopiatrici, stampanti laser, utensili elettrici o qualsiasi altro
tipo di carico induttivo.
Dopo l’avviamento iniziale, tenere alimentato il
g
ruppo per
almeno 10 ore (collegato alla sola rete elettrica), affinché le
batterie possano caricarsi completamente. L’UPS carica le
batterie quando è collegato alla rete elettrica.
Si consiglia di collegare all’apparato un carico non superiore
all’80-85% del massimo valore permesso (in Watt).
L’UPS può anche essere collocato su un muro. In questo caso
è opportuno collocare 2 chiodi allineati distanti 195 mm su cui
agganciare il dispositivo.
1.6 Test di Funzionamento
Collegare i carichi all’UPS nelle prese sul pannello superiore. Collegare l’UPS alla
rete elettrica.
Per accendere l'UPS premere il bottone [ ]sino a che il dispositivo non emette
un doppio beep sonoro.
È possibile effettuare un test di corretto funzionamento. A tal fine rimuovere il cavo
che collega l’UPS alla rete elettrica. L'UPS emetterà un beep acustico (ogni 30
secondi).
L’intervento dell’UPS permette al PC (carichi connessi) di continuare ad avere la
continuità elettrica, per i dispositivi connessi alle 3 prese schuko Surge & Backup.

ITA
12
Quando l'UPS viene colle
g
ato alla rete elettrica, benché
non acceso, è in grado di ricaricare la batteria ed è quindi
funzionante, anche se in uno stato di basso consumo.
L'uscita dell'UPS invece, se non acceso, non presenta
voltaggio.
1.7 Pannello frontale
In questo modello è presente un bottone con un LED circolare di colore blu.
LED/Bottone Informazione
Main Switch
[ ]
Per accendere/spe
g
nere l'UPS premere il bottone per 2
secondi sino a che il dispositivo non emette 2/3 beep sonori.
Il Led si accenderà in azzurro ad indicare la corretta
accensione.
È possibile accendere l’UPS in caso manchi la rete elettrica ed
alimentare direttamente il carico. Questa funzionalità “DC-
Start” richiede che il carico collegato sia inferiore all’80% del
carico massimo (è importante accendere prima tutte le
periferiche e per ultimo l’UPS. Il carico infatti deve restare
costante).
A
LL
A
RMI
Acustici In Modalità Batteria (se
g
nale acustico o
g
ni 30 secondi).
Batteria quasi scarica (se
g
nale acustico o
g
ni 2 secondi).
OverLoad (se
g
nale acustico 2 volte al secondo). Sconnettere
alcuni carichi, attendere 10 secondi, verificare l’ICS e
riaccendere l’UPS.
Nel caso di
g
uasto la se
g
nalazione acustica è continua.

ITA
13
1.8 Le prese schuko
Identificativo Utilizzo
1 Cavo per la connessione alla rete elettrica.
2 ICS. Sistema di protezioni contro sovracorrenti in in
g
resso.
Premere per ripristinare il corretto funzionamento.
3 Prese Schuko di bac
k
-up
/
sur
g
e. Colle
g
are a queste prese
g
li
apparati che devono essere alimentati dalla batteria in caso di
black-out o altre anomalie sulla rete elettrica.
Surge=Offre solo protezione
Surge & Backup=Offre protezione e alimentazione (ideali per
carichi critici)
1.9 Sostituzione Batterie
La batteria dell’UPS ha 1 anno di garanzia.
Qualora venga sostituita la batteria seguire le seguenti precauzioni:
non indossare orologi, anelli o oggetti di metallo.
impugnare attrezzi con materiale isolante.
indossare guanti di gomma e stivali.
non appoggiare attrezzi o parti di metallo sopra la batteria.
All’uscita dell’UPS può esserci una tensione di 220V anche quando il gruppo è
scollegato dalla rete.
Prima di iniziare la sostituzione della batteria è opportuno spegnere l’UPS
e staccarlo dalla rete elettrica.

ITA
14
Utilizzare un cacciavite a stella per rimuovere 2 viti poste alla base del dispositivo
e sfilare il pannello inferiore.
Staccare il filo di colore nero(negativo) e poi quello di colore rosso(positivo).
Sfilare delicatamente la batteria.
Connettere i cavi alla nuova batteria (è normale osservare delle scintille presso i
connettori della batteria).
Spingere delicatamente la batteria nell’UPS.
Riposizionare il pannello inferiore e riavvitare le 2 viti.
Riporre le batterie sostituite in un luogo appropriato.
Le batterie sostituite vanno considerate come un
RIFIUTO TOSSICO e trattate di conseguenza.

ITA
15
APPENDICE A: Risoluzione dei problemi e Supporto
Questo capitolo illustra come identificare e risolvere eventuali problemi riscontrati con
l’utilizzo del dispositivo.
A.1.1 Problematiche dell’UPS
I Led ed i segnali acustici sono un utile strumento per individuare eventuali problemi,
osservandone lo stato e/o ascoltandone il tipo di beep è possibile individuare
velocemente un eventuale malfunzionamento.
Situazione Controllo Soluzione
L’Alimentazione
elettrica è presente
ma il LED resta
spento.
1. Accertarsi che l’UPS sia
acceso (premere il
bottone di Main
Switch).
2. Controllare il cavo di
alimentazione sia
correttamente
connesso.
1. Accendere l’UPS
premendo il bottone di
Main Switch.
2. Controllare che il cavo
di alimentazione sia
propriamente
collegato.
3. Verificare l’ICS.
A
llarme acustico
persistente (2 beep
al secondo) in
presenza di una
corretta
alimentazione da
rete.
1. Controllare il carico
verificando di non
essere in condizioni di
overload.
1. Sconnettere parte del
carico.
Il LED non si
accende.
1. Le batterie sono
completamente
scariche.
1. Lasciare il prodotto
sotto carica per 24 ore
e riprovare.
2. Chiamare l’assistenza
tecnica di Atlantis.
La durata delle
batterie non è
soddisfacente.
1. Le batterie non sono
completamente cariche.
2. Le batterie sono vicine al
termine del loro ciclo di
vita.
1. Ricaricare l’UPS per 10
ore.
2. Rimpiazzare le batterie
(come da punto 1.10).
L’UPS funziona
normalmente ma
1. Controllare la messa a
terra o provare ad
1. Chiamare un elettricista e
fare controllare l’impianto

ITA
16
continua ad emettere
una se
g
nalazione
sonora continua.
invertire il verso della
presa elettrica.
elettrico.
Q
uando la rete è
assente o fuori
finestra di
funzionamento
tollerata il carico si
spegne.
1. Controllare che il carico
non abbia un PFC attivo.
1. Tale tipolo
g
ia di UPS non
è adatto a questo carico
(verificare che l’UPS
funzioni facendo il test
con ad esempio un
monitor LCD), si consi
g
lia
di cambiare UPS con uno
a tipologia sinusoidale.
Q
uando la rete è
assente o fuori
finestra di
funzionamento
tollerata il carico e
l’UPS si spengono.
1. Controllare che il carico
non abbia un PFC attivo.
1. L’UPS va in protezione per
evitare di
g
uastarsi a
causa della tipologia di
carico colle
g
ato (PFC
Attivo). Potrebbe essere
necessario un UPS di
ma
gg
iore potenza e/o di
tipolo
g
ia differente
(Sinusoidale).
A.1.2 Batterie e ICS
Domanda Risposta
Cos’è il Backup
time?
È
la durata cui l’UPS può mantenere attivo il carico ad esso
colle
g
ato prima che le batterie siano completamente
scariche. Tale durata, ovviamente, dipende dal tipo di carico.
Controllare nella sezione alle fine del manuale.
Che tipo di batterie
sono incluse
nell’UPS?
12V/5.6Ah Hi
g
h Density
O
g
ni quanto vanno
cambiate? Dipende dal tipo di utilizzo.
È
buona norma testare
periodicamente l’UPS per controllare lo stato di
deterioramento delle batterie.
Si raccomanda di sostituire le batterie una volta all’anno.

ITA
17
Dove posso trovare
le batterie per la
sostituzione?
1. In un qualunque ne
g
ozio specializzato.
2. Chiederle direttamente all’assistenza tecnica di Atlantis:
indicare 1 batteria da 12V/5.6Ah High Density
ICS? Sistema di protezioni contro le sovracorrenti in in
g
resso. Per
proteggere l’ups il sistema interrompe il circuito (come un
fusibile). Per ripristinare il circuito premere il bottone rosso.
Le Batterie
consentono una
durata non in linea
con quanto
riportato nella
tabella (Backup
Time).
1. Le condizioni ambientali possono alterare sensibilmente
tali valori.
2. Andrebbero effettuati almeno 5 cicli di carica/scarica
prima di arrivare ad un uso ottimale.
3. L’UPS inte
g
ra un circuito di controllo che evita di scaricare
completamente la batteria.
4. Dopo un anno prendere in considerazione l’idea di
sostituire le batterie prossime all’esaurimento.
A.1.3 Varie
Domanda Risposta
Il Volta
gg
io
misurato all’uscita
dell’UPS (in
modalità Inverter) è
errato.
Cambiare il multimetro con cui si effettua la rilevazione con
un multimetro adeguato (True RMS). Solo questi ultimi
possono leggere in maniera corretta un’uscita stepwave.
A.1.4 Supporto Offerto
Per qualunque altro problema o dubbio sul funzionamento del prodotto, è possibile
contattare telefonicamente il Supporto Tecnico di Atlantis al numero 02 -
93.55.00.66, dalle 14:30 alle 18:00, dal lunedì al venerdì. Per esporre eventuali
richieste di supporto prevendita o richieste di contatto, si invita ad utilizzare gli
indirizzi mail [email protected] oppure prevendite@atlantis-land.com.
Atlantis
Fax: +39.02.84.16.00.19, Website: http://www.atlantis-land.com,
Email: [email protected]

ENG
18
Copyright
The Atlantis logo is a registered trademark of Atlantis. All other names mentioned
may be trademarks or registered trademarks of their respective owners. Subject to
change without notice. No liability for technical errors and/or omissions.
IMPORTANT SAFETY INSTRUCTIONS
This manual contains important safety instructions. Please follow all instructions
carefully during installation. Read this manual thoroughly before attempting to
unpack, install or operate.
Caution: Any changes or modifications to the equipment not expressly approved by
the party responsible for compliance could void the user’s authority to operate the
equipment.
Shielded interface cables and AC power cords, if any, must be used in order to comply
with the emission limits.
Caution: To prevent the risk of fire or electric shock, install in a temperature and
humidity controlled indoor area, free of conductive contaminants.
Caution: Risk of electric shock, do not remove the cover. No user serviceable parts.
The UPS system operates with hazardous voltages. Repairs may be carried out only
by qualified maintenance personnel.
Caution: Connect the UPS system only to an earthed shockproof outlet which must
be easily accessible and close to the UPS system.
Caution: Risk of electric shock, hazardous live parts inside this UPS can be energized
from the battery supply even when the input AC power is disconnected.
Caution: Risk of electric shock, Battery Circuit is not isolated from AC input,
hazardous voltage may exist between battery terminals and ground. Test before
touching.
Caution: Do not install the UPS system near water or in moist environments.
Caution: Do not install the UPS system where it would be exposed to direct sunlight
or near heater.
Caution: Do not block ventilation holes in the UPS housing.
Caution: The UPS is designed to be for use with computer loads only. Do not connect
a laser printer to the outlets. Do not connect domestic appliances such as hair dryers
to UPS output sockets.
Caution: Please use only CE-marked mains cable (e.g. the mains cable of your
computer) to connect the UPS system to the building wiring outlet (shockproof
outlet).
Caution: Please use only CE-marked power cables to connect the loads to the UPS
system.
Caution: Prevent no fluids or other foreign objects from inside of the UPS system.

ENG
19
Caution: In a domestic environment, this product may cause radio interference, in
which case the user may be required to take adequate measures.
Caution: Do not try to repair the unit yourself, contact your local supplier or your
warranty will be void.
Caution: Before carrying out any kind of service and/or maintenance, disconnect the
batteries and verify that no current is present and no hazardous voltage exists in the
terminals of high capability capacitor such as BUS-capacitors.
Caution: Place cables in such a way that no one can step on or trip over them.
Caution: Do not disconnect the mains cable on the UPS system or the building wiring
outlet (shockproof socket outlet) during operations since this would cancel the
protective earthing of the UPS system and of all connected loads.
Transportation
Please transport the UPS system only in the original package to protect against shock
and impact.
Preparation
Condensation may occur if the UPS system is moved directly from cold to warm
environment. The UPS system must be absolutely dry before being installed. Please
allow at least four (5) hours for the UPS system to acclimate the environment.

ENG
20
Manual
Congratulations on your purchase of Atlantis UPS. This manual discusses how to
install and use the UPS.
1.1 Important Safety Instructions
This manual contains important safety instructions. Please follow all instructions
carefully during installation. Read this manual thoroughly before attempting to
unpack, install or operate.
1.2 Inspection
Inspect the UPS upon receipt. Notify the carrier and dealer if there is damage. The
package is recyclable; save it for reuse or dispose of it properly.
1.3 Package Contents
Make sure that you have the following items :
OnePower UPS.
Manual.
Warranty.
If any of the above items are missing, please contact your reseller.
1.4 Placement
To prevent the risk of fire or electric shock, install in a temperature and humidity
controlled indoor area, free of conductive contaminants.
This UPS system is designed for indoor use only.
Do not install the UPS under direct sunlight. Your warranty will be void if the
batteries fail due to overheating.
Install in a temperature and humidity controlled indoor area
To eliminate any overheating of the UPS, keep all ventilation openings free from
obstruction and do not place any foreign objects on top of the UPS. Keep the UPS
15 cm away from the wall.

ENG
21
1.5 Connect the loads
First, plug the loads into the output connectors on the rear of the UPS then connect
the UPS with the AC Mains. To use the UPS as a master “On/Off” switch, make sure
that all of the loads are switch “On”.
Do not connect a laser printer to the outlets. These UPS
outlets provide battery power and surge protection to the
equipment when utility voltage is outside acceptable
limits.
Connect to Utility and Char
g
in
g
Plug in the AC input cord to the wall outlet. For the best
results, suggest to charge the battery at least 10 hours
before initial use. The unit charges its battery while
connecting to the utility.

ENG
22
1.6 Operation Test
Connect your computer equipment with sockets of the UPS, then connect the UPS
to the wall receptacle.
Press the UPS On/OFF [ ] Switch for approx. 3 seconds, then the Buzzer sounds
twice, the UPS will be start-up.
[Battery Test]: Pull off the input power cable of the UPS from the wall receptacle.
Meanwhile, please check if alarm buzzer is beeping (every 30 seconds).
Try the field working condition by running some application programs on your
computer and repeating step.
Check if the UPS is initiated properly to support continuous operation (for devices
connected to Surge & Backup outles).
Your new UPS may be used immediately upon receipt.
However, recharging the battery for at least 8/10 hours is
recommended to ensure that the battery's maximum charge
capacity is achieved. Charge loss may occur during shipping
and storage. To recharge the battery, simply leave the unit
plugged into an AC outlet. The unit will charge in both the on
and off position.
1.7 Front Panel Explanations
On the front panel You can found 1 LED for an easy diagnostic.
A
coustic Alarm Battery Mode (buzzer alarms every 30 seconds).
UPS is in battery low condition (buzzer alarms every 2
seconds).
OverLoad (buzzer alarms twice in a second).
Fault (buzzer alarms continuously).

ENG
23
LED Information
Main Switch [
] Press the UPS On/OFF [ ] Switch for approx. 2/3
seconds, then the Buzzer sounds twice/3 times, the UPS
will be start-up/Switch OFF. The power on indicator light
will illuminate (blue).
To enable “DC-Start” Function when Utility fails. (To
enable DC Start properly, you are recommended to
connect <80% output load with the UPS only). P.S. Make
sure the computer connected to the UPS is switched on
before enable the "DC-Start" function. You are not
recommended to add some other computer or
peripherals after DC-Start function is activated.
1.8 Rear Panel Explanations
Numbe
r Explanations
1 AC cable.
2 ICS.
3 Backup Outlets:
3 Schuko (Surge)
3 Schuko (Surge & Backup) for critical load.

ENG
24
1.9 Replacing the Battery
The Following Precautions Should be Observed When Working on Batteries:
Remove watches, rings, or other metal objects.
Use tools with insulated handles.
Wear rubber gloves and boots.
Do not lay tools or metal parts on top of batteries.
Disconnect charging source prior to connecting or disconnecting battery terminals.
Before beginning the replacing of the battery You have to switch-off all the device
and detach AC cable from the wall receptacle.
Use a cross-type screwdriver to remove the two top cover screws and slide back
the cover.
Gently Pull the battery out of the UPS.
Loosen the black wire from the negative terminal and red wire from the positive
terminal.
Connect the battery leads to the new battery (small sparks at the battery
connectors are normal during connection).
Slide the battery into the UPS.
Close the top cover and fasten two screws then front panel and fasten two screws.
Dispose of the old battery properly at an appropriate recycling facility.
Once the battery is disconnected, the loads are not
protected from power outages.
Dispose of the old battery properly at an appropriate
recycling facility.
Do not dispose of batteries in a fire. The battery may
explode. Do not open or mutilate the battery or batteries.
Released electrolyte is harmful to the skin and eyes.
When replacin
g
the batteries, use the same number and
type of batteries. Internal battery voltage is 12Vdc.
Sealed, lead-acid, 6-cell battery.
Servicing of batteries should be performed or supervised
by personnel knowledgeable of batteries and the required
precautions. Keep unauthorized personnel away from
batteries.

ENG
25
APPENDIX A: TROUBLE SHOOTING & SUPPORT
If the UPS is not functioning properly, you can refer first to this chapter for simple
troubleshooting before contacting your reseller. This could save you time and effort
but if the problem persist, then consult your service provider.
A.1.1 UPS
The LED and the acoustic signals are a profit tool to individualize immediately possible
problems
Situation Check Items Solution
Mains normal but LED is
off.
1. Is the power switch on?
2. Check the ICS?
3. Is the power cord loose?
1. Press Main Switch
on.
2. Push the ICS button.
3. Re-connect the
power cord properly.
A
larm buzzer beeps
continuously when
Utility is normal.
1. Check the load status 1. Remove some
uncritical load.
No LED display on the
front panel
1. Contact Atlantis.
UPS does not provide
expected backup time.
1. The UPS’s battery is weak
due to recent outage.
2. The UPS’s battery is near
the end of its service life.
1. Char
g
e the battery.
2. If the battery is near
the end of its service
life, you have to
replace the battery.
The UPS operates
normally, but the site
wiring fault indicator is
lit.
1. Buildin
g
wirin
g
error such
as missin
g
g
round or hot to
neutral wire reversal.
1. Call a qualified
electrician in order to
correct the buildin
g
wiring.
A.1.2 Battery and ICS
Situation Solution
Backup time The battery backup time (sometime called battery reserve
time or battery autonomy) is the len
g
th of time the battery

ENG
26
will supply power to the load durin
g
a power failure. You can
check on the Appendix Backup Time.
Wich type of battery
does UPS use?
12V/5.6Ah High Density
How often do I have
to change battery? Atlantis recommends to replace the batteries once a year.
Where can I find
batteries? 1. please contact Your reseller.
2. please contact directly Atlantis.
How can I check the
ICS? The circuit breaker provides optimal overload protection. If
an overload is detected, an audible alarm will sound and the
unit will emit one long beep. To correct this, turn the UPS off
and unplug at least one piece of equipment from the battery
power supplied outlets. Wait 10 seconds. Make sure the
circuit breaker is normal and then turns the UPS on.
A.1.3 Support
For technical questions and support, please contact our help-desk by ticket on
http://www.atlantis-land.com/ita/supporto.php. For generic informations, please
send an e-mail to [email protected]. For presales informations, please send an
e-mail to prevendite@atlantis-land.com.
Atlantis
Fax: +39.02.84.16.00.19
Website: http://www.atlantis-land.com
Email: [email protected]

FRA
27
Copyright
Tout droits réservés. Sont interdites, la reproduction, la transmission, la transcription,
la mémorisation dans un système de sauvegarde où la traduction dans une autre
langue ou en langage informatique quels qu’ils soient, de la présente publication,
sous quelque forme que ce soit ou quelque en soit le moyen, électronique,
mécanique, magnétique, optique, chimique, manuel ou de tout autre genre, sans
avoir obtenu préalablement l’autorisation de notre entreprise.
Non-responsabilité
La présente entreprise n’admet pas de requêtes ni de garantie, explicites ou
implicites, au sujet du contenu et de manière spécifique exclue la possibilité de
garantie, communicabilité ou adaptabilité pour des finalités particulières. Le logiciel
décrit dans le présent manuel est vendu ou concédé en licence “tel quel”. Si les
programmes devaient présenter des problèmes après l’achat, l’acquéreur (et non pas
la présente entreprise, son distributeur ou concessionnaire) est tenu de prendre en
charge tous les coûts de manutention ainsi que les coûts dus à des dommages
accidentels ou des conséquences dérivants d’un défaut du logiciel. La présente
entreprise se réserve en outre le droit de revoir le contenu de cette publication et d’y
apporter des modifications de temps en temps, sans obligation d’informer les
utilisateurs de ces changements. Nous avons fait tout notre possible afin d’éviter la
présence d’erreurs dans le texte, les images, les tableaux présents dans ce manuel
et dans le Cd-Rom. Cependant, nous ne pouvons pas garantir l’absence totale
d’erreurs et/ou d’omissions, nous vous remercions donc de nous les signaler et vous
prions de nous en excuser. Enfin, nous ne pouvons être tenus pour responsables dans
quelque perte que ce soit, dommage ou incompréhension à la suite directe ou
indirecte de l’utilisation de notre manuel, le logiciel Cd-Rom et/ou disque dur. Toutes
les marques ou noms de produits mentionnés dans le présent manuel sont des
marques commerciales et/ou brevetées par leurs propriétaires respectifs.

FRA
28
ATTENTION
Ce manuel contient des informations importantes à propos de la sécurité. Suivez
attentivement les instructions pendant l’installation. Lisez les instructions avant de
déballer, installer et mettre en fonction cet appareil.
Pour prévenir les risques de feu ou de choc électrique, installez dans une pièce dont
la température et l’humidité sont contrôlées.
Risque de choc électrique: N'enlevez pas le capot. Ne toucher pas le produit
lorsqu’il est sous tension. Ne soumettez l'entretien qu’à du personnel qualifié. Les
parties actives à l'intérieur de cet UPS peuvent être à de fortes tensions même lorsque
l’alimentation secteur est déconnectée. Le Circuit de la Batterie n'est pas isolé de
l’entrée secteur, une tension dangereuse peut être présente entre les bornes de la
batterie et la terre. Testez avant de toucher.
Attention : Pour garantir l’intégrité et le fonctionnement correct du produit, ne
jamais brancher sur la sortie de l’ UPS des photocopieuses, imprimantes laser, outils
électriques ou une quelconque charge inductive. L'UPS n’est conçu que pour
fonctionner avec un ordinateur.
Attention: Dans l’ UPS est installé une batterie d’accumulateurs qui est une source
d’énergie (à l’intérieur de l’UPS il y a des tensions dangereuses qui sont présentes
même éteint).
Attention: N’ouvrez jamais l’UPS pour le réparer, en agissant de cette façon vous
risquez une décharge électrique et vous n’aurez plus droit à la garantie. L’UPS peut
être réparé uniquement par du personnel qualifié.
Attention: Cet appareil peut causer des interférences radio, dans ce cas nous vous
invitons à prendre les contre-mesures appropriées.
Attention: La principale précaution à observer est d’éteindre l’UPS s’il n’est pas
alimenté par le secteur, pour éviter le déchargement total des batteries (situations
de black-out prolongées).
La garantie de la batterie est d’un (1) an à partir de la date d’achat.
En cas de remplacement de la batterie, il faut suivre ces précautions:
• ne porter ni montre, ni bague ou n’importe quel objet métallique;
• tenir les outils avec du matériel isolant;
• porter gants en gomme et bottes;
• ne pas toucher la batterie avec un objet en métal;
A la sortie de l’UPS il peut y avoir une tension de 220V même lorsqu’il n’est pas
connecté au réseau électrique. Ne jamais ouvrir le couvercle.
Ne jamais introduire de liquide à l’intérieur de la machine.

FRA
29
Manuel Utilisateur
Ce manuel a été rédigé pour une utilisation avancée du UPS pour cette raison y sont
abordés des sujets qui peuvent rebuter certains utilisateurs.
1.1 Introduction
Ce manuel contient d’importantes informations de sécurité. Suivez attentivement les
instructions pendant l’installation. Nous vous prions de lire attentivement ce manuel
avant l’installation et la mise en service de votre onduleur Atlantis, en vous rappelant
que la garantie n’est plus valable si toutes les normes et les prescriptions indiquées
dans ce manuel ne sont pas respectées.
1.2 Vérification
Vérifiez l’UPS dès sa livraison. Prévenez le transporteur ou le vendeur en cas de
dommages. L’emballage est recyclable.
1.3 Dans la boîte
Une fois ouverte, vous devriez trouver les éléments suivants:
OnePower UPS.
Manuel.
Coupon de Garantie.
Si vous constatez qu’un de ces composants manque, merci de vous adressez à votre
revendeur.

FRA
30
1.4 Mise en place
Pour prévenir les risques de feu ou de choc électrique, installez dans une pièce dont
la température et l’humidité sont contrôlées.
Cet UPS ne doit être utilisé qu’à l’intérieur.
Ne pas l’installer à un endroit directement exposé au soleil, la garantie serait
annulée en cas de surchauffe de la batterie.
Afin d’éliminer les surchauffes, n’obstruez aucune ouie de ventilation, ne posez
aucun objet sur l’UPS et laissez une quinzaine de cms de distance avec le mur.
Attention, Vous ne pouvez pas mettre d'onduleur pour protéger une imprimante laser.
Attention, Vous ne pouvez pas mettre d'onduleur pour
protéger une imprimante laser.

FRA
31
1.5 Reliez les charges
Branchez en premier les appareils à l’UPS, puis connectez l’UPS au secteur. Pour
utiliser l’UPS comme interrupteur “On/Off”, veillez à mettre sur “On” tous les
appareils.
Pour
g
arantir l’inté
g
rité et le fonctionnement correct, ne
jamais brancher à la sortie de l’UPS des photocopieuses,
imprimantes laser, outils électriques ou une quelconque
charge inductive. L'UPS n’est conçu que pour fonctionner
avec un ordinateur.
1.6 Opérations de Test
Branchez en premier les appareils à l’UPS, puis connectez l’UPS au secteur.
Appuyez sur le bouton M/A [ ] pour 3 secondes pour allumer/désactiver
l'onduleur.
[Optionnel] Débranchez l’UPS du secteur. Contrôler que l’alarme émet un signal
sonore (chaque 30 secondes).
Vérifiez le bon fonctionnement en utilisant normalement votre ordinateur.
Vérifiez que votre UPS est bien initialisé pour supporter un fonctionnement continu
(pour les appareils connectés sur les prises Surge & Backup).
Avant tout usa
g
e, il faut char
g
er l’UPS pendant au moins
10 heures.

FRA
32
1.7 Facade
Sur la facade du produit il y a 1 LED bleu pour indiquer l'état de fonctionnement.
LED Si
g
nification
Bouton M/A [] Appuyez sur le bouton M/A [ ] pour 3 secondes
pour allumer/désactiver l'onduleur.
Pour démarrer le mode Secours (DC-Start).
(Attention, il est recommandé de ne pas dépassé une
charge d’environ 80%)
P.S. Il faut s’assurer que le Pc est en fonction avant
de mettre le mode secours (DC-Start), de plus une
fois le mode Secours activé, il ne faut pas brancher de
nouveau périphérique.
A
LARME
A
coustique Mode secours (alarme sonore toutes les 30 secondes).
La batterie est faible (alarme sonore toutes les 2
secondes).
Condition de surchar
g
e (alarme sonore 2 fois pour
seconde).
Panne (alarme sonore continu).
1.8 Face arrière
Numéro Utilisation
1 Alimentation secteur (cable schuko).

FRA
33
2 Prise sortie Secours: 3 Schuko (Sur
g
e & Backup)
Prise sortie Protection surtensions: 3 Schuko (Surge)
1.9 Changement de Batterie
En cas de remplacement de la batterie, il faut suivre ces précautions:
ne porter ni montre, ni bague ou n’importe quel objet métallique;
tenir les outils avec du matériel isolant;
porter gants en gomme et bottes;
ne pas toucher la batterie avec un objet en métal;
A la sortie de l’UPS il peut y avoir une tension de 220V même lorsqu’il n’est pas
connecté au réseau électrique.
Debranchez tous les cables reliés à l’UPS. Avec un tournevis cruciforme retirez les
2 vis du dessus glisser le capot.
Tirez doucement la batterie vers l’extérieur.
Déconnectez le câble noir, puis le câble rouge des bornes.
Connectez les cables à la nouvelle batterie (de petites étincelles peuvent se
produire aux bornes de la batterie).
Glissez la batterie dans l’UPS
Repositionnez les panneaux puis les vis.
Jetez la vieille batterie dans un endroit approprié (pollution).
Une fois la batterie déconnectée, la charge n’est plus
protégée en cas de coupure de l’alimentation électrique.
Jetez la vieille batterie dans un endroit approprié
(pollution).

FRA
34
APPENDICE A: Problèmes
Lorsque l’onduleur ne fonctionne pas correctement, avant de vous adressez au
service après vente, consultez ce chapitre.
A.1.1 Problèmes
Les LEDs et les signaux sonores sont des indicateurs utiles pour déterminer
d’éventuels problèmes, en observant l'état et/ou en écoutant les beep il est possible
de déterminer rapidement un éventuel mauvais fonctionnement.
Situation Verification Solution
Secteur normal mais la
Ligne LED est éteinte.
1. Bouton M/A sur Marche?
2. Controlez le ICS!
3. Câble secteur déconnecté?
1. Pressez le bouton
M/A.
2. Pressez le ICS.
3. Reconnectez le câble.
A
larme sonore continue
en utilisation normale.
1. Trop de char
g
e! 1. Retirez des char
g
es
peu importantes.
A
ucune LED allumée en
face avant.
1. Consultez la Hot-Line
L’UPS n’assure plus un
temps de sauve
g
arde
normal.
1. La batterie vient d’être
déchargée.
2. La batterie est en fin de vie.
1. Char
g
ez la batterie.
2. Remplacez la
batterie.
L’UPS fonctionne
normalement mais
l’indicateur de témoin de
réseau est allumé.
1. Erreur de câbla
g
e de la prise
murale (Terre non
connectée, phase sur
neutre, etc..).
1. Un électricien qualifié
doit contrôler et
réparer l’anomalie.
A.1.2 Batterie et ICS
Q
uestion Solution
Durée du secours
(backup time) Durée pendant laquelle l'UPS peut maintenir le bon
focntionnement de la char
g
e avant le déchar
g
ement complet de

FRA
35
la batterie. Cette durée dépend évidemment du type de char
g
e.
Voir la section à la fin du manuel pour de plus amples détails.
Type de batterie
utilisée dans l'UPS
12V/5.6Ah High Density
Durée de vie de la
batterie Dépendante de l’utilisation, une bonne rè
g
le consiste à tester
périodiquement l'état de détérioration de la batterie.
Il est recommandé de la remplacer une fois par an.
Où trouver la
batterie? 1. n'importe quel ma
g
asin spécialisé.
2. vous pouvez aussi contacter votre distributeur.
Comment vérifier le
ICS? Pressez le ICS. Retirez des char
g
es peu importantes. Attendez
10 secondes. Pressez le bouton M/A
A.1.3 Support
Pour tous problèmes ou renseignements vous pouvez contacter le service d’assistence
web d’Atlantis http://www.atlantis-land.com/ita/supporto.php.
Pour avoir des info vous pouvez contacter [email protected] ou
prevendite@atlantis-land.com.
Atlantis
Fax: +39.02.84.16.00.19
Website: http://www.atlantis-land.com
Email: [email protected]

ESP
36
ADVERTENCIA
Hemos hecho todo lo posible para evitar que en el texto, las imagines y tablas
presentes en este manual, así como en el software y hardware no hubiesen errores.
De todos modos no podemos garantizar que no hayan errores y/o omisiones. En fin,
no podemos ser responsables de perdida, daño o incomprensión cometidos
directamente o indirectamente, como resulta del utilizo del manual, software y/o
hardware.
El contenido de este manual es exclusivamente para uso informal, puede ser
cambiado sin aviso (Por lo tanto se invita a consultar el sitio www.atlantisland.it o
www.atlantis-land.com para consultar las actualizaciones) no debe ser interpretado
como un compromiso de parte de Atlantis que no se asume la responsabilidad de
algún error o inexactitud que se pueda encontrar en este manual. Ninguna parte de
esta publicación puede ser reproducida o transmitida de otra manera o a través de
otros medios, electrónicamente o mecánicamente, incluso fotocopia, reproducción, o
registración en un sistemas de rescate, o traducido en otro idioma o en otra forma
sin un permiso expreso por escrito de parte de Atlantis. Todos los nombres de
productores y cualquier marca registrada o meno, mencionados en este manual son
usados con el único objetivo identificativo y permanecen propiedad exclusiva de sus
respectivos propietarios.
Atención!
Este aparato puede ser instalado por cualquier persona, después de leer atentamente
este manual. La garantía caduca si no se respeta todas las normas e informaciones
indicadas en este manual operativo.
La SAI “sistema de alimentación ininterrumpida” (UPS) puede ser reparado solo por
un personal calificado.
La garantía de la batería es de 1 año a partir de la fecha de comprado.
Si viene sustituida la batería seguir las siguientes precauciones:
No usar reloj, anillo u objeto de metal;
Usar herramientas con material aislante;
Usar guantes de goma y botas;
No apoyar herramientas o partes de metal sobre la batería;
No intentar abrir las baterías: no requieren mantenimiento (El liquido electrólito
contenido es extremadamente peligroso para la piel , los ojos, y puede resultar
toxico)
No tirar la batería al fuego;
En la salida del SAI(UPS) puede haber una tensión de 220V aunque cuando este
desconectado del tomacorriente. No abrir nunca la tapa.

ESP
37
Las baterías sustituidas son consideradas como RESIDUOS TÓXICOS van tratadas
en consecuencia.
No introducir nunca ningún liquido en el interior de la dispositivo (SAI).
Atención: Para garantizar la integridad y la correcta función del Sistema de
Alimentación Ininterrumpida, no conecte nunca en la salida del SAI una
fotocopiadora, impresora laser, utensilios eléctricos o cualquier otro tipo de carga
inductiva. Este producto ha sido proyectado para conectar exclusivamente
un ordenador. Si no se respetan estas indicaciones comportará el caducar de la
garantía.
Atención: El tomacorriente al cual el SAI(UPS) está conectado debe tener toma de
tierra.
Atención: Con el fin de evitar incendio o descargas eléctricas, disponer el aparato
en ambiente interno (indoor) con temperatura y humedad controlada, sin agentes
conductores de cualquier tipo.
Atención: La principal precaución a tener en cuenta es apagar el SAI(UPS) si, por
pausas laborales o festivas, se desconecta la red de alimentación principal, para evitar
la descarga total de la batería (situación de Back-out prolongado). Dejar cargar el
SAI(UPS) por al menos 8 horas, cada 3 meses, en el caso esté desconectado de la
red eléctrica (condiciones ambientales no estándar pueden acelerar la descarga de la
batería).
Atención: No remover los paneles externos para evitar el riesgo de descargas
eléctricas. Para cualquier duda o inquietud consulte un técnico cualificado.
Atención: En el SAI(UPS) hay instalada una batería de acumuladores que es fuente
de energía, por lo que al interno del SAI(UPS) hay tensiones peligrosas aunque
cuando esté apagado y/o desconectado de la red eléctrica.
Atención: No conectar al SAI(UPS) una carga que absorba en Watt mas del 85% del
valor máximo soportado.
Atención: El dispositivo contiene baterías y por tanto en la salida del SAI(UPS) puede
haber una tensión de 220V aunque cuando el sistema esté desconectado de la red
y/o esté ausente. Todas las reparaciones deben ser efectuadas exclusivamente por
técnicos autorizados.
Atención: El SAI(UPS) genera una corriente de dispersión. Es oportuno verificar que
la suma de la corriente de dispersión a tierra del SAI(UPS) y de la carga conectada
sea inferior a 30mA. Si así no es, sería oportuno cambiar el interruptor diferencial.
Atención: En un ambiente domestico el dispositivo puede causar interferencia radio,
en este caso es oportuno tomar las medidas adecuadas.
Atención: Atlantis no se hace responsable por daños causados a productos de
terceros atribuibles al utilizo, a la instalación en ambientes no a prueba de fuego o
no idóneos, a la ruptura o al malfuncionamiento de productos Atlantis.

ESP
38
Restricciones de responsabilidad
El software de control, si está presente, es dado en licencia. Atlantis no ofrece suporte
sobre el utilizo ni podrá ser considerada responsable por el malfuncionamiento y/o
perdida de datos causados por este. El software ha sido probado solo en ambiente
Windows (Algún soporte para Linux/MAC OS X, aunque soportados, será
proporcionado).
Este aparato podría no ser adapto a aparatos con PFC
activo (Corrector del factor de potencia activo).
Verificar anteriormente el tipo de alimentador montado
en el PC/Servidor.
Todas las condiciones de utilizo y cláusulas contenidas
en este manual y en la garantía se suponen leídas y
aceptadas. Por favor devuelva inmediatamente (dentro
de los 7 días de la compra) el producto en el caso este
no sea aceptado.
Para aprovechar condiciones de
g
arantía
mejores asociadas al producto (Fast Swap, On
Site On Center) es oportuno registrarlo en el
sitio www.atlantis-land.com antes y no después
de 15 días de la fecha de comprado. Si no se
registra dentro del plazo establecido
anteriormente hará que el producto este
cubierto exclusivamente por las condiciones
estándares de garantía.

ESP
39
Manual de Uso
Le damos las gracias por haber escogido un dispositivo Atlantis. Se aconseja que lea
este documento con el fin de un correcto uso del producto.
1.1 Introducción del producto
Siga atentamente todas las instrucciones durante la instalación. Leer atentamente
todo el manual antes de instalar el dispositivo.
1.2 Prueba inicial
Controlar inmediatamente el dispositivo. Dirigirse al vendedor si el dispositivo esta
dañado. La caja de cartón es en material reciclable y debe ser conservada y utilizada
para proteger el producto durante eventuales envíos. En el caso que el producto sea
devuelto en una caja no original o claramente no adapta y/o completa, el material
viaja con riesgos y peligros a cargos del Consumidor.
1.3 Contenidos de la caja
Una vez abierta la caja de cartón debería encontrar los siguientes componentes:
OnePower SAI(UPS).
Manual de instalación multilenguaje.
Certificado de garantía.
En caso que falte uno de estos componentes dirigirse inmediatamente al vendedor.
1.4 Colocación
Con el fin de evitar riesgos de incendio y descargas eléctricas, disponer el aparato
exclusivamente en ambiente interior (indoor) con temperatura y humedad
controladas y sin agentes conductores de cualquier tipo. Se recuerda además que:
El SAI(UPS) se puede usar exclusivamente en ambientes cerrados (indoor).
Debe ser colocado lejos de fuentes de calor.
No debe ser expuesto directamente a los rayos solares.
Debe ser colocado en un ambiente con humedad controlada.
Es oportuno dejar al menos 20cm de espacio desde las rejillas para consentir una
oportuna ventilación.

ESP
40
No se debe colocar en ambientes inflamables (va puesto lejos de la madera,
parquet y superficies símiles).
Asegurarse que el cable de alimentación no este escachado por el SAI(UPS) o por
otros objetos pesados.
El cables que conecta la carga al SAI(UPS) no debe superar los 10 metros de largo
Después de la puesta en marcha inicial, de
j
ar alimentar
el dispositivo mínimo por 10 horas (Conectado solo a la
red eléctrica), de modo que las baterías puedan cargarse
completamente. El SAI (UPS) carga las baterías cuando
esta conectado a la red eléctrica.

ESP
41
1.5 Conexión de la carga
En primer lugar conectar la carga en las salidas situadas en la parte posterior del
UPS(SAI). Sucesivamente conectar el cable de alimentación a la toma de entrada
situada en la parte posterior del UPS(SAI) e introducir el enchufe en la red. Hay
tomas IEC/Shucko disponibles en modalidad Backup (en caso de apagón (black-out)
son alimentadas). Encender el UPS(SAI) después que todas las cargas hayan sido
encendidas.
3 tomas Shuko (Surge & Backup)
3 tomas Shuko (Surge)
Para
g
arantizar la inte
g
ridad y el correcto funcionamiento
del grupo de continuidad, no conectar nunca en la salida
del UPS(SAI) fotocopiadoras, impresoras laser, utensilios
eléctricos o cualquier otro tipo de carga inductiva.
1.6 Prueba de funcionamiento
Una vez conectada la carga al UPS(SAI) es posible conectar el UPS(SAI) a la red
eléctrica.
Para encender el UPS(SAI) pulsar el botón [ ] por 3 segundos hasta que el
dispositivo no emita 2 beep acústicos.
Una vez conectada la carga al UPS(SAI) es posible efectuar un test del correcto
funcionamiento. A esta fin quitar el cable que conecta el UPS(SAI) a la red eléctrica.
El UPS(SAI) emitirá un beep acústico (cada 30 segundos).
La intervención del UPS(SAI) permite que el ordenador tenga una continuidad
eléctrica (Surge & Backup).
Cuando el UPS(SAI) es conectado a la red eléctrica,
aunque no esté encendido, es capaz de recargar la
batería y por lo tanto está en funcionamiento, aunque sea
en un estado de bajo consumo. Si el UPS(SAI) no está
encendido en la salida no hay voltaje.
En este estado, en los modelos LCD la iluminación de las
pantallas es extremamente baja (el extractor de calor

ESP
42
(ventilador) si
g
ue siendo activo), en los modelos LED está
apagado.
1.7 Panel frontal
En función del modelo, en el panel frontal hay 1 Led.
LED Información
Main Switch
[ ]
Para encender/apa
g
ar el UPS(SAI) cuando la red eléctrica
esta presente.
Para encender el UPS(SAI) en el caso falte la red eléctrica
y alimentar directamente la carga. Esta función “DC-
Start” requiere que la carga conectada sea inferior al
80% de la carga máxima (es importante encender antes
todos los dispositivos y por último el UPS(SAI). De hecho
la carga se debe permanecer constante).
Para encender/apagar el UPS(SAI) pulsar el botón por 2
segundos aproximadamente hasta que el dispositivo no
emita 2/3 beep sonoros.
A
larma acústica En modalidad batería (señal acústico cada 30
segundos).
Batería casi a
g
otada (señal acústico cada 2
segundos).
Sobrecar
g
a (OverLoad)(señal acústico cada 0,5
segundos).
A
LLARMI VISIVO Señal acústico continuo (problemas en el
dispositivo).

ESP
43
1.8 Los puertos posteriores
Identificación Utilización
1 Cable de entrada de la red eléctrica.
2 ICS.
3 Tomas IEC de bac
k
-up. Conectar a estas tomas los aparatos que
deben ser alimentados por la batería en caso de black-out u
otras anomalías de la red eléctrica (Surge & Backup).
1.9 Sustitución de las baterías
La batería del SAI(UPS) tiene un año de garantía.
En caso que venga sustituida la batería seguir las siguientes precauciones:
No usar reloj, anillos u objetos de metal.
Usar herramientas con material aislante.
Usar guantes de goma y botas.
No apoyar herramientas o partes de metal sobre la batería
En la salida del SAI(UPS) puede haber una tensión de 220V aunque el grupo este
desconectado de la corriente
Antes de iniciar la sustitución de la batería es oportuno apagar el
SAI(UPS) y desconectarlo de la toma de corriente.
Utilizar un destornillador para remover los 2 tornillos en la base del dispositivo y
deslizar delicadamente el panel superior.
Tire del pestillo que bloquea la batería.
Desconectar el cable de color negro (negativo) y después el de color rojo (positivo).
Deslizar delicadamente la batería.

ESP
44
Conectar los cables a la nueva batería (es normal observar chispas en los
conectores de la batería).
Empuje delicadamente la batería dentro del UPS(SAI).
Posicionar el pestillo que bloquea la batería.
Posicionar el panel superior empujándolo desde el alto hacia abajo y en fin atornillar
los 2 tornillos.
Poner la batería sustituida en un lugar apropiado.
Las baterías sustituidas son consideradas como RESIDUOS
TÓXICOS van tratadas en consecuencia.

ESP
45
APENDICE A: Solución de problemas y soporte
Este capitulo muestra como identificar y resolver eventuales problemas que podría
encontrar con el utilizo del dispositivo.
A.1.1 Problemas del UPS(SAI)
Los LEDs y las señales acústicas son un útil instrumento para individuar eventuales
problemas, observando el estado y/o escuchando el tipo de beep es posible individuar
rápidamente un mal funcionamiento.
Situación Control Solución
La alimentación
eléctrica está presente
pero el LED no está
encendido.
1. Ase
g
urarse que el
UPS(SAI) esté encendido
(pulsar el botón Main
Switch).
2. Controlar el cable de
alimentación.
1. Encender el
UPS(SAI)
pulsando el botón
Main Switch.
2. Cambiar el cable
de alimentación o
controlar que esté
correctamente
conectado.
3. Cambiar el
fusible.
La alimentación
eléctrica está presente
pero el LED no está
encendido.
1. El volta
j
e de la batería es
demasiado bajo. 1. Recar
g
ue el
UPS(SAI) por al
menos 24 horas.
A
larma acústica
persistente en
presencia de una
correcta alimentación
de la red.
2. Controlar la car
g
a
verificando que no esté
en condición de
sobrecarga (overload).
2. Desconectar
parte de la carga.
Nin
g
ún LED se
enciende en el panel
frontal.
1. Las baterías están
completamente
agotadas.
1. De
j
ar el producto
ba
j
o car
g
a por 24
horas y volver a
probar.
2. Llamar a la
asistencia técnica
de Atlantis.

ESP
46
La duración de las
baterías no es
satisfactoria.
1. Las baterías no están
completamente
cargadas.
2. Las baterías están casi al
final del ciclo de vida.
1. Recar
g
ue el
UPS(SAI) por 10
horas.
2. Reemplazar las
baterías (como
en el punto 1.10)
El UPS(SAI) funciona
normalmente pero el
indicador Fault está
encendido.
1. Controlar la conexión a
tierra o pruebe a invertir
el sentido de la toma de
corriente eléctrica.
1. Llamar un
electricista y
hacer que
controle el
cableado
eléctrico.
Cuando el volta
j
e está
fuera de los parámetros
tolerados o ausente, la
carga se apaga.
1. Controlar que la car
g
a no
ten
g
a un factor de potencia
(PFC) activo.
1. Tal tipo de SAI(UPS)
no es apto para esta
car
g
a (verificar que el
SAI(UPS)haciendo la
prueba con solo LCD),
se aconse
j
a de cambiar
SAI(UPS) con uno de
tipo sinusoidal.
A.1.2 Vario
Pre
g
unta Respuesta
El volta
j
e medido en la
salida del UPS(SAI)
(en modalidad
inverter) está mal.
Cambiar el multímetro con el cual si efectúa la medición
con un multímetro adecuado (True RMS). Solo este tipo
puede leer en manera correcta una salida stepwave.

DEU
47
Handbuch
Danke, dass Sie sich für den Kauf einer USV-Einheit von Atlantis entschieden haben.
Lesen Sie bitte die Installationsanleitung und die Sicherheitshinweise aufmerksam
durch.
Die US
V
-Einheit niemals öffnen, auch dann nicht, wenn sie vom
Stromnetz getrennt ist. Die Einheit sauber halten und die
Lüftungsgitter nicht abdecken. In der Nähe der USV-Einheit
keine Flüssigkeiten oder entzündbares Material aufbewahren.
Die US
V
-Einheit nur an einem trockenen Ort verwenden. Nicht
im Freien verwenden.
In der US
V
-Einheit befinden sich Batterien mit hohe
r
Spannun
g
,
die bei Berührung zu ernsten Problemen führen können.
Mö
g
licherweise ist diese US
V
-Einheit nicht für Geräte mit
aktiver PFC-Schaltung geeignet. Dieses Produkt wurde
ausschließlich für den Anschluss an einen PC ausgelegt. Die
Nichtbeachtung der richtigen Verwendung lässt die Garantie
sofort entfallen.
Wichti
g
e Sicherheitshinweise (DIESE ANLEITUNG AN
EINEM SICHEREN ORT AUFBEWAHREN)
ACHTUNG! Um der Gefahr eines Brands oder Stromschlags
vorzubeugen, die Einheit immer in einem Innenbereich mit
kontrollierter Temperatur und Luftfeuchtigkeit und ohne
Verunreinigungssubstanzen installieren.
ACHTUNG! Um die Gefahr einer Überhitzung der USV-
Einheit einzuschränken, die Lüftungsöffnungen nicht
abdecken und die Einheit nicht direktem Sonnenlicht
aussetzen oder in der Nähe von Wärme erzeugenden
Geräten wie Heizkörpern oder Backöfen installieren.
ACHTUNG! An die USV-Einheit keine anderen Geräte als
Computer anschließen, wie z. B. Medizingeräte,
Reanimationsgeräte, Mikrowellenherde und Staubsauger.
ACHTUNG! Die USV-Einheit nicht mit ihrer eigenen
Steckdose verbinden.
ACHTUNG! Aufpassen, dass keine Flüssigkeiten oder
Fremdkörper ins Innere der USV-Einheit eindringen. Keine
Getränke oder Behälter mit Flüssigkeiten auf die Einheit oder
in ihre Nähe stellen.

DEU
48
ACHTUNG! Sollte eine Notsituation eintreten, die OFF-Taste
(Ausschalttaste) drücken und das Speisekabel von der
Stromversorgung trennen, um die Einheit zu deaktivieren.
ACHTUNG! Die USV-Einheit nicht mit elektronischen
Vorschaltgeräten oder Überstromschutzeinrichtungen
verbinden.
ACHTUNG! Wenn die USV-Einheit in ein Metallgehäuse
eingeschlossen ist, muss sie geerdet werden, um
sicherzustellen, dass der Fehlerstrom 3,5 mA nicht
überschreitet.
ACHTUNG! Immer daran danken, dass Stromschlaggefahr
besteht. Auch wenn die Einheit von der Stromversorgung
getrennt wurde, kann nicht ausgeschlossen werden, dass
von den Batterien erzeugte, gefährliche Spannung anliegt.
Bevor Wartungseingriffe oder Reparaturen im Innern der
USV-Einheit ausgeführt werden, müssen die Batterien daher
am Plus- und Minuspol der Verbinder mit Schnellauslösung
getrennt werden.
ACHTUNG! Die Wartung der Batterien muss von
Fachpersonal ausgeführt werden, das in der Benutzung von
Batterien erfahren ist und die Risiken kennt. Unbefugtem
Personal ist das Eingreifen zu verbieten.
ACHTUNG! Immer dieselbe Anzahl und denselben Typ von
Ersatzbatterien installieren.
ACHTUNG! Die Spannung der internen Batterien beträgt 12
V DC. Es handelt sich um hermetisch dichte Bleibatterien.
ACHTUNG! Die Batterien niemals ins Feuer werfen, sie
könnten explodieren. Die Batterien niemals öffnen oder
manipulieren. Ein Elektrolytaustritt aus den Batterien kann
Haut- und Augenschäden verursachen.
ACHTUNG! Die USV-Einheit vor der Reinigung immer von
der Stromversorgung trennen. Keine Flüssigreiniger oder
Spray verwenden.
ACHTUNG! Die Batterien können Stromschläge
herbeiführen und sehr hohen Kurzschlussstrom verursachen.
Beim Austausch der Batterien sollten Sie sich daher immer
an das folgende Verfahren halten: 1-Armbanduhr, Ringe
oder anderen Metallschmuck ablegen.
2-Werkzeuge mit Isoliergriff verwenden. 3-
Gummihandschuhe und Gummistiefel tragen. 4-Keine

DEU
49
Werkzeu
g
e oder Metall
g
e
g
enstände auf die Batterien le
g
en.
5-Vor dem Anschließen und Trennen der Batterieklemmen
die Ladequelle trennen.
1.1 Installation und Lagerung/ Aufladen der Batterie
Die USV-Einheit in einem geschützten, staubfreien und gut gelüfteten Bereich
installieren. Einen Abstand von mindestens 20 cm zu anderen Geräten halten, um
Störungen zu vermeiden. Die USV-Einheit NICHT bei Temperaturen über oder unter
0-40°C (bei Luftfeuchtigkeit 0-90%) verwenden.
Niemals Drucker oder Scanner an die Einheit anschließen, denn
sie könnten sie beschädigen!
Das AC-Netzkabel in eine Wandsteckdose stecken. Um optimale
Ergebnisse zu erzielen, empfehlen wir, vor der ersten Benutzung
der Einheit die Batterie mindestens 8 Stunden lang aufzuladen.
Die Einheit lädt die Batterie auch dann auf, wenn sie an eine Last
angeschlossen ist.
Es wird empfohlen, an das Gerät eine Last
anzuschließen, die 80-85% des maximal zulässigen
Wertes (in Watt) nicht überschreitet.

DEU
50
Die USV kann auch an einer Wand auf
g
estellt werden. In
diesem Fall ist es ratsam, 2 ausgerichtete Nägel mit einem
Abstand von 195 mm zu platzieren, an denen das Gerät
befestigt werden soll.
1.2 Anschluss der Lasten
Die Lasten an die Ausgangsbuchsen an der Rückseite der USV-Einheit anschließen.
Um die an die USV-Einheit angeschlossenen Geräte zu schützen, muss sie lediglich
durch Drücken der Einschalttaste eingeschaltet werden.
1.3 Ein-/Ausschalten der Einheit
Zum Ein- und Ausschalten der USV drücken Sie die Taste 2 Sekunden lang, bis das
Gerät 2/3 Pieptöne abgibt. Die LED leuchtet blau, um die korrekte Beleuchtung
anzuzeigen.
Die Steckdosen (Surge & Backup) versorgen die Last bei Netzausfall mit der
Batterie.
1.4 Tabelle mit der Beschreibung der Kontrollleuchten und der
Alarme
Zustand LED-Sichtanzei
g
e
A
larm

DEU
51
AC-Betrieb Die blaue LED leuchtet
auf Nicht aktiv
Batteriebetrieb Akustischer Alarm alle
30 Sekunden
Batterie fast leer (20-
30%) in Batteriebetrieb Akustischer Alarm alle
2 Sekunden
Überlastung Akustischer Alarm alle
0.5 Sekunden
Scheitern
Akustischer Alarm
immer aktiv
1.5 Problemlösung
Falls während der Benutzung der Einheit Probleme auftreten, in der folgenden Tabelle
nachschlagen, um zu versuchen, sie zu beheben.
Problem Wahrscheinliche Ursache Maßnahme zur
Behebung
An der Vorderseite sind
keine Kontrollleuchten
eingeschaltet. Batterien leer
Die US
V
-Einheit
mindestens 8
Stunden lang
aufladen.
Batterien defekt Die Batterien durch
Modelle desselben
Typs ersetzen.
USV-Einheit ausgeschaltet.
Die Einschalttaste
erneut drücken, um
die USV-Einheit
einzuschalten.
Der akustische Alarm
bleibt weiterhin aktiv,
auch wenn die
Stromversorgung aus
dem Netz normal ist.
USV-Einheit überlastet.
Zuerst eini
g
e Lasten
entfernen. Vor dem
erneuten Anschluss
der Geräte
kontrollieren, ob die
Last den Angaben in
den technischen
Daten der USV-
Einheit entspricht.

DEU
52
Die US
V
-Einheit bleibt
nur kurze Zeit in
Betrieb, wenn ein
Stromausfall eintritt
Geringe Batteriespannung.
Die US
V
-Einheit
mindestens 8
Stunden lang
aufladen.
Batterien defekt. Dieses
Problem kann auftreten,
wenn die
Umgebungstemperatur zu
hoch ist oder wenn die
Batterie nicht einwandfrei
funktioniert oder fast
erschöpft ist.
Die Batterien durch
Modelle desselben
Typs ersetzen.
Die Stromversor
g
un
g
aus dem Netz weist
keine Probleme auf,
aber die Einheit ist in
Batteriebetrieb
eingeschaltet
Netzkabel gelockert Das Netzkabel wieder
richtig einstecken.
Sicherung (AC Eingang)
defekt.
Die Sicherun
g
an der
Rückseite
kontrollieren und
eventuell
auswechseln.
1.6 Garantie
Ihre USV-Einheit ist durch eine zweijährige Garantie auf die elektronischen Teile
gedeckt. Die Garantiezeit für die Batterie beträgt maximal 12 Monate. Alle
Informationen finden Sie auf der Website: www.atlantis-land.com.

53
Technical Features
Model
A
03-PS1000
Release 21.0
Power Ratin
g
(VA) 1000
Power Ratin
g
(W) 500
INPU
T
V
olta
g
e: 162-290
V
ac
Frequency: 50Hz±5%
OUTPU
T
V
olta
g
e: 220V(±205%) [AC] / 220V(±8%) [Battery]
Frequency: 50Hz (±1%)
Waveform Simulated SineWave
TRANSFER Line/Batter
y
Less than 4 ms (typical)
EFFICIENC
Y
94%
BATTER
Y
V
olta
g
e 12
V
DC
Capacity 12V/5.6Ah Hi
g
h Density
Quantity 1
Rechar
g
e Time 6-8 hours to (90%)
Type Sealed Maintenance Free Lead Acid VRLA Type
INDICATORS [LED]Utility Normal, Backup, and Battery/Fault
conditions
PROTECTION Overload AC Buzzer continuously alarms
Overload Inverter Buzzer continuously alarms
Short Circuit INV Input Fuse & Electric Circuit
Short Circuit AC Electric Circuit
Battery Over-drain Two sta
g
es: Controlled
Battery Low Warning & Cut Off
Spike Suppression
Noise Suppression
CONNECTIONS Output 3 x Schuko (Sur
g
e) + 3 x Schuko
(Battery Power Supplied)
Backup Time 10 to 30 mins for typical PC Load
MECHANICAL Dimensions WxHxD: 108 x 90 x 300 mm
Net Wei
g
ht 2,9Kg with Battery
ENVIRONMENTS Temperature 0°-40° C
Humidity 0-90% (non-condensin
g
)
Packa
g
e Contents OnePower UPS
Manual (Italian, English, Spanish and French)
Warranty and WEEE Instructions

54
CERTIFICATION CE
EAN 8026974018898
Backup TIME & Battery
A
03-PS1000
Power Ratin
g
(W) 100 150 200 300 400 500
Power Ratin
g
(VA) 200 300 400 600 800 1000
Backup Time (min) 12' 7' 5' 2' 45" Some seconds
A
03-PS1000
Battery Lo
w
11.1
V
±0.5VD
C
Battery CutOFF 10.1
V
± 0.5VD
C
Battery Char
g
in
g
Volta
g
e 13.9
V
± 0.4
V
D
C

55

-
 1
1
-
 2
2
-
 3
3
-
 4
4
-
 5
5
-
 6
6
-
 7
7
-
 8
8
-
 9
9
-
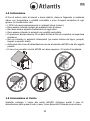 10
10
-
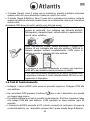 11
11
-
 12
12
-
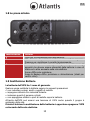 13
13
-
 14
14
-
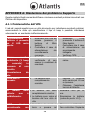 15
15
-
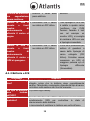 16
16
-
 17
17
-
 18
18
-
 19
19
-
 20
20
-
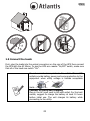 21
21
-
 22
22
-
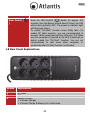 23
23
-
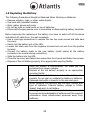 24
24
-
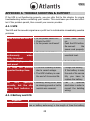 25
25
-
 26
26
-
 27
27
-
 28
28
-
 29
29
-
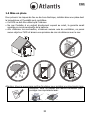 30
30
-
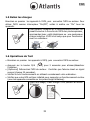 31
31
-
 32
32
-
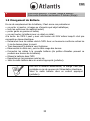 33
33
-
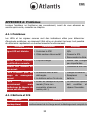 34
34
-
 35
35
-
 36
36
-
 37
37
-
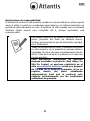 38
38
-
 39
39
-
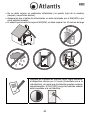 40
40
-
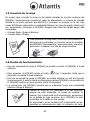 41
41
-
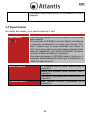 42
42
-
 43
43
-
 44
44
-
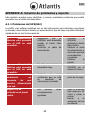 45
45
-
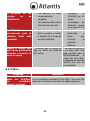 46
46
-
 47
47
-
 48
48
-
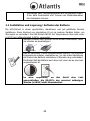 49
49
-
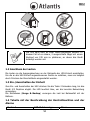 50
50
-
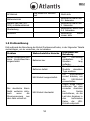 51
51
-
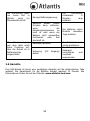 52
52
-
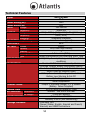 53
53
-
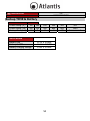 54
54
-
 55
55
-
 56
56


Atlantis A03-PS1000 Manual de usuario
- Tipo
- Manual de usuario
en otros idiomas
- français: Atlantis A03-PS1000 Manuel utilisateur
- italiano: Atlantis A03-PS1000 Manuale utente
- English: Atlantis A03-PS1000 User manual
- Deutsch: Atlantis A03-PS1000 Benutzerhandbuch
Artículos relacionados
Otros documentos
-
Riello DVT 80 Manual de usuario
-
Riello Dialog Vision Manual de usuario
-
BlueWalker PowerWalker VFI 1500RM LCD Manual de usuario
-
Legrand KEOR PDU Single Phase UPS Manual de usuario
-
 Aros Syncro 1500 Manual de usuario
-
BlueWalker PowerWalker VFI 1000 LCD Especificación
-
BlueWalker PowerWalker VFI 2000 LCD/UK Especificación
-
 PowerWalker VFI 1500 RM LCD El manual del propietario
-
-
Eaton Evolution S EXB 2500 RT 2U Installation and User Manual

