Clatronic BS 1302 Manual de usuario

Categoría
Aspiradoras
Tipo
Manual de usuario

Este manual también es adecuado para

Bedienungsanleitung / Garantie
Gebruiksaanwijzing • Mode d’emploi • Instrucciones de servicio
Istruzioni per l’uso • Instruction Manual • Instrukcja obsługi / Gwarancja
Használati utasítás • Руководство по эксплуатации •
BODENSTAUBSAUGER
Stofzuiger • Aspirateur-traîneau • Aspiradora • Aspirapolvere a carrello
Floor vacuum cleaner • Odkurzacz • Porszívó
Пылесос для пола •
BS 1302
BS1302_IM 08.03.16
2
BS1302_IM 08.03.16
DEUTSCH
Inhalt
Übersicht der Bedienelemente .................................. Seite 3
Abbildungen A - H ....................................................... Seite 4
Bedienungsanleitung .................................................Seite 5
Technische Daten ......................................................Seite 8
Garantie .....................................................................Seite 9
Entsorgung .................................................................Seite 10
NEDERLANDS
Inhoud
Overzicht van de bedieningselementen .................Pagina 3
Afbeeldingen A - H ................................................... Pagina 4
Gebruiksaanwijzing .................................................Pagina 11
Technische gegevens .............................................Pagina 14
Verwijdering .............................................................Pagina 15
FRANÇAIS
Sommaire
Liste des différents éléments de commande ............. Page 3
Figures A - H ...............................................................Page 4
Mode d’emploi ............................................................Page 16
Données techniques ..................................................Page 19
Élimination ..................................................................Page 20
ESPAÑOL
Indice
Indicación de los elementos de manejo .................Página 3
Figuras A - H ............................................................Página 4
Instrucciones de servicio.........................................Página 21
Datos técnicos.........................................................Página 24
Eliminación ..............................................................Página 25
ITALIANO
Indice
Elementi di comando ..............................................Pagina 3
Figure A - H .............................................................. Pagina 4
Istruzioni per l’uso ................................................... Pagina 26
Dati tecnici ...............................................................Pagina 29
Smaltimento ............................................................Pagina 30
ENGLISH
Contents
Overview of the Components ....................................Page 3
Figures A - H ...............................................................Page 4
Instruction Manual ......................................................Page 31
Technical Data............................................................Page 34
Disposal......................................................................Page 35
JĘZYK POLSKI
Spis treści
Przegląd elementów obłsugi ....................................Strona 3
Rysunki A - H.............................................................Strona 4
Instrukcja obsługi .....................................................Strona 36
Dane techniczne ......................................................Strona 39
Warunki gwarancji ....................................................Strona 40
Usuwanie .................................................................Strona 41
MAGYARUL
Tartalom
A kezelőelemek áttekintése .......................................Oldal 3
Ábrák A - H .................................................................. Oldal 4
Használati utasítás .....................................................Oldal 42
Műszaki adatok ..........................................................Oldal 45
Hulladékkezelés ......................................................... Oldal 46
РУССКИЙ
Содержание
Обзор деталей прибора ............................................стр. 3
Рисунки A - H ................................................................стр. 4
Руководство по эксплуатации ...................................стр. 47
Технические данные .................................................. стр. 50

3 .................................
4 ..................................... H - A
55 .............................................. 
52 ............................................... 
Übersicht der Bedienelemente
Overzicht van de bedieningselementen • Liste des différents éléments de commande
Indicación de los elementos de manejo • Elementi di comando • Overview of the Components
Przegląd elementów obłsugi • A kezelőelemek áttekintése
Обзор деталей прибора •
3
BS1302_IM 08.03.16
Abbildungen A bis H
Afbeeldingen A - H • Figures A - H • Figuras A - H
Figure A - H • Figures A - H • Rysunki A - H • Ábrák A - H
Рисунки A - H • H - A
4
5
BS1302_IM 08.03.16
Bedienungsanleitung
Vielen Dank, dass Sie sich für unser Produkt entschieden
haben. Wir wünschen Ihnen viel Freude mit dem Gerät.
Symbole in dieser Bedienungsanleitung
Wichtige Hinweise für Ihre Sicherheit sind besonders gekenn-
zeichnet. Beachten Sie diese Hinweise unbedingt, um Unfälle
und Schäden am Gerät zu vermeiden:
WARNUNG:
Warnt vor Gefahren für Ihre Gesundheit und zeigt mögliche
Verletzungsrisiken auf.
ACHTUNG:
Weist auf mögliche Gefährdungen für das Gerät oder
andere Gegenstände hin.
HINWEIS: Hebt Tipps und Informationen für Sie hervor.
Allgemeine Hinweise
Lesen Sie vor Inbetriebnahme dieses Gerätes die Bedie-
nungsanleitung sehr sorgfältig durch und bewahren Sie diese
inkl. Garantieschein, Kassenbon und nach Möglichkeit den
Karton mit Innenverpackung gut auf. Falls Sie das Gerät an
Dritte weitergeben, geben Sie auch die Bedienungsanleitung
mit.
Benutzen Sie das Gerät ausschließlich für den privaten
und den dafür vorgesehenen Zweck. Dieses Gerät ist
nicht für den gewerblichen Gebrauch bestimmt.
Benutzen Sie das Gerät nicht im Freien. Halten Sie es
vor Hitze, direkter Sonneneinstrahlung, Feuchtigkeit (auf
keinen Fall in Flüssigkeiten tauchen) und scharfen Kanten
fern. Benutzen Sie das Gerät nicht mit feuchten Händen.
Bei feucht oder nass gewordenem Gerät sofort den
Netzstecker ziehen.
Schalten Sie das Gerät aus und ziehen Sie immer den
Stecker aus der Steckdose (ziehen Sie am Stecker, nicht
am Kabel), wenn Sie das Gerät nicht benutzen, Zubehör-
teile anbringen, zur Reinigung oder bei Störung.
Betreiben Sie das Gerät nicht unbeaufsichtigt. Sollten Sie
den Raum verlassen, schalten Sie das Gerät immer aus.
Ziehen Sie den Stecker aus der Steckdose.
Das Gerät und das Netzkabel müssen regelmäßig auf
Zeichen von Beschädigungen untersucht werden. Wird
eine Beschädigung festgestellt, darf das Gerät nicht mehr
benutzt werden.
Verwenden Sie nur Original-Zubehör.
Zur Sicherheit Ihrer Kinder lassen Sie keine Verpackungs-
teile (Plastikbeutel, Karton, Styropor, etc.) erreichbar
liegen.
WARNUNG:
Lassen Sie kleine Kinder nicht mit Folie spielen. Es
besteht Erstickungsgefahr!
Spezielle Sicherheitshinweise für dieses Gerät
Reparieren Sie das Gerät nicht selbst, sondern suchen Sie einen
autorisierten Fachmann auf. Wenn die Netzanschlussleitung dieses
Gerätes beschädigt wird, muss sie durch den Hersteller oder seinen
Kundendienst oder eine ähnlich qualizierte Person ersetzt werden,
um Gefährdungen zu vermeiden.
Dieses Gerät kann von Kindern ab 8 Jahren und darüber und von
Personen mit verringerten physischen, sensorischen oder mentalen
Fähigkeiten oder Mangel an Erfahrung und / oder Wissen benutzt
werden, wenn sie beaufsichtigt werden oder bezüglich des sicheren
Gebrauchs des Gerätes unterwiesen wurden und die daraus resul-
tierenden Gefahren verstanden haben.
Kinder dürfen nicht mit dem Gerät spielen.
6
BS1302_IM 08.03.16
Reinigung und Benutzer-Wartung dürfen nicht durch Kinder ohne
Beaufsichtigung durchgeführt werden.
Saugen Sie keine Feuchtigkeit bzw. Flüssigkeiten auf!
Saugen Sie keine heiße Asche, spitze oder scharfe Gegenstände!
Benutzen Sie das Gerät nicht in feuchten Räumen!
Saugen Sie niemals ohne Filter. Prüfen Sie stets den korrekten Sitz
der Filter nach dem Einsetzen!
Halten Sie während des Betriebes Haare, Kleidung und Körperteile
von der Staubsaugerdüse fern!
Halten Sie den Staubsauger von Wärmequellen wie Radiatoren,
Öfen usw. fern!
Übersicht der Bedienelemente
1 Luftschieber
2 Griff
3 Saugschlauch
4 Verschluss der Abdeckung (Staubbehälter)
5 Ein / Aus Schalter
6 Tragegriff
7 Entriegelungstaste für Staubbehälter
8 Taste zur Kabelaufwicklung
9 Saugleistungsregler
10 Verschluss des Lüftungsgitters (Auslasslter)
11 Parkhilfe
12 Staubbehälter
13 Bodenplatte des Staubbehälters
14 Schlauchanschluss
15 Verbindungskopf des Saugschlauches
16 Umschalter Teppich / Hartboden
17 Bodendüse (mit Haken (ohne Abb.))
18 Teleskop-Saugrohr
19 Parkettbürste
20 Kombinierte Bürsten- / Fugendüse
Inbetriebnahme
Stecken Sie den Verbindungskopf des Saugschlauches
in den Schlauchanschluss des Gerätes. Er muss mecha-
nisch einrasten.
Um den Schlauch wieder zu lösen, drücken Sie auf die
Taste am Verbindungskopf.
Stecken Sie ggf. das Saugrohr am Griffstück auf.
Mit der Schiebetaste am Teleskop-Saugrohr können Sie
die Länge individuell einstellen. (Seite 4, Abb. A)
Montieren Sie die Bodendüse bzw. das Zubehör.
Düsenaufsatz
Bodendüse (17)
Sie können mit der Bodendüse glatte Flächen und Teppiche
reinigen.
Stellen Sie den Umschalter (16) nach der Beschaffenheit des
Bodens ein:
Für unempndliche Hartböden wie Laminat,
Fliesen, PVC usw.
Für Teppichböden, Läufer usw. mit hohem oder
niedrigem Flor
Parkettbürste (19)
Für die schonende Reinigung von empndlichen Hartböden
wie Parkett, Laminat, Fliesen usw.
Kombinierte Bürsten- / Fugendüse (20)
Zum Saugen von Polstern, Vorhängen und in Ecken und
Schlitzen usw.
HINWEIS: „2 in 1“ Düse:
Zusammengeklappt können Sie sie als Fugendüse be-
nutzen. Möchten Sie die Bürstendüse verwenden, ziehen
Sie am Bürstenteil in Pfeilrichtung, bis diese mechanisch
einrastet.
Um die Düsenaufsätze vom Saugrohr zu lösen, ziehen Sie
diese unter leichtem Drehen ab.
Benutzen des Gerätes
1. Wickeln Sie die benötigte Kabellänge ab.
ACHTUNG:
Ziehen Sie das Netzkabel maximal bis zur gelben
Markierung.
7
BS1302_IM 08.03.16
ACHTUNG:
Ziehen Sie das Kabel auf keinen Fall bis zur roten
Markierung, da die Kabelaufwicklung Schaden
nehmen kann. Solche Schäden fallen nicht in den
Garantieanspruch.
HINWEIS:
Falls die rote Markierung sichtbar ist, ziehen Sie das
Kabel mithilfe der Kabelaufrolltaste wieder bis zur
gelben Markierung ein.
2. Stecken Sie den Netzstecker in eine vorschriftsmäßig
installierte Schutzkontakt-Steckdose.
3. Schalten Sie das Gerät mit dem Ein- / Aus Schalter ein,
indem Sie die Taste nach unten drücken.
4. Stellen Sie je nach Bodenbelag den Umschalter „Teppich /
Hartboden“ ein.
5. Stellen Sie die Saugleistung am Saugleistungsregler ein.
6. Saugen Sie nun mit gleichmäßiger Geschwindigkeit.
Andrücken ist nicht nötig.
HINWEIS:
Achten Sie auf die durch die Kabellänge begrenzte
Reichweite!
Luftschieber (1)
Öffnen Sie den Luftschieber am Schlauchgriff zur Luftregulie-
rung oder, um an der Düse haftende Teile zu lösen.
Ausschalten und Stromkabel aufrollen
1. Schalten Sie den Bodenstaubsauger am Ein- / Aus-Schal-
ter aus und ziehen Sie den Stecker aus der Steckdose.
2. Halten Sie das Kabel fest, um ein Herumschlagen zu
vermeiden.
3. Drücken Sie die Taste für die Kabelaufwicklung und
führen Sie das Kabel nach.
Wartung
Entleeren des Staubbehälters
Entleeren Sie den Staubbehälter, wenn der Schmutz die
Markierung MAX erreicht.
1. Ziehen Sie den Netzstecker aus der Steckdose.
2. Drücken Sie die Taste (7), um den Staubbehälter zu
entriegeln. Entnehmen Sie den Staubbehälter.
3. Halten Sie den Staubbehälter über einen Mülleimer.
Entleeren Sie den Inhalt des Staubbehälters. Drücken Sie
dazu die Taste am Staubbehälter, um die Bodenplatte zu
öffnen. (Seite 4, Abb. B)
4. Schließen Sie die Bodenplatte wieder.
5. Befestigen Sie den Staubbehälter am Gerät. Setzen Sie
ihn zuerst unten am Gerät an und klicken Sie ihn mit dem
Haken oben ein.
6. Prüfen Sie den festen Sitz des Staubbehälters, indem Sie
das Gerät am Tragegriff kurz anheben.
Das Filtersystem
Ihr Gerät verfügt über 4 Filter. Das herkömmliche Staub-
beutelsystem wurde ersetzt durch einen transparenten
Staubbehälter. In ihm werden grober Schmutz und kleinste
Schwebepartikel durch die hohe Strömungsgeschwindigkeit
aus der „Saugluft“ gewirbelt.
Der Erwerb von Staubbeuteln entfällt.
Die Filter müssen regelmäßig gereinigt werden.
Die Filtereinheit (Seite 4 Abb. C bis H)
Die Filtereinheit besteht aus:
Nylonlter
Filtervlies
Zentrallter
Vorlter
Befestigungsscheibe
ACHTUNG:
Waschen Sie die Bauteile niemals in einer Wasch- oder
Spülmaschine!
Verwenden Sie keinen Haartrockner zum Trocknen.
Nehmen Sie das Gerät nur wieder in Betrieb, wenn alle
Bauteile vollständig trocken und korrekt montiert sind.
Um die Filtereinheit zu reinigen gehen Sie wie folgt vor:
1. Entleeren Sie den Staubbehälter wie zuvor beschrieben.
(Punkte 1 - 3)
2. Demontage der Filtereinheit
2.1.
Drehen Sie die Filtereinheit in Richtung . (Abb. C)
2.2. Ziehen Sie die Filtereinheit aus dem Staubbehälter.
(Abb. D)
2.3. Drehen Sie die Befestigungsscheibe und ziehen Sie
diese ab. (Abb. E)
2.4. Ziehen Sie den Vorlter vom Zentrallter ab. (Abb. F)
2.5. Öffnen Sie die Abdeckung der Filtereinheit. (Abb. G)
2.6. Entnehmen Sie den Nylon-Filter und das Filtervlies.
(Abb. H)
3. Reinigen Sie alle Teile der Filtereinheit und den Staubbe-
hälter unter ießendem Wasser. Sie können eine weiche
Bürste zur Hilfe nehmen.
4. Lassen Sie alle Bauteile an der Luft vollständig trocknen.
5. Montage der Filtereinheit
5.1. Legen Sie zuerst das Filtervlies, danach den
Nylon-Filter in die Abdeckung ein.
5.2. Schließen Sie die Abdeckung. Sie muss mecha-
nisch einrasten.
5.3. Setzen Sie den Vorlter auf den Zentrallter.
HINWEIS:
Der Vorlter hat unterschiedlich große Ausspa-
rungen, die auf die Rastnasen am Zentrallter
passen.
5.4. Setzen Sie die Befestigungsscheibe auf den Vorl-
ter und drehen Sie diese fest.
8
BS1302_IM 08.03.16
5.5. Setzen Sie die Filtereinheit zurück in den Staub-
behälter: Setzen Sie die Führungsnase an der
Filtereinheit über dem Symbol an. Drehen Sie
die Filtereinheit in Richtung fest.
Auslasslter
Des Weiteren verfügt Ihr Gerät über einen Auslasslter.
Er bendet sich auf der Rückseite des Gerätes.
1. Drücken Sie den Verschluss (10) nach unten und nehmen
Sie das Lüftungsgitter ab.
2. Entnehmen Sie den Filtereinsatz und reinigen Sie diesen,
wie oben beschrieben.
3. Setzen Sie den Filter im vollständig getrockneten Zustand
wieder in das Lüftungsgitter ein.
4. Setzen Sie das Lüftungsgitter zurück an das Gerät.
Beachten Sie die Führungsnasen. Das Lüftungsgitter
muss hörbar einrasten.
Ersatzteile
Diese können Sie über unser Internet-Serviceportal
www.sli24.de
unter „Ersatzteile & Zubehör“ bestellen.
Reinigung
WARNUNG:
Ziehen Sie vor jeder Reinigung den Netzstecker aus der Steck-
dose.
Das Gerät auf keinen Fall zum Reinigen in Wasser tauchen. Es
könnte zu einem elektrischen Schlag oder Brand führen.
ACHTUNG:
Benutzen Sie keine Drahtbürste oder andere scheuern-
de Gegenstände.
Benutzen Sie keine scharfen oder scheuernden Reini-
gungsmittel.
Das Gehäuse reinigen Sie mit einem weichen, trockenen
Tuch ohne Zusatzmittel.
Aufbewahrung
Lassen Sie das Gerät vollständig abkühlen.
Rollen Sie das Kabel komplett ein.
Hängen Sie den Haken der Bodendüse in die Parkhilfe auf
der Rückseite des Gerätes ein.
Störungsbehebung
Gerät ist ohne Funktion.
Abhilfe:
Überprüfen Sie den Netzanschluss.
Überprüfen Sie die Stellung des Schalters.
Gerät saugt nicht.
Mögliche Ursache:
Der Staubbehälter ist voll.
Abhilfe:
Entleeren Sie den Staubbehälter.
oder
Mögliche Ursache:
Die Filter sind verschmutzt.
Abhilfe:
Reinigen Sie die Bauteile.
oder
Mögliche Ursache:
Im Saugschlauch oder der Düse bendet sich ein
Fremdkörper.
Abhilfe:
Kontrollieren Sie das Zubehör auf Fremdkörper.
Technische Daten
Modell: ......................................................................... BS 1302
Spannungsversorgung: ........................ 220 - 240 V~, 50 / 60 Hz
Schutzklasse: ..........................................................................
Nettogewicht: .................................................................5,30 kg
Technische und gestalterische Änderungen im Zuge stetiger
Produktentwicklungen vorbehalten.
9
BS1302_IM 08.03.16
Produktdatenblatt für Haushalts-Staubsauger nach
Verordnung (EU) Nr. 665/2013
Marke Clatronic
Modell BS 1302
Benutzung als Universal-Staubsauger mit Bodendüse
Energieefzienzklasse
1)
A
Verbrauchsdaten
Jährlicher Energieverbrauch
2)
kWh/Jahr 28,0
Reinigungsklasse
Teppichreinigungsklasse E
Hartbodenreinigungsklasse B
Staubemissionsklasse G
Schallleistungspegel
dB(A)
re1pW
85
Nennleistungsaufnahme W 700
Benutzung als Hartboden-Staubsauger mit Parkettbürste
Energieefzienzklasse
1)
A
Verbrauchsdaten
Jährlicher Energieverbrauch
2)
kWh/Jahr 20,4
Reinigungsklasse
Hartbodenreinigungsklasse D
Staubemissionsklasse G
Schallleistungspegel
dB(A)
re1pW
85
Nennleistungsaufnahme W 700
1) A (höchste Efzienz) bis G (geringste Efzienz).
2) Indikativer jährlicher Energieverbrauch (kWh pro Jahr),
basierend auf 50 Reinigungsvorgängen.
Der tatsächliche jährliche Energieverbrauch hängt davon
ab, wie von dem Gerät Gebrauch gemacht wird.
Die Geräte entsprechen den harmonisierten europäi-
schen Normen sowie den Richtlinien in der jeweils bei
Lieferung aktuellen Fassung:
Niederspannungsrichtlinie 2014/35/EU
Richtlinie zur Elektromagnetische Verträglichkeit
2014/30/EU
RoHS-Richtlinie 2011/65/EG
Ökodesign Richtlinie 2009/125/EG
Umweltgerechte Gestaltung von Stausaugern delegierte
Verordnung (EU) Nr. 666/2013
Garantie
Garantiebedingungen
1. Gegenüber Verbrauchern gewähren wir bei privater
Nutzung des Geräts eine Garantie von 24 Monaten ab
Kaufdatum.
Ist das Gerät zur gewerblichen Nutzung geeignet, gewäh-
ren wir beim Kauf durch Unternehmer für das Gerät eine
Garantie von 12 Monaten.
Die Garantiezeit für Verbraucher reduziert sich auf 12
Monate, sofern sie ein zur gewerblichen Nutzung geeig-
netes Gerät – auch teilweise – gewerblich nutzen.
2. Voraussetzung für unsere Garantieleistungen sind der
Kauf des Geräts in Deutschland bei einem unserer
Vertragshändler sowie die Übersendung einer Kopie des
Kaufbelegs und dieses Garantiescheins an uns.
Bendet sich das Gerät zum Zeitpunkt des Garantiefalls
im Ausland, muss es auf Kosten des Käufers uns zur
Erbringung der Garantieleistungen zur Verfügung gestellt
werden.
3. Mängel müssen innerhalb von 14 Tagen nach Erkennbar-
keit uns gegenüber schriftlich angezeigt werden. Besteht
der Garantieanspruch zu Recht, entscheiden wir, auf
welche Art der Schaden / Mangel behoben werden soll,
ob durch Reparatur oder durch Austausch eines gleich-
wertigen Geräts.
4. Garantieleistungen werden nicht für Mängel erbracht, die
auf der Nichtbeachtung der Gebrauchsanweisung, un-
sachgemäßer Behandlung oder normaler Abnutzung des
Geräts beruhen. Garantieansprüche sind ferner ausge-
schlossen für leicht zerbrechliche Teile, wie zum Beispiel
Glas oder Kunststoff. Schließlich sind Garantieansprüche
ausgeschlossen, wenn nicht von uns autorisierte Stellen
Arbeiten an dem Gerät vornehmen.
5. Durch Garantieleistungen wird die Garantiezeit nicht
verlängert. Es besteht auch kein Anspruch auf neue
Garantieleistungen. Diese Garantieerklärung ist eine
freiwillige Leistung von uns als Hersteller des Geräts.
Die gesetzlichen Gewährleistungsrechte (Nacherfüllung,
Rücktritt, Schadensersatz und Minderung) werden durch
diese Garantie nicht berührt.
Stand 06 2012
Garantieabwicklung
24 Stunden am Tag, 7 Tage in der Woche
Sollte Ihr Gerät innerhalb der Garantiezeit einen Mangel
aufweisen, steht Ihnen die schnellste und komfortabelste
Möglichkeit der Reklamationsanmeldung über unser SLI -
Internet-Serviceportal zur Verfügung.
www.sli24.de
Bitte melden Sie direkt den Servicevorgang auf unserem
Online Serviceportal www.sli24.de an. Sie erhalten wenige
Sekunden nach Abschluss der Anmeldung ein kostenloses
Versandticket per E-Mail übermittelt. Zusätzlich erhalten Sie
weitere Informationen zur Abwicklung Ihrer Reklamation.
Mit Ihren persönlichen Zugangsdaten, die direkt nach Ihrer
Anmeldung per E-Mail an Sie übermittelt werden, können Sie
den Status Ihres Vorgangs auf unserem Serviceportal
www.sli24.de online verfolgen.
10
BS1302_IM 08.03.16
Sie brauchen das kostenlose Versandticket nur noch auf die
Verpackung Ihres gut verpackten Gerätes zu kleben und das
Paket bei der nächsten Annahmestelle der Deutschen Post /
DHL abzugeben. Der Versand erfolgt für Sie kostenlos an
unser Servicecenter bzw. Servicepartner.
So einfach kann Service sein!
1. Anmelden
2. Einpacken
3. Ab zur Post damit
Fertig, so einfach geht es!
Bitte vergessen Sie nicht, dem Gerät eine Kopie Ihres
Kaufbeleges (Kassenbon, Rechnung, Lieferschein) als
Garantienachweis beizulegen, da wir sonst keine kostenlosen
Garantieleistungen erbringen können.
Unser Serviceportal www.sli24.de bietet Ihnen weitere
Leistungen an:
Downloadbereich für Bedienungsanleitungen
Downloadbereich für Firmwareupdates
FAQ‘s, die Ihnen Problemlösungen anbieten
Kontaktformular
Zugang zu unseren Zubehör- und Ersatzteile-Webshops
Auch nach der Garantie sind wir für Sie da! – Kosten-
günstige Reparaturen zum Festpreis!
Bitte nehmen Sie in keinem Fall eine unfreie Einsendung
Ihres Gerätes vor. Unfreie Lieferungen werden von uns nicht
angenommen. Es entstehen Ihnen damit erhebliche Kosten.
Stand 06 2012
Entsorgung
Bedeutung des Symbols „Mülltonne“
Schonen Sie unsere Umwelt, Elektrogeräte
gehören nicht in den Hausmüll.
Nutzen Sie die für die Entsorgung von Elektro-
geräten vorgesehenen Sammelstellen und
geben dort Ihre Elektrogeräte ab die Sie nicht
mehr benutzen werden.
Sie helfen damit die potenziellen Auswirkungen, durch
falsche Entsorgung, auf die Umwelt und die menschliche
Gesundheit zu vermeiden.
Sie leisten damit Ihren Beitrag zur Wiederverwertung, zum
Recycling und zu anderen Formen der Verwertung von
Elektro- und Elektronik-Altgeräten.
Informationen, wo die Geräte zu entsorgen sind, erhalten Sie
über Ihre Kommunen oder die Gemeindeverwaltungen.
11
BS1302_IM 08.03.16
Gebruiksaanwijzing
Dank u voor uw keuze van dit product. We hopen dat u er
veel plezier van beleeft.
Symbolen in deze bedieningshandleiding
Belangrijke aanwijzingen voor uw veiligheid zijn speciaal
gekenmerkt. Neem deze aanwijzingen strikt in acht om
ongevallen en schade aan het apparaat te vermijden:
WAARSCHUWING:
Waarschuwt voor gevaren voor uw gezondheid en toont
mogelijk letselrisico’s.
LET OP:
Wijst op mogelijke gevaren voor het apparaat of andere
voorwerpen.
OPMERKING: Kenmerkt tips en informatie voor u.
Algemene Opmerkingen
Lees vóór de ingebruikname van dit apparaat de handleiding
uiterst zorgvuldig door en bewaar deze goed, samen met het
garantiebewijs, de kassabon en zo mogelijk de doos met de
binnenverpakking. Geef ook de handleiding mee wanneer u
de machine aan derden doorgeeft.
Gebruik het apparaat uitsluitend privé en uitsluitend
voor de voorgeschreven toepassing. Dit apparaat is niet
geschikt voor commercieel gebruik.
Gebruik het apparaat niet buiten. Bescherm het tegen
hitte, directe zonnestralen, vocht (in geen geval in vloei-
stofen dompelen) en scherpe randen. Gebruik het appa-
raat niet met vochtige handen. Bij vochtig of nat geworden
apparaat onmiddellijk de stroomtoevoer onderbreken.
Schakel het apparaat uit en onderbreek altijd de stroom-
toevoer (trek aan de stekker, niet aan de kabel) wanneer u
het apparaat niet gebruikt, hulpstukken aanbrengt, reinigt
of wanneer storingen optreden.
Laat het ingeschakelde apparaat niet zonder toezicht
werken. Schakel het apparaat altijd uit voordat u de ruimte
verlaat. Trek de netsteker uit de contactdoos.
Het apparaat en de netkabel moeten regelmatig op zicht-
bare schade worden gecontroleerd. Wanneer u schade
vaststelt, mag het apparaat niet meer worden gebruikt.
Gebruik alleen originele reserveonderdelen.
Laat om veiligheidsredenen geen verpakkingsdelen
(plasticzak, doos, piepschuim, enz.) binnen het bereik van
uw kinderen liggen.
WAARSCHUWING:
Laat kleine kinderen niet met de folie spelen. Er bestaat
gevaar voor verstikking!
Probeer het apparaat niet zelf te repareren. Neem altijd contact op
met een erkende monteur. Als de stroomkabel is beschadigd, moet
deze door de fabrikant, zijn dealer of vergelijkbare, erkende perso-
nen vervangen worden om gevaar te vermijden.
Dit apparaat kan alleen worden gebruikt door kinderen vanaf 8
jaar, personen met verminderde fysieke, zintuiglijke of mentale
vermogens, of personen met onvoldoende kennis en ervaring als
zij begeleid worden of zijn geïnstrueerd in het veilig gebruik van het
apparaat en de gevaren begrijpen.
Kinderen mogen niet met het apparaat spelen.
Reinigen en gebruikersonderhoud mag niet door kinderen wor-
den uitgevoerd zonder begeleiding.
Zuig nooit vocht of vloeistoffen op!
Zuig nooit hete as, spitse of scherpe voorwerpen op!
Gebruik het apparaat niet in vochtige ruimtes!
12
BS1302_IM 08.03.16
Zuig nooit zonder lter. Controleer altijd of de lter en na het plaat-
sen correct zit!
Houd tijdens het zuig in haar een, kleding en lichaamsdelen van de
zuigmond verwijderd!
Houd de stofzuiger ver verwijderd van warmtebronnen zoals radia-
toren, kachels enz.!
Overzicht van de bedieningselementen
1 Luchtcontrole
2 Handgreep
3 Zuigslang
4 Kapvergrendeling (stofcontainer)
5 Aan / Uit-schakelaar
6 Handvat
7 Stofcontainer ontgrendelingstoets
8 Toets voor kabeloprolling
9 Zuigkrachtregelaar
10 Vergrendeling Ventilatierooster (lteruitlaat)
11 Positioneringssteun
12 Stofcontainer
13 Stofcontainer bodemplaat
14 Slangaansluiting
15 Aansluitkop van de stofzuigerslang
16 Keuzeschakelaar Tapijt / harde vloer
17 Vloermondstuk (met haak (zonder afb.))
18 Telescopische zuigslang
19 Parketborstel
20 Gecombineerde borstel / plintzuiger
Ingebruikname
Plaats de aansluitkop van de zuigslang in de slan-
gaansluiting van het apparaat. Deze moet mechanisch
vergrendelen.
Om de slang weer los te koppelen, drukt u op de knop op
de aansluitkop.
Steek eventueel de zuigbuis op de handgreep.
U kunt de schuifschakelaar op de telescopische zuigslang
gebruiken om de lengte individueel aan te passen.
(Pagina 4, Afb. A)
Monteer het vloermondstuk of het toebehoren.
Hulpmondstuk
Vloermondstuk (17)
U kunt de vloermondstuk gebruiken voor het reinigen van
gladde oppervlakken en tapijten.
Stel de keuzeschakelaar (16) in overeenkomstig de conditie
van de vloer:
Voor duurzame harde vloeren zoals laminaat,
tegels, PVC, enz.
Voor vloerbedekking, tapijten, enz. met een
hoge of lage pool
Parketborstel (19)
Voor de milde reiniging van gevoelige harde vloeren zoals
parket, laminaat, tegels, enz.
Gecombineerde borstel / plintzuiger (20)
Voor het afzuigen van kussens en gordijnen en het schoon-
maken van hoeken en gleuven enz.
OPMERKING: “Twee in een”-mondstuk:
Dichtgeklapt kunt u het gebruiken als voegenmondstuk.
Wanneer u het wilt gebruiken als borstelmondstuk, trekt
u aan het borstelgedeelte in de pijlrichting totdat het
mechanisch inklikt.
Om de mondstukken los te koppelen van de stofzuigerstang,
dient u deze los te trekken door ze iets te draaien.
Bediening van het apparaat
1. Rol de benodigde kabellengte af.
LET OP:
Trek de netkabel maximaal uit tot de gele markering.
Trek de netkabel in geen geval uit tot de rode marke-
ring, omdat daardoor de kabeloprolling beschadigd
kan worden.
OPMERKING:
Wanneer de rode markering zichtbaar is, trekt u de
kabel met behulp van de kabeloprolling weer tot aan de
gele markering naar binnen.
2. Steek de netsteker in een correct geïnstalleerde en
geaarde contactdoos.
3. Schakel het apparaat in met de aan- / uitschakelaar door
de toets naar beneden te drukken.
4. Stel de schakelaar “Tapijt / Harde vloer” in al naargelang
de vloerbedekking.
5. Stel de zuigkracht in met behulp van de zuigkrachtrege-
laar.
6. Zuig nu met gelijkmatige snelheid. U hoeft geen druk uit
te oefenen.
13
BS1302_IM 08.03.16
OPMERKING:
Let op dat de kabel slechts een beperkte reikwijdte
heeft!
Luchtcontrole (1)
Open de luchtregelschuif aan de slanggreep om de luchtaan-
zuiging te regelen of aan het mondstuk hechtende delen te
verwijderen.
Uitschakelen en stroomkabel oprollen
1. Schakel de vloerstofzuiger uit via de aan-/uitschakelaar
en trek de steker uit de contactdoos.
2. Houd de kabel vast zodat hij niet rondslingert.
3. Druk op de toets voor de kabeloprolling en voer de kabel
met u mee.
Onderhoud
Legen van de stofcontainer
Leeg de stofcontainer zodra het verzamelde stof de MAX
markering bereikt.
1. Trek de stekker uit het stopcontact.
2. Druk op toets (7) om de stofcontainer te ontgrendelen.
Verwijder de stofcontainer.
3. Leeg de stofcontainer in een afvalbak. Om dit te doen,
drukt u op de toets op de stofcontainer om de bodemplaat
te openen. (Pagina 4, Afb. B)
4. Daarna sluit u de bodemplaat weer.
5. Plaats de stofcontainer op het apparaat. Plaats deze eerst
op de bodem van het apparaat en vergrendel hem dan
met de haak aan de bovenkant
6. Controleer of de stofcontainer goed vastzit door het
apparaat kortstondig aan de draaggreep op te tillen.
Het ltersysteem
Uw apparaat beschikt over 4 lters. Het gewone stofzak-
systeem is vervangen door een transparante stofcontainer.
De hogere doorstroomsnelheid van de container maakt het
mogelijk om grof vuil en de kleinste zwevende deeltjes te
scheiden van de “aangezogen lucht”.
Het is niet nodig om stofzakken te kopen.
De lters moeten regelmatig worden gereinigd.
De ltereenheid (Pagina 4, Afb. C tot H)
Het lter bestaat uit:
Nylon lter
Filter eece
Centrale lter
Voorlter
Bevestigingsschijf
LET OP:
Was de onderdelen nooit in een wasmachine of een
vaatwasmachine!
Gebruik geen haardroger voor het drogen.
Gebruik het apparaat alleen weer als alle onderdelen
volledig droog en correct geïnstalleerd zijn.
Ga als volgt te werk om de ltereenheid te reinigen:
1. Leeg de stofcontainer zoals hierboven beschreven.
(Stappen 1 - 3)
2. Het demonteren van de ltereenheid
2.1.
Draai de ltereenheid in de richting van . (Afb. C)
2.2. Trek de ltereenheid uit de stofcontainer. (Afb. D)
2.3. Draai de bevestigingsschijf en trek deze los. (Afb. E)
2.4. Trek het voorlter uit het centrale lter. (Afb. F)
2.5. Open de kap van de ltereenheid. (Afb. G)
2.6. Verwijder het nylon lter en de lter eece. (Afb. H)
3. Reinig alle onderdelen van de ltereenheid en de stofcon-
tainer onder stromend water. U kunt een zachte borstel
gebruiken.
4. Laat alle onderdelen volledig aan de lucht drogen.
5. Het monteren van de ltereenheid
5.1. Plaats de lter eece en daarna het nylon lter in de
kap.
5.2. Sluit de kap. Deze moet mechanisch vergrendelen.
5.3. Bevestig het voorlter aan het centrale lter.
OPMERKING:
Het voorlter heeft uitsparingen van verschillende
afmetingen, die overeenkomen met de tabs op
het centrale lter.
5.4. Plaats de bevestigingsschijf op het voorlter en
draai deze vast.
5.5. Plaats de ltereenheid weer in de stofcontainer. Zet
de geleider van de tab op de ltereenheid op het
symbool. Zet de ltereenheid vast door deze in
de richting van te draaien.
Uitlaatlter
Uw apparaat beschikt tevens over een uitlaatlter.
Deze bevindt zich aan de achterkant van het apparaat.
1. Druk de vergrendeling (10) naar beneden en verwijder het
ventilatierooster.
2. Verwijder het lterinzetstuk en reinig zoals hierboven
beschreven.
3. Plaats het volledig droge lter terug in de ventilatierooster.
4. Zet de ventilatierooster terug op het toestel. Let op de
geleidenokken. Het ventilatierooster moet hoorbaar
vastklikken.
14
BS1302_IM 08.03.16
Reiniging
WAARSCHUWING:
Voordat u het apparaat reinigt, trekt u altijd eerst de stekker uit het
stopcontact.
Dompel het apparaat voor de reiniging niet onder water. Dit zou tot
een elektrische schok of brand kunnen leiden.
LET OP:
Gebruik géén draadborstel of andere schurende
voorwerpen.
Gebruik geen scherpe of schurende reinigingsmiddelen.
Reinig het huis met een zachte, droge doek zonder reini-
gingsmiddel.
Bewaren
Laat het apparaat volledig afkoelen.
Rol de kabel volledig op.
Hangt u de haak van het vloermondstuk in de parkeerhulp
aan de achterzijde van het apparaat.
Verhelpen van storingen
Apparaat functioneert niet.
Maatregel:
Controleer de netaansluiting.
Controleer de stand van de schakelaar.
Apparaat zuigt niet.
Mogelijk oorzaak:
De stofcontainer is vol.
Maatregel:
Leeg de stofcontainer.
of
Mogelijk oorzaak:
De lters zijn verontreinigd.
Maatregel:
Reinig de onderdelen.
of
Mogelijk oorzaak:
In de zuigerslang of de mondstukken bevindt zich een
vreemd voorwerp.
Maatregel:
Controleer het toebehoren op vreemde voorwerpen.
Technische gegevens
Model:..........................................................................BS 1302
Spanningstoevoer: ............................... 220 - 240 V~, 50 / 60 Hz
Beschermingsklasse: ..............................................................
Nettogewicht: .................................................................5,30 kg
Het recht om technische en ontwerpaanpassingen te maken
in de loop van voortdurende productontwikkeling blijft voor-
behouden.
Commissie Gedelegeerde Regulering (Eu) Nr. 665/2013
Handelsmerk Clatronic
Model BS 1302
Gebruik als universele stofzuiger met vloermondstuk
Energie Efcientie Klasse
1)
A
Energieverbruik
Jaarlijks energieverbruik
2)
kWh/year 28,0
Reiniging Prestatie Klasse
Vloerbedekking reiniging
prestatie klasse
E
Harde vloer reiniging prestatie
klasse
B
Stof Verwijder Klasse G
Geluidsniveau
dB(A)
re1pW
85
Stroomverbruik W 700
15
BS1302_IM 08.03.16
Gebruik als stofzuiger voor harde vloeren met parket-
borstel
Energie Efcientie Klasse
1)
A
Energieverbruik
Jaarlijks energieverbruik
2)
kWh/Jahr 20,4
Reiniging Prestatie Klasse
Harde vloer reiniging prestatie
klasse
D
Stof Verwijder Klasse G
Geluidsniveau
dB(A)
re1pW
85
Stroomverbruik W 700
1) A (hoogste efcientie) tot G (laagste efcientie).
2) Indicatief jaarlijks energieverbruik (kWh per jaar), gebas-
seerd op 50 keer zuigen.
Werkelijk jaarlijks energieverbruik hangt af van hoe het
apparaat gebruikt wordt.
Het apparaat voldoet aan de Europese standard en
wetgeving in de huidige versie en aevering:
Laag Voltage Wetgeving (LVD) 2014/35/EU
Electromagnetische Compatibiliteit (EMC) Juridische
Wetgeving 2014/30/EU
RoHS-wetgeving 2011/65/EU
Ecodesign-wetgeving (ErP) 2009/125/EC
Ecodesign eisen gesteld aan stofzuigers COMMISSIE
REGULERING (EU) No 666/2013
Verwijdering
Betekenis van het symbool “vuilnisemmer”
Bescherm ons milieu, elektrische apparaten
horen niet in het huisafval.
Maak voor het afvoeren van elektrische
apparaten gebruik van de voorgeschreven
verzamelpunten en geef daar de elektrische
apparaten af die u niet meer gebruikt.
Daardoor helpt u de potentiële effecten te voorkomen die een
verkeerde afvoer op het milieu en de menselijke gezondheid
kunnen hebben.
Op deze wijze levert u uw bijdrage aan het hergebruik, de
recycling en andere verwerkingsvormen voor oude elektroni-
sche en elektrische apparaten.
Voor informatie over verzamelpunten voor uw apparaten kunt
u contact opnemen met uw gemeente of gemeenteadminis-
tratie.
16
BS1302_IM 08.03.16
Mode d’emploi
Merci d’avoir choisi notre produit. Nous espérons que vous
saurez proter votre appareil.
Symboles de ce mode d’emploi
Les informations importantes pour votre sécurité sont particu-
lièrement indiquées. Veillez à bien respecter ces indications
an d’éviter tout risque d’accident ou d’endommagement de
l’appareil :
AVERTISSEMENT :
Prévient des risques pour votre santé et des risques
éventuels de blessure.
ATTENTION :
Indique les risques pour l’appareil ou tout autre appareil.
NOTE :
Attire votre attention sur des conseils et informations.
Notes générales
Lisez attentivement ce mode d’emploi avant de mettre
l’appareil en marche pour la première fois. Conservez le
mode d’emploi ainsi que le bon de garantie, votre ticket de
caisse et si possible, le carton avec l’emballage se trouvant
à l’intérieur. Si vous remettez l‘appareil à des tiers, veuillez-le
remettre avec son mode d‘emploi.
N’utilisez cet appareil que pour un usage privé et pour les
taches auxquelles il est destiné. Cet appareil n’est pas
prévu pour une utilisation professionnelle.
Ne l’utilisez pas en plein air. Protégez-le de la chaleur, des
rayons directs du soleil, de l’humidité (ne le plongez en
aucun cas dans l’eau) et des objets tranchants. N’utilisez
pas cet appareil avec des mains humides. S’il arrive que
de l’humidité ou de l’eau atteignent l’appareil, débranchez
aussitôt le câble d’alimentation.
Arrêtez l’appareil et débranchez toujours le câble
d’alimentation de la prise de courant (en tirant sur la che
et non pas sur le câble) si vous n’utilisez pas l’appareil,
si vous installez les accessoires, pour le nettoyage ou en
cas de panne.
Ne laissez jamais fonctionner l’appareil sans surveillance.
Lorsque vous quittez la pièce, toujours arrêter l’appareil.
Débranchez la che de la prise.
Il y a lieu d’inspecter l’appareil et le bloc d’alimentation
régulièrement en vue d’éventuels signes d’endommage-
ments. Lorsqu’un endommagement est détecté, l’appareil
ne doit plus être utilisé.
N’utilisez que les accessoires d’origine.
Par mesure de sécurité vis-à-vis des enfants, ne laissez
pas les emballages (sac en plastique, carton, polystyrène)
à leur portée.
AVERTISSEMENT :
Ne pas laisser les jeunes enfants jouer avec le lm. Il y a
risque d’étouffement !
Conseils de sécurité spéciques à cet appareil
N’essayez pas de réparer l’appareil vous-même. Contactez toujours
un technicien agrée. Si le cordon d’alimentation est endommagé, il
doit être remplacé par le fabricant, son agent de service ou des per-
sonnes ayant qualité semblable an d’éviter un risque.
Cet appareil peut être utilisé par les enfants d’âge supérieur à 8
ans et par les personnes aux capacités sensorielles, physiques ou
mentales réduites, ainsi que par les personnes sans expérience ou
connaissances, tant qu’elles sont supervisées et instruites à l’utili-
sation de l’appareil en sécurité et tant qu’elles en comprennent les
risques.
Les enfants ne doivent pas jouer avec l’appareil.
Le nettoyage et l’entretien utilisateur ne doivent pas être effectués
par les enfants sans supervision.
17
BS1302_IM 08.03.16
N’aspirez jamais d’emplacement humide ou de liquide !
N’aspirez jamais de cendres chaudes, d’objets pointus ou tran-
chants !
Ne pas utiliser l’appareil dans des locaux humides !
N’aspirez jamais sans ltre. Vériez toujours que le ltre est correc-
tement installé !
N’approchez jamais les embouts de l’appareil en utilisation de che-
veux, vêtements et parties du corps !
Maintenez l’aspirateur à l’écart de sources de chaleur comme radia-
teurs, fours, etc. !
Liste des différents éléments de commande
1 Commande de l’air
2 Poignée
3 Tuyau d’aspiration
4 Verrou de couvercle (récipient à poussière)
5 Interrupteur marche / arrêt
6 Poignée
7 Bouton de libération du collecteur de poussière
8 Bouton de rangement du câble
9 Contrôle de puissance d'aspiration
10 Verrou de grille d'aération (ltre de sortie)
11 Support de positionnement
12 Récipient à poussière
13 Base du collecteur de poussière
14 Raccord du tuyau
15 Tête de raccord du tuyau exible
16 Sélecteur tapis / sol dur
17 Suceur de plancher (comprenant un crochet (sans g.))
18 Tuyau d’aspiration télescopique
19 Brosse à parquet
20 Embout brosse / ssure
Avant la première utilisation
Introduisez la tête de raccordement du tuyau d’aspiration
dans le raccordement du tuyau de l’appareil. Celui-ci doit
se bloquer mécaniquement.
Pour déconnecter le tuyau, appuyer sur le bouton de la
tête de connexion.
Fixer si nécessaire le tuyau d’aspiration à la poignée.
Vous pouvez utiliser le bouton à glissière situé sur le
tuyau d’aspiration télescopique pour régler la longueur
individuellement. (Page 4, Fig. A)
Installez l’accessoire pour les sols ou tout autre acces-
soire.
Embout suceur
Suceur de plancher (17)
Vous pouvez nettoyer des surfaces et tapis lisses à l’aide du
suceur de plancher.
Ajuster le sélecteur (16) en fonction de la condition du sol :
Pour les sols en dur tels que les sols stratiés,
le carrelage, PVC, etc.
Pour les sols en moquette, les tapis, etc. plus
ou moins épais
Brosse à parquet (19)
Pour un nettoyage délicat des sols en dur sensibles tels que
les parquets, sols stratiés, carrelages, etc.
Embout brosse / ssure (20)
Pour aspirer les canapés, les rideaux, les recoins et les
fentes.
NOTE : Embout “2 en 1” :
Vous pouvez utiliser l’accessoire, comme suceur. Si vous
voulez utiliser la brosse, tirez sur la partie brosse dans le
sens de la èche jusqu’à ce que l’accessoire s’enclenche.
Pour retirer les suceurs du tuyau d’aspiration, enlevez-les en
les tournant légèrement.
Utilisation de l’appareil
1. Déroulez la longueur de câble nécessaire.
ATTENTION :
Vous êtes priés de ne dérouler le câble d’alimenta-
tion que jusqu’à la marque jaune.
Ne le déroulez en aucun cas jusqu’à la marque
rouge, cela risque d’endommager le dispositif.
18
BS1302_IM 08.03.16
NOTE :
Si le marquage est visible, faites rentrer le câble à
l’aide de la touche d’enroulement du câble jusqu’au
marquage jaune.
2. Enchez la che au secteur dans une prise de courant de
sécurité installée conformément aux normes.
3. Mettre en marche l’appareil à l’aide de l’interrupteur
marche / arrêt en appuyant sur la touche.
4. Réglez le commutateur “Tapis / sol dur“ en fonction du
revêtement du sol.
5. Ajuster la puissance d'aspiration à l'aide du contrôle de
puissance d'aspiration.
6. Aspirez maintenant avec régularité. Il est inutile d’exercer
une pression pendant que vous aspirez.
NOTE :
Tenez compte du rayon d’action limité dû à la longueur
de câble !
Commande de l’air (1)
Ouvrez le régulateur d’air situé sur la poignée du exible pour
réguler l’air ou pour libérer des objets ayant pu se xer sur
l’embout.
Arrêter et enrouler le câble du secteur
1. Arrêtez l’aspirateur à l’aide de l’interrupteur Marche / Arrêt
et retirez la che de la prise électrique.
2. Maintenez le câble fermement entre vos doigts pour éviter
qu’il ne s’agite de façon incontrôlée.
3. Appuyez sur le bouton de rangement du câble tout en
guidant le câble.
Entretien
Vider le collecteur de poussière
Videz le collecteur de poussière dès que la poussière recueil-
lie atteint la marque MAX.
1. Déconnectez la che électrique de la prise murale.
2. Appuyez sur le bouton (7) pour libérer le collecteur de
poussière. Enlevez le collecteur de poussière.
3. Videz le collecteur de poussière au-dessus d’une pou-
belle. Pour cela, appuyez sur le bouton sur le collecteur
de poussière pour ouvrir la base. (Page 4, Fig. B)
4. Puis, refermez la base.
5. Fixez le collecteur de poussière à l’appareil. Placez-le
d’abord au bas de l’appareil, puis xez-le par le haut avec
le crochet.
6. Vériez que la position du collecteur de poussière est
sûre en levant brièvement l’appareil par sa poignée de
transport.
Le système de ltre
Votre appareil dispose de 4 ltres. Le système de sac à
poussière habituel a été remplacé par un collecteur de
poussière transparent. La vitesse supérieure du débit du
collecteur permet à la poussière lourde et aux particules les
plus petites qui ottent de se séparer de l’“air aspiré”.
Il n’est donc pas nécessaire d’acheter des sacs à poussière.
Les ltres doivent être nettoyés régulièrement.
Le dispositif de ltration (Page 4, Fig. C à H)
Le dispositif de ltration est constitué par :
Filtre nylon
Filtre feutrine
Filtre central
Pré-ltre
Disque de xation
ATTENTION :
Ne jamais laver les composants dans une machine à
laver ou un lave-vaisselle !
Ne pas utiliser de sèche-cheveux pour sécher.
Ne réutiliser l'appareil que lorsque tous les composants
sont entièrement secs et qu'ils ont été installés correc-
tement.
Procéder comme suit pour nettoyer le dispositif de ltration :
1. Vider le récipient à poussière ainsi qu'il est décrit ci-des-
sus. (Étapes 1 - 3)
2. Démonter le dispositif de ltration
2.1. Faire pivoter le dispositif de ltration dans la direc-
tion
. (Fig. C)
2.2. Retirer le dispositif de ltrage du récipient à pous-
sière. (Fig. D)
2.3. Faire pivoter le disque de xation pour le retirer.
(Fig. E)
2.4. Retirer le pré-ltre du ltre central. (Fig. F)
2.5. Ouvrir le couvercle de l'appareil. (Fig. G)
2.6. Retirer le ltre nylon et le ltre en feutrine. (Fig. H)
3. Nettoyer toutes les pièces du dispositif de ltrage, ainsi
que le récipient à poussière sous l'eau courante. Il est
possible d'utiliser une brosse souple.
4. Laisser sécher entièrement toutes les pièces à l'air libre.
5. Assembler le dispositif de ltration
5.1. Insérer le ltre en feutrine, puis le ltre en nylon
dans le couvercle.
5.2. Refermer le couvercle. Celui-ci doit se bloquer
mécaniquement.
5.3. Installer le pré-ltre sur le ltre central.
NOTE :
Le pré-ltre est pourvu d'encoches de différentes
tailles, qui correspondent aux onglets sur le ltre
central.
5.4. Poser le disque de xation sur le pré-ltre et serrer
en le faisant pivoter.
19
BS1302_IM 08.03.16
5.5. Remettre le dispositif de ltration dans le récipient à
poussière : Placer l'onglet de guidage du dispositif
de ltration sur le symbole . Serrer le dispositif
de guidage en le faisant pivoter dans la direction .
Filtre d’échappement
Votre appareil est en outre équipé d’un ltre d’échappement.
Le ltre de sortie est situé à l'arrière de l'appareil.
1. Pousser le verrou (10) vers le bas et retirer la grille de
ventilation.
2. Enlevez l’élément ltrant et nettoyez-le comme décrit
ci-dessus.
3. Replacez entièrement le ltre sec dans la grille de
ventilation.
4. Remettez la grille de ventilation sur l’appareil. Respectez
les ergots. La grille de ventilation doit s’emboîter.
Nettoyage
AVERTISSEMENT :
Débranchez toujours l‘appareil avant de le nettoyer.
En aucun cas plonger l’appareil dans de l’eau pour le nettoyer.
vous risqueriez de provoquer une électrocution ou un incendie.
ATTENTION :
Ne pas utiliser de brosse en l de fer ou autres objets
abrasifs.
Ne pas utiliser de détergents agressifs ou abrasifs.
Servez-vous d’un chiffon doux et sec sans produit additionnel
pour nettoyer le corps du séchoir.
Rangement
Laissez l’appareil refroidir complètement.
Enroulez complètement le câble.
Introduisez le crochet de la brosse pour le sol dans la
position parking située au dos de l’appareil.
En cas de dysfonctionnements
L’appareil ne fonctionne pas.
Solution :
Vériez son branchement au secteur.
Vériez la position de l’interrupteur.
L’appareil n’aspire pas.
Cause possible :
Le collecteur de poussière est plein.
Solution :
Videz le collecteur de poussière.
ou
Cause possible :
Les ltres sont sales.
Solution :
Nettoyez les différentes pièces de l’appareil.
ou
Cause possible :
Un corps étranger se trouve dans le exible d’aspiration
ou dans la tête d’aspiration.
Solution :
Contrôlez les accessoires en vue d’éventuels corps
étrangers.
Données techniques
Modèle : ...................................................................... BS 1302
Alimentation : ....................................... 220 - 240 V~, 50 / 60 Hz
Pression de service : ...............................................................
Poids net : ......................................................................5,30 kg
Nous nous réservons le droit d’apporter des modications
techniques ainsi que des modications de conception dans le
cadre du développement continu de nos produits.
20
BS1302_IM 08.03.16
Donnees Techniques sur les aspirateurs
RÈGLEMENT DÉLÉGUÉ DE LA COMMISSION (EU)
N° 665/2013
Marque de commerce Clatronic
Modèle BS 1302
Utilisation comme aspirateur universel avec brosse pour
le sol
Classe de rendement éner-
gétique
1)
A
Consommation d’énergie
annuelle
2)
kWh/an 28,0
Classe de performance de
nettoyage
Classe de performance de
nettoyage des tapis
E
Classe de performance de
nettoyage des sols durs
B
Classe de ré-émission de
poussière
G
Niveau de puissance sonore
dB(A)
re1pW
85
Puissance nominale W 700
Utilisation comme aspirateur pour sol dur avec brosse
à plancher
Classe de rendement éner-
gétique
1)
A
Consommation d’énergie
annuelle
2)
kWh/an 20,4
Classe de performance de
nettoyage
Classe de performance de
nettoyage des sols durs
D
Classe de ré-émission de
poussière
G
Niveau de puissance sonore
dB(A)
re1pW
85
Puissance nominale W 700
1) A (rendement le plus élevé) à G (rendement le plus bas).
2)
Consommation d’énergie annuelle indicative (kWh par an),
sur la base de 50 nettoyages.
La consommation d’énergie annuelle réelle dépendra de
la manière dont l’appareil est utilisé.
L’appareil répond aux normes et directives européennes
dans la version en cours à la livraison :
Directive Basse tension (LVD) 2014/35/EU
Directive sur la compatibilité électromagnétique (EMC)
2014/30/EU
Directive RoHS 2011/65/EC
Directive Ecodesign (ErP) 2009/125/EC
Exigences Ecodesign du RÈGLEMENT DE LA COMMIS-
SION (EU) N° 666/2013 sur les aspirateurs
Élimination
Signication du symbole “Élimination“
Protégez votre environnement, ne jetez pas vos
appareils électriques avec les ordures ména-
gères.
Utilisez, pour l’élimination de vos appareils
électriques, les bornes de collecte prévues à
cet effet où vous pouvez vous débarrasser des
appareils que vous n’utilisez plus.
Vous contribuez ainsi à éviter les impacts potentiels dans
l’environnement et sur la santé de chacun, causés par une
mauvaise élimination de ces déchets.
Vous contribuez aussi au recyclage sous toutes ses formes
des appareils électriques et électroniques usagés.
Vous trouverez toutes les informations sur les bornes
d’élimination des appareils auprès de votre commune ou de
l’administration de votre communauté.
21
BS1302_IM 08.03.16
Instrucciones de servicio
Le agradecemos la conanza depositada en este producto y
esperamos que disfrute de su uso.
Símbolos en este manual de instrucciones
Advertencias importantes para su seguridad están señaladas
en especial. Siga estas advertencias incondicionalmente,
para evitar accidentes y daños en el aparato:
AVISO:
Advierte ante los peligros para su salud y demuestra
posibles riesgos de herida.
ATENCIÓN:
Indica los posibles riesgos para el aparato u otros objetos.
NOTA:
Pone en relieve consejos e informaciones para usted.
Notas generales
Antes de la puesta en servicio de este aparato lea dete-
nidamente el manual de instrucciones y guarde éste bien
incluido la garantía, el recibo de pago y si es posible también
el cartón de embalaje con el embalaje interior. En caso de
dejar el aparato a terceros, también entregue el manual de
instrucciones.
Solamente utilice el aparato para el uso privado y para el
n previsto. Este aparato no está destinado para el uso
profesional.
No lo utilice al aire libre. No lo exponga al calor, a la
entrada directa de rayos de sol, a la humedad (en ningún
caso sumerja el aparato en agua) y a los cantos agudos.
No utilice el aparato con las manos húmedas. En caso de
que el aparato esté húmedo o mojado retire de momento
la clavija de la caja de enchufe.
Desconecte el aparato y siempre retire la clavija de la
caja de enchufe (por favor tire de la clavija y no del cable),
cuando no quiera utilizar el aparato, montar piezas o en
caso de limpieza o defectos.
No utilice el aparato sin vigilancia. En caso de salir de
la habitación, desconecte siempre el aparato. Retire la
clavija de la caja de enchufe.
El aparato y el cable de alimentación de red se deben
controlar regularmente para garantizar que no estén
dañados. En caso de que se comprobara un daño, no se
podrá seguir utilizando el aparato.
Solamente utilice accesorios originales.
Para la seguridad de sus niños no deje material de
embalaje (Bolsas de plástico, cartón, poliestireno etc.) a
su alcance.
AVISO:
No deje jugar a los niños con la lámina. ¡Existe peligro
de asxia!
Instrucciones especiales de seguridad para el aparato
No intente reparar el aparato. Póngase en contacto con un técnico
autorizado. Si el cable de alimentación está dañado, corresponde al
fabricante, a su representante o persona de cualicación similar su
reemplazo para evitar peligros.
Pueden utilizar este aparato niños mayores de 8 años y personas
con minusvalías físicas, sensoriales o mentales, o sin experiencia
ni conocimientos, siempre que se les someta a supervisión o se les
instruya respecto a su uso de forma segura y de manera que en-
tiendan los peligros existentes.
Los niños no deben jugar con el aparato.
La limpieza y el mantenimiento no deben realizarlo niños sin su-
pervisión.
¡No aspiren nunca agua u otro líquido!
22
BS1302_IM 08.03.16
¡No aspiren nunca cenizas calientes, objetos agudos o cortantes!
¡No utilice el aparato en espacios húmedos!
Nunca aspire sin ltro. ¡Siempre compruebe el correcto ajuste de la
bolsa que acaba de colocar!
¡Durante el funcionamiento mantenga apartado de la boquilla del
aspirador, el pelo, piezas de ropa o extremidades del cuerpo!
¡Mantenga la aspiradora apartada de fuentes de calor como radio-
dores, estufas etc.!
Indicación de los elementos de manejo
1 Control del aire
2 Asa
3 Manguera de aspiración
4 Bloqueo de la cubierta (contenedor de polvo)
5 Botón de encendido / apagado
6 Asa de transporte
7 Botón de apertura del compartimento del polvo
8 Tecla para el enrollamiento de cable
9 Control de potencia de succión
10 Bloqueo de ventilación de la rejilla (ltro exterior)
11 Soporte de apoyo para el tubo telescópico
12 Contenedor de polvo
13 Tapa de base del compartimento del polvo
14 Conexión de manguera
15 Cabezal de conexión para la manguera de la aspiradora
16 Selector de alfombras / suelo duro
17 Boquilla para el suelo (con gancho (sin imagen))
18 Tubo de aspiración telescópico
19 Cepillo para parqué
20 Cepillo / boquilla rinconera combinada
Puesta en marcha
Introduzca el cabezal de conexión de la manguera de
succión en la conexión de la manguera del aparato. Se
debe bloquear mecánicamente.
Para desconectar la manguera de nuevo, pulse el botón
en el cabezal de conexión.
En caso de que sea necesario, encaje el tubo aspirador
en la empuñadura.
Puede utilizar el interruptor deslizante en el tubo de
aspiración telescópico para ajustar la longitud de manera
independiente. (Página 4, Fig. A)
Coloque la tobera de suelo, es decir el accesorio.
Pieza sobrepuesta de tobera
Boquilla para el suelo (17)
Con la boquilla para el suelo podrá limpiar supercies planas
y alfombras.
Ajuste el selector (16) según la condición del suelo:
Para suelos duros duraderos como laminado,
azulejos, PVC, etc.
Para suelos con alfombras, moqueta, etc., con
pelo muy tupido o poco tupido
Cepillo para parqué (19)
Para una limpieza suave de suelos duros sensibles como el
parquet, laminado, azulejos, etc.
Cepillo / boquilla rinconera combinada (20)
Para la aspiración de tapicería, cortinas y en esquinas y en
ranuras etc.
NOTA: Tobera “2 en 1”:
Plegada la puede utilizar como tobera para juntas. Si quie-
re utilizar la tobera de cepillo, tire del cepillo en dirección de
la echa, hasta que encaje mecánicamente.
Para separar los accesorios de la boquilla del tubo de aspira-
ción, tire de ellos girándolos ligeramente.
Uso del aparato
1. Desenrolle el cable necesitado.
ATENCIÓN:
Por favor tire del cable solamente hasta la marca-
ción amarilla.
Nunca tire hasta la marcación roja, ya que el enrolla-
miento de cable se podría estropear.
NOTA:
En caso de que la marcación roja esté visible, recoja el
cable hasta la marcación amarilla con ayuda de la tecla
para el enrollamiento de cable.
2. Introduzca la clavija en una caja de enchufe con tomatie-
rra, e instalada por la norma.
3. Encienda / Apague el equipo con el botón de encendido/
apagado, apretándo el botón hacia abajo.
4. Dependiendo de las características del suelo ajuste el
conmutador “Moqueta / Suelo duro”.
23
BS1302_IM 08.03.16
5. Ajuste la potencia de succión con el controlador de
potencia de succión.
6. Aspire ahora en una velocidad constante. No es necesa-
rio apretar.
NOTA:
Tenga atención con el alcanze del cable, ya que es
limitado!
Control del aire (1)
Abra el regulador de admisión que se encuentra en la em-
puñadura del tubo exible, para su regulación de aire o para
soltar piezas que se hayan pegado en la tobera.
Desconexión y enrollameinto del cable de alimentación
1. Desconecte el aspirador en el conectador / desconectador
y retire la clavija de la caja de enchufe.
2. Mantenga el cable para evitar que se enrolle.
3. Presione la tecla para el enrollamiento de cable y guie
el cable.
Mantenimiento
Vaciado del compartimento del polvo
Vacíe el compartimento del polvo cuando este sucio y alcan-
ce la marca del máximo MAX.
1. Desenchufe de la toma de corriente.
2. Presione el botón (7) para soltar el colector de polvo.
Suelte el compartimento del polvo.
3. Vacíe el compartimento del polvo sobre un cubo de
basura. Para ello, proceda conforme a lo siguiente, pulse
el botón del compartimento del polvo para abrir la tapa de
base. (Página 4, Fig. B)
4. Luego cierre la tapa de base.
5. Acople el compartimento del polvo al aparato. Primero
coloque por la parte inferior al aparato y luego asegúrelo
con el gancho en la parte superior.
6. Compruebe que la posición del compartimento del polvo
está bien sujeta elevando un poco el aparato como si lo
transportara.
Sistema de ltro
El aparato dispone de 4 ltros. El sistema común de bolsa
de polvo se ha sustituido por un compartimento del polvo
transparente. Una mayor velocidad del ujo permite separar
las partículas que otan de la suciedad fuerte y ligera del aire
aspirado.
Por tanto, no es necesario comprar bolsas de polvo.
Los ltros deben limpiarse periódicamente.
Unidad de ltro (Página 4, Fig. C a H)
La unidad de ltro se compone de:
Filtro de nylon
Filtro de vellón
Filtro central
Filtro previo
Disco de sujeción
ATENCIÓN:
¡Nunca lave los componentes en una lavadora o un
lavavajillas!
No use un secador de pelo para secar las piezas.
Utilice el aparato solamente cuando todos los
componentes estén completamente secos y se hayan
instalado correctamente.
Proceda de la siguiente manera para limpiar la unidad de
ltro:
1. Vacíe el depósito de polvo como se describe arriba.
(Pasos 1 - 3)
2. Desmontaje de la unidad de ltro
2.1. Gire la unidad de ltro en dirección
. (Fig. C)
2.2. Saque la unidad de ltro del recipiente de polvo.
(Fig. D)
2.3. Gire el disco de sujeción y tire de él. (Fig. E)
2.4. Tire del ltro previo desde el ltro central. (Fig. F)
2.5. Abra la cubierta de la unidad de ltro. (Fig. G))
2.6. Retire el ltro de nylon y el de vellón. (Fig. H)
3. Limpie todas las partes de la unidad de ltro y el reci-
piente de polvo con agua corriente. Es posible utilizar un
cepillo suave.
4. Deje que todas las partes se sequen completamente al
aire.
5. Montaje de la unidad de ltro
5.1. Inserte el vellón del ltro y luego el ltro de nylon en
la cubierta.
5.2. Cierre la cubierta. Se debe bloquear mecánicamen-
te.
5.3. Coloque el ltro previo en el ltro central.
NOTA:
El ltro previo tiene huecos de diferentes
tamaños, que coinciden con las lengüetas del
ltro central.
5.4. Ajuste el disco de ajuste sobre el ltro previo y
ajuste girándolo.
5.5. Vuelva a colocar la unidad de ltro en el recipiente
de polvo. Alinee la lengüeta en la unidad de ltro
con el
símbolo. Apriete la unidad de ltro
girándola en dirección .
Filtro de salida:
Su aparato también dispone de un ltro de salida.
Se encuentra en la parte posterior del aparato.
1. Pulse el sistema de bloqueo (10) y retire la rejilla de
ventilación.
2. Saque el ltro y límpielo como se ha descrito anterior-
mente.
3. Coloque el ltro totalmente seco en la rejilla de ventila-
ción.
4. Vuelva a poner la rejilla de ventilación en el aparato.
Observe las orejetas de guía. La rejilla de ventilación
debe encajar y oírse como claramente.
24
BS1302_IM 08.03.16
Limpieza
AVISO:
Desconecte siempre el aparato antes de limpiarlo.
Para la limpieza, en ningún caso sumergir el aparato en agua.
Podría causar un electrochoque o un incendio.
ATENCIÓN:
No utilice un cepillo de alambre u objetos abrasivos.
No utilice detergentes agresivos o abrasivos.
Limpie la carcasa con un paño suave y seco, sin emplear
ningún agente adicional.
Almacenamiento
Deje enfriar el aparato completamente.
Enrolle el cable por completo.
Cuelgue por favor el gancho en la tobera de suelo en la
ayuda de estacionamiento que se encuentra en la parte
posterior del aparato.
Reparación de fallos
El aparato no tiene función.
Remedio:
Supervise la conexión de red.
Supervise la posición del interruptor.
El aparato no aspira.
Causa probable:
El compartimento del polvo está lleno.
Remedio:
Vacíe el compartimento del polvo.
o
Causa probable:
Los ltros están ensuciados.
Remedio:
Limpie las piezas.
o
Causa probable:
En la manguera aspirante o en la tobera se encuentra un
cuerpo extraño.
Remedio:
Controle, si hay un cuerpo extraño en los accesorios.
Datos técnicos
Modelo: ....................................................................... BS 1302
Suministro de tensión: ......................... 220 - 240 V~, 50 / 60 Hz
Clase de protección: ...............................................................
Peso neto: ......................................................................5,30 kg
El derecho de realizar modicaciones técnicas y de diseño
en el curso del desarrollo continuo del producto está reser-
vado.
Datos Técnicos para aspiradoras
REGLAMENTO DELEGADO DE LA COMISIÓN (EU)
Nº 665/2013
Marca comercial Clatronic
Modelo BS 1302
Uso de aspirador universal con boquilla para suelo
Clase de eciencia energé-
tica
1)
A
Consumo de energía
Consumo de energía anual
2)
kWh/año 28,0
Clase de ecacia de limpieza
Clase de ecacia de limpieza
de alfombras
E
Clase de ecacia de la limpieza
del suelos
B
Clase de reemisión de polvo G
Nivel de potencia de sonido
dB(A)
re1pW
85
Potencia nominal de entrada W 700
25
BS1302_IM 08.03.16
Uso de aspirador para suelo duro con boquilla para
parqué
Clase de eciencia energé-
tica
1)
A
Consumo de energía
consumo de energía anual
2)
kWh/año 20,4
Clase de ecacia de limpieza
Clase de ecacia de la limpieza
del suelos
D
Clase de reemisión de polvo G
Nivel de potencia de sonido
dB(A)
re1pW
85
Potencia nominal de entrada W 700
1) A (de mayor eciencia) a G (menor eciencia).
2) Consumo indicativo anual de energía (kWh al año), en
base a 50 tareas de limpieza.
El consumo anual de energía real depende de cómo se
utilice el aparato.
El dispositivo cumple con las normas y directivas euro-
peas en la versión actual en el momento de la entrega:
Directiva de Voltaje Bajo (LVD) 2014/35/EU
Compatibilidad Electromagnética (EMC) Legislación
2014/30/EU
Conformidad con la Directiva RoHS 2011/65/UE
Directiva Diseño ecológico: 2009/125/CE
REGULACIÓN DE LA COMISIÓN (EU) nº 666/2013 sobre
los requisitos de diseño ecológico para aspiradoras
Eliminación
Signicado del símbolo “Cubo de basura”
Proteja nuestro medio ambiente, aparatos
eléctricos no forman parte de la basura domés-
tica.
Haga uso de los centros de recogida previstos
para la eliminación de aparatos eléctricos y
entregue allí sus aparatos eléctricos que no
vaya a utilizar más.
Ayudará en evitar las potenciales consecuencias, a causa
de una errónea eliminación de desechos, para el medio
ambiente y la salud humana.
Con ello, contribuirá a la recuperación, al reciclado y a otras
formas de reutilización de los aparatos viejos eléctricos y
electrónicos.
La información cómo se debe eliminar los aparatos, se
obtiene en su ayuntamiento o su administración municipal.
26
BS1302_IM 08.03.16
Istruzioni per l’uso
Grazie per aver scelto il nostro prodotto. Vi auguriamo un
buon utilizzo del dispositivo.
Simboli per questo manuale di istruzioni per l’uso
Le indicazioni importanti per la propria sicurezza sono indicati
appropriatamente. Osservare assolutamente queste indica-
zioni, per evitare incidenti e danni all’apparecchio:
AVVISO:
Previene i rischi della propria salute ed indica possibili
rischi di ferite.
ATTENZIONE:
Indica possibili pericoli per l’apparecchio o altri oggetti.
NOTA: Mette in risalto consigli ed informazioni.
Note generali
Prima di mettere in funzione questo apparecchio, leggere
molto attentamente le istruzioni per l’uso e conservarle con
cura unitamente al certicato di garanzia, allo scontrino e, se
possibile, alla scatola di cartone con la confezione interna. Se
passate l‘apparecchio a terzi, consegnate anche le istruzioni
per l‘uso.
Utilizzare l’apparecchio esclusivamente per scopi privati
e conformemente al tipo di applicazione previsto. Questo
prodotto non è stato concepito ai ni di un impiego in
ambito industriale.
Non utilizzarlo all’aperto. Proteggerlo dal calore, nonché
dall’esposizione diretta ai raggi solari e dall’umidità (non
immergerlo mai in sostanze liquide) e tenerlo a distanza
da oggetti con spigoli aflati. Non utilizzare l’apparecchio
con le mani umide. Nel caso in cui si bagni o si inumidisca
l’apparecchio, staccare immediatamente la spina.
Disattivare l’apparecchio e staccare sempre la spina dalla
relativa presa (prendendo in mano la spina, non tirando
il cavo) allorché non si utilizza l’apparecchio, quando
si applicano degli accessori oppure nel caso in cui lo si
debba pulire o si siano manifestate anomalie.
Non mettere in funzione l’ apparecchio senza sorveglian-
za. Spegnere sempre l’apparecchio, se si desidera uscire
dalla stanza. Estrarre la spina dalla presa.
Controllare regolarmente che l‘apparecchio e il cavo non
presentino tracce di danneggiamento. In tal caso l‘appa-
recchio non deve più essere utilizzato.
Utilizzare esclusivamente accessori originali.
Per sicurezza tenere l’imballaggio (sacchetto di plastica,
scatola, polistirolo, ecc.) fuori dalla portata dei bambini.
AVVISO:
Non lasciar giocare i bambini piccoli con la pellicola.
Pericolo di soffocamento!
Avvertenze speciali di sicurezza per questo apparecchio
Non tentare di riparare l’apparecchio da soli. Contattare sempre un
tecnico autorizzato. Se il cavo di alimentazione è danneggiato, farlo
sostituire dal produttore, dall’agente addetto all’assistenza oppure
da personale qualicato per evitare situazioni pericolose.
Il ferro da stiro può essere utilizzato dai bambini da 8 anni in su e
dalle persone con ridotte abilità siche, sensoriali o mentali o man-
canza di esperienza e conoscenza sotto la diretta supervisione o
dietro istruzioni sull’uso sicuro dell’apparecchio e sui possibili peri-
coli derivanti dal suo utilizzo.
Il bambini non devono giocare con l’apparecchio.
Pulizia e manutenzione non devono essere eseguiti da bambini
senza supervisione.
Non utilizzare l’apparecchio per aspirare sostanze liquide o umide!
27
BS1302_IM 08.03.16
Non utilizzare l’apparecchio per aspirare ceneri ancora calde oppu-
re oggetti aflati o acuminat!
Non usare l’apparecchio in locali umidi!
Non utilizzare mai l’apparecchio senza ltro. Dopo aver usato l’aspi-
rapolvere, accertarsi sempre che il ltro sia installato correttamente
nella posizione corrispondente!
Durante l’utilizzo dell’apparecchio, tenere la bocchetta dell’aspirato-
re lontana da capelli, abiti e da altre parti del corpo!
Tenere l’aspiratore lontano dalle fonti di calore quali i radiatori, il for-
no, ecc!
Elementi di comando
1 Comando aria
2 Impugnatura
3 Flessibile aspirazione
4 Blocco del coperchio (contenitore della polvere)
5 Interruttore on / off
6 Impugnatura
7 Pulsante di apertura del collettore della polvere
8 Tasto del sistema avvolgicavo
9 Controllo potenza di aspirazione
10 Blocco della griglia di ventilazione (ltro di uscita)
11 Fermo di posizionamento
12 Contenitore della polvere
13 Piastra di base del collettore della polvere
14 Collegamento essibile
15 Testina di collegamento essibile vuoto
16 Selettore tappeti / pavimenti duri
17 Bocchetta per pavimenti (con gancio (senza g.))
18 Tubo di aspirazione telescopico
19 Spazzola per parquet
20 Spazzola / ugello fessure combinati
Messa in funzione
Inserire l’estremità di collegamento del tubo di aspirazione
nella manichetta di collegamento del dispositivo. Deve
bloccarsi meccanicamente.
Per scollegare il tubo, premere il tasto sulla testa di
connessione.
Eventualmente inlare il tubo di aspirazione nell’impu-
gnatura.
Puoi usare l’interruttore a scorrimento sul tubo di aspira-
zione telescopico per regolare la lunghezza individualmen-
te. (Pagina 4, Fig. A)
Montare la bocchetta pavimenti o un altro accessorio.
Supporto bocchette
Bocchetta per pavimenti (17)
È possibile pulire superci lisce e tappeti con l’ugello
pavimento.
Impostare il selettore (16) in base alle condizioni del
pavimento:
Per pavimenti duri e resistenti come laminato,
piastrelle, PVC, ecc.
Per moquette, tappeti, ecc. con pelo lungo o
corto
Spazzola per parquet (19)
Per la pulizia delicata di pavimenti resistenti e delicati come
parquet, laminato, piastrelle, ecc.
Spazzola / ugello fessure combinati (20)
Per la pulizia di imbottiti, tende, angoli, fessure eccetera.
NOTA: Bocchetta “2 in 1”:
Utilizzandola nella sua forma chiusa, questa bocchetta può
essere impiegata come bocchetta per giunti. Nel caso in
cui si desideri invece utilizzare la bocchetta a spazzola, è
necessario tirare la spazzola nella direzione indicata dalla
freccia, nché essa non si innesti meccanicamente in
posizione.
Per staccare gli attacchi ugello dal tubo di aspirazione,
staccarli girandoli leggermente.
Utilizzo dell’apparecchio
1. Srotolare il cavo nella lunghezza necessaria.
ATTENZIONE:
Si raccomanda di estrarre il cavo soltanto no al
contrassegno in colore giallo.
28
BS1302_IM 08.03.16
ATTENZIONE:
Non tirare mai, in nessun caso, il cavo sino al con-
trassegno rosso, in quanto il dispositivo avvolgicavo
potrebbe danneggiarsi.
NOTA:
Se la tacca rossa è visibile, tirare nuovamente il cavo
no alla tacca gialla servendosi del tasto avvolgicavo.
2. Inserire la spina in una presa con contatto di terra regolar-
mente installata.
3. Accendere l’apparecchio con l’interruttore on / off, tenendo
il tasto premuto all’ingiù.
4. A seconda del pavimento regolare il selettore “Moquette /
pavimenti duri”.
5. Impostare la potenza di aspirazione utilizzando il controllo
della potenza di aspirazione.
6. Utilizzare quindi l’apparecchio operando in modo da
usare una velocità sempre costante. Non è necessario
esercitare pressione sull’apparecchio.
NOTA:
Prestare attenzione al raggio d’azione consentito, il
quale dipende dalla lunghezza del cavo!
Comando aria (1)
Aprire la grata di aerazione sull’impugnatura del essibile per
la regolazione dell’aria o per staccare pezzi che aderiscono
alla bocchetta.
Spegnere e avvolgere il cavo
1. Spegnere l’aspirapolvere premendo il tasto On / Off ed
estrarre la spina dalla presa.
2. Si consiglia di tenere il cavo, in modo da impedire movi-
menti violenti e disordinati del medesimo.
3. Premere il pulsante relativo al dispositivo avvolgicavo e
accompagnare il cavo con la mano.
Manutenzione
Svuotamento del collettore della polvere
Svuotare il collettore quando il livello della polvere aspirata
raggiunge il segno MAX.
1. Staccare la spina dalla presa di corrente.
2. Premere il pulsante (7) per aprire il collettore della polve-
re. Rimuovere il collettore.
3. Svuotare il collettore della polvere in una pattumiera. Per
fare ciò, premere il pulsante sul collettore per aprire la
piastra di base. (Pagina 4, Fig. B)
4. Quindi richiudere la pistra di base.
5. Fissare il collettore della polvere all'apparecchio. Posi-
zionarlo sul fondo dell'apparecchio e poi ssarlo tramite il
gancio nella parte superiore.
6. Vericare la corretta posizione del collettore della polvere
sollevando brevemente l'apparecchio dalla maniglia.
Il sistema di ltraggio
L’apparecchio dispone di 4 ltri. Il comune sistema a sacchet-
to è stato sostituito da un collettore della polvere trasparente.
La superiore velocità di usso del collettore consente di
separare dall’aria aspirata sia lo sporco pesante che le
particelle più piccole.
Non è quindi necessario acquistare sacchetti.
I ltri devono essere puliti periodicamente.
L'unità ltro (Pagina 4, Fig. da C ad H)
L'unità ltro è costituita da:
Filtro in nylon
Filtro in tessuto
Filtro centrale
Pre-ltro
Disco di ssaggio
ATTENZIONE:
Non lavare mai le parti in lavatrice o in lavastoviglie!
Non utilizzare un asciugacapelli per asciugare.
Utilizzare di nuovo l'apparecchio solo quando tutte le
parti sono completamente asciutte e sono state montate
correttamente.
Per pulire l'unità ltro, procedere nel seguente modo:
1. Vuotare il contenitore della polvere come descritto sopra.
(Passi 1 - 3)
2. Smontaggio dell'unità ltro
2.1. Ruotare l'unità ltro in direzione
. (Fig. C)
2.2. Estrarre l'unità ltro dal contenitore della polvere.
(Fig. D)
2.3. Ruotare ed estrarre il disco di ssaggio. (Fig. E)
2.4. Estrarre il pre-ltro dal ltro centrale. (Fig. F)
2.5. Aprire il coperchio dell'unità ltro. (Fig. G)
2.6. Rimuovere il ltro in nylon ed il ltro in tessuto. (Fig. H)
3. Pulire tutte le parti dell'unità ltro ed il contenitore della
polvere sotto l'acqua corrente. E' possibile usare una
spazzola morbida.
4. Lasciare asciugare tutte le parti completamente all'aria.
5. Montaggio dell'unità ltro
5.1. Inserire il ltro in tessuto e poi il ltro in nylon nel
coperchio.
5.2. Chiudere il coperchio. Deve bloccarsi meccanica-
mente.
5.3. Posizionare il pre-ltro sul ltro centrale.
NOTA:
Il pre-ltro ha recessi di varie dimensioni, che
corrispondono alle linguette sul ltro centrale.
5.4. Posizionare il disco di ssaggio sul pre-ltro e
ruotarlo per ssarlo in posizione.
5.5. Rimettere l'unità ltro nel contenitore della polvere.
Allineare la linguetta guida sull'unità ltro al simbolo
. Fissare l'unità ltro in posizione ruotandola in
direzione .
29
BS1302_IM 08.03.16
Filtro di scarico
L’apparecchio dispone inoltre di un ltro di scarico.
E' situato nella parte posteriore dell'apparecchio.
1. Premere il blocco (10) verso il basso e rimuovere la griglia
di ventilazione.
2. Rimuovere l’inserto ltro e pulirlo come descritto sopra.
3. Reinserire il ltro completamente asciutto nella griglia di
ventilazione.
4. Reinserire la griglia di ventilazione sull’apparecchio.
Osserva le alette guida. La griglia di ventilazione deve
ingranare udibilmente.
Pulizia
AVVISO:
Togliere la spina dalla presa prima di pulire.
In nessun caso immergere l‘apparecchio in acqua per la pulizia.
Ne potrebbe conseguire un corto circuito o incendio.
ATTENZIONE:
Non usare pagliette o altri oggetti abrasivi.
Per la pulizia non usare detersivi forti o abrasivi.
Pulire l’esterno con una pezza morbida e asciutta senza
l’aggiunta d’alcuna sostanza.
Conservazione
Lasciate raffreddare completamente l’apparecchio.
Riavvolgere completamente il cavo.
Appendere il gancio che si trova sulla spazzola per
pavimenti nel dispositivo di stazionamento nella parte
posteriore dell‘apparecchio.
Rimozione guasti
L’apparecchio è senza funzione.
Rimedio:
Esaminare il collegamento rete.
Esaminare la posizione dell’interruttore.
L’apparecchio non aspira.
Possibile causa:
Il collettore della polvere è pieno.
Rimedio:
Svuotare il collettore della polvere.
Oppure
Possibile causa:
I ltri sono sporchi.
Rimedio:
Pulire gli elementi.
Oppure
Possibile causa:
Nel essibile o nell’ugello si trova un oggetto.
Rimedio:
Controllare gli accessori in caso di otturazioni dovute ad
oggetti.
Dati tecnici
Modello: ....................................................................... BS 1302
Alimentazione rete: .............................. 220 - 240 V~, 50 / 60 Hz
Classe di protezione: ..............................................................
Peso netto: .....................................................................5,30 kg
Si riserva il diritto di apportare modiche tecniche e di design
nel corso dello sviluppo del prodotto.
Dati tecnici per pulitori ad aspirazione
REGOLAMENTO DELEGATA DALLA COMMISSIONE (UE)
Nr. 665/2013
Marchio commerciale Clatronic
Modello BS 1302
Uso come aspirapolvere universale con bocchetta per
pavimenti
Classe di efcienza energe-
tica
1)
A
Consume di energia
Consumo annuo di energia
2)
kWh/anno 28,0
Classe di prestazione di
energia
Classe di prestazione di pulizia
tappeti
E
Classe I prestazione di puliziat
pavimenti duri
B
Classe di re-emissione
polvere
G
Livello di potenza sonora
dB(A)
re1pW
85
Potenza in ingresso W 700
30
BS1302_IM 08.03.16
Uso come aspirapolvere per pavimenti duri con spazzola
per parquet
Classe di efcienza energe-
tica
1)
A
Consume di energia
Consumo annuo di energia
2)
kWh/anno 20,4
Classe di prestazione di
energia
Classe I prestazione di puliziat
pavimenti duri
D
Classe di re-emissione
polvere
G
Livello di potenza sonora
dB(A)
re1pW
85
Potenza in ingresso W 700
1) Da A (efcienza massima) a G (efcienza minima).
2) Consumo energetico annuo indicativo (kWh per anno), in
base a 50 attività di pulizia.
Il consumo di energia annuo reale dipenderà da come è
utilizzato il dispositivo.
Il dispositivo soddisfa gli standard e le direttive europei
nella versione corrente alla consegna:
Direttiva sulla bassa tensione 2014/35/UE
Direttiva sulla compatibilità elettromagnetica (EMC)
2014/30/UE
Direttiva RoHS 2011/65/UE
Direttiva Ecodesign (ErP) 2009/125/CE
Requisiti di Ecodesign per pulitori ad aspirazione REGO-
LAMENTO DELLA COMMISSIONE (UE) Nr. 666/2013
Smaltimento
Signicato del simbolo “Eliminazione”
Salvaguardare l’ambiente, gli elettrodomestici
non vanno eliminati come riuti domestici.
Per l’eliminazione degli elettrodomestici, fare
uso dei posti di raccolta previsti per questo tipo
e porre quegli elettrodomestici che non sono
più in uso.
Si contribuisce così ad evitare un effetto potenziale sull’am-
biente e sulla salute, dovuto magari ad una eliminazione
sbagliata.
Questo signica un contributo personale alla riutilizzazione, al
riciclaggio e altre forme di utilizzazione di elettrodomestici ed
apparecchi elettronici usati.
Si possono trovare le corrispondenti informazioni sugli appo-
siti luoghi di raccolta, nelle amministrazioni dei comuni.
31
BS1302_IM 08.03.16
Instruction Manual
Thank you for choosing our product. We hope you will enjoy
using the appliance.
Symbols in these Instructions for Use
Important information for your safety is specially marked. It is
essential to comply with these instructions in order to avoid
accidents and prevent damage to the machine:
WARNING:
This warns you of dangers to your health and indicates
possible injury risks.
CAUTION:
This refers to possible hazards to the machine or other
objects.
NOTE: This highlights tips and information.
General Notes
Read the operating instructions carefully before putting the
appliance into operation and keep the instructions including
the warranty, the receipt and, if possible, the box with the
internal packing. If you give this device to other people,
please also pass on the operating instructions.
The appliance is designed exclusively for private use and
for the envisaged purpose. This appliance is not t for
commercial use.
Do not use it outdoors. Keep it away from sources of heat,
direct sunlight, humidity (never dip it into any liquid) and
sharp edges. Do not use the appliance with wet hands. If
the appliance is humid or wet, unplug it immediately.
When cleaning or putting it away, switch off the appliance
and always pull out the plug from the socket (pull the plug
itself, not the lead) if the appliance is not being used and
remove the attached accessories.
Do not operate the machine without supervision. If you
leave the room you should always turn the device off.
Remove the plug from the socket.
The device and the mains lead have to be checked reg-
ularly for signs of damage. If damage is found the device
must not be used.
Use only original spare parts.
In order to ensure your children’s safety, please keep all
packaging (plastic bags, boxes, polystyrene etc.) out of
their reach.
WARNING:
Do not allow small children to play with the foil. There is
a danger of suffocation!
Special Safety Instructions for this Device
Do not try to repair the appliance on your own. Always contact an
authorized technician. If the supply cord is damaged, it must be
replaced by the manufacturer, its service agent or similarly qualied
persons in order to avoid a hazard.
This appliance can be used by children aged from 8 years and
above and persons with reduced physical, sensory or mental capa-
bilities or lack of experience and knowledge if they have been given
supervision or instruction concerning use of the appliance in a safe
way and understand the hazards involved.
Children shall not play with the appliance.
Cleaning and user maintenance shall not be made by children
without supervision.
Do not suck up liquids!
Do not suck up hot ashes or pointed or sharp objects!
Do not use the device in damp rooms!
32
BS1302_IM 08.03.16
Never use without the lter. Check that the lter is inserted correctly!
Hair, clothing and body parts away from the vacuum nozzle during
use!
Keep the vacuum cleaner away from sources of heat like radiators,
ovens, etc.!
Overview of the Components
1 Air slide
2 Handle
3 Suction hose
4 Cover lock (dust container)
5 On / off switch
6 Carrying handle
7 Dust collector release button
8 Cable-winding button
9 Suction power control
10 Ventilation grill lock (outlet lter)
11 Positioning aid
12 Dust container
13 Dust collector base plate
14 Hose connection
15 Connection head of the vacuum hose
16 Carpet / hard oor selector
17 Floor nozzle (with hook (not shown))
18 Telescopic suction tube
19 Parquet brush
20 Combined brush / crevice nozzle
Start-up
Insert the connecting head of the suction hose into the
hose connection of the appliance. It must lock mechan-
ically.
To disconnect the hose again, press the button on the
connecting head.
Insert the vacuum tube into the handle if required.
You can use the sliding switch on the telescopic suction
tube to adjust the length individually. (Page 4, Fig. A)
Then assemble the oor nozzle and / or the accessories.
Nozzle Attachment
Floor nozzle (17)
You can clean smooth surfaces and carpets with the oor
nozzle.
Set the selector (16) according to condition of the oor:
For durable hard oors like laminate, tiles, PVC,
etc.
For carpet oors, rugs, etc. with high or low pile
Parquet brush (19)
For gentle cleaning of sensitive hard oors like parquet,
laminate, tiles, etc.
Combined brush / crevice nozzle (20)
For vacuuming upholstery, curtains and in corners and
crevices etc.
NOTE: “2-in-1” nozzle:
When this is folded together it can be used as a groove
nozzle. If you would like to use the brush nozzle, pull the
brush section in the direction of the arrow until it locks in
place.
To detach the nozzle attachments from the suction pipe, pull
them off by turning them slightly.
Using the Appliance
1. Unwind the length of cable you require.
CAUTION:
Pull out the cable up to the maximum length indicat-
ed with the yellow mark.
Never pull the cable out up to the red mark as the
cable winding can be damaged.
NOTE:
If the red mark is visible, pull in the cable with the help
of the cable winding button back to the yellow mark.
2. Insert the mains plug into a correctly installed power
socket.
3. Turn the device on by the on / off switch by pressing down
the button.
4. Set the “carpet / hard oor” selector, depending on the
oor covering.
5. Set the suction power with the suction power controller.
6. Vacuum at a steady speed. There is no need to exert
pressure.
NOTE:
Pay attention to the range that can be covered with the
cable length!
Air Slide (1)
Open the air slide on the hose handle in order to regulate the
airow or to clear any particles sticking to the nozzle.
33
BS1302_IM 08.03.16
Switching off and Winding up the Mains Lead
1. Turn the vacuum cleaner off by the on / off switch and
remove the plug from the socket.
2. Hold the cable to avoid wrapping.
3. Press the cable winding button and guide the cable.
Maintenance
Emptying the dust collector
Empty the dust collector once the collected dirt reaches the
MAX marking.
1. Disconnect the mains plug from the wall socket.
2. Press the button (7) to release the dust collector. Remove
the dust collector.
3. Empty the dust collector over a dustbin. In order to do so,
press the button on the dust collector to open the base
plate. (Page 4, Fig. B)
4. Then close the base plate again.
5. Attach the dust collector to the appliance. First position it
at the bottom of the appliance and then secure it with the
hook on top.
6. Check that the position of the dust collector is secure by
briey lifting the appliance at its carrying handle.
The Filter System
Your appliance features 4 lters. The common dust bag
system has been replaced by a transparent dust collector.
The higher ow speed of the collector allows for heavy dirt
and smallest oating particles to be separated from the
“sucked-in air”.
It is thus not necessary to buy dust bags.
The lters must be cleaned periodically.
The lter unit (Page 4, Fig. C to H)
The lter unit is composed of:
Nylon lter
Filter eece
Central lter
Pre-lter
Fastening disk
CAUTION:
Never wash the components in a washing machine or a
dishwasher!
Do not use a hairdryer for drying.
Operate the appliance again only when all components
are completely dry and have been installed correctly.
Proceed as follows to clean the lter unit:
1. Empty the dust container as described above. (Steps
1 - 3)
2. Disassembly of the lter unit
2.1. Turn the lter unit in the
direction. (Fig. C)
2.2. Pull the lter unit from the dust container. (Fig. D)
2.3. Turn the fastening disk and pull it off. (Fig. E)
2.4. Pull the pre-lter from the central lter. (Fig. F)
2.5. Open the cover of the lter unit. (Fig. G)
2.6. Remove the nylon lter and the lter eece. (Fig. H)
3. Clean all parts of the lter unit and the dust container
under running water. You may use a soft brush.
4. Allow all parts to dry completely in air.
5. Assembly of the lter unit
5.1. Insert the lter eece and then the nylon lter into
the cover.
5.2. Close the cover. It must lock mechanically.
5.3. Set the pre-lter to the central lter.
NOTE:
The pre-lter has recesses of different sizes,
which match the tabs on the central lter.
5.4. Set the fastening disk onto the pre-lter and tighten
it by turning.
5.5. Replace the lter unit in the dust container: Set
the guide tab on the lter unit to the
symbol.
Tighten the lter unit by turning it in the direction.
Outlet lter
The appliance is also equipped with an outlet lter.
It is located on the back of the appliance.
1. Push the lock (10) down and remove the ventilation grill.
2. Remove the lter insert and clean it as described above.
3. Place the completely dry lter back into the ventilation
grille.
4. Put the ventilation grille back on the appliance. Observe
the guide lugs. The ventilation grid must engage audibly.
Cleaning
WARNING:
Before cleaning remove the mains lead from the socket.
34
BS1302_IM 08.03.16
WARNING:
Under no circumstances should you immerse the device in water
for cleaning purposes. Otherwise this might result in an electric
shock or re.
CAUTION:
Do not use a wire brush or any abrasive items.
Do not use any acidic or abrasive detergents.
Clean the housing with a soft, dry cloth without additives.
Storage
Let the device cool down completely.
Wind the cable completely.
Please insert the hook of the oor nozzle into the parking
assistant on the rear of the device.
Troubleshooting
The device does not work.
Remedy:
Check the connection to the mains.
Check the position of the switch.
The device does not suck up anything.
Possible Cause:
The dust collector is full.
Remedy:
Empty the dust collector.
or
Possible Cause:
The lters are dirty.
Remedy:
Clean the components.
or
Possible Cause:
There is a foreign body in the suction tube or the nozzle.
Remedy:
Check the accessories for foreign bodies.
Technical Data
Model:..........................................................................BS 1302
Power supply:....................................... 220 - 240 V~, 50 / 60 Hz
Protection class: ......................................................................
Net weight: .....................................................................5.30 kg
The right to make technical and design modications in the
course of continuous product development remains reserved.
Technical Data for vacuum cleaners
COMMISSION DELEGATED REGULATION (EU)
Nr. 665/2013
Trade mark Clatronic
Model BS 1302
Use as universal vacuum cleaner with oor nozzle
Energy efciency class
1)
A
Energy consumption
Annual energy consumption
2)
kWh/year 28.0
Cleaning performance class
Carpet cleaning performance
class
E
Hard oor cleaning performance
class
B
Dust re-emission class G
Sound power level
dB(A)
re1pW
85
Rated input power W 700
Use as hard oor vacuum cleaner with parquet brush
Energy efciency class
1)
A
Energy consumption
Annual energy consumption
2)
kWh/year 20.4
Cleaning performance class
Hard oor cleaning performance
class
D
Dust re-emission class G
Sound power level
dB(A)
re1pW
85
Rated input power W 700
1) A (highest efciency) to G (lowest efciency).
2) Indicative annual energy consumption (kWh per year),
based on 50 cleaning tasks.
Actual annual energy consumption will depend on how
the appliance is used.
35
BS1302_IM 08.03.16
The device meets the European standards and directives
in the current version at delivery:
Low Voltage Directive (LVD) 2014/35/EU
Electromagnetic Compatibility (EMC) Legislation Directive
2014/30/EU
RoHS-directive 2011/65/EU
Ecodesign-directive (ErP) 2009/125/EC
Ecodesign requirements for vacuum cleaners COMMIS-
SION REGULATION (EU) No 666/2013
Disposal
Meaning of the “Dustbin” Symbol
Protect our environment: do not dispose of
electrical equipment in the domestic waste.
Please return any electrical equipment that
you will no longer use to the collection points
provided for their disposal.
This helps avoid the potential effects of incorrect
disposal on the environment and human health.
This will contribute to the recycling and other forms of re-utili-
sation of electrical and electronic equipment.
Information concerning where the equipment can be dis-
posed of can be obtained from your local authority.
36
BS1302_IM 08.03.16
Instrukcja obsługi
Dziękujemy za wybór naszego produktu. Mamy nadzieję, że
korzystanie z urządzenia sprawi Państwu radość.
Symbole użyte w tej instrukcji obsługi
Ważne informacje dotyczące bezpieczeństwa użytkownika są
specjalnie wyróżnione. Koniecznie stosuj się do tych wskazó-
wek, aby uniknąć wypadków i uszkodzenia urządzenia.
OSTRZEŻENIE:
Ostrzega przed zagrożeniami dla zdrowia i wskazuje na
potencjalne ryzyka obrażeń.
UWAGA:
Wskazuje na potencjalne zagrożenia dla urządzenia lub
innych przedmiotów.
WSKAZÓWKA:
Wyróżnia porady i informacje ważne dla użytkownika.
Uwagi ogólne
Przed uruchomieniem urządzenia proszę bardzo dokładnie
przeczytać instrukcję obsługi. Proszę zachować ją wraz z
kartą gwarancyjną, paragonem i w miarę możliwości również
kartonem z opakowaniem wewnętrznym. Przekazując urzą-
dzenie innej osobie, oddaj jej także instrukcję obsługi.
Proszę wykorzystywać urządzenie jedynie dla prywatnego
celu, jaki został przewidziany dla urządzenia.
Urządzenie to nie zostało przewidziane do użytku w
ramach działalności gospodarczej.
Proszę nie korzystać z urządzenia na zewnątrz. Proszę
trzymać urządzenie z daleka od ciepła, bezpośredniego
promieniowania słonecznego, wilgoci (w żadnym wypadku
nie zanurzać w substancjach płynnych) oraz ostrych
krawędzi. Proszę nie obsługiwać urządzenia wilgotnymi
dłońmi. Jeżeli urządzenie jest wilgotne lub mokre, proszę
natychmiast wyciągnąć wtyczkę.
Jeżeli nie korzystacie Państwo z urządzenia, jeżeli
chcecie Państwo zamontować jakieś akcesoria, w celu
wyczyszczenia lub w przypadku jakichkolwiek zakłóceń,
proszę zawsze wyłączyć urządzenie i wyjąć wtyczkę z
gniazdka (należy ciągnąć za wtyczkę, nie za przewód).
Pracującego urządzenia nie należy pozostawiać bez
nadzoru. Przed opuszczeniem pomieszczenia urządzenie
należy zawsze wyłączać i wyciągać wtyczkę sieciową z
gniazda.
Należy regularnie sprawdzać, czy urządzenie i kabel
sieciowy nie są uszkodzone. W razie uszkodzenia należy
przestać korzystać z urządzenia.
Proszę stosować tylko oryginalne akcesoria.
Dla bezpieczeństwa dzieci proszę nie zostawiać swo-
bodnie dostępnych części opakowania (torby plastikowe,
kartony, styropian itp.).
OSTRZEŻENIE:
Nie pozwalaj dzieciom bawić się folią. Niebezpieczeń-
stwo uduszenia!
Specjalne wskazówki związane z bezpieczną
obsługą tego urządzenia
Nie próbować naprawiać urządzenia samodzielnie. Skontaktować
się z pracownikiem autoryzowanego serwisu. Jeśli przewód zasi-
lania jest uszkodzony, należy go wymienić u producenta, przedsta-
wiciela serwisu lub podobnie wykwalikowanej osoby, aby uniknąć
zagrożenia.
Urządzenie to może być używane przez dzieci w wieku lat 8 lub
starsze, osoby z obniżoną sprawnością zyczną, zmysłową lub
umysłową, osoby z brakiem doświadczenia i wiedzy, jeśli są one
nadzorowane lub gdy je poinstruowano jak korzystać z tego urzą-
dzenia w bezpieczny sposób, i gdy zdają sobie sprawę z istnieją-
cych niebezpieczeństw.
Dzieci nie powinny bawić się tym urządzeniem.
37
BS1302_IM 08.03.16
Czyszczenie i konserwacja nie powinny być wykonywane przez
dzieci bez nadzoru.
Proszę nie wciągać odkurzaczem cieczy lub wilgoci!
Proszę nie wciągać odkurzaczem gorącego popiołu, przedmiotów
ostrych i ostro zakończonych!
Nie używaj urządzenia w pomieszczeniach wilgotnych!
Proszę nigdy nie odkurzać bez ltra. Po włożeniu ltra proszę
sprawdzić, czy został założony prawidłowo!
Podczas pracy odkurzacza proszę trzymać włosy, ubranie i części
ciała z daleka od końcówki!
Proszę trzymać odkurzacz z daleka od źródeł ciepła takich jak pro-
mienniki, piece itd.!
Przegląd elementów obsługi
1 Zasuwa powietrzna
2 Uchwyt
3 Wąż ssania
4 Blokada pokrywy (pojemnik na brud)
5 Włącznik / wyłącznik
6 Uchwyt do przenoszenia
7 Przycisk zwalniania pojemnika na pył
8 Przycisk zwijania kabla
9 Regulacja mocy ssania
10 Blokada kratki wentylacyjnej (ltr wylotowy)
11 Wspornik na szczotkę
12 Pojemnik na brud
13 Płyta podstawy pojemnika na pył
14 Połączenie przewodu
15 Głowica łączeniowa w przewodzie próżniowym
16 Przełącznik funkcji czyszczenia dywanów /
podłóg twardych
17 Dysza do podłóg (z haczykiem (bez rys.))
18 Teleskopowa rura ssąca
19 Szczotka do parkietu
20 Połączona szczotka / ssawka szczelinowa
Uruchomienie
Włożyć głowicę łączącą węża ssącego do gniazda
połączeniowego na wąż ssący w urządzeniu. Musi dojść
do mechanicznego zablokowania.
W celu odłączenia węża naciśnij przycisk na końcówce
połączeniowej.
Proszę wsunąć rurę zasysającą w uchwyt.
Długość teleskopowej rury ssącej można regulować za
pomocą przesuwanego przycisku. (Str. 4, rys. A)
Proszę zamontować dyszę do podłogi ewent. akcesoria.
Nasadka z dyszą
Dysza do podłóg (17)
Za pomocą dyszy do podłóg można czyścić gładkie po-
wierzchnie oraz dywany.
Ustaw przełącznik (16) zgodnie z rodzajem powierzchni:
Do wytrzymałych podłóg twardych, takich jak
podłoga laminowana, z płytek ceramicznych,
PCW itp.
Do wykładzin podłogowych, dywaników itp. z
długim lub krótkim włosiem
Szczotka do parkietu (19)
Do łagodnego czyszczenia delikatnych podłóg twardych,
takich jak parkiet, podłoga laminowana, z płytek ceramicz-
nych itp.
Połączona szczotka / ssawka szczelinowa (20)
Do odkurzania tapicerki, zasłon oraz w rogach i szczelinach,
itp.
WSKAZÓWKA: „2 w 1“ Dysza:
Złożona nadaje się do stosowania jako dysza do fug. Jeżeli
chcą Państwo użyć dyszy szczotkowej, proszę pociągnąć
za szczotkę w kierunku wskazywanym przez strzałkę, aż
mechanicznego zazębienia się elementu.
Aby zdjąć końcówki dyszy z rury ssącej, należy wyjąć je i
jednocześnie delikatnie obracać.
38
BS1302_IM 08.03.16
Używanie urządzenia
1. Proszę odwinąć wymagany odcinek kabla.
UWAGA:
Kabel sieciowy można wyciągać maksymalnie do
żółtego znacznika.
W żadnym wypadku proszę nie wyciągać kabla do
czerwonego znacznika, gdyż można w ten sposób
uszkodzić funkcję zwijania kabla. Tego typu uszko-
dzenia nie są objęte gwarancją.
WSKAZÓWKA:
Jeżeli widoczna jest czerwona kreska, dociągnij kabel
do żółtej kreski przy użyciu przycisku zwijania.
2. Proszę włożyć wtyczkę do przepisowo zainstalowanego
gniazdka z uziemieniem.
3. Proszę włączyć urządzenie włącznikiem / wyłącznikiem,
wciskając przycisk do dołu.
4. W zależności od rodzaju wykładziny podłogowej użyj jed-
nej z pozycji przełącznika „Dywany / twarde nawierzchnie”.
5. Ustaw moc ssania za pomocą regulatora mocy ssania.
6. Teraz można rozpocząć odkurzanie w równomiernym
tempie. Nie ma konieczności dociskania końcówek do
odkurzanej powierzchni.
WSKAZÓWKA:
Proszę pamiętać, że zasięg odkurzacza ograniczony
jest długością kabla!
Zasuwa powietrzna (1)
W celu regulacji przepływu powietrza lub odczepienia
elementów przylegających do dyszy proszę otworzyć zasuwę
powietrzną.
Wyłączanie i zwijanie kabla zasilającego
1. Wyłącz odkurzacz podłogowy przy użyciu wyłącznika
głównego i wyciągnij wtyczkę z gniazda sieciowego.
2. Proszę mocno trzymać przewód, żeby zapobiec jego
niekontrolowanym ruchom.
3. Proszę wcisnąć przycisk zwijania kabla i wprowadzać
przewód do odkurzacza.
Konserwacja
Opróżnianie pojemnika na pył
Opróżnić pojemnik na pył, gdy zebrany brud sięga znaku
MAX.
1. Odłączyć wtyczkę przewodu zasilania z gniazdka
sieciowego.
2. Nacisnąć przycisk (7) w celu zwolnienia pojemnika na pył.
Opróżnić pojemnik na pył.
3. Opróżnić pojemnik z nagromadzonego pyłu nad koszem
na śmieci. Aby to zrobić, należy nacisnąć przycisk na
pojemniku na pył w celu otwarcia płyty podstawy. (Str. 4,
Rys. B)
4. Następnie ponownie zamknąć płytę podstawy.
5. Pojemnik na pył zamontować do urządzenia. Najpierw
ustawić go w dolnej części urządzenia, a następnie
unieruchomić go za pomocą haka na górze.
6. Sprawdzić, czy położenie pojemnika na pył jest nierucho-
me przez uniesienie urządzenia, chwytając za rączkę do
przenoszenia.
System ltrów
Urządzenie zawiera 4 ltry. Powszechnie stosowany układ
torby na pył został zastąpiony przezroczystym pojemnikiem
na pył. Im większa prędkość przepływu powietrza przez
odkurzacz pozwala na usuwanie silnych zabrudzeń i oddzie-
lenie najmniejszych przepływających z powietrzem cząstek
od „zassanego powietrza”.
Zatem nie ma potrzeby zakupu worków na pył.
Filtry muszą być okresowo czyszczone.
Zespół ltra (Str. 4, rys. od C do H)
Zespół ltra składa się z poniższych elementów:
Filtr nylonowy
Włóknina ltracyjna
Filtr centralny
Filtr wstępny
Tarcza mocująca
UWAGA:
Nie należy nigdy czyścić elementów w pralce ani
zmywarce!
Nie wolno suszyć przy użyciu suszarki do włosów.
Urządzenie można ponownie włączyć dopiero po cał-
kowitym wyschnięciu i prawidłowej instalacji wszystkich
elementów.
Aby wyczyścić zespół ltra, należy wykonać poniższe
czynności:
1. Opróżnij pojemnik na brud zgodnie z powyższym opisem.
(Kroki 1 - 3)
2. Demontaż zespołu ltra
2.1. Przekręć zespół ltra w kierunku symbolu
.
(Rys. C)
2.2. Wyjmij zespół ltra z pojemnika na brud. (Rys. D)
2.3. Przekręć tarczę mocującą i wyjmij ją. (Rys. E)
2.4. Wyjmij ltr wstępny z ltra centralnego. (Rys. F)
2.5. Otwórz pokrywę zespołu ltra. (Rys. G)
2.6. Wyjmij ltr nylonowy i włókninę ltracyjną. (Rys. H)
3. Wyczyść wszystkie elementy zespołu ltra oraz pojemnik
na brud pod bieżącą wodą. Można użyć miękkiej
szczoteczki.
4. Pozostaw wszystkie elementy do całkowitego wyschnię-
cia na powietrzu.
5. Montaż zespołu ltra
5.1. Włóż włókninę ltracyjną, a następnie ltr nylonowy
do pokrywy.
5.2. Zamknij pokrywę. Musi dojść do mechanicznego
zablokowania.
5.3. Umieść ltr wstępny w ltrze centralnym.
39
BS1302_IM 08.03.16
WSKAZÓWKA:
W ltrze wstępnym znajdują się wgłębienia o
różnej wielkości, które pasują do wypustek ltra
centralnego.
5.4. Umieść tarczę mocującą na ltrze wstępnym i
przekręć ją w celu dokręcenia.
5.5. Umieść ponownie zespół ltra w pojemniku na brud:
Ustaw wypustkę naprowadzającą zespołu ltra
w pozycji symbolu
. Przekręć zespół ltra w
kierunku symbolu w celu dokręcenia.
Filtr wylotowy
Dodatkowo urządzenie wyposażone jest w ltr wylotowy.
Znajduje się on z tyłu urządzenia.
1. Przesuń blokadę (10) w dół i wyjmij kratkę wentylacyjną.
2. Wyjąć wkładkę ltra i wyczyścić zgodnie z powyższym
opisem.
3. Umieścić całkowicie suchy ltr z powrotem na kratce
wentylacyjnej.
4. Wstawić kratkę wentylacyjną z powrotem na urządzenie.
Prosimy zwrócić uwagę na prowadzące nadlewy. Zamo-
cowaniu kratki wylotowej powietrza musi towarzyszyć
słyszalny dźwięk kliknięcia.
Czyszczenie
OSTRZEŻENIE:
Przed rozpoczęciem czyszczenia należy zawsze wyjąć wtyczkę z
gniazdka.
Urządzenia parze nie wolno do czyszczenia zanurzać w wodzie.
Może to doprowadzić do porażenia elektrycznego lub pożaru.
UWAGA:
Nie używaj szczotki drucianej ani innych podobnych
przed-miotów.
Nie używaj ostrych lub ściernych środków czyszczących.
Obudowę należy czyścić miękką i suchą ściereczką bez
dodatku żadnych środków czyszczących!
Przechowywanie
Prosimy pozostawić urządzenie do całkowitego schło-
dzenia.
Proszę w całości schować przewód.
Zaczep haczyk dyszy podłogowej w uchwycie na tylnej
ściance urządzenia.
Eliminowanie usterek i zakłóceń
Urządzenie nie działa.
Co robić:
Sprawdź podłączenie do sieci.
Sprawdź położenie wyłącznika.
Urządzenie nie odkurza (brak ssania).
Możliwa przyczyna:
Pojemnik na pył jest zapełniony.
Co robić:
Opróżnić pojemnik na pył.
lub
Możliwa przyczyna:
Filtry są zabrudzone.
Co robić:
Oczyść części.
lub
Możliwa przyczyna:
Ciała obce w wężu ssącym lub dyszy.
Co robić:
Sprawdź osprzęt, czy nie ma w nim ciał obcych.
Dane techniczne
Model:..........................................................................BS 1302
Napięcie zasilające: ............................. 220 - 240 V~, 50 / 60 Hz
Stopień ochrony: .....................................................................
Masa netto: ....................................................................5,30 kg
Zastrzegamy sobie prawo wprowadzania zmian technicznych
i projektowych w trakcie ciągłego rozwoju produktu.
40
BS1302_IM 08.03.16
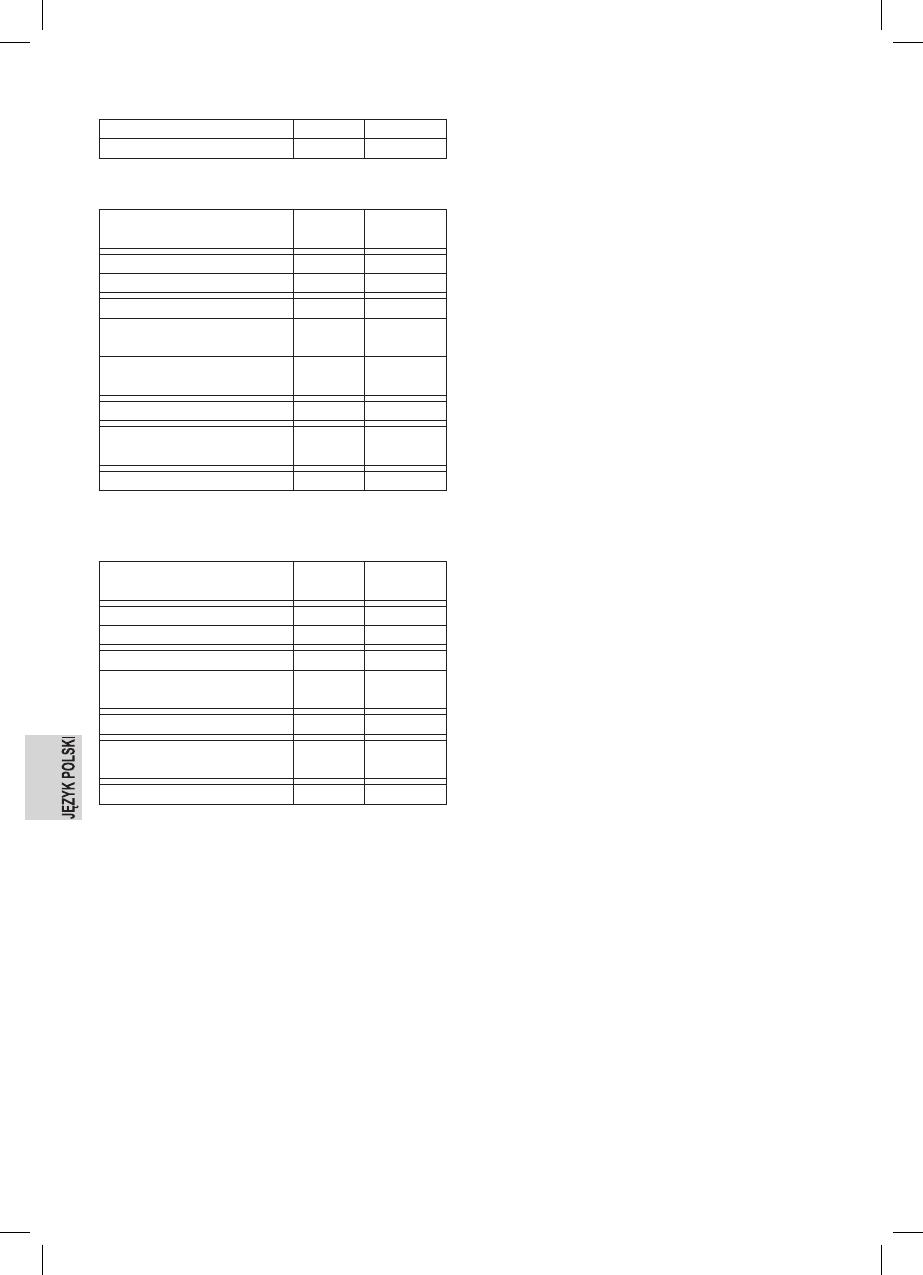
Rozporządzenie delegowane komisji (UE) Nr 665/2013
Znak towarowy Clatronic
Model BS 1302
Użyj jako uniwersalny odkurzacz z dyszą podłogową
Klasa efektywności energe-
tycznej
1)
A
Zużycie energii
Roczne zużycie energii
2)
kWh/rok 28,0
Klasa skuteczności odkurzania
dywanu
E
Klasa skuteczności odkurzania
podłogi twardej
B
Klasa reemisji kurzu G
Poziom głośności
dB(A)
re1pW
85
Znamionowa moc wejściowa W 700
Użyj jako odkurzacza do twardych podłóg ze szczotką
do parkietów
Klasa efektywności energe-
tycznej
1)
A
Zużycie energii
Roczne zużycie energii
2)
kWh/rok 20,4
Klasa skuteczności odkurzania
podłogi twardej
D
Klasa reemisji kurzu G
Poziom głośności
dB(A)
re1pW
85
Znamionowa moc wejściowa W 700
1) Od A (najwyższa efektywność) do G (najniższa efektyw-
ność).
2) Średnie roczne zużycie energii (kWh na rok) zmierzone
na podstawie 50 cykli odkurzania.
Faktyczne roczne zużycie energii zależy od sposobu
użytkowania urządzenia.
Aktualna wersja zakupionego urządzenia jest zgodna z
poniższymi europejskimi standardami i dyrektywami:
Dyrektywa niskonapięciowa (LVD) 2014/35/EU
Dyrektywa dotycząca zgodności elektromagnetycznej
(EMC) 2014/30/EU
Dyrektywa RoHS 2011/65/UE
Dyrektywa w sprawie ekoprojektu (ErP) 2009/125/WE
ROZPORZĄDZENIE KOMISJI w sprawie wymogów
dotyczących ekoprojektu dla odkurzaczy (UE) nr 666/2013
Warunki gwarancji
Przyznajemy 24 miesiące gwarancji na produkt licząc od daty
zakupu.
W tym okresie będziemy bezpłatnie usuwać w terminie 14 dni
od daty dostarczenia wadliwego sprzętu z kartą gwarancyjną
do miejsca zakupu wszystkie uszkodzenia powstałe w tym
urządzeniu na skutek wady materiałów lub wadliwego wyko-
nania, naprawiając oraz wymieniając wadliwe części lub (jeśli
uznamy za stosowne) wymieniając całe urządzenie na nowe.
Sprzęt do naprawy powinien być dostarczony w komplecie
wraz z dowodem zakupu oraz z ważną kartą gwarancyjną do
sprzedawcy w miarę możliwości w oryginalnym opakowaniu
lub innym odpowiednim dla zabezpieczenia przed uszkodze-
niem. W razie braku kompletnego opakowania fabrycznego,
ryzyko uszkodzenia sprzętu podczas transportu do i z
miejsca zakupu ponosi reklamujący.
Naprawa gwarancyjna nie dotyczy czynności przewidzianych
w instrukcji obsługi, do wykonania których zobowiązany jest
użytkownik we własnym zakresie i na własny koszt.
Gwarancja nie obejmuje:
mechanicznych, termicznych, chemicznych uszkodzeń
sprzętu i wywołanych nimi wad,
uszkodzeń powstałych w wyniku działania sił zewnętrz-
nych takich jak wyładowania atmosferyczne, zmiana
napięcia zasilania i innych zdarzeń losowych,
nieprawidłowego ustawienia wartości napięcia elektrycz-
nego, zasilanie z nieodpowiedniego gniazda zasilania,
sznurów połączeniowych, sieciowych, żarówek, baterii,
akumulatorów,
uszkodzeń wyrobu powstałych w wyniku niewłaściwego
lub niezgodnego z instrukcją jego użytkowania, przecho-
wywania, konserwacji, samowolnego zrywania plomb oraz
wszelkich przeróbek i zmian konstrukcyjnych dokonanych
przez użytkownika lub osoby niepowołane,
roszczeń z tytułu parametrów technicznych wyrobu, o ile
są one zgodne z podanymi przez producenta,
prawidłowego zużycia i uszkodzeń, które mają nieistotny
wpływ na wartość lub działanie tego urządzenia.
Karta gwarancyjna bez pieczątki sklepu, daty sprzedaży, nie
wypełniona, źle wypełniona, ze śladami poprawek, nieczy-
telna wskutek zniszczenia, bez możliwości ustalenia miejsca
sprzedaży oraz dołączonego dowodu zakupu jest nieważna.
Korzystanie z usług gwarancyjnych nie jest możliwe po
upływie daty ważności gwarancji. Gwarancja na części lub
całe urządzenie, które są wymieniane kończy się, wraz z
końcem gwarancji na to urządzenie.
Wszystkie inne roszczenia, wliczając w to odszkodowania są
wykluczone chyba, że prawo przewiduje inaczej. Roszczenia
wykraczające poza tą umowę nie są uwzględniane przez tą
gwarancję.
41
BS1302_IM 08.03.16
Gwarancja na sprzedany towar konsumpcyjny nie wyłącza,
nie ogranicza ani nie zawiesza uprawnień kupującego
wynikających z niezgodności towaru z umową.
Gwarancja oraz zawarte w niej warunki obowiązują na
terenie Rzeczpospolitej Polskiej.
Dystrybutor:
CTC Clatronic Sp. z o.o
ul. Opolska 1 a karczów
49 - 120 Dąbrowa
Usuwanie
Znaczenie symbolu „Pojemnik na śmieci“
Proszę oszczędzać nasze środowisko, sprzęt
elektryczny nie należy do śmieci domowych.
Proszę korzystać z punktów zbiorczych, prze-
widzianych do zdawania sprzętu elektrycznego,
i tam proszę oddawać sprzęt elektryczny,
którego już nie będą Państwo używać.
Tym sposobem pomagają Państwo unikać potencjalnych
następstw niewłaściwego usuwania odpadów, mających
wpływ na środowisko i zdrowie ludzi.
Tą drogą przyczyniają się Państwo do ponownego użycia,
do recyklingu i do innych form wykorzystania starego sprzętu
elektrycznego i elektronicznego.
Informacje, gdzie można zdać sprzęt, otrzymają Państwo w
swoich urzędach komunalnych lub w administracji gminy.
42
BS1302_IM 08.03.16
Használati utasítás
Köszönjük, hogy a termékünket választotta. Reméljük,
elégedetten használja majd a készüléket.
A használati útmutatóban található szimbólumok
Az Ön biztonságára vonatkozó utasítások kifejezetten meg
vannak különböztetve. Kérjük, mindenképpen ügyeljen
ezekre annak érdekében, hogy elkerülje a baleseteket és a
készülék károsodását:
FIGYELMEZTETÉS:
Egészségét károsító veszélyforrásokra gyelmeztet és
rámutat a lehetséges sérülési lehetőségekre.
VIGYÁZAT:
Lehetséges veszélyre utal, mely a készülékben vagy más
tárgyakban kárt tehet.
MEGJEGYZÉS: Tippeket és információkat emel ki.
Általános megjegyzések
A készülék használatba vétele előtt gondosan olvassa végig
a használati utasítást, és őrizze meg a garancialevéllel, a
pénztári nyugtával és lehetőleg a csomagolókartonnal, ill. az
abban lévő bélésanyaggal együtt! Amennyiben a készüléket
harmadik személynek adja tovább, a használati útmutatót is
adja a készülékhez.
Kizárólag személyi célra használja a készüléket, és
csupán arra, amire való! A készülék nem ipari jellegű
használatra készült.
Ne használja a szabadban! Ne tegye ki erős hőhatásnak,
közvetlen napsugárzásnak és nedvességnek (semmi
esetre se mártsa folyadékba), és óvja az éles szélektől!
Ne használja a készüléket vizes kézzel! Ha a készülék
vizes vagy nedves lett, azonnal húzza ki a konnektorból!
Kapcsolja ki a készüléket és mindig húzza ki a csatlakozót
a dugaszoló aljzatból (a csatlakozót, ne pedig a vezetéket
húzza), ha nem használja a készüléket, tartozékokat
szerel fel rá, tisztítja vagy zavart észlel.
Ne működtesse a készüléket felügyelet nélkül! Mindig
kapcsolja ki a készüléket, ha elhagyja a helyiséget! Húzza
ki a csatlakozót a dugaszoló aljzatból!
A készüléket és a hálózati kábelt rendszeresen ellenőrizni
kell, hogy nincs-e rajta sérülés jele. Ha sérülést lát rajta, a
készüléket nem szabad használni.
Csak eredeti tartozékokat használjon.
Gyermekei biztonsága érdekében ne hagyja általuk
elérhető helyen a csomagolóelemeket (műanyag zacskó,
karton, sztiropor stb.).
FIGYELMEZTETÉS:
Kisgyermekeket ne engedjen a fóliával játszani. Fulla-
dás veszélye állhat fenn!
A készülékre vonatkozó speciális biztonsági szabályok
Ne próbálja saját kezűleg megjavítani a készüléket. Mindig lépjen
kapcsolatba szakképzett szerelővel. Ha a villanyvezeték megsérül,
a gyártónak, a szerviz ügynökségnek vagy más, hasonlóan képzett
személynek kell a javítást végeznie, a veszélyek elkerülése érdeké-
ben.
A készüléket 8 éves és idősebb gyerekek és csökkent zikai, ér-
zékszervi vagy értelmi képességű személyek és akiknek nincs meg
a tapasztalatuk és tudásuk ehhez, csak akkor használhatják, ha
felügyelet alatt állnak vagy a készülék biztonságos használatára
megtanították őket és megértették az érintett veszélyeket.
A gyerekek nem játszhatnak a készülékkel.
A tisztítást és karbantartást gyerekek felügyelet nélkül nem végez-
hetik.
Ne szívjon fel a készülékkel nedvességet, ill. folyadékokat!
43
BS1302_IM 08.03.16
Ne szívjon fel forró hamut, hegyes vagy éles tárgyakat!
Ne használja a készüléket nedves helyiségekben!
Soha ne porszívózzon lter nélkül! Behelyezés után mindig elle-
nőrizze, hogy a lter megfelelően fekszik-e fel!
Működés közben tartsa távol a porszívófejet a hajától, ruházatától
és a testrészeitől!
Tartsa távol a porszívót olyan hőforrásoktól, mint pl. a radiátorok,
kályha stb.!
A kezelőelemek áttekintése
1 Levegőszabályozás
2 Markolat
3 Gégecső
4 Fedél zárja (portartály)
5 Be / ki kapcsoló
6 Hordozófül
7 Porgyűjtő kioldógomb
8 Kábelfelcsévélő gomb
9 Szívóerő-szabályozó
10 Szellőzőrács zárja (kimeneti szűrő)
11 Pozícionáló segéd
12 Portartály
13 Porgyűjtő alaplemez
14 Csőcsatlakozó
15 A szívócső csatlakozófeje
16 Szőnyeg / keménypadló váltó
17 Padló szívófej (akasztóval (ábra nélkül))
18 Teleszkópikus szívócső
19 Parkettatisztító kefe
20 Kombinált kefe / résszívófej
Használatba vétel
Illessze be a szívócső csatlakozófejét a készülék csőcsat-
lakozójába. A csatlakozás mechanikusan zár.
A cső lecsatlakoztatásához nyomja meg a csatlakozófejen
található gombot.
Ha szükséges, húzza rá a szívócsövet a fogantyúra!
Használhatja a teleszkópikus szívócsőn található csúszó-
kapcsolót a hossz beállításához. (4. oldal, A ábra)
Szerelje fel a padlószívó fejet , ill. a tartozékot!
Szívófej
Padló szívófej (17)
A padló szívófejjel sima felületek és szőnyegek tisztíthatók.
A padlónak megfelelően állítsa a váltót (16) a megfelelő
állásba:
Nagy kopásállóságú kemény padlókhoz,
például laminált padlóhoz, csempéhez, PVC-
hez stb.
Vékony vagy vastag anyagú szőnyegpadlóhoz,
rongyszőnyeghez stb.
Parkettatisztító kefe (19)
Kényesebb keménypadló, pl. parketta, laminált padló, csem-
pe stb. kíméletesebb tisztításához.
Kombinált kefe / résszívófej (20)
Párnásbútor, függönyök, ill. sarkok, rések stb. porszívózá-
sára.
MEGJEGYZÉS: „2 1-ben“ fej:
Összecsukva, résszívófejként használható. Ha kefés
fejként kívánja használni, húzza a kefés részt a nyíl irányá-
ban a mechanikus bekattanásig!
A szívófej egység gégecsőről lecsatlakoztatásához enyhén
elforgatva húzza ki a szívófejet.
A készülék használata
1. Tekerje le a kábelt a szükséges hosszúságban!
VIGYÁZAT:
A hálózati kábelt csak a sárga jelölésig húzza ki!
Semmi esetre se húzza egészen a piros jelölésig,
mert megsérülhet a kábelfelcsévélő.
MEGJEGYZÉS:
Amennyiben a piros jelzés válik láthatóvá, húzza be a
vezetéket a vezetékcsévélő gomb segítségével a sárga
jelzésig.
2. Dugja a dugaszt előírásszerűen szerelt, érintésvédett
konnektorba!
3. Kapcsolja be a készüléket a be/ki kapcsolóval a gomb
lefele nyomásával.
4. A padló minőségétől függően állítsa be a „Szőnyeg /
kemény padló” átkapcsolót.
5. Állítsa be a szívóerőt a szívóerő-szabályozóval.
44
BS1302_IM 08.03.16
6. Porszívózzon egyenletes sebességgel! A porszívót nem
kell rányomni a felületre!
MEGJEGYZÉS:
Ügyeljen a kábel hosszúsága által megszabott hatótá-
volságra!
Levegőszabályozás (1)
A légáram szabályozása vagy a fejre tapadt részek leválasz-
tása céljából nyissa ki a légelzárót!
Kikapcsolás és a vezeték felcsévélése
1. Kapcsolja ki a porszívót a be-és kikapcsoló gombbal és
húzza ki a csatlakozót a dugaszoló aljzatból.
2. Tartsa biztosan, hogy nehogy összetekeredjen!
3. Nyomja meg a kábelfelcsévélő gombot, és vezesse meg
kézzel a begördülő kábelt!
Karbantartás
A porgyűjtő kiürítése
Ürítse ki a porgyűjtőt, amikor az összegyűlt szennyeződés
eléri a MAX jelzést.
1. Húzza ki a hálózati dugaszt a fali elektromos aljzatból.
2. A porgyűjtő kioldásához nyomja meg a gombot (7). Vegye
ki a porgyűjtőt.
3. Ürítse ki a porgyűjtő tartalmát a szemetesbe. Ehhez a
porgyűjtőn az alaplemez kinyitásához nyomja meg a
gombot. (oldal 4, ábra. B)
4. Ezután zárja be újra az alaplemezt.
5. Helyezze be a porgyűjtőt a készülékbe. Először illessze
a helyére a készülék alján, majd a tetején rögzítse a
kampóval.
6. Ellenőrizze, hogy a porgyűjtő helyzete rögzítve van-e,
úgy, hogy a hordozófogantyúnál fogva megpróbálja
kiemeli.
A szűrőrendszer
A készülék 4 szűrővel van ellátva. Az általános porzsákrend-
szer egy átlátszó porgyűjtőre lett kicserélve. A gyűjtő nagyobb
áramlási sebessége lehetővé teszi a nehéz szennyeződések
és a kisebb lebegő részecskék elkülönítését a „beszívott
levegőtől”.
Ezért nincs szükség porzsákok vásárlására.
A szűrőrendszert adott időközönként meg kell tisztítani.
A szűrőegység (4. oldal, C–H ábra)
A szűrőegység a következő elemekből áll:
Nylonszűrő
Szűrőgyapjú
Központi szűrő
Előszűrő
Rögzítőlemez
VIGYÁZAT:
Soha ne mossa az alkatrészeket mosógépben vagy
mosogatógépben!
Ne használjon hajszárítót a szárításhoz.
Csak akkor működtesse újra a készüléket, ha már
minden alkatrész teljesen megszáradt és megfelelően
vissza lett helyezve.
A szűrőegység tisztítása:
1. A fent leírt módon ürítse ki a portartályt. (1 - 3. lépés)
2. A szűrőegység szétszerelése
2.1. Fordítsa el a szűrőegységet a
jelzés irányába.
(C ábra)
2.2. Húzza ki a szűrőegységet a portartályból. (D ábra)
2.3. Fordítsa el és húzza ki a rögzítőlemezt. (E ábra)
2.4. Húzza le az előszűrőt a központi szűrőről. (F ábra))
2.5. Nyissa fel a szűrőegység fedelét. (G ábra)
2.6. Vegye ki a nylonszűrőt és a szűrőgyapjút. (H ábra)
3. Folyóvíz alatt tisztítsa meg a szűrőegység és a portartály
minden elemét. Ehhez puha szőrű kefét is használhat.
4. Levegőn hagyja megszáradni az összes alkatrészt.
5. A szűrőegység összeszerelése
5.1. Helyezze be a szűrőgyapjút és a nylonszűrőt a
fedélbe.
5.2. Zárja le a fedelet. A fedélnek mechanikusan kell
zárnia.
5.3. Helyezze rá az előszűrőt a központi szűrőre.
MEGJEGYZÉS:
Az előszűrőn különböző méretű mélyedések, a
központi szűrőn pedig ennek megfelelő méretű
fülek találhatók.
5.4. Helyezze rá a rögzítőlemezt az előszűrőre, és
elfordítva szorítsa rá.
5.5. Helyezze vissza a szűrőegységet a portartályba
ehhez illessze a vezetőfület a szűrőegységen a
jelzéshez. Szorítsa meg a szűrőegységet: fordítsa
el a jelzéshez.
Kibocsátólter
A porszívónak van még egy kibocsátóltere is.
A kimeneti szűrő a készülék hátulján található.
1. Nyomja le a zárat (10), majd vegye ki a szűrőrácsot.
2. Vegye ki a szűrőbetétet, és tisztítsa meg a fent leírt
módon.
3. Tegye vissza a teljesen száraz szűrőt a szellőzőrácsba.
4. Helyezze vissza a szellőzőrácsot a készülékbe. Ügyeljen
a vezetőfülekre. A szellőzőrácsnak hallhatóan rögzülnie
kell.
45
BS1302_IM 08.03.16
Tisztítás
FIGYELMEZTETÉS:
Minden tisztítás előtt húzza ki a csatlakozót a konnektorból.
A készüléket semmiképpen ne merítse vízbe tisztítás közben. Ez
elektromos áramütést vagy tüzet okozhat.
VIGYÁZAT:
Ne használjon drótkefét vagy más súroló hatású tárgyat.
Ne használjon agresszív vagy súroló hatású tisztítószert.
A készülékházat puha, száraz kendővel tisztítsuktisztítószer
hozzáadása nélkül.
Tárolás
Hagyja a készüléket teljesen kihűlni.
Csévélje fel teljesen a kábelt!
Akassza be a padlószívó fejen található horgot a készülék
hátoldalán lévő parkolóállásba!
Hibaelhárítás
A készülék nem működik.
Megoldás:
Ellenőrizze a hálózati csatlakozást.
Ellenőrizze a kapcsoló állását.
A készülék nem szív.
Lehetséges ok:
A porgyűjtő megtelt.
Megoldás:
Ürítse ki a porgyűjtőt.
vagy
Lehetséges ok:
A szűrők szennyezettek.
Megoldás:
Tisztítsa meg az alkatrészeket.
vagy
Lehetséges ok:
A szívócsőbe vagy a fúvókába valami beszorult.
Megoldás:
Ellenőrizze, hogy nem szorult-e be valami a tartozékba.
Műszaki adatok
Modell: ......................................................................... BS 1302
Feszültségellátás: ................................ 220 - 240 V~, 50 / 60 Hz
Védelmi osztály: ......................................................................
Nettó súly: ......................................................................5,30 kg
A műszaki és kivitelezési módosítások jogát a folyamatos
termékfejlesztés miatt fenntartjuk.
Porszívó Műszaki Asatok
A TANÁCS ÁLTAL MEGHATÁROZOTT ELŐÍRÁS (EU)
SZ.: 665/2013
Gyártmány Clatronic
Modell BS 1302
Univerzális porszívóként, padlótisztító szívófejjel való
használat esetén
Energiahatékonysági osztály
1)
A
Energiafogyasztás
Eves energiafelhasználás
2)
kWh/év 28,0
Tisztítási teljesítményosztály
Szőnyegtisztítási teljesítmé-
nyosztály
E
Kemény padló tisztítási teljesít-
ményosztály
B
Por újrakibocsátási osztály G
Hangteljesítményszint
dB(A)
re1pW
85
Névleges teljesítmény W 700
46
BS1302_IM 08.03.16
Keménypadlón, parkettatisztító kefével való használat
esetén
Energiahatékonysági osztály
1)
A
Energiafogyasztás
Eves energiafelhasználás
2)
kWh/év 20,4
Tisztítási teljesítményosztály
Kemény padló tisztítási teljesít-
ményosztály
D
Por újrakibocsátási osztály G
Hangteljesítményszint
dB(A)
re1pW
85
Névleges teljesítmény W 700
1) A (legmagasabb hatékonyság) - G (legalacsonyabb
hatékonyság).
2) Jelzésértékű éves energiafogyasztás (kWh per év), 50
tisztítási feladat alapján.
Az aktuális éves energiafogyasztás a készülék használati
módjától függ.
A készülék megfelel az alábbi európai szabványok és
irányelvek a gyártás pillanatában érvényes változatainak:
2014/35/EU kisfeszültségű készülékekre vonatkozó
irányelv (LVD)
2014/30/EU elektromágneses kompatibilitásra (EMC)
vonatkozó irányelv
2011/65/EU RoHS irányelv
Környezetbarát tervezési irányelvek (ErP) 2009/125/EK
Környezetbarát tervezési követelmények a porszívókhoz –
A TANÁCS ÁLTAL ELFOGADOTT IRÁNYELV (EU)
SZ. 666/2013
Hulladékkezelés
A „kuka“ piktogram jelentése
Kímélje környezetünket, az elektromos készülé-
kek nem a háztartási szemétbe valók.
Használja az elektromos készülékek ártalmat-
lanítására kijelölt gyűjtőhelyeket, ott adja le
azokat az elektromos készülékeit, amelyeket
többé már nem kíván használni.
Ezzel segítséget nyújt ahhoz, hogy elkerülhetők legyenek
azok a hatások, amelyeket a helytelen „szemétre dobás“
gyakorolhat a környezetre és az emberi egészségre.
Ezzel hozzájárul az újrahasznosításhoz, a recycling hoz és a
kiöregedett elektromos és elektronikus készülékek értékesíté-
sének egyéb formáihoz.
Az önkormányzatoknál vagy a polgármesteri hivatalokban
tájékoztatást kaphat arról, hogy hova viheti a kiselejtezett
készülékeke.
47
BS1302_IM 08.03.16
Руководство по эксплуатации
Спасибо за выбор нашего продукта. Надеемся, он вам
понравится.
Символы применяемые в данном руководстве
пользователя
Важные рекомендации для обеспечения вашей безопас-
ности обозначены по особенному. Обязательно следуйте
этим рекомендациям, чтобы предотвратить несчастный
случай или поломку изделия:
ПРЕДУПРЕЖДЕНИЕ:
Предупреждает об опасности для здоровья и возмож-
ном риске получения травмы.
ВНИМАНИЕ:
Указывает на возможную опасность для изделия и
других окружающих предметов.
ПРИМЕЧАНИЯ: Дает советы и информацию.
Общая информация
Перед началом эксплуатации прибора внимательно
прочитайте прилагаемую инструкцию по эксплуатации и
сохраните ее в надежном месте, вместе с гарантийным
талоном, кассовым чеком и, по возможности, картонной
коробкой с упаковочным материалом. Если даете кому
либо попользоваться прибором, обязательно дайте в
придачу данную инструкцию по эксплуатации.
Пользуйтесь прибором только частным образом и по
назначению. Прибор не предназначен для коммерче-
ского использования.
Не пользуйтесь прибором под открытым небом.
Предохраняйте прибор от жары, прямых солнечных
лучей, влажности (ни в коем случае не погружайте его
в воду) и ударов об острые углы. Не прикасайтесь к
прибору влажными руками. Если прибор увлажнился
или намок, тут же выньте вилку из розетки.
После эксплуатации, монтаже принадлежностей,
чистке или поломке прибора всегда вынимайте вилку
из розетки (тяните за вилку, а не за кабель).
Не оставляйте включенные электроприборы без
присмотра. Выходя из помещения всегда выключайте
прибор. Выньте штекер из розетки.
Прибор и кабель сетевого питания необходимо
регулярно обследовать на наличие следов повреж-
дения. При обнаружении повреждения пользоваться
прибором запрещается.
Используйте только оригинальные запчасти.
Из соображений безопасности для детей не остав-
ляйте лежать упаковку (пластиковые мешки, картон,
пенопласт и т.д.) без присмотра.
ПРЕДУПРЕЖДЕНИЕ:
Не позволяйте детям играть с полиэтиленовой
пленкой. Опасность удушья!
Специальные указания по безопасности
для этого прибора
Не пытайте отремонтировать устройство самостоятельно. Обя-
зательно свяжитесь с авторизованным мастером. При повреж-
дении сетевого шнура, во избежание опасности поражения
электрическим током, шнур следует заменить у изготовителя,
сервисного представителя или других квалифицированных
лиц.
Этим прибором могут пользоваться дети старше 8 лет и лица с
ограниченными физическими, осязательными и психическими
способностями или не имеющие опыта или знаний, если они
находятся под надзором или проинструктированы в отноше-
нии безопасного пользования прибором и знают о связанных с
этим опасностях.
48
BS1302_IM 08.03.16
Не позволяйте детям играть с прибором.
Чистка и уход за прибором не должны проводиться детьми
без надзора.
Не всасывайте жидкости!
Не всасывайте горячий пепел или остроконечные или острые
предметы!
Не используйте устройство в сырых помещениях!
Никогда не используйте устройство без фильтра. Проверяйте,
правильно ли вставлен фильтр!
Во время использования держите волосы, одежду и части тела
подальше от всасывающего сопла!
Не приближайте пылесос к источникам тепла, таким как бата-
реи отопления, печи и т. д.!
Обзор деталей прибора
1 Регулятор подачи воздуха
2 Ручка
3 Всасывающий шланг
4 Замок крышки (емкость для пыли)
5 Переключатель вкл / выкл
6 Ручка для переноски
7 Кнопка фиксатора пылесборника
8 Кнопка сматывания шнура
9 Регулятор мощности всасывания
10 Замок вентиляционной решетки (выпускной фильтр)
11 Крепление для шланга
12 Емкость для пыли
13 Основание пылесборника
14 Подключение шланга
15 Соединительная головка вакуумного шланга
16 Переключатель режима "ковер / твердый пол"
17 Насадка для пола (с крюком, который не показан)
18 Телескопическая всасывающая труба
19 Щетка для паркета
20 Комбинированная щетка / узкое длинное сопло
Начало работы
Вставьте соединительную головку всасывающей
трубы в отверстие подключения на устройстве. Она
должна зафиксироваться механически.
Для того чтобы отсоединить шланг, нажмите кнопку на
соединительной головке.
Вставьте вакуумную трубу в ручку, если необходимо.
Можно использовать сдвижной переключатель на
телескопической всасывающей трубе, чтобы настро-
ить ее длину. (стр. 4, рис. A)
Затем установите насадку для пола и/или другие
аксессуары.
Насадки
Насадка для пола (17)
С помощью насадки для пола можно чистить гладкие
поверхности и ковры.
Установите переключатель (16) согласно состоянию пола:
Для прочных, твердых полов типа ламината,
плитки, ПВХ и т.д.
Для ковровых покрытий, ковриков и т.п. с
высоким или низким ворсом
Щетка для паркета (19)
Для мягкой уборки чувствительных твердых полов,
например, паркета, ламината, плитки и пр.
Комбинированная щетка / узкое длинное сопло (20)
Для чистки драпировки, штор, в углах и углублениях и т.д.
ПРИМЕЧАНИЯ: Насадка “2-в-1”:
Когда обе части насадки не соединены, обеспечен
режим чистки в углах. Когда потребуется щетка,
насадите часть со щеткой в направлении стрелки до
фиксации на месте.
Для отсоединения концевых насадок от всасывающего
патрубка необходимо их слегка повертывать.
49
BS1302_IM 08.03.16
Использование прибора
1. Разверните шнур на необходимую длину.
ВНИМАНИЕ:
Вытаскивайте шнур только до максимальной
длины, указанной желтой меткой.
Не вытягивайте кабель дальше красной метки,
иначае можно повредить устройство сворачива-
ния шнура.
ПРИМЕЧАНИЯ:
Если видна красная метка, вдвиньте шнур внутрь
с помощью кнопки сворачивания шнура вплоть до
желтой метки.
2. Вставьте вилку электропитания в правильно установ-
ленную электрическую розетку.
3. Включите устройство переключателем вкл/выкл,
нажав его кнопку.
4. Установите переключатель “ковер / пол” в зависимости
от места очистки.
5. Установите мощность всасывания с помощью регуля-
тора мощности всасывания.
6. Проводите чистку с постоянной скоростью. Не требу-
ется прилагать значительного усилия.
ПРИМЕЧАНИЯ:
Обратите внимание на расстояние, которое обеспе-
чивается длиной шнура!
Регулятор подачи воздуха (1)
Откройте бегунок воздуха на ручке шланга, чтобы регули-
ровать поток воздуха или удалить предметы, прилипшие
к насадке.
Выключение и сворачивание шнура электропитания
1. Выключите пылесос переключателем вкл / выкл и
извлеките вилку из электрической розетки.
2. Держите кабель крепко в руках, чтобы предотвратить
его хлестание.
3. Нажмите кнопку сворачивания шнура и направляйте
шнур в пылесос.
Обслуживание
Опустошение пылесборника
Выбрасывайте мусор из пылесборника, как только
уровень дойдет до отметки MAX.
1. Выключите вилку из сетевой розетки.
2. Для отсоединения пылесборника нажмите кнопку (7).
Вытащите пылесборник.
3. Выбросите мусор из пылесборника в мусорное ведро.
Для этого нажмите кнопку на пылесборнике, открывая
основания. (стр 4, рис. B)
4. Затем закройте основание.
5. Закрепите пылесборник в устройстве. Сначала
установите его внутрь и затем закрепите с помощью
верхнего крючка.
6. Проверьте надежность расположение пылесборника,
слегка приподняв устройство за ручку.
Система фильтров
В устройстве предусмотрено 4 фильтра. Обычная
система с мешком для сбора пыли была заменена на
прозрачный пылесборник. Более высокая скорость сбора
пыли позволяет разделять тяжелую пыль и малейшие
частицы в засасываемом воздуха.
Таким образом, отсутствует необходимость покупать
мешки.
Фильтры требуют периодической очистки.
Блок фильтров (стр. 4, рис. C - H)
Блок фильтров включает в себя следующее:
Нейлоновый фильтр
Фильтрующий ворс
Центральный фильтр
Фильтр предварительной очистки
Крепежный диск
ВНИМАНИЕ:
Запрещается мыть компоненты прибора в стираль-
ной или посудомоечной машине!
Запрещается использовать для высушивания фен
для волос.
Повторное использование прибора разрешается
только, когда все компоненты полностью сухие и
установлены правильно.
Для очистки блока фильтров выполните следующее:
1. Опорожните емкость для пыли согласно приведенным
выше инструкциям. (Шаг 1 - 3)
2. Разберите блок фильтров.
2.1. Поверните блок фильтров в направлении
.
(Рис. C)
2.2. Выньте блок фильтров из емкости для пыли.
(Рис. D)
2.3. Поверните крепежный диск и выньте его. (Рис. E)
2.4. Выньте фильтр предварительной очистки из
центрального фильтра. (Рис. F)
2.5. Откройте крышку блока фильтров. (Рис. G)
2.6. Извлеките нейлоновый фильтр и фильтрующий
ворс. (Рис. H)
3. Очистите все детали блока фильтров и емкость для
пыли проточной водой. При этом можно воспользо-
ваться мягкой щеткой.
4. Дайте всем деталям полностью высохнуть на воздухе.
5. Сборка блока фильтров
5.1. Вставьте фильтрующий ворс, затем нейлоновый
фильтр в крышку.
5.2. Закройте крышку. Она должна зафиксироваться
механически.
50
BS1302_IM 08.03.16
5.3. Вставьте фильтр предварительной очистки в
центральный фильтр.
ПРИМЕЧАНИЯ:
Фильтр предварительной очистки имеет углу-
бления разного размера, которые совпадают с
выступами на центральном фильтре.
5.4. Установите крепежный диск на фильтр предва-
рительной очистки и затяните повернув его.
5.5. Установите блок фильтров на место в емкости
для пыли: Установите направляющий выступ на
блоке фильтров по символу
. Затяните блок
фильтров повернув его в направлении .
Выпускной фильтр
Прибор также имеет выпускной фильтр.
Он располагается на задней части прибора.
1. Нажмите на замок (10) и снимите вентиляционную
решетку.
2. Снимите фильтрующую вставку и очистите ее, как
рассмотрено выше.
3. Установите полностью высушенный фильтр обратно
в вентиляционную решетку.
4. Вставьте вентиляционную решетку обратно в прибор.
Соблюдайте расположение в направляющих проу-
шинах. Вентиляционная сетка должна встать на свое
место со слышимым щелчком.
Чистка
ПРЕДУПРЕЖДЕНИЕ:
Перед очисткой извлеките вилку из розетки.
Ни при каких обстоятельствах не допускайте погружения
устройства в воду с целью очистки. Иначе возможен удар
электрическим током или возгорание.
ВНИМАНИЕ:
Не применяйте проволочную щетку или абразивные
материалы.
Не используйте кислоты или абразивные чистящие
средства.
Очистите корпус мягкой сухой тканью без чистящих
средств.
Хранение
Обеспечьте полное остывание устройства.
Полностью сверните шнур.
Пожалуйста, вставьте крюк насадки для пола на
выступ при хранении на задней стороне устройства.
Диагностика
Устройство не работает.
Устранение:
Проверьте подключение к сети электропитания.
Проверьте положение переключателя.
Устройство не всасывает.
Возможная причина:
Пылесборник переполнен.
Устранение:
Опустошите пылесборник.
или
Возможная причина:
Грязные фильтра.
Устранение:
Очистите эти компоненты.
или
Возможная причина:
Посторонний предмет находится во всасывающей
трубе или в насадке.
Устранение:
Проверьте эти принадлежности на посторонние
предметы.
Технические данные
Модель: ...................................................................... BS 1302
Электропитание: .................................220 - 240 В~, 50 / 60 Гц
Класс защиты: .......................................................................
Вес нетто: .......................................................................5,30 кг
Сохранено право на технические и конструкционные
изменения в рамках продолжающейся разработки
продукта.
51
BS1302_IM 08.03.16
Делегированный Регламент Комиссии (Ес)
№ 665/2013
Торговая марка Clatronic
Модель BS 1302
Используйте как универсальный пылесос с насадкой
для пола
Класс энергопотребления
1)
A
Энергопотребление
Ежегодная потребляемая
мощность
2)
кВт-ч/год 28,0
Класс очистки
Класс очистки ковровых
покрытий
E
Класс очистки жестких
поверхностей
B
Класс вторичного выброса
пыли
G
Уровень звуковой мощ-
ности
дБ(A) исх.
1 пВт
85
Номинальная входная
мощность
Вт 700
Используйте как пылесос для твердых поверхностей
со щеткой для паркета
Класс энергопотребления
1)
A
Энергопотребление
Ежегодная потребляемая
мощность
2)
кВт-ч/год 20,4
Класс очистки
Класс очистки жестких
поверхностей
D
Класс вторичного выброса
пыли
G
Уровень звуковой мощ-
ности
дБ(A) исх.
1 пВт
85
Номинальная входная
мощность
Вт 700
1) A (максимальная эффективность) — G (минимальная
эффективность).
2) Предполагаемая ежегодная потребляемая мощность
(кВт-ч в год) на основе 50 операций чистки.
Фактическая ежегодная потребляемая мощность
зависит от способа использования прибора.
Устройство соответствует европейским стандартам
и директивам в редакции, действительной на момент
доставки устройства:
Низковольтное оборудование 2014/35/EU
Директива по электромагнитной совместимости
2014/30/EU
Директива RoHS 2011/65/EU
Директива по экодизайну 2009/125/EC
Требования по экодизайну для пылесосов ПОСТА-
НОВЛЕНИЕ СОВЕТА (ЕС) №666/2013
52
BS1302_IM 08.03.16











BS 1302 ....................................................... 
60/50240-220 .......................
..............................................................
5,3 ....................................



665/2013
Clatronic

BS 1302


A
1


28,0


2


E 
B 
G 
85


re1pW

700  

A
1


20,4


2


D 
G 
85


re1pW

700  
GA )1
50 2




) 

EU/30/2014
EU/65/2011
)

2013/666
53
BS1302_IM 08.03.16
6 .



4








)HC4












1 .
)31
2 .
)C
 2.1
)D 2.2
)E 2.3
)F 2.4
)G 2.5
)H 2.6
3 .

4 .
5 .
 5.1
 5.2
 5.3



 5.4

 5.5


. 



1 .10
2 .
3 .

4 .





























54
BS1302_IM 08.03.16




 1
 2
 3
 4
 5
 6


 7
 8

 10
 11
 12


 13

14
 15
 16

 17
 18
 
 20







)A4



)17

16




)



)20


:"12






1 .










2 .
3 .

4 .
5 .
6 .


1



1 .


2 .
3 .



.MAX


1 .
2 .

7
3 .



)B4
4 .
5 .



55
BS1302_IM 08.03.16





















































!







8







 





BS 1302
Stand 03 / 2016
BS1302_IM 08.03.16
  • Page 1 1
  • Page 2 2
  • Page 3 3
  • Page 4 4
  • Page 5 5
  • Page 6 6
  • Page 7 7
  • Page 8 8
  • Page 9 9
  • Page 10 10
  • Page 11 11
  • Page 12 12
  • Page 13 13
  • Page 14 14
  • Page 15 15
  • Page 16 16
  • Page 17 17
  • Page 18 18
  • Page 19 19
  • Page 20 20
  • Page 21 21
  • Page 22 22
  • Page 23 23
  • Page 24 24
  • Page 25 25
  • Page 26 26
  • Page 27 27
  • Page 28 28
  • Page 29 29
  • Page 30 30
  • Page 31 31
  • Page 32 32
  • Page 33 33
  • Page 34 34
  • Page 35 35
  • Page 36 36
  • Page 37 37
  • Page 38 38
  • Page 39 39
  • Page 40 40
  • Page 41 41
  • Page 42 42
  • Page 43 43
  • Page 44 44
  • Page 45 45
  • Page 46 46
  • Page 47 47
  • Page 48 48
  • Page 49 49
  • Page 50 50
  • Page 51 51
  • Page 52 52
  • Page 53 53
  • Page 54 54
  • Page 55 55
  • Page 56 56
  • Page 57 57
  • Page 58 58

Clatronic BS 1302 Manual de usuario

Categoría
Aspiradoras
Tipo
Manual de usuario
Este manual también es adecuado para