La página se está cargando...
La página se está cargando...

—,,_,—.-—,‘——-
Fold
out
this
page
Extienda
esta
hoja
Bu
sayfayi
diaryi
‘!oru
k-”n
Opno
I
pessa
sIou
(it
__--
Some
safety
rules
a)
Tae
care
to
avoid
njury
to
your
fin
gers
by
the needle
during
sewing.
b>
Be
sure
to
unplug
the
power cord
whenever
you
leave
the
machine
or
wish
to
clean
it,
oil
it
or
change
mechanical
and
accessory
parts.
c)
Be
sure
to
use
only
a
15watt
light
bulb
in
the
sewing
lamp.
For
safety
rules
applicable
to
the
UK
please
see
page
56.
Normas
de
seguridad
para
máquinas
de
coser
domésticas
segün
DIN
57730,
parte
2
C
a>
Debido
al
movmiento
vertical
de
Ia
aguja,
el
usuarlo
deberd
tener
todo
el
cuidado
posible
durante
ci
trabajo
y
or
deberd
apartar
a
vista
de
Ia
zona
de
costura.
b)
Al
cambiar
Ia
aguja,
el
pie
prensatelas,
Ia
canilla
o
Ia
placa
de
aguja,
lo
mismo
que
al
limpiar,
enyrasar
o
reparar
Ia
maquina,
o
siempre
que
no
Ia
use,
deberá
desconectarla
eldctricamente,
es
decir
dehera
sacar
el
enchufe
de
a
red.
c)
La
potencia
mdx
admisible
de
Ia
bom
billa
es de
15
W
Contents
on
page
65
Indce:
Dag.
67
-
DIN
(Alman
Endüstri
Normu)
57730
Kisim
2C’ye
gore
evde
kullaralan
diki
makinalari
icin
guvenhik
talimatlan
a)
Makinayi
kullanan
kimsenin,
yukariya
ye
asaya
doru
hareket
eden
ne
dolayinyla,
yeteri
kadar
dikkatlt
day
ranmasi
ye
caItma
esnasmda
dikig
yerini
devamh
olarak
gOzlemesi
gerekir.
b)
Makinanin
terkedilmesi
esnasinda,
bakim
ileri
esnannda
veya
parca
lannin
veya
ildve
parçalann
dejitiriI
mesi
sirasinda
makinanin
fidini
prizden
cikarmak
suretiyle,
ceryanin
kesilmesi
gerekir.
c>
Ldmbanin
rnUsaade
olunan
azami
gdcu
15
Vattir.
Nokkrar
OryggisrOstafanir
a)
Gti5
>ess
aS
fingur
verSi ekki
fyrir
ndlinni,
)egar
sauma5
er
b)
GenS
)a
5
aS
venju
ySar
aS
taka
vélina
ür
samoandi,
)egar
skipta
)sarf
um
ndl,
saumfOt,
eSa
)egar
ér
eruS
aS
hreinsa
og
smyrja
vélina.
c)
Aldrei
ma
vera sterkari
pera
vélinni
en
15W
Icindekiler
Sayfa
69
Efnisyfirlit
er
a
bls,
71
)
La página se está cargando...
La página se está cargando...
La página se está cargando...

power
lead
Out
of
the
foot
Saque
el
cable
del
pedal.
Kabloyu
martan
danya
doru
cekinz.
TogO
eOsluna
Ur
rnOtstoOunn.
coloqu:
:te1u1
a
a
mdquina
y
unaagoL
7
H
K
U
K
N
Push
master
switch
104;
the
sewing
light
goes
on.
pg
La
lám
Ana
saltere
(104)
basnz
bu
arada
dik
hryshOaaOalrofann
104
og
urn
eiO
kviknar,J
La página se está cargando...

o
Place
a
bobbin
on
spindle
119,
making
sure
pin
A
enters
slot
B.
Coloque
Ia
canilla
sobre
ci
devanador
119
N
de
forma
que
Ia
espiga
N
encaje
en
a
‘
ranura
0.
Masurayi
sarici
(119)
üzerine
geciriniz.
N
pirninin
0
yarii
içerisinde
bulunmasi
119
gerekir.
SetjiO
spOluna
a
spdlarann
119.
Hak
N
verOur
Z
aO
talla
i
rauf
0.
W
-Ul
N
)_—
L.
‘
(
Disengaging
the
sewing
mechanism:
/
Hold
the
hand
wheel
steady
and
turn
_
doru
çeviriniz.
Setjiô
véfina
I
Iausagang:
HaIdO
urn
hand
hjOliO
og
asia
skrUfu
103.
ing
the
sewing
spool
holder
toward
Eche
hacia
atrds
ci
segundo
portacarretes.
Ikinci
makara
tutucusunu
geriye
dorii
cevirerek
dOndOrünüzl
\\
YtiO
auka
ketIispinnanum
upp.
Push
a
spool
of
thread
and
small
thrust
collar
P
onto
the
holder.
ntroduzca
en
ci
porracarretes
si
cairete
ci
pequeño
disco
P.
Makarayi
vu
kdcük
dbrier
oisk
tutanak
Ozerine
sürdnüz.
SetjiO
tvnnakefli
og
litia
skitu
P
a
pinnann.

7
(I
Winding
the
bobbin
from
a
second
spool:
tilt
spool
pin
127
fonvard.
PuH
the
thread
into
guide
125
and
into
gude
127
as
shown
n
the
drawing,
making
sure
that
the
thread
passes
between
th
dO
de
and
tension
spring
N.
Now
wind
the
thread
a
Few
tjrns
around
the
bobuin.
Push
the
bobbin
to
the
rignt.
Press
the
foot
control
to
wind
the
bobbin.
P
ish
the
filled
bobbin
to
the
left
remove
it,
pull
the
thread
to
the
front
and
cut
it
in
thread
cutter
0.
Important
note:
On
spools
with
threac
retaining
slots
the
slot
must
face
right
when
the
spool
is
fitted.
Devanado
desde
un
segundo
carrete:
Gire
hacia
adelante
ci
guichilos
127.
Pase
ci
hilo
par
Ia
guia
125
y
po
a
guia
127
coma
muestra
el
dibujo.
El
hilo
debe
pasar
entre
a
guia
y
el
muelle
tensor
N.
Arrolle
ahora
unas
vueltas
de
hilo
en
Ia
oaniila
Empule
a
canilla
hacia
a
derecho.
Accione
Cl
pedal
para
comenzar
a
deva
nar.
Empuje
hacia
Ia
izquierda
a
canilla
llena,
saquela.
tire
del
hilo
hacia
ci
frente
y
cortelo
en
a
cuchilla
0.
Nota
mportante:
En
el
caso
de
carretes
con
ranura
pare
suletar
el
bib.
dicha
ranura
deberã
quedar
a
a
derecha
al
introducir
el
carrete.
—
l.
I
H
_______
_
Ii
U125
_-
d
rL
,
N
7
--_
j
6
La página se está cargando...

rItl
Pi____
1i
—f
____
__
/17i
N\
___‘:
//
___
,
iz__
_
/
Winding
through
the
needle
eye
(0)
Raise
the
sewing
foot.
Tne
neeole
must
he
in
its
‘up’
position.
Place
a
bobbin
on
spindle
119.
Disengage
the
sewing
mechanismDraw
the
needle
thread
under
the
sewing
foot,
up
and
into
guide
127
(see
drawing
Wind
the
thread
arouno
tue
hoobin
a
few
times
and
push
the
bobbn
toward
the
right.
Press
the
foot
control
cede!
and
wind
the
boboin.
Push
the
full
bobbin
toward
the
left
and
take
it
Out,
pulling
the
thread
nto
thread
cutter.
Reengage
the
sewing
mechanism.
Devanado
a
través
de
a
aguja:
Alce
el
pronsatelas
y
eleve
a
aguji.
Cooque
ic
canuiia
snore
el
devanador
119.
Desco
necte
ci
necinismo
de
costura.
Paso
ci
hilo
superior
uor
debajo
dei
prensotelas,
haca
a
derecha,
y
por
Ia
guia
127
(vease
dbujo).
Arrolle
ones
vueltas
cc
hilo
en
Ia
canilla
y
empujela
hacia
Ic
derecr-a.
Aco:ore
el
pedal
para
devaiar.
Empuje
Ia
caniila
lena
hacia
la
izquerda,
sequoia,
tire
del
h
o
haca
ci
recte
y
cOrtelo
en
Ia
cuchula
N.
/
8
••
H
-.
1JLj
‘1’
____
1
FE
La página se está cargando...
La página se está cargando...

lnseing
the
bobbin
case:
Raise
latch
N
and
push
the
bobbin
case
onto
stud
0
as
far
as
it
will
go,
making
sure
cutout
P
points
upwards.
/7
/
o
‘
i
Cotocacián
tie
Ia
cápsula
con
a
canilla:
7
/
‘/
0
Levante
Ia
bisagrita
N
e
introduzca
a
cap
sula
en
a
espiga
0
hasta
el
tope.
La
o
muesca
P
tiene
que
mirar
hacia
Mekii
tskmak
N
klapesni
kaldinnz
ye
mekii
dayanaa
kadar
0
pimi
dzerine
sürdnüz.
Bu
sirada
P
kesiminin
yukanya
doru
ydnelmi
olmasi
gerekir.
::i:tri
7)
\
I
Placing
spo&
of
thread
:n
n:
Ha:e
large
unreeling
disc
R
in
front
of
large
s\’,”
1)1))’
spools.
ColocaciOn
de
los
carretes
de
hilo:
Para
carretes
pequeños
coloque
el
disco
pequeno
o
mediano
de
forma
que
quede
döner
rondeayiQbüyükrnakar&ann
I..
\,
Tvinnakeflin
sefl
a:
Fyrir
litil
kefli
er
litla
skifan
0
sett
fyrir
framan
kefllO
en
skifa
R
rir
srri
kefli.
__
-.
:
‘‘-r’n
.4
.
I

Upper
threading:
\lVoh
th
needle
paso
toned
at
the
top,
raise
tao
sewing
aot.
Drn
:e
thread
into
slot
N
to
the
left
past
gude
from
below
into
slot
0
and
take-un
lever
1
26
(see
arrows),
then
back
sn:
0
und
intO
tho
af
-
tn:ea
jiac
the
needle
holder
Press
button
B
(see
page
21).
Enhebrado
del
hilo
superior:
La
aquja
debera
ester
elevada.
Levante
el
pia
uren
satelas
Conforme
a
as
flechas,
pase
el
hilo
desde
el
carrete
por
a
erura
N,
par
Ia
izquierda
en
a
gule
P
haste
a
palanca
trahilos
126.
A
cont:nuación,
páseio
par
Ii
ranura
0
haste
engancharlo
en
i
gua
hues
derecho
del
portagujas.
Pulse
ci
baton
s
(peg.
22).
Ust
ipliin
takilmase
renin
durumu,
yukenda.
Diku
ayeunu
ukanya
kaldunnuz.
)p)uOi,
ok
istikametinde
olmak
Ozere,
N
‘eruuna,
P
kulavuzunun
so)
tarafundar’
Jecirip,
alt
taraftan
0
yaruuna,
horoz)i26)
ucerusune,
ger)ye
doru
0
yaruuna
ye
upluk
tutamaunda
bu)unan
saj
ku
avuz
ucerisune
cekuniz.
8
tusuna
basunuz
)Say-fa
22).
Prôing:
Ndlin
I
elstu
stdOu.
FOtur
upp
PrOuO
ems
og
brvarnar
syna
rauf
N,
v
nsra
megun
vuO
st’nngu
P
aà
neOan
I
raut
0
I
raOgjafa
126.
aftur
raaf
0
og
slOan
hasgr:
s:vnngu
a
nalaholdunnu.
Yt6
a
takka
B
Ibis.
23).
1’
N
0
N
12
Place
the
needle
thread
behind
hook
0
and
hold
it
there.
Pull
thread
110
fully
downwards.
Coloque
ci
hilo
superior
detràs
del
gancho
Q
y
sujételo.
Tire
del
enhebrador
110
hacia
abajo
dci
todo.
Ust
piui
acengeim
arkesuna
yerletirinuz
ye
tutunuz.
ineye
ipiik
gegiruciyi
(110)
tarnamen
asauya
doru
cekiniz.
LegguO
yfirtvinnann
aftur
fyrir
hak
0
og
haidiO
i
tvinnann.
ToguO
siOan
irOarann
110
aiveg
niOur.
N
)
N
-
t-ij
/8’
/./
/
0
/
0.
La página se está cargando...

—
I
-
--
I
/
/
Hold
the
needle
thread
taut.
Turn
the
0
/
hand
toward
you
until
the
nedP
moves
aown
ana
up
again.
Pull
t’e
bobbin
toread
uo
by
puilq
on
th
thrau
/
Sujete
el
bib
superior.
Gire
ci
ebb
rterrnrtradodeb
ntY.bUe
Ust
pb
i
sKIca
atunuz
El
carkini
on
/
dogru
ceviriniz.
Sir
batis
cnjniz.
Ust
iplikle,
alt
plii
yukariya
dojru
çekiniz
o
Haidià
yf
rtvinnann
Sr’GO
nandhjó
nu
ham
a
-
iâ
r
tb
násn
hebur
fanO
niâur
og
smLr
uoo
.
‘ç
acu
I
ogiO
unairtvinnann
upp.
(“ac:Dcththads
toward
the
right
under
Coboque
ambos
bibs
hacia
a
derecha
O
-
-‘‘---.
dehajo
del
prensatelas.
saadoru,dikiaya
Close
the
tree
arm
cover.
Cierre
a
tapa
121
Kapak
klapesini
(121)
yukariya
doru
kapatiniz.
LokiO
okinu
121
14
La página se está cargando...

Checking
the
needle
thread
tension:
The
normal
setting
is
in
the
white
range
between
3
and
5,
The
higher
the
number,
the
tighter
the
tension.
To
check
the
tension,
set
the
machine
at
the
zigzag
stitch.
Sew
a
short
seam.
The
threads
should
interlock
in
the
middle
of
the
material.
Operating
the
foot
control:
The
more
you
n:ess
down
hu
pedal,
the
faster
thu
rnacnne
uns
Accionamiento
del
pedal:
Cud
:o
profundo
pise
el
pedal
tanto
mayor
sera
Ia
velocidad
de
costura
de
a
Creatise.
Marsa
ayakla
basiniz.
Marsa
nekadar
fazia
bir
sekilde
haslirsa.
“ceative”
oke
dar
sdratli
diker.
Stigiô
a
mótstOuna:
Pvi
fastarsem
érs
‘&bvnraO.arsarnarvélin
Needle
thread
tension
124
N
=
Setting
mark.
TensiOn
del
hilo
superior
124
N
=
Marca
pare
Ia
regulaciOn.
Ust
iplik
gerginlii
124
N
=
Ayar
iaretlemesi.
Yfirspenna
124
N
=
vOrniOun
,rIr
rétta
spennu.
Comprobación
de
a
tensiOn
del
hilo
superior.
La
regulacion
normal
se
halla
en
Ia
zona
blanca
entre
3
y
5.
Cuanto
más
alto
sea
el
ndmero
tanto
mayor
será
Ia
tensiOn.
La
comprobacion
se
hace
con
puntada
zig
zag.
Haga
una
costura
corta.
Los
bibs
deberàn
quedar
anudados
dentro
del
material.
N
)
16
La página se está cargando...

1___/
Dual
fabric
feed
This
prevents
shifting
of
the
fahnc
plies
against
each
other
Before
engngnr;
or
disenpcjH
a:se
the
presser
foot.
Doble
arrastre
El
doble
arrastre
evita
que
as
pezas
do
costura
so
desplacen
entre
si.
Antes
de
Ia
conexiOn
y
desconexión
habrá
que
alzar
ci
pie
prensate!as.
cift
kuma
taimasi.
Bu,
kurn
as
katlannin
dikis
esrtasnda
kay
rnasn
engeller.
çaltsttrmadan
veys
kapat
madan
once,
dikis
ayan
‘ukarya
kaldrinz.
Efri
flytjarinn:
Kemur
i
veg
tynr
aO
efnn
geti
rnisfasrst.
Lyftiâ
tsetnum
OOur
en
ér
setjiO
etri
flytjarann
i
sam-
band
eOa
takiO
hann
Or
samband.
4
4
g4
N\L
/
01
I
To
engage:
push
top
feed
130
down
so
that
it
snaps
in
place.
To
disengage:
push
top
feed
lightly
down
and
towards
the
back.
Para
conectarlo:
empuje
el
pie
trasnporta
dor
130
hacia
abajo
hasta
quo
encaje.
Para
desconectarlo:
empuje
ligerarnente
ci
transportador
hacia
abajo
y
tire
de
01
hacia
fuera.
çallstrma:
Ust
tasIytcy
(130l,
yerine
otu
runcaya
kadar
asaya
doru
sOrOnOz.
Kapatma:
Hafifçe
asaiya
doru
basonniz,
arkaya
doru
cekiniz
ye
yukariya
doru
kaydirtniz.
Tl
aô
setja
hann
i
samband
‘tiO
Or
enfald
lega
0
yfirflytarann
130
ar
Iii
hann
smellur
i
samband.
Til
aO
taka
hann
Or
sambandi
‘tiâ
ér
0
hann
niOur
0
vO
og
takiO
hann
Or
rauf
fOtarins
urn
leiO.
Per
hann
DO
aftur
i
sina
efri
stbOu,
18

\\\\\
‘\\
\“
7
Regulating
the
stitch
length
The
numbers
on
stitch
length
contro
106
indicate
the
stitch
length
in
millimeters.
The
shtch
length
range
s
0
to
6
mm.
Turn
the
control
to
set
the
number
indicating
the
stitch
length
at
mark
N.
tig
0
(bottom)
snows
how
to
set
the
s:och
length
control
‘or
sewing
stretch
stdches
(red
stitch
symbols
on
push
but
tOnal.
Regulación
del
argo
de
puntada
Las
cifras
sabre
ci
regulador
106
inaican
ci
argo
de
puntada
en
mm.
La
zona
de
regulacion
va
de
0
a
6
mm.
Ore
el
disco
regulador
hasta
que
Ci
argo
de
ountada
deseado
concda
con
a
marca
de
regulacion
N.
La
‘igura
0
(abajo)
muestra
el
ajuste
del
regulador
de
largos
de
puntada
para
coser
as
purtadas
stretch
que
se
hallan
sabre
los
botones.
Batis
uzunluunun
ayarlanmasi
Batis
uzunluju-ayarlayicisi
(106)
uzerin
deki
rakkamlar,
mm
olarak
batis,
uzunlu
unu
vermektedir.
Ayariama
sahasi
0
la
6
mm
arasindadir
Arzu
adilen
batis
czunluu,
N
ayar
are
tine
gelecek
sekilde
çevrilir.
Asaidaki
0
Resmi,
tuslarda
kirmizi
olarak
isaretienen
esnek
batisiari
dikmek
iGn
batis
uzunluu-ayarlcyicisinin
ayarini
gostermektedir.
Sporlengdin
stillt:
Thiurnar
a
sporlengdarcKifunni
106
geta
ii
synna
sporlengdina
iii
i.
Hgt
em
sO
stilla
ird
0
ti
0mm.
StilliO
sporlengaina
sen
iota
a
ô
met-i
N
Mynd
0
her
aO
neOan
snir
hvemng
stiila
a
tyrir
teygjanlegan
saum.
Stretch).
Merkt
moO
rauOu
a
valtokkunum
19
La página se está cargando...
La página se está cargando...

L
\\
\\
\b1-
________________________
\\\
-
Selecting
utility
stitches
•‘
Ajuste
de
las
puntadas
utilitarias
(white
symbols)
(smbolos
blancos)
Push
the
button
required
and
set
the
Pulse
ci
botón
y
ajuste
ci
argo
de
pun
stitch
length
netween
1
and
6.
tada
deseado
entre
I
y
6.
All
zigzag,
and
utility
stircnes
jre
hal’ied
Pulsndo
el
botOn
a
a
anchura
de
las
in
width
when
button
G
is
Dressed.
puntedas
zigzag
y
utiiitarias
quedan
redu
cidas
a
a
mitad.
-
--__
_
4
-____
Fonksiyonel
dikislerin
ayarlanmasi
Nytjasaumar
)beyaz
sirngeler)
(H’h
takn
Tusa
basin:
ye
arzu
edilen
batiq
uzunlu
Y1O
a
takkann
og
‘JeiliO
pa
eor
1
encd
scm
unu,
1
ia
6
arasinda
oimak
dzere,
ayar
cer
j1
1
O
nota
tra
1
ti
6
layiniz.
Turn
zikzak
dikisier
ye
fonksiyonel
dikisler
Oil
z
k
zak
og
nyt)aspor
er
negt
aO
rnlokKa
G
tuuna
iiâveten
basmak
suretiyle,
genis-
I
urn
helming
meO
bvi
aO
yta
samtrnls
a
ilk
itibaryle
yariya
indirilmis
oiur.
teeka
C
24

\\\
Selecting
stretch
stitches
/
Ajuste
de
as
puntadas
elãsticas
(stretch)
(red
symbols)
(simbolos
rojos)
Push
the
button
required
and
turn
the
Pulse
ci
botón
y
gire
ci
reguiador
de
iar
stitch
length
control
as
far
as
it
wiH
go
qos
de
puntada
hasta
ci
tone
al
sirbolo
(red
symbol).
rojo
By
also
pressing
button
G,
all
stretch
stit
Pilsando
ci
botón
G,
a
anchura
de
(as
ches
can
he
halved
in
width.
puntadas
stretch
quedan
reducidas
a
a
mtad.
7
—
Esnek
dikisierin
ayarlanmasi
Teygjanlegir
saumar:
kirmizi
simgeier)
RauO
takn).
Tusa
basiniz
ye
bati
uzuniuu-ayar
YtO
a
takkann
eq
sti
hO
sporhengdarstihl
rinn
layicisini
dayaraa
kadac
kmizi
:saret
ems
ang
eq
nann
kemst
a
rajOa
svOinu
czerlfle
rO;ir:Z
OH
teygjaneg
spor
er
hqt
sO
mjokka
um
Tdm
esnek
dikiler
G
tuHuna
ilHveten
bas-
he
ming
me.O
vi
aO
yta
samtimls
a
takka
G.
mak
suretiyle,
genislik
itiheriyle
yariya
ndirilrnis
clue
I
-
_____

(V
Utility-
and
srtch
stitch
corthino
tions
•
V
sho’.n
tn
an
the
n
e
jr
hnged
ton
coer
and
at
the
ed
o
tljs
boo
lt
on•
or
wdn
sewog
trn
V
e’’e,
von
wan
5’
afl
V
•
eiastc
o
plo:
cn,
pLon
bu::;s
‘
nd
F
V
se’ect
a
sttci:
engtn
oetweo
1
and
t.
Combinaciones
de
puntadas
utilitarias
y
punt
I
crotch
V
Po’lt0003
oii:r
a
se
eiicuntrjp
an
a
labIa
de
cragrarnas
en
a
tapa
ahetbl
iS
a
rnaouira
•/
final
V
de
este
cuajarno,
con
ndcac
ones
oara
a
costura.
Por
eemplo,
ci
ount
e
asdco
nvsbe
noise
al
rnis’o
tatrnoo
os
hoto
Eye
ayn
zamanda
baSnz.
Bat
n
uzunlu
I
equr
D
n-,aornjr
en
no
Cr
•n
stn’rns
-
26

D_
Selecting
the
needle
position
for
straight
stitching
Lsft
needle
posit:on:
push
SuttOn
3
Centrul
needle
posnion:
push
button
C
PPht
needle
poshon-
øush
buttons
H
an
2II
Ui
B
Lr5R
LJ
___
H
4
4
PosiciOn
de
Ta
puntada
en
el
punto
recto
Posic:On
izqu:erda:
pulse
ci
bo:On
B
PosiciOn
central:
pulse
el
bothn
C
PosiciOn
derecha:
pulse
los
botorus
H
e
P
Duz
dikiste
bats
durumunun
ayarlnn
ma
s
Bat:s
dururnu
soldu:
Tus
Bye
bas:n:z
Btis
dururnu
rtada.
Tus
G’ye
has:ruz
Batis
dururnu
sada:
Tus
H’ye
ye
‘ye
has:
n
z
Sporlegan
stilit
via
beint
spor:
Spohega
H
v:nstr:
=
YtiO
a
takka
B
Spuhega
nOu
Yt:O
h’aka
H
Cpu:
ecu
:r
‘:agr:
CO
:-
I
27

(A-M
1
Tf1
r
r
0
4L4Li•LiJ
J
H
/7
Thumb
wheel
for
fancy
stitches
(Model
1171)
Every
fancy
stitch
is
provided
with
a
letter
Select
the
fancy
stitch
from
the
table.
Set
the
co’msoonding
letter
at
mark
“0”
by
:urnino
thumb
wheel
N.
For
sewing
utility
stitches,
tnumb
wheel
N
for
fancy
stitches
must
be
disengaged.
To
do
so.
set
the
white
dot
at
mark
“0’.
7/
-
Disco
regulador
para
puntadas
de
adorno
)mode(o
1171)
Cada
puntada
de
adorno
Ileva
as
gnada
una
letra.
Elija
(a
puntada
de
adorno
en
Ia
tabra.
gire
el
disco
regulador
“N”
has:a
que
Ia
letra
corresoond’ente
quede
por
debajo
de
a
marca
de
-egulacion
“0
Para
coser
las
ountadas
utilitarias,
hay
que
desconectar
a)
disco
reaulador
“N”
de
as
ountadas
de
adorno.
Para
ello
gire
ai
punto
blanco
debajo
oe
(a
marca
Je
req
!acion
“0”.
/
7
Sus
dikipieri
cm
ayar
dürnesi
Model
1171j
Her
batisrna
bir
hart
tekabdl
etmekte
dir.
Sds
batisini
cetvelder’
seqiniz.
“N”
ayar
ddmesi
,le
uygun
olan
“0”
ayar
garehnin
altina
ceviriniz.
Fonks)yonel
dekislerin
dikhnesi
;cn
“N”
ayar
dhmesrnin
kapanmrg
almost
gerekir.
Bunun
cm
beyaz
noktayr
0”
ayar
isareti
altmna
cevrrmniz,
Stillihjol
fyrir
skrautsauma
(Vel
1171)
Hoer
srautsaumur
re’ur
sinn
coksar
ye’
1
O
emnt’em
saurn
at
:crlunni
og
sculô
saa”
a:
njo
mu
N
annmg
aâ
v
Okomandm
cckstaur
se
tyrir
neOan
still
merkmO
0
Pegar
her
saummO
venmu:eaa
saurna
eOa
nyiJa
sauna
sen
eru
a
a
okkur’um
verOu
at
II
0
sO
iera
jr
samoardi
Hvitm
cun’jjr’rn
a
njoi
nu
‘jerOur
P0
sO
vera
ryrir
neOan
s’i
rnerk:O.
0
I)
n
j
4
-I
28
La página se está cargando...
La página se está cargando...
La página se está cargando...

lyrir.
5
=
HnappagatafOtur
6
Stoopfotur
tng
35
Detachab’e
work
support
and
accessories:
The
work
support
can
be
lifted
out
(N).
Open
ts
lid
and
take
out
accessory
box
P.
Underneath
the
box
is
an
accessory
com
partment
0.
Illustration
0
shows
how
to
arrange
sewing
feet,
needles
and
bobbins
in
the
accessory
box.
o
Ordinary
sewing
foot
1
Fancy-stitch
foot
for
top
feed
2
Fancy-stitch
foot
(without
top
feed)
3
Blindstitch
and
overlock
foot
4
Zip
foot
5
Buttonhole
foot
6
Darning
foot
7
Hemmer
8
Edge
guide
Supemento
y
accesorios
El
suplemento
se
puede
quitar
del
todo
(N).
Abra
el
suplemento
y
saque
a
cala
de
accesorios
P.
Debajo
de
ella
hay
un
corn
partimento
0
para
accesorios.
La
figura
0.
muestra
cdmo
deben
colocarse
os
pies
prensatelas,
as
agujas
y
las
canllas.
o
Prensatelas
normal
1
Prensatelas
para
puntada
de
adorno,
para
transporte
superior
2
Prensatelas
para
puntada
de
adorno
(sin
transporte
superior)
3
Prensatelas
para
puntada
invisible
(overlockl
4
Prensatelas
para
cremalleras
5
Prensatelas
para
ojales
6
Prensatelas
para
zurcdos
7
Prensatelas
dobladillador
8
Guia
Oeisebi(en
(dikilecek
seyin
üzerine
konduu,
kaldirilabilir)
dikis
yOzeyi
ye
i!âve
parcalar:
Dikis
ydzeyi
dariya
ckanlahilir
(N).
Dikig
yüzeyini
acinz,
teferruat
(iláve
parcalarl
kutucuunu
(P(
disariya
cikanniz.
Teferruat
kutucuunun
altnda
bir
lSve
parcalar
bdl
mesi
(0)
bulunmaktadr.
Resim
0.,
dikis
ayaklannin.
inelerin,
masuralarin
nasl
dizilmesi
gerektiini
gdstermektedir.
O
Normal
diki
ayai
1
Ust
tasima
cm
süs
dikii
ayai
2
Süs
diksi
ayai
)üst
tarnasz(
3
Kör
dikis-
ye
overlock
ayaI
4
Fermuar
ayai
5
Ilik
ayai
6
Orerek
tamir
etme
ayai
7
Etek
baski
ayai
8
Cetvel
I
/
/
Vinnubori8
og
aukahiutir:
Hgt
er
aO
taka
borOiO
at
N.
OpniO
aO
og
fjar(gO
efri
hluta
P.
Undir
efri
h(utanurn
er
auka
geymsluhdlf
0.
Mynd
0
snir
hvernig
fdtum,
nálum
cg
spdlum
er
haganlegast
fromiO
o
=
Venulegur
saumfOtur
1
=
Utsaumsfótur
fynr
efri
tlytjara
2
=
Utsaurnsfólur
an
efri
Hytjara
3
=
Blindföidunar-
og
overlockfOtur
=
Rennilásafótur

t=
f
oCt
C:mbio
d
pr
prensatelas
por
su
pae
detantera
y
empüjelo
hacia
abajo.
El
prensatelas
as
suelta.
Diki
ayaini
deistirmek:
D!ks
an
N.
on
tarafindan
tutunuz
vs
asaa
doru
an,
)
nnisti
hrn
n
nOur
cc
a
denL,
anr
at
___________________
—-
.
—
-.
cing
the
sewing
foot:
lower
the
presser
bar
ifter
and
move
the
foot
so
that
pins
N
snap
into
grooves
0
sJ
Colocación
de
pie
prensatelas:
Baje
ía
palanca
aizaprensatelas
y
posicone
al
N
mismo
hempo
el
prensatelas
de
forma
o
—
fl
quelos
pasadores
N
encajen
en
las
ranu
Diki
ayaini
takmak:
Kumas
bashrma
kolunu
aaya
indiriniz
vs
bu
arada
aya,
N
kOprpcüü
0
oluu
iqensine
oturacak
ekilde
sürinüz.
Fotur
settur
a:
LkkO
fOttyhinnn
og
tr:O
totfln
ti
anng
aO
Ithr
N
ah
molar
0
o
\
\
I
I
I
J
Screws
P
and
Q
are
for
secunng
accesso
nes.
R
is
the
sewing
toot
retaining
screw.
P
y
0
sinien
para
fijas
guias.
R
sirve
para
fijar
a!
soporte
del
prensate
as.
P
ye
Q.
Have
parçatarin
tespit
edilmesi
—
_..---
cindir.
B,
diki
aya
tutamak
vidasdr.
0
p
og
0
eru
ti
aO
lesta
aukahutum
ens
og
kantstyr’ngu.
R
festir
bOlduna
yrr
saum
0
fturnar
36

4
4
Sewing
feet
(standard
accessories)
0
Ordinan
sewing
foot
1
Fancy-stitching
foot.
for
top
feed
-.
2
Fancy-stitching
foot
without
top
feed)
D
‘U
3
Blindstitching
or
overlock
foot
4
Zip-
and
edge-stitching
foot
5
Buttonhole
foot
6
Darning
foot
7
Hemmer
S
Edge
guide
386-
Si
Pies
prensatelas
(accesorios
normales(
0
Prensatelas
normal
1
Prensateias
para
puntada
de
adorno,
pars
transporte
superior
2
Prensateas
para
puntada
de
adorno
(sin
trsnsporte
superior)
3
Prensatelas
para
puntada
invisible
y
overlock
4
Prensatelas
pars
cremallera
y
costuras
SI
(
(
canto
5
Prensatelas
oars
Olales
6
Prensateias
pars
zurcidos
.
7
Prensatelas
dobladillador
8
Guis
-
Diki
syakiari
(normal
lâve
parpalar)
-
--
0
Normal
dikis
ayai
1
Ust
tasima
cm
ads
dikisi
ayai
2
Sds
dikiyi
ayai
(dst
tasimasiz)
3
Kbr
diki-
ye
overlock
ayai
S.
Fermuar-
‘a
kenar
ayai
5
(iikayai
6
Orerek
tamir
etme
ayai
7
Etek
baski
ayai
8
Cetvel
Ftur
(scm
fylgja
vélinni)
S
0
Venjulegur
saumfOtur
•
1
1
UtsaumsfOtur
fyrir
efri
flytjara
-
ZBlindfbkiunarogoverlcckfOtur
///
4
RennHásaogkantfOtur
/
6
Stoppfótur
8
Kantstring
0
_____________________________
-
93-035
960-91
37

Blindstitching
and
overlock
foot
8lindstitching
(N):
turn
screw
P
to
set
guide
0
at
the
left.
The
guide
is
then
adjusted
according
to
the
needle
penetra
tions.
The
folded
edge
of
the
material
runs
along
guide
edge
P.
0verloc
stitching
(0).
Turn
screw
P
to
set
guide
0
to
the
far
right.
The
fabric
runs
along
guide
edge
R.
Prensat&as
para
puntada
invisible
y
overlock:
Costura
invisible
(N):
Girando
el
tornillo
corra
Ia
guia
0.
hacia
Ia
izquierda.
La
guia
se
regula
ahora
para
(a
penetraciOn
de
Ia
aguja.
El
borde
del
doblez
superior
se
desliza
contra
el
horde
R
de
Ia
guia.
Costura
overlock
(0).
Con
el
tornillo
gire
Id
gula
0.
hacia
Ia
derecha,
hasta
ci
tope.
La
pieza
de
costura
so
desliza
ahora
contra
el
borde
R
de
Ia
gula.
4
Kör
diki
ayai
ye
overlock
ayaI:
Kor
bati
dikii
(NI:
P
vidasiyla
Q
kilavu
zunu
sola
getiriniz.
Kilavuz
daha
sonra
ine
batii
igin
ayarlanacaktir.
Ust
kuma
katlamasi,
P
kilavuz
kenari
boyunca
yürür.
Overlock
dikisi
(0):
p
vidisiyla
Q
kilavu
zunu
dayanaa
kadar
saga
doru
geviriniz.
Kuma,
R
kilavuz
kenari
boyunca
yürür.
L
4
Blindfäldunar
og
overlockfótur:
Blindfbldun
(NI
MeO
skrufu
P
er
styring
0
frO
til
vinstri.
Strgir
or
siOar
frâ
til
)annig
aO
nalin
stingi
nOur
i
faldinn
Brot
lina
faldsins
er
latin
renna
eftir
stringunni
R
Overlocksaumur
01
MoO
skrufu
P
er
styr
ng
0
frO
til
hgr
EfniO
or
sOan
atiO
renna
meOfram
styrngu
A.
fl
HHf
Q
4
Q
p
4
38

Orerek
tamir
etme
ayaI:
lneyi
yukanya
kaldiriniz.
P
er
kolunu
arkaya
doru
bastinniz
ye
sikica
tutunuz,
Ayain
pimini
N
deiii
icerisine
qa’rnz,
cu
uruua
,uinas
oastrmu.junu
kavrar.
Ayai
dayanaa
kadar
takiniz.
P
eri
kolunu
birakiniz,
bu
arada
eri
kol.,
0
tutamak
vidasi
Uzerine
gelir.
0
vidasini
sikitinniz.
Ydn
ile
örerek
tarnir
etme
esnasinda
vdn
iplik
S
kilavuzu
igerisine
çekiImek;nn.
Stoppfótur:
SetO
nátna
I
efstu
stöOu.
YtiO
haki
P
frd
yOur
og
-naldiO
fds;u.
a
faNnurn
at
N
R
tata
nu
utan
urn
fotstdngina.
SieppiO
haki
P.
sem
eggst
no
ofan
a
ndlaskrOfuna
0
Et
stoppaO
er
ytir
uUarraO
er
hann
rdd
ur
cat
S
a
ftinum.
fl_s
I)
U
i
jir
1
/
\
R
Lc
Darning
foot:
Position
the
needle
up.
Push
bar
P
to
the
hack
and
hold
it
there.
Fit
the
pin
of
the
foot
in
hole
N;
at
the
same
time,
fork
R
engages
the
presser
bar,
and
push
the
foot
fully
in.
Let
go
of
bar
which
then
rests
on
retaining
screw
0.
Tighten
screw
0.
For
wool
darning
the
woollen
thread
is
pulled
into
guide
S.
4
Pie
zurcidor:
Eleve
a
aguja.
Presione
a
palanquita
P
hacia
atrás
y
sujétela.
lntroduzca
el
paso
dor
del
prensatelas
en
ci
orificio
N,
con
0
que
a
horquilta
R
se
apoya
contra
Ta
barra
del
prensatelas,
y
meta
ahora
el
pie
hasta
ci
tope.
Suelte
a
palanquita
en
cuyo
caso
Se
apoyará
contra
ci
tornillo
0.
Apriete
el
torriillo
0.
Para
zurcir
tejidos
de
lana,
ci
hilo
de
lana
habrd
que
introducirlo
en
Ta
guia
S.
)
H:
1.

—
z
Zipper
foot
(edge
sewing
foot
(N):
The
zipper
toot
is
secured
on
the
left
or
right,
depending
on
the
side
of
the
zip
to
be
sewn
(NI
Edge
guide
(0):
Push
the
edge
guide
into
hole
Q,
set
the
required
edge
distance
and
tighten
it
there.
Prensatelas
para
cremalleras
(pie
pare
bordes)
(N):
El
prensatelas
pare
cremalleras
se
encaja
a
izquierda
o
derecha,
segn
si
hay
que
coser
Ia
mitad
izquierda
o
denacha
(N)
de
Ia
crernallera.
Guia
marginal
(0):
Pase
a
guia
por
ci
agujero
fly
después
de
ajustarla
a
Ia
distancia
deseada,
segün
Ia
labor,
fijela
con
ci
tornillo
R
Rennilasafôtur
(kantfotur)
(N)
RennIásaftnum
er
smellt
a
v.nsra
eOa
hgra
megn
alIt
ettir
hvoru
megn
er
‘aljO
hata
rennilàsnn
N)
Kantstring
(0)
SetjiO
kanstringuna
I
gat
C
og
eftlr
aO
hata
stillt
fjarIgOina.
scm
ér
vIlIlO
bata
Pa
nerOtô
er
skrüfu
P
•j
I
4
-I
Fermuar
ayai
(kenar
ayai(
(N):
Fermuar
aya,
bahis
konusu
olan
fermuar
cm
sol
veya
sa
tarafta
(N)
yerine
oturtu
lace
kti
r.
Kilavuz
cetveli
(0):
Cetveli
Q
delii
igerisine
sürünüz
ye
arzu
edilen
araltin
ayarlanmasindan
sonra
P
vidasini
sIk,tInnIz.
U
40

lIii
ayarlamak:
C
tuuna
basniz.
Ust
iplik
gerginliini
Hik
sahasi
3’e
getiriniz.
Hk
ayaini
takiriiz.
N
lik
sahasinda,
batis
sikliini
ayarlayintz.
Pith
ipliini
(kaba
büküm
ipgHini)
diki
ayainda
aaida
belirtilen
sekilde
takiniz:
flil
arka
tirnak
üzer:ne
kc:niz,
cekiniz
ye
on
tirnak
(0)
icinde
sikistiriniz.
Dikis
esnasinda
P
oku,
H
taksimati
hoyunca
yürdr.
Bu
suretle
uk
uzunluu
tespit
olunabilir.
Ilik
dikmek
icin
ince
dik
iphi
kullaniniz.
Hnappagatastilling:
YtiO
a
takka
C.
ShlIiO
yfirtvinnaspennuna
0
hnappagatasvOi
(ca.
3).
SetjiO
hnaopagala
fOtinn
0
‘iëtna.
og
siO
)Ottleika
sporsins
0
stillisvOi
N.
Legg:O
und:rrOâinn
sem
her
seg
r
ai
5
a:a;i
0
d’tfliOfl.
Q0
raO:nn
og
klemmiO
hann
I
fremra
hakiO
0
A
rneOan
saumaO
er
fr:st
bnn
P
meOfram
rn:istikunni
R.
:o
or
pannig
ngt
i3
ákvarOa
Iengdina
a
hnaopagatinu.
NotiO
aOens
rndg
non
toinna
vO
hnappa
gatasaum
Otsaumstvinna).
Hi
uttonhoe
setting:
Push
button
C.
Set
the
needle
thread
ten
sion
at
range
3
for
buttonhole
sewing.
Attach
the
buttonhole
foot.
Set
the
stitch
density
at
range
N.
Insert
a
gimp
thread
in
the
sewing
foot
as
shown
in
the
illustra
tion:
Place
the
thread
over
the
back
ridge.
and
pull
it
taut
so
that
it
is
hold
in
tab
0
at
the
front.
During
sewing,
arrow
P
runs
along
scale
R.
This
is
how
the
buttonhole
length
is
determined.
For
sewing
buttonholes
use
light
sewing
thread.
Ajuste
para
hacer
ojales:
Pulse
el
botOn
C.
En
Ia
zona
del
oal,
ajuste
Ia
tensiOn
del
bib
superior
en
3.
Coloque
el
pie
para
ojales.
Regule
Ia
den
sidad
de
puntada
en
Ia
zona
del
ojal
N.
Coloque
el
bib
de
refuerzo
en
el
prensa
telas
de
Ia
siguiente
forma:
engOnchelo
en
el
saliente
posteriot
sujêtebo,
bien
tenso,
y
engOnchebo
en
el
saliente
anterior.
Durante
Ia
costura,
Ia
flecha
P
se
va
des
plazando
a
lo
largo
de
Ia
escala
R.
Con
ello
se
puede
determinar
Ia
bargura
del
ojal.
Para
coser
ojales
utilicie
bibs
finos.
41
.
i:j

1
rFii
\\
\\
Li
4
Sewing
buttonholes
Pull
the
bottom
of
the
buttonhole
foot
for
ward
as
tar
as
it
will
go.
1
Sew
first
buttonhole
seam.
Raise
the
needle
2
Push
button
B
in
until
4
to
6
bartack
ing
stitches
are
sewn,
holding
the
workpiece
firmly,
then
release
the
but
ton.
3
Push
button
A.
Sew
the
second
but
tonhole
seam
the
same
length
as
the
first.
4
Push
button
B
in
until
4
to
6
bartack
ng
stitches
are
sewn,
holding
the
material
firmly,
then
release
the
but
ton.
5
Sew
a
few
tying
stitches.
Remove
the
fabric,
pull
the
filler
cord
taut
and
trim.
6
Cut
the
buttonhole
open.
Before
sewing
buttonholes
in
the
gar
ment
it
is
recommended
to
sew
a
but
tonhole
as
a
test.
Costura
del
ojal
Empuje
Ia
pieza
corrediza
hacia
el
frente
hasta
el
tope.
1
Cosa
el
primer
labio
del
ojal
en
Ia
ar
gura
deseada.
2
2
Pulse
el
botOn
B
y
manténgalo
pul
sado,
haga
de
4
a
6
puntadas
de
pre
silla,
sujetando
a
tela,
suelte
el
botOn
3
Pulse
el
botón
A
y
cosa
el
segundo
labio
del
ojal
igual
de
largo
qua
el
pri
mero.
4
Pulse
el
botcin
B
y
mantcingalo
pul
sado,
haga
de
4
a
6
puntadas
de
pre
silla,
sujetando
Ia
tela,
y
suelte
ci
botcin.
5
Haga
varias
puntadas
de
remate,
Retire
Ia
pieza
cia
costura,
tire
del
htlo
de
refuerzo
y
córtelo.
6
Abra
ci
ojal
con
el
descosedor
Antes
de
coser
los
ojales
en
a
prenda,
haga
primeramente
un
ojal
de
prueba.
:1
H
II
42
La página se está cargando...

I
C’eaning
and
oing
Tilt
the
needle
plate
up
at
the
hack
(N)
and
take
it
out
(0).
Clean
the
feed
dog
and
the
parts
in
the
sewing
hook
area
with
a
soft
brush.
Clean
the
bobbin
thread
monitor
as
instructed
on
page
57.
Do
not
oil
the
machine.
Only
apply
a
drop
of
oil
in
the
hook
raceway
(see
ill.)
occasionaH’
Temz(emek
ye
yalamak:
Bati
)evhasini
arka
tarafindan
yukariya
kaldir;niz
(N)
ye
dtsariya
çikanniz
(0).
Firça
ile
transportdrü
(tasiyiciyi)
ye
kavrayici
nm
bulunduu
yen
temizleyiniz.
Alt
ip(ik
kon
trolu,
Savf
6t
‘cteki
talimatlara
core
teniizenecektii.
Makinayi
yaIamayiniz.
Resimde
göruidüu
gibi,
sadece
arasira
kavrayicinin
bulunduu
hareket
sahasina
bir
damie
ya
darnlatiniz.
Hreinsun
og
smurning:
Lyftiâ
stngpldtunn
app
aO
atlan
N.
og
lakiO
hana
at
0
HrensiO
flyt(arann
og
krngurn
gria
arann
maO
bursta
Hra:O
elektrcniska
ertir
h
rneO
urrdirtvinnarim
Smyrjiô
ekki
velina
hun
er
sjâlfsmurô.
Alit
sem
)Dér
urfiO
aO
gera
er
aO
smyrja
bOrn
hvoru
griparann
-
45
N
)
4
4
Limpieza
y
engrase:
Lava
nte
ía
placa
de
aguja
N
y
retireia
0.
Limpie
ci
transportador
y
ía
zone
del
gar
fio
con
an
pincei.
La
(impieza
del
bib
infe
rior
se
efectia
conforme
a
as
instruccio
nes
de
(a
pOgina
59.
La
maquina
no
nece
site
engrase.
Lo
bnico
que
deberá
hacer
es
ponet
de
vez
en
cuando,
one
gota
de
aceite
en
Ia
pista
del
garfio,
como
se
muestra
en
ía
figure.

t,.z:t
//
4
N
Changing
the
light
bulb:
Pull
out
the
mains
plug.
Close
the
hinged
top
cover
and
swing
up
the
carrying
handle.
Insert
the edge
guide
into
cutout
Q,
push
down
the
lamp
housing
and
hold
it
there.
Turn
the
light
bulb
toward
N
and
take
it
out.
Insert
the
new
bulb
so
that
its
pins
slide
in
slots
P.
Push
it
up
and turn
it
toward
0.
Pull
Out
the
edge
guide.
Cambio
de
Ia
bombilla:
Desenchufe
a
mãquina de
Is
red.
Cierre
Ia
tapa
abatible
y
levante
el
asa.
lntroduzca
Ia
guia
recta
entre
Ia
ranura
de
Ia
tapa
frontal
y
Ia
carcasa
en
Ia
escotadura
Q.
Con
dicha
guia,
empuje
hacia
abajo
el
portalãmparas
y
manténgalo
sujeto.
Gire
Ia
bombilla
hacia
N
y
sáquela.
Coloque
Ia
nueva
bom
bills
de
forma
que
las
guias
encaen
en
las
ranuras
empOjela.hacia
arriba
y
girds
hacia
0
Retire
Ia
guia
Ampul
deistirmek:
Ceranin
fiini
cekiniz.
Acilir
kapanir
kapai
kapatiniz
ye
tasima
kolunu
yuka
riya
kaldinniz.
Kilavuz
cetvelini,
üst
kapak
ye
mahfaza
arasindan,
ayrica
Q
kesimi
arasindan
gegiriniz:
Ampulü
N
ydnunde
ceviriniz
ye
diariya
gikartiniz.
Yeni
ampulü,
yataklar
P
oluklari
içerisine
gire
cek
ekiide
sürünüz,
yukariya
doru
bastiriniz
ye
0
yonünde
geviriniz.
Cetveli
disanya
gikanniz.
N
Skipt
urn
peru:
TakiO
ratmagnstengilinn
jr
sarntancli
LyftO
handfanginu
upp.
Setlia
kantstrirguna
niOur
urn
raul
0
ofan
a
vefinni
PrSfst
a
meO
string
unni
alan
a
peruholduna
og
haldia
henni
fastri.
Prstia
perunni
upp
a
via
og
snuia
i
alt
aO
N
TakiO
peruna
ur
og
setlia
nyla
peru
annig
aâ
hok
n
a
perunni
talli
i
raufar
P
r’stia
a
og
snuia
alt
aO
0
Losia
nu
a
str
ngunni.
annig
aa
peruhaldan
fan
attur
upp.
fl
/
$-
6
4
ii
46

anging
the
fuse
Pull
out
the
mains
plug.
Turn
fuse
holder
N
left
a
quarter
turn
with
a
screwdrivec
release
it
and
take
it
out.
Pull
out
fuse
B.
insert
a
new
fuse
in
the
hoidet
replace
the
holdec
push
it
in
with
the
screwdrivet
then
turn
it
clockwise
a
quarter
turn.
(The
fuse
is
type
F2A.)
110-volt
machines
have
no
fuse.
7,
Sigortayt
deitirrnek:
Ceryan
fiini
çekiniz.
N
sigorta
mesnedim
bir
tornavidayla
ddrtte
birlik
bir
döndürme
ile
sole
doru
cevirip
serbest
birakiniz
ye
dsariya
çikannz.
0
sigortasni
disanya
cekniz.
Yeni
sigortayl
mesnet
icerisne
sürünüz,
Mesnedi
yerletiriniz,
tornavi
dayla
arkaya
doru
bastinniz
ye
ddrtte
birlik
bir
döndürme
ile
saga
doru
sikntz.
(Sigorta
gücü
F2A).
110
V
makinalarda
sigorta
yoktur.
D
Carnbio
del
fusible:
Censenchufe
a
máquina
de
Ia
red.
Con un
destornillador,
gire
el
portafusbles
N
un
cuarto
de
vuelta
hacia
Ia
izquieraa
y
retirelo.
Saque
ahora
el
fusible
0.
Coloque
un
nuevo
fusble
en
ci
portafusibles.
lntroduzca
el
portafusibles,
presiOnelo
hacia
atrãs
con
el
destornillador
y
asegU
relo,
giràndolo
un
cuarto
de
vuelta
hacia
Ia
derecha.
(Fusible
del
tipo
F2A(.
Las
máquinas
para
110
V
no
Ilevan
fusible.
Skipt
urn
Oryggi:
TakiO
vetna
ur
sambandi
vO
veggtenqu
MeO
srndpen:ng
cOo
skrOfjárni
losO
Or
urn
orygg
shdiduna
N
meO
vi
aO
snda
henni
ti
vins!ri
TauO
ho
t;OO,
ur
og
skiptiO
urn
cryggiO
0
SetjiO
siOan
holduna
aftur
i,
‘tiO
lauslega
a
hana,
og
snLiO
LI
hgri.
Oryggi
at
styrkleika
F2A
fãiO
ér
h1
á
Pfatf
urnboOiru
I
velurn
‘yrr
110
loll
or
ekkert
47
La página se está cargando...
La página se está cargando...
La página se está cargando...
La página se está cargando...
La página se está cargando...
Transcripción de documentos
__-- —,,_,—.-—,‘——- Fold out this page Extienda esta hoja Bu sayfayi diaryi ‘!oru k-”n Opno I pessa sIou (it - DIN (Alman Endüstri Normu) 57730 Kisim 2C’ye gore evde kullaralan diki makinalari icin guvenhik talimatlan a) Makinayi kullanan kimsenin, yukariya ye asaya doru hareket eden ne dolayinyla, yeteri kadar dikkatlt day ranmasi ye caItma esnasmda dikig yerini devamh olarak gOzlemesi gerekir. b) Makinanin terkedilmesi esnasinda, bakim ileri esnannda veya parca lannin veya ildve parçalann dejitiriI mesi sirasinda makinanin fidini prizden cikarmak suretiyle, ceryanin kesilmesi gerekir. c> Ldmbanin rnUsaade olunan azami gdcu 15 Vattir. Some safety rules a) Tae care to avoid njury to your fin gers by the needle during sewing. b> Be sure to unplug the power cord whenever you leave the machine or wish to clean it, oil it or change mechanical and accessory parts. c) Be sure to use only a 15watt light bulb in the sewing lamp. For safety rules applicable to the UK please see page 56. Normas de seguridad para máquinas de coser domésticas segün DIN 57730, parte 2 C a> Debido al movmiento vertical de Ia aguja, el usuarlo deberd tener todo el cuidado posible durante ci trabajo y or deberd apartar a vista de Ia zona de costura. b) Al cambiar Ia aguja, el pie prensatelas, Ia canilla o Ia placa de aguja, lo mismo que al limpiar, enyrasar o reparar Ia maquina, o siempre que no Ia use, deberá desconectarla eldctricamente, es decir dehera sacar el enchufe de a red. c) La potencia mdx admisible de Ia bom billa es de 15 W Nokkrar OryggisrOstafanir a) Gti5 >ess aS fingur verSi ekki fyrir ndlinni, )egar sauma5 er 5 aS venju ySar aS taka vélina b) GenS )a ür samoandi, )egar skipta )sarf um ndl, saumfOt, eSa )egar ér eruS aS hreinsa og smyrja vélina. c) Aldrei ma vera sterkari pera vélinni en 15W ) Contents on page 65 Indce: Dag. 67 Icindekiler Sayfa 69 Efnisyfirlit er a bls, 71 power lead Out of the foot Saque el cable del pedal. Kabloyu martan danya doru cekinz. TogO eOsluna Ur rnOtstoOunn. coloqu: :te1u1 a a mdquina y unaagoL 7 KN H U K Push master switch 104; the sewing light goes on. pg La lám Ana saltere (104) basnz bu arada dik hryshOaaOalrofann 104 og urn eiO kviknar,J _ 119, making Place a bobbin on spindle B. slot s sure pin A enter nador 119 Coloque Ia canilla sobre ci deva en a je enca N a espig de forma que Ia ranura 0. geciriniz. N Masurayi sarici (119) üzerine nmasi bulu e pirninin 0 yarii içerisind o N ‘ gerekir. Hak N verOur SetjiO spOluna a spdlarann 119. aO talla i rauf 0. 119 Z W N -Ul L. )_— ‘ / ( hanism: Disengaging the sewing mec turn and y stead l whee hand the Hold doru çeviriniz. O urn hand Setjiô véfina I Iausagang: HaId hjOliO og asia skrUfu 103. holder toward ing the sewing spool portacarretes. Eche hacia atrds ci segundo geriye dorii Ikinci makara tutucusunu cevirerek dOndOrünüzl \\ YtiO auka ketIispinnanum upp. thread and small thrust Push a spool of holder. the onto P r colla si cairete ntroduzca en ci porracarretes P. pequeño disco ci Makarayi vu kdcük dbrier oisk Ozerine sürdnüz. skitu P SetjiO tvnnakefli og litia tutanak a pinnann. __ __ — 7 (I I l. H Ii U125 d rL , N Winding the bobbin from a second spool: tilt spool pin 127 fonvard. PuH the thread into guide 125 and into gude 127 as shown n the drawing, making sure that the thread passes between th dO de and tension spring N. Now wind the thread a Few tjrns around the bobuin. Push the bobbin to the rignt. Press the foot control to wind the bobbin. P ish the filled bobbin to the left remove it, pull the thread to the front and cut it in thread cutter 0. Important note: On spools with threac retaining slots the slot must face right when the spool is fitted. 7 _ -- Devanado desde un segundo carrete: Gire hacia adelante ci guichilos 127. Pase ci hilo par Ia guia 125 y po a guia 127 coma muestra el dibujo. El hilo debe pasar entre a guia y el muelle tensor N. Arrolle ahora unas vueltas de hilo en Ia oaniila Empule a canilla hacia a derecho. Accione Cl pedal para comenzar a deva nar. Empuje hacia Ia izquierda a canilla llena, saquela. tire del hilo hacia ci frente y cortelo en a cuchilla 0. Nota mportante: En el caso de carretes con ranura pare suletar el bib. dicha ranura deberã quedar a a derecha al introducir el carrete. j 6 __ ___‘: 1JLj •• H -. rItl Pi____ ‘1’ 1 —f 1i /17i N\ // , _ _ z i / ugh the needle eye (0) Winding thro ng foot. Tne neeole must sewi the Raise bobbin on he in its ‘up’ position. Place a ing sew the age eng Dis 119. spindle ad under thre dle nee the mechanismDraw de 127 gui into and up foot, ing the sew ad arouno tue (see drawing Wind the thre h the bobbn pus and es tim few a bin hoo foot control toward the right. Press the . Push the full oin bob the wind and e! ced it Out, bobbin toward the left and take ad cutter. thre nto ad thre the ng pulli hanism. Reengage the sewing mec FE aguja: Alce el Devanado a través de a Cooque ic ji. agu a eleve y s tela nsa pro Desco 119. dor ana canuiia snore el dev tura. Paso ci cos de mo inis nec ci te nec prensotelas, hilo superior uor debajo dei guia 127 (vease Ia por a, y ech der a a hac ltas cc hilo en Ia dbujo). Arrolle ones vue Ic derecr-a. hacia a ujel emp y la canil aiar. Empuje Ia dev para Aco:ore el pedal erda, sequoia, izqu la hacia lena la canii cOrtelo en Ia tire del h o haca ci recte y N. ula cuch / 8 lnseing the bobbin case: Raise latch N and push the bobbin case onto stud 0 as far as it will go, making sure cutout P points upwards. /7 / 7/ o ‘/ Cotocacián tie Ia cápsula con a canilla: Levante Ia bisagrita N e introduzca a cap sula en a espiga 0 hasta el tope. La muesca P tiene que mirar hacia i ‘ 0 o Mekii tskmak N klapesni kaldinnz ye mekii dayanaa kadar 0 pimi dzerine sürdnüz. Bu sirada P kesiminin yukanya doru ydnelmi olmasi gerekir. ::i:tri 7) \ I Placing spo& of thread :n n: Ha:e large unreeling disc R in front of large spools. s\’,” 1)1))’ ColocaciOn de los carretes de hilo: Para carretes pequeños coloque el disco pequeno o mediano de forma que quede döner rondeayiQbüyükrnakar&ann \, Tvinnakeflin sefl a: Fyrir litil kefli er litla skifan 0 sett fyrir framan kefllO en skifa R rir srri kefli. __ : -. .4 . ‘‘-r’n I I.. N Upper threading: \lVoh th needle paso toned at the top, raise tao sewing aot. Drn :e thread into slot N to the left from below into slot 0 and past gude take-un lever 1 26 (see arrows), then back sn: 0 und intO tho af tn:ea jiac the needle holder Press button B (see page 21). - - Enhebrado del hilo superior: La aquja debera ester elevada. Levante el pia uren satelas Conforme a as flechas, pase el hilo desde el carrete por a erura N, par Ia izquierda en a gule P haste a palanca trahilos 126. A cont:nuación, páseio par Ii ranura 0 haste engancharlo en i gua hues derecho del portagujas. Pulse ci baton s (peg. 22). t-ij Ust ipliin takilmase renin durumu, yukenda. Diku ayeunu ukanya kaldunnuz. )p)uOi, ok istikametinde olmak Ozere, N ‘eruuna, P kulavuzunun so) tarafundar’ ) Jecirip, alt taraftan 0 yaruuna, horoz)i26 ucerusune, ger)ye doru 0 yaruuna ye upluk tutamaunda bu)unan saj ku avuz ucerisune /8’ /./ 0 / cekuniz. 8 tusuna basunuz )Say-fa 22). / Prôing: Ndlin I elstu stdOu. FOtur upp PrOuO ems og brvarnar syna rauf N, v nsra I megun vuO st’nngu P aà neOan I raut 0 hasgr: slOan 0 og raaf raOgjafa 126. aftur 0. s:vnngu a nalaholdunnu. Yt6 a takka B Ibis. 23). N Place the needle thread behind hook 0 and hold it there. Pull thread 110 fully downwards. ho Coloque ci hilo superior detràs del ganc hacia 110 or brad enhe del Q y sujételo. Tire abajo dci todo. uz Ust piui acengeim arkesuna yerletirin (110) ciyi gegiru ipiik e ye tutunuz. iney tarnamen asauya doru cekiniz. 1’ N 0 N 12 haidiO i LegguO yfirtvinnann aftur fyrir hak 0 og aiveg 110 rann irOa siOan ToguO n. tvinnan niOur. ) I — / I / / 0 / - -- Hold the needle thread taut. Turn the toward you until the nedP hand moves aown ana up again. Pull t’e bobbin toread uo by puilq on th thrau superior. Gire ci ntY.bUe rterrnrtradodeb Sujete el bib ebb Ust pb i sKIca atunuz El carkini on dogru ceviriniz. Sir batis cnjniz. Ust iplikle, alt plii yukariya dojru çekiniz / o - ‘ç . Haidià yf rtvinnann Sr’GO nandhjó nu ham a iâ r tb násn hebur fanO niâur og smLr uoo acu I ogiO unairtvinnann upp. (“ac:Dcththads toward the right under O - -‘‘---. Coboque ambos bibs hacia a derecha dehajo del prensatelas. saadoru,dikiaya Close the tree arm cover. Cierre a tapa 121 Kapak klapesini (121) yukariya doru kapatiniz. LokiO okinu 121 14 Operating the foot control: The more you n:ess down hu pedal, the faster thu rnacnne uns Accionamiento del pedal: Cud :o profundo pise el pedal tanto mayor sera Ia velocidad de costura de a Creatise. Marsa ayakla basiniz. Marsa nekadar fazia bir sekilde haslirsa. “ceative” oke dar sdratli diker. Stigiô a mótstOuna: Pvi fastarsem érs ‘&bvnraO.arsarnarvélin N Needle thread tension 124 N = Setting mark. TensiOn del hilo superior 124 N = Marca pare Ia regulaciOn. Ust N = iplik gerginlii 124 Ayar iaretlemesi. Yfirspenna 124 N = vOrniOun ,rIr rétta spennu. Checking the needle thread tension: The normal setting is in the white range between 3 and 5, The higher the number, the tighter the tension. To check the tension, set the machine at the zigzag stitch. Sew a short seam. The threads should interlock in the middle of the material. 16 Comprobación de a tensiOn del hilo superior. La regulacion normal se halla en Ia zona blanca entre 3 y 5. Cuanto más alto sea el ndmero tanto mayor será Ia tensiOn. La comprobacion se hace con puntada zig zag. Haga una costura corta. Los bibs deberàn quedar anudados dentro del material. ) 4 4 Dual fabric feed This prevents shifting of the fahn c plies against each other Before engngnr; or disenpcjH a:se the presser foot. g4 Doble arrastre El doble arrastre evita que as peza s do costura so desplacen entre si. Antes de Ia conexiOn y desconex ión habrá que alzar ci pie prensate!as. cift / N\L kuma taimasi. Bu, kurn as katlannin dikis esrtasnda kay rnasn engeller. çaltsttrmadan veys kapat madan once, dikis ayan ‘ukarya kaldrinz. 01 I 1___/ Efri flytjarinn: Kemur i veg tynr aO efnn geti rnisfas rst. Lyftiâ tsetnum OOur en ér setjiO etri flytjara nn i samband eOa takiO hann Or samband. To engage: push top feed 130 dow n so that it snaps in place. To disengage : push top feed lightly down and towards the back. Para conectarlo: empuje el pie trasnporta dor 130 hacia abajo hasta quo enca je. Para desconectarlo: empuje liger arnente ci transportador hacia abajo tire y de 01 hacia fuera. çallstrma: Ust tasIytcy (130 l, yerine otu runcaya kadar asaya doru sOrOn Oz. Kapatma: Hafifçe asaiya doru basonniz, arkaya doru cekiniz ye yukariya doru kaydirtniz. Tl aô setja hann i samband ‘tiO Or enfald lega 0 yfirflytarann 130 ar Iii hann smellur i samband. Til aO taka hann Or sambandi ‘tiâ ér 0 hann niOur 0 vO og takiO hann Or rauf fOtarins urn leiO. Per hann DO aftur i sina efri stbOu, 18 Regulating the stitch length The numbers on stitch length contro 106 indicate the stitch length in millimeters. The shtch length range s 0 to 6 mm. Turn the control to set the number indicating the stitch length at mark N. tig 0 (bottom) snows how to set the s:och length control ‘or sewing stretch stdches (red stitch symbols on push but tOnal. Regulación del argo de puntada Las cifras sabre ci regulador 106 inaican ci argo de puntada en mm. La zona de regulacion va de 0 a 6 mm. Ore el disco regulador hasta que Ci argo de ountada deseado concda con a marca de regulacion N. La ‘igura 0 (abajo) muestra el ajuste del regulador de largos de puntada para coser as purtadas stretch que se hallan sabre los botones. \\\\\ Batis uzunluunun ayarlanmasi Batis uzunluju-ayarlayicisi (106) uzerin deki rakkamlar, mm olarak batis, uzunlu unu vermektedir. Ayariama sahasi 0 la 6 mm arasindadir Arzu adilen batis czunluu, N ayar are tine gelecek sekilde çevrilir. Asaidaki 0 Resmi, tuslarda kirmizi olarak isaretienen esnek batisiari dikmek iGn batis uzunluu-ayarlcyicisinin ayarini gostermektedir. ‘\\ Sporlengdin stillt: Thiurnar a sporlengdarcKifunni 106 geta ii synna sporlengdina iii i. Hgt em sO stilla ird 0 ti 0mm. StilliO sporlengaina sen iota a ô met-i N Mynd 0 her aO neOan snir hvemng stiila a tyrir teygjanlegan saum. Stretch). Merkt moO rauOu a valtokkunum \“ 7 19 ________________________ L \\ \b1- \\ \\\ - •‘ Selecting utility stitches Ajuste de las puntadas utilitarias (white symbols) Push the button required and set the stitch length netween 1 and 6. (smbolos blancos) Pulse ci botón y ajuste ci argo de pun tada deseado entre I y 6. All zigzag, and utility stircnes jre hal’ied in width when button G is Dressed. a anchura de las Pulsndo el botOn puntedas zigzag y utiiitarias quedan redu cidas a a mitad. a - 4Fonksiyonel dikislerin ayarlanmasi --__ __ -__ Nytjasaumar (H’h takn encd scm 1 Y1O a takkann og ‘JeiliO pa eor O nota tra 1 ti 6 1 cer j1 )beyaz sirngeler) Tusa basin: ye arzu edilen batiq uzunlu unu, 1 ia 6 arasinda oimak dzere, ayar layiniz. Turn zikzak dikisier ye fonksiyonel dikisler G tuuna iiâveten basmak suretiyle, genisilk itibaryle yariya indirilmis oiur. 24 I Oil z k zak og nyt)aspor er negt aO rnlokKa urn helming meO bvi aO yta samtrnls a teeka C \\\ Selecting stretch stitches (red symbols) Push the button required and turn the stitch length control as far as it wiH go (red symbol). / Pilsando ci botón G, a anchura de (as puntadas stretch quedan reducidas a a mtad. By also pressing button G, all stretch stit ches can he halved in width. 7 — Teygjanlegir saumar: RauO takn). YtO a takkann eq sti hO sporhengdarstihl rinn ems ang eq nann kemst a rajOa svOinu Esnek dikisierin ayarlanmasi kirmizi simgeier) Tusa basiniz ye bati uzuniuu-ayar layicisini dayaraa kadac kmizi :saret czerlfle Ajuste de as puntadas elãsticas (stretch) (simbolos rojos) Pulse ci botón y gire ci reguiador de iar qos de puntada hasta ci tone al sirbolo rojo rO;ir:Z Tdm esnek dikiler G tuHuna ilHveten basmak suretiyle, genislik itiheriyle yariya ndirilrnis clue OH teygjaneg spor er hqt sO mjokka um he ming me.O vi aO yta samtimls a takka G. I - (V Utility- and srtch stitch corthino tions • V sho’.n tn an the n e jr hnged ton coer and at the ed o tljs boo lt on• or wdn sewog e’’e, von wan 5’ afl eiastc o plo: cn, pLon bu::;s nd F se’ect a sttci: engtn oetweo 1 and t. trn V V ‘ • V Combinaciones de puntadas utilitarias y I crotch punt Po’lt0003 oii:r a se eiicuntrjp an a labIa de cragrarnas en a tapa ahetbl iS a rnaouira •/ final de este cuajarno, con ndcac ones oara V V a Por eemplo, ci ount e asdco nvsbe noise al rnis’o tatrnoo hoto costura. os Eye ayn zamanda baSnz. Bat I - 26 equr D n-,aornjr en no Cr •n n uzunlu stn’rns D_ Lr5R 2II Ui LJ H B Selecting the needle position for straight stitching Lsft needle posit:on: push SuttOn 3 Centrul needle posnion: push button C PPht needle poshon- øush buttons H an Duz dikiste bats durumunun ayarlnn ma s Bat:s dururnu soldu: Tus Bye bas:n:z Btis dururnu rtada. Tus G’ye has:ruz Batis dururnu sada: Tus H’ye ye ‘ye has: n z 4 4 PosiciOn de Ta puntada en el punto recto Posic:On izqu:erda: pulse ci bo:On B PosiciOn central: pulse el bothn C P PosiciOn derecha: pulse los botorus H e Sporlegan stilit via beint spor: Spohega H v:nstr: = YtiO a takka B Yt:O h’aka H Spuhega nOu :CO Cpu: ecu :r ‘:agr: I 27 n (A-M I) Tf1 1 r r L4Li•LiJ J H j 0 4 /7 7/ - Disco regulador para puntadas de Thumb wheel for fancy stitches (Model 1171) adorno )mode(o 1171) Cada puntada de adorno Ileva as gnada una letra. Elija (a puntada de adorno en Ia tabra. gire el disco regulador “N” has:a que Ia letra corresoond’ente quede por debajo de a marca de -egulacion “0 Para coser las ountadas utilitarias, hay que desconectar a) disco reaulador “N” de as ountadas de adorno. Para ello gire ai punto blanco debajo oe (a marca Je req !acion “0”. Every fancy stitch is provided with a letter Select the fancy stitch from the table. Set the co’msoonding letter at mark “0” by :urnino thumb wheel N. For sewing utility stitches, tnumb wheel N for fancy stitches must be disengaged. To do so. set the white dot at mark “0’. / 7 Sus dikipieri cm ayar dürnesi Model 1171j batisrna bir hart tekabdl etmekte Her dir. Sds batisini cetvelder’ seqiniz. “N” ayar ddmesi ,le uygun olan “0” ayar garehnin altina ceviriniz. Fonks)yonel dekislerin dikhnesi ;cn “N” ayar dhmesrnin kapanmrg almost gerekir. Bunun cm beyaz noktayr 0” ayar isareti altmna cevrrmniz, 4 Stillihjol fyrir skrautsauma (Vel 1171) 1O Hoer srautsaumur re’ur sinn coksar ye’ emnt’em saurn at :crlunni og sculô saa” a: njo mu N annmg aâ v Okomandm cckstaur se tyrir neOan still merkmO 0 Pegar her saummO venmu:eaa saurna eOa nyiJa sauna sen eru a a okkur’um verOu at II 0 sO iera jr samoardi Hvitm cun’jjr’rn a njoi nu ‘jerOur P0 sO vera ryrir neOan s’i rnerk:O. 0 -I 28 o Detachab’e work support and accessories: The work support can be lifted out (N). Open ts lid and take out accessory box P. Underneath the box is an accessory com partment 0. Illustration 0 shows how to arrange sewing feet, needles and bobbins in the accessory box. 1 2 3 4 5 6 7 8 Ordinary sewing foot Fancy-stitch foot for top feed Fancy-stitch foot (without top feed) Blindstitch and overlock foot Zip foot Buttonhole foot Darning foot Hemmer Edge guide I Supemento y accesorios El suplemento se puede quitar del todo (N). Abra el suplemento y saque a cala de accesorios P. Debajo de ella hay un corn partimento 0 para accesorios. La figura 0. muestra cdmo deben colocarse os pies prensatelas, as agujas y las canllas. o Prensatelas normal Prensatelas para puntada de adorno, para transporte superior 2 Prensatelas para puntada de adorno (sin transporte superior) 3 Prensatelas para puntada invisible (overlockl 4 Prensatelas para cremalleras 5 Prensatelas para ojales 6 Prensatelas para zurcdos 7 Prensatelas dobladillador 8 Guia 1 / Oeisebi(en (dikilecek seyin üzerine konduu, kaldirilabilir) dikis yOzeyi ye i!âve parcalar: Dikis ydzeyi dariya ckanlahilir (N). Dikig yüzeyini acinz, teferruat (iláve parcalarl kutucuunu (P( disariya cikanniz. Teferruat kutucuunun altnda bir lSve parcalar bdl mesi (0) bulunmaktadr. Resim 0., dikis ayaklannin. inelerin, masuralarin nasl dizilmesi gerektiini gdstermektedir. O 1 2 3 4 5 6 7 8 Normal diki ayai Ust tasima cm süs dikii ayai Süs diksi ayai )üst tarnasz( Kör dikis- ye overlock ayaI Fermuar ayai Ilik ayai Orerek tamir etme ayai Etek baski ayai Cetvel / o Vinnubori8 og aukahiutir: Hgt er aO taka borOiO at N. OpniO aO og fjar(gO efri hluta P. Undir efri h(utanurn er auka geymsluhdlf 0. Mynd 0 snir hvernig fdtum, nálum cg spdlum er haganlegast fromiO 1 2 3 = lyrir. 5 = = = = = 6 Venulegur saumfOtur Utsaumsfótur fynr efri tlytjara Utsaurnsfólur an efri Hytjara Blindföidunar- og overlockfOtur Rennilásafótur HnappagatafOtur Stoopfotur tng 35 oCt t= f pr C:mbio d pae detantera y prensatelas por su as ajo. El prensatelas empüjelo hacia ab suelta. an istirmek: D!ks Diki ayaini de doru unuz vs asaa on tarafindan tut an, N. ) r at ur cc a denL, an nnisti hrn n nO -. — . — _ _ _ _ _ _ _ _ _ _ _ _ _ _ _ _ _ _ _ er the e sewing foot: low cing th t so foo the ve ifter and mo presser bar into grooves 0 that pins N snap sJ N las ra s N encajen en quelos pasadore fl — o ía prensatelas: Baje Colocación de pie al e on sic po y satelas palanca aizapren ma prensatelas de for mismo hempo el nu rma mak: Kumas bash Diki ayaini tak aya, da ara bu vs indiriniz kolunu aaya racak uu iqensine otu N kOprpcüü 0 ol ekilde sürinüz. og tr:O LkkO fOttyhinnn Fotur settur a: Ithr N ah molar 0 totfln ti anng aO o J \ \I I I cesso are for secunng ac Screws P and Q screw. ing ain ret t too ing nes. R is the sew fijas guias. ra P y 0 sinien pa sate soporte del pren a! r fija ra pa R sirve as. esi tarin tespit edilm — _..--- 0 P ye Q. Have parça tutamak vidasdr. cindir. B, diki aya ens og lesta aukahutum p og 0 eru ti aO yrr saum festir bOlduna kantstyr’ngu. R fturnar 0 36 ___________ ___________ _______ 4 4 -. D ‘U 386- Si Sewing feet (standard accessories) 0 Ordinan sewing foot 1 Fancy-stitching foot. for top feed 2 Fancy-stitching foot without top feed) 3 Blindstitching or overlock foot 4 Zip- and edge-stitching foot 5 Buttonhole foot 6 Darning foot 7 Hemmer S Edge guide Pies prensatelas (accesorios normales( 0 Prensatelas normal 1 Prensateias para puntada de adorno, pars transporte superior ( . Diki syakiari (normal lâve parpalar) 0 Normal dikis ayai 1 Ust tasima cm ads dikisi ayai 2 Sds dikiyi ayai (dst tasimasiz) 3 Kbr diki- ye overlock ayai S. Fermuar- ‘a kenar ayai 5 (iikayai 6 Orerek tamir etme ayai 7 Etek baski ayai 8 Cetvel - - -- S - ( 2 Prensateas para puntada de adorno (sin trsnsporte superior) 3 Prensatelas para puntada invisible y overlock 4 Prensatelas pars cremallera y costuras SI canto 5 Prensatelas oars Olales 6 Prensateias pars zurcidos 7 Prensatelas dobladillador 8 Guis • /// / 1 Ftur (scm fylgja vélinni) 0 Venjulegur saumfOtur 1 UtsaumsfOtur fyrir efri flytjara ZBlindfbkiunarogoverlcckfOtur 4 RennHásaogkantfOtur 6 Stoppfótur 8 Kantstring 0 - 93-035 960-91 37 fl HHf Q Q 4Blindstitching and overlock foot 8lindstitching (N): turn screw P to set guide 0 at the left. The guide is then adjusted according to the needle penetra tions. The folded edge of the material runs along guide edge P. 0verloc stitching (0). Turn screw P to set guide 0 to the far right. The fabric runs along guide edge R. 4 Kör diki ayai ye overlock ayaI: Kor bati dikii (NI: P vidasiyla Q kilavu zunu sola getiriniz. Kilavuz daha sonra ine batii igin ayarlanacaktir. Ust kuma katlamasi, P kilavuz kenari boyunca yürür. Overlock dikisi (0): p vidisiyla Q kilavu zunu dayanaa kadar saga doru geviriniz. Kuma, R kilavuz kenari boyunca yürür. L 38 p 4 Prensat&as para puntada invisible y overlock: Costura invisible (N): Girando el tornillo corra Ia guia 0. hacia Ia izquierda. La guia se regula ahora para (a penetraciOn de Ia aguja. El borde del doblez superior se desliza contra el horde R de Ia guia. gire Costura overlock (0). Con el tornillo Id gula 0. hacia Ia derecha, hasta ci tope. La pieza de costura so desliza ahora contra el borde R de Ia gula. 4 Blindfäldunar og overlockfótur: Blindfbldun (NI frO til vinstri. )annig aO nalin lina faldsins er R MeO skrufu P er styring 0 Strgir or siOar frâ til stingi nOur i faldinn Brot latin renna eftir stringunni Overlocksaumur 01 MoO skrufu P er styr ng 0 frO til hgr EfniO or sOan atiO renna meOfram styrngu A. fl_s I) U i r 1 ji / \ R Lc 4 Pie zurcidor: P one a palanquita Eleve a aguja. Presi ca el paso uz rod lnt . ela jét hacia atrás y su 0 en ci orificio N, con dor del prensatelas ra bar Ta a R se apoya contr que a horquilta pie hasta , y meta ahora el las ate ns del pre en cuyo ita qu lan pa a e ci tope. Suelt ntra ci tornillo 0. caso Se apoyará co 0. lo Apriete el torriil Darning foot: to the le up. Push bar P Position the need pin of the the Fit re. the it d hack and hol k R the same time, for foot in hole N; at sh the pu and , bar r sse engages the pre n of bar which the foot fully in. Let go hten screw Tig 0. ew scr ing rests on retain 0. lana s de lana, ci hilo de Para zurcir tejido S. a gui Ta en rlo habrd que introduci d is the woollen threa For wool darning S. de pulled into gui Stoppfótur: stöOu. SetO nátna I efstu fds;u. r og -naldiO yOu frd YtiO haki P R N at a faNnurn O haki fotstdngina. Sieppi tata nu utan urn 0 n a ndlaskrOfuna P. sem eggst no ofa rdd uUarraO er hann Et stoppaO er ytir ur cat S a ftinum. e ayaI: Orerek tamir etm iniz. P er kolunu dir lneyi yukanya kal uz, nniz ye sikica tutun arkaya doru basti ’rnz, qa ne risi ice iii de Ayain pimini N strmu.junu cu uruua ,uinas oa takiniz. P ar kad a na ya kavrar. Ayai da eri kol., 0 da , bu ara eri kolunu birakiniz asini vid 0 ir. gel ne eri tutamak vidasi Uz sikitinniz. etme esnasinda vdn Ydn ile örerek tarnir n. risine çekiImek;n iplik S kilavuzu ige ) H: 1. •j —z I Zipper foot (edge sewing foot (N): The zipper toot is secured on the left or right, depending on the side of the zip to be sewn (NI Prensatelas para cremalleras (pie pare bordes) (N): El prensatelas pare cremalleras se encaja a izquierda o derecha, segn si hay que coser Ia mitad izquierda o denacha (N) de Ia crernallera. Edge guide (0): Push the edge guide into hole Q, set the required edge distance and tighten it there. Guia marginal (0): Pase a guia por ci agujero fly después de ajustarla a Ia distancia deseada, segün Ia labor, fijela con ci tornillo R -I Fermuar ayai (kenar ayai( (N): Fermuar aya, bahis konusu olan fermuar cm sol veya sa tarafta (N) yerine oturtu lace kti r. Kilavuz cetveli (0): Cetveli Q delii igerisine sürünüz ye arzu edilen araltin ayarlanmasindan sonra P vidasini sIk,tInnIz. 40 4 Rennilasafôtur (kantfotur) (N) RennIásaftnum er smellt a v.nsra eOa hgra megn alIt ettir hvoru megn er ‘aljO hata rennilàsnn N) Kantstring (0) SetjiO kanstringuna I gat C og eftlr aO hata stillt fjarIgOina. scm ér vIlIlO bata Pa nerOtô er skrüfu P U Hi uttonhoe setting: ten Push button C. Set the needle thread sion at range 3 for buttonhole sewing. h Attach the buttonhole foot. Set the stitc in density at range N. Insert a gimp thread tra illus the in n show as the sewing foot tion: Place the thread over the back ridge. and pull it taut so that it is hold in tab 0 runs at the front. During sewing, arrow P e nhol butto the how is along scale R. This length is determined. ng For sewing buttonholes use light sewi thread. Ajuste para hacer ojales: Pulse el botOn C. En Ia zona del oal, rior en 3. ajuste Ia tensiOn del bib supe Ia den Regule ojales. para pie el e Coloqu N. ojal del zona Ia en sidad de puntada el prensa en o refuerz de bib el e Coloqu chelo en telas de Ia siguiente forma: engOn bien tenso, y o, sujêteb eriot post nte salie el r. engOnchebo en el saliente anterio P se va des flecha Ia ra, Ia costu e Durant R. Con plazando a lo largo de Ia escala a del bargur Ia r mina deter e pued se ello ojal. finos. Para coser ojales utilicie bibs Hnappagatastilling: lIii ayarlamak: i Hik C tuuna basniz. Ust iplik gerginliin . N i takiriiz ayain Hk iz. getirin sahasi 3’e lik sahasinda, batis sikliini ayarlayintz. Pith ipliini (kaba büküm ipgHini) diki ayainda aaida belirtilen sekilde takiniz: flil arka tirnak üzer:ne kc:niz, cekiniz ye on tirnak (0) icinde sikistiriniz. Dikis esnasinda P oku, H taksimati hoyunca yürdr. Bu suretle uk uzunluu tespit olunabilir. Ilik dikmek icin ince dik iphi kullaniniz. YtiO a takka C. ShlIiO yfirtvinnaspennuna 0 pagala hnappagatasvOi (ca. 3). SetjiO hnao s 0 sporsin ka fOtinn 0 ‘iëtna. og siO )Ottlei her sem âinn und:rrO stillisvOi N. Legg:O seg r ai 5 a:a;i 0 d’tfliOfl. Q0 hakiO 0 A raO:nn og klemmiO hann I fremra meOfram P bnn fr:st er O rneOan sauma ngt i3 pannig or :o R. ni tikun rn:is NotiO ákvarOa Iengdina a hnaopagatinu. pa hnap vO toinna non aOens rndg ). stvinna Otsaum gatasaum 41 . i:j :1 H 1 rFii II \\ \\ Li 4Sewing buttonholes for Pull the bottom of the buttonhole foot go. will it ward as tar as e the 1 Sew first buttonhole seam. Rais needle ck 2 Push button B in until 4 to 6 barta the ing hold , sewn are hes ing stitc workpiece firmly, then release the but ton. Push button A. Sew the second but tonhole seam the same length as the first. ck 4 Push button B in until 4 to 6 barta ng stitches are sewn, holding the material firmly, then release the but 3 ton. Sew a few tying stitches. Remove the . fabric, pull the filler cord taut and trim . open e nhol butto 6 Cut the 5 gar Before sewing buttonholes in the ment it is recommended to sew a but tonhole as a test. 42 Costura del ojal el frente Empuje Ia pieza corrediza hacia . tope el hasta en Ia ar 1 Cosa el primer labio del ojal gura deseada. alo pul 2 2 Pulse el botOn B y manténg de pre adas punt 6 a 4 de haga , sado botOn el e suelt tela, a silla, sujetando ndo segu el cosa A y n botó el e 3 Puls el pri labio del ojal igual de largo qua mero. pul 4 Pulse el botcin B y mantcingalo pre de adas punt 6 4 a de haga , sado ci e suelt y tela, Ia silla, sujetando botcin. te, 5 Haga varias puntadas de rema htlo Retire Ia pieza cia costura, tire del lo. de refuerzo y córte or 6 Abra ci ojal con el descosed prenda, Antes de coser los ojales en a ba. prue de ojal un haga primeramente N ) I C’eaning and oing Tilt the needle plate up at the hack (N) and take it out (0). Clean the feed dog and the parts in the sewing hook area with a soft brush. Clean the bobbin thread monitor as instructed on page 57. Do not oil the machine. Only apply a drop of oil in the hook raceway (see ill.) occasionaH’ 4 Limpieza y engrase: 4 Lava nte ía placa de aguja N y retireia 0. Limpie ci transportador y ía zone del gar fio con an pincei. La (impieza del bib infe rior se efectia conforme a as instruccio nes de (a pOgina 59. La maquina no nece site engrase. Lo bnico que deberá hacer es ponet de vez en cuando, one gota de aceite en Ia pista del garfio, como se muestra en ía figure. Temz(emek ye yalamak: Bati )evhasini arka tarafindan yukariya kaldir;niz (N) ye dtsariya çikanniz (0). Firça ile transportdrü (tasiyiciyi) ye kavrayici nm bulunduu yen temizleyiniz. Alt ip(ik kon trolu, Savf 6t ‘cteki talimatlara core Hreinsun og smurning: teniizenecektii. Makinayi yaIamayiniz. hun er sjâlfsmurô. Smyrjiô ekki velina Alit sem )Dér urfiO aO gera er aO smyrja bOrn hvoru griparann Resimde göruidüu gibi, sadece arasira kavrayicinin bulunduu hareket sahasina bir damie ya darnlatiniz. Lyftiâ stngpldtunn app aO atlan N. og lakiO hana at 0 HrensiO flyt(arann og krngurn gria arann maO bursta Hra:O elektrcniska ertir h rneO urrdirtvinnarim - 45 fl t,.z:t / $- // 4 6 Changing the light bulb: Pull out the mains plug. Close the hinged top cover and swing up the carrying handle. Insert the edge guide into cutout Q, push down the lamp housing and hold it there. Turn the light bulb toward N and take it out. Insert the new bulb so that its pins slide in slots P. Push it up and turn it toward 0. Pull Out the edge guide. N 4 Skipt urn peru: Ampul deistirmek: Ceranin fiini cekiniz. Acilir kapanir kapai kapatiniz ye tasima kolunu yuka riya kaldinniz. Kilavuz cetvelini, üst kapak ye mahfaza arasindan, ayrica Q kesimi arasindan gegiriniz: Ampulü N ydnunde ceviriniz ye diariya gikartiniz. Yeni ampulü, yataklar P oluklari içerisine gire cek ekiide sürünüz, yukariya doru bastiriniz ye 0 yonünde geviriniz. Cetveli disanya gikanniz. TakiO ratmagnstengilinn jr sarntancli LyftO handfanginu upp. Setlia kantstrirguna niOur urn raul 0 ofan a vefinni PrSfst a meO string unni alan a peruholduna og haldia henni fastri. Prstia perunni upp a via og snuia i alt aO N TakiO peruna ur og setlia nyla peru annig aâ hok n a perunni talli i raufar P r’stia a og snuia alt aO 0 Losia nu a str ngunni. annig aa peruhaldan fan attur upp. ii 46 Cambio de Ia bombilla: Desenchufe a mãquina de Is red. Cierre Ia tapa abatible y levante el asa. lntroduzca Ia guia recta entre Ia ranura de Ia tapa frontal y Ia carcasa en Ia escotadura Q. Con dicha guia, empuje hacia abajo el portalãmparas y manténgalo sujeto. Gire Ia bombilla hacia N y sáquela. Coloque Ia nueva bom bills de forma que las guias empOjela.hacia encaen en las ranuras arriba y girds hacia 0 Retire Ia guia N D anging the fuse Pull out the mains plug. Turn fuse holder N left a quarter turn with a screwdrivec release it and take it out. Pull out fuse B. insert a new fuse in the hoidet replace the holdec push it in with the screwdrivet then turn it clockwise a quarter turn. (The fuse is type F2A.) 110-volt machines have no fuse. Carnbio del fusible: Censenchufe a máquina de Ia red. Con un destornillador, gire el portafusbles N un cuarto de vuelta hacia Ia izquieraa y retirelo. Saque ahora el fusible 0. Coloque un nuevo fusble en ci portafusibles. lntroduzca el portafusibles, presiOnelo hacia atrãs con el destornillador y asegU relo, giràndolo un cuarto de vuelta hacia Ia derecha. (Fusible del tipo F2A(. Las máquinas para 110 V no Ilevan fusible. 7, Skipt urn Oryggi: TakiO vetna ur sambandi vO veggtenqu MeO srndpen:ng cOo skrOfjárni losO Or urn orygg shdiduna N meO vi aO snda henni ti vins!ri TauO ho t;OO, ur og skiptiO urn cryggiO 0 Sigortayt deitirrnek: Ceryan fiini çekiniz. N sigorta mesnedim bir tornavidayla ddrtte birlik bir döndürme ile sole doru cevirip serbest birakiniz ye dsariya çikannz. 0 sigortasni disanya cekniz. Yeni sigortayl mesnet icerisne sürünüz, Mesnedi yerletiriniz, tornavi dayla arkaya doru bastinniz ye ddrtte birlik bir döndürme ile saga doru sikntz. (Sigorta gücü F2A). 110 V makinalarda sigorta yoktur. SetjiO siOan holduna aftur i, ‘tiO lauslega a hana, og snLiO LI hgri. á Pfatf 1 Oryggi at styrkleika F2A fãiO ér h urnboOiru I velurn ‘yrr 110 loll or ekkert 47-
 1
1
-
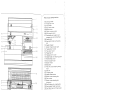 2
2
-
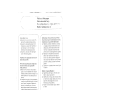 3
3
-
 4
4
-
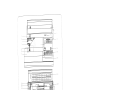 5
5
-
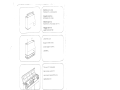 6
6
-
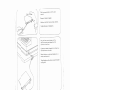 7
7
-
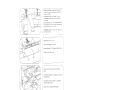 8
8
-
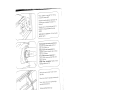 9
9
-
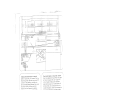 10
10
-
 11
11
-
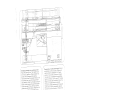 12
12
-
 13
13
-
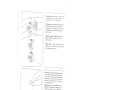 14
14
-
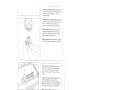 15
15
-
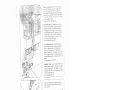 16
16
-
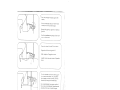 17
17
-
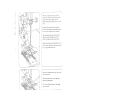 18
18
-
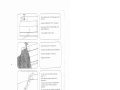 19
19
-
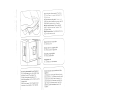 20
20
-
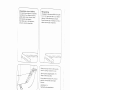 21
21
-
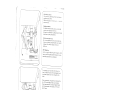 22
22
-
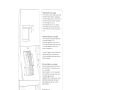 23
23
-
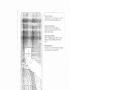 24
24
-
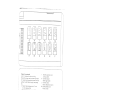 25
25
-
 26
26
-
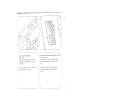 27
27
-
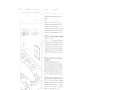 28
28
-
 29
29
-
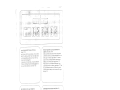 30
30
-
 31
31
-
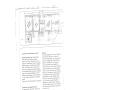 32
32
-
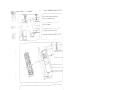 33
33
-
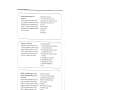 34
34
-
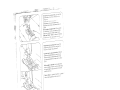 35
35
-
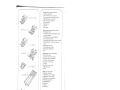 36
36
-
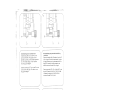 37
37
-
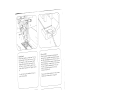 38
38
-
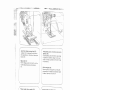 39
39
-
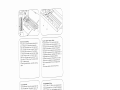 40
40
-
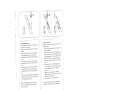 41
41
-
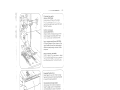 42
42
-
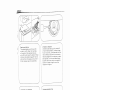 43
43
-
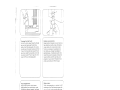 44
44
-
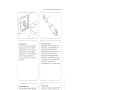 45
45
-
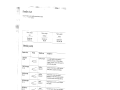 46
46
-
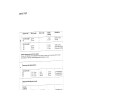 47
47
-
 48
48
-
 49
49
-
 50
50


Pfaff tiptronic 1171 El manual del propietario
- Tipo
- El manual del propietario
- Este manual también es adecuado para
en otros idiomas
- English: Pfaff tiptronic 1171 Owner's manual
- Türkçe: Pfaff tiptronic 1171 El kitabı