La página se está cargando...
La página se está cargando...
La página se está cargando...
La página se está cargando...
La página se está cargando...
La página se está cargando...

7/160505927033 D
Y07552
M
M
Y01852
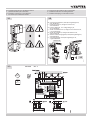
de Gilt nur für stetig Modus
fr S‘applique uniquement au
mode de régulation continue
en Applies for continuous mode only
it Vale solo per modo „continuo“
es Se aplica sólo para modo continuo
sv Gäller endast för kontinuerlig reglering
nl Geldt uitsluitend voor continu modus
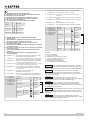
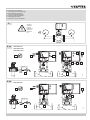
1 2 3 4
On
Off
1 2 3 4
On
Off
stroke
x
2
1 2 3 4
On
Off
stroke
Signal
stroke
Signal
lin
1 2 3 4
On
Off
stroke
stroke
1 2 3 4
On
Off
stroke
Signal
lin
de Hub
fr Course
en Stroke
it Corsa
es Carrera
sv Slaglängd
nl Slag
1 mm 14 mm 20 mm 40 mm
1 2 3 4
On
Off
de Laufzeit
fr Temps de marche
en Running time
it Tempo di marcia
es Tiempo de funcionamiento
sv Löptid
nl Looptijd
2 s 28 s ± 1 40 s ± 1 80 s ± 4
1 2 3 4
On
Off
4 s 56 s ± 2 80 s ± 4 160 s ± 4
1 2 3 4
On
Off
1 2 3 4
On
Off
6 s 84 s ± 4 120 s ± 4 240 s ± 8
de Schalterkodierung
fr Codage de commutation
en Swith coding
it Codicadiintervento
es Codicacióndeconmutación
sv Kodomkopplare
nl Schakelcodering

8/16 0505927033 D
de
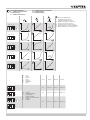
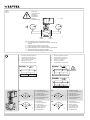
1. Beide Tasten (siehe Bild) gleichzeitig für 5 s drücken. Die Initialisierung
beginnt. Während diesem Vorgang blinken beide LEDs am Antrieb rot.
2. Die Spindel fährt bis an den mechanischen Anschlag des Stellantriebes
(Ventil ganz offen).
3. Von dieser Stellung aus wird die Spindel bis zum mechanischen
Anschlag des Stellantriebes (Ventil zu) eingezogen.
4. Die Initialisierung ist beendet. Die Spindel fährt in die entsprechende
Position des Steuersignals.
• Durch kurzes Antippen einer der beiden Tasten, kann die Initialisierung
abgebrochen werden.
• Während der Initialisierung ist ein automatisches Ankoppeln des Ventils
möglich.
fr
1. Presser les deux touches (voir illustration) simultanément pendant 5 s.
L‘initialisation commence. Pendant cette procédure, les deux témoins
LED sur le servomoteur clignotent en rouge.
2. La tige sort jusqu‘à la butée mécanique du servomoteur (vanne
entièrement ouverte).
3. A partir de cette position, la tige est rétractée jusqu‘à la butée
mécanique du servomoteur (vanne fermée).
4. L‘initialisation est terminée. Le servomoteur se rend à la position
correspondant au signal de commande.
• L‘initialisation peut être interrompue par une brève pression sur l‘une
des deux touches.
• Lors de l‘initialisation, un accouplement automatique est possible.
en
1. Keep both buttons pressed (see diagram) at the same time for 5
seconds. The initialisation begins. During this procedure, both LEDs on
theactuatorashred.
2. The spindle extends up to the mechanical stop on the control unit (valve
fully open).
3. From this position, the spindle is retracted until it hits the mechanical
stop on the control unit (valve closed).
4. Initialisation is ended. The control unit moves to the position that is in
accordance with the control signal.
• Initialisation can be aborted by tapping either of the two buttons.
• During initialisation, automatic coupling is possible.
it
1. Tenere contemporaneamente premuti per 5 s entrambi i tasti (vedere
gura).L‘inizializzazionevieneavviata.Durantequestafaseentrambii
LED del servomotore lampeggiano in rosso.
2. Lostelovieneestrattonoallabattutameccanicadelservomotore
(valvola completamente aperta).
3. Apartiredaquestaposizionelostelovieneretrattonoallabattuta
meccanica del servomotore (valvola chiusa).
4. L‘inizializzazione è terminata. Il servomotore va nella posizione
corrispondente al segnale di comando.
• Premendo brevemente uno dei due tasti, l‘inizializzazione può venire
interrotta.
• Durante l‘inizializzazione è possibile un accoppiamento automatico.
es
1. Mantener ambos botones pulsados al mismo tiempo durante 5
segundos(vergura).Lainicializacióncomienza.Duranteeste
procedimiento, ambos LEDs en el servomotor parpadean en rojo.
2. El eje se extiende buscando el extremo mecánico en la unidad de
control (válvula completamente abierta).
3. Desde ésta posición, el eje se retrae hasta llegar al extremo opuesto en
la unidad de control (válvula cerrada).
4. Lainicializaciónhanalizado.Launidaddecontrolsedesplazaala
posición que recibe de la señal de mando.
• La inicialización puede abortarse pulsando cualquiera de los 2 botones.
• Durante la inicialización, es posible el acoplamiento automático.
sv
1. Båda knapparna (se bild) måste hållas nedtryckt minst 5 sekunder.
Initialiseringen startar. Under tiden blinkar båda LED rödt.
2. Ställdonsspindeln trycks ut mot ventilens nedre ändläge (ventil öppen).
3. Ställdonsspindeln dras inn mot ventilens övre ändläge (ventil stängd).
4. Initialiseringen avslutat. Ställdonet ställer sig i läge motsvarande
styrsignalen.
• Med ett snabbt tryck på en av knapparna kan initialiseringen avbrytas.
• Vid initialiseringen är automatisk sammankoppling med ventil möjlig.
nl
1. Beide toetsen (zie afb.) tegelijkertijd 5 sec. ingedrukt houden. De
initialisatie begint. Tijdens deze procedure knipperen beide LEDs op de
aandrijving rood.
2. De spindel schuift tot aan de mechanische aanslag van het corrigerend
orgaan naar buiten (afsluiter volledig geopend).
3. Vanuit deze stand wordt de spindel tot aan de mechanische aanslag
van het corrigerend orgaan weer naar binnen getrokken (afsluiter
gesloten).
4. De initialisatie is beëindigd. Het corrigerend orgaan gaat in de stand
staan die door het besturingssignaal is aangegeven.
• Door kort op één van de beide toetsen te tippen kan de initialisatie
onderbroken worden.
• Bij de initialisatie is een automatisch aankoppelen mogelijk.
de Initialisierung
fr Initialisation
en Initialisation
it Inicialización
es Inizializzazione
sv Initialiseringsstart
nl Initialisatie
B10551
4

9/160505927033 D
de Handbedienmodus
fr Mode de service manuel
en Manual operating mode
it Modo comando manuale
es Modo de funcionamiento
manual
sv Manuellt mode
nl Manueel bedrijf
B105
51
5
de
Tasten (siehe Bild) Funktion
Einer der beiden Tasten 5 s
gedrückt halten.
Handbedienmodus ist aktiv.
Einer der beiden Tasten im
Handbedienmodus antippen.
Der Stellantrieb fährt in die
entsprechende Richtung bis zum
Anschlag.
Einer der beiden Tasten während
der Fahrt antippen.
Stellantrieb stoppt.
Einer der beiden Tasten im
Handbedienmodus 5 s gedrückt
halten.
Regelmodus ist wieder aktiv.
fr
Touches (voir illustration) Fonction
Presser une des deux touches
pendant 5 secondes.
Activer le mode de service manuel.
Taper légèrement une des deux
touches au mode manuel.
Le servomoteur passe en position
dendecoursedansladirection
correspondante.
Taper légèrement une des deux
touches pendant la course.
Stopper le servomoteur.
Presser à une des deux touches
pendant 5 secondes au mode
manuel.
Réactiver le mode de réglage.
en
Buttons (see diagram) Function
Press one of the two buttons for 5
seconds.
Activate the manual operating
mode.
In manual operating mode, tap
either of the two buttons.
The actuator moves to the
appropriate direction until it
reaches the stop.
Tap either of the two buttons while
the actuator is moving
The actuator stops.
In manual operating mode, press
either of the two buttons for 5
seconds
Re-activate the control mode.
it
Tasti Funzione
Tenere premuto per 5 s uno dei
due tasti.
La modalità manuale è attiva.
Nel modo comando manuale
premere brevemente uno dei due
tasti.
Il servomotore marcia nella
corrispondentedirezionenoal
fermo.
Premendo brevemente uno dei
due tasti durante la marcia.
Il servomotore si arresta.
In modalità manuale tenere
premuto per 5 s uno dei due tasti.
La modalità regolazione è di
nuovo attiva.
es
Botones Funcionamiento
Pulse uno de los dos botones
durante 5 segundos.
Activar el modo de funcionamiento
manual.
En modo de funcionamiento
manual, pulse cualquiera de los
dos botones.
El servomotor se mueve en
la dirección apropiada hasta
alcanzar el tope.
Pulse cualquiera de los dos
botones mientras el servomotor
se está moviendo.
El servomotor entonces se para.
En modo de funcionamiento
manual, pulse cualquiera de los
dos botones durante 5 segundos.
Reactivar el modo de regulación.
sv
Knapparna Manövrering
Tryck på en av knapparna i 5
sekunder.
Aktivera manuellt mode.
I manuellt mode, tryck på en av de
två knapparna.
Ställdonetyttarsigibestämd
riktning tills det når ändläget.
Tryck på någon av knapparna när
ställdonet rör på sig;
Ställdonet stoppar.
I manuellt mode, tryck på någon
av knapparna i 5 sekunder.
Att återgå till styrmode.
nl
Toetsen Functie
Eén van de beide toetsen
gedurende 5 s ingedrukt houden.
Manueel bedrijf is geactiveerd.
Bij manueel bedrijf één van de
beide toetsen kort aantippen.
De aandrijving beweegt zich in
de betreffende richting tot aan de
aanslag.
Tijdens het openen of sluiten
een van de beide toetsen kort
aantippen.
Aandrijving stopt.
Bij manueel bedrijf één van
de beide toetsen 5 s ingedrukt
houden.
Regelmodus is weer actief.
La página se está cargando...

11/160505927033 D
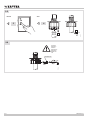
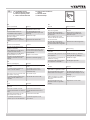
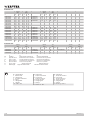
es
LED Descripción
Ambos LEDs se encienden de
color verde
Periodo de espera (45 s) después
de que la función de emergencia
hanalizado.
Ambos LEDs parpadean en rojo. Inicialización
Un LED parpadea en verde. El servomotor extiende su
carrera; la dirección coincide con
el LED.
Un LED se enciende de color
verde.
El servomotor está en posición
de fábrica, la última dirección de
operación coincide con el LED.
Un LED se enciende de color rojo. Sehaalcanzadolaposiciónnal.
La posición de la válvula (abierta
o cerrada) coincide con el LED.
No se enciende el LED No hay tensión de alimentación
o no hay modulación (en modo
3-pt.)
Modo manual: Ambos LEDs
parpadean en rojo/verde.
El servomotor se mantiene en la
misma posición.
Modo manual: Un LED parpadea
en rojo/verde y otro parpadea en
verde.
El servomotor extiende su carrera
hacia el LED que parpadea en
verde.
sv
LED Beskrivning
Båda LED lyser grönt. Väntetid (45 s) efter avslutat
nödställfunktio.
Båda LED blinkar rödt. Initialisering
En LED blinkar grönt. Ställdonet i drift i riktning med
motsvarande LED
En LED lyser grönt. Ställdonet står still. Senaste
riktning med motsvarande LED.
En LED lyser rödt. Uppnådd ändläge motsvarande
LED (öppet eller stängd).
Ingen LED lyser. Ingen spänningsmatning (plint
21).
Manuell drift: Båda LED blinkar
rödt/grönt.
Ställdonet står still.
Manuell drift: En LED blinkar rödt/
grönt och den andra LED blinkar
grönt.
Ställdonet rör sig i riktning mot
den grönt blinkande LED.
nl
LED Beschrijving
Beide LEDs knipperen groen.
Wachttijd (45 s) na beëindigde
nulspanningsterugloop.
Beide LEDs knipperen rood. Initialisatie
Eén LED knippert groen.
De aandrijving maakt een slag,
richting volgens de LED.
Eén LED brandt groen.
Aandrijving in rustpositie, laatste
looprichting volgens de LED.
Eén LED brandt rood.
Eindpositie bereikt. Stand van de
afsluiter (open of dicht) volgens
de LED.
Geen enkele LED brandt.
Geen spanningsvoorziening
of in de 3-punts-modus geen
aansturing.
Handbediening: Beide LEDs
knipperen rood/groen.
Aandrijving staat stil.
Eén LED knippert rood/groen en
de andere LED knippert groen.
De aandrijving maakt een slag
in de richting van de groen
knipperende LED.
0313815 001
B10447a
de zu
fr fermé
en closed
it chiuso
es cerrado
sv stängd
nl dicht
6
B10448a
de Isolationsgrenze
fr Limite de l‘isolation
en Insulation limit
it Limite di isolamento
es Limite de aislamiento
sv Isoleringsgäns
nl Isolatiegrens
Warnung
Avertissement
Warning
Avvertenza
Advertencia
Warning
Waarschuwing
La página se está cargando...
La página se está cargando...
La página se está cargando...
La página se está cargando...
La página se está cargando...
Transcripción de documentos
de fr en it Schalterkodierung Codage de commutation Swith coding Codifica di intervento es Codificación de conmutación sv Kodomkopplare nl Schakelcodering M de Gilt nur für stetig Modus fr S‘applique uniquement au mode de régulation continue en Applies for continuous mode only it Vale solo per modo „continuo“ es Se aplica sólo para modo continuo sv Gäller endast för kontinuerlig reglering nl Geldt uitsluitend voor continu modus Y07552 Y01852 M 1 2 3 4 On Off 1 2 3 4 x2 On Off stroke stroke 1 2 3 4 On lin Off stroke Signal stroke Signal 1 2 3 4 On Off stroke 1 2 3 4 On lin Off stroke de fr en it es sv nl Hub Course Stroke Corsa Carrera Slaglängd Slag Signal 1 mm 14 mm 20 mm 40 mm 2s 28 s ± 1 40 s ± 1 80 s ± 4 4s 56 s ± 2 80 s ± 4 160 s ± 4 6s 84 s ± 4 120 s ± 4 240 s ± 8 1 2 3 4 On Off 1 2 3 4 On Off 1 2 3 4 On Off 1 2 3 4 de fr en it es sv nl Laufzeit Temps de marche Running time Tempo di marcia Tiempo de funcionamiento Löptid Looptijd On Off 0505927033 D 7/16 de fr en it Initialisierung Initialisation Initialisation Inicialización es Inizializzazione sv Initialiseringsstart nl Initialisatie B10551 4 de es 1. Beide Tasten (siehe Bild) gleichzeitig für 5 s drücken. Die Initialisierung beginnt. Während diesem Vorgang blinken beide LEDs am Antrieb rot. 2. Die Spindel fährt bis an den mechanischen Anschlag des Stellantriebes (Ventil ganz offen). 3. Von dieser Stellung aus wird die Spindel bis zum mechanischen Anschlag des Stellantriebes (Ventil zu) eingezogen. 4. Die Initialisierung ist beendet. Die Spindel fährt in die entsprechende Position des Steuersignals. • Durch kurzes Antippen einer der beiden Tasten, kann die Initialisierung abgebrochen werden. • Während der Initialisierung ist ein automatisches Ankoppeln des Ventils möglich. 1. Mantener ambos botones pulsados al mismo tiempo durante 5 segundos (ver figura). La inicialización comienza. Durante este procedimiento, ambos LEDs en el servomotor parpadean en rojo. 2. El eje se extiende buscando el extremo mecánico en la unidad de control (válvula completamente abierta). 3. Desde ésta posición, el eje se retrae hasta llegar al extremo opuesto en la unidad de control (válvula cerrada). 4. La inicialización ha finalizado. La unidad de control se desplaza a la posición que recibe de la señal de mando. • La inicialización puede abortarse pulsando cualquiera de los 2 botones. • Durante la inicialización, es posible el acoplamiento automático. fr 1. Båda knapparna (se bild) måste hållas nedtryckt minst 5 sekunder. Initialiseringen startar. Under tiden blinkar båda LED rödt. 2. Ställdonsspindeln trycks ut mot ventilens nedre ändläge (ventil öppen). 3. Ställdonsspindeln dras inn mot ventilens övre ändläge (ventil stängd). 4. Initialiseringen avslutat. Ställdonet ställer sig i läge motsvarande styrsignalen. • Med ett snabbt tryck på en av knapparna kan initialiseringen avbrytas. • Vid initialiseringen är automatisk sammankoppling med ventil möjlig. 1. Presser les deux touches (voir illustration) simultanément pendant 5 s. L‘initialisation commence. Pendant cette procédure, les deux témoins LED sur le servomoteur clignotent en rouge. 2. La tige sort jusqu‘à la butée mécanique du servomoteur (vanne entièrement ouverte). 3. A partir de cette position, la tige est rétractée jusqu‘à la butée mécanique du servomoteur (vanne fermée). 4. L‘initialisation est terminée. Le servomoteur se rend à la position correspondant au signal de commande. • L‘initialisation peut être interrompue par une brève pression sur l‘une des deux touches. • Lors de l‘initialisation, un accouplement automatique est possible. en 1. Keep both buttons pressed (see diagram) at the same time for 5 seconds. The initialisation begins. During this procedure, both LEDs on the actuator flash red. 2. The spindle extends up to the mechanical stop on the control unit (valve fully open). 3. From this position, the spindle is retracted until it hits the mechanical stop on the control unit (valve closed). 4. Initialisation is ended. The control unit moves to the position that is in accordance with the control signal. • Initialisation can be aborted by tapping either of the two buttons. • During initialisation, automatic coupling is possible. sv nl 1. Beide toetsen (zie afb.) tegelijkertijd 5 sec. ingedrukt houden. De initialisatie begint. Tijdens deze procedure knipperen beide LEDs op de aandrijving rood. 2. De spindel schuift tot aan de mechanische aanslag van het corrigerend orgaan naar buiten (afsluiter volledig geopend). 3. Vanuit deze stand wordt de spindel tot aan de mechanische aanslag van het corrigerend orgaan weer naar binnen getrokken (afsluiter gesloten). 4. De initialisatie is beëindigd. Het corrigerend orgaan gaat in de stand staan die door het besturingssignaal is aangegeven. • Door kort op één van de beide toetsen te tippen kan de initialisatie onderbroken worden. • Bij de initialisatie is een automatisch aankoppelen mogelijk. it 1. Tenere contemporaneamente premuti per 5 s entrambi i tasti (vedere figura). L‘inizializzazione viene avviata. Durante questa fase entrambi i LED del servomotore lampeggiano in rosso. 2. Lo stelo viene estratto fino alla battuta meccanica del servomotore (valvola completamente aperta). 3. A partire da questa posizione lo stelo viene retratto fino alla battuta meccanica del servomotore (valvola chiusa). 4. L‘inizializzazione è terminata. Il servomotore va nella posizione corrispondente al segnale di comando. • Premendo brevemente uno dei due tasti, l‘inizializzazione può venire interrotta. • Durante l‘inizializzazione è possibile un accoppiamento automatico. 8/16 0505927033 D de fr en it Handbedienmodus Mode de service manuel Manual operating mode Modo comando manuale es Modo de funcionamiento manual sv Manuellt mode nl Manueel bedrijf B10551 5 de es Tasten (siehe Bild) Funktion Botones Funcionamiento Einer der beiden Tasten 5 s gedrückt halten. Handbedienmodus ist aktiv. Pulse uno de los dos botones durante 5 segundos. Activar el modo de funcionamiento manual. Einer der beiden Tasten im Handbedienmodus antippen. Der Stellantrieb fährt in die entsprechende Richtung bis zum Anschlag. En modo de funcionamiento manual, pulse cualquiera de los dos botones. El servomotor se mueve en la dirección apropiada hasta alcanzar el tope. Pulse cualquiera de los dos botones mientras el servomotor se está moviendo. El servomotor entonces se para. En modo de funcionamiento manual, pulse cualquiera de los dos botones durante 5 segundos. Reactivar el modo de regulación. Einer der beiden Tasten während der Fahrt antippen. Einer der beiden Tasten im Handbedienmodus 5 s gedrückt halten. Stellantrieb stoppt. Regelmodus ist wieder aktiv. fr Touches (voir illustration) Fonction Presser une des deux touches pendant 5 secondes. Activer le mode de service manuel. Taper légèrement une des deux touches au mode manuel. Le servomoteur passe en position de fin de course dans la direction correspondante. Taper légèrement une des deux touches pendant la course. Presser à une des deux touches pendant 5 secondes au mode manuel. Knapparna Manövrering Tryck på en av knapparna i 5 sekunder. Aktivera manuellt mode. Stopper le servomoteur. I manuellt mode, tryck på en av de två knapparna. Ställdonet flyttar sig i bestämd riktning tills det når ändläget. Réactiver le mode de réglage. Tryck på någon av knapparna när ställdonet rör på sig; Ställdonet stoppar. I manuellt mode, tryck på någon av knapparna i 5 sekunder. Att återgå till styrmode. en Buttons (see diagram) Function Press one of the two buttons for 5 seconds. Activate the manual operating mode. In manual operating mode, tap either of the two buttons. The actuator moves to the appropriate direction until it reaches the stop. Tap either of the two buttons while the actuator is moving The actuator stops. In manual operating mode, press either of the two buttons for 5 seconds Re-activate the control mode. it Tasti Funzione Tenere premuto per 5 s uno dei due tasti. La modalità manuale è attiva. Nel modo comando manuale premere brevemente uno dei due tasti. Il servomotore marcia nella corrispondente direzione fino al fermo. Premendo brevemente uno dei due tasti durante la marcia. Il servomotore si arresta. In modalità manuale tenere premuto per 5 s uno dei due tasti. La modalità regolazione è di nuovo attiva. 0505927033 D sv nl Toetsen Functie Eén van de beide toetsen gedurende 5 s ingedrukt houden. Manueel bedrijf is geactiveerd. Bij manueel bedrijf één van de beide toetsen kort aantippen. De aandrijving beweegt zich in de betreffende richting tot aan de aanslag. Tijdens het openen of sluiten een van de beide toetsen kort aantippen. Aandrijving stopt. Bij manueel bedrijf één van de beide toetsen 5 s ingedrukt houden. Regelmodus is weer actief. 9/16 6 es Ambos LEDs se encienden de color verde Periodo de espera (45 s) después de que la función de emergencia ha finalizado. Ambos LEDs parpadean en rojo. Inicialización Un LED parpadea en verde. El servomotor extiende su carrera; la dirección coincide con el LED. Un LED se enciende de color verde. El servomotor está en posición de fábrica, la última dirección de operación coincide con el LED. Un LED se enciende de color rojo. Se ha alcanzado la posición final. La posición de la válvula (abierta o cerrada) coincide con el LED. No se enciende el LED No hay tensión de alimentación o no hay modulación (en modo 3-pt.) Modo manual: Ambos LEDs parpadean en rojo/verde. El servomotor se mantiene en la misma posición. Modo manual: Un LED parpadea en rojo/verde y otro parpadea en verde. El servomotor extiende su carrera hacia el LED que parpadea en verde. 0313815 001 de fr en it es sv nl zu fermé closed chiuso cerrado stängd dicht Warnung Avertissement Warning Avvertenza Advertencia Warning Waarschuwing sv LED Beskrivning Båda LED lyser grönt. Väntetid (45 s) efter avslutat nödställfunktio. Båda LED blinkar rödt. Initialisering En LED blinkar grönt. Ställdonet i drift i riktning med motsvarande LED En LED lyser grönt. Ställdonet står still. Senaste riktning med motsvarande LED. En LED lyser rödt. Uppnådd ändläge motsvarande LED (öppet eller stängd). Ingen LED lyser. Ingen spänningsmatning (plint 21). Manuell drift: Båda LED blinkar rödt/grönt. Ställdonet står still. Manuell drift: En LED blinkar rödt/ grönt och den andra LED blinkar grönt. Ställdonet rör sig i riktning mot den grönt blinkande LED. nl LED Beschrijving Beide LEDs knipperen groen. Wachttijd (45 s) na beëindigde nulspanningsterugloop. Beide LEDs knipperen rood. Initialisatie Eén LED knippert groen. Eén LED brandt groen. Eén LED brandt rood. Geen enkele LED brandt. de fr en it es sv nl Isolationsgrenze Limite de l‘isolation Insulation limit Limite di isolamento Limite de aislamiento Isoleringsgäns Isolatiegrens De aandrijving maakt een slag, richting volgens de LED. Aandrijving in rustpositie, laatste looprichting volgens de LED. Eindpositie bereikt. Stand van de afsluiter (open of dicht) volgens de LED. Geen spanningsvoorziening of in de 3-punts-modus geen aansturing. Handbediening: Beide LEDs knipperen rood/groen. Aandrijving staat stil. Eén LED knippert rood/groen en de andere LED knippert groen. De aandrijving maakt een slag in de richting van de groen knipperende LED. 0505927033 D B10447a Descripción B10448a LED 11/16-
 1
1
-
 2
2
-
 3
3
-
 4
4
-
 5
5
-
 6
6
-
 7
7
-
 8
8
-
 9
9
-
 10
10
-
 11
11
-
 12
12
-
 13
13
-
 14
14
-
 15
15
-
 16
16


sauter VUP Assembly Instructions
- Tipo
- Assembly Instructions
en otros idiomas
- français: sauter VUP
- italiano: sauter VUP
- English: sauter VUP
- Deutsch: sauter VUP
- Nederlands: sauter VUP
- svenska: sauter VUP
Artículos relacionados
-
sauter BQE Assembly Instructions
-
-
-
sauter EY-CM 731 Assembly Instructions
-
-
sauter ASM 105S, 115S F152 Assembly Instructions
-
sauter BUD Assembly Instructions
-
-
-