STIHL SEA 20 Manual de usuario
- Categoría
- Aspiradoras
- Tipo
- Manual de usuario

STIHL SEA 20
Instruction Manual
Manual de instrucciones
WARNING
Read Instruction Manual thoroughly before use and
follow all safety precautions – improper use can cause
serious or fatal injury.
ADVERTENCIA
Antes de usar la máquina lea y siga todas las precauciones
de seguridad dadas en el manual de instrucciones – el uso
incorrecto puede causar lesiones graves o mortales.


Original Instruction ManualPrinted on chlorine-free paper
Printing inks contain vegetable oils, paper can be recycled.
© ANDREAS STIHL AG & Co. KG 2021
0458-006-8621-A. VA0.D21.
0000009633_001_GB
0458-006-8621-A
English
1
This instruction manual is protected by copyright. All rights reserved, especially the rights to reproduce, translate and process
with electronic systems.
Contents
1 Introduction
. . . . . . . . . . . . . . . . . . . . . . . . . . . . . . . . . . . . . . . . .
2
2 Guide to Using this Manual
. . . . . . . . . . . . . . . . . . . . . . . . . .
2
2.1 Signal Words
. . . . . . . . . . . . . . . . . . . . . . . . . . . . . . . . . . . . . . . .
2
2.2 Symbols in Text
. . . . . . . . . . . . . . . . . . . . . . . . . . . . . . . . . . . . .
3
3 Main Parts
. . . . . . . . . . . . . . . . . . . . . . . . . . . . . . . . . . . . . . . . . .
3
3.1 Handheld Vacuum Cleaner ("Vacuum"), Battery
and Charger
. . . . . . . . . . . . . . . . . . . . . . . . . . . . . . . . . . . . . . . . .
3
3.2 Vacuum Attachments
. . . . . . . . . . . . . . . . . . . . . . . . . . . . . . . .
4
4 Safety Symbols on the Products
. . . . . . . . . . . . . . . . . . . . .
5
4.1 Vacuum, Battery and Charger
. . . . . . . . . . . . . . . . . . . . . . .
5
5 IMPORTANT SAFETY INSTRUCTIONS
. . . . . . . . . . . . .
5
5.1 General Safety Warnings and Instructions
. . . . . . . . . . .
5
5.2 Intended Use
. . . . . . . . . . . . . . . . . . . . . . . . . . . . . . . . . . . . . . . .
6
5.3 Operator
. . . . . . . . . . . . . . . . . . . . . . . . . . . . . . . . . . . . . . . . . . . .
6
5.4 Personal Protective Equipment
. . . . . . . . . . . . . . . . . . . . . .
7
5.5 Vacuum
. . . . . . . . . . . . . . . . . . . . . . . . . . . . . . . . . . . . . . . . . . . . .
7
5.6 Using the Vacuum
. . . . . . . . . . . . . . . . . . . . . . . . . . . . . . . . . . .
8
6 Battery Safety
. . . . . . . . . . . . . . . . . . . . . . . . . . . . . . . . . . . . . .
11
6.1 Warnings and Instructions
. . . . . . . . . . . . . . . . . . . . . . . . . .
11
7 Charger Safety
. . . . . . . . . . . . . . . . . . . . . . . . . . . . . . . . . . . . .
12
7.1 Warnings and Instructions
. . . . . . . . . . . . . . . . . . . . . . . . . .
12
8 Maintenance, Repair and Storage
. . . . . . . . . . . . . . . . . .
14
8.1 Warnings and Instructions
. . . . . . . . . . . . . . . . . . . . . . . . . .
14
9 Before Starting Work
. . . . . . . . . . . . . . . . . . . . . . . . . . . . . . .
15
9.1 Preparing the Vacuum for Operation
. . . . . . . . . . . . . . . .
15
10 Charging the Battery
. . . . . . . . . . . . . . . . . . . . . . . . . . . . . . .
15
10.1 Setting up the Charger
. . . . . . . . . . . . . . . . . . . . . . . . . . . . .
15
10.2 Charging
. . . . . . . . . . . . . . . . . . . . . . . . . . . . . . . . . . . . . . . . . . .
15
10.3 Mounting the Charger on a Wall
. . . . . . . . . . . . . . . . . . . .
16
11 LED Diagnostics
. . . . . . . . . . . . . . . . . . . . . . . . . . . . . . . . . . .
16
11.1 LEDs on the Vacuum
. . . . . . . . . . . . . . . . . . . . . . . . . . . . . .
16
11.2 LED on the Charger
. . . . . . . . . . . . . . . . . . . . . . . . . . . . . . . .
17
12 Assembling the Vacuum
. . . . . . . . . . . . . . . . . . . . . . . . . . . .
18
12.1 Mounting the Vacuum Attachments
. . . . . . . . . . . . . . . .
18
13 Inserting and Removing the Battery
. . . . . . . . . . . . . . . .
18
13.1 Inserting the Battery
. . . . . . . . . . . . . . . . . . . . . . . . . . . . . . .
18
13.2 Removing the Battery
. . . . . . . . . . . . . . . . . . . . . . . . . . . . . .
19
14 Switching the Vacuum On and Off
. . . . . . . . . . . . . . . . . .
19
14.1 Switching On
. . . . . . . . . . . . . . . . . . . . . . . . . . . . . . . . . . . . . .
19
14.2 Switching Off
. . . . . . . . . . . . . . . . . . . . . . . . . . . . . . . . . . . . . .
19
15 Checking the Vacuum
. . . . . . . . . . . . . . . . . . . . . . . . . . . . . .
20
15.1 Testing the Controls
. . . . . . . . . . . . . . . . . . . . . . . . . . . . . . .
20
16 During Operation
. . . . . . . . . . . . . . . . . . . . . . . . . . . . . . . . . . .
20
16.1 Vacuuming
. . . . . . . . . . . . . . . . . . . . . . . . . . . . . . . . . . . . . . . .
20
16.2 Using the Power Hold Button
. . . . . . . . . . . . . . . . . . . . . .
20
16.3 Empty the Container
. . . . . . . . . . . . . . . . . . . . . . . . . . . . . . .
21
17 After Finishing Work
. . . . . . . . . . . . . . . . . . . . . . . . . . . . . . .
21
17.1 Preparing for Transportation or Storage
. . . . . . . . . . . .
21
18 Transporting the Vacuum, Battery and Charger
. . . . .
21
18.1 Vacuum
. . . . . . . . . . . . . . . . . . . . . . . . . . . . . . . . . . . . . . . . . . .
21
18.2 Battery
. . . . . . . . . . . . . . . . . . . . . . . . . . . . . . . . . . . . . . . . . . . . .
21
18.3 Charger
. . . . . . . . . . . . . . . . . . . . . . . . . . . . . . . . . . . . . . . . . . . .
22
19 Storing the Vacuum, Battery and Charger
. . . . . . . . . .
22
19.1 Vacuum
. . . . . . . . . . . . . . . . . . . . . . . . . . . . . . . . . . . . . . . . . . .
22
19.2 Battery
. . . . . . . . . . . . . . . . . . . . . . . . . . . . . . . . . . . . . . . . . . . . .
22
19.3 Charger
. . . . . . . . . . . . . . . . . . . . . . . . . . . . . . . . . . . . . . . . . . . .
23
20 Cleaning
. . . . . . . . . . . . . . . . . . . . . . . . . . . . . . . . . . . . . . . . . . .
23
20.1 Vacuum, Battery and Charger
. . . . . . . . . . . . . . . . . . . . . .
23
20.2 Cleaning the Vacuum Filter
. . . . . . . . . . . . . . . . . . . . . . . .
24
21 Inspection and Maintenance
. . . . . . . . . . . . . . . . . . . . . . .
24
21.1 Inspecting and Maintaining the Vacuum
. . . . . . . . . . . .
24
22 Troubleshooting Guide
. . . . . . . . . . . . . . . . . . . . . . . . . . . . .
25
22.1 Vacuum and Battery
. . . . . . . . . . . . . . . . . . . . . . . . . . . . . . .
25
22.2 Charger
. . . . . . . . . . . . . . . . . . . . . . . . . . . . . . . . . . . . . . . . . . . .
26

0458-006-8621-A
2
English
1 Introduction
Thank you for your purchase. The information contained in
this manual will help you receive maximum performance and
satisfaction from your STIHL handheld vacuum cleaner
("vacuum") and, if followed, reduce the risk of injury from its
use.
SAVE THIS MANUAL!
Have your authorized STIHL servicing dealer show you how
to operate your vacuum. Be thoroughly familiar with the
controls and the proper use of the equipment. Know how to
stop the unit.
Do not lend or rent your vacuum without this instruction
manual. Allow only persons who fully understand the
information in this manual to operate the vacuum.
For further information, or if you do not understand any of
the instructions in this manual, please go to
www.stihlusa.com or contact your authorized STIHL
servicing dealer.
2.1 Signal Words
This manual contains safety information that requires your
special attention. Such information is introduced with the
following symbols and signal words:
23 Specifications
. . . . . . . . . . . . . . . . . . . . . . . . . . . . . . . . . . . . . .
27
23.1 STIHL SEA 20.0
. . . . . . . . . . . . . . . . . . . . . . . . . . . . . . . . . . .
27
23.2 STIHL AS Series Battery
. . . . . . . . . . . . . . . . . . . . . . . . . . .
27
23.3 STIHL AL 1
. . . . . . . . . . . . . . . . . . . . . . . . . . . . . . . . . . . . . . . .
27
23.4 Ambient Temperature Limits
. . . . . . . . . . . . . . . . . . . . . . .
27
23.5 Ambient Temperature Recommendations
. . . . . . . . . .
27
23.6 Symbols on the Vacuum, Battery and Charger
. . . . .
28
23.7 Engineering Improvements
. . . . . . . . . . . . . . . . . . . . . . . . .
28
23.8 FCC 15 Compliance Statement
. . . . . . . . . . . . . . . . . . . .
28
24 Replacement Parts and Equipment
. . . . . . . . . . . . . . . . .
29
24.1 Genuine STIHL Replacement Parts
. . . . . . . . . . . . . . . .
29
25 Disposal
. . . . . . . . . . . . . . . . . . . . . . . . . . . . . . . . . . . . . . . . . . .
29
25.1 Disposal of the Vacuum and Charger
. . . . . . . . . . . . . . .
29
25.2 Battery Recycling
. . . . . . . . . . . . . . . . . . . . . . . . . . . . . . . . . .
29
26 Limited Warranty
. . . . . . . . . . . . . . . . . . . . . . . . . . . . . . . . . . .
29
26.1 STIHL Incorporated Limited Warranty Policy
. . . . . . .
29
27 Trademarks
. . . . . . . . . . . . . . . . . . . . . . . . . . . . . . . . . . . . . . . .
29
27.1 Registered Trademarks
. . . . . . . . . . . . . . . . . . . . . . . . . . . .
29
27.2 Common Law Trademarks
. . . . . . . . . . . . . . . . . . . . . . . . .
30
28 Addresses
. . . . . . . . . . . . . . . . . . . . . . . . . . . . . . . . . . . . . . . . .
30
28.1 STIHL Incorporated
. . . . . . . . . . . . . . . . . . . . . . . . . . . . . . . .
30
1 Introduction
Because the vacuum is a high-speed, battery-
powered tool, special safety precautions must
be observed to reduce the risk of personal injury.
Read this instruction manual thoroughly before
use and periodically thereafter. Follow all safety
precautions. Careless or improper use of the
vacuum can cause serious or fatal injury.
2 Guide to Using this Manual

0458-006-8621-A
3
English
3 Main Parts
DANGER
Indicates a hazardous situation that, if not avoided, will
result in death or serious injury.
WARNING
Indicates a hazardous situation that, if not avoided, could
result in death or serious injury.
NOTICE
Indicates a risk of property damage, including damage to the
machine or its individual components.
2.2 Symbols in Text
The following symbol is included to assist you with the use
of the manual:
3.1 Handheld Vacuum Cleaner ("Vacuum"), Battery
and Charger
Refers to a designated chapter or sub-chapter in this
instruction manual.
3 Main Parts
1
3
2
10
4
5
6
7
8
9
13
#
#
11
12
14
15
17
#
16
0000099085_001

0458-006-8621-A
4
English
3 Main Parts
1 Container
Captures and stores collected debris.
2 Locking Clip
For securing the container.
3 Power Hold Button
Holds the suction force.
4 Trigger Switch
Switches the motor on and off.
5 Control Handle
Gripping surface for the operator's rear hand.
6 Battery Compartment
Holds the battery.
7 Push Button
Activates the vacuum's LEDs.
8 Vacuum LEDs
Indicate the battery's state of charge and display error
messages regarding potential malfunctions in the
vacuum or battery.
9 Vacuum Filter
Consists of a filter basket and a paper filter. For filtering
dust and debris.
10 Nozzle
Directs and concentrates the airstream.
11 Locking Lever
Secures the battery in the battery compartment.
12 Battery
Supplies electrical power to the motor.
13 Carrying Bag
Designed for transporting and storing the vacuum,
battery, charger and accessories.
14 Power Supply Cord
Supplies the charger with electricity when plugged into
an electrical outlet.
15 Plug
Connects the power supply cord to an electrical outlet.
16 Charger LED
Indicates the operating status of the charger.
17 Charger
Charges the battery.
# Rating Plate
Contains electrical information and the product's serial
number.
3.2 Vacuum Attachments
1 Floor Attachment
For cleaning smooth surfaces and carpets.
2 Brush Attachment
For cleaning a variety of surfaces.
3 Crevice Attachment
For cleaning narrow openings and other areas that are
hard to reach.
4 Flexible Suction Hose
Extends the reach and maneuverability of the nozzle.
5 Extension Tube
Extends the reach of the nozzle.
1 3
4
2
5
0000098908_001

0458-006-8621-A
5
English
4 Safety Symbols on the Products
4.1 Vacuum, Battery and Charger
The following safety symbols are found on the vacuum,
battery and/or charger:
5.1 General Safety Warnings and Instructions
This section contains the prescribed general safety
warnings and instructions for battery-powered vacuum.
Additional important warnings and instructions are provided
in subsequent sections of this manual.
WARNING
When using an electric vacuum, basic safety precautions
should always be followed to reduce the risk of fire, electric
shock and personal injury, including the following:
READ ALL INSTRUCTIONS BEFORE USING THE
VACUUM
a)Do not leave appliance unattended when the battery is
inserted. Switch off the vacuum and remove the battery
when not in use and before servicing.
b)Do not expose to rain. Store indoors.
c)Do not allow to be used as a toy. Close attention is
necessary when used by or near children.
d)Use only as described in this manual. Use only
manufacturer’s recommended attachments.
e)Do not use with a damaged battery. If the vacuum is not
working as it should, has been dropped, damaged, left
outdoors, or dropped into water, return it to a service
center.
f) Do not handle battery or appliance with wet hands.
g)Do not put any object into openings. Do not use with any
opening blocked; keep free of dust, lint, hair, and anything
that may reduce air flow.
4 Safety Symbols on the Products
To reduce the risk of injury, follow the specified
safety precautions.
Read and follow all safety precautions in the
instruction manual. Improper use can lead to
serious or fatal personal injury or property
damage.
To reduce the risk of injury or property damage
from unintended activation, remove the battery
any time the vacuum is not in use, @ 5.6.
To reduce the risk of electric shock, do not
expose the vacuum to rain, water or excessive
moisture. Store it indoors. If it is exposed to rain
or very damp conditions, take it to your
authorized STIHL servicing dealer before further
operation, @ 5.5
To reduce the risk of personal injury or property
damage from fire or electric shock, keep the
charger dry. Protect it from rain, water, liquids
and damp conditions. For indoor use only, @ 7.
To reduce the risk of personal injury or property
damage from fire, explosion or burns, including
chemical burns, do not disassemble, crush,
drop, damage or heat the battery above 212 °F
(100 °C). Never expose it to fire or incinerate,
@ 6.
To reduce the risk of personal injury or property
damage from a short circuit, fire or explosion,
keep the battery dry. Protect it from rain, water,
liquids and damp conditions. Never immerse the
battery in water or other liquids, @ 6.
5 IMPORTANT SAFETY
INSTRUCTIONS

0458-006-8621-A
6
English
5 IMPORTANT SAFETY INSTRUCTIONS
h)Keep hair, loose clothing, fingers, and all parts of body
away from openings.
i) Turn off all controls before removing the battery.
j) Use extra care when cleaning on stairs.
k)Do not use to pick up flammable or combustible liquids,
such as gasoline, or use in areas where they may be
present.
l) Do not pick up anything that is burning or smoking, such
as cigarettes, matches, or hot ashes.
m)Do not use with damaged or missing container and/or
filters in place.
WARNING
SAVE THESE
INSTRUCTIONS!
5.2 Intended Use
WARNING
■ This vacuum is designed for vacuuming dry, non-
flammable materials.
■ Designed for household use. Not intended for commercial
or industrial applications.
■ Vacuuming prohibited substances increases the risk of
serious personal injury from fire, explosion, or exposure to
dangerous airborne particulate.
Never attempt to vacuum:
– Liquids of any type.
– Asbestos or asbestos-containing materials.
– Hot ashes, coals, glowing cigarettes or other hot
particles.
– Magnesium or aluminum dust, leaded dust, or similar
materials.
– Dust or dirt containing mold or pathogenic agents.
– Gasoline, oil, paint thinner, solvents or any flammable
or combustible liquids.
– Acids, lye, or similar materials.
– Salt water or saline solutions.
■ Improper use could result in personal injury or property
damage, including damage to the vacuum.
– Use the vacuum, battery and charger only as
described in this manual.
– Never attempt to modify or override the vacuum's
controls or safety devices in any way.
– Never use a vacuum that has been modified or
altered from its original design.
■ Use the vacuum, battery and charger only as described in
this manual. Do not use it for other purposes, since
misuse may result in personal injury or property damage,
including damage to the vacuum.
■ The STIHL AS series battery is designed for use only with
compatible STIHL power tools.
■ The STIHL AL 1 series charger is designed for charging
STIHL AS series batteries only.
5.3 Operator
WARNING
■ Working with the vacuum can be strenuous. The operator
must be in good physical condition and mental health. To
reduce the risk of personal injury from fatigue and loss of
control:
– Check with your doctor before using the vacuum if
you have any health condition that may be
aggravated by strenuous work.
– Do not operate the vacuum while under the influence
of any substance (drug, alcohol or medication, etc.)
that might impair vision, balance, dexterity or
judgment.

0458-006-8621-A
7
English
5 IMPORTANT SAFETY INSTRUCTIONS
– Be alert. Do not operate the vacuum when you are
tired. Take a break if you become tired.
– Do not permit minors to use the vacuum.
– Bystanders, especially children, and animals should
not be allowed in the area where the vacuum is in
use.
■ According to STIHL's current knowledge, the electric
motor of this vacuum should not interfere with a
pacemaker.
– However, persons with a pacemaker or other
implanted medical device should consult their
physician and device manufacturer before operating
this vacuum.
5.4 Personal Protective Equipment
WARNING
■ Loss of control and severe injuries may result if hair,
clothing or apparel are drawn into the vacuum intake port
or air discharge opening or otherwise become entangled
in the components of the vacuum. To reduce the risk of
severe personal injury:
– Avoid loose-fitting jackets, scarves, neckties, flared
or cuffed pants, jewelry and any other apparel that
could be drawn into the vacuum intake port or air
discharge opening.
– Secure hair above shoulder level before starting
work.
5.5 Vacuum
WARNING
■ To reduce the risk of electric shock:
– Never use your vacuum if the housing is cracked or
damaged.
■ To reduce the risk of personal injury to the operator and
bystanders:
– Never leave the vacuum unattended while running.
■ Although certain unauthorized attachments may fit your
STIHL vacuum, their use may be extremely dangerous.
Only attachments supplied by STIHL or expressly
approved by STIHL for use with this specific model are
recommended.
– Use only attachments supplied or expressly
approved by STIHL.
– Never modify this vacuum in any way or attempt to
use a vacuum that has been modified or altered from
its original design.
■ If the vacuum is dropped or subjected to similar heavy
impacts:
– Check that it is undamaged, in good condition and
functioning properly before continuing work.
– Check that the controls and safety devices are
working properly.
– Check the LEDs for error messages, @ 11.1.1.
– Check that the battery has not been damaged.
Never use or charge a malfunctioning, damaged,
cracked, leaking or deformed battery.
– Wear sturdy and snug-fitting clothing that
also allows complete freedom of
movement.
– Do not expose the vacuum to rain, water
or excessive moisture.
– Never immerse the vacuum in water or
other liquids.
– Store the vacuum indoors.
– Always release the trigger switch and
remove the battery before assembling,
transporting, adjusting, inspecting,
cleaning, servicing, maintaining or
storing the vacuum, and any other time it
is not in use.

0458-006-8621-A
8
English
5 IMPORTANT SAFETY INSTRUCTIONS
– Never work with a damaged or malfunctioning
vacuum. In case of doubt, have the vacuum checked
by your authorized STIHL servicing dealer.
■ If the vacuum is damaged, not working properly, has been
left outdoors, exposed to rain or damp conditions, or
dropped into water or other liquid, its components may no
longer function properly and safety devices may be
inoperative. To reduce the risk of personal injury and
property damage:
– Take the vacuum and battery to your authorized
STIHL servicing dealer to be checked before further
operation.
■ Genuine STIHL replacement parts are specifically
designed to match your vacuum and meet safety and
performance requirements. Use of parts that are not
authorized or approved by STIHL may cause serious or
fatal injury or property damage.
– STIHL recommends that only identical STIHL
replacement parts be used.
5.6 Using the Vacuum
5.6.1 Before Operation
WARNING
■ Misuse or unauthorized use may result in personal injury
and property damage.
– Use the vacuum only as described in this instruction
manual.
■ Using a vacuum that is modified, damaged, improperly
adjusted or maintained, or not completely and securely
assembled can lead to a malfunction and increase the risk
of serious personal injury or death.
– Never operate a vacuum that is modified, damaged,
improperly maintained or not completely and
securely assembled.
– Always check your vacuum for proper condition and
operation before starting work.
– Ensure that the trigger switch moves freely and
always springs back when released
– Never attempt to modify or override the controls or
safety devices in any way.
– If your vacuum or any part is damaged or does not
function properly, take it to your authorized STIHL
servicing dealer. Do not use the vacuum until the
problem has been corrected.
■ Before inserting the battery:
– Ensure that the vacuum filter is in place and
undamaged.
– Check the contacts in the battery compartment for
corrosion or other foreign matter and. Keep clean.
– Never insert or use a malfunctioning, damaged,
cracked, leaking or deformed battery.
– Read and follow the instructions on switching on the
vacuum, @ 14.1.
■ To help reduce the risk of serious personal injury or death
from unintentional starting:
– Be sure the trigger switch is in the off position when
inserting the battery.
– Avoid contacting the trigger switch when grasping
the control handle of the vacuum.
– Release the trigger switch before removing the
battery.
– Never leave the vacuum unattended when the
battery is inserted.
– Never store the battery in the vacuum.
– Remove the battery before assembling,
transporting, adjusting, inspecting,
cleaning, servicing, maintaining or
storing the vacuum, and any other time it
is not in use.

0458-006-8621-A
9
English
5 IMPORTANT SAFETY INSTRUCTIONS
5.6.2 Holding and Controlling the Vacuum
WARNING
■ To maintain a firm grip and properly control your vacuum:
– Keep the vacuum and its attachments free of pitch,
oil, grease and resin.
■
■ Wrap your fingers tightly around the control handle (1),
keeping the handle cradled between your thumb and
forefinger (see illustration).
■ To reduce the risk of injury from loss of control:
– Never work on a ladder, roof or while standing on
any other insecure support.
– Do not overreach. Keep proper footing and balance
at all times. Take special care when working on
stairs.
5.6.3 Working Conditions
WARNING
■ Your vacuum is a one-person machine.
– Do not allow other persons in the general work area.
– Bystanders, especially children, and animals should
not be allowed in the area where it is in use.
– Switch off the motor immediately if you are
approached.
■ To reduce the risk of injury to bystanders and
unauthorized users:
– Never leave the vacuum unattended when the
battery is inserted.
– Switch off the vacuum and remove the battery during
work breaks and any other time the vacuum is not in
use.
■ Sparks generated from the operation of the vacuum may
be capable of igniting combustible gases, liquids, vapors,
dusts or other combustible materials and substances. To
reduce the risk of fire and explosion:
– Never operate the vacuum in a location where
combustible gases, liquids, vapors, dusts or other
combustible materials and substances are present.
– Read and follow recommendations issued by
government authorities (e.g., OSHA) for identifying
and avoiding the hazards of combustible gases,
liquids, vapors, dusts or other combustible materials
and substances.
■ Use of this vacuum can disperse dust and other
substances containing chemicals known to cause
respiratory problems, cancer, birth defects and other
reproductive harm.
– Never vacuum asbestos-containing materials such
as asbestos cement or asbestos siding. Hazardous,
breathable asbestos fibers may be released in
addition to the dirt.
– Consult governmental agencies such as EPA,
OSHA, CARB and NIOSH and other authoritative
sources on hazardous materials if you are unfamiliar
with the risks associated with the particular
substances you are vacuuming.
■ Dust created by sanding, grinding, drilling and sawing may
contain chemicals known to the State of California and
other authorities to cause cancer, birth defects, or other
reproductive harm.
– This vacuum is not designed for the collection of
asbestos-containing materials, lead paint, respirable
crystalline silica or other harmful or toxic substances.
Use for such purposes is prohibited.
1
0000098878_001

0458-006-8621-A
10
English
5 IMPORTANT SAFETY INSTRUCTIONS
■ Inhalation of certain dusts, especially organic dusts such
as mold or pollen, can cause susceptible persons to have
an allergic or asthmatic reaction. Substantial or repeated
inhalation of dust or other airborne contaminants,
especially those with a smaller particle size, may cause
respiratory or other illnesses.
– Control dust and mists at the source where possible.
– To the extent possible, operate the vacuum so that
the wind or operating process directs any dust, mist
or other particulate matter raised by the vacuum
away from the operator.
– When respirable dust or other particulate matter
cannot be kept at or near background levels, always
wear a respirator that is approved by NIOSH and
rated for worksite-specific conditions. Follow the
recommendations of governmental authorities (e.g.,
OSHA/NIOSH) and occupational and trade
associations.
– When emptying the container or cleaning the
vacuum filter, wear appropriate respiratory
protection approved by NIOSH/MSHA to reduce
inhalation hazards.
■ Breathing asbestos dust is dangerous and can cause
severe or fatal injury, respiratory illness or cancer,
including mesothelioma. The use and disposal of
asbestos-containing products is strictly regulated by
OSHA and the EPA.
– Stop work immediately and contact the relevant
state and local authorities and/or EPA, your
employer or local OSHA representative if you have
reason to believe that you might be disturbing
asbestos.
5.6.4 Operating Instructions
WARNING
■ In the event of an emergency:
– Switch off the motor immediately and remove the
battery.
■ To reduce the risk of fire/explosion resulting in serious or
fatal injury or property damage:
– Never cover the vacuum or its air intake port. Always
ensure adequate motor ventilation to prevent
overheating and damage.
– Switch off the vacuum before changing or adjusting
any attachment or accessory.
■ Inserting any foreign object into the vacuum intake port or
air discharge opening may result in property damage,
including damage to the vacuum itself, and serious injury
to the operator or bystanders from the object or broken
parts being blown at high speed.
– Never insert any objects into the vacuum intake port
or air discharge opening.
– Immediately switch off the vacuum if it starts to
vibrate abnormally.
– Do not allow the vacuum to be used as a toy.
■ Using the vacuum to vacuum herbicides, pesticides,
fertilizers or other chemical substances can be dangerous
and may cause serious or fatal injury to persons and
damage to the environment.
– Never use the vacuum to collect chemicals of any
kind.
■ Using the vacuum without a vacuum filter can damage the
vacuum.
– Never operate your vacuum with a damaged or
missing vacuum filter
– Replace a damaged vacuum filter.
– Never vacuum flammable or combustible
liquids such as gasoline or use in areas
where they may be present.
– Never vacuum anything that is burning or
smoking, such as cigarettes, matches, or
hot ashes.
– Never vacuum fluids that contain
solvents or acids (e.g., gasoline, heating
oil, paint thinner or acetone).

0458-006-8621-A
11
English
6 Battery Safety
6.1 Warnings and Instructions
WARNING
■ Use of unauthorized batteries can damage the vacuum
and result in fire, explosion and personal injury and
property damage.
– Use only genuine STIHL AS series batteries.
■ Use of STIHL AS series batteries for any purpose other
than powering STIHL power tools could be extremely
dangerous.
– Use STIHL AS series batteries only to power
compatible STIHL power tools.
■ Use of unauthorized chargers can damage the battery and
result in fire, explosion and personal injury and property
damage.
– Use only a genuine STIHL AL 1 series charger to
charge STIHL AS series batteries.
■ The battery contains safety features and devices which, if
damaged, may allow the battery to generate heat, rupture,
leak, ignite or explode.
– Never use or charge a malfunctioning, damaged,
cracked, leaking or deformed battery.
– Never open, disassemble, crush, drop, subject to
heavy impact or otherwise damage the battery.
– Never expose the battery to microwaves or high
pressures.
– Never insert objects into the battery's cooling slots.
■ Extreme temperatures may cause the battery to generate
heat, rupture, leak, ignite or explode, resulting in severe or
fatal personal injury and property damage.
– Never charge, use or store the battery outside the
specified ambient temperature limits, @ 23.4.
– Never store the battery in direct sunlight or inside a
vehicle in hot weather.
■ To reduce the risk of personal injury and property damage
in the event the battery emits smoke, an unusual smell or
feels unusually hot while using, charging or storing:
– Immediately discontinue using or charging the
battery. Contact the authorities in the event of fire or
explosion.
■ To reduce the risk of a short circuit, which could lead to
electric shock, fire and explosion:
– Never bridge the battery terminals with wires or
other metallic objects.
– Keep a battery that is not in use away from metal
objects (e.g., paper clips, nails, coins, keys).
– Never transport or store the battery in a metal
container.
– Store the battery indoors in a dry room.
– Never store the battery in damp or corrosive
environments or in conditions that could lead to
corrosion of its metal components.
– Never store the battery in the vacuum or charger.
– Protect the battery from exposure to corrosive
agents such as garden chemicals and de-icing salts.
– Protect the battery from exposure to conductive
liquids such as salt water.
– Do not attempt to repair, open or disassemble the
battery. There are no user-serviceable parts inside.
6 Battery Safety
– Never heat the battery above 212 °F
(100 °C).
– Never incinerate or place the battery on
or near fires, stoves or other high-
temperature locations.
– Keep the battery dry. Protect it from rain,
water, liquids and damp conditions.
– Never immerse the battery in water or
other liquids.

0458-006-8621-A
12
English
7 Charger Safety
■ Leaking battery fluid is potentially harmful and can cause
skin and eye irritation, chemical burns and other serious
personal injury.
– Avoid contact with skin and eyes.
– Use an inert absorbent such as sand on spilled
battery fluid.
– In the event of accidental contact, immediately rinse
the contact area thoroughly with mild soap and
water.
– If fluid gets into your eye(s): Do not rub. Rinse water
over the open eye(s) for at least 15 minutes and
seek medical attention.
■ A battery fire can be dangerous. To reduce the risk of
severe personal injury and property damage in the event
of fire:
– Evacuate the area. Fire can spread rapidly. Stay
clear of any vapors generated and maintain a safe
distance.
– Contact the fire department.
– Although water can be used to put out a battery fire,
use of a multi-purpose dry chemical fire extinguisher
is preferable.
– Consult the fire department regarding proper
disposal of a burned battery.
■ Dropping the battery could result in personal injury or
property damage. To prevent the battery from falling
during removal:
– Use care when ejecting the battery.
7.1 Warnings and Instructions
WARNING
■ To reduce the risk of fire, electric shock and other
personal injury or property damage:
– Read and follow all cautionary markings on the
charger, battery and vacuum and all instructions in
this manual before using the charger.
– Charge only genuine STIHL AS series batteries.
Other batteries may burst, catch fire or explode,
resulting in personal injury and property damage.
– Do not handle the charger, including power supply
cord and plug, with wet hands.
– Never use a damaged charger.
– Never charge malfunctioning, damaged, cracked,
leaking or deformed batteries.
– Never store a battery in the charger.
– Operate the charger only indoors, in dry rooms.
– Operate the charger only within the specified
ambient temperature limits, @ 23.4.
– Keep the charger out of the reach of children.
– Always plug the charger into a properly installed
electrical outlet matching the voltage and electrical
frequency stated on the charger.
– Never use power strips to operate multiple chargers
or other devices from the same outlet or on the same
circuit.
7 Charger Safety
– For indoor use only.
– Keep the charger dry. Protect it from
rain, water, liquids and damp conditions.
Never insert a wet battery or use a wet
charger.

0458-006-8621-A
13
English
7 Charger Safety
– Do not operate a charger that has received a sharp
or heavy blow, has been dropped or is otherwise
damaged in any way.
– Do not attempt to repair, open or disassemble the
charger. There are no user-serviceable parts inside.
■ To reduce the risk of electric shock or fire from a short
circuit:
– Make sure the battery and charger are completely
dry before starting the charging process.
– Never bridge the contacts of the charger with wires
or other metallic objects.
– Do not insert any objects into the charger's cooling
slots.
■ The charger heats up during the charging process. To
reduce the risk of fire:
– Do not operate on a combustible surface (e.g.,
paper, cardboard, textiles) or in a combustible
environment.
– Allow the charger to cool down normally. Do not
cover it.
■ Chargers can produce sparks which may ignite
combustible gases, liquids, vapors, dusts or other
combustible materials. To reduce the risk of fire and
explosion:
– Do not operate in a location where combustible
gases, liquids, vapors, dusts or other combustible
materials are present.
■ Using a damaged power supply cord or plug may result in
fire, electric shock and other personal injury or property
damage. To reduce these risks:
– Have a damaged power supply cord replaced by an
authorized STIHL servicing dealer.
– Unplug the power supply cord from the outlet when
the charger is not in use.
– Never jerk the power supply cord to disconnect it
from the electrical outlet. To unplug, grasp the plug,
not the power supply cord.
– Do not use the power supply cord for carrying or
hanging up the charger.
– Make sure the power supply cord is located or
marked so that it will not be stepped on, tripped over,
come in contact with sharp objects or moving parts,
or otherwise be subjected to damage or stress.
■ An extension cord should not be used unless absolutely
necessary. Overloading an extension cord can result in
overheating and fire. If an extension cord must be used:
– Use only a properly wired 16 gauge (AWG 16) or
heavier gauge extension cord.
– Never connect more than one charger or other
device to an extension cord.
– Never use an extension cord with a wattage rating
lower than the wattage on your charger's rating
plate.
– Never use an extension cord if the blades on its plug
are different from the blades on the charger plug in
number, size or shape.
– Do not link (chain) extension cords.
■ A typical household electrical circuit is between 15 and
20 amps. A single STIHL AL 1 charger draws
approximately 0.275 amps. To reduce the risk of fire from
overloading an electrical circuit:
– Ensure the electrical system is rated to withstand the
expected electrical draw before charging your
battery.
– Charge multiple batteries one at a time or on
separate circuits, unless you know your circuit can
handle the total expected draw from multiple
chargers.
– Check the charger’s power supply cord
and plug regularly for damage. If
damaged, immediately disconnect the
plug from the electrical outlet.

0458-006-8621-A
14
English
8 Maintenance, Repair and Storage
■ In case of fire, or if the charger or the battery it is charging
emits smoke, an unusual smell, feels hot or appears
abnormal in any other way:
– Immediately disconnect the charger from the outlet.
Contact the authorities in the event of fire or
explosion.
■ To reduce the risk of electric shock and other personal
injury or property damage when mounting the charger:
– Ensure that no electrical cables, pipes or other
service lines run behind the wall where the charger
is to be mounted.
– Mount the charger only as described in this manual.
– Remove the battery before mounting the charger.
8.1 Warnings and Instructions
WARNING
■ There are no user-authorized repairs for the battery,
charger or vacuum. To reduce the risk of fire, electric
shock or other personal injury and property damage:
– Users may carry out only the cleaning and
maintenance operations described in this manual.
– Strictly follow the cleaning and maintenance
instructions in the appropriate sections of this
instruction manual.
– STIHL recommends that all repair work be
performed by authorized STIHL servicing dealers.
■ Unintentional starting may result in personal injury or
property damage. To reduce the risk of personal injury
and property damage from unintentional starting:
■ Use of parts that are not authorized or approved by STIHL
may cause serious or fatal injury or property damage.
– STIHL recommends that only identical STIHL
replacement parts be used for repair or
maintenance.
■ To reduce the risk of electric shock:
– Never use your vacuum if the housing is cracked or
damaged.
– Unplug the charger from the electrical outlet before
inspecting or cleaning the charger.
– Regularly check the charger and ensure that the
insulation of the power cord and plug are in good
condition and show no signs of aging (brittleness),
wear or damage.
– Have a damaged power supply cord replaced by an
authorized STIHL servicing dealer.
■ To reduce the risk of short circuit and fire:
– Keep the battery guides free of foreign matter. Clean
as necessary with a dry cloth or soft, dry brush.
MOVING AND STORAGE INSTRUCTIONS
WARNING
■ Improper storage can result in unauthorized use, damage
to the vacuum, battery and charger, and an increased risk
of fire, electric shock and other personal injury or property
damage.
– Remove the battery from the vacuum before storing.
– Never store the vacuum or charger with the battery
inserted.
– Before storing, always unplug the charger from the
electrical outlet and remove the battery.
– Store the vacuum, battery and charger indoors in a
dry, secure place that cannot be accessed by
children or other unauthorized users.
– Never store the battery in the vacuum, in the
charger, in a metal container or in a container with
metal objects (e.g., paper clips, nails, coins, keys).
8 Maintenance, Repair and Storage
– Remove the battery before inspecting
the vacuum or carrying out any cleaning,
maintenance or repair work, before
storing, and any other time it is not in
use.

0458-006-8621-A
15
English
9 Before Starting Work
SAVE THESE
INSTRUCTIONS!
9.1 Preparing the Vacuum for Operation
Before starting work:
► Fully charge the battery, @ 10.2.
► Mount the vacuum attachments, @ 12.1.
► Check the controls for proper function and condition,
@ 15.1.
10.1 Setting up the Charger
WARNING
Read and follow the safety precautions on the battery and
charger and the warnings and instructions in this manual,
@ 7. To reduce the risk of short circuit, which could lead to
electric shock, fire and explosion, make sure the charger
and its components are dry and not damaged; operate the
charger indoors at an appropriate ambient temperature,
@ 7.
WARNING
A typical household electrical circuit is between 15 and
20 amps. A single STIHL AL 1 charger draws approximately
0.275 amps. To reduce the risk of fire from overloading an
electrical circuit:
► Ensure the electrical system is rated to withstand the
expected electrical draw before charging your battery.
► Charge multiple batteries one at a time or on separate
circuits, unless you know your circuit can handle the total
expected draw from multiple chargers.
WARNING
Since the battery and charger heat up during the charging
process, do not operate the charger on a combustible
surface or in a location where combustible gases, liquids,
vapors, dusts or other materials are present, @ 7.
To set up the charger:
► Insert the plug (3) into a properly installed electrical
outlet (4) matching the voltage and electrical frequency
stated on the charger's rating plate.
The charger runs a self-test immediately after it is plugged
in. The LED (1) will glow green for about 1 second, then it
will glow red briefly before going out. Once the LED goes
out, the self-test is complete and the charger is ready to
charge the battery.
► Position the power supply cord (2) so that it will not be
stepped on, tripped over, come in contact with sharp
objects or moving parts or otherwise be subjected to
damage or stress.
10.2 Charging
WARNING
STIHL batteries contain safety features and devices which,
if damaged, may allow the battery to generate heat, rupture,
leak, ignite or explode. Never charge a malfunctioning,
damaged, cracked, leaking or deformed battery or use a
charger that has been damaged, @ 7. Make sure the
9 Before Starting Work
10 Charging the Battery
3
0000-GXX-9295-A0
1
2
4

0458-006-8621-A
16
English
11 LED Diagnostics
charger and the battery to be charged are both completely
dry before charging, @ 7. Follow all product-specific
warnings and instructions accompanying your battery.
To charge the battery:
► Push the battery (1) into the charger (2) until it stops.
The LED on the charger (3) glows or flashes green when
the battery is charging.
When the LED on the charger goes out, the charging
process is complete and the charger will shut itself off. The
battery can be removed from the charger.
► Disconnect the power supply cord from the electrical
outlet when the charger is not in use for extended periods
of time.
A battery is not fully charged when it ships from the factory.
STIHL recommends that you fully charge the battery before
using it the first time.
Operate the charger indoors in a dry room. For optimum
performance, observe the recommended ambient
temperature ranges, @ 23.5.
The battery heats up during operation. If a hot battery is
inserted into the charger, it may be necessary for it to cool
down before charging starts. The charging process begins
only after the battery has cooled down sufficiently.
Charging time depends on a number of factors, including
battery condition and the ambient temperature. For a
complete list of approximate charging times, see
www.stihl.com/charging-times.
10.3 Mounting the Charger on a Wall
Before mounting, ensure that no electrical cables, pipes or
other service lines run in the wall behind the charger.
To mount the wall charger:
► Mount the charger indoors in a dry room near an electrical
outlet.
► Sink the screws into a wall stud. Use appropriate screw-in
wall anchors or other similar mounting devices if an
appropriate wall stud is not available.
► Align the charger as shown above. Mount to a wall with the
following dimensions:
– a = minimum 18 in. (450 mm)
– b = minimum 3.9 in. (100 mm)
– c = 2.1 in. (54 mm)
– d = 0.2 in. (4.5 mm)
– e = 0.4 in. (9 mm)
– f = 0.1 in. (2.5 mm)
11.1 LEDs on the Vacuum
11.1.1 Vacuum Status
The LEDs on the vacuum show the status of the power tool.
2
3
1
0000-GXX-9296-A0
11 LED Diagnostics
a
1
2 3
b
c
e
d
f
f
0000-GXX-8802-A1

0458-006-8621-A
17
English
11 LED Diagnostics
If three LEDs glow red continuously: the vacuum motor is
too hot. Allow the motor to cool down.
If three LEDs flash red when you activate the trigger switch:
the vacuum has an electrical malfunction. Do not operate the
vacuum. Have it checked by an authorized STIHL servicing
dealer before use or storage.
For troubleshooting information, @ 22.1.
11.1.2 Battery Status
The same LEDs on the vacuum also indicate the status of
the battery.
These LEDs can glow or flash green or red.
If one LED glows red continuously: the battery is either too
hot or too cold. Allow the battery to warm up or cool down
gradually at an ambient temperature of about 50 °F to 68 °F
(10 °C to 20 °C).
If all 4 LEDs flash red: the battery has a malfunction and
must be replaced. Do not attempt to charge, use or store the
battery.
11.1.3 Charge Status
The LEDs on the vacuum also show the battery's state of
charge.
To determine the battery's state of charge:
► Insert the battery.
► Press the button (1).
The LEDs on the vacuum will glow or flash green for about
5 seconds and indicate the state of charge (see
illustration).
For example:
If four green LEDs glow continuously: full charge.
If one green LED is flashing: less than 20 % charge.
11.2 LED on the Charger
One LED shows the status of the charger and battery. The
LED can glow or flash green or red.
For more information, @ 22.
0-20%
20-40%
40-60%
60-80%
80-100%
1
0000098912_001
If the LED glows green continuously or flashes
green: the battery is being charged.
If the LED flashes red: there is no contact
between the battery and the charger. Remove
and reinsert the battery.
or
The battery has a malfunction and must be
replaced. Do not use or charge the battery.
or
The charger has a malfunction. Have it checked
by an authorized STIHL servicing dealer before
use.
If the LED glows red continuously : The battery is
too hot or too cold for charging. Allow the battery
to warm up or cool down gradually at an ambient
temperature of about 50 °F to 68 °F (10 °C to
20 °C).

0458-006-8621-A
18
English
12 Assembling the Vacuum
12.1 Mounting the Vacuum Attachments
To mount the vacuum attachments:
► Switch off the vacuum, @ 14.1.
► Remove the battery, @ 13.2.
► Connect the attachments in your preferred combination or
as a single part to the vacuum.
Removing and Mounting the Brush Attachment
To remove the brush attachment:
► Press and hold the locking lever (1) to remove the brush
attachment (2).
To mount the brush attachment:
► Slide the brush attachment (2) until it covers the entire
bottom of the floor attachment and clicks into place
13.1 Inserting the Battery
WARNING
Never use a malfunctioning, damaged, cracked, leaking or
deformed battery, @ 6.1. Never charge, use or store the
battery outside the specified ambient temperature limits,
@ 23.4.
WARNING
To reduce the risk of unintended activation, never store the
battery in the vacuum, @ 19.2.
To insert the battery:
► Push the battery (1) into the battery compartment (2) until
it stops.
The battery is properly inserted when you hear an audible
click.
Since a new battery is not fully charged, STIHL recommends
that you fully charge the battery before using it the first time,
@ 10.2.
12 Assembling the Vacuum
0000098911_001
2
1
0000099060_001
13 Inserting and Removing the Battery
1
2
0000-GXX-9347-A0

0458-006-8621-A
19
English
14 Switching the Vacuum On and Off
13.2 Removing the Battery
WARNING
To reduce the risk of severe personal injury from unintended
activation, always remove the battery before assembling,
transporting, adjusting, cleaning, servicing, maintaining or
storing the vacuum and any other time it is not in use.
WARNING
Use care when ejecting the battery to prevent it from falling
and causing personal injury or property damage.
To remove the battery:
► Release the trigger switch.
► Press down the locking levers (1) on both sides and pull
out the battery (2).
NOTICE
Avoid exposing the battery to excessive heat or prolonged
periods of direct sunlight. Use or storage outside the
recommended ambient temperature range can reduce the
performance of the battery.
14.1 Switching On
WARNING
Never operate your vacuum if it is modified, damaged,
improperly adjusted or maintained, not completely and
securely assembled or not functioning properly, @ 5.5.
Before switching on:
► Make sure you have a secure and firm footing.
► Stand upright.
To switch the vacuum on:
► Squeeze the trigger switch (1) with your index finger.
The vacuum will start suction.
14.2 Switching Off
WARNING
To reduce the risk of personal injury from unintended
activation or unauthorized use, switch off the motor and
remove the battery before transporting or putting the
vacuum down.
To switch the vacuum off:
► Release the trigger switch so that it springs back to the off
position.
2
1
0000-GXX-9348-A0
14 Switching the Vacuum On and Off
1
0000098875_001

0458-006-8621-A
20
English
15 Checking the Vacuum
15.1 Testing the Controls
Before starting work, confirm that the trigger switch (1) is
undamaged and functioning properly.
Trigger Switch (1)
To test the controls:
► Remove the battery.
► Depress the trigger switch.
The trigger switch should spring back. If it does not, take
the vacuum to an authorized STIHL servicing dealer to be
repaired before use.
► Insert the battery.
► Hold the vacuum firmly and depress the trigger switch
trigger switch momentarily.
The vacuum should switch on. If it does not, take the
vacuum to an authorized STIHL servicing dealer to be
repaired before use.
► Release the trigger switch.
The vacuum should switch off.
If the vacuum does not switch off after you release the
trigger switch, remove the battery and take the vacuum to
an authorized STIHL servicing dealer to be repaired
before use.
16.1 Vacuuming
WARNING
The vacuum's electric motor is not waterproof. To reduce the
risk of serious or fatal injury from electrocution or electric
shock, do not use in the rain.
For vacuuming dust and dry debris:
► Switch on the vacuum, @ 14.1
► Hold the vacuum firmly on the control handle while
working. Vacuum either directly with the nozzle or use one
of the attachments.
For optimum performance, observe the recommended
ambient temperature ranges, @ 23.5.
16.2 Using the Power Hold Button
You can set and retain the selected suction force by
pressing the power hold button.
To use the power hold feature:
► Squeeze the trigger switch (1).
► Depress the power hold button (2).
The trigger switch can be released and the vacuum will
continue operating.
Press the trigger switch to stop the vacuum.
15 Checking the Vacuum
1
0000098875_001
16 During Operation
2
1
0000098877_001

0458-006-8621-A
21
English
17 After Finishing Work
16.3 Empty the Container
WARNING
When emptying the container, cleaning the filter cartridge or
removing the vacuum bag, wear appropriate respiratory
protection approved by NIOSH/MSHA to reduce inhalation
hazards.
To empty the container:
► Switch off the vacuum, @ 14.2.
► Remove the battery, @ 13.2.
► Release the locking clip (1).
► Remove the container (2).
► Dispose of all contents in accordance with local
regulations and environmental requirements.
► Position the container so that the lugs (3) engage in the
holes (4).
► Close the container until it engages with an audible click.
17.1 Preparing for Transportation or Storage
WARNING
To reduce the risk of personal injury from unintended
activation or unauthorized use, switch off the vacuum and
remove the battery before transporting the vacuum or
putting it down.
To prepare the vacuum for transportation or storage:
► Switch off the vacuum, @ 14.2.
► Remove the battery, @ 13.2.
► If the battery or vacuum became wet during operation,
allow them to dry separately and completely before
charging or storing.
18.1 Vacuum
When transporting the vacuum:
► When transporting the vacuum by hand, hold it by the
control handle with the nozzle pointing down and your
finger off the trigger switch.
► When transporting the vacuum in a vehicle insert the
vacuum securely in the carrying bag. Secure and position
the vacuum to prevent turnover, impact and damage.
18.2 Battery
WARNING
To reduce the risk of a short circuit, which could lead to
electric shock, fire and explosion, never transport the battery
in a metal container or near metal objects (e.g., paper clips,
nails, coins, keys), @ 6.
1
2
2
4
3
0000098876_001
17 After Finishing Work
18 Transporting the Vacuum, Battery and
Charger

0458-006-8621-A
22
English
19 Storing the Vacuum, Battery and Charger
When transporting the battery:
► Place the battery in a non-metal container or carton and
secure it against impact or damage. Never transport the
battery in a metal or other container that is capable of
conducting electricity, or near metal objects (e.g., paper
clips, nails, coins, keys).
► If you are transporting the battery in a vehicle, secure it
and its container to prevent turnover, impact and damage.
STIHL batteries comply with the requirements set forth in
UN-Manual ST/SG/AC.10/11/Rev.5/Part III, Subsection
38.3.
Commercial air, vessel and ground transportation of lithium
ion cells and batteries is regulated. The battery is classified
as a UN 3480, Class 9, packaging group II product. Shipping
it, either as a complete tool or the battery, requires
compliance with all applicable shipping regulations. Check
with the ground, vessel, air cargo or passenger airline to
determine if transport is prohibited or subject to restrictions
or exemptions prior to shipping or travel.
Normally, no further conditions have to be met by the user in
order to transport STIHL batteries by road to the power tool's
operating site. Check and comply with any special
regulations that may apply to your situation.
For further information please go to
www.stihlusa.com/battery-transportation-safety.
18.3 Charger
To properly transport the charger:
► Disconnect the charger from the electrical outlet.
► Remove the battery from the charger.
► Wrap the power supply cord and attach it to the charger,
@ 19.3.
► When transporting the charger in a vehicle, ensure that it
is secured in a manner that prevents turnover, impact and
damage.
19.1 Vacuum
WARNING
Store the vacuum indoors in a dry, secure place that cannot
be accessed by children or other unauthorized users, @ 5.5
Never store the battery in the vacuum or charger. Improper
storage can result in unauthorized use and damage to the
vacuum, @ 5.5.
When storing the vacuum
► Clean the vacuum, @ 20.1.
► Store the vacuum indoors in a dry and secure location, out
of the reach of children and other unauthorized persons.
19.2 Battery
WARNING
To reduce the risk of a short circuit, which could lead to
electric shock, fire and explosion, never store the battery in
a metal container or near metal objects, @ 6. If the battery
is damp or wet, allow it to dry thoroughly before storing,
@ 6.
WARNING
Extreme temperatures can damage the battery and may also
cause the battery to generate heat, rupture, leak, ignite or
explode, resulting in severe or fatal personal injury or
property damage. Never charge, use or store the battery
outside the specified ambient temperature limits, @ 23.4.
Never store the battery in direct sunlight or inside a vehicle
in hot weather, @ 6.
To properly store the battery:
► Remove the battery from the garden pruner or the
charger.
► Make sure the battery is dry and store it indoors in a dry
and secure location.
19 Storing the Vacuum, Battery and
Charger

0458-006-8621-A
23
English
20 Cleaning
► Keep it out of the reach of children and other unauthorized
persons.
► Protect the battery against dampness and corrosive
agents such as garden chemicals and de-icing salts.
► Protect the battery from exposure to conductive liquids
such as salt water.
► For maximum battery life, store the battery at an ambient
temperature between 50 °F and 68 °F (10 °C and 20 °C)
with a charge between 40 % and 60 % (2 green LEDs).
► Do not leave spare batteries unused. Use them in rotation.
NOTICE
A battery that is not stored properly may experience deep
discharge, which can result in permanent damage. To avoid
deep discharge:
► Charge the battery before storing. For maximum battery
life, store the battery with a charge between 40 % and
60 % (2 green LEDs).
► Remove the battery from the vacuum after finishing work.
► Remove the battery from the charger after charging is
complete.
► For maximum battery life, store the battery at an ambient
temperature between 50 °F and 68 °F (10 °C and 20 °C).
19.3 Charger
To properly store the charger:
► Disconnect the charger from the electrical outlet.
► Remove the battery from the charger.
► Wrap the power supply cord and attach it to the charger.
► Store the charger indoors in a dry and secure location.
► Keep it out of the reach of children and other unauthorized
persons.
► Never hang the charger by its power supply cord or cord
bracket (3).
20.1 Vacuum, Battery and Charger
WARNING
To reduce the risk of personal injury from unintended
activation, remove the battery before carrying out any
cleaning work, @ 5.1. Users of this vacuum should carry
out only the cleaning described in this manual.
To clean the vacuum, battery and charger:
► Clean the vacuum's polymer components with a slightly
dampened cloth. Do not use detergents or solvents. They
may damage the polymer components.
► Do not use a pressure washer to clean the vacuum or
otherwise spray it with water or other liquids.
► Keep the battery housing and guides free from foreign
matter and clean as necessary with a soft brush or soft,
dry cloth.
20 Cleaning
0000-GXX-8804-A1
1
2
3

0458-006-8621-A
24
English
21 Inspection and Maintenance
► Keep the charger housing and electrical contacts free
from foreign matter. Clean as necessary with a soft brush
or soft, dry cloth. Always unplug the charger before
cleaning.
20.2 Cleaning the Vacuum Filter
WARNING
When emptying the container or cleaning the filter or, wear
appropriate respiratory protection approved by
NIOSH/MSHA to reduce inhalation hazards.
Very fine dust can collect in the vacuum filter and block
proper air flow. This dust cannot be removed by simply
knocking it out.
To clean the vacuum filter:
► Switch off the vacuum, @ 14.2.
► Remove the battery, @ 13.2.
► Rotate the filter basket (1) counter-clockwise by hand until
it can be removed.
► Remove the filter basket.
► Remove the paper filter (2).
► Rinse away coarse dirt from the outside of the paper filter.
Never spray the paper filter or filter basket with a pressure
washer.
► If the paper filter is damaged, replace it.
► Knock off the filter basket.
► Rinse the filter basket under running water.
► Allow the filter basket to air dry.
► After the filter basket has dried thoroughly, insert the
paper filter back into the filter basket.
► Insert the filter basket into the vacuum and turn clockwise
until it clicks into place.
21.1 Inspecting and Maintaining the Vacuum
WARNING
To reduce the risk of personal injury from unintended
activation, remove the battery before inspecting the vacuum
or carrying out any maintenance, @ 8.1. Carry out only the
maintenance operations described in this manual. There are
no user-authorized repairs. STIHL recommends that repair
work be performed by authorized STIHL servicing dealers.
Proper maintenance of the vacuum includes the following
activities:
► Inspecting vacuum attachments periodically and having a
worn component replaced.
► Having worn, missing or damaged safety labels replaced
by an authorized STIHL servicing dealer.
If you make a warranty claim for a component that has not
been serviced or maintained properly, coverage may be
denied.
1
1
2
0000098909_001
21 Inspection and Maintenance

0458-006-8621-A
25
English
22 Troubleshooting Guide
22.1 Vacuum and Battery
22 Troubleshooting Guide
Always remove the battery before carrying out any inspection, cleaning or maintenance.
Condition LEDs on
Vacuum
Possible Cause Remedy
Vacuum does not
start when switched
on.
No electrical contact
between vacuum
and battery.
► Remove the battery, @ 13.2.
► Visually check the electrical contacts in the battery
compartment and on the battery.
► Reinsert the battery, @ 13.1.
1 LED flashes
green.
Battery has low
charge.
► Charge the battery, @ 10.2.
1 LED glows
red.
Battery too hot / too
cold.
► Allow the battery to warm up or cool down gradually at
ambient temperatures of about 50 °F to 68 °F (10 °C to
20 °C).
4 LEDs flash
red.
Malfunction in
battery.
► Remove the battery and reinsert it, @ 13.
► Switch on the vacuum, @ 14.1.
► If the LEDs continue to flash, do not attempt to use.
The battery has a malfunction and must be replaced.
3 LEDs glow
red.
Vacuum too hot. ► Allow the vacuum to cool down.
3 LEDs flash
red.
Malfunction in
vacuum .
► Remove the battery and reinsert it, @ 13
► Switch on the vacuum, @ 14.1.
► If the LEDs still flash, do not attempt to use.
The vacuum has a malfunction and must be checked by a
servicing dealer.
Vacuum cuts out
during operation.
1 LED glows
red.
Battery too hot / too
cold.
► Remove the battery, @ 13.2.
► Allow the vacuum and battery to warm up / cool down
gradually at ambient temperatures of about 50 °F to 68 °F
(10 °C to 20 °C).
3 LEDs glow
red.
Vacuum too hot.
Runtime is too short. Battery not fully
charged.
► Charge the battery, @ 10.2.
Useful life of battery
has been reached or
exceeded.
► Have the battery checked by an authorized STIHL servicing
dealer.

0458-006-8621-A
26
English
22 Troubleshooting Guide
22.2 Charger
Battery is not being
charged even though
LED on charger
glows green.
1 LED glows
red.
Battery too hot / too
cold.
► Allow the battery to warm up or cool down gradually at
ambient temperatures of about 50 °F to 68 °F (10 °C to
20 °C).
► Operate the charger indoors in a dry room. For optimum
performance, observe the recommended ambient
temperature ranges, @ 23.5.
The suction power is
too low
The container is full. ► Empty the container, @ 16.3.
The filter bag or
paper-filter is dirty.
► Clean the filter, @ 20.2.
The nozzle or the
attachment is
blocked.
► Clean the vacuum, @ 20.1.
Always remove the battery before carrying out any inspection, cleaning or maintenance.
Condition LEDs on
Vacuum
Possible Cause Remedy
Condition LED on Charger Cause Remedy
Battery is not being
charged.
LED glows red. Battery too hot / too cold. ► Allow the battery to warm up or cool down
gradually at ambient temperatures of about 50 °F
to 68°F (10°C to 20°C).
LED flashes red. No electrical contact
between charger and
battery.
► Remove the battery and reinsert it into the
charger.
Malfunction in charger. ► Do not use the charger.
► Have the charger checked by an authorized
STIHL servicing dealer.
Malfunction in battery. ► Do not use the battery.
► Have the battery checked by an authorized STIHL
servicing dealer.
The charger does not
run a self-test.
The LED glows not
green for about
1 second and then
red for about
1 second.
Electrical contact to
charger was briefly
interrupted.
► Disconnect the plug from the electrical outlet.
► Wait 1 minute.
► Insert the plug in an electrical outlet.

0458-006-8621-A
27
English
23 Specifications
23.1 STIHL SEA 20.0
Intended for household use.
– Approved battery type: STIHL AS series
– Weight without accessories and battery: 2.4 lbs. (1.1 kg)
Performance
– Maximum intake capacity, air: 36,23 cf/min (1026 l /min)
– Maximum vacuum: 32 in H
2
O (80 mbar)
Dimensions
– Length: 18.3 in. (465 mm)
– Width: 4.4 in. (113 mm)
– Height: 7.4 in. (187 mm)
– Inside diameter of suction hose: 1.1 in. (29 mm)
– Container capacity: 0.198 US gal. (0.75 l)
23.2 STIHL AS Series Battery
Approved charger type: STIHL AL 1 series.
– Battery technology: Lithium-Ion
– Voltage: 10.8 V
– Rated capacity in Ah
1
: See rating plate
– Stored energy in Wh
2
: See rating plate
– Weight in kg: See rating plate
For a complete list of approximate charging times, see
www.stihl.com/charging-times.
For a complete list of approximate battery runtimes, see
www.stihl.com/battery-life.
23.3 STIHL AL 1
– Mains voltage: See rating plate
– Rated current: See rating plate
– Frequency: See rating plate
– Charging current: See rating plate
– Rated power: See rating plate
– Insulation: See rating plate
23.4 Ambient Temperature Limits
WARNING
Extreme temperatures can damage the battery and may also
cause it to generate heat, rupture, leak, ignite or explode,
resulting in severe or fatal personal injury or property
damage. Never charge, use or store the battery outside the
ambient temperature limits specified below.
► Do not charge the battery below - 4 °F (- 20 °C) or above
122 °F (50 °C).
► Do not use the vacuum, battery or charger below - 4°F (-
20 °C) or above 122 °F (50 °C).
► Do not store the vacuum, battery or charger below - 4 °F
(- 20 °C) or above 158 °F (70 °C).
23.5 Ambient Temperature Recommendations
For optimum performance, observe the following ambient
temperature ranges for the vacuum, battery and charger:
– Charging: 41 °F to 86 °F (5 °C to 30 °C)
– Use: 32 °F to 86 °F (0 °C to 30 °C)
– Storage: - 4 °F to 122 °F (- 20 °C to 50 °C)
Charging, using or storing the battery outside the
recommended ambient temperature ranges may reduce
performance.
23 Specifications
1
Rated capacity calculated pursuant to IEC 61960. Usable energy
available to the operator will be less.
2
The battery is marked with its stored energy as provided by the cell
manufacturer. Usable energy available to the operator will be less.

0458-006-8621-A
28
English
23 Specifications
23.6 Symbols on the Vacuum, Battery and Charger
23.7 Engineering Improvements
STIHL's philosophy is to continually improve all of its
products. As a result, engineering changes and
improvements are made from time to time. Therefore, some
changes, modifications and improvements may not be
covered in this manual. If the operating characteristics or the
appearance of your machine differs from those described in
this manual, please contact your STIHL dealer or the STIHL
distributor in your area for assistance.
23.8 FCC 15 Compliance Statement
This device complies with part 15 of the FCC Rules.
Operation is subject to the following two conditions:
– this device may not cause harmful interference.
– this device must accept any interference received,
including interference that may cause undesired
operation.
Note: This equipment has been tested and found to comply
with the limits for a Class B digital device, pursuant to part
15 of the FCC Rules. These limits are designed to provide
reasonable protection against harmful interference in a
residential installation. This equipment generates, uses and
can radiate radio frequency energy and, if not installed and
used in accordance with the instructions, may cause harmful
interference to radio communications. However, there is no
guarantee that interference will not occur in a particular
installation.
If this equipment does cause harmful interference to radio or
television reception, which can be determined by turning the
equipment off and on, the user is encouraged to try to
correct the interference by one or more of the following
measures:
– reorient or relocate the receiving antenna,
– increase the separation between the equipment and
receiver,
– connect the equipment to an outlet on a circuit different
from that to which the receiver is connected,
– consult an authorized STIHL servicing dealer or an
experienced radio/TV technician for help.
Do not change or modify this product in any way unless
specifically allowed in this manual, since this could void your
authority to operate it.
Symbol Explanation
VVolt
Hz Hertz
A Ampere
Ah Ampere hour
WWatt
Wh Watt hour
Indicates the power hold button.
Certification/listing mark of UL
STIHL products must not be disposed of in the
household trash, but only in accordance with local,
state and federal laws and regulations and as
provided in this manual, @ 25.1.
Direct current
Number of cells and stored energy according to cell
manufacturer's specification. Usable energy will be
less.
The RBRC seal indicates that STIHL has prepaid for
battery recycling
Read the manual
Use and store charger only indoors in dry rooms

0458-006-8621-A
29
English
24 Replacement Parts and Equipment
24.1 Genuine STIHL Replacement Parts
STIHL recommends the use of genuine STIHL replacement
parts. Genuine STIHL parts can be identified by the STIHL
part number, the logo and, in some cases, by the
STIHL parts symbol . The symbol may appear alone on
small parts.
25.1 Disposal of the Vacuum and Charger
STIHL products must not be thrown in household trash or
disposed of except as outlined in this manual.
► Take the vacuum, charger, accessories and packaging to
an approved disposal site for environmentally friendly
recycling.
► Contact your authorized STIHL
servicing dealer for the
latest information on disposal and recycling.
25.2 Battery Recycling
WARNING
Handle discharged/depleted batteries carefully. Even if
believed to be discharged, lithium ion batteries may never
totally discharge and still may deliver a dangerous short
circuit current. If damaged or exposed to extreme
temperatures, they may leak, generate heat, catch fire or
explode.
► Observe all federal, state and local disposal rules and
regulations.
► Contact your authorized STIHL servicing dealer for the
latest information on waste disposal.
► Recycle depleted batteries promptly.
► Keep batteries away from children. Do not disassemble
and do not dispose of in fire.
The RBRC seal indicates that STIHL has prepaid for battery
recycling. RBRC has a toll free phone number (1-800-822-
8837) that connects you to information on battery recycling
locations and information on battery disposal bans or
restrictions in your area. You can also return your spent
battery to any authorized STIHL servicing dealer for
recycling free of charge.
26.1 STIHL Incorporated Limited Warranty Policy
This product is sold subject to the STIHL Incorporated
Limited Warranty Policy, available at
www.stihlusa.com/warranty.html. It can also be obtained
from your authorized STIHL dealer or by calling
1-800-GO-STIHL (1-800-467-8445).
27.1 Registered Trademarks
24 Replacement Parts and Equipment
25 Disposal
STIHL is committed to the development of products
that are environmentally responsible. This
commitment does not stop when the product leaves
the authorized STIHL servicing dealer. STIHL has
partnered with the RBRC (Rechargeable Battery
Recycling Corporation) to promote the collection and
recycling of spent STIHL lithium ion batteries in the
United States and Canada.
26 Limited Warranty
27 Trademarks
STIHL
®
FARM BOSS
®
iCademy
®
MAGNUM
®
The color combination
orange-grey (U.S.
Registrations #2,821,860;
#3,010,057, #3,010,058,
#3,400,477; and
#3,400,476)
MasterWrench Service
®
MotoMix
®
OILOMATIC
®
ROCK BOSS
®
STIHL Cutquik
®

0458-006-8621-A
30
English
28 Addresses
27.2 Common Law Trademarks
This listing of trademarks is subject to change.
Any unauthorized use of these trademarks without the
express written consent of ANDREAS STIHL AG & Co. KG,
Waiblingen is strictly prohibited.
28.1 STIHL Incorporated
STIHL Incorporated
536 Viking Drive
P.O. Box 2015
Virginia Beach, VA
23452-2015
AutoCut
®
STIHL DUROMATIC
®
YARD BOSS
®
STIHL Quickstop
®
STIHL ROLLOMATIC
®
STIHL WOOD BOSS
®
WOOD BOSS
®
TIMBERSPORTS
®
4-MIX™ HT Plus™
BioPlus™ STIHL PowerSweep™
Easy2Start™ STIHL Protech™
EasySpool™ STIHL MiniBoss™
ElastoStart™ STIHL MotoPlus 4™
Ematic™ Master Control Lever™
STIHL Precision Series™ STIHL OUTFITTERS™
FixCut™ STIHL PICCO™
Micro™ TrimCut™
Pro Mark™ STIHL M-Tronic™
Quad Power™ STIHL HomeScaper Series™
Quiet Line™ STIHL PolyCut™
STIHL Arctic™ STIHL RAPID™
STIHL Compact™ STIHL SuperCut™
STIHL Interchangeable
Attachment Series™
STIHL Multi-Cut HomeScaper
Series™
TapAction™ STIHL Territory™
TM
STIHL
Injection
28 Addresses

Manual de instrucciones originalImpreso en papel libre de cloro.
Las tintas contienen aceites vegetales, el papel es reciclable.
© ANDREAS STIHL AG & Co. KG 2021
0458-006-8621-A. VA0.D21.
0000009633_001_EA
0458-006-8621-A
español / EE.UU
31
Este manual de instrucciones está protegido por derechos de propiedad intelectual. Todos los derechos reservados, especial-
mente los derechos de reproducción, traducción y procesamiento con sistemas electrónicos.
Contenido
1 Introducción
. . . . . . . . . . . . . . . . . . . . . . . . . . . . . . . . . . . . . . . .
32
2 Acerca de este manual de instrucciones
. . . . . . . . . . . .
33
2.1 Palabras identificadoras
. . . . . . . . . . . . . . . . . . . . . . . . . . . .
33
2.2 Símbolos en el texto
. . . . . . . . . . . . . . . . . . . . . . . . . . . . . . .
33
3 Componentes importantes
. . . . . . . . . . . . . . . . . . . . . . . . .
33
3.1 Aspiradora de mano ("aspiradora"), batería y
cargador
. . . . . . . . . . . . . . . . . . . . . . . . . . . . . . . . . . . . . . . . . . .
33
3.2 Accesorios de aspiración
. . . . . . . . . . . . . . . . . . . . . . . . . . .
34
4 Símbolos de seguridad en los productos
. . . . . . . . . . .
35
4.1 La aspiradora, la batería y el cargador
. . . . . . . . . . . . . .
35
5 INSTRUCCIONES IMPORTANTES DE
SEGURIDAD
. . . . . . . . . . . . . . . . . . . . . . . . . . . . . . . . . . . . . . .
35
5.1 Advertencias e instrucciones de seguridad
generales
. . . . . . . . . . . . . . . . . . . . . . . . . . . . . . . . . . . . . . . . . .
35
5.2 Uso previsto
. . . . . . . . . . . . . . . . . . . . . . . . . . . . . . . . . . . . . . .
36
5.3 Operador
. . . . . . . . . . . . . . . . . . . . . . . . . . . . . . . . . . . . . . . . . . .
37
5.4 Equipos de protección personal
. . . . . . . . . . . . . . . . . . . .
37
5.5 Aspiradora
. . . . . . . . . . . . . . . . . . . . . . . . . . . . . . . . . . . . . . . . .
37
5.6 Uso de la aspiradora
. . . . . . . . . . . . . . . . . . . . . . . . . . . . . . .
38
6 Seguridad de la batería
. . . . . . . . . . . . . . . . . . . . . . . . . . . .
42
6.1 Advertencias e instrucciones
. . . . . . . . . . . . . . . . . . . . . . .
42
7 Seguridad del cargador
. . . . . . . . . . . . . . . . . . . . . . . . . . . .
43
7.1 Advertencias e instrucciones
. . . . . . . . . . . . . . . . . . . . . . .
43
8 Mantenimiento, reparación y almacenamiento
. . . . . .
45
8.1 Advertencias e instrucciones
. . . . . . . . . . . . . . . . . . . . . . .
45
9 Antes de empezar a trabajar
. . . . . . . . . . . . . . . . . . . . . . .
46
9.1 Preparación de la aspiradora para el uso
. . . . . . . . . . .
46
10 Carga de la batería
. . . . . . . . . . . . . . . . . . . . . . . . . . . . . . . . .
47
10.1 Preparación del cargador para el funcionamiento
. . .
47
10.2 Carga
. . . . . . . . . . . . . . . . . . . . . . . . . . . . . . . . . . . . . . . . . . . . . .
47
10.3 Montaje del cargador en una pared
. . . . . . . . . . . . . . . .
48
11 Diagnóstico de LED
. . . . . . . . . . . . . . . . . . . . . . . . . . . . . . . .
49
11.1 LEDs en la aspiradora
. . . . . . . . . . . . . . . . . . . . . . . . . . . . .
49
11.2 LED en el cargador
. . . . . . . . . . . . . . . . . . . . . . . . . . . . . . . .
49
12 Montaje de la aspiradora
. . . . . . . . . . . . . . . . . . . . . . . . . . .
50
12.1 Montaje de los accesorios de aspiración
. . . . . . . . . . .
50
13 Colocación y extracción de la batería.
. . . . . . . . . . . . . .
50
13.1 Colocación de la batería
. . . . . . . . . . . . . . . . . . . . . . . . . . .
50
13.2 Extracción de la batería
. . . . . . . . . . . . . . . . . . . . . . . . . . . .
51
14 Encendido y apagado de la aspiradora
. . . . . . . . . . . . .
51
14.1 Encendido
. . . . . . . . . . . . . . . . . . . . . . . . . . . . . . . . . . . . . . . . .
51
14.2 Apagado
. . . . . . . . . . . . . . . . . . . . . . . . . . . . . . . . . . . . . . . . . . .
52
15 Revisión de la aspiradora
. . . . . . . . . . . . . . . . . . . . . . . . . .
52
15.1 Prueba de los controles
. . . . . . . . . . . . . . . . . . . . . . . . . . . .
52
16 Durante el funcionamiento
. . . . . . . . . . . . . . . . . . . . . . . . .
53
16.1 Aspiración
. . . . . . . . . . . . . . . . . . . . . . . . . . . . . . . . . . . . . . . . .
53
16.2 Uso del botón de retención de potencia
. . . . . . . . . . . .
53
16.3 Vaciado del depósito
. . . . . . . . . . . . . . . . . . . . . . . . . . . . . . .
53
17 Después de completar el trabajo
. . . . . . . . . . . . . . . . . . .
54
17.1 Preparativos para el transporte o el
almacenamiento
. . . . . . . . . . . . . . . . . . . . . . . . . . . . . . . . . . .
54
18 Transporte de la aspiradora, de la batería y del
cargador
. . . . . . . . . . . . . . . . . . . . . . . . . . . . . . . . . . . . . . . . . . .
54
18.1 Aspiradora
. . . . . . . . . . . . . . . . . . . . . . . . . . . . . . . . . . . . . . . . .
54
18.2 Batería
. . . . . . . . . . . . . . . . . . . . . . . . . . . . . . . . . . . . . . . . . . . .
54
18.3 Cargador
. . . . . . . . . . . . . . . . . . . . . . . . . . . . . . . . . . . . . . . . . .
55
19 Almacenamiento de la aspiradora, la batería y el
cargador
. . . . . . . . . . . . . . . . . . . . . . . . . . . . . . . . . . . . . . . . . . .
55
19.1 Aspiradora
. . . . . . . . . . . . . . . . . . . . . . . . . . . . . . . . . . . . . . . . .
55
19.2 Batería
. . . . . . . . . . . . . . . . . . . . . . . . . . . . . . . . . . . . . . . . . . . .
55
19.3 Cargador
. . . . . . . . . . . . . . . . . . . . . . . . . . . . . . . . . . . . . . . . . .
56
20 Limpieza
. . . . . . . . . . . . . . . . . . . . . . . . . . . . . . . . . . . . . . . . . . .
56
20.1 La aspiradora, la batería y el cargador
. . . . . . . . . . . . .
56
20.2 Limpieza del filtro de la aspiradora
. . . . . . . . . . . . . . . . .
56
21 Inspección y mantenimiento
. . . . . . . . . . . . . . . . . . . . . . . .
57
21.1 Inspección y mantenimiento de la aspiradora
. . . . . .
57

0458-006-8621-A
32
español / EE.UU
1 Introducción
Gracias por su compra. La información que contiene este
manual lo ayudará a aprovechar y disfrutar al máximo las
prestaciones de su aspiradora portátil ("aspiradora") de
STIHL, y a reducir el riesgo de lesiones que supone su uso,
si respeta las indicaciones correspondientes.
CONSERVE ESTE MANUAL
Pida a su concesionario de servicio STIHL autorizado que le
enseñe a manejar su aspiradora. Asegúrese de
familiarizarse por completo con los controles y con el uso
adecuado del equipo. Conozca cómo detener a la unidad.
No preste ni alquile nunca su aspiradora sin entregar
también este manual de instrucciones. Asegúrese de que
solo usen la aspiradora personas que comprenden
íntegramente la información de este manual.
Si necesita más información, o si no comprende alguna de
las instrucciones incluidas en este manual, visite
www.stihlusa.com o póngase en contacto con su
concesionario de servicio autorizado de STIHL.
22 Guía de solución de problemas
. . . . . . . . . . . . . . . . . . . . .
58
22.1 La aspiradora y la batería
. . . . . . . . . . . . . . . . . . . . . . . . . .
58
22.2 Cargador
. . . . . . . . . . . . . . . . . . . . . . . . . . . . . . . . . . . . . . . . . .
59
23 Especificaciones
. . . . . . . . . . . . . . . . . . . . . . . . . . . . . . . . . . .
61
23.1 STIHL SEA 20.0
. . . . . . . . . . . . . . . . . . . . . . . . . . . . . . . . . . .
61
23.2 Batería STIHL serie AS
. . . . . . . . . . . . . . . . . . . . . . . . . . . .
61
23.3 STIHL AL 1
. . . . . . . . . . . . . . . . . . . . . . . . . . . . . . . . . . . . . . . .
61
23.4 Límites de temperatura ambiente
. . . . . . . . . . . . . . . . . .
61
23.5 Recomendaciones de temperatura ambiente
. . . . . . .
61
23.6 Símbolos en la aspiradora, en la batería y en el
cargador
. . . . . . . . . . . . . . . . . . . . . . . . . . . . . . . . . . . . . . . . . . .
62
23.7 Mejoramientos técnicos
. . . . . . . . . . . . . . . . . . . . . . . . . . . .
62
23.8 Declaración de cumplimiento con norma FCC 15
. . .
62
24 Piezas y equipos de repuesto
. . . . . . . . . . . . . . . . . . . . . .
64
24.1 Piezas de repuesto originales de STIHL
. . . . . . . . . . . .
64
25 Eliminación
. . . . . . . . . . . . . . . . . . . . . . . . . . . . . . . . . . . . . . . .
64
25.1 Eliminación de la aspiradora y del cargador
. . . . . . . .
64
25.2 Reciclado de las baterías
. . . . . . . . . . . . . . . . . . . . . . . . . .
64
26 Garantía limitada
. . . . . . . . . . . . . . . . . . . . . . . . . . . . . . . . . . .
64
26.1 Política de garantía limitada de STIHL
Incorporated
. . . . . . . . . . . . . . . . . . . . . . . . . . . . . . . . . . . . . . .
64
27 Marcas comerciales
. . . . . . . . . . . . . . . . . . . . . . . . . . . . . . . .
64
27.1 Marcas comerciales registradas
. . . . . . . . . . . . . . . . . . . .
64
27.2 Marcas comerciales por ley común
. . . . . . . . . . . . . . . . .
65
28 Direcciones
. . . . . . . . . . . . . . . . . . . . . . . . . . . . . . . . . . . . . . . .
65
28.1 STIHL Incorporated
. . . . . . . . . . . . . . . . . . . . . . . . . . . . . . . .
65
1 Introducción
Dado que la aspiradora es una herramienta
motorizada accionada a batería y de gran
velocidad, es necesario tomar medidas
especiales de seguridad para reducir el riesgo
de lesiones.
Lea este manual de instrucciones
detenidamente antes de usar el equipo por
primera vez, y periódicamente de allí en
adelante. Respete todas las medidas de
seguridad. Un uso descuidado o inadecuado de
la aspiradora puede causar lesiones graves,
incluso mortales.

0458-006-8621-A
33
español / EE.UU
2 Acerca de este manual de instrucciones
2.1 Palabras identificadoras
Este manual contiene información sobre seguridad a la que
usted debe prestar atención especial. Dicha información se
indica con los siguientes símbolos y palabras
identificadoras:
PELIGRO
Identifica una situación de peligro que, de no evitarse,
causará lesiones graves o mortales.
ADVERTENCIA
Identifica una situación de peligro que, de no evitarse,
podría causar lesiones graves o mortales.
INDICACIÓN
Indica el riesgo de daños a la propiedad, incluidos la
máquina o sus componentes.
2.2 Símbolos en el texto
El siguiente símbolo tiene como finalidad ayudarlo a utilizar
este manual.
3.1 Aspiradora de mano ("aspiradora"), batería y
cargador
2 Acerca de este manual de
instrucciones
Hace referencia a un capítulo o subcapítulo designado
en este manual de instrucciones.
3 Componentes importantes
1
3
2
10
4
5
6
7
8
9
13
#
#
11
12
14
15
17
#
16
0000099085_001

0458-006-8621-A
34
español / EE.UU
3 Componentes importantes
1 Depósito
Captura y almacena los escombros.
2 Pinza de bloqueo
Para asegurar el recipiente.
3 Botón de retención de potencia
Retiene la fuerza de succión.
4 Gatillo
Enciende y apaga el motor.
5 Mango de control
Superficie de agarre para la mano trasera del operador.
6 Compartimiento de la batería
Espacio en que se coloca la batería.
7 Pulsador
Activa los LED de la aspiradora.
8 LEDs de la aspiradora
Indican el estado de carga de la batería y los mensajes
de error acerca de los posibles defectos de la batería o
de la aspiradora.
9 Filtro de aspiradora
Consta de una cesta filtrante y un filtro de papel. Filtra el
polvo y los desperdicios.
10 Boquilla
Dirige y concentra el chorro de aire.
11 Palanca de bloqueo
Asegura la batería en el compartimiento de la batería.
12 Batería
Suministra energía eléctrica al motor.
13 Bolso de transporte
Diseñado para trasladar y guardar la aspiradora, la
batería, el cargador y los accesorios.
14 Cordón eléctrico
Suministra electricidad al cargador cuando está
enchufado a un tomacorriente.
15 Enchufe
Permite conectar el cordón eléctrico a un tomacorriente
de pared.
16 LED del cargador
Indica el estado de funcionamiento del cargador.
17 Cargador
Carga la batería.
# Placa de características
Contiene los datos eléctricos y el número de serie del
producto.
3.2 Accesorios de aspiración
1 Accesorio de piso
Para limpiar superficies lisas y alfombras.
2 Accesorio de cepillo
Para limpiar superficies diversas.
3 Accesorio de hendidura
Para limpiar aberturas estrechas y otras zonas de difícil
acceso.
4 Manguera de aspiración flexible
Amplía el alcance y la maniobrabilidad de la boquilla.
5 Tubo de extensión
Amplía el alcance de la boquilla.
1 3
4
2
5
0000098908_001

0458-006-8621-A
35
español / EE.UU
4 Símbolos de seguridad en los productos
4.1 La aspiradora, la batería y el cargador
Los siguientes símbolos de seguridad se pueden ver en la
aspiradora, en la batería y/o en el cargador:
5.1 Advertencias e instrucciones de seguridad
generales
Esta sección contiene las advertencias de seguridad y las
instrucciones generales prescritas para aspiradoras con
baterías. En secciones posteriores de este manual se
proporcionan advertencias e instrucciones adicionales
importantes.
ADVERTENCIA
Para reducir el riesgo de incendios, choques eléctricos y
lesiones personales, cuando use una aspiradora eléctrica
respete siempre las precauciones de seguridad básicas,
entre las que se incluyen las siguientes:
LEA TODAS LAS INSTRUCCIONES ANTES DE USAR LA
ASPIRADORA
a)No deje el dispositivo desatendido si tiene la batería
colocada. Apague la aspiradora y retire la batería cuando
no la utilice y antes de realizar el mantenimiento.
b)No lo exponga a la lluvia. Guárdelo bajo techo.
c)No permita que el aparato se use como juguete. Preste
especial atención cuando lo utilice cerca de niños.
d)Utilice el aparato solamente de la manera descrita en este
manual. Utilice exclusivamente los accesorios
recomendados por el fabricante.
4 Símbolos de seguridad en los
productos
Para reducir el riesgo de lesiones, respete las
medidas de seguridad especificadas.
Lea y respete todas las medidas de seguridad
que se dan en el manual de instrucciones. Un
uso inadecuado puede provocar lesiones graves
o mortales, así como daños materiales.
Para reducir el riesgo de lesiones o de daños
materiales causados por una activación
inesperada, quite la batería siempre que no esté
usando la aspiradora, @ 5.6.
Para reducir el riesgo de descarga eléctrica, no
exponga la aspiradora a la lluvia, al agua ni a
una humedad excesiva. Guarde la máquina bajo
techo. Si la herramienta se expone a la lluvia o
a condiciones muy húmedas, llévela a su
concesionario de servicio STIHL autorizado
antes de volver a utilizarla, @ 5.5.
Para reducir el riesgo de lesiones y de daños
materiales a consecuencia de incendios o de
choques eléctricos, asegúrese de que el
cargador no se moja. Protéjalo de la lluvia, del
agua, de cualquier líquido y de la humedad.
Para uso en interiores únicamente, @ 7.
Para reducir el riesgo de lesiones y de daños
materiales provocados por incendios,
explosiones o quemaduras, incluidas
quemaduras químicas, no desarme, aplaste,
deje caer, dañe ni caliente la batería a más de
212 °F (100 °C). Nunca la exponga al fuego ni la
incinere, @ 6.
Para reducir el riesgo de lesiones y de daños
materiales provocados por un cortocircuito, un
incendio o una explosión, asegúrese de que la
batería se mantiene seca. Protéjalo de la lluvia,
del agua, de cualquier líquido y de la humedad.
Nunca sumerja la batería en agua ni en otros
líquidos, @ 6.
5 INSTRUCCIONES IMPORTANTES
DE SEGURIDAD

0458-006-8621-A
36
español / EE.UU
5 INSTRUCCIONES IMPORTANTES DE SEGURIDAD
e)No use el aparato si su batería está averiada. Si la
aspiradora no está funcionando de la manera debida, si
se ha caído, ha sufrido daños, se ha dejado a la
intemperie o ha caído al agua, llévela a un servicentro
autorizado.
f) No manipule la batería ni el aparato con las manos
mojadas.
g)No introduzca ningún objeto por las aberturas. No utilice
el aparato si alguna de las aberturas está taponada;
mantenga el aparato libre de polvo, pelusas, pelos u otros
materiales que puedan dificultar el flujo de aire.
h)Mantenga el pelo, la ropa suelta, los dedos y todas las
partes del cuerpo lejos de las aberturas.
i) Ponga todos los controles en posición de apagado antes
de sacar la batería.
j) Proceda con especial cuidado cuando limpie escaleras.
k)No utilice el aparato para recoger líquidos inflamables o
combustibles como la gasolina, ni en lugares donde este
tipo de líquidos puedan estar presentes.
l) No recoja objetos que estén ardiendo o echen humo, tales
como cigarrillos, fósforos o cenizas calientes.
m)No utilice el aparato si el recipiente y/o los filtros están
dañados o faltan.
ADVERTENCIA
¡GUARDE ESTAS
INSTRUCCIONES!
5.2 Uso previsto
ADVERTENCIA
■ Esta aspiradora está diseñada para aspirar materiales
secos no inflamables.
■ Para uso doméstico. El equipo no está diseñado para
aplicaciones comerciales ni industriales.
■ La aspiración de sustancias prohibidas aumenta el riesgo
de lesiones personales graves por incendio, explosión o
exposición a partículas peligrosas en el aire.
Nunca trate de aspirar:
– Líquidos de cualquier tipo.
– Asbesto o materiales que contengan asbesto.
– Carbón o cenizas calientes, cigarrillos encendidos o
partículas calientes de otro tipo.
– Polvo de aluminio o magnesio, polvo con plomo o
materiales similares.
– Polvo o suciedad que contengan moho o agentes
patógenos.
– Gasolina, aceites, aguarrás, disolventes o cualquier
líquido inflamable o combustible.
– Ácidos, lejía o sustancias similares.
– Agua salada o soluciones salinas.
■ Un uso indebido podría provocar lesiones o daños
materiales, incluidos daños en la aspiradora.
– Use la aspiradora, la batería y el cargador solo como
se describe en este manual.
– Nunca intente modificar ni anular en modo alguno
los controles ni los dispositivos de seguridad de la
aspiradora.
– Nunca utilice una aspiradora que haya sido
modificado o alterado, apartándose de su diseño
original.
■ Use la aspiradora, la batería y el cargador solo como se
describe en este manual. No la utilice para ningún otro
propósito: un uso indebido puede causar lesiones
personales o daños materiales, incluidos daños en la
aspiradora.
■ La batería de la serie STIHL AS está diseñada solo para
el uso con herramientas eléctricas STIHL compatibles.

0458-006-8621-A
37
español / EE.UU
5 INSTRUCCIONES IMPORTANTES DE SEGURIDAD
■ El cargador STIHL AL 1 está diseñado para cargar
solamente las baterías STIHL de las series AS.
5.3 Operador
ADVERTENCIA
■ El uso de la aspiradora puede ser fatigoso. El operador
debe encontrarse en buenas condiciones, tanto físicas
como mentales. Para reducir el riesgo de lesiones
personales causadas por la fatiga o por una pérdida de
control sobre el equipo:
– Consulte a su médico antes de usar la aspiradora si
tiene algún problema de salud que pudiera verse
agravado por un trabajo fatigoso.
– No utilice la aspiradora si se encuentra bajo los
efectos de cualquier sustancia (drogas, alcohol,
medicamentos, etc.), que pueda afectar la visión, el
equilibrio, la destreza o el juicio.
– Esté alerta. No maneje la aspiradora si está
cansado. Haga una pausa si se cansa.
– No permita que los niños usen la aspiradora.
– No se debe permitir la presencia de otras personas,
especialmente niños, ni de animales, en la zona en
que se está usando la aspiradora.
■ De acuerdo con los conocimientos actuales de STIHL, el
motor eléctrico de esta aspiradora no interfiere con
marcapasos.
– Sin embargo, las personas que tengan un
marcapasos u otro dispositivo médico implantado
deben consultar a su médico y al fabricante del
dispositivo antes de utilizar esta aspiradora.
5.4 Equipos de protección personal
ADVERTENCIA
■ Si el cabello, la ropa o los aparejos son aspirados por la
lumbrera de entrada de la aspiradora o por la abertura de
descarga de aire, o si se enredan en los componentes de
la aspiradora, pueden provocar una pérdida de control y
producir lesiones graves. Para reducir el riesgo de
lesiones graves:
– Evite el uso de chaquetas sueltas, bufandas,
corbatas, pantalones de pierna ancha o con basta
doblada, joyería y otras prendas o accesorios que
puedan ser aspirados por la lumbrera de entrada de
la aspiradora o por la abertura de descarga de aire.
– Sujétese el cabello por encima de los hombros antes
de empezar a trabajar.
5.5 Aspiradora
ADVERTENCIA
■ Para reducir el riesgo de una descarga eléctrica:
– Nunca use su aspiradora si la carcasa de la misma
está agrietada o dañada.
■ Para reducir el riesgo de que el operador o las personas
que se encuentran cerca sufran lesiones:
– Nunca deje la aspiradora desatendida mientras está
en marcha.
■ Si bien es posible conectar ciertos accesorios no
autorizados a su aspiradora STIHL, le advertimos de que
su uso puede ser extremadamente peligroso. Le
– Use ropa resistente y ajustada que le
permita moverse con completa libertad.
– No exponga la aspiradora a la lluvia, al
agua ni a una humedad excesiva.
– Nunca sumerja la aspiradora en agua ni
en otros líquidos.
– Guarde la aspiradora bajo techo.
– Siempre suelte el gatillo y quite la batería
antes de armar, transportar, ajustar,
inspeccionar, limpiar, mantener, reparar
o guardar la aspiradora, y en cualquier
momento en que no se esté usando.

0458-006-8621-A
38
español / EE.UU
5 INSTRUCCIONES IMPORTANTES DE SEGURIDAD
recomendamos que utilice únicamente accesorios
suministrados por STIHL o expresamente autorizados por
STIHL para el uso con este modelo específico.
– Use solo accesorios suministrados o expresamente
aprobados por STIHL.
– Nunca modifique esta aspiradora en modo alguno,
ni intente usar una aspiradora cuyo diseño original
se haya modificado o alterado.
■ Si la aspiradora se cae o se expone a un impacto fuerte
similar al de una caída:
– Asegúrese de que no se ha dañado, de que está en
buenas condiciones y de que funciona
correctamente antes de reanudar el trabajo.
– Verifique que los controles y los dispositivos de
seguridad funcionan correctamente.
– Revise los LED y compruebe si hay mensajes de
error, @ 11.1.1.
– Asegúrese de que la batería no se ha dañado.
Nunca use ni cargue una batería que no funcione
correctamente o que esté dañada, agrietada,
deformada o pierda líquido.
– Nunca trabaje con una aspiradora que esté dañada
o no funcione correctamente. En caso de duda, lleve
la aspiradora a su concesionario de servicio de
STIHL autorizado para que la revisen.
■ Si la aspiradora se daña, no funciona correctamente, se
ha dejado al aire libre, se ha expuesto a lluvia o
condiciones húmedas o se ha caído en agua u otro
líquido, es posible que sus componentes y los dispositivos
de seguridad ya no funcionen. Para reducir el riesgo de
lesiones y de daños materiales:
– Lleve la sopladora y la batería al concesionario de
servicio STIHL autorizado para que los revisen
antes de volver a utilizarlos.
■ Las piezas de repuesto auténticas de STIHL están
diseñadas específicamente para su modelo de aspiradora
y cumplen los requisitos de rendimiento y seguridad
correspondientes. El uso de piezas no autorizadas o no
aprobadas por STIHL puede provocar lesiones graves o
mortales, así como daños materiales.
– STIHL recomienda utilizar únicamente repuestos de
STIHL idénticos a las piezas originales.
5.6 Uso de la aspiradora
5.6.1 Antes de usar
ADVERTENCIA
■ Un uso inadecuado o no autorizado puede causar
lesiones y daños materiales.
– Use la aspiradora solo como se describe en este
manual de instrucciones.
■ El uso de una aspiradora que se ha modificado, que está
dañada, mal ajustada o no se ha mantenido debidamente,
o que no se ha montado por completo y de forma segura,
puede derivar en un fallo de funcionamiento y aumentar el
riesgo de lesiones personales graves o mortales.
– No utilice nunca una aspiradora que haya sido
modificada, que esté dañada o mal mantenida, o
que no se haya montado completamente y de forma
segura.
– Compruebe siempre si la aspiradora está en buenas
condiciones y si funciona correctamente antes de
empezar a trabajar con ella.
– Asegúrese de que el interruptor del gatillo se mueve
libremente y siempre vuelve a saltar cuando se
suelta
– Nunca intente modificar ni anular en modo alguno
los controles ni los dispositivos de seguridad.
– Si la aspiradora o cualquiera de sus piezas están
dañadas o no funcionan correctamente, llévelas a
un concesionario de servicio STIHL autorizado. No
use la aspiradora hasta que el problema se haya
solucionado.

0458-006-8621-A
39
español / EE.UU
5 INSTRUCCIONES IMPORTANTES DE SEGURIDAD
■ Antes de colocar la batería:
– Asegúrese de que el filtro de la aspiradora está
colocado y de que no presenta daños.
– Compruebe si hay corrosión o materias extrañas en
los contactos del compartimiento de la batería y.
Manténgalos limpios.
– Nunca inserte ni use una batería que esté
defectuosa, dañada, agrietada o deformada, o que
pierda líquido.
– Lea y siga las instrucciones sobre cómo encender la
aspiradora, @ 14.1.
■ Para reducir el riesgo de lesiones graves o mortales
provocadas por un arranque accidental:
– Asegúrese de que el gatillo está en la posición de
apagado cuando coloque la batería.
– Evite el contacto con el gatillo y con su bloqueo
cuando sujete el mango de control de la aspiradora.
– Suelte el gatillo antes de retirar la batería.
– Nunca deje la aspiradora desatendida si tiene la
batería colocada.
– Nunca guarde la batería en la aspiradora.
5.6.2 Sujeción y control de la aspiradora
ADVERTENCIA
■ Para sujetar con firmeza y controlar correctamente la
aspiradora:
– Proteja a la aspiradora y sus accesorios del
alquitrán, del aceite, de la grasa y de la resina.
■
■ Envuelva los dedos firmemente en el mango de control
(1), manteniéndolo sujeto entre los dedos índice y pulgar
(vea la ilustración).
■ Para reducir el riesgo de lesiones provocadas por una
pérdida de control:
– No trabaje sobre una escalera de mano, sobre un
techo ni sobre cualquier otro punto de apoyo que no
sea seguro.
– No extienda los brazos más de lo necesario.
Mantenga el equilibrio y los pies bien apoyados en
todo momento. Proceda con especial cuidado
cuando trabaje en escaleras.
– Quite la batería antes de armar,
transportar, ajustar, inspeccionar,
limpiar, reparar, mantener o guardar la
aspiradora, y siempre que no se esté
usando.
1
0000098878_001

0458-006-8621-A
40
español / EE.UU
5 INSTRUCCIONES IMPORTANTES DE SEGURIDAD
5.6.3 Condiciones de trabajo
ADVERTENCIA
■ Su aspiradora es una máquina que debe ser manejada
por una sola persona.
– No permita que otras personas se acerquen a la
zona general de trabajo.
– No se debe permitir la entrada de espectadores,
especialmente niños, ni de animales en el área
donde se está utilizando el equipo.
– Apague el motor inmediatamente si se le aproxima
alguna persona.
■ Para reducir el riesgo de lesiones a los presentes y a los
usuarios no autorizados:
– Nunca deje la aspiradora desatendida si tiene la
batería colocada.
– Apague la aspiradora y retire la pila durante las
descansos de trabajo y en cualquier otro momento
en que la aspiradora no esté en uso.
■ Las chispas generadas durante el funcionamiento de la
aspiradora pueden inflamar gases, líquidos, vapores,
polvos u otros materiales y sustancias combustibles. Para
reducir el riesgo de incendios y explosiones:
– Nunca utilice la aspiradora en un lugar donde haya
gases, líquidos, vapores, polvos u otros materiales y
sustancias combustibles.
– Lea y respete las recomendaciones de las
autoridades gubernamentales (por ejemplo, OSHA),
para identificar y evitar los peligros que representan
los gases, líquidos, vapores o polvos combustibles,
así como otros materiales y sustancias
combustibles.
■ El uso de esta aspiradora puede generar polvo y otras
sustancias que contienen productos químicos
considerados como causantes de enfermedades
respiratorias, cáncer, defectos de nacimiento u otros
trastornos reproductivos.
– Nunca aspire materiales que contengan asbesto,
tales como el hormigón de asbesto o revestimientos
de asbesto. Además de suciedad, se podrían liberar
fibras de asbesto peligrosas que se podrían inhalar.
– Consulte a agencias gubernamentales como EPA,
OSHA, CARB y NIOSH o investigue en otras fuentes
fidedignas sobre materiales peligrosos si desconoce
los riesgos asociados con las sustancias concretas
que va a aspirar.
■ Algunos polvos que se producen al lijar, esmerilar,
taladrar y serrar pueden contener sustancias químicas
consideradas por el Estado de California y por otras
autoridades como causantes de cáncer, defectos de
nacimiento u otros trastornos reproductivos.
– Esta aspiradora no está diseñada para recoger
materiales que contengan asbesto, pintura con plomo,
sílice cristalina respirable ni otras sustancias nocivas o
tóxicas. El uso para este tipo de propósitos está
prohibido.
■ La inhalación de determinados polvos, y especialmente
de polvos orgánicos como el moho o el polen, puede
provocar reacciones alérgicas o asmáticas en personas
sensibles a estas sustancias. La inhalación repetida o en
grandes cantidades de polvo o de otros contaminantes
suspendidos en el aire, y especialmente de las partículas
más pequeñas, puede causar enfermedades respiratorias
o de otro tipo.
– Siempre que sea posible, controle el polvo y los
vapores en su punto de origen.
– En la medida de lo posible, use la aspiradora de
modo que el viento o la propia máquina dirijan
cualquier polvo, vapor o partículas de otro tipo que
se generen en dirección contraria a la del operador.
– Si no es posible mantener el polvo y otras partículas
inhalables a niveles de fondo o aproximadamente de
fondo, siempre utilice una mascarilla aprobada por

0458-006-8621-A
41
español / EE.UU
5 INSTRUCCIONES IMPORTANTES DE SEGURIDAD
NIOSH que reúna las características adecuadas
para las condiciones específicas de la zona de
trabajo. Siga las recomendaciones de las entidades
gubernamentales (por ejemplo, OSHA/NIOSH), y de
las asociaciones laborales y comerciales.
– Cuando vacíe el depósito o limpie el filtro de la
aspiradora, lleve siempre una protección adecuada
de las vías respiratorias que esté aprobada por
NIOSH/MSHA, para reducir el riesgo de inhalar
sustancias peligrosas.
■ La aspiración de polvo de asbesto es peligrosa y puede
causar lesiones graves o mortales, enfermedades de las
vías respiratorias o cáncer, incluido el mesotelioma. El
uso y la eliminación de los productos que contienen
asbesto están estrictamente reglamentados por OSHA y
EPA.
– Si tiene razones para creer que está alterando
asbesto, suspenda el trabajo de inmediato y
póngase en contacto con las autoridades estatales y
locales competentes y/o con la EPA, con su
empresa o con el representante local de OSHA.
5.6.4 Instrucciones de manejo
ADVERTENCIA
■ En caso de emergencia:
– Apague el motor de inmediato y retire la batería.
■ Para reducir el riesgo de incendio o de explosión, que
podría provocar lesiones personales graves o daños
materiales:
– Nunca cubra la aspiradora ni la lumbrera de entrada
de aire de la misma. Asegúrese siempre de que el
motor cuenta con una ventilación suficiente, para
prevenir el sobrecalentamiento y daños en el
equipo.
– Apague la aspiradora antes de cambiar o ajustar
cualquier accesorio o adaptador.
■ Insertar un objeto extraño en la lumbrera de entrada de
aspiración o en la abertura de descarga de aire puede
ocasionar daños materiales, incluidos daños en la propia
aspiradora, y lesiones graves al operador o a las
personas de los alrededores, porque el objeto o partes del
mismo rotas podrían salir despedidas del soplador a alta
velocidad.
– Nunca introduzca ningún objeto en la lumbrera de
entrada ni en la abertura de descarga de aire.
– Apague la aspiradora inmediatamente si comienza a
vibrar de un modo anormal.
– No permita que la aspiradora se use como juguete.
– Nunca aspire líquidos inflamables o
combustibles, como la gasolina, ni use la
aspiradora en zonas en las que podría
haber este tipo de líquidos.
– No aspire objetos que estén ardiendo o
echen humo, como cigarrillos, fósforos o
cenizas calientes.
– No aspire fluidos que contengan
disolventes o ácidos (por ejemplo,
gasolina, aceite para calefacción,
diluyente de pintura o acetona).

0458-006-8621-A
42
español / EE.UU
6 Seguridad de la batería
■ Usar la aspiradora para aspirar herbicidas, pesticidas,
fertilizantes u otros productos químicos puede ser
peligroso, causar lesiones graves o mortales a las
personas y dañar el medio ambiente.
– Nunca use la aspiradora para recoger ningún tipo de
producto químico.
■ Usar la aspiradora sin un filtro de aspiradora puede
provocar daños en la máquina.
– Nunca use su aspiradora si el filtro de aspiradora
está dañado o no está colocado.
– Siempre sustituya un filtro de aspiradora dañado
6.1 Advertencias e instrucciones
ADVERTENCIA
■ El uso de baterías no autorizadas puede dañar la
aspiradora y provocar incendios, explosiones, lesiones
personales y daños materiales.
– Use solo baterías de la serie STIHL AS genuinas.
■ El uso de baterías de la serie STIHL AS para cualquier fin
que no sea alimentar las herramientas motorizadas STIHL
podría ser extremadamente peligroso.
– Use las baterías de la serie STIHL AS solo con
herramientas motorizadas STIHL compatibles.
■ El uso de cargadores no autorizados puede causar daños
en la batería y provocar incendios, explosiones, lesiones
y daños materiales.
– Use solo cargadores de la serie STIHL AL 1
auténticos para cargar las baterías de la serie STIHL
AS.
■ La batería tiene funciones y dispositivos de seguridad
que, de dañarse, pueden provocar que la batería genere
calor, se rompa, pierda líquido, se incendie o explote.
– Nunca use ni cargue una batería que no funcione
correctamente o que esté dañada, agrietada,
deformada o pierda líquido.
– Nunca abra, desmonte ni golpee la batería; no la
deje caer ni la exponga a impactos fuertes o a daños
de cualquier otro tipo.
– Nunca exponga la batería a microondas ni a
presiones elevadas.
– Nunca introduzca objetos en las ranuras de
ventilación de la batería.
■ Las temperaturas extremas pueden hacer que la batería
genere calor, se rompa, pierda líquido, se incendie o
explote, lo que podría causar lesiones graves o fatales y
daños materiales.
– Nunca cargue, utilice o almacene la batería fuera de
los límites de temperatura ambiente especificados,
@ 23.4.
– Nunca guarde la batería en un lugar expuesto a la
luz solar directa ni dentro de un vehículo si la
temperatura exterior es elevada.
■ Para reducir el riesgo de que se produzcan lesiones
personales y daños materiales en caso de que la batería
humee, emita un olor inusual o se caliente más de lo
habitual durante el uso, la carga o el almacenamiento:
– Deje de usar o de cargar de la batería
inmediatamente. Póngase en contacto con las
autoridades en caso de incendio o explosión.
■ Para reducir el riesgo de que se produzca un cortocircuito,
que podría causar, a su vez, una descarga eléctrica, un
incendio o una explosión:
6 Seguridad de la batería
– Nunca permita que la temperatura de la
batería supere los 212 °F (100 °C).
– Nunca prenda fuego a la batería, ni la
coloque sobre o junto a fuegos, estufas
u otro tipo de objetos que alcances
temperaturas muy altas.

0458-006-8621-A
43
español / EE.UU
7 Seguridad del cargador
– Nunca puentee los terminales de la batería con
alambres ni con otros objetos metálicos.
– Cuando no la esté usando, mantenga la batería
alejada de objetos metálicos (p. ej., presillas para
papel, clavos, monedas, llaves).
– Nunca transporte ni guarde la batería en un
recipiente de metal.
– Guarde la batería bajo techo, en un lugar seco.
– Nunca guarde la batería en entornos húmedos o
corrosivos, ni en condiciones que podrían provocar
corrosión en los componentes metálicos.
– Nunca guarde la batería en la aspiradora ni en el
cargador.
– Proteja la batería de la exposición a productos
corrosivos, como las sustancias químicas utilizadas
en el jardín o las sales descongelantes.
– Proteja la batería de la exposición a líquidos
conductores como el agua salada.
– No intente reparar, abrir ni desmontar la batería. No
contiene ninguna pieza que el usuario pueda reparar
sin ayuda.
■ El líquido que contiene la batería, y que puede
derramarse en determinadas circunstancias, es
potencialmente nocivo y puede provocar irritaciones en
los ojos y en la piel, quemaduras químicas y otras
lesiones graves.
– Evite el contacto con la piel y con los ojos.
– Para recoger el líquido de batería derramado, use
un producto absorbente inerte, como la arena.
– En caso de contacto accidental, limpie
inmediatamente y a fondo la zona afectada con un
jabón suave y agua.
– Si le entra líquido de batería en los ojos: no se los
frote. Aclárese los ojos con agua corriente durante al
menos 15 minutos y acuda al servicio médico más
cercano.
■ Si la batería se prende fuego, puede resultar peligrosa.
Para reducir el riesgo de que se produzcan lesiones
personales graves y daños materiales, en caso de
incendio:
– Evacue la zona. El fuego se puede extender
rápidamente. Manténgase lejos de cualquier vapor
que se genere y respete una distancia de seguridad
suficiente.
– Avise a los bomberos.
– Aunque se puede usar agua para apagar un
incendio de batería, es preferible utilizar un extintor
de incendios de polvo químico multiuso.
– El cuerpo de bomberos le informará sobre la forma
adecuada de eliminar una batería que se ha
incendiado.
■ Si la batería se cae, puede provocar lesiones o daños
materiales. Para evitar que la batería se caiga al sacarla:
– Tenga cuidado cuando saque la batería.
7.1 Advertencias e instrucciones
ADVERTENCIA
■ Para reducir el riesgo de incendios y choques eléctricos,
así como de otras lesiones y daños materiales:
– Lea y respete todas las señales de precaución del
cargador, de la batería y de la aspiradora, así como
todas las instrucciones de este manual, antes de
usar el cargador.
– Cargue únicamente baterías de la serie STIHL AS
auténticas. Otras baterías podrían reventar,
incendiarse o explotar, y causar lesiones o daños
materiales.
– No moje la batería. Protéjalo de la lluvia,
del agua, de cualquier líquido y de la
humedad.
– Nunca sumerja la batería en agua ni en
otros líquidos.
7 Seguridad del cargador

0458-006-8621-A
44
español / EE.UU
7 Seguridad del cargador
– No manipule el cargador, su cordón eléctrico ni su
enchufe con las manos mojadas.
– Nunca use el cargador si está dañado.
– Nunca cargue baterías que estén defectuosas,
dañadas, agrietadas o deformadas, o que pierdan
líquido.
– Nunca guarde una batería en el cargador.
– Utilice el cargador únicamente bajo techo, en
recintos secos.
– Utilice el cargador sólo dentro de los límites de
temperatura ambiente ambiente
especificados,@ 23.4.
– Mantenga el cargador fuera del alcance de los
niños.
– Siempre enchufe el cargador a un tomacorriente de
pared que esté instalado correctamente, y que tenga
los mismos valores de voltaje y frecuencia eléctrica
que se indican en el cargador.
– Nunca use zapatillas eléctricas para hacer funcionar
varios cargadores u otros dispositivos desde el
mismo tomacorriente o en el mismo circuito.
– No utilice el cargador si este ha recibido un golpe
fuerte, si se ha caído o se ha dañado de cualquier
otro modo.
– No intente reparar, abrir ni desarmar el cargador. No
contiene ninguna pieza que el usuario pueda reparar
sin ayuda.
■ Para reducir el riesgo de descarga eléctrica o de incendio
a consecuencia de un cortocircuito:
– Asegúrese de que la batería y el cargador están
completamente secos antes de iniciar el proceso de
carga.
– Nunca puentee los contactos del cargador con
cables ni con otros objetos metálicos.
– No inserte ningún objeto en las ranuras de
enfriamiento del cargador.
■ El cargador se calienta durante el proceso de carga. Para
reducir el riesgo de incendio:
– No ponga en funcionamiento el equipo sobre
superficies combustibles (p. ej., papel, cartón o
telas), ni en entornos combustibles.
– Deje que el cargador se enfríe por sí solo. No lo
cubra.
■ Los cargadores pueden producir chispas que, a su vez,
pueden encender gases, líquidos, vapores, polvos u otros
materiales combustibles. Para reducir el riesgo de
incendios y explosiones:
– No utilice la máquina en un lugar en el que haya
gases, líquidos, vapores, polvos u otros materiales
combustibles.
■ El uso de un cordón eléctrico o de un enchufe que estén
dañados puede provocar incendios, descargas eléctricas
y otras lesiones personales, así como daños materiales.
Para reducir estos riesgos:
– Si el cordón eléctrico está dañado, solicite a un
concesionario de servicio STIHL autorizado que lo
reemplace.
– Desenchufe el cable de alimentación del
tomacorriente cuando no esté usando el cargador.
– Para uso en interiores únicamente.
– Mantenga el cargador seco en todo
momento. Protéjalo de la lluvia, del
agua, de cualquier líquido y de la
humedad. Nunca inserte una batería
húmeda ni use el cargador si está
mojado.
– Revise regularmente el cable eléctrico y
el enchufe del cargador para comprobar
si tienen daños. Si detecta daños, retire
el enchufe inmediatamente del
tomacorriente.

0458-006-8621-A
45
español / EE.UU
8 Mantenimiento, reparación y almacenamiento
– Nunca tire del cordón eléctrico para sacar el enchufe
del tomacorriente. Para desenchufar la máquina,
agarre el enchufe, y no el cordón.
– No use el cordón eléctrico para transportar ni
sostener el cargador.
– Asegúrese de que el cordón eléctrico está colocado
o marcado de modo que nadie pueda pisarlo ni
tropezarse con él; compruebe que no está en
contacto con objetos cortantes ni con partes móviles
ni expuesto a ningún otro daño o esfuerzo.
■ No se debe usar un alargador a menos que sea
absolutamente inevitable. Sobrecargar un alargador
puede provocar sobrecalentamiento e incendios. Si es
imprescindible utilizar un alargador:
– Use únicamente un alargador debidamente formado
con alambres de calibre 16 (AWG 16) o mayor.
– Nunca conecte más de un cargador u otro
dispositivo a un alargador.
– Nunca use un alargador que tenga un vataje inferior
al que figura en la placa de características del
cargador.
– Nunca use un alargador si las clavijas del enchufe
difieren de las clavijas del enchufe del cargador en
cantidad, tamaño o forma.
– No una varios alargadores (en cadena).
■ El circuito eléctrico doméstico típico es de entre 15 y
20 amperios. Un cargador STIHL AL 1 consume
aproximadamente 0,275 amperios. Para reducir el riesgo
de incendios provocados por la sobrecarga de un circuito
eléctrico:
– Asegúrese de que el sistema eléctrico tiene
capacidad suficiente para resistir el consumo
eléctrico previsto antes de cargar la batería.
– Si tiene que cargar varias baterías, cárguelas una a
una o en circuitos separados, a menos que tenga la
certeza de que su circuito resistirá el consumo total
que necesitan todos los cargadores.
■ En caso de incendio, o si el cargador o la batería humean
o emanan un olor inusual, si están calientes o presentan
cualquier otra anomalía durante el proceso de carga:
– Desconecte el cargador de la toma de corriente de
inmediato. Póngase en contacto con las autoridades
en caso de incendio o explosión.
■ Para reducir el riesgo de choques eléctricos y de otras
lesiones, así como de daños materiales, al montar el
cargador:
– Asegúrese de que no pasan cables eléctricos,
tuberías ni otros conductos de servicio por detrás de
la pared donde va a montar el cargador.
– Monte el cargador solo como se describe en este
manual.
– Retire la batería antes de montar el cargador.
8.1 Advertencias e instrucciones
ADVERTENCIA
■ La batería, el cargador o la aspiradora no contienen
piezas que el usuario esté autorizado a reparar. Para
reducir el riesgo de incendios, descargas eléctricas o
lesiones de otro tipo, así como de años materiales:
– Los usuarios deben realizar únicamente los trabajos
de mantenimiento y limpieza que se describen en
este manual.
– Respete escrupulosamente las instrucciones de
limpieza y mantenimiento que se dan en las
secciones correspondientes de este manual de
instrucciones.
– STIHL le recomienda que encargue la realización de
los trabajos de reparación a un concesionario de
servicio STIHL autorizado.
■ Un arranque accidental puede provocar lesiones o daños
materiales. Para reducir el riesgo de lesiones y de daños
materiales provocados por un arranque accidental:
8 Mantenimiento, reparación y
almacenamiento

0458-006-8621-A
46
español / EE.UU
9 Antes de empezar a trabajar
■ El uso de piezas no autorizadas o no aprobadas por
STIHL puede provocar lesiones graves o mortales, así
como daños materiales.
– Para llevar a cabo tareas de reparación o
mantenimiento, STIHL recomienda utilizar
únicamente piezas de repuesto STIHL idénticas a
las originales.
■ Para reducir el riesgo de una descarga eléctrica:
– Nunca use su aspiradora si la carcasa de la misma
está agrietada o dañada.
– Antes de inspeccionar o limpiar el cargador,
desenchúfelo del tomacorriente de pared.
– Revise regularmente el cargador y asegúrese de
que el aislamiento del cable de alimentación y el
enchufe están en buenas condiciones y de que no
muestran signos de deterioro (fragilidad), desgaste
ni daños.
– Si el cordón eléctrico está dañado, solicite a un
concesionario de servicio STIHL autorizado que lo
reemplace.
■ Para reducir el riesgo de cortocircuitos e incendios:
– Mantenga las ranuras de la batería libres de cuerpos
extraños. Límpielas siempre que sea necesario con
un paño seco o con un cepillo suave y seco.
INSTRUCCIONES DE TRANSPORTE Y
ALMACENAMIENTO
ADVERTENCIA
■ Un almacenamiento incorrecto puede resultar en un uso
no autorizado, provocar daños en la aspiradora, en la
batería y en el cargador y aumentar el riesgo de incendio,
descarga eléctrica y de otras lesiones o daños materiales.
– Retire la batería de la aspiradora antes de
almacenarlo.
– Nunca guarde la aspiradora ni el cargador con la
batería puesta.
– Antes de guardar la máquina, siempre desenchufe
el cargador del tomacorriente y quite la batería.
– Guarde la aspiradora, la batería y el cargador en
interiores, en un lugar seco y seguro al que no
puedan acceder niños ni otras personas no
autorizadas.
– Nunca guarde la batería en la aspiradora, en el
cargador o en un envase metálico, ni en un envase
junto con objetos metálicos (por ejemplo, presillas
para papel, clavos, monedas, llaves).
¡GUARDE ESTAS
INSTRUCCIONES!
9.1 Preparación de la aspiradora para el uso
Antes de empezar a trabajar:
► Cargue por completo la batería, @ 10.2.
► Monte los accesorios de aspiración, @ 12.1.
► Compruebe si los controles funcionan correctamente y si
están en buen estado, @ 15.1.
– Quite la batería antes de inspeccionar la
aspiradora o de realizar alguna tarea de
limpieza, mantenimiento o reparación,
antes del almacenamiento y cuando el
aparato no esté en uso.
9 Antes de empezar a trabajar

0458-006-8621-A
47
español / EE.UU
10 Carga de la batería
10.1 Preparación del cargador para el
funcionamiento
ADVERTENCIA
Lea y siga las medidas de seguridad que se ven en la
batería y en el cargador, y las advertencias e instrucciones
de este manual, @ 7. Para reducir el riesgo de
cortocircuito, que podría provocar una descarga eléctrica,
un incendio y una explosión, asegúrese de que el cargador
y sus componentes estén secos y no estén dañados; opere
el cargador puertas adentro a la temperatura ambiente
adecuada, @ 7.
ADVERTENCIA
El circuito eléctrico doméstico típico es de entre 15 y
20 amperios. Un cargador STIHL AL 1 consume
aproximadamente 0,275 amperios. Para reducir el riesgo de
incendios provocados por la sobrecarga de un circuito
eléctrico:
► Asegúrese de que el sistema eléctrico tiene capacidad
suficiente para resistir el consumo eléctrico previsto antes
de cargar la batería.
► Si tiene que cargar varias baterías, cárguelas una a una o
en circuitos separados, a menos que tenga la certeza de
que su circuito resistirá el consumo total que necesitan
todos los cargadores.
ADVERTENCIA
Dado que la batería y el cargador se calientan durante el
proceso de carga, no ponga el cargador en funcionamiento
sobre superficies combustibles o en un lugar donde haya
gases, líquidos, vapores, polvo u otros materiales
combustibles, @ 7.
Para preparar el cargador para el funcionamiento:
► Inserte el enchufe (3) en una toma de corriente eléctrica
(4) correctamente instalada y que coincida con la tensión
y la frecuencia eléctrica indicadas en la placa de
características del cargador.
El cargador ejecutará una autoprueba inmediatamente
después de enchufarlo. El LED (1) se iluminará en verde
durante 1 segundo aproximadamente, y luego en rojo por un
lapso breve hasta apagarse. Una vez que el LED se apaga,
la autoprueba ha finalizado y el cargador está listo para
cargar la batería.
► Ubique el cordón eléctrico (2) como para que no se lo
pise, cause tropiezos, esté en contacto con objetos
cortantes o partes móviles o, de otro modo sujeto, a daño
o esfuerzo.
10.2 Carga
ADVERTENCIA
Las baterías STIHL tienen características y dispositivos de
seguridad que, de dañarse, pueden provocar que la batería
genere calor, se rompa, pierda líquido, se incendie o
explote. Nunca cargue una batería que funcione mal, que
presente daños, grietas o fugas o que esté deformada, ni
utilice un cargador dañado, @ 7. Asegúrese de que el
cargador y la batería que va a cargar están completamente
secos antes de iniciar la carga, @ 7. Respete todas las
advertencias e instrucciones específicas que se adjuntan
con su batería.
10 Carga de la batería
3
0000-GXX-9295-A0
1
2
4

0458-006-8621-A
48
español / EE.UU
10 Carga de la batería
Para cargar la batería:
► Inserte la batería (1) en el cargador (2) hasta que haga
tope.
El LED del cargador (3) se ilumina o destella en verde
cuando la batería se está cargando.
Cuando el LED del cargador se apague, el proceso de
carga habrá finalizado y el cargador se apagará. La
batería puede retirarse del cargador.
► Desenchufe el cordón eléctrico del tomacorriente cuando
el cargador no se vaya a usar durante un periodo
prolongado.
La batería no se suministra completamente cargada de
fábrica. STIHL le recomienda que cargue la batería por
completo antes de usarla por primera vez.
Utilice el cargador en interiores, en un lugar seco. Para un
rendimiento óptimo, respete los rangos de temperatura
ambiente recomendados, @ 23.5.
La batería se calienta durante el funcionamiento. Si se
inserta en el cargador una batería caliente, puede ser
necesario dejarla enfriar antes de cargarla. El proceso de
carga solo comienza una vez que la batería se ha enfriado
lo suficiente.
El tiempo de carga depende de varios factores, tales como
el estado de la batería y la temperatura ambiente. Si quiere
ver una lista completa de los tiempos de carga aproximados,
visite www.stihl.com/charging-times.
10.3 Montaje del cargador en una pared
Antes del montaje, asegúrese de que no pasan cables
eléctricos, tuberías ni otros conductos de servicio detrás del
lugar en que va a instalar el cargador.
Para montar el cargador de pared:
► Monte el cargador bajo techo, en un lugar seco y cerca de
un tomacorriente de pared.
► Introduzca los tornillos en un montante de pared. Utilice
anclajes de pared roscados adecuados u otros elementos
de montaje similares si no hay montantes disponibles.
► Alinee el cargador como se muestra más arriba. Haga la
instalación en una pared que tenga las siguientes
dimensiones:
– a = como mínimo, 18 in. (450 mm)
– b = como mínimo, 3,9 in. (100 mm)
– c = 2,1 in. (54 mm)
– d = 0,2 in. (4,5 mm)
– e = 0,4 in. (9 mm)
– f = 0,1 in. (2,5 mm)
2
3
1
0000-GXX-9296-A0
a
1
2 3
b
c
e
d
f
f
0000-GXX-8802-A1

0458-006-8621-A
49
español / EE.UU
11 Diagnóstico de LED
11.1 LEDs en la aspiradora
11.1.1 Estatus de la aspiradora
Los LED de la aspiradora indican el estado de la
herramienta motorizada.
Si los tres LED se encienden en rojo continuamente, el
motor de la aspiradora está demasiado caliente. Deje que el
motor se enfríe.
Si tres LED destellan en rojo cuando activa el gatillo, la
aspiradora tiene un defecto eléctrico. No maneje la
aspiradora. Solicite a un concesionario de servicio STIHL
autorizado que la revise antes de usarlo.
Para información de localización de averías, @ 22.1.
11.1.2 Estatus de la batería
Los mismos LED en la aspiradora también indican el estado
de la batería.
Estos LED pueden encenderse o destellar en verde o en
rojo.
Si un LED se enciende en rojo continuamente, la batería
está demasiado caliente o demasiado fría. Deje que la
batería se caliente o se enfríe gradualmente hasta alcanzar
una temperatura ambiente de entre 50 °F y 68 °F
aproximadamente (entre 10 °C y 20 °C).
Si los 4 LED destellan en rojo: la batería está averiada y es
necesario reemplazarla. No intente cargar, usar ni guardar
la batería.
11.1.3 Estado de carga
Los LED en la aspiradora también muestran el estado de
carga de la batería.
Para determinar el estado de carga de la batería:
► Coloque la batería.
► Oprima el botón (1).
Los LED de la aspiradora se encenderán o destellarán en
verde por unos 5 segundos e indicarán el estado de carga
(vea la ilustración).
Por ejemplo:
Si cuatro LED se encienden en verde continuamente, la
carga está completa.
Si un LED destella en verde, queda menos del 20 % de la
carga.
11.2 LED en el cargador
Un LED muestra el estado del cargador y de la batería. El
LED puede encenderse o destellar en verde o rojo.
11 Diagnóstico de LED
Si el LED se ilumina continuamente en verde o
destella verde: la batería se está cargando.
0-20%
20-40%
40-60%
60-80%
80-100%
1
0000098912_001

0458-006-8621-A
50
español / EE.UU
12 Montaje de la aspiradora
Para obtener más información, @ 22.
12.1 Montaje de los accesorios de aspiración
Para montar los accesorios de aspiración:
► Apague la aspiradora, @ 14.1.
► Retire la batería, @ 13.2.
► Conecte los accesorios en la combinación que prefiera o
como piezas individuales a la aspiradora.
Desmontaje y montaje del accesorio de cepillado
Para retirar el accesorio de cepillaje:
► Mantenga presionada la palanca de bloqueo (1) para
extraer el accesorio del cepillo (2).
Para colocar el accesorio de cepillaje:
► Deslice el accesorio del cepillo (2) hasta que cubra toda
la parte inferior del accesorio de suelo y encaje en su sitio
13.1 Colocación de la batería
ADVERTENCIA
Nunca use una batería que esté defectuosa, dañada,
agrietada, que pierda líquido o esté deformada, @ 6.1.
Nunca cargue, utilice o almacene la batería fuera de los
límites de temperatura ambiente especificados, @ 23.4.
ADVERTENCIA
Para reducir el riesgo de activación accidental, nunca
guarde la batería en la aspiradora, @ 19.2.
Si el LED destella en rojo: no hay contacto entre
la batería y el cargador. Retire y vuelva a colocar
la batería.
O bien
La batería no funciona correctamente, y es
necesario cambiarla. No use ni cargue la batería.
O bien
El cargador está averiado. Solicite a un
concesionario de servicio STIHL autorizado que
lo revise antes de usarlo.
Si el LED se enciende en rojo continuamente: La
batería está demasiado caliente o demasiado
fría para cargarse. Deje que la batería se
caliente o se enfríe gradualmente hasta alcanzar
una temperatura ambiente de entre 50 °F y 68 °F
aproximadamente (entre 10 °C y 20 °C).
12 Montaje de la aspiradora
0000098911_001
13 Colocación y extracción de la batería.
2
1
0000099060_001

0458-006-8621-A
51
español / EE.UU
14 Encendido y apagado de la aspiradora
Para colocar la batería:
► Inserte la batería (1) en su compartimiento (2) hasta que
haga tope.
La batería está colocada correctamente cuando se
escucha un chasquido.
Las baterías nuevas no están completamente cargadas. Por
eso, STIHL recomienda cargarlas por completo antes de
usarlas por primera vez, @ 10.2.
13.2 Extracción de la batería
ADVERTENCIA
Para reducir el riesgo de lesiones graves provocadas por
una activación accidental, quite la batería siempre antes de
armar, transportar, ajustar, limpiar, reparar, mantener o
guardar la aspiradora, y cuando no se esté usando.
ADVERTENCIA
Saque la batería con cuidado, para evitar que se caiga y
provoque lesiones o daños materiales.
Para quitar la batería:
► Suelte el gatillo.
► Oprima las palancas de bloqueo (1) en ambos lados y
hale la batería (2) para extraerla.
INDICACIÓN
Evite exponer la batería a un calor excesivo o a la luz solar
directa durante períodos prolongados. El uso o el
almacenamiento a temperaturas no incluidas en el rango de
temperatura ambiente recomendado pueden reducir el
rendimiento de la batería.
14.1 Encendido
ADVERTENCIA
Nunca use la aspiradora si ha sido modificado, está dañado,
mal ajustado o reparado, no fue armado completa y
debidamente o no funciona de manera correcta, @ 5.5.
Antes de encender la máquina:
► Asegúrese de que tiene los pies bien apoyados.
► Mantenga una posición erguida.
1
2
0000-GXX-9347-A0
14 Encendido y apagado de la aspiradora
2
1
0000-GXX-9348-A0

0458-006-8621-A
52
español / EE.UU
15 Revisión de la aspiradora
Para encender la aspiradora:
► Apriete el gatillo (1) con el dedo índice.
La aspiradora comenzará a succionar.
14.2 Apagado
ADVERTENCIA
Para reducir el riesgo de lesiones personales causadas por
la activación accidental o el uso no autorizado, apague el
motor y retire la batería antes de transportar o de bajar la
aspiradora.
Para apagar la aspiradora:
► Suelte el gatillo de modo que vuelva a la posición de
apagado.
15.1 Prueba de los controles
Antes de empezar a trabajar, confirme que el interruptor (1)
está libre de daños y que funciona correctamente.
Gatillo (1).
Para probar los controles:
► Retire la batería.
► Oprima el gatillo de aceleración.
El interruptor del gatillo debería volver a saltar. En caso
negativo, lleve la aspiradora a un concesionario
autorizado de STIHL para que sea reparada antes de
usarla.
► Coloque la batería.
► Sostenga la aspiradora con firmeza y oprima
momentáneamente el interruptor del gatillo.
La aspiradora debería encenderse. En caso negativo,
lleve la aspiradora a un concesionario autorizado de
STIHL para que sea reparada antes de usarla.
► Suelte el gatillo.
La aspiradora debería apagarse.
Si la aspiradora no se apaga después de soltar el gatillo,
retire la batería y lleve la aspiradora a un concesionario de
servicio STIHL autorizado para que lo reparen antes de
utilizarlo.
1
0000098875_001
15 Revisión de la aspiradora
1
0000098875_001

0458-006-8621-A
53
español / EE.UU
16 Durante el funcionamiento
16.1 Aspiración
ADVERTENCIA
El motor eléctrico de la aspiradora no es resistente al agua.
Para reducir el riesgo de sufrir lesiones graves o mortales
causadas por electrocución o descarga eléctrica, no use la
máquina bajo la lluvia.
Para aspirar polvo y residuos secos:
► Encienda la aspiradora, @ 14.1
► Sujete la aspiradora firmemente en el mango de control
cuando trabaja. Aspire directamente con la boquilla o use
uno de los accesorios.
Para un rendimiento óptimo, respete los rangos de
temperatura ambiente recomendados, @ 23.5.
16.2 Uso del botón de retención de potencia
Puede fijar y mantener la fuerza de succión seleccionada
por medio de oprimir el botón de retención de potencia.
Para usar la función de retención de potencia:
► Comprima el gatillo (1).
► Oprima el botón de encendido (2).
El gatillo puede soltarse; la aspiradora continuará
funcionando con la fuerza de soplado seleccionada.
Oprima el bloqueo del gatillo para detener a la aspiradora.
16.3 Vaciado del depósito
ADVERTENCIA
Cuando vacíe el depósito, limpie el cartucho filtrante o retire
la bolsa, lleve siempre una protección adecuada de las vías
respiratorias que esté aprobada por NIOSH/MSHA, para
reducir el riesgo de inhalar sustancias peligrosas.
Para vaciar el depósito:
► Apague la aspiradora, @ 14.2.
► Retire la batería, @ 13.2.
► Suelte la pinza de bloqueo (1).
► Quite el recipiente (2).
► Elimine todo el contenido de acuerdo con la normativa
local y con los requisitos de protección del medio
ambiente.
► Coloque el contenedor de manera que las lengüetas (3)
encajen en los agujeros (4).
► Cierre el contenedor hasta que encaje con un clic audible.
16 Durante el funcionamiento
2
1
0000098877_001
1
2
2
4
3
0000098876_001

0458-006-8621-A
54
español / EE.UU
17 Después de completar el trabajo
17.1 Preparativos para el transporte o el
almacenamiento
ADVERTENCIA
Para reducir el riesgo de lesiones personales causadas por
la activación accidental o el uso no autorizado, apague el
motor y retire la batería antes de transportar o de bajar la
aspiradora.
Para preparar la aspiradora para el transporte o el
almacenamiento:
► Apague la aspiradora, @ 14.2.
► Retire la batería, @ 13.2.
► Si la batería o la aspiradora se humedecieron durante el
funcionamiento, déjelos secar por separado y por
completo antes de cargarlos o guardarlos.
18.1 Aspiradora
Cuando transporte la aspiradora:
► Al transportar la aspiradora de jardín con la mano,
sosténgalo por la boquilla con la espada apuntando hacia
abajo, sin colocar los dedos en el gatillo de aceleración.
► Cuando transporte la aspiradora de jardín en un vehículo,
cubra la espada con su funda e inserte la aspiradora de
jardín de modo seguro en un bolso de transporte (si lo
tiene). Asegure y coloque la aspiradora de manera tal que
se eviten vuelcos, impactos y daños.
18.2 Batería
ADVERTENCIA
Para reducir el riesgo de cortocircuito, que podría generar
una descarga eléctrica, un incendio o una explosión, nunca
transporte la batería en un contenedor metálico o cerca de
objetos de metal (por ejemplo, presillas de papel, clavos,
monedas, llaves), @ 6
Al transportar la batería:
► Coloque la batería en un contenedor o una caja no
metálicos y protéjala de impactos o daños. Nunca
transporte la batería en un envase metálico u otro
contenedor capaz de conducir electricidad, ni cerca de
objetos metálicos (por ejemplo, presillas para papel,
clavos, monedas, llaves, etc.).
► Si transporta la batería en un vehículo, asegúrela junto
con su contenedor para prevenir vuelcos, impactos y
daños.
Las baterías STIHL cumplen con los requisitos descritos en
el Manual UN ST/SG/AC.10/11/Ver.5/Parte III, Subsección
38.3.
El transporte comercial por aire, agua y tierra de celdas de
ion de litio y baterías está regulado. Esta batería está
clasificada como un producto UN 3480, Clase 9 y grupo de
envasado II. Para transportarla, ya sea como parte de la
herramienta completa o sola, es necesario cumplir con
todas las normas de transporte correspondientes. Antes del
transporte o traslado, consulte con la empresa de transporte
por tierra o agua, o bien con la aerolínea de carga o
pasajeros, para determinar si el transporte está prohibido o
sujeto a restricciones o exenciones.
Por lo general, el usuario no necesita cumplir con ninguna
condición adicional para poder transportar baterías STIHL
por carretera hasta el sitio donde se encuentra la
herramienta eléctrica. Verifique y respete cualquier norma
especial que pudiera aplicarse a su situación.
Para obtener más información, visite
www.stihlusa.com/battery-transportation-safety.
17 Después de completar el trabajo
18 Transporte de la aspiradora, de la
batería y del cargador

0458-006-8621-A
55
español / EE.UU
19 Almacenamiento de la aspiradora, la batería y el cargador
18.3 Cargador
Para transportar correctamente el cargador:
► Desconecte el cargador del tomacorriente.
► Retire la batería del cargador.
► Enrolle el cable eléctrico y sujételo al cargador, @ 19.3.
► Cuando transporte el cargador en un vehículo, cerciórese
de que está asegurado de manera que no puede volcar,
golpearse ni sufrir daños.
19.1 Aspiradora
ADVERTENCIA
Guarde la aspiradora, la batería y el cargador en interiores,
en un lugar seco y seguro al que no puedan acceder niños
ni otras personas no autorizadas, @ 5.5 No guarde nunca
la batería en la aspiradora o en el cargador. Si la máquina
no se guarda correctamente, podrían usarla personas no
autorizadas y podría resultar dañada, @ 5.5.
Cuando guarde la aspiradora:
► Limpie la aspiradora, @ 20.1.
► Guarde la aspiradora bajo techo, en un lugar seco y
seguro al que no puedan acceder niños ni otras personas
no autorizadas.
19.2 Batería
ADVERTENCIA
Para reducir el riesgo de que se produzca un cortocircuito
que, a su vez, podría causar una descarga eléctrica, un
incendio o una explosión, nunca guarde la batería en un
recipiente metálico ni cerca de objetos de metal, @ 6. Si la
batería está húmeda o mojada, espere a que se seque por
completo antes de guardarla, @ 6.
ADVERTENCIA
Las temperaturas extremas pueden dañar la batería y
provocar que esta genere calor, se rompa, pierda líquido, se
incendie o explote, lo que podría causar lesiones
personales graves o fatales y daños materiales. Nunca
cargue, utilice o almacene la batería fuera de los límites de
temperatura ambiente especificados, @ 23.4. Nunca
guarde la batería en un lugar expuesto a la luz solar directa
ni dentro de un vehículo si la temperatura exterior es
elevada, @ 6.
Para guardar correctamente la batería:
► Retire la batería del podador de jardín o del cargador.
► Asegúrese de que la batería está seca y guárdela bajo
techo, en un lugar seco y seguro.
► Asegúrese de que queda fuera del alcance de los niños y
de otras personas no autorizadas.
► Proteja la batería de la humedad y de los productos
corrosivos, como las sustancias químicas utilizadas en el
jardín o las sales descongelantes.
► Proteja la batería de la exposición a líquidos conductores
como el agua salada.
► Para alargar al máximo la vida útil de su batería, guárdela
a una temperatura ambiente de entre 50 °F y 68 °F (10 °C
y 20 °C), con un nivel de carga de entre el 40 % y el 60 %
(2 LED verdes iluminados).
► Las baterías de repuesto no deben permanecer
inutilizadas. Use todas sus baterías, por turnos.
INDICACIÓN
Una batería que no se almacena correctamente puede sufrir
una descarga profunda, lo que puede provocar daños
permanentes. Para evitar una descarga profunda:
► Cargue la batería antes de guardarla. Para obtener la
máxima duración de la batería, guárdela con una carga
entre el 40 % y el 60 % (2 LEDs verdes).
► Retire la batería de la aspiradora después de terminar el
trabajo.
► Retire la batería del cargador una vez completada la
carga.
19 Almacenamiento de la aspiradora, la
batería y el cargador

0458-006-8621-A
56
español / EE.UU
20 Limpieza
► Para obtener la máxima duración de la batería, guárdela
a una temperatura ambiente de entre 50 °F y 68 °F (10 °C
y 20 °C).
19.3 Cargador
Para almacenar el cargador correctamente:
► Desconecte el cargador del tomacorriente.
► Retire la batería del cargador.
► Enrolle el cable eléctrico y sujételo al cargador.
► Guarde el cargador bajo techo, en un lugar seco y seguro.
► Asegúrese de que queda fuera del alcance de los niños y
de otras personas no autorizadas.
► Nunca cuelgue el cargador por el cable eléctrico ni por el
soporte del cable (3).
20.1 La aspiradora, la batería y el cargador
ADVERTENCIA
Para reducir el riesgo de lesiones provocadas por una
activación accidental, quite la batería antes de realizar
cualquier trabajo de limpieza, @ 5.1. Los usuarios de esta
aspiradora deben llevar a cabo únicamente las tareas de
limpieza que se describen en este manual.
Para limpiar la aspiradora, la batería y el cargador:
► Limpie los componentes plásticos de la aspiradora con un
paño levemente humedecido. No use detergentes ni
disolventes. Estos productos pueden dañar los
componentes de polímero.
► No use una hidrolavadora para limpiar la aspiradora, ni la
rocíe con agua ni con otros líquidos.
► Mantenga la carcasa y las guías de la batería libres de
cuerpos extraños, y límpielas siempre que sea necesario
con un cepillo blando o con un paño suave y seco.
► Mantenga los contactos eléctricos y la carcasa del
cargador libres de materias extrañas. Límpielos siempre
que sea necesario con un cepillo suave o con un paño
suave y seco. Desenchufe el cargador siempre antes de
limpiarlo.
20.2 Limpieza del filtro de la aspiradora
ADVERTENCIA
Cuando vacíe el depósito o limpie el filtro o lleve siempre
una protección adecuada de las vías respiratorias que esté
aprobada por NIOSH/MSHA, para reducir el riesgo de
inhalar sustancias peligrosas.
Las partículas de polvo muy finas se pueden acumular en el
filtro de la aspiradora e impedir el flujo adecuado del aire.
Este polvo no se puede eliminar simplemente golpeando el
filtro suavemente.
Para limpiar el filtro de la aspiradora:
► Apague la aspiradora, @ 14.2.
► Retire la batería, @ 13.2.
20 Limpieza
0000-GXX-8804-A1
1
2
3

0458-006-8621-A
57
español / EE.UU
21 Inspección y mantenimiento
► Gire el cesto del filtro (1) con la mano en sentido contrario
a las agujas del reloj hasta que se pueda extraer.
► Quite el cesto del filtro.
► Quite el filtro de papel (2).
► Retire las partículas de suciedad más gruesas del exterior
del filtro de papel. No rocíe nunca el filtro de papel o la
cesta del filtro con un limpiador a presión.
► Si el filtro de papel está dañado, sustitúyalo.
► Quitar la cesta del filtro.
► Enjuague el cesto de filtro con agua corriente.
► Espere a que el cesto de filtro se seque.
► Después de que la cesta del filtro se haya secado
completamente, inserte el filtro de papel de nuevo en la
cesta del filtro.
► Introduzca la cesta del filtro en la aspiradora y gire en el
sentido de las agujas del reloj hasta que encaje.
21.1 Inspección y mantenimiento de la aspiradora
ADVERTENCIA
Para reducir el riesgo de lesiones personales causadas por
una activación accidental, quite la batería antes de
inspeccionar la aspiradora o de realizar cualquier tarea de
mantenimiento, @ 8.1. Lleve a cabo únicamente las tareas
de mantenimiento que se describen en este manual. No hay
reparaciones que el usuario esté autorizado a llevar a cabo.
STIHL le recomienda que encargue las reparaciones a
concesionarios de servicio STIHL autorizados.
Un mantenimiento adecuado de la aspiradora incluye las
siguientes actividades:
► Inspeccionar periódicamente la aspiradora y los
accesorios de aspiración, sustituir los componentes que
estén gastados.
► Si las etiquetas de seguridad están gastadas o dañadas,
o faltan, solicitar a un concesionario de servicio STIHL
autorizado que las reemplace.
Si reclama cobertura de garantía para algún componente
que no se ha reparado o mantenido debidamente, es posible
que se le deniegue la garantía.
21 Inspección y mantenimiento
1
1
2
0000098909_001

0458-006-8621-A
58
español / EE.UU
22 Guía de solución de problemas
22.1 La aspiradora y la batería
22 Guía de solución de problemas
Siempre retire la batería antes de realizar cualquier trabajo de inspección, limpieza o mantenimiento.
Problema LEDs en la
aspiradora
Posible causa Solución
La aspiradora no
arranca cuando se
enciende.
No hay contacto
eléctrico entre la
aspiradora y la
batería.
► Retire la batería, @ 13.2.
► Inspeccione visualmente los contactos eléctricos del
compartimiento de la batería y de la batería.
► Vuelva a colocar la batería, @ 13.1.
1 LED destella
en verde.
La batería tiene poca
carga.
► Cargue la batería, @ 10.2.
1 LED se
ilumina en rojo.
La batería está
demasiado
caliente/demasiado
fría.
► Espere a que la batería se caliente o se enfríe
gradualmente hasta alcanzar una temperatura ambiente de
entre 50 °F y 68 °F aproximadamente (de 10 °C a 20 °C).
4 LED destellan
en rojo.
La batería no
funciona
correctamente.
► Retire la batería y colóquela de nuevo, @ 13.
► Encienda la aspiradora, @ 14.1
► Si los LED siguen destellando, no intente usar la máquina.
La batería no funciona correctamente, y es necesario
cambiarla.
3 LED
iluminados en
rojo.
Aspiradora
demasiado caliente.
► Deje que la aspiradora se enfríe.
3 LED destellan
en rojo.
Hay un fallo de
funcionamiento en la
aspiradora.
► Retire la batería y colóquela de nuevo, @ 13.
► Encienda la aspiradora, @ 14.1
► Si los LED siguen destellando, no intente usar la máquina.
La aspiradora tiene una avería y debe ser revisado por un
concesionario de servicio.
La aspiradora se
apaga durante la
operación.
1 LED se
ilumina en rojo.
La batería está
demasiado
caliente/demasiado
fría.
► Retire la batería, @ 13.2.
► Espere a que la aspiradora y batería se caliente / se enfríe
gradualmente hasta alcanzar una temperatura ambiente de
entre 50 °F y 68 °F aproximadamente (de 10 °C a 20 °C).
3 LED
iluminados en
rojo.
Aspiradora
demasiado caliente.

0458-006-8621-A
59
español / EE.UU
22 Guía de solución de problemas
22.2 Cargador
El tiempo de
funcionamiento es
demasiado corto.
La batería no está
completamente
cargada.
► Cargue la batería, @ 10.2.
Se alcanzó o se
superó la vida útil de
la batería.
► Lleve la batería a un concesionario de servicio STIHL
autorizado para que la revisen.
La batería no se
carga, aunque el
LED del cargador
está encendido en
verde.
1 LED se
ilumina en rojo.
La batería está
demasiado
caliente/demasiado
fría.
► Espere a que la batería se caliente o se enfríe
gradualmente hasta alcanzar una temperatura ambiente de
entre 50 °F y 68 °F aproximadamente (de 10 °C a 20 °C).
► Utilice el cargador en interiores, en un lugar seco. Para un
rendimiento óptimo, respete los rangos de temperatura
ambiente recomendados, @ 23.5.
La potencia de
aspiración es
demasiado baja.
El depósito está
lleno.
► Vacíe el depósito, @ 16.3.
La bolsa de filtro o el
filtro de papel están
sucios.
► Limpie el filtro,@ 20.2.
El accesorio o la
boquilla están
bloqueados.
► Limpie la aspiradora, @ 20.1.
Siempre retire la batería antes de realizar cualquier trabajo de inspección, limpieza o mantenimiento.
Problema LEDs en la
aspiradora
Posible causa Solución
Problema LED del cargador Causa Solución
La batería no se está
cargando.
LED encendido en
rojo.
La batería está demasiado
caliente/demasiado fría.
► Espere a que la batería se caliente o se enfríe
gradualmente hasta alcanzar una temperatura
ambiente de entre 50 °F y 68 °F
aproximadamente (de 10 °C a 20 °C).
El LED destella en
rojo.
No hay contacto eléctrico
entre el cargador y la
batería.
► Retire la batería y vuelva a insertarla en el
cargador.

0458-006-8621-A
60
español / EE.UU
22 Guía de solución de problemas
Cargador averiado. ► No utilice el cargador.
► Solicite a un concesionario de servicio STIHL
autorizado que revise el cargador.
La batería no funciona
correctamente.
► No use la batería.
► Lleve la batería a un concesionario de servicio
STIHL autorizado para que la revisen.
El cargador no lleva
a cabo ninguna
prueba automática.
El LED no se
ilumina en verde
durante
aproximadamente
1 segundo y luego
en rojo durante
1 segundo
aproximadamente.
El contacto eléctrico con el
cargador se ha
interrumpido brevemente.
► Retire el enchufe del tomacorriente.
► Espere 1 minuto.
► Inserte el enchufe en un tomacorriente.
Problema LED del cargador Causa Solución

0458-006-8621-A
61
español / EE.UU
23 Especificaciones
23.1 STIHL SEA 20.0
Para uso doméstico.
– Tipo de batería aprobado: gama AS de STIHL
– Peso sin accesorios ni batería: 2,4 lbs. (1,1 kg)
Rendimiento
– Capacidad máx. de admisión de aire: 36,23 cf/min
(1026 l/min)
– Aspiración máxima: 32 en H
2
O (80 mbar)
Dimensiones
– Largo: 18,3 in. (465 mm)
– Ancho: 4,4 in. (113 mm)
– Altura: 7,4 in. (187 mm)
– Diámetro interior de la manguera de aspiración: 1,1 pulg.
(29 mm)
– Capacidad del contenedor: 0.198 US gal. (0,75 l)
23.2 Batería STIHL serie AS
Tipo de cargador aprobado: STIHL series AL 1.
– Tecnología de la batería: ion de litio
– Voltaje: 10,8 V
– Capacidad nominal en Ah
1
: Véase la placa de
características
– Energía acumulada en Wh
2
: Véase la placa de
características
– Peso en kg: Ver placa de características
Si quiere ver una lista completa de los tiempos de carga
aproximados, visite www.stihl.com/charging-times.
Para obtener una lista completa de tiempos de
funcionamiento aproximados de la batería, visite
www.stihl.com/battery-life.
23.3 STIHL AL 1
– Voltaje de alimentación: consulte la placa de
características
– Corriente nominal: consulte la placa de características
– Frecuencia: consulte la chapa de identificación
– Corriente de carga: consulte la placa de características
– Potencia nominal: consulte la placa de características
– Aislamiento: consulte la placa de características
23.4 Límites de temperatura ambiente
ADVERTENCIA
Las temperaturas extremas pueden dañar la batería y
provocar que esta genere calor, se rompa, pierda líquido, se
incendie o explote, lo que podría causar lesiones
personales graves o fatales y daños materiales. Nunca
cargue, utilice o almacene la batería fuera de los límites de
temperatura ambiente especificados a continuación.
► No cargue la batería por debajo de - 4 °F (- 20 °C) ni por
encima de 122 °F (50°C).
► No utilice la aspiradora, la batería o el cargador por
debajo de - 4 °F (- 20 °C) ni por encima de 122 °F (50 °C).
► No almacene la aspiradora, la batería o el cargador por
debajo de - 4 °F (- 20 °C) ni por encima de 158 °F (70 °C).
23.5 Recomendaciones de temperatura ambiente
Para un rendimiento óptimo, respete los siguientes rangos
de temperatura ambiente para la aspiradora, la batería y el
cargador:
– Cargando: 41 °F a 86 °F (5 °C a 30 °C)
23 Especificaciones
1
Capacidad nominal calculada de acuerdo con CEI 61960. La
energía útil disponible para el operador será menor.
2
En la batería figura la energía acumulada de acuerdo con los datos
facilitados por el fabricante de las pilas. La energía útil disponible
para el operador será menor.

0458-006-8621-A
62
español / EE.UU
23 Especificaciones
– Uso: de 32 °F a 86 °F (de 0 °C a 30 °C)
– Almacenamiento: - 4 °F a 122 °F (- 20 °C a 50 °C)
Cargar, utilizar o almacenar la batería fuera de los rangos
de temperatura ambiente recomendados puede reducir su
rendimiento.
23.6 Símbolos en la aspiradora, en la batería y en el
cargador
23.7 Mejoramientos técnicos
STIHL tiene la filosofía de mejorar continuamente todos sus
productos. Como resultado de ello, periódicamente se
introducen cambios de diseño y mejoras. Por lo tanto, es
posible que algunos cambios, modificaciones y mejoras no
se describan en este manual. Si las características de
funcionamiento o la apariencia de su máquina difieren de las
descritas en este manual, comuníquese con el
concesionario STIHL para obtener la ayuda que requiera.
23.8 Declaración de cumplimiento con norma FCC
15
Este dispositivo cumple con la parte 15 de las normas de la
FCC.
El funcionamiento está sujeto a las dos condiciones dadas
a continuación:
– este dispositivo no deberá causar interferencias nocivas.
– este dispositivo deberá aceptar todas las interferencias
que reciba, incluso las interferencias que pudieran causar
un funcionamiento no deseado.
Nota: Este equipo ha sido sometido a prueba y se ha hallado
que cumple con los límites de los dispositivos digitales
Categoría B, según la parte 15 del Reglamento de la FCC.
Estos límites están diseñados para ofrecer protección
razonable contra las interferencias nocivas en una
instalación residencial. Este equipo genera, utiliza y puede
irradiar energía a radiofrecuencias y, si no se lo instala y
utiliza conforme a las presentes instrucciones, podría
causar interferencias nocivas para las comunicaciones por
radio. No obstante, no se ofrece garantía alguna de que la
interferencia no ocurrirá en una instalación particular.
Si este equipo llegara a causar interferencias perjudiciales
a la recepción de radio o televisión, lo cual puede
determinarse encendiendo y apagando el equipo, se le
Símbolo Significado
VVoltio
Hz Hercio
A Amperio
Ah Amperio-hora
WVatio
Wh Vatio-hora
Indica el botón de retención de potencia.
Marca de certificación/listado de UL
Los productos STIHL no se deben eliminar junto con
la basura doméstica, sino de acuerdo con las leyes y
normas locales, estatales y federales y como se
especifica en este manual, @ 25.1.
Corriente continua
Número de pilas y energía acumulada de acuerdo
con las especificaciones del fabricante de las pilas.
La cantidad de energía aprovechable será menor.
El sello RBRC indica que STIHL ha pagado por
adelantado el reciclaje de la batería
Lea el manual
Usar y guardar únicamente bajo techo y en recintos
secos.

0458-006-8621-A
63
español / EE.UU
23 Especificaciones
indica al usuario que intente corregir la interferencia por
medio de tomar una o más de las medidas siguientes:
– reoriente o cambie la ubicación de la antena de recepción,
– aumente la separación entre el equipo y el receptor,
– conecte el equipo a un tomacorriente de un circuito
diferente al cual está conectado el receptor,
– consulte a un concesionario de servicio STIHL autorizado
o a un técnico de radio/TV experto para recibir ayuda.
No cambie ni modifique este producto en modo alguno, a
menos que se le indique específicamente hacerlo en este
manual, puesto que podría anular la autoridad de usarlo.

0458-006-8621-A
64
español / EE.UU
24 Piezas y equipos de repuesto
24.1 Piezas de repuesto originales de STIHL
STIHL recomienda el uso de piezas de repuesto originales
de STIHL. Es posible identificar las piezas originales de
STIHL por el número de pieza STIHL, el logotipo de
y, en ciertos casos, el símbolo de piezas
STIHL. En las piezas pequeñas el símbolo puede aparecer
solo.
25.1 Eliminación de la aspiradora y del cargador
Los productos de STIHL no deben tirarse a la basura
doméstica ni desecharse excepto como se indica en este
manual.
► Lleve la aspiradora, el cargador, los accesorios y el
embalaje a un vertedero autorizado para reciclarlos y
contribuir con el cuidado del medio ambiente.
► Comuníquese con un concesionario de servicio STIHL
autorizado para obtener la información más actualizada
sobre eliminación y reciclado.
25.2 Reciclado de las baterías
ADVERTENCIA
Manipule las baterías descargadas/agotadas con cuidado.
Aunque parezca que están descargadas, las baterías de ion
de litio nunca se descargan completamente y pueden
generar una corriente de cortocircuito peligrosa. Si se dañan
o exponen a temperaturas extremas, pueden perder líquido,
generar calor, incendiarse o explotar.
► Respete todas las leyes y normas federales, estatales y
locales sobre eliminación de desechos.
► Comuníquese con un concesionario de servicio STIHL
autorizado para obtener la información más actualizada
acerca de la eliminación de desechos.
► Recicle las baterías agotadas rápidamente.
► Mantenga las baterías alejadas de los niños. No desarme
el producto ni lo incinere.
El sello de la RBRC indica que STIHL ya aportó dinero para
el reciclado de la batería. El sello de la RBRC lleva impreso
un número telefónico gratuito (1-800-822-8837) que le
permite acceder a información sobre lugares de reciclaje de
baterías y prohibiciones o restricciones respecto del
reciclado de baterías en su zona. También puede devolver
las baterías a cualquier concesionario de servicio STIHL
autorizado para reciclarlas gratuitamente.
26.1 Política de garantía limitada de STIHL
Incorporated
Este producto se vende sujeto a la Política de garantía
limitada de STIHL Incorporated, disponible en
www.stihlusa.com/warranty.html. También puede obtenerlo
de un concesionario de servicio STIHL autorizado o
llamando al 1-800-GO-STIHL (1-800-467-8445).
27.1 Marcas comerciales registradas
24 Piezas y equipos de repuesto
25 Eliminación
STIHL está comprometida con el desarrollo de
productos que protejan el medio ambiente. Este
compromiso no termina cuando el producto sale del
concesionario de servicio STIHL autorizado. STIHL
se asoció con la RBRC (Corporación de Reciclaje de
Baterías Recargables) para fomentar la recolección y
el reciclado de baterías de ion de litio STIHL en los
Estados Unidos y Canadá.
26 Garantía limitada
27 Marcas comerciales
STIHL
®
FARM BOSS
®
iCademy
®
MAGNUM
®

0458-006-8621-A
65
español / EE.UU
28 Direcciones
27.2 Marcas comerciales por ley común
Esta lista de marcas comerciales está sujeta a cambios.
Queda terminantemente prohibido todo uso de estas
marcas comerciales sin el consentimiento expreso por
escrito de ANDREAS STIHL AG & Co. KG, Waiblingen.
28.1 STIHL Incorporated
STIHL Incorporated
536 Viking Drive
P.O. Box 2015
Virginia Beach, VA
23452-2015
La combinación de colores
anaranjado-gris (Registros
en EE. UU. #2,821,860;
#3,010,057, #3,010,058,
#3,400,477; y #3,400,476)
MasterWrench Service
®
MotoMix
®
OILOMATIC
®
ROCK BOSS
®
STIHL Cutquik
®
AutoCut
®
STIHL DUROMATIC
®
YARD BOSS
®
STIHL Quickstop
®
STIHL ROLLOMATIC
®
STIHL WOOD BOSS
®
WOOD BOSS
®
TIMBERSPORTS
®
4-MIX™ HT Plus™
BioPlus™ STIHL PowerSweep™
Easy2Start™ STIHL Protech™
EasySpool™ STIHL MiniBoss™
ElastoStart™ STIHL MotoPlus 4™
Ematic™ Master Control Lever™
STIHL Precision Series™ STIHL OUTFITTERS™
FixCut™ STIHL PICCO™
Micro™ TrimCut™
Pro Mark™ STIHL M-Tronic™
Quad Power™ STIHL HomeScaper Series™
Quiet Line™ STIHL PolyCut™
STIHL Arctic™ STIHL RAPID™
STIHL Compact™ STIHL SuperCut™
STIHL Interchangeable
Attachment Series™
STIHL Multi-Cut HomeScaper
Series™
TapAction™ STIHL Territory™
TM
STIHL
Injection
28 Direcciones

www.stihl.com
*04580068621A*
0458-006-8621-A
0458-006-8621-A
englisch / spanisch USA
U
This
vacuum
, battery and charger contains,
or can disperse dust containing, chemicals
known to the State of California to cause
cancer, birth defects or other reproductive
harm.
WARNING
Este vacío, esta batería y este cargador
contiene o es capaz de esparcir polvos que
contienen sustancias químicas considera-
das por el Estado de California como caus-
antes de cáncer, defectos de nacimiento u
otra toxicidad reproductora.
ADVERTENCIA
-
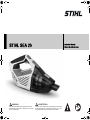 1
1
-
 2
2
-
 3
3
-
 4
4
-
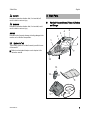 5
5
-
 6
6
-
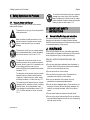 7
7
-
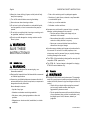 8
8
-
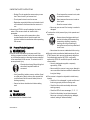 9
9
-
 10
10
-
 11
11
-
 12
12
-
 13
13
-
 14
14
-
 15
15
-
 16
16
-
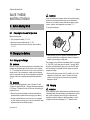 17
17
-
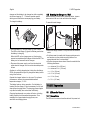 18
18
-
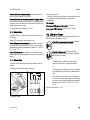 19
19
-
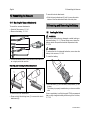 20
20
-
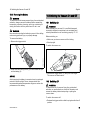 21
21
-
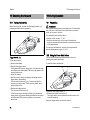 22
22
-
 23
23
-
 24
24
-
 25
25
-
 26
26
-
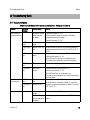 27
27
-
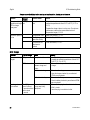 28
28
-
 29
29
-
 30
30
-
 31
31
-
 32
32
-
 33
33
-
 34
34
-
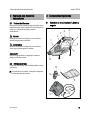 35
35
-
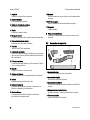 36
36
-
 37
37
-
 38
38
-
 39
39
-
 40
40
-
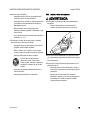 41
41
-
 42
42
-
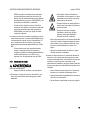 43
43
-
 44
44
-
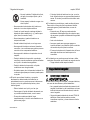 45
45
-
 46
46
-
 47
47
-
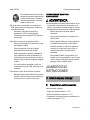 48
48
-
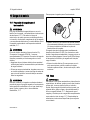 49
49
-
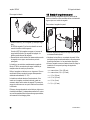 50
50
-
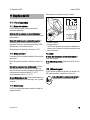 51
51
-
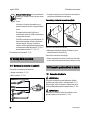 52
52
-
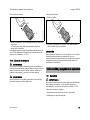 53
53
-
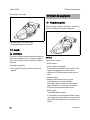 54
54
-
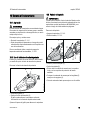 55
55
-
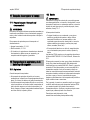 56
56
-
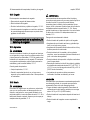 57
57
-
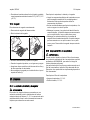 58
58
-
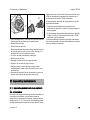 59
59
-
 60
60
-
 61
61
-
 62
62
-
 63
63
-
 64
64
-
 65
65
-
 66
66
-
 67
67
-
 68
68


STIHL SEA 20 Manual de usuario
- Categoría
- Aspiradoras
- Tipo
- Manual de usuario
en otros idiomas
- English: STIHL SEA 20 User manual
Artículos relacionados
-
STIHL AL 1 Manual de usuario
-
STIHL AL 101 El manual del propietario
-
STIHL AL 301-4 Manual de usuario
-
STIHL SE 33 Manual de usuario
-
STIHL SE 122 Manual de usuario
-
-
-
-
STIHL SGA 85 Manual de usuario
-