Cuisinart individuel sans fil RPB100E El manual del propietario
- Categoría
- Batidoras
- Tipo
- El manual del propietario

Instructions - Hinweise - Instructies - Istruzioni -
Instrucciones - instruções - instrukcji -инструкциями
RPB100E
BABYLISS SARL
99 avenue Aristide Briand
92120 Montrouge
France
www.cuisinart.eu
B IB-20/341
FAC 2020 / 10
CORDLESS ON THE GO BLENDER
BLENDER PORTABLE SANS FIL
RPB100E
Q172a
Блендер электрический
Производитель: BaByliss SARL
99 Авеню Аристид Бриан
92120, Монруж, Франция
Факс 33 (0) 1 46 56 47 52
Сделано в Китае
Дата производства (неделя, год): см. на товаре
1.
5.
6.
7.
8.
9.
4.
3.
2.

SOMMAIRE
1. Consignes de sécurité .............. 1
2. Introduction ....................... 6
3. Caractéristiques du produit ........ 6
4. Utilisation ......................... 6
5. Nettoyage & entretien ............. 8
Garantie internationale . . . . . . . . . . . . . . 72
CONTENTS
1. Safety cautions ..................... 9
2. Introduction ...................... 13
3. Product features .................. 13
4. Use .............................. 13
5. Cleaning & maintenance .......... 15
International Guarantee ............. 72
INHALTSVERZEICHNIS
1. Sicherheitshinweise ............... 16
2. Einleitung ........................ 21
3. Eigenschaften des Produkts ...... 21
4. Gebrauch ........................ 21
5. Reinigung & pege ............... 23
Internationale Garantie ............. 72
INHOUD
1. Veiligheidinstructies .............. 24
2. Inleiding ......................... 28
3. Product kenmerken ............... 29
4. Gebruik .......................... 29
5. Reiniging & onderhoud ............ 31
Internationale garantie .............. 72
CONTENUTO
1. Istruzioni di sicurezza ............. 32
2. Introduzione ..................... 36
3. Caratteristiche del prodotto ....... 37
4. Utilizzo .......................... 37
5. Pulizia & manutenzione ........... 39
Garanzia internazionale ............. 72
CONTENIDO
1. Consignas de seguridad ........... 40
2. Introducción ...................... 44
3. Características del producto ....... 44
4. Utilización ....................... 45
5. Limpieza & mantenimiento ........ 46
Garantía Internacional .............. 72
ÍNDICE
1. Instruções de segurança ........... 47
2. Introdução ........................ 51
3. Características do produto ......... 52
4. Utilização ........................ 52
5. Limpeza & manutenção ............ 54
Garantia internacional ............... 72
SPIS TREŚCI
1. Przepisy Bezpieczeństwa .......... 55
2. Wstęp ............................ 60
3. Specykacja produktu ............ 60
4. Użytkowanie ..................... 60
5. Czyszczenie & konserwacja ....... 62
Gwarancja międzynarodowa ........ 72
СОДЕРЖАНИЕ
1. Правила безопасности ........... 63
2. Вступление ....................... 68
3. Характеристики и комплектация
изделия .......................... 68
4. Порядок работы ................. 69
5. Уход и обслуживание ............. 71
Международная гарантия .......... 72

1
1. CONSIGNES DE SECURITE
TRADUCTIONS DES INSTRUCTIONS ORIGINALES
LIRE ATTENTIVEMENT TOUTES LES INSTRUCTIONS
AVANT D’UTILISER L’APPAREIL ET LES CONSERVER EN
LIEU SÛR EN VUE D’UNE CONSULTATION ULTÉRIEURE.
Toujours suivre les consignes de sécurité lors de l’utilisation
de cet appareil an d’éviter tout risque de blessure ou de
dommage à l’appareil. Cet appareil doit exclusivement être
utilisé comme décrit dans la présente notice. L’utilisation
incorrecte de l’appareil peut provoquer des blessures.
• Cet appareil est destiné à un usage strictement domestique
et n’est pas prévu pour être utilisé dans des applications telles
que : les coins cuisine réservés au personnel des magasins,
bureaux et autres environnements professionnels ; les
fermes; l’utilisation par les clients des hôtels, motels et autres
environnements à caractère résidentiel; les environnements
de type chambres d’hôtes.
• Pendant l’utilisation et le nettoyage, il convient de manipuler
les accessoires avec précaution.
• Faire preuve de prudence en versant des liquides chauds dans
le bol an d’éviter les projections dues aux jets de vapeur
soudains.
• Cet appareil n’est pas destiné à être commandé au moyen
d’une minuterie externe ou d’un système de contrôle à
distance.
• Cet appareil n’est pas prévu pour être utilisé par des personnes
présentant des capacités physiques, sensorielles ou mentales
réduites ou par des personnes dénuées d’expérience ou de
connaissances, à moins qu’une personne responsable de leur
sécurité les ait supervisées ou leur ait fourni des instructions
concernant l’utilisation de l’appareil.
• Il convient de surveiller en permanence les enfants pour

2
s’assurer qu’ils ne jouent pas avec ce produit.
• Cet appareil ne peut être utilisé par des enfants. Pendant et
après son utilisation, conserver l’appareil et son chargeur en
dehors de la portée des enfants.
• Toujours vérier que l’appareil et ses accessoires ne présentent
pas de traces apparentes de dommages avant leur utilisation.
Ne pas utiliser l’appareil s’il est endommagé ou s’il est tombé.
En cas de dommage ou de défaillance technique, prendre
contact avec le service clientèle de Cuisinart (consulter la
page 72 pour obtenir de plus amples informations).
• Ne pas utiliser l’appareil si le câble d’alimentation est
endommagé. S’il est endommagé, cesser immédiatement
toute utilisation de l’appareil et il doit être remplacé par
le fabricant. Retourner l’appareil au service à la clientèle
(consulter la page 72 pour obtenir de plus amples informations).
Le consommateur ne peut pas tenter de réparer lui-même
l’appareil.
• Ne jamais tirer sur le câble d’alimentation pour débrancher
l’appareil.
• Ne pas enrouler le câble d’alimentation autour du corps de
l’appareil pendant ou après son utilisation.
• Cet appareil peut rester branché à l’alimentation électrique
en toute sécurité lorsqu’il n’est pas utilisé an que ses
batteries soient chargées en permanence. Cependant, il doit
être débranché avant d’être assemblé, démonté ou nettoyé
ou lorsqu’il n’est pas utilisé pendant une période prolongée.
• Cet appareil contient un jeu de batteries lithium-ion
rechargeables qui ne peuvent être retirées en vue de leur
chargement et remplacées.
• Les bornes d’alimentation ne peuvent être court-circuitées.
• AVERTISSEMENT: pour recharger le jeu de batteries, utiliser
exclusivement l’unité de chargement amovible fournie
avec cet appareil. Ce symbole
indique que l’appareil

3
dispose d’un câble d’alimentation amovible en vue de son
chargement.
• Ce produit est conforme à la législation et aux normes
européennes pertinentes applicables à ce type et à cette
classe d’appareils. Notre entreprise est certiée ISO9001:2015,
une norme qui évalue en permanence la performance de
notre système de gestion de la qualité. En cas de questions
concernant la sécurité et la conformité de nos produits, merci
de prendre contact avec le service clientèle (consulter la page
72 pour obtenir de plus amples informations).
• AVERTISSEMENT: éviter tout contact avec les parties
mobiles. Pendant le fonctionnement de l’appareil, garder les
mains, cheveux, vêtements ainsi que les spatules et autres
ustensiles à distance des accessoires an de réduire le risque
de blessure et/ou de dommage à l’appareil. Une spatule peut
uniquement être utilisée lorsque l’appareil est éteint.
• AVERTISSEMENT: ne pas placer les doigts près des
accessoires. Pour déloger des aliments, s’assurer au préalable
que l’appareil soit bien éteint.
• Le chargeur doit être branché dans une prise électrique située
à distance de l’évier ou des surfaces chaudes.
• Ne pas utiliser de rallonge. Brancher le chargeur directement
dans une prise électrique.
• Ne pas charger l’appareil dans une prise extérieure.
• An d’éviter les chocs électriques, ne pas plonger l’appareil
dans de l’eau ou dans tout autre liquide. Seuls les accessoires
de cet appareil ont été conçus pour être immergés dans
de l’eau ou dans un autre liquide. Ne jamais immerger les
autres éléments de cet appareil. Si le blender portable tombe
dans un liquide, le retirer immédiatement du liquide, puis le
nettoyer et le sécher soigneusement avant de poursuivre.
• Retirer la lame du bol avant de procéder au nettoyage.

4
• Ne pas remplir le bol gradué à l’excès. Ne pas dépasser le
niveau maximum.
• Ne pas actionner le blender portable à vide car cela risquerait
d’endommager le moteur.
• Ne pas mixer de liquides chauds dans le bol.
• Ne pas plonger l’appareil dans de l’eau ou dans tout autre
liquide.
• ATTENTION: manipuler la lame avec précaution. Les lames
sont tranchantes et peuvent provoquer des blessures. NE PAS
tenter de retirer les lames de leur dispositif.
N.B.: la lame en acier inoxydable ne peut être retirée du
dispositif noir.
AVERTISSEMENT : les sachets en polyéthylène
entourant l’appareil ou l’emballage peuvent être
dangereux. Pour éviter tout danger de suocation,
conserver ces sachets hors de la portée de bébés et
des enfants. Ces sachets ne sont pas des jouets.
MISE AU REBUT DE LA BATTERIE
Afin de réduire les risques pour la santé et
l’environnement à la n du cycle de vie de ce produit,
la législation relative aux déchets d’équipements
électriques et électroniques (DEEE) et la directive
concernant les déchets de piles et accumulateurs imposent au
consommateur de déposer ce produit dans un centre de collecte
adéquat qui se chargera de l’envoyer en vue de l’élimination de
sa batterie et de son recyclage adéquat. Prendre contact avec les
autorités locales pour obtenir de plus amples renseignements à
propos de son recyclage et de sa mise au rebut en toute sécurité
dans votre région.
Le symbole gurant sur le produit ou son emballage indique
que cet appareil ne peut être traité comme un déchet ménager.
Au contraire, celui-ci doit être déposé dans un point de collecte

5
adéquat dédié au recyclage d’équipements électriques et
électroniques. Contribuer à éviter de potentielles conséquences
néfastes pour l’environnement et la santé publique qui
pourraient découler d’un traitement des déchets inapproprié
de ce produit. Pour obtenir de plus amples informations
concernant le recyclage de ce produit, prendre contact avec
votre administration locale ou votre service local de traitement
des déchets ménagers.
Sécurité pendant l’utilisation
Le chargeur doit être branché à une prise électrique située à
distance de l’évier ou d’une surface chaude.
• Ne pas utiliser de rallonge. Brancher le chargeur directement
dans une prise électrique.
• Ne pas charger l’appareil dans une prise extérieure.
• An d’éviter les chocs électriques, ne pas plonger
l’appareil dans de l’eau ou dans tout autre liquide. Si le
socle d’alimentation tombe dans un liquide, le retirer
immédiatement du liquide, puis le nettoyer et le sécher
soigneusement avant de poursuivre.
• Utiliser le blender portable sur une surface robuste, propre
et sèche.
• Ne pas placer la lame sur le socle du blender portable sans le
bol.
• Avant d’utiliser l’appareil, s’assurer que le dispositif de la lame
est bien xé au bol.
• Ne pas verser de boissons gazeuses dans le bol.
• Le bol ne convient pas au four à micro-ondes.
• Remettre le couvercle de protection sur la lame avant de la
ranger.

6
2. INTRODUCTION
Félicitations ! Vous venez d’acheter le blender portable Cuisinart.
Cuisinart fabrique du matériel de cuisine haut de gamme depuis plus de 30 ans. Tous les produits
Cuisinart se distinguent par leur durée de vie exceptionnellement longue et sont conçus pour
orir, jour après jour, d’excellentes performances et une grande facilité d’utilisation.
Pour en savoir plus sur nos produits ou découvrir nos recettes, consulter le site Internet
www.cuisinart.eu.
3. CARACTÉRISTIQUES DU PRODUIT (voir couverture)
1. Bol
2. Lame
3. Indicateurs de charge de la batterie
4. Bouton marche / arrêt
5. Socle d’alimentation
6. Port de charge (non illustré)
7. Couvercle pour boire
8. Couvercle de protection de la lame
9. Câble USB et chargeur
4. UTILISATION
Avant la première utilisation, il est recommandé de nettoyer l’appareil à l’aide d’un chiffon
propre et humide afin d’éliminer les saletés ou la poussière. Sécher minutieusement l’appareil à
l’aide d’un chiffon doux absorbant. Nettoyer soigneusement le bol, le dispositif de la lame et le
couvercle pour boire dans de l’eau chaude savonneuse.
N.B.: ne pas utiliser de détergents abrasifs, d’ustensiles à récurer ou d’éponges à récurer.
A. CHARGER LE BLENDER PORTABLE
Les batteries de votre blender portable n’ont pas été chargées complètement. Avant de l’utiliser,
elles doivent être chargées jusqu’à ce que les trois voyants bleus soient allumés. Une fois chargées,
il pourra préparer environ 8 smoothies en fonction de la recette et de la dureté des ingrédients
utilisés. Le blender portable sera complètement chargé au bout de 2 heures environ.
N.B.: pour charger l’appareil, insérer la fiche Micro USB du câble d’alimentation dans le port de
charge situé à l’arrière de l’appareil. Insérer la fiche USB dans le chargeur, puis brancher ce dernier
dans une prise de courant.
Indicateurs de charge de la batterie
Les voyants bleus clignotent lorsque la batterie est en charge. Lorsque les trois voyants sont
allumés, cela signifie que la batterie est complètement chargée et prête à être utilisée. Les voyants
s’éteignent à mesure que la batterie se décharge. La batterie doit être rechargée lorsque le dernier
voyant clignote. Si la batterie est complètement déchargée, l’appareil ne fonctionnera pas.
N.B.: le blender portable ne peut être utilisé lorsqu’il est branché et en charge.

7
Pour optimiser les performances de chargement de votre blender portable, nous vous
recommandons d’utiliser exclusivement le câble USB et le chargeur fournis avec l’appareil.
B. FONCTIONNEMENT
• S’assurer que le blender portable est partiellement chargé en suivant les instructions de la
sectionA. Si le blender portable est totalement déchargé, il ne peut fonctionner en étant branché
sur secteur. Il conviendra alors d’attendre jusqu’à ce qu’il dispose d’une charge suffisante pour
être utilisé.
• Déposer les ingrédients dans le bol.
N.B.: attention à ne pas dépasser le niveau de remplissage maximum. Pour obtenir un résultat
optimal, commencer par mixer les ingrédients les plus durs (glaçons, fruits surgelés, etc.) et
terminer par les ingrédients mous et les liquides. Il est recommandé de couper au préalable les
aliments en morceaux de 3 cm pour obtenir un résultat homogène. Dans le cas d’ingrédients durs,
comme des carottes, le bol ne peut être rempli à plus de la moitié.
• Fixer le dispositif noir de la lame sur le bol en présentant la lame vers le bas dans le bol. Tourner
le dispositif dans le sens des aiguilles d’une montre jusqu’à ce qu’il soit bien serré.
N.B.: éviter de toucher les lames. Manipuler le dispositif en le tenant par la partie en plastique
noir.
• S’assurer que le socle d’alimentation est posé sur une surface plane et propre. Disposer le bol sur
le socle d’alimentation avec le dispositif noir au fond et le faire pivoter pour le verrouiller. Un clic
confirmera que le dispositif est bien en place. S’assurer que le dispositif est bien verrouillé avant
d’utiliser le blender portable.
N.B.: si le bol et le dispositif de la lame ne sont pas fixés correctement, le blender portable ne
fonctionnera pas.
• Pour mettre l’appareil en marche, appuyer une fois sur le bouton marche / arrêt. Les voyants
LED s’allument et le moteur se met en marche. Pour éteindre l’appareil, rappuyer sur le bouton
marche / arrêt.
N.B.: le blender portable ne peut pas fonctionner pendant plus d’une minute en continu. Au bout
d’une minute, il s’arrêtera automatiquement. Si, pour votre recette, il doit fonctionner pendant
plus d’une minute, interrompre le fonctionnement pendant quelques secondes et le remettre en
marche.
• Une fois les ingrédients mixés, retirer le bol du socle en le faisant pivoter dans le sens inverse des
aiguilles d’une montre pour le déverrouiller.
N.B.: ne pas essayer de retirer le bol pendant que le moteur tourne. Si le bol est déverrouillé
pendant le fonctionnement de l’appareil, celui-ci se coupera automatiquement.
• Disposer le bol à la verticale sur la surface, avec le dispositif noir de la lame en haut. Tourner le
dispositif de la lame dans le sens inverse des aiguilles d’une montre pour le retirer.
N.B.: attention à ne pas toucher les lames, elles sont très tranchantes. Manipuler le dispositif en le
tenant par la partie en plastique noir.
N.B.: la lame en acier inoxydable ne peut être retirée du dispositif noir.
• Le dispositif de la lame peut être lavé immédiatement ou rangé en toute sécurité grâce au
couvercle de protection en attendant d’être lavé. Placer simplement le couvercle de protection
sur le dispositif de la lame et tourner dans le sens des aiguilles d’une montre pour le verrouiller.
N.B.: toujours replacer le couvercle de protection sur le dispositif de la lame avant de le ranger.
• Au besoin, fixer le couvercle pour boire sur le bol en le tournant dans le sens des aiguilles d’une
montre jusqu’à ce qu’il soit bien en place. S’assurer qu’il soit bien bien fermé avant de déposer le
bol dans un sac de voyage.

8
C. CONSEILS ET ASTUCES
• Pour obtenir un résultat optimal lors de l’utilisation du blender portable, commencer par mixer
les ingrédients les plus durs (glaçons, fruits surgelés, etc.) et terminer par les ingrédients mous
et les liquides.
• Il est recommandé de couper la plupart des aliments en morceaux de 3 cm pour obtenir un
résultat homogène.
• Si des aliments restent collés à la paroi du bol pendant la préparation, éteindre le blender
portable, retirer le bol et le secouer délicatement. Ensuite, replacer le bol et poursuivre.
• Pour mixer des préparations plus épaisses, tenir le haut du bol afin d’éviter les secousses.
• Une fois l’opération terminée, retirer le bol et le déposer sur une surface avec le dispositif de la
lame vers le haut. Tapoter délicatement le bol pour éviter de renverser au moment de retirer les
lames.
• Certaines recettes nécessitent plus d’une minute de préparation. Dans ce cas, redémarrer tout
simplement le blender portable.
5. NETTOYAGE & ENTRETIEN
• Nettoyer soigneusement l’appareil après chaque utilisation.
• Retirer la lame et nettoyer l’unité principale uniquement à l’aide d’une éponge ou d’un chiffon
humide.
• Ne pas utiliser de détergents abrasifs pouvant rayer la surface de l’appareil.
• Laver la lame à la main dans de l’eau chaude savonneuse.
• Le bol, le couvercle de protection de la lame et le couvercle pour boire peuvent être lavés dans
de l’eau chaude savonneuse ou dans le panier supérieur du lave-vaisselle.
ATTENTION : manipuler la lame avec précaution. Les lames sont tranchantes et peuvent
provoquer des blessures. NE PAS tenter de retirer les lames de leur dispositif.

9
1. SAFETY CAUTIONS
ORIGINAL INSTRUCTIONS
CAREFULLY READ ALL THE INSTRUCTIONS BEFORE
USING THE APPLIANCE AND KEEP IN A SAFE PLACE
FOR FUTURE REFERENCE.
Always follow these safety cautions when using this appliance
to avoid personal injury or damage to the appliance. This
appliance should be used only as described within this
instruction book. There is a risk of injury if the product is
misused.
• This appliance is for domestic use only and is not intended
to be used in applications such as: staff kitchen areas in
shops, offices and other working environments; farm houses;
by customers in hotels, motels and other residential type
environments; bed and breakfast type establishments.
• Care should be taken when handling the attachments, during
use and cleaning.
• Be careful if hot liquid is poured into the blending jug as it
can be ejected out due to sudden steaming.
• The appliance is not intended to be operated by means of
external timer or separate remote control system.
• This appliance is not intended for use by persons with reduced
physical, sensory or mental capabilities, or lack of experience
and knowledge, unless they have been given supervision
or instruction concerning use of the appliance by a person
responsible for their safety.
• Children should always be supervised to ensure that they do
not play with this product.
• This appliance shall not be used by children. Keep the
appliance and power adapter out of reach of children during
and after use.
• Always inspect the appliance and appliance accessories

10
before use for noticeable signs of damage. Do not use if
damaged, or if the appliance has been dropped. In the event
of damage, or if the appliance develops a fault, contact the
Cuisinart Customer Care Line (see “International guarantee”
on page 72).
• Do not use the appliance if the lead is damaged. In the event
of lead damage, discontinue use immediately. If the lead is
damaged it must be replaced by the manufacturer. Return
the appliance to the Customer Care Centre (see “International
guarantee” on page 72). No repair must be attempted by the
consumer.
• Never pull the plug out of the mains socket by the lead.
• Do not wrap the lead around the main body of the appliance
during or after use.
• The appliance is safe to be left plugged into the electrical
supply when not in use to ensure the batteries are always
charged. It should however be unplugged before assembling,
disassembling, cleaning or if not being used for a prolonged
period of time.
• This product contains a Lithium Ion rechargeable battery pack
that is not to be removed from the appliance for charging.
The batteries in this appliance are non-replaceable.
• The supply terminals are not to be short circuited.
• WARNING: For the purposes of recharging the battery pack,
only use the detachable charging supply unit provided
with this appliance. This symbol
indicates there is a
detachable power supply for means of charging.
• This product complies fully with all appropriate EU and UK
legislation and the standards relevant to this type and class
of appliance. We are an ISO9001:2015 certified company
that continually evaluates our Quality Management System
performance. If you have any queries regarding product
safety and compliance, please contact our Customer Services

11
Department (see “International guarantee” on page 72).
• WARNING: Avoid contact with moving parts. Keep hands,
hair, clothing, as well as spatulas and other utensils away
from attachments during operation to reduce risk of injury to
persons, and/or damage to the appliance. A spatula may be
used, but only when the unit is not operating.
• WARNING: Do not put fingers near the attachments. To
dislodge food ensure mixer is not in operation first.
• The charger should be plugged into an electrical socket away
from a sink or any hot surface.
• Do not use an extension cord. Plug the charger directly into
an electrical socket.
• Do not charge the unit using an outdoor socket.
• To protect against electrical shock, do not put the main
unit in water or other liquids. Only the attachments, of this
appliance, have been designed for submersion in water or
other liquids. Never submerge any other portion of this unit.
If the hand mixer falls into liquid, remove immediately, clean
and dry the unit thoroughly before continuing.
• Always remove blade assembly from the cup before cleaning.
• Do not overload the blending cup. Observe the maximum fill
line.
• Do not run the blender empty - this will damage the motor.
• Do not blend hot liquids in the blending cup.
• Do not put the main unit in water or other liquids
• CAUTION: Handle the blade carefully. The blades are sharp
and may cause injury. DO NOT attempt to remove blades
from assembly.
N.B. The stainless steel blade cannot be removed from the
black blade assembly.

12
WARNING: Polythene bags over the product or
packaging may be dangerous. To avoid danger of
suocation, keep away from babies and children. These
bags are not toys.
BATTERY DISPOSAL
To minimise hazards to health and the environment at
the end of this product’s life, laws dealing with Waste
Electrical and Electronic Equipment (WEEE) and The
Waste Battery Directive require you to dispose of this product at a
suitable collection facility where it will be sent in order to remove
the batteries and for appropriate recycling. Please contact your
local authorities for more details on recycling and safe disposal
of these in your area.
The symbol on the product or on its packaging indicates that
this product may not be treated as household waste. Instead it
should be handed over to the applicable collection point for the
recycling of electrical and electronic equipment. By ensuring this
product is disposed of correctly, you will help prevent potential
negative consequences for the environment and human health,
which could otherwise be caused by inappropriate waste
handling of this product. For more detailed information about
the recycling of this product, please contact your local council
oce or your household waste disposal service.
Safety During Use
• The charger should be plugged into an electrical socket away
from a sink or any hot surface.
• Do not use an extension cord. Plug the charger directly into
an electrical socket.
• Do not charge the unit using an outdoor socket.
• To protect against electrical shock, do not put the main unit
in water or other liquids. If the power base falls into liquid,
remove immediately, clean and dry the unit thoroughly

13
before continuing.
• Always use the blender on a clean, sturdy and dry surface.
• Do not place the blade onto the blender base without the
blending cup attached.
• Make sure the blade assembly is tightly attached to the
blending cup before use
• Never use carbonated beverages in the blending cup
• The blending cup is not suitable for use in a microwave.
• Always store the blade using the blade protection cap.
2. INTRODUCTION
Congratulations on you purchase of this Cuisinart Blender.
For over 30 years Cuisinart’s aim has been to produce the very finest kitchen equipment. All
Cuisinart products are engineered for exceptionally long life and designed to be easy to use as
well as to give excellent performance day after day.
To learn more about our products and for recipe ideas visit our website www.cuisinart.eu
3. PRODUCT FEATURES (refer to cover)
1. Blending cup
2. Blade assembly
3. Indicator lights
4. On/Off switch
5. Power base
6. Charging port (not shown)
7. Drinking lid
8. Blade protection cover
9. USB lead and adaptor
4. USE
Before rst use, we recommend that you wipe the main unit with a clean, damp cloth to remove
any dirt or dust. Dry it thoroughly with a soft absorbent cloth. Carefully clean the blending cup,
blade assembly and drinking lid in warm soapy water.
N.B. Do not use abrasive cleaners, hard implements or a scourer.

14
A. CHARGING THE BLENDER
The batteries in your Blender have not been fully charged. Before using, the batteries must be
charged until all three blue lights are illuminated. With a full charge, your Blender will make
around 8 smoothies, but this depends on the recipe and the hardness of the ingredients used.
Your Blender will be fully charged in approximately 2 hours.
N.B. To charge the main unit, insert the Micro USB end of charging lead into the charging port at
the back of the main unit. Plug the USB end directly into the adapter plug and then into a mains
supply outlet.
Battery Life Indicator Lights
The indicator lights will ash blue, when the battery is being charged. When all three lights are
illuminated, this means the battery is fully charged and is then ready to use. As the battery starts
to run down, the indicator lights will turn o. The battery will need to be recharged when the last
indicator light is ashing. If the battery has completely run down on the unit, it will not operate.
N.B. The Blender cannot be used while it is plugged in and charging.
To ensure the best performance when charging your Blender, we recommend only using the USB
lead and charging adaptor supplied with this appliance.
B. OPERATION
• Ensure your blender has some charge using the instructions in Section A. If the blender has no
charge, it cannot be operated by plugging into the mains power. You will need to wait until it has
sucient charge to perform the blending task.
• Put the ingredients into the blending cup.
N.B. Be careful not to exceed the maximum ll line. For best results, always put the hardest
ingredients into the cup rst (ice cubes, frozen fruit, etc) and nish with the softer ingredients and
liquids. We recommend cutting foods into 3cm pieces to achieve the most uniform result. If you
are using harder ingredients such as carrots, the blending jug shouldn’t be lled past half way.
• Attach the black blade assembly to the cup with the blade facing downwards into the cup. Twist
the blade assembly clockwise until tightened.
N.B. Take care not to touch the blades – always handle using black plastic part of the blade
assembly.
• Ensure the power base is sitting on a clean, dry surface. Place the blending cup onto the power
base with the black blade assembly at the bottom and turn to lock into place. You will feel a click
when the cup is securely in place. Always ensure it is locked into place before using the blender.
N.B. If the blade assembly and cup are not properly attached, the blender will not operate.
• To operate, press the power button once. The LED lights are displayed and the motor will start.
Press the power button again to turn the unit o.
N.B. The Blender cannot operate for more than 1 minute, After 1 minute of blending it will
automatically stop. If your recipe requires more than a minute of blending, simply pause for a few
seconds and then start the blender again.
• Once your ingredients are blended, remove the blending cup from the base by twisting the
blending cup anti clockwise to unlock.
N.B. Do not try to remove the blending cup whilst the motor is still running. If the cup is unlocked
during blending, the blender will automatically stop.
• Place the blending cup upright on the surface with the black blade assembly at the top. Twist the
black blade assembly anti-clockwise to remove.

15
N.B. Take care not to touch the blades- they are very sharp. Always handle using the black plastic
part of the blade assembly.
N.B. The stainless steel blade cannot be removed from the black blade assembly.
• The blade assembly can be washed immediately or stored safely by using the clear blade
protection cap until you are able to wash the blade. Simply place the blade protection cap over
the blade assembly and twist clockwise until it lock into place.
N.B. Always use the blade protection cap when storing the blade assembly.
• If required, attach the drinking lid to the blending cup by twisting clockwise until it feels tight.
Ensure the drinking opening cap is securely closed before placing in a bag for travel.
C. HINTS & TIPS
• For best results when using your Blender, always put the hardest ingredients into the cup rst
(ice cubes, frozen fruit, etc) and nish with the softer ingredients and liquids.
• It is recommended that most foods be cut into 3cm pieces to achieve the most uniform result.
• If food sticks to the sides of the cup when blending, stop the blender, remove the cup and gently
shake the cup. Replace and blend again.
• When blending thicker mixtures, lightly hold down the top of the cup to prevent jumping on
the surface.
• After blending, remove the cup and place on a surface so that the blade assembly is on the top.
Gently tap the cup a few times to prevent any spillage which may occur when removing the
blades.
• Some recipes may require more than a minute of blending. Simply start the blender again,
5. CLEANING & MAINTENANCE
• Always clean the appliance thoroughly after use.
• Remove the blade and clean the main unit with a sponge or damp cloth only.
• Do not use abrasive cleaners that could scratch the surface.
• Wash the blade by hand in warm soapy water.
• The blending cup, blade protection cover and drinking lid can be washed in warm soapy water
or cleaned on the top rack of the dishwasher.
CAUTION: Handle the blade carefully. The blades are sharp and may cause injury. DO NOT
attempt to remove blades from cutting assembly.

16
1. SICHERHEITSHINWEISE
ÜBERSETZUNG DER ORIGINALFASSUNG DER
GEBRAUCHSANLEITUNG
LESEN SIE VOR DEM GEBRAUCH DES GERÄTS SORGFÄLTIG
ALLE ANWEISUNGEN DURCH UND BEWAHREN SIE SIE GUT
AUF, UM EVENTUELL SPÄTER ETWAS NACHZULESEN.
Beachten Sie bei der Verwendung dieses Geräts stets diese
Sicherheitshinweise, um Verletzungen oder Schäden am
Gerät zu vermeiden. Dieses Gerät sollte nur so verwendet
werden, wie es in dieser Anleitung beschrieben ist. Es besteht
Verletzungsgefahr, wenn das Produkt nicht korrekt verwendet
wird.
• Dieses Gerät ist ausschließlich für den Hausgebrauch bestimmt
und nicht geeignet für die Verwendung in Einrichtungen wie:
Küchenbereiche, die für Mitarbeiter in Geschäften, Büros und
anderen professionellen Umgebungen vorgesehen sind;
landwirtschaftliche Betriebe; die Nutzung durch Gäste in
Hotels, Motels und anderen Wohneinrichtungen; die Nutzung
in Bed-and-Breakfastähnlichen Einrichtungen.
• Beim Umgang mit den Rühraufsätzen ist sowohl während des
Gebrauchs als auch bei der Reinigung Vorsicht geboten.
• Seien Sie vorsichtig, wenn Sie heiße Flüssigkeiten
in das Mixgefäß gießen, sie könnte durch plötzliche
Dampfentwicklung herausspritzen.
• Das Gerät ist nicht für die Bedienung mittels externer
Zeitschaltuhr oder separater Fernbedienung vorgesehen.
• Dieses Gerät darf nicht von Personen mit eingeschränkten
physischen, sensorischen oder mentalen Fähigkeiten oder
von Personen ohne jede Erfahrungs- oder Kenntnisgrundlage
verwendet werden, wenn sie nicht dabei beaufsichtigt oder
vorher über den sicheren Gebrauch des Geräts unterrichtet
werden und die mit der Verwendung im Zusammenhang
stehenden Risiken begreifen.

17
• Kinder sollten immer beaufsichtigt werden, damit sie nicht mit
diesem Produkt spielen.
• Dieses Gerät sollte nicht von Kindern verwendet werden.
Bewahren Sie das Gerät und den Ladestecker während und
nach dem Gebrauch außerhalb der Reichweite von Kindern
auf.
• Das Gerät und das Zubehör vor dem Gebrauch immer auf
oensichtliche Anzeichen einer Beschädigung untersuchen.
Verwenden Sie das Gerät nicht, wenn es beschädigt oder
heruntergefallen ist. Im Fall einer Beschädigung oder wenn das
Gerät nicht mehr korrekt funktioniert, nehmen Sie Kontakt zum
Cuisinart Kundendienst auf (siehe “Internationale Garantie” auf
S. 72).
• Das Gerät nicht verwenden, wenn das Kabel beschädigt ist. Die
Verwendung sofort einstellen, wenn das Netzkabel beschädigt
wird. Wenn das Kabel beschädigt ist, muss es vom Hersteller
ersetzt werden. Senden Sie das Gerät an den Kundendienst
zurück (siehe „Internationale Garantie“ auf S. 72). Der Benutzer
darf keinesfalls versuchen, das Gerät selbst zu reparieren.
• Ziehen Sie den Netzstecker niemals am Kabel aus der
Steckdose.
• Das Kabel während oder nach dem Gebrauch nicht um das
Gerät wickeln.
• Wenn das Gerät nicht benutzt wird, kann es bedenkenlos
am Stromnetz angeschlossen bleiben, um zu gewährleisten,
dass die Akkus immer aufgeladen sind. Er sollte jedoch vom
Netzstrom entfernt werden, bevor es montiert, auseinander
genommen oder gereinigt werden soll bzw. längere Zeit nicht
benutzt wird.
• Dieses Produkt enthält ein wiederaufladbares Lithium-
Ionen-Akkupack, das nicht zum Aufladen aus dem Gerät
entfernt werden kann. Die Akkus in diesem Gerät sind nicht
austauschbar.

18
• Die Anschlusskontakte dürfen nicht kurzgeschlossen werden.
• ACHTUNG: Verwenden Sie zum Aufladen des Akkupacks
nur den mit diesem Gerät mitgelieferten abnehmbaren
Ladestecker. Dieses Symbol
weist darauf hin, dass eine
abnehmbare Stromzufuhr zum Auaden vorhanden ist.
• Dieses Produkt entspricht in vollem Umfang allen einschlägigen
Rechtsvorschriften der EU und Großbritanniens und den für
diesen Gerätetyp und diese Geräteklasse relevanten Normen.
Wir sind ein nach ISO9001:2015 zertiziertes Unternehmen,
das die Leistung unseres Qualitätsmanagementsystems
kontinuierlich bewertet. Wenn Sie Fragen zur Produktsicherheit
und Konformität haben, wenden Sie sich bitte an unseren
Kundendienst (siehe “Internationale Garantie” auf S. 72).
• ACHTUNG: Vermeiden Sie es, Teile zu berühren, während sie
sich bewegen. Um Verletzungsrisiken bei Menschen und/oder
Schäden am Gerät zu vermeiden, sollten Sie Haar und Kleidung
sowie auch Spatel oder andere Küchenutensilien während des
Betriebs in sicherer Entfernung der Rühraufsätze halten. Ein
Spatel kann verwendet werden, jedoch nur, wenn das Gerät
nicht in Betrieb ist.
• ACHTUNG: Achten Sie darauf, dass Ihre Finger nicht in die
Nähe der Rühraufsätze geraten. Vergewissern Sie sich, dass der
Mixer nicht in Betrieb ist, bevor Sie Nahrungsmittel entfernen.
• Der Ladestecker sollte an eine Steckdose in sicherer Entfernung
von Waschbecken oder heißen Oberächen angeschlossen
werden.
• Kein Verlängerungskabel verwenden. Stecken Sie den
Ladestecker direkt in eine Steckdose.
• Laden Sie das Gerät nicht an einer Steckdose im Freien auf.
• Zum Schutz vor Stromschlägen darf das Hauptgerät nicht in
Wasser oder andere Flüssigkeiten getaucht werden. Nur die
Rühraufsätze dieses Geräts sind für das Eintauchen in Wasser
oder andere Flüssigkeiten konzipiert. Tauchen Sie niemals

19
einen anderen Teil dieses Geräts in Wasser oder andere
Flüssigkeiten ein. Wenn der Handmixer in Flüssigkeit fällt,
sofort herausholen und das Gerät gründlich reinigen und
trocknen, bevor Sie fortfahren.
• Entfernen Sie den Klingensatz vor dem Reinigen immer aus
dem Zubereitungsgefäß.
• Das Mixgefäß nicht zu sehr befüllen. Beachten Sie die maximale
Fülllinie.
• Betreiben Sie den Mixer nicht ohne Inhalt - der Motor könnte
beschädigt werden.
• Mixen Sie keine heißen Flüssigkeiten im Mixbecher.
• Die Haupteinheit nicht in Wasser oder andere Flüssigkeiten
geben.
• ACHTUNG: Gehen Sie vorsichtig mit dem Messer um. Die
Klingen sind scharf und können Verletzungen verursachen.
VERSUCHEN SIE NICHT, die Klingen aus der Halterung zu
entfernen.
HINWEIS: Die Edelstahlklinge kann nicht von der schwarzen
Klingenhalterung des Moduls entfernt werden.
ACHTUNG: Plastiktüten über Produkt oder Verpackung
können gefährlich sein. Von Babys und Kleinkindern
fernhalten, um Erstickungsgefahr zu vermeiden. Diese
Tüten sind kein Spielzeug.
ENTSORGEN DES AKKUS: Um die Gefahren für die
Gesundheit und die Umwelt am Ende der Lebensdauer
dieses Produkts zu minimieren, schreiben die
Rechtsvorschriften zu Elektro- und Elektronik-Altgeräten
(WEEE) und die Altbatterierichtlinie vor, dass Sie dieses Produkt
bei einer geeigneten Sammelstelle entsorgen müssen, von wo
es an eine geeignete Stelle weitergeleitet wird, um die Akkus
zu entfernen und einem angemessenen Recycling zuzuführen.
Erkundigen Sie sich bitte bei den zuständigen Behörden über

20
Einzelheiten zur Wiederverwertung und sicheren Entsorgung
von Altgeräten in Ihrer Region.
Das Symbol auf Produkt oder Verpackung besagt, dass
dieses Produkt nicht als Hausmüll behandelt werden darf.
Stattdessen sollte es zu einer entsprechenden Sammelstelle
zur Wiederverwertung von elektrischen und elektronischen
Altgeräten gebracht werden. Durch das korrekte Recycling
wird möglichen Schäden für die Umwelt und die Gesundheit
vorgebeugt, die durch unsachgemäße Behandlung der
Produktabfälle entstehen könnten. Weitere Information über
die Wiederverwertung von batteriebetriebenen Elektrogeräten
erhalten Sie in Ihrer lokalen Gemeindeverwaltung oder bei dem
für Sie zuständigen Hausmüllverwertungszentrum.
Sicherheit während des Gebrauchs
• Der Ladestecker sollte an eine Steckdose in sicherer Entfernung
von Waschbecken oder heißen Oberächen angeschlossen
werden.
• Kein Verlängerungskabel verwenden. Stecken Sie den
Ladestecker direkt in eine Steckdose.
• Laden Sie das Gerät nicht an einer Steckdose im Freien auf.
• Zum Schutz vor Stromschlägen darf das Hauptgerät nicht in
Wasser oder andere Flüssigkeiten getaucht werden. Wenn der
Gerätesockel in Flüssigkeit fällt, sofort herausholen und das
Gerät gründlich reinigen und trocknen, bevor Sie fortfahren.
• Verwenden Sie den Mixer immer auf einer sauberen, stabilen
und trockenen Oberäche.
• Befestigen Sie die Klinge nie ohne das Zubereitungsgefäß auf
dem Gerätesockel.
• Achten Sie darauf, dass der Klingensatz vor dem Gebrauch gut
im Zubereitungsgefäß befestigt ist.
• Verwenden Sie im Mixbecher niemals kohlensäurehaltige
Getränke.

21
• Der Mixbecher ist nicht für den Einsatz in der Mikrowelle
geeignet.
• Die Klinge immer mit der Klingenschutzkappe aufbewahren.
2. EINLEITUNG
Herzlichen Glückwunsch zum Kauf Ihres Cuisinart Standmixers.
Bereits seit über 30 Jahren ist es das erklärte Ziel von Cuisinart, die allerbesten Küchengeräte
herzustellen. Alle Produkte von Cuisinart sind äußerst langlebig und so konzipiert, dass sie leicht
zu verwenden sind und Tag für Tag hervorragende Leistungen vollbringen.
Mehr über unsere Produkte und Rezeptideen erfahren Sie auf unserer Webseite www.cuisinart.eu
3. EIGENSCHAFTEN DES PRODUKTS (siehe Umverpackung)
1. Mixbecher
2. Klingenset
3. Anzeigeleuchten
4. Ein-/ Ausschalter
5. Sockel für die Stromversorgung
6. Ladeanschluss (nicht abgebildet)
7. Trinkdeckel
8. Klingenschutzkappe
9. USB-Kabel und Ladestecker
4. GEBRAUCH
Vor dem ersten Gebrauch empfehlen wir Ihnen, die Haupteinheit mit einem sauberen, feuchten
Tuch abzuwischen, um eventuelle Schmutz- und Staubrückstände zu entfernen. Danach mit
einem weichen, saugfähigen Tuch gründlich abtrocknen. Reinigen Sie den Mixbecher, den
Klingensatz und den Trinkdeckel sorgfältig in warmem Seifenwasser.
ANM.: Keine scheuernden Reinigungsmittel, harten Gegenstände oder Scheuerschwämme
verwenden.
A. AUFLADEN DES GERÄTS
Die Akkus in Ihrem Standmixer sind nicht voll geladen. Vor dem Gebrauch müssen die Akkus
aufgeladen werden, bis alle drei blauen Lämpchen leuchten. Mit einer vollen Akkuladung mixt
Ihr Standmixer etwa 8 Smoothies, aber dies hängt vom Rezept und der Härte der verwendeten
Zutaten ab. Ihr Standmixer ist nach ca. 2 Stunden vollständig aufgeladen.
ANM.: Um die Haupteinheit aufzuladen, stecken Sie das Micro-USB-Ende des Ladekabels in
den Ladeanschluss auf der Rückseite der Haupteinheit. Stecken Sie das USB-Ende direkt in den
Ladestecker, und diesen dann in eine Netzsteckdose.

22
Anzeigeleuchten für den Ladestand des Akkus
Die Anzeigeleuchten blinken blau, wenn der Akku geladen wird. Wenn alle drei Lämpchen
konstant leuchten, bedeutet dies, dass der Akku voll geladen und somit einsatzbereit ist. Wenn
der Akkuladestand geringer wird, erlöschen die Anzeigeleuchten eine nach der anderen. Der
Akku muss spätestens dann aufgeladen werden, wenn die letzte Anzeigeleuchte blinkt. Wenn der
Akku des Geräts vollständig entladen ist, funktioniert es nicht mehr.
ANM.: Der Standmixer kann nicht benutzt werden, solange er an den Netzstrom angeschlossen
ist und aufgeladen wird.
Um die beste Leistung beim Laden des Mixers zu gewährleisten, empfehlen wir, nur das mit
diesem Gerät gelieferte USB-Kabel und den mitgelieferten Ladestecker zu verwenden.
B. BETRIEB
• Sorgen Sie dafür, dass der Mixer zumindest ein wenig geladen ist. Befolgen Sie dazu die
Anweisungen in Abschnitt A. Wenn der Mixer nicht geladen ist, kann er nicht durch Anschließen
an das Stromnetz betrieben werden. Sie müssen warten, bis die Ladung ausreicht, um den
Mixvorgang auszuführen.
• Geben Sie die Zutaten in den Mixbecher.
Achten Sie dabei darauf, dass die maximale Füllmarkierung nicht überschritten wird. Für
beste Ergebnisse immer die härtesten Zutaten zuerst in den Becher geben (Eiswürfel, gefrorene
Früchte usw.) und erst danach die weicheren Zutaten und Flüssigkeiten. Wir empfehlen, die
Nahrungsmittel in 3 cm große Stücke zu schneiden, um ein möglichst gleichmäßiges Ergebnis zu
erzielen. Wenn Sie härtere Zutaten wie Karotten verwenden, sollte der Mixbecher nicht mehr als
zur Hälfte gefüllt werden.
• Das schwarze Klingenset mit der Klinge nach unten im Gefäß befestigen. Das Klingenset im
Uhrzeigersinn drehen, bis es gut befestigt ist.
HINWEIS: Achten Sie darauf, die Klingen nicht zu berühren – das Klingenset immer an dem
schwarzen Kunststoteil festhalten.
• Achten Sie darauf, dass der Gerätesockel immer auf einer sauberen, trockenen Oberäche steht.
Den Mixbecher mit dem schwarzen Klingenset nach unten auf den Gerätesockel und festdrehen.
Das Gefäß rastet spürbar ein wenn es sicher befestigt ist. Vergewissern Sie sich immer, dass es
gut befestigt ist, bevor Sie den Mixer verwenden.
HINWEIS: Wenn der Klingensatz und der Mixbecher nicht korrekt angebracht sind, kann der
Mixer nicht betrieben werden.
• Drücken Sie zum Einschalten einmal den Betriebsschalter. Die LED-Anzeigen leuchten, und der
Motor startet. Drücken Sie den Betriebsschalter erneut, um das Gerät auszuschalten.
HINWEIS: Der Mixer kann nicht länger als 1 Minute betrieben werden. Nach einer Minute Mixen
stoppt er automatisch. Wenn Ihr Rezept mehr als eine Minute Mixen erfordert, warten Sie einfach
einige Sekunden und starten dann den Mixer erneut.
• Sobald Ihre Zutaten gemixt sind, entfernen Sie den Mixbecher vom Gerätesockel, indem Sie den
Mixbecher gegen den Uhrzeigersinn drehen, um ihn zu entriegeln.
HINWEIS: Versuchen Sie nicht, den Mixbecher zu entfernen, während der Motor noch läuft. Wenn
der Becher während des Mixens entriegelt wird, stoppt der Mixer automatisch.
• Den Mixbecher aufrecht mit dem schwarzen Klingensatz nach oben auf die Arbeitsäche stellen.
Den schwarzen Klingensatz gegen den Uhrzeigersinn drehen, um ihn zu entfernen.
Achten Sie darauf, die Klingen nicht zu berühren – sie sind sehr scharf. Den Klingensatz immer
an dem schwarzen Kunststoteil festhalten.
HINWEIS: Die Edelstahlklinge kann nicht aus der schwarzen Klingenhalterung des Moduls
entfernt werden.

23
• Der Klingensatz kann sofort gewaschen oder sicher beiseite gelegt werden, wenn Sie die
durchsichtige Klingenschutzkappe verwenden, bis Sie die Klinge waschen können. Einfach die
Klingenschutzkappe auf den Klingensatz stecken und im Uhrzeigersinn drehen, bis sie einrastet.
HINWEIS: Verwenden Sie zum Aufbewahren des Klingensatzes immer die Klingenschutzkappe.
• Befestigen Sie bei Bedarf den Trinkdeckel am Mixbecher, indem Sie ihn im Uhrzeigersinn drehen,
bis er fühlbar fest sitzt. Vergewissern Sie sich, dass die Verschlusskappe für die Trinkönung fest
verschlossen ist, bevor Sie den Becher zum Mitnehmen in eine Tasche stecken.
C. TIPPS & TRICKS
• Für beste Ergebnisse mit Ihrem Mixer immer die härtesten Zutaten zuerst in den Becher geben
(Eiswürfel, gefrorene Früchte usw.) und erst danach die weicheren Zutaten und Flüssigkeiten.
• Wir empfehlen, die meisten Nahrungsmittel in 3 cm große Stücke zu schneiden, um ein möglichst
gleichmäßiges Ergebnis zu erzielen.
• Wenn beim Mixen Nahrungsmittel an den Seiten des Bechers haften bleiben, stoppen Sie den
Mixer, nehmen Sie den Becher heraus und schütteln Sie ihn vorsichtig. Danach wieder einsetzen
und den Mixvorgang fortsetzen.
• Beim Mixen dickerer Mischungen die Oberseite des Bechers leicht andrücken, damit das Gerät
nicht auf der Arbeitsäche springt.
• Nach dem Mixen den Becher abnehmen und mit dem Klingensatz nach oben auf die Arbeitsäche
stellen. Einige Male vorsichtig auf den Becher klopfen, um eventuelle Spritzer beim Entfernen
des Klingensatzes zu vermeiden.
• Einige Rezepte können mehr als eine Minute Mixen erfordern. In dem Fall einfach den Mixer
erneut starten.
5. REINIGUNG & PFLEGE
• Das Gerät nach dem Gebrauch immer gründlich reinigen.
• Den Klingensatz entfernen und das Hauptgerät nur mit einem Schwamm oder einem feuchten
Tuch reinigen.
• Verwenden Sie keine Scheuermittel, die die Oberäche zerkratzen könnten.
• Die Klingen von Hand in warmem Seifenwasser waschen.
• Der Mixbecher, die Klingenschutzkappe und der Trinkdeckel können in warmem Seifenwasser
gewaschen oder im oberen Bereich des Geschirrspülers gereinigt werden.
ACHTUNG: Gehen Sie vorsichtig mit dem Messer um. Die Klingen sind scharf und können
Verletzungen verursachen. VERSUCHEN SIE NICHT, die Klingen aus dem Klingensatz zu
entfernen.

24
1. VEILIGHEIDSINSTRUCTIES
(VERTALING VAN DE ORIGINELE INSTRUCTIES)
LEES ALLE INSTRUCTIES GOED DOOR VÓÓR U HET APPARAAT
IN GEBRUIK NEEMT EN BEWAAR DE GEBRUIKSAANWIJZING
GOED ZODAT U HEM KUNT RAADPLEGEN INDIEN NODIG.
Volg deze veiligheidsinstructies altijd op als u dit apparaat
gebruikt, om persoonlijk letsel of schade aan het apparaat te
voorkomen. Dit apparaat dient uitsluitend gebruikt te worden
zoals beschreven is in deze handleiding. Bij verkeerd gebruik
kan letsel ontstaan.
• Dit apparaat is uitsluitend bedoeld voor huishoudelijk
gebruik en niet bedoeld voor gebruik in bijvoorbeeld
personeelskeukens van winkels, kantoren en andere
werkomgevingen; boerderijen; voor gebruik door klanten
van hotels, motels en andere verblijfsaccommodaties of in
bed and breakfast-achtige omgevingen.
• Wees voorzichtig met de accessoires tijdens het gebruik en
het reinigen.
• Wees voorzichtig als u hete vloeistof in de mengbeker giet.
Door stoomvorming kan het hete vocht er ineens uitschieten.
• Het apparaat is niet bedoeld om te worden gebruikt
met een externe tijdschakelaar of een apart
afstandsbedieningssysteem.
• Dit apparaat is niet bedoeld voor gebruik door personen
met verminderde lichamelijke, zintuiglijke of geestelijke
vermogens, of mensen met weinig ervaring en kennis, tenzij
iemand die verantwoordelijk is voor hun veiligheid toezicht
op hen houdt of hen heeft uitgelegd hoe het apparaat dient
te worden gebruikt.
• Houdt altijd toezicht op kinderen om te voorkomen dat ze
met dit product gaan spelen.
• Dit apparaat mag niet worden gebruikt door kinderen. Houd

25
het apparaat en de adapter tijdens en na gebruik buiten
bereik van kinderen.
• Controleer het apparaat vóór gebruik altijd op zichtbare
tekenen van beschadiging. Gebruik het apparaat niet meer
nadat het beschadigd of gevallen is. Neem, in geval van
schade of wanneer het apparaat een storing vertoont,
telefonisch contact op met de Cuisinart Klantenservice (zie
‘Internationale garantie’ op pagina 72).
• Gebruik het apparaat niet als het snoer beschadigd is. Bij
schade aan het snoer onmiddellijk stoppen met het gebruik.
Als het snoer is beschadigd dient dit te worden vervangen
door de fabrikant. Breng het apparaat terug naar de
Klantenservice (zie ‘Internationale garantie’ op pagina 72). De
consument dient zelf geen reparaties uit te voeren.
• Trek nooit de stekker aan het snoer uit het stopcontact maar
altijd aan de stekker.
• Wikkel tijdens of na gebruik het snoer niet om de behuizing
van het apparaat.
• U kunt het apparaat veilig in het stopcontact laten zitten
wanneer u het niet gebruikt, zodat de accu altijd is opgeladen.
De stekker moet echter wel uit het stopcontact worden
gehaald voordat u het apparaat monteert, demonteert,
reinigt of langere tijd niet gebruikt.
• Dit product bevat een oplaadbare lithium-ion-accu die niet
uit het apparaat mag worden verwijderd om opgeladen te
worden. De accu in dit apparaat kan niet vervangen worden.
• De contactpunten mogen niet worden kortgesloten.
• WAARSCHUWING: Gebruik voor het opladen van de accu
uitsluitend de afneembare oplader die bij dit apparaat
is meegeleverd. Dit symbool
geeft aan dat er een
afneembare energietoevoer is om op te laden.
• Dit product voldoet volledig aan alle van toepassing zijnde
EU- en Britse wetgeving en de normen die relevant zijn voor

26
dit type en deze klasse apparaten. Wij zijn een ISO9001:2015
gecerticeerd bedrijf dat voortdurend de prestaties van ons
Kwaliteitsmanagementsysteem evalueert. Indien u vragen
heeft over productveiligheid en naleving, neem dan contact
op met onze afdeling Klantenservice (zie ‘Internationale
garantie’ op pagina 72).
• WAARSCHUWING: Vermijd contact met bewegende delen.
Om persoonlijk letsel en/of schade aan het apparaat te
voorkomen, altijd handen, haar, kleding, spatels en ander
keukengerei uit de buurt van de accessoires houden als het
apparaat in gebruik is. U kunt wel een spatel gebruiken maar
alleen als het apparaat niet in werking is.
• WAARSCHUWING: Blijf met uw vingers bij de messen
vandaan. Wilt u de messen afschrapen, controleer dan altijd
eerst of de mixer uitstaat.
• Sluit de oplader aan op een stopcontact uit de buurt van een
gootsteen of een heet oppervlak.
• Gebruik geen verlengsnoer. Steek de oplader rechtstreeks in
een stopcontact.
• Laad het apparaat niet buiten in een stopcontact op.
• Om een elektrische schok te voorkomen, het apparaat
niet in water of andere vloeistoen plaatsen. Alleen
de losse accessoires van dit apparaat zijn geschikt om
ondergedompeld te worden in water of andere vloeistoen.
De rest van dit apparaat mag nooit ondergedompeld worden.
Mocht de handmixer motorbasis in een vloeistof vallen, haal
hem er dan onmiddellijk uit en reinig en droog hem voordat
u verder gaat.
• Verwijder altijd de messeneenheid van de beker voordat u
deze gaat schoonmaken.
• Doe de mengbeker niet te vol. Let op de maximum-aanduiding
• Zet de blender niet aan terwijl hij leeg is - dit beschadigt de
motor.

27
• Mix geen hete vloeistoen in de mengbeker.
• Dompel de motorbasis nooit in water of andere vloeistof
• LET OP: Wees voorzichtig met het mes. De messen zijn scherp
en kunnen letsel veroorzaken. PROBEER NIET de messen uit
de messeneenheid te verwijderen.
NB: Het roestvrijstalen mes kan niet uit de zwarte eenheid
worden verwijderd.
OPGELET: De polytheenzakken die om het product
of de verpakking zitten, kunnen gevaarlijk zijn. Om
elke kans op verstikking te voorkomen, deze buiten
bereik van baby’s en kinderen houden. Deze zakken
zijn geen speelgoed.
INZAMELEN VAN ACCU’S EN BATTERIJEN
Om de gevaren voor de gezondheid en het milieu
aan het einde van de levensduur van dit product
tot een minimum te beperken, dient u dit product
volgens de regelgeving met betrekking tot
afgedankte elektrische en elektronische apparatuur (AEEA)
en de richtlijn betreende lege batterijen, in te leveren bij een
inzamelingslocatie die ervoor zal zorgen dat de batterijen op
de juiste manier gerecycled worden. Neem contact op met de
plaatselijke autoriteiten voor meer informatie over recycling
en veilige verwijdering van deze producten in uw regio.
Het symbool op het product of op de verpakking geeft aan dat
dit product niet bij het huishoudelijk afval terecht mag komen.
In plaats daarvan dient het naar een inzamelpunt gebracht
te worden waar elektrische en elektronische apparatuur
gerecycled kan worden. Door ervoor te zorgen dat dit product
op de juiste manier wordt ingezameld, helpt u mogelijke
negatieve gevolgen voor het milieu en de menselijke
gezondheid te voorkomen, die anders zouden kunnen
worden veroorzaakt door een onjuiste afvalverwerking van dit

28
product. Neem voor meer informatie over het recyclen van dit
product contact op met uw gemeente, het scheidingsdepot of
de milieustraat.
Veiligheid tijdens gebruik
• Sluit de oplader aan op een stopcontact uit de buurt van een
gootsteen of een heet oppervlak.
• Gebruik geen verlengsnoer. Steek de oplader rechtstreeks in
een stopcontact.
• Laad het apparaat niet buiten in een stopcontact op.
• Om een elektrische schok te voorkomen, het apparaat niet in
water of andere vloeistoen plaatsen. Mocht de motoreenheid
in een vloeistof vallen, haal hem er dan onmiddellijk uit en
reinig en droog hem voordat u verder gaat.
• Gebruik de blender altijd op een schone, stevige en droge
ondergrond.
• Plaats het mes niet op de motorbasis zonder de mengbeker.
• Zorg dat de messeneenheid stevig aan de mengbeker is
bevestigd voordat u het apparaat aanzet
• Gebruik nooit koolzuurhoudende dranken in de mengbeker
• De mengbeker is niet geschikt voor gebruik in een magnetron.
• Plaats altijd de beschermkap over het mes als u deze opbergt.
2. INLEIDING
Gefeliciteerd met de aankoop van deze Cuisinart Blender!
Al meer dan 30 jaar maakt Cuisinart de meest voortreelijke keukenapparatuur. Alle Cuisinart
producten zijn gemaakt om heel lang mee te gaan. Ze zijn ook ontworpen voor eenvoudig gebruik
en om dag in dag uit uitstekende prestaties te leveren.
Ga voor meer informatie over onze producten en voor recepten naar onze website
www.cuisinart.eu

29
3. PRODUCT KENMERKEN (zie voorpagina)
1. Mengbeker
2. Messeneenheid
3. Indicatielampjes
4. Aan/uit-schakelaar
5. Motorbasis
6. Oplaadpoort (niet afgebeeld)
7. Drinkdeksel
8. Messenbeschermkap
9. USB-kabel en adapter
4. GEBRUIK
Voordat u het apparaat voor het eerst gebruikt, raden we u aan hem schoon te vegen met een
schone, vochtige doek om eventueel vuil of stof te verwijderen. Droog hem daarna goed af met
een zachte, vochtabsorberende doek. Maak de mengbeker, de messeneenheid en het drinkdeksel
goed schoon met een warm sopje.
NB Gebruik geen schuurmiddelen, harde voorwerpen of schuursponsjes.
A. DE BLENDER OPLADEN
De accu in uw blender is nog niet volledig opgeladen. Voor gebruik moet de accu eerst worden
opgeladen totdat alle drie de blauwe lampjes branden. Als deze volledig is opgeladen, kan deze
blender ongeveer 8 smoothies maken maar dit is afhankelijk van het recept en de hardheid van
de gebruikte ingrediënten. Uw blender is na ongeveer 2 uur volledig opgeladen.
NB Om het apparaat op te laden, steekt u het micro-USB-plugje van de oplaadkabel in de
oplaadpoort aan de achterkant van het apparaat. Sluit het USB-uiteinde rechtstreeks aan op de
adapterstekker en steek deze in een stopcontact.
Indicatielampjes voor de accu
De indicatielampjes knipperen blauw wanneer de accu wordt opgeladen. Wanneer alle drie de
lampjes branden, betekent dit dat de accu volledig is opgeladen en klaar is voor gebruik. Naarmate
de accu leger wordt, doven de indicatielampjes. De accu moet worden opgeladen wanneer het
laatste indicatielampje gaat knipperen. Als de accu helemaal leeg is, zal het apparaat niet werken.
NB De blender kan niet worden gebruikt terwijl hij in het stopcontact zit en wordt opgeladen.
Voor de beste oplaadprestaties van uw blender adviseren we u om alleen de USB-kabel en de
oplaadadapter te gebruiken die bij dit apparaat zijn meegeleverd.
B. BEDIENING
• Zorg dat uw blender in ieder geval een beetje is opgeladen volgens de instructies in Sectie A. Als
de blenderaccu leeg is, kunt u hem niet gebruiken door de stekker in het stopcontact te steken.
U dient dan eerst te wachten tot hij voldoende is opgeladen om te kunnen blenden.
• Doe de ingrediënten in de mengbeker.
LET OP: Zorg ervoor dat de maximale vullijn niet wordt overschreden. Doe voor het beste
resultaat altijd eerst de hardste ingrediënten in de beker (ijsklontjes, bevroren fruit, enz.) en als

30
laatste de zachtere ingrediënten en vloeistoen. We raden u aan voedsel in stukjes van 3 cm te
snijden voor het meest gelijkmatige resultaat. Als u hardere ingrediënten zoals wortels gebruikt,
mag de mengbeker maximaal tot de helft worden gevuld.
• Bevestig de zwarte messeneenheid op de beker met de messen naar beneden, in de beker. Draai
de messeneenheid met de klok mee totdat hij goed vast zit.
NB Pas op dat u de messen niet aanraakt – pak altijd het zwarte plastic deel vast en niet de
messen zelf.
• Zorg ervoor dat de motoreenheid op een schone, droge ondergrond staat. Plaats de mengbeker
op de motoreenheid, met de zwarte messeneenheid aan de onderkant en draai hem goed vast.
U voelt een klik wanneer de beker goed op zijn plaats zit. Zorg altijd dat hij goed vergrendeld zit
voordat u de blender aanzet.
NB Als de messeneenheid en de beker niet goed aan elkaar zijn bevestigd, zal de blender niet
werken.
• Druk eenmaal op de aan/uit-knop om de blender aan te zetten. De LED-lampjes lichten op en
de motor zal starten. Om het apparaat uit te schakelen drukt u nogmaals op de aan/uit-knop.
NB De blender werkt maximaal 1 minuut. Na 1 minuut stopt hij automatisch. Als u voor uw recept
langer dan een minuut moet blenden, hoeft u alleen maar een paar seconden te wachten en
vervolgens de blender opnieuw aan te zetten.
• Als uw ingrediënten eenmaal goed zijn geblend, verwijdert u de mengbeker van de motorbasis
door de beker tegen de klok in te draaien om hem te ontgrendelen.
NB Probeer de mengbeker niet te verwijderen terwijl de motor nog draait. Als de beker tijdens
het blenden wordt ontgrendeld, stopt de blender automatisch.
• Draai dan de beker om en zet hem rechtop neer met de zwarte messeneenheid naar boven
gericht. Draai de zwarte messeneenheid tegen de klok in los om hem te verwijderen.
NB Raak de messen niet aan, ze zijn zeer scherp. Pak de messeneenheid altijd bij het zwarte
plastic gedeelte vast.
NB Het roestvrijstalen mes kan niet uit de zwarte eenheid worden verwijderd.
• De messeneenheid kan direct worden afgewassen of tijdelijk veilig worden afgedekt met
de doorzichtige kap totdat u hem kunt afwassen. Plaats daarvoor de beschermkap over de
messeneenheid en draai de kap met de klok mee totdat hij vastklikt.
NB Gebruik altijd de beschermkap als u de messeneenheid opbergt.
• Bevestig indien gewenst het drinkdeksel op de mengbeker door hem met de klok mee te draaien
totdat hij goed dicht zit. Zorg ook dat de drinkopening van het deksel goed is afgesloten voordat
u de beker in een tas stopt om hem mee te nemen.
C. TIPS & TRICKS
• Doe voor het beste resultaat altijd eerst de hardste ingrediënten in de beker (ijsklontjes,
bevroren fruit, enz.) en als laatste de zachtere ingrediënten en vloeistoen. We raden u aan om
de ingrediënten in stukjes van 3 cm te snijden voor het beste gelijkmatige resultaat.
• Als er tijdens het blenden ingrediënten aan de zijkant van de beker blijven plakken, zet u de
blender even stop, verwijdert u de beker en de messeneenheid en schudt u de beker voorzichtig.
Plaats hem daarna weer terug en zet het apparaat weer aan.
• Druk bij het blenden van dikkere mengsels de bovenkant van de beker zachtjes naar beneden
zodat hij niet gaat ‘wandelen’ over het aanrecht.
• Verwijder na het blenden de beker samen met de messeneenheid en zet hem neer op een vlakke
ondergrond met de messeneenheid naar boven gericht. Tik een paar keer voorzichtig tegen de

31
beker zodat u niet morst als u de messen losdraait en verwijdert.
• Voor sommige recepten is langer dan een minuut blenden noodzakelijk. Start de blender dan
gewoon opnieuw.
5. REINIGING & ONDERHOUD
• Maak het apparaat na gebruik altijd goed schoon.
• Verwijder het mes en maak het apparaat met een spons of een vochtig doekje schoon.
• Gebruik geen schurende reinigingsmiddelen die krassen geven.
• Was het mes met de hand in een warm sopje.
• De mengbeker, de messenbeschermer en het drinkdeksel kunnen worden afgewassen in een
warm sopje of in het bovenste rek van de vaatwasmachine.
LET OP: Wees voorzichtig met het mes. De messen zijn scherp en kunnen letsel veroorzaken.
PROBEER NIET de messen uit de messeneenheid te verwijderen.

32
1. ISTRUZIONI DI SICUREZZA
(TRADUZIONE DELLE ISTRUZIONI ORIGINALI)
LEGGERE ATTENTAMENTE LE ISTRUZIONI PRIMA DI
USARE L’APPARECCHIO. CONSERVARE LE ISTRUZIONI
CON CURA PER UN’EVENTUALE CONSULTAZIONE
SUCCESSIVA.
Rispettare sempre le presenti istruzioni di sicurezza nell’utilizzare
l’apparecchio, in modo da evitare infortuni personali o danni
all’apparecchio. L’apparecchio deve essere utilizzato solo
secondo le istruzioni riportate nel presente libretto. Esiste il
rischio di infortuni in caso di uso non corretto del prodotto.
• L’apparecchio è previsto unicamente per uso domestico e non
è adatto a situazioni quali le aree cucina destinate al personale
di negozi, uci, altri ambienti di lavoro e agriturismi, e non
deve essere utilizzato dai clienti in alberghi, motel e altri
ambienti residenziali e strutture tipo bed and breakfast.
• Occorre prestare la massima attenzione nella manipolazione
degli accessori, durante l’uso e la pulizia.
• Prestare la massima attenzione nel versare liquidi molto caldi
nel bicchiere frullatore, in quanto possono essere schizzati
fuori a causa di improvvisi getti di vapore.
• Questo apparecchio non è destinato a un utilizzo con dispositivi
a tempo (timer) esterni o con dispositivi di comando a distanza.
• Questo apparecchio può essere utilizzato da persone con
capacità siche, sensoriali o mentali ridotte, o da soggetti
privi delle necessarie esperienze o conoscenze, qualora
siano correttamente sorvegliati o siano state impartite loro le
istruzioni riguardanti l’utilizzo dell’apparecchio da una persona
responsabile della loro sicurezza.
• I bambini devono essere sempre controllati per far sì che non
giochino con questo prodotto.
• Questo apparecchio non può essere utilizzato dai bambini.

33
Tenere l’apparecchio e l’adattatore lontano dai bambini, sia
durante che dopo l’uso.
• Controllare sempre l’apparecchio e i suoi accessori prima
dell’uso, per rilevare eventuali segni di danno. Non utilizzare
l’apparecchio se danneggiato o se caduto. In caso di danno, o se
l’apparecchio presenta un guasto, contattare la linea assistenza
clienti Cuisinart (consultare «Garanzia internazionale» a pagina
72).
• Non utilizzare l’apparecchio se il cavo di alimentazione risulta
danneggiato. Se danneggiato, interrompere immediatamente
l’utilizzo dell’apparecchio. Il cavo eventualmente danneggiato
deve essere sostituito dal fabbricante. Restituire l’apparecchio
al centro assistenza (consultare «Garanzia internazionale» a
pagina 72) Nessuna riparazione deve essere tentata dal cliente.
• Per staccare dalla presa di corrente, tirare sempre la spina. Non
tirare mai il cavo.
• Non avvolgere mai il cavo di alimentazione attorno alla
struttura principale dell’apparecchio durante o dopo l’uso.
• L’apparecchio può essere lasciato, in sicurezza, attaccato
all’alimentazione elettrica quando non viene utilizzato, per
far sì che le batterie siano sempre cariche. Tuttavia, deve essere
staccato dalla rete elettrica prima di montaggi, smontaggi,
operazioni di pulizia o per periodi prolungati in cui resta
inutilizzato.
• Questo prodotto contiene un blocco batterie ricaricabile litio-
ioni che non deve essere tolto dall’apparecchio per la carica.
Le batterie di questo apparecchio non sono sostituibili.
• I terminali delle batterie non devono mai essere cortocircuitati.
• ATTENZIONE: per ricaricare la batteria, usare solo il dispositivo
amovibile di ricarica fornito in dotazione con l’apparecchio.
Questo simbolo
indica che viene fornito in dotazione
un dispositivo amovibile di alimentazione per ricaricare
l’apparecchio.

34
• Questo prodotto è pienamente conforme a tutte le vigenti
normative UE e britanniche applicabili a questo tipo e classe
di apparecchi. Siamo un’azienda certicata ISO9001:2015 che
valuta continuamente la validità del suo sistema di gestione
della qualità. In caso di domande riguardo alla sicurezza e alla
conformità del prodotto, contattare il nostro dipartimento
di assistenza clienti (consultare «Garanzia internazionale» a
pagina 72).
• ATTENZIONE: evitare il contatto con le parti in movimento.
Durante il funzionamento dell’apparecchio, tenere mani,
capelli, indumenti, nonché spatole e altri utensili, lontani dagli
accessori al ne di ridurre il rischio di infortuni personali e/o
danni all’apparecchio. Può essere utilizzata una spatola, ma
solo quando l’apparecchio non è in funzione.
• ATTENZIONE: non avvicinare le dita agli accessori. Prima di
spostare il cibo, controllare che il frullatore sia spento.
• Il caricabatterie deve essere attaccato a una presa elettrica
lontano da lavandini o da superci calde.
• Non utilizzare prolunghe. Attaccare il caricabatterie
direttamente a una presa elettrica.
• Non caricare l’apparecchio utilizzando una presa elettrica
esterna, all’aperto.
• Per evitare scosse elettriche, non mettere mai la struttura
principale in acqua o altro liquido. Solo gli accessori di
questo apparecchio sono stati progettati per essere immersi
in acqua o altro liquido. Non immergere mai l’apparecchio,
nemmeno in parte. Se il frullatore cade in un liquido, estrarlo
immediatamente. Quindi, pulire e asciugare bene l’apparecchio
prima di continuare.
• Togliere sempre il gruppo lame dal bicchiere prima di pulire.
• Non riempire eccessivamente il bicchiere frullatore. Rispettare
la linea massima di riempimento.
• Non attivare il frullatore vuoto: così facendo, si danneggia il

35
motore.
• Non frullare liquidi molto caldi nel bicchiere frullatore.
• Non mettere mai la struttura principale in acqua o altro liquido
• ATTENZIONE: maneggiare le lame con estrema attenzione. Le
lame sono alate e potrebbero causare infortuni. NON tentare
di togliere le lame dal gruppo lame.
N.B. La lama in acciaio inossidabile non può essere tolta dal
gruppo lama di colore nero.
ATTENZIONE: i sacchetti in polietilene sul prodotto o
sull’imballaggio possono essere pericolosi. Per evitare
rischi di soocamento, tenere lontano da bambini e
neonati. Questi sacchetti non sono giocattoli.
SMALTIMENTO DELLA BATTERIA
Al fine di ridurre al minimo i rischi per la salute e
l’ambiente alla ne del ciclo di vita del prodotto, le
norme riguardanti i riuti di apparecchi elettrici ed
elettronici (RAEE) e la direttiva sulle batterie impongono
lo smaltimento di questo prodotto presso un apposito centro
di raccolta, che estrarrà le batterie e procederà allo specico
riciclaggio. Rivolgersi alle autorità locali per saperne di più su
come riciclare e smaltire questi prodotti in modo sicuro nel
proprio comune.
Il simbolo sul prodotto o sul suo imballaggio indica che questo
prodotto non può essere trattato come rifiuto domestico.
Deve essere consegnato a uno specico punto di raccolta per
il riciclaggio delle apparecchiature elettriche ed elettroniche.
Così facendo, il prodotto sarà smaltito correttamente e si
contribuirà a evitare potenziali conseguenze negative per
l’ambiente e la salute, che potrebbero invece essere il risultato di
un trattamento non corretto del prodotto arrivato a ne vita. Per
informazioni più dettagliate sul riciclaggio di questo prodotto,
contattare i servizi della nettezza urbana del proprio comune.

36
Sicurezza durante l’uso
• Il caricabatterie deve essere attaccato a una presa elettrica
lontano da lavandini o da superci calde.
• Non utilizzare prolunghe. Attaccare il caricabatterie
direttamente a una presa elettrica.
• Non caricare l’apparecchio utilizzando una presa elettrica
esterna, all’aperto.
• Per evitare scosse elettriche, non mettere mai la struttura
principale in acqua o altro liquido. Se la base dell’apparecchio
cade in un liquido, estrarlo immediatamente. Quindi, pulire e
asciugare bene l’apparecchio prima di continuare.
• Utilizzare il frullatore su una supercie pulita, solida e asciutta.
• Non posizionare la lama sulla base dell’apparecchio senza aver
inserito il bicchiere frullatore.
• Prima dell’uso, controllare che il gruppo lama sia attaccato
saldamente al bicchiere frullatore
• Non usare mai bevande gassate nel bicchiere frullatore
• Il bicchiere frullatore non è adatto per essere utilizzato in un
forno a microonde.
• Riporre sempre la lama utilizzando l’apposita copertura
protettiva.
2. INTRODUZIONE
Complimenti per l’acquisto del frullatore Cuisinart.
Da oltre 30 anni, l’obiettivo di Cuisinart è sviluppare apparecchi di altissima gamma per gli
appassionati di cucina. Tutti i prodotti Cuisinart sono progettati per durare eccezionalmente a
lungo, essere facili da utilizzare e orire eccellenti prestazioni giorno dopo giorno.
Per saperne di più sui nostri prodotti e per idee di ricette, visitate il nostro sito Internet
www.cuisinart.eu

37
3. CARATTERISTICHE DEL PRODOTTO (riferimento alla copertina)
1. Bicchiere frullatore
2. Blocco lama
3. Spie luminose
4. Interruttore acceso/spento
5. Base dell’apparecchio
6. Porta di ricarica (non ragurata)
7. Coperchio per bere
8. Copertura protettiva lama
9. Adattatore e cavo USB
4. UTILIZZO
Prima del primo utilizzo, consigliamo di pulire la struttura principale dell’apparecchio con
un panno pulito e leggermente inumidito, per togliere eventuali tracce di sporcizia o polvere.
Asciugare bene con un panno assorbente morbido. Lavare con cura in acqua e sapone il bicchiere
frullatore, il gruppo lama e il coperchio per bere.
N.B. Non usare detersivi abrasivi, oggetti duri o pagliette in acciaio.
A. CARICARE IL FRULLATORE
Le batterie del frullatore non sono state caricate totalmente. Prima di usare l’apparecchio, le
batterie devono essere caricate fino a quando tutte e tre le luci blu sono illuminate. Con una carica
completa, il frullatore sarà in grado di preparare circa 8 smoothies, in funzione della ricotta e della
durezza degli ingredienti utilizzati. Le batterie del frullatore a immersione si caricano totalmente
in circa 2 ore.
N.B. To Per caricare l’apparecchio, inserire la presa micro-USB del cavo di alimentazione nella
porta di ricarica sulla parte posteriore della struttura principale. Attaccare l’estremità del cavo USB
direttamente alla presa dell’adattatore, poi quest’ultimo a una presa elettrica.
Spie di carica della batteria
Le spie luminose lampeggiano di blu quando la batteria è sotto carica. Se tutte e tre le luci sono
illuminate, la batteria è completamente carica e l’apparecchio è pronto all’uso. Appena la batteria
comincia a scaricarsi, le spie si spengono. La batteria deve essere ricaricata quando l’ultima spia
lampeggia. Se la batteria è completamente scarica, l’apparecchio non funziona.
N.B. Il frullatore non può essere usato quando è attaccato alla corrente e sotto carica.
Per garantire le migliori prestazioni di carica del frullatore, raccomandiamo di usare solo
l’adattatore e il cavo USB forniti in dotazione con l’apparecchio.
B. FUNZIONAMENTO
• Controllare che il frullatore sia almeno parzialmente carico, seguendo le istruzioni della sezione
A. Se il frullatore è privo di carica, non può essere attivato attaccandolo semplicemente a una
presa elettrica. Occorre aspettare che si sia caricato a sufficienza per poter frullare.
• Inserire gli ingredienti nel bicchiere frullatore.
N.B. Fare attenzione a non superare la linea massima di riempimento. Per avere risultati ottimali,

38
mettere sempre per primi gli ingredienti più duri nel bicchiere (cubetti di ghiaccio, frutti congelati,
ecc.), per finire con quelli più teneri e i liquidi. Consigliamo di tagliare gli alimenti in pezzi da 3 cm
per ottenere risultati più uniformi. Se si usano ingredienti più duri, per esempio carote. Il bicchiere
frullatore non deve essere riempito per più di metà.
• Attaccare il blocco lama nero al bicchiere con la lama rivolta verso il basso nel bicchiere. Stringere
a fondo il blocco lama in senso orario.
N.B. Prestare la massima attenzione a non toccare le lame – maneggiare usando sempre la parte
in plastica nera del blocco lama.
• Controllare che la base dell’apparecchio sia poggiata su una superficie pulita e asciutta. Inserire il
bicchiere frullatore nella base dell’apparecchio con il blocco lama nero sul fondo, quindi ruotarlo
per posizionarlo saldamente. Nel momento in cui il bicchiere viene posizionato correttamente,
si avverte uno scatto. Controllare sempre che il blocco sia ancorato saldamente prima di usare
il frullatore.
N.B. Se il blocco lama e il bicchiere non sono attaccati correttamente, il frullatore non funziona.
• Per attivare l’apparecchio, premere una volta il pulsante di accensione. Le luci LED si accendono
e il motore comincia a funzionare. Premere nuovamente il pulsante dell’alimentazione prima di
spegnere l’apparecchio.
N.B. Il frullatore non può funzionare per più di 1 minuto. Dopo 1 minuto, il frullatore si arresta
automaticamente. Se, per la ricetta, occorre frullare per più di un minuto, fare una pausa di alcuni
secondi per riprendere a frullare successivamente.
• Dopo aver frullato gli ingredienti, togliere il bicchiere frullatore dalla base ruotandolo in senso
antiorario per sbloccare.
N.B. Non tentare di togliere il bicchiere frullatore mentre il motore è ancora in funzione.
Se il bicchiere viene sbloccato mentre il frullatore è in funzione, l’apparecchio si arresta
automaticamente.
• Posizionare il bicchiere frullatore in posizione verticale con blocco lama nero nella parte alta.
Ruotare il blocco lama nero in senso anti-orario per toglierlo.
N.B. Prestare la massima attenzione a non toccare le lame, in quanto sono molto affilate.
Maneggiare tenendo sempre la parte nera in plastica del gruppo lama.
N.B. La lama in acciaio inossidabile non può essere tolta dal gruppo lama di colore nero.
• Il gruppo lama può essere lavato subito oppure riposte in modo sicuro applicando la copertura
protettiva trasparente sulla lama fino a quando può essere lavata. Posizionare la copertura
protettiva della lama sul gruppo lama, ruotando in senso orario per posizionarla saldamente.
N.B. Utilizzare sempre la copertura protettiva della lama quando si ripone il gruppo lama.
• Se necessario, attaccare il coperchio per bere al bicchiere frullatore, ruotando in senso orario fino
a bloccarlo saldamente. Controllare che il tappo del coperchio per bere sia ben chiuso prima di
mettere il bicchiere in una borsa da viaggio.
C. CONSIGLI & ASTUZIE
• Per avere risultati ottimali, mettere sempre per primi gli ingredienti più duri nel bicchiere (cubetti
di ghiaccio, frutti congelati, ecc.), per finire con quelli più teneri e i liquidi.
• Consigliamo di tagliare la maggior parte degli alimenti in pezzi da 3 cm per ottenere risultati più
omogenei.
• Se gli alimenti si attaccano ai bordi del bicchiere mentre vengono frullati, spegnere il frullatore,
togliere il bicchiere e scuotere leggermente il bicchiere. Riposizionare e ricominciare a frullare.
• Per frullare composti più spessi, tenere giù leggermente la parte alta del bicchiere per evitare
fuoriuscite sulla superficie.

39
• Dopo aver frullato, togliere il bicchiere e posizionarlo su una superficie in modo che il gruppo
lama sia sulla parte alta. Picchiettare leggermente alcune volte il bicchiere per evitare eventuali
fuoriuscite quando si tolgono le lame.
• Se, per la ricetta, occorre frullare per più di un minuto, riprendere semplicemente a frullare
successivamente,
5. PULIZIA & MANUTENZIONE
• Pulire sempre l’apparecchio dopo l’uso.
• Togliere la lama e pulire la struttura principale solo con una spugna o un panno leggermente
inumidito.
• Non usare prodotti abrasivi, che potrebbero graffiare la superficie.
• Lavare la lama a mano in acqua calda e sapone.
• Il bicchiere frullatore, la copertura protettiva della lama e il coperchio per bere possono essere
lavati in acqua calda e sapone oppure nel cestello superiore della lavastoviglie.
ATTENZIONE: maneggiare le lame con estrema attenzione. Le lame sono affilate e
potrebbero causare infortuni. NON tentare di togliere le lame dal gruppo lame.

40
1. CONSIGNAS DE SEGURIDAD
(TRADUCCIÓN DE LAS INSTRUCCIONES ORIGINALES)
¡LEA ATENTAMENTE ESTAS CONSIGNAS DE SEGURIDAD
ANTES DE UTILIZAR EL APARATO!
Siga siempre las consignas de seguridad cuando utilice
este aparato para evitar lesiones o daños en el mismo. Este
aparato solo se debe usar tal y como se indica en el libro de
instrucciones. Si usa el producto de forma inadecuada existe
un riesgo de lesiones.
• Este aparato está destinado únicamente a un uso doméstico
y no está previsto su uso en zonas de cocina para el personal
en tiendas, ocinas y otros centros de trabajo, casas rurales,
habitaciones de hoteles o moteles y otros establecimientos
de tipo turístico.
• Tenga cuidado al manipular los accesorios durante su uso y
limpieza.
• Tenga cuidado si hay líquido caliente en el vaso mezclador,
pues puede salpicar a causa del vapor.
• Este aparato no debe utilizarse con temporizador externo o
con sistemas de control remoto.
• Este aparato no está pensado para que lo usen personas
con capacidad física, sensorial o mental reducida o personas
desprovistas de experiencia y conocimientos sucientes, salvo
que personas responsables de su seguridad las supervisen
adecuadamente o impartan instrucciones previas relativas a
la utilización del mismo.
• Mantenga a los niños bajo supervisión para evitar que
jueguen con este aparato.
• Este aparato no puede ser utilizado por niños. Mantenga el
aparato y el cargador fuera del alcance de niños durante su
uso y después del mismo.
• Inspeccione siempre el aparato y sus accesorios en busca de

41
daños aparentes antes de utilizarlo. No lo use si está dañado
o ha sufrido algún golpe. En caso de que se produzcan daños
o que el aparato presente una avería, póngase en contacto
con el Servicio de Atención al Cliente de Cuisinart (consulte el
apartado «Garantía internacional» en la página 72)
• No utilice el aparato si el cable está dañado. En ese caso, deje
de usarlo inmediatamente. Si el cable está dañado, debe ser
sustituido por el fabricante. Devuelva el aparato al Servicio
de Atención al Cliente (consulte el apartado «Garantía
internacional» en la página 72) El consumidor no debe
intentar ninguna reparación.
• No desenchufe el aparato tirando del cable.
• No enrolle el cable alrededor del cuerpo del aparato durante
o después de su uso.
• Es seguro dejar el aparato enchufado a la red eléctrica cuando
no lo está utilizando para garantizar que las baterías estén
siempre cargadas. Sin embargo, proceda a desenchufarlo
antes de montarlo, desmontarlo, limpiarlo, o si no lo va a
utilizar durante un periodo prolongado de tiempo.
• Este producto contiene una batería recargable de Ion Litio
que no debe ser retirada del aparato para su carga. Las
baterías del aparato no son sustituibles.
• Los terminales eléctricos no deben estar en cortocircuito.
• ¡ATENCIÓN! Para recargar la batería, utilice exclusivamente el
cargador y el cable incluidos. Este símbolo
indica que
el aparato incluye una fuente de alimentación externa para
su recarga.
• Este producto cumple plenamente con toda la legislación
pertinente de la UE y del Reino Unido, así como las normas
relativas a este tipo y clase de aparatos. Somos una empresa
certicada ISO9001:2015 y evaluamos de forma constante
el desempeño de nuestro Sistema de Gestión de Calidad. Si
tiene alguna pregunta sobre la seguridad y la conformidad

42
de los productos, póngase en contacto con nuestro Servicio
de Atención al Cliente (consulte el apartado «Garantía
internacional» en la página 72)
• ¡ATENCIÓN! Evite el contacto con las partes móviles.
Mantenga las manos, el cabello, la ropa y las espátulas y
otros utensilios de cocina lejos de los accesorios mientras el
aparato esté funcionando, para evitar lesiones o daños en el
mismo. Se puede utilizar una espátula, pero solo cuando el
aparato no esté en funcionamiento.
• ¡ATENCIÓN! No acerque los dedos a los accesorios. Antes
de retirar la comida, compruebe que la batidora no está
encendida.
• Enchufe el cargador a una toma de corriente, lejos de lavabos
o supercies calientes.
• No use alargadores. Enchufe el cargador directamente a la
toma de corriente.
• No utilice un enchufe de exterior para cargar la unidad.
• Para evitar descargas eléctricas, no introduzca la unidad en
agua u otros líquidos. Solo los accesorios de este aparato
están diseñados para sumergirlos en agua o en cualquier
otro líquido. No sumerja en ningún caso el cuerpo del
aparato. Si la batidora se cae en un recipiente con líquido,
sáquela inmediatamente y limpie y seque la unidad antes de
continuar.
• Retire siempre las cuchillas del vaso antes de limpiarlas.
• No llene excesivamente el vaso mezclador. Respete la línea
de llenado máximo.
• No utilice la batidora con el vaso vacío, pues se puede dañar
el motor.
• No use el vaso mezclador con líquidos calientes.
• Para evitar descargas eléctricas, no introduzca el cuerpo de la
batidora en agua u otros líquidos

43
• PRECAUCIÓN: Tenga cuidado al manipular las cuchillas. Las
cuchillas están aladas y pueden causar lesiones. No intente
desmontar las cuchillas.
NOTA: Las cuchillas de acero inoxidable no pueden retirarse
de su base.
ATENCIÓN: Las bolsas de polietileno sobre el producto
o el embalaje pueden ser peligrosas. Para evitar peligro
de asxia, debe mantenerlas alejadas de los bebés y
los niños. Estas bolsas no son juguetes.
ELIMINACIÓN DE LA BATERÍA
Para minimizar los riesgos para la salud y el medio
ambiente al final de la vida de este producto, la
legislación relativa a los residuos de aparatos eléctricos
y electrónicos (RAEE) y la Directiva sobre residuos de
pilas y acumuladores exigen que haga llegar este producto a
un centro de recogida adecuado, que se ocupará de retirar las
baterías para su reciclado. Por favor, póngase en contacto con
las autoridades locales para obtener información acerca del
reciclado y la eliminación segura de estos residuos en su zona.
El símbolo en el producto o en su embalaje indica que este
producto no debe ser desechado junto con la basura doméstica.
Debe entregarse en el punto de recogida encargado del reciclar
equipos eléctricos y electrónicos. Al deshacerse correctamente
de este producto, ayudará a prevenir las posibles consecuencias
negativas para el medio ambiente y la salud humana que
podría causar eliminación inadecuada de este producto. Para
más detalles sobre el reciclaje de este producto, póngase en
contacto con su ayuntamiento o con el centro de tratamiento
de residuos más cercano.
Seguridad durante el uso
• Enchufe el cargador a una toma de corriente, lejos de lavabos
o supercies calientes.

44
• No use alargadores. Enchufe el cargador directamente a la
toma de corriente.
• No utilice un enchufe de exterior para cargar la unidad.
• Para evitar descargas eléctricas, no introduzca la unidad en
agua u otros líquidos. Si el motor se cae en un recipiente con
líquido, sáquelo inmediatamente y limpie y seque la unidad
antes de continuar.
• Utilice siempre la batidora sobre una supercie limpia,
resistente y seca.
• No coloque las cuchillas sobre la base del motor sin el vaso.
• Compruebe que el bloque de las cuchillas está correctamente
colocado en el vaso mezclador antes de su uso.
• No introduzca en el vaso mezclador bebidas gaseosas.
• El vaso mezclador no es apto para microondas.
• Coloque siempre la tapa de protección sobre la cuchilla antes
de almacenarla.
2. INTRODUCCIÓN
Felicidades, acaba de adquirir una batidora Cuisinart.
Durante más de 30 años, el objetivo de Cuisinart ha sido fabricar los mejores equipos de cocina.
Todos los productos Cuisinart están diseñados para una vida útil excepcionalmente larga y un uso
sencillo y ofrecen un excelente rendimiento día tras día.
Para obtener más información sobre nuestros productos algunas ideas de recetas, visite nuestro
sitio web www.cuisinart.eu
3. CARACTERÍSTICAS DEL PRODUCTO
(consulte la portada para referencia)
1. Vaso mezclador
2. Cuchillas
3. Indicadores
4. Interruptor marcha / parada
5. Motor
6. Puerto de carga (no se muestra)
7. Tapa para beber

45
8. Tapa de protección de la cuchilla
9. Cable USB y cargador
4. UTILIZACIÓN
Antes de usarla por primera vez, le recomendamos que limpie la unidad con un paño limpio y
húmedo para eliminar la suciedad y el polvo. A continuación, séquela con un paño suave. Limpie
cuidadosamente el vaso mezclador el bloque de las cuchillas y la tapa con agua jabonosa tibia.
NOTA: No use limpiadores o estropajos agresivos o utensilios rígidos para limpiar.
A. CARGA DE LA BATIDORA
Las baterías de la batidora no están completamente cargadas. Antes de usarla, cargue las baterías
hasta que se iluminen las tres luces azules. Con una carga completa, la batidora puede hacer
alrededor de 8 batidos, dependiendo de la receta y de la dureza de los ingredientes utilizados. La
batidora se cargará completamente en aproximadamente dos horas y media.
NOTA: Para cargar el aparato, inserte el conector Micro USB en el puerto de carga de la parte
posterior. Luego enchufe el otro extremo al adaptador y este a la toma de corriente.
Indicadores de carga
Los indicadores de carga parpadean en azul mientras la batería se está cargando. Cuando la
batería esté completamente cargada y lista para su uso se encenderán los tres indicadores de
carga. Cuando la batería empiece a agotarse se irán apagando los indicadores de carga. Cuando
empiece a parpadear el último indicador, debe poner a cargar la batería. La unidad no funciona
cuando la batería está completamente descargada.
NOTA: No se puede usar la batidora mientras está enchufada y cargando.
Para garantizar un mejor rendimiento, recomendamos que utilice exclusivamente el cable USB y
el cargador incluidos para cargar la batidora.
B. USO
• Compruebe que la batidora está suficientemente cargada, siguiendo las instrucciones del
apartado A. Si la batería no tiene carga, no es posible utilizarla conectada a la red. Necesita
esperar a que tenga carga suficiente para su uso.
• Coloque los ingredientes en el vaso mezclador.
NOTA: Tenga cuidado de no superar la línea de carga máxima. Para lograr mejores resultados,
ponga primero los ingredientes más duros (cubitos de hielo, fruta congelada...) y termine con los
ingredientes líquidos y más blandos. Recomendamos cortar los alimentos en trozos de 3 cm para
lograr resultados más uniformes. Si está utilizando ingredientes duros, como zanahorias, no debe
llenar el vaso mezclador más de la mitad.
• Coloque el bloque de las cuchillas sobre el vaso mezclador, con las cuchillas hacia dentro. Gire el
bloque de las cuchillas en sentido horario hasta que quede bien apretado.
NOTA: Tenga cuidado de no tocar las cuchillas, debe sujetarlas siempre por la base de plástico
negro.
• Compruebe que la base del motor está sobre una superficie limpia y seca. Coloque el vaso
mezclador sobre la base del motor, con la parte negra del bloque de las cuchillas hacia abajo y
gire para que encaje en su lugar. Oirá un clic cuando el vaso mezclador encaje en su lugar. Antes
de encender la batidora, compruebe que está bien colocado.
NOTA: Si el bloque de las cuchillas y el vaso no están bien colocados, la batidora no funcionará.

46
• Para ponerla en marcha, pulse el botón de encendido una vez. Se encenderán los indicadores y
el motor se pondrá a girar. Pulse de nuevo el botón de encendido para apagar la unidad.
NOTA: la batidora no puede funcionar durante más de 1 minuto. Pasado 1 minuto, se apagará
automáticamente. Si su receta requiere un batido más largo de un minuto, simplemente espere
unos segundos antes de ponerla en marcha de nuevo.
• Una vez los ingredientes estén mezclados, retire el vaso mezclador de la base girando en sentido
antihorario para desbloquearlo.
NOTA: No intente retirar el vaso mezclador con el motor en marcha. Si el vaso se desbloquea
durante el uso, la batidora se detendrá automáticamente.
• Coloque el vaso mezclador en posición vertical en la superficie con el bloque de las cuchillas en
la parte superior. Gire las cuchillas en sentido antihorario para retirarlas.
NOTA: tenga cuidado de no tocar las cuchillas, pues están muy afiladas. Siempre debe sujetarlas
por la base de plástico negra.
NOTA: Las cuchillas de acero inoxidable no pueden retirarse de su base.
• Lave el bloque de las cuchillas de forma inmediata o guárdelo de forma segura utilizando la tapa
transparente de protección hasta que pueda lavarlo. Simplemente coloque la tapa de protección
sobre las cuchillas y gírela en sentido horario hasta que encaje.
NOTA: Use siempre la tapa de protección cuando guarde las cuchillas.
• Para colocar la tapa del vaso mezclador, debe girarla en sentido horario y apretando bien.
Compruebe que la tapa está bien cerrada antes de colocar el vaso en una bolsa de transporte.
E. CONSEJOS Y SUGERENCIAS
• Para lograr mejores resultados con la batidora, ponga primero los ingredientes más duros
(cubitos de hielo, fruta congelada...) y termine con los ingredientes líquidos y más blandos.
• Recomendamos cortar los alimentos en trozos de 3 cm para lograr resultados más uniformes.
• Si la comida se queda pegada a los laterales del vaso mezclador, detenga la batidora, retire el
vaso mezclador y agítelo suavemente. Vuelva a colocarlo en su lugar y vuelva a batir.
• Si trabaja con mezclas más gruesas, sujete con la mano la parte superior del vaso para evitar que
se mueva.
• Cuando termine de mezclar, retire el vaso y colóquelo sobre una superficie de modo que el
bloque de las cuchillas quede en la parte superior. Dé unos golpecitos al vaso para evitar que los
alimentos se derramen al retirar las cuchillas.
• Algunas recetas requieren más de un minuto de mezcla. En ese caso, simplemente vuelva a
poner en marcha la batidora.
5. LIMPIEZA & MANTENIMIENTO
• Limpie siempre bien el aparato después de usarlo.
• Retire la cuchilla y limpie la base del motor con una esponja o paño húmedo.
• No use limpiadores abrasivos que puedan rayar la superficie.
• Lave las cuchillas en agua caliente jabonosa.
• El vaso mezclador, su tapadera y la tapa de protección de las cuchillas pueden lavarse en agua
caliente jabonosa o en la bandeja superior del lavavajillas.
PRECAUCIÓN: Tenga cuidado al manipular las cuchillas. Las cuchillas están afiladas y
pueden causar lesiones. No intente desmontar las cuchillas.

47
1. INSTRUÇÕES DE SEGURANÇA
TRADUÇÃO DAS INSTRUÇÕES ORIGINAIS
LEA DETENIDAMENTE TODAS LAS INSTRUCCIONES
ANTES DE USAR EL APARATO Y GUÁRDELAS EN UN
LUGAR SEGURO PARA REFERENCIA FUTURA.
Respeite sempre as presentes instruções de segurança durante
a utilização para evitar lesões corporais ou danos ao aparelho.
Este aparelho deve ser utilizado exclusivamente como indicado
no presente modo de emprego. Há risco de lesão em caso de
utilização indevida do aparelho.
• Este aparelho destina-se apenas a uso doméstico e não deve
ser utilizado em aplicações como áreas de cozinha reservadas
ao pessoal em lojas, escritórios e outros ambientes de trabalho;
casas agropecuárias; clientes em hotéis, motéis e similares;
pequenos alojamentos turísticos.
• Há que ter o máximo cuidado na manipulação dos acessórios,
durante a utilização e a limpeza.
• Tenha o máximo cuidado quando deitar líquidos quentes no
copo misturador para evitar lesões causadas por libertação
súbita de vapor.
• O aparelho não se destina a ser operado por meio de
temporizador externo ou de telecomando.
• Este aparelho não se destina a ser utilizado por pessoas com
capacidades físicas, sensoriais ou mentais diminuídas, ou sem
experiência e conhecimento, a menos que estejam sob vigilância
ou tenham recebido instrução sobre o modo de emprego do
aparelho da pessoa responsável pela sua segurança.
• As crianças devem ser devidamente vigiadas para garantir que
não brincam com este aparelho.
• Este aparelho não deve ser utilizado por crianças. Mantenha o
aparelho e o transformador fora do alcance de crianças durante
e após a sua utilização.

48
• Examine sempre o aparelho e os respectivos acessórios antes
da utilização para conrmar que não apresenta sinais visíveis
de dano. Não o utilize se estiver danicado ou se tiver caído. Em
caso de avaria, entre em contacto com o serviço de assistência
técnica (consulte a secção “Garantia internacional” na página
72).
• Não utilize o aparelho se o cabo de alimentação estiver
danificado. Neste caso, deixe imediatamente de utilizar o
aparelho. Se o cabo de alimentação estiver danicado deve ser
substituído pelo fabricante. Devolva o aparelho ao serviço de
assistência técnica (consulte a secção “Garantia internacional” na
página 72). O consumidor deverá abster-se de toda e qualquer
tentativa de reparação.
• Nunca puxe pelo cabo de alimentação para desligar o aparelho
da tomada de corrente.
• Não enrole o cabo de alimentação à volta do corpo principal
do aparelho durante ou após a utilização.
• Este aparelho pode car ligado à fonte de alimentação eléctrica
quando não estiver a ser utilizado para garantir que as baterias
estão sempre carregadas. Deve, no entanto, ser desligado antes
da montagem, desmontagem e limpeza, ou se não for utilizado
durante um período de tempo prolongado.
• Este aparelho contém um pack de baterias recarregáveis de iões
de lítio que não devem ser retiradas do aparelho para carregar.
As baterias deste aparelho não podem ser substituídas.
• Os terminais de alimentação não podem ser colocados em
curto-circuito.
• ADVERTÊNCIA: Para recarregar o pack de baterias, utilize
exclusivamente o carregador separado fornecido com este
aparelho. Este símbolo
indica a presença de uma fonte
de alimentação separada para este efeito.
• O presente aparelho cumpre integralmente o disposto na
legislação da UE e do RU e as normas relevantes para este tipo

49
e classe de aparelho. Na qualidade de empresa certificada
ISO9001:2015, avaliamos constantemente o desempenho do
sistema de gestão da qualidade. Em caso de dúvidas quanto à
segurança e ao cumprimento do aparelho, entre em contacto
com o serviço de assistência técnica (consulte a secção “Garantia
internacional” na página 72).
• ADVERTÊNCIA: Evite o contacto com as peças móveis. Mantenha
as mãos, o cabelo e a roupa, bem como espátulas e outros
utensílios, afastados dos acessórios durante o funcionamento
para reduzir o risco de lesões corporais e/ou danos ao aparelho.
Pode utilizar uma espátula, mas apenas quando a unidade
estiver parada.
• ADVERTÊNCIA: Não aproxime os dedos dos acessórios. Para
remover alimentos que tenham cado presos, desligue primeiro
o aparelho da corrente eléctrica.
• O carregador deve ser ligado a uma tomada de corrente, longe
de um lava-loiça ou de qualquer fonte de calor.
• Não utilize uma extensão. Ligue o carregador directamente a
uma tomada de corrente.
• Não carregue o aparelho utilizando uma tomada no exterior.
• Para evitar o risco de choque eléctrico, não coloque a unidade
principal em água ou em quaisquer outros líquidos. Apenas
os acessórios deste aparelho foram concebidos para serem
mergulhados em água ou em outros líquidos. Nunca submerja
qualquer outra parte deste aparelho. Se o aparelho cair dentro
de água ou outro líquido, apanhe-o imediatamente, limpe e
seque completamente antes de continuar.
• Remova sempre o conjunto das lâminas do copo antes de
limpar.
• Não encha excessivamente o copo misturador. Respeite a linha
de enchimento máximo.
• Nunca ponha a funcionar o aparelho vazio – corre o risco de
danicar o motor.

50
• Não misture líquidos quentes no copo misturador.
• Não coloque a unidade principal em água ou em quaisquer
outros líquidos.
• ATENÇÃO: Manipule a lâmina com cuidado. As lâminas são
aadas e podem causar lesões. NÃO tente remover as lâminas
do conjunto.
N.B. A lâmina em aço inoxidável não pode ser removida do
conjunto de lâminas de cor preta.
ADVERTÊNCIA: Os sacos em polietileno contendo o
aparelho ou a sua embalagem podem ser perigosos.
Para evitar o risco de asxia, mantenha esses sacos fora
do alcance de bebés e crianças. Estes sacos não são
brinquedos.
ELIMINAÇÃO DAS BATERIAS
A m de minimizar os riscos para a saúde e o ambiente
no m da vida útil deste aparelho, a directiva relativa
aos resíduos de equipamentos eléctricos e electrónicos
(REEE) e a diretiva relativa a pilhas e baterias e
respectivos resíduos exigem que elimine este aparelho nas
instalações de retoma e de recolha disponibilizados localmente
onde serão removidas as baterias e se procederá à reciclagem.
Contacte os serviços de recolha de resíduos urbanos da área
onde reside para obter informações mais detalhadas sobre a
reciclagem e a eliminação deste aparelho em condições de
segurança.
O símbolo presente neste aparelho ou na sua embalagem indica
que o mesmo não pode ser tratado como lixo doméstico. Em
vez disso, deve recorrer aos sistemas de recolha e retoma dos
REEE disponíveis na sua área. Ao assegurar que este aparelho
é correctamente eliminado, estará a contribuir para prevenir
potenciais consequências negativas para o ambiente e para a
saúde pública devido ao teor de substâncias nocivas presentes
na sua constituição. Para obter informações mais detalhadas

51
sobre a reciclagem deste aparelho, contacte os serviços de
recolha de resíduos urbanos da área onde reside.
Segurança durante a utilização
• O carregador deve ser ligado a uma tomada de corrente, longe
de um lava-loiça ou de qualquer fonte de calor.
• Não utilize uma extensão. Ligue o carregador directamente a
uma tomada de corrente.
• Não carregue o aparelho utilizando uma tomada no exterior.
• Para evitar o risco de choque eléctrico, não coloque a unidade
principal em água ou em quaisquer outros líquidos. Se o aparelho
cair dentro de água ou outro líquido, apanhe-o imediatamente,
limpe e seque completamente antes de continuar.
• Utilize sempre o aparelho numa superfície limpa, estável e seca.
• Não coloque a lâmina na base sem que o copo misturador esteja
montado.
• Certique-se de que o conjunto das lâminas está rmemente
acoplado ao copo misturador antes de utilizar.
• Nunca utilize bebidas gaseicadas no copo misturador.
• O copo misturador não é adequado para o microondas.
• Guarde sempre a lâmina com a tampa de proteção.
2. INTRODUÇÃO
Parabéns por ter comprado a Hand Blender da Cuisinart.
Há mais de 30 anos que o objectivo da Cuisinart é produzir o melhor em equipamento de cozinha.
Todos os produtos da Cuisinart são concebidos para terem uma vida útil excepcionalmente longa,
grande facilidade de utilização e um desempenho excelente dia após dia.
Para saber mais sobre os nossos produtos e descobrir ideias de receitas fantásticas, visite o site
www.cuisinart.eu

52
3. CARACTERÍSTICAS DO PRODUTO (ver a tampa da embalagem)
1. Copo misturador
2. Conjunto das lâminas
3. Indicadores luminosos
4. Interruptor de alimentação
5. Base de alimentação eléctrica
6. Entrada de carregamento (não visível)
7. Tampa do copo
8. Tampa de protecção das lâminas
9. Cabo USB e transformador
4. UTILIZAÇÃO
Antes da primeira utilização, recomenda-se que limpe a unidade principal com um pano limpo
e húmido para retirar qualquer sujidade ou pó. Seque-a completamente com um pano macio e
absorvente. Lave cuidadosamente o copo misturador, o conjunto das lâminas e a tampa do copo
em água quente com detergente.
N.B. Não utilize produtos de limpeza abrasivos, esfregões ou utensílios metálicos.
A. CARREGAMENTO DO APARELHO
As baterias do aparelho não estão completamente carregadas. Antes de utilizar, as baterias
devem ser carregadas até os três indicadores luminosos carem acesos com cor azul. Com uma
carga completa, o aparelho dá para cerca de 8 smoothies, consoante a receita e os ingredientes
utilizados. O aparelho demora aproximadamente 2 horas até car completamente carregado.
N.B. Para carregar a unidade principal, introduza a extremidade do cabo USB na entrada de
carregamento situada na sua traseira. Insira a outra extremidade do cabo USB directamente na
cha do transformador e depois na tomada da rede eléctrica.
Indicadores luminosos da autonomia da bateria
Os indicadores luminosos cam intermitentes com cor azul, indicando que o aparelho está a
carregar. Quando os três indicadores luminosos carem permanentemente acesos, signica que
a bateria está completamente carregada e o aparelho está pronto para ser utilizado. Quando a
bateria está quase esgotada, os indicadores luminosos apagam-se um a um. A bateria precisa de
ser recarregada quando o último indicador luminoso car intermitente. Quando a bateria estiver
completamente descarregada, o aparelho deixa de funcionar.
N.B. O aparelho não pode ser utilizado enquanto estiver a carregar.
Para garantir o melhor desempenho quando carregar o aparelho, recomendamos que utilize o
cabo USB e o transformador fornecido.
B. FUNCIONAMENTO
• Certique-se de que o aparelho tem carga suciente utilizando as instruções na parte A. Se
o aparelho estiver descarregado, não pode ser operado ligando-o a corrente eléctrica. Será
necessário aguardar que tenha carga suciente para executar a tarefa pretendida.
• Coloque os ingredientes no copo misturador.

53
N.B. Não exceda a linha de enchimento máximo. Para obter melhores resultados, comece sempre
por colocar primeiro os ingredientes mais duros (cubos de gelo, fruta congelada, etc.) e termine
com os ingredientes mais moles. Recomendamos que corte os alimentos em porções de 3 cm
para obter resultados mais uniformes. Quando utilizar ingredientes mais rijos, como cenouras,
encha o copo misturador apenas até meio.
• Fixe o conjunto das lâminas de cor preta no copo com a lâmina virada para baixo. Rode o
conjunto das lâminas no sentido dos ponteiros do relógio até estar correctamente apertado.
N.B. Não toque nas lâminas – manipule sempre pegando pela parte do conjunto das lâminas em
plástico de cor preta.
• Certique-se de que a base de alimentação eléctrica está colocada numa superfície limpa e seca.
Coloque o copo misturador sobre a base de alimentação eléctrica com o conjunto das lâminas
na base e rode para encaixar. Ouvirá um clique quando o copo encaixar. Assegure-se sempre que
o copo está encaixado antes de utilizar o aparelho.
N.B. Se o conjunto das lâminas e o copo não estiverem correctamente acoplados, o aparelho não
funcionará.
• Para accionar, prima uma vez o interruptor de alimentação. As luzes LED acendem-se e o motor
começa a funcionar. Prima de novo o interruptor de alimentação para desligar a unidade.
N.B. Este aparelho não pode funcionar mais de 1 minuto de cada vez, passado 1 minuto pára
automaticamente. Se a sua receita exigir mais de um minuto de funcionamento, interrompa
durante alguns segundos e recomece a seguir.
• Uma vez os ingredientes misturados, remova o copo misturador da base rodando o copo
misturador no sentido contrário ao dos ponteiros do relógio para desbloquear.
N.B. Não tente remover o copo misturador com o motor a funcionar. Neste caso, o aparelho pára
automaticamente.
• Coloque o copo misturador direito sobre a superfície com o conjunto das lâminas de cor preta
por cima. Rode o conjunto das lâminas no sentido contrário ao dos ponteiros do relógio para
remover.
N.B. Não toque nas lâminas – são muito aadas. Manipule sempre pegando pela parte do
conjunto das lâminas em plástico de cor preta.
N.B. A lâmina em aço inoxidável não pode ser removida do conjunto das lâminas de cor preta.
• O conjunto das lâminas pode ser lavado imediatamente ou guardado em condições de segurança
utilizando a tampa transparente de protecção da lâmina até ser possível lavar a lâmina. Basta
colocar a tampa de protecção da lâmina sobre o conjunto das lâminas e rodar no sentido dos
ponteiros do relógio até encaixar.
N.B. Use sempre a tampa de protecção da lâmina quando guardar o conjunto das lâminas.
• Se necessário, coloque a tampa do copo no copo misturador rodando no sentido dos ponteiros
do relógio até estar bem apertada. Certique-se de que a tampa do copo está bem fechada
antes de o colocar num saco para o transportar consigo.
C. SUGESTÕES & DICAS
• Para obter melhores resultados quando utilizar este aparelho, comece sempre por colocar
primeiro os ingredientes mais duros (cubos de gelo, fruta congelada, etc.) e termine com os
ingredientes mais moles.
• Recomenda-se que a maioria dos alimentos seja cortada em porções de 3 cm para obter
resultados uniformes.
• Se os alimentos carem colados às paredes do copo quando misturar, pare o aparelho, remova o
copo e sacuda cuidadosamente o copo. Volte a colocar o copo e reinicie a operação.

54
• Quando misturar alimentos mais espessos, carregue levemente no topo do copo para evitar que
venham para a superfície.
• Depois de misturar, remova o copo e coloque sobre uma superfície de modo que o conjunto das
lâminas que em cima. Bata levemente com o copo várias vezes para evitar qualquer derrame
que possa ocorrer quando remover as lâminas.
• Algumas receitas podem exigir mais de um minuto de funcionamento, interrompa durante
alguns segundos e recomece a seguir.
5. LIMPEZA & MANUTENÇÃO
• Limpe sempre o aparelho completamente depois de cada utilização.
• Remova a lâmina e limpe a unidade principal unicamente com uma esponja ou um pano húmido.
• Não utilize produtos abrasivos que possam riscar a superfície.
• Lave a lâmina à mão em água quente com detergente.
• O copo misturador, a tampa de protecção das lâminas e a tampa do copo podem ser lavados
em água quente com detergente ou colocados no tabuleiro superior da máquina de lavar loiça.
ATENÇÃO: Manipule a lâmina com cuidado. As lâminas são aadas e podem causar lesões.
NÃO tente remover as lâminas do conjunto.

55
1. PRZEPISY BEZPIECZEŃSTWA
TŁUMACZENIE ORYGINALNEJ INSTRUKCJI OBSŁUGI
PRZED UŻYCIEM URZĄDZENIA DOKŁADNIE PRZECZYTAJ
CAŁOŚĆ INSTRUKCJI I PRZECHOWUJ JĄ W BEZPIECZNYM
MIEJSCU DO WYKORZYSTANIA W PRZYSZŁOŚCI.
Zawsze przestrzegać tych wskazówek bezpieczeństwa, aby
uniknąć obrażeń ciała lub uszkodzenia urządzenia. Z tego
urządzenia należy korzystać wyłącznie zgodnie z wskazówkami
zawartymi w tej instrukcji obsługi. Istnieje ryzyko odniesienia
obrażeń w przypadku niewłaściwego użytkowania produktu.
• To urządzenie jest przeznaczone wyłącznie do użytku
domowego i nie jest przeznaczone do użytku w: kuchniach
pracowników w sklepach, biurach i innych miejscach pracy,
gospodarstwach, przez klientów hoteli, moteli i innych miejsc
mieszkalnych, obiektów noclegowych, pokojów gościnnych.
• Należy zachować ostrożność podczas korzystania z końcówek,
użytkowania i czyszczenia.
3. Podczas nalewania gorącej cieczy do dzbanka blendera
należy zachować ostrożność, gdyż może ona zostać wyrzucona
na zewnątrz z powodu błyskawicznego parowania.
• Urządzenie nie może być obsługiwane za pomocą
zewnętrznego zegara lub oddzielnego systemu zdalnego
sterowania.
• Urządzenie nie jest przeznaczone do użytkowania przez osoby
o ograniczonych zdolnościach fizycznych, sensorycznych
lub umysłowych, lub osoby nieposiadające doświadczenia i
wiedzy, chyba że osoby odpowiedzialne za ich bezpieczeństwo
zapewniają im opiekę oraz szkolenie dotyczące użytkowania
urządzenia.
• Dzieci powinny być zawsze pod opieką, aby zapewnić, że nie
bawią się tym produktem.
• To urządzenie nie może być używane przez dzieci. Urządzenie

56
i zasilacz należy przechowywać w miejscu niedostępnym dla
dzieci podczas i po zakończeniu użytkowania.
• Przed użyciem zawsze należy sprawdzić urządzenie i akcesoria
pod kątem widocznych śladów uszkodzeń. Nie używać
urządzenia, jeśli jest uszkodzone lub upadło. W przypadku
uszkodzenia lub awarii urządzenia należy skontaktować się
z infolinią obsługi klienta Cuisinart (patrz punkt „Gwarancja
międzynarodowa” na stronie 72).
• Nie używać urządzenia, jeśli przewód jest uszkodzony. W
przypadku uszkodzenia przewodu natychmiast przerwać
korzystanie z urządzenia. Jeśli przewód ulegnie uszkodzeniu,
musi on zostać wymieniony przez producenta. Urządzenie
należy zwrócić do punktu obsługi klienta (patrz punkt
„Gwarancja międzynarodowa” na stronie 72). Użytkownikowi
nie wolno podejmować prób naprawy urządzenia.
• Nigdy nie wyciągać wtyczki z gniazdka sieciowego za przewód.
• Nie owijać przewodu wokół urządzenia podczas ani po
zakończeniu użytkowania.
• Urządzenie można bezpiecznie pozostawić podłączone do sieci
elektrycznej, gdy nie jest używane, co zapewni, że akumulatory
będą zawsze ładowane. Należy je jednak odłączyć przed
montażem, demontażem, czyszczeniem lub jeśli nie będzie
używane przez dłuższy czas.
• Produkt zawiera akumulator litowo-jonowy, którego nie należy
wyjmować z urządzenia w celu jego naładowania. Akumulator
w urządzeniu nie jest przeznaczony do wymiany.
• Nie wolno dopuścić do zwarcia zacisków zasilania.
• OSTRZEŻENIE: W celu naładowania akumulatora należy
używać wyłącznie odłączanej ładowarki dostarczanej wraz z
tym urządzeniem. Symbol
ten oznacza, że urządzenie
należy ładować przy użyciu odłączanego zasilacza.
• Produkt ten jest w pełni zgodny ze wszystkimi
obowiązującym
przepisami UE i Wielkiej Brytanii oraz normami odnoszącymi

57
się do tego urządzeń tego typu i klasy. Nasza rma uzyskała
certykat ISO9001:2015 i nieustannie werykuje działanie
naszego systemu zarządzania jakością. W przypadku
jakichkolwiek pytań dotyczących bezpieczeństwa i
zgodności produktów prosimy o kontakt z naszym działem
obsługi klienta (patrz punkt „Gwarancja międzynarodowa”
na stronie 72).
• OSTRZEŻENIE: Unikać kontaktu z ruchomymi częściami.
Podczas pracy z urządzeniem nie zbliżać dłoni, włosów,
elementów odzieży ani łopatek czy innych przyborów
do akcesoriów z powodu ryzyka obrażeń ciała i/lub
uszkodzenia urządzenia. Łopatki można użyć tylko wtedy,
gdy urządzenie nie pracuje.
• OSTRZEŻENIE: Nie zbliżać palców do końcówek. Aby wyjąć
żywność, należy najpierw upewnić się, że urządzenie nie
działa.
• Ładowarkę należy podłączyć do gniazdka elektrycznego z
dala od zlewu i gorącej powierzchni.
• Nie wolno używać przedłużaczy. Podłączać ładowarkę
bezpośrednio do gniazda elektrycznego.
• Nie wolno ładować urządzenia za pomocą gniazda
elektrycznego umieszczonego na zewnątrz.
• Nie wolno zanurzać jednostki głównej w wodzie ani w
innych cieczach, gdyż może to spowodować porażenie
prądem elektrycznym. Jedynie końcówki tego urządzenia są
przeznaczone do zanurzania w wodzie lub innych cieczach.
Nie wolno nigdy zanurzać w jakichkolwiek cieczach żadnej
innej części tego urządzenia. Jeśli urządzenie wpadnie
do jakiejkolwiek cieczy, należy go natychmiast wyjąć,
wyczyścić i dokładnie wysuszyć przed ponownym użyciem.
• Przed czyszczeniem zawsze wyjąć zespół noży z misy.

58
• Nie wolno umieszczać zbyt dużych ilości składników w
misie blendera. Misę napełniać do zaznaczonej wysokości
maksymalnej.
• Nie uruchamiać blendera z pustą misą – spowoduje to
uszkodzenie silnika.
• Nie miksować gorących cieczy w misie blendera.
• Jednostki głównej nie wolno zanurzać w wodzie ani innych
cieczach.
• OSTROŻNIE: Z nożami należy obchodzić się ostrożnie. Noże
są ostre i mogą być przyczyną obrażeń ciała. NIE WOLNO
podejmować prób wyjęcia noży z zespołu.
UWAGA: Noży ze stali nierdzewnej nie wolno wyjmować z
czarnego zespołu noży.
OSTRZEŻENIE: Worki polietylenowe, w których
znajduje się produkt lub jego opakowania mogą
stanowić zagrożenie. Aby uniknąć ryzyka uduszenia,
przechowuj je w miejscach niedostępnych dla
niemowląt i dzieci. Worki te nie służą do zabawy.
UTYLIZACJA BATERII
Aby zminimalizować zagrożenia dla zdrowia i
środowiska naturalnego po zakończeniu eksploatacji
produktu, przepisy dotyczące zużytego sprzętu
elektrycznego i elektronicznego (WEEE) oraz dyrektywa w
sprawie zużytych baterii wymagają, aby został on utylizowany
w odpowiednim punkcie zbiórki, do którego zostanie wysłany w
celu usunięcia baterii i odpowiedniego recyklingu. Skontaktuj
się z lokalnymi instytucjami, aby uzyskać więcej informacji
na temat recyklingu i bezpiecznej utylizacji w Twoim miejscu
zamieszkania.
Symbol umieszczony na produkcie lub jego opakowaniu
wskazuje, że produkt ten nie może być traktowany jako odpad
komunalny. Powinien on zostać dostarczony do właściwego

59
punktu zbiórki zajmującego się recyklingiem urządzeń
elektrycznych i elektronicznych. Zapewniając prawidłową
utylizację produktu pomagasz w zapobieganiu potencjalnym
negatywnym skutkom dla środowiska i zdrowia ludzkiego,
które w przeciwnym razie mogłyby być spowodowane
niewłaściwym postępowaniem z odpadami tego produktu. Aby
uzyskać bardziej szczegółowe informacje na temat recyklingu
tego produktu, należy skontaktować się z biurem lokalnego
samorządu lub służbami utylizacji odpadów komunalnych.
Bezpieczeństwo podczas użytkowania
• Ładowarkę należy podłączyć do gniazdka elektrycznego z dala
od zlewu i gorącej powierzchni.
• Nie wolno używać przedłużaczy. Podłączać ładowarkę
bezpośrednio do gniazda elektrycznego.
• Nie wolno ładować urządzenia za pomocą gniazda
elektrycznego umieszczonego na zewnątrz.
• Nie wolno zanurzać jednostki głównej w wodzie ani w
innych cieczach, gdyż może to spowodować porażenie
prądem elektrycznym. Jeśli podstawa zasilająca wpadnie do
jakiejkolwiek cieczy, należy go natychmiast wyjąć, wyczyścić
i dokładnie wysuszyć przed ponownym użyciem.
• Z blendera należy zawsze korzystać na czystej, stabilnej i
suchej powierzchni.
• Nie umieszczać noży na podstawie blendera bez
zamocowanego kielicha do rozdrabniania.
• Przed użyciem sprawdzić, czy zespół noży jest stabilnie
zamocowany w kielichu do rozdrabniania.
• W kielichu do rozdrabniania nie wolno przygotowywać
napojów gazowanych.
• Kielicha do rozdrabniania nie wolno używać w kuchence
mikrofalowej.
• Noże należy zawsze przechowywać w osłonie zabezpieczającej.

60
2. WSTĘP
Gratulujemy zakupu blendera Cuisinart.
Od ponad 30 lat celem firmy Cuisinart jest produkcja najdoskonalszych urządzeń kuchennych.
Wszystkie produkty Cuisinart zostały zaprojektowane z myślą o wyjątkowo długim okresie
eksploatacji; są łatwe w użyciu i zapewniają doskonałe efekty dzień po dniu.
Aby dowiedzieć się więcej o naszych produktach i zapoznać się z pomysłami na przepisy, odwiedź
naszą witrynę internetową www.cuisinart.eu.
3. SPECYFIKACJA PRODUKTU (patrz okładka)
1. Kielich do rozdrabniania
2. Zespół noży
3. Kontrolki
4. Przełącznik wł./wył.
5. Podstawa zasilająca
6. Port ładowania (nie pokazano)
7. Pokrywka do picia
8. Osłona zabezpieczająca noży
9. Przewód i adapter USB
4. UŻYTKOWANIE
Przed pierwszym użyciem zalecamy przetarcie jednostki głównej czystą, wilgotną szmatką,
aby usunąć wszelkie zabrudzenia i kurz. Następnie należy wytrzeć ją miękką, chłonną szmatką.
Starannie oczyścić kielich do rozdrabniania, zespół noży i pokrywkę do picia w ciepłej wodzie z
detergentem.
UWAGA: Nie należy używać środków czyszczących o właściwościach ściernych, ostrych narzędzi
ani szorstkich myjek.
A. ŁADOWANIE BLENDERA
Akumulator blendera nie został całkowicie naładowany. Przed użyciem akumulator należy
ładować do chwili, aż zapalą się wszystkie trzy niebieskie kontrolki. Całkowicie naładowany
blender wystarczy do przygotowania około 8 koktajli, lecz czas użytkowania zależy od przepisu i
twardości użytych składników. Blender osiąga pełne naładowanie po około 2 godzinach.
UWAGA: Aby naładować jednostkę główną, umieścić koniec przewodu do ładowania micro USB w
porcie do ładowania z tyłu jednostki głównej. Podłączyć końcówkę przewodu USB bezpośrednio
do wtyczki adaptera, a następnie do gniazdka sieciowego.
Kontrolki naładowania akumulatora
Podczas ładowania akumulatora kontrolki będą migać na niebiesko. Gdy palą się wszystkie
trzy kontrolki, oznacza to, że akumulator jest całkowicie naładowany i gotowy do użytku. Gdy
akumulator zacznie się rozładowywać, kontrolki kolejno gasną. Gdy ostatnia kontrolka miga,
akumulator należy naładować. Jeśli akumulator całkowicie się wyczerpie, urządzenie nie będzie
działać.

61
UWAGA: Nie wolno używać blendera, gdy jest podłączony do sieci i ładuje się.
Najlepsze rezultaty ładowania blendera zapewnia używanie wyłącznie przewodu USB i adaptera
do ładowania dostarczanych z urządzeniem.
B. DZIAŁANIE
• Sprawdzić, czy blender jest naładowany, używając instrukcji w punkcie A. Jeśli nie jest, nie
można z niego korzystać po podłączeniu do sieci elektrycznej. Przed rozpoczęciem korzystania z
urządzenia poczekać, aż naładuje się w wystarczającym stopniu.
• Umieścić składniki w kielichu do rozdrabniania.
UWAGA: Zachować ostrożność i nie przekraczać maksymalnej linii napełniania. Aby uzyskać
najlepsze rezultaty, zawsze umieszczać najpierw w kielichu najtwardsze składniki (kostki lodu,
zamrożone owoce itp.), a następnie dodawać bardziej miękkie i ciecze. Zalecamy krojenie
składników w kostkę o boku 3 cm, by uzyskać najbardziej jednorodny rezultat. W przypadku
rozdrabniania twardych składników, jak marchewka, kielich do rozdrabniania należy napełniać
maksymalnie do połowy.
• ołączyć czarny zespół noży z kielichem z ostrzem skierowanym w dół do kielicha. Obrócić zespół
noży w kierunku zgodnym z ruchem wskazówek zegara, do jego dokręcenia.
UWAGA: Zachować ostrożność i nie dotykać noży - zawsze trzymać zespół noży za czarną część
z tworzywa sztucznego.
• Sprawdzić, czy podstawa zasilająca została umieszczona na czystej, suchej powierzchni. Umieścić
kielich do rozdrabniania na podstawie zasilającej z czarnym zespołem noży na spodzie i obrócić,
by wskoczył na swoje miejsce. Gdy kielich zostanie zamocowany, rozlegnie się kliknięcie. Przed
użyciem blendera należy zawsze sprawdzić, czy kielich został zamocowany.
UWAGA: Jeśli zespół noży i kielich nie zostaną prawidłowo połączone, blender nie uruchomi się.
• Aby go włączyć, nacisnąć raz przycisk zasilania. Zapalą się diody LED i silnik się uruchomi.
Nacisnąć ponownie przycisk zasilania, by wyłączyć urządzenie.
UWAGA: Blender może pracować maksymalnie przez 1 minutę. Po upływie 1 minuty
automatycznie się wyłączy. Jeśli przepis wymaga rozdrabniania dłuższego niż jedna minuta,
wystarczy przerwać je na kilka sekund, a następnie ponownie uruchomić blender.
• Po rozdrobnieniu składników zdjąć kielich do rozdrabniania z podstawy obracając go w kierunku
przeciwnym do ruchu wskazówek zegara.
UWAGA: Nie podejmować prób zdjęcia kielicha, jeśli silnik nadal pracuje. Jeśli kielich zostanie
odblokowany podczas rozdrabniania, blender automatycznie się wyłączy.
• Umieścić kielich do rozdrabniania prosto na blacie z czarnym zespołem noży na górze. Obrócić
zespół noży w kierunku przeciwnym do ruchu wskazówek zegara, by go zdjąć.
UWAGA: Zachować ostrożność i nie dotykać ostrzy, gdyż są bardzo ostre. Zawsze trzymać zespół
noży za czarny element z tworzywa sztucznego.
UWAGA: Noży ze stali nierdzewnej nie wolno wyjmować z czarnego zespołu noży.
• Zespół noży należy natychmiast umyć lub bezpiecznie schować zakładając przezroczystą osłonę
noży do chwili, gdy będzie można je umyć. Wystarczy nałożyć osłonę na zespół noży i obrócić w
kierunku zgodnym z ruchem wskazówek zegara, by zablokować je na miejscu.
UWAGA: Zawsze używać osłony ochronnej podczas przechowywania zespołu noży.
• W razie potrzeby zamocować na kielichu do rozdrabniania pokrywkę do picia obracając ją w
kierunku zgodnym z ruchem wskazówek zegara, aż zostanie dokręcona. Przed umieszczeniem
kielicha w torbie w celu jego przewiezienia sprawdzić, czy wieczko pokrywki jest bezpiecznie
zamknięte.

62
C. SUGESTIE I WSKAZÓWKI
• Aby uzyskać najlepsze rezultaty, podczas stosowania blendera zawsze umieszczać najpierw
w kielichu najtwardsze składniki (kostki lodu, zamrożone owoce itp.), a następnie dodawać
bardziej miękkie i ciecze.
• Zalecamy krojenie większości składników w kostkę o boku 3 cm, by uzyskać najbardziej
jednorodny rezultat.
• Jeśli żywność zacznie przywierać do boków kielicha, wyłączyć blender, zdjąć kielich i delikatnie
nim potrząsnąć. Założyć z powrotem i rozdrabniać dalej.
• Podczas rozdrabniania gęstszych mieszanin delikatnie przycisnąć górną część kielicha, by nie
odrywał się od powierzchni blatu.
• Po rozdrobnieniu zdjąć kielich i umieścić go na blacie tak, by zespół noży znajdował się na górze.
Delikatnie stuknąć kilka razy w kielich, by zapobiec skapywaniu mieszaniny po wyjęciu noży.
• Niektóre przepisy wymagają rozdrabniania trwającego dłużej niż jedną minutę. Wystarczy
uruchomić blender ponownie.
5. CZYSZCZENIE & KONSERWACJA
• Po użyciu urządzenie należy zawsze starannie oczyścić.
• Zdjąć noże i oczyścić jednostkę główną gąbką lub wilgotną ściereczką.
• Nie należy używać środków czyszczących o właściwościach ściernych, które mogą zarysować
powierzchnię.
• Noże myć ręcznie wodą z detergentem.
• Kielich do rozdrabniania, osłona zabezpieczająca noży i pokrywka do picia mogą być myte wodą
z detergentem lub umieszczane na górnej półce zmywarki.
OSTROŻNIE: Z nożami należy obchodzić się ostrożnie. Noże są ostre i mogą być przyczyną
obrażeń ciała. NIE WOLNO podejmować prób wyjęcia noży z zespołu.

63
1.
( )
ПРЕЖДЕ ЧЕМ ИСПОЛЬЗОВАТЬ ЭЛЕКТРОПРИБОР,
ВНИМАТЕЛЬНО ПРОЧТИТЕ ДАННЫЕ ПРАВИЛА
БЕЗОПАСНОСТИ!
Чтобы избежать телесных повреждений или поломок
электроприбора, всегда соблюдайте нижеследующие
правила безопасности в процессе использования
прибора. Используйте данный электроприбор только так,
как это описано в настоящем руководстве. Использование
прибора не по назначению может привести к травме.
• Данный электроприбор предназначен исключительно
для домашнего использования. Прибор не предназначен
для эксплуатации на кухнях коллективного пользования
для персонала офисов, магазинов, а так же в любой другой
профессиональной среде. Прибор не предназначен для
использования в гостевых домах на фермах, клиентами
гостиниц, мотелей и других учреждений проживания,
типа гостевых комнат.
• Будьте осторожны при обращении с насадками в процессе
их использования и ухода за ними.
• Будьте осторожны, если в чашу для смешивания налита
горячая жидкость: она может переливаться через край
при выбросе пара.
• Электроприбор не предназначен для использования
с внешним таймером или дистанционным пультом
управления.
• Лица с ограниченными физическими, сенсорными
или умственными способностями, или с недостатком
опыта и знаний, могут пользоваться прибором только
в том случае, если они находятся под наблюдением или
были проинструктированы лицом, ответственным за их
безопасность, о правилах пользования прибором.

64
• Проследите за детьми, чтобы они не играли с данным
электроприбором.
• Прибор не предназначен для использования детьми.
Прибор и сетевой адаптер должны находиться в местах,
недоступных для детей, как во время, так и по окончании
их использования.
• Каждый раз, перед тем как воспользоваться
электроприбором или его аксессуарами, обязательно
проверьте их состояние и убедитесь в отсутствии
видимых признаков повреждений. Не пользуйтесь
электроприбором, если он поврежден или если он падал.
В случае повреждения или неисправности прибора
обратитесь в службу поддержки клиентов Cuisinart (см.
раздел «Международная гарантия», стр. 72).
• Не пользуйтесь электроприбором, если шнур питания
поврежден. При повреждении шнура питания
немедленно прекратите использование электроприбора.
Замена поврежденного электрического шнура должна
осуществляться производителем. Верните прибор в
отдел послепродажного обслуживания (см. раздел
«Международная гарантия», стр. 72). Никакие виды
ремонта не должны выполняться пользователем.
• Никогда не вытаскивайте вилку из розетки, потянув за
шнур.
• Не наматывайте электрический шнур вокруг корпуса во
время или после использования электроприбора.
• Чтобы аккумуляторные батарейки были всегда
заряженными, можно без опасений оставлять
электроприбор вк люченным в сеть, когда вы не пользуетесь
им. Однако если вы не пользуетесь электроприбором в
течение длительного периода времени, а также перед
сборкой, демонтажем или очисткой прибора его следует
отключить от сети.

65
• Данный электроприбор оснащен литий-ионной
перезаряжаемой батарейкой. Для перезарядки батарейки
ее не следует извлекать из электроприбора. Батарейки в
данном приборе не подлежат замене.
• Не допускайте короткого замыкания клемм питания.
• : Для зарядки аккумуляторной батарейки
пользуйтесь только тем зарядным устройством, которое
включено в комплект поставки электроприбора. Данный
символ указывает на наличие съемного зарядного
устройства.
• Данное изделие полностью соответствует всем
применяемым законодательным актам ЕС и
Великобритании, а также стандартам, относящимся
к этому типу и классу приборов. Наша компания
сертифицирована в соответствии со стандартом
ISO9001:2015, определяющим требования к системе
управления качеством, эффективность которой находится
под постоянным контролем. Если у вас есть какие-
либо вопросы относительно безопасности продукции
и ее соответствия требованиям, обратитесь в наш отдел
обслуживания клиентов (см. раздел «Международная
гарантия», стр. 72).
• : Избегайте контакта с движущимися частями.
Руки, волосы, одежда, а также кухонные шпатели и иная
утварь должны быть на удалении от насадок во время
функционирования прибора, чтобы избежать телесных
повреждений и/или поломок электроприбора. Кухонным
шпателем можно пользоваться только при выключенном
приборе.
• : Не прикасайтесь пальцами к насадкам
прибора. Прежде чем удалить с насадок остатки
продуктов, убедитесь в том, что блендер остановлен.
• Розетка, в которую включается зарядное устройство,
должна находиться на удалении от кухонной раковины и

66
от горячих поверхностей.
• Не пользуйтесь удлинителем. Включайте зарядное
устройство непосредственно в электрическую розетку.
• Для зарядки электроприбора не пользуйтесь розеткой,
установленной вне помещения.
• Во избежание поражения электрическим током не
погружайте основной блок прибора в воду или другие
жидкости. Только насадки электроприбора выполнены
таким образом, чтобы их было можно погружать в воду
или иную жидкость. Никогда не погружайте в воду другие
части прибора. Если блендер попадает в жидкость,
немедленно извлеките его оттуда, тщательно очистите и
высушите прежде, чем продолжить работу.
• Перед уходом за блоком ножей достаньте его из чаши.
• Не перегружайте чашу для смешивания. Соблюдайте
линию максимального заполнения.
• Не запускайте блендер пустым: это может повредить
двигатель.
• Не смешивайте в рабочей чаше горячие жидкости.
• Не погружайте основной блок в воду или другие жидкости
• : Обращайтесь с ножом блендера очень
осторожно. Лезвия ножа - острые и могут стать причиной
травм. НЕ ПЫТАЙТЕСЬ снять нож с ножевого блока.
N.B. Нож из нержавеющей стали не снимается с черной
основы ножевого блока.
: полиэтиленовые пакеты, в которые
уложен аппарат или его упаковка, могут
представлять собой опасность. Во избежание
малейшей опасности удушения следует хранить
эти пакеты в местах, недоступных младенцам и
детям. Данные пакеты не игрушка!

67
Чтобы свести к минимуму опасность для здоровья
и окружающей среды по окончании срока
службы данного изделия, законы, касающиеся
отходов электрического и электронного
оборудования (WEEE), а также Директива по отработанным
аккумуляторным батареям требуют, чтобы данный прибор
был утилизирован в соответствующем месте сбора,
где после извлечения батареек он будет переработан
надлежащим образом. Пожалуйста, свяжитесь с местными
органами управления для получения более подробной
информации о переработке и безопасной утилизации
подобных отходов в вашем регионе.
Символ на товаре или на его упаковке означает, что
прибор не следует выбрасывать с бытовыми отходами.
Вместо этого его следует сдать в соответствующий пункт
сбора для утилизации электрического и электронного
оборудования. Обеспечивая надлежащую утилизацию
данного прибора, вы способствуете предотвращению
возможных негативных последствий для окружающей
среды и здоровья человека, которые в противном случае
могут быть вызваны неправильным обращением с
отслужившим прибором. Для получения более подробной
информации об утилизации данного прибора, пожалуйста,
свяжитесь с местными органами управления или службой
по утилизации бытовых отходов.
• Розетка, в которую включается зарядное устройство,
должна находиться на удалении от кухонной раковины и
от горячих поверхностей.
• Не пользуйтесь удлинителем. Включайте зарядное
устройство непосредственно в электрическую розетку.
• Для зарядки электроприбора не пользуйтесь розеткой,
установленной вне помещения.

68
• Во избежание поражения электрическим током не
погружайте основной блок прибора в воду или другие
жидкости. Если блок питания попадает в жидкость,
немедленно извлеките его оттуда, тщательно очистите и
высушите прежде, чем продолжить работу.
• Пользуйтесь блендером только на чистой, прочной и
сухой поверхности.
• Не устанавливайте нож на блендер без прикрепленной
чаши для смешивания.
• Перед использованием прибора убедитесь в том, что блок
ножей плотно закреплен в чаше для смешивания.
• Никогда не используйте газированные напитки в чаше
для смешивания
• Чаша для смешивания не предназначена для
использования в микроволновой печи.
• Храните нож с надетым на него защитным колпачком.
2.
Cuisinart!
В течение вот уже более 30 лет целью компании Cuisinart является производство
высококачественного кухонного оборудования. Все изделия Cuisinart отличаются
исключительной долговечностью, весьма просты в использовании и каждодневно
демонстрируют свои выдающиеся эксплуатационные качества.
Чтобы поближе ознакомиться со всеми нашими изделиями и с идеями рецептов, посетите
сайт www.cuisinart.eu
3.
(. )
1.
2.
3.
4. ./.
5.
6. ( )

69
7.
8.
9. USB-
4.
Перед первым использованием мы рекомендуем протереть корпус прибора чистой
влажной тканью, чтобы удалить грязь и пыль. Вытрите его насухо мягкой впитывающей
тканью. Тщательно вымойте в теплой мыльной воде чашу для смешивания, нож блендера
и крышку для питья.
N.B. Не используйте абразивные чистящие средства, жесткие приспособления или мочалки.
.
Батарейки блендера были заряжены не полностью. Перед тем как воспользоваться
прибором, его следует оставить на зарядке до тех пор, пока не загорятся все три синих
световых индикатора. Полностью заряженным блендером можно приготовить примерно
8 смузи, в зависимости от рецепта и от твердости перерабатываемых ингредиентов. Для
полной зарядки блендера потребуется примерно 2 часа.
N.B. Чтобы зарядить основной блок, вставьте конец кабеля для зарядки с разъемом Micro
USB в разъем для подключения зарядного устройства на задней панели основного блока.
Вставьте другой конец кабеля USB непосредственно в вилку сетевого адаптера, и затем
подключите к розетке.
В процессе зарядки синие световые индикаторы мигают. Когда все три световых индикатора
горят постоянно, это значит, что батарейка полностью заряжена, и прибор готов к работе.
Когда батарейка разряжается, световые индикаторы начинают гаснуть. Когда мигает
последний световой индикатор, батарейку необходимо перезарядить. Если аккумуляторная
батарейка полностью разряжена, прибор не будет работать.
N.B. Нельзя пользоваться блендером, пока он заряжается от сети.
Чтобы обеспечить максимальную эффективность зарядки блендера, мы рекомендуем
использовать только тот USB-кабель и тот сетевой адаптер для зарядки, которые поставлены
вместе с прибором.
.
• Зарядите блендер, как рекомендовано в разделе А «Зарядка блендера». Если блендер не
заряжен, он не сможет функционировать при включении в сеть. Вам придется подождать,
пока прибор достаточно зарядится, чтобы он смог функционировать в соответствии со
своим назначением.
• Поместите ингредиенты в чашу для смешивания.
N.B. Будьте внимательны: не превышайте максимальный уровень заполнения. Для
достижения наилучших результатов сначала поместите в чашу наиболее твердые
ингредиенты (кубики льда, замороженные фрукты и т. д.), а затем более мягкие ингредиенты
и жидкости. Для получения наиболее равномерного результата мы рекомендуем нарезать
продукты кусочками в 3 см. Если вы используете твердые ингредиенты, такие как морковь,
чаша для смешивания не должна быть заполнена больше чем наполовину.
• Закрепите черный ножевой блок в чаше; лезвие ножа должно быть направлено вниз.

70
Поворачивайте ножевой блок по часовой стрелке до тех пор, пока он не затянется до
упора.
N.B. Будьте осторожны, не притрагивайтесь к лезвиям ножа, беритесь только за черную
пластмассовую часть ножевого блока.
• Поставьте блок питания на чистую, сухую поверхность. Установите чашу для смешивания
на блок питания (черный ножевой блок должен быть внизу) и поверните ее, чтобы
заблокировать на месте. Когда чаша установлена должным образом, вы почувствуете
щелчок. Перед использованием блендера обязательно проверяйте, закреплена ли в нем
чаша.
N.B. Если ножевой блок и чаша не закреплены должным образом, блендер не будет работать.
• Чтобы привести прибор в действие, нажмите на кнопку питания один раз. При этом
загорятся светодиодные индикаторы, и двигатель запустится. Чтобы выключить прибор,
снова нажмите на кнопку питания.
N.B. Блендер может функционировать не долее 1 минуты. По истечении 1 минуты
перемешивания ингредиентов блендер автоматически останавливается. Если по рецепту
требуется смешивать ингредиенты дольше минуты, просто сделайте паузу на несколько
секунд, а затем снова запустите блендер.
• Как только все ингредиенты будут достаточно перемешаны, снимите рабочую чашу с
блендера, повернув ее против часовой стрелки, чтобы разблокировать ее.
N.B. Не пытайтесь снять чашу для смешивания, пока работает двигатель. Если чашу
разблокировать во время смешивания, блендер автоматически остановится.
• Поставьте чашу для смешивания на поверхность вертикально, черный ножевой блок
должен находиться вверху. Чтобы снять черный ножевой блок, поверните его против
часовой стрелки.
N.B. Будьте осторожны, не притрагивайтесь к лезвиям ножа – они крайне острые, беритесь
только за черную пластмассовую часть ножевого блока.
N.B. Лезвие из нержавеющей стали не может быть снято с ножевого блока.
• Ножевой блок можно вымыть сразу же или отложить его в сторону, обезопасив с помощью
защитного колпачка, до того момента, когда блок можно будет вымыть. Достаточно надеть
колпачок на ножевой блок и закрепить его на месте, повернув по часовой стрелке.
N.B. Для хранения ножевого блока всегда пользуйтесь защитным колпачком.
• При необходимости закрепите крышку для питья на чаше для смешивания: поверните
крышку по часовой стрелке до тех пор, пока она плотно не закроет чашу. Убедитесь
в том, что крышка питьевого отверстия надежно закрыта, прежде чем положить чашу в
дорожную сумку.
.
• Для достижения наилучших результатов при использовании блендера сначала поместите
в чашу наиболее твердые ингредиенты (кубики льда, замороженные фрукты и т. д.), а затем
более мягкие ингредиенты и жидкости.
• Для получения однородного результата переработки продуктов их рекомендуется
нарезать кусочками в 3 см.
• Если ингредиенты прилипли к стенкам чаши при смешивании, остановите блендер, снимите
чашу и осторожно встряхните ее. Установите чашу на место и продолжите переработку.
• При приготовлении густых смесей слегка прижмите чашу сверху, чтобы она не
перемещалась по рабочей поверхности.
• После смешивания снимите чашу и поставьте ее на рабочую поверхность таким образом,

71
чтобы ножевой блок находился сверху. Слегка постучите по чаше несколько раз, чтобы
жидкость стекла по стенкам и не разбрызгивалась при извлечении ножевого блока.
• Для некоторых рецептов может потребоваться смешивать ингредиенты дольше одной
минуты. В таком случае достаточно снова запустить блендер после его остановки.
5.
• Прибор следует тщательно очистить после каждого использования.
• Снимите ножевой блок, протрите основной блок влажной губкой или тканью.
• Не пользуясь никакими абразивными средствами, которые могу повредить поверхность
прибора.
• Вымойте ножевой блок вручную горячей мыльной водой.
• Чашу для смешивания, защитный колпачок для ножа и крышку для питья можно вымыть
либо горячей мыльной водой, либо в верхней корзине посудомоечной машины.
: :
. .

72
Facture - Ticket de caisse / Receipt - Sales ticket / Rechnung - Kassenschein
/ Factuur - Kasticket / Fattura - scontrino / Factura - Tique de caja /
Factura - talão de caixa / Faktura - Paragon / -
Acheteur / Purchaser / Käufer / Koper / Acquirente / Comprador / Comprador / Nabywca / Покупатель
FRANÇAIS : CUISINART vous garantit une mise en relation facilitée
avec ses services consommateurs de tous les pays. Pour connaître
les coordonnées de votre service consommateur, composez le :
ENGLISH : CUISINART guarantees easier contact with its customer
services in every country. For details of the customer services in
your area, call:
DEUTSCH : CUISINART gewährleistet Ihnen eine unkomplizierte
Kontaktaufnahme mit den Kundendienststellen in allen Ländern.
Um die Adresse Ihres Kundendienstes zu erfahren, wählen Sie:
NEDERLANDS : CUISINART garandeert u een eenvoudig contact
met de klantenservice in alle landen. Om telefonisch contact
met de klantenservice te verkrijgen, raadpleegt u het volgende
nummer:
ITALIANO : CUISINART garantisce in ogni paese un facile contatto
con i propri servizi di assistenza ai consumatori. Per conoscere i
dettagli del vostro servizio consumatori, telefonate al numero:
ESPAÑOL : CUISINART le facilita la comunicación con los servicios
de atención al cliente de todos los países. Para conocer los datos
de su servicio de atención al cliente, marque el:
PORTUGUÊS : A CUISINART facilita o acesso aos seus serviços de
apoio ao consumidor em todos os países. Para entrar em contacto
com o seu serviço de apoio ao consumidor, marque o número:
POLSKI : Firma CUISINART zapewnia Państwu łatwy kontakt
ze swoim działem obsługi klientów we wszystkich krajach. Aby
uzyskać dane kontaktowe działu obsługi klientów w Państwa
kraju, należy wybrać numer:
: CUISINART гарантирует наличие сервисных
центров в любой стране. При приобретении изделий
домашнего применения торговой марки CUISINART
на территории Российской Федерации, информация
по ближайшим сервисным центрам и их адресам
предоставляется по телефону:
• Merci de conserver cette carte de garantie avec l’original de votre preuve d’achat.
• Please keep this warranty card with your original proof of purchase.
• Bitte bewahren Sie diese Garantiekarte zusammen mit dem Original Ihres Kaufbelegs auf.
• Bewaar deze garantiekaart goed, samen met uw originele aankoopbewijs
• Conservare il presente attestato di garanzia con l’originale della prova d’acquisto.
• Debe conservar este certicado de garantía junto con el original de su prueba de compra.
• Conserve este certicado de garantia com o original do comprovativo de compra.
• Proszę zachować tę kartę gwarancyjną z oryginałem dowodu zakupu.
•Пожалуйста, сохраняйте данный гарантийный талон вместе с оригиналами документов, подтверждающих Вашу покупку.
N°VERT
00 800 2011 2014
France
Deutschland
Italia
España
Portugal
Polska
+31 (79) 363 4242
+7 495 729 76 13
+7 495 018 59 47
Nederland
00 800 5000 6000
GREEN
NUMBER
Belgique, België,
Belgien
00 800 5000 6000
GREEN
NUMBER
00 800 5000 6000
GREEN
NUMBER
00 800 5000 6000
GREEN
NUMBER
00 800 5000 6000
GREEN
NUMBER
00 800 5000 6000
GREEN
NUMBER
Hot Line: 00 800 5000 6000
cuisinart_international@conair.com
Garantie Internationale / International Guarantee/ Internationale Garantie / Internationaal
garantiebewijs / Garanzia Internazionale / Garantía Internacional / Garantia Internacional / Gwarancja
międzynarodowa /
CUISINART
99 avenue Aristide Briand
92120 MONTROUGE - FRANCE
www.cuisinart.eu

73
FRANCAIS : GARANTIE uniquement d’application en France + DOM/COM
(Martinique, Réunion, Guyane, Guadeloupe, Mayotte, Saint-Pierre-et-
Miquelon, Saint-Barthélemy), Nouvelle Calédonie, Polynésie Française,
Wallis-et-Futuna
2 ans de garantie à compter de la date d’achat sur présentation d’une preuve
d’achat.
- Un échange standard (produit identique ou à défaut produit équivalent)
du produit sera eectué pendant cette période (ticket de caisse ou facture).
La garantie couvre tout défaut de fabrication ou vice de matière mais
s’applique sous certaines conditions. En particulier :
- L’appareil doit avoir été utilisé exclusivement et conformément à sa
destination, telle qu’indiquée dans la notice d’utilisation et pour un usage
non professionnel.
- La garantie exclut les détériorations résultant d’une mauvaise utilisation,
d’une chute, de démontage, réparation ou modication eectués par des
personnes non autorisées par Cuisinart, d’une négligence, d’une utilisation
à une tension électrique non appropriée ou avec des accessoires ou
consommables non adaptés.
- Les accessoires et consommables ne sont pas pris en charge dans le cadre de
cette garantie.
- La garantie ne s’applique pas pour les dommages causés par une catastrophe
naturelle telle qu’un incendie ou dégât des eaux.
Nos produits peuvent être réparés, échangés ou remboursés, au choix exclusif
de Cuisinart et de son revendeur.
Cette garantie Cuisinart vient en complément de la garantie légale de
conformité telle que mentionnée aux articles L. 211-4 à L. 211-13 du code de
la consommation et de celle relative aux défauts de la chose vendue, dans les
conditions prévues aux articles 1641 à 1648 et 2232 du Code Civil.
Extrait du Code de la consommation :
Art. L. 211-4. « Le vendeur est tenu de livrer un bien conforme au contrat et répond
des défauts de conformité existant lors de la délivrance. Il répond également des
défauts de conformité résultant de l’emballage, des instructions de montage ou de
l’installation lorsque celle-ci a été mise à sa charge par le contrat ou a été réalisée
sous sa responsabilité ».
Art. L. 211-12. « L’action résultant du défaut de conformité se prescrit par deux ans
à compter de la délivrance du bien ».
Art. L. 211-5. « Pour être conforme au contrat, le bien doit :
1. Etre propre à l’usage habituellement attendu d’un bien semblable et, le cas
échéant :
- correspondre à la description donnée par le vendeur et posséder les qualités que
celui-ci a présentées à l’acheteur sous forme d’échantillon ou de modèle ;
- présenter les qualités qu’un acheteur peut légitimement attendre eu égard
aux déclarations publiques faites par le vendeur, par le producteur ou par son
représentant, notamment dans la publicité ou l’étiquetage.
2. Présenter les caractéristiques dénies d’un commun accord par les parties ou être
propre à tout usage spécial recherché par l’acheteur, porté à la connaissance du
vendeur et que ce dernier a accepté ».
Extrait du Code civil :
Art. 1641. « Le vendeur est tenu de la garantie à raison des défauts cachés de la
chose vendue qui la rende impropre à l’usage auquel on la destine, ou qui diminuent
tellement cet usage, que l’acheteur ne l’aurait pas acquise, ou n’en aurait donné qu’un
moindre prix, s’il les avait connus ».
Art. 1648 - alinéa 1er. « L’action résultant des vices rédhibitoires doit être intentée
par l’acquéreur dans un délai de deux ans à compter de la découverte du vice »
Pièces détachées et accessoires :
Ce produit n’étant pas réparable, aucune pièce détachée de réparation n’est
disponible.
Toutefois, vous pouvez vous procurer les diérents accessoires et consom
-
mables indispensables à l’utilisation du produit pendant une période d’au
moins 5 ans à compter de la date d’achat. Pour cela, merci de contacter le
service consommateurs Cuisinart.
FRANÇAIS : GARANTIE (pays autres que la France)
Cuisinart vous ore 2 ans de garantie contre tout défaut de fabrication. Un
échange standard (produit identique ou à défaut produit équivalent) du pro
-
duit sera eectué pendant cette période. Pour en bénécier, le présent bon
doit comporter l’original de la preuve d’achat (ticket de caisse ou facture)
ainsi que vos coordonnées complètes. La garantie exclut les détériorations
résultant d’une mauvaise utilisation, d’une chute, de démontage ou de répa
-
ration par des personnes non autorisées. Cette garantie contractuelle vient
en complément de la garantie légale.
ENGLISH: GUARANTEE
Cuisinart oers you a 2-year warranty. We oer a standard exchange of the
appliance (identical or equivalent) during this period. To benet from the war
-
ranty, the original proof of purchase (sales ticket or receipt) must be attached
to this warranty slip along with your full contact details. The warranty does not
cover damage resulting from misuse, falls, dismantling, or repair by unautho
-
rized persons. This guarantee in no way aects your rights under statutory law.
DEUTSCH: GARANTIE
Cuisinart bietet 2 Jahre Garantie. In diesem Zeitraum erfolgt ein
Standardumtausch des Geräts (identisches Produkt oder gegebenenfalls
gleichwertiges Produkt). Um auf diese Garantie zurückgreifen zu können,
muss dem vorliegenden Garantieschein das Original des Einkaufsbelegs
(Kassenzettel oder Rechnung) beigelegt werden. Die Garantie schließt
Schäden aufgrund einer unsachgemäßen Verwendung, eines Sturzes, eines
Zerlegens oder einer Reparatur durch nicht autorisierte Personen aus. Diese
Garantie schränkt auf keinen Fall Ihre gesetzlichen Rechte ein.
NEDERLANDS: GARANTIE
Cuisinart biedt u 2 jaar garantie. Tijdens eventuele reparatie wordt standaard
een vervangend product (een zelfde of vergelijkbaar apparaat) beschikbaar
gesteld. Om hiervan gebruik te kunnen maken dient u deze volledig ingevulde
bon en het originele aankoopbewijs te overleggen. De garantie omvat niet
beschadigingen voortvloeiend uit een verkeerd gebruik, een val, demontage
of herstelling door onbevoegde personen. Deze garantie heeft op geen enkele
manier invloed op uw rechten volgens de statutaire wet.
ITALIANO: GARANZIA
Cuisinart vi ore 2 anni di garanzia. Durante tale periodo sarà eettuato uno
scambio standard (prodotto identico o, in mancanza, prodotto equivalente).
Per beneciare della garanzia, il presente buono deve essere accompagnato
dall’originale della prova di acquisto (scontrino o fattura) e dai vostri dati
completi. Dalla garanzia sono esclusi deterioramenti dovuti ad un errato
utilizzo, a cadute, a smontaggio o riparazione eseguiti da personale non
autorizzato. La presente garanzia non inuisce in alcun modo sui vostri diritti
in base alle normative vigenti.
ESPAÑOL: GARANTíA
Cuisinart le ofrece 2 años de garantía. Durante este periodo se llevará a cabo un
cambio estándar (producto idéntico o, en su defecto, producto equivalente).
Para utilizarla, debe adjuntar a este bono el original de la prueba de compra
(tique de caja o factura), así como sus datos completos. La garantía excluye
el deterioro derivado de una utilización incorrecta, una caída, el desmontaje
o la reparación realizados por personal no autorizado. Lo dispuesto en este
contrato de garantía no puede afectar en modo alguno a los derechos que
le otorga la legislación de su país.
PORTUGUÊS: GARANTIA
A Cuisinart oferece 2 anos de garantia contra qualquer defeito de fabrico.
Durante esse período será efetuada uma troca padrão (produto idêntico ou,
na sua falta, produto equivalente). Para beneciar da garantia, esta deve ser
acompanhada do comprovativo de compra (talão de caixa ou factura), bem
como dos dados completos do comprador. Da garantia são excluídas as dete
-
riorações resultantes de uma utilização deciente, de uma queda, de desmon-
tagem ou de reparação por pessoas não autorizadas. O disposto na presente
garantia contratual não afeta os direitos legais vigentes no país do comprador.
POLSKI: GWARANCJA
Firma Cuisinart udziela gwarancji 2-letniej dotyczącej wad produkcyjnych.
W tym okresie przeprowadzona zostanie standardowa wymiana (na pro
-
dukt identyczny lub równoważny). Aby z niej skorzystać, niniejszy bon musi
zawierać oryginalny dowód zakupu (paragon lub fakturę) oraz Państwa pełne
dane identykacyjne. Gwarancja nie obejmuje uszkodzeń wynikających z
niewłaściwego użytkowania, upadku, demontażu lub przeprowadzenia
naprawy przez osoby nieupoważnione. Niniejsza gwarancja umowna stanowi
uzupełnienie gwarancji prawnej.
:
При приобретении товаров домашнего применения торговой марки
Cuisinart на территории Российской Федерации мы даем гарантию
на все заводские дефекты в течение 2 (двух) года (гарантийный срок).
В случае обнаружения в указанный гарантийный срок дефектов,
вызванных недостаточным качеством материалов или сборки в изделии,
приобретенном в Российской Федерации, в гарантийный период оно
может быть заменено на новое или аналогичное в соответствии с
Федеральным законом «О защите прав потребителей». Гарантийная
замена производится при предъявлении документов, подтверждающих
покупку товара (чек, квитанцию, гарантийный талон с отметками и т.п.)
при условии соблюдения правил эксплуатации, описанных в инструкции
по эксплуатации изделия.
Гарантия на изделия не распространяется в случаях механических
повреждений, вызванных ненадлежащим использованием, выхода из
строя изделия из-за попадания внутрь инородных предметов, жидкостей,
насекомых и т.п., его падения; разборки, ремонта или преобразования
лицами, не уполномоченными Cuisinart и/или если использованы
неоригинальные детали; вскрытия пломб на изделии; использования
изделий в условиях и режимах, отличающихся от бытовых; нарушения
инструкций по эксплуатации.
Гарантия не распространяется на аксессуары и комплектующие.
В случае предъявления претензий в соответствии с условиями настоящей
Гарантии передайте изделие целиком вместе с гарантийным талоном в
любой из центров сервисного обслуживания.
Гарантийный срок – 2 года
Cрок службы – 2 года

74

75

76

Operator :ling
PDF version :
Color Series:
Remark:
1+1(K)
1+1(K)
Version no :
Size:
Material:
Coating:
Color (Cover):
(Inside):
Date: October-15-2020
Co-ordinator :
cover:157gsm gloss art paper 6pp
inside:105gsm gloss art paper 76pp
IB-20/341
82pp
Non
n
Astor You/Andy Ws Chan
BOND FUND Code :
BOND FUND Diecut:
BOND FUND Descriptio
140mm(W)X210mm(H)
waterbase varnishing for whole book
waterbase varnishing for whole book
IB-20/341 (0,0)
Transcripción de documentos
1. 2. 3. 4. 5. Блендер электрический Производитель: BaByliss SARL 99 Авеню Аристид Бриан 92120, Монруж, Франция Факс 33 (0) 1 46 56 47 52 BABYLISS SARL 99 avenue Aristide Briand 92120 Montrouge France Сделано в Китае Дата производства (неделя, год): см. на товаре www.cuisinart.eu 6. 7. CORDLESS ON THE GO BLENDER BLENDER PORTABLE SANS FIL RPB100E Q172a FAC 2020 / 10 Instructions - Hinweise - Instructies - Istruzioni Instrucciones - instruções - instrukcji -инструкциями B IB-20/341 RPB100E 8. 9. SOMMAIRE CONTENIDO 1. Consignes de sécurité . . . . . . . . . . . . . . 1 2. Introduction . . . . . . . . . . . . . . . . . . . . . . . 6 3. Caractéristiques du produit . . . . . . . . 6 4. Utilisation . . . . . . . . . . . . . . . . . . . . . . . . . 6 5. Nettoyage & entretien . . . . . . . . . . . . . 8 Garantie internationale . . . . . . . . . . . . . . 72 1. Consignas de seguridad . . . . . . . . . . . 2. Introducción . . . . . . . . . . . . . . . . . . . . . . 3. Características del producto . . . . . . . 4. Utilización . . . . . . . . . . . . . . . . . . . . . . . 5. Limpieza & mantenimiento . . . . . . . . Garantía Internacional . . . . . . . . . . . . . . CONTENTS ÍNDICE 1. Safety cautions. . . . . . . . . . . . . . . . . . . . . 9 2. Introduction . . . . . . . . . . . . . . . . . . . . . . 13 3. Product features . . . . . . . . . . . . . . . . . . 13 4. Use . . . . . . . . . . . . . . . . . . . . . . . . . . . . . . 13 5. Cleaning & maintenance . . . . . . . . . . 15 International Guarantee . . . . . . . . . . . . . 72 1. Instruções de segurança . . . . . . . . . . . 2. Introdução . . . . . . . . . . . . . . . . . . . . . . . . 3. Características do produto . . . . . . . . . 4. Utilização . . . . . . . . . . . . . . . . . . . . . . . . 5. Limpeza & manutenção . . . . . . . . . . . . Garantia internacional . . . . . . . . . . . . . . . INHALTSVERZEICHNIS SPIS TREŚCI 1. Sicherheitshinweise . . . . . . . . . . . . . . . 2. Einleitung . . . . . . . . . . . . . . . . . . . . . . . . 3. Eigenschaften des Produkts . . . . . . 4. Gebrauch . . . . . . . . . . . . . . . . . . . . . . . . 5. Reinigung & pflege . . . . . . . . . . . . . . . Internationale Garantie . . . . . . . . . . . . . 16 21 21 21 23 72 INHOUD 1. Veiligheidinstructies . . . . . . . . . . . . . . 2. Inleiding . . . . . . . . . . . . . . . . . . . . . . . . . 3. Product kenmerken . . . . . . . . . . . . . . . 4. Gebruik . . . . . . . . . . . . . . . . . . . . . . . . . . 5. Reiniging & onderhoud . . . . . . . . . . . . Internationale garantie . . . . . . . . . . . . . . 47 51 52 52 54 72 55 60 60 60 62 72 СОДЕРЖАНИЕ 24 28 29 29 31 72 CONTENUTO 1. Istruzioni di sicurezza . . . . . . . . . . . . . 2. Introduzione . . . . . . . . . . . . . . . . . . . . . 3. Caratteristiche del prodotto . . . . . . . 4. Utilizzo . . . . . . . . . . . . . . . . . . . . . . . . . . 5. Pulizia & manutenzione . . . . . . . . . . . Garanzia internazionale . . . . . . . . . . . . . 1. Przepisy Bezpieczeństwa . . . . . . . . . . 2. Wstęp . . . . . . . . . . . . . . . . . . . . . . . . . . . . 3. Specyfikacja produktu . . . . . . . . . . . . 4. Użytkowanie . . . . . . . . . . . . . . . . . . . . . 5. Czyszczenie & konserwacja . . . . . . . Gwarancja międzynarodowa . . . . . . . . 40 44 44 45 46 72 32 36 37 37 39 72 1. Правила безопасности . . . . . . . . . . . 2. Вступление. . . . . . . . . . . . . . . . . . . . . . . 3. Характеристики и комплектация изделия . . . . . . . . . . . . . . . . . . . . . . . . . . 4. Порядок работы . . . . . . . . . . . . . . . . . 5. Уход и обслуживание. . . . . . . . . . . . . Международная гарантия . . . . . . . . . . 63 68 68 69 71 72 1. CONSIGNES DE SECURITE (TRADUCTIONS DES INSTRUCTIONS ORIGINALES) LIRE ATTENTIVEMENT TOUTES LES INSTRUCTIONS AVANT D’UTILISER L’APPAREIL ET LES CONSERVER EN LIEU SÛR EN VUE D’UNE CONSULTATION ULTÉRIEURE. Toujours suivre les consignes de sécurité lors de l’utilisation de cet appareil afin d’éviter tout risque de blessure ou de dommage à l’appareil. Cet appareil doit exclusivement être utilisé comme décrit dans la présente notice. L’utilisation incorrecte de l’appareil peut provoquer des blessures. • Cet appareil est destiné à un usage strictement domestique et n’est pas prévu pour être utilisé dans des applications telles que : les coins cuisine réservés au personnel des magasins, bureaux et autres environnements professionnels ; les fermes ; l’utilisation par les clients des hôtels, motels et autres environnements à caractère résidentiel ; les environnements de type chambres d’hôtes. • Pendant l’utilisation et le nettoyage, il convient de manipuler les accessoires avec précaution. • Faire preuve de prudence en versant des liquides chauds dans le bol afin d’éviter les projections dues aux jets de vapeur soudains. • Cet appareil n’est pas destiné à être commandé au moyen d’une minuterie externe ou d’un système de contrôle à distance. • Cet appareil n’est pas prévu pour être utilisé par des personnes présentant des capacités physiques, sensorielles ou mentales réduites ou par des personnes dénuées d’expérience ou de connaissances, à moins qu’une personne responsable de leur sécurité les ait supervisées ou leur ait fourni des instructions concernant l’utilisation de l’appareil. • Il convient de surveiller en permanence les enfants pour 1 s’assurer qu’ils ne jouent pas avec ce produit. • Cet appareil ne peut être utilisé par des enfants. Pendant et après son utilisation, conserver l’appareil et son chargeur en dehors de la portée des enfants. • Toujours vérifier que l’appareil et ses accessoires ne présentent pas de traces apparentes de dommages avant leur utilisation. Ne pas utiliser l’appareil s’il est endommagé ou s’il est tombé. En cas de dommage ou de défaillance technique, prendre contact avec le service clientèle de Cuisinart (consulter la page 72 pour obtenir de plus amples informations). • Ne pas utiliser l’appareil si le câble d’alimentation est endommagé. S’il est endommagé, cesser immédiatement toute utilisation de l’appareil et il doit être remplacé par le fabricant. Retourner l’appareil au service à la clientèle (consulter la page 72 pour obtenir de plus amples informations). Le consommateur ne peut pas tenter de réparer lui-même l’appareil. • Ne jamais tirer sur le câble d’alimentation pour débrancher l’appareil. • Ne pas enrouler le câble d’alimentation autour du corps de l’appareil pendant ou après son utilisation. • Cet appareil peut rester branché à l’alimentation électrique en toute sécurité lorsqu’il n’est pas utilisé afin que ses batteries soient chargées en permanence. Cependant, il doit être débranché avant d’être assemblé, démonté ou nettoyé ou lorsqu’il n’est pas utilisé pendant une période prolongée. • Cet appareil contient un jeu de batteries lithium-ion rechargeables qui ne peuvent être retirées en vue de leur chargement et remplacées. • Les bornes d’alimentation ne peuvent être court-circuitées. • AVERTISSEMENT : pour recharger le jeu de batteries, utiliser exclusivement l’unité de chargement amovible fournie indique que l’appareil avec cet appareil. Ce symbole 2 dispose d’un câble d’alimentation amovible en vue de son chargement. • Ce produit est conforme à la législation et aux normes européennes pertinentes applicables à ce type et à cette classe d’appareils. Notre entreprise est certifiée ISO9001:2015, une norme qui évalue en permanence la performance de notre système de gestion de la qualité. En cas de questions concernant la sécurité et la conformité de nos produits, merci de prendre contact avec le service clientèle (consulter la page 72 pour obtenir de plus amples informations). • AVERTISSEMENT : éviter tout contact avec les parties mobiles. Pendant le fonctionnement de l’appareil, garder les mains, cheveux, vêtements ainsi que les spatules et autres ustensiles à distance des accessoires afin de réduire le risque de blessure et/ou de dommage à l’appareil. Une spatule peut uniquement être utilisée lorsque l’appareil est éteint. • AVERTISSEMENT : ne pas placer les doigts près des accessoires. Pour déloger des aliments, s’assurer au préalable que l’appareil soit bien éteint. • Le chargeur doit être branché dans une prise électrique située à distance de l’évier ou des surfaces chaudes. • Ne pas utiliser de rallonge. Brancher le chargeur directement dans une prise électrique. • Ne pas charger l’appareil dans une prise extérieure. • Afin d’éviter les chocs électriques, ne pas plonger l’appareil dans de l’eau ou dans tout autre liquide. Seuls les accessoires de cet appareil ont été conçus pour être immergés dans de l’eau ou dans un autre liquide. Ne jamais immerger les autres éléments de cet appareil. Si le blender portable tombe dans un liquide, le retirer immédiatement du liquide, puis le nettoyer et le sécher soigneusement avant de poursuivre. • Retirer la lame du bol avant de procéder au nettoyage. 3 • Ne pas remplir le bol gradué à l’excès. Ne pas dépasser le niveau maximum. • Ne pas actionner le blender portable à vide car cela risquerait d’endommager le moteur. • Ne pas mixer de liquides chauds dans le bol. • Ne pas plonger l’appareil dans de l’eau ou dans tout autre liquide. • ATTENTION : manipuler la lame avec précaution. Les lames sont tranchantes et peuvent provoquer des blessures. NE PAS tenter de retirer les lames de leur dispositif. N.B. : la lame en acier inoxydable ne peut être retirée du dispositif noir. AVERTISSEMENT : les sachets en polyéthylène entourant l’appareil ou l’emballage peuvent être dangereux. Pour éviter tout danger de suffocation, conserver ces sachets hors de la portée de bébés et des enfants. Ces sachets ne sont pas des jouets. MISE AU REBUT DE LA BATTERIE Afin de réduire les risques pour la santé et l’environnement à la fin du cycle de vie de ce produit, la législation relative aux déchets d’équipements électriques et électroniques (DEEE) et la directive concernant les déchets de piles et accumulateurs imposent au consommateur de déposer ce produit dans un centre de collecte adéquat qui se chargera de l’envoyer en vue de l’élimination de sa batterie et de son recyclage adéquat. Prendre contact avec les autorités locales pour obtenir de plus amples renseignements à propos de son recyclage et de sa mise au rebut en toute sécurité dans votre région. Le symbole figurant sur le produit ou son emballage indique que cet appareil ne peut être traité comme un déchet ménager. Au contraire, celui-ci doit être déposé dans un point de collecte 4 adéquat dédié au recyclage d’équipements électriques et électroniques. Contribuer à éviter de potentielles conséquences néfastes pour l’environnement et la santé publique qui pourraient découler d’un traitement des déchets inapproprié de ce produit. Pour obtenir de plus amples informations concernant le recyclage de ce produit, prendre contact avec votre administration locale ou votre service local de traitement des déchets ménagers. Sécurité pendant l’utilisation Le chargeur doit être branché à une prise électrique située à distance de l’évier ou d’une surface chaude. • Ne pas utiliser de rallonge. Brancher le chargeur directement dans une prise électrique. • Ne pas charger l’appareil dans une prise extérieure. • Afin d’éviter les chocs électriques, ne pas plonger l’appareil dans de l’eau ou dans tout autre liquide. Si le socle d’alimentation tombe dans un liquide, le retirer immédiatement du liquide, puis le nettoyer et le sécher soigneusement avant de poursuivre. • Utiliser le blender portable sur une surface robuste, propre et sèche. • Ne pas placer la lame sur le socle du blender portable sans le bol. • Avant d’utiliser l’appareil, s’assurer que le dispositif de la lame est bien fixé au bol. • Ne pas verser de boissons gazeuses dans le bol. • Le bol ne convient pas au four à micro-ondes. • Remettre le couvercle de protection sur la lame avant de la ranger. 5 2. INTRODUCTION Félicitations ! Vous venez d’acheter le blender portable Cuisinart. Cuisinart fabrique du matériel de cuisine haut de gamme depuis plus de 30 ans. Tous les produits Cuisinart se distinguent par leur durée de vie exceptionnellement longue et sont conçus pour offrir, jour après jour, d’excellentes performances et une grande facilité d’utilisation. Pour en savoir plus sur nos produits ou découvrir nos recettes, consulter le site Internet www.cuisinart.eu. 3. CARACTÉRISTIQUES DU PRODUIT (voir couverture) 1. Bol 2. Lame 3. Indicateurs de charge de la batterie 4. Bouton marche / arrêt 5. Socle d’alimentation 6. Port de charge (non illustré) 7. Couvercle pour boire 8. Couvercle de protection de la lame 9. Câble USB et chargeur 4. UTILISATION Avant la première utilisation, il est recommandé de nettoyer l’appareil à l’aide d’un chiffon propre et humide afin d’éliminer les saletés ou la poussière. Sécher minutieusement l’appareil à l’aide d’un chiffon doux absorbant. Nettoyer soigneusement le bol, le dispositif de la lame et le couvercle pour boire dans de l’eau chaude savonneuse. N.B. : ne pas utiliser de détergents abrasifs, d’ustensiles à récurer ou d’éponges à récurer. A. CHARGER LE BLENDER PORTABLE Les batteries de votre blender portable n’ont pas été chargées complètement. Avant de l’utiliser, elles doivent être chargées jusqu’à ce que les trois voyants bleus soient allumés. Une fois chargées, il pourra préparer environ 8 smoothies en fonction de la recette et de la dureté des ingrédients utilisés. Le blender portable sera complètement chargé au bout de 2 heures environ. N.B. : pour charger l’appareil, insérer la fiche Micro USB du câble d’alimentation dans le port de charge situé à l’arrière de l’appareil. Insérer la fiche USB dans le chargeur, puis brancher ce dernier dans une prise de courant. Indicateurs de charge de la batterie Les voyants bleus clignotent lorsque la batterie est en charge. Lorsque les trois voyants sont allumés, cela signifie que la batterie est complètement chargée et prête à être utilisée. Les voyants s’éteignent à mesure que la batterie se décharge. La batterie doit être rechargée lorsque le dernier voyant clignote. Si la batterie est complètement déchargée, l’appareil ne fonctionnera pas. N.B. : le blender portable ne peut être utilisé lorsqu’il est branché et en charge. 6 Pour optimiser les performances de chargement de votre blender portable, nous vous recommandons d’utiliser exclusivement le câble USB et le chargeur fournis avec l’appareil. B. FONCTIONNEMENT • S’assurer que le blender portable est partiellement chargé en suivant les instructions de la section A. Si le blender portable est totalement déchargé, il ne peut fonctionner en étant branché sur secteur. Il conviendra alors d’attendre jusqu’à ce qu’il dispose d’une charge suffisante pour être utilisé. • Déposer les ingrédients dans le bol. N.B. : attention à ne pas dépasser le niveau de remplissage maximum. Pour obtenir un résultat optimal, commencer par mixer les ingrédients les plus durs (glaçons, fruits surgelés, etc.) et terminer par les ingrédients mous et les liquides. Il est recommandé de couper au préalable les aliments en morceaux de 3 cm pour obtenir un résultat homogène. Dans le cas d’ingrédients durs, comme des carottes, le bol ne peut être rempli à plus de la moitié. • Fixer le dispositif noir de la lame sur le bol en présentant la lame vers le bas dans le bol. Tourner le dispositif dans le sens des aiguilles d’une montre jusqu’à ce qu’il soit bien serré. N.B. : éviter de toucher les lames. Manipuler le dispositif en le tenant par la partie en plastique noir. • S’assurer que le socle d’alimentation est posé sur une surface plane et propre. Disposer le bol sur le socle d’alimentation avec le dispositif noir au fond et le faire pivoter pour le verrouiller. Un clic confirmera que le dispositif est bien en place. S’assurer que le dispositif est bien verrouillé avant d’utiliser le blender portable. N.B. : si le bol et le dispositif de la lame ne sont pas fixés correctement, le blender portable ne fonctionnera pas. • Pour mettre l’appareil en marche, appuyer une fois sur le bouton marche / arrêt. Les voyants LED s’allument et le moteur se met en marche. Pour éteindre l’appareil, rappuyer sur le bouton marche / arrêt. N.B. : le blender portable ne peut pas fonctionner pendant plus d’une minute en continu. Au bout d’une minute, il s’arrêtera automatiquement. Si, pour votre recette, il doit fonctionner pendant plus d’une minute, interrompre le fonctionnement pendant quelques secondes et le remettre en marche. • Une fois les ingrédients mixés, retirer le bol du socle en le faisant pivoter dans le sens inverse des aiguilles d’une montre pour le déverrouiller. N.B. : ne pas essayer de retirer le bol pendant que le moteur tourne. Si le bol est déverrouillé pendant le fonctionnement de l’appareil, celui-ci se coupera automatiquement. • Disposer le bol à la verticale sur la surface, avec le dispositif noir de la lame en haut. Tourner le dispositif de la lame dans le sens inverse des aiguilles d’une montre pour le retirer. N.B. : attention à ne pas toucher les lames, elles sont très tranchantes. Manipuler le dispositif en le tenant par la partie en plastique noir. N.B. : la lame en acier inoxydable ne peut être retirée du dispositif noir. • Le dispositif de la lame peut être lavé immédiatement ou rangé en toute sécurité grâce au couvercle de protection en attendant d’être lavé. Placer simplement le couvercle de protection sur le dispositif de la lame et tourner dans le sens des aiguilles d’une montre pour le verrouiller. N.B. : toujours replacer le couvercle de protection sur le dispositif de la lame avant de le ranger. • Au besoin, fixer le couvercle pour boire sur le bol en le tournant dans le sens des aiguilles d’une montre jusqu’à ce qu’il soit bien en place. S’assurer qu’il soit bien bien fermé avant de déposer le bol dans un sac de voyage. 7 C. CONSEILS ET ASTUCES • Pour obtenir un résultat optimal lors de l’utilisation du blender portable, commencer par mixer les ingrédients les plus durs (glaçons, fruits surgelés, etc.) et terminer par les ingrédients mous et les liquides. • Il est recommandé de couper la plupart des aliments en morceaux de 3 cm pour obtenir un résultat homogène. • Si des aliments restent collés à la paroi du bol pendant la préparation, éteindre le blender portable, retirer le bol et le secouer délicatement. Ensuite, replacer le bol et poursuivre. • Pour mixer des préparations plus épaisses, tenir le haut du bol afin d’éviter les secousses. • Une fois l’opération terminée, retirer le bol et le déposer sur une surface avec le dispositif de la lame vers le haut. Tapoter délicatement le bol pour éviter de renverser au moment de retirer les lames. • Certaines recettes nécessitent plus d’une minute de préparation. Dans ce cas, redémarrer tout simplement le blender portable. 5. NETTOYAGE & ENTRETIEN • Nettoyer soigneusement l’appareil après chaque utilisation. • Retirer la lame et nettoyer l’unité principale uniquement à l’aide d’une éponge ou d’un chiffon humide. • Ne pas utiliser de détergents abrasifs pouvant rayer la surface de l’appareil. • Laver la lame à la main dans de l’eau chaude savonneuse. • Le bol, le couvercle de protection de la lame et le couvercle pour boire peuvent être lavés dans de l’eau chaude savonneuse ou dans le panier supérieur du lave-vaisselle. ATTENTION : manipuler la lame avec précaution. Les lames sont tranchantes et peuvent provoquer des blessures. NE PAS tenter de retirer les lames de leur dispositif. 8 1. SAFETY CAUTIONS (ORIGINAL INSTRUCTIONS) CAREFULLY READ ALL THE INSTRUCTIONS BEFORE USING THE APPLIANCE AND KEEP IN A SAFE PLACE FOR FUTURE REFERENCE. Always follow these safety cautions when using this appliance to avoid personal injury or damage to the appliance. This appliance should be used only as described within this instruction book. There is a risk of injury if the product is misused. • This appliance is for domestic use only and is not intended to be used in applications such as: staff kitchen areas in shops, offices and other working environments; farm houses; by customers in hotels, motels and other residential type environments; bed and breakfast type establishments. • Care should be taken when handling the attachments, during use and cleaning. • Be careful if hot liquid is poured into the blending jug as it can be ejected out due to sudden steaming. • The appliance is not intended to be operated by means of external timer or separate remote control system. • This appliance is not intended for use by persons with reduced physical, sensory or mental capabilities, or lack of experience and knowledge, unless they have been given supervision or instruction concerning use of the appliance by a person responsible for their safety. • Children should always be supervised to ensure that they do not play with this product. • This appliance shall not be used by children. Keep the appliance and power adapter out of reach of children during and after use. • Always inspect the appliance and appliance accessories 9 before use for noticeable signs of damage. Do not use if damaged, or if the appliance has been dropped. In the event of damage, or if the appliance develops a fault, contact the Cuisinart Customer Care Line (see “International guarantee” on page 72). • Do not use the appliance if the lead is damaged. In the event of lead damage, discontinue use immediately. If the lead is damaged it must be replaced by the manufacturer. Return the appliance to the Customer Care Centre (see “International guarantee” on page 72). No repair must be attempted by the consumer. • Never pull the plug out of the mains socket by the lead. • Do not wrap the lead around the main body of the appliance during or after use. • The appliance is safe to be left plugged into the electrical supply when not in use to ensure the batteries are always charged. It should however be unplugged before assembling, disassembling, cleaning or if not being used for a prolonged period of time. • This product contains a Lithium Ion rechargeable battery pack that is not to be removed from the appliance for charging. The batteries in this appliance are non-replaceable. • The supply terminals are not to be short circuited. • WARNING: For the purposes of recharging the battery pack, only use the detachable charging supply unit provided indicates there is a with this appliance. This symbol detachable power supply for means of charging. • This product complies fully with all appropriate EU and UK legislation and the standards relevant to this type and class of appliance. We are an ISO9001:2015 certified company that continually evaluates our Quality Management System performance. If you have any queries regarding product safety and compliance, please contact our Customer Services 10 Department (see “International guarantee” on page 72). • WARNING: Avoid contact with moving parts. Keep hands, hair, clothing, as well as spatulas and other utensils away from attachments during operation to reduce risk of injury to persons, and/or damage to the appliance. A spatula may be used, but only when the unit is not operating. • WARNING: Do not put fingers near the attachments. To dislodge food ensure mixer is not in operation first. • The charger should be plugged into an electrical socket away from a sink or any hot surface. • Do not use an extension cord. Plug the charger directly into an electrical socket. • Do not charge the unit using an outdoor socket. • To protect against electrical shock, do not put the main unit in water or other liquids. Only the attachments, of this appliance, have been designed for submersion in water or other liquids. Never submerge any other portion of this unit. If the hand mixer falls into liquid, remove immediately, clean and dry the unit thoroughly before continuing. • Always remove blade assembly from the cup before cleaning. • Do not overload the blending cup. Observe the maximum fill line. • Do not run the blender empty - this will damage the motor. • Do not blend hot liquids in the blending cup. • Do not put the main unit in water or other liquids • CAUTION: Handle the blade carefully. The blades are sharp and may cause injury. DO NOT attempt to remove blades from assembly. N.B. The stainless steel blade cannot be removed from the black blade assembly. 11 WARNING: Polythene bags over the product or packaging may be dangerous. To avoid danger of suffocation, keep away from babies and children. These bags are not toys. BATTERY DISPOSAL To minimise hazards to health and the environment at the end of this product’s life, laws dealing with Waste Electrical and Electronic Equipment (WEEE) and The Waste Battery Directive require you to dispose of this product at a suitable collection facility where it will be sent in order to remove the batteries and for appropriate recycling. Please contact your local authorities for more details on recycling and safe disposal of these in your area. The symbol on the product or on its packaging indicates that this product may not be treated as household waste. Instead it should be handed over to the applicable collection point for the recycling of electrical and electronic equipment. By ensuring this product is disposed of correctly, you will help prevent potential negative consequences for the environment and human health, which could otherwise be caused by inappropriate waste handling of this product. For more detailed information about the recycling of this product, please contact your local council office or your household waste disposal service. Safety During Use • The charger should be plugged into an electrical socket away from a sink or any hot surface. • Do not use an extension cord. Plug the charger directly into an electrical socket. • Do not charge the unit using an outdoor socket. • To protect against electrical shock, do not put the main unit in water or other liquids. If the power base falls into liquid, remove immediately, clean and dry the unit thoroughly 12 before continuing. • Always use the blender on a clean, sturdy and dry surface. • Do not place the blade onto the blender base without the blending cup attached. • Make sure the blade assembly is tightly attached to the blending cup before use • Never use carbonated beverages in the blending cup • The blending cup is not suitable for use in a microwave. • Always store the blade using the blade protection cap. 2. INTRODUCTION Congratulations on you purchase of this Cuisinart Blender. For over 30 years Cuisinart’s aim has been to produce the very finest kitchen equipment. All Cuisinart products are engineered for exceptionally long life and designed to be easy to use as well as to give excellent performance day after day. To learn more about our products and for recipe ideas visit our website www.cuisinart.eu 3. PRODUCT FEATURES (refer to cover) 1. Blending cup 2. Blade assembly 3. Indicator lights 4. On/Off switch 5. Power base 6. Charging port (not shown) 7. Drinking lid 8. Blade protection cover 9. USB lead and adaptor 4. USE Before first use, we recommend that you wipe the main unit with a clean, damp cloth to remove any dirt or dust. Dry it thoroughly with a soft absorbent cloth. Carefully clean the blending cup, blade assembly and drinking lid in warm soapy water. N.B. Do not use abrasive cleaners, hard implements or a scourer. 13 A. CHARGING THE BLENDER The batteries in your Blender have not been fully charged. Before using, the batteries must be charged until all three blue lights are illuminated. With a full charge, your Blender will make around 8 smoothies, but this depends on the recipe and the hardness of the ingredients used. Your Blender will be fully charged in approximately 2 hours. N.B. To charge the main unit, insert the Micro USB end of charging lead into the charging port at the back of the main unit. Plug the USB end directly into the adapter plug and then into a mains supply outlet. Battery Life Indicator Lights The indicator lights will flash blue, when the battery is being charged. When all three lights are illuminated, this means the battery is fully charged and is then ready to use. As the battery starts to run down, the indicator lights will turn off. The battery will need to be recharged when the last indicator light is flashing. If the battery has completely run down on the unit, it will not operate. N.B. The Blender cannot be used while it is plugged in and charging. To ensure the best performance when charging your Blender, we recommend only using the USB lead and charging adaptor supplied with this appliance. B. OPERATION • Ensure your blender has some charge using the instructions in Section A. If the blender has no charge, it cannot be operated by plugging into the mains power. You will need to wait until it has sufficient charge to perform the blending task. • Put the ingredients into the blending cup. N.B. Be careful not to exceed the maximum fill line. For best results, always put the hardest ingredients into the cup first (ice cubes, frozen fruit, etc) and finish with the softer ingredients and liquids. We recommend cutting foods into 3cm pieces to achieve the most uniform result. If you are using harder ingredients such as carrots, the blending jug shouldn’t be filled past half way. • Attach the black blade assembly to the cup with the blade facing downwards into the cup. Twist the blade assembly clockwise until tightened. N.B. Take care not to touch the blades – always handle using black plastic part of the blade assembly. • Ensure the power base is sitting on a clean, dry surface. Place the blending cup onto the power base with the black blade assembly at the bottom and turn to lock into place. You will feel a click when the cup is securely in place. Always ensure it is locked into place before using the blender. N.B. If the blade assembly and cup are not properly attached, the blender will not operate. • To operate, press the power button once. The LED lights are displayed and the motor will start. Press the power button again to turn the unit off. N.B. The Blender cannot operate for more than 1 minute, After 1 minute of blending it will automatically stop. If your recipe requires more than a minute of blending, simply pause for a few seconds and then start the blender again. • Once your ingredients are blended, remove the blending cup from the base by twisting the blending cup anti clockwise to unlock. N.B. Do not try to remove the blending cup whilst the motor is still running. If the cup is unlocked during blending, the blender will automatically stop. • Place the blending cup upright on the surface with the black blade assembly at the top. Twist the black blade assembly anti-clockwise to remove. 14 N.B. Take care not to touch the blades- they are very sharp. Always handle using the black plastic part of the blade assembly. N.B. The stainless steel blade cannot be removed from the black blade assembly. • The blade assembly can be washed immediately or stored safely by using the clear blade protection cap until you are able to wash the blade. Simply place the blade protection cap over the blade assembly and twist clockwise until it lock into place. N.B. Always use the blade protection cap when storing the blade assembly. • If required, attach the drinking lid to the blending cup by twisting clockwise until it feels tight. Ensure the drinking opening cap is securely closed before placing in a bag for travel. C. HINTS & TIPS • For best results when using your Blender, always put the hardest ingredients into the cup first (ice cubes, frozen fruit, etc) and finish with the softer ingredients and liquids. • It is recommended that most foods be cut into 3cm pieces to achieve the most uniform result. • If food sticks to the sides of the cup when blending, stop the blender, remove the cup and gently shake the cup. Replace and blend again. • When blending thicker mixtures, lightly hold down the top of the cup to prevent jumping on the surface. • After blending, remove the cup and place on a surface so that the blade assembly is on the top. Gently tap the cup a few times to prevent any spillage which may occur when removing the blades. • Some recipes may require more than a minute of blending. Simply start the blender again, 5. CLEANING & MAINTENANCE • Always clean the appliance thoroughly after use. • Remove the blade and clean the main unit with a sponge or damp cloth only. • Do not use abrasive cleaners that could scratch the surface. • Wash the blade by hand in warm soapy water. • The blending cup, blade protection cover and drinking lid can be washed in warm soapy water or cleaned on the top rack of the dishwasher. CAUTION: Handle the blade carefully. The blades are sharp and may cause injury. DO NOT attempt to remove blades from cutting assembly. 15 1. SICHERHEITSHINWEISE (ÜBERSETZUNG DER ORIGINALFASSUNG DER GEBRAUCHSANLEITUNG) LESEN SIE VOR DEM GEBRAUCH DES GERÄTS SORGFÄLTIG ALLE ANWEISUNGEN DURCH UND BEWAHREN SIE SIE GUT AUF, UM EVENTUELL SPÄTER ETWAS NACHZULESEN. Beachten Sie bei der Verwendung dieses Geräts stets diese Sicherheitshinweise, um Verletzungen oder Schäden am Gerät zu vermeiden. Dieses Gerät sollte nur so verwendet werden, wie es in dieser Anleitung beschrieben ist. Es besteht Verletzungsgefahr, wenn das Produkt nicht korrekt verwendet wird. • Dieses Gerät ist ausschließlich für den Hausgebrauch bestimmt und nicht geeignet für die Verwendung in Einrichtungen wie: Küchenbereiche, die für Mitarbeiter in Geschäften, Büros und anderen professionellen Umgebungen vorgesehen sind; landwirtschaftliche Betriebe; die Nutzung durch Gäste in Hotels, Motels und anderen Wohneinrichtungen; die Nutzung in Bed-and-Breakfastähnlichen Einrichtungen. • Beim Umgang mit den Rühraufsätzen ist sowohl während des Gebrauchs als auch bei der Reinigung Vorsicht geboten. • Seien Sie vorsichtig, wenn Sie heiße Flüssigkeiten in das Mixgefäß gießen, sie könnte durch plötzliche Dampfentwicklung herausspritzen. • Das Gerät ist nicht für die Bedienung mittels externer Zeitschaltuhr oder separater Fernbedienung vorgesehen. • Dieses Gerät darf nicht von Personen mit eingeschränkten physischen, sensorischen oder mentalen Fähigkeiten oder von Personen ohne jede Erfahrungs- oder Kenntnisgrundlage verwendet werden, wenn sie nicht dabei beaufsichtigt oder vorher über den sicheren Gebrauch des Geräts unterrichtet werden und die mit der Verwendung im Zusammenhang stehenden Risiken begreifen. 16 • Kinder sollten immer beaufsichtigt werden, damit sie nicht mit diesem Produkt spielen. • Dieses Gerät sollte nicht von Kindern verwendet werden. Bewahren Sie das Gerät und den Ladestecker während und nach dem Gebrauch außerhalb der Reichweite von Kindern auf. • Das Gerät und das Zubehör vor dem Gebrauch immer auf offensichtliche Anzeichen einer Beschädigung untersuchen. Verwenden Sie das Gerät nicht, wenn es beschädigt oder heruntergefallen ist. Im Fall einer Beschädigung oder wenn das Gerät nicht mehr korrekt funktioniert, nehmen Sie Kontakt zum Cuisinart Kundendienst auf (siehe “Internationale Garantie” auf S. 72). • Das Gerät nicht verwenden, wenn das Kabel beschädigt ist. Die Verwendung sofort einstellen, wenn das Netzkabel beschädigt wird. Wenn das Kabel beschädigt ist, muss es vom Hersteller ersetzt werden. Senden Sie das Gerät an den Kundendienst zurück (siehe „Internationale Garantie“ auf S. 72). Der Benutzer darf keinesfalls versuchen, das Gerät selbst zu reparieren. • Ziehen Sie den Netzstecker niemals am Kabel aus der Steckdose. • Das Kabel während oder nach dem Gebrauch nicht um das Gerät wickeln. • Wenn das Gerät nicht benutzt wird, kann es bedenkenlos am Stromnetz angeschlossen bleiben, um zu gewährleisten, dass die Akkus immer aufgeladen sind. Er sollte jedoch vom Netzstrom entfernt werden, bevor es montiert, auseinander genommen oder gereinigt werden soll bzw. längere Zeit nicht benutzt wird. • Dieses Produkt enthält ein wiederaufladbares LithiumIonen-Akkupack, das nicht zum Aufladen aus dem Gerät entfernt werden kann. Die Akkus in diesem Gerät sind nicht austauschbar. 17 • Die Anschlusskontakte dürfen nicht kurzgeschlossen werden. • ACHTUNG: Verwenden Sie zum Aufladen des Akkupacks nur den mit diesem Gerät mitgelieferten abnehmbaren weist darauf hin, dass eine Ladestecker. Dieses Symbol abnehmbare Stromzufuhr zum Aufladen vorhanden ist. • Dieses Produkt entspricht in vollem Umfang allen einschlägigen Rechtsvorschriften der EU und Großbritanniens und den für diesen Gerätetyp und diese Geräteklasse relevanten Normen. Wir sind ein nach ISO9001:2015 zertifiziertes Unternehmen, das die Leistung unseres Qualitätsmanagementsystems kontinuierlich bewertet. Wenn Sie Fragen zur Produktsicherheit und Konformität haben, wenden Sie sich bitte an unseren Kundendienst (siehe “Internationale Garantie” auf S. 72). • ACHTUNG: Vermeiden Sie es, Teile zu berühren, während sie sich bewegen. Um Verletzungsrisiken bei Menschen und/oder Schäden am Gerät zu vermeiden, sollten Sie Haar und Kleidung sowie auch Spatel oder andere Küchenutensilien während des Betriebs in sicherer Entfernung der Rühraufsätze halten. Ein Spatel kann verwendet werden, jedoch nur, wenn das Gerät nicht in Betrieb ist. • ACHTUNG: Achten Sie darauf, dass Ihre Finger nicht in die Nähe der Rühraufsätze geraten. Vergewissern Sie sich, dass der Mixer nicht in Betrieb ist, bevor Sie Nahrungsmittel entfernen. • Der Ladestecker sollte an eine Steckdose in sicherer Entfernung von Waschbecken oder heißen Oberflächen angeschlossen werden. • Kein Verlängerungskabel verwenden. Stecken Sie den Ladestecker direkt in eine Steckdose. • Laden Sie das Gerät nicht an einer Steckdose im Freien auf. • Zum Schutz vor Stromschlägen darf das Hauptgerät nicht in Wasser oder andere Flüssigkeiten getaucht werden. Nur die Rühraufsätze dieses Geräts sind für das Eintauchen in Wasser oder andere Flüssigkeiten konzipiert. Tauchen Sie niemals 18 einen anderen Teil dieses Geräts in Wasser oder andere Flüssigkeiten ein. Wenn der Handmixer in Flüssigkeit fällt, sofort herausholen und das Gerät gründlich reinigen und trocknen, bevor Sie fortfahren. • Entfernen Sie den Klingensatz vor dem Reinigen immer aus dem Zubereitungsgefäß. • Das Mixgefäß nicht zu sehr befüllen. Beachten Sie die maximale Fülllinie. • Betreiben Sie den Mixer nicht ohne Inhalt - der Motor könnte beschädigt werden. • Mixen Sie keine heißen Flüssigkeiten im Mixbecher. • Die Haupteinheit nicht in Wasser oder andere Flüssigkeiten geben. • ACHTUNG: Gehen Sie vorsichtig mit dem Messer um. Die Klingen sind scharf und können Verletzungen verursachen. VERSUCHEN SIE NICHT, die Klingen aus der Halterung zu entfernen. HINWEIS: Die Edelstahlklinge kann nicht von der schwarzen Klingenhalterung des Moduls entfernt werden. ACHTUNG: Plastiktüten über Produkt oder Verpackung können gefährlich sein. Von Babys und Kleinkindern fernhalten, um Erstickungsgefahr zu vermeiden. Diese Tüten sind kein Spielzeug. ENTSORGEN DES AKKUS: Um die Gefahren für die Gesundheit und die Umwelt am Ende der Lebensdauer dieses Produkts zu minimieren, schreiben die Rechtsvorschriften zu Elektro- und Elektronik-Altgeräten (WEEE) und die Altbatterierichtlinie vor, dass Sie dieses Produkt bei einer geeigneten Sammelstelle entsorgen müssen, von wo es an eine geeignete Stelle weitergeleitet wird, um die Akkus zu entfernen und einem angemessenen Recycling zuzuführen. Erkundigen Sie sich bitte bei den zuständigen Behörden über 19 Einzelheiten zur Wiederverwertung und sicheren Entsorgung von Altgeräten in Ihrer Region. Das Symbol auf Produkt oder Verpackung besagt, dass dieses Produkt nicht als Hausmüll behandelt werden darf. Stattdessen sollte es zu einer entsprechenden Sammelstelle zur Wiederverwertung von elektrischen und elektronischen Altgeräten gebracht werden. Durch das korrekte Recycling wird möglichen Schäden für die Umwelt und die Gesundheit vorgebeugt, die durch unsachgemäße Behandlung der Produktabfälle entstehen könnten. Weitere Information über die Wiederverwertung von batteriebetriebenen Elektrogeräten erhalten Sie in Ihrer lokalen Gemeindeverwaltung oder bei dem für Sie zuständigen Hausmüllverwertungszentrum. Sicherheit während des Gebrauchs • Der Ladestecker sollte an eine Steckdose in sicherer Entfernung von Waschbecken oder heißen Oberflächen angeschlossen werden. • Kein Verlängerungskabel verwenden. Stecken Sie den Ladestecker direkt in eine Steckdose. • Laden Sie das Gerät nicht an einer Steckdose im Freien auf. • Zum Schutz vor Stromschlägen darf das Hauptgerät nicht in Wasser oder andere Flüssigkeiten getaucht werden. Wenn der Gerätesockel in Flüssigkeit fällt, sofort herausholen und das Gerät gründlich reinigen und trocknen, bevor Sie fortfahren. • Verwenden Sie den Mixer immer auf einer sauberen, stabilen und trockenen Oberfläche. • Befestigen Sie die Klinge nie ohne das Zubereitungsgefäß auf dem Gerätesockel. • Achten Sie darauf, dass der Klingensatz vor dem Gebrauch gut im Zubereitungsgefäß befestigt ist. • Verwenden Sie im Mixbecher niemals kohlensäurehaltige Getränke. 20 • Der Mixbecher ist nicht für den Einsatz in der Mikrowelle geeignet. • Die Klinge immer mit der Klingenschutzkappe aufbewahren. 2. EINLEITUNG Herzlichen Glückwunsch zum Kauf Ihres Cuisinart Standmixers. Bereits seit über 30 Jahren ist es das erklärte Ziel von Cuisinart, die allerbesten Küchengeräte herzustellen. Alle Produkte von Cuisinart sind äußerst langlebig und so konzipiert, dass sie leicht zu verwenden sind und Tag für Tag hervorragende Leistungen vollbringen. Mehr über unsere Produkte und Rezeptideen erfahren Sie auf unserer Webseite www.cuisinart.eu 3. EIGENSCHAFTEN DES PRODUKTS (siehe Umverpackung) 1. Mixbecher 2. Klingenset 3. Anzeigeleuchten 4. Ein-/ Ausschalter 5. Sockel für die Stromversorgung 6. Ladeanschluss (nicht abgebildet) 7. Trinkdeckel 8. Klingenschutzkappe 9. USB-Kabel und Ladestecker 4. GEBRAUCH Vor dem ersten Gebrauch empfehlen wir Ihnen, die Haupteinheit mit einem sauberen, feuchten Tuch abzuwischen, um eventuelle Schmutz- und Staubrückstände zu entfernen. Danach mit einem weichen, saugfähigen Tuch gründlich abtrocknen. Reinigen Sie den Mixbecher, den Klingensatz und den Trinkdeckel sorgfältig in warmem Seifenwasser. ANM.: Keine scheuernden Reinigungsmittel, harten Gegenstände oder Scheuerschwämme verwenden. A. AUFLADEN DES GERÄTS Die Akkus in Ihrem Standmixer sind nicht voll geladen. Vor dem Gebrauch müssen die Akkus aufgeladen werden, bis alle drei blauen Lämpchen leuchten. Mit einer vollen Akkuladung mixt Ihr Standmixer etwa 8 Smoothies, aber dies hängt vom Rezept und der Härte der verwendeten Zutaten ab. Ihr Standmixer ist nach ca. 2 Stunden vollständig aufgeladen. ANM.: Um die Haupteinheit aufzuladen, stecken Sie das Micro-USB-Ende des Ladekabels in den Ladeanschluss auf der Rückseite der Haupteinheit. Stecken Sie das USB-Ende direkt in den Ladestecker, und diesen dann in eine Netzsteckdose. 21 Anzeigeleuchten für den Ladestand des Akkus Die Anzeigeleuchten blinken blau, wenn der Akku geladen wird. Wenn alle drei Lämpchen konstant leuchten, bedeutet dies, dass der Akku voll geladen und somit einsatzbereit ist. Wenn der Akkuladestand geringer wird, erlöschen die Anzeigeleuchten eine nach der anderen. Der Akku muss spätestens dann aufgeladen werden, wenn die letzte Anzeigeleuchte blinkt. Wenn der Akku des Geräts vollständig entladen ist, funktioniert es nicht mehr. ANM.: Der Standmixer kann nicht benutzt werden, solange er an den Netzstrom angeschlossen ist und aufgeladen wird. Um die beste Leistung beim Laden des Mixers zu gewährleisten, empfehlen wir, nur das mit diesem Gerät gelieferte USB-Kabel und den mitgelieferten Ladestecker zu verwenden. B. BETRIEB • Sorgen Sie dafür, dass der Mixer zumindest ein wenig geladen ist. Befolgen Sie dazu die Anweisungen in Abschnitt A. Wenn der Mixer nicht geladen ist, kann er nicht durch Anschließen an das Stromnetz betrieben werden. Sie müssen warten, bis die Ladung ausreicht, um den Mixvorgang auszuführen. • Geben Sie die Zutaten in den Mixbecher. Achten Sie dabei darauf, dass die maximale Füllmarkierung nicht überschritten wird. Für beste Ergebnisse immer die härtesten Zutaten zuerst in den Becher geben (Eiswürfel, gefrorene Früchte usw.) und erst danach die weicheren Zutaten und Flüssigkeiten. Wir empfehlen, die Nahrungsmittel in 3 cm große Stücke zu schneiden, um ein möglichst gleichmäßiges Ergebnis zu erzielen. Wenn Sie härtere Zutaten wie Karotten verwenden, sollte der Mixbecher nicht mehr als zur Hälfte gefüllt werden. • Das schwarze Klingenset mit der Klinge nach unten im Gefäß befestigen. Das Klingenset im Uhrzeigersinn drehen, bis es gut befestigt ist. HINWEIS: Achten Sie darauf, die Klingen nicht zu berühren – das Klingenset immer an dem schwarzen Kunststoffteil festhalten. • Achten Sie darauf, dass der Gerätesockel immer auf einer sauberen, trockenen Oberfläche steht. Den Mixbecher mit dem schwarzen Klingenset nach unten auf den Gerätesockel und festdrehen. Das Gefäß rastet spürbar ein wenn es sicher befestigt ist. Vergewissern Sie sich immer, dass es gut befestigt ist, bevor Sie den Mixer verwenden. HINWEIS: Wenn der Klingensatz und der Mixbecher nicht korrekt angebracht sind, kann der Mixer nicht betrieben werden. • Drücken Sie zum Einschalten einmal den Betriebsschalter. Die LED-Anzeigen leuchten, und der Motor startet. Drücken Sie den Betriebsschalter erneut, um das Gerät auszuschalten. HINWEIS: Der Mixer kann nicht länger als 1 Minute betrieben werden. Nach einer Minute Mixen stoppt er automatisch. Wenn Ihr Rezept mehr als eine Minute Mixen erfordert, warten Sie einfach einige Sekunden und starten dann den Mixer erneut. • Sobald Ihre Zutaten gemixt sind, entfernen Sie den Mixbecher vom Gerätesockel, indem Sie den Mixbecher gegen den Uhrzeigersinn drehen, um ihn zu entriegeln. HINWEIS: Versuchen Sie nicht, den Mixbecher zu entfernen, während der Motor noch läuft. Wenn der Becher während des Mixens entriegelt wird, stoppt der Mixer automatisch. • Den Mixbecher aufrecht mit dem schwarzen Klingensatz nach oben auf die Arbeitsfläche stellen. Den schwarzen Klingensatz gegen den Uhrzeigersinn drehen, um ihn zu entfernen. Achten Sie darauf, die Klingen nicht zu berühren – sie sind sehr scharf. Den Klingensatz immer an dem schwarzen Kunststoffteil festhalten. HINWEIS: Die Edelstahlklinge kann nicht aus der schwarzen Klingenhalterung des Moduls entfernt werden. 22 • Der Klingensatz kann sofort gewaschen oder sicher beiseite gelegt werden, wenn Sie die durchsichtige Klingenschutzkappe verwenden, bis Sie die Klinge waschen können. Einfach die Klingenschutzkappe auf den Klingensatz stecken und im Uhrzeigersinn drehen, bis sie einrastet. HINWEIS: Verwenden Sie zum Aufbewahren des Klingensatzes immer die Klingenschutzkappe. • Befestigen Sie bei Bedarf den Trinkdeckel am Mixbecher, indem Sie ihn im Uhrzeigersinn drehen, bis er fühlbar fest sitzt. Vergewissern Sie sich, dass die Verschlusskappe für die Trinköffnung fest verschlossen ist, bevor Sie den Becher zum Mitnehmen in eine Tasche stecken. C. TIPPS & TRICKS • Für beste Ergebnisse mit Ihrem Mixer immer die härtesten Zutaten zuerst in den Becher geben (Eiswürfel, gefrorene Früchte usw.) und erst danach die weicheren Zutaten und Flüssigkeiten. • Wir empfehlen, die meisten Nahrungsmittel in 3 cm große Stücke zu schneiden, um ein möglichst gleichmäßiges Ergebnis zu erzielen. • Wenn beim Mixen Nahrungsmittel an den Seiten des Bechers haften bleiben, stoppen Sie den Mixer, nehmen Sie den Becher heraus und schütteln Sie ihn vorsichtig. Danach wieder einsetzen und den Mixvorgang fortsetzen. • Beim Mixen dickerer Mischungen die Oberseite des Bechers leicht andrücken, damit das Gerät nicht auf der Arbeitsfläche springt. • Nach dem Mixen den Becher abnehmen und mit dem Klingensatz nach oben auf die Arbeitsfläche stellen. Einige Male vorsichtig auf den Becher klopfen, um eventuelle Spritzer beim Entfernen des Klingensatzes zu vermeiden. • Einige Rezepte können mehr als eine Minute Mixen erfordern. In dem Fall einfach den Mixer erneut starten. 5. REINIGUNG & PFLEGE • Das Gerät nach dem Gebrauch immer gründlich reinigen. • Den Klingensatz entfernen und das Hauptgerät nur mit einem Schwamm oder einem feuchten Tuch reinigen. • Verwenden Sie keine Scheuermittel, die die Oberfläche zerkratzen könnten. • Die Klingen von Hand in warmem Seifenwasser waschen. • Der Mixbecher, die Klingenschutzkappe und der Trinkdeckel können in warmem Seifenwasser gewaschen oder im oberen Bereich des Geschirrspülers gereinigt werden. ACHTUNG: Gehen Sie vorsichtig mit dem Messer um. Die Klingen sind scharf und können Verletzungen verursachen. VERSUCHEN SIE NICHT, die Klingen aus dem Klingensatz zu entfernen. 23 1. VEILIGHEIDSINSTRUCTIES (VERTALING VAN DE ORIGINELE INSTRUCTIES) LEES ALLE INSTRUCTIES GOED DOOR VÓÓR U HET APPARAAT IN GEBRUIK NEEMT EN BEWAAR DE GEBRUIKSAANWIJZING GOED ZODAT U HEM KUNT RAADPLEGEN INDIEN NODIG. Volg deze veiligheidsinstructies altijd op als u dit apparaat gebruikt, om persoonlijk letsel of schade aan het apparaat te voorkomen. Dit apparaat dient uitsluitend gebruikt te worden zoals beschreven is in deze handleiding. Bij verkeerd gebruik kan letsel ontstaan. • Dit apparaat is uitsluitend bedoeld voor huishoudelijk gebruik en niet bedoeld voor gebruik in bijvoorbeeld personeelskeukens van winkels, kantoren en andere werkomgevingen; boerderijen; voor gebruik door klanten van hotels, motels en andere verblijfsaccommodaties of in bed and breakfast-achtige omgevingen. • Wees voorzichtig met de accessoires tijdens het gebruik en het reinigen. • Wees voorzichtig als u hete vloeistof in de mengbeker giet. Door stoomvorming kan het hete vocht er ineens uitschieten. • Het apparaat is niet bedoeld om te worden gebruikt met een externe tijdschakelaar of een apart afstandsbedieningssysteem. • Dit apparaat is niet bedoeld voor gebruik door personen met verminderde lichamelijke, zintuiglijke of geestelijke vermogens, of mensen met weinig ervaring en kennis, tenzij iemand die verantwoordelijk is voor hun veiligheid toezicht op hen houdt of hen heeft uitgelegd hoe het apparaat dient te worden gebruikt. • Houdt altijd toezicht op kinderen om te voorkomen dat ze met dit product gaan spelen. • Dit apparaat mag niet worden gebruikt door kinderen. Houd 24 het apparaat en de adapter tijdens en na gebruik buiten bereik van kinderen. • Controleer het apparaat vóór gebruik altijd op zichtbare tekenen van beschadiging. Gebruik het apparaat niet meer nadat het beschadigd of gevallen is. Neem, in geval van schade of wanneer het apparaat een storing vertoont, telefonisch contact op met de Cuisinart Klantenservice (zie ‘Internationale garantie’ op pagina 72). • Gebruik het apparaat niet als het snoer beschadigd is. Bij schade aan het snoer onmiddellijk stoppen met het gebruik. Als het snoer is beschadigd dient dit te worden vervangen door de fabrikant. Breng het apparaat terug naar de Klantenservice (zie ‘Internationale garantie’ op pagina 72). De consument dient zelf geen reparaties uit te voeren. • Trek nooit de stekker aan het snoer uit het stopcontact maar altijd aan de stekker. • Wikkel tijdens of na gebruik het snoer niet om de behuizing van het apparaat. • U kunt het apparaat veilig in het stopcontact laten zitten wanneer u het niet gebruikt, zodat de accu altijd is opgeladen. De stekker moet echter wel uit het stopcontact worden gehaald voordat u het apparaat monteert, demonteert, reinigt of langere tijd niet gebruikt. • Dit product bevat een oplaadbare lithium-ion-accu die niet uit het apparaat mag worden verwijderd om opgeladen te worden. De accu in dit apparaat kan niet vervangen worden. • De contactpunten mogen niet worden kortgesloten. • WAARSCHUWING: Gebruik voor het opladen van de accu uitsluitend de afneembare oplader die bij dit apparaat geeft aan dat er een is meegeleverd. Dit symbool afneembare energietoevoer is om op te laden. • Dit product voldoet volledig aan alle van toepassing zijnde EU- en Britse wetgeving en de normen die relevant zijn voor 25 dit type en deze klasse apparaten. Wij zijn een ISO9001:2015 gecertificeerd bedrijf dat voortdurend de prestaties van ons Kwaliteitsmanagementsysteem evalueert. Indien u vragen heeft over productveiligheid en naleving, neem dan contact op met onze afdeling Klantenservice (zie ‘Internationale garantie’ op pagina 72). • WAARSCHUWING: Vermijd contact met bewegende delen. Om persoonlijk letsel en/of schade aan het apparaat te voorkomen, altijd handen, haar, kleding, spatels en ander keukengerei uit de buurt van de accessoires houden als het apparaat in gebruik is. U kunt wel een spatel gebruiken maar alleen als het apparaat niet in werking is. • WAARSCHUWING: Blijf met uw vingers bij de messen vandaan. Wilt u de messen afschrapen, controleer dan altijd eerst of de mixer uitstaat. • Sluit de oplader aan op een stopcontact uit de buurt van een gootsteen of een heet oppervlak. • Gebruik geen verlengsnoer. Steek de oplader rechtstreeks in een stopcontact. • Laad het apparaat niet buiten in een stopcontact op. • Om een elektrische schok te voorkomen, het apparaat niet in water of andere vloeistoffen plaatsen. Alleen de losse accessoires van dit apparaat zijn geschikt om ondergedompeld te worden in water of andere vloeistoffen. De rest van dit apparaat mag nooit ondergedompeld worden. Mocht de handmixer motorbasis in een vloeistof vallen, haal hem er dan onmiddellijk uit en reinig en droog hem voordat u verder gaat. • Verwijder altijd de messeneenheid van de beker voordat u deze gaat schoonmaken. • Doe de mengbeker niet te vol. Let op de maximum-aanduiding • Zet de blender niet aan terwijl hij leeg is - dit beschadigt de motor. 26 • Mix geen hete vloeistoffen in de mengbeker. • Dompel de motorbasis nooit in water of andere vloeistof • LET OP: Wees voorzichtig met het mes. De messen zijn scherp en kunnen letsel veroorzaken. PROBEER NIET de messen uit de messeneenheid te verwijderen. NB: Het roestvrijstalen mes kan niet uit de zwarte eenheid worden verwijderd. OPGELET: De polytheenzakken die om het product of de verpakking zitten, kunnen gevaarlijk zijn. Om elke kans op verstikking te voorkomen, deze buiten bereik van baby’s en kinderen houden. Deze zakken zijn geen speelgoed. INZAMELEN VAN ACCU’S EN BATTERIJEN Om de gevaren voor de gezondheid en het milieu aan het einde van de levensduur van dit product tot een minimum te beperken, dient u dit product volgens de regelgeving met betrekking tot afgedankte elektrische en elektronische apparatuur (AEEA) en de richtlijn betreffende lege batterijen, in te leveren bij een inzamelingslocatie die ervoor zal zorgen dat de batterijen op de juiste manier gerecycled worden. Neem contact op met de plaatselijke autoriteiten voor meer informatie over recycling en veilige verwijdering van deze producten in uw regio. Het symbool op het product of op de verpakking geeft aan dat dit product niet bij het huishoudelijk afval terecht mag komen. In plaats daarvan dient het naar een inzamelpunt gebracht te worden waar elektrische en elektronische apparatuur gerecycled kan worden. Door ervoor te zorgen dat dit product op de juiste manier wordt ingezameld, helpt u mogelijke negatieve gevolgen voor het milieu en de menselijke gezondheid te voorkomen, die anders zouden kunnen worden veroorzaakt door een onjuiste afvalverwerking van dit 27 product. Neem voor meer informatie over het recyclen van dit product contact op met uw gemeente, het scheidingsdepot of de milieustraat. Veiligheid tijdens gebruik • Sluit de oplader aan op een stopcontact uit de buurt van een gootsteen of een heet oppervlak. • Gebruik geen verlengsnoer. Steek de oplader rechtstreeks in een stopcontact. • Laad het apparaat niet buiten in een stopcontact op. • Om een elektrische schok te voorkomen, het apparaat niet in water of andere vloeistoffen plaatsen. Mocht de motoreenheid in een vloeistof vallen, haal hem er dan onmiddellijk uit en reinig en droog hem voordat u verder gaat. • Gebruik de blender altijd op een schone, stevige en droge ondergrond. • Plaats het mes niet op de motorbasis zonder de mengbeker. • Zorg dat de messeneenheid stevig aan de mengbeker is bevestigd voordat u het apparaat aanzet • Gebruik nooit koolzuurhoudende dranken in de mengbeker • De mengbeker is niet geschikt voor gebruik in een magnetron. • Plaats altijd de beschermkap over het mes als u deze opbergt. 2. INLEIDING Gefeliciteerd met de aankoop van deze Cuisinart Blender! Al meer dan 30 jaar maakt Cuisinart de meest voortreffelijke keukenapparatuur. Alle Cuisinart producten zijn gemaakt om heel lang mee te gaan. Ze zijn ook ontworpen voor eenvoudig gebruik en om dag in dag uit uitstekende prestaties te leveren. Ga voor meer informatie over onze producten en voor recepten naar onze website www.cuisinart.eu 28 3. PRODUCT KENMERKEN (zie voorpagina) 1. Mengbeker 2. Messeneenheid 3. Indicatielampjes 4. Aan/uit-schakelaar 5. Motorbasis 6. Oplaadpoort (niet afgebeeld) 7. Drinkdeksel 8. Messenbeschermkap 9. USB-kabel en adapter 4. GEBRUIK Voordat u het apparaat voor het eerst gebruikt, raden we u aan hem schoon te vegen met een schone, vochtige doek om eventueel vuil of stof te verwijderen. Droog hem daarna goed af met een zachte, vochtabsorberende doek. Maak de mengbeker, de messeneenheid en het drinkdeksel goed schoon met een warm sopje. NB Gebruik geen schuurmiddelen, harde voorwerpen of schuursponsjes. A. DE BLENDER OPLADEN De accu in uw blender is nog niet volledig opgeladen. Voor gebruik moet de accu eerst worden opgeladen totdat alle drie de blauwe lampjes branden. Als deze volledig is opgeladen, kan deze blender ongeveer 8 smoothies maken maar dit is afhankelijk van het recept en de hardheid van de gebruikte ingrediënten. Uw blender is na ongeveer 2 uur volledig opgeladen. NB Om het apparaat op te laden, steekt u het micro-USB-plugje van de oplaadkabel in de oplaadpoort aan de achterkant van het apparaat. Sluit het USB-uiteinde rechtstreeks aan op de adapterstekker en steek deze in een stopcontact. Indicatielampjes voor de accu De indicatielampjes knipperen blauw wanneer de accu wordt opgeladen. Wanneer alle drie de lampjes branden, betekent dit dat de accu volledig is opgeladen en klaar is voor gebruik. Naarmate de accu leger wordt, doven de indicatielampjes. De accu moet worden opgeladen wanneer het laatste indicatielampje gaat knipperen. Als de accu helemaal leeg is, zal het apparaat niet werken. NB De blender kan niet worden gebruikt terwijl hij in het stopcontact zit en wordt opgeladen. Voor de beste oplaadprestaties van uw blender adviseren we u om alleen de USB-kabel en de oplaadadapter te gebruiken die bij dit apparaat zijn meegeleverd. B. BEDIENING • Zorg dat uw blender in ieder geval een beetje is opgeladen volgens de instructies in Sectie A. Als de blenderaccu leeg is, kunt u hem niet gebruiken door de stekker in het stopcontact te steken. U dient dan eerst te wachten tot hij voldoende is opgeladen om te kunnen blenden. • Doe de ingrediënten in de mengbeker. LET OP: Zorg ervoor dat de maximale vullijn niet wordt overschreden. Doe voor het beste resultaat altijd eerst de hardste ingrediënten in de beker (ijsklontjes, bevroren fruit, enz.) en als 29 laatste de zachtere ingrediënten en vloeistoffen. We raden u aan voedsel in stukjes van 3 cm te snijden voor het meest gelijkmatige resultaat. Als u hardere ingrediënten zoals wortels gebruikt, mag de mengbeker maximaal tot de helft worden gevuld. • Bevestig de zwarte messeneenheid op de beker met de messen naar beneden, in de beker. Draai de messeneenheid met de klok mee totdat hij goed vast zit. NB Pas op dat u de messen niet aanraakt – pak altijd het zwarte plastic deel vast en niet de messen zelf. • Zorg ervoor dat de motoreenheid op een schone, droge ondergrond staat. Plaats de mengbeker op de motoreenheid, met de zwarte messeneenheid aan de onderkant en draai hem goed vast. U voelt een klik wanneer de beker goed op zijn plaats zit. Zorg altijd dat hij goed vergrendeld zit voordat u de blender aanzet. NB Als de messeneenheid en de beker niet goed aan elkaar zijn bevestigd, zal de blender niet werken. • Druk eenmaal op de aan/uit-knop om de blender aan te zetten. De LED-lampjes lichten op en de motor zal starten. Om het apparaat uit te schakelen drukt u nogmaals op de aan/uit-knop. NB De blender werkt maximaal 1 minuut. Na 1 minuut stopt hij automatisch. Als u voor uw recept langer dan een minuut moet blenden, hoeft u alleen maar een paar seconden te wachten en vervolgens de blender opnieuw aan te zetten. • Als uw ingrediënten eenmaal goed zijn geblend, verwijdert u de mengbeker van de motorbasis door de beker tegen de klok in te draaien om hem te ontgrendelen. NB Probeer de mengbeker niet te verwijderen terwijl de motor nog draait. Als de beker tijdens het blenden wordt ontgrendeld, stopt de blender automatisch. • Draai dan de beker om en zet hem rechtop neer met de zwarte messeneenheid naar boven gericht. Draai de zwarte messeneenheid tegen de klok in los om hem te verwijderen. NB Raak de messen niet aan, ze zijn zeer scherp. Pak de messeneenheid altijd bij het zwarte plastic gedeelte vast. NB Het roestvrijstalen mes kan niet uit de zwarte eenheid worden verwijderd. • De messeneenheid kan direct worden afgewassen of tijdelijk veilig worden afgedekt met de doorzichtige kap totdat u hem kunt afwassen. Plaats daarvoor de beschermkap over de messeneenheid en draai de kap met de klok mee totdat hij vastklikt. NB Gebruik altijd de beschermkap als u de messeneenheid opbergt. • Bevestig indien gewenst het drinkdeksel op de mengbeker door hem met de klok mee te draaien totdat hij goed dicht zit. Zorg ook dat de drinkopening van het deksel goed is afgesloten voordat u de beker in een tas stopt om hem mee te nemen. C. TIPS & TRICKS • Doe voor het beste resultaat altijd eerst de hardste ingrediënten in de beker (ijsklontjes, bevroren fruit, enz.) en als laatste de zachtere ingrediënten en vloeistoffen. We raden u aan om de ingrediënten in stukjes van 3 cm te snijden voor het beste gelijkmatige resultaat. • Als er tijdens het blenden ingrediënten aan de zijkant van de beker blijven plakken, zet u de blender even stop, verwijdert u de beker en de messeneenheid en schudt u de beker voorzichtig. Plaats hem daarna weer terug en zet het apparaat weer aan. • Druk bij het blenden van dikkere mengsels de bovenkant van de beker zachtjes naar beneden zodat hij niet gaat ‘wandelen’ over het aanrecht. • Verwijder na het blenden de beker samen met de messeneenheid en zet hem neer op een vlakke ondergrond met de messeneenheid naar boven gericht. Tik een paar keer voorzichtig tegen de 30 beker zodat u niet morst als u de messen losdraait en verwijdert. • Voor sommige recepten is langer dan een minuut blenden noodzakelijk. Start de blender dan gewoon opnieuw. 5. REINIGING & ONDERHOUD • Maak het apparaat na gebruik altijd goed schoon. • Verwijder het mes en maak het apparaat met een spons of een vochtig doekje schoon. • Gebruik geen schurende reinigingsmiddelen die krassen geven. • Was het mes met de hand in een warm sopje. • De mengbeker, de messenbeschermer en het drinkdeksel kunnen worden afgewassen in een warm sopje of in het bovenste rek van de vaatwasmachine. LET OP: Wees voorzichtig met het mes. De messen zijn scherp en kunnen letsel veroorzaken. PROBEER NIET de messen uit de messeneenheid te verwijderen. 31 1. ISTRUZIONI DI SICUREZZA (TRADUZIONE DELLE ISTRUZIONI ORIGINALI) LEGGERE ATTENTAMENTE LE ISTRUZIONI PRIMA DI USARE L’APPARECCHIO. CONSERVARE LE ISTRUZIONI CON CURA PER UN’EVENTUALE CONSULTAZIONE SUCCESSIVA. Rispettare sempre le presenti istruzioni di sicurezza nell’utilizzare l’apparecchio, in modo da evitare infortuni personali o danni all’apparecchio. L’apparecchio deve essere utilizzato solo secondo le istruzioni riportate nel presente libretto. Esiste il rischio di infortuni in caso di uso non corretto del prodotto. • L’apparecchio è previsto unicamente per uso domestico e non è adatto a situazioni quali le aree cucina destinate al personale di negozi, uffici, altri ambienti di lavoro e agriturismi, e non deve essere utilizzato dai clienti in alberghi, motel e altri ambienti residenziali e strutture tipo bed and breakfast. • Occorre prestare la massima attenzione nella manipolazione degli accessori, durante l’uso e la pulizia. • Prestare la massima attenzione nel versare liquidi molto caldi nel bicchiere frullatore, in quanto possono essere schizzati fuori a causa di improvvisi getti di vapore. • Questo apparecchio non è destinato a un utilizzo con dispositivi a tempo (timer) esterni o con dispositivi di comando a distanza. • Questo apparecchio può essere utilizzato da persone con capacità fisiche, sensoriali o mentali ridotte, o da soggetti privi delle necessarie esperienze o conoscenze, qualora siano correttamente sorvegliati o siano state impartite loro le istruzioni riguardanti l’utilizzo dell’apparecchio da una persona responsabile della loro sicurezza. • I bambini devono essere sempre controllati per far sì che non giochino con questo prodotto. • Questo apparecchio non può essere utilizzato dai bambini. 32 Tenere l’apparecchio e l’adattatore lontano dai bambini, sia durante che dopo l’uso. • Controllare sempre l’apparecchio e i suoi accessori prima dell’uso, per rilevare eventuali segni di danno. Non utilizzare l’apparecchio se danneggiato o se caduto. In caso di danno, o se l’apparecchio presenta un guasto, contattare la linea assistenza clienti Cuisinart (consultare «Garanzia internazionale» a pagina 72). • Non utilizzare l’apparecchio se il cavo di alimentazione risulta danneggiato. Se danneggiato, interrompere immediatamente l’utilizzo dell’apparecchio. Il cavo eventualmente danneggiato deve essere sostituito dal fabbricante. Restituire l’apparecchio al centro assistenza (consultare «Garanzia internazionale» a pagina 72) Nessuna riparazione deve essere tentata dal cliente. • Per staccare dalla presa di corrente, tirare sempre la spina. Non tirare mai il cavo. • Non avvolgere mai il cavo di alimentazione attorno alla struttura principale dell’apparecchio durante o dopo l’uso. • L’apparecchio può essere lasciato, in sicurezza, attaccato all’alimentazione elettrica quando non viene utilizzato, per far sì che le batterie siano sempre cariche. Tuttavia, deve essere staccato dalla rete elettrica prima di montaggi, smontaggi, operazioni di pulizia o per periodi prolungati in cui resta inutilizzato. • Questo prodotto contiene un blocco batterie ricaricabile litioioni che non deve essere tolto dall’apparecchio per la carica. Le batterie di questo apparecchio non sono sostituibili. • I terminali delle batterie non devono mai essere cortocircuitati. • ATTENZIONE: per ricaricare la batteria, usare solo il dispositivo amovibile di ricarica fornito in dotazione con l’apparecchio. indica che viene fornito in dotazione Questo simbolo un dispositivo amovibile di alimentazione per ricaricare l’apparecchio. 33 • Questo prodotto è pienamente conforme a tutte le vigenti normative UE e britanniche applicabili a questo tipo e classe di apparecchi. Siamo un’azienda certificata ISO9001:2015 che valuta continuamente la validità del suo sistema di gestione della qualità. In caso di domande riguardo alla sicurezza e alla conformità del prodotto, contattare il nostro dipartimento di assistenza clienti (consultare «Garanzia internazionale» a pagina 72). • ATTENZIONE: evitare il contatto con le parti in movimento. Durante il funzionamento dell’apparecchio, tenere mani, capelli, indumenti, nonché spatole e altri utensili, lontani dagli accessori al fine di ridurre il rischio di infortuni personali e/o danni all’apparecchio. Può essere utilizzata una spatola, ma solo quando l’apparecchio non è in funzione. • ATTENZIONE: non avvicinare le dita agli accessori. Prima di spostare il cibo, controllare che il frullatore sia spento. • Il caricabatterie deve essere attaccato a una presa elettrica lontano da lavandini o da superfici calde. • Non utilizzare prolunghe. Attaccare il caricabatterie direttamente a una presa elettrica. • Non caricare l’apparecchio utilizzando una presa elettrica esterna, all’aperto. • Per evitare scosse elettriche, non mettere mai la struttura principale in acqua o altro liquido. Solo gli accessori di questo apparecchio sono stati progettati per essere immersi in acqua o altro liquido. Non immergere mai l’apparecchio, nemmeno in parte. Se il frullatore cade in un liquido, estrarlo immediatamente. Quindi, pulire e asciugare bene l’apparecchio prima di continuare. • Togliere sempre il gruppo lame dal bicchiere prima di pulire. • Non riempire eccessivamente il bicchiere frullatore. Rispettare la linea massima di riempimento. • Non attivare il frullatore vuoto: così facendo, si danneggia il 34 motore. • Non frullare liquidi molto caldi nel bicchiere frullatore. • Non mettere mai la struttura principale in acqua o altro liquido • ATTENZIONE: maneggiare le lame con estrema attenzione. Le lame sono affilate e potrebbero causare infortuni. NON tentare di togliere le lame dal gruppo lame. N.B. La lama in acciaio inossidabile non può essere tolta dal gruppo lama di colore nero. ATTENZIONE: i sacchetti in polietilene sul prodotto o sull’imballaggio possono essere pericolosi. Per evitare rischi di soffocamento, tenere lontano da bambini e neonati. Questi sacchetti non sono giocattoli. SMALTIMENTO DELLA BATTERIA Al fine di ridurre al minimo i rischi per la salute e l’ambiente alla fine del ciclo di vita del prodotto, le norme riguardanti i rifiuti di apparecchi elettrici ed elettronici (RAEE) e la direttiva sulle batterie impongono lo smaltimento di questo prodotto presso un apposito centro di raccolta, che estrarrà le batterie e procederà allo specifico riciclaggio. Rivolgersi alle autorità locali per saperne di più su come riciclare e smaltire questi prodotti in modo sicuro nel proprio comune. Il simbolo sul prodotto o sul suo imballaggio indica che questo prodotto non può essere trattato come rifiuto domestico. Deve essere consegnato a uno specifico punto di raccolta per il riciclaggio delle apparecchiature elettriche ed elettroniche. Così facendo, il prodotto sarà smaltito correttamente e si contribuirà a evitare potenziali conseguenze negative per l’ambiente e la salute, che potrebbero invece essere il risultato di un trattamento non corretto del prodotto arrivato a fine vita. Per informazioni più dettagliate sul riciclaggio di questo prodotto, contattare i servizi della nettezza urbana del proprio comune. 35 Sicurezza durante l’uso • Il caricabatterie deve essere attaccato a una presa elettrica lontano da lavandini o da superfici calde. • Non utilizzare prolunghe. Attaccare il caricabatterie direttamente a una presa elettrica. • Non caricare l’apparecchio utilizzando una presa elettrica esterna, all’aperto. • Per evitare scosse elettriche, non mettere mai la struttura principale in acqua o altro liquido. Se la base dell’apparecchio cade in un liquido, estrarlo immediatamente. Quindi, pulire e asciugare bene l’apparecchio prima di continuare. • Utilizzare il frullatore su una superficie pulita, solida e asciutta. • Non posizionare la lama sulla base dell’apparecchio senza aver inserito il bicchiere frullatore. • Prima dell’uso, controllare che il gruppo lama sia attaccato saldamente al bicchiere frullatore • Non usare mai bevande gassate nel bicchiere frullatore • Il bicchiere frullatore non è adatto per essere utilizzato in un forno a microonde. • Riporre sempre la lama utilizzando l’apposita copertura protettiva. 2. INTRODUZIONE Complimenti per l’acquisto del frullatore Cuisinart. Da oltre 30 anni, l’obiettivo di Cuisinart è sviluppare apparecchi di altissima gamma per gli appassionati di cucina. Tutti i prodotti Cuisinart sono progettati per durare eccezionalmente a lungo, essere facili da utilizzare e offrire eccellenti prestazioni giorno dopo giorno. Per saperne di più sui nostri prodotti e per idee di ricette, visitate il nostro sito Internet www.cuisinart.eu 36 3. CARATTERISTICHE DEL PRODOTTO (riferimento alla copertina) 1. Bicchiere frullatore 2. Blocco lama 3. Spie luminose 4. Interruttore acceso/spento 5. Base dell’apparecchio 6. Porta di ricarica (non raffigurata) 7. Coperchio per bere 8. Copertura protettiva lama 9. Adattatore e cavo USB 4. UTILIZZO Prima del primo utilizzo, consigliamo di pulire la struttura principale dell’apparecchio con un panno pulito e leggermente inumidito, per togliere eventuali tracce di sporcizia o polvere. Asciugare bene con un panno assorbente morbido. Lavare con cura in acqua e sapone il bicchiere frullatore, il gruppo lama e il coperchio per bere. N.B. Non usare detersivi abrasivi, oggetti duri o pagliette in acciaio. A. CARICARE IL FRULLATORE Le batterie del frullatore non sono state caricate totalmente. Prima di usare l’apparecchio, le batterie devono essere caricate fino a quando tutte e tre le luci blu sono illuminate. Con una carica completa, il frullatore sarà in grado di preparare circa 8 smoothies, in funzione della ricotta e della durezza degli ingredienti utilizzati. Le batterie del frullatore a immersione si caricano totalmente in circa 2 ore. N.B. To Per caricare l’apparecchio, inserire la presa micro-USB del cavo di alimentazione nella porta di ricarica sulla parte posteriore della struttura principale. Attaccare l’estremità del cavo USB direttamente alla presa dell’adattatore, poi quest’ultimo a una presa elettrica. Spie di carica della batteria Le spie luminose lampeggiano di blu quando la batteria è sotto carica. Se tutte e tre le luci sono illuminate, la batteria è completamente carica e l’apparecchio è pronto all’uso. Appena la batteria comincia a scaricarsi, le spie si spengono. La batteria deve essere ricaricata quando l’ultima spia lampeggia. Se la batteria è completamente scarica, l’apparecchio non funziona. N.B. Il frullatore non può essere usato quando è attaccato alla corrente e sotto carica. Per garantire le migliori prestazioni di carica del frullatore, raccomandiamo di usare solo l’adattatore e il cavo USB forniti in dotazione con l’apparecchio. B. FUNZIONAMENTO • Controllare che il frullatore sia almeno parzialmente carico, seguendo le istruzioni della sezione A. Se il frullatore è privo di carica, non può essere attivato attaccandolo semplicemente a una presa elettrica. Occorre aspettare che si sia caricato a sufficienza per poter frullare. • Inserire gli ingredienti nel bicchiere frullatore. N.B. Fare attenzione a non superare la linea massima di riempimento. Per avere risultati ottimali, 37 mettere sempre per primi gli ingredienti più duri nel bicchiere (cubetti di ghiaccio, frutti congelati, ecc.), per finire con quelli più teneri e i liquidi. Consigliamo di tagliare gli alimenti in pezzi da 3 cm per ottenere risultati più uniformi. Se si usano ingredienti più duri, per esempio carote. Il bicchiere frullatore non deve essere riempito per più di metà. • Attaccare il blocco lama nero al bicchiere con la lama rivolta verso il basso nel bicchiere. Stringere a fondo il blocco lama in senso orario. N.B. Prestare la massima attenzione a non toccare le lame – maneggiare usando sempre la parte in plastica nera del blocco lama. • Controllare che la base dell’apparecchio sia poggiata su una superficie pulita e asciutta. Inserire il bicchiere frullatore nella base dell’apparecchio con il blocco lama nero sul fondo, quindi ruotarlo per posizionarlo saldamente. Nel momento in cui il bicchiere viene posizionato correttamente, si avverte uno scatto. Controllare sempre che il blocco sia ancorato saldamente prima di usare il frullatore. N.B. Se il blocco lama e il bicchiere non sono attaccati correttamente, il frullatore non funziona. • Per attivare l’apparecchio, premere una volta il pulsante di accensione. Le luci LED si accendono e il motore comincia a funzionare. Premere nuovamente il pulsante dell’alimentazione prima di spegnere l’apparecchio. N.B. Il frullatore non può funzionare per più di 1 minuto. Dopo 1 minuto, il frullatore si arresta automaticamente. Se, per la ricetta, occorre frullare per più di un minuto, fare una pausa di alcuni secondi per riprendere a frullare successivamente. • Dopo aver frullato gli ingredienti, togliere il bicchiere frullatore dalla base ruotandolo in senso antiorario per sbloccare. N.B. Non tentare di togliere il bicchiere frullatore mentre il motore è ancora in funzione. Se il bicchiere viene sbloccato mentre il frullatore è in funzione, l’apparecchio si arresta automaticamente. • Posizionare il bicchiere frullatore in posizione verticale con blocco lama nero nella parte alta. Ruotare il blocco lama nero in senso anti-orario per toglierlo. N.B. Prestare la massima attenzione a non toccare le lame, in quanto sono molto affilate. Maneggiare tenendo sempre la parte nera in plastica del gruppo lama. N.B. La lama in acciaio inossidabile non può essere tolta dal gruppo lama di colore nero. • Il gruppo lama può essere lavato subito oppure riposte in modo sicuro applicando la copertura protettiva trasparente sulla lama fino a quando può essere lavata. Posizionare la copertura protettiva della lama sul gruppo lama, ruotando in senso orario per posizionarla saldamente. N.B. Utilizzare sempre la copertura protettiva della lama quando si ripone il gruppo lama. • Se necessario, attaccare il coperchio per bere al bicchiere frullatore, ruotando in senso orario fino a bloccarlo saldamente. Controllare che il tappo del coperchio per bere sia ben chiuso prima di mettere il bicchiere in una borsa da viaggio. C. CONSIGLI & ASTUZIE • Per avere risultati ottimali, mettere sempre per primi gli ingredienti più duri nel bicchiere (cubetti di ghiaccio, frutti congelati, ecc.), per finire con quelli più teneri e i liquidi. • Consigliamo di tagliare la maggior parte degli alimenti in pezzi da 3 cm per ottenere risultati più omogenei. • Se gli alimenti si attaccano ai bordi del bicchiere mentre vengono frullati, spegnere il frullatore, togliere il bicchiere e scuotere leggermente il bicchiere. Riposizionare e ricominciare a frullare. • Per frullare composti più spessi, tenere giù leggermente la parte alta del bicchiere per evitare fuoriuscite sulla superficie. 38 • Dopo aver frullato, togliere il bicchiere e posizionarlo su una superficie in modo che il gruppo lama sia sulla parte alta. Picchiettare leggermente alcune volte il bicchiere per evitare eventuali fuoriuscite quando si tolgono le lame. • Se, per la ricetta, occorre frullare per più di un minuto, riprendere semplicemente a frullare successivamente, 5. PULIZIA & MANUTENZIONE • Pulire sempre l’apparecchio dopo l’uso. • Togliere la lama e pulire la struttura principale solo con una spugna o un panno leggermente inumidito. • Non usare prodotti abrasivi, che potrebbero graffiare la superficie. • Lavare la lama a mano in acqua calda e sapone. • Il bicchiere frullatore, la copertura protettiva della lama e il coperchio per bere possono essere lavati in acqua calda e sapone oppure nel cestello superiore della lavastoviglie. ATTENZIONE: maneggiare le lame con estrema attenzione. Le lame sono affilate e potrebbero causare infortuni. NON tentare di togliere le lame dal gruppo lame. 39 1. CONSIGNAS DE SEGURIDAD (TRADUCCIÓN DE LAS INSTRUCCIONES ORIGINALES) ¡LEA ATENTAMENTE ESTAS CONSIGNAS DE SEGURIDAD ANTES DE UTILIZAR EL APARATO! Siga siempre las consignas de seguridad cuando utilice este aparato para evitar lesiones o daños en el mismo. Este aparato solo se debe usar tal y como se indica en el libro de instrucciones. Si usa el producto de forma inadecuada existe un riesgo de lesiones. • Este aparato está destinado únicamente a un uso doméstico y no está previsto su uso en zonas de cocina para el personal en tiendas, oficinas y otros centros de trabajo, casas rurales, habitaciones de hoteles o moteles y otros establecimientos de tipo turístico. • Tenga cuidado al manipular los accesorios durante su uso y limpieza. • Tenga cuidado si hay líquido caliente en el vaso mezclador, pues puede salpicar a causa del vapor. • Este aparato no debe utilizarse con temporizador externo o con sistemas de control remoto. • Este aparato no está pensado para que lo usen personas con capacidad física, sensorial o mental reducida o personas desprovistas de experiencia y conocimientos suficientes, salvo que personas responsables de su seguridad las supervisen adecuadamente o impartan instrucciones previas relativas a la utilización del mismo. • Mantenga a los niños bajo supervisión para evitar que jueguen con este aparato. • Este aparato no puede ser utilizado por niños. Mantenga el aparato y el cargador fuera del alcance de niños durante su uso y después del mismo. • Inspeccione siempre el aparato y sus accesorios en busca de 40 daños aparentes antes de utilizarlo. No lo use si está dañado o ha sufrido algún golpe. En caso de que se produzcan daños o que el aparato presente una avería, póngase en contacto con el Servicio de Atención al Cliente de Cuisinart (consulte el apartado «Garantía internacional» en la página 72) • No utilice el aparato si el cable está dañado. En ese caso, deje de usarlo inmediatamente. Si el cable está dañado, debe ser sustituido por el fabricante. Devuelva el aparato al Servicio de Atención al Cliente (consulte el apartado «Garantía internacional» en la página 72) El consumidor no debe intentar ninguna reparación. • No desenchufe el aparato tirando del cable. • No enrolle el cable alrededor del cuerpo del aparato durante o después de su uso. • Es seguro dejar el aparato enchufado a la red eléctrica cuando no lo está utilizando para garantizar que las baterías estén siempre cargadas. Sin embargo, proceda a desenchufarlo antes de montarlo, desmontarlo, limpiarlo, o si no lo va a utilizar durante un periodo prolongado de tiempo. • Este producto contiene una batería recargable de Ion Litio que no debe ser retirada del aparato para su carga. Las baterías del aparato no son sustituibles. • Los terminales eléctricos no deben estar en cortocircuito. • ¡ATENCIÓN! Para recargar la batería, utilice exclusivamente el indica que cargador y el cable incluidos. Este símbolo el aparato incluye una fuente de alimentación externa para su recarga. • Este producto cumple plenamente con toda la legislación pertinente de la UE y del Reino Unido, así como las normas relativas a este tipo y clase de aparatos. Somos una empresa certificada ISO9001:2015 y evaluamos de forma constante el desempeño de nuestro Sistema de Gestión de Calidad. Si tiene alguna pregunta sobre la seguridad y la conformidad 41 de los productos, póngase en contacto con nuestro Servicio de Atención al Cliente (consulte el apartado «Garantía internacional» en la página 72) • ¡ATENCIÓN! Evite el contacto con las partes móviles. Mantenga las manos, el cabello, la ropa y las espátulas y otros utensilios de cocina lejos de los accesorios mientras el aparato esté funcionando, para evitar lesiones o daños en el mismo. Se puede utilizar una espátula, pero solo cuando el aparato no esté en funcionamiento. • ¡ATENCIÓN! No acerque los dedos a los accesorios. Antes de retirar la comida, compruebe que la batidora no está encendida. • Enchufe el cargador a una toma de corriente, lejos de lavabos o superficies calientes. • No use alargadores. Enchufe el cargador directamente a la toma de corriente. • No utilice un enchufe de exterior para cargar la unidad. • Para evitar descargas eléctricas, no introduzca la unidad en agua u otros líquidos. Solo los accesorios de este aparato están diseñados para sumergirlos en agua o en cualquier otro líquido. No sumerja en ningún caso el cuerpo del aparato. Si la batidora se cae en un recipiente con líquido, sáquela inmediatamente y limpie y seque la unidad antes de continuar. • Retire siempre las cuchillas del vaso antes de limpiarlas. • No llene excesivamente el vaso mezclador. Respete la línea de llenado máximo. • No utilice la batidora con el vaso vacío, pues se puede dañar el motor. • No use el vaso mezclador con líquidos calientes. • Para evitar descargas eléctricas, no introduzca el cuerpo de la batidora en agua u otros líquidos 42 • PRECAUCIÓN: Tenga cuidado al manipular las cuchillas. Las cuchillas están afiladas y pueden causar lesiones. No intente desmontar las cuchillas. NOTA: Las cuchillas de acero inoxidable no pueden retirarse de su base. ATENCIÓN: Las bolsas de polietileno sobre el producto o el embalaje pueden ser peligrosas. Para evitar peligro de asfixia, debe mantenerlas alejadas de los bebés y los niños. Estas bolsas no son juguetes. ELIMINACIÓN DE LA BATERÍA Para minimizar los riesgos para la salud y el medio ambiente al final de la vida de este producto, la legislación relativa a los residuos de aparatos eléctricos y electrónicos (RAEE) y la Directiva sobre residuos de pilas y acumuladores exigen que haga llegar este producto a un centro de recogida adecuado, que se ocupará de retirar las baterías para su reciclado. Por favor, póngase en contacto con las autoridades locales para obtener información acerca del reciclado y la eliminación segura de estos residuos en su zona. El símbolo en el producto o en su embalaje indica que este producto no debe ser desechado junto con la basura doméstica. Debe entregarse en el punto de recogida encargado del reciclar equipos eléctricos y electrónicos. Al deshacerse correctamente de este producto, ayudará a prevenir las posibles consecuencias negativas para el medio ambiente y la salud humana que podría causar eliminación inadecuada de este producto. Para más detalles sobre el reciclaje de este producto, póngase en contacto con su ayuntamiento o con el centro de tratamiento de residuos más cercano. Seguridad durante el uso • Enchufe el cargador a una toma de corriente, lejos de lavabos o superficies calientes. 43 • No use alargadores. Enchufe el cargador directamente a la toma de corriente. • No utilice un enchufe de exterior para cargar la unidad. • Para evitar descargas eléctricas, no introduzca la unidad en agua u otros líquidos. Si el motor se cae en un recipiente con líquido, sáquelo inmediatamente y limpie y seque la unidad antes de continuar. • Utilice siempre la batidora sobre una superficie limpia, resistente y seca. • No coloque las cuchillas sobre la base del motor sin el vaso. • Compruebe que el bloque de las cuchillas está correctamente colocado en el vaso mezclador antes de su uso. • No introduzca en el vaso mezclador bebidas gaseosas. • El vaso mezclador no es apto para microondas. • Coloque siempre la tapa de protección sobre la cuchilla antes de almacenarla. 2. INTRODUCCIÓN Felicidades, acaba de adquirir una batidora Cuisinart. Durante más de 30 años, el objetivo de Cuisinart ha sido fabricar los mejores equipos de cocina. Todos los productos Cuisinart están diseñados para una vida útil excepcionalmente larga y un uso sencillo y ofrecen un excelente rendimiento día tras día. Para obtener más información sobre nuestros productos algunas ideas de recetas, visite nuestro sitio web www.cuisinart.eu 3. CARACTERÍSTICAS DEL PRODUCTO (consulte la portada para referencia) 1. Vaso mezclador 2. Cuchillas 3. Indicadores 4. Interruptor marcha / parada 5. Motor 6. Puerto de carga (no se muestra) 7. Tapa para beber 44 8. Tapa de protección de la cuchilla 9. Cable USB y cargador 4. UTILIZACIÓN Antes de usarla por primera vez, le recomendamos que limpie la unidad con un paño limpio y húmedo para eliminar la suciedad y el polvo. A continuación, séquela con un paño suave. Limpie cuidadosamente el vaso mezclador el bloque de las cuchillas y la tapa con agua jabonosa tibia. NOTA: No use limpiadores o estropajos agresivos o utensilios rígidos para limpiar. A. CARGA DE LA BATIDORA Las baterías de la batidora no están completamente cargadas. Antes de usarla, cargue las baterías hasta que se iluminen las tres luces azules. Con una carga completa, la batidora puede hacer alrededor de 8 batidos, dependiendo de la receta y de la dureza de los ingredientes utilizados. La batidora se cargará completamente en aproximadamente dos horas y media. NOTA: Para cargar el aparato, inserte el conector Micro USB en el puerto de carga de la parte posterior. Luego enchufe el otro extremo al adaptador y este a la toma de corriente. Indicadores de carga Los indicadores de carga parpadean en azul mientras la batería se está cargando. Cuando la batería esté completamente cargada y lista para su uso se encenderán los tres indicadores de carga. Cuando la batería empiece a agotarse se irán apagando los indicadores de carga. Cuando empiece a parpadear el último indicador, debe poner a cargar la batería. La unidad no funciona cuando la batería está completamente descargada. NOTA: No se puede usar la batidora mientras está enchufada y cargando. Para garantizar un mejor rendimiento, recomendamos que utilice exclusivamente el cable USB y el cargador incluidos para cargar la batidora. B. USO • Compruebe que la batidora está suficientemente cargada, siguiendo las instrucciones del apartado A. Si la batería no tiene carga, no es posible utilizarla conectada a la red. Necesita esperar a que tenga carga suficiente para su uso. • Coloque los ingredientes en el vaso mezclador. NOTA: Tenga cuidado de no superar la línea de carga máxima. Para lograr mejores resultados, ponga primero los ingredientes más duros (cubitos de hielo, fruta congelada...) y termine con los ingredientes líquidos y más blandos. Recomendamos cortar los alimentos en trozos de 3 cm para lograr resultados más uniformes. Si está utilizando ingredientes duros, como zanahorias, no debe llenar el vaso mezclador más de la mitad. • Coloque el bloque de las cuchillas sobre el vaso mezclador, con las cuchillas hacia dentro. Gire el bloque de las cuchillas en sentido horario hasta que quede bien apretado. NOTA: Tenga cuidado de no tocar las cuchillas, debe sujetarlas siempre por la base de plástico negro. • Compruebe que la base del motor está sobre una superficie limpia y seca. Coloque el vaso mezclador sobre la base del motor, con la parte negra del bloque de las cuchillas hacia abajo y gire para que encaje en su lugar. Oirá un clic cuando el vaso mezclador encaje en su lugar. Antes de encender la batidora, compruebe que está bien colocado. NOTA: Si el bloque de las cuchillas y el vaso no están bien colocados, la batidora no funcionará. 45 • Para ponerla en marcha, pulse el botón de encendido una vez. Se encenderán los indicadores y el motor se pondrá a girar. Pulse de nuevo el botón de encendido para apagar la unidad. NOTA: la batidora no puede funcionar durante más de 1 minuto. Pasado 1 minuto, se apagará automáticamente. Si su receta requiere un batido más largo de un minuto, simplemente espere unos segundos antes de ponerla en marcha de nuevo. • Una vez los ingredientes estén mezclados, retire el vaso mezclador de la base girando en sentido antihorario para desbloquearlo. NOTA: No intente retirar el vaso mezclador con el motor en marcha. Si el vaso se desbloquea durante el uso, la batidora se detendrá automáticamente. • Coloque el vaso mezclador en posición vertical en la superficie con el bloque de las cuchillas en la parte superior. Gire las cuchillas en sentido antihorario para retirarlas. NOTA: tenga cuidado de no tocar las cuchillas, pues están muy afiladas. Siempre debe sujetarlas por la base de plástico negra. NOTA: Las cuchillas de acero inoxidable no pueden retirarse de su base. • Lave el bloque de las cuchillas de forma inmediata o guárdelo de forma segura utilizando la tapa transparente de protección hasta que pueda lavarlo. Simplemente coloque la tapa de protección sobre las cuchillas y gírela en sentido horario hasta que encaje. NOTA: Use siempre la tapa de protección cuando guarde las cuchillas. • Para colocar la tapa del vaso mezclador, debe girarla en sentido horario y apretando bien. Compruebe que la tapa está bien cerrada antes de colocar el vaso en una bolsa de transporte. E. CONSEJOS Y SUGERENCIAS • Para lograr mejores resultados con la batidora, ponga primero los ingredientes más duros (cubitos de hielo, fruta congelada...) y termine con los ingredientes líquidos y más blandos. • Recomendamos cortar los alimentos en trozos de 3 cm para lograr resultados más uniformes. • Si la comida se queda pegada a los laterales del vaso mezclador, detenga la batidora, retire el vaso mezclador y agítelo suavemente. Vuelva a colocarlo en su lugar y vuelva a batir. • Si trabaja con mezclas más gruesas, sujete con la mano la parte superior del vaso para evitar que se mueva. • Cuando termine de mezclar, retire el vaso y colóquelo sobre una superficie de modo que el bloque de las cuchillas quede en la parte superior. Dé unos golpecitos al vaso para evitar que los alimentos se derramen al retirar las cuchillas. • Algunas recetas requieren más de un minuto de mezcla. En ese caso, simplemente vuelva a poner en marcha la batidora. 5. LIMPIEZA & MANTENIMIENTO • Limpie siempre bien el aparato después de usarlo. • Retire la cuchilla y limpie la base del motor con una esponja o paño húmedo. • No use limpiadores abrasivos que puedan rayar la superficie. • Lave las cuchillas en agua caliente jabonosa. • El vaso mezclador, su tapadera y la tapa de protección de las cuchillas pueden lavarse en agua caliente jabonosa o en la bandeja superior del lavavajillas. PRECAUCIÓN: Tenga cuidado al manipular las cuchillas. Las cuchillas están afiladas y pueden causar lesiones. No intente desmontar las cuchillas. 46 1. INSTRUÇÕES DE SEGURANÇA (TRADUÇÃO DAS INSTRUÇÕES ORIGINAIS) LEA DETENIDAMENTE TODAS LAS INSTRUCCIONES ANTES DE USAR EL APARATO Y GUÁRDELAS EN UN LUGAR SEGURO PARA REFERENCIA FUTURA. Respeite sempre as presentes instruções de segurança durante a utilização para evitar lesões corporais ou danos ao aparelho. Este aparelho deve ser utilizado exclusivamente como indicado no presente modo de emprego. Há risco de lesão em caso de utilização indevida do aparelho. • Este aparelho destina-se apenas a uso doméstico e não deve ser utilizado em aplicações como áreas de cozinha reservadas ao pessoal em lojas, escritórios e outros ambientes de trabalho; casas agropecuárias; clientes em hotéis, motéis e similares; pequenos alojamentos turísticos. • Há que ter o máximo cuidado na manipulação dos acessórios, durante a utilização e a limpeza. • Tenha o máximo cuidado quando deitar líquidos quentes no copo misturador para evitar lesões causadas por libertação súbita de vapor. • O aparelho não se destina a ser operado por meio de temporizador externo ou de telecomando. • Este aparelho não se destina a ser utilizado por pessoas com capacidades físicas, sensoriais ou mentais diminuídas, ou sem experiência e conhecimento, a menos que estejam sob vigilância ou tenham recebido instrução sobre o modo de emprego do aparelho da pessoa responsável pela sua segurança. • As crianças devem ser devidamente vigiadas para garantir que não brincam com este aparelho. • Este aparelho não deve ser utilizado por crianças. Mantenha o aparelho e o transformador fora do alcance de crianças durante e após a sua utilização. 47 • Examine sempre o aparelho e os respectivos acessórios antes da utilização para confirmar que não apresenta sinais visíveis de dano. Não o utilize se estiver danificado ou se tiver caído. Em caso de avaria, entre em contacto com o serviço de assistência técnica (consulte a secção “Garantia internacional” na página 72). • Não utilize o aparelho se o cabo de alimentação estiver danificado. Neste caso, deixe imediatamente de utilizar o aparelho. Se o cabo de alimentação estiver danificado deve ser substituído pelo fabricante. Devolva o aparelho ao serviço de assistência técnica (consulte a secção “Garantia internacional” na página 72). O consumidor deverá abster-se de toda e qualquer tentativa de reparação. • Nunca puxe pelo cabo de alimentação para desligar o aparelho da tomada de corrente. • Não enrole o cabo de alimentação à volta do corpo principal do aparelho durante ou após a utilização. • Este aparelho pode ficar ligado à fonte de alimentação eléctrica quando não estiver a ser utilizado para garantir que as baterias estão sempre carregadas. Deve, no entanto, ser desligado antes da montagem, desmontagem e limpeza, ou se não for utilizado durante um período de tempo prolongado. • Este aparelho contém um pack de baterias recarregáveis de iões de lítio que não devem ser retiradas do aparelho para carregar. As baterias deste aparelho não podem ser substituídas. • Os terminais de alimentação não podem ser colocados em curto-circuito. • ADVERTÊNCIA: Para recarregar o pack de baterias, utilize exclusivamente o carregador separado fornecido com este indica a presença de uma fonte aparelho. Este símbolo de alimentação separada para este efeito. • O presente aparelho cumpre integralmente o disposto na legislação da UE e do RU e as normas relevantes para este tipo 48 e classe de aparelho. Na qualidade de empresa certificada ISO9001:2015, avaliamos constantemente o desempenho do sistema de gestão da qualidade. Em caso de dúvidas quanto à segurança e ao cumprimento do aparelho, entre em contacto com o serviço de assistência técnica (consulte a secção “Garantia internacional” na página 72). • ADVERTÊNCIA: Evite o contacto com as peças móveis. Mantenha as mãos, o cabelo e a roupa, bem como espátulas e outros utensílios, afastados dos acessórios durante o funcionamento para reduzir o risco de lesões corporais e/ou danos ao aparelho. Pode utilizar uma espátula, mas apenas quando a unidade estiver parada. • ADVERTÊNCIA: Não aproxime os dedos dos acessórios. Para remover alimentos que tenham ficado presos, desligue primeiro o aparelho da corrente eléctrica. • O carregador deve ser ligado a uma tomada de corrente, longe de um lava-loiça ou de qualquer fonte de calor. • Não utilize uma extensão. Ligue o carregador directamente a uma tomada de corrente. • Não carregue o aparelho utilizando uma tomada no exterior. • Para evitar o risco de choque eléctrico, não coloque a unidade principal em água ou em quaisquer outros líquidos. Apenas os acessórios deste aparelho foram concebidos para serem mergulhados em água ou em outros líquidos. Nunca submerja qualquer outra parte deste aparelho. Se o aparelho cair dentro de água ou outro líquido, apanhe-o imediatamente, limpe e seque completamente antes de continuar. • Remova sempre o conjunto das lâminas do copo antes de limpar. • Não encha excessivamente o copo misturador. Respeite a linha de enchimento máximo. • Nunca ponha a funcionar o aparelho vazio – corre o risco de danificar o motor. 49 • Não misture líquidos quentes no copo misturador. • Não coloque a unidade principal em água ou em quaisquer outros líquidos. • ATENÇÃO: Manipule a lâmina com cuidado. As lâminas são afiadas e podem causar lesões. NÃO tente remover as lâminas do conjunto. N.B. A lâmina em aço inoxidável não pode ser removida do conjunto de lâminas de cor preta. ADVERTÊNCIA: Os sacos em polietileno contendo o aparelho ou a sua embalagem podem ser perigosos. Para evitar o risco de asfixia, mantenha esses sacos fora do alcance de bebés e crianças. Estes sacos não são brinquedos. ELIMINAÇÃO DAS BATERIAS A fim de minimizar os riscos para a saúde e o ambiente no fim da vida útil deste aparelho, a directiva relativa aos resíduos de equipamentos eléctricos e electrónicos (REEE) e a diretiva relativa a pilhas e baterias e respectivos resíduos exigem que elimine este aparelho nas instalações de retoma e de recolha disponibilizados localmente onde serão removidas as baterias e se procederá à reciclagem. Contacte os serviços de recolha de resíduos urbanos da área onde reside para obter informações mais detalhadas sobre a reciclagem e a eliminação deste aparelho em condições de segurança. O símbolo presente neste aparelho ou na sua embalagem indica que o mesmo não pode ser tratado como lixo doméstico. Em vez disso, deve recorrer aos sistemas de recolha e retoma dos REEE disponíveis na sua área. Ao assegurar que este aparelho é correctamente eliminado, estará a contribuir para prevenir potenciais consequências negativas para o ambiente e para a saúde pública devido ao teor de substâncias nocivas presentes na sua constituição. Para obter informações mais detalhadas 50 sobre a reciclagem deste aparelho, contacte os serviços de recolha de resíduos urbanos da área onde reside. Segurança durante a utilização • O carregador deve ser ligado a uma tomada de corrente, longe de um lava-loiça ou de qualquer fonte de calor. • Não utilize uma extensão. Ligue o carregador directamente a uma tomada de corrente. • Não carregue o aparelho utilizando uma tomada no exterior. • Para evitar o risco de choque eléctrico, não coloque a unidade principal em água ou em quaisquer outros líquidos. Se o aparelho cair dentro de água ou outro líquido, apanhe-o imediatamente, limpe e seque completamente antes de continuar. • Utilize sempre o aparelho numa superfície limpa, estável e seca. • Não coloque a lâmina na base sem que o copo misturador esteja montado. • Certifique-se de que o conjunto das lâminas está firmemente acoplado ao copo misturador antes de utilizar. • Nunca utilize bebidas gaseificadas no copo misturador. • O copo misturador não é adequado para o microondas. • Guarde sempre a lâmina com a tampa de proteção. 2. INTRODUÇÃO Parabéns por ter comprado a Hand Blender da Cuisinart. Há mais de 30 anos que o objectivo da Cuisinart é produzir o melhor em equipamento de cozinha. Todos os produtos da Cuisinart são concebidos para terem uma vida útil excepcionalmente longa, grande facilidade de utilização e um desempenho excelente dia após dia. Para saber mais sobre os nossos produtos e descobrir ideias de receitas fantásticas, visite o site www.cuisinart.eu 51 3. CARACTERÍSTICAS DO PRODUTO (ver a tampa da embalagem) 1. Copo misturador 2. Conjunto das lâminas 3. Indicadores luminosos 4. Interruptor de alimentação 5. Base de alimentação eléctrica 6. Entrada de carregamento (não visível) 7. Tampa do copo 8. Tampa de protecção das lâminas 9. Cabo USB e transformador 4. UTILIZAÇÃO Antes da primeira utilização, recomenda-se que limpe a unidade principal com um pano limpo e húmido para retirar qualquer sujidade ou pó. Seque-a completamente com um pano macio e absorvente. Lave cuidadosamente o copo misturador, o conjunto das lâminas e a tampa do copo em água quente com detergente. N.B. Não utilize produtos de limpeza abrasivos, esfregões ou utensílios metálicos. A. CARREGAMENTO DO APARELHO As baterias do aparelho não estão completamente carregadas. Antes de utilizar, as baterias devem ser carregadas até os três indicadores luminosos ficarem acesos com cor azul. Com uma carga completa, o aparelho dá para cerca de 8 smoothies, consoante a receita e os ingredientes utilizados. O aparelho demora aproximadamente 2 horas até ficar completamente carregado. N.B. Para carregar a unidade principal, introduza a extremidade do cabo USB na entrada de carregamento situada na sua traseira. Insira a outra extremidade do cabo USB directamente na ficha do transformador e depois na tomada da rede eléctrica. Indicadores luminosos da autonomia da bateria Os indicadores luminosos ficam intermitentes com cor azul, indicando que o aparelho está a carregar. Quando os três indicadores luminosos ficarem permanentemente acesos, significa que a bateria está completamente carregada e o aparelho está pronto para ser utilizado. Quando a bateria está quase esgotada, os indicadores luminosos apagam-se um a um. A bateria precisa de ser recarregada quando o último indicador luminoso ficar intermitente. Quando a bateria estiver completamente descarregada, o aparelho deixa de funcionar. N.B. O aparelho não pode ser utilizado enquanto estiver a carregar. Para garantir o melhor desempenho quando carregar o aparelho, recomendamos que utilize o cabo USB e o transformador fornecido. B. FUNCIONAMENTO • Certifique-se de que o aparelho tem carga suficiente utilizando as instruções na parte A. Se o aparelho estiver descarregado, não pode ser operado ligando-o a corrente eléctrica. Será necessário aguardar que tenha carga suficiente para executar a tarefa pretendida. • Coloque os ingredientes no copo misturador. 52 N.B. Não exceda a linha de enchimento máximo. Para obter melhores resultados, comece sempre por colocar primeiro os ingredientes mais duros (cubos de gelo, fruta congelada, etc.) e termine com os ingredientes mais moles. Recomendamos que corte os alimentos em porções de 3 cm para obter resultados mais uniformes. Quando utilizar ingredientes mais rijos, como cenouras, encha o copo misturador apenas até meio. • Fixe o conjunto das lâminas de cor preta no copo com a lâmina virada para baixo. Rode o conjunto das lâminas no sentido dos ponteiros do relógio até estar correctamente apertado. N.B. Não toque nas lâminas – manipule sempre pegando pela parte do conjunto das lâminas em plástico de cor preta. • Certifique-se de que a base de alimentação eléctrica está colocada numa superfície limpa e seca. Coloque o copo misturador sobre a base de alimentação eléctrica com o conjunto das lâminas na base e rode para encaixar. Ouvirá um clique quando o copo encaixar. Assegure-se sempre que o copo está encaixado antes de utilizar o aparelho. N.B. Se o conjunto das lâminas e o copo não estiverem correctamente acoplados, o aparelho não funcionará. • Para accionar, prima uma vez o interruptor de alimentação. As luzes LED acendem-se e o motor começa a funcionar. Prima de novo o interruptor de alimentação para desligar a unidade. N.B. Este aparelho não pode funcionar mais de 1 minuto de cada vez, passado 1 minuto pára automaticamente. Se a sua receita exigir mais de um minuto de funcionamento, interrompa durante alguns segundos e recomece a seguir. • Uma vez os ingredientes misturados, remova o copo misturador da base rodando o copo misturador no sentido contrário ao dos ponteiros do relógio para desbloquear. N.B. Não tente remover o copo misturador com o motor a funcionar. Neste caso, o aparelho pára automaticamente. • Coloque o copo misturador direito sobre a superfície com o conjunto das lâminas de cor preta por cima. Rode o conjunto das lâminas no sentido contrário ao dos ponteiros do relógio para remover. N.B. Não toque nas lâminas – são muito afiadas. Manipule sempre pegando pela parte do conjunto das lâminas em plástico de cor preta. N.B. A lâmina em aço inoxidável não pode ser removida do conjunto das lâminas de cor preta. • O conjunto das lâminas pode ser lavado imediatamente ou guardado em condições de segurança utilizando a tampa transparente de protecção da lâmina até ser possível lavar a lâmina. Basta colocar a tampa de protecção da lâmina sobre o conjunto das lâminas e rodar no sentido dos ponteiros do relógio até encaixar. N.B. Use sempre a tampa de protecção da lâmina quando guardar o conjunto das lâminas. • Se necessário, coloque a tampa do copo no copo misturador rodando no sentido dos ponteiros do relógio até estar bem apertada. Certifique-se de que a tampa do copo está bem fechada antes de o colocar num saco para o transportar consigo. C. SUGESTÕES & DICAS • Para obter melhores resultados quando utilizar este aparelho, comece sempre por colocar primeiro os ingredientes mais duros (cubos de gelo, fruta congelada, etc.) e termine com os ingredientes mais moles. • Recomenda-se que a maioria dos alimentos seja cortada em porções de 3 cm para obter resultados uniformes. • Se os alimentos ficarem colados às paredes do copo quando misturar, pare o aparelho, remova o copo e sacuda cuidadosamente o copo. Volte a colocar o copo e reinicie a operação. 53 • Quando misturar alimentos mais espessos, carregue levemente no topo do copo para evitar que venham para a superfície. • Depois de misturar, remova o copo e coloque sobre uma superfície de modo que o conjunto das lâminas fique em cima. Bata levemente com o copo várias vezes para evitar qualquer derrame que possa ocorrer quando remover as lâminas. • Algumas receitas podem exigir mais de um minuto de funcionamento, interrompa durante alguns segundos e recomece a seguir. 5. LIMPEZA & MANUTENÇÃO • Limpe sempre o aparelho completamente depois de cada utilização. • Remova a lâmina e limpe a unidade principal unicamente com uma esponja ou um pano húmido. • Não utilize produtos abrasivos que possam riscar a superfície. • Lave a lâmina à mão em água quente com detergente. • O copo misturador, a tampa de protecção das lâminas e a tampa do copo podem ser lavados em água quente com detergente ou colocados no tabuleiro superior da máquina de lavar loiça. ATENÇÃO: Manipule a lâmina com cuidado. As lâminas são afiadas e podem causar lesões. NÃO tente remover as lâminas do conjunto. 54 1. PRZEPISY BEZPIECZEŃSTWA (TŁUMACZENIE ORYGINALNEJ INSTRUKCJI OBSŁUGI) PRZED UŻYCIEM URZĄDZENIA DOKŁADNIE PRZECZYTAJ CAŁOŚĆ INSTRUKCJI I PRZECHOWUJ JĄ W BEZPIECZNYM MIEJSCU DO WYKORZYSTANIA W PRZYSZŁOŚCI. Zawsze przestrzegać tych wskazówek bezpieczeństwa, aby uniknąć obrażeń ciała lub uszkodzenia urządzenia. Z tego urządzenia należy korzystać wyłącznie zgodnie z wskazówkami zawartymi w tej instrukcji obsługi. Istnieje ryzyko odniesienia obrażeń w przypadku niewłaściwego użytkowania produktu. • To urządzenie jest przeznaczone wyłącznie do użytku domowego i nie jest przeznaczone do użytku w: kuchniach pracowników w sklepach, biurach i innych miejscach pracy, gospodarstwach, przez klientów hoteli, moteli i innych miejsc mieszkalnych, obiektów noclegowych, pokojów gościnnych. • Należy zachować ostrożność podczas korzystania z końcówek, użytkowania i czyszczenia. 3. Podczas nalewania gorącej cieczy do dzbanka blendera należy zachować ostrożność, gdyż może ona zostać wyrzucona na zewnątrz z powodu błyskawicznego parowania. • Urządzenie nie może być obsługiwane za pomocą zewnętrznego zegara lub oddzielnego systemu zdalnego sterowania. • Urządzenie nie jest przeznaczone do użytkowania przez osoby o ograniczonych zdolnościach fizycznych, sensorycznych lub umysłowych, lub osoby nieposiadające doświadczenia i wiedzy, chyba że osoby odpowiedzialne za ich bezpieczeństwo zapewniają im opiekę oraz szkolenie dotyczące użytkowania urządzenia. • Dzieci powinny być zawsze pod opieką, aby zapewnić, że nie bawią się tym produktem. • To urządzenie nie może być używane przez dzieci. Urządzenie 55 i zasilacz należy przechowywać w miejscu niedostępnym dla dzieci podczas i po zakończeniu użytkowania. • Przed użyciem zawsze należy sprawdzić urządzenie i akcesoria pod kątem widocznych śladów uszkodzeń. Nie używać urządzenia, jeśli jest uszkodzone lub upadło. W przypadku uszkodzenia lub awarii urządzenia należy skontaktować się z infolinią obsługi klienta Cuisinart (patrz punkt „Gwarancja międzynarodowa” na stronie 72). • Nie używać urządzenia, jeśli przewód jest uszkodzony. W przypadku uszkodzenia przewodu natychmiast przerwać korzystanie z urządzenia. Jeśli przewód ulegnie uszkodzeniu, musi on zostać wymieniony przez producenta. Urządzenie należy zwrócić do punktu obsługi klienta (patrz punkt „Gwarancja międzynarodowa” na stronie 72). Użytkownikowi nie wolno podejmować prób naprawy urządzenia. • Nigdy nie wyciągać wtyczki z gniazdka sieciowego za przewód. • Nie owijać przewodu wokół urządzenia podczas ani po zakończeniu użytkowania. • Urządzenie można bezpiecznie pozostawić podłączone do sieci elektrycznej, gdy nie jest używane, co zapewni, że akumulatory będą zawsze ładowane. Należy je jednak odłączyć przed montażem, demontażem, czyszczeniem lub jeśli nie będzie używane przez dłuższy czas. • Produkt zawiera akumulator litowo-jonowy, którego nie należy wyjmować z urządzenia w celu jego naładowania. Akumulator w urządzeniu nie jest przeznaczony do wymiany. • Nie wolno dopuścić do zwarcia zacisków zasilania. • OSTRZEŻENIE: W celu naładowania akumulatora należy używać wyłącznie odłączanej ładowarki dostarczanej wraz z ten oznacza, że urządzenie tym urządzeniem. Symbol należy ładować przy użyciu odłączanego zasilacza. • Produkt ten jest w pełni zgodny ze wszystkimi obowiązującym przepisami UE i Wielkiej Brytanii oraz normami odnoszącymi 56 się do tego urządzeń tego typu i klasy. Nasza firma uzyskała certyfikat ISO9001:2015 i nieustannie weryfikuje działanie naszego systemu zarządzania jakością. W przypadku jakichkolwiek pytań dotyczących bezpieczeństwa i zgodności produktów prosimy o kontakt z naszym działem obsługi klienta (patrz punkt „Gwarancja międzynarodowa” na stronie 72). • OSTRZEŻENIE: Unikać kontaktu z ruchomymi częściami. Podczas pracy z urządzeniem nie zbliżać dłoni, włosów, elementów odzieży ani łopatek czy innych przyborów do akcesoriów z powodu ryzyka obrażeń ciała i/lub uszkodzenia urządzenia. Łopatki można użyć tylko wtedy, gdy urządzenie nie pracuje. • OSTRZEŻENIE: Nie zbliżać palców do końcówek. Aby wyjąć żywność, należy najpierw upewnić się, że urządzenie nie działa. • Ładowarkę należy podłączyć do gniazdka elektrycznego z dala od zlewu i gorącej powierzchni. • Nie wolno używać przedłużaczy. Podłączać ładowarkę bezpośrednio do gniazda elektrycznego. • Nie wolno ładować urządzenia za pomocą gniazda elektrycznego umieszczonego na zewnątrz. • Nie wolno zanurzać jednostki głównej w wodzie ani w innych cieczach, gdyż może to spowodować porażenie prądem elektrycznym. Jedynie końcówki tego urządzenia są przeznaczone do zanurzania w wodzie lub innych cieczach. Nie wolno nigdy zanurzać w jakichkolwiek cieczach żadnej innej części tego urządzenia. Jeśli urządzenie wpadnie do jakiejkolwiek cieczy, należy go natychmiast wyjąć, wyczyścić i dokładnie wysuszyć przed ponownym użyciem. • Przed czyszczeniem zawsze wyjąć zespół noży z misy. 57 • Nie wolno umieszczać zbyt dużych ilości składników w misie blendera. Misę napełniać do zaznaczonej wysokości maksymalnej. • Nie uruchamiać blendera z pustą misą – spowoduje to uszkodzenie silnika. • Nie miksować gorących cieczy w misie blendera. • Jednostki głównej nie wolno zanurzać w wodzie ani innych cieczach. • OSTROŻNIE: Z nożami należy obchodzić się ostrożnie. Noże są ostre i mogą być przyczyną obrażeń ciała. NIE WOLNO podejmować prób wyjęcia noży z zespołu. UWAGA: Noży ze stali nierdzewnej nie wolno wyjmować z czarnego zespołu noży. OSTRZEŻENIE: Worki polietylenowe, w których znajduje się produkt lub jego opakowania mogą stanowić zagrożenie. Aby uniknąć ryzyka uduszenia, przechowuj je w miejscach niedostępnych dla niemowląt i dzieci. Worki te nie służą do zabawy. UTYLIZACJA BATERII Aby zminimalizować zagrożenia dla zdrowia i środowiska naturalnego po zakończeniu eksploatacji produktu, przepisy dotyczące zużytego sprzętu elektrycznego i elektronicznego (WEEE) oraz dyrektywa w sprawie zużytych baterii wymagają, aby został on utylizowany w odpowiednim punkcie zbiórki, do którego zostanie wysłany w celu usunięcia baterii i odpowiedniego recyklingu. Skontaktuj się z lokalnymi instytucjami, aby uzyskać więcej informacji na temat recyklingu i bezpiecznej utylizacji w Twoim miejscu zamieszkania. Symbol umieszczony na produkcie lub jego opakowaniu wskazuje, że produkt ten nie może być traktowany jako odpad komunalny. Powinien on zostać dostarczony do właściwego 58 punktu zbiórki zajmującego się recyklingiem urządzeń elektrycznych i elektronicznych. Zapewniając prawidłową utylizację produktu pomagasz w zapobieganiu potencjalnym negatywnym skutkom dla środowiska i zdrowia ludzkiego, które w przeciwnym razie mogłyby być spowodowane niewłaściwym postępowaniem z odpadami tego produktu. Aby uzyskać bardziej szczegółowe informacje na temat recyklingu tego produktu, należy skontaktować się z biurem lokalnego samorządu lub służbami utylizacji odpadów komunalnych. Bezpieczeństwo podczas użytkowania • Ładowarkę należy podłączyć do gniazdka elektrycznego z dala od zlewu i gorącej powierzchni. • Nie wolno używać przedłużaczy. Podłączać ładowarkę bezpośrednio do gniazda elektrycznego. • Nie wolno ładować urządzenia za pomocą gniazda elektrycznego umieszczonego na zewnątrz. • Nie wolno zanurzać jednostki głównej w wodzie ani w innych cieczach, gdyż może to spowodować porażenie prądem elektrycznym. Jeśli podstawa zasilająca wpadnie do jakiejkolwiek cieczy, należy go natychmiast wyjąć, wyczyścić i dokładnie wysuszyć przed ponownym użyciem. • Z blendera należy zawsze korzystać na czystej, stabilnej i suchej powierzchni. • Nie umieszczać noży na podstawie blendera bez zamocowanego kielicha do rozdrabniania. • Przed użyciem sprawdzić, czy zespół noży jest stabilnie zamocowany w kielichu do rozdrabniania. • W kielichu do rozdrabniania nie wolno przygotowywać napojów gazowanych. • Kielicha do rozdrabniania nie wolno używać w kuchence mikrofalowej. • Noże należy zawsze przechowywać w osłonie zabezpieczającej. 59 2. WSTĘP Gratulujemy zakupu blendera Cuisinart. Od ponad 30 lat celem firmy Cuisinart jest produkcja najdoskonalszych urządzeń kuchennych. Wszystkie produkty Cuisinart zostały zaprojektowane z myślą o wyjątkowo długim okresie eksploatacji; są łatwe w użyciu i zapewniają doskonałe efekty dzień po dniu. Aby dowiedzieć się więcej o naszych produktach i zapoznać się z pomysłami na przepisy, odwiedź naszą witrynę internetową www.cuisinart.eu. 3. SPECYFIKACJA PRODUKTU (patrz okładka) 1. Kielich do rozdrabniania 2. Zespół noży 3. Kontrolki 4. Przełącznik wł./wył. 5. Podstawa zasilająca 6. Port ładowania (nie pokazano) 7. Pokrywka do picia 8. Osłona zabezpieczająca noży 9. Przewód i adapter USB 4. UŻYTKOWANIE Przed pierwszym użyciem zalecamy przetarcie jednostki głównej czystą, wilgotną szmatką, aby usunąć wszelkie zabrudzenia i kurz. Następnie należy wytrzeć ją miękką, chłonną szmatką. Starannie oczyścić kielich do rozdrabniania, zespół noży i pokrywkę do picia w ciepłej wodzie z detergentem. UWAGA: Nie należy używać środków czyszczących o właściwościach ściernych, ostrych narzędzi ani szorstkich myjek. A. ŁADOWANIE BLENDERA Akumulator blendera nie został całkowicie naładowany. Przed użyciem akumulator należy ładować do chwili, aż zapalą się wszystkie trzy niebieskie kontrolki. Całkowicie naładowany blender wystarczy do przygotowania około 8 koktajli, lecz czas użytkowania zależy od przepisu i twardości użytych składników. Blender osiąga pełne naładowanie po około 2 godzinach. UWAGA: Aby naładować jednostkę główną, umieścić koniec przewodu do ładowania micro USB w porcie do ładowania z tyłu jednostki głównej. Podłączyć końcówkę przewodu USB bezpośrednio do wtyczki adaptera, a następnie do gniazdka sieciowego. Kontrolki naładowania akumulatora Podczas ładowania akumulatora kontrolki będą migać na niebiesko. Gdy palą się wszystkie trzy kontrolki, oznacza to, że akumulator jest całkowicie naładowany i gotowy do użytku. Gdy akumulator zacznie się rozładowywać, kontrolki kolejno gasną. Gdy ostatnia kontrolka miga, akumulator należy naładować. Jeśli akumulator całkowicie się wyczerpie, urządzenie nie będzie działać. 60 UWAGA: Nie wolno używać blendera, gdy jest podłączony do sieci i ładuje się. Najlepsze rezultaty ładowania blendera zapewnia używanie wyłącznie przewodu USB i adaptera do ładowania dostarczanych z urządzeniem. B. DZIAŁANIE • Sprawdzić, czy blender jest naładowany, używając instrukcji w punkcie A. Jeśli nie jest, nie można z niego korzystać po podłączeniu do sieci elektrycznej. Przed rozpoczęciem korzystania z urządzenia poczekać, aż naładuje się w wystarczającym stopniu. • Umieścić składniki w kielichu do rozdrabniania. UWAGA: Zachować ostrożność i nie przekraczać maksymalnej linii napełniania. Aby uzyskać najlepsze rezultaty, zawsze umieszczać najpierw w kielichu najtwardsze składniki (kostki lodu, zamrożone owoce itp.), a następnie dodawać bardziej miękkie i ciecze. Zalecamy krojenie składników w kostkę o boku 3 cm, by uzyskać najbardziej jednorodny rezultat. W przypadku rozdrabniania twardych składników, jak marchewka, kielich do rozdrabniania należy napełniać maksymalnie do połowy. • ołączyć czarny zespół noży z kielichem z ostrzem skierowanym w dół do kielicha. Obrócić zespół noży w kierunku zgodnym z ruchem wskazówek zegara, do jego dokręcenia. UWAGA: Zachować ostrożność i nie dotykać noży - zawsze trzymać zespół noży za czarną część z tworzywa sztucznego. • Sprawdzić, czy podstawa zasilająca została umieszczona na czystej, suchej powierzchni. Umieścić kielich do rozdrabniania na podstawie zasilającej z czarnym zespołem noży na spodzie i obrócić, by wskoczył na swoje miejsce. Gdy kielich zostanie zamocowany, rozlegnie się kliknięcie. Przed użyciem blendera należy zawsze sprawdzić, czy kielich został zamocowany. UWAGA: Jeśli zespół noży i kielich nie zostaną prawidłowo połączone, blender nie uruchomi się. • Aby go włączyć, nacisnąć raz przycisk zasilania. Zapalą się diody LED i silnik się uruchomi. Nacisnąć ponownie przycisk zasilania, by wyłączyć urządzenie. UWAGA: Blender może pracować maksymalnie przez 1 minutę. Po upływie 1 minuty automatycznie się wyłączy. Jeśli przepis wymaga rozdrabniania dłuższego niż jedna minuta, wystarczy przerwać je na kilka sekund, a następnie ponownie uruchomić blender. • Po rozdrobnieniu składników zdjąć kielich do rozdrabniania z podstawy obracając go w kierunku przeciwnym do ruchu wskazówek zegara. UWAGA: Nie podejmować prób zdjęcia kielicha, jeśli silnik nadal pracuje. Jeśli kielich zostanie odblokowany podczas rozdrabniania, blender automatycznie się wyłączy. • Umieścić kielich do rozdrabniania prosto na blacie z czarnym zespołem noży na górze. Obrócić zespół noży w kierunku przeciwnym do ruchu wskazówek zegara, by go zdjąć. UWAGA: Zachować ostrożność i nie dotykać ostrzy, gdyż są bardzo ostre. Zawsze trzymać zespół noży za czarny element z tworzywa sztucznego. UWAGA: Noży ze stali nierdzewnej nie wolno wyjmować z czarnego zespołu noży. • Zespół noży należy natychmiast umyć lub bezpiecznie schować zakładając przezroczystą osłonę noży do chwili, gdy będzie można je umyć. Wystarczy nałożyć osłonę na zespół noży i obrócić w kierunku zgodnym z ruchem wskazówek zegara, by zablokować je na miejscu. UWAGA: Zawsze używać osłony ochronnej podczas przechowywania zespołu noży. • W razie potrzeby zamocować na kielichu do rozdrabniania pokrywkę do picia obracając ją w kierunku zgodnym z ruchem wskazówek zegara, aż zostanie dokręcona. Przed umieszczeniem kielicha w torbie w celu jego przewiezienia sprawdzić, czy wieczko pokrywki jest bezpiecznie zamknięte. 61 C. SUGESTIE I WSKAZÓWKI • Aby uzyskać najlepsze rezultaty, podczas stosowania blendera zawsze umieszczać najpierw w kielichu najtwardsze składniki (kostki lodu, zamrożone owoce itp.), a następnie dodawać bardziej miękkie i ciecze. • Zalecamy krojenie większości składników w kostkę o boku 3 cm, by uzyskać najbardziej jednorodny rezultat. • Jeśli żywność zacznie przywierać do boków kielicha, wyłączyć blender, zdjąć kielich i delikatnie nim potrząsnąć. Założyć z powrotem i rozdrabniać dalej. • Podczas rozdrabniania gęstszych mieszanin delikatnie przycisnąć górną część kielicha, by nie odrywał się od powierzchni blatu. • Po rozdrobnieniu zdjąć kielich i umieścić go na blacie tak, by zespół noży znajdował się na górze. Delikatnie stuknąć kilka razy w kielich, by zapobiec skapywaniu mieszaniny po wyjęciu noży. • Niektóre przepisy wymagają rozdrabniania trwającego dłużej niż jedną minutę. Wystarczy uruchomić blender ponownie. 5. CZYSZCZENIE & KONSERWACJA • Po użyciu urządzenie należy zawsze starannie oczyścić. • Zdjąć noże i oczyścić jednostkę główną gąbką lub wilgotną ściereczką. • Nie należy używać środków czyszczących o właściwościach ściernych, które mogą zarysować powierzchnię. • Noże myć ręcznie wodą z detergentem. • Kielich do rozdrabniania, osłona zabezpieczająca noży i pokrywka do picia mogą być myte wodą z detergentem lub umieszczane na górnej półce zmywarki. OSTROŻNIE: Z nożami należy obchodzić się ostrożnie. Noże są ostre i mogą być przyczyną obrażeń ciała. NIE WOLNO podejmować prób wyjęcia noży z zespołu. 62 1. ПРАВИЛА БЕЗОПАСНОСТИ (ПЕРЕВОД ОРИГИНАЛЬНЫХ ИНСТРУКЦИЙ) ПРЕЖДЕ ЧЕМ ИСПОЛЬЗОВАТЬ ЭЛЕКТРОПРИБОР, ВНИМАТЕЛЬНО ПРОЧТИТЕ ДАННЫЕ ПРАВИЛА БЕЗОПАСНОСТИ! Чтобы избежать телесных повреждений или поломок электроприбора, всегда соблюдайте нижеследующие правила безопасности в процессе использования прибора. Используйте данный электроприбор только так, как это описано в настоящем руководстве. Использование прибора не по назначению может привести к травме. • Данный электроприбор предназначен исключительно для домашнего использования. Прибор не предназначен для эксплуатации на кухнях коллективного пользования для персонала офисов, магазинов, а так же в любой другой профессиональной среде. Прибор не предназначен для использования в гостевых домах на фермах, клиентами гостиниц, мотелей и других учреждений проживания, типа гостевых комнат. • Будьте осторожны при обращении с насадками в процессе их использования и ухода за ними. • Будьте осторожны, если в чашу для смешивания налита горячая жидкость: она может переливаться через край при выбросе пара. • Электроприбор не предназначен для использования с внешним таймером или дистанционным пультом управления. • Лица с ограниченными физическими, сенсорными или умственными способностями, или с недостатком опыта и знаний, могут пользоваться прибором только в том случае, если они находятся под наблюдением или были проинструктированы лицом, ответственным за их безопасность, о правилах пользования прибором. 63 • Проследите за детьми, чтобы они не играли с данным электроприбором. • Прибор не предназначен для использования детьми. Прибор и сетевой адаптер должны находиться в местах, недоступных для детей, как во время, так и по окончании их использования. • Каждый раз, перед тем как воспользоваться электроприбором или его аксессуарами, обязательно проверьте их состояние и убедитесь в отсутствии видимых признаков повреждений. Не пользуйтесь электроприбором, если он поврежден или если он падал. В случае повреждения или неисправности прибора обратитесь в службу поддержки клиентов Cuisinart (см. раздел «Международная гарантия», стр. 72). • Не пользуйтесь электроприбором, если шнур питания поврежден. При повреждении шнура питания немедленно прекратите использование электроприбора. Замена поврежденного электрического шнура должна осуществляться производителем. Верните прибор в отдел послепродажного обслуживания (см. раздел «Международная гарантия», стр. 72). Никакие виды ремонта не должны выполняться пользователем. • Никогда не вытаскивайте вилку из розетки, потянув за шнур. • Не наматывайте электрический шнур вокруг корпуса во время или после использования электроприбора. • Чтобы аккумуляторные батарейки были всегда заряженными, можно без опасений оставлять электроприбор включенным в сеть, когда вы не пользуетесь им. Однако если вы не пользуетесь электроприбором в течение длительного периода времени, а также перед сборкой, демонтажем или очисткой прибора его следует отключить от сети. 64 • Данный электроприбор оснащен литий-ионной перезаряжаемой батарейкой. Для перезарядки батарейки ее не следует извлекать из электроприбора. Батарейки в данном приборе не подлежат замене. • Не допускайте короткого замыкания клемм питания. • ВНИМАНИЕ: Для зарядки аккумуляторной батарейки пользуйтесь только тем зарядным устройством, которое включено в комплект поставки электроприбора. Данный символ указывает на наличие съемного зарядного устройства. • Данное изделие полностью соответствует всем применяемым законодательным актам ЕС и Великобритании, а также стандартам, относящимся к этому типу и классу приборов. Наша компания сертифицирована в соответствии со стандартом ISO9001:2015, определяющим требования к системе управления качеством, эффективность которой находится под постоянным контролем. Если у вас есть какиелибо вопросы относительно безопасности продукции и ее соответствия требованиям, обратитесь в наш отдел обслуживания клиентов (см. раздел «Международная гарантия», стр. 72). • ВНИМАНИЕ: Избегайте контакта с движущимися частями. Руки, волосы, одежда, а также кухонные шпатели и иная утварь должны быть на удалении от насадок во время функционирования прибора, чтобы избежать телесных повреждений и/или поломок электроприбора. Кухонным шпателем можно пользоваться только при выключенном приборе. • ВНИМАНИЕ: Не прикасайтесь пальцами к насадкам прибора. Прежде чем удалить с насадок остатки продуктов, убедитесь в том, что блендер остановлен. • Розетка, в которую включается зарядное устройство, должна находиться на удалении от кухонной раковины и 65 от горячих поверхностей. • Не пользуйтесь удлинителем. Включайте зарядное устройство непосредственно в электрическую розетку. • Для зарядки электроприбора не пользуйтесь розеткой, установленной вне помещения. • Во избежание поражения электрическим током не погружайте основной блок прибора в воду или другие жидкости. Только насадки электроприбора выполнены таким образом, чтобы их было можно погружать в воду или иную жидкость. Никогда не погружайте в воду другие части прибора. Если блендер попадает в жидкость, немедленно извлеките его оттуда, тщательно очистите и высушите прежде, чем продолжить работу. • Перед уходом за блоком ножей достаньте его из чаши. • Не перегружайте чашу для смешивания. Соблюдайте линию максимального заполнения. • Не запускайте блендер пустым: это может повредить двигатель. • Не смешивайте в рабочей чаше горячие жидкости. • Не погружайте основной блок в воду или другие жидкости • ВНИМАНИЕ: Обращайтесь с ножом блендера очень осторожно. Лезвия ножа - острые и могут стать причиной травм. НЕ ПЫТАЙТЕСЬ снять нож с ножевого блока. N.B. Нож из нержавеющей стали не снимается с черной основы ножевого блока. ВНИМАНИЕ: полиэтиленовые пакеты, в которые уложен аппарат или его упаковка, могут представлять собой опасность. Во избежание малейшей опасности удушения следует хранить эти пакеты в местах, недоступных младенцам и детям. Данные пакеты не игрушка! 66 УТИЛИЗАЦИЯ АККУМУЛЯТОРНЫХ БАТАРЕЕК Чтобы свести к минимуму опасность для здоровья и окружающей среды по окончании срока службы данного изделия, законы, касающиеся отходов электрического и электронного оборудования (WEEE), а также Директива по отработанным аккумуляторным батареям требуют, чтобы данный прибор был утилизирован в соответствующем месте сбора, где после извлечения батареек он будет переработан надлежащим образом. Пожалуйста, свяжитесь с местными органами управления для получения более подробной информации о переработке и безопасной утилизации подобных отходов в вашем регионе. Символ на товаре или на его упаковке означает, что прибор не следует выбрасывать с бытовыми отходами. Вместо этого его следует сдать в соответствующий пункт сбора для утилизации электрического и электронного оборудования. Обеспечивая надлежащую утилизацию данного прибора, вы способствуете предотвращению возможных негативных последствий для окружающей среды и здоровья человека, которые в противном случае могут быть вызваны неправильным обращением с отслужившим прибором. Для получения более подробной информации об утилизации данного прибора, пожалуйста, свяжитесь с местными органами управления или службой по утилизации бытовых отходов. Безопасность в процессе использования прибора • Розетка, в которую включается зарядное устройство, должна находиться на удалении от кухонной раковины и от горячих поверхностей. • Не пользуйтесь удлинителем. Включайте зарядное устройство непосредственно в электрическую розетку. • Для зарядки электроприбора не пользуйтесь розеткой, установленной вне помещения. 67 • Во избежание поражения электрическим током не погружайте основной блок прибора в воду или другие жидкости. Если блок питания попадает в жидкость, немедленно извлеките его оттуда, тщательно очистите и высушите прежде, чем продолжить работу. • Пользуйтесь блендером только на чистой, прочной и сухой поверхности. • Не устанавливайте нож на блендер без прикрепленной чаши для смешивания. • Перед использованием прибора убедитесь в том, что блок ножей плотно закреплен в чаше для смешивания. • Никогда не используйте газированные напитки в чаше для смешивания • Чаша для смешивания не предназначена для использования в микроволновой печи. • Храните нож с надетым на него защитным колпачком. 2. ВСТУПЛЕНИЕ Поздравляем вас с покупкой блендера Cuisinart! В течение вот уже более 30 лет целью компании Cuisinart является производство высококачественного кухонного оборудования. Все изделия Cuisinart отличаются исключительной долговечностью, весьма просты в использовании и каждодневно демонстрируют свои выдающиеся эксплуатационные качества. Чтобы поближе ознакомиться со всеми нашими изделиями и с идеями рецептов, посетите сайт www.cuisinart.eu 3. ХАРАКТЕРИСТИКИ И КОМПЛЕКТАЦИЯ ИЗДЕЛИЯ (см. обложку) 1. Чаша для смешивания 2. Ножевой блок 3. Световые индикаторы 4. Переключатель вкл./выкл. 5. Блок питания 6. Разъем для подключения зарядного устройства (не показан) 68 7. Крышка для питья 8. Защитный колпачок для ножа 9. USB-кабель и сетевой адаптер для зарядки 4. ПОРЯДОК РАБОТЫ Перед первым использованием мы рекомендуем протереть корпус прибора чистой влажной тканью, чтобы удалить грязь и пыль. Вытрите его насухо мягкой впитывающей тканью. Тщательно вымойте в теплой мыльной воде чашу для смешивания, нож блендера и крышку для питья. N.B. Не используйте абразивные чистящие средства, жесткие приспособления или мочалки. А. ЗАРЯДКА БЛЕНДЕРА Батарейки блендера были заряжены не полностью. Перед тем как воспользоваться прибором, его следует оставить на зарядке до тех пор, пока не загорятся все три синих световых индикатора. Полностью заряженным блендером можно приготовить примерно 8 смузи, в зависимости от рецепта и от твердости перерабатываемых ингредиентов. Для полной зарядки блендера потребуется примерно 2 часа. N.B. Чтобы зарядить основной блок, вставьте конец кабеля для зарядки с разъемом Micro USB в разъем для подключения зарядного устройства на задней панели основного блока. Вставьте другой конец кабеля USB непосредственно в вилку сетевого адаптера, и затем подключите к розетке. Световые индикаторы уровня зарядки В процессе зарядки синие световые индикаторы мигают. Когда все три световых индикатора горят постоянно, это значит, что батарейка полностью заряжена, и прибор готов к работе. Когда батарейка разряжается, световые индикаторы начинают гаснуть. Когда мигает последний световой индикатор, батарейку необходимо перезарядить. Если аккумуляторная батарейка полностью разряжена, прибор не будет работать. N.B. Нельзя пользоваться блендером, пока он заряжается от сети. Чтобы обеспечить максимальную эффективность зарядки блендера, мы рекомендуем использовать только тот USB-кабель и тот сетевой адаптер для зарядки, которые поставлены вместе с прибором. В. ПРИНЦИП РАБОТЫ • Зарядите блендер, как рекомендовано в разделе А «Зарядка блендера». Если блендер не заряжен, он не сможет функционировать при включении в сеть. Вам придется подождать, пока прибор достаточно зарядится, чтобы он смог функционировать в соответствии со своим назначением. • Поместите ингредиенты в чашу для смешивания. N.B. Будьте внимательны: не превышайте максимальный уровень заполнения. Для достижения наилучших результатов сначала поместите в чашу наиболее твердые ингредиенты (кубики льда, замороженные фрукты и т. д.), а затем более мягкие ингредиенты и жидкости. Для получения наиболее равномерного результата мы рекомендуем нарезать продукты кусочками в 3 см. Если вы используете твердые ингредиенты, такие как морковь, чаша для смешивания не должна быть заполнена больше чем наполовину. • Закрепите черный ножевой блок в чаше; лезвие ножа должно быть направлено вниз. 69 Поворачивайте ножевой блок по часовой стрелке до тех пор, пока он не затянется до упора. N.B. Будьте осторожны, не притрагивайтесь к лезвиям ножа, беритесь только за черную пластмассовую часть ножевого блока. • Поставьте блок питания на чистую, сухую поверхность. Установите чашу для смешивания на блок питания (черный ножевой блок должен быть внизу) и поверните ее, чтобы заблокировать на месте. Когда чаша установлена должным образом, вы почувствуете щелчок. Перед использованием блендера обязательно проверяйте, закреплена ли в нем чаша. N.B. Если ножевой блок и чаша не закреплены должным образом, блендер не будет работать. • Чтобы привести прибор в действие, нажмите на кнопку питания один раз. При этом загорятся светодиодные индикаторы, и двигатель запустится. Чтобы выключить прибор, снова нажмите на кнопку питания. N.B. Блендер может функционировать не долее 1 минуты. По истечении 1 минуты перемешивания ингредиентов блендер автоматически останавливается. Если по рецепту требуется смешивать ингредиенты дольше минуты, просто сделайте паузу на несколько секунд, а затем снова запустите блендер. • Как только все ингредиенты будут достаточно перемешаны, снимите рабочую чашу с блендера, повернув ее против часовой стрелки, чтобы разблокировать ее. N.B. Не пытайтесь снять чашу для смешивания, пока работает двигатель. Если чашу разблокировать во время смешивания, блендер автоматически остановится. • Поставьте чашу для смешивания на поверхность вертикально, черный ножевой блок должен находиться вверху. Чтобы снять черный ножевой блок, поверните его против часовой стрелки. N.B. Будьте осторожны, не притрагивайтесь к лезвиям ножа – они крайне острые, беритесь только за черную пластмассовую часть ножевого блока. N.B. Лезвие из нержавеющей стали не может быть снято с ножевого блока. • Ножевой блок можно вымыть сразу же или отложить его в сторону, обезопасив с помощью защитного колпачка, до того момента, когда блок можно будет вымыть. Достаточно надеть колпачок на ножевой блок и закрепить его на месте, повернув по часовой стрелке. N.B. Для хранения ножевого блока всегда пользуйтесь защитным колпачком. • При необходимости закрепите крышку для питья на чаше для смешивания: поверните крышку по часовой стрелке до тех пор, пока она плотно не закроет чашу. Убедитесь в том, что крышка питьевого отверстия надежно закрыта, прежде чем положить чашу в дорожную сумку. С. ПОЛЕЗНЫЕ СОВЕТЫ • Для достижения наилучших результатов при использовании блендера сначала поместите в чашу наиболее твердые ингредиенты (кубики льда, замороженные фрукты и т. д.), а затем более мягкие ингредиенты и жидкости. • Для получения однородного результата переработки продуктов их рекомендуется нарезать кусочками в 3 см. • Если ингредиенты прилипли к стенкам чаши при смешивании, остановите блендер, снимите чашу и осторожно встряхните ее. Установите чашу на место и продолжите переработку. • При приготовлении густых смесей слегка прижмите чашу сверху, чтобы она не перемещалась по рабочей поверхности. • После смешивания снимите чашу и поставьте ее на рабочую поверхность таким образом, 70 чтобы ножевой блок находился сверху. Слегка постучите по чаше несколько раз, чтобы жидкость стекла по стенкам и не разбрызгивалась при извлечении ножевого блока. • Для некоторых рецептов может потребоваться смешивать ингредиенты дольше одной минуты. В таком случае достаточно снова запустить блендер после его остановки. 5. УХОД И ОБСЛУЖИВАНИЕ • Прибор следует тщательно очистить после каждого использования. • Снимите ножевой блок, протрите основной блок влажной губкой или тканью. • Не пользуясь никакими абразивными средствами, которые могу повредить поверхность прибора. • Вымойте ножевой блок вручную горячей мыльной водой. • Чашу для смешивания, защитный колпачок для ножа и крышку для питья можно вымыть либо горячей мыльной водой, либо в верхней корзине посудомоечной машины. ВНИМАНИЕ: Будьте осторожны при обращении с ножом: его лезвия очень острые и могут стать причиной травм. НЕ ПЫТАЙТЕСЬ СНЯТЬ лезвия с ножевого блока. 71 CUISINART 99 avenue Aristide Briand 92120 MONTROUGE - FRANCE www.cuisinart.eu Garantie Internationale / International Guarantee/ Internationale Garantie / Internationaal garantiebewijs / Garanzia Internazionale / Garantía Internacional / Garantia Internacional / Gwarancja międzynarodowa / Международная гарантия FRANÇAIS : CUISINART vous garantit une mise en relation facilitée avec ses services consommateurs de tous les pays. Pour connaître les coordonnées de votre service consommateur, composez le : France ENGLISH : CUISINART guarantees easier contact with its customer services in every country. For details of the customer services in Belgique, België, your area, call: DEUTSCH : CUISINART gewährleistet Ihnen eine unkomplizierte Belgien Kontaktaufnahme mit den Kundendienststellen in allen Ländern. Nederland Um die Adresse Ihres Kundendienstes zu erfahren, wählen Sie: NEDERLANDS : CUISINART garandeert u een eenvoudig contact met de klantenservice in alle landen. Om telefonisch contact Deutschland met de klantenservice te verkrijgen, raadpleegt u het volgende nummer: ITALIANO : CUISINART garantisce in ogni paese un facile contatto Italia con i propri servizi di assistenza ai consumatori. Per conoscere i dettagli del vostro servizio consumatori, telefonate al numero: España ESPAÑOL : CUISINART le facilita la comunicación con los servicios de atención al cliente de todos los países. Para conocer los datos de su servicio de atención al cliente, marque el: Portugal PORTUGUÊS : A CUISINART facilita o acesso aos seus serviços de apoio ao consumidor em todos os países. Para entrar em contacto com o seu serviço de apoio ao consumidor, marque o número: Polska POLSKI : Firma CUISINART zapewnia Państwu łatwy kontakt ze swoim działem obsługi klientów we wszystkich krajach. Aby uzyskać dane kontaktowe działu obsługi klientów w Państwa Россия kraju, należy wybrać numer: РУССКИЙ: CUISINART гарантирует наличие сервисных центров в любой стране. При приобретении изделий домашнего применения торговой марки CUISINART на территории Российской Федерации, информация по ближайшим сервисным центрам и их адресам предоставляется по телефону: N°VERT 00 800 2011 2014 GREEN 00 800 5000 6000 NUMBER +31 (79) 363 4242 GREEN 00 800 5000 6000 NUMBER GREEN NUMBER 00 800 5000 6000 GREEN 00 800 5000 6000 NUMBER GREEN 00 800 5000 6000 NUMBER GREEN 00 800 5000 6000 NUMBER +7 495 729 76 13 +7 495 018 59 47 Facture - Ticket de caisse / Receipt - Sales ticket / Rechnung - Kassenschein / Factuur - Kasticket / Fattura - scontrino / Factura - Tique de caja / Factura - talão de caixa / Faktura - Paragon / Квитанция - Кассовый чек Acheteur / Purchaser / Käufer / Koper / Acquirente / Comprador / Comprador / Nabywca / Покупатель • Merci de conserver cette carte de garantie avec l’original de votre preuve d’achat. • Please keep this warranty card with your original proof of purchase. • Bitte bewahren Sie diese Garantiekarte zusammen mit dem Original Ihres Kaufbelegs auf. • Bewaar deze garantiekaart goed, samen met uw originele aankoopbewijs • Conservare il presente attestato di garanzia con l’originale della prova d’acquisto. • Debe conservar este certificado de garantía junto con el original de su prueba de compra. • Conserve este certificado de garantia com o original do comprovativo de compra. • Proszę zachować tę kartę gwarancyjną z oryginałem dowodu zakupu. •Пожалуйста, сохраняйте данный гарантийный талон вместе с оригиналами документов, подтверждающих Вашу покупку. Hot Line: 00 800 5000 6000 [email protected] 72 (Kassenzettel oder Rechnung) beigelegt werden. Die Garantie schließt Schäden aufgrund einer unsachgemäßen Verwendung, eines Sturzes, eines Zerlegens oder einer Reparatur durch nicht autorisierte Personen aus. Diese Garantie schränkt auf keinen Fall Ihre gesetzlichen Rechte ein. FRANCAIS : GARANTIE uniquement d’application en France + DOM/COM (Martinique, Réunion, Guyane, Guadeloupe, Mayotte, Saint-Pierre-etMiquelon, Saint-Barthélemy), Nouvelle Calédonie, Polynésie Française, Wallis-et-Futuna 2 ans de garantie à compter de la date d’achat sur présentation d’une preuve d’achat. - Un échange standard (produit identique ou à défaut produit équivalent) du produit sera effectué pendant cette période (ticket de caisse ou facture). La garantie couvre tout défaut de fabrication ou vice de matière mais s’applique sous certaines conditions. En particulier : - L’appareil doit avoir été utilisé exclusivement et conformément à sa destination, telle qu’indiquée dans la notice d’utilisation et pour un usage non professionnel. - La garantie exclut les détériorations résultant d’une mauvaise utilisation, d’une chute, de démontage, réparation ou modification effectués par des personnes non autorisées par Cuisinart, d’une négligence, d’une utilisation à une tension électrique non appropriée ou avec des accessoires ou consommables non adaptés. - Les accessoires et consommables ne sont pas pris en charge dans le cadre de cette garantie. - La garantie ne s’applique pas pour les dommages causés par une catastrophe naturelle telle qu’un incendie ou dégât des eaux. Nos produits peuvent être réparés, échangés ou remboursés, au choix exclusif de Cuisinart et de son revendeur. Cette garantie Cuisinart vient en complément de la garantie légale de conformité telle que mentionnée aux articles L. 211-4 à L. 211-13 du code de la consommation et de celle relative aux défauts de la chose vendue, dans les conditions prévues aux articles 1641 à 1648 et 2232 du Code Civil. NEDERLANDS: GARANTIE Cuisinart biedt u 2 jaar garantie. Tijdens eventuele reparatie wordt standaard een vervangend product (een zelfde of vergelijkbaar apparaat) beschikbaar gesteld. Om hiervan gebruik te kunnen maken dient u deze volledig ingevulde bon en het originele aankoopbewijs te overleggen. De garantie omvat niet beschadigingen voortvloeiend uit een verkeerd gebruik, een val, demontage of herstelling door onbevoegde personen. Deze garantie heeft op geen enkele manier invloed op uw rechten volgens de statutaire wet. ITALIANO: GARANZIA Cuisinart vi offre 2 anni di garanzia. Durante tale periodo sarà effettuato uno scambio standard (prodotto identico o, in mancanza, prodotto equivalente). Per beneficiare della garanzia, il presente buono deve essere accompagnato dall’originale della prova di acquisto (scontrino o fattura) e dai vostri dati completi. Dalla garanzia sono esclusi deterioramenti dovuti ad un errato utilizzo, a cadute, a smontaggio o riparazione eseguiti da personale non autorizzato. La presente garanzia non influisce in alcun modo sui vostri diritti in base alle normative vigenti. ESPAÑOL: GARANTíA Cuisinart le ofrece 2 años de garantía. Durante este periodo se llevará a cabo un cambio estándar (producto idéntico o, en su defecto, producto equivalente). Para utilizarla, debe adjuntar a este bono el original de la prueba de compra (tique de caja o factura), así como sus datos completos. La garantía excluye el deterioro derivado de una utilización incorrecta, una caída, el desmontaje o la reparación realizados por personal no autorizado. Lo dispuesto en este contrato de garantía no puede afectar en modo alguno a los derechos que le otorga la legislación de su país. Extrait du Code de la consommation : Art. L. 211-4. « Le vendeur est tenu de livrer un bien conforme au contrat et répond des défauts de conformité existant lors de la délivrance. Il répond également des défauts de conformité résultant de l’emballage, des instructions de montage ou de l’installation lorsque celle-ci a été mise à sa charge par le contrat ou a été réalisée sous sa responsabilité ». Art. L. 211-12. « L’action résultant du défaut de conformité se prescrit par deux ans à compter de la délivrance du bien ». Art. L. 211-5. « Pour être conforme au contrat, le bien doit : 1. Etre propre à l’usage habituellement attendu d’un bien semblable et, le cas échéant : - correspondre à la description donnée par le vendeur et posséder les qualités que celui-ci a présentées à l’acheteur sous forme d’échantillon ou de modèle ; - présenter les qualités qu’un acheteur peut légitimement attendre eu égard aux déclarations publiques faites par le vendeur, par le producteur ou par son représentant, notamment dans la publicité ou l’étiquetage. 2. Présenter les caractéristiques définies d’un commun accord par les parties ou être propre à tout usage spécial recherché par l’acheteur, porté à la connaissance du vendeur et que ce dernier a accepté ». Extrait du Code civil : Art. 1641. « Le vendeur est tenu de la garantie à raison des défauts cachés de la chose vendue qui la rende impropre à l’usage auquel on la destine, ou qui diminuent tellement cet usage, que l’acheteur ne l’aurait pas acquise, ou n’en aurait donné qu’un moindre prix, s’il les avait connus ». Art. 1648 - alinéa 1er. « L’action résultant des vices rédhibitoires doit être intentée par l’acquéreur dans un délai de deux ans à compter de la découverte du vice » PORTUGUÊS: GARANTIA A Cuisinart oferece 2 anos de garantia contra qualquer defeito de fabrico. Durante esse período será efetuada uma troca padrão (produto idêntico ou, na sua falta, produto equivalente). Para beneficiar da garantia, esta deve ser acompanhada do comprovativo de compra (talão de caixa ou factura), bem como dos dados completos do comprador. Da garantia são excluídas as deteriorações resultantes de uma utilização deficiente, de uma queda, de desmontagem ou de reparação por pessoas não autorizadas. O disposto na presente garantia contratual não afeta os direitos legais vigentes no país do comprador. POLSKI: GWARANCJA Firma Cuisinart udziela gwarancji 2-letniej dotyczącej wad produkcyjnych. W tym okresie przeprowadzona zostanie standardowa wymiana (na produkt identyczny lub równoważny). Aby z niej skorzystać, niniejszy bon musi zawierać oryginalny dowód zakupu (paragon lub fakturę) oraz Państwa pełne dane identyfikacyjne. Gwarancja nie obejmuje uszkodzeń wynikających z niewłaściwego użytkowania, upadku, demontażu lub przeprowadzenia naprawy przez osoby nieupoważnione. Niniejsza gwarancja umowna stanowi uzupełnienie gwarancji prawnej. Pièces détachées et accessoires : Ce produit n’étant pas réparable, aucune pièce détachée de réparation n’est disponible. Toutefois, vous pouvez vous procurer les différents accessoires et consommables indispensables à l’utilisation du produit pendant une période d’au moins 5 ans à compter de la date d’achat. Pour cela, merci de contacter le service consommateurs Cuisinart. РУССКИЙ: ГАРАНТИЯ При приобретении товаров домашнего применения торговой марки Cuisinart на территории Российской Федерации мы даем гарантию на все заводские дефекты в течение 2 (двух) года (гарантийный срок). В случае обнаружения в указанный гарантийный срок дефектов, вызванных недостаточным качеством материалов или сборки в изделии, приобретенном в Российской Федерации, в гарантийный период оно может быть заменено на новое или аналогичное в соответствии с Федеральным законом «О защите прав потребителей». Гарантийная замена производится при предъявлении документов, подтверждающих покупку товара (чек, квитанцию, гарантийный талон с отметками и т.п.) при условии соблюдения правил эксплуатации, описанных в инструкции по эксплуатации изделия. Гарантия на изделия не распространяется в случаях механических повреждений, вызванных ненадлежащим использованием, выхода из строя изделия из-за попадания внутрь инородных предметов, жидкостей, насекомых и т.п., его падения; разборки, ремонта или преобразования лицами, не уполномоченными Cuisinart и/или если использованы неоригинальные детали; вскрытия пломб на изделии; использования изделий в условиях и режимах, отличающихся от бытовых; нарушения инструкций по эксплуатации. Гарантия не распространяется на аксессуары и комплектующие. В случае предъявления претензий в соответствии с условиями настоящей Гарантии передайте изделие целиком вместе с гарантийным талоном в любой из центров сервисного обслуживания. FRANÇAIS : GARANTIE (pays autres que la France) Cuisinart vous offre 2 ans de garantie contre tout défaut de fabrication. Un échange standard (produit identique ou à défaut produit équivalent) du produit sera effectué pendant cette période. Pour en bénéficier, le présent bon doit comporter l’original de la preuve d’achat (ticket de caisse ou facture) ainsi que vos coordonnées complètes. La garantie exclut les détériorations résultant d’une mauvaise utilisation, d’une chute, de démontage ou de réparation par des personnes non autorisées. Cette garantie contractuelle vient en complément de la garantie légale. ENGLISH: GUARANTEE Cuisinart offers you a 2-year warranty. We offer a standard exchange of the appliance (identical or equivalent) during this period. To benefit from the warranty, the original proof of purchase (sales ticket or receipt) must be attached to this warranty slip along with your full contact details. The warranty does not cover damage resulting from misuse, falls, dismantling, or repair by unauthorized persons. This guarantee in no way affects your rights under statutory law. DEUTSCH: GARANTIE Cuisinart bietet 2 Jahre Garantie. In diesem Zeitraum erfolgt ein Standardumtausch des Geräts (identisches Produkt oder gegebenenfalls gleichwertiges Produkt). Um auf diese Garantie zurückgreifen zu können, muss dem vorliegenden Garantieschein das Original des Einkaufsbelegs Гарантийный срок – 2 года Cрок службы – 2 года 73 74 75 76 Version no : IB-20/341 (82pp) Size: 140mm(W)X210mm(H) Material: cover:157gsm gloss art paper 6pp inside:105gsm gloss art paper 76pp Coating: waterbase varnishing for whole book Color (Cover): 1+1(K) (Inside):1+1(K) Date: October-15-2020 Co-ordinator : Astor You/Andy Ws Chan BOND FUND Description PDF version : IB-20/341 (0,0) BOND FUND Code : Color Series: Non Operator :ling BOND FUND Diecut: Remark: waterbase varnishing for whole book-
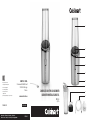 1
1
-
 2
2
-
 3
3
-
 4
4
-
 5
5
-
 6
6
-
 7
7
-
 8
8
-
 9
9
-
 10
10
-
 11
11
-
 12
12
-
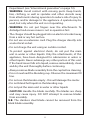 13
13
-
 14
14
-
 15
15
-
 16
16
-
 17
17
-
 18
18
-
 19
19
-
 20
20
-
 21
21
-
 22
22
-
 23
23
-
 24
24
-
 25
25
-
 26
26
-
 27
27
-
 28
28
-
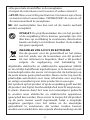 29
29
-
 30
30
-
 31
31
-
 32
32
-
 33
33
-
 34
34
-
 35
35
-
 36
36
-
 37
37
-
 38
38
-
 39
39
-
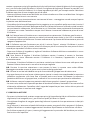 40
40
-
 41
41
-
 42
42
-
 43
43
-
 44
44
-
 45
45
-
 46
46
-
 47
47
-
 48
48
-
 49
49
-
 50
50
-
 51
51
-
 52
52
-
 53
53
-
 54
54
-
 55
55
-
 56
56
-
 57
57
-
 58
58
-
 59
59
-
 60
60
-
 61
61
-
 62
62
-
 63
63
-
 64
64
-
 65
65
-
 66
66
-
 67
67
-
 68
68
-
 69
69
-
 70
70
-
 71
71
-
 72
72
-
 73
73
-
 74
74
-
 75
75
-
 76
76
-
 77
77
-
 78
78
-
 79
79


Cuisinart individuel sans fil RPB100E El manual del propietario
- Categoría
- Batidoras
- Tipo
- El manual del propietario
en otros idiomas
- français: Cuisinart individuel sans fil RPB100E Le manuel du propriétaire
- italiano: Cuisinart individuel sans fil RPB100E Manuale del proprietario
- English: Cuisinart individuel sans fil RPB100E Owner's manual
- Deutsch: Cuisinart individuel sans fil RPB100E Bedienungsanleitung
- русский: Cuisinart individuel sans fil RPB100E Инструкция по применению
- Nederlands: Cuisinart individuel sans fil RPB100E de handleiding
- português: Cuisinart individuel sans fil RPB100E Manual do proprietário
- polski: Cuisinart individuel sans fil RPB100E Instrukcja obsługi
Artículos relacionados
Otros documentos
-
KitchenAid KHB2561CU Manual de usuario
-
Breville BCS600XL Manual de usuario
-
-
KitchenAid KHB1231ER Manual de usuario
-
Camry CR 4071 Instrucciones de operación
-
Bifinett KH 527 Operating Instructions Manual
-
MOB MO6327 Manual de usuario
-
Sage BPB550 Guía del usuario
-
NutriBullet Baby Manual de usuario
-
NutriBullet NBY-50100 Guía del usuario