
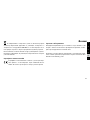
5x42 Night Vision
Art. No. 18-77450
Nachtsichtgerät mit Aufnahmefunktion
Night Vision with record funtion
Appareil de vision nocturne avec fonction d’enregistrement
Dispositivo de visión nocturna con función de grabación
Visore notturno con funzione ripresa di immagini
DE
BEDIENUNGSANLEITUNG
GB
INSTRUCTION MANUAL
FR
MODE D’EMPLOI
ES
INSTRUCCIONES DE USO
RU
РУКОВОДСТВО ПО ЭКСПЛУАТАЦИИ.
IT
ISTRUZIONI PER L’USO

2
A
B C

1@
c
b
e
d
f
1)
1!
1$
1#
J
H
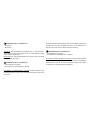
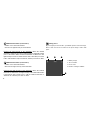
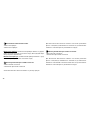
Batterien erforderlich
Batteries required
6x AA
I
g

4
Allgemeine Informationen
Zu dieser Anleitung
Diese Bedienungsanleitung ist als Teil des Gerätes zu betrachten.
Lesen Sie vor der Benutzung des Geräts aufmerksam die Sicherheitshin
-
weise und die Bedienungsanleitung.
Bewahren Sie diese Bedienungsanleitung für die erneute Verwendung zu
einem späteren Zeitpunkt auf. Bei Verkauf oder Weitergabe des Gerätes
ist die Bedienungsanleitung an jeden nachfolgenden Besitzer/Benutzer
des Produkts weiterzugeben.
GEFAHR!
Dieses Zeichen steht vor jedem Textabschnitt, der auf Gefahren hinweist,
die bei unsachgemäßer Anwendung zu schwersten Verletzungen oder
sogar zum Tode führen.
ACHTUNG!
Dieses Zeichen steht vor jedem Textabschnitt, der auf Sach- oder Um
-
weltschäden bei unsachgemäßer Anwendung hinweist.
Verwendungszweck
Dieses Produkt dient ausschließlich der privaten Nutzung. Es wurde ent
-
wickelt zur vergrößerten Darstellung von Naturbeobachtungen.
Allgemeine Warnhinweise
GEFAHR von Körperschäden!
Schauen Sie mit diesem Gerät niemals direkt in die Sonne oder in die
Nähe der Sonne. Es besteht ERBLINDUNGSGEFAHR!
GEFAHR von Körperschäden!
Kinder dürfen das Gerät nur unter Aufsicht benutzen. Verpackungs-
materialien (Plastiktüten, Gummibänder, etc.) von Kindern fernhalten! Es
besteht ERSTICKUNGSGEFAHR!
4

5
DE
GB
FR
ES
RU
IT
BRAND-/EXPLOSIONSGEFAHR!
Setzen Sie das Gerät keinen hohen Temperaturen aus. Benutzen Sie nur
die empfohlenen Batterien. Gerät und Batterien nicht kurzschließen oder
ins Feuer werfen! Durch übermäßige Hitze und unsachgemäße Handha
-
bung können Kurzschlüsse, Brände und sogar Explosionen ausgelöst
werden!
BRANDGEFAHR!
Setzen Sie das Gerät – speziell die Linsen – keiner direkten Sonnen
-
einstrahlung aus! Durch die Lichtbündelung könnten Brände verursacht
werden.
GEFAHR EINES STROMSCHLAGS!
Dieses Gerät beinhaltet Elektronikteile, die über eine Stromquelle (Batte
-
rien) betrieben werden. Lassen Sie Kinder beim Umgang mit dem Gerät
nie unbeaufsichtigt! Die Nutzung darf nur, wie in der Anleitung beschrie
-
ben, erfolgen, andernfalls besteht GEFAHR eines STROMSCHLAGS!
VERÄTZUNGSGEFAHR!
Ausgelaufene Batteriesäure kann zu Verätzungen führen! Vermeiden
Sie den Kontakt von Batteriesäure mit Haut, Augen und Schleimhäuten.
Spülen Sie bei Kontakt mit der Säure die betroffenen Stellen sofort mit
reichlich klarem Wasser und suchen Sie einen Arzt auf.
GEFAHR von Sachschäden!
Bauen Sie das Gerät nicht auseinander! Wenden Sie sich im Falle eines
Defekts an das für Ihr Land zuständige Service-Center (auf der Garan
-
tiekarte vermerkt).

6
Benutzen Sie nur die empfohlenen Batterien. Ersetzen Sie schwache
oder verbrauchte Batterien immer durch einen komplett neuen Satz Bat
-
terien mit voller Kapazität. Verwenden Sie keine Batterien unterschiedli-
cher Marken, Typen oder unterschiedlich hoher Kapazität. Entfernen Sie
Batterien aus dem Gerät, wenn es längere Zeit nicht benutzt wird!
SCHUTZ der Privatsphäre!
Das Gerät ist für den Privatgebrauch gedacht. Achten Sie die Privatsphä
-
re Ihrer Mitmenschen – schauen Sie mit diesem Gerät zum Beispiel nicht
in Wohnungen!
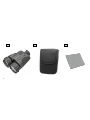
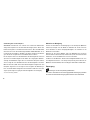
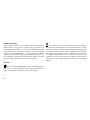
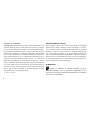
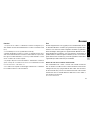
Lieferumfang
Nachtsichtgerät (A), Nylontasche (B), Putztuch (C),
Bedienungsanleitung
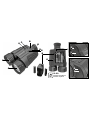
Teileübersicht
1. Infrarotaufheller
2. Objektiv
3. Okular
4. Helligkeit erhöhen (Infrarotaufheller)
5. Helligkeit verringern (Infrarotaufheller)
6. Regulierung der Empfindlichkeit
7. Einschalten/Ausschalten
8. Batteriefach (6x AA Batterien*)
9. Status LED
10. Fotoaufnahme -Taste
11. Filmaufnahme-Taste
12. Stativanschlussgewinde 6,35mm (0,25“)
13. Micro-SD-Karteneinschub
(für SD-Karten* bis maximal 32GB Speicherkapazität)
14. Mini-USB-Port
*nicht im Lieferumfang enthalten

7
DE
GB
FR
ES
RU
IT
Funktionen
1. Bei diesem Nachtsichtgerät mit integriertem Infrarotaufheller ist es
möglich die Helligkeit der Infrarotbeleuchtung über die Tasten (4, 5) an
-
zupassen.
2. Die Empfindlichkeit lässt sich danach weiter regulieren (6).
3. Wenn der Infrarotaufheller abgeschaltet ist, erfolgt eine Bildwieder
-
gabe durch die Verstärkung von noch vorhandenem Umgebungslicht.
Sobald der Illuminator zugeschaltet wird, ist auch eine Beobachtung in
kompletter Dunkelheit möglich.
4. Batterien (6 Stück, Typ AA) sind im Lieferumfang nicht enthalten. Bei
abgeschaltetem Infrarotaufheller beträgt die Beobachtungszeit ca. 6
Stunden. Bei eingeschalteter Infrarotbeleuchtung ca. 4 Stunden.
5. In völliger Dunkelheit beträgt die Erfassungsreichweite bei eingeschal
-
tetem Infrarotaufheller ungefähr 200 m.
Bedienung
Richten Sie das Gerät auf ein Objekt das 20-30 m entfernt ist.
Schauen Sie ins Okular (3) und drehen Sie dieses, bis der Bild-
schirm klar zu erkennen ist. Stellen Sie durch Drehung des Ob-
jektivs (2) eine deutliche Abbildung des Objekts ein. Bei Änderung
der Beobachtungsentfernung erreichen Sie ein hochwertiges Bild
allein durch Drehen des Objektivs (2). Ein weiteres Drehen des
Okulars (3) ist nicht erforderlich, Ihr Gerät ist bereits individuell auf
Sie eingestellt.
Verwendung einer Micro-SD-Speicherkarte*
Um Bilder oder Videos speichern zu können, benötigen Sie eine
SD-Speicherkarte* bis 32GB. Schieben Sie die Micro-SD-Speicher-
karte in den Micro-SD-Karteneinschub (13) bis sie mit einem leisen
Klicken einrastet. Zum Entfernen der Micro-SD-Karte drücken Sie
einmal kurz auf die Karte im Einschub. Diese springt mit ei
nem leisen
Klicken aus dem Fach und kann heraus genommen werden.
*nicht im Lieferumfang enthalten

8
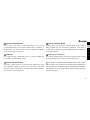
Multifunktionstaste (2 Funktionen):
• Anschalten
• Abschalten
Anschalten: Wenn das Gerät abgeschaltet ist, kann es durch kurzes ge
-
drückt halten der Taste eingeschaltet werden. Die Status-LED leuchtet im
eingeschalteten Zustand blau.
Abschalten: Das eingeschaltete Gerät lässt sich durch kurzes gedrückt
halten der Taste abschalten.
+
Multifunktionstaste (2 Funktionen):
• Infrarotaufheller einschalten
• Leuchtstärke des Infrarotaufhellers erhöhen
Leuchtstärke des Infrarotaufhellers erhöhen: Bei abgeschaltetem Infra
-
rotaufheller kann dieser durch einen einmaligen Tastendruck eingeschal-
tet werden.
Bei eingeschaltetem Infrarotaufheller wird die Leuchtkraft je Tastendruck
gesteigert bis 100% der Leuchtkraft erreicht ist. Ist die maximale Leis
-
tung erreicht, hat ein weiteres Drücken keine Auswirkung.
Multifunktionstaste (2 Funktionen):
• Infrarotaufheller ausschalten
• Leuchtstärke des Infrarotaufhellers verringern
Leuchtstärke des Infrarotaufhellers verringern: Bei eingeschaltetem Infra
-
rotaufheller wird durch einmaliges Drücken der Taste die Leuchtkraft des
Infrarotaufhellers gesenkt, bis der Infrarotaufheller abgeschaltet. Weite
-
res Drücken der Taste hat keine Auswirkung.

9
DE
GB
FR
ES
RU
IT
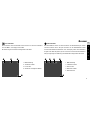
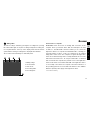
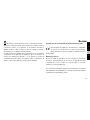
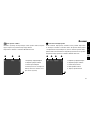
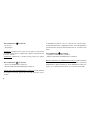
Fotoaufnahme
Durch Drücken der Fotoaufnahme -Taste machen Sie eine Fotoaufnahme
des Live-Bildes, die abgespeichert wird.
Die Auflösung der Fotobilder beträgt 768 x 582 Pixel.
Filmaufnahme
Die Filmaufnahme starten Sie durch Drücken des Aufnahmeknopfs; durch
erneutes Drücken dieses Knopfes beenden Sie die Filmaufnahme. Wäh
-
rend der Filmaufnahme blinkt links oben im Display neben dem Filmkame-
rasymbol das Rekordsymbol (4) und es wird oben die laufende Aufnahme-
zeit (5) angezeigt. Die Auflösung der Filmbilder beträgt 768 x 582 Pixel.
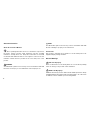
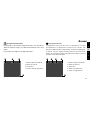
b
c
e
d
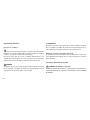
1. Batterieladung
2. SD-Karten Status
3. Fotomodus
4. Anzahl der verfügbaren Bilder
1. Batterieladung
2. SD-Karten Status
3. Videomodus
4. Aufnahme Status
5. Aufnahmezeit
cd
F
e
b

10
Verbindung mit einem Computer
ACHTUNG! Unterbrechen Sie niemals eine bestehende Datenverbin
-
dung zum Computer bevor Sie alle Daten übertragen haben. Durch eine
Unterbrechung kann es zu Datenverlusten kommen. Über den Mini USB-
Anschluss lässt sich das Nachtsichtgerät mittels Mini-USB-Kabel* an ei
-
nen Computer anschließen, um Bilder oder Videos auf diesen zu übertra-
gen oder ihn als vergrößerten Vorschaubildschirm zu nutzen.
Der Computer erkennt im Normalfall das Nachtsichtgerät als externen
Speicher und erlaubt Zugriff auf die Daten der eingelegten SDKarte*.
Solange ein USB-Kabel* angeschlossen und mit dem Computer verbun
-
den ist, zeigt der Vorschaubildschirm des Nachtsichtgerätes ein blaues
Bild und den Text „USB“. Wenn das Nachtsichtgerät erfolgreich an den
Computer angeschlossen ist folgen sie den Vorgaben des Betriebssys
-
tems, um auf die Daten zuzugreifen. Diese Funktion steht auch ohne eine
eigene Spannungsversorgung des Nachtsichtgerätes zur Verfügung.
*nicht im Lieferumfang enthalten
Hinweise zur Reinigung
Trennen Sie das Gerät vor der Reinigung von der Stromquelle (Batterien
entfernen)! Reinigen Sie das Gerät nur äußerlich mit einem trockenen
Tuch. Benutzen Sie keine Reinigungsflüssigkeit, um Schäden an der
Elektronik zu vermeiden.
Reinigen Sie die Linsen (Okulare und/oder Objektive) nur mit einem
weichen und fusselfreien Tuch (z. B. Microfaser). Das Tuch nicht zu stark
aufdrücken, um ein Verkratzen der Linsen zu vermeiden.
Schützen Sie das Gerät vor Staub und Feuchtigkeit! Bewahren Sie es in
der mitgelieferten Tasche oder Transportverpackung auf. Entfernen Sie
Batterien aus dem Gerät, wenn es längere Zeit nicht benutzt wird!
Entsorgung
Entsorgen Sie die Verpackungsmaterialien
sortenrein. Informationen zur ordnungsgemäßen Entsorgung erhalten
Sie beim kommunalen Entsorgungsdienstleister oder Umweltamt.

11
DE
GB
FR
ES
RU
IT
Werfen Sie Elektrogeräte nicht in den Hausmüll!
Gemäß der Europäischen Richtlinie 2002/96/EG über Elektro- und
Elektronik-Altgeräte und deren Umsetzung in nationales Recht müssen
verbrauchte Elektrogeräte getrennt gesammelt und einer umweltgerechten
Wiederverwertung zugeführt werden.
Entladene Altbatterien und Akkus müssen vom Verbraucher in
Batteriesammelgefäßen entsorgt werden. Informationen zur Entsorgung
alter Geräte oder Batterien, die nach dem 01.06.2006 produziert wurden,
erfahren Sie beim kommunalen Entsorgungsdienstleister oder Umweltamt.
EG-Konformitätserklärung
Eine „Konformitätserklärung“ in Übereinstimmung mit den
anwendbaren Richtlinien und entsprechenden Normen ist von
der Bresser GmbH erstellt worden. Diese kann auf Anfrage
jederzeit eingesehen werden.
Garantie & Service
Die reguläre Garantiezeit beträgt 2 Jahre und beginnt am Tag des
Kaufs. Um von einer verlängerten, freiwilligen Garantiezeit wie auf
dem Geschenkkarton angegeben zu profitieren, ist eine Registrie-
rung auf unserer Website erforderlich.
Die vollständigen Garantiebedingungen sowie Informationen zu
Garantiezeitverlängerung und Serviceleistungen können Sie unter
www.bresser.de/garantiebedingungen einsehen.

12
General Information
About this Instruction Manual
These operating instructions are to be considered a component of
the device. Please read the safety instructions and the operating
instructions carefully before use. Keep these instructions for renewed
use at a later date. When the device is sold or given to someone else, the
instruction manual must be provided to the new owner/user of the
product.
DANGER!
You will find this symbol in front of every section of text which deals with
the risk of severe injury or even death in the event of improper use.
NOTE!
You will find this symbol in front of every section of text which deals with
the risk of damage to property or the environment.
Intended Use
This product is intended only for private use. It was developed for the
magnified display of things in nature.
General Warnings
RISK of bodily injury!
Never use this device to look directly at the sun or in the direct proximity
of the sun. Doing so may result in a risk of blindness.
RISK of bodily injury!
Children should only use the device under adult supervision. Keep
packaging material, like plastic bags and rubber bands, out of the reach
of children, as these materials pose a choking hazard.

13
DE
GB
FR
ES
RU
IT
RISK OF FIRE/EXPLOSION!
Do not expose the device to high temperatures. Use only the
recommended batteries. Do not short-circuit the device or batteries, or
throw them into a fire. Excessive heat or improper handling could trigger
a short-circuit, a fire or an explosion.
FIRE RISK!
Do not place the device, particularly the lenses, in direct sunlight. The
concentration of light could cause a fire.
RISK OF ELECTRIC SHOCK
This device contains electronic components that operate via a power
source (batteries). Children should only use the device under adult
supervision. Only use the device as described in the manual; otherwise,
you run the risk of an electric shock.
RISK OF CHEMICAL BURN!
Leaking battery acid can lead to chemical burns. Avoid contact of
battery acid with skin, eyes and mucous membranes. In the event of
contact, rinse the affected region immediately with a plenty of water and
seek medical attention.
RISK of property damage!
Do not disassemble the device. In the event of a defect, please contact
the Service Centre in your country (see the warranty card).
Use only the recommended batteries. Always replace weak or empty
batteries with a new, complete set of batteries at full capacity. Do
not use batteries from different brands or with different capacities.
The batteries should be removed from the unit if it has not been
used for a long time.

14
Privacy PROTECTION!
The device is intended only for private use. Please heed the privacy of
other people. Do not use it to look into apartments, for example.
Scope of delivery
Night vision device (A), nylon bag (B), cleaning cloth (C),
user manual.
Parts overview
1. Infrared illuminator
2. Lens
3. Eyepiece
4. Increase brightness (infrared illuminator)
5. Reduce brightness (infrared illuminator)
6. Regulation of sensitivity
7. Switch on / off
8. Battery compartment
9. LED status
10. Photoshot button
11. Film record button
12. Threaded tripod connector 6.35mm (0.25”)
13. Micro-SD card slot (for SD cards up to 32GB * storage capacity)
14. Mini USB Port
*not included with delivery
Functions
1. It is possible to adjust the brightness of the infrared illumination using
buttons (4, 5) on this night vision device with integrated infrared
illuminator.
2. The sensitivity can be regulated further (6).
3. If the infrared illuminator is switched off, an image reproduction is
carried out through the amplification of the ambient light still present.

15
DE
GB
FR
ES
RU
IT
Once the illuminator is switched on, viewing in complete darkness is
possible.
4. Batteries (6 pcs. type AA) are not included. The viewing time amounts
to about 6 hours when the infrared illuminator is switched off. When the
infrared illuminator is switched on, it’s about 4 hours.
5. In total darkness, the detection range is about 200 m. when the
infrared illuminator is switched on.
Operation
Set up the device on an object that is about 20-30m away.
Look into the eyepiece (3) and turn this until the display is clearly visible.
Adjust by rotating the lens (2) to focus on a clear image of the object.
If you change the viewing distance you will reach a high-quality image
solely by turning the lens (2). Another rotation of the eyepiece (3) is not
necessary, your device is individually set for you.
Use of a micro SD memory card*
To save images or videos, you need an SD memory card up to 32GB*.
Slide the micro SD memory card into the micro SD card slot (13) until it
locks into place with a soft click.For removing the micro SD card, press
the card in the slot just once briefly. This jumps out of the compartment
with a soft click and can be taken out.
*not included with delivery
Multifunction button (2 functions):
• Switch on
• Switch off
Switch on: If the device is switched off, it can be switched back on
by briefly holding down the button. The status LED lights up blue when
switched on.
Switch off: The switched on device can be switched off by briefly holding
down the button.

16
+
Multifunction button (2 functions):
• Switch on the infrared illuminator
• Increase the light intensity of the illuminator
Increase the light intensity of the illuminator: When the infrared
illuminator is switched off, it can be switched back on again with a single
press of the button. When the infrared illuminator is switched on, the
light intensity is increased, until it reaches 100%, with each press of the
button. If the maximum output is reached, a further press has no effect.
Multifunction button (2 functions):
• Switch on the infrared illuminator
• Decrease the light intensity of the illuminator
Decrease the light intensity of the illuminator: When the infrared
illuminator is switched on, the light intensity of the infrared illuminator
is decreased, with a single press, until the infrared illuminator is
switched off. A further press has no effect.
Taking photos
By pressing the photoshot button, you will take a picture of the live image,
which is then stored. The resolution of the photo image is 768 x 582
pixels.
b
c
e
1. Battery charge
2. SD card status
3. Photo mode
4. Number of images available
d

17
DE
GB
FR
ES
RU
IT
Taking a film
The film recording is started by pressing the recording knob; pressing
this same button again to stop the recording. During film recording, the
record symbol flashes on the top of the display next to the film camera
symbol and the running recording time is displayed above likewise.
The resolution of the film images is 768 x 582 pixels.
1. Battery charge
2. SD card status
3. Video mode
4. Recording status
5. Recording time
cd
F
e
b
Connection to a computer
ATTENTION! Never disconnect an existing data connection to the
computer before you transfer all the data. An interruption can lead
to data loss. The Mini USB connection enables you to connect the
night vision device to a computer via a mini-USB cable *, allowing you
to transfer images or videos on this or to view them as an enlarged
image/video on the screen. The computer recognizes the night vision
device as an external storage device normally and allows access to the
data of the inserted SD card *. As long as a USB cable * is attached
and connected to the computer, the preview screen of the night vision
device shows a blue screen and the text “USB”. If the night vision device
is successfully connected to the computer, follow the instructions of
the operating system to access the data. This function is also available
without a separate power supply of the night vision device.
* not included in delivery

18
NOTES on Cleaning
Before cleaning the device, disconnect it from the power supply (remove
batteries)! Only use a dry cloth to clean the exterior of the device. To
avoid damaging the electronics, do not use any cleaning fluid. Clean the
eyepieces and lenses only with a soft, lint-free cloth, (e.g. microfibre
cloth). To avoid scratching the lenses, use only gentle pressure with the
cleaning cloth. Protect the device from dust and moisture. Store it in
the supplied bag or transportation packaging. The batteries should be
removed from the unit if it has not been used for a long time.
Disposal
Dispose of the packaging materials properly, according to their type,
such as paper or cardboard. Contact your local waste-disposal service or
environmental authority for information on the proper disposal.
Do not dispose of electronic devices in the household garbage!
As per Directive 2002/96/EC of the European Parliament on waste
electrical and electronic equipment and its adaptation into German law,
used electronic devices must be collected separately and recycled in an
environmentally friendly manner. Empty, old batteries must be disposed
of at battery collection points by the consumer. You can find out more
information about the disposal of devices or batteries produced after 6
January 2006 from your local waste-disposal service or environmental
authority.

19
DE
GB
FR
ES
RU
IT
EC Declaration of Conformity
Bresser GmbH has issued a „Declaration of Conformity“ in
accordance with applicable guidelines and corresponding
standards. This can be viewed any time upon request.
Warranty & Service
The regular guarantee period is 2 years and begins on the day of
purchase. To benefit from an extended voluntary guarantee period as
stated on the gift box, registration on our website is required.
You can consult the full guarantee terms as well as information
on extending the guarantee period and details of our services at
www.bresser.de/warranty_terms.

20
Informations générales
A propos de ce manuel
Le présent mode d‘emploi doit être considéré comme faisant partie
intégrante de l’appareil. Avant d’utiliser l’appareil, veuillez lire attentive
-
ment les consignes de sécurité et le mode d’emploi.
Conservez celui-ci afin de pouvoir le réutiliser ultérieurement le cas
échéant. En cas de revente ou de cession de l’appareil, le mode d’emploi
doit être remis à tout propriétaire ou utilisateur suivant du produit.
DANGER!
Ce symbole précède un passage destiné à mettre l’utilisateur en garde
face à un danger susceptible de résulter d’un usage inapproprié et pou
-
vant entraîner des blessures graves voire mortelles.
REMARQUE!
Ce symbole précède un passage destiné à mettre l’utilisateur en garde
face à un danger susceptible de résulter d’un usage inapproprié et pou
-
vant entraîner des dommages matériels ou de l‘environnement.
Utilisation conforme / destination du produit
Ce produit est exclusivement destiné pour un usage privé. Il a été conçu
pour l’agrandissement d’images dans le cadre d’expériences d’observa
-
tion de la nature.
Consignes générales de sécurité
RISQUE de dommages corporels!
Ne jamais regarder directement le soleil à travers cet appareil en le
pointant directement en sa direction. L’observateur court un
RISQUE
DE CECITE!

21
DE
GB
FR
ES
RU
IT
RISQUE de dommages corporels!
Les enfants ne doivent utiliser cet appareil que sous surveillance. Main
-
tenez les enfants éloignés des matériaux d’emballage (sacs plastiques,
bandes en caoutchouc, etc.)! RISQUE D’ETOUFFEMENT!
RISQUE D’EXPLOSION/ D’INCENDIE !
Ne pas exposer l’appareil à des températures trop élevées. N’utilisez que
les batteries conseillées. L’appareil et les batteries ne doivent pas être
court-circuitées ou jeter dans le feu! Toute surchauffe ou manipulation
inappropriée peut déclencher courts-circuits, incendies voire conduire
à des explosions!
RISQUE D’INCENDIE!
Ne jamais orienter l’appareil – en particuliers les lentilles – de manière à
capter directement les rayons du soleil ! La focalisation de la lumière peut
déclencher des incendies.
RISQUE D’ELECTROCUTION!
Cet appareil contient des pièces électroniques raccordées à une
source d’alimentation électrique (batteries). Ne jamais laisser les en
-
fants manipuler l’appareil sans surveillance! L’utilisation de l’appareil doit
se faire exclusivement comme décrit dans ce manuel, faute de quoi un
RISQUE d’ELECTROCUTION peut exister!
RISQUE DE BLESSURE!
L’écoulement de l‘électrolyte d’une batterie peut entraîner des bles
-
sures par brûlure due à l’acidité du produit! Evitez tout contact de l’élec-
trolyte avec la peau, les yeux et les muqueuses. En cas de contact
avec l‘acide, rincez abondamment et immédiatement les parties
du corps concernées en utilisant de l’eau claire et consultez un
médecin dans les meilleurs délais.

22
RISQUE de dommages matériels!
Ne pas démonter l’appareil! En cas de défaut, veuillez vous adresser au
service client de votre pays (figurant sur le bon de garantie).
N‘utilisez que les batteries conseillées. Remplacez toujours les batte-
ries trop faibles ou usées par un jeu complet de nouvelles batteries dis-
posant de toute sa capacité. N’utilisez pas de batteries de marques, de
types ou de capacités différentes. Les batteries doivent être enlevées de
l’appareil lorsque celui-ci est destiné à ne pas être utiliser pendant un
certain temps !
PROTECTION de la sphère privée !
Le dispositif sont destinées à un usage privé. Respectez la sphère pri
-
vée de vos concitoyens et n’utilisez pas ces dispositif pour, par exemple,
observer ce qui se passe dans un appartement !
Périmètre de la livraison
Appareil de vision nocturne (A), sac en nylon (B), chiffon (C),
mode d’emploi
Liste des pièces
1. Illuminateur infrarouge
2. Objectif
3. Oculaire
4. Augmentation de la luminosité (Illuminateur infrarouge)
5. Réduction de la luminosité (Illuminateur infrarouge)
6. Régulation de la sensibilité
7. Marche/arrêt
8. Compartiment pour piles
9. LED d‘état
10. Bouton pour la prise de vues
11. Bouton pour l’enregistrement vidéo
12. Filetage pour le raccordement d’un pied de 6,35mm (0,25“)

23
DE
GB
FR
ES
RU
IT
13. Fente permettant d’insérer une carte micro SD
(pour cartes SD* d’une capacité maximale de 32 Go)
14. Port Mini-USB
*non fournie
Fonctionnalités
1. Cet appareil de vision nocturne, doté d’un illuminateur infrarouge intégré,
permet d’adapter la luminosité de l’éclairage infrarouge via les boutons (4, 5).
2. La sensibilité peut être réglée en outre (6).
3. Lorsque l’illuminateur infrarouge est éteint, l’image est resituée grâce
à l’amplification de la lumière ambiante encore présente. Dès que l’illu
-
minateur infrarouge est mis en marche, une observation est également
possible dans l’obscurité totale.
4. 6 piles (de type AA) : non fournie. Lorsque l’illuminateur infrarouge est
à l’arrêt, le temps d’observation est d’environ 6 heures. Lorsque l’illumi
-
nateur infrarouge est en marche, ce temps d’observation est ramené à
4 heures.
5. Dans l’obscurité totale, lorsque l’illuminateur infrarouge est allumé, sa
portée est d’environ 200 m.
Utilisation
Dirigez l’appareil sur un objet situé à une distance d’environ 20 à
30 m. Regardez à travers l’oculaire (3) et tournez celui-ci jusqu’à ce
que l’image
apparaisse clairement à l’écran. Réglez la netteté de
l’image de l’objet en agissant sur l’objectif (2). Lorsque la distance
de l’objet observé change, la netteté de l’image se règle unique-
ment en tournant l’objectif (2). Il est inutile de tourner l’oculaire (3)
davantage,
votre appareil est déjà réglé sur votre vision.
Utilisation d’une carte mémoire Micro-SD*
Pour pouvoir enregistrer les images et les vidéos, vous avez besoin
d’une carte mémoire SD* d’une capacité maximale de 32 Go. Insérez la
carte Micro-SD dans la fente Micro-SD (13) jusqu’à ce que vous enten
-
diez un léger clic Pour retirer la carte Micro-SD, appuyez brièvement
sur la carte insérée dans la fente. Celle-ci est alors éjectée de la fente

24
en émettant un petit bruit de clic et peut ensuite être retirée.
*non fournie
Touche multifonction (2 fonctions):
• Mise en marche
• Mise à l’arrêt
Mise en marche: lorsque l’appareil est à l’arrêt, celui-ci peut être mis
en marche en maintenant le bouton enfoncé pendant un court laps de
temps. Lorsqu’il est en marche, la LED d’état s’allume en bleu.
Mise à l’arrêt: lorsque l’appareil est en marche, celui-ci peut être mis à
l‘arrêt en maintenant le bouton enfoncé pendant un court laps de temps.
+
Touche multifonction (2 fonctions):
• Mise en marche de l’illuminateur infrarouge
• Augmentation de l’intensité lumineuse de l’illuminateur infrarouge
Augmentation de l’intensité lumineuse de l’illuminateur infrarouge:
Lorsque l’illuminateur infrarouge est à l’arrêt, celui-ci peut être mis en
marche en appuyant une fois sur ce bouton. Lorsque l’illuminateur infra
-
rouge est en marche, une impulsion sur ce bouton permet d’augmenter
son intensité lumineuse jusqu’à ce que celle-ci atteigne 100% de l’inten
-
sité. Lorsque la puissance maximale est atteinte, toute nouvelle impulsion
reste sans effets.
Touche multifonction (2 fonctions):
• Mise à l’arrêt de l’illuminateur infrarouge
• Diminution de l’intensité lumineuse de l’illuminateur infrarouge
Diminution de l’intensité lumineuse de l’illuminateur infrarouge:
Lorsque l’illuminateur infrarouge est en marche, une impulsion sur ce
bouton permet de diminuer l’intensité lumineuse de l’illuminateur infra
-
rouge jusqu’à ce que celui-ci s’éteigne. Toute nouvelle impulsion
reste sans effets.

25
DE
GB
FR
ES
RU
IT
Enregistrement de photo
En appuyant sur la touche Enregistrement photo, vous avez la pos-
sibilité de capturer l’image qui s’affiche actuellement et de l’enre-
gistrer.
La résolution de l’image est de 768 x 582 pixels.
c
e
1. Etat de charge de la batterie
2. Etat de la carte SD
3. Mode photo
4. Nombre d’images disponibles
Enregistrement vidéo
L’enregistrement vidéo peut être lancé en appuyant sur le bouton
d’enregistrement ; en appuyant une nouvelle fois sur ce bouton, vous
avez la possibilité d’arrêter l’enregistrement. Pendant l’enregistrement,
le symbole « Record » clignote en haut à gauche de l’écran à côté du
symbole de la caméra et le temps d’enregistrement s’affiche en haut. La
résolution est de 768 x 582 pixels.
1. Etat de charge de la batterie
2. Etat de la carte SD
3. Mode vidéo
4. Etat de l’enregistrement
5. Temps d’enregistrement
cd
F
e
d
b
b

26
Connexion à un ordinateur
ATTENTION! Ne jamais couper une liaison de données existante avec
l‘ordinateur avant d’avoir transféré toutes les données. Une interruption
de la connexion peut entraîner des pertes de données. Le port Mini USB
permet de relier l’appareil de vision nocturne à un ordinateur au moyen
d’un câble Mini-USB*, afin d’y transférer les images ou les vidéos ou d’uti
-
liser simplement l’ordinateur comme un grand écran de prévisualisation.
Normalement, l’ordinateur reconnaît l’appareil de vision nocturne comme
un lecteur externe et permet d’accéder aux données qui se trouvent sur
la carte SD* qui y est insérée. Dès qu’un câble USB* est raccordé et relié
à l’ordinateur, l’écran de prévisualisation de l’appareil de vision nocturne
affiche un écran bleu et le texte « USB ». Lorsque l’appareil de vision
nocturne a été relié à l’ordinateur avec succès, il suffit de suivre les ins
-
tructions données par le système d’exploitation pour accéder aux don-
nées. Cette fonction est également accessible sans que l’alimentation
électrique de l’appareil de vision nocturne soit assurée.
*non fourni
REMARQUE concernant le nettoyage
Avant de nettoyer l’appareil, veuillez le couper de son alimentation
électrique (enlevez les batteries)! Ne nettoyez l’appareil que de l’extérieur
en utilisant un chiffon sec. Ne pas utiliser de liquides de nettoyage, afin
d’éviter d’endommager les parties électroniques. Les lentilles (oculaires ou
objectifs) ne doivent être nettoyé qu’avec un chiffon doux et ne peluchant
pas (p. ex. microfibres). Le chiffon doit être passé sans trop le presser
sur la surface, afin d’éviter de rayer les lentilles. Protégez l’appareil de
la poussière et de l’humidité! Conservez l’appareil dans sa sacoche (de
transport) fournie. Les batteries doivent être retirées de l’appareil lorsque
celui-ci est destiné à ne pas être utilisé un certain temps.
ELIMINATION
Eliminez l’emballage en triant les matériaux. Pour plus d’informations
concernant les règles applicables en matière d’élimination de ce type des
produits, veuillez vous adresser aux services communaux en charge de la
gestion des déchets ou de l’environnement.

27
DE
GB
FR
ES
RU
IT
Ne jamais éliminer les appareils électriques avec les ordures
ménagères! Conformément à la directive européenne 2002/96/CE sur
les appareils électriques et électroniques et ses transpositions aux plans
nationaux, les appareils électriques usés doivent être collectés séparément
et être recyclés dans le respect des réglementations en vigueur en
matière de protection de l’environnement. Les batteries déchargées et les
accumulateurs usés doivent être apportés par leurs utilisateurs dans les
points de collecte prévus à cet effet. Pour plus d’informations concernant
les règles applicables en matière d’élimination des batteries produites après
la date du 01.06.2006, veuillez vous adresser aux services communaux
en charge de la gestion des déchets ou de l’environnement.
Déclaration de conformité CE
Bresser GmbH a émis une « déclaration de conformité »
conformément aux lignes directrices applicables et aux normes
correspondantes. Celle-ci peut être consultée à tout moment sur demande.
Garantie et Service
La durée normale de la garantie est de 2 ans à compter du jour de
l’achat. Afin de pouvoir profiter d’une prolongation facultative de
la garantie, comme il est indiqué sur le carton d’emballage, vous
devez vous enregistrer sur notre site Internet.
Vous pouvez consulter l’intégralité des conditions de garantie ainsi
que les informations concernant la prolongation de la garantie et
les prestations de service sur www.bresser.de/warranty_terms.

28
Informaciones de carácter general
Sobre este manual
El presente manual de instrucciones se debe considerar parte inte-
grante del aparato.
Antes de utilizar el aparato, lea detenidamente las indicaciones de segu
-
ridad y el manual de instrucciones.
Guarde el presente manual de instrucciones por si necesita volver a uti
-
lizarlo más tarde. En caso de venta o entrega a terceros del aparato,
se debe entregar el manual de instrucciones al siguiente propietario/
usuario del producto.
¡PELIGRO!
Este signo se encuentra delante de cualquier sección de texto que indica
peligros provocados por el uso indebido que tienen como consecuencia
lesiones graves o incluso la muerte
¡NOTA!
Este signo se encuentra delante de cualquier sección de texto que indica
daños materiales o medioambientales provocados por el uso indebido.
Uso previsto
Este producto sirve exclusivamente para el uso privado. Se ha desarrolla
-
do para ampliar la representación de observaciones naturales.
Advertencias de carácter general
¡PELIGRO de lesiones corporales!
No mire nunca directamente al sol o cerca de él con este aparato. ¡Existe
PELIGRO DE CEGUERA!
¡PELIGRO de lesiones corporales!
Los niños solo deberían utilizar el aparato bajo supervisión. Mantener los
materiales de embalaje (bolsas de plástico, bandas de goma) alejadas
del alcance de los niños. ¡Existe PELIGRO DE ASFIXIA!

29
DE
GB
FR
ES
RU
IT
¡PELIGRO DE INCENDIO/EXPLOSIÓN!
No exponga el aparato a altas temperaturas. Utilice exclusivamente las
pilas recomendadas. ¡No cortocircuitar ni arrojar al fuego el aparato o
las pilas! El calor excesivo y el manejo inadecuado pueden provocar
cortocircuitos, incendios e incluso explosiones.
¡PELIGRO DE INCENDIO!
No exponer el aparato – especialmente las lentes – a la radiación directa
del sol. La concentración de la luz puede provocar incendios.
¡PELIGRO DE DESCARGA ELÉCTRICA!
Este aparato contiene componentes electrónicos que funcionan me
dian-
te una fuente de electricidad (pilas). No deje nunca que los niños utilicen
el aparato sin supervisión. El uso se deberá realizar de la forma descrita
en el manual; de lo contrario, existe PELIGRO de DESCARGA ELÉC
-
TRICA.
¡PELIGRO DE ABRASIÓN!
Si se derrama el ácido de las pilas, este puede provocar abrasiones
Evite el contacto del ácido de las baterías con la piel, los ojos y las
mucosas. En caso de contacto con el ácido, enjuague inmediatamente
las zonas afectadas con agua limpia abundante y visite a un médico.
¡PELIGRO de daños materiales!
No desmonte el aparato. En caso de que haya algún defecto, le ro
-
gamos que se ponga en contacto con el centro de servicio técnico
responsable de su país (se indica en la tarjeta de garantía).
Utilice exclusivamente las pilas recomendadas. Recambie
siempre las pilas agotadas o muy usadas por un juego completo
de pilas nuevas con plena capacidad. No utilice pilas de marcas o
mo
delos distintos ni de distinto nivel de capacidad. ¡Hay que retirar las
pilas del aparato si no se va a usar durante un periodo prolongado!

30
¡PROTECCIÓN de la privacidad!
El dispositivo están concebidos para el uso privado. Respete la privaci
-
dad de las personas de su entorno – por ejemplo, no utilice este aparato
para mirar en el interior de viviendas.
Contenido de la entrega
Dispositivo de visión nocturna (A), bolsa de nailon (B), paño de limpieza
(C), Instrucciones de uso
Componentes
1. Blanqueador de infrarrojos
2. Objetivo
3. Ocular
4. Aumento del brillo (blanqueador de infrarrojos)
5. Reducción del brillo (blanqueador de infrarrojos)
6. Regulación de la sensibilidad
7. Encendido/Apagado
8. Compartimento de las pilas
9. Estado del LED
10. Botón para tomar una instantánea
11. Botón para grabar un vídeo
12. Rosca de acople al trípode de 6,35mm (0,25“)
13. Ranura para tarjetas microSD (para tarjetas SD* de
hasta 32GB de capacidad de memoria)
14. Puerto miniUSB
*no incluido en la entrega
Funciones
1. Con este dispositivo de visión nocturna con blanqueador de infra-
rrojos integrado es posible regular el brillo de la iluminación de infrarrojos
con los botones (4,5).
2. La sensibilidad se puede regular más (6).

31
DE
GB
FR
ES
RU
IT
2. Cuando el blanqueador de infrarrojos se encuentra apagado, la re-
producción de imágenes se realiza mediante un refuerzo de la luz de
ambiente aún existente. Cuando se enciende el iluminador es posible
una observación en oscuridad completa.
3. 6 pilas (tipo AA) no incluido en la entrega. El tiempo de observación
asciende a 6 horas aprox. con el blanqueador de infrarrojos apagado.
Con el blanqueador de infrarrojos encendido el tiempo asciende a 4 ho
-
ras aprox.
4. En la oscuridad absoluta el alcance de detención asciende a aprox.
200 m con el blanqueador de infrarrojos encendido.
Manejo
Dirija el dispositivo a un objeto situado a unos 20-30 m. Observe a través
del ocular (3) y gírelo hasta que la imagen sea nítida. Enfoque girando
el objetivo (2) hasta obtener una imagen nítida del objeto. Si cambia la
distancia de observación le bastará girar el objetivo (2) para obtener una
imagen de alta calidad. No es necesario girar más el ocular (3). Su dis
-
positivo se encuentra configurado para sus necesidades.
Empleo de una tarjeta de memoria microSD*
Para poder guardar vídeos o fotografías necesita una tarjeta de memo
-
ria SD* de hasta 32GB. Introduzca la tarjeta microSD en la ranura para
tarjetas microSD (13) hasta que oiga un leve clic.
Para extraer la tarjeta microSD pulse una vez sobre la tarjeta en la ra
-
nura. La tarjeta saldrá con un leve clic de la ranura y puede extraerse.
*no incluido en la entrega

32
Botón multifunción (2 funciones):
• Encendido
• Apagado
Encendido: si el dispositivo se encuentra apagado se puede encender
manteniendo pulsado el botón brevemente. El LED de estado se ilumi
-
nará en azul.
Apagado: se puede apagar el dispositivo manteniendo pulsado el botón
brevemente.
+
Botón multifunción (2 funciones):
• Encendido del blanqueador de infrarrojos
• Aumento de la intensidad del blanqueador de infrarrojos
Aumentar la intensidad del blanqueador de infrarrojos: si el blanque-
ador se encuentra apagado se puede encender pulsando una sola
vez el botón.
Cuando el blanqueador de infrarrojos esté encendido se puede au-
mentar la intensidad cada vez que pulse el botón hasta que se haya
alcanzado el 100% de intensidad. En este caso seguir pulsando el
botón no reportará efecto alguno.
Botón multifunción (2 funciones):
• Apagado del blanqueador de infrarrojos
• Disminución de la intensidad del blanqueador de infrarrojos
Disminuir la intensidad del blanqueador de infrarrojos: Cuando el
blanqueador de infrarrojos esté encendido se puede disminuir la
intensidad pulsando el botón una única vez hasta que se haya apa-
gado el blanqueador. Seguir pulsando el botón no reportará efecto
alguno.

33
DE
GB
FR
ES
RU
IT
Toma de instantáneas
Pulsando el botón de toma de instantáneas realizará una instantánea de
la imagen actual, que será guardada.
La resolución de la instantánea es de 768 x 582 píxeles.
Grabación de películas
Si pulsa el botón de grabación empezará un vídeo. Si vuelve a pulsar
dicho botón terminará la grabación. Durante la grabación el símbolo
de grabación situado en la parte de arriba a la izquierda de la pantalla
parpadea y se muestra el tiempo de grabación. La resolución de las
imágenes de grabación es de 768 x 582 píxeles.
b
c
e
1. Estado de la bateria
2. Estado de la tarjeta SD
3. Modo de fotografía
4. Número de las fotografías
restantes
1. Estado de la bateria
2. Estado de la tarjeta SD
3. Modo de grabación
4. Estado de la grabación
5. Tiempo de grabación
cd
F
e
b
d

34
Conexión con el ordenador
ATENCIÓN! Nunca interrumpa una conexión de datos establecida con el
ordenador hasta que todos los datos hayan sido copiados. La interrup
-
ción de este procedimiento puede llevar consigo una pérdida de datos.
En la ranura para mini USB se puede conectar el dispositivo de visión
nocturna a un ordenador con el cable mini USB* para copiar las instan
-
táneas o vídeos al ordenador o para utilizar la pantalla como aumento de
vista previa. El ordenador reconoce normalmente el dispositivo de visión
nocturna como memoria externa y permite un acceso a los datos de la
tarjeta SD inserida. Mientras el cable USB* está conectado con el orde
-
nador, la pantalla de vista previa del dispositivo muestra una imagen azul
con el texto „USB“. Una vez el dispositivo de visión nocturna haya sido
conectado con éxito, siga las instrucciones de su sistema operativo para
abrir los datos. Esta función también se encuentra disponible sin cable
de alimentación de corriente del dispositivo.
*no incluido en la entrega
INSTRUCCIONES de limpieza
Antes de limpiar el aparato, desconéctelo de la fuente de electricidad
(quite las pilas). Limpie solamente el exterior del aparato con un paño
seco. No utilice productos de limpieza para evitar daños en el sistema
electrónico. Limpie las lentes (oculares y objetivos) exclusivamente
con un paño suave y sin hilachas (p. ej. de microfibras). No presione el
paño con demasiada fuerza para evitar arañazos en las lentes.¡Proteja el
aparato del polvo y la humedad! Consérvelo en la bolsa suministrada o
en el embalaje de transporte. Se deben retirar las pilas del aparato si no
se va a usar durante un periodo prolongado.
ELIMINACIÓN
Elimine los materiales de embalaje separados por tipos.
Obtendrá información sobre la eliminación reglamentaria en los
proveedores de servicios de eliminación municipales o en la agencia
de protección medioambiental.

35
DE
GB
FR
ES
RU
IT
¡No elimine los electrodomésticos junto con la basura doméstica!
Conforme a la directiva europea 2002/96/UE sobre aparatos eléctricos
y electrónicos usados y a su aplicación en la legislación nacional, los
aparatos eléctricos usados se deben recoger por separado y conducir a
un reciclaje que no perjudique al medio ambiente.
Las pilas y baterías descargadas deben ser llevadas por los consumidores
a recipientes de recogida para su eliminación. En los proveedores de
servicios de eliminación municipales o en la agencia de protección
medioambiental podrá obtener información sobre la eliminación de
aparatos o pilas usados fabricados después del 01-06-2006.
Declaración de conformidad de la Unión Europea (CE)
Bresser GmbH ha emitido una „Declaración de conformidad“
de acuerdo con las directrices y normas correspondientes.
Dicha declaración se puede consultar en cualquier momento,
previa petición.
Garantía y servicio
El período regular de garantía es dos anos iniciándose en el día de
la compra. Para beneficiarse de un período de garantía más largo
y voluntario tal y como se indica en la caja de regalo es necesario
registrarse en nuestra página web.
Las condiciones de garantía completas así como informaciones relativas
a la ampliación de la garantía y los servicios pueden encontrarse
en www.bresser.de/warranty_terms.

36
Общая информация
О данном руководстве
Данное руководство по эксплуатации является частью устрой-
ства. Перед использованием устройства внимательно прочитайте ин-
струкции по технике безопасности и руководство по эксплуатации.
Сохраните руководство по эксплуатации для последующего исполь
-
зования. При продаже или передаче устройства руководство по экс-
плуатации необходимо передать следующему владельцу (пользова-
телю).
ОПАСНОСТЬ!
Этот символ располагается перед каждым фрагментом текста, в ко
-
тором имеется указание на риски, которые при ненадлежащем ис-
пользовании могут привести к тяжким телесным повреждениям или
даже к гибели.
ВНИМАНИЕ!
Этот символ располагается перед каждым фрагментом текста, в
котором имеется указание на риски материального ущерба или на
-
несения ущерба окружающей среде вследствие ненадлежащего ис-
пользования.
Назначение
Данное устройство предназначено исключительно для личного ис
-
пользования. Устройство разработано для наблюдения за природой
в увеличенном виде.
Общие предупреждения
ОПАСНОСТЬ травмирования!
Ни в коем случае не смотрите через это устройство прямо на солнце
или в направлении солнца. Опасность ПОТЕРИ ЗРЕНИЯ!

37
DE
GB
FR
ES
RU
IT
ОПАСНОСТЬ травмирования!
Дети могут пользоваться устройством только под присмотром взрос
-
лых. Храните упаковку (пластиковые пакеты, резиновые ленты и пр.)
в недоступном для детей месте. Существует опасность УДУШЕНИЯ!
ОПАСНОСТЬ ПОЖАРА / ВЗРЫВА
Не допускайте нагревания устройства до высокой температуры. Ис
-
пользуйте только рекомендованные батарейки. Не закорачивайте
устройство и батарейки, не бросайте их в огонь! Перегрев и непра
-
вильное обращение могут стать причиной короткого замыкания, по-
жара и даже взрыва!
ОПАСНОСТЬ ПОЖАРА!
Не оставляйте устройство – в особенности линзы – под прямыми сол
-
нечными лучами! Из-за фокусировки солнечных лучей может возник-
нуть пожар!
ОПАСНОСТЬ ПОРАЖЕНИЯ ЭЛЕКТРОТОКОМ!
Данное устройство содержит электронные компоненты, приво
-
димые в действие от источника тока (батарейки). Не оставляйте
ребенка без присмотра. Устройство следует использовать только
так, как указано в инструкции, иначе есть серьезный риск получить
УДАР ТОКОМ.
ОПАСНОСТЬ ПОЛУЧЕНИЯ ОЖОГА!
Вытекшая из аккумуляторных батарей кислота может стать причи
-
ной ожога! Не допускайте попадания кислоты из аккумуляторных
батарей на кожу, в глаза и слизистые оболочки. В случае попадания
кислоты
немедленно промойте пораженные места большим ко-
личеством чистой воды и обратитесь к врачу.
ОПАСНОСТЬ повреждения материала!
Никогда не разбирайте устройство. В случае неисправности обра
-
щайтесь в сервисный центр по вашей стране (указан на гарантий-
ном талоне).

38
Используйте только рекомендованные батарейки. Заменяйте весь
комплект разряженных или использованных батареек целиком. Не
устанавливайте батарейки разных марок, типов или емкостей. Если
устройство не будет использоваться в течение длительного времени,
выньте из него батарейки!
ЗАЩИТА сферы личной жизни!
Бинокли предназначены для личного использования. Соблюдайте
права на личную жизнь окружающих вас людей – не используйте это
устройство, например, для заглядывания в окна жилых помещений!
Комплект поставки
Прибор ночного видения (A), нейлоновый чехол (B), салфетка (C),
инструкция по эксплуатации.
Детали прибора
1. ИК-осветитель
2. Объектив
3. Окуляр
4. Кнопка увеличения яркости ИК-осветителя
5. Кнопка уменьшения яркости ИК-осветителя
6. Регулирование чувствительности
7. Кнопка включения и выключения прибора
8. Батарейный отсек
9. Светодиодный индикатор
10. Спусковая кнопка затвора
11. Кнопка начала видеозаписи
12. Разъем для установки на штатив (6,35 мм)
13. Разъем для карт microSD
(возможна установка карт объемом до 32 ГБ *)
14. Разъем miniUSB
* не входит в комплект поставки

39
DE
GB
FR
ES
RU
IT
Возможности прибора
1. Яркость ИК-осветителя данного прибора ночного видения можно
отрегулировать при помощи соответствующих кнопок (4, 5).
2. Чувствительность может регулироваться в дальнейшем (6).
3. При выключенном ИК-осветителе прибор усиливает слабые источ
-
ники освещения, а включенный ИК-осветитель позволяет использо-
вать данный прибор в полной темноте.
4. шесть батарейки (тип AA) не входит в комплект поставки. При вы
-
ключенном ИК-осветителе время работы данных батареек составля-
ет около шести часов, при включенном ИК-осветителе – около четы-
рех.
5. В полной темной максимальная дистанция наблюдения составляет
200 м со включенным ИК-осветителем.
Эксплуатация прибора
Наведите прибор на объект, расположенный на расстоянии
25 м от вас. Посмотрите в окуляр (3) на дисплей и поворачи-
вайте окуляр, пока дисплей не будет четко виден (повторять
эту операцию не потребуется). Чтобы сфокусировать изобра-
жение, поворачивайте объектив (2), пока не получите четкое
изображение объекта. При изменении расстояния до объекта
наблюдения сфокусировать изображение можно, поворачивая
объектив (2).
Использование карты памяти microSD *
Сделанные снимки и видеоролики сохраняются на карту памя-
ти microSD*. Вставьте карту памяти microSD в разъем на кор-
пусе прибора (13) до щелчка.
Чтобы вынуть установленную карту памяти, нажмите на нее
один раз, и карта выскочит из разъема.
* не входит в комплект поставки

40
Кнопка включения и выключения:
• Включение прибора
• Выключение прибора
Включение прибора: для включения прибора нажмите и удержи
-
вайте эту кнопку в течение нескольких секунд. Светодиодный инди-
катор загорится синий светом.
Выключение прибора: для выключения прибора нажмите и удер
-
живайте эту кнопку в течение нескольких секунд.
+
Кнопка увеличения яркости ИК-осветителя:
• Включение ИК-осветителя
• Увеличение яркости ИК-осветителя
Чтобы включить ИК-осветитель нажмите эту кнопку один раз.
При включенном ИК-осветителе нажатие этой кнопки увеличивает
яркость освещения до максимального значения. По достижении мак
-
симального значения яркость увеличиваться не будет.
Кнопка уменьшения яркости ИК-осветителя:
• Включение ИК-осветителя
• Уменьшение яркости ИК-осветителя
При включенном ИК-осветителе нажатие этой кнопки уменьшает
яркость освещения до минимального значения. По достижении ми
-
нимального значения ИК-осветитель выключится. По достижении ми-
нимального значения яркость уменьшаться не будет.

41
DE
GB
FR
ES
RU
IT
Как сделать снимок
Нажмите спусковую кнопку затвора, чтобы сделать снимок, который
будет сохранен на установленную карту памяти.
Разрешение снимков составляет 768x582 пикселей.
Как записать видеоролик
Чтобы записать видеоролик, нажмите кнопку начала видеозапи
-
си. Повторное нажатие остановит запись. Во время записи рядом
с изображением видеокамеры на дисплее мигает красная пикто
-
грамма записи и показывается текущая продолжительность ролика.
Разрешение видеороликов составляет 768x582 пикселей.
b
cd
e
cd
F
e
b
1. Индикатор заряда батареи
2. Индикатор карты памяти
3. Режим фотоаппарата
4. Свободное место на карте па
-
мяти (количество снимков, кото-
рые можно сделать)
1. Индикатор заряда батареи
2. Индикатор карты памяти
3. Режим видеозаписи
4. Пиктограмма записи
5. Текущее время записи

42
Подключение к компьютеру
Не разрывайте подключение к компьютеру во время передачи ин
-
формации, так как это может привести к необратимой потере данных.
Разъем miniUSB позволяет подключить прибор ночного видения к
компьютеру при помощи соответствующего кабеля* для сохранения
изображений и видеороликов на жестком диске компьютера. Опера
-
ционная система распознает подключенный прибор ночного видения
как внешнее запоминающее устройство и позволяет просматривать
содержимое карты памяти microSD*. Во время подключения к ком
-
пьютеру на дисплее прибора ночного видения появляется надпись
«USB». При подключении к компьютеру прибор ночного видения мо
-
жет работать даже без подключения к источнику питания.
* не входит в комплект поставки
СОВЕТЫ по уходу
Перед чисткой отключите устройство от источника питания (выдерни-
те штепсельную вилку из розетки или выньте батарейки)! Протирайте
поверхности устройства сухой салфеткой. Не используйте чистящую
жидкость, она может повредить электронные компоненты. Линзы
(окуляры и объектив) следует очищать только мягкой нетканой сал
-
феткой (например, микрофиброй). Не давите слишком сильно – мож-
но поцарапать линзу. Берегите устройство от пыли и влаги. Храните
устройство в кейсе или в оригинальной упаковке. Если устройство не
будет использоваться в течение длительного времени, выньте из него
батарейки!
УТИЛИЗАЦИЯ
Утилизируйте упаковку как предписано законом. При необходи-
мости проконсультируйтесь с местными властями.

43
DE
GB
FR
ES
RU
IT
Гарантия и обслуживание
Стандартный гарантийный срок составляет 2 года, начиная со дня
покупки. Чтобы воспользоваться расширенной гарантией, необхо
-
димо зарегистрироваться на нашем сайте.
Подробные условия гарантии, информацию о расширенной гаран
-
тии и о наших сервисных центрах можно получить на нашем сайте
www.bresser.de/warranty_terms.
Не выбрасывайте электронные детали в обычный мусорный
контейнер. Европейская директива по утилизации электронного и
электрического оборудования 2002/96/EU и соответствующие ей за
-
коны требуют отдельного сбора и переработки подобных устройств.
Использованные элементы питания следует утилизировать отдельно.
Подробную информацию об утилизации электроники можно получить
у местных властей.
Сертификат соответствия ЕС
Сертификат соответствия был составлен с учетом действую-
щих правил и соответствующих норм компанией Bresser
GmbH. Его можно просмотреть по запросу в любое время.

44
Informazioni generali
Informazioni sul presente manuale
Questo manuale d’uso va considerato parte integrante dell’apparec-
chio. Prima di usare l’apparecchio, leggere con attenzione le indicazioni
di sicurezza e il manuale d’uso.
Conservare il manuale d’uso per poterlo utilizzare di nuovo in un secondo
momento. Se si vende o si cede l’apparecchio, consegnare il manuale
d’uso ad ogni successivo possessore/utilizzatore del prodotto.
PERICOLO!
Questo simbolo precede sempre le porzioni di testo che avvisano di
eventuali pericoli legati a un utilizzo non conforme che può comportare
lesioni gravi o avere persino conseguenze letali.
NOTA!
Questo simbolo precede sempre le porzioni di testo che avvisano di
eventuali pericoli legati a un utilizzo non conforme che può comportare
danni materiali o ambientali.
Scopo di utilizzo
Questo prodotto è destinato esclusivamente all’utilizzo privato. È stato
progettato per ingrandire le immagini legate alle osservazioni in natura.
Avvertenze di sicurezza generali
PERICOLO di danni alla persona!
Mai utilizzare questo apparecchio per fissare direttamente il sole o
altri oggetti nelle sue vicinanze. PERICOLO PER LA VISTA!

45
DE
GB
FR
ES
RU
IT
PERICOLO di danni alla persona!
I bambini possono utilizzare l’apparecchio soltanto sotto la vigilanza di
un adulto. Tenere i materiali di imballaggio (sacchetti di plastica, elastici,
ecc.) fuori dalla portata dei bambini! PERICOLO DI SOFFOCAMENTO!
PERICOLO DI INCENDIO/ESPLOSIONE!
Non esporre l’apparecchio a temperature elevate. Utilizzare solo l’alimen
-
tatore incluso oppure le batterie consigliate. Non cortocircuitare o but-
tare nel fuoco l‘apparecchio e le batterie! Un surriscaldamento oppure
un utilizzo non conforme può provocare cortocircuiti, incendi e persino
esplosioni!
PERICOLO DI INCENDIO!
Non esporre l’apparecchio, in particolare le lenti, ai raggi solari diretti. La
compressione della luce può provocare un incendio.
RISCHIO DI FOLGORAZIONE!
Questo apparecchio contiene componenti elettronici azionati da una
sorgente di corrente (batterie). Non consentire ai bambini di utilizzare
l‘apparecchio senza supervisione! L’utilizzo deve avvenire soltanto con
-
formemente a quanto descritto nella guida, in caso contrario esiste il
PERICOLO di SCOSSA ELETTRICA!
RISCHIO DI CORROSIONE!
La fuoriuscita dell’acido della batteria può causare corrosione! Evitare
che l’acido della batteria entri in contatto con pelle, occhi e mucose. In
caso di contatto con l’acido, sciacquare immediatamente le parti inte
-
ressate con abbondante acqua pulita e rivolgersi ad un medico.
PERICOLO di danni materiali!
Non smontare l’apparecchio! In caso di guasto rivolgersi al centro
di assistenza del proprio Paese (indicato nelle scheda di garanzia).

46
Utilizzare esclusivamente le batterie consigliate. Sostituire le batterie
scariche o usate sempre con una serie di batterie nuove completamente
cariche. Non utilizzare batterie di marche, tipi o livelli di carica diversi.
Togliere le batterie dall’apparecchio nel caso non venga utilizzato per un
periodo prolungato!
PROTEZIONE della privacy!
Il binocolo è stata realizzato solo per l’uso privato. Rispettare la privacy
delle altre persone: ad esempio non utilizzare l’apparecchio per guardare
negli appartamenti altrui.
Accessori in dotazione
Visore notturno (A), custodia in nylon (B), panno (C),
istruzioni per l‘uso
Elenco delle parti componenti
1. Illuminatore a infrarossi
2. Obiettivo
3. Oculare
4. Aumento della luminosità (illuminatore a infrarossi)
5. Riduzione della luminosità (illuminatore a infrarossi)
6. Regolamento della sensibilità
7. Accensione/Spegnimento
8. Vano batterie
9. LED di stato
10. Tasto per scattare fotografie
11. Tasto per registrare filmati
12. Attacco filettato per treppiede da 6,35 mm (0,25”)
13. Slot per microscheda di memoria SD
(per schede di memoria SD* fino a un massimo di 32 GB di memo
ria)
14. Porta Mini USB
*Non inclusa nella dotazione

47
DE
GB
FR
ES
RU
IT
Funzioni
1. In questo visore notturno con illuminatore a infrarossi integrato è pos-
sibile adattare la luminosità dell’illuminazione a infrarossi mediante i tasti
(4, 5).
2. La sensibilità può essere regolata ulteriormente (6).
2. Quando l‘illuminatore a infrarossi è spento, le immagini vengono ripro
-
dotte in virtù dell‘intensificazione della luce ambientale ancora presente.
Non appena si attiva l’illuminatore, è anche possibile effettuare osserva
-
zioni in condizioni di oscurità completa.
3. 6 pile (tipo AA) non inclusa nella dotazione. A illuminatore a infrarossi
spento, il tempo di osservazione è di circa 6 ore. A illuminazione a infra
-
rossi accesa, invece, è di circa 4 ore.
4. In condizioni di completa oscurità il raggio di rilevamento con l’illumina
-
tore a infrarossi acceso è di circa 200 m.
Uso
Puntare l’apparecchio su un oggetto posto a una distanza di 20-30
m. Guardare attraverso l’oculare (3) e girarlo finché il riquadro dello
schermo non sarà ben visibile. Regolare l’obiettivo (2) girandolo
finché l‘immagine dell‘oggetto non apparirà nitida. Quando si cam-
bia la distanza di osservazione, per poter ottenere un‘immagine di
qualità elevata, è sufficiente girare l‘obiettivo (2). Non è necessario
girare ulteriormente l’oculare (3), poiché la regolazione dell’oculare
è già stata impostata in maniera personalizzata.
Utilizzo di una microscheda di memoria SD*
Per memorizzare foto o video, occorre una scheda di memoria
SD* di massimo 32 GB. Inserire la microscheda di memoria SD
nell’apposito slot (13), spingendola fino allo scatto. Per rimuovere
la microscheda SD, premere una volta brevemente sulla scheda
inserita nello slot. La scheda salta fuori dallo slot con uno scatto e
può quindi essere rimossa.
*Non inclusa nella dotazione

48
Tasto multifunzione (2 funzioni)
• Accensione
• Spegnimento
Accensione: se l’apparecchio è spento, per accenderlo, tenere premuto
per qualche istante il tasto. Il LED di stato si illumina di blu quando l‘ap
-
parecchio è acceso.
Spegnimento: l’apparecchio si spegne tenendo premuto per qualche
istante il tasto.
Tasto multifunzione
+
(2 funzioni)
• Accensione dell’illuminatore a infrarossi
• Aumento della luminosità dell’illuminatore a infrarossi
Aumento della luminosità dell’illuminatore a infrarossi: quando l’illumina
-
tore a infrarossi è spento, premere una sola volta questo tasto per ac-
cenderlo.
Se l’illuminatore a infrarossi è acceso, ogni volta che si preme il tasto,
la luminosità aumenta fino a raggiungere il 100%. Una volta raggiunta la
potenza massima, premendo ulteriormente il tasto non si produce alcun
effetto.
Tasto multifunzione
(2 funzioni)
• Spegnimento dell’illuminatore a infrarossi
• Riduzione della luminosità dell’illuminatore a infrarossi
Riduzione della luminositˆ dell’illuminatore a infrarossi: Quando l’illumina
-
tore a infrarossi è acceso, premendo una sola volta il tasto, la luminosità
dell‘illuminatore a infrarossi diminuisce, finché l‘illuminatore a infrarossi è
spento. Se si continua a premere il tasto, non si produce alcun effetto.

49
DE
GB
FR
ES
RU
IT
Ripresa fotografica
Premendo il tasto della ripresa fotografica, si scatta un immagine dal vivo
che viene memorizzata.
La risoluzione delle foto è di 768 x 582 pixel.
Ripresa video
Per avviare la registrazione di un filmato, premere l’apposito tasto; se
lo si preme ancora una volta, la ripresa video si interrompe. Durante la
ripresa video, nella parte sinistra in alto del display accanto al simbolo
della telecamera, lampeggia il simbolo della registrazione e in alto viene
visualizzato la durata della ripresa in corso. La risoluzione delle immagini
video è di 768 x 582 pixel.
b
cd
e
cd
F
e
b
1. Livello di carica delle pile
2. Stato della scheda di memoria
SD
3. Modalità foto
4. Numero di immagini disponibili
1. Livello di carica delle pile
2. Stato della scheda di memoria
SD
3. Modalità video
4. Stato della ripresa
5. Durata della ripresa

50
Collegamento con un computer
ATTENZIONE!
Non interrompere mai un collegamento dati in corso con il computer,
prima che il trasferimento dei dati sia stato completato. L’interruzione può
provocare perdite di dati.
Attraverso la presa Mini-USB il visore notturno può essere collegato per
mezzo di un cavo Mini-USB* a un computer, per trasferire sul computer
eventuali foto o video oppure per visualizzare sul monitor del computer
le immagini ingrandite. In genere il computer riconosce il visore notturno
come memoria esterna e autorizza l’accesso ai dati della scheda di me
-
moria SD* inserita nello slot. Non appena si connette un cavo USB* e lo si
collega al computer, sullo schermo del visore notturno appare visualizza
-
ta un’immagine blu con il testo “USB”. Se il visore notturno è stato corret-
tamente collegato al computer, seguono le indicazioni del sistema ope-
rativo per accedere ai dati. Questa funzione è disponibile anche senza
avere a disposizione un’alimentazione di tensione per il visore notturno.
*Non inclusi nella dotazione
NOTE per la pulizia
Prima di procedere con la pulizia, staccare l’apparecchio dalla sorgente
di corrente (rimuovere le batterie)! Pulire l’apparecchio soltanto con
un panno asciutto. Non utilizzare liquidi detergenti per evitare danni
ai componenti elettronici. Pulire le lenti (gli oculari e/o gli obiettivi)
soltanto con un panno morbido e privo di pelucchi (es. in microfibra).
Non premere troppo forte il panno per evitare di graffiare le lenti.
Proteggere l’apparecchio dalla polvere e dall’umidità! Conservarlo nella
borsa fornitura o nella confezione per il trasporto. Togliere le batterie
dall’apparecchio nel caso non venga utilizzato per un periodo prolungato!
SMALTIMENTO
Smaltire i materiali di imballaggio in maniera differenziata. Le
informazioni su uno smaltimento conforme sono disponibili presso il
servizio di smaltimento comunale o l’Agenzia per l’ambiente locale.

51
DE
GB
FR
ES
RU
IT
Non smaltire gli apparecchi elettronici con i rifiuti domestici!
Secondo la Direttiva Europea 2002/96/CE riguardante gli apparecchi
elettrici ed elettronici usati e la sua applicazione nel diritto nazionale,
gli apparecchi elettronici usati devono essere raccolti in maniera
differenziata e destinati al riciclaggio ecologico.
Le batterie e gli accumulatori scarichi devono essere smaltiti dall’utilizzatore
negli appositi contenitori di raccolta. Le informazioni degli apparecchi o
delle batterie usate prodotte dopo il 01.06.2006 sono disponibili presso
il servizio di smaltimento o l’Agenzia per l’ambiente locale.
Dichiarazione di conformità CE
Bresser GmbH ha redatto una „dichiarazione di conformità“ in
linea con le disposizioni applicabili e le rispettive norme. Su
richiesta, è visionabile in qualsiasi momento.
Garanzia e assistenza
La durata regolare della garanzia è di 2 anni e decorre dalla data
dell’acquisto. Per godere di un’estensione volontaria della garanzia
come descritto sulla confezione regalo, è necessario registrarsi nel
nostro sito Web.
Le condizioni complete di garanzia e le informazioni sull’estensione di
garanzia e i servizi di assistenza sono visibili al sito:
www.bresser.de/warranty_terms.

Bresser GmbH
Gutenbergstr. 2 · DE-46414 Rhede
Germany
www.bresser.de · service@bresser.de
Irrtümer und technische Änderungen vorbehalten. · Errors and technical changes reserved.
Sous réserve d’erreurs et de modifications techniques. · Queda reservada la posibilidad de incluir modi-
ficaciones o de que el texto contenga errores. · Оставляем за собой право на ошибки и технические
изменения. · Con riserva di errori e modifiche tecniche.
ANL1877450MSP0615BRESSER
Besuchen Sie uns auf • Find us on:
-
 1
1
-
 2
2
-
 3
3
-
 4
4
-
 5
5
-
 6
6
-
 7
7
-
 8
8
-
 9
9
-
 10
10
-
 11
11
-
 12
12
-
 13
13
-
 14
14
-
 15
15
-
 16
16
-
 17
17
-
 18
18
-
 19
19
-
 20
20
-
 21
21
-
 22
22
-
 23
23
-
 24
24
-
 25
25
-
 26
26
-
 27
27
-
 28
28
-
 29
29
-
 30
30
-
 31
31
-
 32
32
-
 33
33
-
 34
34
-
 35
35
-
 36
36
-
 37
37
-
 38
38
-
 39
39
-
 40
40
-
 41
41
-
 42
42
-
 43
43
-
 44
44
-
 45
45
-
 46
46
-
 47
47
-
 48
48
-
 49
49
-
 50
50
-
 51
51
-
 52
52


En otros idiomas
- français: Bresser 18-77450 Manuel utilisateur
- italiano: Bresser 18-77450 Manuale utente
- English: Bresser 18-77450 User manual
- Deutsch: Bresser 18-77450 Benutzerhandbuch
- русский: Bresser 18-77450 Руководство пользователя
Documentos relacionados
Otros documentos
-
National Geographic 3x25 Night Vision El manual del propietario
-
Yukon Ranger 5x42 LT Manual de usuario
-
Minox NVD 650 Manual de usuario
-
NIGHT OWL Nob5X El manual del propietario
-
Bushnell Equinox-Z NV 260140/260150 Manual de usuario
-
-
Pulsar Forward FN El manual del propietario
-
Bushnell 260332 El manual del propietario
-
-