NIGHT OWL Nob5X El manual del propietario
- Categoría
- Prismáticos
- Tipo
- El manual del propietario
La página se está cargando...
La página se está cargando...
La página se está cargando...
La página se está cargando...
La página se está cargando...

6
Object
Photo
Cathode
Screen
Objective
Lens
Ocular
Lens
Electrons
Phosphorescent
Screen
EIT*
General Information
Night vision technology has been developing over many years and today your product represents years
of advancement, technological development and economies of scale.
Night vision products are electro-optical devices that assist in viewing in near-dark conditions. They do
this by amplifying existing light such as the light from the moon or the stars. Most of our products include
an infrared illuminator, which provides an external light source enabling you to see in complete darkness.
Your new device is a highly sophisticated product that should be treated like other high-tech products, in
terms of care. Your new night vision device is specially engineered to assist you in seeing in dark condi-
tions. Unlike daylight binoculars, night vision devices are specifically designed without high magnification,
as high magnification often reduces resolution and light gathering capabilities which are considered to be
the most important functions of night vision products.
The family of products from Night Owl Optics
®
consists of monoculars, binoculars and goggles. There are
several models within each group and their specifications will vary according to the type of Electronic
Intensifier Tube (EIT) in each device along with the optical characteristics of the objective lens and ocular
system. For more information on this technology or our product line, please visit our website at
www.nightowloptics.com.
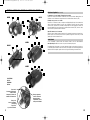
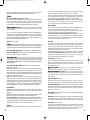
Night Vision Technology
How it works...
English
Infrared
Illuminator (IR)
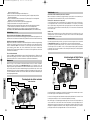
Available light is gathered by the front Objective Lenses, where it is transmitted through a set of optical
lenses to the Electronic Intensifier Tube (EIT)*.
High levels of energy, produced by the device’s complex power supply, knock out electrons from the
Photocathode Screen, located on the front of the Electronic Intensifier Tube.
This same energy creates a highly static field, pushing the electrons to the Phosphorescent Screen, a sen-
sitive layer located on the back of the EIT. These electrons strike the Phosphorescent Screen with great
speed, causing the screen to illuminate. This process produces an image, which is then magnified by the
Ocular Lenses located at the back of the device. By looking through the Ocular Lenses you will see the
image as if you just looked through a regular optical device, except the image will appear in a monochrome
green color.
By adjusting the Ocular Lenses and / or the Objective Lenses to your own individual eyesight (diopter
adjustment), you will receive the best possible focusing results. Please refer to the Focusing Your
Device section below.
An Infrared Illuminator (IR) is an external light source which projects a beam of light that is invisible to the
human eye, yet visible by the EIT. This allows you to utilize your night vision device in complete darkness.
*Please note that binoculars and goggles employ 2 Electronic Intensifier Tubes.
English
19
Modelo NONH4U: Enfoque cada ocular con su ajuste dióptrico (H) para adaptarlo a su visión individual.
Modelo NOTG1: Enfoque primero los oculares (B) para ajustarlos a su visión individual (ajuste dióptrico)y
luego gire el objetivo (F) para ajustarlo a la distancia del objeto en observación. Posiblemente necesite
ajustar la distancia interocular separando o juntando los dos oculares.
Modelo NOAV24/7 (Modo diurno solamente):
Enfoque primero los oculares (B) para ajustarlos a su visión individual (ajuste dióptrico). Tenga presente
que puede ser necesario repetir el ajuste de los oculares cada vez que pase de modo diurno a nocturno o
viceversa. Y posiblemente necesite ajustar la distancia interocular separando o juntando los dos oculares.
Como almacenar su instrumento
NOTA IMPORTANTE!
(para cualquier modelo)
Es normal que la luminosidad verde perdure durante varios minutos después de apagar el intensificador
electrónico y/o el iluminador de infrarrojo de su instrumento de visión nocturna. Se recomienda extraer
las pilas del mismo si va a guardarla durante más de 24 horas.
Cuidado de su instrumento de vision nocturna (cualquier modelo)
1) Para prevenir cualquier daño al intensificador electrónico, no encienda el instrumento de día o en
condiciones de mucha luz, a menos que las lentes estén cubier tas con sus protectores*. Las fuentes
de luz directa, como por ejemplo los faros de un coche a corta distancia, pueden dañar permanente-
mente los componentes sensibles de su circuito, y pueden causar la anulación de su garantía.
2) Absténgase de desarmar o intentar reparar usted mismo este instrumento, ya que esto anularía su
garantía. Consulte su tarjeta de garantía si su instrumento neces ita reparación.
3) Mantenga el aparato alejado de salidas de aire acondicionado y de calefactores.
4) Protéjalo de la luz solar directa, del polvo, de la humedad y de bruscos cambios de temperatura.
5) Evite dejarlo caer o golpearlo. Todo maltrato anulará la garantía.
6) Limpie las lentes con productos profesionales de limpieza de lentes.
7) Limpie la unidad por fuera con un paño limpio y suave.
8) Si utiliza el instrumento en tiempo extremadamente frío y observa condensación en él, espere por lo
menos cinco horas antes de usarlo de nuevo.
9) Siempre almacene su unidad en un lugar limpio, seco y bien ventilado.
* Se exceptúa el modelo NOAV24/7, SÓLO EN CASO DE FUNCIONAR EN MODO DIURNO. (Sírvase consultar las instrucciones
de utilización para mayor detalle).
Localizacion de anomalias (cualquier modelo)
Si la unidad no se enciende al apretar el interruptor de encendido:
Verifique la correcta instalación y el buen estado de las pilas. Segundo, asegúrese de que está activando
el intensificador electrónico y no sólo el iluminador de infrarrojo.
Si la imagen es muy oscura o no hay imagen:
Tal vez intente usar el instrumento en la oscuridad absoluta. Todo aparato de visión nocturna requiere
alguna luz, como por ejemplo las estrellas, de la luna o del iluminador de infrarrojo, para conseguir ver un
objeto. También es posible que haya apuntado el instrumento hacia una luz intensa y que esto haya cau-
sado su extinción como medida protectora del intensificador electrónico. En tal caso, espere varios min-
utos antes de encenderlo nuevamente.
Si no consigue enfocar:
Ajuste el ocular y el objetivo según las instrucciones. Si aún no puede enfocar, limpie las lentes. Si sigue
sin enfocar, llame a nuestro servicio de atención al cliente en el número indicado en su tarjeta de garantía.
Servicio al Cliente
En caso de cualquier problema con su instrumento, visite la sección de apoyo al cliente en nuestra web:
www.nightowloptics.com, donde encontrará respuestas a las preguntas más frecuentes.
En caso de dificultad o necesidad de reparación, le rogamos que visite la sección de servicio al cliente en
nuestra web o contacte telefónicamente nuestro servicio de atención al cliente, cuyo número de teléfono
aparece en la tarjeta de garantía. Asimismo le rogamos rellenar y enviarnos esa tarjeta, para facilitar y
abreviar el trámite de cualquier posible reclamación posterior.
BinocularMultilenguageManual.qx 11/21/08 2:59 PM Page 6

7
Important!
Please read prior to operating your device for the first time: (all models)
1) Do not take off the lens covers or use the device in lighted conditions. This can reduce the life of your
intensifier tube or damage it severely. This damage is not covered under your one-year limited warranty.
2) The purpose of the device you purchased is to assist your viewing in near dark conditions.
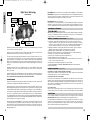
Installing the Batteries (all models)
(Batteries not included)
While installing the battery(s) make sure the lens covers remain on the objective lenses (D). After remov-
ing the battery cover(s) of the device (E), insert the required battery(s) according to the +/- diagram locat-
ed either inside the battery compartment or underneath the battery cover. Please note that it is recom-
mended to remove the battery(s) from the unit if it is stored for more than 24 hours.
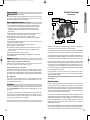
Model NOTG1 (only):
Important! When installing or removing the batteries, the power control will be removed together with
the battery cover, therefore please be sure not to hold the power control as you may accidentally turn the
unit on or off. Please refer to illustration 1.
Models NOFB3, NONH4U,
NOTG1, NOAV24/7:
These models use 2
standard AA batteries.
Activating Your Device
Once the batteries are installed you are ready to operate the device. REMEMBER, IF YOU ARE NOT
GOING TO USE YOUR DEVICE IN A DARK AREA, KEEP BOTH COVERS ON THE OBJECTIVE LENSES (F).
Models NOFB3, NOCB4, NONH4U, NOAV24/7 (Night Mode - letter N on the Mode Switch should be visible):
Step 1: To activate the Electronic Intensifier Tube (EIT) press the power control (A) and hold for about 5
seconds. This produces a green image visible by viewing through the oculars (B), indicating the EIT is
activated. When the image darkens, you will need to press the power control again for 5 seconds to
recharge the unit. When operating your device in dark conditions, you may remove the lens covers.
Step 2: To activate the Infrared Illuminator (D) press the IR control (C) and continuously hold it. This will
activate the Infrared Illuminator (D). Please note the IR control is spring activated and once you release it
the Illuminator will immediately shut off.
To deactivate (turn off) the EIT and/or Infrared Illuminator: Your device will be deactivated (turned off)
automatically after a short period of time (up to 5 minutes). When finished, replace both lens covers onto
the objective lenses (F) and place the device into the protective carrying case.
Model NOXB3/NOXB5:
Step 1: To activate the Electronic Intensifier Tube (EIT) press the power button (A) once. The green light
indicator located on the back of the unit will illuminate, indicating the EIT is activated.
Step 2: To activate the Infrared Illuminator (IR) press the IR button (B) once. The red light indicator locat-
ed on the back of the unit will illuminate, indicating that the IR is activated.
To deactivate (turn off) the EIT and/or Infrared Illuminator: Press the corresponding button(s) (A) + (B)
again.The indicator lights will no longer be illuminated, indicating the device has been correctly turned off.
To minimize the possibility of accidentally activating your device during storage, it is recommended to
remove the battery(s) prior to returning the device to its carrying case.
Model NOTG1:
Step 1: To activate the Electronic Intensifier Tube (EIT) turn the power control (A) to the ON position by
rotating it clockwise (Illustration 1). This produces a green image visible by viewing through the oculars
(B), indicating the EIT is activated. Mount the unit on your head securing all straps (I). Please refer to illus-
tration 2. When operating your device in dark conditions, you may remove the lens covers.
Step 2: To activate the Infrared Illuminator (D) turn the infrared illuminator control (C) to the ON position.
To deactivate (turn off) the EIT and/or Infrared Illuminator: Turn the corresponding control(s) (A) + (C)
to the OFF position and place the lens covers back on the lenses. It is likely that the green image will stay
on for several minutes after deactivating the unit. This is normal.
Models NOCB4, NOXB3/NOXB5:
These models use a 3-volt lithium battery,
123 type, which is also known as the CR
123A, EL 123AP or DL 123A.
18
Modelos NOCB4, NOXB3/NOXB5: Estos modelos utilizan una pila de litio de 3 V, de tipo 123, también
designado CR123A, EL123AP y DL123A.
Como poner en funcionamiento su instrumento
Una vez instaladas las pilas, su instrumento está listo para funcionar. MANTENGA LOS OBJETIVOS (F)
CUBIERTOS SI NO LO VA A ENCENDER EN UN LUGAR OSCURO.
Modelos NOFB3, NOCB4, NONH4U, NOAV24/7 (En modo nocturno, es decir con la letra N visible en el
conmutador de modo):
Paso1: Para activar el intensificador electrónico (EIT), apriete el interruptor de encendido A y manténga-
lo presionado durante unos 5 segundos. Esto causa la aparición de una imagen verde en los oculares (B),
lo que indica que el EIT está en funcionamiento. Cuando la imagen se oscurezcadeberá apretar nueva-
mente el interruptor de encendido durante 5 segundos a fin de recargar la unidad. Mientras opere en la
oscuridad, podrá quitar las tapas de las lentes.
Paso 2: Para activar el iluminador de infrarrojo (D) apriete el interruptor C y manténgalo presionado con-
tinuamente. Esto activará el iluminador de infrarrojo (D). Como se trata de un interruptor de presión, en
cuanto lo suelte el iluminador de infrarrojo se apagará.Parada del intensificador electrónico y/o del ilumi-
nador de infrarrojo. El instrumento se apaga automáticamente después de un período de unos cinco minu-
tos. Cuando haya terminado, coloque las tapas en ambos objetivos y guarde el instrumento en su estuche.
Modelo NOXB3/NOXB5:
Paso1: Para activar el intensificador electrónico (EIT), apriete una vez el interruptor de encendido (A). Se
iluminará una luz verde situada en la parte posterior del instrumento, indicando que el EIT está en fun-
cionamiento.
Paso 2: Para activar el iluminador de infrarrojo (IR) apriete una vez el interruptor del iluminador de
infrarrojo (B). Se iluminará una luz roja situada en la parte posterior del instrumento, indicando que el
IR está en funcionamiento.
Para desactivar (apagar) el EIT y/o el iluminador de infrarrojo: Apriete una segunda vez los interrup-
tores correspondientes (A) + (B). Las luces indicadoras se apagarán, indicando que el instrumento está
correctamente apagado. Para reducir la posibilidad de encender el instrumento de forma accidental
mientras está guardado, se recomienda extraer la batería antes de colocar el instrumento en su estuche.
Modelo NOTG1:
Paso 1: Para activar el intensificador electrónico) gire el interruptor de encendido (A) en sentido horario
hasta la posición ON (figura 1). Esto causa la aparición de una imagen verde en los oculares (B), lo que
indica que el intensificador electrónico está en funcionamiento. Fije al instrumento a su cabeza ajustando
todas las correas de sujeción que se muestran en la figura 2. Mientras opere en la oscuridad, podrá quitar
las tapas de las lentes.
Paso 2: Para activar el iluminador de infrarrojos (D) gire su interruptor (C) a la posición ON.
Para apagar el intensificador electrónico y/o el iluminador de infrarrojo: gire el interruptor correspon-
diente (A y/o C) a la posición OFF y vuelva a colocar las tapas en las lentes. La imagen verde puede per-
manecer visible varios minutos después del apagado del instrumento: esto es normal.
Modelo NOAV24/7 (Modo diurno solamente):
Verifique que en el conmutador de modo diurno / nocturno (G) esté visible la letra D, lo que acondiciona
el instrumento para operación diurna. Destape ambas lentes. Mire por ambos oculares (B) para observar
su objeto. Cuando haya terminado, tape ambas lentes y coloque de nuevo el instrumento en su estuche.
Es importante quitar las pilas del instrumento si planea utilizar su NOAV24/7 solamente para uso diurno
o si no lo va a utilizar durante 24 horas.
Enfoque del instrumento (cualquier modelo)
Para enfocar, consulte la sección Margen de Enfoque en las Especificaciones Generales del producto.
Modelos NOFB3, NOAV24/7 (Modo nocturno):
Gire los oculares (B) para ajustarlos a su visión individual (ajuste dióptrico). Posiblemente necesite ajus-
tar la distancia interocular separando o juntando los dos oculares.
Modelos NOCB4, NOXB3/NOXB5: Enfoque primero los oculares (B) para ajustarlos a su visión individual
(ajuste dióptrico). Gire luego el objetivo (F) para enfocarlo a la distancia del objeto en observación.
Posiblemente necesite ajustar la distancia interocular separando o juntando los dos oculares.
BinocularMultilenguageManual.qx 11/21/08 2:59 PM Page 7

8
Model NOAV24/7 (Day Mode only):
Make sure the Day and Night Mode Switch (G) is switched so that the letter “D” is visible, making the
binocular ready for daytime operation. Remove both lens covers. Now look through both oculars (B) to
view your object. When finished, replace both lens covers and place the device into its protective carrying case.
Important: Please remove the batteries if you intend to operate your NOAV24/7 only as a daylight
binocular or if storing for more than 24 hours.
Focusing Your Device (all models)
When focusing, please refer to Focusing Range in the General Product Specifications section.
Models NOFB3, NOAV24/7 (Night Mode):
Focus by rotating the Oculars (B) to adjust for your own individual eyesight. You may have to adjust the
distance between the left and right eyes by pulling apart and/or pressing together each side of the binocular.
Models NOCB4, NOXB3/NOXB5: First focus the Oculars (B) to adjust for your own individual eyesight
(diopter adjustment), then rotate the objective lens barrels (F) to adjust to the distance of the object you
are observing. You may have to adjust the distance between the left and right eyes by pulling apart or
pressing together each side of the binocular.
Model NONH4U: Focus each Ocular with the Diopter Adjustment Controls (H) to adjust for your own indi-
vidual eyesight.
Model NOTG1: First focus the Oculars (B) to adjust for your own individual eyesight (diopter adjustment),
then rotate the objective lens barrels (F) to adjust to the distance of the object you are observing. You may
have to adjust the distance between your eyes (interocular distance) by sliding both sides of the unit apart
or pulling them together.
Model NOAV24/7 (Day Mode only):
To adjust for your own individual eyesight (diopter adjustment), rotate each individual ocular (eyepiece) (B)
until you achieve the best possible result. Please note that you may need to readjust the oculars (eyepieces)
of your binocular each time you switch between Night and Day modes. You may also have to adjust the dis-
tance between the left and right eyes by pulling apart or pressing together each side of the binocular.
Storing Your Device
Important!
(all models)
After you deactivate (turn off) the EIT and/or infrared illuminator of your night vision device, it is normal
for the unit to retain its green illumination for up to several minutes. It is recommended to remove the bat-
tery(s) from the unit if you intend to store it for more than 24 hours.
Caring for Your Night Vision Device (all models)
1) To avoid damaging the Electronic Intensifier Tube (EIT), do not switch on the device during the day
or under highly illuminated conditions without the lens covers in place*. Direct light sources such as
close viewing of automobile headlights could cause permanent damage to the sensitive internal
components and may void your warranty for this product.
2) Do not disassemble or attempt to service this device by yourself. Doing so will void your warranty. If
your device needs repair, please refer to your warranty card.
3) Keep the device away from air conditioner’s vents or heating devices.
4) Protect the device from direct sunlight, dust, moisture or sudden temperature changes.
5) Avoid dropping or otherwise shocking the device. Mishandling will void any warranty claims.
6) Clean the lenses with professional lens cleaning supplies.
7) Clean the exterior with a soft clean cloth.
8) If you use your device in extreme cold temperature and condensation is visible on the unit, wait at
least five hours before using it again.
9) Always store your device in a clean and dry, well ventilated area
* For NOAV24/7 only: UNLESS OPERATED IN “DAY” MODE (please see operational instructions for details).
17
Informacion General
La tecnología de visión nocturna se ha venido perfeccionando durante muchos años; los productos de hoy
representan todo el progreso, el refinamiento técnico y la economía de escala así logrados.
Los productos de visión nocturna son instrumentos electroópticos que facilitan la visión en condiciones
de iluminación casi nula. Operan amplificando la luz existente, por ejemplo la que emiten las estrellas o la
luna. Nuestros productos, en su mayoría, incluyen un iluminador de infrarrojo, es decir una fuente exter-
na de radiación, con la cual se podrá ver en condiciones de oscuridad total.
Su nuevo instrumento es un producto altamente refinado que debe ser cuidado como cualquier otro pro-
ducto técnico de precisión. Fue diseñado especialmente para ayudarle a ver en condiciones de escasa
luminosidad. Por ello, los instrumentos de visión nocturna, a diferencia de los prismáticos, se construyen
con pocos aumentos, ya que un elevado número de aumentos tiende a reducir la resolución y la lumi-
nosidad, consideradas las mayores prestaciones de un instrumento de visión nocturna.
La familia de productos de Night Owl Optics
®
comprende instrumentos monoculares, binoculares y gafas.
Hay en cada grupo varios modelos cuyas especificaciones varían según el tipo de intensificador electróni-
co (EIT) de cada uno y las características ópticas de su ocular y objetivo. Podrá hallar mayor información
sobre estos aspectos técnicos de nuestros productos visitando nuestra web www.nightowloptics.com.
Importante!
Lea esto antes de hacer funcionar su instrumento por primera vez (cualquier modelo).
1) No saque la tapa de la lente ni haga funcionar el aparato en plena luz. Esto puede acortar la vida de su
tubo intensificador o dañarlo seriamente, y ese daño no será cubierto por su garantía de un año.
2) El propósito final de este instrumento es ayudar a las personas a ver en condiciones de oscuridad
Como instalar las pilas (cualquier modelo)
(pilas no incluidas)
Asegúrese de que el objetivo (D) permanezca tapado mientras cambie las pilas. Una vez quitada la tapa
de las pilas (G) del instrumento, instale las pilas requeridas de acuerdo con los signos de polaridad
(+ y -) marcados ya sea en el compartimento de pilas o debajo de la tapa del mismo. Recuerde que se
recomienda quitar las pilas del instrumento si no lo va a utilizar durante 24 horas.
Modelo NOTG1 (solamente):
Es importante tener presente que el botón de encendido está unido a la tapa de pilas y será por lo
tanto extraído con ella. Debe, en consecuencia, poner especial cuidado en no oprimir accidentalmente ese
botón y encender inadvertidamente la unidad. Véase al respecto la figura 1.
Modelos NOFB3, NONH4U, NOTG1, NOAV24/7: Estos modelos utilizan 2 pilas normales de tamaño AA.
El objetivo, al frente del instrumento, recoge la luz existente y la transmite a través de una serie de lentes al Tubo
Electrónico Intensificador (EIT).
La fuente de potencia provee altos niveles de energía con los que el fotocátodo, situado al frente del
Intensificador Electrónico, emite electrones.
Esta energía también establece un intenso campo estático que encamina los electrones hacia la Pantalla
Fosforescente, que es una capa sensible situada al extremo trasero del EIT. Los electrones inciden a gran
velocidad en la Pantalla Fosforescente, la que responde emitiendo luz.
Este proceso genera una imagen que será ampliada por el ocular situado al extremo trasero del instru-
mento. A través del ocular, el ojo del observador verá esta imagen como a través de cualquier instrumento
óptico, excepto que la imagen será de color verde y monocromática.
El ocular permite un ajuste a la visión individual del observador, mientras que el objetivo provee el ajuste
a la distancia del objeto observado.
El iluminador infrarrojo es una fuente externa de luz que proyecta un haz de luz invisible al ojo humano,
pero visible al intensificador electronico (EIT). Esto le permite utilizar su instrumento de visión nocturna
en la oscuridad completa.
*Tenga en cuenta que los prismaticos y las gafas utilizan 2 intensificadores electrónicos.
BinocularMultilenguageManual.qx 11/21/08 2:59 PM Page 8
La página se está cargando...
La página se está cargando...
La página se está cargando...
La página se está cargando...
Transcripción de documentos
BinocularMultilenguageManual.qx English English Infrared Illuminator (IR) 11/21/08 2:59 PM Page 6 Night Vision Technology Modelo NONH4U: Enfoque cada ocular con su ajuste dióptrico (H) para adaptarlo a su visión individual. How it works... Modelo NOTG1: Enfoque primero los oculares (B) para ajustarlos a su visión individual (ajuste dióptrico)y luego gire el objetivo (F) para ajustarlo a la distancia del objeto en observación. Posiblemente necesite ajustar la distancia interocular separando o juntando los dos oculares. Photo Cathode Screen Electrons Ocular Lens Object Modelo NOAV24/7 (Modo diurno solamente): Enfoque primero los oculares (B) para ajustarlos a su visión individual (ajuste dióptrico). Tenga presente que puede ser necesario repetir el ajuste de los oculares cada vez que pase de modo diurno a nocturno o viceversa. Y posiblemente necesite ajustar la distancia interocular separando o juntando los dos oculares. Como almacenar su instrumento NOTA IMPORTANTE! (para cualquier modelo) Es normal que la luminosidad verde perdure durante varios minutos después de apagar el intensificador electrónico y/o el iluminador de infrarrojo de su instrumento de visión nocturna. Se recomienda extraer las pilas del mismo si va a guardarla durante más de 24 horas. Cuidado de su instrumento de vision nocturna (cualquier modelo) Objective Lens EIT* Phosphorescent Screen Available light is gathered by the front Objective Lenses, where it is transmitted through a set of optical lenses to the Electronic Intensifier Tube (EIT)*. High levels of energy, produced by the device’s complex power supply, knock out electrons from the Photocathode Screen, located on the front of the Electronic Intensifier Tube. This same energy creates a highly static field, pushing the electrons to the Phosphorescent Screen, a sensitive layer located on the back of the EIT. These electrons strike the Phosphorescent Screen with great speed, causing the screen to illuminate. This process produces an image, which is then magnified by the Ocular Lenses located at the back of the device. By looking through the Ocular Lenses you will see the image as if you just looked through a regular optical device, except the image will appear in a monochrome green color. By adjusting the Ocular Lenses and / or the Objective Lenses to your own individual eyesight (diopter adjustment), you will receive the best possible focusing results. Please refer to the Focusing Your Device section below. An Infrared Illuminator (IR) is an external light source which projects a beam of light that is invisible to the human eye, yet visible by the EIT. This allows you to utilize your night vision device in complete darkness. *Please note that binoculars and goggles employ 2 Electronic Intensifier Tubes. General Information Night vision technology has been developing over many years and today your product represents years of advancement, technological development and economies of scale. Night vision products are electro-optical devices that assist in viewing in near-dark conditions. They do this by amplifying existing light such as the light from the moon or the stars. Most of our products include an infrared illuminator, which provides an external light source enabling you to see in complete darkness. Your new device is a highly sophisticated product that should be treated like other high-tech products, in terms of care. Your new night vision device is specially engineered to assist you in seeing in dark conditions. Unlike daylight binoculars, night vision devices are specifically designed without high magnification, as high magnification often reduces resolution and light gathering capabilities which are considered to be the most important functions of night vision products. The family of products from Night Owl Optics® consists of monoculars, binoculars and goggles. There are several models within each group and their specifications will vary according to the type of Electronic Intensifier Tube (EIT) in each device along with the optical characteristics of the objective lens and ocular system. For more information on this technology or our product line, please visit our website at www.nightowloptics.com. 6 1) Para prevenir cualquier daño al intensificador electrónico, no encienda el instrumento de día o en condiciones de mucha luz, a menos que las lentes estén cubier tas con sus protectores*. Las fuentes de luz directa, como por ejemplo los faros de un coche a corta distancia, pueden dañar permanentemente los componentes sensibles de su circuito, y pueden causar la anulación de su garantía. 2) Absténgase de desarmar o intentar reparar usted mismo este instrumento, ya que esto anularía su garantía. Consulte su tarjeta de garantía si su instrumento neces ita reparación. 3) Mantenga el aparato alejado de salidas de aire acondicionado y de calefactores. 4) Protéjalo de la luz solar directa, del polvo, de la humedad y de bruscos cambios de temperatura. 5) Evite dejarlo caer o golpearlo. Todo maltrato anulará la garantía. 6) Limpie las lentes con productos profesionales de limpieza de lentes. 7) Limpie la unidad por fuera con un paño limpio y suave. 8) Si utiliza el instrumento en tiempo extremadamente frío y observa condensación en él, espere por lo menos cinco horas antes de usarlo de nuevo. 9) Siempre almacene su unidad en un lugar limpio, seco y bien ventilado. * Se exceptúa el modelo NOAV24/7, SÓLO EN CASO DE FUNCIONAR EN MODO DIURNO. (Sírvase consultar las instrucciones de utilización para mayor detalle). Localizacion de anomalias (cualquier modelo) Si la unidad no se enciende al apretar el interruptor de encendido: Verifique la correcta instalación y el buen estado de las pilas. Segundo, asegúrese de que está activando el intensificador electrónico y no sólo el iluminador de infrarrojo. Si la imagen es muy oscura o no hay imagen: Tal vez intente usar el instrumento en la oscuridad absoluta. Todo aparato de visión nocturna requiere alguna luz, como por ejemplo las estrellas, de la luna o del iluminador de infrarrojo, para conseguir ver un objeto. También es posible que haya apuntado el instrumento hacia una luz intensa y que esto haya causado su extinción como medida protectora del intensificador electrónico. En tal caso, espere varios minutos antes de encenderlo nuevamente. Si no consigue enfocar: Ajuste el ocular y el objetivo según las instrucciones. Si aún no puede enfocar, limpie las lentes. Si sigue sin enfocar, llame a nuestro servicio de atención al cliente en el número indicado en su tarjeta de garantía. Servicio al Cliente En caso de cualquier problema con su instrumento, visite la sección de apoyo al cliente en nuestra web: www.nightowloptics.com, donde encontrará respuestas a las preguntas más frecuentes. En caso de dificultad o necesidad de reparación, le rogamos que visite la sección de servicio al cliente en nuestra web o contacte telefónicamente nuestro servicio de atención al cliente, cuyo número de teléfono aparece en la tarjeta de garantía. Asimismo le rogamos rellenar y enviarnos esa tarjeta, para facilitar y abreviar el trámite de cualquier posible reclamación posterior. 19 BinocularMultilenguageManual.qx 11/21/08 2:59 PM Page 7 Modelos NOCB4, NOXB3/NOXB5: Estos modelos utilizan una pila de litio de 3 V, de tipo 123, también designado CR123A, EL123AP y DL123A. Como poner en funcionamiento su instrumento Una vez instaladas las pilas, su instrumento está listo para funcionar. MANTENGA LOS OBJETIVOS (F) CUBIERTOS SI NO LO VA A ENCENDER EN UN LUGAR OSCURO. Modelos NOFB3, NOCB4, NONH4U, NOAV24/7 (En modo nocturno, es decir con la letra N visible en el conmutador de modo): Paso1: Para activar el intensificador electrónico (EIT), apriete el interruptor de encendido A y manténgalo presionado durante unos 5 segundos. Esto causa la aparición de una imagen verde en los oculares (B), lo que indica que el EIT está en funcionamiento. Cuando la imagen se oscurezcadeberá apretar nuevamente el interruptor de encendido durante 5 segundos a fin de recargar la unidad. Mientras opere en la oscuridad, podrá quitar las tapas de las lentes. Paso 2: Para activar el iluminador de infrarrojo (D) apriete el interruptor C y manténgalo presionado continuamente. Esto activará el iluminador de infrarrojo (D). Como se trata de un interruptor de presión, en cuanto lo suelte el iluminador de infrarrojo se apagará.Parada del intensificador electrónico y/o del iluminador de infrarrojo. El instrumento se apaga automáticamente después de un período de unos cinco minutos. Cuando haya terminado, coloque las tapas en ambos objetivos y guarde el instrumento en su estuche. Modelo NOXB3/NOXB5: Paso1: Para activar el intensificador electrónico (EIT), apriete una vez el interruptor de encendido (A). Se iluminará una luz verde situada en la parte posterior del instrumento, indicando que el EIT está en funcionamiento. Paso 2: Para activar el iluminador de infrarrojo (IR) apriete una vez el interruptor del iluminador de infrarrojo (B). Se iluminará una luz roja situada en la parte posterior del instrumento, indicando que el IR está en funcionamiento. Para desactivar (apagar) el EIT y/o el iluminador de infrarrojo: Apriete una segunda vez los interruptores correspondientes (A) + (B). Las luces indicadoras se apagarán, indicando que el instrumento está correctamente apagado. Para reducir la posibilidad de encender el instrumento de forma accidental mientras está guardado, se recomienda extraer la batería antes de colocar el instrumento en su estuche. Modelo NOTG1: Paso 1: Para activar el intensificador electrónico) gire el interruptor de encendido (A) en sentido horario hasta la posición ON (figura 1). Esto causa la aparición de una imagen verde en los oculares (B), lo que indica que el intensificador electrónico está en funcionamiento. Fije al instrumento a su cabeza ajustando todas las correas de sujeción que se muestran en la figura 2. Mientras opere en la oscuridad, podrá quitar las tapas de las lentes. Paso 2: Para activar el iluminador de infrarrojos (D) gire su interruptor (C) a la posición ON. Para apagar el intensificador electrónico y/o el iluminador de infrarrojo: gire el interruptor correspondiente (A y/o C) a la posición OFF y vuelva a colocar las tapas en las lentes. La imagen verde puede permanecer visible varios minutos después del apagado del instrumento: esto es normal. Modelo NOAV24/7 (Modo diurno solamente): Verifique que en el conmutador de modo diurno / nocturno (G) esté visible la letra D, lo que acondiciona el instrumento para operación diurna. Destape ambas lentes. Mire por ambos oculares (B) para observar su objeto. Cuando haya terminado, tape ambas lentes y coloque de nuevo el instrumento en su estuche. Es importante quitar las pilas del instrumento si planea utilizar su NOAV24/7 solamente para uso diurno o si no lo va a utilizar durante 24 horas. Enfoque del instrumento (cualquier modelo) Para enfocar, consulte la sección Margen de Enfoque en las Especificaciones Generales del producto. Modelos NOFB3, NOAV24/7 (Modo nocturno): Gire los oculares (B) para ajustarlos a su visión individual (ajuste dióptrico). Posiblemente necesite ajustar la distancia interocular separando o juntando los dos oculares. Modelos NOCB4, NOXB3/NOXB5: Enfoque primero los oculares (B) para ajustarlos a su visión individual (ajuste dióptrico). Gire luego el objetivo (F) para enfocarlo a la distancia del objeto en observación. Posiblemente necesite ajustar la distancia interocular separando o juntando los dos oculares. 18 Important! Please read prior to operating your device for the first time: (all models) 1) Do not take off the lens covers or use the device in lighted conditions. This can reduce the life of your intensifier tube or damage it severely. This damage is not covered under your one-year limited warranty. 2) The purpose of the device you purchased is to assist your viewing in near dark conditions. Installing the Batteries (all models) (Batteries not included) While installing the battery(s) make sure the lens covers remain on the objective lenses (D). After removing the battery cover(s) of the device (E), insert the required battery(s) according to the +/- diagram located either inside the battery compartment or underneath the battery cover. Please note that it is recommended to remove the battery(s) from the unit if it is stored for more than 24 hours. Model NOTG1 (only): Important! When installing or removing the batteries, the power control will be removed together with the battery cover, therefore please be sure not to hold the power control as you may accidentally turn the unit on or off. Please refer to illustration 1. Models NOFB3, NONH4U, NOTG1, NOAV24/7: These models use 2 standard AA batteries. Models NOCB4, NOXB3/NOXB5: These models use a 3-volt lithium battery, 123 type, which is also known as the CR 123A, EL 123AP or DL 123A. Activating Your Device Once the batteries are installed you are ready to operate the device. REMEMBER, IF YOU ARE NOT GOING TO USE YOUR DEVICE IN A DARK AREA, KEEP BOTH COVERS ON THE OBJECTIVE LENSES (F). Models NOFB3, NOCB4, NONH4U, NOAV24/7 (Night Mode - letter N on the Mode Switch should be visible): Step 1: To activate the Electronic Intensifier Tube (EIT) press the power control (A) and hold for about 5 seconds. This produces a green image visible by viewing through the oculars (B), indicating the EIT is activated. When the image darkens, you will need to press the power control again for 5 seconds to recharge the unit. When operating your device in dark conditions, you may remove the lens covers. Step 2: To activate the Infrared Illuminator (D) press the IR control (C) and continuously hold it. This will activate the Infrared Illuminator (D). Please note the IR control is spring activated and once you release it the Illuminator will immediately shut off. To deactivate (turn off) the EIT and/or Infrared Illuminator: Your device will be deactivated (turned off) automatically after a short period of time (up to 5 minutes). When finished, replace both lens covers onto the objective lenses (F) and place the device into the protective carrying case. Model NOXB3/NOXB5: Step 1: To activate the Electronic Intensifier Tube (EIT) press the power button (A) once. The green light indicator located on the back of the unit will illuminate, indicating the EIT is activated. Step 2: To activate the Infrared Illuminator (IR) press the IR button (B) once. The red light indicator located on the back of the unit will illuminate, indicating that the IR is activated. To deactivate (turn off) the EIT and/or Infrared Illuminator: Press the corresponding button(s) (A) + (B) again.The indicator lights will no longer be illuminated, indicating the device has been correctly turned off. To minimize the possibility of accidentally activating your device during storage, it is recommended to remove the battery(s) prior to returning the device to its carrying case. Model NOTG1: Step 1: To activate the Electronic Intensifier Tube (EIT) turn the power control (A) to the ON position by rotating it clockwise (Illustration 1). This produces a green image visible by viewing through the oculars (B), indicating the EIT is activated. Mount the unit on your head securing all straps (I). Please refer to illustration 2. When operating your device in dark conditions, you may remove the lens covers. Step 2: To activate the Infrared Illuminator (D) turn the infrared illuminator control (C) to the ON position. To deactivate (turn off) the EIT and/or Infrared Illuminator: Turn the corresponding control(s) (A) + (C) to the OFF position and place the lens covers back on the lenses. It is likely that the green image will stay on for several minutes after deactivating the unit. This is normal. 7 BinocularMultilenguageManual.qx 11/21/08 2:59 PM Page 8 Model NOAV24/7 (Day Mode only): Make sure the Day and Night Mode Switch (G) is switched so that the letter “D” is visible, making the binocular ready for daytime operation. Remove both lens covers. Now look through both oculars (B) to view your object. When finished, replace both lens covers and place the device into its protective carrying case. El objetivo, al frente del instrumento, recoge la luz existente y la transmite a través de una serie de lentes al Tubo Electrónico Intensificador (EIT). Important: Please remove the batteries if you intend to operate your NOAV24/7 only as a daylight binocular or if storing for more than 24 hours. Esta energía también establece un intenso campo estático que encamina los electrones hacia la Pantalla Fosforescente, que es una capa sensible situada al extremo trasero del EIT. Los electrones inciden a gran velocidad en la Pantalla Fosforescente, la que responde emitiendo luz. Focusing Your Device (all models) When focusing, please refer to Focusing Range in the General Product Specifications section. Models NOFB3, NOAV24/7 (Night Mode): Focus by rotating the Oculars (B) to adjust for your own individual eyesight. You may have to adjust the distance between the left and right eyes by pulling apart and/or pressing together each side of the binocular. La fuente de potencia provee altos niveles de energía con los que el fotocátodo, situado al frente del Intensificador Electrónico, emite electrones. Este proceso genera una imagen que será ampliada por el ocular situado al extremo trasero del instrumento. A través del ocular, el ojo del observador verá esta imagen como a través de cualquier instrumento óptico, excepto que la imagen será de color verde y monocromática. El ocular permite un ajuste a la visión individual del observador, mientras que el objetivo provee el ajuste a la distancia del objeto observado. Models NOCB4, NOXB3/NOXB5: First focus the Oculars (B) to adjust for your own individual eyesight (diopter adjustment), then rotate the objective lens barrels (F) to adjust to the distance of the object you are observing. You may have to adjust the distance between the left and right eyes by pulling apart or pressing together each side of the binocular. El iluminador infrarrojo es una fuente externa de luz que proyecta un haz de luz invisible al ojo humano, pero visible al intensificador electronico (EIT). Esto le permite utilizar su instrumento de visión nocturna en la oscuridad completa. *Tenga en cuenta que los prismaticos y las gafas utilizan 2 intensificadores electrónicos. Model NONH4U: Focus each Ocular with the Diopter Adjustment Controls (H) to adjust for your own individual eyesight. Informacion General Model NOTG1: First focus the Oculars (B) to adjust for your own individual eyesight (diopter adjustment), then rotate the objective lens barrels (F) to adjust to the distance of the object you are observing. You may have to adjust the distance between your eyes (interocular distance) by sliding both sides of the unit apart or pulling them together. Model NOAV24/7 (Day Mode only): To adjust for your own individual eyesight (diopter adjustment), rotate each individual ocular (eyepiece) (B) until you achieve the best possible result. Please note that you may need to readjust the oculars (eyepieces) of your binocular each time you switch between Night and Day modes. You may also have to adjust the distance between the left and right eyes by pulling apart or pressing together each side of the binocular. Storing Your Device Important! (all models) After you deactivate (turn off) the EIT and/or infrared illuminator of your night vision device, it is normal for the unit to retain its green illumination for up to several minutes. It is recommended to remove the battery(s) from the unit if you intend to store it for more than 24 hours. Caring for Your Night Vision Device (all models) 1) To avoid damaging the Electronic Intensifier Tube (EIT), do not switch on the device during the day or under highly illuminated conditions without the lens covers in place*. Direct light sources such as close viewing of automobile headlights could cause permanent damage to the sensitive internal components and may void your warranty for this product. 2) Do not disassemble or attempt to service this device by yourself. Doing so will void your warranty. If your device needs repair, please refer to your warranty card. 3) Keep the device away from air conditioner’s vents or heating devices. 4) Protect the device from direct sunlight, dust, moisture or sudden temperature changes. 5) Avoid dropping or otherwise shocking the device. Mishandling will void any warranty claims. 6) Clean the lenses with professional lens cleaning supplies. 7) Clean the exterior with a soft clean cloth. 8) If you use your device in extreme cold temperature and condensation is visible on the unit, wait at least five hours before using it again. 9) Always store your device in a clean and dry, well ventilated area * For NOAV24/7 only: UNLESS OPERATED IN “DAY” MODE (please see operational instructions for details). La tecnología de visión nocturna se ha venido perfeccionando durante muchos años; los productos de hoy representan todo el progreso, el refinamiento técnico y la economía de escala así logrados. Los productos de visión nocturna son instrumentos electroópticos que facilitan la visión en condiciones de iluminación casi nula. Operan amplificando la luz existente, por ejemplo la que emiten las estrellas o la luna. Nuestros productos, en su mayoría, incluyen un iluminador de infrarrojo, es decir una fuente externa de radiación, con la cual se podrá ver en condiciones de oscuridad total. Su nuevo instrumento es un producto altamente refinado que debe ser cuidado como cualquier otro producto técnico de precisión. Fue diseñado especialmente para ayudarle a ver en condiciones de escasa luminosidad. Por ello, los instrumentos de visión nocturna, a diferencia de los prismáticos, se construyen con pocos aumentos, ya que un elevado número de aumentos tiende a reducir la resolución y la luminosidad, consideradas las mayores prestaciones de un instrumento de visión nocturna. La familia de productos de Night Owl Optics® comprende instrumentos monoculares, binoculares y gafas. Hay en cada grupo varios modelos cuyas especificaciones varían según el tipo de intensificador electrónico (EIT) de cada uno y las características ópticas de su ocular y objetivo. Podrá hallar mayor información sobre estos aspectos técnicos de nuestros productos visitando nuestra web www.nightowloptics.com. Importante! Lea esto antes de hacer funcionar su instrumento por primera vez (cualquier modelo). 1) No saque la tapa de la lente ni haga funcionar el aparato en plena luz. Esto puede acortar la vida de su tubo intensificador o dañarlo seriamente, y ese daño no será cubierto por su garantía de un año. 2) El propósito final de este instrumento es ayudar a las personas a ver en condiciones de oscuridad Como instalar las pilas (cualquier modelo) (pilas no incluidas) Asegúrese de que el objetivo (D) permanezca tapado mientras cambie las pilas. Una vez quitada la tapa de las pilas (G) del instrumento, instale las pilas requeridas de acuerdo con los signos de polaridad (+ y -) marcados ya sea en el compartimento de pilas o debajo de la tapa del mismo. Recuerde que se recomienda quitar las pilas del instrumento si no lo va a utilizar durante 24 horas. Modelo NOTG1 (solamente): Es importante tener presente que el botón de encendido está unido a la tapa de pilas y será por lo tanto extraído con ella. Debe, en consecuencia, poner especial cuidado en no oprimir accidentalmente ese botón y encender inadvertidamente la unidad. Véase al respecto la figura 1. Modelos NOFB3, NONH4U, NOTG1, NOAV24/7: Estos modelos utilizan 2 pilas normales de tamaño AA. 8 17-
 1
1
-
 2
2
-
 3
3
-
 4
4
-
 5
5
-
 6
6
-
 7
7
-
 8
8
-
 9
9
-
 10
10
-
 11
11
-
 12
12


NIGHT OWL Nob5X El manual del propietario
- Categoría
- Prismáticos
- Tipo
- El manual del propietario
en otros idiomas
- français: NIGHT OWL Nob5X Le manuel du propriétaire
- italiano: NIGHT OWL Nob5X Manuale del proprietario
- English: NIGHT OWL Nob5X Owner's manual
- Deutsch: NIGHT OWL Nob5X Bedienungsanleitung
Artículos relacionados
Otros documentos
-
Bushnell 26-3150 Manual de usuario
-
LG AS560DWR0 Manual de usuario
-
-
-
-
-
-
-
Bresser 18-77450 Manual de usuario
-