Yamaha MDX-E300 Manual de usuario
- Categoría
- Jugadores minidisc
- Tipo
- Manual de usuario

MDX-E300
OWNER’S MANUAL
MODE D’EMPLOI
BEDIENUNGSANLEITUNG
BRUKSANVISNING
MANUALE DI ISTRUZIONI
MANUAL DE INSTRUCCIONES
GEBRUIKSAANWIJZING
Minidisc Recorder
Lecteur Enregistreur de Minidisc
GB
YAMAHA ELECTRONICS CORPORATION, USA 6660 ORANGETHORPE AVE., BUENA PARK, CALIF. 90620, U.S.A.
YAMAHA CANADA MUSIC LTD. 135 MILNER AVE., SCARBOROUGH, ONTARIO M1S 3R1, CANADA
YAMAHA ELECTRONIK EUROPA G.m.b.H. SIEMENSSTR. 22-34, 25462 RELLINGEN BEI HAMBURG, F.R. OF GERMANY
YAMAHA ELECTRONIQUE FRANCE S.A. RUE AMBROISE CROIZAT BP70 CROISSY-BEAUBOURG 77312 MARNE-LA-VALLEE CEDEX02, FRANCE
YAMAHA ELECTRONICS (UK) LTD. YAMAHA HOUSE, 200 RICKMANSWORTH ROAD WATFORD, HERTS WD1 7JS, ENGLAND
YAMAHA SCANDINAVIA A.B. J A WETTERGRENS GATA 1, BOX 30053, 400 43 VÄSTRA FRÖLUNDA, SWEDEN
YAMAHA MUSIC AUSTRALIA PTY, LTD. 17-33 MARKET ST., SOUTH MELBOURNE, 3205 VIC., AUSTRALIA
Printed in Malaysia V914100
MDX-E300
CAUTION – VISIBLE AND
/
OR INVISIBLE LASER RADIATION
WHEN OPEN. AVOID EXPOSURE TO BEAM.
VARNING – SYNLIG OCH
/
ELLER OSYNLIG LASERSTRÅLNING NÄR
DENNA DEL ÄR ÖPPNAD. STRÅLEN ÄR FARLIG.
VARO ! AVATTAESSA OLET ALTTIINA NÄKYVÄLLE JA
/
TAI
NÄKYMÄTÖMÄLLE LASERSÄTEILYLLE.
ÄLÄ KATSO SÄTEESEEN.
VARNING – SYNLIG OCH
/
ELLER OSYNLIG LASERSTRÅLNING NÄR
DENNA DEL ÄR ÖPPNAD. BETRAKTA EJ STRÅLEN.
VORSICHT ! SICHTBARE UND
/
ODER UNSICHTBARE
LASERSTRAHLUNG WENN ABDECKUNG GEÖFFNET.
NICHT DEM STRAHL AUSSETZEN.
CLASS 1 LASER PRODUCT
LASER KLASSE 1 PRODUKT
LUOKAN 1 LASERLAITE
KLASS 1 LASER APPARAT
VARO!
AVATTAESSA JA SUOJALUKITUS
OHITETTAESSA OLET ALTTIINA
NÄKYMÄTTÖMÄLLE LASERSÄTEILYLLE. ÄLÄ
KATSO SÄTEESEEN.
VARNING!
OSYNLIG LASERSTRÅLNING NÄR DENNA DEL
ÄR ÖPPNAD OCH SPÄRREN ÄR URKOPPLAD.
BETRAKTA EJ STRÅLEN.
CAUTION
Use of controls or adjustments or performance of
procedures other than those specified herein may
result in hazardous radiation exposure.
ATTENTION
L’emploi de commandes, de réglages ou un choix
de procédures différents des spécifications de cette
brochure peut entraîner une exposition à
d’éventuelles radiations pouvant être dangereses.
ACHTUNG
Die Verwendung von Bedienungselementen oder
Einstellungen oder die Durchführung von
Bedienungsvorgängen, die nicht in dieser Anleitung
aufgeführt sind, kann zu einem Kontakt mit
gefährlichen Laserstrahlen führen.
OBSERVERA
Användning av kontroller och justeringar eller
genomförande av procedurer andra än de som
specificeras i denna bok kan resultera i att du
utsätter dig för farlig strålning.
ATTENZIONE
Uso di controlli o regolazioni o procedure non
specificamente descritte può causare l’esposizione
a radiazioni di livello pericoloso.
PRECAUCIÓN
El uso de los controles o los procedimientos de
ajuste o utilización diferentes de los especificados
en este manual pueden causar una exposición
peligrosa a la radiación.
VOORZICHTIG
Gebruik van bedieningsorganen of instellingen, of
uitvoeren van handelingen anders dan staan
beschreven in deze handleiding kunnen leiden tot
blootstelling aan gevaarlijke stralen.
0101MDXE300(M).cv1-4.E 02.5.17, 0:02 PM1

1 To assure the finest performance, please read this
manual carefully. Keep it in a safe place for future
reference.
2 Install this unit in a well ventilated, cool, dry, clean
place away from direct sunlight, heat sources, vibration,
dust, moisture or cold. In a cabinet, allow about 2.5 cm
(1 inch) of free space all around this unit for adequate
ventilation.
3 Locate this unit away from other electrical appliances,
motors, or transformers to avoid humming sounds.
4 Do not expose this unit to sudden temperature changes
from cold to hot, nor locate this unit in an environment
with high humidity (i.e., a room with a humidifier) to
prevent condensation inside this unit, which may cause
an electrical shock, fire, damage to this unit, and/or
personal injury.
5 Avoid installing this unit in a location where foreign
objects may fall onto this unit or where this unit may be
exposed to liquid dripping or splashing. On the top of
this unit, do not place:
• Other components, as they may cause damage and/or
discoloration on the surface of this unit.
• Burning objects (i.e., candles), as they may cause fire,
damage to this unit, and/or personal injury.
• Containers with liquid in them, as they may fall, spilling
the liquid and causing an electrical shock to the user
and/or damage to this unit.
6 Do not cover this unit with a newspaper, tablecloth,
curtain, etc. in order not to obstruct heat radiation. If the
temperature inside this unit rises, it may cause fire,
damage to this unit, and/or personal injury.
7 Do not plug in this unit to a wall outlet until all
connections are complete.
8 Do not operate this unit upside-down. It may overheat,
possibly causing damage.
9 Do not use excessive force on switches, knobs and/or
cords.
10 When disconnecting the power cord from the wall
outlet, grasp the plug; do not pull the cord.
11 Do not clean this unit with chemical solvents; this might
damage the finish. Use a clean, dry cloth.
12 Use only the voltage specified on this unit. Using this
unit with a higher voltage than specified is dangerous
and may cause fire, damage to this unit, and/or personal
injury. YAMAHA will not be held responsible for any
damage resulting from use of this unit with a voltage
other than as specified.
13 To prevent damage by lightning, disconnect the power
cord from the wall outlet during an electrical storm.
14 Do not attempt to modify or fix this unit. Contact
qualified YAMAHA service personnel when any service
is needed. The cabinet should never be opened for any
reason.
15 When not planning to use this unit for long periods of
time (i.e., vacation), disconnect the AC power plug from
the wall outlet.
16 Be sure to read the “Troubleshooting” section on
common operating errors before concluding that this
unit is faulty.
CAUTION: READ THIS BEFORE OPERATING THIS UNIT
17 Before moving this unit, press STANDBY/ON to set the
unit in standby mode, then disconnect the AC power
plug from the wall outlet.
18 VOLTAGE SELECTOR (China and General models
only)
The VOLTAGE SELECTOR on the rear panel of this
unit must be set for your local main voltage BEFORE
plugging into the AC main supply. Voltages are 110/120/
220/240 V AC, 50/60 Hz.
To reduce the risk of fire or electric shock, do not
expose this appliance to rain or moisture.
The unit is not disconnected from the AC power source
as long as it is connected to the wall outlet, even if this
unit itself is turned off. This state is called the standby
mode. In this state, this unit is designed to consume a
very small quantity of power.
SPECIAL INSTRUCTIONS FOR U.K. MODEL
IMPORTANT:
The wires in the mains lead are coloured in accordance
with the following code:
Blue: NEUTRAL
Brown: LIVE
As the colours of the wires in the mains lead of this
apparatus may not correspond with the coloured
markings identifying the terminals in your plug,
proceed as follows: The wire which is coloured BLUE
must be connected to the terminal which is marked
with the letter N or coloured BLACK. The wire which
is coloured BROWN must be connected to the terminal
which is marked with the letter L or coloured RED.
Making sure that neither core is connected to the earth
terminal of the three pin plug.
For U.K. customers
If the socket outlets in the home are not suitable for the
plug supplied with this appliance, it should be cut off and
an appropriate 3 pin plug fitted. For details, refer to the
instructions described above.
Note: The plug severed from the mains lead must be
destroyed, as a plug with bared flexible cord is hazardous
if engaged in a live socket outlet.
CAUTION
Use of controls or adjustments or performance of
procedures other than those specified herein may
result in hazardous radiation exposure.
0102MDXE300(M).Cau.E 02.5.17, 10:53 AM2

1
English
FEATURES
• MINI DISC digital audio system
• Digital optical input (2)/output
• Sampling rate converter
• EDIT function
CONTENTS
FEATURES .............................................. 1
SUPPLIED ACCESSORIES ....................... 2
NOTES ABOUT MINIDISCS .................... 2
NAMES OF BUTTONS AND CONTROLS
Front panel ............................................................ 3
Display .................................................................. 3
Remote control ..................................................... 4
GETTING STARTED
Remote control ..................................................... 5
System connections .............................................. 6
Connecting your audio system ............................. 8
PLAYBACK............................................. 9
Skipping tracks ..................................................... 9
Searching .............................................................. 9
Switching the display ......................................... 10
Random play ....................................................... 11
Repeat play ......................................................... 11
A-B repeat .......................................................... 11
Program play ...................................................... 12
RECORDING ........................................ 13
Adjusting recording levels .................................. 14
Track marking ..................................................... 14
Music synchro recording .................................... 15
Setting the recording mode ................................. 15
Monitor out ......................................................... 16
Protecting a recorded MD .................................. 16
EDITING ............................................... 17
Erase ................................................................... 18
Move ................................................................... 19
Combine ............................................................. 19
Divide ................................................................. 20
Undo ................................................................... 20
TOC write ........................................................... 20
FRA check .......................................................... 20
TITLING................................................ 21
ADDITIONAL INFORMATION
MD recorder system notes .................................. 22
Display messages................................................ 23
Troubleshooting .................................................. 24
Specifications...................................................... 25
• Synchronized recording/timer recording
by system connection
• Digital rec level control
• MDLP (Long play and recording)
0103MDXE300(M).1-8.E 02.5.17, 10:53 AM1

2
SUPPLIED ACCESSORIES
Check that the following items are included.
• Remote control
• Batteries (AA, R6, UM-3)
• Optical cable
• System control cable
• Audio pin cable
NOTES ABOUT MINIDISCS
Care of MDs
• Do not expose the MD to direct sunlight or heat sources
such as hot air ducts, nor leave it in a car parked in
direct sunlight as there can be a considerable rise in
temperature inside the car.
• Periodically remove dust and debris from the cartridge
surface by wiping it with a dry cloth.
• Because the MD itself is housed in a cartridge, you can
handle it normally without being concerned about dirt
or fingerprints. However, malfunctioning may result if
the cartridge itself is dirty or warped.
Do not open the shutter on the MD
cartridge
Trying to force the shutter open will damage the shutter.
TITLE
DELETE
SET
CANCEL ENTER
EDIT
CHAR
NUMBER
A B C D E F G H I J K L
1234
5678
90
+10 +100
A-B S/F
DISPLAY
POWER
SCROLL
M N O P Q R S T U V W X
Y Z
REC/
PAUSE
SYNC
/
SPACE
M-MARK REC MODE
INPUT
RANDOM PROGRAM
REPEAT
0103MDXE300(M).1-8.E 02.5.17, 10:53 AM2

3
English
NAMES OF BUTTONS AND CONTROLS
Front panel
1 STANDBY/ON (P.9)
2 Disc insertion slot (P.9)
3 (P.9)
4 & (P.9)
5 #/* (P.9)
6 REC/PAUSE (P.13)
Display
1 Input indicator (P.13)
2 TOTAL indicator (P.10)
3 DISC/TRACK indicator (P.10)
4 REMAIN indicator (P.10)
5 MANUAL indicator (P.14)
6 REC indicator (P.13)
7 Pause indicator
8 Multi information display
9 Sampling frequency indicator (P.13)
STANDBY/ON
NATURAL SOUND MINIDISC RECORDER MDX-E300
+–
INPUT
ANALOG
REC LEVEL
DIGITAL
MIN MAX
REC/PAUSE
123456
7890q
ANALOG
DIGITAL
COAX.
32 44.1 48
kHz
REPEAT
MANUAL
REC
MONO
LP2 LP4
TOC
DISC TRACK
TOTAL
REMAIN
RANDOM
PROGRAM
A-B S F
L
R
dB
–
60 30 10 6 4 2 1 0 OVER00
–– – ––––
OPT.12
qwer ty u90
1234567 8
0 REPEAT A-B/S F indicator (P.11)
q PROGRAM indicator (P.12)
w RANDOM indicator (P.11)
e MONO indicator (P.15)
r LP2/LP4 indicator (P.15)
t TOC indicator (P.17)
y Play indicator
u Recording level meter (P.14)
7 Remote control sensor (P.5)
8 Display (P.3)
9 INPUT (P.13)
0 ANALOG REC LEVEL (P.14)
q Jog dial ($ ›)/DIGITAL REC LEVEL
(P.9/P.14)
0103MDXE300(M).1-8.E 02.5.17, 10:53 AM3

4
Remote control
1 DELETE/CANCEL (P.21)
2 TITLE (P.21)
3 CHAR (P.21)
4 NUMBER (P.21)
5 Numbers [Characters] (P.9/P.21)
6 # (P.9/P.14)
7 ! (P.9/P.21)
8 $ (P.9/P.21)
9 REC/PAUSE (P.13)
0 M-MARK (P.14)
q REC MODE (P.15)
w RANDOM (P.11)
e PROGRAM (P.12)
r POWER (P.9)
t SET/ENTER (P.21)
y EDIT (P.18)
u * (P.9)
i ⁄ (P.9/P.21)
o › (P.9/P.21)
p SYNC (P.15)
a & (P.9)
s INPUT (P.13)
d REPEAT A-B (P.11)
REPEAT S/F (P.11)
f SCROLL (P.10)
g DISPLAY (P.10)
NAMES OF BUTTONS AND CONTROLS
TITLE
DELETE
SET
CANCEL ENTER
EDIT
CHAR
NUMBER
A B C D E F G H I J K L
1234
5678
90
+10 +100
A-B S/F
DISPLAY
POWER
SCROLL
M N O P Q R S T U V W X
Y Z
REC/
PAUSE
SYNC
/
SPACE
M-MARK REC MODE
INPUT
RANDOM PROGRAM
REPEAT
1t
y
u
i
o
p
a
s
d
f
g
2
3
4
5
6
8
9
0
q
w
e
r
7
0103MDXE300(M).1-8.E 02.5.17, 10:53 AM4

5
English
Remote control
Battery installation
1 Remove the battery compartment cover.
2 Insert batteries into the battery compartment.
3 Replace the battery compartment cover.
Battery replacement
If you find that the remote control must be used closer to
the main unit than usual, the batteries are weak. Replace
batteries with new ones.
Notes
• Use only AA, R6, UM-3 batteries for replacement.
• Be sure the polarities are correct. (See the illustration inside
the battery compartment.)
• Remove the batteries if the remote control will not be used for
an extended period of time.
• If batteries leak, dispose of them immediately. Avoid touching
the leaked material or letting it come in contact with clothing,
etc. Clean the battery compartment thoroughly before
installing new batteries.
Remote control operation range
Notes
• There should be no large obstacles between the remote control
and the main unit.
• If the remote control sensor is directly illuminated by strong
lighting (especially an inverter type of fluorescent lamp, etc.),
it might cause the remote control not to work correctly. In this
case, reposition the main unit to avoid direct lighting.
Removing the protection sheet
The remote control is shipped with a protection sheet to
prevent the surface from being scratched during
transportation.
When removing the sheet, first put adhesive tape on an
edge of the remote control so that the tape sticks to the
sheet. Then peel the sheet off with the tape.
Note
• Do not scratch the remote control surface when peeling the
sheet off.
GETTING STARTED
STANDBY/ON
NATURAL SOUND MINIDISC RECORDER MDX-E300
+–
INPUT
ANALOG
REC LEVEL
DIGITAL
MIN MAX
REC/PAUSE
30°
30°
Remote control
sensor
Within approximately
6 m (20 feet)
2
1
3
TITL
E
D
E
L
E
T
E
S
ET
C
H
A
R
N
U
M
B
E
R
A
B
C
D
E
F
G
H
I
J
K
L
M
N
O
P
Q
R S
T
U
V
W
X
Y
Z/
S
P
A
C
E
C
A
N
C
E
L
E
N
T
E
R
E
D
IT
1
2
3
4
5
6
7
8
9
0
+10
+100
T
I
T
L
E
D
E
L
E
T
E
S
E
T
C
H
A
R
N
U
M
B
E
R
A
B
C
D
E
F
G
H
I
J
K
L
M
N
O
P
Q
R
S
T
U
V
W
X
Y
Z
/
S
P
A
C
E
CANCEL ENTER
E
D
I
T
1
2
3
4
5
6
7
8
9
0
+
1
0
+
1
0
0
0103MDXE300(M).1-8.E 02.5.17, 10:53 AM5

6
System connections
Never plug the AC power cord to the wall outlet until all connections are
completed.
• Connections should be made to the correct input/output jacks on the other component.
• Also refer to the owner’s manual supplied with the components you are connecting.
• If the placement of this unit causes noise in other equipment, such as a tuner, move them farther apart.
• The connection using the SYSTEM CONNECTOR jack allows you to control this unit as well as the connected
components of YAMAHA Piano Craft series. Make system control connections between the Piano Craft series
components using the system control cable.
To reduce the standby power consumption, connect the AC power cord of this unit to a switched AC outlet of your
receiver (Except for U.K. model).
Notes
• Before making OPTICAL connections, remove the jack cover(s).
• In order to protect the jacks from dust, be sure to attach the jack covers when the optical jacks are not being used.
Connecting CRX-E300
GETTING STARTED
ANALOG DIGITAL
OPTICAL
SYSTEM
CONNECTOR
IN
L
D
OUT
1
IN
2 OUT
R
C
MD
TAPE
IN
OUT
IN
IN
OUT
AUX
D
A
B
LR
C
OUT
6
Ω
MIN. /SPEAKER
OUT
DIGITAL
SUBWOOFER
OPTICAL
SPEAKERS
RL
FM ANT
GND – AM ANT
75Ω UNBAL.
SYSTEM CONNECTOR
This unit (MDX-E300)
CD receiver (CRX-E300)
Audio pin
cables
(included)
Optical cable
(included)
System control cable
(included)
To wall outlet
To CRX-E300
Notes
• The ANALOG OUT jacks on this unit are marked Ç and the ANALOG IN jacks are marked Î. When connecting this unit to
CRX-E300 whose jacks are marked Å, ı, Ç and Î, connect this unit’s ANALOG OUT jacks to the input jacks marked Ç and connect
this unit’s ANALOG IN jacks to the output jacks marked Î on the rear panel of CRX-E300.
• The SYSTEM CONNECTOR jack should be connected to the SYSTEM CONNECTOR jack on CRX-E300.
• For digital recording, the DIGITAL OPTICAL 1 IN jack should be connected to the DIGITAL OPTICAL OUT jack on CRX-E300.
0103MDXE300(M).1-8.E 02.5.17, 10:53 AM6

7
English
ANALOG DIGITAL
OPTICAL
SYSTEM
CONNECTOR
IN
L
D
OUT
1
IN
2 OUT
R
C
FM ANT
75Ω UNBAL.
IN
IN
IN
IN
OUT
OUT
6Ω MIN./SPEAKER
SPEAKERS
SUBWOOFER
OUT
SYSTEM
CONNECTOR
GND
AM
ANT
TAPE
CD
AUX
MD
R
L
R L
+
–
A
B
E
C
D
ANALOG DIGITAL
OPTICAL
SYSTEM
CONNECTOR
L
OUT
OUT
R
E
GETTING STARTED
To wall outlet
Notes
• The ANALOG OUT jacks on this unit are marked Ç and the ANALOG IN jacks are marked Î. When connecting this unit to RX-E400
whose jacks are marked Å, ı, Ç, Î and ‰, connect this unit’s ANALOG OUT jacks to the input jacks marked Ç and connect this
unit’s ANALOG IN jacks to the output jacks marked Î on the rear panel of RX-E400.
• The SYSTEM CONNECTOR jack should be connected to the SYSTEM CONNECTOR jack on CDX-E400.
• For digital recording, the DIGITAL OPTICAL 1 IN jack should be connected to the DIGITAL OPTICAL OUT jack on CDX-E400.
Connecting RX-E400 and CDX-E400
CD player (CDX-E400)
This unit (MDX-E300)
Receiver (RX-E400)
To RX-E400
Optical cable
(included)
System control cable
(included)
Audio pin cables
(included)
System control cable
To RX-E400
0103MDXE300(M).1-8.E 02.5.17, 10:53 AM7

8
DIGITAL OUT
OPTICAL
DIGITAL IN DIGITAL OUT
OPTICAL OPTICAL
ANALOG DIGITAL
OPTICAL
SYSTEM
CONNECTOR
IN
L
D
OUT
1
IN
2 OUT
R
C
Connecting your audio system
Digital connections
GETTING STARTED
Notes for digital connections
• The DIGITAL OPTICAL IN jacks can be connected to any component with an optical output so you can make direct digital recordings.
• The DIGITAL OPTICAL OUT jacks can be connected to any component with an optical input so you can output digital audio from an
MD.
• Before making OPTICAL connections, remove the jack cover(s).
• In order to protect the jacks from dust, be sure to attach the jack covers when the optical jacks are not being used.
Analog connections
Notes for analog connections
• The white plug on the audio pin cables corresponds to the L (left) channel and the red plug corresponds to the R (right) channel. Be sure
to connect L (left) to L and R (right) to R. Also make sure that the plugs are fully inserted and that the connection is firm.
• The ANALOG OUT jacks on this unit should be connected to the MD PLAY jacks on your amplifier.
The ANALOG IN jacks on this unit should be connected to the MD REC jacks on your amplifier.
MD/TAPE
ANALOG DIGITAL
OPTICAL
SYSTEM
CONNECTOR
IN
L
D
OUT
1
IN
2 OUT
R
C
This unit (MDX-E300)
Optical cable
Audio pin cables
CD player (etc.) with
optical OUT
Amplifier/Receiver
with optical IN/OUT
Optical cable
Optical cable
This unit (MDX-E300)
Amplifier/Receiver
To AC outlet
To AC outlet
0103MDXE300(M).1-8.E 02.5.17, 10:53 AM8

9
English
English
STANDBY/ON
NATURAL SOUND MINIDISC RECORDER MDX-E300
+–
INPUT
ANALOG
REC LEVEL
DIGITAL
MIN MAX
REC/PAUSE
1 Insert an MD.
2 Press #/* (# on the remote control) to start
playback.
3 Adjust the volume using the volume control on the
amplifier (or receiver).
STANDBY/ON
Jog dial
&
1
2
TITLE
DELETE
SET
CANCEL ENTER
EDIT
CHAR
NUMBER
A B C D E F G H I J K L
1234
5678
90
+10 +100
A-B S/F
DISPLAY
POWER
SCROLL
M N O P Q R S T U V W X
Y Z
REC/
PAUSE
SYNC
/
SPACE
M-MARK REC MODE
INPUT
RANDOM PROGRAM
REPEAT
!
2
*
Numbers
&
⁄
$›
POWER
To pause
Press #/* (* on the remote control).
Press again to resume playback (or press # on the remote
control).
To stop
Press &.
To eject the MD
Press .
Skipping tracks
To skip to the next track
Turn the jog dial to the right (or press › on the remote
control).
To skip to a previous track
Turn the jog dial to the left (or press $ on the remote
control).
To skip to a specific track number
Press the number buttons on the remote control
corresponding to the track you desire.
Example:
To select track 3, press 3.
To select track 13, press +10, then press 3.
To select track 23, press +10 twice, then press 3.
To select track 123, press +100 once, and +10 twice, then
press 3.
Searching
To search forward during play or
pause
Press and hold ⁄ on the remote control.
To search in reverse during play or
pause
Press and hold ! on the remote control.
Notes
• Sound can be heard when searching in play mode to help you
locate the desired position within the track. No sound is heard
when searching in pause mode, but the search is conducted at a
higher speed.
• Search may not function correctly when there are several
consecutive tracks consisting of only a few seconds each.
Arrow pointed toward
disc insertion slot
Label facing up
Preparation
• Press STANDBY/ON (POWER on the remote control)
to turn this unit on.
• Select “MD” as the input source of the connected
receiver.
PLAYBACK
0104MDXE300(M).9-12.E 02.5.17, 10:54 AM9

10
Switching the display
Press DISPLAY during stop or playback to display other
information, such as the remaining time and track titles.
During stop
Press DISPLAY repeatedly to display the following
information.
1 Number of tracks and total playing time
2 Time remaining on the MD (only for recordable
MDs)
3 Disc title
During playback
Press DISPLAY repeatedly to display the following
information.
1 Current track number and elapsed time
2 Time remaining on the current track
3 Track title
• If the track has not been given a name, “No Title”
is displayed.
To view the entire disc (track) title
If the disc (track) title is too long to fit in the display,
press SCROLL to move the title sequentially across the
display. While the title is being displayed, press
SCROLL to pause the display, and again to continue
presentation of the title. Press and hold SCROLL for
rapid presentation of the title.
A-B S/F
DISPLAY
POWER
SCROLL
REC/
PAUSE
SYNC
M-MARK REC MODE
INPUT
RANDOM PROGRAM
REPEAT
SCROLL
DISPLAY
ANALOG
DIGITAL
OPT.123
COAX.
32 44.1 48
kHz
REPEAT
MONO
REC
MANUAL
TOC
DISC TRACK
TOTAL
REMAIN
RANDOM
PROGRAM
A-B S F
L
R
dB
–
60 30 10 6 4 2 1 0 OVER00
–– – – ––
ANALOG
DIGITAL
OPT.123
COAX.
32 44.1 48
kHz
REPEAT
MONO
REC
MANUAL
TOC
DISC TRACK
TOTAL
REMAIN
RANDOM
PROGRAM
A-B S F
L
R
dB
–
60 30 10 6 4 2 1 0 OVER00
–– – – ––
ANALOG
DIGITAL
OPT.123
COAX.
32 44.1 48
kHz
REPEAT
MONO
REC
MANUAL
TOC
DISC TRACK
TOTAL
REMAIN
RANDOM
PROGRAM
A-B S F
L
R
dB
–
60 30 10 6 4 2 1 0 OVER00
–– – – ––
ANALOG
DIGITAL
OPT.123
COAX.
32 44.1 48
kHz
REPEAT
MONO
REC
MANUAL
TOC
DISC TRACK
TOTAL
REMAIN
RANDOM
PROGRAM
A-B S F
L
R
dB
–
60 30 10 6 4 2 1 0 OVER00
–– – – ––
ANALOG
DIGITAL
OPT.123
COAX.
32 44.1 48
kHz
REPEAT
MONO
REC
MANUAL
TOC
DISC TRACK
TOTAL
REMAIN
RANDOM
PROGRAM
A-B S F
L
R
dB
–
60 30 10 6 4 2 1 0 OVER00
–– – – ––
ANALOG
DIGITAL
OPT.123
COAX.
32 44.1 48
kHz
REPEAT
MONO
REC
MANUAL
TOC
DISC TRACK
TOTAL
REMAIN
RANDOM
PROGRAM
A-B S F
L
R
dB
–
60 30 10 6 4 2 1 0 OVER00
–– – – ––
Total tracks
Total playing time
REMAIN indicator Time remaining on the MD
Total tracks
REMAIN indicator
Track number
Elapsed time
PLAYBACK
0104MDXE300(M).9-12.E 02.5.17, 10:54 AM10

11
English
English
Random play
You can have the unit play all the tracks on a disc in
random order.
To start random playback
Press RANDOM.
The RANDOM indicator lights up and “_ _ _ - - : - -”
appears in the display while the unit selects a track.
Playback starts automatically.
To cancel
Press RANDOM again to turn off the RANDOM
indicator or press &.
Note
• Pressing › during random play skips to another track at
random. Pressing $ returns to the beginning of the current
track (you cannot return to previously played tracks).
Repeat play
You can have the unit repeat a single track, a full disc, or
just part of a track.
Press REPEAT S/F repeatedly to light the REPEAT S or
REPEAT F indicators.
To repeat the single track, light the REPEAT S indicators.
To repeat the full disc, light the REPEAT F indicators.
To cancel
Press REPEAT S/F repeatedly to turn off the REPEAT S
or REPEAT F indicators.
Notes on full disc repeat
• In program play mode, the entire program is played repeatedly.
• In random play mode, the unit reshuffles the tracks and plays
them again after each track plays once.
A-B repeat
This function lets you repeat a specific part of a track.
It’s a convenient way to study a language, or to learn the
lyrics to your favorite song (etc.).
1 Press REPEAT A-B during playback to specify the
beginning (A point) of the part you want to repeat.
• The REPEAT A indicators light up.
2 Press REPEAT A-B again to specify the end (B
point) of the part you want to repeat.
• The REPEAT A-B indicators light up and the part
you specified starts to repeat.
To cancel
Press & or REPEAT A-B.
A-B S/F
DISPLAY
POWER
SCROLL
REC/
PAUSE
SYNC
M-MARK REC MODE
INPUT
RANDOM PROGRAM
REPEAT
REPEAT S/F
REPEAT A-B
RANDOM
A-B S/F
DISPLAY
POWER
SCROLL
REC/
PAUSE
SYNC
M-MARK REC MODE
INPUT
RANDOM PROGRAM
REPEAT
COAX
.
32 44.1 48
kHz
REPEAT
MONO
REC
MANUAL
TOC
RANDOM
PROGRAM
A-B S F
L
R
dB
–
60 30 10 6 4 2 1 0 OVER00
–– – – ––
COAX
.
32 44.1 48
kHz
REPEAT
MONO
REC
MANUAL
TOC
RANDOM
PROGRAM
A-B S F
L
R
dB
–
60 30 10 6 4 2 1 0 OVER00
–– – – ––
COAX.
32 44.1 48
kHz
REPEAT
MONO
REC
MANUAL
TOC
RANDOM
PROGRAM
A-B S F
L
R
dB
–
60 30 10 6 4 2 1 0 OVER00
–– – – ––
COAX
.
32 44.1 48
kHz
REPEAT
MONO
REC
MANUAL
TOC
RANDOM
PROGRAM
A-B S F
L
R
dB
–
60 30 10 6 4 2 1 0 OVER00
–– – – ––
PLAYBACK
0104MDXE300(M).9-12.E 02.5.17, 10:54 AM11

12
Program play
This function lets you enjoy listening to your favorite
tracks in any order you desire.
1 Press & to stop playback.
2 Press PROGRAM to light up the PROGRAM
indicator.
3 Program the desired track by pressing the
corresponding number buttons.
Example:
To select track 3, press 3.
To select track 13, press +10, then press 3.
To select track 23, press +10 twice, then press 3.
To select track 123, press +100 once, and +10 twice,
then press 3.
Repeat this operation to program up to 30 steps.
4 Press PROGRAM to confirm the program.
5 Press # to start program playback.
To check the programmed data
1 Stop or pause program playback.
2 Press $ or › to skip through the step
information (or use the jog dial on the front panel).
To change a step
1 Stop program playback.
2 Press PROGRAM.
3 Press $ or › to skip through the step
information (or use the jog dial on the front panel).
4 Use the number buttons to program a new track
number for that step. The original track is cleared
from memory and the new track is programmed.
To delete a specific step
1 Stop program playback.
2 Press PROGRAM.
3 Press $ or › to skip through the step
information (or use the jog dial on the front panel).
4 Press DELETE to delete the step. The higher steps
are renumbered automatically.
To cancel
During the stop mode, press & to turn off the PROGRAM
indicator.
Notes
• If the total time exceeds 100 minutes, “Over” is displayed
instead of the total time.
• $ or › can be used during playback to skip between
programmed tracks.
5
Current programmed
track number
Total playing time
2,4
3
DELETE/
CANCEL
!
⁄
$
›
1
TITLE
DELETE
SET
CANCEL ENTER
EDIT
CHAR
NUMBER
A B C D E F G H I J K L
1234
5678
90
+10 +100
A-B S/F
DISPLAY
POWER
SCROLL
M N O P Q R S T U V W X
Y Z
REC/
PAUSE
SYNC
/
SPACE
M-MARK REC MODE
INPUT
RANDOM PROGRAM
REPEAT
ANALOG
DIGITAL
OPT.123
COAX.
32 44.1 48
kHz
REPEAT
MONO
REC
MANUAL
TOC
DISC TRACK
TOTAL
REMAIN
RANDOM
PROGRAM
A-B S F
L
R
dB
–
60 30 10 6 4 2 1 0 OVER00
–– – – ––
PLAYBACK
0104MDXE300(M).9-12.E 02.5.17, 10:54 AM12

13
English
English
TITLE
DELETE
SET
CANCEL ENTER
EDIT
CHAR
NUMBER
A B C D E F G H I J K L
1234
5678
90
+10 +100
A-B S/F
DISPLAY
POWER
SCROLL
M N O P Q R S T U V W X
Y Z
REC/
PAUSE
SYNC
/
SPACE
M-MARK REC MODE
INPUT
RANDOM PROGRAM
REPEAT
STANDBY/ON
NATURAL SOUND MINIDISC RECORDER MDX-E300
+–
INPUT
ANALOG
REC LEVEL
DIGITAL
MIN MAX
REC/PAUSE
STANDBY/ON
&
1
8
8
*
DELETE/
CANCEL
&
POWER
Note
Please check the copyright laws in your country to
record from records, compact discs, radio, etc.
Recording of copyright material may infringe
copyright laws.
This unit allows you to make recordings from a wide
variety of program sources (both analog and digital).
When recording an analog source (such as an FM
broadcast or cassette) this unit converts the analog signals
to a 44.1 kHz digital signal before recording them onto
the MD.
When recording a digital source, this unit converts the
digital signals to 44.1 kHz for recording onto the MD.
However, if you are recording a 44.1 kHz source signal
(such as a CD) there is no conversion. This unit can
record 32, 44.1 and 48 kHz digital signals.
Preparation
• Press STANDBY/ON (POWER on the remote control)
to turn this unit on.
6
277
6
M-MARK
SET/ENTER
2
1 Insert an MD.
2 Press INPUT repeatedly to select the input you want
to record.
For Select
ANALOG IN Î ANALOG
DIGITAL OPTICAL 1 IN DIGITAL OPT. 1
DIGITAL OPTICAL 2 IN DIGITAL OPT. 2
* Appears when digital signal is input.
3 If desired, press REC MODE to select the recording
mode (see “Setting the recording mode” on page 15).
4 Locate the point where you want to start recording.
When recording on a blank MD
• Skip this step.
To start recording from the end of a previous
recording
• Press & to set this unit to stop mode.
To record over a previous recording
• Turn the jog dial (or press $ or › on the remote
control) to select a track (recording starts from the
beginning of the deleted track).
5 Start playing the source to be recorded.
• If you do not need to adjust the recording level,
this step is not necessary.
6 Press REC/PAUSE to set this unit to record pause
mode.
• The REC * indicators light up.
“REC Standby” and the amount of time available
for recording flash alternately in the display.
If you selected a track number (in step 4) to
record over a previous recording
•“OverWrite OK?” appears in the display.
To confirm, press SET/ENTER. This operation will
erase the selected track number (or point) and all
subsequent material.
To cancel, press DELETE/CANCEL (or &).
Arrow pointed toward
disc insertion slot
Label facing up
ANALOG
DIGITAL
OPT.123
COAX.
32 44.1 48
kHz
REPEAT
MONO
REC
MANUAL
TOC
DISC TRACK
TOTAL
REMAIN
RANDOM
PROGRAM
A-B S F
L
R
dB
–
60 30 10 6 4 2 1 0 OVER00
–– – – ––
Input indicator
(Source) sampling frequency indicators*
RECORDING
3
0105MDXE300(M).13-16.E 02.5.17, 10:54 AM13

14
7 Adjust the recording levels. (See “Adjusting
recording levels” on this page.)
• Before proceeding to the next step, be sure to reset
the source to be recorded to the beginning.
8 Press #/* (# on the remote control) to start
recording.
• The TOC indicator lights up.
When the TOC indicator is lit, this means that the
TOC information has not yet been written to the
disc. After recording is complete, the TOC data is
automatically written to the disc.
9 Start playing the source to be recorded.
• Synchronized start is possible if you make system
control connections to CRX-E300, CDX-E400 or
KX-E300. Press ^ on CRX-E300, CDX-E400
or # on KX-E300 to start playing the source after
step 7. The recording begins automatically. To use
timer recording, please refer to the instructions
supplied with CRX-E300 or CRX-E400.
To pause
Press REC/PAUSE.
Press #/* (# on the remote) to resume recording.
To stop
Press &.
To eject the MD
Press .
If the power cord is disconnected while making a
recording, the TOC data cannot be correctly written to
the disc and the recorded data will be erased.
TOC writing may be impossible (or track number
marking may not perform as expected) when recording
a damaged CD or a broadcast source with interference.
Adjusting recording levels
Setting the digital recording level
The digital recording level is set by default to 0 dB, the
level of the input source. Normally, it is not necessary to
adjust this level. However, because of the variance in
levels between different digital formats and sources, it is
possible to adjust the recording level of the digital signal.
The digital level can be adjusted up to +12 dB and down
to a minimum (MIN) level. Adjust DIGITAL REC
LEVEL so that the highest peak causes the 0 dB level
indicators to flicker. Do not cause the OVER indicator to
light. Once recording is stopped, the digital recording
level returns to the default level of 0 dB.
Setting the analog recording level
For best results, play the loudest passage of the source to
be recorded and watch the recording level meter in the
display.
Adjust ANALOG REC LEVEL so that the highest peak
causes the 0 dB level indicators to flicker. Do not cause
the OVER indicator to light as it may produce distortion
in the audio signal.
Note
• To adjust the recording level of a source connected with the
system control cable, remove the MD before pressing ^ (or
#) on the source component. If you press the button with an
MD in this unit, the recording begins automatically.
Track marking
When making a recording, you can choose either
automatic or manual marking. This feature operates
somewhat differently for analog and digital signals. See
below for details.
Press M-MARK repeatedly to select automatic
(MANUAL indicator is not lit) or manual (MANUAL
indicator lit) marking.
When recording analog signals
Auto : Track numbers are written in synchronization with
the input level of the signal being recorded. During
recording, if no sound is detected for more than 1.5
seconds, the recorder interprets this to be a gap between
two tracks. When the source signal is detected again, a
track number is automatically written.
Manual : One track number is written automatically
when you start recording, but none are written during
recording. To mark a track number, press M-MARK at the
desired position while recording.
Note
• When using manual marking, the marks must be set at least 4
seconds apart.
When recording digital signals
Track numbers are written in the same positions as the
original source (CD, etc.) with either automatic or manual
marking.
To add additional track numbers, set M-MARK to
MANUAL and press M-MARK at the desired position
while recording.
Notes
• When recording is paused, the portion recorded up to the pause
is counted as an individual track. When recording is resumed,
a new track number is created.
• During synchronized recording, manual track marking is not
possible.
L
R
dB
–
60 30 10 6 4 2 1 0 OVER00
–– – ––––
Should not light
RECORDING
0105MDXE300(M).13-16.E 02.5.17, 10:54 AM14

15
English
English
Music synchro recording
The synchronized recording function lets you set this unit
to start recording automatically when a sound signal is
input.
1 Load the sound source into the source component.
• If necessary, program, or select the track you want
to start recording from before proceeding to the
next step. (Refer to the operation manual supplied
with the source component for instructions
regarding its use.)
2 Press INPUT repeatedly to select the input connected
to the sound source you want to record.
3 Press SYNC to set this unit to record pause mode.
• The REC * indicators light up.
“Synchro REC” and the amount of time available
for recording flash alternately in the display.
During synchronized recording, analog input
sources are recorded at the current ANALOG
REC LEVEL setting, digital sources are recorded
at the 0 dB level.
The MD starts recording automatically when a
sound signal is input. When the sound signal
stops, the unit switches back to record pause mode
and “Synchro REC” blinks in the display. The
next time a sound signal is detected, recording
starts again. In this manner, the presence of a
sound signal automatically switches the unit
between record and record pause modes.
4 Start playing the sound source.
To cancel the synchronized recording
mode
Press &.
Note
• When the signals at the beginning of a track are lower than the
level required to start synchronized recording, they are not
recorded. Should this occur, perform manual recording.
SYNC
INPUT
REC MODE
&
Setting the recording
mode
This unit incorporates various recording modes. Choose
the one that suits your needs.
Press REC MODE repeatedly until the indicator for the
desired recording mode lights up.
Example: When using an 80 minute MD
MONO (monaural)
This mode provides 160 minutes monaural recording.
LP2
This mode provides 160 minutes stereo recording.
LP4
This mode provides 320 minutes stereo recording.
When all of the above indicators are turned off, this unit
enters normal stereo recording mode.
Notes
• MDLPs (= discs recorded in LP mode) cannot be played back
nor edited on non MDLP players. If you play MDLPs (=discs
recorded in LP mode) on a non-MDLP player, “LP:” will
appear at the top of the title and no sound will be reproduced.
• Normal stereo recording provides the best sound quality.
• The recording mode cannot be changed during recording.
A-B S/F
DISPLAY
POWER
SCROLL
REC/
PAUSE
SYNC
M-MARK REC MODE
INPUT
RANDOM PROGRAM
REPEAT
A-B S/F
DISPLAY
POWER
SCROLL
REC/
PAUSE
SYNC
M-MARK REC MODE
INPUT
RANDOM PROGRAM
REPEAT
RECORDING
0105MDXE300(M).13-16.E 02.5.17, 10:54 AM15

16
Monitor out
When a disc is not loaded, you can use the monitor out
function to monitor the sound of the input source. The
monitor out function can also be used to set recording
levels without loading a disc.
1 Press to remove the disc.
2 Press INPUT repeatedly to select the input connected
to the sound source you want to monitor.
3 Press REC/PAUSE.
•“Monitor Out” appears in the display.
Sound from the selected input will be output from
this unit’s analog and digital output terminals.
4 Start playing the sound source.
• The sound is output from the MD recorder’s
analog and digital output terminals.
To cancel
Press &.
Notes
• This function is useful to monitor the sound of an external
digital component connected to the DIGITAL OPTICAL 2 IN
jack.
• The digital volume can be adjusted when using the monitor out
function. However, please note that the digital volume setting
is restored to the default (0 dB) the next time a recording is
made.
STANDBY/ON
NATURAL SOUND MINIDISC RECORDER MDX-E300
+–
INPUT
ANALOG
REC LEVEL
DIGITAL
MIN MAX
REC/PAUSE
23
&
1
Protecting a recorded MD
• To protect a recorded MD, slide the tab on the side of
the MD to open the slot.
In this position, the MD cannot be used for recording,
editing, or titling. To record, edit, or title the MD, slide
the tab to close the slot.
• If the MD is protected against erasure, “Protected”
appears in the display.
Tab
Slide the tab to
open the slot.
RECORDING
0105MDXE300(M).13-16.E 02.5.17, 10:54 AM16

17
English
English
TITLE
DELETE
SET
CANCEL ENTER
EDIT
CHAR
NUMBER
A B C D E F G H I J K L
1234
5678
90
+10 +100
A-B S/F
DISPLAY
POWER
SCROLL
M N O P Q R S T U V W X
Y Z
REC/
PAUSE
SYNC
/
SPACE
M-MARK REC MODE
INPUT
RANDOM PROGRAM
REPEAT
›
&
SET/ENTER
EDITING
One of the main advantages of MD is its editing
capabilities. You can remove the commercials from a
radio broadcast, reorder songs into the order you want,
remove songs, combine songs, and even remove part of a
song.
This unit offers the following editing operations.
Erase
Lets you erase a track, the entire disc, or part of a track.
You can also erase the title of a disc, or the titles of tracks
on a disc.
Move
Lets you move a track to a different track number.
Combine
Lets you combine two adjacent tracks.
Divide
Lets you split a single track into two different tracks.
FRA check
Lets you recover disc space that may have been lost after
multiple edit operations.
TOC write
Lets you write TOC information to the disc so that
changes are saved.
Undo
Lets you undo the previous edit operation if you make a
mistake.
Notes on editing
To cancel an edit
Press &.
Before editing
Make sure that the MD is not protected against erasure. If
the MD is protected, you cannot edit the MD. Slide the
tab to close the slot on the side of the MD.
After editing
• Press in order to update the TOC information and
pull the MD out.
• The TOC indicator lights to show that the TOC
information has not yet been written to the disc. Undo is
possible only when the TOC indicator is lit.
EDIT
⁄
$
!
0106MDXE300(M).17-20.E 02.5.17, 10:54 AM17

18
Erase
EDITING
Erase
The ability to erase sound without having to re-record is a
convenient function of MD. You can erase the entire disc,
a single track, or just part of a track.
Disc erase
This operation lets you erase all audio and title (character)
data to create a blank MD. Please note that once erased,
this data can be recovered using the UNDO function.
1 Press & to set this unit to stop mode.
2 Press EDIT repeatedly to display “Disc Erase?”, then
press SET/ENTER.
•“DiscEraseOK?” appears in the display.
3 Press SET/ENTER again.
• When all audio, name and title data has been
erased “Complete” appears momentarily.
Track erase
This operation lets you erase a single track as well as
corresponding title data. After you erase the track, the
total number of tracks decreases by one and all tracks
following that track are renumbered.
Example: Erasing track 3
1 Use $ or › to select the track you want to erase.
2 Press EDIT repeatedly to display “Erase ?”, then
press SET/ENTER.
•“(track number) Erase OK?” appears in the
display.
3 Press SET/ENTER again.
• The track is erased and “Complete” appears
momentarily.
If you plan to erase two or more tracks
To avoid confusion you should always erase from higher
track numbers to lower track numbers. This prevents
accidental renumbering of tracks you plan to erase.
Before
erasing
After
erasing
Part erase
This operation lets you erase part of a track.
1 Play the track containing the part you want to erase.
2 Use ! or ⁄ to locate the beginning of the part
you want to erase (point A), then press * to pause at
that point.
3 Press EDIT repeatedly to display “A–B Erase?”, then
press SET/ENTER.
• Point A (from step 2) is registered and “Erase
A–_” appears in the display.
4 Use # and ⁄ to locate the end of the part you want
to erase (point B).
5 Press SET/ENTER to register point B.
•“Check” appears, then the part you specified plays
repeatedly and “Erase A–B?” appears in the
display.
To adjust points A and B
• Press EDIT repeatedly to display “A point” and “B point”
alternately. Adjust the selected point by using $ or
› in the direction you want to move the point.
Each point can be adjusted up to 2 seconds in either
direction.
6 Press SET/ENTER again.
• The part is erased and “Complete” appears
momentarily.
Notes
• After part erase, a new track number is automatically assigned
to the section starting after point B.
• Point B cannot be positioned before point A.
Before
erasing
After
erasing
12
AB DEC
3456
12
AB EFD
3456
1
ACB
23
12
A1 A2 CB
34
0106MDXE300(M).17-20.E 02.5.17, 10:54 AM18

19
English
English
EDITING
Disc or track title erase
This operation lets you erase the title of the disc or the
title of tracks on a disc. The title of the disc can only be
erased during the stop mode, however, the title of the
track can be erased during play or stop mode.
To erase a disc title
1 Press & to set this unit to stop mode.
2 Press EDIT repeatedly to display “Title Erase?”, then
press SET/ENTER.
•“Disc Title” and “Erase OK?” appear alternatively
in the display.
3 Press SET/ENTER again.
• The disc title is erased and “Complete” appears
momentarily.
To erase a track title
1 Use $ or › to select the track with the title you
want to erase.
2 Press EDIT repeatedly to display “Title Erase?”, then
press SET/ENTER.
•“Track Title” and “Erase OK?” appear
alternatively in the display.
3 Press SET/ENTER again.
• The track title is erased and “Complete” appears
momentarily.
Notes
• Note that the DISC and TRACK indicators appear in the
display when “Title Erase” is displayed to distinguish between
the two operations.
• To avoid mistakes when erasing the disc or track names, press
DISPLAY repeatedly until the title display screen appears so
that titles can be confirmed beforehand.
Move
This function lets you change the position of any track.
When you move tracks, all tracks are automatically
renumbered.
Example: Moving track 2 to track number 4
1 Use $ or › to select the track you want to move.
Before
moving
After
moving
Before
combining
After
combining
Selected track
Destination
12
AB DEC
3456
12
AC BED
3456
ANALOG
DIGITAL
OPT.123
COAX.
32 44.1 48
kHz
REPEAT
MONO
REC
MANUAL
TOC
DISC TRACK
TOTAL
REMAIN
RANDOM
PROGRAM
A-B S F
L
R
dB
–
60 30 10 6 4 2 1 0 OVER00
–– – – ––
12
AB DEC
3456
12
A B+C D E
345
2 Press EDIT repeatedly to display “Move ?”, then
press SET/ENTER.
3 Use $ or › to select the track’s destination (new
track number).
4 Press SET/ENTER.
•“Complete” appears momentarily in the display.
Combine
This function lets you combine two consecutive tracks
into one. After you combine the tracks, the total number
of tracks decreases by one and the tracks following the
combined tracks are renumbered.
Example: Combining tracks 2 and 3
1 Press & to stop playback.
2 Use $ or › to select the second track of the two
you want to combine.
3 Press EDIT repeatedly to display “Combine ?”, then
press SET/ENTER.
•“Check” appears momentarily, then the MD
recorder plays the 4 seconds before and after the
point where the tracks will be connected. “(track
number) + (track number) OK?” appears in the
display.
4 Press SET/ENTER again.
• The tracks are combined and “Complete” appears
momentarily.
Note
• A track recorded in MDLP mode cannot be combined with a
track recorded in the non-MDLP mode. (“Impossible” appears
in the display.)
0106MDXE300(M).17-20.E 02.5.17, 10:54 AM19

20
EDITING
Divide
This function lets you divide one track into two separate
tracks by adding a new track number to a specified point
in the track.
Example: Dividing track 3
1 Play the track you want to divide.
2 Use ! or ⁄ to locate the point where you want to
divide the track, then press * to pause at that
position.
3 Press EDIT repeatedly to display “Divide ?”, then
press SET/ENTER.
•“Check” appears momentarily, then “Divide
OK ?” appears and the MD recorder starts
repeating the point where the track will be
divided.
4 If necessary, use $ or › to adjust the position of
the point where the track will be divided.
• The dividing position can be adjusted up to 2
second (255 steps) in either direction.
5 Press SET/ENTER.
• The track is divided and “Complete” appears
momentarily.
Undo
The UNDO function lets you immediately return to the
condition before an edit is made (note: you cannot undo
an edit once you press any other button).
1 Press & to stop the MD recorder.
2 Press EDIT repeatedly to display “Undo ____
*1
”,
then press SET/ENTER.
•“Undo OK ?” appears in the display. To cancel
undoing, press &.
____*1
: The type of editing you can undo is displayed
here.
3 Press SET/ENTER again to undo.
Note
• You cannot undo an edit once it has been written to the TOC.
TOC write
When making a recording, the TOC (Table Of Contents)
of the MD is written as soon as recording is finished.
When making disc edits or titling, however, the TOC isn’t
automatically written unless the disc is ejected. If the unit
is accidentally turned off before writing edits or titling to
the TOC, it is possible that these changes will not be
saved. By using this function, you can ensure that your
edits or titles are saved on the disc.
1 Press & to stop playback.
2 Press EDIT repeatedly to display “TOC Write ?”,
then press SET/ENTER.
•“TOC Write OK ?” appears.
3 Press SET/ENTER.
•“TOC Writing” blinks in the display momentarily.
Note
• The TOC Write function can only be selected when the TOC
indicator is lit in the display.
FRA check
When edit functions such as “MOVE” and “DIVIDE” are
performed, spaces of recordable space may be lost and
“TOC Full” may appear in the display to indicate that no
more recording can be performed. When this occurs, it
may be possible to recover the FRA (Freely Recordable
Area) on the disc that was lost during edit functions so
that more recording is possible.
1 Press & to stop playback.
2 Press EDIT repeatedly to display “FRA Check ?”,
then press SET/ENTER.
•“FRA Check OK ?” appears.
3 Press SET/ENTER.
•“Complete” appears momentarily.
12
AB DEC
3456
12
A B C2 DC1
3456
Before
dividing
After
dividing
0106MDXE300(M).17-20.E 02.5.17, 10:54 AM20

21
English
English
This function lets you title recorded MDs and the
individual tracks. Titles may consist of uppercase and
lowercase letters, numbers, and symbols for a maximum
of up to 250 characters for each title.
1 To title a disc
Press & to stop playback.
To title a track
1 Press & to stop playback.
2 Use $ or › to select the track you want to
title. You can also title during playback, pause, or
recording. However, UNDO is not possible in
these cases.
2 Press TITLE to activate the title mode.
• The cursor appears in the display.
3 A) To enter letters of the alphabet
1 Press CHAR repeatedly to select between
uppercase letters (A, B, C…) and lowercase letters
(a, b, c…).
2 Use the numbers [characters] buttons to select a
letter.
B) To enter numbers
1 Press NUMBER.
2 Use the numbers [characters] buttons to select a
number.
C) To enter symbols (! # $ % &…)
Use $ or › to select a symbol. Symbols are
between numbers and uppercase letters in the
character set.
EDIT
TITLING
DELETE/
CANCEL
⁄!
Example:
• Having pressed CHAR in step 3:
Press 1 [ABC] once to select “A”.
Press 1 [ABC] twice to select “B”.
• Having pressed NUMBER in step 3:
Press 1 [ABC] to select “1”.
• To search symbols quickly:
Having pressed CHAR and 1 [ABC] to select uppercase
“A”, press $ to search symbols from the end.
Also, you can use $ or › repeatedly to scroll
through the entire character set.
4 Press SET/ENTER to enter the character.
Note
• When a number is selected using a number button in step
3, it is not necessary to press SET/ENTER.
5 Repeat steps 3 and 4 to complete your title.
To delete a character (AB
CD = ABD)
1Use ! or ⁄ to move the cursor to the position of the
character you want to delete.
2Press DELETE/CANCEL.
To insert a character (ABCD = ABTCD)
1Use ! or ⁄ to move the cursor to the position where
you want to insert the character.
2Use CHAR or character buttons to select the new
character.
3Press SET/ENTER to set the character. The character
previously in that position automatically moves to the
right.
To insert a space (ABCD = AB CD)
1Use ! or ⁄ to move the cursor to the position where
you want to insert the space.
2Press +10 [SPACE] on the remote control.
To cancel titling
Press &.
6 Press TITLE to exit the title mode.
• If a title consists of more than 12 characters, it
will scroll across the display once and then be
displayed in abbreviated form (first 12 characters
only).
To undo TITLE
1Press & to display the total tracks and total playing time
on the disc.
2Press EDIT repeatedly to display “Undo Title”, then
press SET/ENTER.
“Undo OK ?” appears in the display.
3 Press SET/ENTER again to undo.
7 If the TOC indicator is lit, perform the TOC WRITE
function.
To perform the TOC WRITE function
1Follow the procedure of “TOC write” on page 20.
2Press on the front panel. (The MD recorder
automatically performs the TOC WRITE function.)
TITLE
DELETE
SET
CANCEL ENTER
EDIT
CHAR
NUMBER
A B C D E F G H I J K L
1234
5678
90
+10 +100
A-B S/F
DISPLAY
POWER
SCROLL
M N O P Q R S T U V W X
Y Z
REC/
PAUSE
SYNC
/
SPACE
M-MARK REC MODE
INPUT
RANDOM PROGRAM
REPEAT
+10
[SPACE]
4
3B
1,3C
1
2,6
3A
3A,3B
1,3C
0107MDXE300(M).21-25.E 02.5.17, 10:54 AM21

22
ADDITIONAL INFORMATION
MD recorder system
notes
The recording system in your MD recorder is radically
different from those used in cassette and DAT decks and
is characterized by the limitations described below. Note,
however, that these limitations are inherent to the MD
recording system and are not a result of mechanical
trouble.
“Can’t REC!” is displayed before the
maximum recording time has been reached
Once 255 tracks have been recorded on one MD, “Can’t
REC” is displayed regardless of the total recorded time.
“TOC Full” is displayed before the maximum
number of tracks (255) have been recorded
During automatic track marking, fluctuations in emphasis
within songs may be interpreted as song intervals,
increasing the total number of tracks and causing “TOC
Full” to be displayed.
The remaining recording time does not
increase even after erasing numerous short
tracks
Tracks under 12 seconds in length are not counted and so
erasing them may not lead to an increase in the recording
time.
“TOC Reading” is displayed continuously
The “TOC Reading” display lasts longer than normal
when a brand new (blank) disc is inserted.
The total recorded time and the remaining
time on the MD do not total to the
maximum recording time
• Recording is done in minimum units of 2 seconds each,
no matter how short the material.
• This unit displays the length of the largest continuous
blank area as the remaining time. Therefore, if there are
several separate blank spaces, the remaining time will
only display a time equivalent to the largest continuous
blank space.
Tracks created through editing may exhibit
sound dropout during search operations.
Track numbers are not recorded correctly
Incorrect assignment or recording of track numbers may
result when CD tracks are divided into several smaller
tracks during digital recording.
It is not possible to erase part of a track
using the A-B ERASE function
This unit organizes the audio data in sound groups and
clusters. The minimum size of these units may not consist
of less than 10 seconds of stereo sound.
Limitations when recording over an existing
track
• The correct remaining recording time may not be
displayed.
• You may find it impossible to record over a track if that
track has been recorded over several times already. If
this happens, erase the track using the ERASE function.
• The remaining recording time may be shortened out of
proportion to the total recorded time.
• Recording over a track to eliminate noise is not
recommended since this may shorten the duration of the
track.
• You may find it impossible to label a track while
recording over another track.
The correct recorded/playing time may not
be displayed during playback of MDs
recorded in monaural.
SCMS - Serial Copy Management
System
As a digital audio component, this MD recorder conforms
with the Serial Copy Management System (SCMS)
standards. The Serial Copy Management System restricts
copies made by recording digital signals to first-
generation copies only. Therefore, an MD recorded
through a digital input cannot be used as a source for
making another digital recording.
0107MDXE300(M).21-25.E 02.5.17, 10:54 AM22

23
English
English
ADDITIONAL INFORMATION
Display messages
Can’t copy
Digital recording cannot be performed. (See “SCMS -
Serial Copy Management System” on page 22.)
Can’t edit!
Edit operations are not possible.
Can’t REC!
Recording is not possible. The loaded disc may be
protected or there may not be enough blank space
remaining on the disc.
Can’t REC
Recording is not possible. The loaded disc may be
damaged.
DIG in Unlock
No digital signal is being input to the selected digital input
jack.
TMP Over!!
The temperature of the unit has exceeded the normal
operating temperature. Turn off the unit and let it cool
down. If the unit is installed in a place with little
ventilation (such as a built in bookcase), move the unit to
another location with better ventilation.
Disc Full
Recording is not possible because there is no blank space
remaining on the disc.
Title Full!
Additional characters cannot be input for the current title
because the maximum number of characters for a single
title (250) has already been input.
UTOC W Error
Error occurred when writing to the UTOC.
Not Audio
The inserted disc is not an audio MD.
Tr Protected
The selected track cannot be edited because it is protected.
TOC Full
The disc area allotted for TOC data has become full and
further editing is not possible.
UTOC Err L0~4
Problem involving UTOC data.
TOC Writing
The TOC data is being written to the disc. Do not move
the unit or pull out the mains lead. If you do, recorded
material may not be saved normally.
TOC Reading
The unit is reading the TOC data.
Protected
The record protection on the inserted MD is set to
“protect”.
PlayBack MD
The inserted MD is a designed for playback only (you
cannot record on this disc).
Monitor Out
The monitor out function is active. The audio signal input
to the selected input terminals is output from this unit’s
output terminals.
No Track
Blank disc is played or searched.
0107MDXE300(M).21-25.E 02.5.17, 10:54 AM23

24
ADDITIONAL INFORMATION
Troubleshooting
If your MD recorder fails to operate normally, check the following table. It lists common operating errors and simple
measures which you can take to correct the problem. If it cannot be corrected, or the symptom is not listed, disconnect the
recorder’s power cord and contact your authorized YAMAHA dealer or service center for help.
CAUSE
MD is dirty or damaged.
MD is damaged (“UTOC Err L0~4” appears in the
display).
There is an influence of strong external noise
(lightning, excessive static electricity, etc.) or a
misoperation was performed while using this unit.
Moisture is on the laser pickup.
The power is OFF.
The disc has been loaded incorrectly.
An unrecorded (blank) MD was loaded (“Blank
Disc” appears in the display).
The disc is write protected (“Protected” appears in
the display).
A pre-mastered MD is loaded (“PlayBack MD”
appears in the display).
The source is not connected correctly.
The input setting is incorrect.
The recording level is too low.
The digital output level of the digital source is too
low.
There is not enough blank space left on the MD.
If the power cord was unplugged or there was a
power outage during recording, that recording may
be lost.
The carriage lock function has activated.
The unit is too close to the television or other
component.
The batteries are exhausted.
The remote control transmitter is operated from an
incorrect distance or angle.
The remote control sensor is located in strong
direct light.
REMEDY
Replace the current disc with a new one.
Turn the power off and disconnect the AC power
from the AC outlet. After about 30 seconds have
passed, connect the power and try again.
Leave the unit switched ON and wait 20 to 30
minutes for the moisture to evaporate before
trying to play a disc.
Press STANDBY/ON (POWER on the remote
control) to turn the power on.
Reload the disc with the label side facing up, and
the arrow pointing toward the disc insertion slot.
Insert a recorded MD.
Slide the write-protect tab to the closed position.
Load a recordable MD.
Check all connections again.
Press INPUT repeatedly to select the correct
input jacks.
Turn REC LEVEL to adjust the recording level.
Set the digital output level of the digital source to
“MAX”.
Load a recordable MD with fewer recorded
tracks, or erase unnecessary tracks from the
current MD.
If recording was interrupted, try recording again
starting from the beginning.
Insert the MD completely, then press to eject
it.
Place the unit farther away from the television or
other component.
Replace the batteries.
Operate the remote from less than 6 meters
(about 20 feet) and within 30° on either side of
the sensor.
Place the unit away from the strong light.
SYMPTOM
The unit does not respond to operations.
The unit does not work normally.
Playback is not possible.
Recording is not possible.
The MD cannot be removed when
partially inserted.
Excessive noise.
The remote control does not operate.
0107MDXE300(M).21-25.E 02.5.17, 10:54 AM24

25
English
English
ADDITIONAL INFORMATION
Specifications
Digital audio system
System .................................................. MiniDisc digital audio system
Laser .................................................................... Semiconductor laser
Laser diode properties
Material ................................................................................ GaAIAs
Wavelength ............................................................................ 785 nm
Pulse time
Read mode .................................................... 0.6 mW Continuous
Write mode ................... Accessible emission level 2.6 mW 0.5S
min cycle 1.5S
Repetition
Record/Playback time .................................. Max. 80 minutes (Stereo)
261 minutes (ATRAC3-LP2)
323 minutes (ATRAC3-LP4)
Sampling frequency ............................................................... 44.1 kHz
(32 kHz and 48 kHz signals converted to 44.1 kHz for recording)
Frequency response ......................................... 5 – 20,000 Hz ±0.5 dB
Signal-to-Noise ratio .................................................................. 99 dB
Digital rec level ............................................................ Min. – +12 dB
Inputs
LINE IN (REC)
Type ...................................................................................... Pin jack
Standard input level (50 k-ohms) ......................................... 300 mV
DIGITAL IN (OPTICAL) (2)
Type ................................................... Square optical connector jack
Outputs
LINE OUT (REC)
Type ...................................................................................... Pin jack
Standard output level (1 kHz, 0 dB) .......................... 2.0 ± 0.5 Vrms
DIGITAL OUT (OPTICAL)
Type ................................................... Square optical connector jack
General
Power supplies
[U.K. and Europe models] ........................................... 230 V, 50 Hz
[General model] ................................. 110/120/220/240 V, 50/60 Hz
Power consumption ..................................................................... 12 W
Power consumption (standby mode)
[U.K. and Europe models] ....................................................... 7.5 W
[General model] ....................................................................... 7.6 W
Dimensions (W x H x D) ....................................... 217 x 88 x 297 mm
(8-9/16" x 3-7/16" x 11-11/16")
Weight ................................................................. 2.6 kg (5 lbs. 12 oz.)
Specifications subject to change without notice.
US and foreign patents licensed from Dolby Laboratories
Licensing Corporation.
0107MDXE300(M).21-25.E 02.5.17, 10:54 AM25

MDX-E300
OWNER’S MANUAL
MODE D’EMPLOI
BEDIENUNGSANLEITUNG
BRUKSANVISNING
MANUALE DI ISTRUZIONI
MANUAL DE INSTRUCCIONES
GEBRUIKSAANWIJZING
Minidisc Recorder
Lecteur Enregistreur de Minidisc
GB
YAMAHA ELECTRONICS CORPORATION, USA 6660 ORANGETHORPE AVE., BUENA PARK, CALIF. 90620, U.S.A.
YAMAHA CANADA MUSIC LTD. 135 MILNER AVE., SCARBOROUGH, ONTARIO M1S 3R1, CANADA
YAMAHA ELECTRONIK EUROPA G.m.b.H. SIEMENSSTR. 22-34, 25462 RELLINGEN BEI HAMBURG, F.R. OF GERMANY
YAMAHA ELECTRONIQUE FRANCE S.A. RUE AMBROISE CROIZAT BP70 CROISSY-BEAUBOURG 77312 MARNE-LA-VALLEE CEDEX02, FRANCE
YAMAHA ELECTRONICS (UK) LTD. YAMAHA HOUSE, 200 RICKMANSWORTH ROAD WATFORD, HERTS WD1 7JS, ENGLAND
YAMAHA SCANDINAVIA A.B. J A WETTERGRENS GATA 1, BOX 30053, 400 43 VÄSTRA FRÖLUNDA, SWEDEN
YAMAHA MUSIC AUSTRALIA PTY, LTD. 17-33 MARKET ST., SOUTH MELBOURNE, 3205 VIC., AUSTRALIA
Printed in Malaysia V914100
MDX-E300
CAUTION – VISIBLE AND
/
OR INVISIBLE LASER RADIATION
WHEN OPEN. AVOID EXPOSURE TO BEAM.
VARNING – SYNLIG OCH
/
ELLER OSYNLIG LASERSTRÅLNING NÄR
DENNA DEL ÄR ÖPPNAD. STRÅLEN ÄR FARLIG.
VARO ! AVATTAESSA OLET ALTTIINA NÄKYVÄLLE JA
/
TAI
NÄKYMÄTÖMÄLLE LASERSÄTEILYLLE.
ÄLÄ KATSO SÄTEESEEN.
VARNING – SYNLIG OCH
/
ELLER OSYNLIG LASERSTRÅLNING NÄR
DENNA DEL ÄR ÖPPNAD. BETRAKTA EJ STRÅLEN.
VORSICHT ! SICHTBARE UND
/
ODER UNSICHTBARE
LASERSTRAHLUNG WENN ABDECKUNG GEÖFFNET.
NICHT DEM STRAHL AUSSETZEN.
CLASS 1 LASER PRODUCT
LASER KLASSE 1 PRODUKT
LUOKAN 1 LASERLAITE
KLASS 1 LASER APPARAT
VARO!
AVATTAESSA JA SUOJALUKITUS
OHITETTAESSA OLET ALTTIINA
NÄKYMÄTTÖMÄLLE LASERSÄTEILYLLE. ÄLÄ
KATSO SÄTEESEEN.
VARNING!
OSYNLIG LASERSTRÅLNING NÄR DENNA DEL
ÄR ÖPPNAD OCH SPÄRREN ÄR URKOPPLAD.
BETRAKTA EJ STRÅLEN.
CAUTION
Use of controls or adjustments or performance of
procedures other than those specified herein may
result in hazardous radiation exposure.
ATTENTION
L’emploi de commandes, de réglages ou un choix
de procédures différents des spécifications de cette
brochure peut entraîner une exposition à
d’éventuelles radiations pouvant être dangereses.
ACHTUNG
Die Verwendung von Bedienungselementen oder
Einstellungen oder die Durchführung von
Bedienungsvorgängen, die nicht in dieser Anleitung
aufgeführt sind, kann zu einem Kontakt mit
gefährlichen Laserstrahlen führen.
OBSERVERA
Användning av kontroller och justeringar eller
genomförande av procedurer andra än de som
specificeras i denna bok kan resultera i att du
utsätter dig för farlig strålning.
ATTENZIONE
Uso di controlli o regolazioni o procedure non
specificamente descritte può causare l’esposizione
a radiazioni di livello pericoloso.
PRECAUCIÓN
El uso de los controles o los procedimientos de
ajuste o utilización diferentes de los especificados
en este manual pueden causar una exposición
peligrosa a la radiación.
VOORZICHTIG
Gebruik van bedieningsorganen of instellingen, of
uitvoeren van handelingen anders dan staan
beschreven in deze handleiding kunnen leiden tot
blootstelling aan gevaarlijke stralen.
0101MDXE300(M).cv1-4.E 02.5.17, 0:02 PM1
Transcripción de documentos
GB CAUTION Use of controls or adjustments or performance of procedures other than those specified herein may result in hazardous radiation exposure. CLASS 1 LASER PRODUCT LASER KLASSE 1 PRODUKT LUOKAN 1 LASERLAITE KLASS 1 LASER APPARAT MDX-E300 ATTENTION L’emploi de commandes, de réglages ou un choix de procédures différents des spécifications de cette brochure peut entraîner une exposition à d’éventuelles radiations pouvant être dangereses. ACHTUNG Die Verwendung von Bedienungselementen oder Einstellungen oder die Durchführung von Bedienungsvorgängen, die nicht in dieser Anleitung aufgeführt sind, kann zu einem Kontakt mit gefährlichen Laserstrahlen führen. MDX-E300 Minidisc Recorder Lecteur Enregistreur de Minidisc OBSERVERA Användning av kontroller och justeringar eller genomförande av procedurer andra än de som specificeras i denna bok kan resultera i att du utsätter dig för farlig strålning. ATTENZIONE Uso di controlli o regolazioni o procedure non specificamente descritte può causare l’esposizione a radiazioni di livello pericoloso. PRECAUCIÓN El uso de los controles o los procedimientos de ajuste o utilización diferentes de los especificados en este manual pueden causar una exposición peligrosa a la radiación. CAUTION – VISIBLE AND / OR INVISIBLE LASER RADIATION WHEN OPEN. AVOID EXPOSURE TO BEAM. VARNING – SYNLIG OCH / ELLER OSYNLIG LASERSTRÅLNING NÄR DENNA DEL ÄR ÖPPNAD. STRÅLEN ÄR FARLIG. VARO ! AVATTAESSA OLET ALTTIINA NÄKYVÄLLE JA / TAI NÄKYMÄTÖMÄLLE LASERSÄTEILYLLE. ÄLÄ KATSO SÄTEESEEN. VARNING – SYNLIG OCH / ELLER OSYNLIG LASERSTRÅLNING NÄR DENNA DEL ÄR ÖPPNAD. BETRAKTA EJ STRÅLEN. VORSICHT ! SICHTBARE UND / ODER UNSICHTBARE LASERSTRAHLUNG WENN ABDECKUNG GEÖFFNET. NICHT DEM STRAHL AUSSETZEN. VOORZICHTIG Gebruik van bedieningsorganen of instellingen, of uitvoeren van handelingen anders dan staan beschreven in deze handleiding kunnen leiden tot blootstelling aan gevaarlijke stralen. VARO! AVATTAESSA JA SUOJALUKITUS OHITETTAESSA OLET ALTTIINA NÄKYMÄTTÖMÄLLE LASERSÄTEILYLLE. ÄLÄ KATSO SÄTEESEEN. VARNING! OSYNLIG LASERSTRÅLNING NÄR DENNA DEL ÄR ÖPPNAD OCH SPÄRREN ÄR URKOPPLAD. BETRAKTA EJ STRÅLEN. YAMAHA YAMAHA YAMAHA YAMAHA YAMAHA YAMAHA YAMAHA OWNER’S MANUAL MODE D’EMPLOI BEDIENUNGSANLEITUNG BRUKSANVISNING MANUALE DI ISTRUZIONI MANUAL DE INSTRUCCIONES GEBRUIKSAANWIJZING ELECTRONICS CORPORATION, USA 6660 ORANGETHORPE AVE., BUENA PARK, CALIF. 90620, U.S.A. CANADA MUSIC LTD. 135 MILNER AVE., SCARBOROUGH, ONTARIO M1S 3R1, CANADA ELECTRONIK EUROPA G.m.b.H. SIEMENSSTR. 22-34, 25462 RELLINGEN BEI HAMBURG, F.R. OF GERMANY ELECTRONIQUE FRANCE S.A. RUE AMBROISE CROIZAT BP70 CROISSY-BEAUBOURG 77312 MARNE-LA-VALLEE CEDEX02, FRANCE ELECTRONICS (UK) LTD. YAMAHA HOUSE, 200 RICKMANSWORTH ROAD WATFORD, HERTS WD1 7JS, ENGLAND SCANDINAVIA A.B. J A WETTERGRENS GATA 1, BOX 30053, 400 43 VÄSTRA FRÖLUNDA, SWEDEN MUSIC AUSTRALIA PTY, LTD. 17-33 MARKET ST., SOUTH MELBOURNE, 3205 VIC., AUSTRALIA Printed in Malaysia 0101MDXE300(M).cv1-4.E 1 V914100 02.5.17, 0:02 PM CAUTION: READ THIS BEFORE OPERATING THIS UNIT 1 2 3 4 5 To assure the finest performance, please read this manual carefully. Keep it in a safe place for future reference. Install this unit in a well ventilated, cool, dry, clean place away from direct sunlight, heat sources, vibration, dust, moisture or cold. In a cabinet, allow about 2.5 cm (1 inch) of free space all around this unit for adequate ventilation. Locate this unit away from other electrical appliances, motors, or transformers to avoid humming sounds. Do not expose this unit to sudden temperature changes from cold to hot, nor locate this unit in an environment with high humidity (i.e., a room with a humidifier) to prevent condensation inside this unit, which may cause an electrical shock, fire, damage to this unit, and/or personal injury. Avoid installing this unit in a location where foreign objects may fall onto this unit or where this unit may be exposed to liquid dripping or splashing. On the top of this unit, do not place: • Other components, as they may cause damage and/or discoloration on the surface of this unit. • Burning objects (i.e., candles), as they may cause fire, damage to this unit, and/or personal injury. • Containers with liquid in them, as they may fall, spilling the liquid and causing an electrical shock to the user and/or damage to this unit. 6 7 8 9 10 11 12 13 14 15 16 Do not cover this unit with a newspaper, tablecloth, curtain, etc. in order not to obstruct heat radiation. If the temperature inside this unit rises, it may cause fire, damage to this unit, and/or personal injury. Do not plug in this unit to a wall outlet until all connections are complete. Do not operate this unit upside-down. It may overheat, possibly causing damage. Do not use excessive force on switches, knobs and/or cords. When disconnecting the power cord from the wall outlet, grasp the plug; do not pull the cord. Do not clean this unit with chemical solvents; this might damage the finish. Use a clean, dry cloth. Use only the voltage specified on this unit. Using this unit with a higher voltage than specified is dangerous and may cause fire, damage to this unit, and/or personal injury. YAMAHA will not be held responsible for any damage resulting from use of this unit with a voltage other than as specified. To prevent damage by lightning, disconnect the power cord from the wall outlet during an electrical storm. Do not attempt to modify or fix this unit. Contact qualified YAMAHA service personnel when any service is needed. The cabinet should never be opened for any reason. When not planning to use this unit for long periods of time (i.e., vacation), disconnect the AC power plug from the wall outlet. Be sure to read the “Troubleshooting” section on common operating errors before concluding that this unit is faulty. 0102MDXE300(M).Cau.E 2 17 18 Before moving this unit, press STANDBY/ON to set the unit in standby mode, then disconnect the AC power plug from the wall outlet. VOLTAGE SELECTOR (China and General models only) The VOLTAGE SELECTOR on the rear panel of this unit must be set for your local main voltage BEFORE plugging into the AC main supply. Voltages are 110/120/ 220/240 V AC, 50/60 Hz. To reduce the risk of fire or electric shock, do not expose this appliance to rain or moisture. The unit is not disconnected from the AC power source as long as it is connected to the wall outlet, even if this unit itself is turned off. This state is called the standby mode. In this state, this unit is designed to consume a very small quantity of power. SPECIAL INSTRUCTIONS FOR U.K. MODEL IMPORTANT: The wires in the mains lead are coloured in accordance with the following code: Blue: NEUTRAL Brown: LIVE As the colours of the wires in the mains lead of this apparatus may not correspond with the coloured markings identifying the terminals in your plug, proceed as follows: The wire which is coloured BLUE must be connected to the terminal which is marked with the letter N or coloured BLACK. The wire which is coloured BROWN must be connected to the terminal which is marked with the letter L or coloured RED. Making sure that neither core is connected to the earth terminal of the three pin plug. For U.K. customers If the socket outlets in the home are not suitable for the plug supplied with this appliance, it should be cut off and an appropriate 3 pin plug fitted. For details, refer to the instructions described above. Note: The plug severed from the mains lead must be destroyed, as a plug with bared flexible cord is hazardous if engaged in a live socket outlet. CAUTION Use of controls or adjustments or performance of procedures other than those specified herein may result in hazardous radiation exposure. 02.5.17, 10:53 AM FEATURES MINI DISC digital audio system Digital optical input (2)/output Sampling rate converter EDIT function • Synchronized recording/timer recording by system connection • Digital rec level control • MDLP (Long play and recording) English • • • • CONTENTS FEATURES .............................................. 1 SUPPLIED ACCESSORIES ....................... 2 NOTES ABOUT MINIDISCS .................... 2 NAMES OF BUTTONS AND CONTROLS Front panel ............................................................ 3 Display .................................................................. 3 Remote control ..................................................... 4 GETTING STARTED Remote control ..................................................... 5 System connections .............................................. 6 Connecting your audio system ............................. 8 PLAYBACK ............................................. 9 Skipping tracks ..................................................... 9 Searching .............................................................. 9 Switching the display ......................................... 10 Random play ....................................................... 11 Repeat play ......................................................... 11 A-B repeat .......................................................... 11 Program play ...................................................... 12 RECORDING ........................................ 13 Adjusting recording levels .................................. 14 Track marking ..................................................... 14 Music synchro recording .................................... 15 Setting the recording mode ................................. 15 Monitor out ......................................................... 16 Protecting a recorded MD .................................. 16 EDITING ............................................... 17 Erase ................................................................... 18 Move ................................................................... 19 Combine ............................................................. 19 Divide ................................................................. 20 Undo ................................................................... 20 TOC write ........................................................... 20 FRA check .......................................................... 20 TITLING ................................................ 21 ADDITIONAL INFORMATION MD recorder system notes .................................. 22 Display messages ................................................ 23 Troubleshooting .................................................. 24 Specifications ...................................................... 25 1 0103MDXE300(M).1-8.E 1 02.5.17, 10:53 AM SUPPLIED ACCESSORIES Check that the following items are included. • Remote control • Optical cable TITLE DELETE SET CANCEL ENTER EDIT GHI JKL CHAR NUMBER ABC DEF 1 2 3 4 MNO 5 PQR 6 STU 7 VWX 8 YZ 9 / 0 SPACE +10 +100 REC/ PAUSE SYNC • System control cable M-MARK REC MODE INPUT RANDOM PROGRAM REPEAT A-B S/F DISPLAY SCROLL POWER • Batteries (AA, R6, UM-3) • Audio pin cable NOTES ABOUT MINIDISCS Care of MDs • Do not expose the MD to direct sunlight or heat sources such as hot air ducts, nor leave it in a car parked in direct sunlight as there can be a considerable rise in temperature inside the car. • Periodically remove dust and debris from the cartridge surface by wiping it with a dry cloth. • Because the MD itself is housed in a cartridge, you can handle it normally without being concerned about dirt or fingerprints. However, malfunctioning may result if the cartridge itself is dirty or warped. Do not open the shutter on the MD cartridge Trying to force the shutter open will damage the shutter. 2 0103MDXE300(M).1-8.E 2 02.5.17, 10:53 AM NAMES OF BUTTONS AND CONTROLS 1 2 3 NATURAL SOUND MINIDISC RECORDER 4 5 English Front panel 6 MDX-E300 REC/PAUSE INPUT STANDBY/ON REC LEVEL – DIGITAL ANALOG MIN 7 8 1 STANDBY/ON (P.9) 2 Disc insertion slot (P.9) 3 (P.9) 4 & (P.9) 5 #/* (P.9) 6 REC/PAUSE (P.13) 90 + MAX q 7 Remote control sensor (P.5) 8 Display (P.3) 9 INPUT (P.13) 0 ANALOG REC LEVEL (P.14) q Jog dial ($ ›)/DIGITAL REC LEVEL (P.9/P.14) Display 1 2 3 4 5 6 7 ANALOG DISC TRACK DIGITAL TOTAL REMAIN OPT.12 COAX. 32 44.1 48 RANDOM kHz PROGRAM MANUAL REC REPEAT A-B S F MONO LP2 LP4 TOC 9 0 q w e 1 Input indicator (P.13) 2 TOTAL indicator (P.10) 3 DISC/TRACK indicator (P.10) 4 REMAIN indicator (P.10) 5 MANUAL indicator (P.14) 6 REC indicator (P.13) 7 Pause indicator 8 Multi information display 9 Sampling frequency indicator (P.13) r 8 L dB – 00 –60 R ty –30 –10 – 6 –4 – 2 –1 0 OVER u 0 REPEAT A-B/S F indicator (P.11) q PROGRAM indicator (P.12) w RANDOM indicator (P.11) e MONO indicator (P.15) r LP2/LP4 indicator (P.15) t TOC indicator (P.17) y Play indicator u Recording level meter (P.14) 3 0103MDXE300(M).1-8.E 3 02.5.17, 10:53 AM NAMES OF BUTTONS AND CONTROLS Remote control 1 2 3 4 5 6 7 8 9 0 q w e r TITLE DELETE SET CANCEL ENTER EDIT JKL t y CHAR NUMBER ABC DEF GHI 1 2 3 4 MNO 5 PQR 6 STU 7 VWX 8 YZ 9 / 0 SPACE +10 +100 u i o REC/ PAUSE SYNC M-MARK REC MODE INPUT RANDOM PROGRAM REPEAT A-B S/F DISPLAY SCROLL POWER p a s d f g 1 DELETE/CANCEL (P.21) 2 TITLE (P.21) 3 CHAR (P.21) 4 NUMBER (P.21) 5 Numbers [Characters] (P.9/P.21) 6 # (P.9/P.14) 7 ! (P.9/P.21) 8 $ (P.9/P.21) 9 REC/PAUSE (P.13) 0 M-MARK (P.14) q REC MODE (P.15) w RANDOM (P.11) e PROGRAM (P.12) r POWER (P.9) t SET/ENTER (P.21) y EDIT (P.18) u * (P.9) i ⁄ (P.9/P.21) o › (P.9/P.21) p SYNC (P.15) a & (P.9) s INPUT (P.13) d REPEAT A-B (P.11) REPEAT S/F (P.11) f SCROLL (P.10) g DISPLAY (P.10) 4 0103MDXE300(M).1-8.E 4 02.5.17, 10:53 AM GETTING STARTED NATURAL SOUND Battery installation MINIDISC RECORDER English Remote control operation range Remote control MDX-E300 INPUT REC/PAUSE STANDBY/ON REC LEVEL ANALOG – DIGITAL 2 MIN + MAX 1 Remote control sensor 3 1 2 3 Within approximately 6 m (20 feet) Remove the battery compartment cover. Insert batteries into the battery compartment. 30° 30° Replace the battery compartment cover. Battery replacement Removing the protection sheet M X +1 00 8 W J I V H G 3 U SP AC +1 E 0 T F 7 S 2 R Q 6 N 0 O 1 / P C B A 4 K L DE L CA ETE NCE L SE EN T BE TER R M LE NU TIT AR E 8 +1 00 CH D X J W I V H G 3 U T S R Q 6 P / 0 O N Y 9 Y Z Z 5 M 7 SP AC +1 E 0 D F E 2 LE TIT D AR CH C B 1 A 4 K L EL CA ETE NCE NU L SE M EN T BE TER R ED ED IT IT The remote control is shipped with a protection sheet to prevent the surface from being scratched during transportation. When removing the sheet, first put adhesive tape on an edge of the remote control so that the tape sticks to the sheet. Then peel the sheet off with the tape. 5 Notes • Use only AA, R6, UM-3 batteries for replacement. • Be sure the polarities are correct. (See the illustration inside the battery compartment.) • Remove the batteries if the remote control will not be used for an extended period of time. • If batteries leak, dispose of them immediately. Avoid touching the leaked material or letting it come in contact with clothing, etc. Clean the battery compartment thoroughly before installing new batteries. Notes • There should be no large obstacles between the remote control and the main unit. • If the remote control sensor is directly illuminated by strong lighting (especially an inverter type of fluorescent lamp, etc.), it might cause the remote control not to work correctly. In this case, reposition the main unit to avoid direct lighting. 9 If you find that the remote control must be used closer to the main unit than usual, the batteries are weak. Replace batteries with new ones. Note • Do not scratch the remote control surface when peeling the sheet off. 5 0103MDXE300(M).1-8.E 5 02.5.17, 10:53 AM GETTING STARTED System connections Never plug the AC power cord to the wall outlet until all connections are completed. • • • • Connections should be made to the correct input/output jacks on the other component. Also refer to the owner’s manual supplied with the components you are connecting. If the placement of this unit causes noise in other equipment, such as a tuner, move them farther apart. The connection using the SYSTEM CONNECTOR jack allows you to control this unit as well as the connected components of YAMAHA Piano Craft series. Make system control connections between the Piano Craft series components using the system control cable. To reduce the standby power consumption, connect the AC power cord of this unit to a switched AC outlet of your receiver (Except for U.K. model). Notes • Before making OPTICAL connections, remove the jack cover(s). • In order to protect the jacks from dust, be sure to attach the jack covers when the optical jacks are not being used. Connecting CRX-E300 CD receiver (CRX-E300) FM ANT GND – AM ANT SPEAKERS 75Ω UNBAL. R DIGITAL L SUBWOOFER OPTICAL OUT OUT SYSTEM CONNECTOR 6Ω MIN. /SPEAKER C IN MD OUT D To wall outlet A IN TAPE OUT B Audio pin cables (included) AUX IN R L System control cable (included) Optical cable (included) To CRX-E300 IN D ANALOG SYSTEM C OUT CONNECTOR L DIGITAL OPTICAL 1 2 OUT IN R This unit (MDX-E300) Notes • The ANALOG OUT jacks on this unit are marked Ç and the ANALOG IN jacks are marked Î. When connecting this unit to CRX-E300 whose jacks are marked Å, ı, Ç and Î, connect this unit’s ANALOG OUT jacks to the input jacks marked Ç and connect this unit’s ANALOG IN jacks to the output jacks marked Î on the rear panel of CRX-E300. • The SYSTEM CONNECTOR jack should be connected to the SYSTEM CONNECTOR jack on CRX-E300. • For digital recording, the DIGITAL OPTICAL 1 IN jack should be connected to the DIGITAL OPTICAL OUT jack on CRX-E300. 6 0103MDXE300(M).1-8.E 6 02.5.17, 10:53 AM GETTING STARTED English Connecting RX-E400 and CDX-E400 Receiver (RX-E400) C To wall outlet IN MD OUT FM ANT 75Ω UNBAL. D A R IN L GND TAPE OUT AM ANT B Audio pin cables (included) + – IN CD E SUBWOOFER OUT SYSTEM CONNECTOR IN 6Ω MIN./SPEAKER AUX SPEAKERS L R System control cable CD player (CDX-E400) To RX-E400 ANALOG E OUT DIGITAL OPTICAL SYSTEM CONNECTOR OUT L R Optical cable (included) System control cable (included) This unit (MDX-E300) To RX-E400 IN D ANALOG SYSTEM C OUT CONNECTOR L DIGITAL OPTICAL 1 2 OUT IN R Notes • The ANALOG OUT jacks on this unit are marked Ç and the ANALOG IN jacks are marked Î. When connecting this unit to RX-E400 whose jacks are marked Å, ı, Ç, Î and ‰, connect this unit’s ANALOG OUT jacks to the input jacks marked Ç and connect this unit’s ANALOG IN jacks to the output jacks marked Î on the rear panel of RX-E400. • The SYSTEM CONNECTOR jack should be connected to the SYSTEM CONNECTOR jack on CDX-E400. • For digital recording, the DIGITAL OPTICAL 1 IN jack should be connected to the DIGITAL OPTICAL OUT jack on CDX-E400. 7 0103MDXE300(M).1-8.E 7 02.5.17, 10:53 AM GETTING STARTED Connecting your audio system Digital connections This unit (MDX-E300) To AC outlet IN D CD player (etc.) with optical OUT ANALOG SYSTEM C OUT CONNECTOR L DIGITAL OPTICAL 1 2 Amplifier/Receiver with optical IN/OUT OUT IN R DIGITAL OUT Optical cable OPTICAL DIGITAL IN DIGITAL OUT OPTICAL OPTICAL Optical cable Optical cable Notes for digital connections • The DIGITAL OPTICAL IN jacks can be connected to any component with an optical output so you can make direct digital recordings. • The DIGITAL OPTICAL OUT jacks can be connected to any component with an optical input so you can output digital audio from an MD. • Before making OPTICAL connections, remove the jack cover(s). • In order to protect the jacks from dust, be sure to attach the jack covers when the optical jacks are not being used. Analog connections This unit (MDX-E300) Audio pin cables To AC outlet MD/TAPE IN D ANALOG SYSTEM C OUT CONNECTOR L DIGITAL OPTICAL 1 2 OUT IN R Amplifier/Receiver Notes for analog connections • The white plug on the audio pin cables corresponds to the L (left) channel and the red plug corresponds to the R (right) channel. Be sure to connect L (left) to L and R (right) to R. Also make sure that the plugs are fully inserted and that the connection is firm. • The ANALOG OUT jacks on this unit should be connected to the MD PLAY jacks on your amplifier. The ANALOG IN jacks on this unit should be connected to the MD REC jacks on your amplifier. 8 0103MDXE300(M).1-8.E 8 02.5.17, 10:53 AM PLAYBACK To pause • Press STANDBY/ON (POWER on the remote control) to turn this unit on. • Select “MD” as the input source of the connected receiver. Press #/* (* on the remote control). Press again to resume playback (or press # on the remote control). 1 2 & NATURAL SOUND MINIDISC RECORDER To stop Press &. To eject the MD Press MDX-E300 INPUT Skipping tracks REC/PAUSE STANDBY/ON REC LEVEL ANALOG – DIGITAL MIN . + MAX To skip to the next track STANDBY/ON Jog dial Turn the jog dial to the right (or press › on the remote control). To skip to a previous track TITLE DELETE SET CANCEL ENTER Turn the jog dial to the left (or press $ on the remote control). EDIT CHAR NUMBER ABC Numbers 2 ! $ DEF GHI 2 3 4 PQR 6 STU 7 VWX 8 YZ 9 / 0 SPACE +10 +100 REC/ PAUSE * Press the number buttons on the remote control corresponding to the track you desire. ⁄ Example: › To select track 3, press 3. To select track 13, press +10, then press 3. To select track 23, press +10 twice, then press 3. To select track 123, press +100 once, and +10 twice, then press 3. SYNC & M-MARK REC MODE INPUT RANDOM PROGRAM REPEAT A-B POWER To skip to a specific track number JKL 1 MNO 5 S/F DISPLAY SCROLL POWER Searching 1 To search forward during play or pause Insert an MD. Press and hold ⁄ on the remote control. Label facing up To search in reverse during play or pause Press and hold ! on the remote control. Notes Arrow pointed toward disc insertion slot 2 3 Press #/* (# on the remote control) to start playback. • Sound can be heard when searching in play mode to help you locate the desired position within the track. No sound is heard when searching in pause mode, but the search is conducted at a higher speed. • Search may not function correctly when there are several consecutive tracks consisting of only a few seconds each. Adjust the volume using the volume control on the amplifier (or receiver). 9 0104MDXE300(M).9-12.E 9 02.5.17, 10:54 AM English English Preparation PLAYBACK Switching the display Press DISPLAY during stop or playback to display other information, such as the remaining time and track titles. During playback Press DISPLAY repeatedly to display the following information. 1 Current track number and elapsed time Track number REC/ PAUSE Elapsed time SYNC ANALOG DISC TRACK DIGITAL TOTAL OPT.123 REMAIN COAX. 32 44.1 48 RANDOM REC kHz PROGRAM MONO MANUAL REPEAT A-B S F M-MARK REC MODE INPUT RANDOM PROGRAM REPEAT A-B S/F DISPLAY SCROLL TOC L dB – 00 –60 R –30 –10 –6 4 – 2 –1 0 OVER –6 4 – 2 –1 0 OVER SCROLL POWER DISPLAY 2 Time remaining on the current track REMAIN indicator During stop Press DISPLAY repeatedly to display the following information. 1 Number of tracks and total playing time Total tracks ANALOG DISC TRACK DIGITAL TOTAL OPT.123 REMAIN COAX. 32 44.1 48 RANDOM kHz PROGRAM MONO REC MANUAL REPEAT A-B S F TOC Total playing time L dB – 00 –60 R –30 –10 –6 4 – 2 –1 0 OVER ANALOG DISC TRACK DIGITAL TOTAL OPT.123 REMAIN COAX. 32 44.1 48 RANDOM REC kHz PROGRAM MONO MANUAL REPEAT A-B S F TOC L dB – 00 –60 R –30 –10 3 Track title • If the track has not been given a name, “No Title” is displayed. ANALOG DISC TRACK DIGITAL TOTAL OPT.123 REMAIN COAX. 32 44.1 48 RANDOM PROGRAM MONO REC kHz MANUAL REPEAT A-B S F TOC L dB – 00 –60 R –30 –10 –6 4 – 2 –1 0 OVER To view the entire disc (track) title 2 Time remaining on the MD (only for recordable MDs) REMAIN indicator ANALOG DISC TRACK DIGITAL TOTAL OPT.123 REMAIN COAX. 32 44.1 48 RANDOM REC kHz PROGRAM MONO REPEAT A-B S F MANUAL Time remaining on the MD TOC L dB – 00 –60 R –30 –10 –6 4 – 2 –1 0 OVER –30 –10 –6 4 – 2 –1 0 OVER If the disc (track) title is too long to fit in the display, press SCROLL to move the title sequentially across the display. While the title is being displayed, press SCROLL to pause the display, and again to continue presentation of the title. Press and hold SCROLL for rapid presentation of the title. Total tracks 3 Disc title ANALOG DISC TRACK DIGITAL TOTAL OPT.123 REMAIN COAX. 32 44.1 48 RANDOM kHz PROGRAM MONO REC REPEAT A-B S F MANUAL TOC L dB – 00 –60 R 10 0104MDXE300(M).9-12.E 10 02.5.17, 10:54 AM PLAYBACK You can have the unit play all the tracks on a disc in random order. REC/ PAUSE To repeat the single track, light the REPEAT S indicators. COAX. 32 44.1 48 RANDOM kHz PROGRAM MONO REC REPEAT A-B S F MANUAL COAX. 32 44.1 48 RANDOM REC kHz PROGRAM MONO REPEAT A-B S F MANUAL M-MARK REC MODE INPUT RANDOM L dB – 00 –60 R –30 –10 –6 4 – 2 –1 0 OVER To repeat the full disc, light the REPEAT F indicators. SYNC RANDOM PROGRAM TOC L dB – 00 –60 R TOC –30 –10 –6 4 – 2 –1 0 OVER REPEAT A-B S/F DISPLAY SCROLL To cancel POWER Press REPEAT S/F repeatedly to turn off the REPEAT S or REPEAT F indicators. Notes on full disc repeat To start random playback Press RANDOM. The RANDOM indicator lights up and “_ _ _ - - : - -” appears in the display while the unit selects a track. Playback starts automatically. To cancel Press RANDOM again to turn off the RANDOM indicator or press &. Note • In program play mode, the entire program is played repeatedly. • In random play mode, the unit reshuffles the tracks and plays them again after each track plays once. A-B repeat This function lets you repeat a specific part of a track. It’s a convenient way to study a language, or to learn the lyrics to your favorite song (etc.). 1 • Pressing › during random play skips to another track at random. Pressing $ returns to the beginning of the current track (you cannot return to previously played tracks). COAX. 32 44.1 48 RANDOM PROGRAM MONO REC kHz MANUAL REPEAT A-B S F 2 Repeat play You can have the unit repeat a single track, a full disc, or just part of a track. Press REPEAT A-B during playback to specify the beginning (A point) of the part you want to repeat. • The REPEAT A indicators light up. M-MARK REC MODE INPUT –10 –6 4 – 2 –1 0 OVER TOC L dB – 00 –60 R –30 –10 –6 4 – 2 –1 0 OVER Press & or REPEAT A-B. REPEAT A-B –30 To cancel SYNC RANDOM PROGRAM L dB – 00 –60 R Press REPEAT A-B again to specify the end (B point) of the part you want to repeat. • The REPEAT A-B indicators light up and the part you specified starts to repeat. COAX. 32 44.1 48 RANDOM kHz PROGRAM MONO REC MANUAL REPEAT A-B S F REC/ PAUSE TOC S/F REPEAT S/F DISPLAY SCROLL POWER REPEAT A-B 11 0104MDXE300(M).9-12.E 11 02.5.17, 10:54 AM English English Press REPEAT S/F repeatedly to light the REPEAT S or REPEAT F indicators. Random play PLAYBACK To check the programmed data Program play 1 Stop or pause program playback. This function lets you enjoy listening to your favorite tracks in any order you desire. 2 Press $ or › to skip through the step information (or use the jog dial on the front panel). To change a step DELETE/ CANCEL 3 TITLE 1 Stop program playback. DELETE SET CANCEL ENTER EDIT CHAR NUMBER 2 Press PROGRAM. ABC DEF GHI JKL 1 2 3 4 MNO 5 PQR 6 STU 7 VWX 8 YZ 9 / 0 SPACE +10 +100 5 ! $ ⁄ › REC/ PAUSE SYNC 1 M-MARK REC MODE INPUT RANDOM PROGRAM 2,4 REPEAT A-B 3 Press $ or › to skip through the step information (or use the jog dial on the front panel). 4 Use the number buttons to program a new track number for that step. The original track is cleared from memory and the new track is programmed. To delete a specific step S/F 1 Stop program playback. DISPLAY SCROLL POWER 2 Press PROGRAM. 3 Press $ or › to skip through the step information (or use the jog dial on the front panel). 1 2 3 4 Press DELETE to delete the step. The higher steps are renumbered automatically. Press & to stop playback. Press PROGRAM to light up the PROGRAM indicator. To cancel Program the desired track by pressing the corresponding number buttons. During the stop mode, press & to turn off the PROGRAM indicator. Example: To select track 3, press 3. To select track 13, press +10, then press 3. To select track 23, press +10 twice, then press 3. To select track 123, press +100 once, and +10 twice, then press 3. • If the total time exceeds 100 minutes, “Over” is displayed instead of the total time. • $ or › can be used during playback to skip between programmed tracks. Current programmed track number ANALOG DISC TRACK DIGITAL TOTAL OPT.123 REMAIN COAX. 32 44.1 48 RANDOM REC kHz PROGRAM MONO MANUAL REPEAT A-B S F TOC L dB – 00 –60 R Notes Total playing time –30 –10 –6 4 – 2 –1 0 OVER Repeat this operation to program up to 30 steps. 4 5 Press PROGRAM to confirm the program. Press # to start program playback. 12 0104MDXE300(M).9-12.E 12 02.5.17, 10:54 AM RECORDING Insert an MD. Please check the copyright laws in your country to record from records, compact discs, radio, etc. Recording of copyright material may infringe copyright laws. This unit allows you to make recordings from a wide variety of program sources (both analog and digital). When recording an analog source (such as an FM broadcast or cassette) this unit converts the analog signals to a 44.1 kHz digital signal before recording them onto the MD. When recording a digital source, this unit converts the digital signals to 44.1 kHz for recording onto the MD. However, if you are recording a 44.1 kHz source signal (such as a CD) there is no conversion. This unit can record 32, 44.1 and 48 kHz digital signals. English English 1 Note Label facing up Arrow pointed toward disc insertion slot 2 Press INPUT repeatedly to select the input you want to record. For Select ANALOG IN Î DIGITAL OPTICAL 1 IN DIGITAL OPTICAL 2 IN ANALOG DIGITAL OPT. 1 DIGITAL OPT. 2 Input indicator Preparation • Press STANDBY/ON (POWER on the remote control) to turn this unit on. 1 ANALOG DISC TRACK TOTAL DIGITAL OPT.123 REMAIN COAX. 32 44.1 48 RANDOM REC kHz PROGRAM MONO MANUAL REPEAT A-B S F 8 6 & TOC L dB – 00 –60 R –30 –10 –6 4 – 2 –1 0 OVER (Source) sampling frequency indicators* NATURAL SOUND MINIDISC RECORDER MDX-E300 * Appears when digital signal is input. INPUT 3 REC/PAUSE STANDBY/ON REC LEVEL ANALOG – DIGITAL MIN + MAX 4 2 STANDBY/ON 7 7 If desired, press REC MODE to select the recording mode (see “Setting the recording mode” on page 15). Locate the point where you want to start recording. When recording on a blank MD • Skip this step. To start recording from the end of a previous recording • Press & to set this unit to stop mode. DELETE/ CANCEL 8 6 M-MARK TITLE SET CANCEL ENTER EDIT JKL ABC DEF GHI 1 2 3 4 MNO 5 PQR 6 STU 7 VWX 8 YZ 9 / 0 SPACE +10 +100 SET/ENTER 5 * 6 REC/ PAUSE SYNC & M-MARK REC MODE INPUT RANDOM PROGRAM REPEAT A-B POWER To record over a previous recording DELETE CHAR NUMBER S/F 2 DISPLAY SCROLL POWER 3 • Turn the jog dial (or press $ or › on the remote control) to select a track (recording starts from the beginning of the deleted track). Start playing the source to be recorded. • If you do not need to adjust the recording level, this step is not necessary. Press REC/PAUSE to set this unit to record pause mode. • The REC * indicators light up. “REC Standby” and the amount of time available for recording flash alternately in the display. If you selected a track number (in step 4) to record over a previous recording • “OverWrite OK?” appears in the display. To confirm, press SET/ENTER. This operation will erase the selected track number (or point) and all subsequent material. To cancel, press DELETE/CANCEL (or &). 13 0105MDXE300(M).13-16.E 13 02.5.17, 10:54 AM RECORDING 7 8 9 Adjust the recording levels. (See “Adjusting recording levels” on this page.) • Before proceeding to the next step, be sure to reset the source to be recorded to the beginning. Press #/* (# on the remote control) to start recording. • The TOC indicator lights up. When the TOC indicator is lit, this means that the TOC information has not yet been written to the disc. After recording is complete, the TOC data is automatically written to the disc. Start playing the source to be recorded. • Synchronized start is possible if you make system control connections to CRX-E300, CDX-E400 or KX-E300. Press ^ on CRX-E300, CDX-E400 or # on KX-E300 to start playing the source after step 7. The recording begins automatically. To use timer recording, please refer to the instructions supplied with CRX-E300 or CRX-E400. To pause Press REC/PAUSE. Press #/* (# on the remote) to resume recording. To stop For best results, play the loudest passage of the source to be recorded and watch the recording level meter in the display. Adjust ANALOG REC LEVEL so that the highest peak causes the 0 dB level indicators to flicker. Do not cause the OVER indicator to light as it may produce distortion in the audio signal. L dB – 00 – 60 R –30 –10 – 6 – 4 – 2 –1 0 OVER Should not light Note • To adjust the recording level of a source connected with the system control cable, remove the MD before pressing ^ (or #) on the source component. If you press the button with an MD in this unit, the recording begins automatically. Track marking When making a recording, you can choose either automatic or manual marking. This feature operates somewhat differently for analog and digital signals. See below for details. Press M-MARK repeatedly to select automatic (MANUAL indicator is not lit) or manual (MANUAL indicator lit) marking. Press &. To eject the MD Press Setting the analog recording level When recording analog signals . If the power cord is disconnected while making a recording, the TOC data cannot be correctly written to the disc and the recorded data will be erased. TOC writing may be impossible (or track number marking may not perform as expected) when recording a damaged CD or a broadcast source with interference. Adjusting recording levels Auto : Track numbers are written in synchronization with the input level of the signal being recorded. During recording, if no sound is detected for more than 1.5 seconds, the recorder interprets this to be a gap between two tracks. When the source signal is detected again, a track number is automatically written. Manual : One track number is written automatically when you start recording, but none are written during recording. To mark a track number, press M-MARK at the desired position while recording. Note Setting the digital recording level • When using manual marking, the marks must be set at least 4 seconds apart. The digital recording level is set by default to 0 dB, the level of the input source. Normally, it is not necessary to adjust this level. However, because of the variance in levels between different digital formats and sources, it is possible to adjust the recording level of the digital signal. The digital level can be adjusted up to +12 dB and down to a minimum (MIN) level. Adjust DIGITAL REC LEVEL so that the highest peak causes the 0 dB level indicators to flicker. Do not cause the OVER indicator to light. Once recording is stopped, the digital recording level returns to the default level of 0 dB. When recording digital signals 14 0105MDXE300(M).13-16.E 14 Track numbers are written in the same positions as the original source (CD, etc.) with either automatic or manual marking. To add additional track numbers, set M-MARK to MANUAL and press M-MARK at the desired position while recording. Notes • When recording is paused, the portion recorded up to the pause is counted as an individual track. When recording is resumed, a new track number is created. • During synchronized recording, manual track marking is not possible. 02.5.17, 10:54 AM RECORDING The synchronized recording function lets you set this unit to start recording automatically when a sound signal is input. REC/ PAUSE & SYNC Setting the recording mode English English Music synchro recording This unit incorporates various recording modes. Choose the one that suits your needs. SYNC REC/ PAUSE SYNC M-MARK REC MODE INPUT INPUT RANDOM PROGRAM REPEAT A-B S/F M-MARK REC MODE INPUT REC MODE RANDOM PROGRAM REPEAT A-B DISPLAY SCROLL POWER S/F DISPLAY SCROLL POWER 1 2 3 Load the sound source into the source component. • If necessary, program, or select the track you want to start recording from before proceeding to the next step. (Refer to the operation manual supplied with the source component for instructions regarding its use.) Example: When using an 80 minute MD MONO (monaural) This mode provides 160 minutes monaural recording. Press INPUT repeatedly to select the input connected to the sound source you want to record. LP2 Press SYNC to set this unit to record pause mode. • The REC * indicators light up. “Synchro REC” and the amount of time available for recording flash alternately in the display. During synchronized recording, analog input sources are recorded at the current ANALOG REC LEVEL setting, digital sources are recorded at the 0 dB level. LP4 The MD starts recording automatically when a sound signal is input. When the sound signal stops, the unit switches back to record pause mode and “Synchro REC” blinks in the display. The next time a sound signal is detected, recording starts again. In this manner, the presence of a sound signal automatically switches the unit between record and record pause modes. 4 Press REC MODE repeatedly until the indicator for the desired recording mode lights up. This mode provides 160 minutes stereo recording. This mode provides 320 minutes stereo recording. When all of the above indicators are turned off, this unit enters normal stereo recording mode. Notes • MDLPs (= discs recorded in LP mode) cannot be played back nor edited on non MDLP players. If you play MDLPs (=discs recorded in LP mode) on a non-MDLP player, “LP:” will appear at the top of the title and no sound will be reproduced. • Normal stereo recording provides the best sound quality. • The recording mode cannot be changed during recording. Start playing the sound source. To cancel the synchronized recording mode Press &. Note • When the signals at the beginning of a track are lower than the level required to start synchronized recording, they are not recorded. Should this occur, perform manual recording. 15 0105MDXE300(M).13-16.E 15 02.5.17, 10:54 AM RECORDING Monitor out Protecting a recorded MD When a disc is not loaded, you can use the monitor out function to monitor the sound of the input source. The monitor out function can also be used to set recording levels without loading a disc. 1 NATURAL SOUND MINIDISC RECORDER Tab & MDX-E300 Slide the tab to open the slot. REC/PAUSE INPUT STANDBY/ON REC LEVEL – DIGITAL ANALOG MIN 2 1 2 3 4 Press + MAX 3 to remove the disc. Press INPUT repeatedly to select the input connected to the sound source you want to monitor. • To protect a recorded MD, slide the tab on the side of the MD to open the slot. In this position, the MD cannot be used for recording, editing, or titling. To record, edit, or title the MD, slide the tab to close the slot. • If the MD is protected against erasure, “Protected” appears in the display. Press REC/PAUSE. • “Monitor Out” appears in the display. Sound from the selected input will be output from this unit’s analog and digital output terminals. Start playing the sound source. • The sound is output from the MD recorder’s analog and digital output terminals. To cancel Press &. Notes • This function is useful to monitor the sound of an external digital component connected to the DIGITAL OPTICAL 2 IN jack. • The digital volume can be adjusted when using the monitor out function. However, please note that the digital volume setting is restored to the default (0 dB) the next time a recording is made. 16 0105MDXE300(M).13-16.E 16 02.5.17, 10:54 AM EDITING TITLE EDIT DELETE SET CANCEL ENTER EDIT GHI JKL SET/ENTER CHAR NUMBER This unit offers the following editing operations. ABC Erase Lets you erase a track, the entire disc, or part of a track. You can also erase the title of a disc, or the titles of tracks on a disc. Move DEF 1 2 3 4 MNO 5 PQR 6 STU 7 VWX 8 YZ 9 / 0 SPACE +10 +100 ! ⁄ $ › REC/ PAUSE SYNC & M-MARK REC MODE INPUT Lets you move a track to a different track number. English English One of the main advantages of MD is its editing capabilities. You can remove the commercials from a radio broadcast, reorder songs into the order you want, remove songs, combine songs, and even remove part of a song. RANDOM PROGRAM REPEAT A-B S/F DISPLAY SCROLL POWER Combine Lets you combine two adjacent tracks. Divide Lets you split a single track into two different tracks. FRA check Lets you recover disc space that may have been lost after multiple edit operations. TOC write Lets you write TOC information to the disc so that changes are saved. Undo Lets you undo the previous edit operation if you make a mistake. Notes on editing To cancel an edit Press &. Before editing Make sure that the MD is not protected against erasure. If the MD is protected, you cannot edit the MD. Slide the tab to close the slot on the side of the MD. After editing • Press in order to update the TOC information and pull the MD out. • The TOC indicator lights to show that the TOC information has not yet been written to the disc. Undo is possible only when the TOC indicator is lit. 17 0106MDXE300(M).17-20.E 17 02.5.17, 10:54 AM EDITING Part erase Erase This operation lets you erase part of a track. The ability to erase sound without having to re-record is a convenient function of MD. You can erase the entire disc, a single track, or just part of a track. Erase Before erasing 1 2 A 3 B C Disc erase This operation lets you erase all audio and title (character) data to create a blank MD. Please note that once erased, this data can be recovered using the UNDO function. 1 2 3 Press & to set this unit to stop mode. Press EDIT repeatedly to display “Disc Erase?”, then press SET/ENTER. • “DiscEraseOK?” appears in the display. Press SET/ENTER again. • When all audio, name and title data has been erased “Complete” appears momentarily. 1 After erasing 1 2 3 Track erase 4 This operation lets you erase a single track as well as corresponding title data. After you erase the track, the total number of tracks decreases by one and all tracks following that track are renumbered. 5 Example: Erasing track 3 1 Before erasing After erasing 1 2 3 2 A 1 3 B 2 A 4 C 3 B 5 D 4 D E 6 F Use $ or › to select the track you want to erase. Press EDIT repeatedly to display “Erase ?”, then press SET/ENTER. • “(track number) Erase OK?” appears in the display. 3 A2 Use ! or ⁄ to locate the beginning of the part you want to erase (point A), then press * to pause at that point. Press EDIT repeatedly to display “A–B Erase?”, then press SET/ENTER. • Point A (from step 2) is registered and “Erase A–_” appears in the display. Use # and ⁄ to locate the end of the part you want to erase (point B). Press SET/ENTER to register point B. • “Check” appears, then the part you specified plays repeatedly and “Erase A–B?” appears in the display. 6 • Press EDIT repeatedly to display “A point” and “B point” alternately. Adjust the selected point by using $ or › in the direction you want to move the point. Each point can be adjusted up to 2 seconds in either direction. Press SET/ENTER again. • The part is erased and “Complete” appears momentarily. Notes • After part erase, a new track number is automatically assigned to the section starting after point B. • Point B cannot be positioned before point A. If you plan to erase two or more tracks To avoid confusion you should always erase from higher track numbers to lower track numbers. This prevents accidental renumbering of tracks you plan to erase. 18 18 C Play the track containing the part you want to erase. Press SET/ENTER again. • The track is erased and “Complete” appears momentarily. 0106MDXE300(M).17-20.E 4 B To adjust points A and B 6 5 E 2 A1 02.5.17, 10:54 AM EDITING This operation lets you erase the title of the disc or the title of tracks on a disc. The title of the disc can only be erased during the stop mode, however, the title of the track can be erased during play or stop mode. 3 Press EDIT repeatedly to display “Move ?”, then press SET/ENTER. Use $ or › to select the track’s destination (new track number). Selected track To erase a disc title 1 2 3 ANALOG DISC TRACK TOTAL DIGITAL OPT.123 REMAIN COAX. 32 44.1 48 RANDOM REC kHz PROGRAM MONO REPEAT A-B S F MANUAL Press & to set this unit to stop mode. Press EDIT repeatedly to display “Title Erase?”, then press SET/ENTER. • “Disc Title” and “Erase OK?” appear alternatively in the display. Press SET/ENTER again. • The disc title is erased and “Complete” appears momentarily. To erase a track title 1 2 3 Use $ or › to select the track with the title you want to erase. Press EDIT repeatedly to display “Title Erase?”, then press SET/ENTER. • “Track Title” and “Erase OK?” appear alternatively in the display. Press SET/ENTER again. • The track title is erased and “Complete” appears momentarily. Notes • Note that the DISC and TRACK indicators appear in the display when “Title Erase” is displayed to distinguish between the two operations. • To avoid mistakes when erasing the disc or track names, press DISPLAY repeatedly until the title display screen appears so that titles can be confirmed beforehand. Move This function lets you change the position of any track. When you move tracks, all tracks are automatically renumbered. Example: Moving track 2 to track number 4 1 Before moving 2 A 1 After moving 1 3 B 2 A 4 C 3 C 5 D 4 D 6 E 5 B 4 TOC L dB – 00 –60 R –30 Destination –10 –6 4 – 2 –1 0 OVER Press SET/ENTER. • “Complete” appears momentarily in the display. Combine This function lets you combine two consecutive tracks into one. After you combine the tracks, the total number of tracks decreases by one and the tracks following the combined tracks are renumbered. Example: Combining tracks 2 and 3 1 Before combining After combining 1 2 3 4 2 A 1 3 B 4 C 2 A 5 D 3 B+C 6 E 4 D 5 E Press & to stop playback. Use $ or › to select the second track of the two you want to combine. Press EDIT repeatedly to display “Combine ?”, then press SET/ENTER. • “Check” appears momentarily, then the MD recorder plays the 4 seconds before and after the point where the tracks will be connected. “(track number) + (track number) OK?” appears in the display. Press SET/ENTER again. • The tracks are combined and “Complete” appears momentarily. Note • A track recorded in MDLP mode cannot be combined with a track recorded in the non-MDLP mode. (“Impossible” appears in the display.) 6 E Use $ or › to select the track you want to move. 19 0106MDXE300(M).17-20.E 19 02.5.17, 10:54 AM English English 2 Disc or track title erase EDITING Divide TOC write This function lets you divide one track into two separate tracks by adding a new track number to a specified point in the track. Example: Dividing track 3 Before dividing After dividing 1 2 3 4 5 1 2 A 1 3 B 2 A 4 C 3 B 5 D 4 C1 6 E 5 C2 6 D 1 2 Play the track you want to divide. Use ! or ⁄ to locate the point where you want to divide the track, then press * to pause at that position. Press EDIT repeatedly to display “Divide ?”, then press SET/ENTER. • “Check” appears momentarily, then “Divide OK ?” appears and the MD recorder starts repeating the point where the track will be divided. If necessary, use $ or › to adjust the position of the point where the track will be divided. • The dividing position can be adjusted up to 2 second (255 steps) in either direction. Press SET/ENTER. • The track is divided and “Complete” appears momentarily. Undo The UNDO function lets you immediately return to the condition before an edit is made (note: you cannot undo an edit once you press any other button). 1 2 When making a recording, the TOC (Table Of Contents) of the MD is written as soon as recording is finished. When making disc edits or titling, however, the TOC isn’t automatically written unless the disc is ejected. If the unit is accidentally turned off before writing edits or titling to the TOC, it is possible that these changes will not be saved. By using this function, you can ensure that your edits or titles are saved on the disc. 3 Press & to stop playback. Press EDIT repeatedly to display “TOC Write ?”, then press SET/ENTER. • “TOC Write OK ?” appears. Press SET/ENTER. • “TOC Writing” blinks in the display momentarily. Note • The TOC Write function can only be selected when the TOC indicator is lit in the display. FRA check When edit functions such as “MOVE” and “DIVIDE” are performed, spaces of recordable space may be lost and “TOC Full” may appear in the display to indicate that no more recording can be performed. When this occurs, it may be possible to recover the FRA (Freely Recordable Area) on the disc that was lost during edit functions so that more recording is possible. 1 2 3 Press & to stop playback. Press EDIT repeatedly to display “FRA Check ?”, then press SET/ENTER. • “FRA Check OK ?” appears. Press SET/ENTER. • “Complete” appears momentarily. Press & to stop the MD recorder. Press EDIT repeatedly to display “Undo ____*1”, then press SET/ENTER. • “Undo OK ?” appears in the display. To cancel undoing, press &. ____*1 : The type of editing you can undo is displayed here. 3 Press SET/ENTER again to undo. Note • You cannot undo an edit once it has been written to the TOC. 20 0106MDXE300(M).17-20.E 20 02.5.17, 10:54 AM TITLING • Having pressed CHAR in step 3: Press 1 [ABC] once to select “A”. Press 1 [ABC] twice to select “B”. • Having pressed NUMBER in step 3: Press 1 [ABC] to select “1”. • To search symbols quickly: Having pressed CHAR and 1 [ABC] to select uppercase “A”, press $ to search symbols from the end. DELETE/ CANCEL 2,6 3A 3A,3B EDIT TITLE DELETE SET CANCEL ENTER EDIT CHAR NUMBER ABC DEF GHI JKL 1 2 3 4 MNO 5 PQR 6 STU 7 VWX 8 YZ 9 / 0 SPACE +10 +100 ! 1,3C REC/ PAUSE SYNC M-MARK REC MODE INPUT RANDOM PROGRAM 4 3B Also, you can use $ or › repeatedly to scroll through the entire character set. 4 Note +10 [SPACE] ⁄ 1,3C 1 • When a number is selected using a number button in step 3, it is not necessary to press SET/ENTER. 5 Repeat steps 3 and 4 to complete your title. To delete a character (ABCD = ABD) 1 Use ! or ⁄ to move the cursor to the position of the character you want to delete. 2 Press DELETE/CANCEL. REPEAT A-B Press SET/ENTER to enter the character. S/F DISPLAY SCROLL POWER To insert a character (ABCD = ABTCD) 1 1 Use ! or ⁄ to move the cursor to the position where you want to insert the character. 2 Use CHAR or character buttons to select the new character. 3 Press SET/ENTER to set the character. The character previously in that position automatically moves to the right. To title a disc Press & to stop playback. To title a track 1 Press & to stop playback. 2 Use $ or › to select the track you want to title. You can also title during playback, pause, or recording. However, UNDO is not possible in these cases. 2 3 Press TITLE to activate the title mode. • The cursor appears in the display. To insert a space (ABCD = AB CD) 1 Use ! or ⁄ to move the cursor to the position where you want to insert the space. 2 Press +10 [SPACE] on the remote control. To cancel titling Press &. 6 A) To enter letters of the alphabet 1 Press CHAR repeatedly to select between uppercase letters (A, B, C…) and lowercase letters (a, b, c…). 2 Use the numbers [characters] buttons to select a letter. To undo TITLE 1 Press & to display the total tracks and total playing time on the disc. 2 Press EDIT repeatedly to display “Undo Title”, then press SET/ENTER. “Undo OK ?” appears in the display. 3 Press SET/ENTER again to undo. B) To enter numbers 1 Press NUMBER. 2 Use the numbers [characters] buttons to select a number. C) To enter symbols (! # $ % &…) Use $ or › to select a symbol. Symbols are between numbers and uppercase letters in the character set. Press TITLE to exit the title mode. • If a title consists of more than 12 characters, it will scroll across the display once and then be displayed in abbreviated form (first 12 characters only). 7 If the TOC indicator is lit, perform the TOC WRITE function. To perform the TOC WRITE function 1 Follow the procedure of “TOC write” on page 20. 2 Press on the front panel. (The MD recorder automatically performs the TOC WRITE function.) 21 0107MDXE300(M).21-25.E 21 02.5.17, 10:54 AM English English Example: This function lets you title recorded MDs and the individual tracks. Titles may consist of uppercase and lowercase letters, numbers, and symbols for a maximum of up to 250 characters for each title. ADDITIONAL INFORMATION MD recorder system notes The recording system in your MD recorder is radically different from those used in cassette and DAT decks and is characterized by the limitations described below. Note, however, that these limitations are inherent to the MD recording system and are not a result of mechanical trouble. “Can’t REC!” is displayed before the maximum recording time has been reached Once 255 tracks have been recorded on one MD, “Can’t REC” is displayed regardless of the total recorded time. “TOC Full” is displayed before the maximum number of tracks (255) have been recorded During automatic track marking, fluctuations in emphasis within songs may be interpreted as song intervals, increasing the total number of tracks and causing “TOC Full” to be displayed. The remaining recording time does not increase even after erasing numerous short tracks Tracks under 12 seconds in length are not counted and so erasing them may not lead to an increase in the recording time. “TOC Reading” is displayed continuously The “TOC Reading” display lasts longer than normal when a brand new (blank) disc is inserted. The total recorded time and the remaining time on the MD do not total to the maximum recording time It is not possible to erase part of a track using the A-B ERASE function This unit organizes the audio data in sound groups and clusters. The minimum size of these units may not consist of less than 10 seconds of stereo sound. Limitations when recording over an existing track • The correct remaining recording time may not be displayed. • You may find it impossible to record over a track if that track has been recorded over several times already. If this happens, erase the track using the ERASE function. • The remaining recording time may be shortened out of proportion to the total recorded time. • Recording over a track to eliminate noise is not recommended since this may shorten the duration of the track. • You may find it impossible to label a track while recording over another track. The correct recorded/playing time may not be displayed during playback of MDs recorded in monaural. SCMS - Serial Copy Management System As a digital audio component, this MD recorder conforms with the Serial Copy Management System (SCMS) standards. The Serial Copy Management System restricts copies made by recording digital signals to firstgeneration copies only. Therefore, an MD recorded through a digital input cannot be used as a source for making another digital recording. • Recording is done in minimum units of 2 seconds each, no matter how short the material. • This unit displays the length of the largest continuous blank area as the remaining time. Therefore, if there are several separate blank spaces, the remaining time will only display a time equivalent to the largest continuous blank space. Tracks created through editing may exhibit sound dropout during search operations. Track numbers are not recorded correctly Incorrect assignment or recording of track numbers may result when CD tracks are divided into several smaller tracks during digital recording. 22 0107MDXE300(M).21-25.E 22 02.5.17, 10:54 AM ADDITIONAL INFORMATION Can’t copy Digital recording cannot be performed. (See “SCMS Serial Copy Management System” on page 22.) Can’t edit! Edit operations are not possible. Can’t REC! Recording is not possible. The loaded disc may be protected or there may not be enough blank space remaining on the disc. Can’t REC Recording is not possible. The loaded disc may be damaged. DIG in Unlock No digital signal is being input to the selected digital input jack. TOC Writing English English Display messages The TOC data is being written to the disc. Do not move the unit or pull out the mains lead. If you do, recorded material may not be saved normally. TOC Reading The unit is reading the TOC data. Protected The record protection on the inserted MD is set to “protect”. PlayBack MD The inserted MD is a designed for playback only (you cannot record on this disc). Monitor Out The monitor out function is active. The audio signal input to the selected input terminals is output from this unit’s output terminals. No Track Blank disc is played or searched. TMP Over!! The temperature of the unit has exceeded the normal operating temperature. Turn off the unit and let it cool down. If the unit is installed in a place with little ventilation (such as a built in bookcase), move the unit to another location with better ventilation. Disc Full Recording is not possible because there is no blank space remaining on the disc. Title Full! Additional characters cannot be input for the current title because the maximum number of characters for a single title (250) has already been input. UTOC W Error Error occurred when writing to the UTOC. Not Audio The inserted disc is not an audio MD. Tr Protected The selected track cannot be edited because it is protected. TOC Full The disc area allotted for TOC data has become full and further editing is not possible. UTOC Err L0~4 Problem involving UTOC data. 23 0107MDXE300(M).21-25.E 23 02.5.17, 10:54 AM ADDITIONAL INFORMATION Troubleshooting If your MD recorder fails to operate normally, check the following table. It lists common operating errors and simple measures which you can take to correct the problem. If it cannot be corrected, or the symptom is not listed, disconnect the recorder’s power cord and contact your authorized YAMAHA dealer or service center for help. SYMPTOM CAUSE REMEDY The unit does not respond to operations. MD is dirty or damaged. Replace the current disc with a new one. MD is damaged (“UTOC Err L0~4” appears in the display). The unit does not work normally. There is an influence of strong external noise (lightning, excessive static electricity, etc.) or a misoperation was performed while using this unit. Turn the power off and disconnect the AC power from the AC outlet. After about 30 seconds have passed, connect the power and try again. Playback is not possible. Moisture is on the laser pickup. Leave the unit switched ON and wait 20 to 30 minutes for the moisture to evaporate before trying to play a disc. The power is OFF. Press STANDBY/ON (POWER on the remote control) to turn the power on. The disc has been loaded incorrectly. Reload the disc with the label side facing up, and the arrow pointing toward the disc insertion slot. An unrecorded (blank) MD was loaded (“Blank Disc” appears in the display). Insert a recorded MD. The disc is write protected (“Protected” appears in the display). Slide the write-protect tab to the closed position. A pre-mastered MD is loaded (“PlayBack MD” appears in the display). Load a recordable MD. The source is not connected correctly. Check all connections again. The input setting is incorrect. Press INPUT repeatedly to select the correct input jacks. The recording level is too low. Turn REC LEVEL to adjust the recording level. The digital output level of the digital source is too low. Set the digital output level of the digital source to “MAX”. There is not enough blank space left on the MD. Load a recordable MD with fewer recorded tracks, or erase unnecessary tracks from the current MD. If the power cord was unplugged or there was a power outage during recording, that recording may be lost. If recording was interrupted, try recording again starting from the beginning. The MD cannot be removed when partially inserted. The carriage lock function has activated. Insert the MD completely, then press it. Excessive noise. The unit is too close to the television or other component. Place the unit farther away from the television or other component. The remote control does not operate. The batteries are exhausted. Replace the batteries. The remote control transmitter is operated from an incorrect distance or angle. Operate the remote from less than 6 meters (about 20 feet) and within 30° on either side of the sensor. The remote control sensor is located in strong direct light. Place the unit away from the strong light. Recording is not possible. 24 0107MDXE300(M).21-25.E 24 02.5.17, 10:54 AM to eject ADDITIONAL INFORMATION Digital audio system System .................................................. MiniDisc digital audio system Laser .................................................................... Semiconductor laser Laser diode properties Material ................................................................................ GaAIAs Wavelength ............................................................................ 785 nm Pulse time Read mode .................................................... 0.6 mW Continuous Write mode ................... Accessible emission level 2.6 mW 0.5S min cycle 1.5S Repetition Record/Playback time .................................. Max. 80 minutes (Stereo) 261 minutes (ATRAC3-LP2) 323 minutes (ATRAC3-LP4) Sampling frequency ............................................................... 44.1 kHz (32 kHz and 48 kHz signals converted to 44.1 kHz for recording) Frequency response ......................................... 5 – 20,000 Hz ±0.5 dB Signal-to-Noise ratio .................................................................. 99 dB Digital rec level ............................................................ Min. – +12 dB General Power supplies [U.K. and Europe models] ........................................... 230 V, 50 Hz [General model] ................................. 110/120/220/240 V, 50/60 Hz Power consumption ..................................................................... 12 W Power consumption (standby mode) [U.K. and Europe models] ....................................................... 7.5 W [General model] ....................................................................... 7.6 W Dimensions (W x H x D) ....................................... 217 x 88 x 297 mm (8-9/16" x 3-7/16" x 11-11/16") Weight ................................................................. 2.6 kg (5 lbs. 12 oz.) Specifications subject to change without notice. US and foreign patents licensed from Dolby Laboratories Licensing Corporation. Inputs LINE IN (REC) Type ...................................................................................... Pin jack Standard input level (50 k-ohms) ......................................... 300 mV DIGITAL IN (OPTICAL) (2) Type ................................................... Square optical connector jack Outputs LINE OUT (REC) Type ...................................................................................... Pin jack Standard output level (1 kHz, 0 dB) .......................... 2.0 ± 0.5 Vrms DIGITAL OUT (OPTICAL) Type ................................................... Square optical connector jack 25 0107MDXE300(M).21-25.E 25 02.5.17, 10:54 AM English English Specifications GB CAUTION Use of controls or adjustments or performance of procedures other than those specified herein may result in hazardous radiation exposure. CLASS 1 LASER PRODUCT LASER KLASSE 1 PRODUKT LUOKAN 1 LASERLAITE KLASS 1 LASER APPARAT MDX-E300 ATTENTION L’emploi de commandes, de réglages ou un choix de procédures différents des spécifications de cette brochure peut entraîner une exposition à d’éventuelles radiations pouvant être dangereses. ACHTUNG Die Verwendung von Bedienungselementen oder Einstellungen oder die Durchführung von Bedienungsvorgängen, die nicht in dieser Anleitung aufgeführt sind, kann zu einem Kontakt mit gefährlichen Laserstrahlen führen. MDX-E300 Minidisc Recorder Lecteur Enregistreur de Minidisc OBSERVERA Användning av kontroller och justeringar eller genomförande av procedurer andra än de som specificeras i denna bok kan resultera i att du utsätter dig för farlig strålning. ATTENZIONE Uso di controlli o regolazioni o procedure non specificamente descritte può causare l’esposizione a radiazioni di livello pericoloso. PRECAUCIÓN El uso de los controles o los procedimientos de ajuste o utilización diferentes de los especificados en este manual pueden causar una exposición peligrosa a la radiación. CAUTION – VISIBLE AND / OR INVISIBLE LASER RADIATION WHEN OPEN. AVOID EXPOSURE TO BEAM. VARNING – SYNLIG OCH / ELLER OSYNLIG LASERSTRÅLNING NÄR DENNA DEL ÄR ÖPPNAD. STRÅLEN ÄR FARLIG. VARO ! AVATTAESSA OLET ALTTIINA NÄKYVÄLLE JA / TAI NÄKYMÄTÖMÄLLE LASERSÄTEILYLLE. ÄLÄ KATSO SÄTEESEEN. VARNING – SYNLIG OCH / ELLER OSYNLIG LASERSTRÅLNING NÄR DENNA DEL ÄR ÖPPNAD. BETRAKTA EJ STRÅLEN. VORSICHT ! SICHTBARE UND / ODER UNSICHTBARE LASERSTRAHLUNG WENN ABDECKUNG GEÖFFNET. NICHT DEM STRAHL AUSSETZEN. VOORZICHTIG Gebruik van bedieningsorganen of instellingen, of uitvoeren van handelingen anders dan staan beschreven in deze handleiding kunnen leiden tot blootstelling aan gevaarlijke stralen. VARO! AVATTAESSA JA SUOJALUKITUS OHITETTAESSA OLET ALTTIINA NÄKYMÄTTÖMÄLLE LASERSÄTEILYLLE. ÄLÄ KATSO SÄTEESEEN. VARNING! OSYNLIG LASERSTRÅLNING NÄR DENNA DEL ÄR ÖPPNAD OCH SPÄRREN ÄR URKOPPLAD. BETRAKTA EJ STRÅLEN. YAMAHA YAMAHA YAMAHA YAMAHA YAMAHA YAMAHA YAMAHA OWNER’S MANUAL MODE D’EMPLOI BEDIENUNGSANLEITUNG BRUKSANVISNING MANUALE DI ISTRUZIONI MANUAL DE INSTRUCCIONES GEBRUIKSAANWIJZING ELECTRONICS CORPORATION, USA 6660 ORANGETHORPE AVE., BUENA PARK, CALIF. 90620, U.S.A. CANADA MUSIC LTD. 135 MILNER AVE., SCARBOROUGH, ONTARIO M1S 3R1, CANADA ELECTRONIK EUROPA G.m.b.H. SIEMENSSTR. 22-34, 25462 RELLINGEN BEI HAMBURG, F.R. OF GERMANY ELECTRONIQUE FRANCE S.A. RUE AMBROISE CROIZAT BP70 CROISSY-BEAUBOURG 77312 MARNE-LA-VALLEE CEDEX02, FRANCE ELECTRONICS (UK) LTD. YAMAHA HOUSE, 200 RICKMANSWORTH ROAD WATFORD, HERTS WD1 7JS, ENGLAND SCANDINAVIA A.B. J A WETTERGRENS GATA 1, BOX 30053, 400 43 VÄSTRA FRÖLUNDA, SWEDEN MUSIC AUSTRALIA PTY, LTD. 17-33 MARKET ST., SOUTH MELBOURNE, 3205 VIC., AUSTRALIA Printed in Malaysia 0101MDXE300(M).cv1-4.E 1 V914100 02.5.17, 0:02 PM-
 1
1
-
 2
2
-
 3
3
-
 4
4
-
 5
5
-
 6
6
-
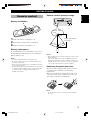 7
7
-
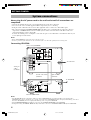 8
8
-
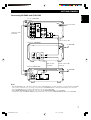 9
9
-
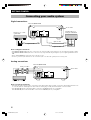 10
10
-
 11
11
-
 12
12
-
 13
13
-
 14
14
-
 15
15
-
 16
16
-
 17
17
-
 18
18
-
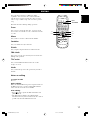 19
19
-
 20
20
-
 21
21
-
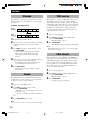 22
22
-
 23
23
-
 24
24
-
 25
25
-
 26
26
-
 27
27
-
 28
28


Yamaha MDX-E300 Manual de usuario
- Categoría
- Jugadores minidisc
- Tipo
- Manual de usuario
en otros idiomas
- français: Yamaha MDX-E300 Manuel utilisateur
- italiano: Yamaha MDX-E300 Manuale utente
- English: Yamaha MDX-E300 User manual
- Deutsch: Yamaha MDX-E300 Benutzerhandbuch
- русский: Yamaha MDX-E300 Руководство пользователя
- Nederlands: Yamaha MDX-E300 Handleiding
- português: Yamaha MDX-E300 Manual do usuário
- dansk: Yamaha MDX-E300 Brugermanual
- polski: Yamaha MDX-E300 Instrukcja obsługi
- čeština: Yamaha MDX-E300 Uživatelský manuál
- svenska: Yamaha MDX-E300 Användarmanual
- Türkçe: Yamaha MDX-E300 Kullanım kılavuzu
- suomi: Yamaha MDX-E300 Ohjekirja
- română: Yamaha MDX-E300 Manual de utilizare
Artículos relacionados
-
Yamaha MDX-E300 El manual del propietario
-
-
-
-
-
-
-
-
-