Sony XAV-AX1005DB Instrucciones de operación
- Categoría
- Radios
- Tipo
- Instrucciones de operación

XAV-AX1005DB
4-740-893-11(1)
AV RECEIVER
To cancel the demonstration (Demo) display, see page 15.
For the connection/installation, see page 25.
Zum Deaktivieren der Demo-Anzeige (Demo) schlagen Sie bitte
auf Seite 16 nach.
Informationen zum Anschluss und zur Installation finden Sie auf
Seite 26.
Pour annuler la démonstration (Démo), reportez-vous à la
page 16.
Pour le raccordement/l’installation, reportez-vous à la page 26.
Per annullare la dimostrazione (Dimostrazione), vedere a
pagina 16.
Per l’installazione e i collegamenti, consultare pagina 26.
Para cancelar la pantalla de demostración (Demostración),
consulte la página 16.
Para la conexión/instalación, consulte la página 26.
Operating Instructions
GB
Bedienungsanleitung
DE
Mode d’emploi
FR
Istruzioni per l’uso
IT
Manual de instrucciones
ES

2GB
The nameplate indicating operating voltage, etc., is
located on the bottom of the chassis.
Warning
To prevent fire or shock hazard, do not
expose the unit to rain or moisture.
To avoid electrical shock, do not open the
cabinet. Refer servicing to qualified personnel
only.
Made in Thailand
Hereby, Sony Corporation declares that this
equipment is in compliance with Directive 2014/53/
EU.
The full text of the EU declaration of conformity is
available at the following internet address:
http://www.compliance.sony.de/
The validity of the CE marking is restricted to only
those countries where it is legally enforced, mainly
in the countries EEA (European Economic Area) and
Switzerland.
Notice for customers: the following
information is only applicable to equipment
sold in countries applying EU Directives
This product has been manufactured by or on
behalf of Sony Corporation.
EU Importer: Sony Europe Limited.
Inquiries to the EU Importer or related to product
compliance in Europe should be sent to the
manufacturer’s authorized representative, Sony
Belgium, bijkantoor van Sony Europe Limited, Da
Vincilaan 7-D1, 1935 Zaventem, Belgium.
Disposal of waste batteries and
electrical and electronic equipment
(applicable in the European Union
and other countries with separate
collection systems)
This symbol on the product, the battery or on the
packaging indicates that the product and the
battery shall not be treated as household waste. On
certain batteries this symbol might be used in
combination with a chemical symbol. The chemical
symbol for lead (Pb) is added if the battery contains
more than 0.004% lead. By ensuring that these
products and batteries are disposed of correctly,
you will help to prevent potentially negative
consequences for the environment and human
health which could be caused by inappropriate
waste handling. The recycling of the materials will
help to conserve natural resources. In case of
products that for safety, performance or data
integrity reasons require a permanent connection
with an incorporated battery, this battery should be
replaced by qualified service staff only. To ensure
that the battery and the electrical and electronic
equipment will be treated properly, hand over
these products at end-of-life to the appropriate
collection point for the recycling of electrical and
electronic equipment. For all other batteries, please
view the section on how to remove the battery from
the product safely. Hand the battery over to the
appropriate collection point for the recycling of
waste batteries. For more detailed information
about recycling of this product or battery, please
contact your local Civic Office, your household
waste disposal service or the shop where you
purchased the product or battery.
Disclaimer regarding services offered by third
parties
Services offered by third parties may be changed,
suspended, or terminated without prior notice.
Sony does not bear any responsibility in these sorts
of situations.
For safety, be sure to install this unit in the
dashboard of the car as the rear side of the unit
becomes hot during use.
For details, see “Connection/Installation”
(page 25).
Warning if your car’s ignition has no ACC
position
Do not install this unit in a car that has no ACC
position. The display of the unit does not turn off
even after turning the ignition off, and this
causes battery drain.

3GB
Caution
IN NO EVENT SHALL SONY BE LIABLE FOR ANY
INCIDENTAL, INDIRECT OR CONSEQUENTIAL
DAMAGES OR OTHER DAMAGES INCLUDING,
WITHOUT LIMITATION, LOSS OF PROFITS, LOSS OF
REVENUE, LOSS OF DATA, LOSS OF USE OF THE
PRODUCT OR ANY ASSOCIATED EQUIPMENT,
DOWNTIME, AND PURCHASER’S TIME RELATED TO
OR ARISING OUT OF THE USE OF THIS PRODUCT, ITS
HARDWARE AND/OR ITS SOFTWARE.
Dear customer, this product includes a radio
transmitter.
According to UNECE Regulation no. 10, a vehicle
manufacturers may impose specific conditions for
installation of radio transmitters into vehicles.
Please check your vehicle operation manual or
contact the manufacturer of your vehicle or your
vehicle dealer, before you install this product into
your vehicle.
Emergency calls
This BLUETOOTH car handsfree and the electronic
device connected to the handsfree operate using
radio signals, cellular, and landline networks as well
as user-programmed function, which cannot
guarantee connection under all conditions.
Therefore do not rely solely upon any electronic
device for essential communications (such as
medical emergencies).
On BLUETOOTH communication
• Microwaves emitting from a BLUETOOTH device
may affect the operation of electronic medical
devices. Turn off this unit and other BLUETOOTH
devices in the following locations, as it may cause
an accident.
– where inflammable gas is present, in a hospital,
train, airplane, or petrol station
– near automatic doors or a fire alarm
• This unit supports security capabilities that
comply with the BLUETOOTH standard to provide
a secure connection when the BLUETOOTH
wireless technology is used, but security may not
be enough depending on the setting. Be careful
when communicating using BLUETOOTH wireless
technology.
• We do not take any responsibility for the leakage
of information during BLUETOOTH
communication.
If you have any questions or problems concerning
your unit that are not covered in this manual,
consult your nearest Sony dealer.
Important notice

4GB
Table of Contents
Warning . . . . . . . . . . . . . . . . . . . . . . . . . . . . . . . . . . . 2
Guide to Parts and Controls . . . . . . . . . . . . . . . . . . . 5
Getting Started
Performing Initial Settings . . . . . . . . . . . . . . . . . . . . 7
Preparing a BLUETOOTH Device. . . . . . . . . . . . . . . . 7
Connecting a USB Device . . . . . . . . . . . . . . . . . . . . . 8
Connecting Other Portable Audio Device . . . . . . . . 8
Connecting Rear View Camera . . . . . . . . . . . . . . . . 8
Listening to the Radio
Listening to the Radio. . . . . . . . . . . . . . . . . . . . . . . . 9
Using Tuner Option Functions . . . . . . . . . . . . . . . . . 9
Listening to the DAB/DAB+ Radio . . . . . . . . . . . . . 10
Using DAB Options Functions . . . . . . . . . . . . . . . . 11
Playback
Playing a USB Device . . . . . . . . . . . . . . . . . . . . . . . 11
Playing a BLUETOOTH Device. . . . . . . . . . . . . . . . . 11
Searching and Playing Tracks. . . . . . . . . . . . . . . . . 12
Other Settings During Playback. . . . . . . . . . . . . . . 12
Handsfree Calling
Receiving a Call . . . . . . . . . . . . . . . . . . . . . . . . . . . . 13
Making a Call . . . . . . . . . . . . . . . . . . . . . . . . . . . . . . 13
Available Operations During a Call . . . . . . . . . . . . 14
Useful Functions
Apple CarPlay . . . . . . . . . . . . . . . . . . . . . . . . . . . . . 14
Using Gesture Command . . . . . . . . . . . . . . . . . . . . 15
Settings
Basic Setting Operation . . . . . . . . . . . . . . . . . . . . . 15
General Settings (General) . . . . . . . . . . . . . . . . . . . 15
Sound Settings (Sound) . . . . . . . . . . . . . . . . . . . . . 16
Visual Settings (Visual) . . . . . . . . . . . . . . . . . . . . . . 17
BLUETOOTH Settings (Bluetooth). . . . . . . . . . . . . . 17
Additional Information
Updating the Firmware. . . . . . . . . . . . . . . . . . . . . . 17
Precautions . . . . . . . . . . . . . . . . . . . . . . . . . . . . . . . 17
Specifications . . . . . . . . . . . . . . . . . . . . . . . . . . . . . 19
Troubleshooting . . . . . . . . . . . . . . . . . . . . . . . . . . . 21
Messages . . . . . . . . . . . . . . . . . . . . . . . . . . . . . . . . . 23
Connection/Installation
Cautions . . . . . . . . . . . . . . . . . . . . . . . . . . . . . . . . . 25
Parts List for Installation . . . . . . . . . . . . . . . . . . . . 25
Connection . . . . . . . . . . . . . . . . . . . . . . . . . . . . . . . 26
Installation . . . . . . . . . . . . . . . . . . . . . . . . . . . . . . . 29

5GB
Guide to Parts and Controls
Display/touch panel
HOME
Open the HOME menu.
ATT (attenuate)
Press and hold for 1 second to attenuate the
sound.
To cancel, press and hold again, or rotate the
volume control dial.
Volume control dial
Rotate to adjust the volume when the sound is
output.
OPTION
Press to open the OPTION screen (page 6).
VOICE
Press and hold to activate the voice command
function for Apple CarPlay.
USB port
AUX input jack
Main unit

6GB
Playback screen:
HOME screen:
OPTION screen:
Status indication
(source option)
Open the source option menu. The available
items differ depending on the source.
Application specific area
Display playback controls/indications or show
the unit’s status. Displayed items differ
depending on the source.
Clock (page 15)
(return to the playback screen)
Switch from the HOME screen to the playback
screen.
Sources and Settings select keys
Change the source or make various settings.
Display the setting icon and other icons by
swiping the bottom of this area right or left.
Sounds select keys
Change the sound.
(EXTRA BASS)
Change the EXTRA BASS setting (page 16).
(EQ10/Subwoofer)
Change the EQ10/Subwoofer setting (page 16).
(monitor off)
Turn off the monitor. When the monitor is turned
off, touch any part of the display to turn it back
on.
Screen displays
Lights up when the sound is attenuated.
Lights up when AF (Alternative
Frequencies) is available.
Lights up when the current traffic
information (TA: Traffic Announcement)
is available.
Lights up when a DAB announcement is
available.
Indicates the signal strength status of
the DAB tuner.
Lights up when the audio device is
playable by enabling the A2DP
(Advanced Audio Distribution Profile).
Lights up when handsfree calling is
available by enabling the HFP (Handsfree
Profile).
Indicates the signal strength status of
the connected cellular phone.
Indicates the remaining battery status of
the connected cellular phone.
Lights up when the Bluetooth® signal is
on. Flashes when the connection is in
progress.

7GB
Performing Initial Settings
You need to perform initial settings before
operating the unit for the first time, after replacing
the car battery, or changing connections.
If the initial settings screen does not appear when
you turn on the unit, perform the factory reset
(page 16) to initialize the unit.
1 Touch [Language], then set the display
language.
2 Touch [Demo] once to select [OFF] to disable
the demonstration mode.
3 Touch [OK].
The startup caution appears.
4 Read through the startup caution, then if
you accept all conditions, touch [Close].
The setting is complete.
This setting can be further configured in the setting
menu (page 15).
Preparing a BLUETOOTH Device
You can enjoy music or perform handsfree calling
depending on the BLUETOOTH compatible device
such as smartphones, cellular phones, and audio
devices (hereafter “BLUETOOTH device” if not
otherwise specified). For details on connecting,
refer to the operating instructions supplied with the
device.
Before connecting the device, turn down the
volume of this unit; otherwise, a loud sound may
result.
When connecting a BLUETOOTH device for the first
time, mutual registration (called “pairing”) is
required. Pairing enables this unit and other devices
to recognize each other.
1 Place the BLUETOOTH device within 1 m
(3 ft) of this unit.
2 Press HOME, then touch [Settings].
3 Touch [Bluetooth].
4 Touch [Bluetooth Connection], then set the
signal to [ON].
The BLUETOOTH signal is turned on and lights
up on the status bar of the unit.
5 Touch [Pairing].
flashes while the unit is in pairing standby
mode.
6 Perform pairing on the BLUETOOTH device
so it detects this unit.
7 Select [XAV-AX1005DB] shown in the display
of the BLUETOOTH device.
If your model name does not appear, repeat
from step 5.
8 If passkey* input is required on the
BLUETOOTH device, input [0000].
* Passkey may be called “passcode,” “PIN code,” “PIN
number,” “password,” etc., depending on the
BLUETOOTH device.
When pairing is made, stays lit.
9 Select this unit on the BLUETOOTH device to
establish the BLUETOOTH connection.
or lights up when the connection is made.
Notes
• The unit can only be connected with one BLUETOOTH
device at a time.
• To disconnect the BLUETOOTH connection, turn the
connection off from either the unit or the BLUETOOTH
device.
• BLUETOOTH pairing is not possible while Apple CarPlay is
running.
Getting Started
Pairing and connecting with a
BLUETOOTH device
[0000]
Input passkey

8GB
To use a paired device, connection with this unit is
required. Some paired devices will connect
automatically.
1 Press HOME, then touch [Settings].
2 Touch [Bluetooth].
3 Touch [Bluetooth Connection], then touch
[ON].
Make sure that lights up on the status bar of
the unit.
4 Activate the BLUETOOTH function on the
BLUETOOTH device.
5 Operate the BLUETOOTH device to connect
to this unit.
or lights up on the status bar.
To connect the last-connected device from
this unit
When the ignition is turned to on with the
BLUETOOTH signal activated, this unit searches for
the last-connected BLUETOOTH device, and
connection is made automatically.
Note
While streaming BLUETOOTH audio, you cannot connect
from this unit to the cellular phone. Connect from the
cellular phone to this unit instead.
To install the microphone
For details, see “Installing the microphone”
(page 28).
Connecting a USB Device
1 Turn down the volume on the unit.
2 Open the USB port lid, then connect the USB
device to the unit.
To connect an iPhone, use the USB connection
cable for iPhone (not supplied).
Connecting Other Portable Audio
Device
1 Turn off the portable audio device.
2 Turn down the volume on the unit.
3 Connect the portable audio device to the
AUX input jack (stereo mini jack) on the unit
with a connecting cord (not supplied)*.
* Be sure to use a straight type plug.
4 Press HOME, then touch [AUX].
To match the volume level of the connected
device to other sources
Start playback of the portable audio device at a
moderate volume, and set your usual listening
volume on the unit.
During playback, touch , then touch [Input
Level]. Adjust the volume level between [-10] and
[+15].
Connecting Rear View Camera
By connecting the optional rear view camera to the
CAMERA IN terminal, you can display the picture
from the rear view camera. For details, see
“Connection/Installation” (page 25).
To display the picture from the rear view
camera
Press HOME, touch [Rear Camera].
Connecting with a paired BLUETOOTH
device

9GB
Listening to the Radio
To listen to the radio, press HOME then touch
[Tuner].
Reception controls/indications
Current band
Change the band (FM1, FM2, FM3, AM1 or AM2).
Current frequency, program service name*,
RDS (Radio Data System) indication*
* During RDS reception.
(tuner option)
Open the tuner option menu.
SEEK–/SEEK+
Tune in automatically.
/
Tune in manually.
Touch and hold to continuously skip
frequencies.
Preset numbers
Select a preset station. Swipe right/left to show
the other preset stations.
Touch and hold to store the current frequency in
that preset.
1 Select the desired band (FM1, FM2, FM3,
AM1 or AM2).
2 Perform tuning.
To tune automatically
Touch SEEK–/SEEK+.
Scanning stops when the unit receives a station.
To tune manually
Touch and hold / to locate the approximate
frequency, then touch / repeatedly to finely
adjust to the desired frequency.
1 While receiving the station that you want to
store, touch and hold the desired preset
number.
1 Select the band, then touch the desired
preset number.
Using Tuner Option Functions
The following functions are available by touching
.
BTM (Best Tuning Memory)
Stores stations in order of frequency on the
preset numbers. 18 stations can be stored for FM
and 12 stations for AM as preset stations.
AF*
Select [ON] to continuously retune the station to
the strongest signal in a network.
TA*
Select [ON] to receive current traffic information
or traffic programs (TP) if available.
Regional*
Select [ON] to stay with the station you are
receiving while the AF function is set to on. If you
leave this regional program’s reception area,
select [OFF]. This function does not work in the
UK and some other areas.
PTY*
Select a program type from the PTY list to search
for a station broadcasting the selected program
type.
* Only available during FM reception.
To receive emergency announcements
With the AF or TA function on, emergency
announcements will automatically interrupt the
currently selected source.
Listening to the Radio
Tuning
Storing manually
Receiving stored stations

10GB
Listening to the DAB/DAB+ Radio
To listen to the DAB/DAB+ radio, press HOME then
touch [DAB+].
Tips
• Set [Antenna Power] to [ON] (default) or [OFF] depending
on the type of DAB antenna (aerial) (not supplied)
(page 11).
• When [DAB+] is selected for the first time after performing
the factory reset, the auto tune starts automatically. Allow
the auto tune to finish. (If interrupted, the auto tune will
start again the next time you select [DAB+].) If no DAB
station is stored by the auto tune, tune by touching [Auto
Tune] of (list).
Reception controls/indications
(list)
Open the station list.
Current band
Change the band (DAB1, DAB2 or DAB3).
Station group name, station name
(DAB Options)
Open the DAB Options menu.
SEEK–/SEEK+
Search for stations.
/
Search for station groups.
(Available only when [Seek By] is set to [Station
Gp].)
Preset numbers
Select a preset station. Swipe right/left to show
the other preset stations.
Touch and hold to store the current station in
that preset.
Before operation, set [Seek By] to [Station Gp] for
searching by station groups (page 11).
1 Touch SEEK+/– to search for a station.
Scanning stops when the unit receives a station.
Search until the desired station is received.
To search for a station group
Touch and hold / to search for a station group
and release when the desired station group is
displayed.
1 While receiving the station that you want to
store, touch and hold the desired preset
number.
1 Touch the desired preset number.
Before operation, set [Seek By] to [A-Z] for
searching by station name (page 11).
1 Touch .
The station list appears.
2 Touch the desired station.
To search from playback screen
Touch SEEK+/– to switch to the previous/next
station.
To update the station list
Touch , then touch [Auto Tune].
Searching for station by station group
Storing a station manually
Receiving stored stations
Searching for station by station name

11GB
Using DAB Options Functions
The following functions are available by touching
.
Seek By
Sets the station search mode: [A-Z] (Search by
station name), [Station Gp] (Search by station
group).
Announce
Enables DAB announcements with interrupting
the currently selected source: [ON], [OFF].
During a DAB announcement, the volume is
adjusted to the level set for TA in RDS (page 9).
Soft Link
Searches for and tunes to the same or similar
program automatically when the signal of the
current program is too weak to receive: [ON],
[OFF].
“Hard Link” follows the same program, and “Soft
Link” follows a similar program.
Information
Displays the currently selected station group
name, station name, PTY type of the station, etc.
Antenna Power
Supplies power to the DAB antenna (aerial) input
terminal: [ON], [OFF].
Playing a USB Device
MSC (Mass Storage Class) type USB devices*
compliant with the USB standard can be used.
* e.g., a USB flash drive, digital media player
Notes
• USB devices formatted with file systems FAT12/16/32/
exFAT are supported.
• For details on the compatibility of your USB device, visit
the support site on the back cover.
• For details on the supported file formats, see “Supported
formats for USB playback” (page 18).
1 Turn down the volume on the unit.
2 Connect the USB device to the USB port.
3 Press HOME, then touch [USB].
Playback starts.
To remove the device
Turn the unit off or turn the ignition switch to the
ACC off position, then remove the USB device.
Playing a BLUETOOTH Device
You can play contents on a connected device that
supports BLUETOOTH A2DP (Advanced Audio
Distribution Profile).
1 Make a BLUETOOTH connection with the
audio device (page 7).
2 Press HOME, then touch [BT Audio].
3 Operate the audio device to start playback.
Notes
• Depending on the audio device, information such as title,
track number/time, and playback status may not be
displayed on this unit.
• Even if the source is changed on this unit, playback of the
audio device does not stop.
• BLUETOOTH pairing is not possible while Apple CarPlay is
running.
To match the volume level of the BLUETOOTH
device to other sources
You can reduce the volume level differences
between this unit and the BLUETOOTH device:
During playback, touch , then touch [Input
Level]. Adjust the volume level between [-6] and
[+6].
Soft Link
DAB FM
Hard
Link
Soft
Link
Hard
Link
Soft
Link
OFF – –
ON
Playback

12GB
Searching and Playing Tracks
1 During playback, touch (repeat) or
(shuffle) repeatedly until the desired play
mode appears.
Playback in the selected play mode may take
time to start.
Available play modes differ depending on the
selected sound source and connected device.
1 During USB playback, touch .
The list screen from the currently played item
appears.
Furthermore, touch (audio) or (video) to
list up by file type.
2 Touch the desired item.
Playback starts.
Other Settings During Playback
Further settings are available in each source by
touching . The available items differ depending
on the source.
Picture EQ
Adjusts the picture quality according to your
taste: [Dynamic], [Standard], [Theater], [Custom].
(Available only when the parking brake is applied
and USB video is selected.)
Aspect
Selects an aspect ratio for the screen of the unit.
(Available only when the parking brake is applied
and USB video is selected.)
Normal
Displays a 4:3 picture in its original size, with side
bars to fill the 16:9 screen.
Zoom
Displays a 16:9 picture that has been converted
into 4:3 letter box format.
Full
Displays a 16:9 picture in its original size.
Captions
Enlarges the picture horizontally, while fitting
captions in the screen.
Repeat play and shuffle play
Searching for a file from the list screen

13GB
To use a cellular phone, connect it with this unit. For
details, see “Preparing a BLUETOOTH Device”
(page 7).
Note
The handsfree calling functions explained below are
available only when the Apple CarPlay function is
deactivated. When the Apple CarPlay function is activated,
use the handsfree calling functions on its application.
Receiving a Call
1 Touch when a call is received.
The phone call starts.
Note
The ringtone and talker’s voice are output only from the
front speakers.
To reject/end a call
Touch .
Making a Call
1 Press HOME, then touch [Phone].
2 Touch one of the call icons on the
BLUETOOTH phone display.
(call history)*
Select a contact from the call history list. The
unit stores the last 20 calls.
(redial)
Make a call automatically to the last contact
you made.
(phonebook)*
Select a contact from the name list/number
list in the phonebook. To search for the
desired contact in alphabetical order from
the name list, touch .
(phone number input)
Enter the phone number.
Preset phone number list
Select the stored contact.
To store the contact, see “Presetting phone
numbers” (page 13).
* The cellular phone needs to support PBAP (Phone
Book Access Profile).
3 Touch .
The phone call starts.
You can store up to 6 contacts in the preset list.
1 In the phone screen, select a phone number
that you want to store in the preset dial
from the phonebook.
The confirmation display appears.
2 Touch [Add to Preset].
3 Select the preset phone number list where
the phone number is stored.
The contact is stored in the preset phone
number list.
Handsfree Calling
Presetting phone numbers

14GB
Available Operations During a
Call
To adjust the ringtone volume
Rotate the volume control dial while receiving a call.
To adjust the talker’s voice volume
Rotate the volume control dial during a call.
To adjust the volume for the other party (Mic
gain adjustment)
During a handsfree call, touch , then set
[MIC Gain] to [High], [Middle], or [Low].
To reduce echo and noise (Echo/noise
canceler mode)
During a call, touch , then set [Speech Quality] to
[Mode 1] or [Mode 2].
To switch between handsfree mode and
handheld mode
During a call, touch to switch the
phone call audio between the unit and cellular
phone.
Note
Depending on the cellular phone, this operation may not be
available.
To answer an incoming call automatically
Touch , then set [Auto Answer] to [ON].
Apple CarPlay
Apple CarPlay lets you use your iPhone in the car in
a way that allows you to stay focused on the road.
Notes on using Apple CarPlay
• iPhone with iOS 7.1 or later is required. Update to
the latest iOS version before use.
•Apple CarPlay can be used on iPhone 5 or later.
•For details on compatible models, refer to the
compatibility list on the support site on the back
cover.
•For details about Apple CarPlay, refer to the
manual supplied with your iPhone, or visit the
website of Apple CarPlay.
•Since the GPS on your iPhone is used, place your
iPhone where it can easily receive a GPS signal.
1 Connect your iPhone to the USB port.
To connect an iPhone, use a USB connection
cable for iPhone (not supplied).
2 Press HOME, then touch the Apple CarPlay
icon.
Your iPhone’s display appears on the display of
the unit. Touch and control the applications.
Use of the Apple CarPlay logo means that a vehicle
user interface meets Apple performance standards.
Apple is not responsible for the operation of this
vehicle or its compliance with safety and regulatory
standards.
Please note that the use of this product with iPhone
may affect wireless performance.
Useful Functions

15GB
Using Gesture Command
You can perform frequently-used operations by
swiping your finger on the reception/playback
display.
Note
The gesture commands explained below are not available
on the screen of Apple CarPlay.
Basic Setting Operation
You can set items in the following setup categories:
General Settings (General), Sound Settings (Sound),
Visual Settings (Visual), BLUETOOTH Settings
(Bluetooth)
1 Press HOME, then touch [Settings].
2 Touch one of the setup category.
The items that can be set differ depending on
the source and settings.
3 Move the scrollbar up and down to select
the desired item.
To return to the previous display
Touch .
To switch to the playback screen
Touch .
General Settings (General)
Language
Selects the display language: [English],
[Español], [Français], [Deutsch], [Italiano],
[Português], [], [ ], [ ], [ ],
[], [].
Demo
Activates the demonstration: [OFF], [ON].
Date/Time
Set Date/Time
Sets the date and clock time: [Auto(DAB)],
[Manual].
Date Format
Selects the format: [DD/MM/YY], [MM/DD/YY],
[YY/MM/DD].
Time Format
Selects the format: [12-hour], [24-hour].
Beep
Activates the operation sound: [OFF], [ON].
Do this To
Swipe left to right
Radio reception:
seek forward stations.
Video/audio playback:
skip forward a file/track.
Swipe right to left
Radio reception:
seek backward stations.
Video/audio playback:
skip backward a file/track.
Swipe upwards
Radio reception:
receive stored stations
(go forward).
Swipe downwards
Radio reception:
receive stored stations
(go backward).
Settings

16GB
Rear View Camera
Selects the image from the rear view camera:
[OFF], [Normal], [Reverse] (mirror image).
[Guide Line Adjust] adjusts the guide on the
picture from the rear view camera.
Touch the near side or far
side (red portions) of the
guide to adjust.
Touch /// to adjust
the guide position, and touch
[ ] or [ ] to adjust the guide width.
Steering Control
Selects the input mode for the connected remote
control. To prevent a malfunction, be sure to
match the input mode with the connected
remote control before use.
Custom
Input mode for the steering wheel remote
control (follow the procedures of [ ] to register
functions on the connected remote control).
Preset
Input mode for the wired remote control
excluding the steering wheel remote control.
The steering button panel appears.
Press and hold the button you want to assign
to the steering wheel.
The button on the panel lights up (standby).
Press and hold the button on the steering
wheel you want to assign the function to.
The button on the panel will change the color
(highlighted or encircled by an orange line).
To register other functions, repeat steps
and .
(Available only when [Steering Control] is set to
[Custom].)
Notes
• While making settings, the connected remote control
cannot be used even though some functions have
already been registered. Use the buttons on the unit.
• If an error occurs while registering, all the registered
information is cleared. Restart registration from the
beginning.
• This function may not be available on some vehicles.
For details on the compatibility of your vehicle, visit the
support site on the back cover.
Factory Reset
Initializes all the settings to the factory settings.
Firmware Version
Updates and confirms the firmware version.
Open Source Licenses
Displays the software licenses.
Sound Settings (Sound)
EXTRA BASS
Reinforces bass sound in synchronization with
the volume level: [OFF], [1], [2].
EQ10/Subwoofer
Selects an equalizer curve and adjusts the
subwoofer level.
EQ10
Selects the equalizer curve: [OFF], [R&B], [Rock],
[Pop], [Hip-Hop], [Dance], [EDM], [Jazz], [Soul],
[Country], [Custom].
[Custom] adjusts the equalizer curve: –6 to +6.
Subwoofer
Adjusts the volume level of the subwoofer:
[OFF], –10 to +10.
Balance/Fader
Adjusts the balance/fader level.
Balance
Adjusts the sound balance between the left and
right speakers: [L15] to [R15].
Fader
Adjusts the sound balance between the front
and rear speakers: [Front 15] to [Rear 15].
Crossover
Adjusts the cut-off frequency and subwoofer
phase.
High Pass Filter
Selects the cut-off frequency of the front/rear
speakers: [OFF], [50Hz], [60Hz], [80Hz], [100Hz],
[120Hz].
Low Pass Filter
Selects the cut-off frequency of the subwoofer:
[OFF], [50Hz], [60Hz], [80Hz], [100Hz], [120Hz].
Subwoofer Phase
Selects the subwoofer phase: [Normal],
[Reverse].
DSO (Dynamic Stage Organizer)
Enhances audio output: [OFF], [Low], [Middle],
[High].

17GB
Visual Settings (Visual)
Wallpaper
Changes the wallpaper by touching the desired
color.
Dimmer
Dims the display: [OFF], [Auto], [ON].
([Auto] is available only when the illumination
control lead is connected and works when the
head light is turned on.)
[ ] adjusts the brightness level when the
dimmer is activated: –5 to +5.
Touch Panel Adjust
Adjusts the touch panel calibration if the
touching position does not correspond with the
proper item.
BLUETOOTH Settings (Bluetooth)
Bluetooth Connection
Activates the BLUETOOTH signal: [OFF], [ON],
[Pairing] (enters into pairing standby mode).
Bluetooth Device Info
Displays the information of the device connected
to the unit.
(Available only when [Bluetooth Connection] is
set to [ON] and a BLUETOOTH device is
connected to the unit.)
Bluetooth Reset
Initializes all BLUETOOTH-related settings such as
pairing information, call history, history of
connected BLUETOOTH devices, etc.
Updating the Firmware
To update the firmware, visit the support site on the
back cover, then follow the online instructions.
Note
During the update, do not remove the USB device.
Precautions
• Power antenna (aerial) extends automatically.
• When you transfer ownership or dispose of your
car with the unit installed, initialize all the settings
to the factory settings by performing the factory
reset (page 16).
• Do not splash liquid onto the unit.
Notes on safety
• Comply with your local traffic rules, laws, and
regulations.
• While driving
– Do not watch or operate the unit, as it may lead
to distraction and cause an accident. Park your
car in a safe place to watch or operate the unit.
– Do not use the setup feature or any other
function which could divert your attention from
the road.
– When backing up your car, be sure to look back
and watch the surroundings carefully for your
safety even if the rear view camera is connected.
Do not depend on the rear view camera
exclusively.
• While operating
– Do not insert your hands, fingers, or foreign
objects into the unit as it may cause injury or
damage to the unit.
– Keep small articles out of the reach of children.
– Be sure to fasten seatbelts to avoid injury in the
event of sudden movement of the car.
Additional Information
Preventing an accident
Pictures appear only after you park the car and
set the parking brake.
If the car starts moving during video playback,
the following caution is displayed and you
cannot watch the video.
[Video blocked for your safety.]
Do not operate the unit or watch the monitor
while driving.

18GB
Notes on LCD panel
• Do not get the LCD panel wet or expose it to
liquids. This may cause a malfunction.
•Do not press down hard on the LCD panel as doing
so can distort the picture or cause a malfunction
(i.e., the picture may become unclear or the LCD
panel may be damaged).
•Do not touch the panel with objects other than
with your finger as it may damage or break the
LCD panel.
•Clean the LCD panel with a dry soft cloth. Do not
use solvents such as benzine, thinner,
commercially available cleaners, or antistatic
spray.
•Do not use the unit outside the temperature range
0 ºC – 40 ºC (32 ºF – 104 ºF).
•If your car was parked in a cold or hot place, the
picture may not be clear. However, the monitor is
not damaged and the picture will become clear
after the temperature in your car becomes normal.
•Some stationary blue, red, or green dots may
appear on the monitor. These are called “bright
spots” and can happen with any LCD. The LCD
panel is precision-manufactured with more than
99.99% of its segments functional. However, it is
possible that a small percentage (typically 0.01%)
of the segments may not light up properly. This
will not, however, interfere with your viewing.
Notes on the touch panel
• This unit uses a resistive touch panel. Touch the
panel directly with your fingertip.
•Multi-touch operation is not supported on this
unit.
•Do not touch the panel with sharp objects such as
a needle, pen, or fingernail. Operation with a
stylus is not supported on this unit.
• Do not let any objects contact the touch panel. If
the panel is touched by an object other than your
fingertip, the unit may not respond correctly.
• Since glass material is used for the panel, do not
subject the unit to strong shock. If cracking or
chipping occurs on the panel, do not touch the
damaged part as it may cause injury.
•Keep other electrical devices away from the touch
panel. They may cause the touch panel to
malfunction.
WMA (.wma)*
1
*
2
Bit rate: 48 kbps – 192 kbps (Supports variable bit
rate (VBR))*
3
Sampling frequency*
4
: 44.1 kHz
MP3 (.mp3)*
1
*
2
Bit rate: 48 kbps – 320 kbps (Supports variable
bit rate (VBR))*
3
Sampling frequency*
4
: 32 kHz, 44.1 kHz, 48 kHz
AAC (.m4a)*
1
*
2
Bit rate: 40 kbps – 320 kbps (Supports variable
bit rate (VBR))*
3
Sampling frequency*
4
: 8 kHz – 48 kHz
Bit per sample (Quantization bit): 16 bits
FLAC (.flac)*
1
*
6
Sampling frequency*
4
: 8 kHz – 48 kHz
Bit per sample (Quantization bit): 16 bits
WAV (.wav)*
1
Sampling frequency*
4
: 8 kHz – 48 kHz
Bit per sample (Quantization bit): 16 bits, 24 bits
Xvid (.avi)
Video codec: MPEG-4 Advanced Simple Profile
Audio codec: MP3 (MPEG-1 Layer3)
Bit rate: Max. 4 Mbps
Frame rate: Max. 30 fps (30p/60i)
Resolution: Max. 1280 × 720*
5
MPEG-4 (.mp4)
Video codec: MPEG-4 Advanced Simple Profile,
AVC Baseline Profile
Audio codec: AAC
Bit rate: Max. 4 Mbps
Frame rate: Max. 30 fps (30p/60i)
Resolution: Max. 1280 × 720*
5
WMV (.wmv, .avi)*
1
Video codec: WMV3, WVC1
Audio codec: MP3, WMA
Bit rate: Max. 6 Mbps
Frame rate: Max. 30 fps
Resolution: Max. 720 × 480*
5
MKV (.mkv)
Video codec: MPEG-4 Advanced Simple Profile,
AVC Baseline Profile
Audio codec: MP3, AAC
Bit rate: Max. 5 Mbps
Frame rate: Max. 30 fps
Resolution: Max. 1280 × 720*
5
*1 Copyright-protected files and multi-channel audio files
cannot be played back.
*2 DRM (Digital Rights Management) files cannot be played
back.
*3 Non-standard bit rates or non-guaranteed bit rates are
included depending on the sampling frequency.
*4 Sampling frequency may not correspond to all encoders.
*5 These numbers indicate the maximum resolution of
playable video and do not indicate the player’s display
resolution. The display resolution is 800 × 480.
*6 Displaying the tag information is not supported.
Note
Some files may not be played back even though their file
formats are supported by the unit.
Supported formats for USB playback

19GB
• For details on compatible iPhone models, visit the support
site on the back cover.
• Use of the Made for Apple badge means that an accessory
has been designed to connect specifically to the Apple
product(s) identified in the badge, and has been certified
by the developer to meet Apple performance standards.
Apple is not responsible for the operation of this device or
its compliance with safety and regulatory standards.
Please note that the use of this accessory with an Apple
product may affect wireless performance.
This product contains software that Sony uses under a
licensing agreement with the owner of its copyright. We are
obligated to announce the contents of the agreement to
customers under requirement by the owner of copyright for
the software.
For details on software licenses, see page 16.
Notice on GNU GPL/LGPL applied software
This product contains software that is subject to the
following GNU General Public License (hereinafter referred
to as “GPL”) or GNU Lesser General Public License
(hereinafter referred to as “LGPL”). These establish that
customers have the right to acquire, modify, and
redistribute the source code of said software in accordance
with the terms of the GPL or LGPL displayed on this unit.
The source code for the above-listed software is available
on the Web.
To download, please access the following URL then select
the model name “XAV-AX1005DB.”
URL: http://www.sony.net/Products/Linux/
Please note that Sony cannot answer or respond to any
inquiries regarding the content of the source code.
If you have any questions or problems concerning your unit
that are not covered in this Operating Instructions, consult
your nearest Sony dealer.
Specifications
Monitor section
Display type: Wide LCD color monitor
Dimensions: 6.2 in
System: TFT active matrix
Number of pixels:
1,152,000 pixels (800 × 3 (RGB) × 480)
Color system:
PAL/NTSC automatic select for CAMERA IN
terminal
Tuner section
DAB/DAB+
Tuning range: 174.928 MHz – 239.200 MHz
Antenna (aerial) terminal:
External antenna (aerial) connector
FM
Tuning range: 87.5 MHz – 108.0 MHz
Usable sensitivity: 7 dBf
Signal-to-noise ratio: 70 dB (mono)
Separation at 1 kHz: 45 dB
AM
Tuning range: 531 kHz – 1,602 kHz
Sensitivity: 32 µV
USB player section
Interface: USB (Hi-speed)
Maximum current: 1.5 A
Wireless communication
Communication System:
BLUETOOTH Standard version 3.0
Output:
BLUETOOTH Standard Power Class 2
(Max. Conducted +1 dBm)
Maximum communication range*
1
:
Line of sight approx. 10 m (33 ft)
Frequency band:
2.4 GHz band (2.4000 GHz – 2.4835 GHz)
Modulation method: FHSS
Compatible BLUETOOTH Profiles*
2
:
A2DP (Advanced Audio Distribution Profile) 1.3
AVRCP (Audio Video Remote Control Profile) 1.3
HFP (Handsfree Profile) 1.6
PBAP (Phone Book Access Profile) 1.1
Corresponding codec: SBC, AAC
*1 The actual range will vary depending on factors such as
obstacles between devices, magnetic fields around a
microwave oven, static electricity, reception sensitivity,
antenna (aerial)’s performance, operating system,
software application, etc.
*2 BLUETOOTH standard profiles indicate the purpose of
BLUETOOTH communication between devices.
About iPhone
Notice on license

20GB
Power amplifier section
Outputs: Speaker outputs
Speaker impedance: 4 – 8
Maximum power output: 55 W × 4 (at 4 )
General
Power requirements: 12 V DC car battery
(negative ground (earth))
Rated current consumption: 10 A
Dimensions:
Approx. 178 mm × 100 mm × 141 mm
(7
1
/8 in × 4 in × 5
5
/8 in) (w/h/d)
Mounting dimensions:
Approx. 182 mm × 111 mm × 121 mm
(7
1
/4 in × 4
3
/8 in × 4
7
/8 in) (w/h/d)
Mass: Approx. 0.9 kg (1 lb 16 oz)
Package contents:
Main unit (1)
Parts for installation and connections (1 set)
Microphone (1)
Ask the dealer for detailed information.
Design and specifications are subject to change
without notice.
The Bluetooth® word mark and logos are registered
trademarks owned by the Bluetooth SIG, Inc. and any use of
such marks by Sony Corporation is under license. Other
trademarks and trade names are those of their respective
owners.
Windows Media is either a registered trademark or
trademark of Microsoft Corporation in the United States
and/or other countries.
This product is protected by certain intellectual property
rights of Microsoft Corporation. Use or distribution of such
technology outside of this product is prohibited without a
license from Microsoft or an authorized Microsoft subsidiary.
Apple, iPhone, and Lightning are trademarks of Apple Inc.,
registered in the U.S. and other countries.
Apple CarPlay is a trademark of Apple Inc.
IOS is a trademark or registered trademark of Cisco in the
U.S. and other countries and is used under license.
THIS PRODUCT IS LICENSED UNDER THE MPEG-4 VISUAL
PATENT PORTFOLIO LICENSE FOR THE PERSONAL AND NON-
COMMERCIAL USE OF A CONSUMER FOR DECODING VIDEO
IN COMPLIANCE WITH THE MPEG-4 VISUAL STANDARD
(“MPEG-4 VIDEO”) THAT WAS ENCODED BY A CONSUMER
ENGAGED IN A PERSONAL AND NONCOMMERCIAL ACTIVITY
AND/OR WAS OBTAINED FROM A VIDEO PROVIDER
LICENSED BY MPEG LA TO PROVIDE MPEG-4 VIDEO.
NO LICENSE IS GRANTED OR SHALL BE IMPLIED FOR ANY
OTHER USE.
ADDITIONAL INFORMATION INCLUDING THAT RELATING TO
PROMOTIONAL, INTERNAL AND COMMERCIAL USES AND
LICENSING MAY BE OBTAINED FROM MPEG LA, LLC. SEE
HTTP://WWW.MPEGLA.COM
THIS PRODUCT IS LICENSED UNDER THE AVC PATENT
PORTFOLIO LICENSE FOR THE PERSONAL AND NON-
COMMERCIAL USE OF A CONSUMER TO
(i)ENCODE VIDEO IN COMPLIANCE WITH THE AVC STANDARD
(“AVC VIDEO”)
AND/OR
(ii)DECODE AVC VIDEO THAT WAS ENCODED BY A
CONSUMER ENGAGED IN A PERSONAL AND
NON-COMMERCIAL ACTIVITY AND/OR WAS OBTAINED FROM
A VIDEO PROVIDER LICENSED TO PROVIDE AVC VIDEO. NO
LICENSE IS GRANTED OR SHALL BE IMPLIED FOR ANY OTHER
USE. ADDITIONAL INFORMATION MAY BE OBTAINED FROM
MPEG LA, L.L.C. SEE
HTTP://WWW.MPEGLA.COM
THIS PRODUCT IS LICENSED UNDER THE AVC PATENT
PORTFOLIO LICENSE AND VC-1 PATENT PORTFOLIO LICENSE
FOR THE PERSONAL AND NON-COMMERCIAL USE OF A
CONSUMER TO DECODE VIDEO IN COMPLIANCE WITH THE
AVC STANDARD (“AVC VIDEO”) AND/OR THE VC-1 STANDARD
(“VC-1 VIDEO”) THAT WAS ENCODED BY A CONSUMER
ENGAGED IN A PERSONAL AND NONCOMMERCIAL ACTIVITY
AND/OR WAS OBTAINED FROM A VIDEO PROVIDER
LICENSED TO PROVIDE AVC VIDEO AND/OR VC-1 VIDEO. NO
LICENSE IS GRANTED OR SHALL BE IMPLIED FOR ANY OTHER
USE. ADDITIONAL INFORMATION MAY BE OBTAINED FROM
MPEG LA, L.L.C. SEE HTTP://WWW.MPEGLA.COM
All other trademarks are trademarks of their respective
owners.
Copyrights

21GB
Troubleshooting
The following checklist will help you remedy
problems you may encounter with your unit.
Before going through the checklist below, check
the connection and operating procedures.
For details on using the fuse and removing the unit
from the dashboard, see “Connection/Installation”
(page 25).
If the problem is not solved, visit the support site on
the back cover.
General
There is no beep sound.
An optional power amplifier is connected and
you are not using the built-in amplifier.
The fuse has blown.
The unit makes noise when the position of the
ignition is switched.
The leads are not matched correctly with the car’s
accessory power connector.
The display disappears from/does not appear on
the monitor.
The monitor off function is activated (page 6).
– Touch anywhere on the display to turn the
display back on.
Menu items cannot be selected.
Unavailable menu items are displayed in gray.
The USB functions do not work properly.
Do not use a USB extension cable as it may cause
deterioration of signal quality.
– Use a shorter USB cable when connecting the
USB device, or replace the USB cable with a new
one.
The unit cannot be operated.
Press and hold HOME for more than 10 seconds
to restart the unit. For your safety, do not restart
the unit while you are driving.
Touch panel operation
The touch panel does not react to your touch
correctly.
Touch one part of the touch panel at a time. If
two or more parts are touched simultaneously,
the touch panel will not react correctly.
Calibrate the touch panel of the display (page 17).
Touch the pressure sensitive panel firmly.
Multi-touch is not recognized.
Multi-touch operation is not supported on this
unit.
Radio reception
The radio reception is poor.
Static noise occurs.
Connect the antenna (aerial) firmly.
RDS
PTY displays [PTY not found.].
The current station is not an RDS station, or the
radio reception is poor.
Seek starts after a few seconds of listening.
The station is non-TP or has a weak signal.
– Deactivate TA (page 9).
There are no traffic announcements.
Activate TA (page 9).
The station does not broadcast any traffic
announcements despite being TP.
– Tune into another station.
DAB/DAB+ radio reception
Stations cannot be received.
See [No Station] (page 24) for details when the
DAB signal cannot be received.
No traffic announcements.
Disable DAB announcements (page 11).
– Traffic announcements are not available while
DAB announcements are enabled.
Picture
There is no picture/picture noise occurs.
A connection has not been made correctly.
Check the connection between this unit and
other equipment and set the input selector of the
equipment to the source corresponding to this
unit.
Installation is not correct.
– Install the unit at an angle of less than 30° in a
sturdy part of the car.
The parking cord (light green) is not connected to
the parking brake switch cord, or the parking
brake is not applied.
The picture does not fit in the screen.
The aspect ratio is fixed on the playback source.

22GB
Sound
There is no sound/sound skips/sound cracks.
A connection has not been made correctly.
Check the connection between this unit and the
connected equipment and set the input selector
of the equipment to the source corresponding to
this unit.
Installation is not correct.
– Install the unit at an angle of less than 30° in a
sturdy part of the car.
The unit is in pause/reverse/fast-forward mode.
The settings for the outputs are not made
correctly.
The volume is too low.
The ATT function is activated.
The format is not supported.
– Check if the format is supported by this unit
(page 18).
Sound is noisy.
Keep cords and cables away from each other.
USB playback
Items cannot be played.
Reconnect the USB device.
The USB device takes longer to play.
The USB device contains large-sized files or files
with a complicated tree structure.
Audio files cannot be played.
USB devices formatted with file systems other
than FAT12, FAT16, FAT32 or exFAT are
unsupported.*
* This unit supports FAT12, FAT16, FAT32 and exFAT, but
some USB device may not support all of these. For details,
refer to the operating instructions of each USB device or
contact the manufacturer.
BLUETOOTH function
The other BLUETOOTH device cannot detect this
unit.
Set [Bluetooth Connection] to [ON] (page 17).
While connecting to a BLUETOOTH device, this
unit cannot be detected by another device.
Terminate the current connection and search for
this unit from the other device.
Depending on your smartphone or cellular
phone, you may need to delete this unit from the
history of the connected smartphone or cellular
phone then pair them again (page 7).
Connection is not possible.
Check the pairing and connection procedures in
the manual of the other device, etc., and perform
the operation again.
The name of the detected device does not
appear.
Depending on the status of the other device, it
may not be possible to obtain the name.
There is no ringtone.
Raise the volume while receiving a call.
The talker’s voice volume is low.
Raise the volume during a call.
The other party says that the volume is too low
or high.
Adjust the [MIC Gain] level (page 14).
Echo or noise occurs during call conversations.
Reduce the volume.
Set [Speech Quality] to [Mode 1] or [Mode 2]
(page 14).
If ambient noise other than the phone call sound
is loud, try reducing this noise.
– Shut the window if road noise is loud.
– Lower the air conditioner if the air conditioner is
loud.
The phone sound quality is poor.
Phone sound quality depends on reception
conditions of the cellular phone.
– Move your car to a place where you can
enhance the cellular phone’s signal if the
reception is poor.
The volume of the connected BLUETOOTH device
is low or high.
Volume level will differ depending on the
BLUETOOTH device.
– Reduce the volume level differences between
this unit and the BLUETOOTH device (page 11).
The sound skips during audio streaming or the
BLUETOOTH connection fails.
Reduce the distance between the unit and the
BLUETOOTH device.
If the BLUETOOTH device is stored in a case which
interrupts the signal, remove the case while
using the device.
Several BLUETOOTH devices or other devices (e.g.
ham radio devices) which emit radio waves are
used nearby.
– Turn off the other devices.
– Increase the distance between the unit and
other devices.
Playback sound stops momentarily when this
unit is connecting to a cellular phone. This is not
a malfunction.

23GB
The connected BLUETOOTH device cannot be
controlled during audio streaming.
Check that the connected BLUETOOTH device
supports AVRCP.
Some functions do not work.
Check that the connecting device supports the
functions in question.
A call is answered unintentionally.
The connecting phone is set to start a call
automatically.
[Auto Answer] of this unit is set to [ON] (page 14).
Pairing failed due to time out.
Depending on the connecting device, the time
limit for pairing may be short. Try completing the
pairing within the time.
Cannot pair.
The unit may not be able to pair with a previously
paired BLUETOOTH device after initializing the
unit if the pairing information of the unit is on the
BLUETOOTH device. In this case, delete the
pairing information of the unit from the
BLUETOOTH device, and then pair them again.
The BLUETOOTH function cannot be operated.
Turn the ignition off. Wait for a while, then turn
the ignition to the ACC position.
No sound is output from the car speakers during
a handsfree call.
If the sound is output from the cellular phone, set
the cellular phone to output the sound from the
car speakers.
Apple CarPlay
The Apple CarPlay icon does not appear on the
HOME screen.
Your iPhone is not compatible with Apple
CarPlay.
– Refer to the compatibility list on the support
site on the back cover.
Disconnect your iPhone from the USB port and
reconnect it again.
Apple CarPlay may not be available in your
country or region.
Make sure a certified Lightning cable is used to
connect your iPhone and the unit.
Messages
General
Cannot play this content.
The currently selected content cannot be played
back, or skipped to the next one.
– The content is not in a supported file format.
Check supported file formats (page 18).
Device no response
The unit does not recognize the connected USB
device.
– Reconnect the USB device.
– Check that the USB device is supported by the
unit.
No Playable Data
The USB device has no playable data.
– Load music data/files into the USB device.
Overcurrent caution on USB.
The USB device is overloaded.
– Disconnect the USB device.
– Indicates that the USB device is out of order, or
an unsupported device is connected.
USB device not supported
For details on the compatibility of your USB
device, visit the support site on the back cover.
USB hub not supported
USB hubs are not supported on this unit.
BLUETOOTH
Bluetooth device is not found.
The unit cannot detect a connectable
BLUETOOTH device.
– Check the BLUETOOTH setting of the
connecting device.
No device is in the list of registered BLUETOOTH
devices.
– Perform pairing with a BLUETOOTH device
(page 7).
Handsfree device is not available.
A cellular phone is not connected.
– Connect a cellular phone (page 8).

24GB
DAB/DAB+ radio reception
No Station
The DAB signal cannot be received.
– Perform an auto tune (page 10).
– Check the connection of the DAB antenna
(aerial) (not supplied).
– Check that [Antenna Power] is set to [ON]
(page 11).
Receiving
The unit is waiting to receive a DAB station.
If these solutions do not help improve the situation,
consult your nearest Sony dealer.

25GB
Cautions
•Do not install this unit in a car that has no ACC
position. The display of the unit does not turn off
even after turning the ignition off, and this causes
battery drain.
• Run all ground (earth) leads to a common
ground (earth) point.
•Do not get the leads trapped under a screw or
caught in moving parts (e.g., seat railing).
•Before making connections, turn the car ignition
off to avoid short circuits.
•Connect the power supply lead to the unit and
speakers before connecting it to the auxiliary
power connector.
•Be sure to insulate any loose unconnected leads
with electrical tape for safety.
•Choose the installation location carefully so that
the unit will not interfere with normal driving
operations.
• Avoid installing the unit in areas subject to dust,
dirt, excessive vibration, or high temperature, such
as in direct sunlight or near heater ducts.
• Use only the supplied mounting hardware for a
safe and secure installation.
Note on the power supply lead (yellow)
When connecting this unit in combination with other stereo
components, the amperage rating of the car circuit to which
the unit is connected must be higher than the sum of each
component’s fuse amperage rating.
Mounting angle adjustment
Adjust the mounting angle to less than 30°.
Parts List for Installation
• This parts list does not include all the package
contents.
•The bracket is attached to the unit before
shipping. Before mounting the unit, use the
release keys to remove the bracket from the
unit. For details, see “Removing the bracket”
(page 29).
• Keep the release keys for future use as they are
also necessary if you remove the unit from your
car.
Connection/Installation
Precautions
× 4
5 × max. 8 mm
(
7
/32 × max.
5
/16 in)
× 2

26GB
Connection
*
3
*
3
*
3
Subwoofer*
1
Power amplifier*
1
from a wired remote control (not
supplied)
*4
*
6
*
7
from a car antenna (aerial)*
5
Rear view
camera*
1
*
3
Light green
Purple/white striped
For details, see “Making
connections” (page 27).
See “Power connection diagram”
(page 28) for details.
*
2
from DAB antenna (aerial)
(not supplied)*
8

27GB
*1 Not supplied
*2 Speaker impedance: 4 – 8 × 4
*3 RCA pin cord (not supplied)
*4 Depending on the type of car, use an adaptor for a wired
remote control (not supplied).
For details on using the wired remote control, see “Using
the wired remote control” (page 28).
*5 Depending on the type of car, use an adaptor (not
supplied) if the antenna (aerial) connector does not fit.
*6 Whether in use or not, route the microphone input cord
so it does not interfere with driving operations. Secure
the cord with a clamp, etc., if it is installed around your
feet.
*7 For details on installing the microphone, see “Installing
the microphone” (page 28).
*8 Set [Antenna Power] to [ON] (default) or [OFF] depending
on the type of DAB antenna (aerial) (not supplied)
(page 11). Max. supply current 0.1 A
If you have a power antenna (aerial) without a relay
box, connecting this unit with the supplied power
supply connection cable may damage the
antenna (aerial).
To the car’s speaker connector
To the car’s power connector
To the parking brake switch cord
The mounting position of the parking brake
switch cord depends on your car.
Be sure to connect the parking brake lead (light
green) of the power supply connection cable
to the parking brake switch cord.
To the +12 V power terminal of the car’s rear
lamp lead (only when connecting the rear
view camera)
Memory hold connection
When the yellow power supply lead is connected,
power will always be supplied to the memory
circuit even when the ignition switch is turned off.
Speaker connection
• Before connecting the speakers, turn the unit off.
• Use speakers with an impedance of 4 to 8 and
with adequate power handling capacities to avoid
damage.
Making connections
1
Rear speaker
(right)
Purple
2
Purple/black
striped
3
Front speaker
(right)
Gray
4
Gray/black striped
5
Front speaker
(left)
White
6
White/black
striped
7
Rear speaker
(left)
Green
8
Green/black
striped
12
continuous power
supply
Yellow
13
power antenna (aerial) /
power amplifier control
(REM OUT)
Blue/white striped
14
switched illumination
power supply
Orange/white
striped
15 switched power supply Red
16 ground (earth) Black
Parking brake switch cord
Hand brake type Foot brake type

28GB
Check your car’s auxiliary power connector and
match the connections of cords correctly
depending on the car.
Common connection
When the positions of the red and yellow
leads are inverted
For cars without ACC position
After matching the connections and switching
power supply leads correctly, connect the unit to
the car’s power supply. If you have any questions
and problems connecting your unit that are not
covered in this manual, consult the car dealer.
To capture your voice during handsfree calling, you
need to install the microphone .
Cautions
•It is extremely dangerous if the cord becomes
wound around the steering column or gearstick.
Be sure to keep it and other parts from interfering
with your driving operations.
•If airbags or any other shock-absorbing
equipment are in your car, contact the store where
you purchased this unit or the car dealer before
installation.
Note
Before attaching the double-sided tape , clean the
surface of the dashboard with a dry cloth.
1 To enable the wired remote control, set
[Steering Control] in [General] to [Preset]
(page 16).
Installation of the rear view camera (not supplied) is
required before use.
The picture from a rear view camera connected to
the CAMERA IN terminal is displayed when:
the back lamp of your car lights up (or the shift
lever is set to the R (reverse) position).
you press HOME, then touch [Rear Camera].
Power connection diagram
12
continuous power
supply
Yellow
15 switched power supply Red
12 switched power supply Yellow
15
continuous power
supply
Red
Auxiliary power connector
Red Red
Yellow Yellow
Red Red
Yellow Yellow
Red
Red
Ye l l ow
Yellow
Installing the microphone
Using the wired remote control
Using the rear view camera
Clip (not supplied)

29GB
Installation
Before installing the unit, remove the bracket
from the unit.
1 Insert both release keys until they click,
and pull down the bracket , then pull up
the unit to separate.
•Before installing, make sure the catches on both
sides of the bracket are bent inwards 3.5 mm
(
5
/32 in).
•For Japanese cars, see “Mounting the unit in a
Japanese car” (page 29).
1 Position the bracket inside the
dashboard, then bend the claws outward
for a tight fit.
2 Mount the unit onto the bracket .
Notes
• If the catches are straight or bent outwards, the unit will
not be installed securely and may spring out.
• Make sure the 4 catches on the protection collar are
properly engaged in the slots of the bracket .
Mounting the unit in a Japanese car
You may not be able to install this unit in some
Japanese cars. In such a case, consult your Sony
dealer.
When mounting this unit to the preinstalled
brackets of your car, use the supplied screws in
the appropriate screw holes based on your car:
T for TOYOTA and N for NISSAN.
Note
To prevent a malfunction, install only with the supplied
screws .
Removing the bracket
Mounting the unit in the dashboard
Face the hook inwards.
Catch
Larger than
182 mm (7
1
/4 in)
Larger than
111 mm (4
3
/8 in)
To the dashboard/center console
Parts supplied with
your car
Bracket
Bracket

30GB
When replacing the fuse, be sure to
use one matching the amperage
rating stated on the original fuse.
If the fuse blows, check the power
connection and replace the fuse.
If the fuse blows again after
replacement, there may be an
internal malfunction. In such a case, consult your
nearest Sony dealer.
Fuse replacement
Fuse (10 A)


2DE
Für mögliche spätere Service-Anfragen, notieren
Sie sich bitte vor der Installation Ihres Gerätes hier
die Seriennummer:
S/N: ___________________________
Hinweis: Die 7-stellige Seriennummer finden Sie
oben auf der Verpackung des Gerätes oder unten
auf dem Gerät selber.
Das Typenschild mit Betriebsspannung usw.
befindet sich an der Geräteunterseite.
Achtung
Um Feuergefahr und die Gefahr eines
elektrischen Schlags zu vermeiden, setzen Sie
das Gerät weder Regen noch sonstiger
Feuchtigkeit aus.
Um einen elektrischen Schlag zu vermeiden,
öffnen Sie das Gehäuse nicht. Überlassen Sie
Wartungsarbeiten stets qualifiziertem
Fachpersonal.
Hergestellt in Thailand
Hiermit erklärt Sony Corporation, dass diese
Funkanlage der Richtlinie 2014/53/EU entspricht.
Der vollständige Text der EU-Konformitätserklärung
ist unter der folgenden Internetadresse verfügbar:
http://www.compliance.sony.de/
Die Gültigkeit des CE-Zeichens beschränkt sich auf
Länder, in denen es gesetzlich vorgeschrieben ist,
hauptsächlich in Ländern des Europäischen
Wirtschaftsraums (EWR) und der Schweiz.
Hinweis für Kunden: Die folgenden
Informationen gelten nur für Geräte, die in
Ländern verkauft werden, in denen EU-
Richtlinien gelten
Dieses Produkt wurde von oder für die Sony
Corporation hergestellt.
EU Importeur: Sony Europe Limited.
Anfragen an den Importeur oder zur
Produktkonformität auf Grundlage der
Gesetzgebung in Europa senden Sie bitte an den
Bevollmächtigten Sony Belgium, bijkantoor van
Sony Europe Limited, Da Vincilaan 7-D1, 1935
Zaventem, Belgien.
Entsorgung von gebrauchten
Batterien und Akkus und
gebrauchten elektrischen und
elektronischen Geräten
(anzuwenden in den Ländern der
Europäischen Union und anderen Ländern mit
einem separaten Sammelsystem für diese
Produkte)
Das Symbol auf dem Produkt, der Batterie/dem
Akku oder der Verpackung weist darauf hin, dass
das Produkt oder die Batterie/der Akku nicht als
normaler Haushaltsabfall zu behandeln sind. Ein
zusätzliches chemisches Symbol Pb (Blei) unter der
durchgestrichenen Mülltonne bedeutet, dass die
Batterie/der Akku einen Anteil von mehr als
0,004 % Blei enthält. Durch Ihren Beitrag zum
korrekten Entsorgen des Produktes und der
Batterie/des Akkus schützen Sie die Umwelt und
die Gesundheit Ihrer Mitmenschen. Umwelt und
Gesundheit werden durch falsches Entsorgen
gefährdet. Materialrecycling hilft, den Verbrauch
von Rohstoffen zu verringern. Bei Produkten, die
auf Grund ihrer Sicherheit, der Funktionalität oder
als Sicherung vor Datenverlust eine ständige
Verbindung zur eingebauten Batterie/zum
eingebauten Akku benötigen, sollte die Batterie/
der Akku nur durch qualifiziertes Servicepersonal
ausgetauscht werden. Um sicherzustellen, dass das
Produkt und die Batterie/der Akku korrekt entsorgt
werden, geben Sie das Produkt zwecks Entsorgung
an einer geeigneten Annahmestelle für das
Recycling von elektrischen und elektronischen
Geräten ab. Für alle anderen Batterien/Akkus
entnehmen Sie die Batterie/den Akku bitte
entsprechend dem Kapitel über die sichere
Entfernung der Batterie/des Akkus. Geben Sie die
Batterie/den Akku an einer geeigneten
Annahmestelle für das Recycling von Batterien/
Akkus ab. Weitere Informationen über das
Recycling dieses Produkts oder der Batterie/des
Akkus erhalten Sie von Ihrer Gemeinde, den
kommunalen Entsorgungsbetrieben oder dem
Geschäft, in dem Sie das Produkt gekauft haben.
Hinweis für Lithiumbatterien: Bitte geben Sie nur
entladene Batterien an den Sammelstellen ab.
Wegen Kurzschlussgefahr überkleben Sie bitte die
Pole der Batterie mit Klebestreifen. Sie erkennen
Lithiumbatterien an den Abkürzungen Li oder CR.
Installieren Sie das Gerät aus Sicherheitsgründen
unbedingt im Armaturenbrett des Fahrzeugs,
denn die Rückseite des Geräts erwärmt sich bei
Betrieb.
Erläuterungen dazu finden Sie unter „Anschluss/
Installation“ (Seite 26).

3DE
Haftungsausschluss für von Dritten
angebotene Dienste
Von Dritten angebotene Dienste können ohne
vorherige Ankündigung geändert, ausgesetzt oder
eingestellt werden. Sony übernimmt in diesen
Fällen keine Haftung.
Achtung
UNTER KEINEN UMSTÄNDEN ÜBERNIMMT SONY DIE
HAFTUNG FÜR INDIREKTE, NEBEN- ODER
FOLGESCHÄDEN ODER FÜR IRGENDWELCHE
SCHÄDEN. DIESER HAFTUNGSAUSSCHLUSS GILT
OHNE JEDE EINSCHRÄNKUNG FÜR ENTGANGENEN
GEWINN, ENTGANGENES EINKOMMEN,
DATENVERLUST, NUTZUNGSAUSFALL DES
PRODUKTS ODER ZUGEHÖRIGER GERÄTE,
AUSFALLZEITEN UND ZEITAUFWAND DES KÄUFERS,
DIE AUF DIE VERWENDUNG DIESES PRODUKTS, DER
HARDWARE UND/ODER SEINER SOFTWARE
ZURÜCKGEHEN ODER IN VERBINDUNG DAMIT
AUFTRETEN.
Sehr geehrte Kunden, dieses Produkt enthält einen
Funksender.
Laut UNECE-Regelung Nr. 10 können
Fahrzeughersteller bestimmte Bedingungen
bezüglich des Einbaus von Funksendern in
Fahrzeuge festlegen.
Bevor Sie dieses Produkt in Ihr Fahrzeug einbauen,
schlagen Sie bitte im Betriebshandbuch des
Fahrzeugs nach oder fragen Sie den
Fahrzeughersteller oder Ihren Fahrzeughändler.
Notrufe
Diese BLUETOOTH-Freisprecheinrichtung für das
Auto und das elektronische Gerät, das mit der
Freisprecheinrichtung verbunden ist, arbeiten mit
Radiosignalen, Mobilfunk- und Festnetzen sowie
benutzerprogrammierten Funktionen, bei denen
nicht unter allen Umständen eine Verbindung
garantiert werden kann.
Verlassen Sie sich daher bei wichtigen Mitteilungen
(wie z. B. medizinischen Notfällen) nicht
ausschließlich auf elektronische Geräte.
BLUETOOTH-Kommunikation
• Von einem BLUETOOTH-Gerät ausgehende
Mikrowellen können den Betrieb von
medizinischen Geräten beeinflussen. Schalten Sie
dieses Gerät und andere BLUETOOTH-Geräte an
folgenden Orten aus. Andernfalls besteht
Unfallgefahr.
– An Orten mit entzündlichen Gasen, in einem
Krankenhaus, Zug, Flugzeug oder an einer
Tankstelle.
– In der Nähe von automatischen Türen oder
Feuermeldern.
• Dieses Gerät unterstützt dem BLUETOOTH-
Standard entsprechende Sicherheitsfunktionen,
um die Verbindungssicherheit bei BLUETOOTH-
Funkverbindungen zu gewährleisten. Je nach
Einstellung bieten diese jedoch möglicherweise
keinen ausreichenden Schutz. Seien Sie bei der
Kommunikation mit BLUETOOTH-Funktechnologie
also vorsichtig.
• Für Sicherheitslücken bei der Übertragung von
Informationen während der BLUETOOTH-
Kommunikation kann keine Haftung übernommen
werden.
Sollten an Ihrem Gerät Probleme auftreten oder
sollten Sie Fragen haben, auf die in dieser
Anleitung nicht eingegangen wird, wenden Sie sich
bitte an Ihren Sony-Händler.
Warnhinweis, wenn die Zündung Ihres
Fahrzeugs nicht über eine Zubehörposition
(ACC oder I) verfügt
Installieren Sie dieses Gerät nicht in einem
Fahrzeug, das nicht über eine Zubehörposition
(ACC oder I) verfügt. Das Display wird auch nach
dem Ausschalten der Zündung nicht
ausgeschaltet und der Autobatterie wird Strom
entzogen.
Wichtiger Hinweis

4DE
Inhalt
Achtung . . . . . . . . . . . . . . . . . . . . . . . . . . . . . . . . . . . 2
Lage und Funktion der Teile und
Bedienelemente . . . . . . . . . . . . . . . . . . . . . . . . . 5
Vorbereitungen
Vornehmen der Anfangseinstellungen. . . . . . . . . . 7
Vorbereiten eines BLUETOOTH-Geräts . . . . . . . . . . 7
Anschließen eines USB-Geräts . . . . . . . . . . . . . . . . 8
Anschließen eines tragbaren Audiogeräts . . . . . . . 8
Anschließen einer Rückfahrkamera . . . . . . . . . . . . 9
Radioempfang
Radioempfang. . . . . . . . . . . . . . . . . . . . . . . . . . . . . . 9
Verwenden von Tuneroptionen . . . . . . . . . . . . . . . 10
DAB/DAB+-Radioempfang. . . . . . . . . . . . . . . . . . . 10
Verwenden der Funktionen in DAB-Optionen . . . 11
Wiedergabe
Wiedergabe mit einem USB-Gerät . . . . . . . . . . . . 12
Wiedergabe mit einem BLUETOOTH-Gerät . . . . . 12
Suchen und Wiedergeben von Titeln . . . . . . . . . . 12
Weitere Einstellungen während der
Wiedergabe . . . . . . . . . . . . . . . . . . . . . . . . . . . . 13
Telefonieren mit
Freisprecheinrichtung
Entgegennehmen eines Anrufs . . . . . . . . . . . . . . . 13
Tätigen eines Anrufs . . . . . . . . . . . . . . . . . . . . . . . . 13
Während eines Anrufs verfügbare
Funktionen. . . . . . . . . . . . . . . . . . . . . . . . . . . . . 14
Weitere nützliche Funktionen
Apple CarPlay . . . . . . . . . . . . . . . . . . . . . . . . . . . . . 15
Bedienung mit dem Finger . . . . . . . . . . . . . . . . . . 15
Einstellungen
Grundlegende Einstellschritte . . . . . . . . . . . . . . . . 16
Allgemeine Einstellungen (Allgemein) . . . . . . . . . 16
Klangeinstellungen (Klang) . . . . . . . . . . . . . . . . . . 17
Visuelle Einstellungen (Visuell) . . . . . . . . . . . . . . . 17
BLUETOOTH-Einstellungen (Bluetooth). . . . . . . . . 17
Weitere Informationen
Aktualisieren der Firmware . . . . . . . . . . . . . . . . . . 18
Sicherheitsmaßnahmen . . . . . . . . . . . . . . . . . . . . . 18
Technische Daten . . . . . . . . . . . . . . . . . . . . . . . . . . 20
Störungsbehebung . . . . . . . . . . . . . . . . . . . . . . . . . 22
Meldungen . . . . . . . . . . . . . . . . . . . . . . . . . . . . . . . 25
Anschluss/Installation
Vorsichtsmaßnahmen . . . . . . . . . . . . . . . . . . . . . . 26
Teileliste für die Installation. . . . . . . . . . . . . . . . . . 26
Anschluss . . . . . . . . . . . . . . . . . . . . . . . . . . . . . . . . 27
Installation . . . . . . . . . . . . . . . . . . . . . . . . . . . . . . . 30

5DE
Lage und Funktion der Teile und Bedienelemente
Display/Touchscreen
HOME
Aufrufen des HOME-Menüs.
ATT (Dämpfen des Tons)
Halten Sie die Taste zum Dämpfen des Tons
1 Sekunde lang gedrückt.
Zum Beenden der Funktion halten Sie die Taste
erneut gedrückt oder drehen den
Lautstärkeregler.
Lautstärkeregler
Drehen Sie zum Einstellen der Lautstärke den
Regler, wenn Ton ausgegeben wird.
OPTION
Drücken Sie die Taste, wenn Sie den OPTION-
Bildschirm aufrufen wollen (Seite 6).
VOICE
Halten Sie die Taste zum Aktivieren der
Sprachbefehlfunktion für Apple CarPlay
gedrückt.
USB-Anschluss
AUX-Eingangsbuchse
Hauptgerät

6DE
Wiedergabebildschirm:
HOME-Bildschirm:
OPTION-Bildschirm:
Statusanzeigen
(Signalquellenoption)
Aufrufen des Optionsmenüs für die Signalquelle.
Welche Optionen zur Verfügung stehen, hängt
von der Signalquelle ab.
Anwendungsspezifischer Bereich
Anzeige der Bedienelemente/Anzeigen für die
Wiedergabe oder Anzeige des Gerätestatus. Die
angezeigten Optionen unterscheiden sich je
nach Signalquelle.
Uhr (Seite 16)
(Zurück zum Wiedergabebildschirm)
Umschalten vom HOME-Bildschirm zum
Wiedergabebildschirm.
Tasten zum Auswählen von Signalquelle und
Einstellungen
Wechseln der Signalquelle oder Vornehmen
verschiedener Einstellungen.
Anzeigen des Einstellsymbols und anderer
Symbole, indem Sie unten in diesem Bereich
nach rechts oder links wischen.
Klangauswahltasten
Einstellen des Tons.
(EXTRA BASS)
Ändern der Einstellung EXTRA BASS (Seite 17).
(EQ10/Subwoofer)
Ändern der Einstellung EQ10/Subwoofer
(Seite 17).
(Monitor aus)
Ausschalten des Monitors. Wenn der Monitor
ausgeschaltet ist, berühren Sie einen beliebigen
Teil des Bildschirms, um ihn wieder
einzuschalten.
Bildschirmanzeigen
Leuchtet, wenn die Tondämpfung
eingeschaltet ist.
Leuchtet, wenn AF
(Alternativfrequenzen) zur Verfügung
steht.
Leuchtet, wenn aktuelle
Verkehrsinformationen (TA:
Verkehrsdurchsagen) zur Verfügung
stehen.
Leuchtet, wenn eine DAB-Durchsage
vorliegt.
Gibt die Signalstärke des DAB-Tuners an.
Leuchtet, wenn die Wiedergabe mit
einem Audiogerät über A2DP (Advanced
Audio Distribution Profile) möglich ist.
Leuchtet, wenn Freisprechanrufe über
HFP (Handsfree Profile) möglich sind.
Gibt die Signalstärke des verbundenen
Mobiltelefons an.
Gibt die Akkurestladung des
verbundenen Mobiltelefons an.
Leuchtet, wenn das Bluetooth®-Signal
eingeschaltet ist. Blinkt, wenn die
Verbindung hergestellt wird.

7DE
Vornehmen der
Anfangseinstellungen
Sie müssen die Anfangseinstellungen vornehmen,
bevor Sie das Gerät zum ersten Mal benutzen oder
wenn Sie die Autobatterie ausgetauscht oder die
Verbindungen gewechselt haben.
Wenn der Bildschirm mit den Anfangseinstellungen
beim Einschalten des Geräts nicht erscheint,
initialisieren Sie das Gerät, indem Sie es auf die
werkseitigen Einstellungen zurücksetzen (Seite 16).
1 Berühren Sie [Sprache] und stellen Sie die
Sprache für die Anzeigen ein.
2 Berühren Sie [Demo] einmal, um [AUS]
auszuwählen und damit den Demomodus
zu deaktivieren.
3 Berühren Sie [OK].
Der Start-Sicherheitshinweis erscheint.
4 Lesen Sie den Start-Sicherheitshinweis
durch. Wenn Sie mit allen Bedingungen
einverstanden sind, berühren Sie
[Schließen].
Die Einstellung ist damit abgeschlossen.
Präzisere Einstellungen können Sie später im
Einstellmenü vornehmen (Seite 16).
Vorbereiten eines BLUETOOTH-
Geräts
Je nach dem BLUETOOTH-kompatiblen Gerät, also
z. B. Smartphone, Mobiltelefon oder Audiogerät (im
Folgenden als „BLUETOOTH-Gerät“ bezeichnet,
sofern nicht anders angegeben), können Sie Musik
wiedergeben oder Freisprechanrufe tätigen.
Einzelheiten zum Verbinden schlagen Sie bitte in
der Bedienungsanleitung zu dem anderen Gerät
nach.
Drehen Sie vor dem Herstellen der Verbindung die
Lautstärke an diesem Gerät herunter. Andernfalls
erfolgt die Tonausgabe unter Umständen
unvermittelt mit hoher Lautstärke.
Wenn Sie zum ersten Mal eine Verbindung zu
einem BLUETOOTH-Gerät herstellen wollen, ist eine
gegenseitige Registrierung (das so genannte
„Pairing“) erforderlich. Durch das Pairing können
dieses und andere Geräte einander erkennen.
1 Platzieren Sie das BLUETOOTH-Gerät
maximal 1 m von diesem Gerät entfernt.
2 Drücken Sie HOME und berühren Sie dann
[Einstell.].
3 Berühren Sie [Bluetooth].
4 Berühren Sie [Bluetooth-Verbindung] und
setzen Sie das Signal dann auf [EIN].
Das BLUETOOTH-Signal wird eingeschaltet und
leuchtet in der Statusleiste dieses Geräts.
5 Berühren Sie [Pairing].
blinkt, wenn sich dieses Gerät im
Bereitschaftsmodus für das Pairing befindet.
6 Führen Sie das Pairing bei dem BLUETOOTH-
Gerät durch, so dass es dieses Gerät
erkennt.
7 Wählen Sie [XAV-AX1005DB] im Display des
BLUETOOTH-Geräts aus.
Wird der Name Ihres Modells nicht angezeigt,
fangen Sie nochmals mit Schritt 5 an.
8 Wenn am BLUETOOTH-Gerät ein Passwort*
eingegeben werden muss, geben Sie [0000]
ein.
* Das Passwort wird bei manchen BLUETOOTH-Geräten
auch „Kennwort“, „PIN-Code“, „PIN-Nummer“ oder
„Passcode“ usw. genannt.
Nach erfolgreichem Pairing leuchtet stetig.
Vorbereitungen
Pairing und Herstellen einer
Verbindung mit einem BLUETOOTH-
Gerät
[0000]
Passwort eingeben

8DE
9 Wählen Sie an dem BLUETOOTH-Gerät, zu
dem eine BLUETOOTH-Verbindung
hergestellt werden soll, dieses Gerät aus.
oder leuchtet auf, wenn die Verbindung
hergestellt wurde.
Hinweise
• Dieses Gerät kann immer nur mit einem BLUETOOTH-Gerät
verbunden sein.
• Zum Trennen der BLUETOOTH-Verbindung deaktivieren Sie
die Verbindung von diesem Gerät oder vom BLUETOOTH-
Gerät aus.
• Das BLUETOOTH-Pairing ist nicht möglich, solange Apple
CarPlay ausgeführt wird.
Sie müssen zu dem Gerät, mit dem ein Pairing
ausgeführt wurde, eine Verbindung herstellen, um
es nutzen zu können. Bei einigen Geräten wird die
Verbindung nach dem Pairing automatisch
hergestellt.
1 Drücken Sie HOME und berühren Sie dann
[Einstell.].
2 Berühren Sie [Bluetooth].
3 Berühren Sie [Bluetooth-Verbindung] und
dann [EIN].
Vergewissern Sie sich, dass in der Statusleiste
dieses Geräts aufleuchtet.
4 Aktivieren Sie die BLUETOOTH-Funktion am
BLUETOOTH-Gerät.
5 Stellen Sie vom BLUETOOTH-Gerät aus die
Verbindung zu diesem Gerät her.
oder leuchtet in der Statusleiste.
So stellen Sie eine Verbindung zu dem zuletzt
verbundenen Gerät von diesem Gerät aus her
Wenn das BLUETOOTH-Signal aktiviert ist und die
Zündung des Fahrzeugs eingeschaltet wird, sucht
dieses Gerät das zuletzt verbundene BLUETOOTH-
Gerät und die Verbindung wird automatisch
hergestellt.
Hinweis
Beim Streaming von BLUETOOTH-Audiodaten können Sie
von diesem Gerät aus keine Verbindung zum Mobiltelefon
herstellen. Stellen Sie die Verbindung zu diesem Gerät
stattdessen vom Mobiltelefon aus her.
So installieren Sie das Mikrofon
Erläuterungen dazu finden Sie unter „Installieren
des Mikrofons“ (Seite 29).
Anschließen eines USB-Geräts
1 Drehen Sie die Lautstärke an diesem Gerät
herunter.
2 Öffnen Sie den USB-Anschlussdeckel und
schließen Sie dann das USB-Gerät an dieses
Gerät an.
Zum Anschließen eines iPhone verwenden Sie
das USB-Verbindungskabel für iPhone (nicht
mitgeliefert).
Anschließen eines tragbaren
Audiogeräts
1 Schalten Sie das tragbare Audiogerät aus.
2 Drehen Sie die Lautstärke an diesem Gerät
herunter.
3 Schließen Sie das tragbare Audiogerät mit
einem Verbindungskabel (nicht
mitgeliefert)* an die AUX-Eingangsbuchse
(Stereominibuchse) am Gerät an.
* Verwenden Sie unbedingt einen geraden Stecker.
4 Drücken Sie HOME und berühren Sie dann
[AUX].
So gleichen Sie den Lautstärkepegel des
angeschlossenen Geräts an andere
Tonquellen an
Starten Sie die Wiedergabe am tragbaren
Audiogerät mit gemäßigter Lautstärke und stellen
Sie die gewohnte Hörlautstärke an diesem Gerät
ein.
Berühren Sie während der Wiedergabe und
dann [Eingangspegel]. Stellen Sie den
Lautstärkepegel auf einen Wert zwischen [-10] und
[+15] ein.
Herstellen einer Verbindung zu einem
BLUETOOTH-Gerät, mit dem ein Pairing
ausgeführt wurde

9DE
Anschließen einer
Rückfahrkamera
Wenn Sie eine gesondert erhältliche
Rückfahrkamera an den Anschluss CAMERA IN
anschließen, können Sie das Bild von der
Rückfahrkamera anzeigen lassen. Erläuterungen
dazu finden Sie unter „Anschluss/Installation“
(Seite 26).
So zeigen Sie das Bild von der
Rückfahrkamera an
Drücken Sie HOME und berühren Sie dann
[Rückf.kam.].
Radioempfang
Wenn Sie Radio hören möchten, drücken Sie HOME
und berühren Sie dann [Tuner].
Bedienelemente/Anzeigen für den
Radioempfang
Aktueller Frequenzbereich
Wechseln des Frequenzbereichs (FM1, FM2, FM3,
AM1 oder AM2).
Aktuelle Frequenz, Programmdienstname*,
RDS-Anzeige (Radio Data System)*
*Beim RDS-Empfang.
(Tuneroption)
Aufrufen des Optionsmenüs für den Tuner.
SEEK–/SEEK+
Automatischer Sendersuchlauf.
/
Manueller Sendersuchlauf.
Damit die Frequenzen schnell durchlaufen,
berühren Sie die Tasten eine Zeit lang.
Speichernummern
Auswählen eines gespeicherten Senders.
Wischen Sie nach rechts/links, um die anderen
gespeicherten Sender anzuzeigen.
Berühren Sie die Nummer eine Zeit lang, um die
aktuelle Frequenz unter einem Speicherplatz
abzulegen.
1 Wählen Sie den gewünschten
Frequenzbereich (FM1, FM2, FM3, AM1 oder
AM2).
2 Stellen Sie Sender ein.
Automatische Sendersuche
Berühren Sie SEEK–/SEEK+.
Der Suchlauf stoppt, wenn ein Sender
empfangen wird.
Radioempfang
Sendereinstellung

10DE
Manuelle Sendersuche
Berühren Sie / eine Zeit lang, bis die
Frequenz in etwa erreicht ist, und berühren Sie
/ dann so oft, bis die gewünschte Frequenz
genau eingestellt ist.
1 Berühren Sie, während der zu speichernde
Sender empfangen wird, die gewünschte
Speichernummer eine Zeit lang.
1 Wählen Sie den Frequenzbereich aus und
berühren Sie dann die gewünschte
Speichernummer.
Verwenden von Tuneroptionen
Die folgenden Funktionen stehen zur Verfügung,
wenn Sie berühren.
BTM (Best Tuning Memory)
Sender werden in der Reihenfolge der
Frequenzen unter den Speichernummern
gespeichert. Für FM (UKW) können 18 Sender, für
AM 12 Sender gespeichert werden.
AF*
Wählen Sie [EIN], wenn in einem Netzwerk der
Sender mit den stärksten Signalen ausgewählt
und ständig neu eingestellt werden soll.
TA*
Wählen Sie [EIN], um gegebenenfalls aktuelle
Verkehrsinformationen bzw. Verkehrsfunksender
(TP) zu empfangen.
Regional*
Wählen Sie [EIN], wenn bei aktivierter AF-
Funktion der aktuelle Sender eingestellt bleiben
soll. Wenn Sie den Empfangsbereich des
betreffenden Regionalsenders verlassen, wählen
Sie [AUS]. Diese Funktion steht in Großbritannien
und einigen anderen Regionen nicht zur
Verfügung.
PTY*
Wählen Sie aus der PTY-Liste einen
Programmtyp aus, um nach einem Sender zu
suchen, der den ausgewählten Programmtyp
ausstrahlt.
* Nur beim FM-Empfang (UKW) verfügbar.
So empfangen Sie Katastrophenwarnungen
Wenn die Funktion AF oder TA aktiviert ist,
unterbrechen Katastrophenwarnungen
automatisch die ausgewählte Signalquelle.
DAB/DAB+-Radioempfang
Für DAB/DAB+-Radioempfang drücken Sie HOME
und berühren dann [DAB+].
Tipps
• Setzen Sie [Antennenleistung] je nach Typ der DAB-
Antenne (nicht mitgeliefert) auf [EIN] (Standard) oder [AUS]
(Seite 11).
• Wenn [DAB+] nach dem Zurücksetzen auf die werkseitigen
Einstellungen zum ersten Mal ausgeführt wird, startet die
automatische Sendersuche automatisch. Warten Sie, bis
die automatische Sendersuche abgeschlossen ist. (Wenn
Sie die automatische Sendersuche unterbrechen, wird sie
beim nächsten Auswählen von [DAB+] erneut gestartet.)
Wenn mit der automatischen Sendersuche kein DAB-
Sender gespeichert wird, nehmen Sie die Sendersuche vor,
indem Sie [Auto Tune] in (Liste) berühren.
Bedienelemente/Anzeigen für den
Radioempfang
(Liste)
Aufrufen der Senderliste.
Aktueller Frequenzbereich
Wechseln des Frequenzbereichs (DAB1, DAB2
oder DAB3).
Name der Sendergruppe, Sender-Name
(DAB-Optionen)
Aufrufen des Menüs DAB-Optionen.
SEEK–/SEEK+
Suchen nach Sendern.
/
Suchen nach Sendergruppen.
(Nur verfügbar, wenn [Seek nach] auf [Sender-
Gp] gesetzt ist.)
Speichernummern
Auswählen eines gespeicherten Senders.
Wischen Sie nach rechts/links, um die anderen
gespeicherten Sender anzuzeigen.
Berühren Sie eine der Tasten eine Zeit lang, um
den aktuellen Sender unter dem
entsprechenden Speicherplatz abzulegen.
Manuelles Speichern von Sendern
Empfangen gespeicherter Sender

11DE
Setzen Sie zunächst [Seek nach] auf [Sender-Gp],
damit die Suche nach Sendergruppen erfolgt
(Seite 11).
1 Berühren Sie SEEK+/–, um nach einem
Sender zu suchen.
Der Suchlauf stoppt, wenn ein Sender
empfangen wird. Setzen Sie die Suche fort, bis
der gewünschte Sender empfangen wird.
So suchen Sie nach Sendergruppe
Berühren Sie eine Zeit lang / , um nach einer
Sendergruppe zu suchen, und lassen Sie los, wenn
die gewünschte Sendergruppe angezeigt wird.
1 Berühren Sie, während der zu speichernde
Sender empfangen wird, die gewünschte
Speichernummer eine Zeit lang.
1 Berühren Sie die gewünschte
Speichernummer.
Setzen Sie zunächst [Seek nach] auf [A-Z], damit
mithilfe des Sendernamens gesucht werden kann
(Seite 11).
1 Berühren Sie .
Die Senderliste wird angezeigt.
2 Berühren Sie den gewünschten Sender.
So suchen Sie vom Wiedergabebildschirm aus
Berühren Sie SEEK+/–, um zum vorherigen/
nächsten Sender zu wechseln.
So aktualisieren Sie die Senderliste
Berühren Sie und dann [Auto Tune].
Verwenden der Funktionen in
DAB-Optionen
Die folgenden Funktionen stehen zur Verfügung,
wenn Sie berühren.
Seek nach
Einstellen des Sendersuchmodus: [A-Z] (Suche
mithilfe des Sendernamens), [Sender-Gp] (Suche
mithilfe einer Sendergruppe).
Announce
Aktivieren von DAB-Durchsagen bei
Unterbrechung der aktuellen Tonquelle: [EIN],
[AUS].
Während einer DAB-Durchsage ist die Lautstärke
auf den Pegel eingestellt, der bei RDS für TA gilt
(Seite 10).
Soft Link
Zum automatischen Suchen und Einstellen
desselben oder eines ähnlichen Programms,
wenn das aktuelle Sendesignal für den Empfang
zu schwach ist: [EIN], [AUS].
Mit „Hard Link“ wird dasselbe Programm, mit
„Soft Link“ ein ähnliches Programm eingestellt.
Informationen
Der Name der gerade ausgewählten
Sendergruppe, der Sendername, der PTY-Typ des
Senders usw. werden angezeigt.
Antennenleistung
Zum Versorgen des DAB-Antenneneingangs mit
Strom: [EIN], [AUS].
Sendersuche mithilfe einer
Sendergruppe
Manuelles Speichern eines Senders
Empfangen gespeicherter Sender
Sendersuche mithilfe des
Sendernamens
Soft Link
DAB FM (UKW)
Hard
Link
Soft
Link
Hard
Link
Soft
Link
AUS – –
EIN

12DE
Wiedergabe mit einem USB-
Gerät
Sie können USB-Geräte des Typs MSC
(Massenspeicherklasse)* verwenden, die dem USB-
Standard entsprechen.
* Beispielsweise ein USB-Flash-Laufwerk, ein digitaler
Medienplayer
Hinweise
• USB-Geräte, die mit einem der Dateisysteme FAT12/16/32/
exFAT formatiert wurden, werden unterstützt.
• Einzelheiten zur Kompatibilität des USB-Geräts finden Sie
auf der Support-Website, die auf der hinteren
Umschlagseite angegeben ist.
• Erläuterungen zu den unterstützten Dateiformaten finden
Sie in „Unterstützte Formate für die USB-Wiedergabe“
(Seite 19).
1 Drehen Sie die Lautstärke an diesem Gerät
herunter.
2 Schließen Sie das USB-Gerät an den USB-
Anschluss an.
3 Drücken Sie HOME und berühren Sie dann
[USB].
Die Wiedergabe beginnt.
So trennen Sie die Verbindung zum Gerät
Schalten Sie dieses Gerät aus oder die Zündung in
die Position ACC off und trennen Sie dann die
Verbindung zum USB-Gerät.
Wiedergabe mit einem
BLUETOOTH-Gerät
Sie können die Inhalte auf einem angeschlossenen
Gerät wiedergeben, das BLUETOOTH A2DP
(Advanced Audio Distribution Profile) unterstützt.
1 Stellen Sie eine BLUETOOTH-Verbindung zu
dem Audiogerät her (Seite 7).
2 Drücken Sie HOME und berühren Sie dann
[BT-Audio].
3 Starten Sie am Audiogerät die Wiedergabe.
Hinweise
• Bei manchen Audiogeräten werden Informationen wie
Titel, Titelnummer, verstrichene Spieldauer und
Wiedergabestatus möglicherweise nicht an diesem Gerät
angezeigt.
• Auch wenn die Signalquelle an diesem Gerät gewechselt
wird, stoppt die Wiedergabe am Audiogerät nicht.
• Das BLUETOOTH-Pairing ist nicht möglich, solange Apple
CarPlay ausgeführt wird.
Angleichen des Lautstärkepegels des
BLUETOOTH-Geräts an andere Signalquellen
Sie können die Lautstärkeunterschiede zwischen
diesem Gerät und dem BLUETOOTH-Gerät
verringern:
Berühren Sie während der Wiedergabe und
dann [Eingangspegel]. Stellen Sie den
Lautstärkepegel auf einen Wert zwischen [-6] und
[+6] ein.
Suchen und Wiedergeben von
Titeln
1 Berühren Sie während der Wiedergabe so
oft (Wiedergabewiederholung) oder
(Zufallswiedergabe), bis der gewünschte
Wiedergabemodus angezeigt wird.
Es kann eine Weile dauern, bis die Wiedergabe
im ausgewählten Wiedergabemodus beginnt.
Je nach ausgewählter Signalquelle und
angeschlossenem Gerät stehen unterschiedliche
Wiedergabemodi zur Verfügung.
1 Berühren Sie während der USB-Wiedergabe
.
Der Listenbildschirm mit dem gerade
wiedergegebenen Element wird angezeigt.
Wenn Sie (Audio) oder (Video) berühren,
werden die Elemente nach Dateityp aufgelistet.
2 Berühren Sie das gewünschte Element.
Die Wiedergabe beginnt.
Wiedergabe
Wiedergabewiederholung und
Zufallswiedergabe
Suchen nach einer Datei im
Listenbildschirm

13DE
Weitere Einstellungen während
der Wiedergabe
Zu jeder Signalquelle stehen weitere Einstellungen
zur Verfügung, die Sie durch Berühren von
aufrufen können. Welche Optionen zur Verfügung
stehen, hängt von der Signalquelle ab.
Picture EQ
Damit stellen Sie die Bildqualität nach Ihrem
Geschmack ein: [Dynamisch], [Standard],
[Theater], [Custom].
(Steht nur zur Verfügung, wenn die Parkbremse
betätigt und USB-Video ausgewählt wurde.)
Bildseitenverhältnis
Damit können Sie das Bildseitenverhältnis für
den Bildschirm dieses Geräts auswählen.
(Steht nur zur Verfügung, wenn die Parkbremse
betätigt und USB-Video ausgewählt wurde.)
Normal
Ein 4:3-Bild wird auf dem 16:9-Bildschirm in
Originalgröße und mit seitlichen Rändern
angezeigt.
Zoom
Zeigt ein 16:9-Bild an, das in das Format 4:3
Letter Box konvertiert wurde.
Voll
Ein 16:9-Bild wird in Originalgröße angezeigt.
Titel
Das Bild wird horizontal vergrößert, so dass
Untertitel auf den Bildschirm passen.
Wenn Sie ein Mobiltelefon zusammen mit diesem
Gerät nutzen wollen, verbinden Sie es mit diesem
Gerät. Erläuterungen dazu finden Sie unter
„Vorbereiten eines BLUETOOTH-Geräts“ (Seite 7).
Hinweis
Die im Folgenden erläuterten Freisprechfunktionen stehen
nur zur Verfügung, wenn die Funktion Apple CarPlay
deaktiviert ist. Wenn die Funktion Apple CarPlay aktiviert ist,
verwenden Sie die Freisprechfunktionen der Anwendung.
Entgegennehmen eines Anrufs
1 Berühren Sie , wenn ein Anruf eingeht.
Das Telefongespräch beginnt.
Hinweis
Das Rufzeichen und die Stimme des Gesprächsteilnehmers
werden nur über die Frontlautsprecher ausgegeben.
Zurückweisen/Beenden eines Anrufs
Berühren Sie .
Tätigen eines Anrufs
1 Drücken Sie HOME und berühren Sie dann
[Telefon].
2 Berühren Sie eins der Anrufsymbole auf der
BLUETOOTH-Telefonanzeige.
(Anrufliste)*
Wählen Sie einen Kontakt aus der Anrufliste.
Das Gerät speichert die letzten 20 Anrufe.
(Wahlwiederholung)
Sie können den letzten angerufenen Kontakt
automatisch erneut anrufen.
Telefonieren mit Freisprecheinrichtung

14DE
(Telefonbuch)*
Wählen Sie einen Kontakt aus der Liste der
Namen/Nummern im Telefonbuch. Wenn die
Namensliste in alphabetischer Reihenfolge
angezeigt werden soll, damit Sie den
gewünschten Kontakt suchen können,
berühren Sie .
(Eingeben der Telefonnummer)
Geben Sie die Telefonnummer ein.
Liste der gespeicherten Telefonnummern
Wählen Sie den gespeicherten Kontakt aus.
Informationen zum Speichern von Kontakten
finden Sie unter „Speichern von
Telefonnummern“ (Seite 14).
* Das Mobiltelefon muss PBAP (Phone Book Access
Profile) unterstützen.
3 Berühren Sie .
Das Telefongespräch beginnt.
Sie können bis zu 6 Kontakte in der Speicherliste
speichern.
1 Wählen Sie auf dem Telefonbildschirm die
Telefonnummer, die in der Kurzwahl
gespeichert werden soll, im Telefonbuch
aus.
Eine Bestätigungsanzeige erscheint.
2 Berühren Sie [Zu Stand. hinzf.].
3 Wählen Sie die Liste der gespeicherten
Telefonnummern, in der die Telefonnummer
gespeichert werden soll.
Der Kontakt wird in der Liste der gespeicherten
Telefonnummern gespeichert.
Während eines Anrufs
verfügbare Funktionen
So stellen Sie die Lautstärke des Rufzeichens
ein
Drehen Sie den Lautstärkeregler, während ein Anruf
eingeht.
So stellen Sie die Lautstärke der Stimme des
Gesprächsteilnehmers ein
Drehen Sie während des Gesprächs den
Lautstärkeregler.
So stellen Sie die Lautstärke für den anderen
Gesprächsteilnehmer ein (Einstellen der
Mikrofonverstärkung)
Berühren Sie während eines Anrufs über die
Freisprecheinrichtung und setzen Sie dann
[Mikrofonverstärkung] auf [Hoch], [Mittel] oder
[Niedrig].
So verringern Sie Echo und Rauschen beim
Telefonieren (Echo-/
Rauschunterdrückungsmodus)
Berühren Sie während eines Anrufs und setzen
Sie dann [Sprachqualität] auf [Modus 1] oder
[Modus 2].
So wechseln Sie zwischen Freisprechmodus
und normalem Telefonmodus
Berühren Sie während eines Anrufs ,
um zwischen dem Telefonieren über dieses Gerät
und über das Mobiltelefon zu wechseln.
Hinweis
Bei manchen Mobiltelefonen steht diese Funktion
möglicherweise nicht zur Verfügung.
So nehmen Sie einen eingehenden Anruf
automatisch entgegen
Berühren Sie und setzen Sie dann [Automatisch
antworten] auf [EIN].
Speichern von Telefonnummern

15DE
Apple CarPlay
Mit Apple CarPlay können Sie Ihr iPhone im
Fahrzeug verwenden, ohne dass Sie vom
Straßenverkehr abgelenkt werden.
Hinweise zur Verwendung von Apple CarPlay
•Ein iPhone mit iOS 7.1 oder höher ist erforderlich.
Aktualisieren Sie das Betriebssystem vor dem
Gebrauch auf die neueste iOS-Version.
•Apple CarPlay kann auf einem iPhone 5 oder
höher verwendet werden.
•Einzelheiten dazu finden Sie in der Liste der
kompatiblen Modelle auf der Support-Website,
die auf der hinteren Umschlagseite angegeben ist.
•Einzelheiten zu Apple CarPlay finden Sie in der
Anleitung zu Ihrem iPhone oder auf der Website
von Apple CarPlay.
•Da die GPS-Funktion auf Ihrem iPhone verwendet
wird, platzieren Sie das iPhone so, dass GPS-
Signale gut empfangen werden können.
1 Schließen Sie Ihr iPhone an den USB-
Anschluss an.
Zum Anschließen eines iPhone verwenden Sie
ein USB-Verbindungskabel für iPhone (nicht
mitgeliefert).
2 Drücken Sie HOME und berühren Sie dann
das Symbol für Apple CarPlay.
Das Display des iPhone wird auf dem
Gerätedisplay angezeigt. Bedienen Sie die
Anwendungen über den Berührungsbildschirm.
Die Verwendung des Apple CarPlay-Logos
bedeutet, dass eine Fahrzeugbenutzerschnittstelle
den Apple-Leistungsstandards entspricht. Apple
übernimmt keine Verantwortung für den Betrieb
dieses Fahrzeugs oder dessen Einhaltung von
Sicherheits- und gesetzlichen Standards.
Bitte beachten Sie, dass die Verwendung dieses
Produkts mit einem iPhone die drahtlose
Leistungsfähigkeit beeinträchtigen kann.
Bedienung mit dem Finger
Sie können häufig verwendete Funktionen auch
ausführen, wenn Sie in der Empfangs-/
Wiedergabeanzeige folgende Fingerbewegungen
machen.
Hinweis
Die im Folgenden erläuterte Bedienung mit dem Finger
steht auf dem Bildschirm von Apple CarPlay nicht zur
Verfügung.
Weitere nützliche Funktionen
Vorgehen Funktion
Wischen von links
nach rechts
Radioempfang:
Sender vorwärts suchen.
Video-/Audio-Wiedergabe:
Um eine Datei/einen Titel
vorwärts springen.
Wischen von rechts
nach links
Radioempfang:
Sender rückwärts suchen.
Video-/Audio-Wiedergabe:
Um eine Datei/einen Titel
rückwärts springen.
Nach oben wischen
Radioempfang:
Gespeicherte Sender einstellen
(vorwärts).
Nach unten
wischen
Radioempfang:
Gespeicherte Sender einstellen
(rückwärts).

16DE
Grundlegende Einstellschritte
Sie können Optionen in den folgenden
Konfigurationskategorien einstellen:
Allgemeine Einstellungen (Allgemein),
Klangeinstellungen (Klang), Visuelle Einstellungen
(Visuell), BLUETOOTH-Einstellungen (Bluetooth)
1 Drücken Sie HOME und berühren Sie dann
[Einstell.].
2 Berühren Sie die gewünschte
Konfigurationskategorie.
Welche Optionen eingestellt werden können,
hängt von der Signalquelle und den
Einstellungen ab.
3 Bewegen Sie die Scrollleiste nach oben und
unten und wählen Sie die gewünschte
Option.
So schalten Sie zur vorherigen Anzeige
zurück
Berühren Sie .
So rufen Sie den Wiedergabebildschirm auf
Berühren Sie .
Allgemeine Einstellungen
(Allgemein)
Sprache
Zum Auswählen der Anzeigesprache: [English],
[Español], [Français], [Deutsch], [Italiano],
[Português], [], [ ], [ ], [ ],
[], [].
Demo
Zum Einstellen des Demo-Modus: [AUS], [EIN].
Datum/Uhrzeit
Datum/Uhrzeit einstellen
Zum Auswählen von Datum und Uhrzeit:
[Auto(DAB)], [Manuell].
Datumsformat
Zum Auswählen des Formats: [DD/MM/YY],
[MM/DD/YY], [YY/MM/DD].
Uhrzeitformat
Zum Auswählen des Formats: [12-Stunden],
[24-Stunden].
Signalton
Zum Aktivieren des Signaltons: [AUS], [EIN].
Rückfahrkamera
Zum Auswählen des Bilds von der
Rückfahrkamera: [AUS], [Normal], [Umgekehrt]
(Spiegelbild).
Mit [Hilfslinien-Einstellung] können Sie die
Markierungslinien auf dem Bild von der
Rückfahrkamera einstellen.
Berühren Sie zum Einstellen
die vordere oder hintere
(rot) der Markierungslinien.
Berühren Sie ///
zum Einstellen der Position
und [ ] oder [ ] zum Einstellen der Länge
der Markierungslinien.
Lenkbetätigung
Zum Auswählen des Eingangsmodus für die
angeschlossene Fernbedienung. Um eine
Fehlfunktion zu vermeiden, achten Sie vor dem
Gebrauch darauf, dass der Eingangsmodus mit
der angeschlossenen Fernbedienung
übereinstimmt.
Custom
Eingangsmodus für die Lenkradfernbedienung
(gehen Sie wie unter [ ] erläutert vor, um
Funktionen für die angeschlossene
Fernbedienung zu registrieren).
Preset
Eingangsmodus für die Kabelfernbedienung,
ausgenommen die Lenkradfernbedienung.
Der Lenkradtasten-Bildschirm erscheint.
Halten Sie die Taste gedrückt, deren Funktion
einer Lenkradtaste zugewiesen werden soll.
Die Taste leuchtet auf dem Bildschirm auf
(Bereitschaft).
Halten Sie die Taste der
Lenkradfernbedienung gedrückt, der Sie die
Funktion zuweisen möchten.
Die Taste auf dem Bildschirm leuchtet in einer
anderen Farbe (hervorgehoben oder mit
einem orangefarbenen Kreis versehen).
Registrieren Sie wie in Schritt und
erläutert weitere Funktionen.
(Nur verfügbar, wenn [Lenkbetätigung] auf
[Custom] gesetzt ist.)
Hinweise
• Beim Vornehmen von Einstellungen steht die
angeschlossene Fernbedienung nicht zur Verfügung,
auch wenn bereits einige Funktionen registriert
wurden. Verwenden Sie die Tasten an diesem Gerät.
• Wenn beim Registrieren ein Fehler auftritt, werden alle
registrierten Informationen gelöscht. Führen Sie die
Registrierung nochmals von vorne aus.
• Diese Funktion steht unter Umständen nicht bei allen
Fahrzeugen zur Verfügung. Einzelheiten zur
Kompatibilität Ihres Fahrzeugs finden Sie auf der
Support-Website, die auf der hinteren Umschlagseite
angegeben ist.
Zurücksetzen auf Werk
Zum Zurücksetzen aller Werte auf die
werkseitigen Einstellungen.
Einstellungen

17DE
Firmware-Version
Zum Aktualisieren und Prüfen der
Firmwareversion.
Open Source-Lizenzen
Zum Anzeigen der Softwarelizenzen.
Klangeinstellungen (Klang)
EXTRA BASS
Zum Verstärken der Bässe synchron mit dem
Lautstärkepegel: [AUS], [1], [2].
EQ10/Subwoofer
Zum Auswählen einer Equalizer-Kurve und
Einstellen des Pegels des Tiefsttonlautsprechers.
EQ10
Zum Auswählen der Equalizer-Kurve: [AUS],
[R&B], [Rock], [Pop], [Hip-Hop], [Dance], [EDM],
[Jazz], [Soul], [Country], [Custom].
Mit [Custom] wird die Equalizer-Kurve
eingestellt: –6 bis +6.
Subwoofer
Zum Einstellen des Lautstärkepegels des
Tiefsttonlautsprechers: [AUS], –10 bis +10.
Balance/Fader
Zum Einstellen des Balance-/Fader-Pegels.
Balance
Zum Einstellen der Tonbalance zwischen den
linken und den rechten Lautsprechern: [L15] bis
[R15].
Fader
Zum Einstellen der Tonbalance zwischen den
Front- und den Hecklautsprechern: [Front 15] bis
[Heck 15].
Crossover
Zum Einstellen der Grenzfrequenz und der Phase
des Tiefsttonlautsprechers.
Hochpassfilter
Zum Auswählen der Grenzfrequenz für die
Front-/Hecklautsprecher: [AUS], [50Hz], [60Hz],
[80Hz], [100Hz], [120Hz].
Tiefpassfilter
Zum Auswählen der Grenzfrequenz für den
Tiefsttonlautsprecher: [AUS], [50Hz], [60Hz],
[80Hz], [100Hz], [120Hz].
Subwooferphase
Zum Auswählen der Phase des
Tiefsttonlautsprechers: [Normal], [Umgekehrt].
DSO (Dynamische Klangraumverbesserung)
Zum Verbessern der Audioausgabe: [AUS],
[Niedrig], [Mittel], [Hoch].
Visuelle Einstellungen (Visuell)
Hintergrundbild
Zum Ändern des Hintergrunds durch Berühren
der gewünschten Farbe.
Dimmer
Zum Dimmen des Displays: [AUS], [Automatisch],
[EIN].
([Automatisch] steht nur zur Verfügung, wenn
die Steuerleitung für die Beleuchtung
angeschlossen ist, und funktioniert, wenn die
Scheinwerfer eingeschaltet sind.)
Mit [ ] können Sie den Helligkeitspegel bei
aktiviertem Dimmer einstellen: –5 bis +5.
Touchscreen-Kalibrierung
Zum Vornehmen der Touchscreen-Kalibrierung,
wenn sich ein Element durch Berühren des
Monitors nicht auswählen lässt.
BLUETOOTH-Einstellungen
(Bluetooth)
Bluetooth-Verbindung
Zum Aktivieren des BLUETOOTH-Signals: [AUS],
[EIN], [Pairing] (Wechsel in den
Bereitschaftsmodus für das Pairing).
Bluetooth-Geräteinfo.
Zum Anzeigen der Informationen des Geräts, das
mit diesem Gerät verbunden wurde.
(Nur verfügbar, wenn [Bluetooth-Verbindung]
auf [EIN] gesetzt ist und ein BLUETOOTH-Gerät
mit diesem Gerät verbunden ist.)
Bluetooth zurücksetzen
Zum Initialisieren aller BLUETOOTH-Einstellungen
wie Pairing-Informationen, Anrufliste, Liste der
verbundenen BLUETOOTH-Geräte usw.

18DE
Aktualisieren der Firmware
Zum Aktualisieren der Firmware rufen Sie die
Support-Website auf, die auf der hinteren
Umschlagseite angegeben ist, und gehen nach den
online angezeigten Anweisungen vor.
Hinweis
Trennen Sie während der Aktualisierung nicht das USB-Gerät
vom Gerät.
Sicherheitsmaßnahmen
•Die Motorantenne wird automatisch ausgefahren.
•Wenn Sie das Fahrzeug mit dem installierten Gerät
entsorgen oder einem Dritten überlassen, setzen
Sie durch eine Initialisierung der Einstellungen alle
Werte auf die werkseitigen Einstellungen zurück
(Seite 16).
• Achten Sie darauf, dass keine Flüssigkeiten auf
das Gerät gelangen.
Sicherheitshinweise
•Beachten Sie stets die örtlichen Verkehrsregeln
und -vorschriften.
•Während der Fahrt
– Bedienen Sie das Gerät während der Fahrt nicht
und schauen Sie nicht darauf. Andernfalls
könnten Sie abgelenkt werden und einen Unfall
verursachen. Wenn Sie auf das Gerät schauen
oder es bedienen wollen, parken Sie das
Fahrzeug zuvor an einer sicheren Stelle.
– Verwenden Sie die Einstellfunktionen nicht und
führen Sie auch keine anderen Funktionen aus,
die Sie vom Straßenverkehr ablenken könnten.
– Schauen Sie aus Sicherheitsgründen beim
Rückwärtsfahren unbedingt nach hinten und
achten Sie auf die Umgebung, und zwar auch
dann, wenn eine Rückfahrkamera
angeschlossen ist. Verlassen Sie sich nicht allein
auf die Rückfahrkamera.
•Bei der Bedienung des Geräts
– Greifen Sie nicht mit der Hand oder den Fingern
in das Gerät und stecken Sie keine Fremdkörper
hinein. Andernfalls kann es zu Verletzungen
oder zu Schäden am Gerät kommen.
– Bewahren Sie kleine Gegenstände außerhalb
der Reichweite von Kindern auf.
– Achten Sie darauf, dass alle Fahrzeuginsassen
die Sicherheitsgurte anlegen, damit es bei einer
plötzlichen Bewegung des Fahrzeugs nicht zu
Verletzungen kommt.
Hinweise zum LCD-Bildschirm
• Lassen Sie den LCD-Bildschirm nicht nass werden
und schützen Sie ihn vor Flüssigkeiten. Andernfalls
kann es zu einer Fehlfunktion kommen.
•Drücken Sie nicht zu stark auf den LCD-Bildschirm.
Andernfalls kann es zu Bildverzerrungen oder
anderen Fehlfunktionen kommen. Das Bild kann
verschwommen sein oder der LCD-Bildschirm
kann beschädigt werden.
•Berühren Sie den LCD-Bildschirm ausschließlich
mit dem Finger und nicht mit Gegenständen.
Andernfalls kann er beschädigt werden oder
zerbrechen.
•Reinigen Sie den LCD-Bildschirm mit einem
weichen, trockenen Tuch. Verwenden Sie keine
Lösungsmittel wie Benzin oder Verdünner und
keine handelsüblichen Reinigungsmittel oder
Antistatik-Sprays.
•Verwenden Sie das Gerät nicht außerhalb des
zulässigen Temperaturbereichs von 0 ºC – 40 ºC.
•Wenn Ihr Fahrzeug in sehr warmer oder sehr kalter
Umgebung geparkt war, ist das Bild unter
Umständen verschwommen. Der Monitor ist
jedoch nicht beschädigt und sobald sich die
Temperatur im Wageninneren normalisiert, wird
auch das Bild wieder scharf.
Weitere Informationen
Unfallverhütung
Das Bild erscheint erst, nachdem Sie das
Fahrzeug geparkt und die Parkbremse betätigt
haben.
Wenn das Fahrzeug während der
Videowiedergabe zu fahren beginnt, erscheint
die folgende Warnmeldung und Sie können das
Video nicht anzeigen.
[Video ist zu Ihrer Sicherheit gesperrt.]
Bedienen Sie das Gerät während des Fahrens
nicht und schauen Sie auch nicht auf den
Monitor.

19DE
•Auf dem Monitor können unbewegliche blaue,
rote oder grüne Punkte erscheinen. Solche so
genannten „Lichtpunkte“ können bei allen LCD-
Bildschirmen auftreten. Der LCD-Bildschirm wird in
einer Hochpräzisionstechnologie hergestellt, so
dass über 99,99% der Segmente korrekt
funktionieren. Ein kleiner Prozentsatz der
Segmente (in der Regel 0,01%) leuchtet unter
Umständen jedoch nicht ordnungsgemäß. Diese
Ausfälle beeinträchtigen die Bildqualität allerdings
nicht.
Hinweise zum Touchscreen
•Dieses Gerät ist mit einem resistiven Touchscreen
ausgestattet. Berühren Sie den Touchscreen mit
den Fingerspitzen.
•Die Multitouch-Bedienung wird von diesem Gerät
nicht unterstützt.
•Berühren Sie den Touchscreen nicht mit harten,
scharfkantigen Gegenständen wie einer Nadel,
einem Stift oder den Fingernägeln. Die Bedienung
mit einem Stift wird von diesem Gerät nicht
unterstützt.
•Achten Sie darauf, dass keine Gegenstände mit
dem Touchscreen in Berührung kommen. Wenn
Sie den Touchscreen nicht mit dem Finger,
sondern mit einem Gegenstand berühren,
reagiert das Gerät möglicherweise nicht richtig.
•Da der Touchscreen aus Glasmaterial besteht,
schützen Sie das Gerät vor starken Stößen. Bei
Rissen oder Kerben auf dem Touchscreen
berühren Sie die beschädigten Bereiche nicht.
Andernfalls kann es zu Verletzungen kommen.
•Halten Sie andere elektrische Geräte vom
Touchscreen fern. Sie könnten Fehlfunktionen am
Touchscreen verursachen.
WMA (.wma)*
1
*
2
Bitrate: 48 Kbps – 192 Kbps (unterstützt variable
Bitrate (VBR))*
3
Abtastfrequenz*
4
: 44,1 kHz
MP3 (.mp3)*
1
*
2
Bitrate: 48 Kbps – 320 Kbps (unterstützt variable
Bitrate (VBR))*
3
Abtastfrequenz*
4
: 32 kHz, 44,1 kHz, 48 kHz
AAC (.m4a)*
1
*
2
Bitrate: 40 Kbps – 320 Kbps (unterstützt variable
Bitrate (VBR))*
3
Abtastfrequenz*
4
: 8 kHz – 48 kHz
Bit pro Sample (Quantisierungsbit): 16 Bit
FLAC (.flac)*
1
*
6
Abtastfrequenz*
4
: 8 kHz – 48 kHz
Bit pro Sample (Quantisierungsbit): 16 Bit
WAV (.wav)*
1
Abtastfrequenz*
4
: 8 kHz – 48 kHz
Bit pro Sample (Quantisierungsbit): 16 Bit, 24 Bit
Xvid (.avi)
Video-Codec: MPEG-4 Advanced Simple Profile
Audio-Codec: MP3 (MPEG-1 Layer3)
Bitrate: max. 4 Mbps
Bildrate: max. 30 fps (30p/60i)
Auflösung: max. 1280 × 720*
5
MPEG-4 (.mp4)
Video-Codec: MPEG-4 Advanced Simple Profile,
AVC Baseline Profile
Audio-Codec: AAC
Bitrate: max. 4 Mbps
Bildrate: max. 30 fps (30p/60i)
Auflösung: max. 1280 × 720*
5
WMV (.wmv, .avi)*
1
Video-Codec: WMV3, WVC1
Audio-Codec: MP3, WMA
Bitrate: max. 6 Mbps
Bildrate: max. 30 fps
Auflösung: max. 720 × 480*
5
MKV (.mkv)
Video-Codec: MPEG-4 Advanced Simple Profile,
AVC Baseline Profile
Audio-Codec: MP3, AAC
Bitrate: max. 5 Mbps
Bildrate: max. 30 fps
Auflösung: max. 1280 × 720*
5
*1 Urheberrechtlich geschützte Dateien und
Mehrkanalaudiodateien können nicht wiedergegeben
werden.
*2 Dateien mit DRM (Digital Rights Management –
Urheberrechtsschutzcodierung) können nicht
wiedergegeben werden.
*3 Abhängig von der Abtastfrequenz sind auch Nicht-
Standard-Bitraten oder nicht-garantierte Bitraten
eingeschlossen.
*4 Die Abtastfrequenz entspricht möglicherweise nicht
allen Encodern.
*5 Diese Zahlen geben die maximale Auflösung von
abspielbaren Videos an und beziehen sich nicht auf die
Display-Auflösung des Players. Die Display-Auflösung
liegt bei 800 × 480.
*6 Die Anzeige von Tag-Informationen wird nicht
unterstützt.
Hinweis
Manche Dateien werden möglicherweise nicht
wiedergegeben, auch wenn ihr Dateiformat von diesem
Gerät unterstützt wird.
Unterstützte Formate für die USB-
Wiedergabe

20DE
• Einzelheiten zu kompatiblen iPhone-Modellen finden Sie
auf der Support-Website, die auf der hinteren
Umschlagseite angegeben ist.
• Die Verwendung des „Made for Apple“-Markenemblems
bedeutet, dass ein Zubehör speziell für den Anschluss an
das(die) Apple-Produkt(e) entwickelt wurde, die im
Markenemblem bezeichnet sind, und vom Entwickler für
die Erfüllung der Apple-Leistungsstandards zertifiziert
wurde. Apple übernimmt keine Verantwortung für den
Betrieb dieses Geräts oder dessen Einhaltung von
Sicherheits- und gesetzlichen Standards.
Bitte beachten, dass die Verwendung dieses Zubehörs mit
einem Apple-Produkt die drahtlose Leistungsfähigkeit
beeinträchtigen kann.
Dieses Produkt umfasst Software, die Sony gemäß einer
Lizenzvereinbarung mit dem Urheberrechteinhaber
verwendet. Wir sind dazu verpflichtet, den Inhalt der
Vereinbarung den Kunden gemäß den Anforderungen des
Urheberrechteinhabers der Software bekannt zu geben.
Ausführliche Informationen zu den Softwarelizenzen finden
Sie auf Seite 17.
Hinweise zu Software, die der GNU GPL/LGPL
unterliegt
Dieses Produkt enthält Software, die der folgenden GNU
General Public License (im Folgenden als „GPL“ bezeichnet)
oder der GNU Lesser General Public License (im Folgenden
als „LGPL“ bezeichnet) unterliegt. Diese legen fest, dass
Kunden das Recht haben, sich den Quellcode der besagten
Software in Einklang mit den Bestimmungen der GPL oder
LGPL, die in diesem Gerät angezeigt wird, anzueignen, ihn
zu verändern und weiterzugeben.
Der Quellcode für die oben aufgeführte Software ist über
das Internet verfügbar.
Um ihn herunterzuladen, besuchen Sie bitte die folgende
URL und wählen Sie die Modellbezeichnung „XAV-
AX1005DB“.
URL: http://www.sony.net/Products/Linux/
Beachten Sie bitte, dass Sony keine Anfragen bezüglich des
Inhalts des Quellcodes beantworten oder darauf reagieren
kann.
Sollten an Ihrem Gerät Probleme auftreten oder sollten Sie
Fragen haben, auf die in dieser Bedienungsanleitung nicht
eingegangen wird, wenden Sie sich bitte an Ihren Sony-
Händler.
Technische Daten
Monitor
Display-Typ: LCD-Breitbild-Farbmonitor
Abmessungen: 6,2 Zoll
System: TFT-Aktivmatrix
Anzahl der Pixel:
1.152.000 Pixel (800 × 3 (RGB) × 480)
Farbsystem:
PAL/NTSC mit Auswahlautomatik für Anschluss
CAMERA IN
Tuner
DAB/DAB+
Empfangsbereich: 174,928 MHz – 239,200 MHz
Antennenanschluss:
Anschluss für Außenantenne
FM
Empfangsbereich: 87,5 MHz – 108,0 MHz
Nutzbare Empfindlichkeit: 7 dBf
Signal-Rauschabstand: 70 dB (mono)
Kanaltrennung bei 1 kHz: 45 dB
AM
Empfangsbereich: 531 kHz – 1.602 kHz
Empfindlichkeit: 32 µV
USB-Player
Schnittstelle: USB (Hi-Speed)
Maximale Stromstärke: 1,5 A
Drahtlose Kommunikation
Kommunikationssystem:
BLUETOOTH-Standard Version 3.0
Sendeleistung:
BLUETOOTH-Standard Leistungsklasse 2
(max. +1 dBm leitungsgebunden)
Maximale Kommunikationsreichweite*
1
:
Sichtlinie ca. 10 m
Frequenzbereich:
2,4-GHz-Frequenzbereich (2,4000 GHz –
2,4835 GHz)
Modulationsverfahren: FHSS
Kompatible BLUETOOTH-Profile*
2
:
A2DP (Advanced Audio Distribution Profile) 1.3
AVRCP (Audio Video Remote Control Profile) 1.3
HFP (Handsfree Profile) 1.6
PBAP (Phone Book Access Profile) 1.1
Entsprechender Codec: SBC, AAC
*1 Die tatsächliche Reichweite hängt von verschiedenen
Faktoren ab, wie z.B. Hindernissen zwischen Geräten,
Magnetfeldern um einen Mikrowellenherd, statischer
Elektrizität, Empfangsempfindlichkeit, Leistung der
Antenne, Betriebssystem, Softwareanwendung usw.
*2 BLUETOOTH-Standardprofile geben den Zweck der
BLUETOOTH-Kommunikation zwischen den Geräten an.
Hinweise zum iPhone
Hinweise zu Lizenz

21DE
Endverstärker
Ausgänge: Lautsprecherausgänge
Lautsprecherimpedanz: 4 – 8
Maximale Ausgangsleistung: 55 W × 4 (an 4 )
Allgemeines
Betriebsspannung: 12 V Gleichstrom,
Autobatterie (negative Erdung)
Nennstromaufnahme: 10 A
Abmessungen:
ca. 178 mm × 100 mm × 141 mm (B/H/T)
Einbaumaße:
ca. 182 mm × 111 mm × 121 mm (B/H/T)
Gewicht: ca. 0,9 kg
Lieferumfang:
Hauptgerät (1)
Montageteile und Anschlusszubehör (1 Satz)
Mikrofon (1)
Nähere Informationen dazu erhalten Sie beim
Händler.
Änderungen, die dem technischen Fortschritt
dienen, bleiben vorbehalten.
Der Bluetooth®-Schriftzug und die Bluetooth-Logos sind
eingetragene Markenzeichen und Eigentum der Bluetooth
SIG, Inc., und ihre Verwendung durch die Sony Corporation
erfolgt in Lizenz. Andere Markenzeichen und Produktnamen
sind Eigentum der jeweiligen Rechteinhaber.
Windows Media ist ein eingetragenes Markenzeichen oder
Markenzeichen der Microsoft Corporation in den USA und/
oder anderen Ländern.
Dieses Produkt ist durch bestimmte gewerbliche Schutz-
und Urheberrechte der Microsoft Corporation geschützt. Die
Verwendung oder der Vertrieb derartiger Technologie
außerhalb dieses Produkts ohne eine Lizenz von Microsoft
oder einer autorisierten Microsoft-Niederlassung ist
untersagt.
Apple, iPhone und Lightning sind in den USA und in
anderen Ländern eingetragene Markenzeichen von Apple
Inc.
Apple CarPlay ist ein Markenzeichen der Apple Inc.
IOS ist ein Markenzeichen oder ein eingetragenes
Markenzeichen von Cisco in den USA und anderen Ländern
und wird in Lizenz verwendet.
DIESES PRODUKT WIRD UNTER DER MPEG-4 VISUAL PATENT
PORTFOLIO-LIZENZ FÜR DEN PRIVATEN UND NICHT
KOMMERZIELLEN GEBRAUCH DURCH DEN BENUTZER
LIZENZIERT, UND ZWAR FÜR DAS DECODIEREN VON
VIDEODATEN, DIE DEM MPEG-4 VISUAL STANDARD
(„MPEG-4 VIDEO“) ENTSPRECHEN UND VON EINEM
BENUTZER IM PRIVATEN, NICHT KOMMERZIELLEN RAHMEN
CODIERT WURDEN UND/ODER VON EINEM VIDEO-ANBIETER
STAMMEN, DER ÜBER EINE LIZENZ VON MPEG LA ZUM
ANBIETEN VON MPEG-4-VIDEOS VERFÜGT.
FÜR EINEN ANDEREN ZWECK WIRD KEINE LIZENZ ERTEILT
ODER IMPLIZIT GEWÄHRT.
WEITERE INFORMATIONEN, AUCH ZU WERBE-, INTERNEN
UND KOMMERZIELLEN ZWECKEN SOWIE LIZENZEN, SIND BEI
MPEG LA, LLC, ERHÄLTLICH. WEITERE INFORMATIONEN
FINDEN SIE UNTER:
HTTP://WWW.MPEGLA.COM
Alle anderen Markenzeichen sind Markenzeichen der
jeweiligen Rechteinhaber.
Urheberrechte

22DE
Störungsbehebung
Anhand der folgenden Checkliste können Sie die
meisten Probleme, die möglicherweise an Ihrem
Gerät auftreten, selbst beheben.
Bevor Sie die folgende Checkliste durchgehen,
überprüfen Sie bitte zunächst, ob Sie das Gerät
richtig angeschlossen und bedient haben.
Einzelheiten zum Gebrauch der Sicherung und zum
Ausbauen des Geräts aus dem Armaturenbrett
finden Sie unter „Anschluss/Installation“ (Seite 26).
Wenn das Problem sich nicht beheben lässt,
besuchen Sie die Support-Website, die auf der
hinteren Umschlagseite angegeben ist.
Allgemeines
Kein Signalton ertönt.
Ein gesondert erhältlicher Endverstärker ist
angeschlossen und Sie verwenden nicht den
integrierten Verstärker.
Die Sicherung ist durchgebrannt.
Vom Gerät sind Störgeräusche zu hören, wenn
der Zündschlüssel gedreht wird.
Die Leitungen sind nicht korrekt an den
Stromanschluss für Zubehörgeräte
angeschlossen.
Die Anzeige wird ausgeblendet bzw. erscheint
nicht auf dem Monitor.
Die Monitorausschaltung ist aktiviert (Seite 6).
– Berühren Sie eine beliebige Stelle auf dem
Display, um den Monitor wieder einzuschalten.
Menüoptionen können nicht ausgewählt
werden.
Nicht verfügbare Menüoptionen werden grau
angezeigt.
Die USB-Funktionen funktionieren nicht
einwandfrei.
Verwenden Sie kein USB-Verlängerungskabel.
Andernfalls kann sich die Signalqualität
verschlechtern.
– Verwenden Sie beim Anschließen des USB-
Geräts ein kürzeres USB-Kabel oder tauschen
Sie das USB-Kabel gegen ein neues aus.
Das Gerät lässt sich nicht bedienen.
Halten Sie HOME länger als 10 Sekunden lang
gedrückt, um das Gerät neu zu starten. Starten
Sie das Gerät aus Sicherheitsgründen nicht beim
Fahren neu.
Touchscreen-Bedienung
Der Touchscreen reagiert nicht richtig auf
Berührung.
Berühren Sie immer nur eine Stelle auf dem
Touchscreen. Wenn Sie den Touchscreen an zwei
oder mehr Stellen gleichzeitig berühren, reagiert
er nicht richtig.
Kalibrieren Sie den Touchscreen des Monitors
(Seite 17).
Berühren Sie das druckempfindliche Bedienfeld
fest.
Multitouch wird nicht erkannt.
Die Multitouch-Bedienung wird von diesem Gerät
nicht unterstützt.
Radioempfang
Der Radioempfang ist schlecht.
Störgeräusche sind zu hören.
Schließen Sie die Antenne fest an.
RDS
Bei der PTY-Funktion wird [PTY nicht gefunden.]
angezeigt.
Der aktuelle Sender ist kein RDS-Sender oder der
Radioempfang ist schlecht.
Der Sendersuchlauf startet nach ein paar
Sekunden Radioempfang.
Der Sender ist kein Verkehrsfunksender (TP) oder
die Sendesignale sind zu schwach.
– Deaktivieren Sie TA (Seite 10).
Es sind keine Verkehrsdurchsagen zu hören.
Aktivieren Sie TA (Seite 10).
Der Sender sendet keine Verkehrsdurchsagen,
obwohl es sich um einen Verkehrsfunksender
(TP) handelt.
– Stellen Sie einen anderen Sender ein.
DAB/DAB+-Radioempfang
Sender lassen sich nicht empfangen.
Unter [Kein Sender] (Seite 25) finden Sie weitere
Informationen, wenn kein DAB-Signal zu
empfangen ist.
Es sind keine Verkehrsdurchsagen zu hören.
Deaktivieren Sie DAB-Durchsagen (Seite 11).
– Verkehrsdurchsagen sind nicht verfügbar,
solange DAB-Durchsagen aktiviert sind.

23DE
Bild
Es ist kein Bild zu sehen/das Bild ist verrauscht.
Eine Verbindung wurde nicht richtig
vorgenommen.
Überprüfen Sie die Verbindung zwischen diesem
und dem anderen Gerät und stellen Sie den
Eingangswählschalter am anderen Gerät auf die
Signale von diesem Gerät ein.
Das Gerät ist nicht richtig installiert.
– Installieren Sie das Gerät in einem Winkel von
unter 30° an einem stabilen Teil des Fahrzeugs.
Die Parkleitung (hellgrün) ist nicht mit der
Parkbremsenschaltleitung verbunden oder die
Parkbremse wurde nicht betätigt.
Das Bild passt nicht auf den Bildschirm.
Das Bildseitenverhältnis lässt sich bei der
Wiedergabesignalquelle nicht ändern.
Ton
Es ist kein Ton zu hören/Ton setzt aus/Ton ist
gestört.
Eine Verbindung wurde nicht richtig
vorgenommen.
Überprüfen Sie die Verbindung zwischen diesem
und dem angeschlossenen Gerät und stellen Sie
den Eingangswählschalter am anderen Gerät auf
die Signale von diesem Gerät ein.
Das Gerät ist nicht richtig installiert.
– Installieren Sie das Gerät in einem Winkel von
unter 30° an einem stabilen Teil des Fahrzeugs.
Das Gerät befindet sich im Pausemodus oder im
Modus zum Vorwärts-/Rückwärtssuchen.
Die Einstellungen für die Ausgänge wurden nicht
korrekt vorgenommen.
Die Lautstärke ist zu niedrig.
Die ATT-Funktion ist aktiviert.
Das Format wird nicht unterstützt.
– Sehen Sie nach, ob das Format von diesem
Gerät unterstützt wird (Seite 19).
Der Ton ist gestört.
Halten Sie die verschiedenen Kabel voneinander
fern.
USB-Wiedergabe
Die Wiedergabe ist nicht möglich.
Trennen Sie das USB-Gerät von diesem Gerät und
schließen Sie es dann wieder an.
Es dauert länger, bis am USB-Gerät die
Wiedergabe beginnt.
Die Dateien auf dem USB-Gerät sind sehr groß
oder befinden sich in einer komplizierten Datei-/
Ordnerstruktur.
Audiodateien können nicht wiedergegeben
werden.
USB-Geräte, die mit einem anderen Dateisystem
als FAT12, FAT16, FAT32 oder exFAT formatiert
wurden, werden nicht unterstützt.*
* Dieses Gerät unterstützt FAT12, FAT16, FAT32 und exFAT,
aber möglicherweise unterstützen nicht alle USB-Geräte
diese FAT-Systeme. Einzelheiten dazu finden Sie in der
Bedienungsanleitung zum USB-Gerät oder wenden Sie
sich an den Hersteller.
BLUETOOTH-Funktion
Ein anderes BLUETOOTH-Gerät kann dieses Gerät
nicht erkennen.
Setzen Sie [Bluetooth-Verbindung] auf [EIN]
(Seite 17).
Während eine Verbindung zu einem BLUETOOTH-
Gerät besteht, kann dieses Gerät von keinem
anderen Gerät erkannt werden. Beenden Sie die
aktuelle Verbindung und lassen Sie dann vom
anderen Gerät aus nach diesem Gerät suchen.
Je nach Smartphone oder Mobiltelefon müssen
Sie dieses Gerät möglicherweise aus der Liste der
verbundenen Smartphones oder Mobiltelefone
löschen und dann erneut ein Pairing ausführen
(Seite 7).
Es kann keine Verbindung hergestellt werden.
Schlagen Sie die Erläuterungen zum Pairing und
zum Herstellen einer Verbindung im Handbuch
zu dem anderen Gerät usw. nach und führen Sie
den Vorgang erneut aus.
Der Name des erkannten Geräts wird nicht
angezeigt.
Je nach dem Status des anderen Geräts wird der
Name möglicherweise nicht angezeigt.
Es ist kein Rufzeichen zu hören.
Erhöhen Sie die Lautstärke, während ein Anruf
eingeht.
Die Stimme des Gesprächsteilnehmers ist sehr
leise.
Erhöhen Sie die Lautstärke während eines
Telefongesprächs.

24DE
Der Gesprächsteilnehmer teilt Ihnen mit, dass die
Lautstärke zu hoch oder zu niedrig ist.
Stellen Sie den Pegel für [Mikrofonverstärkung]
ein (Seite 14).
Bei Telefongesprächen ist ein Echo oder
Rauschen zu hören.
Verringern Sie die Lautstärke.
Setzen Sie [Sprachqualität] auf [Modus 1] oder
[Modus 2] (Seite 14).
Wenn Umgebungsgeräusche das
Telefongespräch überlagern, versuchen Sie,
diese Geräusche zu reduzieren.
– Wenn beispielsweise das Fenster geöffnet ist
und Straßenlärm hereindringt, schließen Sie
das Fenster.
– Wenn die Klimaanlage laut ist, drehen Sie diese
herunter.
Die Tonqualität beim Telefonieren ist nicht gut.
Die Tonqualität beim Telefonieren hängt von den
Empfangsbedingungen des Mobiltelefons ab.
– Fahren Sie bei schlechtem Empfang mit dem
Auto an eine Stelle, an der der Empfang für das
Mobiltelefon besser ist.
Die Lautstärke des verbundenen BLUETOOTH-
Geräts ist zu niedrig oder zu hoch.
Der Lautstärkepegel variiert je nach BLUETOOTH-
Gerät.
– Verringern Sie die Lautstärkeunterschiede
zwischen diesem Gerät und dem BLUETOOTH-
Gerät (Seite 12).
Beim Audio-Streaming kommt es zu
Tonsprüngen oder die BLUETOOTH-Verbindung
schlägt fehl.
Verringern Sie den Abstand zwischen diesem
Gerät und dem anderen BLUETOOTH-Gerät.
Wenn sich das BLUETOOTH-Gerät in einem Etui
befindet, das die Signalübertragung stört,
nehmen Sie es während des Betriebs aus dem
Etui.
In der Nähe werden einige BLUETOOTH- oder
andere Geräte (z. B. Amateurfunkgeräte)
verwendet, die Funkwellen ausstrahlen.
– Schalten Sie die anderen Geräte aus.
– Vergrößern Sie den Abstand zwischen diesem
Gerät und anderen Geräten.
Der Wiedergabeton setzt einen Moment lang
aus, wenn dieses Gerät mit einem Mobiltelefon
verbunden wird. Dies ist keine Fehlfunktion.
Das verbundene BLUETOOTH-Gerät lässt sich
beim Audio-Streaming nicht steuern.
Überprüfen Sie, ob das verbundene BLUETOOTH-
Gerät das Profil AVRCP unterstützt.
Einige Funktionen stehen nicht zur Verfügung.
Vergewissern Sie sich, dass das verbundene
Gerät die betreffenden Funktionen unterstützt.
Ein Anruf wird unbeabsichtigt
entgegengenommen.
Das verbundene Telefon ist so eingestellt, dass
automatisch ein Anruf gestartet wird.
[Automatisch antworten] ist an diesem Gerät auf
[EIN] gesetzt (Seite 14).
Das Pairing ist aufgrund einer Zeitüberschreitung
fehlgeschlagen.
Je nach dem verbundenen Gerät ist das Zeitlimit
für das Pairing sehr kurz. Versuchen Sie, das
Pairing in der vorgegebenen Zeit abzuschließen.
Das Pairing ist nicht möglich.
Nach dem Initialisieren dieses Geräts kann
möglicherweise kein Pairing zwischen diesem
und einem anderen BLUETOOTH-Gerät
ausgeführt werden, wenn sich die Pairing-
Informationen dieses Geräts auf dem
BLUETOOTH-Gerät befinden. Löschen Sie in
diesem Fall die Pairing-Informationen dieses
Geräts vom BLUETOOTH-Gerät und führen Sie das
Pairing dann erneut durch.
Die BLUETOOTH-Funktion lässt sich nicht
verwenden.
Schalten Sie die Zündung aus. Warten Sie eine
Weile und drehen Sie die Zündung dann in die
Position ACC.
Bei einem Anruf über die Freisprecheinrichtung
wird über die Lautsprecher des Fahrzeugs kein
Ton ausgegeben.
Wenn der Ton über das Mobiltelefon ausgegeben
wird, stellen Sie dieses so ein, dass der Ton über
die Lautsprecher des Fahrzeugs ausgegeben
wird.
Apple CarPlay
Das Symbol für Apple CarPlay erscheint nicht auf
dem HOME-Bildschirm.
Ihr iPhone ist nicht mit Apple CarPlay kompatibel.
– Einzelheiten dazu finden Sie in der Liste der
kompatiblen Modelle auf der Support-Website,
die auf der hinteren Umschlagseite angegeben
ist.
Trennen Sie Ihr iPhone vom USB-Anschluss und
schließen Sie es wieder an.
Apple CarPlay ist in manchen Ländern bzw.
Regionen möglicherweise nicht erhältlich.
Vergewissern Sie sich, dass Ihr iPhone über ein
zertifiziertes Lightning-Kabel mit diesem Gerät
verbunden ist.

25DE
Meldungen
Allgemeines
Wdg. dieses Inhalts nicht mögl.
Die zurzeit ausgewählten Inhalte können nicht
wiedergegeben werden oder werden bis zum
nächsten Inhalt übersprungen.
– Das Dateiformat der Inhalte wird nicht
unterstützt. Überprüfen Sie, welche
Dateiformate unterstützt werden (Seite 19).
Gerät reagiert nicht
Dieses Gerät erkennt das angeschlossene USB-
Gerät nicht.
– Trennen Sie das USB-Gerät von diesem Gerät
und schließen Sie es dann wieder an.
– Überprüfen Sie, ob das USB-Gerät von diesem
Gerät unterstützt wird.
Keine spielbaren Daten
Auf dem USB-Gerät befinden sich keine Daten,
die wiedergegeben werden können.
– Speichern Sie Musikdaten/-dateien auf dem
USB-Gerät.
Überstromwarnung b. USB-Eing.
Das USB-Gerät ist überlastet.
– Lösen Sie das USB-Gerät.
– Zeigt an, dass das USB-Gerät nicht einwandfrei
funktioniert oder dass ein nicht unterstütztes
Gerät angeschlossen ist.
USB-Gerät nicht unterstützt
Einzelheiten zur Kompatibilität des USB-Geräts
finden Sie auf der Support-Website, die auf der
hinteren Umschlagseite angegeben ist.
USB-Hub nicht unterstützt
USB-Hubs werden von diesem Gerät nicht
unterstützt.
BLUETOOTH
Bluetooth-Gerät wurde nicht gefunden.
Dieses Gerät kann ein BLUETOOTH-Gerät, zu dem
eigentlich eine Verbindung hergestellt werden
kann, nicht erkennen.
– Überprüfen Sie die BLUETOOTH-Einstellung am
zu verbindenden Gerät.
Die Liste der registrierten BLUETOOTH-Geräte
enthält kein Gerät.
– Führen Sie das Pairing mit einem BLUETOOTH-
Gerät aus (Seite 7).
Freisprechanlage ist nicht verfügbar.
Es besteht keine Verbindung zu einem
Mobiltelefon.
– Stellen Sie eine Verbindung zu einem
Mobiltelefon her (Seite 8).
DAB/DAB+-Radioempfang
Kein Sender
DAB-Signale werden nicht empfangen.
– Führen Sie eine automatische Sendersuche aus
(Seite 11).
– Prüfen Sie die Verbindung der DAB-Antenne
(nicht mitgeliefert).
– Überprüfen Sie, ob [Antennenleistung] auf [EIN]
gesetzt ist (Seite 11).
Wird empfangen
Das Gerät wartet auf den Empfang eines DAB-
Senders.
Wenn sich das Problem mit diesen
Abhilfemaßnahmen nicht beheben lässt, wenden
Sie sich an einen Sony-Händler.

26DE
Vorsichtsmaßnahmen
•Installieren Sie dieses Gerät nicht in einem
Fahrzeug, das nicht über eine Zubehörposition
(ACC oder I) verfügt. Das Display wird auch nach
dem Ausschalten der Zündung nicht
ausgeschaltet und der Autobatterie wird Strom
entzogen.
•Schließen Sie alle Masseleitungen an einen
gemeinsamen Massepunkt an.
•Achten Sie darauf, dass die Leitungen nicht unter
einer Schraube oder zwischen beweglichen Teilen,
wie z. B. in einer Sitzschiene, eingeklemmt
werden.
•Schalten Sie, bevor Sie irgendwelche Anschlüsse
vornehmen, die Zündung des Fahrzeugs aus, um
Kurzschlüsse zu vermeiden.
•Schließen Sie die Stromversorgungsleitung an
dieses Gerät und die Lautsprecher an, bevor Sie
sie an den Hilfsstromanschluss anschließen.
•Aus Sicherheitsgründen müssen alle losen, nicht
angeschlossenen Leitungen mit Isolierband
abgeklebt werden.
•Wählen Sie den Einbauort sorgfältig so aus, dass
das Gerät beim Fahren nicht hinderlich ist.
•Installieren Sie das Gerät nicht an einer Stelle, an
der es Staub, Schmutz, übermäßigen
Erschütterungen oder hohen Temperaturen
ausgesetzt ist, wie z. B. in direktem Sonnenlicht
oder in der Nähe der Heizung.
•Verwenden Sie ausschließlich die mitgelieferten
Montageteile. Nur mit diesen Teilen lässt sich das
Gerät sicher montieren.
Hinweis zur Stromversorgungsleitung (gelb)
Wenn Sie dieses Gerät zusammen mit anderen
Stereokomponenten anschließen, muss der Autostromkreis,
an den die Geräte angeschlossen sind, einen höheren
Ampere-Wert aufweisen als die Summe der Ampere-Werte
der Sicherungen an den einzelnen Komponenten.
Einstellen des Montagewinkels
Achten Sie darauf, dass der Montagewinkel
geringer ist als 30°.
Teileliste für die Installation
•In dieser Teileliste ist nicht der gesamte Inhalt der
Packung aufgeführt.
•Die Halterung wird vor der Auslieferung am
Gerät angebracht. Vor dem Montieren des Geräts
entfernen Sie mit den Löseschlüsseln die
Halterung vom Gerät. Einzelheiten dazu finden
Sie unter „Abnehmen der Halterung“ (Seite 30).
•Bewahren Sie die Löseschlüssel zur späteren
Verwendung auf. Sie benötigen sie auch, wenn
Sie das Gerät aus dem Fahrzeug ausbauen wollen.
Anschluss/Installation
Sicherheitsmaßnahmen
× 4
5 × max. 8 mm
× 2

27DE
Anschluss
*
3
*
3
*
3
Tiefsttonlautsprecher*
1
Endverstärker*
1
von einer Kabelfernbedienung (nicht
mitgeliefert)
*4
*
6
*
7
von einer Autoantenne*
5
Rückfahrkamera
*
1
*
3
Hellgrün
Violettweiß gestreift
Erläuterungen dazu finden
Sie unter „Vornehmen der
Anschlüsse“ (Seite 28).
Näheres dazu finden Sie unter
„Stromanschlussdiagramm“ (Seite 28).
*
2
von einer DAB-Antenne (nicht
mitgeliefert)*
8

28DE
*1 Nicht mitgeliefert
*2 Lautsprecherimpedanz: 4 – 8 × 4
*3 Cinchkabel (nicht mitgeliefert)
*4 Verwenden Sie je nach Fahrzeugtyp einen Adapter für
eine per Kabel angeschlossene Fernbedienung (nicht
mitgeliefert).
Einzelheiten zum Verwenden der Kabelfernbedienung
finden Sie unter „Verwenden der Kabelfernbedienung“
(Seite 29).
*5 Verwenden Sie je nach Fahrzeugtyp einen Adapter (nicht
mitgeliefert), wenn der Antennenanschluss nicht passt.
*6 Führen Sie das Mikrofoneingangskabel so, dass es beim
Fahren nicht hinderlich ist, unabhängig davon, ob es
gerade in Gebrauch ist oder nicht. Sichern Sie das Kabel
mit einer Kabelklemme usw., falls es durch den Fußraum
geführt werden muss.
*7 Weitere Informationen zum Installieren des Mikrofons
finden Sie unter „Installieren des Mikrofons“ (Seite 29).
*8 Setzen Sie [Antennenleistung] je nach Typ der DAB-
Antenne (nicht mitgeliefert) auf [EIN] (Standard) oder
[AUS] (Seite 11). Max. Versorgungsstrom 0,1 A
Wenn Sie eine Motorantenne ohne Relaiskästchen
verwenden und dieses Gerät mit dem
mitgelieferten Stromversorgungsverbindungskabel
anschließen, kann die Antenne beschädigt
werden.
An den Lautsprecheranschluss des Fahrzeugs
An den Stromanschluss des Fahrzeugs
An die Parkbremsenschaltleitung
Die Montageposition der
Parkbremsenschaltleitung hängt vom Fahrzeug
ab.
Die Parkleitung (hellgrün) des
Stromversorgungsverbindungskabels muss
unbedingt an die Parkbremsenschaltleitung
angeschlossen werden.
An den +12-V-Stromversorgungsanschluss des
Rückfahrscheinwerferkabels am Fahrzeug
(nur bei Anschluss einer Rückfahrkamera)
Anschluss für Stromversorgung des
Speichers
Wenn die gelbe Stromversorgungsleitung
angeschlossen ist, wird der Speicher stets (auch bei
ausgeschalteter Zündung) mit Strom versorgt.
Lautsprecheranschluss
• Schalten Sie das Gerät vor dem Anschließen der
Lautsprecher aus.
•Verwenden Sie Lautsprecher mit einer Impedanz
zwischen 4 und 8 und mit ausreichender
Belastbarkeit, um Schäden zu vermeiden.
Stellen Sie die Position des Hilfsstromanschlusses
bei Ihrem Fahrzeug fest und nehmen Sie die
Anschlüsse entsprechend dem Fahrzeug richtig vor.
Vornehmen der Anschlüsse
1
Hecklautsprecher
(rechts)
Violett
2
Violettschwarz
gestreift
3
Frontlautsprecher
(rechts)
Grau
4
Grauschwarz
gestreift
5
Frontlautsprecher
(links)
Weiß
6
Weißschwarz
gestreift
7
Hecklautsprecher
(links)
Grün
8
Grünschwarz
gestreift
12
Kontinuierliche
Stromversorgung
Gelb
13
Steuerung für
Motorantenne/
Endverstärker (REM
OUT)
Blauweiß gestreift
14
Geschaltete
Beleuchtungsstrom-
versorgung
Orangeweiß
gestreift
15
Geschaltete
Stromversorgung
Rot
16 Masse Schwarz
Stromanschlussdiagramm
Parkbremsenschaltleitung
Bei Handbremse Bei Fußbremse
Hilfsstromanschluss

29DE
Normaler Anschluss
Wenn die Position der roten und gelben
Leitung vertauscht ist
Bei einem Fahrzeug mit Zündschloss ohne
Zubehörposition ACC oder I
Stellen Sie die Anschlüsse her, schließen Sie die
geschalteten Stromversorgungsleitungen richtig an
und verbinden Sie dann das Gerät mit der
Stromversorgung des Fahrzeugs. Sollten beim
Anschließen des Geräts Probleme auftreten oder
sollten Sie Fragen haben, auf die in dieser
Anleitung nicht eingegangen wird, wenden Sie sich
bitte an den Fahrzeughändler.
Damit bei Freisprechanrufen Ihre Stimme
übertragen werden kann, müssen Sie das Mikrofon
installieren.
Vorsichtsmaßnahmen
• Es ist sehr gefährlich, wenn sich das Kabel um die
Lenksäule oder den Schalthebel wickelt. Achten
Sie unbedingt darauf, dass das Kabel und andere
Teile beim Fahren nicht hinderlich sind.
• Wenn Ihr Auto mit Airbags oder anderen
Aufprallschutzsystemen ausgestattet ist, wenden
Sie sich vor der Installation an den Händler, bei
dem Sie dieses Gerät erworben haben, oder an
den Autohändler.
Hinweis
Reinigen Sie die Oberfläche des Armaturenbretts mit einem
trockenen Tuch, bevor Sie das doppelseitige Klebeband
anbringen.
1 Zum Aktivieren der Kabelfernbedienung
setzen Sie [Lenkbetätigung] unter
[Allgemein] auf [Preset] (Seite 16).
Die Rückfahrkamera (nicht mitgeliefert) muss vor
dem Gebrauch installiert werden.
Das Bild von einer an den Anschluss CAMERA IN
angeschlossenen Rückfahrkamera wird in
folgenden Fällen angezeigt:
Der Rückfahrscheinwerfer des Fahrzeugs
leuchtet (oder der Schalthebel befindet sich in
der Position R (Rückwärtsgang)).
Sie drücken HOME und berühren dann
[Rückf.kam.].
12
Kontinuierliche
Stromversorgung
Gelb
15
Geschaltete
Stromversorgung
Rot
12
Geschaltete
Stromversorgung
Gelb
15
Kontinuierliche
Stromversorgung
Rot
Rot Rot
Gelb Gelb
Rot Rot
Gelb Gelb
Rot
Rot
Gelb
Gelb
Installieren des Mikrofons
Verwenden der Kabelfernbedienung
Verwenden der Rückfahrkamera
Clip (nicht mitgeliefert)

30DE
Installation
Nehmen Sie vor dem Installieren des Geräts die
Halterung vom Gerät ab.
1 Führen Sie die beiden Löseschlüssel ein,
bis sie mit einem Klicken einrasten. Ziehen
Sie die Halterung nach unten und das
Gerät zum Herausziehen nach oben.
•Vergewissern Sie sich vor der Montage, dass die
Verriegelungen an beiden Seiten der Halterung
um 3,5 mm nach innen gebogen sind.
•Informationen zum Vorgehen bei japanischen
Fahrzeugen finden Sie unter „Montieren des
Geräts in einem japanischen Fahrzeug“ (Seite 30).
1 Platzieren Sie die Halterung im
Armaturenbrett und biegen Sie dann die
Klammern nach außen, um einen sicheren
Halt zu gewährleisten.
2 Montieren Sie das Gerät an der
mitgelieferten Halterung
.
Hinweise
• Wenn die Verriegelungen gerade oder nach außen
gebogen sind, ist das Gerät nicht sicher installiert und
kann herausrutschen.
• Achten Sie darauf, dass die 4 Verriegelungen an der
Schutzumrandung fest in den Kerben an der Halterung
sitzen.
Montieren des Geräts in einem
japanischen Fahrzeug
Dieses Gerät lässt sich möglicherweise in einigen
japanischen Fahrzeugen nicht einbauen. Wenden
Sie sich in einem solchen Fall an Ihren Sony-
Händler.
Wenn Sie dieses Gerät an den eingebauten
Halterungen des Fahrzeugs montieren, befestigen
Sie es mit den mitgelieferten Schrauben in den
für den jeweiligen Fahrzeugtyp geeigneten
Schraubenbohrungen:
T für TOYOTA und N für NISSAN.
Hinweis
Um Fehlfunktionen zu vermeiden, verwenden Sie zum
Einbauen des Geräts nur die mitgelieferten Schrauben .
Abnehmen der Halterung
Montieren des Geräts im
Armaturenbrett
Der Haken muss nach innen weisen.
Verriegelung
Größer als
182 mm
Größer als
111 mm
An Armaturenbrett/Mittelkonsole
Mit dem Fahrzeug
gelieferte Teile
Halterung
Halterung

31DE
Wenn Sie eine Sicherung
austauschen, achten Sie darauf,
eine Ersatzsicherung mit dem
gleichen Ampere-Wert wie die
Originalsicherung zu verwenden.
Dieser ist auf der Originalsicherung
angegeben.
Wenn die Sicherung durchbrennt, überprüfen Sie
den Stromanschluss und tauschen die Sicherung
aus. Brennt die neue Sicherung ebenfalls durch,
kann eine interne Fehlfunktion vorliegen. Wenden
Sie sich in einem solchen Fall an Ihren Sony-
Händler.
Austauschen der Sicherung
Sicherung (10 A)

2FR
La plaque signalétique indiquant la tension de
fonctionnement, etc. se trouve sous le boîtier de
l’appareil.
Avertissement
Pour prévenir les risques d’incendie ou
d’électrocution, tenez cet appareil à l’abri de
la pluie ou de l’humidité.
Pour prévenir les risques d’électrocution,
n’ouvrez pas le boîtier. Confiez les réparations
de l’appareil à un personnel qualifié
uniquement.
Fabriqué en Thaïlande
Le soussigné, Sony Corporation, déclare que cet
équipement est conforme à la Directive 2014/53/
UE.
Le texte complet de la déclaration UE de conformité
est disponible à l’adresse internet suivante :
http://www.compliance.sony.de/
La validité du libellé CE se limite uniquement aux
pays où la loi l’impose, principalement les pays de
l’EEE (Espace économique européen) et la Suisse.
Avis à l’attention des clients : les informations
suivantes s’appliquent uniquement aux
appareils vendus dans des pays qui
appliquent les directives de l’Union
Européenne
Ce produit a été fabriqué par ou pour le compte de
Sony Corporation.
Importateur dans l’UE : Sony Europe Limited.
Les questions basées sur la législation européenne
pour l’importateur ou relatives à la conformité des
produits doivent être adressées au mandataire :
Sony Belgium, bijkantoor van Sony Europe Limited,
Da Vincilaan 7-D1, 1935 Zaventem, Belgique.
Elimination des piles et
accumulateurs et des équipements
électriques et électroniques
usagés (applicable dans les pays
de l’Union Européenne et dans les
autres pays disposant de systèmes de
collecte sélective)
Ce symbole apposé sur le produit, la pile ou
l’accumulateur, ou sur l’emballage, indique que le
produit et les piles et accumulateurs fournis avec ce
produit ne doivent pas être traités comme de
simples déchets ménagers. Sur certains types de
piles, ce symbole apparaît parfois combiné avec un
symbole chimique. Le symbole pour le plomb (Pb)
est rajouté lorsque ces piles contiennent plus de
0,004 % de plomb. En vous assurant que les
produits, piles et accumulateurs sont mis au rebut
de façon appropriée, vous participez activement à
la prévention des conséquences négatives que leur
mauvais traitement pourrait provoquer sur
l’environnement et sur la santé humaine. Le
recyclage des matériaux contribue par ailleurs à la
préservation des ressources naturelles. Pour les
produits qui, pour des raisons de sécurité, de
performance ou d’intégrité des données,
nécessitent une connexion permanente à une pile
ou à un accumulateur intégré(e), il conviendra de
vous rapprocher d’un Service Technique qualifié
pour effectuer son remplacement. En rapportant
votre appareil électrique, les piles et accumulateurs
en fin de vie à un point de collecte approprié vous
vous assurez que le produit, la pile ou
l’accumulateur intégré sera traité correctement.
Pour tous les autres cas de figure et afin d’enlever
les piles ou accumulateurs en toute sécurité de
votre appareil, reportez-vous au manuel
d’utilisation. Rapportez les piles et accumulateurs,
et les équipements électriques et électroniques
usagés au point de collecte approprié pour le
recyclage. Pour toute information complémentaire
au sujet du recyclage de ce produit ou des piles et
accumulateurs, vous pouvez contacter votre
municipalité, votre déchetterie locale ou le point de
vente où vous avez acheté ce produit.
Avis d’exclusion de responsabilité relatif aux
services proposés par des tiers
Les services proposés par des tiers peuvent être
modifiés, suspendus ou clôturés sans avis
préalable. Sony n’assume aucune responsabilité
dans ce genre de situation.
Pour votre sécurité, veuillez installer cet appareil
dans le tableau de bord de la voiture en tenant
compte du fait que l’arrière de l’appareil chauffe
en cours d’utilisation.
Pour plus d’informations, reportez-vous à la
section « Connexion/Installation » (page 26).
Avertissement au cas où le contact de votre
voiture ne dispose pas d’une position ACC
N’installez pas cet appareil dans un véhicule qui
ne possède pas de position ACC. L’affichage de
l’appareil ne s’éteint pas même après avoir
coupé de le contact, ce qui entraîne une
décharge de la batterie.

3FR
Attention
SONY NE PEUT EN AUCUN CAS ETRE TENU
RESPONSABLE DE TOUT DOMMAGE DIRECT OU
INDIRECT OU DE TOUT AUTRE DOMMAGE, Y
COMPRIS, SANS LIMITATION, TOUTE PERTE DE
REVENU, DE DONNEES, D’UTILISATION DU PRODUIT
OU DE TOUT EQUIPEMENT ASSOCIE, DU TEMPS
D’ARRET LIE A OU DECOULANT DE L’UTILISATION DE
CE PRODUIT, MATERIEL ET/OU LOGICIEL.
Cher client, ce produit comprend un émetteur radio.
Conformément au Règlement n°10 de l’UNECE, un
constructeur de véhicule peut imposer des
exigences spécifiques pour l’installation des
émetteurs radio dans les véhicules.
Consultez le mode d’emploi de votre véhicule,
contactez le fabricant de votre véhicule ou votre
revendeur avant d’installer ce produit dans votre
véhicule.
Appels d’urgence
Cet appareil mains libres BLUETOOTH et l’appareil
électronique connecté au système mains libres
fonctionnent grâce à des signaux radio, des
réseaux mobiles et terrestres, ainsi que grâce à des
fonctions programmées par l’utilisateur, qui ne
peuvent garantir la connexion dans toutes les
conditions.
Par conséquent, ne vous reposez pas uniquement
sur les périphériques électroniques pour vos
communications importantes (telles que les
urgences médicales).
Communication BLUETOOTH
• Les émissions d’hyperfréquences d’un
périphérique BLUETOOTH peuvent perturber le
fonctionnement des appareils médicaux
électroniques. Mettez cet appareil ainsi que les
autres périphériques BLUETOOTH situés dans les
endroits suivants hors tension afin d’éviter tout
accident.
– Endroits où du gaz inflammable est présent,
dans un hôpital, un train, un avion ou une
station service
– A proximité de portes automatiques ou
d’alarmes incendie
• Cet appareil prend en charge les capacités de
sécurité conformes à la norme BLUETOOTH pour
offrir une connexion sécurisée lors de l’utilisation
de la technologie sans fil BLUETOOTH ; cependant,
la sécurité peut être insuffisante selon le réglage.
Soyez prudent lorsque vous communiquez au
moyen de la technologie sans fil BLUETOOTH.
• Nous ne pouvons être tenus responsables de la
fuite d’informations lors d’une communication
BLUETOOTH.
Si vous avez des questions ou des problèmes
concernant cet appareil qui ne sont pas abordés
dans ce mode d’emploi, contactez votre revendeur
Sony.
Notification importante

4FR
Table des matières
Avertissement . . . . . . . . . . . . . . . . . . . . . . . . . . . . . . 2
Emplacement des commandes . . . . . . . . . . . . . . . . 5
Préparation
Réglages initiaux. . . . . . . . . . . . . . . . . . . . . . . . . . . . 7
Préparation d’un périphérique BLUETOOTH . . . . . . 7
Raccordement d’un périphérique USB . . . . . . . . . . 8
Raccordement d’un autre périphérique audio
portable . . . . . . . . . . . . . . . . . . . . . . . . . . . . . . . . 8
Connexion de la caméra de recul . . . . . . . . . . . . . . 9
Utilisation de la radio
Utilisation de la radio . . . . . . . . . . . . . . . . . . . . . . . . 9
Utilisation des fonctions de radio en option . . . . 10
Écoute de la radio DAB/DAB+ . . . . . . . . . . . . . . . . 11
Utilisation des fonctions Options DAB . . . . . . . . . 12
Lecture
Écoute d’un périphérique USB. . . . . . . . . . . . . . . . 12
Écoute d’un périphérique BLUETOOTH . . . . . . . . . 12
Recherche et lecture de plages . . . . . . . . . . . . . . . 13
Autres réglages disponibles pendant la
lecture . . . . . . . . . . . . . . . . . . . . . . . . . . . . . . . . 13
Appel en mains libres
Réception d’un appel . . . . . . . . . . . . . . . . . . . . . . . 14
Émission d’un appel . . . . . . . . . . . . . . . . . . . . . . . . 14
Opérations réalisables pendant un appel. . . . . . . 15
Fonctions utiles
Apple CarPlay . . . . . . . . . . . . . . . . . . . . . . . . . . . . . 15
Utilisation de la commande gestuelle. . . . . . . . . . 16
Réglages
Réglages de base . . . . . . . . . . . . . . . . . . . . . . . . . . 16
Réglages généraux (Général). . . . . . . . . . . . . . . . . 16
Réglages du son (Son) . . . . . . . . . . . . . . . . . . . . . . 17
Réglages visuels (Visuel) . . . . . . . . . . . . . . . . . . . . 18
Réglages BLUETOOTH (Bluetooth). . . . . . . . . . . . . 18
Informations complémentaires
Mise à jour du firmware . . . . . . . . . . . . . . . . . . . . . 18
Précautions . . . . . . . . . . . . . . . . . . . . . . . . . . . . . . . 18
Spécifications . . . . . . . . . . . . . . . . . . . . . . . . . . . . . 21
Dépannage . . . . . . . . . . . . . . . . . . . . . . . . . . . . . . . 22
Messages . . . . . . . . . . . . . . . . . . . . . . . . . . . . . . . . . 25
Connexion/Installation
Attention . . . . . . . . . . . . . . . . . . . . . . . . . . . . . . . . . 26
Liste des pièces pour installation . . . . . . . . . . . . . 26
Connexion . . . . . . . . . . . . . . . . . . . . . . . . . . . . . . . . 27
Installation . . . . . . . . . . . . . . . . . . . . . . . . . . . . . . . 30

5FR
Emplacement des commandes
Affichage/écran tactile
HOME
Permet d’ouvrir le menu HOME.
ATT (atténuation)
Maintenez enfoncé pendant 1 seconde pour
atténuer le son.
Pour annuler, maintenez enfoncé à nouveau ou
tournez la molette de réglage du volume.
Molette de réglage du volume
Tournez la molette pour régler le volume lors de
l’émission du son.
OPTION
Appuyez pour ouvrir l’écran OPTION (page 6).
VOICE
Maintenez enfoncé pour activer la fonction de
commande vocale pour Apple CarPlay.
Port USB
Prise d’entrée AUX
Appareil principal

6FR
Écran de lecture :
Écran HOME :
Écran OPTION :
Indication d’état
(option de source)
Permet d’ouvrir le menu des options de source.
Les éléments disponibles varient selon la source.
Zone propre à l’application
Affiche les commandes/indications de lecture
ou l’état de l’appareil. Les éléments affichés
varient selon la source.
Horloge (page 16)
(retour à l’écran de lecture)
Permet de basculer entre l’écran HOME et l’écran
de lecture.
Touches de sélection des sources et des
réglages
Permettent de changer de source ou d’effectuer
divers réglages.
Affichez l’icône des réglages et d’autres icônes
en balayant le bas de cette zone vers la droite ou
la gauche.
Touches de sélection des sons
Permettent de changer de son.
(EXTRA BASS)
Modifiez le réglage EXTRA BASS (page 17).
(EQ10/Caiss. bas.)
Modifiez le réglage EQ10/Caiss. bas. (page 17).
(moniteur désactivé)
Permet de désactiver le moniteur. Quand le
moniteur est éteint, appuyez n’importe où sur
l’affichage pour le rallumer.
Affichages à l’écran
S’allume lorsque le son est atténué.
S’allume lorsque AF (Autres fréquences)
est disponible.
S’allume lorsque des informations de
radioguidage (TA : info trafic) sont
disponibles.
S’allume quand une annonce DAB est
disponible.
Indique l’état de l’intensité du signal du
tuner DAB.
S’allume lorsque l’appareil audio est
lisible en activant le profil A2DP
(Advanced Audio Distribution Profile).
S’allume lorsqu’il est possible d’appeler
en mains libres en activant le profil HFP
(Handsfree Profile).
Indique le niveau d’intensité du signal du
téléphone mobile connecté.
Indique l’état de la charge restante de la
batterie du téléphone mobile connecté.
S’allume lorsque le signal Bluetooth® est
activé. Clignote lorsque la connexion est
en cours.

7FR
Réglages initiaux
Vous devez effectuer les réglages initiaux de
l’appareil avant sa mise en service initiale ou après
avoir remplacé la batterie du véhicule ou modifié
les connexions.
Si l’écran des réglages initiaux n’apparaît pas
lorsque vous mettez l’appareil sous tension,
exécutez la réinitialisation d’usine (page 17) pour
initialiser l’appareil.
1 Appuyez sur [Langue], puis réglez la langue
d’affichage.
2 Appuyez sur [Démo] une fois pour
sélectionner [DÉSACTIVÉ] et désactiver le
mode de démonstration.
3 Appuyez sur [OK].
La mise en garde de démarrage s’affiche.
4 Lisez entièrement la mise en garde de
démarrage, puis, si vous acceptez toutes les
conditions, appuyez sur [Fermer].
Le réglage est terminé.
Ce réglage peut être configuré plus précisément
dans le menu de réglages (page 16).
Préparation d’un périphérique
BLUETOOTH
Vous pouvez profiter de la musique ou passer des
appels en mains libres en fonction de l’appareil
compatible BLUETOOTH. Il peut s’agir d’un
smartphone, d’un téléphone mobile ou d’un
appareil audio (ci-après appelé « périphérique
BLUETOOTH », sauf indication contraire). Pour de
plus amples détails sur la connexion, reportez-vous
au mode d’emploi fourni avec le périphérique.
Avant de connecter le périphérique, diminuez le
volume de cet appareil pour éviter qu’il soit trop
élevé.
La première fois que vous connectez l’appareil à un
périphérique BLUETOOTH, il est nécessaire qu’ils se
reconnaissent mutuellement (c’est ce que l’on
appelle le « pairage »). Le pairage permet à
l’appareil et à d’autres périphériques de se
reconnaître mutuellement.
1 Placez le périphérique BLUETOOTH à moins
de 1 m de cet appareil.
2 Appuyez sur HOME, puis sur [Réglages].
3 Appuyez sur [Bluetooth].
4 Appuyez sur [Connexion Bluetooth], puis
réglez le signal sur [ACTIVÉ].
Le signal BLUETOOTH est activé et s’allume
dans la barre d’état de l’appareil.
5 Appuyez sur [Pairage].
clignote lorsque l’appareil est en mode de
veille de pairage.
6 Procédez au pairage sur le périphérique
BLUETOOTH afin qu’il détecte cet appareil.
7 Sélectionnez [XAV-AX1005DB] indiqué sur
l’affichage du périphérique BLUETOOTH.
Si le nom de votre modèle n’apparaît pas,
recommencez la procédure à partir de l’étape 5.
8 Si la saisie d’une clé d’authentification* est
requise sur le périphérique BLUETOOTH,
saisissez [0000].
* Selon le périphérique BLUETOOTH, la clé
d’authentification peut être appelée «code
d’authentification», «code PIN», «mot de passe», etc.
Une fois le pairage effectué, reste allumé.
9 Sélectionnez cet appareil sur le
périphérique BLUETOOTH pour établir la
connexion BLUETOOTH.
ou s’allume une fois la connexion établie.
Préparation
Pairage et connexion d’un périphérique
BLUETOOTH
[0000]
Saisir la clé d’authentification

8FR
Remarques
• L’appareil ne peut être connecté qu’avec un seul
périphérique BLUETOOTH à la fois.
• Pour déconnecter le BLUETOOTH, désactivez la connexion
sur l’appareil ou le périphérique BLUETOOTH.
• Le pairage BLUETOOTH n’est pas possible pendant que
Apple CarPlay fonctionne.
Pour utiliser un périphérique appairé, vous devez le
connecter à cet appareil. Certains périphériques
appairés se connectent automatiquement.
1 Appuyez sur HOME, puis sur [Réglages].
2 Appuyez sur [Bluetooth].
3 Appuyez sur [Connexion Bluetooth], puis
sur [ACTIVÉ].
Assurez-vous que s’allume dans la barre
d’état de l’appareil.
4 Activez la fonction BLUETOOTH sur le
périphérique BLUETOOTH.
5 Réglez le périphérique BLUETOOTH afin qu’il
se connecte à cet appareil.
ou s’allume dans la barre d’état.
Pour établir la connexion au dernier
périphérique connecté à partir de cet appareil
Quand le contact est mis alors que le signal
BLUETOOTH est activé, l’appareil recherche le
dernier périphérique BLUETOOTH auquel il a été
connecté et établit automatiquement la connexion.
Remarque
En cours de diffusion audio BLUETOOTH en streaming, vous
ne pouvez pas vous connecter au téléphone mobile à partir
de cet appareil. Connectez-vous plutôt à cet appareil à partir
du téléphone mobile.
Pour installer le micro
Pour plus d’informations, reportez-vous à la section
« Installation du micro » (page 29).
Raccordement d’un
périphérique USB
1 Baissez le volume de l’appareil.
2 Ouvrez le couvercle du port USB, puis
raccordez le périphérique USB à l’appareil.
Pour raccorder un iPhone, utilisez le câble de
connexion USB pour iPhone (non fourni).
Raccordement d’un autre
périphérique audio portable
1 Mettez hors tension le périphérique audio
portable.
2 Coupez le volume de l’appareil.
3 Raccordez le périphérique audio portable à
la prise d’entrée AUX (mini prise stéréo) de
l’appareil avec un cordon de raccordement
(non fourni)*.
* Veillez à utiliser une fiche de type droit.
4 Appuyez sur HOME, puis touchez [AUX].
Pour adapter le niveau de volume du
périphérique raccordé à celui des autres
sources
Démarrez la lecture sur le périphérique audio
portable à un niveau de volume modéré et réglez
votre volume d’écoute habituel sur l’appareil.
Pendant la lecture, appuyez sur , puis sur
[Niveau d’entrée]. Réglez le niveau de volume entre
[-10] et [+15].
Connexion à un périphérique
BLUETOOTH appairé

9FR
Connexion de la caméra de recul
En connectant à la borne CAMERA IN la caméra de
recul en option, vous pouvez afficher l’image de la
caméra de recul. Pour plus d’informations,
reportez-vous à la section « Connexion/
Installation » (page 26).
Pour afficher l’image de la caméra de recul
Appuyez sur HOME, puis sur [Cam. recul].
Utilisation de la radio
Pour écouter la radio, appuyez sur HOME, puis sur
[Radio].
Commandes/indications de réception
Gamme d’ondes actuelle
Permet de changer de gamme d’ondes (FM1,
FM2, FM3, AM1 ou AM2).
Fréquence actuelle, nom du service de
programme*, indication RDS (Radio Data
System)*
* Pendant la réception RDS.
(option de radio)
Permet d’ouvrir le menu des options de radio.
SEEK–/SEEK+
Permet de syntoniser automatiquement.
/
Permet de syntoniser manuellement.
Maintenez enfoncé pour ignorer les fréquences
successives.
Numéros présélectionnés
Permet de sélectionner une station
présélectionnée. Glissez vers la gauche/droite
pour afficher les autres stations préréglées.
Maintenez enfoncé pour mémoriser la
fréquence actuelle dans cette présélection.
Utilisation de la radio

10FR
1 Sélectionnez la gamme d’ondes souhaitée
(FM1, FM2, FM3, AM1 ou AM2).
2 Procédez à la syntonisation.
Pour syntoniser automatiquement
Appuyez sur SEEK–/SEEK+.
Le balayage s’interrompt lorsque l’appareil capte
une station.
Pour syntoniser manuellement
Maintenez enfoncé / pour localiser
approximativement la fréquence, puis appuyez
plusieurs fois sur / pour régler la fréquence
souhaitée avec précision.
1 Quand vous captez la station que vous
souhaitez mémoriser, maintenez enfoncée
la touche de présélection souhaitée.
1 Sélectionnez la gamme d’ondes, puis
appuyez sur le numéro de la présélection
souhaitée.
Utilisation des fonctions de radio
en option
Les fonctions suivantes sont disponibles en
appuyant sur .
BTM - Best Tuning Memory (Mémoire des
meilleures réglages)
Mémorise les stations dans l’ordre des
fréquences, sous les touches de présélection.
18 stations peuvent être mémorisées pour la FM
et 12 stations pour l’AM en tant que stations
présélectionnées.
AF*
Sélectionnez [ACTIVÉ] pour régler en
permanence la station sur le signal le plus fort du
réseau.
TA*
Sélectionnez [ACTIVÉ] pour recevoir des
informations ou des programmes de
radioguidage (TP) s’ils sont disponibles.
Regional*
Sélectionnez [ACTIVÉ] pour rester sur la station
captée alors que la fonction AF est activée. Si
vous quittez la zone de réception de cette
émission régionale, sélectionnez [DÉSACTIVÉ].
Cette fonction est inopérante au Royaume-Uni et
dans certaines autres régions.
PTY*
Sélectionnez un type de programme de la liste
PTY pour rechercher une station diffusant le type
de programme sélectionné.
* Uniquement disponible durant la réception FM.
Pour recevoir les messages d’urgence
Lorsque la fonction AF ou TA est activée, les
messages d’urgence interrompent
automatiquement la source sélectionnée en cours
de diffusion.
Syntonisation
Mémorisation manuelle
Réception des stations mémorisées

11FR
Écoute de la radio DAB/DAB+
Pour écouter la radio DAB/DAB+, appuyez sur
HOME, puis sur [DAB+].
Conseils
• Réglez [Puissance de l’antenne] sur [ACTIVÉ] (par défaut)
ou sur [DÉSACTIVÉ] selon le type d’antenne DAB (non
fournie) (page 12).
• La première fois que vous sélectionnez [DAB+] après une
réinitialisation d’usine, la syntonisation automatique
démarre automatiquement. Attendez la fin de la
syntonisation automatique. (Si la syntonisation
automatique est interrompue, elle recommence la
prochaine fois que vous sélectionnez [DAB+].) Si aucune
station DAB n’est mémorisée par la syntonisation
automatique, lancez la syntonisation en appuyant sur
[Auto Tune] sous (liste).
Commandes/indications de réception
(liste)
Ouvre la liste des stations.
Gamme d’ondes actuelle
Permet de changer de gamme d’ondes (DAB1,
DAB2 ou DAB3).
Nom du groupe de station, nom de la station
(Options DAB)
Ouvre le menu Options DAB.
SEEK–/SEEK+
Recherche des stations.
/
Recherche des groupes de station.
(Disponible seulement lorsque [Seek Par] est
défini sur [Station Gp].)
Numéros présélectionnés
Permettent de sélectionner une station
présélectionnée. Glissez vers la droite/gauche
pour afficher les autres stations préréglées.
Maintenez enfoncé pour mémoriser la station
actuelle dans cette présélection.
Avant l’utilisation de cette fonction, définissez
[Seek Par] sur [Station Gp] pour lancer la recherche
par groupe de stations (page 12).
1 Appuyez sur SEEK+/– pour rechercher une
station.
Le balayage s’interrompt lorsque l’appareil capte
une station. Continuez la recherche jusqu’à ce
que la station souhaitée soit captée.
Pour rechercher un groupe de stations
Maintenez enfoncé / pour rechercher un
groupe de stations et relâchez lorsque le groupe de
stations est affiché.
1 Quand vous captez la station que vous
souhaitez mémoriser, maintenez enfoncée
la touche de présélection souhaitée.
1 Appuyez sur le numéro de la présélection
souhaitée.
Avant l’utilisation de cette fonction, définissez
[Seek Par] sur [A-Z] pour lancer la recherche par
nom de station (page 12).
1 Appuyez sur .
La liste des stations s’affiche.
2 Appuyez sur la station souhaitée.
Pour rechercher à partir de l’écran de lecture
Appuyez sur SEEK+/– pour passer à la station
précédente/suivante.
Pour mettre à jour la liste des stations
Appuyez sur , puis sur [Auto Tune].
Recherche d’une station par groupe de
stations
Mémorisation manuelle d’une station
Réception des stations mémorisées
Recherche d’une station par son nom

12FR
Utilisation des fonctions Options
DAB
Les fonctions suivantes sont disponibles lorsque
vous appuyez sur .
Seek Par
Définissez le mode de recherche de station :
[A-Z] (recherche par nom de station), [Station Gp]
(recherche par groupe de stations).
Announce
Active les annonces DAB en interrompant la
source actuellement sélectionnée : [ACTIVÉ],
[DÉSACTIVÉ].
Pendant la diffusion d’une annonce DAB, le
volume est réglé sur le niveau défini pour TA
dans RDS (page 10).
Soft Link
Recherche et sélectionne automatiquement le
programme identique ou similaire au
programme en cours lorsque le signal de celui-ci
est trop faible pour être diffusé : [ACTIVÉ],
[DÉSACTIVÉ].
La fonction « Hard Link » suit le même
programme tandis que la fonction « Soft Link »
suit un programme similaire.
Informations
Affiche le nom du groupe de station
actuellement sélectionné, le nom de la station, le
type PTY de station, etc.
Puissance de l’antenne
Alimente en tension la borne d’entrée d’antenne
DAB : [ACTIVÉ], [DÉSACTIVÉ].
Écoute d’un périphérique USB
Les périphériques USB* de type MSC (Mass Storage
Class) compatibles avec la norme USB peuvent être
utilisés.
* Par exemple, un lecteur flash USB, un lecteur multimédia
numérique
Remarques
• Les périphériques USB formatés avec les systèmes de
fichiers FAT12/16/32/exFAT sont pris en charge.
• Pour plus d’informations sur la compatibilité de votre
périphérique USB, visitez le site d’assistance à l’adresse
mentionnée au dos du manuel.
• Pour plus de détails sur les types de fichier pris en charge,
reportez-vous à la section « Formats pris en charge pour la
lecture USB » (page 19).
1 Baissez le volume sur l’appareil.
2 Connectez le périphérique USB au port USB.
3 Appuyez sur HOME, puis sur [USB].
La lecture commence.
Pour retirer le périphérique
Mettez l’appareil hors tension ou tournez le
démarreur sur la position d’arrêt ACC, puis retirez le
périphérique USB.
Écoute d’un périphérique
BLUETOOTH
Vous pouvez lire du contenu sur un périphérique
connecté qui prend en charge BLUETOOTH A2DP
(Advanced Audio Distribution Profile).
1 Établissez la connexion BLUETOOTH avec le
périphérique audio (page 7).
2 Appuyez sur HOME, puis sur [Audio BT].
3 Faites fonctionner le périphérique audio
pour commencer la lecture.
Remarques
• Selon le périphérique audio, il est possible que ses
informations, notamment le titre, le numéro/durée de la
plage et l’état de lecture ne s’affichent pas sur cet appareil.
• Même si la source change sur cet appareil, la lecture ne
s’interrompt pas sur le périphérique audio.
• Le pairage BLUETOOTH n’est pas possible pendant que
Apple CarPlay fonctionne.
Soft Link
DAB FM
Hard
Link
Soft
Link
Hard
Link
Soft
Link
DÉSACTIVÉ – –
ACTIVÉ
Lecture

13FR
Pour adapter le niveau de volume du
périphérique BLUETOOTH à celui des autres
sources
Vous pouvez réduire les différences de volume
entre cet appareil et le périphérique BLUETOOTH :
Pendant la lecture, appuyez sur , puis sur
[Niveau d’entrée]. Réglez le niveau de volume entre
[-6] et [+6].
Recherche et lecture de plages
1 En cours de lecture, appuyez plusieurs fois
sur (répéter) ou (aléatoire) jusqu’à ce
que le mode de lecture souhaité apparaisse.
Le démarrage de la lecture dans le mode
sélectionné peut prendre un certain temps.
Les modes de lecture disponibles diffèrent selon la
source audio sélectionnée et le périphérique
connecté.
1 En cours de lecture USB, appuyez sur .
L’écran de liste de l’élément en cours de lecture
apparaît.
En outre, appuyez sur (audio) ou (vidéo)
pour établir une liste par type de fichier.
2 Appuyez sur l’élément souhaité.
La lecture commence.
Autres réglages disponibles
pendant la lecture
D’autres réglages sont disponibles dans chaque
source en appuyant sur . Les éléments
disponibles varient selon la source.
Picture EQ
Règle la qualité de limage selon vos souhaits :
[Dynamique], [Standard], [Cinéma],
[Personnalisé].
(Uniquement disponible quand le frein de
stationnement est serré et qu’une vidéo USB est
sélectionnée).
Format
Permet de sélectionner le format de l’écran de
l’appareil.
(Uniquement disponible quand le frein de
stationnement est serré et qu’une vidéo USB est
sélectionnée).
Normal
Affiche une image 4:3 dans la taille d’origine,
accompagnée de barres latérales afin de remplir
l’écran 16:9.
Zoom
Affiche une image 16:9 convertie au format 4:3
Letter Box.
Plein
Affiche une image 16:9 en conservant sa taille
d’origine.
Légendes
Agrandit l’image horizontalement tout en
affichant les sous-titres.
Lecture répétée et aléatoire
Recherche d’un fichier à partir de
l’écran de liste

14FR
Pour utiliser un téléphone mobile, connectez-le à
cet appareil. Pour plus d’informations, reportez-
vous à la section « Préparation d’un périphérique
BLUETOOTH » (page 7).
Remarque
Les fonctions d’appel mains libres expliquées ci-après ne
sont disponibles que lorsque la fonction Apple CarPlay est
désactivée. Lorsque la fonction Apple CarPlay est activée,
utilisez les fonctions d’appel mains libres sur son
application.
Réception d’un appel
1 Appuyez sur quand vous recevez un
appel.
L’appel commence.
Remarque
La sonnerie et la voix de l’utilisateur sont reproduits par les
haut-parleurs avant.
Pour rejeter/mettre fin à un appel
Appuyez sur .
Émission d’un appel
1 Appuyez sur HOME, puis sur [Téléphone].
2 Appuyez sur une des icônes d’appel de
l’affichage du téléphone BLUETOOTH.
(historique des appels)*
Permet de sélectionner un contact dans la
liste de l’historique des appels. L’appareil
mémorise les 20 derniers appels.
(rappel)
Permet d’appeler automatiquement le
dernier contact que vous avez appelé.
(répertoire)*
Permet de sélectionner un contact dans la
liste des noms/numéros du répertoire. Pour
rechercher le contact souhaité par ordre
alphabétique dans la liste des noms,
appuyez sur .
(saisie du numéro de téléphone)
Saisissez le numéro de téléphone.
Liste de numéros de téléphone
présélectionnés
Permet de sélectionner le contact mémorisé.
Pour mémoriser le contact, reportez-vous à
la section « Présélection des numéros de
téléphone » (page 14).
* Le téléphone mobile doit prendre en charge PBAP
(Phone Book Access Profile).
3 Appuyez sur .
L’appel commence.
Vous pouvez mémoriser jusqu’à 6 contacts dans la
liste des présélections.
1 Sur l’écran du téléphone, sélectionnez un
numéro de téléphone à mémoriser dans les
numéros présélectionnés à partir du
répertoire.
L’écran de confirmation apparaît.
2 Appuyez sur [Ajouter au prérégl.].
3 Sélectionnez la liste de numéros de
téléphone présélectionnés dans laquelle le
numéro de téléphone est mémorisé.
Le contact est mémorisé dans la liste de
numéros de téléphone présélectionnés.
Appel en mains libres
Présélection des numéros de téléphone

15FR
Opérations réalisables pendant
un appel
Pour régler le volume de la sonnerie
Tournez la molette de réglage du volume pendant
la réception d’un appel.
Pour régler le volume de la voix de
l’utilisateur
Tournez la molette de réglage du volume pendant
un appel.
Réglage du volume pour le correspondant
(réglage du gain du micro)
Pendant un appel mains libres, appuyez sur ,
puis réglez [Volume Micro] sur [Élevé], [Moyen] ou
[Faible].
Pour réduire l’écho et le bruit (mode
d’annulation de l’écho/du bruit)
Pendant un appel, appuyez sur , puis réglez
[Qualité vocale] sur [Mode 1] ou [Mode 2].
Pour basculer entre le mode mains libres et le
mode combiné
Pendant un appel, appuyez sur pour
basculer le son de l’appel entre l’appareil et le
téléphone mobile.
Remarque
Certains téléphones mobiles ne permettent pas d’effectuer
cette opération.
Pour répondre automatiquement à un appel
entrant
Appuyez sur , puis réglez [Réponse
automatique] sur [ACTIVÉ].
Apple CarPlay
Apple CarPlay vous permet d’utiliser votre iPhone
dans la voiture de manière à rester concentré sur la
route.
Remarques relatives à l’utilisation d’Apple
CarPlay
• Un iPhone sous iOS 7.1 ou une version ultérieure
est requis. Procédez à la mise à jour vers la
dernière version d’iOS avant utilisation.
• Apple CarPlay peut s’utiliser sur un iPhone 5 ou
une version ultérieure.
• Pour plus d’informations sur les modèles
compatibles, consultez la liste de compatibilité du
site d’assistance à l’adresse mentionnée au dos du
manuel.
• Pour plus d’informations sur Apple CarPlay,
reportez-vous au manuel fourni avec votre iPhone
ou visitez le site Web d’Apple CarPlay.
• Comme le GPS de votre iPhone est utilisé, placez
votre iPhone à un endroit où il peut facilement
recevoir un signal GPS.
1 Connectez votre iPhone au port USB.
Pour connecter un iPhone, utilisez le câble de
connexion USB pour iPhone (non fourni).
2 Appuyez sur HOME, puis appuyez sur
l’icône Apple CarPlay.
L’affichage de l’iPhone apparaît sur celui de
l’appareil. Appuyez et commandez les
applications.
L’utilisation du logo Apple CarPlay signifie que
l’interface utilisateur du véhicule répond aux
normes de performance d’Apple. Apple n’est pas
responsable du fonctionnement de ce véhicule ni
de sa conformité avec les consignes et normes de
sécurité.
Veuillez noter que l’utilisation de cet accessoire
avec un iPhone peut avoir un effet adverse sur les
performances sans fil.
Fonctions utiles

16FR
Utilisation de la commande
gestuelle
Vous pouvez effectuer les opérations fréquemment
utilisées en faisant glisser le doigt sur l’écran de
réception/lecture.
Remarque
Les commandes gestuelles expliquées ci-après ne sont pas
disponibles sur l’écran d’Apple CarPlay.
Réglages de base
Vous pouvez régler des éléments dans les
catégories de configuration suivantes :
Réglages généraux (Général), Réglages du son
(Son), Réglages visuels (Visuel), Réglages
BLUETOOTH (Bluetooth)
1 Appuyez sur HOME, puis sur [Réglages].
2 Appuyez sur une des catégories de
configuration.
Les éléments qui peuvent être définis varient
selon la source et les réglages.
3 Déplacez la barre de défilement vers le haut
ou le bas pour sélectionner l’élément
souhaité.
Pour revenir à l’affichage précédent
Appuyez sur .
Pour basculer vers l’écran de lecture
Appuyez sur .
Réglages généraux (Général)
Langue
Permet de sélectionner la langue d’affichage :
[English], [Español], [Français], [Deutsch],
[Italiano], [Português], [], [ ], [ ],
[], [], [].
Démo
Permet d’activer la démonstration : [DÉSACTIVÉ],
[ACTIVÉ].
Date/Heure
Régler Date/Heure
Permet de régler la date et l’heure : [Auto(DAB)],
[Manuel].
Format date
Permet de sélectionner le format : [DD/MM/YY],
[MM/DD/YY], [YY/MM/DD].
Format heure
Permet de sélectionner le format : [12 h], [24 h].
Son des touches
Permet d’activer les sons de fonctionnement :
[DÉSACTIVÉ], [ACTIVÉ].
Procédez
comme suit
Pour
Balayer de gauche
à droite
Réception radio :
rechercher des stations vers
l’avant.
Lecture vidéo/audio :
sauter un fichier/une piste vers
l’avant.
Balayer de droite à
gauche
Réception radio :
rechercher des stations vers
l’arrière.
Lecture vidéo/audio :
sauter un fichier/une piste vers
l’arrière.
Balayer vers le haut
Réception radio :
capter des stations mémorisées
(vers l’avant).
Balayer vers le bas
Réception radio :
capter des stations mémorisées
(vers l’arrière).
Réglages

17FR
Caméra de vue arrière
Permet de sélectionner l’image de la caméra de
recul : [DÉSACTIVÉ], [Normal], [Inversé] (image
miroir).
[Réglage de lignes de guidage] permet de régler
le guide de l’image provenant de la caméra de
recul.
Appuyez sur le côté proche
ou le côté éloigné (parties
en rouge) du guide pour
effectuer le réglage.
Appuyez sur ///
pour régler la position du guide et appuyez sur
[ ] ou [ ] pour régler la largeur du guide.
Contrôle direction
Permet de sélectionner le mode d’entrée de la
télécommande connectée. Pour éviter toute
erreur de fonctionnement, vérifiez avant
utilisation si le mode d’entrée correspond à la
télécommande connectée.
Personnalisé
Mode de saisie de la télécommande de volant
(suivez les procédures de [ ] pour enregistrer
les fonctions sur la télécommande connectée).
Présélectionnée
Mode d’entrée de la télécommande filaire à
l’exclusion de la télécommande au volant.
Le panneau des touches du volant apparaît.
Appuyez sur la touche que vous souhaitez
attribuer au volant et maintenez-la enfoncée.
La touche du panneau s’allume (veille).
Appuyez sur la touche du volant à laquelle
vous souhaitez attribuer la fonction et
maintenez-la enfoncée.
La touche du panneau change de couleur
(mise en surbrillance ou entourée d’une ligne
orange).
Pour enregistrer d’autres fonctions, répétez
les étapes et .
(Disponible uniquement lorsque [Contrôle
direction] est réglé sur [Personnalisé].)
Remarques
• Pendant les réglages, la télécommande connectée est
indisponible même si certaines fonctions ont déjà été
enregistrées. Utilisez les touches de l’appareil.
• Si une erreur se produit lors de l’enregistrement, toutes
les données enregistrées sont effacées. Recommencez
l’enregistrement à partir du début.
• Il est possible que cette fonction ne soit pas disponible
sur certains véhicules. Pour plus d’informations sur la
compatibilité de votre véhicule, visitez le site
d’assistance indiqué sur la couverture arrière.
Réinit. usine
Permet de rétablir tous les réglages par défaut.
Version du logiciel
Permet de mettre à jour et de vérifier la version
du logiciel.
Licences open source
Permet d’afficher les licences logicielles.
Réglages du son (Son)
EXTRA BASS
Permet de renforcer les graves en
synchronisation avec le niveau de volume :
[DÉSACTIVÉ], [1], [2].
EQ10/Caiss. bas.
Permet de sélectionner une courbe d’égalisation
et de régler le niveau du caisson de graves.
EQ10
Permet de sélectionner la courbe d’égalisation :
[DÉSACTIVÉ], [R&B], [Rock], [Pop], [Hip-Hop],
[Dance], [EDM], [Jazz], [Soul], [Country],
[Personnalisé].
[Personnalisé] permet de régler la courbe
d’égalisation : –6 à +6.
Caiss. bas.
Permet de régler le niveau de volume du caisson
de graves : [DÉSACTIVÉ], –10 à +10.
Balance/Équilibreur
Permet de régler le niveau de la balance ou de
l’équilibreur.
Balance
Permet de régler la balance du son entre les
haut-parleurs gauche et droit : [G15] à [D15].
Équilibreur
Permet de régler la balance du son entre les
haut-parleurs avant et arrière : [Avant 15] à
[Arrière 15].
Répartiteur
Permet de régler la fréquence de coupure et la
phase du caisson de graves.
Filtre passe-haut
Permet de sélectionner la fréquence de coupure
des haut-parleurs avant/arrière : [DÉSACTIVÉ],
[50Hz], [60Hz], [80Hz], [100Hz], [120Hz].
Filtre passe-bas
Permet de sélectionner la fréquence de coupure
du caisson de graves : [DÉSACTIVÉ], [50Hz],
[60Hz], [80Hz], [100Hz], [120Hz].
Phase caiss. basses
Permet de sélectionner la phase du caisson de
graves : [Normal], [Inversé].
DSO (Dynamic Stage Organizer)
Permet d’améliorer la sortie audio numérique :
[DÉSACTIVÉ], [Faible], [Moyen], [Élevé].

18FR
Réglages visuels (Visuel)
Fond d’écran
Permet de modifier le fond d’écran en appuyant
sur la couleur souhaitée.
Réglages luminosité
Permet d’atténuer l’affichage : [DÉSACTIVÉ],
[Auto], [ACTIVÉ].
([Auto] est seulement disponible lorsque le fil de
commande de l’éclairage est connecté et ne
fonctionne que si les phares sont allumés.)
[ ] permet de régler le niveau de luminosité
quand le gradateur est activé : –5 à +5.
Réglage de l’écran tactile
Permet de régler l’étalonnage de l’écran tactile si
le point sur lequel vous appuyez est décalé par
rapport à l’élément souhaité.
Réglages BLUETOOTH
(Bluetooth)
Connexion Bluetooth
Permet d’activer le signal BLUETOOTH :
[DÉSACTIVÉ], [ACTIVÉ], [Pairage] (passe en mode
de veille de pairage).
Info app. Bluetooth
Permet d’afficher les informations du
périphérique connecté à l’appareil.
(Disponible uniquement lorsque [Connexion
Bluetooth] est réglé sur [ACTIVÉ] et qu’un
périphérique BLUETOOTH est connecté à
l’appareil.)
Rétablir Bluetooth
Permet d’initialiser tous les réglages relatifs au
BLUETOOTH, notamment les informations de
pairage, l’historique des appels, l’historique des
périphériques BLUETOOTH connectés, etc.
Mise à jour du firmware
Pour mettre à jour le firmware, visitez le site
d’assistance mentionné au dos du manuel, puis
suivez les instructions en ligne.
Remarque
Pendant la mise à jour, ne retirez pas le périphérique USB.
Précautions
•L’antenne électrique se déploie
automatiquement.
•Pour procéder au transfert de propriété de votre
voiture ou pour la mettre au rebut alors que
l’appareil est installé, rétablissez tous les réglages
par défaut en exécutant la réinitialisation d’usine
(page 17).
•Ne projetez pas de liquide sur l’appareil.
Remarques sur la sécurité
•Vous devez vous conformer aux règles, lois et
réglementations locales en vigueur en matière de
circulation.
•Pendant la conduite
– Ne regardez pas ou n’utilisez pas l’appareil, car
cela pourrait détourner votre attention et
provoquer un accident. Pour regarder ou utiliser
l’appareil, garez votre véhicule dans un lieu sûr.
– N’utilisez pas la fonction de configuration ou
toute autre fonction qui pourrait détourner votre
attention de la route.
– Lorsque vous reculez, veillez à bien regarder
derrière vous et observez les alentours avec
attention pour votre sécurité, même si la caméra
de recul est connectée. Ne vous fiez pas
uniquement à la caméra de recul.
•Pendant l’utilisation
– N’introduisez pas la main, un doigt ou un corps
étranger dans l’appareil, car vous risqueriez de
l’endommager ou de vous blesser.
– Conservez les objets de petite taille hors de la
portée des enfants.
– Veillez à boucler les ceintures de sécurité pour
éviter toute blessure éventuelle en cas de
mouvement brusque du véhicule.
Informations complémentaires

19FR
Remarques sur l’écran LCD
•Veillez à conserver l’écran LCD à l’abri de
l’humidité et ne l’exposez pas à des liquides. Cela
pourrait entraîner une panne.
• N’exercez pas de pression sur l’écran LCD, car vous
risqueriez de déformer l’image ou d’entraîner une
panne (par exemple, l’image peut devenir floue
ou l’écran LCD peut être endommagé).
•Appuyez sur l’écran LCD uniquement avec le
doigt, sous peine de l’endommager ou de le
casser.
• Nettoyez l’écran LCD avec un chiffon doux et sec.
N’utilisez pas de solvants tels que de la benzine,
du diluant, des nettoyants disponibles dans le
commerce ou des sprays antistatiques.
• Utilisez l’appareil à des températures comprises
entre 0 ºC et 40 ºC.
• Si votre véhicule est garé dans un lieu froid ou
chaud, l’image risque de ne pas être nette.
Cependant, le moniteur n’est pas endommagé et
l’image retrouve sa netteté une fois que la
température de la voiture redevient normale.
•Des points bleus, rouges ou verts fixes peuvent
apparaître sur le moniteur. C’est ce qu’on appelle
des « points brillants ». Ils peuvent apparaître sur
n’importe quel écran LCD. L’écran LCD est issu
d’une technologie de haute précision et plus de
99,99 % de ses segments sont opérationnels.
Cependant, il est possible qu’un faible
pourcentage (généralement 0,01 %) des segments
ne s’allume pas correctement. Toutefois, ceci ne
gêne en aucun cas la visualisation.
Remarques sur l’écran tactile
• Cet appareil utilise un écran tactile résistif.
Appuyez directement sur l’écran du bout du doigt.
• Cet appareil ne prend pas en charge le
fonctionnement multi-touches.
• Ne touchez pas l’écran avec des objets pointus
tels qu’une aiguille, un stylo ou un ongle de doigt.
Cet appareil ne prend pas en charge la commande
à l’aide d’un stylet.
• Évitez tout contact entre l’écran tactile et un objet
quelconque. Si vous touchez l’écran avec un objet
autre que le bout du doigt, l’appareil risque de ne
pas fonctionner correctement.
• Le panneau est en verre, ne soumettez donc pas
l’appareil à des chocs violents. Si le panneau se
fissure ou s’ébrèche, ne touchez pas la partie
endommagée, sous peine de vous blesser.
• Éloignez les autres appareils électriques de l’écran
tactile. Sinon, l’écran tactile pourrait présenter un
dysfonctionnement.
WMA (.wma)*
1
*
2
Débit binaire : 48 kbit/s – 192 kbit/s (prise en
charge du débit variable (VBR))*
3
Fréquence d’échantillonnage*
4
: 44,1 kHz
MP3 (.mp3)*
1
*
2
Débit binaire : 48 kbit/s – 320 kbit/s (prise en
charge du débit variable (VBR))*
3
Fréquence d’échantillonnage*
4
: 32 kHz,
44,1 kHz, 48 kHz
AAC (.m4a)*
1
*
2
Débit binaire : 40 kbit/s – 320 kbit/s (prise en
charge du débit variable (VBR))*
3
Fréquence d’échantillonnage*
4
: 8 kHz – 48 kHz
Bit par échantillon (bit de quantification) : 16 bits
FLAC (.flac)*
1
*
6
Fréquence d’échantillonnage*
4
: 8 kHz – 48 kHz
Bit par échantillon (bit de quantification) : 16 bits
WAV (.wav)*
1
Fréquence d’échantillonnage*
4
: 8 kHz – 48 kHz
Bit par échantillon (bit de quantification) : 16 bits,
24 bits
Xvid (.avi)
Codec vidéo : MPEG-4 Advanced Simple Profile
Codec audio : MP3 (MPEG-1 Layer3)
Débit binaire : max. 4 Mbp/s
Débit d’images : max. 30 ips (30p/60i)
Résolution : max. 1280 × 720*
5
MPEG-4 (.mp4)
Codec vidéo : MPEG-4 Advanced Simple Profile,
AVC Baseline Profile
Codec audio : AAC
Débit binaire : max. 4 Mbp/s
Débit d’images : max. 30 ips (30p/60i)
Résolution : max. 1280 × 720*
5
Prévention des accidents
Les images apparaissent uniquement une fois le
véhicule garé et le frein de stationnement serré.
Si le véhicule se met en mouvement pendant la
lecture d’une vidéo, l’avertissement suivant
s’affiche et vous ne pouvez pas visionner la
vidéo.
[Vidéo bloquée pour votre sécurité.]
N’utilisez pas l’appareil ou ne regardez pas le
moniteur lorsque vous conduisez.
Formats pris en charge pour la lecture
USB

20FR
WMV (.wmv, .avi)*
1
Codec vidéo : WMV3, WVC1
Codec audio : MP3, WMA
Débit binaire : max. 6 Mbp/s
Débit d’images : max. 30 ips
Résolution : max. 720 × 480*
5
MKV (.mkv)
Codec vidéo : MPEG-4 Advanced Simple Profile,
AVC Baseline Profile
Codec audio : MP3, AAC
Débit binaire : max. 5 Mbp/s
Débit d’image : max. 30 ips
Résolution : max. 1280 × 720*
5
*1 Les fichiers protégés par des droits d’auteur et les fichiers
audio multicanaux ne peuvent pas être lus.
*2 Les fichiers DRM (Digital Rights Management) ne
peuvent pas être lus.
*3 Les débits binaires non standard ou non garantis sont
inclus selon la fréquence d’échantillonnage.
*4 Il est possible que la fréquence d’échantillonnage ne
corresponde pas à tous les encodeurs.
*5 Ces valeurs indiquent la résolution maximale de la vidéo
qui peut être lue et non la résolution d’affichage du
lecteur. La résolution d’affichage est de 800 × 480.
*6 L’affichage des informations de balise n’est pas pris en
charge.
Remarque
Certains fichiers risquent de ne pas pouvoir être lus même si
leur format de fichier est pris en charge.
• Pour plus d’informations sur les modèles d’iPhone
compatibles, visitez le site d’assistance indiqué sur la
dernière de couverture.
• L’utilisation du badge Made for Apple signifie qu’un
accessoire a été conçu pour être raccordé spécifiquement
au produit ou aux produits Apple identifiés dans le badge,
et a été certifié par le constructeur pour satisfaire les
normes de performance d’Apple. Apple n’est pas
responsable du fonctionnement de cet appareil ni de sa
conformité avec les consignes et normes de sécurité.
Veuillez noter que l’utilisation de cet accessoire avec un
produit Apple peut avoir un effet adverse sur les
performances sans fil.
Ce produit inclut un logiciel que Sony utilise dans le cadre
d’un contrat de licence conclu avec le détenteur des droits
d’auteur. Nous sommes tenus d’annoncer le contenu du
contrat aux clients, conformément aux exigences du
propriétaire des droits d’auteur du logiciel.
Pour plus d’informations sur les licences logicielles,
reportez-vous à la page 17.
Remarque relative au logiciel sous licence GNU GPL/
LGPL
Ce produit inclut un logiciel soumis à la licence GNU General
Public License (référencée sous l’abréviation « GPL ») ou
GNU Lesser General Public License (référencée sous
l’abréviation « LGPL »). Celles-ci stipulent que les clients ont
le droit d’acquérir, de modifier et de redistribuer le code
source du logiciel concerné conformément aux conditions
de la licence GPL ou LGPL affichées sur cet appareil.
Le code source du logiciel ci-dessus est disponible sur le
Web.
Pour le télécharger, accédez à l’adresse URL suivante, puis
sélectionnez le nom de modèle « XAV-AX1005DB ».
URL : http://www.sony.net/Products/Linux/
Veuillez noter que Sony ne peut pas répondre ou réagir aux
demandes relatives au contenu du code source.
Si vous avez des questions ou si vous rencontrez des
problèmes concernant votre appareil qui ne sont pas
abordés dans ce mode d’emploi, consultez votre revendeur
Sony le plus proche.
À propos de l’iPhone
Remarque sur la licence

21FR
Spécifications
Moniteur
Type d’écran : moniteur LCD couleur grand écran
Dimensions : 6,2 po
Système : matrice active TFT
Nombre de pixels :
1 152 000 pixels (800 × 3 (RVB) × 480)
Système couleur :
Sélection automatique PAL/NTSC pour la borne
CAMERA IN
Radio
DAB/DAB+
Plage de syntonisation :
174,928 MHz – 239,200 MHz
Borne d’antenne :
Connecteur d’antenne externe
FM
Plage de syntonisation : 87,5 MHz – 108,0 MHz
Sensibilité utile : 7 dBf
Rapport signal/bruit : 70 dB (mono)
Séparation à 1 kHz : 45 dB
AM
Plage de syntonisation : 531 kHz – 1 602 kHz
Sensibilité : 32 µV
Lecteur USB
Interface : USB (grande vitesse)
Courant maximum : 1,5 A
Communication sans fil
Système de communication :
Norme BLUETOOTH version 3.0
Sortie :
Norme BLUETOOTH Power Class 2
(Max. +1 dBm conduit)
Portée de communication maximale*
1
:
En ligne directe environ 10 m
Gamme de fréquences :
Gamme des 2,4 GHz (2,4000 GHz – 2,4835 GHz)
Méthode de modulation : FHSS
Profils BLUETOOTH compatibles*
2
:
A2DP (Advanced Audio Distribution Profile) 1.3
AVRCP (Audio Video Remote Control Profile) 1.3
HFP (Handsfree Profile) 1.6
PBAP (Phone Book Access Profile) 1.1
Codec correspondant : SBC, AAC
*1 La portée réelle varie en fonction de nombreux facteurs
tels que la présence d’obstacles entre les appareils, les
champs magnétiques autour des fours à micro-ondes,
l’électricité statique, la sensibilité de la réception, les
performances de l’antenne, le système d’exploitation, les
applications logicielles, etc.
*2 Les profils standard BLUETOOTH sont destinés à la
communication BLUETOOTH entre les périphériques.
Amplificateur de puissance
Sorties : sorties haut-parleurs
Impédance des haut-parleurs : 4 – 8
Puissance de sortie maximale : 55 W × 4 (sous 4 )
Généralités
Alimentation requise : batterie de véhicule 12 V CC
(masse négative)
Consommation nominale : 10 A
Dimensions :
environ 178 mm × 100 mm × 141 mm (l/h/p)
Dimensions de montage :
environ 182 mm × 111 mm × 121 mm (l/h/p)
Poids : environ 0,9 kg
Contenu de l’emballage :
Appareil principal (1)
Composants destinés à l’installation et aux
connexions (1 jeu)
Micro (1)
Adressez-vous au vendeur pour tout
renseignement complémentaire.
La conception et les spécifications sont sujettes à
modification sans préavis.
Les logos et la marque verbale Bluetooth® sont des marques
déposées qui appartiennent à Bluetooth SIG, Inc. et qui sont
utilisées par Sony Corporation sous licence uniquement. Les
autres marques commerciales et noms commerciaux
appartiennent à leurs propriétaires respectifs.
Windows Media est une marque ou une marque déposée
de Microsoft Corporation aux Etats-Unis et/ou dans d’autres
pays.
Ce produit est protégé par des droits de propriété
intellectuelle de Microsoft Corporation. Toute utilisation ou
diffusion de la technologie décrite sortant du cadre de
l’utilisation de ce produit est interdite sans licence accordée
par Microsoft ou une filiale autorisée de Microsoft.
Apple, iPhone et Lightning sont des marques commerciales
d’Apple Inc., déposées aux États-Unis et dans d’autres pays.
Apple CarPlay est une marque commerciale d’Apple Inc.
IOS est une marque commerciale ou une marque déposée
de Cisco aux États-Unis et dans d’autres pays et qui est
utilisée sous licence.
Droits d’auteur

22FR
CE PRODUIT EST COMMERCIALISÉ SOUS LA LICENCE DU
PORTEFEUILLE DE BREVETS MPEG-4 VISUAL ET EST DESTINÉ
À UNE UTILISATION PERSONNELLE ET NON COMMERCIALE
PAR UN UTILISATEUR À DES FINS DE DÉCODAGE DE VIDÉOS
CONFORMES À LA NORME VISUELLE MPEG-4 (« VIDÉO
MPEG-4 ») ENCODÉES PAR UN UTILISATEUR DANS LE CADRE
D’UNE ACTIVITÉ PERSONNELLE ET NON COMMERCIALE ET/
OU OBTENUES AUPRÈS D’UN FOURNISSEUR VIDÉO AGRÉÉ
PAR MPEG LA POUR FOURNIR DES VIDÉOS MPEG-4.
AUCUNE LICENCE N’EST AUTORISÉE OU IMPLICITE POUR
TOUTE AUTRE UTILISATION.
TOUTE INFORMATION COMPLÉMENTAIRE, Y COMPRIS LES
INFORMATIONS RELATIVES À DES UTILISATIONS
PROMOTIONNELLES, INTERNES ET COMMERCIALES ET À LA
LICENCE PEUT ÊTRE OBTENUE AUPRÈS DE MPEG LA, LLC.
CONSULTEZ LE SITE HTTP://WWW.MPEGLA.COM
Toutes les autres marques commerciales sont des marques
appartenant à leurs détenteurs respectifs.
Dépannage
La liste de contrôles suivante vous aidera à
remédier aux problèmes que vous pourriez
rencontrer avec cet appareil.
Avant de passer en revue la liste de contrôles ci-
dessous, vérifiez les procédures de connexion et
d’utilisation.
Pour plus d’informations sur l’utilisation du fusible
et le retrait de l’appareil du tableau de bord,
reportez-vous à la section « Connexion/
Installation » (page 26).
Si le problème n’est pas résolu, visitez le site
d’assistance indiqué sur la couverture arrière.
Généralités
Aucun bip n’est émis.
Un amplificateur de puissance en option est
connecté et vous n’utilisez pas l’amplificateur
intégré.
Le fusible a sauté.
L’appareil fait du bruit lorsque la position de la
clé de contact est modifiée.
Les câbles ne sont pas connectés correctement
au connecteur d’alimentation destiné aux
accessoires du véhicule.
L’affichage disparaît du moniteur ou il n’apparaît
pas.
La fonction de désactivation du moniteur est
activée (page 6).
– Appuyez n’importe où sur l’affichage pour le
réactiver.
Des éléments de menu ne peuvent pas être
sélectionnés.
Les éléments de menu indisponibles sont grisés.
Les fonctions USB ne fonctionnent pas
correctement.
N’utilisez pas un câble d’extension USB, car cela
pourrait altérer la qualité du signal.
– Utilisez un câble USB plus court pour raccorder
le périphérique USB ou remplacez le câble USB
par un nouveau.
L’appareil ne fonctionne pas.
Maintenez HOME enfoncé pendant plus de
10 secondes pour redémarrer l’appareil. Pour
votre sécurité, ne redémarrez pas l’appareil
pendant que vous conduisez.
Fonctionnement de l’écran tactile
L’écran tactile ne réagit pas alors que vous
appuyez correctement.
Appuyez sur une partie de l’écran à la fois. Si vous
appuyez sur plusieurs parties en même temps,
l’écran tactile ne fonctionne pas correctement.
Étalonnez l’écran tactile de l’affichage (page 18).
Appuyez fermement sur le pavé sensible à la
pression.
Le fonctionnement multi-touches n’est pas
reconnu.
Cet appareil ne prend pas en charge le
fonctionnement multi-touches.
Réception radio
La réception radio est médiocre.
Des bruits statiques sont produits.
Raccordez l’antenne fermement.
RDS
PTY affiche [PTY introuvable.].
La station actuellement captée n’est pas une
station RDS ou la réception radio est médiocre.
La recherche commence après quelques
secondes d’écoute.
La station ne diffuse pas d’informations TP ou le
signal capté est faible.
–Désactivez TA (page10).
Aucun message de radioguidage.
Activez TA (page 10).
La station n’émet pas de messages de
radioguidage, malgré l’indication TP.
– Réglez la fréquence pour capter une autre
station.

23FR
Réception de la radio DAB/DAB+
Il est impossible de capter les stations.
Reportez-vous à la section [Pas de station]
(page 25) pour obtenir des détails lorsque la
réception du signal DAB est impossible.
Pas d’annonce de trafic.
Désactivez les annonces DAB (page 12).
– Les annonces de trafic ne sont pas disponibles
lorsque les annonces DAB sont activées.
Image
Absence d’image/présence de parasites sur
l’image.
Une connexion est incorrecte.
Vérifiez la connexion entre cet appareil et l’autre
appareil et réglez le sélecteur d’entrée de l’autre
appareil sur la source correspondant à cet
appareil.
L’installation est incorrecte.
– Installez l’appareil à un angle inférieur à 30°,
dans un endroit stable du véhicule.
Le cordon du frein de stationnement (vert clair)
n’est pas connecté au cordon du commutateur
du frein de stationnement ou le frein de
stationnement n’est pas serré.
L’image n’occupe pas la totalité de l’écran.
Le format est défini sur la source de lecture.
Son
Absence de son/le son saute/le son grésille.
Une connexion est incorrecte.
Vérifiez la connexion entre cet appareil et
l’appareil connecté et réglez le sélecteur d’entrée
de l’autre appareil sur la source correspondant à
cet appareil.
L’installation est incorrecte.
– Installez l’appareil à un angle inférieur à 30°,
dans un endroit stable du véhicule.
L’appareil est en mode de pause/de retour
rapide/d’avance rapide.
Les réglages des sorties sont incorrects.
Le volume est trop faible.
La fonction ATT est activée.
Le format n’est pas pris en charge.
– Vérifiez si le format est pris en charge par cet
appareil (page 19).
Le son s’accompagne de parasites.
Éloignez les cordons des câbles.
Lecture USB
Impossible de lire des éléments.
Reconnectez le périphérique USB.
La lecture sur un périphérique USB exige un délai
de démarrage plus long.
Le périphérique USB contient des fichiers
volumineux ou une arborescence de fichiers
complexe.
Impossible de lire des fichiers audio.
Les périphériques USB formatés avec des
systèmes de fichiers autres que FAT12, FAT16,
FAT32 ou exFAT ne sont pas pris en charge.*
* Cet appareil prend en charge les formats FAT12, FAT16,
FAT32 et exFAT, mais il se peut que certains périphériques
USB ne les prennent pas tous en charge. Pour plus
d’informations, consultez le mode d’emploi de chaque
périphérique USB ou contactez leur fabricant.
Fonction BLUETOOTH
L’autre périphérique BLUETOOTH ne détecte pas
cet appareil.
Réglez [Connexion Bluetooth] sur [ACTIVÉ]
(page 18).
Lorsqu’il se connecte à un périphérique
BLUETOOTH, cet appareil ne peut pas être
détecté par un autre périphérique. Mettez fin à la
connexion en cours et recherchez cet appareil à
partir de l’autre périphérique.
Selon votre smartphone ou téléphone mobile,
vous devrez peut-être supprimer cet appareil de
l’historique du smartphone ou téléphone mobile
connecté avant de les appairer à nouveau
(page 7).
Impossible d’établir la connexion.
Vérifiez les procédures de pairage et de
connexion dans le manuel de l’autre
périphérique, par exemple, et recommencez
l’opération.
Le nom du périphérique détecté ne s’affiche pas.
Selon l’état de l’autre périphérique, il peut être
impossible d’obtenir un nom.
Absence de sonnerie.
Augmentez le volume pendant la réception d’un
appel.
Le volume de la voix de l’utilisateur est faible.
Augmentez le volume pendant un appel.
L’interlocuteur trouve le volume trop faible ou
trop élevé.
Réglez le niveau [Volume Micro] (page 15).

24FR
Les conversations téléphoniques
s’accompagnent d’écho ou de parasites.
Diminuez le volume.
Réglez [Qualité vocale] sur [Mode 1] ou [Mode 2]
(page 15).
Si le bruit environnant, autre que le son de l’appel
téléphonique, est fort, essayez de réduire ce
bruit.
– Fermez la fenêtre si la rue est bruyante.
– Si le climatiseur est bruyant, diminuez-le.
La qualité sonore du téléphone est mauvaise.
La qualité sonore du téléphone dépend des
conditions de réception du téléphone mobile.
– Déplacez votre véhicule dans un endroit où la
réception est meilleure si elle était mauvaise.
Le volume du périphérique BLUETOOTH connecté
est faible ou élevé.
Le niveau de volume varie d’un périphérique
BLUETOOTH à l’autre.
– Vous pouvez réduire les différences de volume
entre cet appareil et le périphérique
BLUETOOTH (page 13).
Le son s’interrompt en cours de streaming audio
ou la connexion BLUETOOTH échoue.
Réduisez la distance entre l’appareil et le
périphérique BLUETOOTH.
Si le périphérique BLUETOOTH est rangé dans un
étui qui interrompt le signal, sortez-le de cet étui
pour l’utiliser.
Plusieurs périphériques BLUETOOTH ou d’autres
appareils (notamment des équipements de
radio-amateurs) qui émettent des ondes radio
sont utilisés à proximité.
– Mettez les autres périphériques hors tension.
– Éloignez l’appareil des autres périphériques.
Le son de la lecture s’interrompt
momentanément quand cet appareil se connecte
à un téléphone mobile. Il ne s’agit pas d’un
problème de fonctionnement.
Impossible de commander le périphérique
BLUETOOTH connecté en cours de streaming
audio.
Vérifiez que le périphérique BLUETOOTH
connecté prend en charge AVRCP.
Certaines fonctions ne sont pas activées.
Vérifiez que le périphérique à connecter prend en
charge les fonctions en question.
Réponse involontaire à un appel.
Le téléphone à connecter est configuré pour
appeler automatiquement.
[Réponse automatique] de cet appareil est réglé
sur [ACTIVÉ] (page 15).
Échec du pairage dans le délai imparti.
Selon le périphérique à connecter, le délai de
pairage peut être court. Essayez de terminer le
pairage dans ce délai.
Pairage impossible.
Il se peut que l’appareil ne puisse pas effectuer le
pairage avec un appareil BLUETOOTH qui a été
appairé auparavant après l’initialisation de
l’appareil si les informations de l’appareil sont
mémorisées dans le périphérique BLUETOOTH.
Dans ce cas, supprimez les informations de
pairage relatives à l’appareil sur le périphérique
BLUETOOTH, puis recommencez le pairage.
La fonction BLUETOOTH est inopérante.
Coupez le contact. Patientez un moment, puis
tournez le démarreur sur la position ACC.
Les haut-parleurs du véhicule ne reproduisent
aucun son pendant un appel mains libres.
Si le son provient du téléphone mobile, réglez-le
pour que le son soit reproduit par les haut-
parleurs du véhicule.
Apple CarPlay
L’icône Apple CarPlay n’apparaît pas sur l’écran
HOME.
Votre iPhone n’est pas compatible avec Apple
CarPlay.
– Consultez la liste de compatibilité du site
d’assistance à l’adresse mentionnée au dos du
manuel.
Déconnectez votre iPhone du port USB et
reconnectez-le.
Il se peut qu’Apple CarPlay soit indisponible dans
votre pays ou région.
Assurez-vous qu’un câble Lightning certifié est
utilisé pour connecter votre iPhone à l’appareil.

25FR
Messages
Généralités
Lecture imposs. de ce contenu.
Le contenu actuellement sélectionné est
impossible à lire ou passe au suivant.
– Le format de fichier du contenu n’est pas pris
en charge. Vérifiez les formats de fichier pris en
charge (page 19).
Pas de réponse de l’app.
L’appareil ne reconnaît pas le périphérique USB
connecté.
– Reconnectez le périphérique USB.
– Vérifiez si le périphérique USB est pris en
charge par l’appareil.
Aucune donnée de lecture
Le périphérique USB ne contient pas de données
de lecture.
– Chargez des fichiers/données de musique sur
le périphérique USB.
Danger de surintensité entrée USB
Le périphérique USB est surchargé.
– Déconnectez le périphérique USB.
– Indique que le périphérique USB est hors
d’usage ou que le périphérique connecté n’est
pas pris en charge.
Le périphérique USB n’est pas supporté
Pour plus d’informations sur la compatibilité de
votre périphérique USB, visitez le site d’assistance
à l’adresse mentionnée au dos du manuel.
Concentrateur USB non pris en charge
Cet appareil ne prend pas en charge les
concentrateurs USB.
BLUETOOTH
Périphérique Bluetooth introuvable.
L’appareil est incapable de détecter un
périphérique BLUETOOTH connectable.
– Vérifiez la configuration BLUETOOTH du
périphérique à connecter.
Aucun périphérique ne figure dans la liste des
périphériques BLUETOOTH enregistrés.
– Procédez au pairage avec un périphérique
BLUETOOTH (page 7).
Appareil mains libres non disponible.
Aucun téléphone mobile n’est connecté.
– Connectez un téléphone mobile (page 8).
Réception de la radio DAB/DAB+
Pas de station
La réception du signal DAB est impossible.
– Lancez une syntonisation automatique
(page 11).
– Vérifiez la connexion de l’antenne DAB (non
fournie).
– Vérifiez si [Puissance de l’antenne] est réglé sur
[ACTIVÉ] (page 12).
Réception en cours
L’appareil attend de capter une station DAB.
Si ces solutions ne permettent pas d’améliorer la
situation, contactez votre revendeur Sony le plus
proche.

26FR
Attention
•N’installez pas cet appareil dans un véhicule qui
ne possède pas de position ACC. L’affichage de
l’appareil ne s’éteint pas même après avoir coupé
de le contact, ce qui entraîne une décharge de la
batterie.
• Acheminez tous les fils de masse jusqu’à un
point de masse commun.
•Veillez à ce qu’aucun fil ne soit coincé sous une vis
ou happé par des pièces mobiles (par exemple,
une glissière de siège).
•Avant d’effectuer les connexions, coupez le
contact du véhicule pour éviter les courts-circuits.
• Raccordez le câble d’alimentation à l’appareil et
aux haut-parleurs avant de le raccorder au
connecteur d’alimentation auxiliaire.
• Pour des raisons de sécurité, veillez à isoler avec
du ruban isolant les extrémités libres des fils non
connectés.
•Choisissez soigneusement l’emplacement
d’installation afin que l’appareil n’entrave pas la
conduite normale.
•Évitez d’installer l’appareil dans des endroits
soumis à la poussière, à la saleté, à des vibrations
excessives ou à des températures élevées,
notamment les rayons directs du soleil ou la
proximité des conduites de chauffage.
•Utilisez exclusivement le matériel de fixation
fourni afin de garantir une installation sûre.
Remarque sur le câble d’alimentation (jaune)
Lorsque vous connectez cet appareil conjointement avec
d’autres équipements stéréo, l’intensité du circuit du
véhicule auquel l’appareil est relié doit être supérieure à la
somme de l’intensité des fusibles de chaque composant.
Réglage de l’angle de fixation
Réglez l’angle de fixation afin qu’il soit inférieur à
30°.
Liste des pièces pour installation
•Cette liste des pièces ne comprend pas tout le
contenu de l’emballage.
•Le support est fixé à l’appareil avant d’être
expédié. Avant de monter l’appareil, utilisez les
clés de déblocage pour retirer le support de
l’appareil. Pour plus d’informations, reportezvous
à la section « Retrait du support » (page 30).
•Conservez les clés de déblocage à des fins
d’utilisation ultérieure, car vous en aurez aussi
besoin pour enlever l’appareil de votre véhicule.
Connexion/Installation
Précautions
× 4
5 × max. 8 mm
× 2

27FR
Connexion
*
3
*
3
*
3
Caisson de graves*
1
Amplificateur de puissance*
1
d’une télécommande filaire (non
fournie)
*4
*
6
*
7
de l’antenne du véhicule*
5
Caméra de
recul*
1
*
3
Vert clair
Rayé violet/blanc
Pour plus d’informations,
reportez-vous à la section
« Connexions » (page 28).
Reportez-vous à la section « Schéma de
connexion électrique » (page 29) pour plus
d’informations.
*
2
depuis l’antenne DAB (non fournie)*
8

28FR
*1 Non fourni
*2 Impédance des haut-parleurs : 4 – 8 × 4
*3 Cordon à broches RCA (non fourni)
*4 Selon le type de véhicule, utilisez un adaptateur pour la
télécommande filaire (non fournie).
Pour plus d’informations sur l’utilisation de la
télécommande filaire, reportez-vous à la section
« Utilisation de la télécommande filaire » (page 29).
*5 Selon le type de véhicule, utilisez un adaptateur (non
fourni) si le connecteur d’antenne ne convient pas.
*6 Qu’il soit utilisé ou non, acheminez le cordon de l’entrée
micro de façon à ce qu’il n’interfère pas avec la conduite.
Fixez le cordon avec un attache-câble ou autre s’il est
installé près de vos pieds.
*7 Pour plus d’informations sur l’installation du micro,
reportez-vous à la section « Installation du micro »
(page 29).
*8 Réglez [Puissance de l’antenne] sur [ACTIVÉ] (par défaut)
ou sur [DÉSACTIVÉ] selon le type d’antenne DAB (non
fournie) (page 12). Courant d’alimentation max de 0,1 A
Si vous disposez d’une antenne électrique
dépourvue de relais, vous risquez de
l’endommager si vous connectez cet appareil à
l’aide du câble d’alimentation fourni .
Vers le connecteur haut-parleurs du véhicule
Vers le connecteur d’alimentation du véhicule
Vers le cordon du commutateur du frein de
stationnement
La position d’installation du cordon du
commutateur du frein de stationnement dépend
du véhicule.
N’oubliez pas de connecter le fil du frein de
stationnement (vert clair) du câble
d’alimentation au cordon du commutateur du
frein de stationnement.
Vers la borne d’alimentation +12 V du fil des
lampes arrière du véhicule (uniquement en
cas de connexion de la caméra de recul)
Connexion de protection de la mémoire
Lorsque le câble d’alimentation est connecté, le
circuit mémoire est toujours alimenté, même
lorsque le contact est coupé.
Connexion des haut-parleurs
•Avant de connecter les haut-parleurs, mettez
l’appareil hors tension.
• Utilisez des haut-parleurs dont l’impédance est
comprise entre 4 et 8 et dont la puissance
admissible est appropriée pour éviter qu’ils soient
endommagés.
Connexions
1
Haut-parleur
arrière (droit)
Violet
2
Rayé violet/noir
3
Haut-parleur
avant (droit)
Gris
4
Rayé gris/noir
5
Haut-parleur
avant (gauche)
Blanc
6 Rayé blanc/noir
7
Haut-parleur
arrière (gauche)
Vert
8 Rayé vert/noir
12
alimentation
permanente
Jaune
13
antenne électrique/
amplificateur de
puissance (REM OUT)
Rayé bleu/blanc
14
alimentation de
l’éclairage commutée
Rayé orange/
blanc
15 alimentation commutée Rouge
16 masse Noir
Cordon du commutateur du
frein de stationnement
Type de frein à main Type de frein au pied

29FR
Vérifiez le connecteur d’alimentation auxiliaire de
votre véhicule et faites correspondre correctement
les connexions des cordons selon le véhicule.
Connexion ordinaire
Quand les positions des câbles rouge et jaune
sont inversées
Pour les véhicules dépourvus de position ACC
Après avoir fait correspondre correctement les
connexions et les câbles d’alimentation commutée,
connectez l’appareil à l’alimentation du véhicule. Si
vous avez des questions et des problèmes de
connexion de cet appareil, qui ne sont pas abordés
dans ce mode d’emploi, contactez votre
concessionnaire automobile.
Pour capturer votre voix lors d’un appel en mains
libres, vous devez installer le micro .
Attention
• Il est extrêmement dangereux d’avoir le cordon
enroulé autour de la colonne de direction ou du
levier de vitesse. Empêchez le cordon et d’autres
composants d’interférer avec votre conduite.
• Si votre véhicule est équipé d’airbags ou de tout
autre équipement anti-choc, contactez le magasin
où vous avez acheté l’appareil ou le
concessionnaire avant de procéder à l’installation.
Remarque
Avant de placer l’adhésif double face , nettoyez la surface
du tableau de bord avec un chiffon sec.
1 Pour activer la télécommande filaire, réglez
[Contrôle direction] sous [Général] sur
[Présélectionnée] (page 17).
Avant toute utilisation, il est indispensable
d’installer la caméra de recul (non fournie).
L’image d’une caméra de recul connectée à la
borne CAMERA IN s’affiche quand :
le feu de recul de votre véhicule s’allume (ou le
levier de vitesse est en position R (marche
arrière)).
vous appuyez sur HOME, puis sur [Cam. recul].
Schéma de connexion électrique
12
alimentation
permanente
Jaune
15 alimentation commutée Rouge
12 alimentation commutée Jaune
15
alimentation
permanente
Rouge
Connecteur
d’alimentation auxiliaire
Rouge Rouge
Jaune Jaune
Rouge Rouge
Jaune Jaune
Rouge
Rouge
Jaune
Jaune
Installation du micro
Utilisation de la télécommande filaire
Utilisation de la caméra de recul
Clip (non fourni)

30FR
Installation
Avant d’installer l’appareil, retirez son support .
1 Insérez les deux clés de déblocage
jusqu’à ce qu’elles émettent un déclic,
abaissez le support , puis tirez l’appareil
vers le haut pour le séparer.
• Avant de procéder à l’installation, assurez-vous
que les languettes des deux côtés du support
sont inclinées de 3,5 mm vers l’intérieur.
• Pour les voitures japonaises, reportez-vous à la
section « Montage de l’appareil dans une voiture
japonaise » (page 30).
1 Positionnez le support à l’intérieur du
tableau de bord, puis pliez les griffes vers
l’extérieur pour un ajustement serré.
2 Montez l’appareil sur le support .
Remarques
• Si les languettes sont droites ou si elles sont inclinées vers
l’extérieur, l’appareil ne peut pas être installé correctement
et il risque d’être expulsé.
• Assurez-vous que les 4 languettes du collier de protection
sont correctement engagées dans les fentes du
support .
Montage de l’appareil dans une voiture
japonaise
Il est possible que vous ne puissiez pas installer cet
appareil dans certaines voitures japonaises. Dans
ce cas, consultez votre revendeur Sony.
Quand vous montez cet appareil sur les supports
préinstallés de votre voiture, utilisez les vis fournies
dans les orifices appropriés de la voiture :
T pour TOYOTA et N pour NISSAN.
Remarque
Pour éviter tout problème de fonctionnement, utilisez
exclusivement les vis fournies pour l’installation.
Retrait du support
Montage de l’appareil dans le tableau
de bord
Dirigez le crochet vers l’intérieur.
Languette
Au-delà de
182 mm
Au-delà de
111 mm
Vers le tableau de bord/console
centrale
Pièces fournies avec
votre voiture
Support
Support

31FR
Lorsque vous remplacez le fusible,
veillez à utiliser un fusible dont
l’intensité, en ampères, correspond
à la valeur indiquée sur le fusible
usagé.
Si le fusible saute, vérifiez le
branchement de l’alimentation et
remplacez-le.
Si le nouveau fusible saute également, il est
possible que l’appareil soit défectueux. Dans ce cas,
consultez votre revendeur Sony le plus proche.
Remplacement du fusible
Fusible (10 A)

2IT
La targhetta con le indicazioni relative a tensione di
esercizio e informazioni simili è situata sulla parte
inferiore del telaio.
Avvertenza
Per evitare il rischio di incendi o scosse
elettriche, non esporre l’apparecchio alla
pioggia o all’umidità.
Per evitate scosse elettriche, non aprire il
rivestimento. Per le riparazioni, rivolgersi
esclusivamente a personale qualificato.
Fabbricato in Thailandia
Con la presente, Sony Corporation dichiara che
questo apparecchio è conforme alla Direttiva 2014/
53/UE.
Il testo completo della dichiarazione di conformità
UE è disponibile al seguente indirizzo Internet:
http://www.compliance.sony.de/
La marcatura CE è valida esclusivamente nei paesi
in cui è prevista per legge, principalmente nei paesi
inclusi nello Spazio economico europeo (EEA,
European Economic Area) e Svizzera.
Avviso per i clienti: le seguenti informazioni
riguardano esclusivamente gli apparecchi
venduti in paesi in cui sono applicate le
direttive UE
Questo prodotto è stato fabbricato da o per conto
di Sony Corporation.
Importatore UE: Sony Europe Limited.
Richieste all’importatore UE o relative alla
conformità di prodotto in Europa devono essere
indirizzate al rappresentante autorizzato del
costruttore, Sony Belgium, bijkantoor van Sony
Europe Limited, Da Vincilaan 7-D1 1935 Zaventem,
in Belgio.
Smaltimento delle batterie (pile e
accumulatori) esauste e delle
apparecchiature elettriche ed
elettroniche a fine vita (applicabile
in tutti i Paesi dell’Unione Europea
e negli altri Paesi con sistema di raccolta
differenziata)
Questo simbolo sul prodotto, batteria o imballo
indica che il prodotto non deve essere considerato
come un normale rifiuto domestico. Su talune
batterie questo simbolo può essere utilizzato in
combinazione con un simbolo chimico. Il simbolo
chimico del piombo (Pb) è aggiunto se la batteria
contiene più dello 0,004% di piombo.
Assicurandovi che questi prodotti e le batterie siano
smaltiti correttamente, contribuirete a prevenire
potenziali conseguenze negative per l’ambiente e
per la salute che potrebbero essere causate dal
trattamento inappropriato dei medesimi prodotti o
batterie. Il riciclo dei materiali aiuterà a preservare
le risorse naturali. Nel caso di prodotti che per
ragioni di sicurezza, prestazioni o integrità dei dati
richiedano una connessione permanente con una
batteria in essi incorporata, la stessa dovrà essere
sostituita esclusivamente da personale qualificato.
Per assicurarsi che la batteria sia trattata
correttamente, si prega di consegnare i prodotti a
fine vita in un centro di raccolta idoneo per il riciclo
di apparecchiature elettriche ed elettroniche. Per
tutte le altre batterie, si prega di consultare la
sezione relativa alla rimozione sicura della batteria
dal prodotto. Si prega di consegnare le batterie in
un centro di raccolta idoneo per il riciclo delle
batterie esauste. Per informazioni più dettagliate
sul riciclo di questi prodotti o batterie, si prega di
contattare il vostro Comune, il servizio di
smaltimento rifiuti ovvero il punto vendita presso il
quale è stato acquistato il prodotto o la batteria. In
caso di smaltimento abusivo di batterie o di
apparecchiature elettriche ed elettroniche
potrebbero essere applicate le sanzioni previste
dalla normativa vigente (valido solo per l’Italia).
Dichiarazione di non responsabilità relativa a
servizi offerti da terze parti
I servizi offerti da terze parti possono essere
cambiati, sospesi o interrotti senza preavviso. Sony
declina ogni responsabilità in questo genere di
situazioni.
Per motivi di sicurezza, accertarsi di installare
questo apparecchio sul cruscotto dell’auto
perché la parte posteriore dell’apparecchio si
scalda durante l’utilizzo.
Per ulteriori informazioni, consultare
“Collegamenti e installazione” (pagina 26).
Avvertenza relativa all’installazione su
un’auto sprovvista della posizione ACC
(accessoria) sul blocchetto di accensione
Non installare questo apparecchio su un’auto
sprovvista della posizione ACC (accessoria). Il
display non si spegne nemmeno dopo aver
spento l’auto e ciò causa l’esaurimento della
batteria.

3IT
Attenzione
IN NESSUN CASO SONY POTRÀ ESSERE RITENUTA
RESPONSABILE DI DANNI ACCIDENTALI, INDIRETTI,
CONSEQUENZIALI O DI ALTRA NATURA, INCLUSI,
SENZA ALCUNA LIMITAZIONE, PERDITE DI PROFITTI,
PERDITE DI GUADAGNO, PERDITE DI DATI, PERDITE
DELL’UTILIZZO DEL PRODOTTO O DI QUALSIASI
APPARECCHIO ASSOCIATO E TEMPI DI FERMO
DOVUTI ALL’USO DEL PRESENTE PRODOTTO O DEI
RELATIVI COMPONENTI HARDWARE E/O
SOFTWARE.
Gentile cliente, questo prodotto include un
trasmettitore radio.
Sulla base del Regolamento UNECE n. 10, i
produttori di veicoli possono imporre condizioni
specifiche per l’installazione di trasmettitori radio
sui propri veicoli.
Prima di installare il presente prodotto sull’auto,
controllare il manuale d’uso del veicolo o contattare
il concessionario da cui è stata acquistata la vettura.
Chiamate di emergenza
Il presente apparecchio vivavoce BLUETOOTH e il
dispositivo elettronico ad esso connesso
funzionano tramite reti radio, cellulari e terrestri
nonché tramite una funzione programmata
dall’utente. Per questo motivo, non è possibile
garantire la connessione in tutte le condizioni.
Pertanto, non confidare esclusivamente nei
dispositivi elettronici per le comunicazioni
importanti (quali le chiamate per emergenze
mediche).
Informazioni sulla comunicazione BLUETOOTH
• Le microonde trasmesse da un dispositivo
BLUETOOTH potrebbero influire sul
funzionamento di apparecchiature mediche
elettroniche. Disattivare il presente apparecchio e
altri dispositivi BLUETOOTH nei seguenti luoghi,
onde evitare di causare incidenti.
– in presenza di gas infiammabili, all’interno di
ospedali, treni, aerei o stazioni di rifornimento
– in prossimità di porte automatiche o allarmi
antincendio
• Sebbene il presente apparecchio supporti funzioni
di protezione conformi allo standard BLUETOOTH
per garantire la connessione sicura durante l’uso
della tecnologia wireless BLUETOOTH, a seconda
dell’impostazione la protezione potrebbe risultare
insufficiente. Per questo motivo, prestare
attenzione durante le comunicazioni mediante la
tecnologia wireless BLUETOOTH.
• Sony non potrà essere ritenuta responsabile in
caso di eventuali fughe di informazioni durante le
comunicazioni BLUETOOTH.
Per eventuali domande o problemi riguardanti
l’apparecchio non trattati nel presente manuale,
rivolgersi al più vicino rivenditore Sony.
Nota importante

4IT
Indice
Avvertenza. . . . . . . . . . . . . . . . . . . . . . . . . . . . . . . . . 2
Guida alle parti e ai comandi . . . . . . . . . . . . . . . . . . 5
Operazioni preliminari
Applicazione delle prime impostazioni. . . . . . . . . . 7
Preparazione di un dispositivo BLUETOOTH . . . . . . 7
Collegamento di un dispositivo USB . . . . . . . . . . . . 8
Collegamento di un altro dispositivo audio
portatile . . . . . . . . . . . . . . . . . . . . . . . . . . . . . . . . 9
Collegamento della videocamera posteriore . . . . . 9
Ascolto della radio
Ascolto della radio . . . . . . . . . . . . . . . . . . . . . . . . . . 9
Funzioni di opzione del sintonizzatore . . . . . . . . . 10
Ascolto della radio DAB/DAB+ . . . . . . . . . . . . . . . . 10
Utilizzo delle funzioni Opzioni DAB . . . . . . . . . . . . 11
Riproduzione
Riproduzione di un dispositivo USB . . . . . . . . . . . 12
Riproduzione di un dispositivo BLUETOOTH. . . . . 12
Ricerca e riproduzione dei brani . . . . . . . . . . . . . . 12
Altre impostazioni durante la riproduzione . . . . . 13
Chiamata in vivavoce
Ricezione di una chiamata . . . . . . . . . . . . . . . . . . . 13
Effettuazione di una chiamata. . . . . . . . . . . . . . . . 13
Operazioni eseguibili durante una chiamata . . . . 14
Funzioni utili
Apple CarPlay . . . . . . . . . . . . . . . . . . . . . . . . . . . . . 15
Comando gesti . . . . . . . . . . . . . . . . . . . . . . . . . . . . 15
Impostazioni
Operazioni di base delle impostazioni . . . . . . . . . 16
Impostazioni generali (Generale) . . . . . . . . . . . . . 16
Impostazioni audio (Audio) . . . . . . . . . . . . . . . . . . 17
Impostazioni Video (Visuale) . . . . . . . . . . . . . . . . . 17
Impostazioni BLUETOOTH (Bluetooth) . . . . . . . . . 17
Informazioni aggiuntive
Aggiornamento del firmware. . . . . . . . . . . . . . . . . 18
Precauzioni . . . . . . . . . . . . . . . . . . . . . . . . . . . . . . . 18
Caratteristiche tecniche . . . . . . . . . . . . . . . . . . . . . 20
Guida alla soluzione dei problemi. . . . . . . . . . . . . 22
Messaggi . . . . . . . . . . . . . . . . . . . . . . . . . . . . . . . . . 25
Collegamenti e installazione
Attenzione. . . . . . . . . . . . . . . . . . . . . . . . . . . . . . . . 26
Elenco dei componenti per l’installazione . . . . . . 26
Collegamento . . . . . . . . . . . . . . . . . . . . . . . . . . . . . 27
Installazione . . . . . . . . . . . . . . . . . . . . . . . . . . . . . . 30

5IT
Guida alle parti e ai comandi
Display/pannello a sfioramento
HOME
Per aprire il menu HOME.
ATT (attenuazione audio)
Tenere premuto per 1 secondo per attenuare
l’audio.
Per annullare, tenere premuto nuovamente
oppure ruotare la manopola di controllo del
volume.
Manopola di controllo del volume
Ruotare per regolare il volume quando viene
emesso l’audio.
OPTION
Premere per aprire la schermata OPTION
(pagina 6).
VOICE
Tenere premuto per attivare la funzione di
comando vocale per Apple CarPlay.
Porta USB
Presa di ingresso AUX
Unità principale

6IT
Schermata riproduzione:
Schermata HOME:
Schermata OPTION:
Indicazioni di stato
(opzione sorgente)
Per aprire il menu delle opzioni di sorgente. Le
voci disponibili variano in base alla sorgente.
Area specifica applicazione
Per visualizzare i comandi/le indicazioni di
riproduzione o lo stato dell’apparecchio. Le voci
visualizzate variano in base alla sorgente.
Orologio (pagina 16)
(ritorno alla schermata di riproduzione)
Per passare dalla schermata HOME alla
schermata di riproduzione.
Tasti di selezione della sorgente e delle
impostazioni
Per cambiare la sorgente o effettuare varie
impostazioni.
Visualizzare l’icona di impostazione e altre icone
facendo scorrere la parte bassa di quest’area
verso destra o sinistra.
Tasti di selezione dell’audio
Per cambiare l’audio.
(EXTRA BASS)
Consente di modificare l’impostazione EXTRA
BASS (pagina 17).
(EQ10/Subwoofer)
Consente di modificare l’impostazione EQ10/
Subwoofer (pagina 17).
(disattivazione monitor)
Per disattivare il monitor. Quando il monitor è
disattivato, toccare una parte qualsiasi del
display per riattivarlo.
Indicazioni a schermo
Si illumina quando l’audio è basso.
Si illumina quando sono disponibili le
frequenze alternative (AF, Alternative
Frequencies).
Si illumina quando le informazioni
correnti relative al traffico (TA, Traffic
Announcement) sono disponibili.
Si illumina quando è disponibile un
annuncio DAB.
Indica l’intensità del segnale del
sintonizzatore DAB.
Si illumina quando è possibile riprodurre
il dispositivo audio abilitando A2DP
(Advanced Audio Distribution Profile).
Si illumina quando è possibile effettuare
chiamate in vivavoce abilitando HFP
(Handsfree Profile).
Indica l’intensità del segnale del telefono
cellulare connesso.
Indica lo stato di batteria residua del
telefono cellulare connesso.
Si illumina quando il segnale Bluetooth®
è acceso. Lampeggia quando è in corso
la connessione.

7IT
Applicazione delle prime
impostazioni
È necessario eseguire le impostazioni iniziali prima
di utilizzare l’apparecchio per la prima volta, dopo
la sostituzione della batteria dell’auto o dopo avere
effettuato modifiche ai collegamenti.
Se la schermata con le impostazioni iniziali non
viene visualizzata quando si attiva l’apparecchio,
eseguire il ripristino delle impostazioni predefinite
(pagina 16) per inizializzare l’apparecchio.
1 Toccare [Lingua], quindi impostare la lingua
di visualizzazione.
2 Toccare [Dimostrazione] una volta per
selezionare [OFF] per disabilitare la
modalità di dimostrazione.
3 Toccare [OK].
Viene visualizzato un messaggio di attenzione
all’avvio.
4 Leggere tutto il messaggio, quindi se si
accettano tutte le condizioni, toccare
[Chiudi].
L’impostazione è completa.
Tale impostazione può essere ulteriormente
configurata nel menu delle impostazioni
(pagina 16).
Preparazione di un dispositivo
BLUETOOTH
È possibile ascoltare musica o effettuare chiamate
in vivavoce a seconda del dispositivo compatibile
con BLUETOOTH, per esempio smartphone, telefoni
cellulari e dispositivi audio (d’ora in avanti
denominati “dispositivo BLUETOOTH”, se non
specificato diversamente). Per ulteriori informazioni
sulla connessione, consultare le istruzioni per l’uso
in dotazione con il dispositivo.
Prima di collegare il dispositivo, abbassare il
volume dell’apparecchio; in caso contrario,
potrebbe verificarsi un aumento improvviso del
volume.
Quando si stabilisce la connessione di un
dispositivo BLUETOOTH per la prima volta, è
necessario eseguire la registrazione reciproca
(“associazione”). L’associazione consente a questo
apparecchio e ad altri dispositivi di riconoscersi
reciprocamente.
1 Posizionare il dispositivo BLUETOOTH a
distanza massima di 1 m da questo
apparecchio.
2 Premere HOME, quindi toccare
[Impostazioni].
3 Toccare [Bluetooth].
4 Toccare [Connessione Bluetooth], quindi
impostare il segnale su [ON].
Il segnale BLUETOOTH si attiva e si illumina
nella barra di stato dell’apparecchio.
5 Toccare [Associazione].
lampeggia mentre l’apparecchio è in modo
standby per l’associazione.
6 Eseguire l’associazione sul dispositivo
BLUETOOTH in modo tale che quest’ultimo
rilevi l’apparecchio.
7 Selezionare [XAV-AX1005DB] visualizzato
sul display del dispositivo BLUETOOTH.
Se il nome del modello in uso non viene
visualizzato sul display, ripetere la procedura dal
punto 5.
Operazioni preliminari
Associazione e connessione con un
dispositivo BLUETOOTH

8IT
8 Se è richiesto l’inserimento di un codice di
protezione* sul dispositivo BLUETOOTH,
digitare [0000].
* Il codice di protezione può essere indicato in vari modi
(“codice di accesso”, “codice PIN”, “numero PIN”,
“password” ecc.), a seconda del dispositivo
BLUETOOTH.
Una volta completata l’associazione, rimane
acceso.
9 Selezionare questo apparecchio sul
dispositivo BLUETOOTH per effettuare la
connessione BLUETOOTH.
o si illumina quando si stabilisce la
connessione.
Note
• È possibile collegare l’unità solo con un dispositivo
BLUETOOTH per volta.
• Per scollegare la connessione BLUETOOTH, disattivare la
connessione dall’unità o dal dispositivo BLUETOOTH.
• L’associazione BLUETOOTH non è possibile mentre è in
esecuzione Apple CarPlay.
Per utilizzare un dispositivo associato, è necessario
effettuare la connessione con il presente
apparecchio. Alcuni dispositivi associati si
connettono automaticamente.
1 Premere HOME, quindi toccare
[Impostazioni].
2 Toccare [Bluetooth].
3 Toccare [Connessione Bluetooth], quindi
toccare [ON].
Accertarsi che si illumini sulla barra di stato
dell’apparecchio.
4 Attivare la funzione BLUETOOTH sul
dispositivo BLUETOOTH.
5 Utilizzare il dispositivo BLUETOOTH per la
connessione con il presente apparecchio.
o si illumina sulla barra di stato.
Per connettere l’ultimo dispositivo connesso
da questo apparecchio
Quando la chiave di accensione viene attivata con il
segnale BLUETOOTH attivo, il presente apparecchio
ricerca l’ultimo dispositivo BLUETOOTH connesso e,
se possibile, la connessione viene stabilita
automaticamente.
Nota
Durante l’uso della funzione di streaming audio
BLUETOOTH, non è possibile connettere l’apparecchio al
telefono cellulare. Eseguire la connessione al presente
apparecchio dal telefono cellulare.
Per installare il microfono
Per ulteriori informazioni, consultare “Installazione
del microfono” (pagina 29).
Collegamento di un dispositivo
USB
1 Abbassare il volume sull’apparecchio.
2 Aprire il coperchio della porta USB, quindi
collegare il dispositivo USB all’apparecchio.
Per collegare un iPhone, servirsi del cavo di
collegamento USB per iPhone (non in
dotazione).
Connessione con un dispositivo
BLUETOOTH associato
[0000]
Immettere il codice di protezione

9IT
Collegamento di un altro
dispositivo audio portatile
1 Spegnere il dispositivo audio portatile.
2 Abbassare il volume sull’apparecchio.
3 Collegare il dispositivo audio portatile alla
presa di ingresso AUX (minipresa stereo)
sull’apparecchio con un cavo di
collegamento (non in dotazione)*.
* Assicurarsi di utilizzare una spina diritta.
4 Premere HOME, quindi toccare [AUX].
Per adeguare il livello del volume del
dispositivo collegato ad altre sorgenti
Avviare la riproduzione del dispositivo audio
portatile collegato selezionando un volume
moderato e impostare il consueto volume di ascolto
sull’apparecchio.
Durante la riproduzione, toccare , quindi toccare
[Livello di ingresso]. Impostare il livello del volume
tra [-10] e [+15].
Collegamento della videocamera
posteriore
Collegando la videocamera posteriore opzionale al
terminale CAMERA IN, è possibile visualizzare
l’immagine della videocamera posteriore. Per
ulteriori informazioni, consultare “Collegamenti e
installazione” (pagina 26).
Per visualizzare l’immagine dalla
videocamera posteriore
Premere HOME, toccare [Videoc. post.].
Ascolto della radio
Per ascoltare la radio, premere HOME e toccare
[Sintonizzat.].
Comandi/indicazioni di ricezione
Banda corrente
Per modificare la banda (FM1, FM2, FM3, AM1 o
AM2).
Frequenza corrente, nome del servizio
programmi*, indicazione RDS (Radio Data
System)*
*Durante la ricezione RDS.
(opzione sintonizzatore)
Per aprire il menu delle opzioni del
sintonizzatore.
SEEK–/SEEK+
Per eseguire la sintonizzazione
automaticamente.
/
Per eseguire la sintonizzazione manualmente.
Tenere premuto per saltare le frequenze in
modo continuo.
Numeri di preselezione
Per selezionare una stazione preselezionata.
Spostarsi verso destra/sinistra per visualizzare le
stazioni preimpostate.
Tenere premuto per memorizzare la frequenza
visualizzata in quella preselezione.
1 Selezionare la banda desiderata (FM1, FM2,
FM3, AM1 o AM2).
2 Eseguire la sintonizzazione.
Sintonizzazione automatica
Toccare SEEK–/SEEK+.
La ricerca si arresta non appena l’apparecchio
riceve una stazione.
Ascolto della radio
Sintonizzazione

10IT
Sintonizzazione manuale
Tenere premuto / per individuare la
frequenza approssimativa, quindi premere più
volte / per sintonizzarsi esattamente sulla
frequenza desiderata.
1 Durante la ricezione della stazione che si
desidera memorizzare, toccare e tenere
premuto il numero di preselezione
desiderato.
1 Selezionare la banda, quindi toccare il
numero di preselezione desiderato.
Funzioni di opzione del
sintonizzatore
Se si tocca sono disponibili le seguenti funzioni.
BTM (Best Tuning Memory, migliore
ottimizzazione memoria)
Memorizza le stazioni in corrispondenza dei
numeri di preselezione in base all’ordine delle
frequenze. È possibile memorizzare 18 stazioni
per FM e 12 stazioni per AM come stazioni
preimpostate.
AF*
Selezionare [ON] per eseguire nuovamente la
sintonizzazione continua della stazione al
segnale più forte in una rete.
TA*
Selezionare [ON] per ricevere le informazioni
correnti del traffico o il programma di traffico
(TP), se disponibile.
Regional*
Selezionare [ON] per restare sulla stazione in
corso di ricezione, mentre la funzione AF è
impostata sull’attivazione. Se si esce da
quest’area di ricezione del programma regionale,
selezionare [OFF]. Questa funzione non è
disponibile nel Regno Unito e in altre aree.
PTY*
Selezionare un tipo di programma nell’elenco
PTY per cercare una stazione di trasmissione del
tipo di programma selezionato.
* Disponibile solo durante la ricezione FM.
Ricezione dei notiziari di emergenza
Se è attivata la funzione AF o TA, gli annunci di
emergenza interrompono automaticamente la
riproduzione della sorgente selezionata.
Ascolto della radio DAB/DAB+
Per ascoltare la radio DAB/DAB+, premere HOME e
quindi toccare [DAB+].
Suggerimenti
• Impostare [Alimentazione antenna] su [ON] (impostazione
predefinita) o [OFF] a seconda del tipo di antenna DAB
(non in dotazione) (pagina 11).
• Quando è selezionato [DAB+] per la prima volta dopo
l’esecuzione di un ripristino delle impostazioni predefinite,
la sintonizzazione automatica si avvia automaticamente.
Attendere che la sintonizzazione automatica termini. (Se
interrotta, la sintonizzazione automatica si avvierà di
nuovo alla selezione successiva di [DAB+].) Se non viene
memorizzata alcuna stazione DAB tramite la
sintonizzazione automatica, effettuare la sintonizzazione
toccando [Auto Tune] di (elenco).
Comandi/indicazioni di ricezione
(elenco)
Per aprire l’elenco delle stazioni.
Banda corrente
Per modificare la banda (DAB1, DAB2 o DAB3).
Nome Gruppo stazione, Nome stazione
(Opzioni DAB)
Per aprire il menu Opzioni DAB.
SEEK–/SEEK+
Per cercare le stazioni.
/
Per cercare i gruppi di stazioni.
(Disponibile soltanto quando [Seek per] è
impostato su [Gr stazioni].)
Numeri preselezionati
Per selezionare una stazione preselezionata.
Scorrere verso destra/sinistra per visualizzare le
altre stazioni preselezionate.
Tenere premuto per memorizzare la stazione
corrente in quella preselezione.
Memorizzazione manuale
Ricezione delle stazioni memorizzate

11IT
Prima di utilizzare l’apparecchio, impostare [Seek
per] su [Gr stazioni] per effettuare la ricerca per
gruppi di stazioni (pagina 11).
1 Toccare SEEK+/– per cercare una stazione.
La scansione si arresta appena l’apparecchio
riceve una stazione. Proseguire la ricerca fino
alla ricezione della stazione desiderata.
Per cercare un gruppo di stazioni
Tenere premuto / per cercare un gruppo di
stazioni e rilasciare quando viene visualizzato il
gruppo di stazioni desiderato.
1 Durante la ricezione della stazione che si
desidera memorizzare, tenere premuto il
numero di preselezione desiderato.
1 Toccare il numero di preselezione
desiderato.
Prima di utilizzare l’apparecchio, impostare [Seek
per] su [A-Z] per effettuare la ricerca per nome della
stazione (pagina 11).
1 Toccare .
Viene visualizzato l’elenco delle stazioni.
2 Toccare la stazione desiderata.
Per cercare dalla schermata di riproduzione
Toccare SEEK+/– per passare alla stazione
precedente/successiva.
Per aggiornare l’elenco delle stazioni
Toccare , quindi toccare [Auto Tune].
Utilizzo delle funzioni Opzioni
DAB
Le seguenti funzioni sono disponibili toccando .
Seek per
Consente di impostare la modalità di ricerca delle
stazioni: [A-Z] (ricerca di una stazione per nome),
[Gr stazioni] (ricerca di una stazione per gruppo
di stazioni).
Announce
Consente di abilitare gli annunci DAB
interrompendo la sorgente attualmente
selezionata: [ON], [OFF].
Durante un annuncio DAB, il volume viene
regolato sul livello impostato per TA in RDS
(pagina 10).
Soft Link
Consente di cercare e sintonizzare lo stesso
programma o un programma simile
automaticamente quando il segnale del
programma corrente è troppo debole: [ON],
[OFF].
“Hard Link” segue lo stesso programma e “Soft
Link” segue un programma simile.
Informazioni
Consente di visualizzare il nome del gruppo di
stazioni, il nome della stazione, il tipo PTY della
stazione selezionata ecc.
Alimentazione antenna
Consente di fornire alimentazione al terminale di
ingresso dell’antenna DAB: [ON], [OFF].
Ricerca di una stazione per gruppo di
stazioni
Memorizzazione manuale di una
stazione
Ricezione delle stazioni memorizzate
Ricerca di una stazione per nome
Soft Link
DAB FM
Hard
Link
Soft
Link
Hard
Link
Soft
Link
OFF – –
ON

12IT
Riproduzione di un dispositivo
USB
È possibile utilizzare dispositivi USB di tipo MSC
(memorizzazione di massa)* compatibili con lo
standard USB.
* Per es. una chiavetta USB, un lettore di supporti digitali
Note
• Sono supportati i dispositivi USB formattati con file system
FAT12/16/32/exFAT.
• Per ulteriori informazioni sulla compatibilità del dispositivo
USB in uso, visitare il sito di assistenza riportato sulla
retrocopertina.
• Per ulteriori informazioni sui formati di file supportati,
vedere “Formati supportati per la riproduzione USB”
(pagina 19).
1 Abbassare il volume sull’apparecchio.
2 Collegare il dispositivo USB alla porta USB.
3 Premere HOME, quindi toccare [USB].
Viene avviata la riproduzione.
Per rimuovere il dispositivo
Disattivare l’unità oppure ruotare l’interruttore di
accensione sulla posizione di disattivazione ACC,
quindi rimuovere il dispositivo USB.
Riproduzione di un dispositivo
BLUETOOTH
È possibile riprodurre contenuti su un dispositivo
connesso che supporta BLUETOOTH A2DP
(Advanced Audio Distribution Profile).
1 Effettuare la connessione BLUETOOTH con il
dispositivo audio (pagina 7).
2 Premere HOME, quindi toccare [Audio BT].
3 Avviare la riproduzione sul dispositivo
audio.
Note
• A seconda del dispositivo audio, le relative informazioni,
quali titolo, numero/durata del brano e stato della
riproduzione, potrebbero non venire visualizzate sul
presente apparecchio.
• Anche se si cambia sorgente sul presente apparecchio, la
riproduzione del dispositivo audio non viene arrestata.
• L’associazione BLUETOOTH non è possibile mentre è in
esecuzione Apple CarPlay.
Per adeguare il livello del volume del
dispositivo BLUETOOTH ad altre sorgenti
È possibile ridurre le differenze di volume tra il
presente apparecchio e il dispositivo BLUETOOTH:
Durante la riproduzione, toccare , quindi toccare
[Livello di ingresso]. Impostare il livello del volume
tra [-6] e [+6].
Ricerca e riproduzione dei brani
1 Durante la riproduzione, toccare più volte
(ripeti) o (ordine casuale) fino a
visualizzare il modo di riproduzione
desiderato.
La riproduzione nel modo di riproduzione
selezionato potrebbe impiegare qualche tempo
ad avviarsi.
I modi di riproduzione disponibili variano a seconda
della sorgente audio selezionata e del dispositivo
collegato.
1 Durante la ricezione USB, toccare .
Viene visualizzata la schermata dell’elenco della
voce in fase di riproduzione.
Toccare (audio) o (video) per visualizzare
l’elenco per tipo di file.
2 Toccare la voce desiderata.
Viene avviata la riproduzione.
Riproduzione
Riproduzione ripetuta e in ordine
casuale
Ricerca di un file dalla schermata
dell’elenco

13IT
Altre impostazioni durante la
riproduzione
Altre impostazioni sono disponibili in ciascuna
sorgente toccando . Le voci disponibili variano in
base alla sorgente.
Picture EQ
Regola la qualità dell’immagine in base ai propri
gusti: [Dinamica], [Standard], [Cinema],
[Personalizzata].
(Disponibile soltanto se il freno a mano è
azionato ed è selezionato video USB.)
Rapporto di formato
Consente di selezionare un rapporto di formato
per lo schermo dell’apparecchio.
(Disponibile soltanto se il freno a mano è
azionato ed è selezionato video USB.)
Normale
Visualizza un’immagine a 4:3 con le dimensioni
originali, con le bande laterali che riempiono lo
schermo a 16:9.
Zoom
Visualizza un’immagine a 16:9 che è stata
convertita in un formato Letterbox 4:3.
Pieno
Visualizza un’immagine a 16:9 con le dimensioni
originali.
Didascalie
Ingrandisce l’immagine in orizzontale, adattando
nel contempo le didascalie nella schermata.
Per utilizzare un telefono cellulare, collegarlo al
presente apparecchio. Per ulteriori informazioni,
consultare “Preparazione di un dispositivo
BLUETOOTH” (pagina 7).
Nota
Le funzioni di chiamata in vivavoce descritte qui di seguito
sono disponibili solo quando è disattivata la funzione Apple
CarPlay. Quando è attivata la funzione Apple CarPlay,
utilizzare le funzioni di chiamata in vivavoce della relativa
applicazione.
Ricezione di una chiamata
1 Alla ricezione di una chiamata, toccare .
La chiamata telefonica viene avviata.
Nota
Il tono di chiamata e la voce dell’interlocutore vengono
emessi solo dai diffusori anteriori.
Per rifiutare/terminare una chiamata
Toccare .
Effettuazione di una chiamata
1 Premere HOME, quindi toccare [Telefono].
2 Toccare una delle icone sul display del
telefono BLUETOOTH.
(registro chiamate)*
Selezionare un contatto dal registro
chiamate. L’apparecchio conserva in
memoria le ultime 20 chiamate.
(ricomposizione)
Chiamare automaticamente l’ultimo contatto
utilizzato.
Chiamata in vivavoce

14IT
(rubrica)*
Selezionare un contatto dall’elenco dei
nomi/dei numeri della rubrica. Per cercare il
contatto desiderato in ordine alfabetico
nell’elenco dei nomi, toccare .
(immissione di un numero telefonico)
Immettere il numero telefonico.
Elenco dei numeri telefonici di
preselezione
Selezionare il contatto memorizzato.
Per memorizzare il contatto, vedere
“Preimpostazione dei numeri di telefono”
(pagina 14).
* Il telefono cellulare deve supportare PBAP (Phone Book
Access Profile).
3 Toccare .
La chiamata telefonica viene avviata.
L’apparecchio può memorizzare fino a 6 contatti
nell’elenco.
1 Sullo schermo del telefono, selezionare il
numero di telefono che si desidera
memorizzare nel numero di preselezione
scegliendolo dalla rubrica.
Viene visualizzata la schermata di conferma.
2 Toccare [Agg. a preimp.].
3 Selezionare l’elenco dei numeri di telefono
preimpostati dove è memorizzato il numero
telefonico.
Il contatto viene memorizzato nell’elenco dei
numeri di telefono preimpostati.
Operazioni eseguibili durante
una chiamata
Per regolare il volume della suoneria
Ruotare la manopola di controllo del volume
durante la ricezione di una chiamata.
Per regolare il volume della voce
dell’interlocutore
Ruotare la manopola di controllo del volume
durante una chiamata.
Regolazione del volume per l’interlocutore
(regolazione del guadagno del microfono)
Durante una chiamata in vivavoce, toccare ,
quindi impostare [Guadagno mic.] su [Alto], [Medio]
o [Basso].
Riduzione di eco e disturbi (modo
eliminazione dell’eco/eliminazione dei
disturbi)
Durante una chiamata, toccare , quindi
impostare [Qualità del parlato] su [Modo 1] o
[Modo 2].
Per passare dalla modalità vivavoce alla
modalità telefono e viceversa
Durante una chiamata, toccare per
commutare l’audio della chiamata tra l’apparecchio
e il telefono cellulare.
Nota
A seconda del telefono cellulare in uso, questa operazione
potrebbe non essere disponibile.
Per rispondere automaticamente a una
chiamata in arrivo
Toccare , quindi impostare [Risposta automatica]
su [ON].
Preimpostazione dei numeri di telefono

15IT
Apple CarPlay
Apple CarPlay consente di utilizzare il proprio
iPhone in auto in modo da mantenere la
concentrazione sulla strada.
Note sull’utilizzo di Apple CarPlay
•È necessario iPhone con iOS 7.1 o versioni
successive. Prima dell’uso aggiornare all’ultima
versione iOS.
• È possibile utilizzare Apple CarPlay su iPhone 5 o
versioni successive.
•Per informazioni dettagliate sui modelli
compatibili, fare riferimento all’elenco delle
compatibilità sul sito dell’assistenza riportato sulla
retrocopertina.
•Per informazioni dettagliate su Apple CarPlay, fare
riferimento al manuale in dotazione con il proprio
iPhone oppure visitare il sito Web di Apple
CarPlay.
•Poiché si utilizza il GPS del proprio iPhone,
posizionare l’iPhone in un punto in cui riesce a
ricevere facilmente un segnale GPS.
1 Collegare l’iPhone alla porta USB.
Per collegare un iPhone, servirsi di un cavo di
collegamento USB per iPhone (non in
dotazione).
2 Premere HOME, quindi toccare l’icona Apple
CarPlay.
Il display del proprio iPhone viene visualizzato
nel display dell’unità. Toccare e controllare le
applicazioni.
L’uso del logo Apple CarPlay indica che
un’interfaccia utente di un veicolo soddisfa gli
standard di prestazioni Apple. Apple non si assume
alcuna responsabilità in merito al funzionamento
del veicolo o alla conformità con gli standard
normativi e di sicurezza.
Nota: l’uso del prodotto con un iPhone può influire
sulle prestazioni wireless.
Comando gesti
È possibile eseguire operazioni utilizzate di
frequente facendo scorrere il dito sul display di
ricezione/riproduzione.
Nota
I comandi a gesti descritti di seguito non sono disponibili
nella schermata di Apple CarPlay.
Funzioni utili
Azione Per
Spostarsi da sinistra
a destra
Ricezione radio:
cerca le stazioni successive.
Riproduzione video/audio:
salta in avanti di un file/una
traccia.
Spostarsi da destra
a sinistra
Ricezione radio:
cerca le stazioni precedenti.
Riproduzione video/audio:
salta indietro di un file/una
traccia.
Spostarsi in alto
Ricezione radio:
riceve le stazioni memorizzate
(va avanti).
Spostarsi in basso
Ricezione radio:
riceve le stazioni memorizzate
(va indietro).

16IT
Operazioni di base delle
impostazioni
È possibile impostare voci nelle seguenti categorie
di impostazioni:
Impostazioni generali (Generale), Impostazioni
audio (Audio), Impostazioni Video (Visuale),
Impostazioni BLUETOOTH (Bluetooth)
1 Premere HOME, quindi toccare
[Impostazioni].
2 Toccare una delle categorie di
configurazione.
Le voci che possono essere impostate sono
diverse a seconda della sorgente e delle
impostazioni.
3 Spostare la barra di scorrimento in alto e in
basso per selezionare la voce desiderata.
Per tornare al display precedente
Toccare .
Per tornare alla schermata di riproduzione
Toccare .
Impostazioni generali (Generale)
Lingua
Consente di selezionare la lingua di
visualizzazione: [English], [Español], [Français],
[Deutsch], [Italiano], [Português], [],
[ ], [ ], [ ], [ ], [ ].
Dimostrazione
Consente di attivare la dimostrazione: [OFF],
[ON].
Data/Ora
Imp. Data/Ora
Consente di impostare la data e l’orologio:
[Auto(DAB)], [Manuale].
Formato data
Consente di selezionare il formato: [DD/MM/YY],
[MM/DD/YY], [YY/MM/DD].
Formato ora
Consente di selezionare il formato: [12 ore],
[24 ore].
Segnale acustico
Consente di attivare il segnale acustico relativo
alle operazioni: [OFF], [ON].
Telecamera posteriore
Consente di selezionare l’immagine proveniente
dalla videocamera posteriore: [OFF], [Normale]
[Inversa] (immagine speculare).
[Regolazione linea di guida] consente di regolare
la guida sull’immagine proveniente dalla
videocamera posteriore.
Toccare il lato vicino o il lato
lontano (porzioni rosse)
della guida da regolare.
Toccare /// per
regolare la posizione della
guida e toccare [ ] o [ ] per regolare la
larghezza della guida.
Comando sterzo
Consente di selezionare il modo di immissione
del telecomando collegato. Per prevenire
problemi di funzionamento, prima dell’uso
accertarsi di fare corrispondere il modo di
immissione con il telecomando collegato.
Personalizzata
Modalità di inserimento per il telecomando da
volante (attenersi alle procedure di [ ] per
registrare le funzioni sul telecomando collegato).
Preselezione
Modo di immissione per il telecomando cablato
escluso il telecomando da volante.
Viene visualizzato il pannello dei comandi sul
volante.
Tenere premuto il pulsante che si desidera
assegnare al volante.
Il pulsante sul pannello si illumina (standby).
Tenere premuto il pulsante sul volante a cui si
desidera assegnare la funzione.
Il pulsante sul pannello cambierà colore
(evidenziato o circondato da una riga
arancione).
Per registrare altre funzioni, ripetere i passi
e .
(Disponibile solo se [Comando sterzo] è
impostato su [Personalizzata].)
Note
• Durante l’applicazione delle impostazioni, il
telecomando collegato non può essere utilizzato anche
se alcune funzioni sono già state registrate. Utilizzare i
pulsanti sull’unità.
• Se si verifica un errore durante la registrazione, tutte le
informazioni registrate vengono cancellate.
Ricominciare la registrazione dall’inizio.
• Questa funzione potrebbe non essere disponibile su
alcuni veicoli. Per ulteriori informazioni sulla
compatibilità del veicolo in uso, visitare il sito Web
relativo all’assistenza riportato sulla retrocopertina.
Riprist. fabbrica
Consente di inizializzare tutte le impostazioni in
base a quelle predefinite.
Versione del firmware
Consente di aggiornare e confermare la versione
firmware.
Impostazioni

17IT
Licenze open source
Consente di visualizzare le licenze software.
Impostazioni audio (Audio)
EXTRA BASS
Consente di rafforzare il suono dei bassi in
sincronizzazione con il livello del volume:
[OFF], [1], [2].
EQ10/Subwoofer
Consente di selezionare la curva
dell’equalizzatore e regolare il livello del
subwoofer.
EQ10
Consente di selezionare la curva
dell’equalizzatore: [OFF], [R&B], [Rock], [Pop],
[Hip-Hop], [Dance], [EDM], [Jazz], [Soul],
[Country], [Personalizzata].
[Personalizzata] regola la curva
dell’equalizzatore: da –6 a +6.
Subwoofer
Consente di regolare il livello di volume del
subwoofer: [OFF], da –10 a +10.
Bilanc./Dissolv.
Consente di regolare il livello di balance/fader.
Bilanciament
Consente di regolare il bilanciamento dell’audio
tra i diffusori sinistro e destro: da [S15] a [D15].
Dissolviment
Consente di regolare il bilanciamento dell’audio
tra i diffusori anteriore e posteriore:
da [Anteriore 15] a [Retro 15].
Crossover
Consente di regolare la frequenza di taglio e la
fase del subwoofer.
Filtro passa alto
Consente di selezionare la frequenza di taglio dei
diffusori anteriore e posteriore: [OFF], [50Hz],
[60Hz], [80Hz], [100Hz], [120Hz].
Filtro passa basso
Consente di selezionare la frequenza di taglio del
subwoofer: [OFF], [50Hz], [60Hz], [80Hz],
[100Hz], [120Hz].
Fase del subwoofer
Consente di selezionare la fase del subwoofer:
[Normale], [Inversa].
DSO (Dynamic Stage Organizer)
Aumenta l’emissione audio: [OFF], [Basso],
[Medio], [Alto].
Impostazioni Video (Visuale)
Sfondo
Consente di modificare lo sfondo toccando il
colore desiderato.
Regolazione di luminosità
Consente di attenuare la luminosità del display:
[OFF], [Automatico], [ON].
([Automatico] è disponibile solo se il cavo di
controllo dell’illuminazione è collegato e
funziona quando i fari anteriori del veicolo sono
accesi.)
[ ] consente di selezionare il livello di
luminosità se è attivato l’attenuatore di
luminosità: da –5 a +5.
Regolaz. pannello sfioram.
Consente di regolare la calibratura del pannello a
sfioramento in caso di mancata corrispondenza
tra il punto da toccare e la relativa voce.
Impostazioni BLUETOOTH
(Bluetooth)
Connessione Bluetooth
Consente di attivare il segnale BLUETOOTH:
[OFF], [ON], [Associazione] (entra nel modo
standby per l’associazione).
Info disp. Bluetooth
Consente di visualizzare le informazioni del
dispositivo collegato all’apparecchio.
(Disponibile solo quando [Connessione
Bluetooth] è impostato su [ON] e un dispositivo
BLUETOOTH è collegato all’apparecchio.)
Reimpostazione Bluetooth
Consente di inizializzare tutte le impostazioni
relative alla funzione BLUETOOTH come
informazioni sull’associazione, registro chiamate,
informazioni sui dispositivi BLUETOOTH collegati
ecc.

18IT
Aggiornamento del firmware
Per aggiornare il firmware, consultare il sito
dell’assistenza sulla retrocopertina, quindi attenersi
alle istruzioni online.
Nota
Durante l’aggiornamento, non rimuovere il dispositivo USB.
Precauzioni
•L’antenna elettrica si estende automaticamente.
• Quando si trasferisce la proprietà oppure si
rottama la propria auto con l’apparecchio
installato, inizializzare tutte le impostazioni in
base a quelle predefinite eseguendo il ripristino
delle impostazioni predefinite (pagina 16).
• Non bagnare l’apparecchio.
Note sulla sicurezza
•Rispettare i regolamenti, le norme e le leggi sul
traffico in vigore nel proprio paese.
•Durante la guida
– Non guardare né utilizzare l’apparecchio per
evitare di distrarsi e causare incidenti.
Parcheggiare l’auto in un luogo sicuro prima di
guardare o utilizzare l’apparecchio.
– Non utilizzare la funzione di impostazione né
altre funzioni che possano causare distrazione
durante la guida.
– Durante la guida in retromarcia, per una
maggiore sicurezza voltarsi e guardare in tale
direzione e osservare l’area circostante anche se
la videocamera posteriore è collegata. Non
affidarsi esclusivamente alla videocamera
posteriore.
•Durante l’uso
– Non inserire mani, dita o corpi estranei
all’interno dell’apparecchio per evitare di ferirsi o
di danneggiare l’apparecchio stesso.
– Tenere gli oggetti di piccole dimensioni fuori
dalla portata dei bambini.
– Accertarsi di allacciare le cinture di sicurezza per
evitare lesioni in caso di un movimento brusco
dell’auto.
Note sul pannello LCD
•Non bagnare il pannello LCD né esporlo a liquidi.
Ciò potrebbe causare problemi di funzionamento.
•Non esercitare pressione sul pannello LCD per
evitare distorsioni dell’immagine o problemi di
funzionamento (per esempio, l’immagine
potrebbe risultare non nitida oppure il pannello
LCD potrebbe danneggiarsi).
•Toccare il pannello LCD solo con le dita per evitare
di danneggiarlo o romperlo.
•Pulire il pannello LCD con un panno asciutto
morbido. Non utilizzare solventi quale benzene,
trielina o detergenti disponibili in commercio o
spray antistatici.
•Non utilizzare l’apparecchio a temperature non
comprese tra 0 °C e 40 °C.
•Se l’auto viene parcheggiata in luoghi freddi o
caldi, l’immagine potrebbe risultare non nitida.
Tuttavia, ciò non indica che il monitor sia
danneggiato; l’immagine torna a essere nitida
non appena la temperatura all’interno dell’auto
raggiunge valori normali.
•Sul monitor potrebbero apparire alcuni punti fissi
blu, rossi o verdi. Tali punti sono detti “punti
luminosi” ed è possibile trovarli su qualsiasi
schermo LCD. Il pannello LCD è un prodotto di
elevata precisione, con oltre il 99,99% di segmenti
operativi. Tuttavia, è possibile che una piccola
percentuale (solitamente lo 0,01%) dei segmenti
non si illumini correttamente. Ad ogni modo, tale
fenomeno non influenza la visualizzazione.
Informazioni aggiuntive
Per evitare incidenti
Le immagini vengono visualizzate soltanto dopo
che l’auto è stata parcheggiata e che il freno a
mano è stato azionato.
Se l’auto inizia a muoversi durante la
riproduzione video, viene visualizzato il seguente
avviso e non è possibile vedere il video.
[Video bloccato per sicurezza.]
Non utilizzare l’apparecchio o il monitor durante
la guida.

19IT
Note sul pannello a sfioramento
•Questo apparecchio utilizza un pannello a
sfioramento resistivo. Toccare direttamente il
pannello con la punta delle dita.
•L’apparecchio non supporta le operazioni multi-
tocco.
•Non toccare il pannello con oggetti appuntiti quali
aghi, penne o unghie. L’apparecchio non supporta
le operazioni eseguite con un pennino.
•Non lasciare alcun oggetto a contatto con il
pannello a sfioramento. Se il pannello viene
toccato con un oggetto invece che con le dita,
l’apparecchio potrebbe non rispondere
correttamente.
•Poiché per il pannello viene utilizzato materiale in
vetro, non sottoporre l’unità a forti urti. Se si
verificano incrinature o scheggiature sul pannello,
non toccare la parte danneggiata in quanto
potrebbero verificarsi lesioni.
•Tenere altri dispositivi elettrici lontani dal pannello
a sfioramento. In caso contrario, potrebbero
causare problemi di funzionamento al pannello a
sfioramento.
WMA (.wma)*
1
*
2
Frequenza bit: 48 kbps – 192 kbps (Supporta
variable bit rate (VBR))*
3
Frequenza di campionamento*
4
: 44,1 kHz
MP3 (.mp3)*
1
*
2
Frequenza bit: 48 kbps – 320 kbps (Supporta
variable bit rate (VBR))*
3
Frequenza di campionamento*
4
: 32 kHz,
44,1 kHz, 48 kHz
AAC (.m4a)*
1
*
2
Frequenza bit: 40 kbps – 320 kbps (Supporta
variable bit rate (VBR))*
3
Frequenza di campionamento*
4
: 8 kHz – 48 kHz
Bit per campione (Bit di quantizzazione): 16 bits
FLAC (.flac)*
1
*
6
Frequenza di campionamento*
4
: 8 kHz – 48 kHz
Bit per campione (Bit di quantizzazione): 16 bits
WAV (.wav)*
1
Frequenza di campionamento*
4
: 8 kHz – 48 kHz
Bit per campione (Bit di quantizzazione): 16 bits,
24 bits
Xvid (.avi)
Codec video: Profilo semplice avanzato MPEG-4
Codec audio: MP3 (MPEG-1 Layer3)
Frequenza bit: max. 4 Mbps
Frequenza frame: max. 30 fps (30p/60i)
Risoluzione: max. 1280 × 720*
5
MPEG-4 (.mp4)
Codec video: Profilo semplice avanzato MPEG-4,
Profilo Baseline AVC
Codec audio: AAC
Frequenza bit: max. 4 Mbps
Frequenza frame: max. 30 fps (30p/60i)
Risoluzione: max. 1280 × 720*
5
WMV (.wmv, .avi)*
1
Codec video: WMV3, WVC1
Codec audio: MP3, WMA
Frequenza bit: max. 6 Mbps
Frequenza frame: max. 30 fps
Risoluzione: max. 720 × 480*
5
MKV (.mkv)
Codec video: Profilo semplice avanzato MPEG-4,
Profilo Baseline AVC
Codec audio: MP3, AAC
Frequenza bit: max. 5 Mbps
Frequenza frame: max. 30 fps
Risoluzione: max. 1280 × 720*
5
*1 Non è possibile riprodurre file protetti da copyright e file
audio multicanale.
*2 Non è possibile riprodurre file DRM (Digital Rights
Management).
*3 Sono incluse velocità in bit non standard o non garantite,
a seconda della frequenza di campionamento.
*4 La frequenza di campionamento potrebbe non
corrispondere per tutti i codificatori.
*5 Questi numeri indicano la risoluzione massima del video
riproducibile, non la risoluzione del display del lettore. La
risoluzione del display è pari a 800 × 480.
*6 La visualizzazione delle informazioni dei tag non è
supportata.
Nota
Non è possibile riprodurre alcuni file anche se i loro formati
sono supportati dall’apparecchio.
• Per ulteriori informazioni sui modelli iPhone compatibili,
visitare il sito di assistenza riportato sulla retrocopertina.
• L’uso dell’adesivo Made for Apple indica che un accessorio
è stato progettato per essere collegato specificatamente al
prodotto Apple indicato ed è stato certificato dallo
sviluppatore per soddisfare gli standard di prestazioni di
Apple. Apple non si assume alcuna responsabilità in
merito al funzionamento del dispositivo o alla conformità
con gli standard normativi e di sicurezza.
Nota: l’uso dell’accessorio con un prodotto Apple può
influire sulle prestazioni wireless.
Formati supportati per la riproduzione
USB
Informazioni sull’iPhone

20IT
Il presente prodotto contiene software che Sony utilizza in
base a un accordo di licenza con il titolare dei diritti d’autore.
Abbiamo l’obbligo di comunicare il contenuto dell’accordo
ai clienti secondo la richiesta del titolare dei diritti d’autore
del software.
Per ulteriori informazioni sulle licenze software, vedere
pagina 17.
Avviso correlato al software applicato GNU GPL/LGPL
Il presente prodotto contiene software soggetto alla
seguente licenza GNU General Public License (di seguito
“GPL”) o GNU Lesser General Public License (di seguito
“LGPL”). Tali licenze stabiliscono che i clienti hanno il diritto
di acquistare, modificare e ridistribuire il codice sorgente di
tale software nel rispetto dei termini della GPL o LGPL
visualizzati sull’apparecchio.
Il codice sorgente del software elencato in precedenza è
disponibile sul Web.
Per scaricare, accedere al seguente URL, quindi selezionare
il nome del modello “XAV-AX1005DB”.
URL: http://www.sony.net/Products/Linux/
Sony non può rispondere ad alcuna richiesta relativa al
codice sorgente.
Per eventuali domande o problemi riguardanti l’apparecchio
non trattati nelle presenti Istruzioni per l’uso, rivolgersi al
più vicino rivenditore Sony.
Caratteristiche tecniche
Monitor
Tipo di display: monitor LCD a colori con formato
Wide
Dimensioni: 6,2 pollici
Sistema: TFT a matrice attiva
Numero di pixel:
1.152.000 pixel (800 × 3 (RGB) × 480)
Sistema di colore:
Selezione automatica PAL/NTSC per terminale
CAMERA IN
Sintonizzatore
DAB/DAB+
Gamma di sintonia: 174,928 MHz – 239,200 MHz
Terminale dell’antenna:
Connettore dell’antenna esterna
FM
Gamma di frequenze: 87,5 MHz - 108,0 MHz
Sensibilità utilizzabile: 7 dBf
Rapporto segnale-rumore: 70 dB (mono)
Separazione a 1 kHz: 45 dB
AM
Gamma di frequenze: 531 kHz – 1.602 kHz
Sensibilità: 32 µV
Lettore USB
Interfaccia: USB (Hi-speed)
Alimentazione massima: 1,5 A
Comunicazione wireless
Sistema di comunicazione:
Standard BLUETOOTH versione 3.0
Uscita:
Standard BLUETOOTH Power Class 2
(Max. condotto +1 dBm)
Raggio di comunicazione massimo*
1
:
Circa 10 m l’uno di fronte all’altro
Banda di frequenza:
Banda da 2,4 GHz (da 2,4000 GHz a 2,4835 GHz)
Metodo di modulazione: FHSS
Profili BLUETOOTH compatibili*
2
:
A2DP (Advanced Audio Distribution Profile) 1.3
AVRCP (Audio Video Remote Control Profile) 1.3
HFP (Handsfree Profile) 1.6
PBAP (Phone Book Access Profile) 1.1
Codec corrispondenti: SBC, AAC
*1 Il raggio effettivo varia in base a fattori quali ostacoli tra i
dispositivi, campi magnetici attorno a un forno a
microonde, elettricità statica, sensibilità della ricezione,
prestazioni dell’antenna, sistema operativo, applicazione
software e così via.
*2 I profili standard BLUETOOTH indicano lo scopo della
comunicazione BLUETOOTH tra dispositivi.
Avviso relativo alla licenza

21IT
Amplificatore di potenza
Uscite: uscite diffusori
Impedenza diffusori: 4 – 8
Potenza di uscita massima: 55 W × 4 (a 4 )
Generali
Requisiti di alimentazione: batteria auto da 12 V CC
(massa negativa)
Consumo di corrente nominale: 10 A
Dimensioni:
Circa 178 mm × 100 mm × 141 mm (l/a/p)
Dimensioni di montaggio:
Circa 182 mm × 111 mm × 121 mm (l/a/p)
Peso: circa 0,9 kg
Contenuto della confezione:
Unità principale (1)
Elementi per l’installazione e i collegamenti
(1 set)
Microfono (1)
Rivolgersi al rivenditore per informazioni più
dettagliate.
Il design e le caratteristiche tecniche sono soggetti
a modifiche senza preavviso.
Bluetooth® e i relativi loghi sono marchi di fabbrica registrati
di proprietà di Bluetooth SIG, Inc. L’uso di tali marchi è
concesso in licenza a Sony Corporation. Tutti gli altri marchi
di fabbrica o marchi di fabbrica registrati sono di proprietà
delle rispettive aziende.
Windows Media è un marchio di fabbrica registrato o
marchio di fabbrica di Microsoft Corporation negli Stati Uniti
e/o in altri paesi.
Questo prodotto è tutelato da specifici diritti di proprietà
intellettuale di Microsoft Corporation. L’uso o la
distribuzione della tecnologia in questione al di fuori del
presente prodotto sono vietati senza apposita licenza
concessa da Microsoft o da una filiale Microsoft autorizzata.
Apple, iPhone e Lightning sono marchi di proprietà di Apple
Inc., registrati negli Stati Uniti d’America e in altri Paesi.
Apple CarPlay è un marchio commerciale di Apple Inc.
IOS è un marchio di fabbrica o un marchio di fabbrica
registrato di Cisco negli Stati Uniti e in altri paesi ed è
utilizzato su licenza.
IL PRESENTE PRODOTTO È CONCESSO IN LICENZA IN BASE AL
PORTAFOGLIO DEI BREVETTI MPEG-4 VISUAL PER L’USO
PERSONALE E NON COMMERCIALE DI UN UTENTE PER LA
DECODIFICA DI VIDEO SECONDO LO STANDARD MPEG-4
VISUAL (“MPEG-4 VIDEO”) CODIFICATO DA UN UTENTE PER
FINI PRIVATI E NON COMMERCIALI E/O OTTENUTO DA UN
FORNITORE VIDEO AUTORIZZATO DA MPEG LA PER LA
DISTRIBUZIONE DI VIDEO MPEG-4.
NON VIENE GARANTITA ALCUNA LICENZA PER ALTRI TIPI DI
USO.
INFORMAZIONI AGGIUNTIVE, INCLUSE QUELLE RELATIVE A
LICENZE E UTILIZZI PROMOZIONALI, INTERNI E
COMMERCIALI, SONO DISPONIBILI PRESSO MPEG LA, LLC.
FARE RIFERIMENTO A
HTTP://WWW.MPEGLA.COM
Tutti gli altri marchi sono di proprietà dei rispettivi
proprietari.
Informazioni su copyright

22IT
Guida alla soluzione dei
problemi
Fare riferimento alla seguente lista di verifica per
risolvere la maggior parte dei problemi che si
potrebbero verificare durante l’uso di questo
apparecchio.
Prima di esaminare l’elenco che segue, verificare le
procedure di collegamento e d’uso
dell’apparecchio.
Per informazioni sull’utilizzo del fusibile e sulla
rimozione dell’apparecchio dal cruscotto,
consultare “Collegamenti e installazione”
(pagina 26).
Se il problema persiste, visitare il sito di assistenza
riportato sulla retrocopertina.
Generali
Non viene emesso alcun segnale acustico.
Un amplificatore di potenza opzionale è collegato
e l’amplificatore incorporato non viene utilizzato.
Si è bruciato il fusibile.
Quando si cambia la posizione della chiave di
accensione, l’apparecchio emette un disturbo.
I cavi non sono collegati correttamente al
connettore di alimentazione accessoria dell’auto.
Il display viene disattivato/non viene
visualizzato sul monitor.
La funzione di spegnimento del monitor è attiva
(pagina 6).
– Toccare un punto qualsiasi del display per
riattivarlo.
Non è possibile selezionare le voci di menu.
Le voci di menu non disponibili sono visualizzate
in grigio.
Le funzioni USB non operano correttamente.
Non utilizzare una prolunga USB poiché potrebbe
causare un deterioramento della qualità del
segnale.
– Utilizzare un cavo USB più corto quando si
collega un dispositivo USB o sostituire il cavo
USB con un cavo nuovo.
Non è possibile utilizzare l’apparecchio.
Tenere premuto HOME per più di 10 secondi per
riavviare l’apparecchio. Per tutelare la propria
sicurezza, non riavviare l’apparecchio durante la
guida.
Funzionamento del pannello a
sfioramento
Quando viene toccato, il pannello a sfioramento
non risponde correttamente.
Toccare un punto del pannello a sfioramento alla
volta. Se vengono toccate contemporaneamente
due o più parti del pannello a sfioramento,
questo non funziona correttamente.
Calibrare il pannello a sfioramento del display
(pagina 17).
Toccare con decisione la parte del pannello
sensibile alla pressione.
Le operazioni multi-tocco non sono riconosciute.
L’apparecchio non supporta le operazioni multi-
tocco.
Ricezione radiofonica
La ricezione radio è di scarsa qualità.
Si verificano scariche statiche.
Collegare saldamente l’antenna.
RDS
PTY visualizza [PTY non trovato.].
La stazione corrente non è una stazione RDS
oppure la ricezione radio è di scarsa qualità.
Dopo alcuni secondi di ascolto, viene avviata la
funzione Seek.
La stazione non è TP oppure il segnale è debole.
– Disattivare TA (pagina 10).
Non viene trasmesso alcun notiziario sul traffico.
Attivare TA (pagina 10).
La stazione non trasmette notiziari sul traffico pur
essendo una stazione TP.
– Sintonizzarsi su un’altra stazione.
Ricezione radio DAB/DAB+
Non è possibile ricevere le stazioni.
Vedere [Nessuna stazione] (pagina 25) per
informazioni su quando non è possibile ricevere il
segnale DAB.
Non viene trasmesso alcun notiziario sul traffico.
Disabilitare gli annunci DAB (pagina 11).
– Gli annunci sul traffico non sono disponibili
mentre sono abilitati gli annunci DAB.

23IT
Immagine
Non viene visualizzata alcuna immagine/
l’immagine è disturbata.
Uno dei collegamenti non è stato effettuato in
modo corretto.
Verificare il collegamento tra il presente
apparecchio e l’altro dispositivo, quindi
impostare il selettore di ingresso del dispositivo
sulla sorgente corrispondente al presente
apparecchio.
L’installazione non è corretta.
– Installare l’apparecchio con un’angolazione
inferiore a 30° in una parte stabile dell’auto.
Il cavo del freno a mano (verde chiaro) non è
collegato al cavo di commutazione del freno a
mano oppure il freno a mano non è stato
azionato.
L’immagine non si adatta allo schermo.
Il rapporto di formato è fisso sulla sorgente di
riproduzione.
Audio
Non viene riprodotto alcun suono/l’audio salta/
l’audio si interrompe.
Uno dei collegamenti non è stato effettuato in
modo corretto.
Verificare il collegamento tra il presente
apparecchio e l’altro dispositivo collegato, quindi
impostare il selettore di ingresso del dispositivo
sulla sorgente corrispondente al presente
apparecchio.
L’installazione non è corretta.
– Installare l’apparecchio con un’angolazione
inferiore a 30° in una parte stabile dell’auto.
L’apparecchio è impostato sul modo di pausa/
ricerca rapida all’indietro/in avanti.
Le impostazioni per le uscite non sono corrette.
Il volume è troppo basso.
La funzione ATT è attivata.
Il formato non è supportato.
– Verificare che il formato sia supportato dal
presente apparecchio (pagina 19).
L’audio è disturbato.
Allontanare i cavi e i fili gli uni dagli altri.
Riproduzione USB
Non è possibile riprodurre i file.
Ricollegare il dispositivo USB.
Il dispositivo USB necessita di un tempo
maggiore per avviare la riproduzione.
Il dispositivo USB contiene file di grandi
dimensioni o con una struttura ad albero
complessa.
Non è possibile riprodurre file audio.
I dispositivi USB formattati con file system diversi
da FAT12, FAT16, FAT32 o exFAT non sono
supportati.*
* Questo apparecchio supporta FAT12, FAT16, FAT32 e exFAT,
tuttavia è possibile che alcuni dispositivi USB non
supportino tutti questi FAT. Per ulteriori informazioni,
consultare le istruzioni per l’uso del dispositivo USB o
contattare il produttore.
Funzione BLUETOOTH
L’altro dispositivo BLUETOOTH non rileva il
presente apparecchio.
Impostare [Connessione Bluetooth] su [ON]
(pagina 17).
Durante la connessione con un dispositivo
BLUETOOTH, l’apparecchio non può essere
rilevato da altri dispositivi. Terminare la
connessione corrente e ricercare l’apparecchio
dall’altro dispositivo.
A seconda dello smartphone o del telefono
cellulare, potrebbe essere necessario eliminare
l’apparecchio dalla cronologia dello smartphone
collegato o del telefono cellulare, quindi
sintonizzarli di nuovo (pagina 7).
Non è possibile stabilire la connessione.
Verificare le procedure di associazione e
connessione facendo riferimento al manuale
dell’altro dispositivo ecc., quindi eseguire di
nuovo l’operazione.
Il nome del dispositivo rilevato non viene
visualizzato.
A seconda dello stato dell’altro dispositivo, è
possibile che il nome non venga visualizzato.
Non viene emesso alcun tono di chiamata.
Aumentare il volume durante la ricezione di una
chiamata.
Il volume della voce dell’interlocutore è basso.
Aumentare il volume durante la chiamata.
L’interlocutore dice che il volume è troppo basso
o alto.
Regolare il livello [Guadagno mic.] (pagina 14).

24IT
Durante le conversazioni telefoniche si verifica il
fenomeno dell’eco o un disturbo.
Abbassare il volume.
Impostare [Qualità del parlato] su [Modo 1] o
[Modo 2] (pagina 14).
Se il rumore ambientale risulta elevato durante la
chiamata telefonica, tentare di ridurlo.
– Chiudere il finestrino se il rumore proveniente
dalla strada è eccessivamente alto.
– Se il rumore proveniente da un condizionatore
è elevato, abbassare la potenza del
condizionatore.
La qualità audio del telefono è scarsa.
La qualità audio del telefono dipende dalle
condizioni di ricezione del telefono cellulare.
– Se la ricezione è scarsa, spostare l’auto in un
luogo in cui il segnale del telefono cellulare
risulti più potente.
Il livello di volume del dispositivo BLUETOOTH
connesso è basso o alto.
Il livello di volume varia in base al dispositivo
BLUETOOTH.
– Ridurre le differenze di volume tra il presente
apparecchio e il dispositivo BLUETOOTH
(pagina 12).
L’audio salta durante lo streaming audio oppure
la connessione BLUETOOTH non riesce.
Ridurre la distanza tra l’apparecchio e il
dispositivo BLUETOOTH.
Se il dispositivo BLUETOOTH si trova in una
custodia che causa l’interruzione del segnale,
rimuoverlo dalla custodia durante l’uso.
Nelle vicinanze vengono utilizzati più dispositivi
BLUETOOTH o altri dispositivi (per es. dispositivi
radio Ham) che emettono onde radio.
– Spegnere gli altri dispositivi.
– Aumentare la distanza tra l’apparecchio e gli
altri dispositivi.
L’audio di riproduzione si arresta
momentaneamente durante la connessione del
presente apparecchio a un telefono cellulare.
Non si tratta di un problema di funzionamento.
Il dispositivo BLUETOOTH collegato non può
essere controllato durante lo streaming audio.
Verificare che il dispositivo BLUETOOTH connesso
supporti il profilo AVRCP.
Non è possibile utilizzare alcune funzioni.
Verificare se il dispositivo con cui è stata stabilita
la connessione supporta le funzioni in questione.
Una chiamata viene accettata accidentalmente.
Il telefono con cui si sta stabilendo la
connessione è impostato in modo da rispondere
a una chiamata automaticamente.
[Risposta automatica] su questo apparecchio è
impostato su [ON] (pagina 14).
L’associazione non è stata effettuata entro
l’intervallo di tempo previsto.
A seconda del dispositivo di connessione, il limite
di tempo previsto per l’associazione potrebbe
essere breve. Cercare di completare l’operazione
entro tale limite.
Non è possibile effettuare l’associazione.
Potrebbe risultare impossibile effettuare
l’associazione con un dispositivo BLUETOOTH
associato in precedenza dopo l’inizializzazione
dell’apparecchio se le informazioni
sull’associazione dell’apparecchio sono sul
dispositivo BLUETOOTH. In questo caso,
cancellare le informazioni sull’associazione
dell’apparecchio dal dispositivo BLUETOOTH,
quindi effettuare nuovamente l’associazione.
Non è possibile utilizzare la funzione
BLUETOOTH.
Spegnere il motore dell’automobile. Attendere
qualche secondo, quindi riaccendere il motore
impostando la posizione ACC.
Durante le chiamate con funzione vivavoce,
l’audio non viene trasmesso dai diffusori
dell’auto.
Se l’audio viene trasmesso dal telefono cellulare,
impostare quest’ultimo affinché l’audio venga
trasmesso dai diffusori dell’auto.
Apple CarPlay
L’icona Apple CarPlay non viene visualizzata
sulla schermata HOME.
L’iPhone non è compatibile con Apple CarPlay.
– Fare riferimento all’elenco delle compatibilità
sul sito dell’assistenza riportato sulla
retrocopertina.
Scollegare l’iPhone dalla porta USB e ricollegarlo.
Apple CarPlay potrebbe non essere disponibile
nel proprio Paese o area geografica.
Assicurarsi di utilizzare un cavo Lightning
certificato per collegare l’iPhone e l’apparecchio.

25IT
Messaggi
Generali
Contenuto non riproducibile.
Impossibile riprodurre il contenuto attualmente
selezionato o impossibile passare al contenuto
successivo.
– Il contenuto non è in un formato file
supportato. Verificare i formati file supportati
(pagina 19).
No risp. dispositivo
L’apparecchio non riconosce il dispositivo USB
collegato.
– Ricollegare il dispositivo USB.
– Verificare che il dispositivo USB sia supportato
dal presente apparecchio.
Nessun dato riproducibile
Il dispositivo USB non contiene dati riproducibili.
– Caricare file/dati musicali nel dispositivo USB.
Avviso sovracorrente su ingr. USB
Il dispositivo USB è sovraccaricato.
– Scollegare il dispositivo USB.
– Indica che il dispositivo USB non funziona
oppure che è stato collegato un dispositivo non
supportato.
Dispositivo USB non supportato
Per ulteriori informazioni sulla compatibilità del
dispositivo USB in uso, visitare il sito di assistenza
riportato sulla retrocopertina.
Hub USB non supportato
Gli hub USB non sono supportati sul presente
apparecchio.
BLUETOOTH
Il dispositivo Bluetooth non è stato trovato.
L’apparecchio non è in grado di rilevare un
dispositivo BLUETOOTH collegabile.
– Verificare l’impostazione del dispositivo
BLUETOOTH da connettere.
Nell’elenco dei dispositivi BLUETOOTH registrati
non è presente alcun dispositivo.
– Effettuare l’associazione con un dispositivo
BLUETOOTH (pagina 7).
Dispositivo vivavoce non disponibile.
Non è connesso alcun telefono cellulare.
– Connettere un telefono cellulare (pagina 8).
Ricezione radio DAB/DAB+
Nessuna stazione
Non è possibile ricevere il segnale DAB.
– Eseguire una sintonizzazione automatica
(pagina 11).
– Verificare il collegamento dell’antenna DAB
(non in dotazione).
– Verificare che [Alimentazione antenna] sia
impostata su [ON] (pagina 11).
Ricezione
L’apparecchio è in attesa di ricevere una stazione
DAB.
Se le soluzioni riportate non risolvono il problema,
rivolgersi al più vicino rivenditore Sony.

26IT
Attenzione
• Non installare questo apparecchio su un’auto
sprovvista della posizione ACC (accessoria). Il
display non si spegne nemmeno dopo aver
spento l’auto e ciò causa l’esaurimento della
batteria.
• Portare tutti i cavi di messa a terra a un punto di
massa comune.
• Evitare che i cavi rimangano bloccati da una vite o
incastrati nelle parti mobili (ad esempio nelle
guide scorrevoli dei sedili).
•Prima di effettuare i collegamenti, spegnere il
motore dell’automobile onde evitare di causare
cortocircuiti.
• Collegare il cavo di ingresso alimentazione
all’apparecchio e ai diffusori prima di collegarlo al
connettore di alimentazione ausiliaria.
• Per motivi di sicurezza, accertarsi di isolare
qualsiasi cavo non collegato utilizzando del nastro
adesivo.
• Scegliere con attenzione la posizione per
l’installazione in modo che l’apparecchio non
interferisca con le operazioni di guida del
conducente.
•Evitare di installare l’apparecchio dove sia
soggetto ad alte temperature, come alla luce
solare diretta o al getto di aria calda dell’impianto
di riscaldamento, o dove possa essere soggetto a
polvere, sporco e vibrazioni eccessive.
•Usare solo il materiale di montaggio in dotazione
per un’installazione stabile e sicura.
Nota sul cavo di alimentazione (giallo)
Se questo apparecchio viene collegato in combinazione con
altri componenti stereo, la potenza nominale dei circuiti
dell’automobile deve essere superiore a quella prodotta
dalla somma dei fusibili di ciascun componente.
Regolazione dell’angolo di montaggio
Regolare l’angolo di montaggio in modo che sia
inferiore a 30°.
Elenco dei componenti per
l’installazione
•Questo elenco dei componenti non comprende
tutto il contenuto della confezione.
• La staffa viene applicata all’unità in fabbrica.
Prima di installare l’apparecchio, utilizzare le chiavi
di rilascio per rimuovere la staffa
dall’apparecchio. Per ulteriori informazioni,
consultare “Rimozione della staffa” (pagina 30).
•Conservare le chiavi di rilascio per uso futuro
poiché sono necessarie anche per rimuovere
l’apparecchio dall’automobile.
Collegamenti e installazione
Precauzioni
× 4
5 × max. 8 mm
× 2

27IT
Collegamento
*
3
*
3
*
3
Subwoofer*
1
Amplificatore di potenza*
1
da un telecomando cablato (non in
dotazione)
*4
*
6
*
7
dall’antenna dell’auto*
5
Videocamera
posteriore*
1
*
3
Verde chiaro
A strisce viola/bianco
Per ulteriori informazioni,
consultare “Collegamenti”
(pagina 28).
Consultare “Diagramma dei collegamenti di
alimentazione” (pagina 29) per ulteriori
informazioni.
*
2
dall’antenna DAB (non in dotazione)*
8

28IT
*1 Non in dotazione
*2 Impedenza diffusori: 4 – 8 × 4
*3 Cavo a piedini RCA (non in dotazione)
*4 A seconda del tipo di auto, utilizzare un adattatore per il
telecomando cablato (non in dotazione).
Per ulteriori informazioni sull’uso del telecomando
cablato, consultare “Uso del telecomando cablato”
(pagina 30).
*5 A seconda del tipo di auto, utilizzare un adattatore (non
in dotazione) se il connettore dell’antenna non può
essere inserito.
*6 Indipendentemente dal fatto che venga utilizzato o
meno, sistemare il cavo di ingresso del microfono in
modo che non interferisca con la guida. Se il cavo è
installato nella parte dell’abitacolo riservato ai piedi,
fissarlo con un fermacavo o simili.
*7 Per ulteriori dettagli sull’installazione del microfono,
consultare “Installazione del microfono” (pagina 29).
*8 Impostare [Alimentazione antenna] su [ON]
(impostazione predefinita) o [OFF] a seconda del tipo di
antenna DAB (non in dotazione) (pagina 11).
Alimentazione massima fornita: 0,1 A
Quando si collega l’apparecchio con il cavo di
alimentazione in dotazione si potrebbe
danneggiare l’antenna elettrica, se questa non
dispone di scatola a relè.
Al connettore del diffusore dell’auto
Al connettore di alimentazione dell’auto
Al cavo di commutazione del freno a mano
La posizione di installazione del cavo di
commutazione del freno a mano dipende dal
veicolo in uso.
Accertarsi di collegare il cavo del freno a mano
(verde chiaro) del cavo di alimentazione al
cavo di commutazione del freno a mano.
Al terminale di alimentazione da +12 V del
cavo spia della retromarcia dell’auto (solo se
viene collegata la videocamera posteriore)
Collegamento per la conservazione della
memoria
Quando il cavo di ingresso alimentazione giallo è
collegato, viene sempre fornita alimentazione al
circuito di memoria anche quando l’interruttore di
accensione è spento.
Collegamento dei diffusori
•Prima di collegare i diffusori spegnere
l’apparecchio.
• Usare diffusori di impedenza compresa tra 4 e
8 e con capacità di potenza adeguata, altrimenti
i diffusori potrebbero venire danneggiati.
Collegamenti
1
Diffusore
posteriore (destro)
Viola
2
A strisce viola/
nero
3
Diffusore
anteriore (destro)
Grigio
4
A strisce grigio/
nero
5
Diffusore
anteriore (sinistro)
Bianco
6
A strisce bianco/
nero
7
Diffusore
posteriore
(sinistro)
Verde
8
A strisce verde/
nero
12 alimentazione continua Giallo
13
antenna elettrica/
controllo
dell’amplificatore di
potenza (REM OUT)
A strisce blu/
bianco
14
alimentazione
illuminazione
commutata
A strisce
arancione/bianco
15
alimentazione
commutata
Rosso
16 terra Nero
Cavo di commutazione del freno a mano
Tipo freno a mano Tipo freno a pedale

29IT
Controllare il connettore di alimentazione ausiliaria
e far corrispondere correttamente i collegamenti
dei cavi a seconda dell’automobile.
Collegamento normale
Se le posizioni dei cavi rosso e giallo sono
invertite
Per le auto sprovviste della posizione ACC
Dopo aver fatto corrispondere i collegamenti e aver
commutato i cavi di alimentazione, collegare
l’apparecchio all’alimentazione dell’automobile. Per
eventuali domande o problemi riguardanti
l’apparecchio non trattati nel presente manuale,
rivolgersi all’autoconcessionario.
Per catturare la voce durante le chiamate in
vivavoce, è necessario installare il microfono .
Attenzione
• Se il cavo rimane avvolto al piantone dello sterzo o
alla leva del cambio, possono verificarsi situazioni
di estremo pericolo. Accertarsi quindi che il cavo
stesso e altri componenti non interferiscano con le
operazioni di guida.
• Se nell’auto sono presenti air-bag o altri dispositivi
di assorbimento degli urti, prima dell’installazione
contattare il negozio in cui è stato acquistato
l’apparecchio o l’autoconcessionario.
Nota
Prima di applicare il nastro biadesivo , pulire la superficie
del cruscotto con un panno asciutto.
Diagramma dei collegamenti di
alimentazione
12 alimentazione continua Giallo
15
alimentazione
commutata
Rosso
12
alimentazione
commutata
Giallo
15 alimentazione continua Rosso
Connettore di
alimentazione ausiliaria
Rosso Rosso
Giallo Giallo
Rosso Rosso
Giallo Giallo
Rosso
Rosso
Giallo
Giallo
Installazione del microfono
Fermaglio (non in dotazione)

30IT
1 Per abilitare il telecomando cablato,
impostare [Comando sterzo] in [Generale]
su [Preselezione] (pagina 16).
Prima dell’uso, è richiesta l’installazione della
videocamera posteriore (non in dotazione).
L’immagine della videocamera posteriore collegata
al terminale CAMERA IN viene visualizzata quando:
la spia della retromarcia dell’auto si illumina
(oppure quando la leva del cambio viene portata
in posizione R (di retromarcia)).
si preme HOME e si tocca [Videoc. post.].
Installazione
Prima di installare l’apparecchio, rimuovere la staffa
dall’apparecchio.
1 Inserire entrambe le chiavi di rilascio
finché non scattano in posizione e
abbassare la staffa , quindi sollevare
l’apparecchio per estrarlo.
• Prima di installare l’apparecchio, accertarsi di
ripiegare i fermi presenti su entrambi i lati della
staffa verso l’interno di 3,5 mm.
• Per le auto giapponesi, fare riferimento a
“Montaggio dell’apparecchio su un’auto
giapponese” (pagina 31).
1 Inserire la staffa nel cruscotto, quindi
piegare verso l’esterno i morsetti per
un’installazione sicura.
2 Montare l’apparecchio sulla staffa .
Note
• Se i fermi sono diritti o ripiegati verso l’esterno,
l’apparecchio non verrà installato in modo sicuro e
potrebbe fuoriuscire.
• Assicurarsi che i 4 fermi sulla cornice protettiva siano
correttamente inseriti negli alloggiamenti della staffa .
Uso del telecomando cablato
Videocamera posteriore
Rimozione della staffa
Con il gancio rivolto verso l’interno.
Montaggio dell’apparecchio sul
cruscotto
Fermo
Superiore a
182 mm
Superiore a
111 mm

31IT
Montaggio dell’apparecchio su un’auto
giapponese
Potrebbe risultare impossibile installare questo
apparecchio su alcuni tipi di vetture giapponesi. In
tal caso, rivolgersi a un rivenditore Sony.
Durante il montaggio del presente apparecchio
sulle staffe preinstallate dell’auto, inserire le viti in
dotazione negli appositi fori, in base al modello
dell’auto: T per TOYOTA e N per NISSAN.
Nota
Per prevenire problemi di funzionamento, per l’installazione
utilizzare soltanto le viti in dotazione .
Per la sostituzione del fusibile,
assicurarsi di utilizzare un fusibile
dello stesso amperaggio di quello
indicato sull’originale.
Se il fusibile si brucia, controllare i
collegamenti dell’alimentazione e
sostituire il fusibile.
Se dopo la sostituzione il fusibile si brucia di nuovo,
è possibile che si tratti di un problema interno. In tal
caso, rivolgersi al più vicino rivenditore Sony.
Al cruscotto/alla console centrale
Parti in dotazione
con l’auto
Staffa
Staffa
Sostituzione del fusibile
Fusibile (10 A)

2ES
La placa de características que indica el voltaje de
funcionamiento, etc., está situada en la parte
inferior del chasis.
Advertencia
Para evitar el riesgo de incendio o
electrocución, no exponga la unidad a la
lluvia ni a la humedad.
Para evitar recibir descargas eléctricas, no
abra el aparato. Solicite asistencia técnica
únicamente a personal especializado.
Fabricado en Tailandia
Por la presente, Sony Corporation declara que este
equipo es conforme con la Directiva 2014/53/UE.
El texto completo de la declaración UE de
conformidad está disponible en la dirección
Internet siguiente:
http://www.compliance.sony.de/
La validez de la marca CE está limitada a aquellos
países en los que la legislación la impone,
principalmente los países del EEE (Espacio
económico europeo) y Suiza.
Aviso para los clientes: la información
siguiente resulta de aplicación solo a los
equipos comercializados en países afectados
por las directivas de la UE
Este producto ha sido fabricado por, o en nombre
de Sony Corporation.
Importador UE: Sony Europe Limited.
Las consultas relacionadas con el Importador a la
UE o con la conformidad del producto en Europa
deben dirigirse al representante autorizado por el
fabricante, Sony Belgium, bijkantoor van Sony
Europe Limited, Da Vincilaan 7-D1, 1935 Zaventem,
Bélgica.
Tratamiento de las baterías y
equipos eléctricos y electrónicos al
final de su vida útil (aplicable en la
Unión Europea y otros países con
sistemas de tratamiento selectivo
de residuos)
Este símbolo en el producto, la batería o el
embalaje indica que el producto y la batería no
pueden tratarse como un residuo doméstico
normal. En algunas baterías este símbolo puede
utilizarse en combinación con un símbolo químico.
Se añadirá el símbolo químico del plomo (Pb) si la
batería contiene más del 0,004 % de plomo. Al
asegurarse de que estos productos y baterías se
desechan correctamente, ayudará a prevenir las
posibles consecuencias negativas para la salud y el
medio ambiente que podrían derivarse de su
incorrecta manipulación. El reciclaje de los
materiales ayuda a preservar los recursos naturales.
En el caso de productos, que por razones de
seguridad, rendimiento o mantenimiento de datos,
requieran una conexión permanente con la batería
incorporada, esta batería deberá reemplazarse
únicamente por personal técnico cualificado para
ello. Para asegurarse de que la batería se desecha
correctamente, entregue estos productos al final de
su vida útil en un punto de recogida adecuado para
el reciclado de aparatos eléctricos y electrónicos.
Para el resto de baterías, consulte la sección donde
se indica cómo extraer la batería del producto de
forma segura. Deposite la batería en el
correspondiente punto de recogida para el
reciclado de baterías. Si desea obtener información
detallada sobre el reciclaje de este producto o de la
batería, póngase en contacto con el ayuntamiento,
el punto de recogida más cercano o el
establecimiento donde ha adquirido el producto o
la batería.
Nota legal acerca de los servicios prestados
por otros proveedores
Los servicios prestados por otros proveedores están
sujetos a cambios, anulaciones o interrupciones sin
previo aviso. Sony no asume responsabilidad
alguna en estas situaciones.
Por motivos de seguridad, asegúrese de instalar
esta unidad en el salpicadero del automóvil, ya
que la parte posterior de la misma se calienta
durante su uso.
Para obtener información detallada, consulte
“Conexión/Instalación” (página 26).
Advertencia: si el encendido del automóvil
no dispone de una posición ACC
No instale esta unidad en un automóvil que no
disponga de posición ACC. La pantalla de la
unidad no se apaga ni aunque se apague el
contacto, lo que produce la descarga de la
batería.

3ES
Precaución
SONY NO SERÁ RESPONSABLE EN NINGÚN CASO DE
NINGÚN DAÑO ACCIDENTAL, INDIRECTO, DERIVADO
O DE CUALQUIER OTRO TIPO INCLUIDOS, DE FORMA
NO EXHAUSTIVA, PÉRDIDAS DE BENEFICIOS,
PÉRDIDAS DE INGRESOS, PÉRDIDAS DE DATOS,
IMPOSIBILIDAD DE USAR EL PRODUCTO O
CUALQUIER EQUIPO ASOCIADO, TIEMPOS DE
INACTIVIDAD Y TIEMPO DE LOS COMPRADORES
RELACIONADO O DERIVADO DEL USO DE ESTE
PRODUCTO, SU HARDWARE Y/O SU SOFTWARE.
Estimado cliente, este producto incluye un
transmisor de radio.
Según la normativa n.º 10 de UNECE, un fabricante
de un vehículo puede imponer condiciones
específicas para la instalación de transmisores de
radio en vehículos.
Revise el manual de funcionamiento o póngase en
contacto con el fabricante o el concesionario de su
vehículo antes de instalar este producto en el
mismo.
Llamadas de emergencia
Este sistema de manos libres para vehículos con
BLUETOOTH y el dispositivo electrónico conectado
al sistema funcionan mediante señales de radio, y
redes móviles y terrestres, así como con funciones
programadas por el usuario, lo que no permite
garantizar la conexión en todas las condiciones.
Así pues, no debe fiarse exclusivamente de
dispositivos electrónicos para establecer
comunicaciones básicas (como en el caso de
emergencias médicas).
Sobre la comunicación mediante BLUETOOTH
• Las microondas que se emiten desde un
dispositivo BLUETOOTH pueden afectar al
funcionamiento de los dispositivos médicos
electrónicos. Apague esta unidad y los demás
dispositivos BLUETOOTH en las siguientes
ubicaciones para evitar posibles accidentes.
– lugares donde haya gases inflamables
presentes, hospitales, trenes, aviones o
gasolineras
– cerca de puertas automáticas o alarmas de
incendios
• Esta unidad admite funciones de seguridad
compatibles con el estándar BLUETOOTH para
facilitar una conexión segura cuando se emplea la
tecnología inalámbrica BLUETOOTH, pero la
seguridad puede no ser suficiente en función del
entorno. Tenga cuidado al establecer una
comunicación mediante la tecnología inalámbrica
BLUETOOTH.
• No asumimos ninguna responsabilidad por
posibles filtraciones de información durante las
comunicaciones mediante BLUETOOTH.
Si desea realizar alguna consulta o solucionar algún
problema relativo a la unidad que no se trate en
este Manual de instrucciones, póngase en contacto
con el distribuidor Sony más cercano.
Aviso importante

4ES
Tabla de contenidos
Advertencia . . . . . . . . . . . . . . . . . . . . . . . . . . . . . . . . 2
Guía de elementos y controles . . . . . . . . . . . . . . . . 5
Procedimientos iniciales
Ajustes iniciales. . . . . . . . . . . . . . . . . . . . . . . . . . . . . 7
Preparación del dispositivo BLUETOOTH . . . . . . . . 7
Conexión de un dispositivo USB . . . . . . . . . . . . . . . 8
Conexión de otros dispositivos de audio
portátiles . . . . . . . . . . . . . . . . . . . . . . . . . . . . . . . 8
Conexión de la cámara de visualización
posterior. . . . . . . . . . . . . . . . . . . . . . . . . . . . . . . . 9
Escuchar la radio
Escuchar la radio . . . . . . . . . . . . . . . . . . . . . . . . . . . . 9
Uso de las funciones de la opción de
sintonizador. . . . . . . . . . . . . . . . . . . . . . . . . . . . 10
Escuchar la radio DAB/DAB+ . . . . . . . . . . . . . . . . . 10
Uso de las funciones de Opciones DAB . . . . . . . . 11
Reproducción
Reproducción de un dispositivo USB . . . . . . . . . . 12
Reproducción de un dispositivo BLUETOOTH. . . . 12
Búsqueda y reproducción de pistas . . . . . . . . . . . 12
Ajustes adicionales durante la reproducción . . . . 13
Llamadas manos libres
Recepción de llamadas . . . . . . . . . . . . . . . . . . . . . 13
Realización de llamadas. . . . . . . . . . . . . . . . . . . . . 13
Operaciones disponibles durante una
llamada . . . . . . . . . . . . . . . . . . . . . . . . . . . . . . . 14
Funciones útiles
Apple CarPlay . . . . . . . . . . . . . . . . . . . . . . . . . . . . . 15
Uso del control con gestos. . . . . . . . . . . . . . . . . . . 15
Ajustes
Funcionamiento de los ajustes básicos . . . . . . . . 16
Ajustes generales (General) . . . . . . . . . . . . . . . . . . 16
Ajustes de sonido (Sonido) . . . . . . . . . . . . . . . . . . 17
Ajustes visuales (Visual) . . . . . . . . . . . . . . . . . . . . . 17
Ajustes de BLUETOOTH (Bluetooth). . . . . . . . . . . . 17
Información adicional
Actualización del firmware. . . . . . . . . . . . . . . . . . . 18
Precauciones . . . . . . . . . . . . . . . . . . . . . . . . . . . . . . 18
Especificaciones . . . . . . . . . . . . . . . . . . . . . . . . . . . 20
Solución de problemas. . . . . . . . . . . . . . . . . . . . . . 22
Mensajes . . . . . . . . . . . . . . . . . . . . . . . . . . . . . . . . . 25
Conexión/Instalación
Precauciones. . . . . . . . . . . . . . . . . . . . . . . . . . . . . . 26
Lista de piezas para la instalación . . . . . . . . . . . . 26
Conexión . . . . . . . . . . . . . . . . . . . . . . . . . . . . . . . . . 27
Instalación. . . . . . . . . . . . . . . . . . . . . . . . . . . . . . . . 30

5ES
Guía de elementos y controles
Pantalla/panel táctil
HOME
Abra el menú HOME.
ATT (atenuar)
Manténgalo pulsado durante 1 segundo para
atenuar el sonido.
Para cancelar, manténgalo pulsado de nuevo o
gire el dial de control de volumen.
Dial de control de volumen
Gírelo para ajustar el volumen cuando se emite
sonido.
OPTION
Púlselo para abrir la pantalla OPTION (página 6).
VOICE
Manténgalo pulsado para activar la función de
comando de voz para Apple CarPlay.
Puerto USB
Toma de entrada AUX
Unidad principal

6ES
Pantalla de reproducción:
Pantalla HOME:
Pantalla OPTION:
Indicación de estado
(opción de fuente)
Abra el menú de opciones de la fuente. Las
opciones disponibles varían en función de la
fuente.
Área específica de cada aplicación
Muestra controles de reproducción/indicaciones
o el estado de la unidad. Los elementos
visualizados dependen de la fuente.
Reloj (página 16)
(volver a la pantalla de reproducción)
Cambia de la pantalla HOME a la pantalla de
reproducción.
Teclas de selección de fuentes y ajustes
Cambie la fuente o elija varios ajustes.
Para mostrar el icono de ajuste y otros iconos,
debe deslizar hacia la izquierda o la derecha la
parte inferior de esta zona.
Teclas de selección de sonidos
Cambie el sonido.
(EXTRA BASS)
Cambie el ajuste de EXTRA BASS (página 17).
(EQ10/Altav. grav.)
Cambie el ajuste de EQ10/Altav. grav.
(página 17).
(monitor desactivado)
Apague el monitor. Cuando se apaga el monitor,
toque cualquier parte de la pantalla para
activarlo de nuevo.
Pantalla
Se ilumina cuando el sonido está
atenuado.
Se ilumina cuando AF (frecuencias
alternativas) está disponible.
Se ilumina cuando hay información de
tráfico actual (TA: anuncio de tráfico)
disponible.
Se ilumina cuando hay un anuncio DAB
disponible.
Indica el estado de intensidad de la señal
del sintonizador DAB.
Se ilumina cuando el dispositivo de
audio se puede reproducir habilitando el
A2DP (Advanced Audio Distribution
Profile).
Se ilumina cuando están disponibles las
llamadas con el sistema de manos libres
habilitando el HFP (Handsfree Profile).
Indica la potencia de la señal del
teléfono móvil conectado.
Indica la batería restante del teléfono
móvil conectado.
Se ilumina cuando la señal de Bluetooth®
está encendida. Parpadea cuando la
conexión está en curso.

7ES
Ajustes iniciales
Debe configurar los ajustes iniciales antes de
utilizar la unidad por primera vez, o después de
sustituir la batería del vehículo o de cambiar las
conexiones.
Si no aparece la pantalla de ajustes iniciales al
encender la unidad, use el restablecimiento a los
valores de fábrica (página 16) para inicializar la
unidad.
1 Toque [Idioma] y, a continuación, configure
el idioma de la interfaz.
2 Toque [Demostración] una vez para
seleccionar [DESAC.] y desactivar el modo
de demostración.
3 Toque [OK].
Aparecerá la advertencia de arranque.
4 Lea toda la advertencia de arranque y, si
está de acuerdo con todas las condiciones,
toque [Cerrar].
Ha terminado la configuración.
Pueden modificarse más aspectos de esta
configuración desde el menú de ajustes
(página 16).
Preparación del dispositivo
BLUETOOTH
Puede disfrutar de música o realizar llamadas con el
sistema de manos libres en función del dispositivo
compatible con BLUETOOTH, como smartphones,
teléfonos móviles y dispositivos de audio (de aquí
en adelante, se denominará “dispositivo
BLUETOOTH” si no se especifica lo contrario). Para
obtener información detallada sobre la conexión,
consulte el manual de instrucciones suministrado
con el dispositivo.
Antes de conectar el dispositivo, baje el volumen
de esta unidad; si no lo hace, puede emitirse un
sonido a gran volumen.
Al conectar un dispositivo BLUETOOTH por primera
vez, se debe realizar un registro mutuo
(denominado “emparejamiento”). El
emparejamiento permite que esta unidad y otros
dispositivos se reconozcan entre sí.
1 Coloque el dispositivo BLUETOOTH a 1 m de
esta unidad.
2 Pulse HOME y, a continuación, toque
[Ajustes].
3 Toque [Bluetooth].
4 Toque [Conexión Bluetooth] y, a
continuación, establezca la señal en
[ACTIV.].
La señal de BLUETOOTH se activa y se ilumina
en la barra de estado de la unidad.
5 Toque [Conectar].
parpadea mientras la unidad se encuentra en
modo de espera de emparejamiento.
6 Realice el emparejamiento con el
dispositivo BLUETOOTH para que detecte
esta unidad.
7 Seleccione [XAV-AX1005DB] cuando
aparezca en la pantalla del dispositivo
BLUETOOTH.
Si no aparece el nombre de su modelo, repita el
procedimiento desde el paso 5.
8 Si es necesario introducir una clave* en el
dispositivo BLUETOOTH, introduzca [0000].
* La clave puede denominarse “código”, “código PIN”,
“número PIN”, “contraseña”, etc., en función del
dispositivo BLUETOOTH.
Una vez realizado el emparejamiento, el símbolo
se mantiene iluminado.
Procedimientos iniciales
Emparejamiento y conexión de un
dispositivo BLUETOOTH
[0000]
Introduzca la clave

8ES
9 Seleccione esta unidad en el dispositivo
BLUETOOTH para establecer la conexión
mediante BLUETOOTH.
o se iluminan cuando se establece la
conexión.
Notas
• La unidad solo puede estar conectada a un dispositivo
BLUETOOTH a la vez.
• Para cancelar la conexión BLUETOOTH, finalice la conexión
desde la unidad o desde el dispositivo BLUETOOTH.
• El emparejamiento con BLUETOOTH no es posible cuando
Apple CarPlay está en ejecución.
Para usar un dispositivo emparejado, es necesario
establecer una conexión con esta unidad. Algunos
dispositivos emparejados se conectarán
automáticamente.
1 Pulse HOME y, a continuación, toque
[Ajustes].
2 Toque [Bluetooth].
3 Toque [Conexión Bluetooth] y, a
continuación, toque [ACTIV.].
Compruebe si se ilumina en la barra de
estado de la unidad.
4 Active la función BLUETOOTH en el
dispositivo BLUETOOTH.
5 Accione el dispositivo BLUETOOTH para
conectarlo a esta unidad.
o se iluminan en la barra de estado.
Para conectar el último dispositivo conectado
de esta unidad
Cuando se activa el encendido con la señal de
BLUETOOTH activada, esta unidad busca el último
dispositivo BLUETOOTH conectado y se establece la
conexión automáticamente.
Nota
Mientras se reproduce audio BLUETOOTH, no se puede
establecer una conexión entre esta unidad y el teléfono
móvil. En lugar de eso, conecte el teléfono móvil a esta
unidad.
Para instalar el micrófono
Para obtener información detallada, consulte
“Instalación del micrófono” (página 29).
Conexión de un dispositivo USB
1 Baje el volumen en la unidad.
2 Abra la tapa del puerto USB y, a
continuación, conecte el dispositivo USB a la
unidad.
Para conectar un iPhone, utilice el cable de
conexión USB para iPhone (no suministrado).
Conexión de otros dispositivos
de audio portátiles
1 Apague el dispositivo de audio portátil.
2 Baje el volumen en la unidad.
3 Conecte el dispositivo de audio portátil a la
toma de entrada AUX (minitoma estéreo) de
la unidad con un cable de conexión (no
suministrado)*.
* Asegúrese de utilizar un conector de tipo recto.
4 Pulse HOME y toque [AUX].
Para ajustar el nivel de volumen del
dispositivo conectado al de otras fuentes
Inicie la reproducción en el dispositivo de audio
portátil en un volumen moderado y ajuste el
volumen en el que utilizará normalmente la unidad.
Durante la reproducción, toque y, a
continuación, ajuste [Nivel de entrada]. Ajuste el
nivel de volumen a entre [-10] y [+15].
Conexión de un dispositivo BLUETOOTH
emparejado

9ES
Conexión de la cámara de
visualización posterior
Si conecta la cámara de visualización posterior
opcional al terminal CAMERA IN, podrá ver la
imagen de la cámara de visualización posterior.
Para obtener información detallada, consulte
“Conexión/Instalación” (página 26).
Para mostrar la imagen de la cámara de
visualización posterior
Pulse HOME y toque [Cám. poster.].
Escuchar la radio
Para escuchar la radio, pulse HOME y, a
continuación, toque [Sintonizador].
Controles de recepción/indicaciones
Banda actual
Cambie la banda (FM1, FM2, FM3, AM1 o AM2).
Frecuencia actual, nombre del servicio del
programa*, indicación RDS (sistema de datos
de radio)*
* Durante la recepción de RDS.
(opción de sintonizador)
Abra el menú de opciones del sintonizador.
SEEK–/SEEK+
Realice la sintonización automáticamente.
/
Realice la sintonización manualmente.
Manténgalas pulsadas para ir saltando las
frecuencias.
Números de presintonía
Seleccione una emisora presintonizada. Deslice
hacia la izquierda o hacia la derecha para
mostrar otras emisoras presintonizadas.
Manténgala pulsada para guardar la frecuencia
actual en esta presintonía.
1 Seleccione la banda deseada (FM1, FM2,
FM3, AM1 o AM2).
2 Efectúe la sintonización.
Para sintonizar automáticamente
Toque SEEK–/SEEK+.
La búsqueda se detiene cuando la unidad recibe
una emisora.
Escuchar la radio
Sintonización

10ES
Para sintonizar manualmente
Mantenga pulsadas / para buscar la
frecuencia aproximada y, a continuación, toque
/ varias veces para sintonizar la frecuencia
deseada.
1 Mientras recibe la emisora que desea
almacenar, mantenga pulsado el número de
presintonía deseado.
1 Seleccione la banda y, a continuación, toque
el número de presintonía deseado.
Uso de las funciones de la opción
de sintonizador
Las siguientes funciones están disponibles al tocar
.
BTM (Memoria de la mejor sintonía)
Almacena las emisoras en el orden de frecuencia
en los números de presintonía. Pueden
guardarse 18 emisoras FM y 12 emisoras AM
como emisoras presintonizadas.
AF*
Seleccione [ACTIV.] para volver a sintonizar
continuamente la emisora, de modo que se
reciba la señal más intensa de una red.
TA*
Seleccione [ACTIV.] para recibir la información de
tráfico actual o programas de tráfico (TP) si están
disponibles.
Regional*
Seleccione [ACTIV.] para continuar escuchando la
emisora que está recibiendo mientras la función
AF está activada. Si abandona el área de
recepción de este programa regional, seleccione
[DESAC.]. Esta función no está disponible en el
Reino Unido ni en algunas otras zonas.
PTY*
Seleccione un tipo de programa de la lista PTY
para encontrar una emisora que retransmita el
tipo de programa seleccionado.
* Disponible solo durante la recepción FM.
Para recibir anuncios de emergencia
Con la función AF o TA activadas, los anuncios de
emergencia interrumpirán automáticamente la
fuente seleccionada en ese momento.
Escuchar la radio DAB/DAB+
Para escuchar la radio DAB/DAB+, pulse HOME y
toque [DAB+].
Sugerencias
• Ajuste [Potencia de la antena] en [ACTIV.]
(predeterminado) o [DESAC.] en función del tipo de antena
DAB (no suministrada) (página 11).
• Al seleccionar [DAB+] por primera vez después de realizar
un restablecimiento de fábrica, la sintonización
automática empieza automáticamente. Espere a que la
sintonización automática termine. (Si se interrumpe, la
sintonización automática volverá a empezar la próxima
vez que seleccione [DAB+].) Si la sintonización automática
no guarda ninguna emisora DAB, sintonice tocando [Auto
Tune] en (lista).
Controles/indicaciones de recepción
(lista)
Abra la lista de emisoras.
Banda actual
Cambie la banda (DAB1, DAB2 o DAB3).
Nombre de Grupo de estación, nombre de
Estación
(Opciones DAB)
Abra el menú Opciones DAB.
SEEK–/SEEK+
Busque emisoras.
/
Busque grupos de emisoras.
(Disponible solo cuando [Seek by] está ajustado
en [Estación Gp].)
Números de presintonía
Seleccione una emisora presintonizada. Deslice
hacia la derecha/izquierda para mostrar las
demás emisoras presintonizadas.
Mantenga pulsado para guardar la emisora
actual en la presintonía.
Almacenamiento manual
Recepción de emisoras almacenadas

11ES
Antes de esta operación, ajuste [Seek by] en
[Estación Gp] para buscar por grupos de emisoras
(página 11).
1 Toque SEEK+/– para buscar una emisora.
La exploración se detiene cuando la unidad
recibe una emisora. Busque hasta que se reciba
la emisora que desee.
Búsqueda de un grupo de emisoras
Mantenga pulsado / para buscar un grupo de
emisoras y suéltelo cuando aparezca el grupo de
emisoras que desee.
1 Mientras recibe la emisora que desea
almacenar, mantenga pulsado el número de
presintonía que desee.
1 Toque el número de presintonía que desee.
Antes de esta operación, ajuste [Seek by] en [A-Z]
para buscar por nombre de emisora (página 11).
1 Toque .
Aparece la lista de emisoras.
2 Toque la emisora que desee.
Para buscar desde la pantalla de reproducción
Toque SEEK+/– para pasar a la emisora anterior/
siguiente.
Para actualizar la lista de emisoras
Toque y, a continuación, toque [Auto Tune].
Uso de las funciones de
Opciones DAB
Las siguientes funciones están disponibles tocando
.
Seek by
Define el modo de búsqueda de emisoras: [A-Z]
(buscar por nombre de emisora), [Estación Gp]
(buscar por grupo de emisoras).
Announce
Permite los anuncios DAB interrumpiendo la
fuente seleccionada actualmente: [ACTIV.],
[DESAC.].
Durante un anuncio DAB, el volumen se ajusta al
nivel definido para TA en RDS (página 10).
Soft Link
Busca y sintoniza el mismo programa o uno
similar automáticamente cuando la señal del
programa actual es demasiado débil para
recibirla: [ACTIV.], [DESAC.].
“Hard Link” sigue el mismo programa y “Soft
Link” busca un programa similar.
Información
Muestra el nombre del grupo de emisoras
seleccionado actualmente, el nombre de la
emisora, el tipo de PTY de la emisora, etc.
Potencia de la antena
Proporciona alimentación al terminal de entrada
de antena DAB: [ACTIV.], [DESAC.].
Búsqueda de emisora por grupo de
emisoras
Almacenamiento manual de una
emisora
Recepción de emisoras almacenadas
Búsqueda de emisora por nombre
Soft Link
DAB FM
Hard
Link
Soft
Link
Hard
Link
Soft
Link
DESAC. – –
ACTIV.

12ES
Reproducción de un dispositivo
USB
Se pueden utilizar dispositivos USB de tipo MSC
(Mass Storage Class)* que cumplan con la norma
USB.
* Por ejemplo, una unidad flash USB, un reproductor
multimedia digital
Notas
• Pueden utilizarse los dispositivos USB formateados con los
sistemas de archivos FAT12/16/32/exFAT.
• Para obtener más información sobre la compatibilidad de
su dispositivo USB, visite el sitio web de asistencia de la
contraportada.
• Para obtener más información sobre los formatos de
archivo admitidos, consulte “Formatos admitidos para la
reproducción USB” (página 19).
1 Baje el volumen de la unidad.
2 Conecte el dispositivo USB al puerto USB.
3 Pulse HOME y, a continuación, toque [USB].
Se inicia la reproducción.
Para expulsar el dispositivo
Apague la unidad o sitúe el contacto en la posición
de desactivación de ACC y, después, retire el
dispositivo USB.
Reproducción de un dispositivo
BLUETOOTH
Puede reproducir contenido en un dispositivo
conectado compatible con BLUETOOTH A2DP
(Advanced Audio Distribution Profile).
1 Establezca la conexión mediante
BLUETOOTH con el dispositivo de audio
(página 7).
2 Pulse HOME y, a continuación, toque
[Audio BT].
3 Accione el dispositivo de audio para iniciar
la reproducción.
Notas
• En función del dispositivo de audio, puede que en esta
unidad no se muestren datos como título, número/
duración de la pista y estado de la reproducción.
• No se detendrá la reproducción en el dispositivo de audio
aunque se cambie la fuente de esta unidad.
• El emparejamiento con BLUETOOTH no es posible cuando
Apple CarPlay esté en ejecución.
Cómo ajustar el nivel de volumen del
dispositivo BLUETOOTH al de otras fuentes
Puede reducir las diferencias de nivel de volumen
entre esta unidad y el dispositivo BLUETOOTH:
Durante la reproducción, toque y, a
continuación, ajuste [Nivel de entrada]. Ajuste el
nivel de volumen a entre [-6] y [+6].
Búsqueda y reproducción de
pistas
1 Durante la reproducción, toque (repetir)
o (aleatoria) varias veces hasta que
aparezca el modo de reproducción deseado.
Puede que tarde en iniciarse la reproducción en
el modo de reproducción seleccionado.
Los modos de reproducción disponibles varían en
función de la fuente de sonido seleccionada y el
dispositivo conectado.
1 Durante la reproducción de USB, toque .
Aparece la pantalla de lista del elemento que se
reproduce en esos momentos.
Además, puede tocar (audio) o (vídeo)
para ver la lista ordenada por tipo de archivo.
2 Toque el elemento que desee.
Se inicia la reproducción.
Reproducción
Reproducción aleatoria y repetición
Búsqueda de un archivo desde la
pantalla de lista

13ES
Ajustes adicionales durante la
reproducción
Cada fuente dispone de ajustes adicionales, que
pueden verse tocando . Las opciones
disponibles varían en función de la fuente.
Picture EQ
Ajusta la calidad de imagen en función de sus
preferencias: [Dinámica], [Estándar], [Teatro] o
[Personal].
(Solo está disponible si el freno de mano está
accionado y se ha seleccionado vídeo USB).
Aspecto
Selecciona la relación de aspecto de la pantalla
de la unidad.
(Solo está disponible si el freno de mano está
accionado y se ha seleccionado vídeo USB).
Normal
Muestra una imagen 4:3 en su tamaño original,
con barras en los lados para llenar la pantalla de
16:9.
Zoom
Muestra una imagen 16:9 que se ha convertido al
formato 4:3.
Completa
Muestra una imagen 16:9 en su tamaño original.
Subtítulos
Amplía la imagen horizontalmente, dejando
espacio para los subtítulos en la pantalla.
Para usar un teléfono móvil, conéctelo a esta
unidad. Para obtener información detallada,
consulte “Preparación del dispositivo BLUETOOTH”
(página 7).
Nota
Las funciones manos libres explicadas a continuación solo
están disponibles cuando la función Apple CarPlay está
desactivada. Si está activada la función Apple CarPlay,
utilice la función manos libres de su aplicación.
Recepción de llamadas
1 Toque cuando reciba una llamada.
La llamada telefónica se inicia.
Nota
El timbre y la voz de la persona que habla se emiten
únicamente desde los altavoces delanteros.
Para rechazar/finalizar una llamada
Toque .
Realización de llamadas
1 Pulse HOME y, a continuación, toque
[Teléfono].
2 Toque uno de los iconos de llamada de la
pantalla del teléfono BLUETOOTH.
(historial de llamadas)*
Seleccione un contacto de la lista del
historial de llamadas. La unidad almacena
las 20 últimas llamadas.
(rellamada)
Llama de forma automática al último
contacto realizado.
Llamadas manos libres

14ES
(agenda)*
Seleccione un contacto de la lista de
nombres/lista de números de la agenda.
Para buscar el contacto deseado por orden
alfabético en la lista de nombres, toque .
(introducción de número de teléfono)
Introduzca el número de teléfono.
Lista de números de teléfono predefinidos
Seleccione el contacto almacenado.
Para almacenar el contacto, consulte “Cómo
establecer números de teléfono
predefinidos” (página 14).
* El teléfono móvil debe ser compatible con PBAP
(Phone Book Access Profile).
3 Toque .
La llamada telefónica se inicia.
Puede almacenar hasta 6 contactos en la lista
predefinida.
1 En la pantalla del teléfono, seleccione un
número de teléfono que desee guardar en
la marcación predefinida desde la agenda.
Aparece la pantalla de confirmación.
2 Toque [Agregar a predefinida].
3 Seleccione la lista de números de teléfono
predefinidos donde desea almacenar el
número de teléfono.
El contacto se almacena en la lista de números
de teléfono predefinidos.
Operaciones disponibles
durante una llamada
Para ajustar el volumen del timbre
Gire el dial de control de volumen mientras recibe
una llamada.
Para ajustar el volumen de voz de la persona
que habla
Gire el dial de control de volumen durante una
llamada.
Para ajustar el volumen del otro interlocutor
(ajuste de ganancia de micrófono)
Durante una llamada con el sistema de manos
libres, toque y, a continuación, establezca
[Sens. Micrófono] como [Alto], [Medio] o [Bajo].
Para reducir el eco y el ruido (modo anulador
de eco/ruido)
Durante una llamada, toque y, a continuación,
establezca [Calidad de la voz] como [Modo 1] o
[Modo 2].
Para cambiar entre el modo de manos libres y
el modo manual
Durante una llamada, toque para
cambiar el audio de la llamada de teléfono entre la
unidad y el teléfono móvil.
Nota
En función del teléfono móvil, es posible que esta función
no esté disponible.
Para responder de forma automática una
llamada entrante
Toque y, a continuación, establezca
[Resp. automática] en [ACTIV.].
Cómo establecer números de teléfono
predefinidos

15ES
Apple CarPlay
Apple CarPlay le permite usar su iPhone en el
vehículo sin desviar en ningún momento la
atención de la carretera.
Notas sobre la utilización de Apple CarPlay
•Es necesario usar un iPhone con iOS 7.1 o
posterior. Instale la última versión iOS antes de
usar esta función.
•Apple CarPlay puede utilizarse en un iPhone 5 o
modelos posteriores.
• Para obtener más información sobre los modelos
compatibles, consulte la lista de compatibilidad
en el sitio de asistencia que aparece en la
contraportada.
• Para obtener más información sobre Apple
CarPlay, consulte el manual suministrado con el
iPhone o visite el sitio web de Apple CarPlay.
•Como se utiliza el GPS de su iPhone, coloque el
iPhone en un sitio donde pueda recibir fácilmente
una señal GPS.
1 Conecte su iPhone al puerto USB.
Para conectar un iPhone, use un cable de
conexión USB para iPhone (no suministrado).
2 Pulse HOME y, después, toque el icono de
Apple CarPlay.
La pantalla del iPhone aparece en la pantalla de
la unidad. Toque y controle las aplicaciones.
El uso del logotipo Apple CarPlay significa que la
interfaz de usuario de un vehículo cumple las
normas de rendimiento de Apple. Apple no se hace
responsable por el funcionamiento de este vehículo
o su cumplimiento con normas de seguridad y
regulatorias.
Tenga en cuenta que el uso de este producto con
un iPhone puede afectar el rendimiento
inalámbrico.
Uso del control con gestos
Puede realizar las operaciones más frecuentes
deslizando el dedo en la pantalla de recepción/
reproducción.
Nota
Los gestos que se explican a continuación no pueden
utilizarse en la pantalla de Apple CarPlay.
Funciones útiles
Haga esto Para
Deslizar de
izquierda a derecha
Recepción de radio:
búsqueda de emisoras hacia
delante.
Reproducción de vídeo/audio:
salto de un archivo/pista hacia
delante.
Deslizar de derecha
a izquierda
Recepción de radio:
búsqueda de emisoras hacia
atrás.
Reproducción de vídeo/audio:
salto de un archivo/pista hacia
atrás.
Deslizar hacia
arriba
Recepción de radio:
recepción de emisoras
almacenadas (hacia delante).
Deslizar hacia abajo
Recepción de radio:
recepción de emisoras
almacenadas (hacia atrás).

16ES
Funcionamiento de los ajustes
básicos
Puede establecer las opciones de las siguientes
categorías de configuración:
Ajustes generales (General), Ajustes de sonido
(Sonido), Ajustes visuales (Visual), Ajustes de
BLUETOOTH (Bluetooth)
1 Pulse HOME y, a continuación, toque
[Ajustes].
2 Toque una de las categorías de ajustes.
Las opciones que se pueden establecer son
diferentes en función de la fuente y los ajustes.
3 Mueva la barra de desplazamiento hacia
arriba o hacia abajo para seleccionar la
opción deseada.
Para volver a la pantalla anterior
Toque .
Para volver a la pantalla de reproducción
Toque .
Ajustes generales (General)
Idioma
Permite seleccionar el idioma: [English],
[Español], [Français], [Deutsch], [Italiano],
[Português], [], [ ], [ ], [ ],
[] o [].
Demostración
Activa la demostración: [DESAC.], [ACTIV.].
Fecha/Hora
Definir Fecha/Hora
Ajuste de la fecha y la hora del reloj:
[Auto (DAB)], [Manual].
Formato de fecha
Permite seleccionar el formato: [DD/MM/YY],
[MM/DD/YY], [YY/MM/DD].
Formato de hora
Permite seleccionar el formato: [12 horas],
[24 horas].
Pitido
Activa el sonido de funcionamiento: [DESAC.],
[ACTIV.].
Cámara trasera
Selecciona la imagen de la cámara de
visualización posterior: [DESAC.], [Normal],
[Reversa] (imagen de espejo).
[Ajuste de líneas de guía] ajusta la guía en la
imagen de la cámara de visualización posterior.
Toque el lado más próximo
o el lado más lejano (partes
rojas) de la guía para ajustarla.
Toque /// para
ajustar la posición de la guía y
toque [ ] o [ ] para ajustar el ancho de la
guía.
Ctrl. en el volante
Selecciona el modo de entrada del control
remoto conectado. Para evitar que se produzca
una avería, compruebe que el modo de entrada
coincida con el del control remoto conectado
antes de su uso.
Personal
Modo de entrada para el control remoto del
volante (siga los pasos de [ ] para registrar
funciones en el control remoto conectado).
Predefinida
Modo de entrada del control remoto con cable
excluyendo el control remoto del volante.
Aparece el panel de botones del volante.
Mantenga pulsado el botón que desee
asignar al volante.
El botón del panel se enciende (espera).
Mantenga pulsado el botón del volante al que
desee asignar la función.
El botón del panel cambiará de color
(aparecerá resaltado o con un círculo naranja
a su alrededor).
Para registrar otras funciones, repita los pasos
y .
(Solamente está disponible cuando [Ctrl. en el
volante] está ajustado en [Personal]).
Notas
• Mientras realiza ajustes, no debe usar el control remoto
conectado aunque ya haya registrado algunas
funciones. Utilice los botones de la unidad.
• Si se produce un error durante el registro, toda la
información registrada se borra. Reinicie el registro
desde el principio.
• Esta función puede no estar disponible en algunos
vehículos. Para obtener información detallada sobre la
compatibilidad de su vehículo, visite el sitio web de
asistencia de la contraportada.
Restablecimiento de fábrica
Restaura todos los ajustes de fábrica.
Versión de sistema
Actualiza y confirma la versión del firmware.
Fuente para abrir licencias
Muestra las licencias de software.
Ajustes

17ES
Ajustes de sonido (Sonido)
EXTRA BASS
Refuerza el sonido de los graves en
sincronización con el nivel de volumen: [DESAC.],
[1], [2].
EQ10/Altav. grav.
Selecciona una curva del ecualizador y ajusta el
nivel del potenciador de graves.
EQ10
Selecciona la curva del ecualizador: [DESAC.],
[R&B], [Rock], [Pop], [Hip-Hop], [Dance], [EDM],
[Jazz], [Soul], [Country], [Personal].
[Personal] ajusta la curva del ecualizador: de
–6 a +6.
Altav. grav.
Ajusta el nivel de volumen del potenciador de
graves: [DESAC.], de –10 a +10.
Balance/Equilibrio
Ajusta el nivel de balance/equilibrio.
Balance
Ajusta el equilibrio del sonido entre los altavoces
izquierdo y derecho: de [I15] a [D15].
Equilibrio
Ajusta el equilibrio del sonido entre los altavoces
frontal y posterior: de [Delantero 15] a
[Posterior 15].
Separador
Ajusta la frecuencia de corte y la fase del
potenciador de graves.
Filtro de paso alto
Selecciona la frecuencia de corte de los altavoces
frontales/posteriores: [DESAC.], [50Hz], [60Hz],
[80Hz], [100Hz], [120Hz].
Filtro de paso bajo
Selecciona la frecuencia de corte del potenciador
de graves: [DESAC.], [50Hz], [60Hz], [80Hz],
[100Hz], [120Hz].
Fase subgraves
Selecciona la fase del potenciador de graves:
[Normal], [Reversa].
DSO (Dynamic Stage Organizer)
Mejora la salida del audio: [DESAC.], [Bajo],
[Medio], [Alto].
Ajustes visuales (Visual)
Imagen de fondo
Cambia la imagen de fondo tocando el color
deseado.
Atenuador
Atenúa la pantalla: [DESAC.], [Auto], [ACTIV.].
([Auto] solo está disponible si el cable de control
de la iluminación está conectado y funciona
cuando el faro está encendido).
[ ] ajusta el nivel de brillo cuando se activa el
atenuador: de –5 a +5.
Ajuste del panel táctil
Ajusta la calibración del panel táctil si la posición
del contacto no se corresponde con el elemento
correcto.
Ajustes de BLUETOOTH
(Bluetooth)
Conexión Bluetooth
Activa la señal BLUETOOTH: [DESAC.], [ACTIV.],
[Conectar] (entra en el modo de espera de
emparejamiento).
Información dispos. BT
Muestra información sobre el dispositivo
conectado a la unidad.
(Disponible solo cuando la opción [Conexión
Bluetooth] está ajustada en [ACTIV.] y hay un
dispositivo BLUETOOTH conectado a la unidad).
Restablecer Bluetooth
Inicializa todos los ajustes relacionados con
BLUETOOTH, como la información de
emparejamiento, el historial de llamadas, el
historial de dispositivos BLUETOOTH conectados,
etc.

18ES
Actualización del firmware
Para actualizar el firmware, visite el sitio de
asistencia que aparece en la contraportada y siga
las instrucciones mostradas.
Nota
No extraiga el dispositivo USB durante la actualización.
Precauciones
• La antena motorizada se extiende
automáticamente.
•En caso de cesión de la titularidad o retirada de la
circulación del vehículo con la unidad instalada,
restaure los ajustes de fábrica mediante la
operación de restablecimiento de los valores de
fábrica (página 16).
•No derrame líquidos sobre la unidad.
Notas sobre seguridad
• Cumpla las normas, leyes y normativas de tráfico
locales.
•Durante la conducción
– No observe ni manipule la unidad, ya que puede
ser motivo de distracción y causar un accidente.
Estacione el vehículo en un lugar seguro para
observar o manipular la unidad.
– No utilice la función de configuración ni ninguna
otra función que pudiera desviar su atención de
la carretera.
– Cuando conduzca marcha atrás, asegúrese de
mirar atrás y de observar los alrededores
cuidadosamente para su seguridad incluso si la
cámara de visualización posterior está
conectada. No confíe exclusivamente en la
cámara de visualización posterior.
•Durante el funcionamiento de la unidad
– No introduzca manos, dedos ni ningún objeto
extraño en la unidad, ya que podría causar
desperfectos o daños a la misma.
– Mantenga los elementos pequeños fuera del
alcance de los niños.
– Abróchese los cinturones de seguridad para
evitar lesiones en caso de movimiento brusco
del vehículo.
Notas sobre el panel LCD
• No moje el panel LCD ni lo exponga a líquidos. Si
lo hace, puede provocar una avería.
•No ejerza presión sobre el panel LCD porque, si lo
hace, puede distorsionar la imagen o causar una
avería (por ejemplo, la imagen podría volverse
borrosa o el panel LCD podría resultar dañado).
•No toque el panel con objetos, sino únicamente
con los dedos, ya que podría dañar o romper el
panel LCD.
•Limpie el panel LCD con un paño suave y seco. No
utilice disolventes como bencina, diluyentes,
productos de limpieza disponibles en el mercado
ni aerosoles antiestáticos.
•No utilice la unidad fuera del rango de
temperaturas siguiente: 0 ºC – 40 ºC.
•Si su vehículo está estacionado en un lugar frío o
cálido, es posible que la imagen no sea nítida. Sin
embargo, el monitor no está dañado y la imagen
volverá a ser nítida cuando la temperatura de su
vehículo vuelva a ser normal.
•Es posible que aparezcan algunos puntos
estáticos de color azul, rojo o verde en el monitor.
Estos puntos se denominan “puntos brillantes” y
pueden aparecer en cualquier LCD. El panel LCD se
fabrica con precisión, con más del 99,99% de sus
segmentos operativos. No obstante, es posible
que un pequeño porcentaje (habitualmente, el
0,01%) de segmentos no se pueda iluminar
correctamente. Sin embargo, esto no interferirá en
la visualización.
Información adicional
Prevención de accidentes
Las imágenes solamente aparecen cuando el
vehículo está estacionado y con el freno de
mano puesto.
Si el vehículo comienza a moverse durante la
reproducción de vídeo, se muestra la siguiente
advertencia y no se puede ver el vídeo.
[Video bloqueado para su seguridad.]
No manipule la unidad ni observe el monitor
mientras conduzca.

19ES
Notas sobre el panel táctil
•Esta unidad utiliza un panel táctil resistivo. Toque
el panel directamente con la yema del dedo.
• Esta unidad no admite la acción multitáctil.
•No toque el panel con objetos punzantes como
una aguja, un bolígrafo o una uña. Esta unidad no
admite el lápiz táctil.
•No permita que ningún objeto toque el panel
táctil. Si un objeto que no sea la yema del dedo
toca el panel, la unidad puede no responder
correctamente.
•Puesto que se utiliza vidrio para la elaboración del
panel, no lo someta a golpes fuertes. Si el panel se
agrieta o astilla, no toque la zona dañada ya que
puede causar lesiones.
•Mantenga los otros dispositivos eléctricos
apartados del panel táctil. Pueden provocar que el
panel táctil no funcione correctamente.
WMA (.wma)*
1
*
2
Velocidad de bits: de 48 kbps – 192 kbps (admite
la velocidad de bits variable (VBR))*
3
Frecuencia de muestreo*
4
: 44,1 kHz
MP3 (.mp3)*
1
*
2
Velocidad de bits: de 48 kbps – 320 kbps (admite
la velocidad de bits variable (VBR))*
3
Frecuencia de muestreo*
4
: 32 kHz, 44,1 kHz,
48 kHz
AAC (.m4a)*
1
*
2
Velocidad de bits: de 40 kbps – 320 kbps (admite
la velocidad de bits variable (VBR))*
3
Frecuencia de muestreo*
4
: 8 kHz – 48 kHz
Bits por muestra (bit de cuantización): 16 bits
FLAC (.flac)*
1
*
6
Frecuencia de muestreo*
4
: 8 kHz – 48 kHz
Bits por muestra (bit de cuantización): 16 bits
WAV (.wav)*
1
Frecuencia de muestreo*
4
: 8 kHz – 48 kHz
Bits por muestra (bit de cuantización): 16 bits,
24 bits
Xvid (.avi)
Códec de vídeo: perfil simple avanzado de
MPEG-4
Códec de audio: MP3 (MPEG-1 Layer3)
Velocidad de bits: máx. 4 Mbps
Velocidad de fotogramas: máx. 30 fps (30p/60i)
Resolución: máx. 1280 × 720*
5
MPEG-4 (.mp4)
Códec de vídeo: perfil simple avanzado de
MPEG-4, perfil línea de referencia AVC
Códec de audio: AAC
Velocidad de bits: máx. 4 Mbps
Velocidad de fotogramas: máx. 30 fps (30p/60i)
Resolución: máx. 1280 × 720*
5
WMV (.wmv, .avi)*
1
Códec de vídeo: WMV3, WVC1
Códec de audio: MP3, WMA
Velocidad de bits: máx. 6 Mbps
Velocidad de fotogramas: máx. 30 fps
Resolución: máx. 720 × 480*
5
MKV (.mkv)
Códec de vídeo: perfil simple avanzado de
MPEG-4, perfil línea de referencia AVC
Códec de audio: MP3, AAC
Velocidad de bits: máx. 5 Mbps
Velocidad de fotogramas: máx. 30 fps
Resolución: máx. 1280 × 720*
5
*1 No pueden reproducirse los archivos con protección de
copyright ni los archivos de audio multicanal.
*2 No pueden reproducirse los archivos DRM (Digital Rights
Management).
*3 Las velocidades de bits no estándar o no garantizadas se
incluyen en función de la frecuencia de muestreo.
*4 La frecuencia de muestreo no siempre coincide con
todos los codificadores.
*5 Estas cifras indican la resolución máxima del vídeo
reproducible, pero no hacen referencia a la resolución de
la pantalla del reproductor. La resolución de la pantalla
es de 800 × 480.
*6 No se admite la visualización de la información de la
etiqueta.
Nota
Es posible que algunos archivos no puedan reproducirse
aunque estén en un formato admitido por la unidad.
Formatos admitidos para la
reproducción USB

20ES
• Para obtener información detallada sobre los modelos de
iPhone compatibles, visite el sitio web de asistencia de la
contraportada.
• El uso de la insignia Made for Apple significa que un
accesorio ha sido diseñado para conectarse
específicamente al producto o a los productos Apple
identificados en la insignia, y ha sido certificado por el
fabricante de que cumple las normas de rendimiento de
Apple. Apple no se hace responsable por el
funcionamiento de este dispositivo o su cumplimiento con
normas de seguridad y regulatorias.
Tenga en cuenta que el uso de este accesorio con un
producto Apple puede afectar el rendimiento inalámbrico.
Este producto contiene software que Sony utiliza en virtud
de un acuerdo de licencia con el titular del copyright.
Tenemos la obligación de comunicar el contenido del
acuerdo a los clientes por mandato del titular del copyright
del software.
Para obtener más información sobre las licencias del
software, consulte la página 16.
Aviso sobre software sujeto a licencias GPL/LGPL de
GNU
Este producto contiene software que está sujeto a la
siguiente Licencia Pública General de GNU (en adelante
“GPL”) o Licencia Pública General Limitada de GNU (“LGPL”).
Dichas licencias establecen que los clientes tienen el
derecho de adquirir, modificar y redistribuir el código fuente
del software, de conformidad con las condiciones de la GPL
o la LGPL mostradas en esta unidad.
El código fuente del software indicado arriba está
disponible en Internet.
Para descargarlo, acceda a la URL siguiente y, después,
seleccione el nombre de modelo “XAV-AX1005DB”.
URL: http://www.sony.net/Products/Linux/
Sony no puede responder a consultas relacionadas con el
contenido del código fuente.
Si desea realizar alguna consulta o solucionar algún
problema relativo a la unidad que no se trate en este
Manual de instrucciones, póngase en contacto con su
distribuidor Sony más cercano.
Especificaciones
Sección del monitor
Tipo de pantalla: monitor a color LCD panorámico
Dimensiones: 6,2 pulgadas
Sistema: matriz TFT activa
Número de píxeles:
1.152.000 píxeles (800 × 3 (RGB) × 480)
Sistema de color:
Selección automática de PAL/NTSC para el
terminal CAMERA IN
Sección del sintonizador
DAB/DAB+
Rango de sintonización:
174,928 MHz – 239,200 MHz
Terminal de antena:
Conector de antena externa
FM
Rango de sintonización: 87,5 MHz – 108,0 MHz
Sensibilidad útil: 7 dBf
Relación señal-ruido: 70 dB (mono)
Separación a 1 kHz: 45 dB
AM
Rango de sintonización: 531 kHz – 1.602 kHz
Sensibilidad: 32 µV
Sección del reproductor USB
Interfaz: USB (alta velocidad)
Corriente máxima: 1,5 A
Comunicación inalámbrica
Sistema de comunicación:
Estándar BLUETOOTH, versión 3.0
Salida:
Estándar BLUETOOTH, Clase 2 de potencia
(Máx. potencia conducida +1 dBm)
Rango de comunicación máximo*
1
:
Línea de visión de 10 m aproximadamente
Banda de frecuencia:
Banda de 2,4 GHz (2,4000 GHz – 2,4835 GHz)
Método de modulación: FHSS
Perfiles BLUETOOTH compatibles*
2
:
A2DP (Advanced Audio Distribution Profile) 1.3
AVRCP (Audio Video Remote Control Profile) 1.3
HFP (Handsfree Profile) 1.6
PBAP (Phone Book Access Profile) 1.1
Códec correspondiente: SBC, AAC
*1 El rango real varía en función de factores como
obstáculos entre dispositivos, campos magnéticos en
torno a un horno microondas, electricidad estática,
sensibilidad de recepción, rendimiento de la antena,
sistema operativo, aplicación de software, etc.
*2 Los perfiles del estándar BLUETOOTH indican la finalidad
de la comunicación mediante BLUETOOTH entre
dispositivos.
Acerca del iPhone
Aviso sobre la licencia

21ES
Sección del amplificador de potencia
Salidas: salidas de altavoz
Impedancia de altavoz: 4 – 8
Salida de potencia máxima: 55 W × 4 (a 4 )
General
Requisitos de alimentación: batería para vehículo
de 12 V CC (masa negativa)
Consumo de corriente nominal: 10 A
Dimensiones:
aprox. 178 mm × 100 mm × 141 mm (an./al./pr.)
Dimensiones de montaje:
aprox. 182 mm × 111 mm × 121 mm (an./al./pr.)
Peso: aprox. 0,9 kg
Contenidos del paquete:
Unidad principal (1)
Componentes de instalación y conexiones
(1 juego)
Micrófono (1)
Para obtener información detallada, consulte al
distribuidor.
El diseño y las especificaciones pueden variar sin
previo aviso.
La marca y los logotipos Bluetooth® son marcas comerciales
registradas propiedad de Bluetooth SIG, Inc. y Sony
Corporation dispone de la licencia correspondiente para
utilizar dichas marcas. Las otras marcas comerciales y
nombres de marcas pertenecen a sus respectivos
propietarios.
Windows Media es una marca comercial o marca comercial
registrada de Microsoft Corporation en los Estados Unidos y
en otros países.
Este producto está protegido por determinados derechos de
propiedad intelectual de Microsoft Corporation. Queda
prohibido el uso o distribución de esta tecnología fuera de
este producto sin las licencias correspondientes de
Microsoft o una filial autorizada de Microsoft.
Apple, iPhone y Lightning son marcas comerciales de Apple
Inc., registradas en Estados Unidos y otros países.
Apple CarPlay es una marca comercial de Apple Inc.
IOS es una marca comercial o marca comercial registrada de
Cisco en los EE. UU. y en otros países y se utiliza con licencia.
ESTE PRODUCTO HA SIDO CONCEDIDO BAJO LICENCIA DE
ACUERDO CON EL CONTRATO DE LICENCIA DE CARTERA DE
PATENTES MPEG-4 VISUAL, PARA EL USO PERSONAL CON
FINES NO COMERCIALES POR PARTE DE UN CONSUMIDOR
PARA LA DESCODIFICACIÓN DE VÍDEOS EN CUMPLIMIENTO
DEL ESTÁNDAR VISUAL MPEG-4 (“VÍDEO MPEG-4”) QUE
HAYAN SIDO CODIFICADOS POR UN CONSUMIDOR QUE
REALICE UNA ACTIVIDAD PERSONAL CON FINES NO
COMERCIALES Y/O SE HAYA OBTENIDO DE UN PROVEEDOR
DE VÍDEO AL CUAL SE LE HAYA CONCEDIDO UNA LICENCIA
DE MPEG-4, OTORGADA POR MPEG LA.
NO SE CONCEDE LICENCIA ALGUNA PARA NINGÚN OTRO
USO.
PARA OBTENER MÁS INFORMACIÓN, LO QUE INCLUYE LA
INFORMACIÓN RELACIONADA CON LA CONCESIÓN DE
LICENCIAS Y LOS USOS PROMOCIONALES, INTERNOS Y
COMERCIALES, CONSULTE LA PÁGINA WEB DE MPEG LA, LLC.
CONSULTE
HTTP://WWW.MPEGLA.COM
Todas las demás marcas comerciales son marcas
comerciales de sus respectivos propietarios.
Derechos de autor

22ES
Solución de problemas
La siguiente lista de comprobación pretende
facilitar la solución de los problemas que surjan con
la unidad.
Antes de consultar la siguiente lista de
comprobación, verifique los procedimientos de
conexión y de funcionamiento.
Para obtener más información sobre la utilización
del fusible y la extracción de la unidad del
salpicadero, consulte “Conexión/Instalación”
(página 26).
Si el problema no se resuelve, consulte el sitio de
asistencia de la contraportada.
General
La unidad no emite el sonido de pitido.
Se encuentra conectado un amplificador de
potencia opcional y no está usando el
amplificador integrado.
El fusible se fundió.
La unidad hace un ruido al cambiar la posición
del interruptor de la llave de encendido.
Los cables no están bien conectados con el
conector de alimentación auxiliar del vehículo.
Las indicaciones desaparecen o no aparecen en
el monitor.
La función Monitor desactivado está activada
(página 6).
– Toque cualquier punto de la pantalla para
volver a encenderla.
No se pueden seleccionar los elementos del
menú.
Los elementos del menú que no están
disponibles aparecen de color gris.
Las funciones de USB no se ejecutan
correctamente.
No use un cable de extensión USB ya que puede
causar el deterioro de la calidad de la señal.
– Use un cable USB más corto cuando conecte el
dispositivo USB o sustituya el cable USB por
uno nuevo.
No se puede ejecutar la unidad.
Mantenga pulsado HOME durante más de 10
segundos para reiniciar la unidad. Por su
seguridad, no reinicie la unidad mientras
conduce.
Funcionamiento del panel táctil
El panel táctil no reacciona correctamente al
tacto.
Toque una parte del panel táctil cada vez. Si se
tocan dos o más partes de forma simultánea, el
panel táctil no reaccionará correctamente.
Calibre el panel táctil de la pantalla (página 17).
Toque el panel sensible a la presión con fuerza.
No se reconoce la acción multitáctil.
Esta unidad no admite la acción multitáctil.
Recepción de radio
La recepción de radio es débil.
Hay ruido estático.
Conecte bien la antena.
RDS
PTY muestra [PTY no encontrado.].
La emisora actual no es una emisora RDS, o bien
la recepción de radio es débil.
La búsqueda comienza después de unos
segundos de escucha.
La emisora no es TP o tiene una señal débil.
– Desactive TA (página 10).
No se reciben anuncios de tráfico.
Active TA (página 10).
La emisora no emite ninguna notificación de
tráfico a pesar de ser TP.
– Sintonice otra emisora.
Recepción de radio DAB/DAB+
No pueden recibirse emisoras.
Consulte [Sin estación] (página 25) para obtener
más información si no pueden recibirse señales
DAB.
No hay anuncios de tráfico.
Desactive los anuncios DAB (página 11).
– Los anuncios de tráfico no están disponibles si
los anuncios DAB están activados.

23ES
Imagen
No se muestra ninguna imagen o se registran
interferencias de imagen.
La conexión no se ha realizado correctamente.
Compruebe el estado de la conexión entre esta
unidad y otros equipos y ajuste el selector de
entrada del equipo en la fuente correspondiente
a esta unidad.
La instalación no es correcta.
– Instale la unidad en un ángulo inferior a 30° en
una parte firme del vehículo.
El cable de aparcamiento (luz verde) no está
conectado al cable de cambio del freno de mano,
o bien, no se ha aplicado el freno de mano.
La imagen no cabe en la pantalla.
La relación de aspecto viene fijada en la fuente
de reproducción.
Sonido
No se escucha ningún sonido/se producen saltos
de sonido/el sonido se rompe.
La conexión no se ha realizado correctamente.
Compruebe el estado de la conexión entre esta
unidad y el equipo conectado y ajuste el selector
de entrada del equipo en la fuente
correspondiente a esta unidad.
La instalación no es correcta.
– Instale la unidad en un ángulo inferior a 30° en
una parte firme del vehículo.
La unidad está en modo pausa/retroceso/avance
rápido.
Los ajustes para las salidas no se han realizado
correctamente.
El volumen está demasiado bajo.
La función ATT está activada.
El formato no es compatible.
– Compruebe si el formato es compatible con
esta unidad (página 19).
El sonido es defectuoso.
Mantenga los cables eléctricos y los de audio
separados.
Reproducción de USB
No pueden reproducirse los contenidos.
Vuelva a conectar el dispositivo USB.
El dispositivo USB tarda más tiempo en
reproducir contenidos.
El dispositivo USB contiene archivos de gran
tamaño o archivos con una estructura de árbol
complicada.
No se pueden reproducir archivos de audio.
No se admiten dispositivos USB formateados con
sistemas de archivos distintos de FAT12, FAT16,
FAT32 o exFAT.*
* Esta unidad admite FAT12, FAT16, FAT32 y exFAT, pero es
posible que algunos dispositivos USB no los admitan
todos. Para obtener información detallada, consulte el
manual de instrucciones de cada dispositivo USB o
póngase en contacto con el fabricante.
Función BLUETOOTH
El otro dispositivo BLUETOOTH no detecta esta
unidad.
Establezca [Conexión Bluetooth] en [ACTIV.]
(página 17).
Mientras establece la conexión a un dispositivo
BLUETOOTH, ningún otro dispositivo puede
detectar esta unidad. Finalice la conexión actual y
busque esta unidad desde el otro dispositivo.
Dependiendo del teléfono inteligente o el
teléfono móvil, quizás tenga que eliminar esta
unidad del historial del teléfono inteligente o
teléfono móvil conectados y, después, volver a
realizar el emparejamiento (página 7).
No es posible establecer la conexión.
Consulte los procedimientos de emparejamiento
y conexión del manual del otro dispositivo, etc., y
repita la operación.
El nombre del dispositivo detectado no aparece.
Quizá no sea posible obtener el nombre del otro
dispositivo dependiendo de su estado.
El timbre no suena.
Suba el volumen cuando reciba una llamada.
El volumen de la voz de la persona que habla es
demasiado bajo.
Suba el volumen durante la llamada.
La otra persona afirma que el volumen es
demasiado bajo o demasiado alto.
Ajuste el nivel de [Sens. Micrófono] (página 14).

24ES
Se escuchan eco o ruidos durante la llamada.
Baje el volumen.
Establezca [Calidad de la voz] en [Modo 1] o
[Modo 2] (página 14).
Si el ruido ambiente (no el sonido de la llamada)
es elevado, intente reducirlo.
– Cierre la ventana si el ruido de la calle es
elevado.
– Baje la potencia del aire acondicionado si el
ruido del mismo es elevado.
La calidad de sonido del teléfono es deficiente.
La calidad de sonido del teléfono depende de las
condiciones de recepción del teléfono móvil.
– Mueva el coche a un lugar en el que pueda
mejorar la señal del teléfono móvil si la
recepción es deficiente.
El volumen del dispositivo BLUETOOTH
conectado es demasiado bajo o demasiado alto.
El nivel de volumen varía en función del
dispositivo BLUETOOTH.
– Reduzca las diferencias de nivel de volumen
entre esta unidad y el dispositivo BLUETOOTH
(página 12).
El sonido se omite durante la transmisión de
audio o la conexión BLUETOOTH falla.
Reduzca la distancia entre la unidad y el
dispositivo BLUETOOTH.
Si el dispositivo BLUETOOTH está en una funda
que provoca la interrupción de la señal, quite la
funda mientras utiliza el dispositivo.
Se están utilizando varios dispositivos
BLUETOOTH u otros dispositivos (por ejemplo,
radios de radioaficionado) que emiten ondas de
radio en la cercanía.
– Apague los otros dispositivos.
– Aumente la distancia entre la unidad y los otros
dispositivos.
El sonido de la reproducción se detiene de forma
momentánea cuando esta unidad se conecta a
un teléfono móvil. No se trata de un error de
funcionamiento.
No es posible controlar el dispositivo BLUETOOTH
conectado durante la transmisión de audio.
Compruebe que el dispositivo BLUETOOTH
conectado es compatible con AVRCP.
Algunas funciones no están operativas.
Compruebe que el dispositivo que se está
conectando es compatible con las funciones
específicas.
Las llamadas se responden de forma no
intencionada.
El teléfono de la conexión está configurado para
iniciar llamadas automáticamente.
La opción [Resp. automática] de esta unidad está
ajustada en [ACTIV.] (página 14).
Error de emparejamiento por tiempo de espera
superado.
En función del dispositivo que se va a conectar, el
tiempo de espera de emparejamiento puede ser
breve. Pruebe a realizar el emparejamiento en el
tiempo previsto.
Emparejamiento imposible.
Es posible que la unidad no pueda emparejarse
con un dispositivo BLUETOOTH emparejado
previamente después de inicializar la unidad si la
información de emparejamiento de la unidad
está en el dispositivo BLUETOOTH. En este caso,
elimine la información de emparejamiento de la
unidad del dispositivo BLUETOOTH y vuelva a
emparejarlos.
La función BLUETOOTH no se puede utilizar.
Apague el contacto. Espere unos instantes y sitúe
el contacto en la posición ACC.
Los altavoces del vehículo no emiten sonidos
durante una llamada con el sistema de manos
libres.
Si el sonido se emite desde el teléfono móvil,
configure el teléfono para que emita el sonido
desde los altavoces del vehículo.
Apple CarPlay
No aparece el icono de Apple CarPlay en la
pantalla HOME.
Su iPhone no es compatible con Apple CarPlay.
– Consulte la lista de compatibilidad en el sitio de
asistencia que aparece en la contraportada.
Desconecte el iPhone del puerto USB y vuelva a
conectarlo.
Es posible que Apple CarPlay no esté disponible
en su país o región.
Asegúrese de usar un cable Lightning certificado
para conectar el iPhone y la unidad.

25ES
Mensajes
General
No se puede reproducir este contenido.
El contenido seleccionado actualmente no puede
reproducirse o salta al siguiente.
– El formato de archivo del contenido no es
compatible. Consulte los formatos de archivos
admitidos (página 19).
El dispositivo no responde
La unidad no reconoce el dispositivo USB
conectado.
– Vuelva a conectar el dispositivo USB.
– Compruebe si el dispositivo USB es compatible
con la unidad.
No hay datos reproducibles.
El dispositivo USB no contiene datos que puedan
reproducirse.
– Cargue datos/archivos de música en el
dispositivo USB.
Precaución sobrecarga USB
El dispositivo USB está sobrecargado.
– Desconecte el dispositivo USB.
– Indica que el dispositivo USB está fuera de
servicio o bien que se ha conectado un
dispositivo incompatible.
Dispositivo USB no compatible
Para obtener más información sobre la
compatibilidad de su dispositivo USB, visite el
sitio web de asistencia de la contraportada.
Concentrador USB no compatible
Los concentradores USB no son compatibles con
esta unidad.
BLUETOOTH
No se encontró el dispositivo BT.
La unidad no puede detectar un dispositivo
BLUETOOTH conectable.
– Compruebe el ajuste de BLUETOOTH del
dispositivo que se está conectando.
La lista de dispositivos BLUETOOTH registrados
está vacía.
– Realice el emparejamiento con un dispositivo
BLUETOOTH (página 7).
Dispositivo manos libres no está disponible.
No hay ningún teléfono móvil conectado.
– Conecte un teléfono móvil (página 8).
Recepción de radio DAB/DAB+
Sin estación
La señal DAB no puede recibirse.
– Realice una sintonización automática
(página 11).
– Compruebe la conexión de la antena DAB (no
suministrada).
– Compruebe que [Potencia de la antena] esté
ajustado en [ACTIV.] (página 11).
Recepción
La unidad está esperando la recepción de una
emisora DAB.
Si estas soluciones no permiten mejorar la
situación, póngase en contacto con su distribuidor
Sony más cercano.

26ES
Precauciones
•No instale esta unidad en un automóvil que no
disponga de posición ACC. La pantalla de la
unidad no se apaga ni aunque se apague el
contacto, lo que produce la descarga de la batería.
• Dirija todos los cables de masa a un punto de
masa común.
•Evite que los cables queden atrapados bajo un
tornillo o en piezas móviles (p. ej., rieles de
asientos).
•Antes de establecer conexiones, apague el motor
del automóvil para evitar cortocircuitos.
•Conecte el cable de alimentación a la unidad y
los altavoces antes de conectarlo al conector de
alimentación auxiliar.
• Asegúrese de aislar los cables no conectados
sueltos con cinta aislante para mayor seguridad.
•Elija cuidadosamente el lugar de instalación para
que la unidad no interfiera con las operaciones de
conducción normales.
•Evite instalar la unidad en zonas expuestas a
polvo, suciedad, vibración excesiva o
temperaturas elevadas, como la luz solar directa o
cerca de conductos de calefacción.
•Use solo el equipo de montaje suministrado para
realizar una instalación segura.
Nota sobre el cable de alimentación (amarillo)
Al conectar esta unidad junto con otros componentes
estéreo, el valor del amperaje del circuito del vehículo al que
está conectada la unidad debe ser superior a la suma del
valor del amperaje del fusible de cada componente.
Ajuste del ángulo de montaje
Ajuste el ángulo de montaje a menos de 30°.
Lista de piezas para la
instalación
•Esta lista de piezas no incluye todo el contenido
del paquete.
•El soporte está fijado a la unidad al salir de
fábrica. Antes de montar la unidad, utilice las
llaves de liberación para desmontar el soporte
de la unidad. Para obtener más información,
consulte “Extracción del soporte” (página 30).
•Guarde las llaves de liberación para utilizarlas
más adelante, por ejemplo para extraer la unidad
de su vehículo.
Conexión/Instalación
Precauciones
× 4
5 × 8 mm máx.
× 2

27ES
Conexión
*
3
*
3
*
3
Potenciador de graves*
1
Amplificador de potencia*
1
desde un control remoto con cable
(no suministrado)
*4
*
6
*
7
de la antena de un vehículo*
5
Cámara de
visualización
posterior*
1
*
3
Verde claro
A rayas moradas/blancas
Para obtener información
detallada, consulte
“Establecimiento de conexiones”
(página 28).
Consulte “Diagrama de conexión de la
alimentación” (página 29) para obtener
información detallada.
*
2
de la antena DAB (no suministrada)*
8

28ES
*1 No suministrado
*2 Impedancia de altavoz: 4 – 8 × 4
*3 Cable con clavija RCA (no suministrado)
*4 En función del tipo de vehículo, use un adaptador para
un control remoto con cable (no suministrado).
Para obtener información detallada sobre el uso del
control remoto con cable, consulte “Uso del control
remoto con cable” (página 29).
*5 Según el tipo de vehículo, utilice un adaptador (no
suministrado) si el conector de antena no cabe.
*6 Dirija el cable de entrada del micrófono, se esté usando o
no, de manera que no interfiera con las operaciones de
conducción. Fije el cable con una abrazadera, etc., si lo
tiene instalado alrededor de los pies.
*7 Para obtener información detallada sobre la instalación
del micrófono, consulte “Instalación del micrófono”
(página 29).
*8 Ajuste [Potencia de la antena] en [ACTIV.]
(predeterminado) o [DESAC.] en función del tipo de
antena DAB (no suministrada) (página 11). Corriente de
suministro máxima 0,1 A
Si tiene una antena motorizada sin caja de relés, la
conexión de esta unidad con el cable de conexión
de alimentación suministrado puede dañar la
antena.
Al conector del altavoz del vehículo
Al conector de alimentación del vehículo
Al cable de cambio del freno de mano
La posición de montaje del cable de cambio del
freno de mano es diferente en cada vehículo.
Asegúrese de conectar el cable del freno de
mano (verde claro) del cable de conexión de la
fuente de alimentación al cable de cambio
del freno de estacionamiento.
Al terminal de alimentación de +12 V del faro
posterior del vehículo (solo si está conectada
la cámara de visualización posterior)
Conexión del soporte de la memoria
Si el cable de alimentación amarillo está conectado,
siempre se suministrará alimentación eléctrica al
circuito de memoria aunque esté apagado el
interruptor de la llave de encendido.
Conexión del altavoz
• Antes de conectar los altavoces, apague la
unidad.
• Use los altavoces con una impedancia de 4 a
8 y con las capacidades de administración de la
alimentación adecuadas para evitar que se
produzcan daños.
Establecimiento de conexiones
1
Altavoz posterior
(derecho)
Morado
2
A rayas moradas/
negras
3
Altavoz frontal
(derecho)
Gris
4
A rayas grises/
negras
5
Altavoz frontal
(izquierdo)
Blanco
6
A rayas blancas/
negras
7
Altavoz posterior
(izquierdo)
Verde
8
A rayas verdes/
negras
12
Fuente de alimentación
continua
Amarillo
13
Control de la antena
motorizada/
amplificador de
potencia (REM OUT)
A rayas azules/
blancas
14
Fuente de alimentación
de la iluminación
conmutada
A rayas naranjas/
blancas
15
Fuente de alimentación
conmutada
Rojo
16 Masa Negro
Cable de cambio del freno de mano
Tipo de freno manual Tipo de freno de pie

29ES
Compruebe el conector de alimentación auxiliar de
su vehículo y conecte los cables correctamente en
función del vehículo.
Conexión común
Posiciones de los cables rojo y amarillo
invertidas
Para los vehículos sin posición ACC
Después de establecer las conexiones y cambiar los
cables de alimentación correctamente, conecte la
unidad a la fuente de alimentación del vehículo. Si
desea realizar alguna consulta o solucionar algún
problema relativo a la unidad que no se trate en
este Manual de instrucciones, póngase en contacto
con el concesionario de vehículos.
Para capturar su voz durante las llamadas con el
sistema de manos libres, debe instalar el micrófono
.
Precauciones
• Es extremadamente peligroso que el cable se
enrolle alrededor de la columna de dirección o la
palanca de cambios. Asegúrese de colocar tanto
el cable como el resto de piezas de manera que no
interfieran con sus operaciones de conducción.
• Si tiene airbags u otros equipos para la absorción
de impactos instalados en su vehículo, póngase
en contacto con la tienda en la que adquirió esta
unidad o con el concesionario de vehículos antes
de realizar la instalación.
Nota
Antes de colocar la cinta adhesiva de doble cara , limpie la
superficie del salpicadero con un paño seco.
1 Para habilitar el control remoto con cable,
establezca [Ctrl. en el volante] en [General]
como [Predefinida] (página 16).
Es necesario instalar la cámara de visualización
posterior (no suministrada) antes de utilizarla.
Se muestra la imagen de la cámara de visualización
posterior conectada al terminal CAMERA IN en las
siguientes situaciones:
Al encender el faro trasero (o ajustar la palanca
de cambios en la posición R (marcha atrás)).
Al pulsar HOME y, después, tocar [Cám. poster.].
Diagrama de conexión de la
alimentación
12
Fuente de alimentación
continua
Amarillo
15
Fuente de alimentación
conmutada
Rojo
12
Fuente de alimentación
conmutada
Amarillo
15
Fuente de alimentación
continua
Rojo
Conector de alimentación
auxiliar
Rojo Rojo
Amarillo Amarillo
Rojo Rojo
Amarillo Amarillo
Rojo
Rojo
Amarillo Amarillo
Instalación del micrófono
Uso del control remoto con cable
Uso de la cámara de visualización
posterior
Clip (no suministrado)

30ES
Instalación
Antes de instalar la unidad, retire el soporte de la
unidad.
1 Inserte las dos llaves de liberación hasta
que hagan clic, tire del soporte hacia
abajo y, a continuación, tire de la unidad
hacia arriba para separarlos.
•Antes de la instalación, asegúrese de que los
pasadores situados a ambos lados del soporte
estén doblados hacia dentro 3,5 mm.
•En el caso de los vehículos japoneses, consulte
“Montaje de la unidad en un coche japonés”
(página 30).
1 Coloque el soporte dentro del
salpicadero y, a continuación, doble los
ganchos hacia fuera para que queden bien
ajustados.
2 Monte la unidad en el soporte .
Notas
• Si los pasadores están rectos o doblados hacia fuera, la
unidad no se instalará con seguridad y puede salirse hacia
fuera.
• Asegúrese de que los 4 pasadores del reborde de
protección estén correctamente engranados en las
ranuras del soporte .
Montaje de la unidad en un coche
japonés
Es posible que no pueda instalar esta unidad en
algunos coches japoneses. En ese caso, consulte a
su distribuidor de Sony.
Cuando monte esta unidad en los soportes
preinstalados de su vehículo, use los tornillos
suministrados en los orificios para tornillos
adecuados en función del vehículo:
T para TOYOTA y N para NISSAN.
Nota
Para evitar que se produzca una avería, use solo los tornillos
suministrados para realizar la instalación .
Extracción del soporte
Montaje de la unidad en el salpicadero
Oriente el gancho hacia dentro.
Pasador
Longitud superior
a 182 mm
Longitud
superior a
111 mm
Al salpicadero/la consola central
Piezas
suministradas con
su vehículo
Soporte
Soporte

31ES
Cuando sustituya el fusible,
asegúrese de usar uno que
coincida con el valor del amperaje
indicado en el fusible original.
Si se funde el fusible, compruebe la
conexión de la alimentación y
sustituya el fusible.
Si se vuelve a fundir el fusible después de
sustituirlo, puede que haya una avería interna. En
ese caso, consulte al distribuidor Sony más cercano.
Sustitución del fusible
Fusible (10 A)


, Sony Corporation ,
2014/53/EU.
:
http://www.compliance.sony.de/
Sony Corporation ovime izjavljuje da je ova oprema
u skladu s Direktivom 2014/53/EU.
Cjeloviti tekst EU izjave o sukladnosti dostupan je
na sljedećoj internetskoj adresi:
http://www.compliance.sony.de/
Sony Corporation tímto prohlašuje, že toto zařízení
je v souladu se směrnicí 2014/53/EU.
Úplné znění EU prohlášení o shodě je k dispozici na
této internetové adrese:
http://www.compliance.sony.de/
Herved erklærer Sony Corporation, at dette udstyr
er i overensstemmelse med direktiv 2014/53/EU.
Den fulde ordlyd af EU-
overensstemmelseserklæringen er tilgængelig på
følgende internetadresse:
http://www.compliance.sony.de/
Hierbij verklaart Sony Corporation dat deze
radioapparatuur conform is met Richtlijn 2014/53/EU.
De volledige tekst van de EU-
conformiteitsverklaring kan worden geraadpleegd
op het volgende internetadres:
http://www.compliance.sony.de/
Hereby, Sony Corporation declares that this equipment
is in compliance with Directive 2014/53/EU.
The full text of the EU declaration of conformity is
available at the following internet address:
http://www.compliance.sony.de/
Käesolevaga deklareerib Sony Corporation, et
käesolev seade vastab direktiivi 2014/53/EL nõuetele.
ELi vastavusdeklaratsiooni täielik tekst on
kättesaadav järgmisel internetiaadressil:
http://www.compliance.sony.de/
Sony Corporation vakuuttaa, että tämä laite on
direktiivin 2014/53/EU mukainen.
EU-vaatimustenmukaisuusvakuutuksen
täysimittainen teksti on saatavilla seuraavassa
internetosoitteessa:
http://www.compliance.sony.de/
Le soussigné, Sony Corporation, déclare que cet
équipement est conforme à la Directive 2014/53/
UE.
Le texte complet de la déclaration UE de conformité
est disponible à l’adresse internet suivante :
http://www.compliance.sony.de/
Hiermit erklärt Sony Corporation, dass diese
Funkanlage der Richtlinie 2014/53/EU entspricht.
Der vollständige Text der EU-Konformitätserklärung
ist unter der folgenden Internetadresse verfügbar:
http://www.compliance.sony.de/
Με την παρούσα Sony Corporation δηλώνει ότι,
αυτή η συσκευή πληροί τους όρους της οδηγίας
2014/53/EU.
Το πλήρες κείενο της δήλωσης συόρφωσης ΕΕ
διατίθεται στην ακόλουθη ιστοσελίδα στο
διαδίκτυο:
http://www.compliance.sony.de/
A Sony Corporation igazolja, hogy ez a készülék
megfelel a 2014/53/EU irányelvnek.
Az EU-megfelelőségi nyilatkozat teljes szövege
elérhető a következő internetes címen:
http://www.compliance.sony.de/
Con la presente, Sony Corporation dichiara che
questo apparecchio è conforme alla Direttiva 2014/
53/UE.
Il testo completo della dichiarazione di conformità
UE è disponibile al seguente indirizzo Internet:
http://www.compliance.sony.de/
Ar šo Sony Corporation deklarē, ka šī iekārta atbilst
direktīvai 2014/53/ES.
Pilns ES atbilstības deklarācijas teksts ir pieejams
šādā interneta vietnē:
http://www.compliance.sony.de/
Български
Hrvatski
Česky
Dansk
Nederlands
English
Eesti keel
Suomi
Français
Deutsch
Ελληνικά
Magyar
Italiano
Latviešu

Mes, Sony Corporation, patvirtiname, kad šis
įrenginys atitinka direktyvą 2014/53/ES.
Visas ES atitikties deklaracijos tekstas pasiekiamas
šiuo internetiniu adresu:
http://www.compliance.sony.de/
Herved erklærer Sony Corporation at utstyrstypen
er i samsvar med direktiv 2014/53/EU.
EU-erklæring fulltekst finner du på Internett under:
http://www.compliance.sony.de/
Sony Corporation niniejszym oświadcza, że to
urządzenie jest zgodne z dyrektywą 2014/53/UE.
Pełny tekst deklaracji zgodności UE jest dostępny
pod następującym adresem internetowym:
http://www.compliance.sony.de/
O(a) abaixo assinado(a) Sony Corporation declara
que o presente equipamento está em
conformidade com a Diretiva 2014/53/UE.
O texto integral da declaração de conformidade
está disponível no seguinte endereço de Internet:
http://www.compliance.sony.de/
Prin prezenta, Sony Corporation declară că acest
echipament este în conformitate cu Directiva 2014/
53/UE.
Textul integral al declaraiei UE de conformitate este
disponibil la următoarea adresă internet:
http://www.compliance.sony.de/
Sony Corporation potrjuje, da je ta oprema skladna
z Direktivo 2014/53/EU.
Celotno besedilo izjave EU o skladnosti je na voljo
na naslednjem spletnem naslovu:
http://www.compliance.sony.de/
Sony Corporation týmto vyhlasuje, že zariadenie je
v súlade so smernicou 2014/53/EÚ.
Úplné vyhlásenie EÚ o zhode je k dispozícii na tejto
internetovej adrese:
http://www.compliance.sony.de/
Por la presente, Sony Corporation declara que este
equipo es conforme con la Directiva 2014/53/UE.
El texto completo de la declaración UE de
conformidad está disponible en la dirección
Internet siguiente:
http://www.compliance.sony.de/
Härmed försäkrar Sony Corporation att denna
utrustning överensstämmer med direktiv 2014/53/
EU.
Den fullständiga texten till EU-försäkran om
överensstämmelse finns på följande webbadress:
http://www.compliance.sony.de/
Sony Corporation bu ekipmanın 2014/53/AB
Direktifine uygun olduğunu işbu belge ile beyan
eder.
AB uygunluk beyanının tam metni aşağıdaki
internet adresinden edinilebilir:
http://www.compliance.sony.de/
Me anë të këtij dokumenti, Sony Corporation
deklaron se kjo pajisje është në pajtueshmëri me
Direktivën 2014/53/BE.
Teksti i plotë i deklaratës së pajtueshmërisë së BE-
së disponohet në adresën e mëposhtme të të
internetit:
http://www.compliance.sony.de/
, Sony Corporation
2014/53/.
:
http://www.compliance.sony.de/
Sony Corporation ovim izjavljuje da je ova oprema u
skladu sa direktivom 2014/53/EU.
Kompletan tekst EU izjave o usklađenosti je
dostupan na sledećoj internet adresi:
http://www.compliance.sony.de/
Lietuvių kalba
Norsk
Polski
Português
Română
Slovensky
Slovenščina
Español
Svenska
Türkçe
Shqip
Македонски
Srpski

©2018 Sony Corporation Printed in Thailand http://www.sony.net/
Site d’assistance
Si vous avez des questions ou si vous souhaitez
consulter les toutes dernières informations techniques
sur ce produit, rendez-vous sur le site Web suivant :
Sito di assistenza clienti
In caso di domande o per le informazioni più aggiornate
sul presente prodotto, visitare il seguente sito Web:
Support site
If you have any questions or for the latest support
information on this product, please visit
the web site below:
Support-Website
Wenn Sie Fragen haben oder die neuesten
Support-Informationen zu diesem Produkt abrufen
möchten, rufen Sie bitte folgende Website auf:
Sitio Web de soporte técnico en línea
Para resolver cualquier duda u obtener la información
más reciente sobre el soporte técnico de este producto,
visite el siguiente sitio Web:
http://www.sony.eu/support
App. de smartphone
Support by Sony app - Trouvez des infos et recevez des
notifications au sujet de votre produit :
App per smartphone
App Support by Sony - Trovate informazioni e ricevete
notifiche sul vostro prodotto:
Smartphone app
Support by Sony app - Find information and get
notification about your product:
Smartphone App
Support by Sony App - Finden Sie Informationen und
erhalten Sie Benachrichtigungen über Ihr Produkt:
Aplicación para Smartphone
Aplicación Support by Sony - Busque información y
obtenga notificaciones acerca de su producto:
√
News & Alerts / Nachrichten u. Alerts / Actus & Alertes / Novità e avvisi /
Noticias y Alertas
√
Software updates / Software-Updates / Mises à jour / Aggiornamenti software /
Actualizaciones de software
√
Tutorials / Anleitungen / Didacticiels / Tutorial / Tutoriales
√
Tips & Tricks / Tipps u. Tricks / Conseils & Astuces / Consigli e suggerimenti /
Consejos y Trucos
https://sony.net/SBS
http://www.sony.eu/mysony
Register your product online now at:
Merci d’enregister votre produit en ligne sur:
Registre su producto online en:
Registrieren Sie Ihr Produkt jetzt bei:
Registra online il tuo prodotto su:
-
 1
1
-
 2
2
-
 3
3
-
 4
4
-
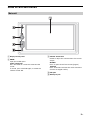 5
5
-
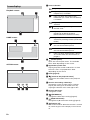 6
6
-
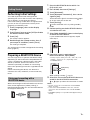 7
7
-
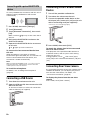 8
8
-
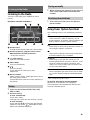 9
9
-
 10
10
-
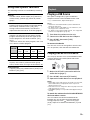 11
11
-
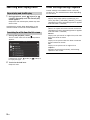 12
12
-
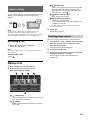 13
13
-
 14
14
-
 15
15
-
 16
16
-
 17
17
-
 18
18
-
 19
19
-
 20
20
-
 21
21
-
 22
22
-
 23
23
-
 24
24
-
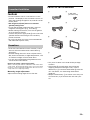 25
25
-
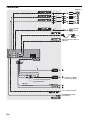 26
26
-
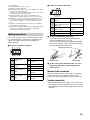 27
27
-
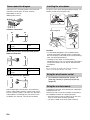 28
28
-
 29
29
-
 30
30
-
 31
31
-
 32
32
-
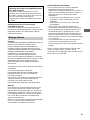 33
33
-
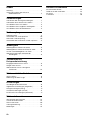 34
34
-
 35
35
-
 36
36
-
 37
37
-
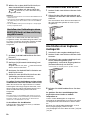 38
38
-
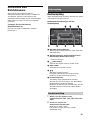 39
39
-
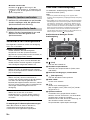 40
40
-
 41
41
-
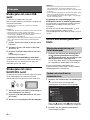 42
42
-
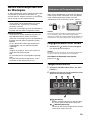 43
43
-
 44
44
-
 45
45
-
 46
46
-
 47
47
-
 48
48
-
 49
49
-
 50
50
-
 51
51
-
 52
52
-
 53
53
-
 54
54
-
 55
55
-
 56
56
-
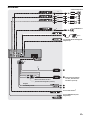 57
57
-
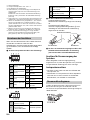 58
58
-
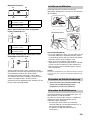 59
59
-
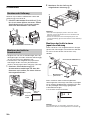 60
60
-
 61
61
-
 62
62
-
 63
63
-
 64
64
-
 65
65
-
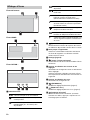 66
66
-
 67
67
-
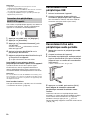 68
68
-
 69
69
-
 70
70
-
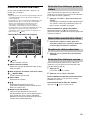 71
71
-
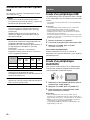 72
72
-
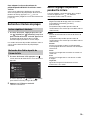 73
73
-
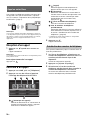 74
74
-
 75
75
-
 76
76
-
 77
77
-
 78
78
-
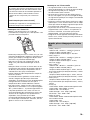 79
79
-
 80
80
-
 81
81
-
 82
82
-
 83
83
-
 84
84
-
 85
85
-
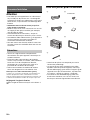 86
86
-
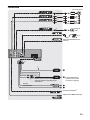 87
87
-
 88
88
-
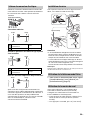 89
89
-
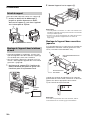 90
90
-
 91
91
-
 92
92
-
 93
93
-
 94
94
-
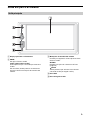 95
95
-
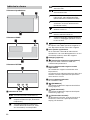 96
96
-
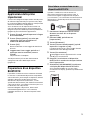 97
97
-
 98
98
-
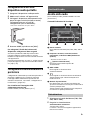 99
99
-
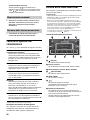 100
100
-
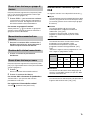 101
101
-
 102
102
-
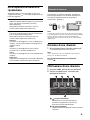 103
103
-
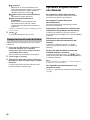 104
104
-
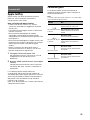 105
105
-
 106
106
-
 107
107
-
 108
108
-
 109
109
-
 110
110
-
 111
111
-
 112
112
-
 113
113
-
 114
114
-
 115
115
-
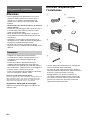 116
116
-
 117
117
-
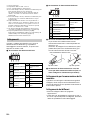 118
118
-
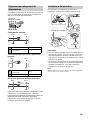 119
119
-
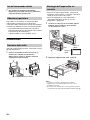 120
120
-
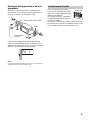 121
121
-
 122
122
-
 123
123
-
 124
124
-
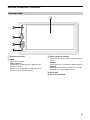 125
125
-
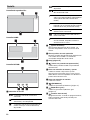 126
126
-
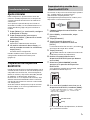 127
127
-
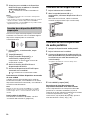 128
128
-
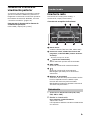 129
129
-
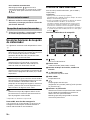 130
130
-
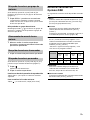 131
131
-
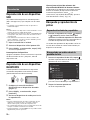 132
132
-
 133
133
-
 134
134
-
 135
135
-
 136
136
-
 137
137
-
 138
138
-
 139
139
-
 140
140
-
 141
141
-
 142
142
-
 143
143
-
 144
144
-
 145
145
-
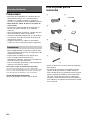 146
146
-
 147
147
-
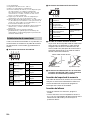 148
148
-
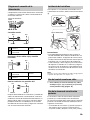 149
149
-
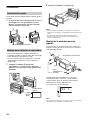 150
150
-
 151
151
-
 152
152
-
 153
153
-
 154
154
-
 155
155
-
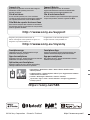 156
156


Sony XAV-AX1005DB Instrucciones de operación
- Categoría
- Radios
- Tipo
- Instrucciones de operación
en otros idiomas
- français: Sony XAV-AX1005DB Mode d'emploi
- italiano: Sony XAV-AX1005DB Istruzioni per l'uso
- English: Sony XAV-AX1005DB Operating instructions
- Deutsch: Sony XAV-AX1005DB Bedienungsanleitung
Artículos relacionados
-
Sony XAV-AX3000 Instrucciones de operación
-
-
Sony XAV-AX3005DB El manual del propietario
-
Sony XAV-AX5550D El manual del propietario
-
Sony XAV-AX205DB El manual del propietario
-
Sony XAV-AX200SXM Manual de usuario
-
Sony XAV-AX1000 Instrucciones de operación
-
-
Sony AK8XAVAX200 Manual de usuario
-
Sony XAV-AX100 Instrucciones de operación