Panasonic SB-FS1000 El manual del propietario
- Categoría
- Amplificador de instrumentos musicales
- Tipo
- El manual del propietario

Model No. SB-TP1000
RQT9219-E
E
ENGLISHESPAÑOLFRANÇAIS
NEDERLANDS
DEUTSCHITALIANOSVENSKADANSK
ČESKY
POLSKI
РУССКИЙ
ЯЗЫК
Operating Instructions
Instrucciones de funcionamiento
Mode d’emploi/Gebruiksaanwijzing
Bedienungsanleitung
Istruzioni per l’uso
Bruksanvisning
Betjeningsvejledning
Návod k obsluze/Instrukcja obsługi
Инструкция по эксплуатации
Інструкції з експлуатації
УКРАЇНСЬКА
ENGLISH See the pages 2–6, 8, 10, 12–22 and 64.
ESPAÑOL Véase las páginas 2, 4–6, 8, 10, 12–22 y 64.
FRANÇAIS Voir les pages 2, 4–5, 7, 9–21, 23 et 64.
NEDERLANDS
Zie bladzijden 2, 4–5, 7, 9–21, 23 en 64.
DEUTSCH Siehe Seite 24–26, 28, 30, 32–42 und 64.
ITALIANO Vedere alle pagg. 24–26, 28, 30, 32–42 e 64.
SVENSKA Se sidorna 24–25, 27, 29–41, 43 och 64.
DANSK Se side 24–25, 27, 29–41, 43 og 64.
ČESKY Viz str. 44–46, 48, 50, 52–62, a 64.
POLSKI Patrz strony 44–46, 48, 50, 52–62 i 64.
РУССКИЙ ЯЗЫК
Cм. стр. 44–45, 47, 49–61, 63, 64 и 65.
УКРАЇНСЬКА
Див. сторінки 44-45, 47, 49–61, 63 та 64.
Before connecting, operating or adjusting this product, please read
these instructions completely.
Please keep this manual for future reference.
Antes de conectar, operar o ajustar este producto, sírvase leer estas
instrucciones completamente.
Guarde este manual.
Avant de raccorder, faire fonctionner ou régler l’appareil, lire attentive-
ment tout ce mode d’emploi.
Conserver ce manuel.
Gelieve deze gebruiksaanwijzing volledig door te lezen alvorens dit
product aan te sluiten, te bedienen of af te stellen.
Bewaar deze gebruiksaanwijzing.
Bitte lesen Sie diese Bedienungsanleitung vor dem Anschließen, Inb-
etriebnehmen oder Einstellen dieses Gerätes vollständig durch.
Diese Anleitung bitte aufbewahren.
Prima di collegare, far funzionare o regolare l’appa recchio, leggere
completamente queste istruzioni.
Conservare questo manuale.
Läs denna bruksanvisning helt innan du ansluter, använder eller
justerar denna produkt.
Spara denna bruksanvisning.
Læs venligst hele denne betjeningsvejledning, før du tilslutter, betjener
eller indstiller dette apparat.
Gem vejledningen til senere brug.
Dříve než začnete jakékoli zapojování, operace nebo nastavování
tohoto výrobku, prostudujte si prosím celý tento návod.
Uschovejte si prosím tento návod k obsluze.
Przed podłączeniem uruchomieniem, lub regulacją sprzętu prosimy o
dokładne zapoznanie się z treścią niniejszej instrukcji.
Pro simy o zachowanie niniejszej instrukcji obsługi.
Niniejsza instrukcja została opracowana na pod stawie oryginalnej
publikacji firmy MATSUSHITA ELECTRIC INDUSTRIAL CO., LTD.
Перед подключением, работой или регулировкой данного аппарата
прочтите, пожалуйста, эту инструкцию полностью.
Сохраните, пожалуйста, эту инструкцию.
Перед тим, як підключати, використовувати або налаштовувати
цей пристрій, будь ласка, повністю прочитайте ці інструкції.
Збережіть цей документ для використання в майбутньому.
Speaker System
Cajas acústicas
Enceintes acoustiques
Luidsprekersysteem
Lautsprecheranlage
Cassa acustica
Högtalarsystem
Højttalersystem
Reprosoustava
Zestaw głośników
Акустическая система
Акустична система

RQT9219
2
ENGLISHESPAÑOLFRANÇAIS
NEDERLANDS
Tables des matières
Accessoires fournis . . . . . . . . . . . . . . . . . . . . . . . . . . . . . . . . . . . . . . . . . . . 4
Remarques . . . . . . . . . . . . . . . . . . . . . . . . . . . . . . . . . . . . . . . . . . . . . . . . . . 5
Précautions de sécurité. . . . . . . . . . . . . . . . . . . . . . . . . . . . . . . . . . . . . . . . 9
Positionnement. . . . . . . . . . . . . . . . . . . . . . . . . . . . . . . . . . . . . . . . . . . . . . .11
Montage et installation. . . . . . . . . . . . . . . . . . . . . . . . . . . . . . . . . . . . . . . . 13
Montage sur socle des enceintes avant . . . . . . . . . . . . . . . . . . . . . . . . . 13
Montage sur socle des enceintes surround . . . . . . . . . . . . . . . . . . . . . . 15
Montage au mur des enceintes avant et surround . . . . . . . . . . . . . . . . . 17
Réglages nécessaires au raccordement de l’amplificateur recommandé
sur le caisson de graves actif. . . . . . . . . . . . . . . . . . . . . . . . . . . . . . . . . 17
Raccordements. . . . . . . . . . . . . . . . . . . . . . . . . . . . . . . . . . . . . . . . . . . . . . 19
Utilisation du caisson de graves. . . . . . . . . . . . . . . . . . . . . . . . . . . . . . . . 21
Données techniques . . . . . . . . . . . . . . . . . . . . . . . . . . . . . . . . . . . . . . . . . 23
Autres remarques. . . . . . . . . . . . . . . . . . . . . . . . . . . . . . . . . . . . . . . . . . . . 23
Entretien . . . . . . . . . . . . . . . . . . . . . . . . . . . . . . . . . . . . . . . . . . . . . . . . . . . 64
Índice
Accessorios suministrados. . . . . . . . . . . . . . . . . . . . . . . . . . . . . . . . . . . . . 4
Notas . . . . . . . . . . . . . . . . . . . . . . . . . . . . . . . . . . . . . . . . . . . . . . . . . . . . . . . 5
Precauciones de seguridad. . . . . . . . . . . . . . . . . . . . . . . . . . . . . . . . . . . . . 8
Ubicación . . . . . . . . . . . . . . . . . . . . . . . . . . . . . . . . . . . . . . . . . . . . . . . . . . 10
Ensamblaje e instalación. . . . . . . . . . . . . . . . . . . . . . . . . . . . . . . . . . . . . . 12
Ensamblaje de los altavoces delanteros como altavoces tipo vertical . . 12
Ensamblaje de los altavoces de sonido ambiental como altavoces
tipo vertical . . . . . . . . . . . . . . . . . . . . . . . . . . . . . . . . . . . . . . . . . . . . . . . 14
Montaje en pared de los altavoces delanteros y de sonido ambiental . . 16
Ajustes para conectar el amplificador recomendado al altavoz de sub-
graves activo. . . . . . . . . . . . . . . . . . . . . . . . . . . . . . . . . . . . . . . . . . . . . . 16
Conexiones . . . . . . . . . . . . . . . . . . . . . . . . . . . . . . . . . . . . . . . . . . . . . . . . . 18
Operación del altavoz de subgraves . . . . . . . . . . . . . . . . . . . . . . . . . . . . 20
Especificaciones técnicas. . . . . . . . . . . . . . . . . . . . . . . . . . . . . . . . . . . . . 22
Otras notas . . . . . . . . . . . . . . . . . . . . . . . . . . . . . . . . . . . . . . . . . . . . . . . . . 22
Mantenimiento . . . . . . . . . . . . . . . . . . . . . . . . . . . . . . . . . . . . . . . . . . . . . . 64
Inhoud
Bijgeleverde accessoires. . . . . . . . . . . . . . . . . . . . . . . . . . . . . . . . . . . . . . . 4
Opmerkingen . . . . . . . . . . . . . . . . . . . . . . . . . . . . . . . . . . . . . . . . . . . . . . . . 5
Veiligheidsmaatregelen . . . . . . . . . . . . . . . . . . . . . . . . . . . . . . . . . . . . . . . . 9
Opstelling . . . . . . . . . . . . . . . . . . . . . . . . . . . . . . . . . . . . . . . . . . . . . . . . . . .11
Montage en installatie . . . . . . . . . . . . . . . . . . . . . . . . . . . . . . . . . . . . . . . . 13
De voorluidsprekers in elkaar zetten als staande luidsprekers . . . . . . . 13
De surroundluidsprekers in elkaar zetten als staande luidsprekers . . . . 15
De voor- en surroundluidsprekers aan een muur bevestigen. . . . . . . . . 17
Instellingen voor aansluiting van de aanbevolen versterker op de
actieve subwoofer. . . . . . . . . . . . . . . . . . . . . . . . . . . . . . . . . . . . . . . . . . 17
Aansluitingen . . . . . . . . . . . . . . . . . . . . . . . . . . . . . . . . . . . . . . . . . . . . . . . 19
Gebruik van de subwoofer . . . . . . . . . . . . . . . . . . . . . . . . . . . . . . . . . . . . 21
Technische gegevens . . . . . . . . . . . . . . . . . . . . . . . . . . . . . . . . . . . . . . . . 23
Overige opmerkingen. . . . . . . . . . . . . . . . . . . . . . . . . . . . . . . . . . . . . . . . . 23
Onderhoud . . . . . . . . . . . . . . . . . . . . . . . . . . . . . . . . . . . . . . . . . . . . . . . . . 64
Estimado cliente
Muchísimas gracias por haber adquirido este aparato.
Lea con atención estas instrucciones para obtener las máximas prestaciones
y seguridad.
Cajas acústicas
Altavoces
SB-FS1000
Altavoz delantero izquierdo (incluyendo canal central)
SB-FC1000L X 1
Altavoz delantero derecho (incluyendo canal central)
SB-FC1000R X 1
Sonido ambiental SB-HS1000 X 2
SB-WA1000
Altavoz de extra-graves amplifi cado
SB-WA1000 X 1
Dear customer
Thank you for purchasing this product.
For optimum performance and safety, please read these instructions carefully.
Speaker system Speaker
SB-FS1000
Front speaker (including center channel) L
SB-FC1000L X 1
Front speaker (including center channel) R
SB-FC1000R X 1
Surround SB-HS1000 X 2
SB-WA1000 Active Subwoofer SB-WA1000 X 1
Cher client
Nous vous remercions pour votre achat de cet appareil.
Pour en obtenir des performances idéales et pour votre sécurité, veuillez lire
attentivement le présent manuel.
Enceintes acoustiques
Enceintes
SB-FS1000
Enceinte avant gauche (avec canal central)
SB-FC1000L X 1
Enceinte avant droite (avec canal central)
SB-FC1000R X 1
Surround SB-HS1000 X 2
SB-WA1000
Enceinte d’extrêmes-graves avec amplifi cateur
SB-WA1000 X 1
Geachte klant
Hartelijk dank voor de aankoop van dit product.
Gelieve deze gebruiksaanwijzing aandachtig door le lezen voor een optimale
prestatie en een veilig gebruik van het systeem.
Luidsprekersysteem
Luidsprekers
SB-FS1000
Voorluidspreker (inclusief middenkanaal) L
SB-FC1000L X 1
Voorluidspreker (inclusief middenkanaal) R
SB-FC1000R X 1
Surround SB-HS1000 X 2
SB-WA1000 Actieve subwoofer SB-WA1000 X 1
Contents
Caution for AC Mains Lead (For United Kingdom) . . . . . . . . . . . . . . . . . . 3
Supplied accessories. . . . . . . . . . . . . . . . . . . . . . . . . . . . . . . . . . . . . . . . . . 4
Notes . . . . . . . . . . . . . . . . . . . . . . . . . . . . . . . . . . . . . . . . . . . . . . . . . . . . . . . 5
Safety precautions . . . . . . . . . . . . . . . . . . . . . . . . . . . . . . . . . . . . . . . . . . . . 8
Location. . . . . . . . . . . . . . . . . . . . . . . . . . . . . . . . . . . . . . . . . . . . . . . . . . . . 10
Assembly and Installation . . . . . . . . . . . . . . . . . . . . . . . . . . . . . . . . . . . . . 12
Assembling the front speakers as stand types . . . . . . . . . . . . . . . . . . . . 12
Assembling the surround speakers as stand types . . . . . . . . . . . . . . . . 14
Wall-mounting the front and surround speakers. . . . . . . . . . . . . . . . . . . 16
Settings for connecting the recommended amplifier to the active
subwoofer . . . . . . . . . . . . . . . . . . . . . . . . . . . . . . . . . . . . . . . . . . . . . . . . 16
Connections . . . . . . . . . . . . . . . . . . . . . . . . . . . . . . . . . . . . . . . . . . . . . . . . 18
Subwoofer operation . . . . . . . . . . . . . . . . . . . . . . . . . . . . . . . . . . . . . . . . . 20
Specifications . . . . . . . . . . . . . . . . . . . . . . . . . . . . . . . . . . . . . . . . . . . . . . . 22
Other notes . . . . . . . . . . . . . . . . . . . . . . . . . . . . . . . . . . . . . . . . . . . . . . . . . 22
Maintenance . . . . . . . . . . . . . . . . . . . . . . . . . . . . . . . . . . . . . . . . . . . . . . . . 64
La página se está cargando ...

RQT9219
4
ENGLISHESPAÑOLFRANÇAIS
NEDERLANDS
SB-FS1000
Speaker cables (long: 10 m) . . . . . . . .2
Cables de altavoces (largos: 10 m) . . .2
Câbles d’enceinte (longs : 10 m) . . . . .2
Luidsprekerkabels (lang: 10 m) . . . . . .2
(REE1397E)
Speaker cables (short: 6 m). . . . . . . . .2
Cables de altavoces (cortos: 6 m) . . . .2
Câbles d’enceinte (courts : 6 m) . . . . .2
Luidsprekerkabels (kort: 6 m). . . . . . . .2
(REE1397D)
Center speaker cable (approx. 6 m). . .1
Cable de altavoz central
(6 m aproximadamente). . . . . . . . . . . .1
Câble d’enceinte centrale
(environ 6 m) . . . . . . . . . . . . . . . . . . . .1
Middenluidsprekerkabel (ong. 6 m) . . .1
(REE1393C)
Stand base mounting screws. . . . . . . .8
Tornillos de montaje de base de soporte
. . 8
Vis de montage de la base du socle . .8
Bevestigingbouten voor voetstuk . . . . .8
(XSB4+20FJK)
Stand mounting screws . . . . . . . . . . . .4
Tornillos de montaje de soporte . . . . . .4
Vis de montage du socle . . . . . . . . . . .4
Bevestigingsbouten voor poot . . . . . . .4
(RXQ1497)
Front L stand base . . . . . . . . . . . . . . . .1
Base de soporte delantera izquierda . .1
Base du socle d’enceinte avant gauche
. . .1
Voetstuk voor linkervoorluidspreker . . .1
(RYQ0607-K1)
Front R stand base. . . . . . . . . . . . . . . .1
Base de soporte delantera derecha. . .1
Base du socle d’enceinte avant droite
. .1
Voetstuk voor rechtervoorluidspreker. .1
(RYQ0607A-K1)
Surround stand bases . . . . . . . . . . . . .2
Bases de soportes de altavoces
de sonido ambiental. . . . . . . . . . . . . . .2
Bases de socle d’enceinte surround . .2
Voetstukken voor
surroundvoorluidsprekers. . . . . . . . . . .2
(RYQ0608-K1)
Front speaker stands . . . . . . . . . . . . . .2
Soportes de altavoces delanteros . . . .2
Socles d’enceinte avant . . . . . . . . . . . .2
Poten voor voorluidsprekers . . . . . . . .2
(RYQ0609A-K)
Surround speaker stands. . . . . . . . . . .2
Soportes de altavoces de sonido
ambiental . . . . . . . . . . . . . . . . . . . . . . .2
Socles d’enceinte surround . . . . . . . . .2
Poten voor surroundluidsprekers . . . . .2
(RYQ0610A-K)
Spacers . . . . . . . . . . . . . . . . . . . . . . .16
Espaciadores . . . . . . . . . . . . . . . . . . .16
Entretoises . . . . . . . . . . . . . . . . . . . . .16
Vulstukken . . . . . . . . . . . . . . . . . . . . .16
(RKA0191-K)
Nylon clamp . . . . . . . . . . . . . . . . . . . . .6
Abrazadera de nailon. . . . . . . . . . . . . .6
Collier de serrage en nylon . . . . . . . . .6
Nylonklem . . . . . . . . . . . . . . . . . . . . . .6
(RMR1503-K)
Screw for nylon clamp . . . . . . . . . . . . .6
Tornillo para abrazadera de nailon. . . .6
Vis du collier de serrage en nylon . . . .6
Schroef voor nylonklem . . . . . . . . . . . .6
(XTW3+10JFJK)
SB-WA1000
AC mains lead
Cable de alimentación de CA
Cordon d’alimentation
Netsnoer
For the United Kingdom . . . . . . . . . 1
Para el Reino Unido. . . . . . . . . . . . 1
Pour le Royaume-Uni. . . . . . . . . . . 1
Voor het Verenigd Koninkrijk . . . . . 1
(K2CT3CA00004)
For Australia and New Zealand . . . 1
Para Australia y Nueva Zelanda. . . 1
Pour l’Australie et la
Nouvelle-Zélande. . . . . . . . . . . . . . 1
Voor Australië en Nieuw-Zeeland. . 1
(K2CJ2DA00010)
For others. . . . . . . . . . . . . . . . . . . . 1
Para otros países. . . . . . . . . . . . . . 1
Pour les autres pays . . . . . . . . . . . 1
Voor overige landen . . . . . . . . . . . . 1
(K2CQ2CA00006)
Monaural connection cable (5 m). . . . .1
Cable de conexión monofónico (5 m)
. .1
Câble de connexion monaural (5 m) . .1
Monokabel (5 m) . . . . . . . . . . . . . . . . .1
(RJLV1P001B50)
Supplied accessories
Accessorios suministrados
Accessoires fournis
Bijgeleverde accessoires
Please check and identify the supplied accessories.
For the United Kingdom
Use numbers indicated in parentheses when asking for replacement parts. “As of June 2008”
Verifique e identifique los accessorios suministrados.
Cocher les accessoires pour vérifier qu’ils sont bien tous dans l’emballage.
Controleer de bijgeleverde accessoires en markeer in de vierkantjes.

RQT9219
5
ENGLISHESPAÑOLFRANÇAIS
NEDERLANDS
Notes
Speaker impedance and allowed input
SB-FC1000L, R/
Impedance 6 Ω
SB-HS1000
Input power 100 W (RATED)
The only receivers or amplifiers you should connect to these speakers
are those whose rated output does not exceed the above figures.
• These speakers are used together with an Active Subwoofer (SB-
WA1000).
• Set the AV control receiver or AV amplifier to [SMALL]. (
page 16)
When using the AV control receiver SA-BX500 with DVD analogue
input, set the DVD player or other playback equipment to [SMALL].
If SA-BX500 is set to [SMALL], the rated output exceeds the figures
above, but these speakers can be used.
Using a receiver or amplifier with higher ratings than listed above can
cause abnormal sounds to occur because of excessive input, damage
to the receiver or speakers, and fire. If equipment is damaged in any
way or unexpected trouble occurs during playback, unplug the system
from its outlet and call a serviceman for help.
Protection circuitry
(SB-FC1000L, R / SB-HS1000)
These units incorporate protection circuitry to protect them from dam-
age caused by excessive input or abnormal signals; when excess input
is detected, input is automatically interrupted.
If sound is interrupted...
1. Reduce the volume of the receiver (or amplifier).
2. Check the sound source and connections for any problems.
If there is no problem, the protection circuitry will reset in a few
minutes.
After the protection circuit is reset...
Take care not to increase the receiver’s volume too high.
Notas
Impedancia del altavoz y potencia de
entrada
SB-FC1000L, R/
Impedancia 6 Ω
SB-HS1000
Potencia de entrada 100 W (RATED)
Los únicos receptores o amplificadores que deberá conectar a estos altavo-
ces son aquellos que cuya salida nominal no exceda las cifras de arriba.
• Estos altavoces se utilizan junto con un altavoz de extra-graves
amplificado (SB-WA1000).
• Ponga el receptor de control AV o el amplificador AV en [SMALL].
( página 16) Cuando utilice el receptor de control AV SA-BX500
con entrada analógica DVD, ponga el reproductor DVD u otro equipo
de reproducción en [SMALL]. Si el SA-BX500 se pone en [SMALL],
la salida nominal excederá las cifras de arriba, pero estos altavoces
podrán ser utilizados.
Al usar un receptor o un amplificador con características nominales superi-
ores a las indicadas arriba se pueden producir ruidos anormales debido a la
entrada excesiva, el receptor o los altavoces se pueden estropear, y además
se puede producir un incendio. Si el equipo es dañado de alguna manera o un
problema inesperado ocurre durante la reproducción, desenchufe el sistema
y llame a su distribuidor para que envíen una persona que le ayude.
Circuito de protección
(SB-FC1000L, R / SB-HS1000)
Estas unidades incorporan un circuito de protección para protegerlos
de daños causados por una entrada excesiva o señales anormales;
cuando una entrada excesiva es detectada, la entrada es automáti-
camente interrumpida.
Si el sonido se interrumpe...
1. Reduzca el volumen del receptor (o amplificador).
2. Verifique si hay problemas en la fuente de sonido y las conexiones.
Si no hay problemas, el circuito de protección se reajustará en unos
pocos minutos.
Después de que el circuito de protección sea reajustado...
Cuídese de no incrementar demasiado el volumen del receptor.
Remarques
Impédance des enceintes et puissance
d’entrée
SB-FC1000L, R/
Impédance 6 Ω
SB-HS1000
Puissance d’entrée 100 W (RATED)
Les seuls ampli-tuners ou amplificateurs auxquels ces enceintes
devraient être raccordées sont ceux dont la puissance de sortie nomi-
nale ne dépasse pas les valeurs indiquées ci-dessus.
• Ces enceintes sont utilisées avec une enceinte d’extrêmes-graves
avec amplificateur (SB-WA1000).
•
Réglez l’ampli-tuner AV ou l’amplificateur AV sur [SMALL]. ( page 17)
Lors de l’utilisation de l’ampli-tuner AV SA-BX500 avec entrée analogique
DVD, réglez le lecteur DVD ou autre appareil de lecture sur [SMALL]. Lorsque
le SA-BX500 est réglé sur [SMALL], la sortie nominale dépasse les chiffres
ci-dessus mais il est quand même possible d’utiliser ces enceintes.
L’utilisation d’un ampli-tuner ou d’un amplificateur plus puissant pourrait
provoquer l’apparition de sons anormaux sous l’effet d’une entrée excessive,
endommager l’ampli-tuner ou les enceintes et provoquer un feu. Si l’appareil est
endommagé ou si des anomalies de fonctionnement se produisent pendant la
lecture, débranchez le système et adressez-vous à une personne de service.
Circuit de protection
(SB-FC1000L, R / SB-HS1000)
Ces enceintes contiennent un circuit de protection destiné à les pro-
téger des dommages causés par une puissance d’entrée excessive
ou des signaux anormaux ; lorsqu’une puissance d’entrée excessive
est détectée, l’entrée est automatiquement interrompue.
Si le son est interrompu...
1. Réduisez le volume sur l’ampli-tuner (ou l’amplificateur).
2. Vérifiez s’il n’y a pas de problème dans la source sonore ou les
raccordements. S’il n’y a pas de problème, le circuit de protection
sera réinitialisé dans les minutes qui suivent.
Une fois que le circuit de protection a été réinitialisé...
Veillez à ne pas élever excessivement le volume de l’ampli-tuner.
Opmerkingen
Luidsprekerimpedantie en
ingangsvermogen
SB-FC1000L, R/
Impedantie 6 Ω
SB-HS1000
Ingangsvermogen 100 W (RATED)
De enige ontvangers of versterkers die u op deze luidsprekers mag aansluiten zijn die waar-
van de nominale uitgangswaarden de hierboven vermelde waarden niet te boven gaan.
• Deze luidsprekers worden gebruikt in combinatie met een actieve
subwoofer (SB-WA1000).
•
Stel de AV-regelontvanger of de AV-versterker in op [SMALL]. ( blz. 17)
Voor gebruik van de AV-regelontvanger SA-BX500 met analoge DVD-ingangssignalen,
stelt u de DVD-speler of andere weergave-apparatuur in op [SMALL]. Als de SA-BX500
staat ingesteld op [SMALL], zal het nominale uitgangsvermogen de hierboven gegeven
waarden overschrijden, maar u kunt deze luidsprekers wel gebruiken.
Bij gebruik van een ontvanger of versterker met een hoger uitgangsvermogen
dan de hierboven vermelde waarde, kunnen abnormale geluiden worden voort-
gebracht ten gevolge van te sterke ingangssignalen, of kunnen de ontvanger of
luidsprekers beschadigd raken. Bovendien bestaat dan gevaar voor brand. In het
geval de audioapparatuur op enigerlei wijze beschadigd raakt of zich onverwa-
chte moeilijkheden voordoen tijdens het weergeven, trekt u de stekker van de
audioapparatuur uit het stopcontact en belt u een servicemonteur om hulp.
Beveiligingscircuit
(SB-FC1000L, R / SB-HS1000)
Dit systeem is uitgerust met een luidspreker-beveiligingscircuit om de
luidsprekers te beschermen tegen te hoge ingangsvermogens en abnor-
male ingangssignalen. Wanneer een te hoog ingangsvermogen wordt
vastgesteld, worden de ingangssignalen automatisch onderbroken.
Wanneer het geluid wordt onderbroken...
1. Verlaag het volumeniveau op de ontvanger (of versterker).
2. Controleer de ingangsbron en de aansluitingen op mogelijke fouten.
Indien er geen fout gemaakt is, zal het beveiligingscircuit zich na
een paar minuten automatisch terugstellen.
Nadat het beveiligingscircuit is teruggesteld...
Let erop dat het volumeniveau op de ontvanger niet te hoog wordt ingesteld.

RQT9219
6
ENGLISHESPAÑOL
WARNING:
TO REDUCE THE RISK OF FIRE, ELECTRIC SHOCK OR PRODUCT
DAMAGE,
• DO NOT EXPOSE THIS APPARATUS TO RAIN, MOISTURE,
DRIPPING OR SPLASHING AND THAT NO OBJECTS FILLED
WITH LIQUIDS, SUCH AS VASES, SHALL BE PLACED ON THE
APPARATUS.
• USE ONLY THE RECOMMENDED ACCESSORIES.
• DO NOT REMOVE THE COVER (OR BACK); THERE ARE NO
USER SERVICEABLE PARTS INSIDE. REFER SERVICING TO
QUALIFIED SERVICE PERSONNEL.
CAUTION!
• DO NOT INSTALL OR PLACE THIS UNIT IN A BOOKCASE, BUILT-
IN CABINET OR IN ANOTHER CONFINED SPACE. ENSURE THE
UNIT IS WELL VENTILATED. TO PREVENT RISK OF ELECTRIC
SHOCK OR FIRE HAZARD DUE TO OVERHEATING, ENSURE
THAT CURTAINS AND ANY OTHER MATERIALS DO NOT
OBSTRUCT THE VENTILATION VENTS.
• DO NOT OBSTRUCT THE UNIT’S VENTILATION OPENINGS
WITH NEWSPAPERS, TABLECLOTHS, CURTAINS, AND SIMILAR
ITEMS.
• DO NOT PLACE SOURCES OF NAKED FLAMES, SUCH AS
LIGHTED CANDLES, ON THE UNIT.
• DISPOSE OF BATTERIES IN AN ENVIRONMENTALLY FRIENDLY
MANNER.
THIS UNIT IS INTENDED FOR USE IN MODERATE CLIMATES.
This product may receive radio interference caused by mobile
telephones during use. If such interference is apparent, please increase
separation between the product and the mobile telephone.
The socket outlet shall be installed near the equipment and easily
accessible.
The mains plug of the power supply cord shall remain readily operable.
To completely disconnect this apparatus from the AC Mains, disconnect
the power supply cord plug from AC receptacle.
Although the AC power switch is in the “OFF” position, the unit is not
completely disconnected from the mains. Remove the plug from the
main electrical outlet if you will not be using the unit for an extended
period of time. Place the unit so the plug can be easily removed.
Keep the accessories (screw, spacer and nylon clamp) out of reach of
children to prevent swallowing.
-If you see this symbol-
Information on Disposal for Users of Waste Electrical & Electronic
Equipment (private households)
This symbol on the products and/or accompanying documents
means that used electrical and electronic products should not
be mixed with general household waste.
For proper treatment, recovery and recycling, please take these
products to designated collection points, where they will be accepted on
a free of charge basis. Alternatively, in some countries you may be able
to return your products to your local retailer upon the purchase of an
equivalent new product.
Disposing of this product correctly will help to save valuable resources
and prevent any potential negative effects on human health and the
environment which could otherwise arise from inappropriate waste
handling. Please contact your local authority for further details of your
nearest designated collection point.
Penalties may be applicable for incorrect disposal of this waste, in
accordance with national legislation.
For business users in the European Union
If you wish to discard electrical and electronic equipment, please contact
your dealer or supplier for further information.
Information on Disposal in other Countries outside the European
Union
This symbol is only valid in the European Union.
If you wish to discard this product, please contact your local authorities
or dealer and ask for the correct method of disposal.
ADVERTENCIA:
PARA REDUCIR EL RIESGO DE INCENDIO, DESCARGA ELÉCTRICA
O DAÑOS EN EL PRODUCTO,
• NO EXPONGA ESTE APARATO A LA LLUVIA, HUMEDAD,
GOTEOS O SALPICADURAS DE LÍQUIDOS, Y NO PERMITA
QUE NINGÚN OBJETO QUE CONTENGA LÍQUIDOS, COMO
JARRONES, ESTÉN CERCA DEL APARATO.
• UTILICE SÓLO LOS ACCESORIOS RECOMENDADOS.
• NO EXTRAIGA LA CUBIERTA (O LA PARTE POSTERIOR); EN EL
INTERIOR NO HAY PARTES QUE PUEDAN SER REPARADAS
POR EL USUARIO. LAS REPARACIONES Y MANTENIMIENTO
DEBEN SER REALIZADOS POR PERSONAL CUALIFICADO.
¡ADVERTENCIA!
• PARA MANTENER BIEN VENTILADA ESTA UNIDAD,
NO LA INSTALE NI PONGA EN UN ESTANTE DE
LIBROS, MUEBLE EMPOTRADO U OTRO ESPACIO DE
DIMENSIONES REDUCIDAS. ASEGÚRESE QUE
CORTINAS Y OTROS MATERIALES NO OBSTRUYAN LAS
CONDICIONES DE VENTILACIÓN PARA PREVENIR EL RIESGO
DE SACUDIDAS ELÉCTRICAS O INCENDIOS DEBIDOS AL
RECALENTAMIENTO.
• NO OBSTRUYA LAS ABERTURAS DE VENTILACIÓN DE LA
UNIDAD CON PERIÓDICOS, MANTELES, CORTINAS U OBJETOS
SIMILARES.
• NO COLOQUE OBJETOS CON LLAMA DESCUBIERTA, UNA VELA
POR EJEMPLO, ENCIMA DE LA UNIDAD.
• TIRE LAS PILAS DE FORMA QUE NO CONTAMINE EL MEDIO
AMBIENTE.
ESTA UNIDAD HA SIDO DISEÑADA PARA SER UTILIZADA EN
CLIMAS MODERADOS.
Este producto puede tener interferencias causadas por teléfonos
móviles durante su utilización. Si tales interferencias resultan evidentes,
aumente la separación entre el producto y el teléfono móvil.
La toma de corriente deberá estar instalada cerca del equipo y donde
se pueda acceder a ella fácilmente.
El enchufe del cable de la alimentación deberá estar siempre listo para
ser utilizado.
Para desconectar completamente este aparato de la red de CA,
desconecte el enchufe del cable de alimentación del receptáculo de CA.
La unidad no quedará completamente desconectada de la
red eléctrica aunque el interruptor de la alimentación de CA
se ponga en “OFF” (desconectado). Desenchufe la clavija de
alimentación de la toma de corriente si no va a utilizar la unidad
durante mucho tiempo. Coloque la unidad en lugar donde la clavija de
alimentación pueda desenchufarse fácilmente.
Guarde los accesorios (tornillo, espaciador y abrazadera de nailon) fuera del
alcance de los niños para impedir que éstos los traguen.
-Si ve este símbolo-
Información sobre la eliminación para los usuarios de equipos
eléctricos y electrónicos usados (particulares)
La aparición de este símbolo en un producto y/o en la
documentación adjunta indica que los productos eléctricos
y electrónicos usados no deben mezclarse con la basura
doméstica general.
Para que estos productos se sometan a un proceso adecuado de
tratamiento, recuperación y reciclaje, llévelos a los puntos de recogida
designados, donde los admitirán sin coste alguno. En algunos países
existe también la posibilidad de devolver los productos a su minorista
local al comprar un producto nuevo equivalente.
Si desecha el producto correctamente, estará contribuyendo a preservar
valiosos recursos y a evitar cualquier posible efecto negativo en la salud
de las personas y en el medio ambiente que pudiera producirse debido
al tratamiento inadecuado de desechos. Póngase en contacto con su
autoridad local para que le informen detalladamente sobre el punto de
recogida designado más cercano.
De acuerdo con la legislación nacional, podrían aplicarse multas por la
eliminación incorrecta de estos desechos.
Para empresas de la Unión Europea
Si desea desechar equipos eléctricos y electrónicos, póngase
en contacto con su distribuidor o proveedor para que le informe
detalladamente.
Información sobre la eliminación en otros países no pertenecientes
a la Unión Europea
Este símbolo sólo es válido en la Unión Europea.
Si desea desechar este producto, póngase en contacto con las
autoridades locales o con su distribuidor para que le informen sobre el
método correcto de eliminación.
La página se está cargando ...

RQT9219
8
ENGLISHESPAÑOL
Safety precautions
Placement
Set the unit up on an even surface away from direct sunlight, high
temperatures, high humidity, and excessive vibration. These conditions
can damage the cabinet and other components, thereby shortening
the unit’s service life.
Voltage
Do not use high voltage power sources. This can overload the unit
and cause a fire.
Do not use a DC power source. Check the source carefully when
setting the unit up on a ship or other place where DC is used.
AC mains lead protection
Ensure the AC mains lead is connected correctly and not damaged.
Poor connection and lead damage can cause fire or electric shock.
Do not pull, bend, or place heavy items on the lead.
Grasp the plug firmly when unplugging the lead. Pulling the AC
mains lead can cause electric shock.
Do not handle the plug with wet hands. This can cause electric
shock.
Foreign matter
Do not let metal objects fall inside the unit. This can cause electric
shock or malfunction.
Do not let liquids get into the unit. This can cause electric shock or
malfunction. If this occurs, immediately disconnect the unit from the
power supply and contact your dealer.
Do not spray insecticides onto or into the unit. They contain flam-
mable gases which can ignite if sprayed into the unit.
Service
Do not attempt to repair this unit by yourself. If sound is interrupted,
indicators fail to light, smoke appears, or any other problem that is
not covered in these operating instructions occurs, disconnect the AC
mains lead and contact your dealer or an authorized service center.
Electric shock or damage to the unit can occur if the unit is repaired,
disassembled or reconstructed by unqualified persons.
Extend operating life by disconnecting the unit from the power
source if it is not to be used for a long time.
Excessive input
You can damage your speakers and shorten their life span
if you keep the volume high over extended periods.
Reduce the volume in the following cases to avoid dam-
age :
• When playing distorted sound.
• When the speakers are receiving howling from a microphone or
record player, noise from FM broadcasts, or continuous signals from
an oscillator, test disc, or electronic instrument.
• When adjusting the sound quality.
• When turning the amplifier on or off.
Precauciones de seguridad
Ubicación
Coloque la unidad en una superficie plana lejos de la luz directa
del sol, temperatura y humedad altas, y vibración excesiva. Estas
condiciones pueden dañar el gabinete y otros componentes, y por lo
tanto acortar la vida útil de la unidad.
Voltaje
No use fuentes de alimentación de alto voltaje. Esto puede sobre-
cargar la unidad y causar un incendio.
No use una fuente de alimentación de CC. Verifique cuidadosa-
mente la fuente cuando coloque la unidad en una embarcación u otro
lugar donde CC sea usada.
Protección del cordón de alimentación
Asegúrese que el cordón de alimentación esté conectado correcta-
mente y no dañado. Una mala conexión y daño en el cordón pueden
causar un incendio o un choque eléctrico. No jale, doble el cordón ni
coloque objetos pesados sobre él.
Coja el enchufe firmemente cuando desenchufe el cordón. El jalar
el cordón puede causar choque eléctrico.
No maneje el enchufe con manos mojadas. Esto puede causar
choque eléctrico.
Objetos extraños
No permita que objetos de metal caigan dentro de la unidad. Esto
puede causar choque eléctrico o fallas.
No permita que líquidos penetren en la unidad. Esto puede causar
choque eléctrico o fallas. Si esto ocurre, desconecte inmediatamente
la unidad de su alimentación y póngase en contacto con su distri-
buidor.
No rocíe insecticidas sobre o dentro de la unidad. Contienen gases
inflamables que pueden encenderse si son rociados dentro de la
unidad.
Servicio
No intente reparar esta unidad por sí mismo. Si el sonido se inter-
rumpe, los indicadores no se iluminan, sale humo o sucede cualquier
problema que no está tratado en estas instrucciones, desconecte el
cordón de alimentación y póngase en contacto con su distribuidor
o con un centro de servicio autorizado. Puede ocurrir un choque
eléctrico o daño a la unidad si esta unidad es reparada, desarmada
o reconstruida por personas no calificadas.
Extienda la vida útil de la unidad desconectándola de la fuente de
alimentación si no va a ser usada por largo tiempo.
Entrada excesiva
Si reproduce el sonido con niveles altos durante períodos
de tiempo prolongados podrá estropear sus altavoces y
reducir su duración.
Para evitar daños, reduzca el volumen en los casos
siguientes:
• Cuando reproduzca sonido distorsionado.
• Cuando los altavoces reciban aullido procedente de un micrófono
o giradiscos, ruido de emisiones de FM o señales continuas proce-
dentes de un oscilador, disco de prueba o instrumento electrónico.
• Cuando ajuste la calidad del sonido.
• Cuando encienda o apague el amplificador.
La página se está cargando ...

RQT9219
10
ENGLISHESPAÑOL
Location
The front and surround speakers should be placed at approximately
the same distance from the listening position. The angles in the dia-
gram are approximate.
Front speaker (including center channel) ( left: SB-FC1000L,
right: SB-FC1000R)
• Put the front speakers on either side of the television.
This system incorporates a center speaker in each of its front speak-
ers.
Using a unique system from Panasonic that reflects the principles of
auditory psychology, the sound seems to come from within the TV
screen, letting you enjoy sound and images with a heightened sense of
integration even if you are not seated directly in front of the TV set.
• It may be hard for the intended effect to be achieved under some
listening and viewing conditions and with some of the playback
sources.
• The effect will not be satisfactorily yielded if the left front speaker is
installed on the right and the right front speaker on the left.
• The sound quality will not be satisfactorily yielded if the center speak-
ers are hidden from the listener’s view.
• Do not position the front speakers so that they face outward or overly
inward.
Place them so that they are facing more or less straight ahead.
Surround speakers ( left, right: SB-HS1000)
• Put the surround speakers to the side of or slightly behind the seating
area.
Active subwoofer ( : SB-WA1000)
• Place it at least 5 cm from the wall as it has a bass reflex port in the
rear.
• Depending on speaker location, the low-range frequency character-
istics will vary. When placed in the corner of a room, the volume will
increase accordingly.
Do not attach the subwoofer to walls or ceilings.
How you set up your speakers can affect the bass and the sound field.
Note the following points.
• Place them on a flat, level secure surface.
Use spacers or similar items to stop them from rocking.
• Placing speakers too close to walls, and corners can result in exces-
sive bass.
• Cover walls and windows with a thick curtain.
• Do not place anything on top of the subwoofer.
30°
30°
120°
Ubicación
Los altavoces delanteros y de sonido ambiental deberán colocarse a
aproximadamente la misma distancia de la posición de escucha. Los
ángulos del diagrama son aproximados.
Altavoz delantero (incluyendo canal central) ( izquierdo: SB-
FC1000L, derecho: SB-FC1000R)
• Ponga los altavoces delanteros a ambos lados del televisor.
Este sistema incorpora un altavoz central en cada uno de sus altavo-
ces delanteros.
Utilizando un sistema único de Panasonic que refleja los principios de
la psicología auditiva, el sonido parece que procede del interior de la
pantalla del televisor, permitiéndole disfrutar de sonidos e imágenes
con una sensación aumentada de integración a pesar de no estar
sentado directamente enfrente del televisor.
• Bajo algunas condiciones de escucha y visión, y con algunas
fuentes de reproducción, puede que resulte difícil obtener el efecto
deseado.
• El efecto apropiado de estos altavoces no se producirá si el altavoz
delantero izquierdo se coloca a la derecha y el altavoz delantero
derecho se coloca a la izquierda.
• La calidad del sonido no se producirá satisfactoriamente si los
altavoces centrales están ocultos de la vista del oyente.
• No coloque los altavoces delanteros de forma que miren hacia el
exterior o demasiado hacia adentro.
Colóquelos de forma que miren más o menos rectos hacia delante.
Altavoz de sonido ambiental ( izquierdo, derecho: SB-
HS1000)
• Ponga los altavoces de sonido ambiental a los lados o un poco por
detrás del área de escucha.
Altavoz de extra-graves amplificado ( : SB-WA1000)
• Sepárelo un mínimo de 5 cm de la pared porque tiene en la parte
trasera un orificio para el reflejo de los graves.
• Dependiendo de la ubicación del altavoz, las características de baja
frecuencia cambiarán. Cuando se coloque en la esquina de una
habitación, el volumen aumentará de la forma correspondiente.
No instale este altavoz en paredes o techos.
La forma en que instala sus altavoces puede afectar a los graves y al
campo de sonido. Tenga en cuenta los puntos siguientes.
• Colóquelos en bases planas, niveladas y seguras.
Utilice espaciadores o cosas similares para impedir que se mue-
van.
• La colocación de los altavoces muy cerca de las paredes o esquinas
puede crear un sonido grave excesivo.
• Tape las paredes y las ventanas con cortinas gruesas.
• No ponga nada encima del altavoz de subgraves.
La página se está cargando ...

RQT9219
12
ENGLISHESPAÑOL
Assembly and Installation
Assembling the front speakers as stand
types
• Do not apply an unreasonable force to the net at the front of the
speaker unit. You cannot remove the front net.
•
You can carry out assembly work stably by placing the cushions in the packing
case beneath the speaker. Place the net sides of the speaker units face up.
Cushions used
Speaker units.
Use the four cushions at the very top of the SB-FS1000.
Method of setting cushions
Place these surfaces face up.
Be sure to spread a cloth, for example, on the cushion to protect it from damage.
• After each task, tighten the screws securely.
1.
Fit the stand bases onto the front speaker stands.
Align the two projections in one of the front speaker stands
(provided) with the two holes in the front R stand base
(provided), and fit together.
•
The packing bag for the front R stand base and the packing bag
for the front center speaker R are held in place by tape of the same
color. Assemble the base and speaker with the same color tape.
•
Similarly, the packing bag for the front L stand base and the packing bag for
the front center speaker L are held in place by tape of the same color.
Attach the stand base using the two stand base mounting
screws (provided).
Use the two screw holes marked “R” to attach the base.
•
Align the positions of the holes marked “R” with the positions of the screw
holes in the stand. If the positions do not line up, change the direction of
the stand. (The base can be fitted onto the top or bottom of the stand.)
•
When assembling front speaker L, use the screw holes marked “L” and fit.
• Tighten the screws alternately, and finally tighten them hard.
Reverse side of stand base
2. Fit the stand onto front speaker R.
Align the two projections in the assembled stand with the two
holes in front speaker R , and fit together.
Attach the stand using the stand mounting screw
(provided).
Use the center screw hole to fit the stand on to the speaker.
3.
Connect the speaker cables (provided) to the terminals.
Before connection, pass the speaker cords through the hole marked
“R” in the back of the stand base.
(Use the hole marked “L” for the left front speaker.)
Center speaker cable (approx. 6 m, provided)
Silver (cable)
:
Connect this to the “CENTER” black negative (–) terminal.
Copper (cable)
:
Connect this to the “CENTER” red positive (+) terminal.
Connect the other center speaker cable to the front speaker L terminal.
Speaker cables (short: 6 m, provided)
Silver (cable)
:
Connect this to the “LF” black negative (–) terminal.
Copper (cable)
:
Connect this to the “HF” red positive (+) terminal.
Do not remove the shorting bars.
Turn the thumb nut in the loosening direction until the hole in
the terminal becomes visible.
Insert the conductor into the hole, and tighten the thumb nut.
Never short-circuit positive (+) and negative (–) speaker wires.
4. Fix the speaker cables.
Press the speaker cables into the cable groove provided in the stand.
The speaker cables must have a thickness of 2.8 mm or less to fit
into the cable groove.
Cable groove
When using speaker cables that are thicker than 2.8 mm, attach
nylon clampers to the speakers and use them to fix the cables.
Example
Nylon clamp (provided)
Screw for nylon clamp (provided)
Speaker cables
Repeat steps 1 to 4 and assemble front speaker L.
R
R
Ensamblaje e instalación
Ensamblaje de los altavoces delanteros
como altavoces tipo vertical
• No aplique una fuerza excesiva a la red de la parte delantera del
altavoz. La red delantera no puede desmontarse.
•
Puede realizar el trabajo de ensamblaje de manera estable colocando los cojines de la caja de embalaje
debajo del altavoz. Coloque las caras de redes de las unidades de altavoces hacia arriba.
Cojines utilizados
Altavoces
Utilice los cuatro cojines en la parte superior del SB-FS1000.
Método de colocación de los cojines
Coloque estas superficies hacia arriba.
Asegúrese de poner un paño, por ejemplo, sobre el amortiguador
para protegerlo contra los daños.
• Apriete firmemente los tornillos después de cada tarea.
1.
Ajuste las bases de soportes en los soportes de los altavoces delanteros.
Alinee los dos resaltos de uno de los soportes de altavoces delanteros
(suministrados)
con los dos agujeros de la base de soporte derecho
(suministrado) y encájelos.
•
La bolsa de embalaje para la base de soporte delantero derecho y la bolsa de em-
balaje para el altavoz delantero central derecho se mantienen en su lugar mediante
cinta del mismo color. Ensamble la base y el altavoz con la cinta del mismo color.
•
De forma similar, la bolsa de embalaje para la base de soporte delantero
izquierdo y la bolsa de embalaje para el altavoz delantero central
izquierdo se mantienen en su lugar mediante cinta del mismo color.
Coloque la base de soporte usando los dos tornillos de mon-
taje de base de soporte (suministrados).
Utilice los dos agujeros de tornillos marcados “R” para colocar la base.
•
Alinee las posiciones de los agujeros marcados “R” con las posiciones de los agujeros
de tornillos en el soporte. Si las posiciones no se alinean, cambie el sentido del
soporte. (La base se puede colocar en la parte superior o inferior del soporte.)
• Cuando ensamble el altavoz delantero izquierdo, utilice los
agujeros de tornillos marcados “L” y fíjelo.
•
Apriete los tornillos de forma alterna y finalmente apriételos firmemente.
Cara posterior de la base de soporte
2.
Coloque el soporte en el altavoz delantero derecho.
Alinee los dos resaltos del soporte ensamblado con los dos
agujeros del altavoz delantero derecho y encájelos.
Coloque el soporte utilizando el tornillo de montaje de soporte
(suministrado).
Use el agujero del tornillo central para fijar el soporte en el altavoz.
3.
Conecte los cables de los altavoces (suministrados) a los terminales.
Antes de hacer la conexión, pase los cables de los altavoces a través
del agujero marcado “R” en la parte posterior de la base.
(Utilice el agujero marcado “L” para el altavoz delantero izquierdo.)
Cable de altavoz central
(6 m aproximadamente, suministrado)
Plata :
Conecte este cable al terminal negativo (–) negro “CENTER”.
Cobre :
Conecte este cable al terminal positivo (+) rojo “CENTER”.
Conecte el otro cable de altavoz central al terminal L del altavoz delantero.
Cables de altavoces (cortos: 6 m, suministrados)
Plata :
Conecte este cable al terminal negativo (–) negro “LF”.
Cobre : Conecte este cable al terminal positivo (+) rojo “HF”.
No quite las barras de cortocircuito.
Gire la tuerca de apriete manual para aflojarla hasta que se pueda ver el agujero del terminal.
Introduzca el conductor en el agujero y apriete la tuerca de apriete manual.
No cortocircuite nunca los cables positivos (+) y negativos (–) de los altavoces.
4. Fije los cables de los altavoces.
Meta a presión los cables de altavoces en la ranura para cables del soporte.
Los cables de altavoces deberán tener un grosor de 2,8 mm o menos
para caber dentro de la ranura de los mismos.
Ranura para cables
Cuando utilice cables de altavoces con un grosor superior a 2,8 mm, coloque
abrazaderas de nailon en los altavoces y utilícelas para fijar los cables.
Ejemplo
Abrazadera de nailon (suministrados)
Tornillo para abrazadera de nailon (suministrados)
Cables de altavoces
Repita los pasos 1 a 4 y ensamble el altavoz delantero izquierdo.
La página se está cargando ...

RQT9219
14
ENGLISHESPAÑOL
S
S
Assembly and Installation
Assembling the surround speakers as
stand types
• Do not apply an unreasonable force to the net at the front of the
speaker unit. You cannot remove the front net.
• You can carry out assembly work stably by placing the cushions in
the packing case beneath each speaker. Place the net sides of the
speaker units face up. ( page 12) Use the same cushions as
used for the front speakers.
Be sure to spread a cloth, for example, on the cushion to protect it
from damage.
• After each task, tighten the screws securely.
1. Fit the stand bases onto the surround speaker
stands.
Align the two projections in one of the surround speaker
stands (provided) with the two holes in one of the surround
stand bases (provided), and fit together.
Install the stand base at the end where the sticker has been adhered
on the inside.
Attach the stand base using the two stand base mounting
screws (provided).
Use the two screw holes marked “S” to attach the base.
Reverse side of stand base
2. Fit the stands onto the surround speakers.
Align the two projections in the assembled stand with the two
holes in the surround speaker , and fit together.
Attach the stand using the stand mounting screw (pro-
vided).
Use the center screw hole to fit the stand on to the speaker.
3. Connect the speaker cables (provided) to the
terminals
Before connection, pass the speaker cords through the hole marked
“S” in the back of the stand base.
Speaker cables (long: 10 m, provided)
Silver (cable) :
Connect this to the black negative (–) terminal.
Copper (cable) :
Connect this to the red positive (+) terminal.
Never short-circuit positive (+) and negative (–) speaker wires.
4. Fix the speaker cables.
Press the speaker cables into the cable groove provided in the
stand.
The speaker cables must have a thickness of 2.8 mm or less to fit
into the cable groove.
Cable groove
When using speaker cables that are thicker than 2.8 mm, attach
nylon clampers to the speakers and use them to fix the cables.
Example
Nylon clamp (provided)
Screw for nylon clamp (provided)
Speaker cables
Repeat steps 1 to 4 and assemble the other surround speaker.
Attaching a stabilizing wire
Example Remove the cover. Wire (not included)
Ring (not included) Screw (not included)
The wall on which the speakers are to be mounted and the screws
(not included) used for installing the speakers must be strong enough
to support a weight of at least 65 kg for the front speakers and 50 kg for
the surround speakers. Consult the contractor in charge of the work.
A screw which is at least 35 mm long ( see above) is used
when installing the speaker on a wooden post or pillar. In all other
cases, use a screw which is strong enough to support a weight of
at least 65 kg or 50 kg.
Ensamblaje e instalación
Ensamblaje de los altavoces de sonido
ambiental como altavoces tipo vertical
• No aplique una fuerza excesiva a la red de la parte delantera del
altavoz. La red delantera no puede desmontarse.
•
Puede realizar el trabajo de ensamblaje de manera estable colocando los
cojines de la caja de embalaje debajo del altavoz. Coloque las caras de
redes de las unidades de altavoces hacia arriba. ( página 12) Utilice
los mismos cojines que los utilizados para los altavoces delanteros.
Asegúrese de poner un paño, por ejemplo, sobre el amortiguador
para protegerlo contra los daños.
• Apriete firmemente los tornillos después de cada tarea.
1. Fije las bases de soportes en los soportes de los
altavoces de sonido ambiental.
Alinee los dos resaltos de uno de los soportes de altavoces de
sonido ambiental (suministrado) con los dos agujeros de
una de las bases de soportes de altavoz de sonido ambiental
(suministrado) y encájelos.
Instale la base de soporte en el extremo donde la pegatina ha sido
adherida al interior.
Coloque la base de soporte usando los dos tornillos de mon-
taje de base de soporte (suministrados).
Utilice los dos agujeros de tornillos marcados “S” para colocar la base.
Cara posterior de la base de soporte
2. Fije los soportes en los altavoces de sonido
ambiental.
Alinee los dos resaltos del soporte ensamblado con los dos
agujeros del altavoz de sonido ambiental y encájelos.
Coloque el soporte utilizando el tornillo de montaje de soporte
(suministrado).
Use el agujero del tornillo central para fijar el soporte en el altavoz.
3. Conecte los cables de los altavoces (suministrados)
a los terminales.
Antes de hacer la conexión, pase los cables de los altavoces a través
del agujero marcado “S” en la parte posterior de la base.
Cables de altavoces (largos: 10 m, suministrados)
Plata : Conecte este cable al terminal negativo (–) negro.
Cobre : Conecte este cable al terminal positivo (+) rojo.
No cortocircuite nunca los cables positivos (+) y negativos (–) de los altavoces.
4. Fije los cables de los altavoces.
Meta a presión los cables de altavoces en la ranura para cables del soporte.
Los cables de altavoces deberán tener un grosor de 2,8 mm o menos
para caber dentro de la ranura de los mismos.
Ranura para cables
Cuando utilice cables de altavoces con un grosor superior a 2,8
mm, coloque abrazaderas de nailon en los altavoces y utilícelas
para fijar los cables.
Ejemplo
Abrazadera de nailon (suministrados)
Tornillo para abrazadera de nailon (suministrados)
Cables de altavoces
Repita los pasos 1 a 4 y ensamble el otro altavoz de sonido ambiental.
Colocación de un alambre estabilizador
Ejemplo Quite la cubierta.
Alambre (no suministrado)
Anillo (no suministrado)
Tornillo (no suministrado)
La pared en la que vayan a montarse los altavoces y los tornillos
(no
incluidos) utilizados para instalar los altavoces deberán ser lo suficiente-
mente fuertes como para poder soportar un peso mínimo de 65 kg para
los altavoces delanteros y 50 kg para los altavoces de sonido ambiental.
Consulte con el contratista encargado de hacer este trabajo.
Cuando se instala el altavoz en un poste o en un pilar de madera
se utiliza un tornillo de 35 mm de longitud como mínimo (
vea más arriba). En todos los demás casos, utilice un tornillo que
sea lo suficientemente fuerte como para poder soportar un peso
mínimo de 65 kg o 50 kg.
La página se está cargando ...

RQT9219
16
ENGLISHESPAÑOL
35 mm
35 mm
Assembly and Installation
Wall-mounting the front and surround
speakers
Do not attempt to attach these speakers to walls using methods other
than those described in this manual.
• After each task, tighten the screws securely.
• Keep the removed parts carefully aside.
1. Connect the speaker cables (provided) to the
terminals.
Refer to step 3 on page 12 and step 3 on page 14.
• If the speakers are to be wall-mounted, the stands and stand
bases need not be fitted onto the speaker units.
2. Adhere the spacers and mount the speakers on
the wall.
Remove the covers from the back of the speakers.
Adhere the spacers in the four locations.
• Align the spacers with the bottom of the holes used for wall
mounting, and adhere.
Mount the speakers on the wall.
When the screws are in this position, the speaker may drop
off.
Fit the speaker securely so the screws are in this position.
Screw (not included)
Arrange the speaker cables in such a way that they will not touch
the holes used for wall mounting.
The wall on which the speakers are to be mounted and the screws
(not included) used for installing the speakers must be strong
enough to support a weight of at least 30 kg for the front speakers
and 20 kg for the surround speakers. Consult the contractor in
charge of the work.
A screw which is at least 35 mm long ( see above) is used
when installing the speaker on a wooden post or pillar. In all
other cases, use a screw which is strong enough to support a
weight of at least 30 kg or 20 kg.
Assembling a wall-mounted speaker system as a stand type
Return the speaker to the original condition by carrying out
the opposite procedure to the above.
Assemble the speaker as a stand type. ( page 12 and page
14)
Settings for connecting the recommended amplifier
to the active subwoofer
When using our SA-BX500/SA-XR700 AV control receiver (not
included)
First make the following settings.
• Refer to “Setting the Amplifier” in the instruction manual for the
SA-BX500/SA-XR700 AV control receiver.
Setting the speaker (YES/NO) and its size
Speaker to be set
SUBW (subwoofer)
LR (Front)
C (Center)
S (Surround)
Setting item
YES (Connected)
SMALL
SMALL
SMALL
Setting the lower region filter
Selection frequency: 100 (Frequencies of 100 Hz and below
are output to the subwoofer.)
Note
To improve the acoustics, it is recommended that the amplifier’s
center speaker output level be set 1 dB to 3 dB higher than
usual.
Ensamblaje e instalación
Montaje en pared de los altavoces
delanteros y de sonido ambiental
No intente colocar estos altavoces en paredes utilizando otros métodos
que no sean los descritos en este manual.
• Apriete firmemente los tornillos después de cada tarea.
• Ponga cuidadosamente a un lado las piezas desmontadas.
1. Conecte los cables de los altavoces (suministrados)
a los terminales.
Consulte el paso 3 en la página 12 y el paso 3 en la página 14.
• Si los altavoces van a ser montados en una pared, los soportes
y las bases de soportes no necesitarán ser colocados en las
unidades de altavoces.
2. Fije los espaciadores y monte los altavoces en la
pared.
Quite las cubiertas de la parte posterior de los altavoces.
Fije los espaciadores en las cuatro ubicaciones.
• Alinee los espaciadores con el fondo de los agujeros utilizados
para el montaje en pared y fíjelos.
Monte los altavoces en la pared.
En esta posición puede que se caiga el altavoz.
Coloque firmemente el altavoz de forma que los tornillos estén
en esta posición.
Tornillo (no suministrado)
Coloque los cables de los altavoces de forma que no toquen los
agujeros utilizados para el montaje en la pared.
La pared en la que vayan a montarse los altavoces y los tornillos
(no incluidos) utilizados para instalar los altavoces deberán ser lo
suficientemente fuertes como para poder soportar un peso mínimo
de 30 kg para los altavoces delanteros y 20 kg para los altavoces
de sonido ambiental. Consulte con el contratista encargado de
hacer este trabajo.
Cuando se instala el altavoz en un poste o en un pilar de madera
se utiliza un tornillo de 35 mm de longitud como mínimo (
vea más arriba). En todos los demás casos, utilice un tornillo
que sea lo suficientemente fuerte como para poder soportar un
peso mínimo de 30 kg o 20 kg.
Ensamblaje de un altavoz montado en pared como altavoz tipo
independiente
Vuelva a poner el altavoz en la condición original realizando
a la inversa el procedimiento descrito más arriba.
Ensamblaje del altavoz como altavoz tipo independiente.
( página 12 y página 14)
Ajustes para conectar el amplificador recomendado
al altavoz de subgraves activo
Cuando utilice nuestro receptor de control AV modelo SA-BX500/
SA-XR700 (no suministrado)
Haga primero los ajustes siguientes.
• Consulte “Ajuste del amplificador” en el manual de instrucciones
del receptor de control AV modelo SA-BX500/SA-XR700.
Ajuste del altavoz (YES/NO) y su tamaño
Altavoz que va a ser ajustado
SUBW (subgraves)
LR (Delantero)
C (Central)
S (Ambiental)
Elemento de ajuste
YES (Conectado)
SMALL
SMALL
SMALL
Ajuste del filtro pasabajos
Selección de frecuencia: 100 (Las frecuencias de 100 Hz y
menos salen al altavoz de subgraves.)
Nota
Para mejorar la acústica se recomienda que el nivel de la salida
del altavoz central sea ajustado en el amplificador entre 1 dB y
3 dB más alto que lo habitual.
La página se está cargando ...

RQT9219
18
ENGLISHESPAÑOL
Connections
Connect to a receiver or amplifier with 6-Ω impedance for the front
and surround speakers, and a pin-type output terminal for an active
subwoofer. You cannot connect these speakers to any equipment
other than this amplifier.
Before connection
Turn off the other equipment.
Do not connect the AC mains lead until all other cables and cords
are connected.
Front and surround speakers
With the front speakers and , connect their center speaker cables
(approx. 6 meters) to the center terminals on the amplifier, and
connect the speaker cables (short: 6 meters) to the front terminals.
With the surround speakers and , connect the speaker cables
(long: 10 meters) to the surround terminals.
Be sure to connect the (+) ends of the speaker cables to the positive
(+) terminals of the amplifier and connect their (–) ends to its negative
(–) terminals.
Never short-circuit positive (+) and negative (–) speaker wires.
Subwoofer
1. Connect using the included monaural connection
cable to the receiver or amplifier’s subwoofer
output terminal.
For the United Kingdom:
BE SURE TO READ THE CAUTION FOR THE AC
MAINS LEAD ON PAGE 3 BEFORE CONNECTION.
2. Connect the AC mains lead to the household
AC outlet .
The included AC mains lead is for use with this unit only.
Do not use it with other equipment.
Bi-wiring connections
The front speakers come with separate mid/high-range (HF) and low-
range (LF) terminals. If your amplifier comes with two sets of speaker
terminals marked A and B, for instance, you can enjoy a more expan-
sive sound field and a greater depth in the sound by connecting the
speaker terminals to the terminals A and B on the amplifier.
• Remove the shorting bars (but be sure to keep them in a safe
place).
• Use the speaker cables (not provided) to connect both the HF
and LF terminals on the amplifier to the front speakers.
• Set the speaker selector switch on the amplifier to A/B (both A and
B).
(For further details, refer to the operating instructions of the ampli-
fier.)
Note
• Do not move the speaker while the speaker cables are connected.
This may cause a short circuit.
• Make sure to bundle the speaker cable with a string etc. when re-
locating the speaker cables.
Conexiones
Haga las conexiones a un receptor o amplificador
con impedancia de 6-Ω
para los altavoces delanteros y de sonido ambiental, y emplee un terminal de
salida tipo contactos para un altavoz de subgraves activo. No puede conectar
estos altavoces a ningún otro equipo que no sea este amplificador.
Antes de hacer la conexión
Apague el otro equipo.
No conecte el cable de alimentación de CA hasta después de haber
conectado todos los demás cables.
Altavoces delanteros y de sonido
ambiental
Con los altavoces delanteros y , conecte los cables de sus al-
tavoces centrales (6 metros aproximadamente) en los terminales
de altavoces centrales del amplificador, y conecte los cables de los
altavoces (cortos: 6 metros) a los terminales de los altavoces
delanteros. Con los altavoces de sonido ambiental y , conecte
los cables de los altavoces (largos: 10 metros) a los terminales de
altavoces de sonido ambiental.
Asegúrese de conectar los extremos (+) de los cables de los altavoces
a los terminales positivos (+) del amplificador y los extremos (–) a los
terminales negativos (–).
No cortocircuite nunca los cables positivos (+) y negativos (–) de
los altavoces.
Altavoz de subgraves
1. Conéctelo con el cable de conexión monofónico
suministrado al terminal de salida de altavoz
de subgraves del receptor o amplificador.
2. Conecte el cable de alimentación de CA a la
toma de CA del hogar .
El cable de alimentación de CA suministrado es para ser utilizado
con esta unidad solamente.
No lo utilice con otros aparatos.
Conexiones tipo bicableado
Los altavoces delanteros vienen con terminales separados de gama media/alta
(HF) y de gama baja (LF). Si sus amplificadores vienen con dos juegos de
terminales de altavoces marcados A y B, por ejemplo, usted puede disfrutar de
un campo acústico más expansivo y de una mayor profundidad en el sonido co-
nectando los terminales de altavoces a los terminales A y B del amplificador.
• Quite las barras de cortocircuito (pero asegúrese de guardarlas
en un lugar seguro).
• Use los cables de altavoces (no suministrados) para conectar los
terminales HF y LF del amplificador a los altavoces delanteros.
•
Ponga el selector de altavoces del amplificador en A/B (ambos, A y B).
(Para conocer más detalles, consulte las instrucciones de funciona-
miento del amplificador.)
Nota
• No mueva el altavoz mientras están conectados sus cables. Esto
podría causar un cortocircuito.
• Asegúrese de juntar los cables de los altavoces con una cuerda,
etc. cuando cambie la posición de los mismos.
La página se está cargando ...

RQT9219
20
ENGLISHESPAÑOL
VOLUME
LOW PASS FILTER
PHASE
POWER
MAXMIN
Hz
50 200
150
100
80
60
NORMAL
REVERSE
OFF
ON
AUTO OPERATION ON/OFF
DUAL DRIVE ACTIVE SUBWOOFER
PHASE
NORMAL
REVERSE
VOLUME
LOW PASS FILTER
PHASE
MAXMIN
Hz
50 200
150
100
80
60
NORMAL
REVERSE
OFF
ON
AUTO OPERATION ON/OFF
DUAL DRIVE ACTIVE SUBWOOFER
POWER
POWER
4
3
5
1
2
Subwoofer operation
The active subwoofer reproduces very low frequency sound mon-
aurally, making use of the fact that the human ear does not sense
direction in the low frequency region.
You can emphasize low frequencies by combining the active subwoofer
with the speaker system.
1. Set [POWER] to “ ON”.
The indicator turns green.
2. Output sound from the receiver or amplifier
and adjust the volume to a suitable level.
See the operating instructions for the other equipment for details.
• Do not adjust the bass as this can cause distortion.
•
If the volume control on the amplifier is left in the minimum position or
there is no signal from the amplifier for more than 10 minutes, the active
subwoofer will automatically switch to standby and the power lamp will
turn red. If you turn up the volume control on the amplifier or if a signal
enters the subwoofer from the amplifier, the subwoofer will automatically
switch to the operation mode and the power lamp will turn green.
Note, however, that the subwoofer may sometimes fail to switch to
standby due to noise emitted by the amplifier to which it is connected.
3. Set [LOW PASS FILTER].
•
Refer to “Frequency response by LOW PASS FILTER setting”
.
• When you adjust the frequency domain of subwoofer with your
receiver or amplifier, set [LOW PASS FILTER] to 200 Hz.
4. Adjust [VOLUME] to a suitable level.
•
Gradually turn up the volume control from the minimum position and set it
in a position where the output from the subwoofer is balanced with the front
speakers and also there is no distortion in the low frequency region.
• Refer to “Level change according to volume control setting” .
5.
Play something, then set [PHASE] to “ NORMAL”
or “
REVERSE” so the sound is normal.
The subwoofer and speakers cancel each other out (causing
unusual, muffled sound) if the phase setting is incorrect.
Set [POWER] to “ OFF”.
The indicator turns off.
When you wish to reproduce 2-channel stereo music
The output in the low range sometimes may be excessively high de-
pending on the setting of the amplifier and the active subwoofer when
you are reproducing a multi-channel movie source.
Reduce the subwoofer level at the amplifier side.
Also, note that you may be able to obtain more natural sound quality by
reducing the frequency of the “low-pass filter” on the active subwoofer.
Note
If the volume output is too loud, this unit’s amplifier can be clipped,
causing output to sound unusual. Reduce the volume of the receiver
or amplifier or the volume of this unit if this occurs.
When settings are complete
The only operation you should have to perform daily is press [POWER]
to turn the unit ON/OFF.
If you reposition the system and the acoustics change, reset the unit
as necessary.
Protection circuitry (SB-WA1000)
This speaker is provided with a protection circuit. If trouble develops
inside the speaker because the speaker is being used in an abnormally
hot location or because excessively high input signals are supplied,
the protection circuit may be triggered, shutting down the output.
It could take approximately an hour for the protection circuitry
to reset.
If sound is interrupted during play...
1. Reduce the volume level from the receiver or amplifier.
2. Press [POWER] to turn the unit off.
3. Check the temperature and connections for problems.
4. Remove the cause of any problems discovered. Press
[POWER] to turn the unit on.
Should the unit still not function properly...
Pull out the plug and consult your dealer.
Operación del altavoz de subgraves
El altavoz de subgraves activo reproduce monofónicamente el sonido
de frecuencias muy bajas, aprovechando el hecho de que el oído
humano no siente la dirección en la zona de frecuencias bajas.
Usted puede realzar las frecuencias bajas combinando el altavoz de
subgraves activo con el sistema de altavoces.
1. Ponga [POWER] en “ ON”.
El indicador se pone verde.
2. Dé salida al sonido del receptor o amplificador
y ajuste el volumen a un nivel apropiado.
Consulte las instrucciones de funcionamiento del otro equipo para conocer detalles.
• No ajuste los graves porque esto puede causar distorsión.
•
Si el control de volumen del amplificador se deja en la posición del mínimo
o no hay señal procedente del amplificador durante más de 10 minutos, el
altavoz de subgraves activo se pondrá automáticamente en el modo de
espera y la luz de la alimentación se pondrá roja. Si sube el volumen en el
amplificador o entra una señal en el altavoz de subgraves procedente del
amplificador, el altavoz de subgraves se pondrá automáticamente en el
modo de funcionamiento y la luz de la alimentación se pondrá verde.
Note, sin embargo, que el altavoz de subgraves podrá no ponerse algunas veces en el
modo de espera debido al ruido emitido por el amplificador al que está conectado.
3. Ajuste [LOW PASS FILTER].
•
Consulte “Respuesta de frecuencia del ajuste LOW PASS FILTER”
.
•
Cuando ajuste el dominio frecuencial del altavoz de subgraves con su
receptor o amplificador, ponga [LOW PASS FILTER] en 200 Hz.
4. Ajuste [VOLUME] a un nivel apropiado.
•
Gire poco a poco el control de volumen desde la posición del mínimo y póngalo en una
posición donde la salida del altavoz de subgraves quede equilibrada con los altavoces
delanteros y no haya tampoco distorsión en la zona de frecuencias bajas.
•
Consulte “Cambio de nivel según el ajuste del control de volumen”
.
5.
Reproduzca algo y luego ajuste [PHASE] a “ NORMAL”
o “
REVERSE” para que el sonido sea normal.
Si la fase no es correcta el altavoz de subgraves y los demás altavo-
ces se anularán entre sí (causando un sonido extraño y apagado).
Ponga [POWER] en “ OFF”.
El indicador se apaga.
Cuando quiera reproducir música estéreo de 2 canales
La salida en la gama baja puede ser algunas veces excesivamente alta
dependiendo del ajuste del amplificador y el altavoz de subgraves activo
cuando usted está reproduciendo películas de múltiples canales.
Reduzca el nivel del altavoz de subgraves en el amplificador.
Tenga también en cuenta que tal vez pueda obtener una calidad de sonido más natural
reduciendo la frecuencia del “filtro pasabajos” en el altavoz de subgraves activo.
Nota
Si la salida del sonido está demasiado alta, el amplificador de esta unidad
podrá bloquearse, haciendo que la salida suene mal. Si ocurre esto, re-
duzca el volumen del receptor, el del amplificador o el de esta unidad.
Cuando los ajustes están completos
La única operación que Ud. deberá realizar diariamente es presionar
[POWER] para encender y apagar la unidad.
Si Ud. reubica el sistema y la acústica cambia, reajuste la unidad como fuera necesario.
Circuitos de protección (SB-WA1000)
El altavoz dispone de un circuito de protección. Si se produce un problema
dentro del altavoz porque éste está siendo utilizado en un lugar excesiva-
mente caliente o porque se suministran señales de entrada excesivamente
altas, el circuito de protección podrá activarse y cortar la salida.
Puede transcurrir aproximadamente una hora hasta que se
restablezcan los circuitos de protección.
Si el sonido se interrumpe durante la reproducción…
1. Reduzca el nivel del volumen del receptor o amplificador.
2. Pulse [POWER] para apagar la unidad.
3.
Compruebe la temperatura y las conexiones por si hubiera algún problema.
4. Elimine la causa de cualquier problema que se descubra.
Pulse [POWER] para encender la unidad.
Si la unidad no funciona correctamente…
Desenchúfela y consulte a su distribuidor.
La página se está cargando ...

RQT9219
22
ENGLISHESPAÑOL
Other notes
When used with a CRT TV set
• Depending on how the installation is configured, irregular coloring
may occur. If this occurs, turn the television off for about 30 minutes.
The television’s demagnetizing function should correct the problem.
If it persists, move the speakers further away from the television.
This speaker system is not magnetically shielded.
Do not place it near a PC or other device that is affected by magnetic
fields.
Keep magnetized items away.
Magnetized cards, bank cards, commuter passes, etc., can be dam-
aged if placed too closed to the speaker magnets. Clocks may also
be affected.
Avoid locations such as described below :
• In direct sunlight
• Near heating appliances or other sources of heat
• Where the humidity is high
Otras notas
Cuando se utilice un televisor con tubo de rayos catódicos
• Dependiendo de cómo se configure la instalación es posible que
se produzcan colores irregulares. Si ocurre esto, apague el televi-
sor durante unos 30 minutos. La función de desmagnetización del
televisor deberá corregir el problema. En caso contrario, separe más
aún los altavoces del televisor.
Este sistema de altavoces no está blindado magnética-
mente.
No lo coloque cerca de un PC u otro dispositivo que sea afectado por
los campos magnéticos.
Aleje los objetos magnetizados.
Las tarjetas magnetizadas, las tarjetas de bancos, los pases de vi-
ajeros, etc., pueden estropearse si se dejan demasiado cerca de los
imanes de los altavoces. Los relojes también pueden ser afectados.
Evite ubicaciones como las indicadas a continuación:
• Expuestas a los rayos solares directos
• Próximas a dispositivos de calefacción u otras fuentes de calor
• Donde la humedad sea excesiva
Specifi cations
SB-FC1000L/SB-FC1000R
FRONT SPEAKER SECTION
Type 3 way 4 speaker system Bass-reflex type
Speaker Woofer: 8 cm cone type x 2
Tweeter: 2.5 cm dome type x 1
Super Tweeter: 1.2 cm dome type x 1
Impedance (HF/LF) 6 Ω
Input power (IEC) (HF/LF) 200 W (MAX), 100 W (RATED)
Sound pressure level 82.5 dB/W (1.0 m)
Crossover frequency 2.5 kHz, 20 kHz
Frequency range 65 Hz – 100 kHz (at –16 dB)
75 Hz – 90 kHz (at –10 dB)
CENTER SPEAKER SECTION
Type 3 way 3 speaker system Bass-reflex type
Speaker Woofer: 8 cm cone type x 1
Midrange: 6.5 cm cone type x 1
Tweeter: 2.5 cm dome type x 1
Impedance 12 Ω
Input power (IEC) 100 W (MAX), 50 W (RATED)
Sound pressure level 80 dB/W (1.0 m)
Crossover frequency 800 Hz, 3 kHz
Frequency range 65 Hz – 50 kHz (at –16 dB)
75 Hz – 40 kHz (at –10 dB)
GENERAL
Dimensions (W x H x D) 279 mm x 1298 mm x 279 mm (with the stand)
175 mm x 802 mm x 102 mm (For wall-mounting)
Mass Approx. 12.6 kg (with the stand)
Approx. 5.4 kg (For wall-mounting)
SB-HS1000
Type 2 way 3 speaker system Bass-reflex type
Speaker Woofer: 8 cm cone type x 2
Tweeter: 2.5 cm dome type x 1
Impedance 6 Ω
Input power (IEC) 200 W (MAX), 100 W (RATED)
Sound pressure level 82.5 dB/W (1.0 m)
Crossover frequency 2.5 kHz
Frequency range 65 Hz – 50 kHz (at –16 dB)
75 Hz – 40 kHz (at –10 dB)
Dimensions (W x H x D)
279 mm x 1298 mm x 279 mm (with the stand)
125 mm x 802 mm x 87 mm (For wall-mounting)
Mass Approx. 9.3 kg (with the stand)
Approx. 3.7 kg (For wall-mounting)
SB-WA1000
SPEAKER SECTION
Type 1 way 2 speaker system Bass-reflex type
Speaker Woofer: 17 cm cone type x 2
Sound pressure level 83 dB/W (1.0 m)
Frequency range (with amp) 28 Hz – 300 Hz (at –16 dB)
32 Hz – 240 Hz (at –10 dB)
AMPLIFIER SECTION
Output power 100 W (6 Ω) x 2 (THD 0.9%)
Input sensitivity / Input Impedance 300 mV/33 kΩ (RCA jack)
Phase switching NORMAL/REVERSE
Low pass filter 50 Hz – 200 Hz Variable
GENERAL
Power supply AC 230 V – 240 V, 50 Hz
Power consumption
140 W
Dimensions (W x H x D) 254 mm x 496 mm x 500 mm
Mass Approx. 22 kg
Power consumption in input standby condition 1.5 W
Note
Specifications are subject to change without notice.
Especifi caciones técnicas
SB-FC1000L/SB-FC1000R
SECCIÓN DE ALTAVOCES DELANTEROS
Tipo Sistema de 4 altavoces de 3 vías tipo reflexión de graves
Altavoces Graves: 2 de tipo cónico de 8 cm
Agudos: 1 de tipo cúpula de 2,5 cm
Superagudos: 1 de tipo cúpula de 1,2 cm
Impedancia (HF/LF) 6 Ω
Potencia de entrada (IEC) (HF/LF) 200 W (máxima), 100 W (nominal)
Nivel de presión acústica 82,5 dB/W (1,0 m)
Frecuencia de cruce 2,5 kHz, 20 kHz
Gama de frecuencias 65 Hz – 100 kHz (a –16 dB)
75 Hz – 90 kHz (a –10 dB)
SECCIÓN DE ALTAVOCES CENTRALES
Tipo Sistema de 3 altavoces de 3 vías tipo reflexión de graves
Altavoces Graves: 1 de tipo cónico de 8 cm
Gama media: 1 de tipo cónico de 6,5 cm
Agudos: 1 de tipo cúpula de 2,5 cm
Impedancia 12 Ω
Potencia de entrada (IEC) 100 W (máxima), 50 W (nominal)
Nivel de presión acústica 80 dB/W (1,0 m)
Frecuencia de cruce 800 Hz, 3 kHz
Gama de frecuencias 65 Hz – 50 kHz (a –16 dB)
75 Hz – 40 kHz (a –10 dB)
GENERALIDADES
Dimensiones (An x Al x Prof)
279 mm x 1298 mm x 279 mm (con el soporte)
175 mm x 802 mm x 102 mm (para montar en pared)
Peso Aprox. 12,6 kg (con el soporte)
Aprox. 5,4 kg (para montar en pared)
SB-HS1000
Tipo Sistema de 3 altavoces de 2 vías tipo reflexión de graves
Altavoces Graves: 2 de tipo cónico de 8 cm
Agudos: 1 de tipo cúpula de 2,5 cm
Impedancia 6 Ω
Potencia de entrada (IEC) 200 W (máxima), 100 W (nominal)
Nivel de presión acústica 82,5 dB/W (1,0 m)
Frecuencia de cruce 2,5 kHz
Gama de frecuencias 65 Hz – 50 kHz (a –16 dB)
75 Hz – 40 kHz (a –10 dB)
Dimensiones (An x Al x Prof)
279 mm x 1298 mm x 279 mm (con el soporte)
125 mm x 802 mm x 87 mm (para montaje en pared)
Peso Aprox. 9,3 kg (con el soporte)
Aprox. 3,7 kg (para montaje en pared)
SB-WA1000
SECCIÓN DE ALTAVOCES
Tipo Sistema de 2 altavoces de 1 vía tipo reflexión de graves
Altavoces Graves: 2 de tipo cónico de 17 cm
Nivel de presión acústica 83 dB/W (1,0 m)
Gama de frecuencias (con amplificador) 28 Hz – 300 Hz (a –16 dB)
32 Hz – 240 Hz (a –10 dB)
SECCIÓN DEL AMPLIFICADOR
Potencia de salida 100 W (6 Ω) x 2 (DAT de 0,9%)
Sensibilidad/impedancia de entrada 300 mV/33 kΩ (toma RCA)
Conmutación de fase Normal/Invertida
Filtro pasabajos 50 Hz – 200 Hz, variable
GENERALIDADES
Alimentación CA 230 V – 240 V, 50 Hz
Consumo 140 W
Dimensiones (An x Al x Prof) 254 mm x 496 mm x 500 mm
Peso Aprox. 22 kg
Consumo de energía en el modo de espera 1,5 W
Nota
Las especificaciones están sujetas a cambios sin previo aviso.
La página se está cargando ...
La página se está cargando ...
La página se está cargando ...
La página se está cargando ...
La página se está cargando ...
La página se está cargando ...
La página se está cargando ...
La página se está cargando ...
La página se está cargando ...
La página se está cargando ...
La página se está cargando ...
La página se está cargando ...
La página se está cargando ...
La página se está cargando ...
La página se está cargando ...
La página se está cargando ...
La página se está cargando ...
La página se está cargando ...
La página se está cargando ...
La página se está cargando ...
La página se está cargando ...
La página se está cargando ...
La página se está cargando ...
La página se está cargando ...
La página se está cargando ...
La página se está cargando ...
La página se está cargando ...
La página se está cargando ...
La página se está cargando ...
La página se está cargando ...
La página se está cargando ...
La página se está cargando ...
La página se está cargando ...
La página se está cargando ...
La página se está cargando ...
La página se está cargando ...
La página se está cargando ...
La página se está cargando ...
La página se está cargando ...
La página se está cargando ...
La página se está cargando ...

RQT9219
64
ENGLISHESPAÑOLFRANÇAIS
NEDERLANDS
DEUTSCHITALIANOSVENSKADANSKČESKYPOLSKI
РУССКИЙ
ЯЗЫК
УКРАЇНСЬКА
Maintenance
Clean these units with a soft, clean, dry cloth.
• Never use alcohol, paint thinner, or benzine to clean these units.
• Before using chemically treated cloth, read the instructions that came
with the cloth carefully.
Mantenimiento
Limpie estas unidades con un paño blando, limpio y seco.
• No utilice nunca alcohol, diluyente de pintura ni bencina para limpiar
estas unidades.
• Antes de utilizar un paño impregnado químicamente, lea con atención
las instrucciones suministradas con la unidad.
Entretien
Nettoyez ces enceintes avec un chiffon doux, propre et sec.
• N’utilisez jamais d’alcool, diluant pour peinture ni de benzine pour
nettoyer ces enceintes.
• Avant d’utiliser un chiffon imprégné chimiquement, lisez attentive-
ment les instructions qui accompagnent le chiffon.
Onderhoud
Reinig de luidsprekers met een zachte, schone, droge doek.
• Gebruik nooit alcohol, verfverdunner of benzine voor het schoon-
maken van de buitenpanelen.
• Alvorens een chemisch behandelde doek te gebruiken, dient u de
bij de doek horende instructies zorgvuldig te lezen.
Pflege und Instandhaltung
Reinigen Sie die Boxen mit einem weichen, sauberen,
trockenen Tuch.
• Auf keinen Fall Alkohol, Farbverdünner oder Benzin zum Reinigen
verwenden.
•
Vor Verwendung eines chem isch behandelten Reinigungstuchs die
dem Tuch beiliegende Gebrauchsanweisung sorgfältig durch lesen.
Manutenzione
Pulire queste unità con un panno morbido, pulito e as-
ciutto.
• Per pulire le unita non si deve mai usare alcol, diluenti per vernici o
benzina.
• Prima di usare un panno trattato chimicamente, leggere con cura le
istruzioni che lo accompagnano.
Underhåll
Rengör enheterna med en mjuk, ren och torr tygduk.
• Använd aldrig alkohol, målarthinner eller ren bensin för att rengöra
enheterna.
• Innan du använder en kemiskt preparerad tygduk, läs instruk tionerna
som följde med tygduken ordentligt.
Vedligeholdelse
Rengør disse enheder med en tør, blød klud.
• Brug aldrig sprit, fortynder, rensebenzin til rengøringen.
• Før du evt. benytter en kemisk imprægneret klud, bør du omhyggeligt
læse den vejledning, som følger med kluden.
Údržba přístroje
Tyto jednotky čistěte měkkým čistým a suchým hadříkem.
• Nikdy nepoužívejte líh, ředidlo nebo benzín pro čištění těchto
přístrojů.
• Před použitím chemicky impregnované látky si prosím pečlivě
přečtěte návod k utěrce přiložený.
Konserwacja
Czyść urządzenia miękką, czystą, suchą szmatką.
• Nigdy nie używaj alkoholu, rozpuszczalnika do farb lub benzyny do
czyszczenia niniejszych urządzeń.
• W razie używania chemicznie impregnowanej ściereczki, starannie
przeczytaj zalecenia dołączone do ściereczki.
Уxoд
Для очистки Данного аппарата используйте мягкую,
чистую и сухую ткань.
• Никогда не используйте для оцистки аппарата спирт, растворитель
или бензин.
• При использоваии ткани, подвергнутой химиуеской обработке,
обратитесь к инструкции по обращению с ней.
Обслуговування
Протирайте пристрої м’якою сухою та чистою тканиною.
• Не використовуйте для чищення пристроїв спирт, розріджувач
або бензин.
• Перш ніж застосовувати хімічно оброблену тканину, уважно
ознайомтеся з інструкціями для її використання.
La página se está cargando ...
La página se está cargando ...
La página se está cargando ...
La página se está cargando ...
Transcripción de documentos
Avant de raccorder, faire fonctionner ou régler l’appareil, lire attentivement tout ce mode d’emploi. Conserver ce manuel. Högtalarsystem Gelieve deze gebruiksaanwijzing volledig door te lezen alvorens dit product aan te sluiten, te bedienen of af te stellen. Bewaar deze gebruiksaanwijzing. Reprosoustava Højttalersystem Zestaw głośników Bitte lesen Sie diese Bedienungsanleitung vor dem Anschließen, Inbetriebnehmen oder Einstellen dieses Gerätes vollständig durch. Diese Anleitung bitte aufbewahren. Акустическая система Акустична система Prima di collegare, far funzionare o regolare l’apparecchio, leggere completamente queste istruzioni. Conservare questo manuale. Model No. Läs denna bruksanvisning helt innan du ansluter, använder eller justerar denna produkt. Spara denna bruksanvisning. Læs venligst hele denne betjeningsvejledning, før du tilslutter, betjener eller indstiller dette apparat. Gem vejledningen til senere brug. Dříve než začnete jakékoli zapojování, operace nebo nastavování tohoto výrobku, prostudujte si prosím celý tento návod. Uschovejte si prosím tento návod k obsluze. ENGLISH SB-TP1000 See the pages 2–6, 8, 10, 12–22 and 64. ESPAÑOL Véase las páginas 2, 4–6, 8, 10, 12–22 y 64. FRANÇAIS Voir les pages 2, 4–5, 7, 9–21, 23 et 64. Przed podłączeniem uruchomieniem, lub regulacją sprzętu prosimy o dokładne zapoznanie się z treścią niniejszej instrukcji. Prosimy o zachowanie niniejszej instrukcji obsługi. Niniejsza instrukcja została opracowana na podstawie oryginalnej publikacji firmy MATSUSHITA ELECTRIC INDUSTRIAL CO., LTD. NEDERLANDS Zie bladzijden 2, 4–5, 7, 9–21, 23 en 64. SVENSKA Se sidorna 24–25, 27, 29–41, 43 och 64. Перед подключением, работой или регулировкой данного аппарата прочтите, пожалуйста, эту инструкцию полностью. Сохраните, пожалуйста, эту инструкцию. DANSK Se side 24–25, 27, 29–41, 43 og 64. ČESKY Viz str. 44–46, 48, 50, 52–62, a 64. Siehe Seite 24–26, 28, 30, 32–42 und 64. ITALIANO Vedere alle pagg. 24–26, 28, 30, 32–42 e 64. POLSKI Patrz strony 44–46, 48, 50, 52–62 i 64. РУССКИЙ ЯЗЫК Cм. стр. 44–45, 47, 49–61, 63, 64 и 65. УКРАЇНСЬКА Див. сторінки 44-45, 47, 49–61, 63 та 64. ENGLISH ESPAÑOL FRANÇAIS NEDERLANDS УКРАЇНСЬКА Перед тим, як підключати, використовувати або налаштовувати цей пристрій, будь ласка, повністю прочитайте ці інструкції. Збережіть цей документ для використання в майбутньому. DEUTSCH DEUTSCH Cassa acustica ITALIANO Lautsprecheranlage Antes de conectar, operar o ajustar este producto, sírvase leer estas instrucciones completamente. Guarde este manual. SVENSKA Luidsprekersysteem DANSK Enceintes acoustiques Before connecting, operating or adjusting this product, please read these instructions completely. Please keep this manual for future reference. ČESKY Cajas acústicas POLSKI Speaker System РУССКИЙ ЯЗЫК Operating Instructions Instrucciones de funcionamiento Mode d’emploi/Gebruiksaanwijzing Bedienungsanleitung Istruzioni per l’uso Bruksanvisning Betjeningsvejledning Návod k obsluze/Instrukcja obsługi Инструкция по эксплуатации Інструкції з експлуатації E RQT9219-E Dear customer Thank you for purchasing this product. For optimum performance and safety, please read these instructions carefully. Speaker system SB-FS1000 SB-WA1000 Speaker Front speaker (including center channel) L Front speaker (including center channel) R Surround Active Subwoofer SB-FC1000L X 1 SB-FC1000R X 1 SB-HS1000 X 2 SB-WA1000 X 1 ENGLISH ESPAÑOL FRANÇAIS NEDERLANDS Enceintes acoustiques SB-FS1000 Enceintes Enceinte avant gauche (avec canal central) Enceinte avant droite (avec canal central) Surround Enceinte d’extrêmes-graves avec amplificateur Caution for AC Mains Lead (For United Kingdom) . . . . . . . . . . . . . . . . . . 3 Supplied accessories. . . . . . . . . . . . . . . . . . . . . . . . . . . . . . . . . . . . . . . . . . 4 Notes . . . . . . . . . . . . . . . . . . . . . . . . . . . . . . . . . . . . . . . . . . . . . . . . . . . . . . . 5 Safety precautions . . . . . . . . . . . . . . . . . . . . . . . . . . . . . . . . . . . . . . . . . . . . 8 Location. . . . . . . . . . . . . . . . . . . . . . . . . . . . . . . . . . . . . . . . . . . . . . . . . . . . 10 Assembly and Installation . . . . . . . . . . . . . . . . . . . . . . . . . . . . . . . . . . . . . 12 Assembling the front speakers as stand types . . . . . . . . . . . . . . . . . . . . 12 Assembling the surround speakers as stand types . . . . . . . . . . . . . . . . 14 Wall-mounting the front and surround speakers. . . . . . . . . . . . . . . . . . . 16 Settings for connecting the recommended amplifier to the active subwoofer . . . . . . . . . . . . . . . . . . . . . . . . . . . . . . . . . . . . . . . . . . . . . . . . 16 Connections . . . . . . . . . . . . . . . . . . . . . . . . . . . . . . . . . . . . . . . . . . . . . . . . 18 Subwoofer operation . . . . . . . . . . . . . . . . . . . . . . . . . . . . . . . . . . . . . . . . . 20 Specifications . . . . . . . . . . . . . . . . . . . . . . . . . . . . . . . . . . . . . . . . . . . . . . . 22 Other notes . . . . . . . . . . . . . . . . . . . . . . . . . . . . . . . . . . . . . . . . . . . . . . . . . 22 Maintenance . . . . . . . . . . . . . . . . . . . . . . . . . . . . . . . . . . . . . . . . . . . . . . . . 64 Tables des matières Estimado cliente Geachte klant Muchísimas gracias por haber adquirido este aparato. Lea con atención estas instrucciones para obtener las máximas prestaciones y seguridad. Cajas acústicas Altavoces Altavoz delantero izquierdo (incluyendo canal central) SB-FS1000 Altavoz delantero derecho (incluyendo canal central) Sonido ambiental SB-WA1000 Altavoz de extra-graves amplificado Índice SB-FC1000L X 1 SB-FC1000R X 1 SB-HS1000 X 2 SB-WA1000 X 1 Accessoires fournis . . . . . . . . . . . . . . . . . . . . . . . . . . . . . . . . . . . . . . . . . . . 4 Remarques . . . . . . . . . . . . . . . . . . . . . . . . . . . . . . . . . . . . . . . . . . . . . . . . . . 5 Précautions de sécurité . . . . . . . . . . . . . . . . . . . . . . . . . . . . . . . . . . . . . . . . 9 Positionnement. . . . . . . . . . . . . . . . . . . . . . . . . . . . . . . . . . . . . . . . . . . . . . .11 Montage et installation. . . . . . . . . . . . . . . . . . . . . . . . . . . . . . . . . . . . . . . . 13 Montage sur socle des enceintes avant . . . . . . . . . . . . . . . . . . . . . . . . . 13 Montage sur socle des enceintes surround . . . . . . . . . . . . . . . . . . . . . . 15 Montage au mur des enceintes avant et surround . . . . . . . . . . . . . . . . . 17 Réglages nécessaires au raccordement de l’amplificateur recommandé sur le caisson de graves actif. . . . . . . . . . . . . . . . . . . . . . . . . . . . . . . . . 17 Raccordements. . . . . . . . . . . . . . . . . . . . . . . . . . . . . . . . . . . . . . . . . . . . . . 19 Utilisation du caisson de graves. . . . . . . . . . . . . . . . . . . . . . . . . . . . . . . . 21 Données techniques . . . . . . . . . . . . . . . . . . . . . . . . . . . . . . . . . . . . . . . . . 23 Autres remarques. . . . . . . . . . . . . . . . . . . . . . . . . . . . . . . . . . . . . . . . . . . . 23 Entretien . . . . . . . . . . . . . . . . . . . . . . . . . . . . . . . . . . . . . . . . . . . . . . . . . . . 64 Hartelijk dank voor de aankoop van dit product. Gelieve deze gebruiksaanwijzing aandachtig door le lezen voor een optimale prestatie en een veilig gebruik van het systeem. Luidsprekersysteem SB-FC1000L X 1 SB-FC1000R X 1 SB-HS1000 X 2 SB-WA1000 X 1 Accessorios suministrados. . . . . . . . . . . . . . . . . . . . . . . . . . . . . . . . . . . . . 4 Notas . . . . . . . . . . . . . . . . . . . . . . . . . . . . . . . . . . . . . . . . . . . . . . . . . . . . . . . 5 Precauciones de seguridad. . . . . . . . . . . . . . . . . . . . . . . . . . . . . . . . . . . . . 8 Ubicación . . . . . . . . . . . . . . . . . . . . . . . . . . . . . . . . . . . . . . . . . . . . . . . . . . 10 Ensamblaje e instalación. . . . . . . . . . . . . . . . . . . . . . . . . . . . . . . . . . . . . . 12 Ensamblaje de los altavoces delanteros como altavoces tipo vertical . . 12 Ensamblaje de los altavoces de sonido ambiental como altavoces tipo vertical . . . . . . . . . . . . . . . . . . . . . . . . . . . . . . . . . . . . . . . . . . . . . . . 14 Montaje en pared de los altavoces delanteros y de sonido ambiental . . 16 Ajustes para conectar el amplificador recomendado al altavoz de subgraves activo. . . . . . . . . . . . . . . . . . . . . . . . . . . . . . . . . . . . . . . . . . . . . . 16 Conexiones . . . . . . . . . . . . . . . . . . . . . . . . . . . . . . . . . . . . . . . . . . . . . . . . . 18 Operación del altavoz de subgraves . . . . . . . . . . . . . . . . . . . . . . . . . . . . 20 Especificaciones técnicas . . . . . . . . . . . . . . . . . . . . . . . . . . . . . . . . . . . . . 22 Otras notas . . . . . . . . . . . . . . . . . . . . . . . . . . . . . . . . . . . . . . . . . . . . . . . . . 22 Mantenimiento . . . . . . . . . . . . . . . . . . . . . . . . . . . . . . . . . . . . . . . . . . . . . . 64 2 Nous vous remercions pour votre achat de cet appareil. Pour en obtenir des performances idéales et pour votre sécurité, veuillez lire attentivement le présent manuel. SB-WA1000 Contents RQT9219 Cher client SB-FS1000 SB-WA1000 Inhoud Luidsprekers Voorluidspreker (inclusief middenkanaal) L Voorluidspreker (inclusief middenkanaal) R Surround Actieve subwoofer SB-FC1000L X 1 SB-FC1000R X 1 SB-HS1000 X 2 SB-WA1000 X 1 Bijgeleverde accessoires. . . . . . . . . . . . . . . . . . . . . . . . . . . . . . . . . . . . . . . 4 Opmerkingen . . . . . . . . . . . . . . . . . . . . . . . . . . . . . . . . . . . . . . . . . . . . . . . . 5 Veiligheidsmaatregelen . . . . . . . . . . . . . . . . . . . . . . . . . . . . . . . . . . . . . . . . 9 Opstelling . . . . . . . . . . . . . . . . . . . . . . . . . . . . . . . . . . . . . . . . . . . . . . . . . . .11 Montage en installatie . . . . . . . . . . . . . . . . . . . . . . . . . . . . . . . . . . . . . . . . 13 De voorluidsprekers in elkaar zetten als staande luidsprekers . . . . . . . 13 De surroundluidsprekers in elkaar zetten als staande luidsprekers . . . . 15 De voor- en surroundluidsprekers aan een muur bevestigen. . . . . . . . . 17 Instellingen voor aansluiting van de aanbevolen versterker op de actieve subwoofer. . . . . . . . . . . . . . . . . . . . . . . . . . . . . . . . . . . . . . . . . . 17 Aansluitingen . . . . . . . . . . . . . . . . . . . . . . . . . . . . . . . . . . . . . . . . . . . . . . . 19 Gebruik van de subwoofer . . . . . . . . . . . . . . . . . . . . . . . . . . . . . . . . . . . . 21 Technische gegevens . . . . . . . . . . . . . . . . . . . . . . . . . . . . . . . . . . . . . . . . 23 Overige opmerkingen. . . . . . . . . . . . . . . . . . . . . . . . . . . . . . . . . . . . . . . . . 23 Onderhoud . . . . . . . . . . . . . . . . . . . . . . . . . . . . . . . . . . . . . . . . . . . . . . . . . 64 Supplied accessories Accessorios suministrados Accessoires fournis Bijgeleverde accessoires NEDERLANDS FRANÇAIS ESPAÑOL ENGLISH Please check and identify the supplied accessories. For the United Kingdom Use numbers indicated in parentheses when asking for replacement parts. “As of June 2008” Verifique e identifique los accessorios suministrados. Cocher les accessoires pour vérifier qu’ils sont bien tous dans l’emballage. Controleer de bijgeleverde accessoires en markeer in de vierkantjes. SB-FS1000 Speaker cables (long: 10 m) . . . . . . . .2 Cables de altavoces (largos: 10 m) . . .2 Câbles d’enceinte (longs : 10 m) . . . . .2 Luidsprekerkabels (lang: 10 m) . . . . . .2 Speaker cables (short: 6 m) . . . . . . . . .2 Cables de altavoces (cortos: 6 m) . . . .2 Câbles d’enceinte (courts : 6 m) . . . . .2 Luidsprekerkabels (kort: 6 m). . . . . . . .2 Center speaker cable (approx. 6 m). . .1 Cable de altavoz central (6 m aproximadamente) . . . . . . . . . . . .1 Câble d’enceinte centrale (environ 6 m) . . . . . . . . . . . . . . . . . . . .1 Middenluidsprekerkabel (ong. 6 m) . . .1 Stand base mounting screws . . . . . . . .8 Tornillos de montaje de base de soporte . .8 Vis de montage de la base du socle . .8 Bevestigingbouten voor voetstuk . . . . .8 (REE1397D) (REE1393C) (XSB4+20FJK) Front L stand base . . . . . . . . . . . . . . . .1 Base de soporte delantera izquierda . .1 Base du socle d’enceinte avant gauche. . .1 Voetstuk voor linkervoorluidspreker . . .1 (RYQ0607-K1) Front R stand base. . . . . . . . . . . . . . . .1 Base de soporte delantera derecha . . .1 Base du socle d’enceinte avant droite. .1 Voetstuk voor rechtervoorluidspreker. .1 (RYQ0607A-K1) Surround speaker stands . . . . . . . . . . .2 Soportes de altavoces de sonido ambiental . . . . . . . . . . . . . . . . . . . . . . .2 Socles d’enceinte surround . . . . . . . . .2 Poten voor surroundluidsprekers . . . . .2 Spacers . . . . . . . . . . . . . . . . . . . . . . .16 Espaciadores . . . . . . . . . . . . . . . . . . .16 Entretoises . . . . . . . . . . . . . . . . . . . . .16 Vulstukken . . . . . . . . . . . . . . . . . . . . .16 Nylon clamp . . . . . . . . . . . . . . . . . . . . .6 Abrazadera de nailon . . . . . . . . . . . . . .6 Collier de serrage en nylon . . . . . . . . .6 Nylonklem . . . . . . . . . . . . . . . . . . . . . .6 Screw for nylon clamp . . . . . . . . . . . . .6 Tornillo para abrazadera de nailon. . . .6 Vis du collier de serrage en nylon . . . .6 Schroef voor nylonklem . . . . . . . . . . . .6 AC mains lead Cable de alimentación de CA Cordon d’alimentation Netsnoer For the United Kingdom . . . . . . . . . 1 Para el Reino Unido . . . . . . . . . . . . 1 Pour le Royaume-Uni. . . . . . . . . . . 1 Voor het Verenigd Koninkrijk . . . . . 1 (K2CT3CA00004) (RXQ1497) Front speaker stands . . . . . . . . . . . . . .2 Soportes de altavoces delanteros . . . .2 Socles d’enceinte avant . . . . . . . . . . . .2 Poten voor voorluidsprekers . . . . . . . .2 4 (REE1397E) Stand mounting screws . . . . . . . . . . . .4 Tornillos de montaje de soporte . . . . . .4 Vis de montage du socle . . . . . . . . . . .4 Bevestigingsbouten voor poot . . . . . . .4 Surround stand bases . . . . . . . . . . . . .2 Bases de soportes de altavoces de sonido ambiental . . . . . . . . . . . . . . .2 Bases de socle d’enceinte surround . .2 Voetstukken voor surroundvoorluidsprekers. . . . . . . . . . .2 RQT9219 SB-WA1000 (RYQ0608-K1) (RYQ0609A-K) (RYQ0610A-K) (RKA0191-K) (RMR1503-K) (XTW3+10JFJK) For Australia and New Zealand . . . 1 Para Australia y Nueva Zelanda. . . 1 Pour l’Australie et la Nouvelle-Zélande . . . . . . . . . . . . . . 1 Voor Australië en Nieuw-Zeeland. . 1 For others. . . . . . . . . . . . . . . . . . . . 1 Para otros países . . . . . . . . . . . . . . 1 Pour les autres pays . . . . . . . . . . . 1 Voor overige landen . . . . . . . . . . . . 1 (K2CJ2DA00010) (K2CQ2CA00006) Monaural connection cable (5 m). . . . .1 Cable de conexión monofónico (5 m) . .1 Câble de connexion monaural (5 m) . .1 Monokabel (5 m) . . . . . . . . . . . . . . . . .1 (RJLV1P001B50) SB-FC1000L, R/ SB-HS1000 Impedance 6Ω Input power 100 W (RATED) The only receivers or amplifiers you should connect to these speakers are those whose rated output does not exceed the above figures. • These speakers are used together with an Active Subwoofer (SBWA1000). • Set the AV control receiver or AV amplifier to [SMALL]. ( page 16) When using the AV control receiver SA-BX500 with DVD analogue input, set the DVD player or other playback equipment to [SMALL]. If SA-BX500 is set to [SMALL], the rated output exceeds the figures above, but these speakers can be used. Using a receiver or amplifier with higher ratings than listed above can cause abnormal sounds to occur because of excessive input, damage to the receiver or speakers, and fire. If equipment is damaged in any way or unexpected trouble occurs during playback, unplug the system from its outlet and call a serviceman for help. Protection circuitry (SB-FC1000L, R / SB-HS1000) These units incorporate protection circuitry to protect them from damage caused by excessive input or abnormal signals; when excess input is detected, input is automatically interrupted. If sound is interrupted... 1. Reduce the volume of the receiver (or amplifier). 2. Check the sound source and connections for any problems. If there is no problem, the protection circuitry will reset in a few minutes. After the protection circuit is reset... Take care not to increase the receiver’s volume too high. SB-FC1000L, R/ SB-HS1000 Impédance 6Ω Puissance d’entrée 100 W (RATED) Les seuls ampli-tuners ou amplificateurs auxquels ces enceintes devraient être raccordées sont ceux dont la puissance de sortie nominale ne dépasse pas les valeurs indiquées ci-dessus. • Ces enceintes sont utilisées avec une enceinte d’extrêmes-graves avec amplificateur (SB-WA1000). • Réglez l’ampli-tuner AV ou l’amplificateur AV sur [SMALL]. ( page 17) Lors de l’utilisation de l’ampli-tuner AV SA-BX500 avec entrée analogique DVD, réglez le lecteur DVD ou autre appareil de lecture sur [SMALL]. Lorsque le SA-BX500 est réglé sur [SMALL], la sortie nominale dépasse les chiffres ci-dessus mais il est quand même possible d’utiliser ces enceintes. L’utilisation d’un ampli-tuner ou d’un amplificateur plus puissant pourrait provoquer l’apparition de sons anormaux sous l’effet d’une entrée excessive, endommager l’ampli-tuner ou les enceintes et provoquer un feu. Si l’appareil est endommagé ou si des anomalies de fonctionnement se produisent pendant la lecture, débranchez le système et adressez-vous à une personne de service. Circuit de protection (SB-FC1000L, R / SB-HS1000) Ces enceintes contiennent un circuit de protection destiné à les protéger des dommages causés par une puissance d’entrée excessive ou des signaux anormaux ; lorsqu’une puissance d’entrée excessive est détectée, l’entrée est automatiquement interrompue. ENGLISH Impédance des enceintes et puissance d’entrée ESPAÑOL Speaker impedance and allowed input FRANÇAIS Remarques NEDERLANDS Notes Si le son est interrompu... 1. Réduisez le volume sur l’ampli-tuner (ou l’amplificateur). 2. Vérifiez s’il n’y a pas de problème dans la source sonore ou les raccordements. S’il n’y a pas de problème, le circuit de protection sera réinitialisé dans les minutes qui suivent. Une fois que le circuit de protection a été réinitialisé... Veillez à ne pas élever excessivement le volume de l’ampli-tuner. Notas Opmerkingen Impedancia del altavoz y potencia de entrada Luidsprekerimpedantie en ingangsvermogen SB-FC1000L, R/ SB-HS1000 Impedancia 6Ω Potencia de entrada 100 W (RATED) Los únicos receptores o amplificadores que deberá conectar a estos altavoces son aquellos que cuya salida nominal no exceda las cifras de arriba. • Estos altavoces se utilizan junto con un altavoz de extra-graves amplificado (SB-WA1000). • Ponga el receptor de control AV o el amplificador AV en [SMALL]. ( página 16) Cuando utilice el receptor de control AV SA-BX500 con entrada analógica DVD, ponga el reproductor DVD u otro equipo de reproducción en [SMALL]. Si el SA-BX500 se pone en [SMALL], la salida nominal excederá las cifras de arriba, pero estos altavoces podrán ser utilizados. Al usar un receptor o un amplificador con características nominales superiores a las indicadas arriba se pueden producir ruidos anormales debido a la entrada excesiva, el receptor o los altavoces se pueden estropear, y además se puede producir un incendio. Si el equipo es dañado de alguna manera o un problema inesperado ocurre durante la reproducción, desenchufe el sistema y llame a su distribuidor para que envíen una persona que le ayude. Circuito de protección (SB-FC1000L, R / SB-HS1000) SB-FC1000L, R/ SB-HS1000 Impedantie 6Ω Ingangsvermogen 100 W (RATED) De enige ontvangers of versterkers die u op deze luidsprekers mag aansluiten zijn die waarvan de nominale uitgangswaarden de hierboven vermelde waarden niet te boven gaan. • Deze luidsprekers worden gebruikt in combinatie met een actieve subwoofer (SB-WA1000). • Stel de AV-regelontvanger of de AV-versterker in op [SMALL]. ( blz. 17) Voor gebruik van de AV-regelontvanger SA-BX500 met analoge DVD-ingangssignalen, stelt u de DVD-speler of andere weergave-apparatuur in op [SMALL]. Als de SA-BX500 staat ingesteld op [SMALL], zal het nominale uitgangsvermogen de hierboven gegeven waarden overschrijden, maar u kunt deze luidsprekers wel gebruiken. Bij gebruik van een ontvanger of versterker met een hoger uitgangsvermogen dan de hierboven vermelde waarde, kunnen abnormale geluiden worden voortgebracht ten gevolge van te sterke ingangssignalen, of kunnen de ontvanger of luidsprekers beschadigd raken. Bovendien bestaat dan gevaar voor brand. In het geval de audioapparatuur op enigerlei wijze beschadigd raakt of zich onverwachte moeilijkheden voordoen tijdens het weergeven, trekt u de stekker van de audioapparatuur uit het stopcontact en belt u een servicemonteur om hulp. Beveiligingscircuit (SB-FC1000L, R / SB-HS1000) Estas unidades incorporan un circuito de protección para protegerlos de daños causados por una entrada excesiva o señales anormales; cuando una entrada excesiva es detectada, la entrada es automáticamente interrumpida. Dit systeem is uitgerust met een luidspreker-beveiligingscircuit om de luidsprekers te beschermen tegen te hoge ingangsvermogens en abnormale ingangssignalen. Wanneer een te hoog ingangsvermogen wordt vastgesteld, worden de ingangssignalen automatisch onderbroken. Si el sonido se interrumpe... Wanneer het geluid wordt onderbroken... 1. Reduzca el volumen del receptor (o amplificador). 2. Verifique si hay problemas en la fuente de sonido y las conexiones. Si no hay problemas, el circuito de protección se reajustará en unos pocos minutos. 1. Verlaag het volumeniveau op de ontvanger (of versterker). 2. Controleer de ingangsbron en de aansluitingen op mogelijke fouten. Indien er geen fout gemaakt is, zal het beveiligingscircuit zich na een paar minuten automatisch terugstellen. Después de que el circuito de protección sea reajustado... Nadat het beveiligingscircuit is teruggesteld... Cuídese de no incrementar demasiado el volumen del receptor. Let erop dat het volumeniveau op de ontvanger niet te hoog wordt ingesteld. 5 RQT9219 ENGLISH ESPAÑOL WARNING: ADVERTENCIA: TO REDUCE THE RISK OF FIRE, ELECTRIC SHOCK OR PRODUCT DAMAGE, • DO NOT EXPOSE THIS APPARATUS TO RAIN, MOISTURE, DRIPPING OR SPLASHING AND THAT NO OBJECTS FILLED WITH LIQUIDS, SUCH AS VASES, SHALL BE PLACED ON THE APPARATUS. • USE ONLY THE RECOMMENDED ACCESSORIES. • DO NOT REMOVE THE COVER (OR BACK); THERE ARE NO USER SERVICEABLE PARTS INSIDE. REFER SERVICING TO QUALIFIED SERVICE PERSONNEL. PARA REDUCIR EL RIESGO DE INCENDIO, DESCARGA ELÉCTRICA O DAÑOS EN EL PRODUCTO, • NO EXPONGA ESTE APARATO A LA LLUVIA, HUMEDAD, GOTEOS O SALPICADURAS DE LÍQUIDOS, Y NO PERMITA QUE NINGÚN OBJETO QUE CONTENGA LÍQUIDOS, COMO JARRONES, ESTÉN CERCA DEL APARATO. • UTILICE SÓLO LOS ACCESORIOS RECOMENDADOS. • NO EXTRAIGA LA CUBIERTA (O LA PARTE POSTERIOR); EN EL INTERIOR NO HAY PARTES QUE PUEDAN SER REPARADAS POR EL USUARIO. LAS REPARACIONES Y MANTENIMIENTO DEBEN SER REALIZADOS POR PERSONAL CUALIFICADO. CAUTION! • DO NOT INSTALL OR PLACE THIS UNIT IN A BOOKCASE, BUILTIN CABINET OR IN ANOTHER CONFINED SPACE. ENSURE THE UNIT IS WELL VENTILATED. TO PREVENT RISK OF ELECTRIC SHOCK OR FIRE HAZARD DUE TO OVERHEATING, ENSURE THAT CURTAINS AND ANY OTHER MATERIALS DO NOT OBSTRUCT THE VENTILATION VENTS. • DO NOT OBSTRUCT THE UNIT’S VENTILATION OPENINGS WITH NEWSPAPERS, TABLECLOTHS, CURTAINS, AND SIMILAR ITEMS. • DO NOT PLACE SOURCES OF NAKED FLAMES, SUCH AS LIGHTED CANDLES, ON THE UNIT. • DISPOSE OF BATTERIES IN AN ENVIRONMENTALLY FRIENDLY MANNER. THIS UNIT IS INTENDED FOR USE IN MODERATE CLIMATES. This product may receive radio interference caused by mobile telephones during use. If such interference is apparent, please increase separation between the product and the mobile telephone. The socket outlet shall be installed near the equipment and easily accessible. The mains plug of the power supply cord shall remain readily operable. To completely disconnect this apparatus from the AC Mains, disconnect the power supply cord plug from AC receptacle. Although the AC power switch is in the “OFF” position, the unit is not completely disconnected from the mains. Remove the plug from the main electrical outlet if you will not be using the unit for an extended period of time. Place the unit so the plug can be easily removed. Keep the accessories (screw, spacer and nylon clamp) out of reach of children to prevent swallowing. -If you see this symbolInformation on Disposal for Users of Waste Electrical & Electronic Equipment (private households) This symbol on the products and/or accompanying documents means that used electrical and electronic products should not be mixed with general household waste. ¡ADVERTENCIA! • PARA MANTENER BIEN VENTILADA ESTA UNIDAD, NO LA INSTALE NI PONGA EN UN ESTANTE DE LIBROS, MUEBLE EMPOTRADO U OTRO ESPACIO DE DIMENSIONES REDUCIDAS. ASEGÚRESE QUE CORTINAS Y OTROS MATERIALES NO OBSTRUYAN LAS CONDICIONES DE VENTILACIÓN PARA PREVENIR EL RIESGO DE SACUDIDAS ELÉCTRICAS O INCENDIOS DEBIDOS AL RECALENTAMIENTO. • NO OBSTRUYA LAS ABERTURAS DE VENTILACIÓN DE LA UNIDAD CON PERIÓDICOS, MANTELES, CORTINAS U OBJETOS SIMILARES. • NO COLOQUE OBJETOS CON LLAMA DESCUBIERTA, UNA VELA POR EJEMPLO, ENCIMA DE LA UNIDAD. • TIRE LAS PILAS DE FORMA QUE NO CONTAMINE EL MEDIO AMBIENTE. ESTA UNIDAD HA SIDO DISEÑADA PARA SER UTILIZADA EN CLIMAS MODERADOS. Este producto puede tener interferencias causadas por teléfonos móviles durante su utilización. Si tales interferencias resultan evidentes, aumente la separación entre el producto y el teléfono móvil. La toma de corriente deberá estar instalada cerca del equipo y donde se pueda acceder a ella fácilmente. El enchufe del cable de la alimentación deberá estar siempre listo para ser utilizado. Para desconectar completamente este aparato de la red de CA, desconecte el enchufe del cable de alimentación del receptáculo de CA. La unidad no quedará completamente desconectada de la red eléctrica aunque el interruptor de la alimentación de CA se ponga en “OFF” (desconectado). Desenchufe la clavija de alimentación de la toma de corriente si no va a utilizar la unidad durante mucho tiempo. Coloque la unidad en lugar donde la clavija de alimentación pueda desenchufarse fácilmente. Guarde los accesorios (tornillo, espaciador y abrazadera de nailon) fuera del alcance de los niños para impedir que éstos los traguen. -Si ve este símbolo- For proper treatment, recovery and recycling, please take these products to designated collection points, where they will be accepted on a free of charge basis. Alternatively, in some countries you may be able to return your products to your local retailer upon the purchase of an equivalent new product. Disposing of this product correctly will help to save valuable resources and prevent any potential negative effects on human health and the environment which could otherwise arise from inappropriate waste handling. Please contact your local authority for further details of your nearest designated collection point. Penalties may be applicable for incorrect disposal of this waste, in accordance with national legislation. For business users in the European Union If you wish to discard electrical and electronic equipment, please contact your dealer or supplier for further information. Information on Disposal in other Countries outside the European Union This symbol is only valid in the European Union. If you wish to discard this product, please contact your local authorities or dealer and ask for the correct method of disposal. 6 RQT9219 Información sobre la eliminación para los usuarios de equipos eléctricos y electrónicos usados (particulares) La aparición de este símbolo en un producto y/o en la documentación adjunta indica que los productos eléctricos y electrónicos usados no deben mezclarse con la basura doméstica general. Para que estos productos se sometan a un proceso adecuado de tratamiento, recuperación y reciclaje, llévelos a los puntos de recogida designados, donde los admitirán sin coste alguno. En algunos países existe también la posibilidad de devolver los productos a su minorista local al comprar un producto nuevo equivalente. Si desecha el producto correctamente, estará contribuyendo a preservar valiosos recursos y a evitar cualquier posible efecto negativo en la salud de las personas y en el medio ambiente que pudiera producirse debido al tratamiento inadecuado de desechos. Póngase en contacto con su autoridad local para que le informen detalladamente sobre el punto de recogida designado más cercano. De acuerdo con la legislación nacional, podrían aplicarse multas por la eliminación incorrecta de estos desechos. Para empresas de la Unión Europea Si desea desechar equipos eléctricos y electrónicos, póngase en contacto con su distribuidor o proveedor para que le informe detalladamente. Información sobre la eliminación en otros países no pertenecientes a la Unión Europea Este símbolo sólo es válido en la Unión Europea. Si desea desechar este producto, póngase en contacto con las autoridades locales o con su distribuidor para que le informen sobre el método correcto de eliminación. Safety precautions Precauciones de seguridad Placement Ubicación ESPAÑOL ENGLISH Set the unit up on an even surface away from direct sunlight, high temperatures, high humidity, and excessive vibration. These conditions can damage the cabinet and other components, thereby shortening the unit’s service life. Voltage Do not use high voltage power sources. This can overload the unit and cause a fire. Do not use a DC power source. Check the source carefully when setting the unit up on a ship or other place where DC is used. AC mains lead protection Ensure the AC mains lead is connected correctly and not damaged. Poor connection and lead damage can cause fire or electric shock. Do not pull, bend, or place heavy items on the lead. Grasp the plug firmly when unplugging the lead. Pulling the AC mains lead can cause electric shock. Do not handle the plug with wet hands. This can cause electric shock. Foreign matter Do not let metal objects fall inside the unit. This can cause electric shock or malfunction. Do not let liquids get into the unit. This can cause electric shock or malfunction. If this occurs, immediately disconnect the unit from the power supply and contact your dealer. Do not spray insecticides onto or into the unit. They contain flammable gases which can ignite if sprayed into the unit. Service Do not attempt to repair this unit by yourself. If sound is interrupted, indicators fail to light, smoke appears, or any other problem that is not covered in these operating instructions occurs, disconnect the AC mains lead and contact your dealer or an authorized service center. Electric shock or damage to the unit can occur if the unit is repaired, disassembled or reconstructed by unqualified persons. Extend operating life by disconnecting the unit from the power source if it is not to be used for a long time. Excessive input You can damage your speakers and shorten their life span if you keep the volume high over extended periods. Reduce the volume in the following cases to avoid damage : • When playing distorted sound. • When the speakers are receiving howling from a microphone or record player, noise from FM broadcasts, or continuous signals from an oscillator, test disc, or electronic instrument. • When adjusting the sound quality. • When turning the amplifier on or off. Coloque la unidad en una superficie plana lejos de la luz directa del sol, temperatura y humedad altas, y vibración excesiva. Estas condiciones pueden dañar el gabinete y otros componentes, y por lo tanto acortar la vida útil de la unidad. Voltaje No use fuentes de alimentación de alto voltaje. Esto puede sobrecargar la unidad y causar un incendio. No use una fuente de alimentación de CC. Verifique cuidadosamente la fuente cuando coloque la unidad en una embarcación u otro lugar donde CC sea usada. Protección del cordón de alimentación Asegúrese que el cordón de alimentación esté conectado correctamente y no dañado. Una mala conexión y daño en el cordón pueden causar un incendio o un choque eléctrico. No jale, doble el cordón ni coloque objetos pesados sobre él. Coja el enchufe firmemente cuando desenchufe el cordón. El jalar el cordón puede causar choque eléctrico. No maneje el enchufe con manos mojadas. Esto puede causar choque eléctrico. Objetos extraños No permita que objetos de metal caigan dentro de la unidad. Esto puede causar choque eléctrico o fallas. No permita que líquidos penetren en la unidad. Esto puede causar choque eléctrico o fallas. Si esto ocurre, desconecte inmediatamente la unidad de su alimentación y póngase en contacto con su distribuidor. No rocíe insecticidas sobre o dentro de la unidad. Contienen gases inflamables que pueden encenderse si son rociados dentro de la unidad. Servicio No intente reparar esta unidad por sí mismo. Si el sonido se interrumpe, los indicadores no se iluminan, sale humo o sucede cualquier problema que no está tratado en estas instrucciones, desconecte el cordón de alimentación y póngase en contacto con su distribuidor o con un centro de servicio autorizado. Puede ocurrir un choque eléctrico o daño a la unidad si esta unidad es reparada, desarmada o reconstruida por personas no calificadas. Extienda la vida útil de la unidad desconectándola de la fuente de alimentación si no va a ser usada por largo tiempo. Entrada excesiva Si reproduce el sonido con niveles altos durante períodos de tiempo prolongados podrá estropear sus altavoces y reducir su duración. Para evitar daños, reduzca el volumen en los casos siguientes: • Cuando reproduzca sonido distorsionado. • Cuando los altavoces reciban aullido procedente de un micrófono o giradiscos, ruido de emisiones de FM o señales continuas procedentes de un oscilador, disco de prueba o instrumento electrónico. • Cuando ajuste la calidad del sonido. • Cuando encienda o apague el amplificador. 8 RQT9219 ESPAÑOL ENGLISH 30° 30° 120° Location The front and surround speakers should be placed at approximately the same distance from the listening position. The angles in the diagram are approximate. Los altavoces delanteros y de sonido ambiental deberán colocarse a aproximadamente la misma distancia de la posición de escucha. Los ángulos del diagrama son aproximados. Front speaker (including center channel) ( left: SB-FC1000L, right: SB-FC1000R) • Put the front speakers on either side of the television. This system incorporates a center speaker in each of its front speakers. Using a unique system from Panasonic that reflects the principles of auditory psychology, the sound seems to come from within the TV screen, letting you enjoy sound and images with a heightened sense of integration even if you are not seated directly in front of the TV set. • It may be hard for the intended effect to be achieved under some listening and viewing conditions and with some of the playback sources. • The effect will not be satisfactorily yielded if the left front speaker is installed on the right and the right front speaker on the left. • The sound quality will not be satisfactorily yielded if the center speakers are hidden from the listener’s view. • Do not position the front speakers so that they face outward or overly inward. Place them so that they are facing more or less straight ahead. Altavoz delantero (incluyendo canal central) ( izquierdo: SBFC1000L, derecho: SB-FC1000R) • Ponga los altavoces delanteros a ambos lados del televisor. Este sistema incorpora un altavoz central en cada uno de sus altavoces delanteros. Utilizando un sistema único de Panasonic que refleja los principios de la psicología auditiva, el sonido parece que procede del interior de la pantalla del televisor, permitiéndole disfrutar de sonidos e imágenes con una sensación aumentada de integración a pesar de no estar sentado directamente enfrente del televisor. • Bajo algunas condiciones de escucha y visión, y con algunas fuentes de reproducción, puede que resulte difícil obtener el efecto deseado. • El efecto apropiado de estos altavoces no se producirá si el altavoz delantero izquierdo se coloca a la derecha y el altavoz delantero derecho se coloca a la izquierda. • La calidad del sonido no se producirá satisfactoriamente si los altavoces centrales están ocultos de la vista del oyente. • No coloque los altavoces delanteros de forma que miren hacia el exterior o demasiado hacia adentro. Colóquelos de forma que miren más o menos rectos hacia delante. Surround speakers ( left, right: SB-HS1000) • Put the surround speakers to the side of or slightly behind the seating area. Active subwoofer ( : SB-WA1000) • Place it at least 5 cm from the wall as it has a bass reflex port in the rear. • Depending on speaker location, the low-range frequency characteristics will vary. When placed in the corner of a room, the volume will increase accordingly. Do not attach the subwoofer to walls or ceilings. How you set up your speakers can affect the bass and the sound field. Note the following points. • Place them on a flat, level secure surface. Use spacers or similar items to stop them from rocking. • Placing speakers too close to walls, and corners can result in excessive bass. • Cover walls and windows with a thick curtain. • Do not place anything on top of the subwoofer. 10 RQT9219 Ubicación Altavoz de sonido ambiental ( izquierdo, derecho: SBHS1000) • Ponga los altavoces de sonido ambiental a los lados o un poco por detrás del área de escucha. Altavoz de extra-graves amplificado ( : SB-WA1000) • Sepárelo un mínimo de 5 cm de la pared porque tiene en la parte trasera un orificio para el reflejo de los graves. • Dependiendo de la ubicación del altavoz, las características de baja frecuencia cambiarán. Cuando se coloque en la esquina de una habitación, el volumen aumentará de la forma correspondiente. No instale este altavoz en paredes o techos. La forma en que instala sus altavoces puede afectar a los graves y al campo de sonido. Tenga en cuenta los puntos siguientes. • Colóquelos en bases planas, niveladas y seguras. Utilice espaciadores o cosas similares para impedir que se muevan. • La colocación de los altavoces muy cerca de las paredes o esquinas puede crear un sonido grave excesivo. • Tape las paredes y las ventanas con cortinas gruesas. • No ponga nada encima del altavoz de subgraves. R ESPAÑOL ENGLISH R Assembly and Installation Ensamblaje e instalación Assembling the front speakers as stand types Ensamblaje de los altavoces delanteros como altavoces tipo vertical • Do not apply an unreasonable force to the net at the front of the speaker unit. You cannot remove the front net. • You can carry out assembly work stably by placing the cushions in the packing case beneath the speaker. Place the net sides of the speaker units face up. Cushions used Speaker units. Use the four cushions at the very top of the SB-FS1000. Method of setting cushions Place these surfaces face up. Be sure to spread a cloth, for example, on the cushion to protect it from damage. • After each task, tighten the screws securely. 1. Fit the stand bases onto the front speaker stands. Align the two projections in one of the front speaker stands (provided) with the two holes in the front R stand base (provided), and fit together. • The packing bag for the front R stand base and the packing bag for the front center speaker R are held in place by tape of the same color. Assemble the base and speaker with the same color tape. • Similarly, the packing bag for the front L stand base and the packing bag for the front center speaker L are held in place by tape of the same color. Attach the stand base using the two stand base mounting screws (provided). Use the two screw holes marked “R” to attach the base. • Align the positions of the holes marked “R” with the positions of the screw holes in the stand. If the positions do not line up, change the direction of the stand. (The base can be fitted onto the top or bottom of the stand.) • When assembling front speaker L, use the screw holes marked “L” and fit. • Tighten the screws alternately, and finally tighten them hard. Reverse side of stand base 2. Fit the stand onto front speaker R. Align the two projections in the assembled stand with the two holes in front speaker R , and fit together. Attach the stand using the stand mounting screw (provided). Use the center screw hole to fit the stand on to the speaker. 3. Connect the speaker cables (provided) to the terminals. Before connection, pass the speaker cords through the hole marked “R” in the back of the stand base. (Use the hole marked “L” for the left front speaker.) Center speaker cable (approx. 6 m, provided) Silver (cable) : Connect this to the “CENTER” black negative (–) terminal. Copper (cable) : Connect this to the “CENTER” red positive (+) terminal. Connect the other center speaker cable to the front speaker L terminal. Speaker cables (short: 6 m, provided) Silver (cable) : Connect this to the “LF” black negative (–) terminal. Copper (cable) : Connect this to the “HF” red positive (+) terminal. Do not remove the shorting bars. Turn the thumb nut in the loosening direction until the hole in the terminal becomes visible. Insert the conductor into the hole, and tighten the thumb nut. Never short-circuit positive (+) and negative (–) speaker wires. 4. Fix the speaker cables. 12 RQT9219 Press the speaker cables into the cable groove provided in the stand. The speaker cables must have a thickness of 2.8 mm or less to fit into the cable groove. Cable groove When using speaker cables that are thicker than 2.8 mm, attach nylon clampers to the speakers and use them to fix the cables. Example Nylon clamp (provided) Screw for nylon clamp (provided) Speaker cables Repeat steps 1 to 4 and assemble front speaker L. • No aplique una fuerza excesiva a la red de la parte delantera del altavoz. La red delantera no puede desmontarse. • Puede realizar el trabajo de ensamblaje de manera estable colocando los cojines de la caja de embalaje debajo del altavoz. Coloque las caras de redes de las unidades de altavoces hacia arriba. Cojines utilizados Altavoces Utilice los cuatro cojines en la parte superior del SB-FS1000. Método de colocación de los cojines Coloque estas superficies hacia arriba. Asegúrese de poner un paño, por ejemplo, sobre el amortiguador para protegerlo contra los daños. • Apriete firmemente los tornillos después de cada tarea. 1. Ajuste las bases de soportes en los soportes de los altavoces delanteros. Alinee los dos resaltos de uno de los soportes de altavoces delanteros (suministrados) con los dos agujeros de la base de soporte derecho (suministrado) y encájelos. • La bolsa de embalaje para la base de soporte delantero derecho y la bolsa de embalaje para el altavoz delantero central derecho se mantienen en su lugar mediante cinta del mismo color. Ensamble la base y el altavoz con la cinta del mismo color. • De forma similar, la bolsa de embalaje para la base de soporte delantero izquierdo y la bolsa de embalaje para el altavoz delantero central izquierdo se mantienen en su lugar mediante cinta del mismo color. Coloque la base de soporte usando los dos tornillos de montaje de base de soporte (suministrados). Utilice los dos agujeros de tornillos marcados “R” para colocar la base. • Alinee las posiciones de los agujeros marcados “R” con las posiciones de los agujeros de tornillos en el soporte. Si las posiciones no se alinean, cambie el sentido del soporte. (La base se puede colocar en la parte superior o inferior del soporte.) • Cuando ensamble el altavoz delantero izquierdo, utilice los agujeros de tornillos marcados “L” y fíjelo. • Apriete los tornillos de forma alterna y finalmente apriételos firmemente. Cara posterior de la base de soporte 2. Coloque el soporte en el altavoz delantero derecho. Alinee los dos resaltos del soporte ensamblado con los dos agujeros del altavoz delantero derecho y encájelos. Coloque el soporte utilizando el tornillo de montaje de soporte (suministrado). Use el agujero del tornillo central para fijar el soporte en el altavoz. 3. Conecte los cables de los altavoces (suministrados) a los terminales. Antes de hacer la conexión, pase los cables de los altavoces a través del agujero marcado “R” en la parte posterior de la base. (Utilice el agujero marcado “L” para el altavoz delantero izquierdo.) Cable de altavoz central (6 m aproximadamente, suministrado) Plata : Conecte este cable al terminal negativo (–) negro “CENTER”. Cobre : Conecte este cable al terminal positivo (+) rojo “CENTER”. Conecte el otro cable de altavoz central al terminal L del altavoz delantero. Cables de altavoces (cortos: 6 m, suministrados) Plata : Conecte este cable al terminal negativo (–) negro “LF”. Cobre : Conecte este cable al terminal positivo (+) rojo “HF”. No quite las barras de cortocircuito. Gire la tuerca de apriete manual para aflojarla hasta que se pueda ver el agujero del terminal. Introduzca el conductor en el agujero y apriete la tuerca de apriete manual. No cortocircuite nunca los cables positivos (+) y negativos (–) de los altavoces. 4. Fije los cables de los altavoces. Meta a presión los cables de altavoces en la ranura para cables del soporte. Los cables de altavoces deberán tener un grosor de 2,8 mm o menos para caber dentro de la ranura de los mismos. Ranura para cables Cuando utilice cables de altavoces con un grosor superior a 2,8 mm, coloque abrazaderas de nailon en los altavoces y utilícelas para fijar los cables. Ejemplo Abrazadera de nailon (suministrados) Tornillo para abrazadera de nailon (suministrados) Cables de altavoces Repita los pasos 1 a 4 y ensamble el altavoz delantero izquierdo. S ESPAÑOL ENGLISH S Assembly and Installation Ensamblaje e instalación Assembling the surround speakers as stand types Ensamblaje de los altavoces de sonido ambiental como altavoces tipo vertical • Do not apply an unreasonable force to the net at the front of the speaker unit. You cannot remove the front net. • You can carry out assembly work stably by placing the cushions in the packing case beneath each speaker. Place the net sides of the speaker units face up. ( page 12) Use the same cushions as used for the front speakers. Be sure to spread a cloth, for example, on the cushion to protect it from damage. • After each task, tighten the screws securely. • No aplique una fuerza excesiva a la red de la parte delantera del altavoz. La red delantera no puede desmontarse. • Puede realizar el trabajo de ensamblaje de manera estable colocando los cojines de la caja de embalaje debajo del altavoz. Coloque las caras de redes de las unidades de altavoces hacia arriba. ( página 12) Utilice los mismos cojines que los utilizados para los altavoces delanteros. Asegúrese de poner un paño, por ejemplo, sobre el amortiguador para protegerlo contra los daños. • Apriete firmemente los tornillos después de cada tarea. 1. Fit the stand bases onto the surround speaker stands. Align the two projections in one of the surround speaker stands (provided) with the two holes in one of the surround stand bases (provided), and fit together. Install the stand base at the end where the sticker has been adhered on the inside. Attach the stand base using the two stand base mounting screws (provided). Use the two screw holes marked “S” to attach the base. Reverse side of stand base 2. Fit the stands onto the surround speakers. Align the two projections in the assembled stand with the two holes in the surround speaker , and fit together. Attach the stand using the stand mounting screw (provided). Use the center screw hole to fit the stand on to the speaker. 3. Connect the speaker cables (provided) to the terminals Before connection, pass the speaker cords through the hole marked “S” in the back of the stand base. Speaker cables (long: 10 m, provided) Silver (cable) : Connect this to the black negative (–) terminal. Copper (cable) : Connect this to the red positive (+) terminal. Never short-circuit positive (+) and negative (–) speaker wires. 4. Fix the speaker cables. Press the speaker cables into the cable groove provided in the stand. The speaker cables must have a thickness of 2.8 mm or less to fit into the cable groove. Cable groove When using speaker cables that are thicker than 2.8 mm, attach nylon clampers to the speakers and use them to fix the cables. Example Nylon clamp (provided) Screw for nylon clamp (provided) Speaker cables Repeat steps 1 to 4 and assemble the other surround speaker. 14 RQT9219 Attaching a stabilizing wire Example Remove the cover. Wire (not included) Ring (not included) Screw (not included) The wall on which the speakers are to be mounted and the screws (not included) used for installing the speakers must be strong enough to support a weight of at least 65 kg for the front speakers and 50 kg for the surround speakers. Consult the contractor in charge of the work. ※ A screw which is at least 35 mm long ( see above) is used when installing the speaker on a wooden post or pillar. In all other cases, use a screw which is strong enough to support a weight of at least 65 kg or 50 kg. 1. Fije las bases de soportes en los soportes de los altavoces de sonido ambiental. Alinee los dos resaltos de uno de los soportes de altavoces de sonido ambiental (suministrado) con los dos agujeros de una de las bases de soportes de altavoz de sonido ambiental (suministrado) y encájelos. Instale la base de soporte en el extremo donde la pegatina ha sido adherida al interior. Coloque la base de soporte usando los dos tornillos de montaje de base de soporte (suministrados). Utilice los dos agujeros de tornillos marcados “S” para colocar la base. Cara posterior de la base de soporte 2. Fije los soportes en los altavoces de sonido ambiental. Alinee los dos resaltos del soporte ensamblado con los dos agujeros del altavoz de sonido ambiental y encájelos. Coloque el soporte utilizando el tornillo de montaje de soporte (suministrado). Use el agujero del tornillo central para fijar el soporte en el altavoz. 3. Conecte los cables de los altavoces (suministrados) a los terminales. Antes de hacer la conexión, pase los cables de los altavoces a través del agujero marcado “S” en la parte posterior de la base. Cables de altavoces (largos: 10 m, suministrados) Plata : Conecte este cable al terminal negativo (–) negro. Cobre : Conecte este cable al terminal positivo (+) rojo. No cortocircuite nunca los cables positivos (+) y negativos (–) de los altavoces. 4. Fije los cables de los altavoces. Meta a presión los cables de altavoces en la ranura para cables del soporte. Los cables de altavoces deberán tener un grosor de 2,8 mm o menos para caber dentro de la ranura de los mismos. Ranura para cables Cuando utilice cables de altavoces con un grosor superior a 2,8 mm, coloque abrazaderas de nailon en los altavoces y utilícelas para fijar los cables. Ejemplo Abrazadera de nailon (suministrados) Tornillo para abrazadera de nailon (suministrados) Cables de altavoces Repita los pasos 1 a 4 y ensamble el otro altavoz de sonido ambiental. Colocación de un alambre estabilizador Ejemplo Quite la cubierta. Alambre (no suministrado) Anillo (no suministrado) Tornillo (no suministrado) La pared en la que vayan a montarse los altavoces y los tornillos (no incluidos) utilizados para instalar los altavoces deberán ser lo suficientemente fuertes como para poder soportar un peso mínimo de 65 kg para los altavoces delanteros y 50 kg para los altavoces de sonido ambiental. Consulte con el contratista encargado de hacer este trabajo. ※ Cuando se instala el altavoz en un poste o en un pilar de madera se utiliza un tornillo de 35 mm de longitud como mínimo ( vea más arriba). En todos los demás casos, utilice un tornillo que sea lo suficientemente fuerte como para poder soportar un peso mínimo de 65 kg o 50 kg. ENGLISH 35 mm ESPAÑOL 35 mm Assembly and Installation Ensamblaje e instalación Wall-mounting the front and surround speakers Montaje en pared de los altavoces delanteros y de sonido ambiental Do not attempt to attach these speakers to walls using methods other than those described in this manual. • After each task, tighten the screws securely. • Keep the removed parts carefully aside. 1. Connect the speaker cables (provided) to the terminals. Refer to step 3 on page 12 and step 3 on page 14. • If the speakers are to be wall-mounted, the stands and stand bases need not be fitted onto the speaker units. 2. Adhere the spacers and mount the speakers on the wall. Remove the covers from the back of the speakers. Adhere the spacers in the four locations. • Align the spacers with the bottom of the holes used for wall mounting, and adhere. Mount the speakers on the wall. When the screws are in this position, the speaker may drop off. Fit the speaker securely so the screws are in this position. Screw (not included) Arrange the speaker cables in such a way that they will not touch the holes used for wall mounting. The wall on which the speakers are to be mounted and the screws (not included) used for installing the speakers must be strong enough to support a weight of at least 30 kg for the front speakers and 20 kg for the surround speakers. Consult the contractor in charge of the work. ※ A screw which is at least 35 mm long ( see above) is used when installing the speaker on a wooden post or pillar. In all other cases, use a screw which is strong enough to support a weight of at least 30 kg or 20 kg. Assembling a wall-mounted speaker system as a stand type Return the speaker to the original condition by carrying out the opposite procedure to the above. Assemble the speaker as a stand type. ( page 12 and page 14) Settings for connecting the recommended amplifier to the active subwoofer 16 RQT9219 When using our SA-BX500/SA-XR700 AV control receiver (not included) First make the following settings. • Refer to “Setting the Amplifier” in the instruction manual for the SA-BX500/SA-XR700 AV control receiver. Setting the speaker (YES/NO) and its size Speaker to be set Setting item SUBW (subwoofer) YES (Connected) LR (Front) SMALL C (Center) SMALL S (Surround) SMALL Setting the lower region filter Selection frequency: 100 (Frequencies of 100 Hz and below are output to the subwoofer.) Note To improve the acoustics, it is recommended that the amplifier’s center speaker output level be set 1 dB to 3 dB higher than usual. No intente colocar estos altavoces en paredes utilizando otros métodos que no sean los descritos en este manual. • Apriete firmemente los tornillos después de cada tarea. • Ponga cuidadosamente a un lado las piezas desmontadas. 1. Conecte los cables de los altavoces (suministrados) a los terminales. Consulte el paso 3 en la página 12 y el paso 3 en la página 14. • Si los altavoces van a ser montados en una pared, los soportes y las bases de soportes no necesitarán ser colocados en las unidades de altavoces. 2. Fije los espaciadores y monte los altavoces en la pared. Quite las cubiertas de la parte posterior de los altavoces. Fije los espaciadores en las cuatro ubicaciones. • Alinee los espaciadores con el fondo de los agujeros utilizados para el montaje en pared y fíjelos. Monte los altavoces en la pared. En esta posición puede que se caiga el altavoz. Coloque firmemente el altavoz de forma que los tornillos estén en esta posición. Tornillo (no suministrado) Coloque los cables de los altavoces de forma que no toquen los agujeros utilizados para el montaje en la pared. La pared en la que vayan a montarse los altavoces y los tornillos (no incluidos) utilizados para instalar los altavoces deberán ser lo suficientemente fuertes como para poder soportar un peso mínimo de 30 kg para los altavoces delanteros y 20 kg para los altavoces de sonido ambiental. Consulte con el contratista encargado de hacer este trabajo. ※ Cuando se instala el altavoz en un poste o en un pilar de madera se utiliza un tornillo de 35 mm de longitud como mínimo ( vea más arriba). En todos los demás casos, utilice un tornillo que sea lo suficientemente fuerte como para poder soportar un peso mínimo de 30 kg o 20 kg. Ensamblaje de un altavoz montado en pared como altavoz tipo independiente Vuelva a poner el altavoz en la condición original realizando a la inversa el procedimiento descrito más arriba. Ensamblaje del altavoz como altavoz tipo independiente. ( página 12 y página 14) Ajustes para conectar el amplificador recomendado al altavoz de subgraves activo Cuando utilice nuestro receptor de control AV modelo SA-BX500/ SA-XR700 (no suministrado) Haga primero los ajustes siguientes. • Consulte “Ajuste del amplificador” en el manual de instrucciones del receptor de control AV modelo SA-BX500/SA-XR700. Ajuste del altavoz (YES/NO) y su tamaño Altavoz que va a ser ajustado Elemento de ajuste SUBW (subgraves) YES (Conectado) LR (Delantero) SMALL C (Central) SMALL S (Ambiental) SMALL Ajuste del filtro pasabajos Selección de frecuencia: 100 (Las frecuencias de 100 Hz y menos salen al altavoz de subgraves.) Nota Para mejorar la acústica se recomienda que el nivel de la salida del altavoz central sea ajustado en el amplificador entre 1 dB y 3 dB más alto que lo habitual. ENGLISH ESPAÑOL Connections Connect to a receiver or amplifier with 6-Ω impedance for the front and surround speakers, and a pin-type output terminal for an active subwoofer. You cannot connect these speakers to any equipment other than this amplifier. Before connection Turn off the other equipment. Do not connect the AC mains lead until all other cables and cords are connected. Front and surround speakers With the front speakers and , connect their center speaker cables (approx. 6 meters) to the center terminals on the amplifier, and connect the speaker cables (short: 6 meters) to the front terminals. With the surround speakers and , connect the speaker cables (long: 10 meters) to the surround terminals. Be sure to connect the (+) ends of the speaker cables to the positive (+) terminals of the amplifier and connect their (–) ends to its negative (–) terminals. Never short-circuit positive (+) and negative (–) speaker wires. Conexiones Haga las conexiones a un receptor o amplificador con impedancia de 6-Ω para los altavoces delanteros y de sonido ambiental, y emplee un terminal de salida tipo contactos para un altavoz de subgraves activo. No puede conectar estos altavoces a ningún otro equipo que no sea este amplificador. Antes de hacer la conexión Apague el otro equipo. No conecte el cable de alimentación de CA hasta después de haber conectado todos los demás cables. Altavoces delanteros y de sonido ambiental Con los altavoces delanteros y , conecte los cables de sus altavoces centrales (6 metros aproximadamente) en los terminales de altavoces centrales del amplificador, y conecte los cables de los altavoces (cortos: 6 metros) a los terminales de los altavoces delanteros. Con los altavoces de sonido ambiental y , conecte los cables de los altavoces (largos: 10 metros) a los terminales de altavoces de sonido ambiental. Asegúrese de conectar los extremos (+) de los cables de los altavoces a los terminales positivos (+) del amplificador y los extremos (–) a los terminales negativos (–). Subwoofer 1. Connect using the included monaural connection cable to the receiver or amplifier’s subwoofer output terminal. For the United Kingdom: BE SURE TO READ THE CAUTION FOR THE AC MAINS LEAD ON PAGE 3 BEFORE CONNECTION. 2. Connect the AC mains lead to the household AC outlet . The included AC mains lead is for use with this unit only. Do not use it with other equipment. Bi-wiring connections The front speakers come with separate mid/high-range (HF) and lowrange (LF) terminals. If your amplifier comes with two sets of speaker terminals marked A and B, for instance, you can enjoy a more expansive sound field and a greater depth in the sound by connecting the speaker terminals to the terminals A and B on the amplifier. • Remove the shorting bars (but be sure to keep them in a safe place). • Use the speaker cables (not provided) to connect both the HF and LF terminals on the amplifier to the front speakers. • Set the speaker selector switch on the amplifier to A/B (both A and B). (For further details, refer to the operating instructions of the amplifier.) Note • Do not move the speaker while the speaker cables are connected. This may cause a short circuit. • Make sure to bundle the speaker cable with a string etc. when relocating the speaker cables. 18 RQT9219 No cortocircuite nunca los cables positivos (+) y negativos (–) de los altavoces. Altavoz de subgraves 1. Conéctelo con el cable de conexión monofónico suministrado al terminal de salida de altavoz de subgraves del receptor o amplificador. 2. Conecte el cable de alimentación de CA a la toma de CA del hogar . El cable de alimentación de CA suministrado es para ser utilizado con esta unidad solamente. No lo utilice con otros aparatos. Conexiones tipo bicableado Los altavoces delanteros vienen con terminales separados de gama media/alta (HF) y de gama baja (LF). Si sus amplificadores vienen con dos juegos de terminales de altavoces marcados A y B, por ejemplo, usted puede disfrutar de un campo acústico más expansivo y de una mayor profundidad en el sonido conectando los terminales de altavoces a los terminales A y B del amplificador. • Quite las barras de cortocircuito (pero asegúrese de guardarlas en un lugar seguro). • Use los cables de altavoces (no suministrados) para conectar los terminales HF y LF del amplificador a los altavoces delanteros. • Ponga el selector de altavoces del amplificador en A/B (ambos, A y B). (Para conocer más detalles, consulte las instrucciones de funcionamiento del amplificador.) Nota • No mueva el altavoz mientras están conectados sus cables. Esto podría causar un cortocircuito. • Asegúrese de juntar los cables de los altavoces con una cuerda, etc. cuando cambie la posición de los mismos. POWER 1 3 DUAL DRIVE ACTIVE SUBWOOFER POWER LOW PASS FILTER 80 100 PHASE 2 VOLUME 60 150 OFF ON NORMAL REVERSE 50 AUTO OPERATION ON/OFF 200 MIN MAX Hz 4 PHASE 5 ESPAÑOL ENGLISH NORMAL REVERSE Subwoofer operation The active subwoofer reproduces very low frequency sound monaurally, making use of the fact that the human ear does not sense direction in the low frequency region. You can emphasize low frequencies by combining the active subwoofer with the speaker system. El altavoz de subgraves activo reproduce monofónicamente el sonido de frecuencias muy bajas, aprovechando el hecho de que el oído humano no siente la dirección en la zona de frecuencias bajas. Usted puede realzar las frecuencias bajas combinando el altavoz de subgraves activo con el sistema de altavoces. 1. Set [POWER] to “ 1. Ponga [POWER] en “ ON”. The indicator turns green. 2. Output sound from the receiver or amplifier and adjust the volume to a suitable level. 2. Dé salida al sonido del receptor o amplificador y ajuste el volumen a un nivel apropiado. See the operating instructions for the other equipment for details. • Do not adjust the bass as this can cause distortion. • If the volume control on the amplifier is left in the minimum position or there is no signal from the amplifier for more than 10 minutes, the active subwoofer will automatically switch to standby and the power lamp will turn red. If you turn up the volume control on the amplifier or if a signal enters the subwoofer from the amplifier, the subwoofer will automatically switch to the operation mode and the power lamp will turn green. Note, however, that the subwoofer may sometimes fail to switch to standby due to noise emitted by the amplifier to which it is connected. Consulte las instrucciones de funcionamiento del otro equipo para conocer detalles. • No ajuste los graves porque esto puede causar distorsión. • Si el control de volumen del amplificador se deja en la posición del mínimo o no hay señal procedente del amplificador durante más de 10 minutos, el altavoz de subgraves activo se pondrá automáticamente en el modo de espera y la luz de la alimentación se pondrá roja. Si sube el volumen en el amplificador o entra una señal en el altavoz de subgraves procedente del amplificador, el altavoz de subgraves se pondrá automáticamente en el modo de funcionamiento y la luz de la alimentación se pondrá verde. Note, sin embargo, que el altavoz de subgraves podrá no ponerse algunas veces en el modo de espera debido al ruido emitido por el amplificador al que está conectado. • Refer to “Frequency response by LOW PASS FILTER setting” . • When you adjust the frequency domain of subwoofer with your receiver or amplifier, set [LOW PASS FILTER] to 200 Hz. 4. Adjust [VOLUME] to a suitable level. • Gradually turn up the volume control from the minimum position and set it in a position where the output from the subwoofer is balanced with the front speakers and also there is no distortion in the low frequency region. • Refer to “Level change according to volume control setting” . 5. Play something, then set [PHASE] to “ NORMAL” or “ REVERSE” so the sound is normal. The subwoofer and speakers cancel each other out (causing unusual, muffled sound) if the phase setting is incorrect. Set [POWER] to “ OFF”. The indicator turns off. When you wish to reproduce 2-channel stereo music The output in the low range sometimes may be excessively high depending on the setting of the amplifier and the active subwoofer when you are reproducing a multi-channel movie source. Reduce the subwoofer level at the amplifier side. Also, note that you may be able to obtain more natural sound quality by reducing the frequency of the “low-pass filter” on the active subwoofer. Note If the volume output is too loud, this unit’s amplifier can be clipped, causing output to sound unusual. Reduce the volume of the receiver or amplifier or the volume of this unit if this occurs. When settings are complete The only operation you should have to perform daily is press [POWER] to turn the unit ON/OFF. If you reposition the system and the acoustics change, reset the unit as necessary. Protection circuitry (SB-WA1000) 20 ON”. El indicador se pone verde. 3. Set [LOW PASS FILTER]. RQT9219 Operación del altavoz de subgraves This speaker is provided with a protection circuit. If trouble develops inside the speaker because the speaker is being used in an abnormally hot location or because excessively high input signals are supplied, the protection circuit may be triggered, shutting down the output. It could take approximately an hour for the protection circuitry to reset. If sound is interrupted during play... 1. Reduce the volume level from the receiver or amplifier. 2. Press [POWER] to turn the unit off. 3. Check the temperature and connections for problems. 4. Remove the cause of any problems discovered. Press [POWER] to turn the unit on. Should the unit still not function properly... Pull out the plug and consult your dealer. 3. Ajuste [LOW PASS FILTER]. • Consulte “Respuesta de frecuencia del ajuste LOW PASS FILTER” . • Cuando ajuste el dominio frecuencial del altavoz de subgraves con su receptor o amplificador, ponga [LOW PASS FILTER] en 200 Hz. 4. Ajuste [VOLUME] a un nivel apropiado. • Gire poco a poco el control de volumen desde la posición del mínimo y póngalo en una posición donde la salida del altavoz de subgraves quede equilibrada con los altavoces delanteros y no haya tampoco distorsión en la zona de frecuencias bajas. • Consulte “Cambio de nivel según el ajuste del control de volumen” . 5. Reproduzca algo y luego ajuste [PHASE] a “ NORMAL” o “ REVERSE” para que el sonido sea normal. Si la fase no es correcta el altavoz de subgraves y los demás altavoces se anularán entre sí (causando un sonido extraño y apagado). Ponga [POWER] en “ OFF”. El indicador se apaga. Cuando quiera reproducir música estéreo de 2 canales La salida en la gama baja puede ser algunas veces excesivamente alta dependiendo del ajuste del amplificador y el altavoz de subgraves activo cuando usted está reproduciendo películas de múltiples canales. Reduzca el nivel del altavoz de subgraves en el amplificador. Tenga también en cuenta que tal vez pueda obtener una calidad de sonido más natural reduciendo la frecuencia del “filtro pasabajos” en el altavoz de subgraves activo. Nota Si la salida del sonido está demasiado alta, el amplificador de esta unidad podrá bloquearse, haciendo que la salida suene mal. Si ocurre esto, reduzca el volumen del receptor, el del amplificador o el de esta unidad. Cuando los ajustes están completos La única operación que Ud. deberá realizar diariamente es presionar [POWER] para encender y apagar la unidad. Si Ud. reubica el sistema y la acústica cambia, reajuste la unidad como fuera necesario. Circuitos de protección (SB-WA1000) El altavoz dispone de un circuito de protección. Si se produce un problema dentro del altavoz porque éste está siendo utilizado en un lugar excesivamente caliente o porque se suministran señales de entrada excesivamente altas, el circuito de protección podrá activarse y cortar la salida. Puede transcurrir aproximadamente una hora hasta que se restablezcan los circuitos de protección. Si el sonido se interrumpe durante la reproducción… 1. Reduzca el nivel del volumen del receptor o amplificador. 2. Pulse [POWER] para apagar la unidad. 3. Compruebe la temperatura y las conexiones por si hubiera algún problema. 4. Elimine la causa de cualquier problema que se descubra. Pulse [POWER] para encender la unidad. Si la unidad no funciona correctamente… Desenchúfela y consulte a su distribuidor. Specifications Especificaciones técnicas ESPAÑOL ENGLISH SB-FC1000L/SB-FC1000R FRONT SPEAKER SECTION Type 3 way 4 speaker system Bass-reflex type Speaker Woofer: 8 cm cone type x 2 Tweeter: 2.5 cm dome type x 1 Super Tweeter: 1.2 cm dome type x 1 Impedance (HF/LF) 6Ω Input power (IEC) (HF/LF) 200 W (MAX), 100 W (RATED) Sound pressure level 82.5 dB/W (1.0 m) Crossover frequency 2.5 kHz, 20 kHz Frequency range 65 Hz – 100 kHz (at –16 dB) 75 Hz – 90 kHz (at –10 dB) CENTER SPEAKER SECTION Type 3 way 3 speaker system Bass-reflex type Speaker Woofer: 8 cm cone type x 1 Midrange: 6.5 cm cone type x 1 Tweeter: 2.5 cm dome type x 1 Impedance 12 Ω Input power (IEC) 100 W (MAX), 50 W (RATED) Sound pressure level 80 dB/W (1.0 m) Crossover frequency 800 Hz, 3 kHz Frequency range 65 Hz – 50 kHz (at –16 dB) 75 Hz – 40 kHz (at –10 dB) GENERAL Dimensions (W x H x D) 279 mm x 1298 mm x 279 mm (with the stand) 175 mm x 802 mm x 102 mm (For wall-mounting) Mass Approx. 12.6 kg (with the stand) Approx. 5.4 kg (For wall-mounting) SB-HS1000 Type Speaker 2 way 3 speaker system Bass-reflex type 8 cm cone type x 2 2.5 cm dome type x 1 6Ω 200 W (MAX), 100 W (RATED) 82.5 dB/W (1.0 m) 2.5 kHz 65 Hz – 50 kHz (at –16 dB) 75 Hz – 40 kHz (at –10 dB) Woofer: Tweeter: Impedance Input power (IEC) Sound pressure level Crossover frequency Frequency range Dimensions (W x H x D) Mass SB-WA1000 279 mm x 1298 mm x 279 mm (with the stand) 125 mm x 802 mm x 87 mm (For wall-mounting) Approx. 9.3 kg (with the stand) Approx. 3.7 kg (For wall-mounting) SPEAKER SECTION Type Speaker Woofer: Sound pressure level Frequency range (with amp) 1 way 2 speaker system Bass-reflex type 17 cm cone type x 2 83 dB/W (1.0 m) 28 Hz – 300 Hz (at –16 dB) 32 Hz – 240 Hz (at –10 dB) AMPLIFIER SECTION Output power Input sensitivity / Input Impedance Phase switching Low pass filter 100 W (6 Ω) x 2 (THD 0.9%) 300 mV/33 kΩ (RCA jack) NORMAL/REVERSE 50 Hz – 200 Hz Variable GENERAL Power supply AC 230 V – 240 V, 50 Hz 140 W Power consumption Dimensions (W x H x D) 254 mm x 496 mm x 500 mm Mass Approx. 22 kg Power consumption in input standby condition 1.5 W Note Specifications are subject to change without notice. SB-FC1000L/SB-FC1000R SECCIÓN DE ALTAVOCES DELANTEROS Tipo Sistema de 4 altavoces de 3 vías tipo reflexión de graves Altavoces Graves: 2 de tipo cónico de 8 cm Agudos: 1 de tipo cúpula de 2,5 cm Superagudos: 1 de tipo cúpula de 1,2 cm Impedancia (HF/LF) 6Ω Potencia de entrada (IEC) (HF/LF) 200 W (máxima), 100 W (nominal) Nivel de presión acústica 82,5 dB/W (1,0 m) Frecuencia de cruce 2,5 kHz, 20 kHz Gama de frecuencias 65 Hz – 100 kHz (a –16 dB) 75 Hz – 90 kHz (a –10 dB) SECCIÓN DE ALTAVOCES CENTRALES Tipo Sistema de 3 altavoces de 3 vías tipo reflexión de graves Altavoces Graves: 1 de tipo cónico de 8 cm Gama media: 1 de tipo cónico de 6,5 cm Agudos: 1 de tipo cúpula de 2,5 cm Impedancia 12 Ω Potencia de entrada (IEC) 100 W (máxima), 50 W (nominal) Nivel de presión acústica 80 dB/W (1,0 m) Frecuencia de cruce 800 Hz, 3 kHz Gama de frecuencias 65 Hz – 50 kHz (a –16 dB) 75 Hz – 40 kHz (a –10 dB) GENERALIDADES Dimensiones (An x Al x Prof) 279 mm x 1298 mm x 279 mm (con el soporte) 175 mm x 802 mm x 102 mm (para montar en pared) Peso Aprox. 12,6 kg (con el soporte) Aprox. 5,4 kg (para montar en pared) SB-HS1000 Tipo Altavoces Sistema de 3 altavoces de 2 vías tipo reflexión de graves Graves: 2 de tipo cónico de 8 cm Agudos: 1 de tipo cúpula de 2,5 cm Impedancia 6Ω Potencia de entrada (IEC) 200 W (máxima), 100 W (nominal) Nivel de presión acústica 82,5 dB/W (1,0 m) Frecuencia de cruce 2,5 kHz Gama de frecuencias 65 Hz – 50 kHz (a –16 dB) 75 Hz – 40 kHz (a –10 dB) Dimensiones (An x Al x Prof) 279 mm x 1298 mm x 279 mm (con el soporte) 125 mm x 802 mm x 87 mm (para montaje en pared) Peso Aprox. 9,3 kg (con el soporte) Aprox. 3,7 kg (para montaje en pared) SB-WA1000 SECCIÓN DE ALTAVOCES Tipo Sistema de 2 altavoces de 1 vía tipo reflexión de graves Altavoces Graves: 2 de tipo cónico de 17 cm Nivel de presión acústica 83 dB/W (1,0 m) Gama de frecuencias (con amplificador) 28 Hz – 300 Hz (a –16 dB) 32 Hz – 240 Hz (a –10 dB) SECCIÓN DEL AMPLIFICADOR Potencia de salida 100 W (6 Ω) x 2 (DAT de 0,9%) Sensibilidad/impedancia de entrada 300 mV/33 kΩ (toma RCA) Conmutación de fase Normal/Invertida Filtro pasabajos 50 Hz – 200 Hz, variable GENERALIDADES Alimentación CA 230 V – 240 V, 50 Hz Consumo 140 W Dimensiones (An x Al x Prof) 254 mm x 496 mm x 500 mm Peso Aprox. 22 kg Consumo de energía en el modo de espera 1,5 W Nota Las especificaciones están sujetas a cambios sin previo aviso. Otras notas Other notes When used with a CRT TV set • Depending on how the installation is configured, irregular coloring may occur. If this occurs, turn the television off for about 30 minutes. The television’s demagnetizing function should correct the problem. If it persists, move the speakers further away from the television. 22 RQT9219 Cuando se utilice un televisor con tubo de rayos catódicos • Dependiendo de cómo se configure la instalación es posible que se produzcan colores irregulares. Si ocurre esto, apague el televisor durante unos 30 minutos. La función de desmagnetización del televisor deberá corregir el problema. En caso contrario, separe más aún los altavoces del televisor. This speaker system is not magnetically shielded. Este sistema de altavoces no está blindado magnéticamente. Do not place it near a PC or other device that is affected by magnetic fields. No lo coloque cerca de un PC u otro dispositivo que sea afectado por los campos magnéticos. Keep magnetized items away. Aleje los objetos magnetizados. Magnetized cards, bank cards, commuter passes, etc., can be damaged if placed too closed to the speaker magnets. Clocks may also be affected. Las tarjetas magnetizadas, las tarjetas de bancos, los pases de viajeros, etc., pueden estropearse si se dejan demasiado cerca de los imanes de los altavoces. Los relojes también pueden ser afectados. Avoid locations such as described below : Evite ubicaciones como las indicadas a continuación: • In direct sunlight • Near heating appliances or other sources of heat • Where the humidity is high • Expuestas a los rayos solares directos • Próximas a dispositivos de calefacción u otras fuentes de calor • Donde la humedad sea excesiva Maintenance Underhåll Rengör enheterna med en mjuk, ren och torr tygduk. • Never use alcohol, paint thinner, or benzine to clean these units. • Before using chemically treated cloth, read the instructions that came with the cloth carefully. • Använd aldrig alkohol, målarthinner eller ren bensin för att rengöra enheterna. • Innan du använder en kemiskt preparerad tygduk, läs instruk tionerna som följde med tygduken ordentligt. Mantenimiento Limpie estas unidades con un paño blando, limpio y seco. • No utilice nunca alcohol, diluyente de pintura ni bencina para limpiar estas unidades. • Antes de utilizar un paño impregnado químicamente, lea con atención las instrucciones suministradas con la unidad. Entretien Nettoyez ces enceintes avec un chiffon doux, propre et sec. • N’utilisez jamais d’alcool, diluant pour peinture ni de benzine pour nettoyer ces enceintes. • Avant d’utiliser un chiffon imprégné chimiquement, lisez attentivement les instructions qui accompagnent le chiffon. Vedligeholdelse Rengør disse enheder med en tør, blød klud. • Brug aldrig sprit, fortynder, rensebenzin til rengøringen. • Før du evt. benytter en kemisk imprægneret klud, bør du omhyggeligt læse den vejledning, som følger med kluden. Údržba přístroje Tyto jednotky čistěte měkkým čistým a suchým hadříkem. • Nikdy nepoužívejte líh, ředidlo nebo benzín pro čištění těchto přístrojů. • Před použitím chemicky impregnované látky si prosím pečlivě přečtěte návod k utěrce přiložený. ITALIANO DEUTSCH NEDERLANDS FRANÇAIS ESPAÑOL ENGLISH Clean these units with a soft, clean, dry cloth. Reinig de luidsprekers met een zachte, schone, droge doek. • Gebruik nooit alcohol, verfverdunner of benzine voor het schoonmaken van de buitenpanelen. • Alvorens een chemisch behandelde doek te gebruiken, dient u de bij de doek horende instructies zorgvuldig te lezen. Konserwacja Czyść urządzenia miękką, czystą, suchą szmatką. • Nigdy nie używaj alkoholu, rozpuszczalnika do farb lub benzyny do czyszczenia niniejszych urządzeń. • W razie używania chemicznie impregnowanej ściereczki, starannie przeczytaj zalecenia dołączone do ściereczki. ČESKY DANSK SVENSKA Onderhoud Pflege und Instandhaltung УКРАЇНСЬКА РУССКИЙ ЯЗЫК POLSKI Reinigen Sie die Boxen mit einem weichen, sauberen, trockenen Tuch. 64 RQT9219 • Auf keinen Fall Alkohol, Farbverdünner oder Benzin zum Reinigen verwenden. • Vor Verwendung eines chem isch behandelten Reinigungstuchs die dem Tuch beiliegende Gebrauchsanweisung sorgfältig durch lesen. Manutenzione Pulire queste unità con un panno morbido, pulito e asciutto. • Per pulire le unita non si deve mai usare alcol, diluenti per vernici o benzina. • Prima di usare un panno trattato chimicamente, leggere con cura le istruzioni che lo accompagnano. Уxoд Для очистки Данного аппарата используйте мягкую, чистую и сухую ткань. • Никогда не используйте для оцистки аппарата спирт, растворитель или бензин. • При использоваии ткани, подвергнутой химиуеской обработке, обратитесь к инструкции по обращению с ней. Обслуговування Протирайте пристрої м’якою сухою та чистою тканиною. • Не використовуйте для чищення пристроїв спирт, розріджувач або бензин. • Перш ніж застосовувати хімічно оброблену тканину, уважно ознайомтеся з інструкціями для її використання.-
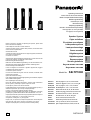 1
1
-
 2
2
-
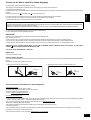 3
3
-
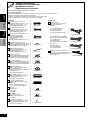 4
4
-
 5
5
-
 6
6
-
 7
7
-
 8
8
-
 9
9
-
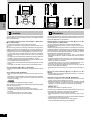 10
10
-
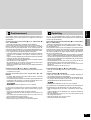 11
11
-
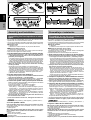 12
12
-
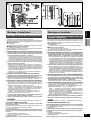 13
13
-
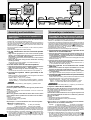 14
14
-
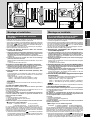 15
15
-
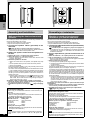 16
16
-
 17
17
-
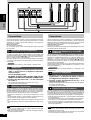 18
18
-
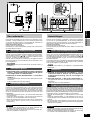 19
19
-
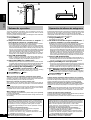 20
20
-
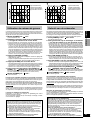 21
21
-
 22
22
-
 23
23
-
 24
24
-
 25
25
-
 26
26
-
 27
27
-
 28
28
-
 29
29
-
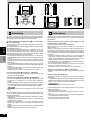 30
30
-
 31
31
-
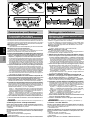 32
32
-
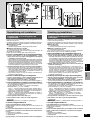 33
33
-
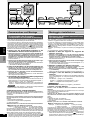 34
34
-
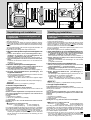 35
35
-
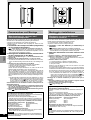 36
36
-
 37
37
-
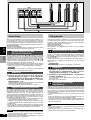 38
38
-
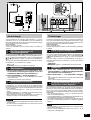 39
39
-
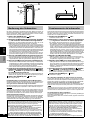 40
40
-
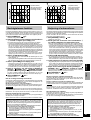 41
41
-
 42
42
-
 43
43
-
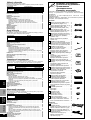 44
44
-
 45
45
-
 46
46
-
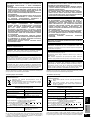 47
47
-
 48
48
-
 49
49
-
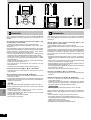 50
50
-
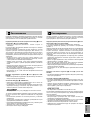 51
51
-
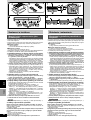 52
52
-
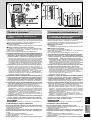 53
53
-
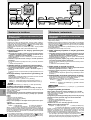 54
54
-
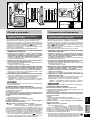 55
55
-
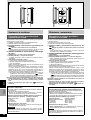 56
56
-
 57
57
-
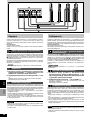 58
58
-
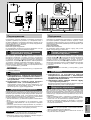 59
59
-
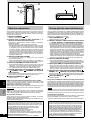 60
60
-
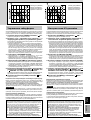 61
61
-
 62
62
-
 63
63
-
 64
64
-
 65
65
-
 66
66
-
 67
67
-
 68
68


Panasonic SB-FS1000 El manual del propietario
- Categoría
- Amplificador de instrumentos musicales
- Tipo
- El manual del propietario
En otros idiomas
- français: Panasonic SB-FS1000 Le manuel du propriétaire
- italiano: Panasonic SB-FS1000 Manuale del proprietario
- English: Panasonic SB-FS1000 Owner's manual
- Deutsch: Panasonic SB-FS1000 Bedienungsanleitung
- русский: Panasonic SB-FS1000 Инструкция по применению
- Nederlands: Panasonic SB-FS1000 de handleiding
- dansk: Panasonic SB-FS1000 Brugervejledning
- polski: Panasonic SB-FS1000 Instrukcja obsługi
- čeština: Panasonic SB-FS1000 Návod k obsluze
- svenska: Panasonic SB-FS1000 Bruksanvisning
Documentos relacionados
-
Panasonic SBCSS250 El manual del propietario
-
Panasonic RP-SPF01 El manual del propietario
-
-
-
-
-
-
-
-
Otros documentos
-
Tangent EVO E8 Sub White Manual de usuario
-
Tangent Evo E10 El manual del propietario
-
Sony BDV-E500W Guía de instalación
-
Sony DAV-DZ310 El manual del propietario
-
Definitive Technology DM30 Guía del usuario
-
Sony STR-DH750 El manual del propietario
-
JVC CS-CN100 Manual de usuario
-
Definitive Technology DM90TM Guía del usuario
-
-
Harman Kardon CA5250 Manual de usuario