La página se está cargando...

RQT7693
2
ENGLISH
ESPAÑOLFRANÇAIS
NEDERLANDS
Supplied accessories
Accessorios suministrados
Accessoires fournis
Bijgeleverde accessoires
Please check and identify the supplied accessories.
For the United Kingdom
Use numbers indicated in parentheses when asking for replacement parts.
Verifique e identifique los accesorios suministrados.
Cocher les accessoires pour vérifier qu’ils sont bien tous dans l’emballage.
Controleer de bijgeleverde accessoires en markeer in de vierkantjes.
SB-FS70
Speaker cables (long: 10 m) ............... 2
Cables de altavoces (largos: 10 m) .... 2
Câbles d’enceinte (longs : 10 m) ........ 2
Luidsprekerkabels (lange: 10 m) ........ 2
Speaker cables (short: 4 m) ............... 2
Cables de altavoces (cortos: 4 m) ...... 2
Câbles d’enceinte (courts : 4 m) ......... 2
Luidsprekerkabels (korte: 4 m) ........... 2
Assembled stabilizer ........................... 4
Estabilizador ensamblado .................. 4
Stabilisateur assemblé ....................... 4
Gemonteerde stabilisator ................... 4
Base ................................................... 4
Base ................................................... 4
Base ................................................... 4
Voetstuk .............................................. 4
Rubber pads ............... 1 sheet (24 feet)
Almohadillas de goma
................................... 1 hoja (24 patas)
Coussinets en caoutchouc
................................. 1 feuille (24 pieds)
Rubberkussentjes ...... 1 vel (24 voetjes)
Screw for base .................................... 8
Tornillos para la base ......................... 8
Vis pour la base .................................. 8
Schroef voor luidsprekerbasis ............ 8
Nylon clamp ........................................ 4
Abrazadera de nailon ......................... 4
Collier de serrage en nylon ................. 4
Nylonklem ........................................... 4
Screw for nylon clamp ........................ 4
Tornillo para abrazadera de nailon ..... 4
Vis du collier de serrage en nylon....... 4
Schroef voor nylonklem ...................... 4
SB-PC70
Speaker cables (short: 4 m) ............... 1
Cables de altavoces (cortos: 4 m) ...... 1
Câbles d’enceinte (courts : 4 m) ......... 1
Luidsprekerkabels (korte: 4 m) ........... 1
Speaker feet ................. 1 sheet (4 feet)
Patas de altavoces ...... 1 hoja (4 patas)
Pieds d’enceinte ........ 1 feuille (4 pieds)
Luidsprekervoetjes ...... 1 vel (4 voetjes)
SB-WA70
AC mains lead .................................... 1
Cable de alimentación de CA ............. 1
Cordon d’alimentation ......................... 1
Netsnoer ............................................. 1
For the United Kingdom
Para el Reino Unido
Pour le Royaume-Uni
Voor het Verenigd Koninkrijk
For Australia and New Zealand
Para Australia y Nueva Zelanda
Pour l’Australie et la Nouvelle-Zélande
Voor Australië en Nieuw-Zeeland
For others
Para otros países
Pour les autres pays
Voor overige landen
Monaural connection cable (5 m) ....... 1
Cable de conexión monofónico (5 m) .....
1
Câble de connexion monaural (5 m) .. 1
Monokabel (5 m) ................................. 1
Dear customer
Thank you for purchasing this product.
For optimum performance and safety, please read these instructions
carefully.
Contents
Caution for AC mains lead .............................................................. 3
Safety precautions .......................................................................... 4
Speaker setup ................................................................................. 6
Location ........................................................................................ 10
Connections .................................................................................. 12
Subwoofer operation (SB-WA70) .................................................. 14
Notes ............................................................................................. 16
Maintenance ................................................................................. 16
Specifications ................................................................................ 46
Cher client
Nous vous remercions pour votre achat de cet appareil.
Pour en obtenir des performances idéales et pour votre sécurité,
veuillez lire attentivement le présent manuel.
Pack d’enceintes Enceintes
SB-FS70 Avant, Surround SB-FS70 X 4
SB-CW70
Centrale SB-PC70 X 1
Caisson de graves actif SB-WA70 X 1
Tables des matières
Précautions de sécurité .................................................................. 5
Installation des enceintes ................................................................ 7
Positionnement ............................................................................. 11
Raccordements ............................................................................. 13
Utilisation du caisson de graves (SB-WA70) ................................ 15
Remarques ................................................................................... 17
Entretien ........................................................................................ 17
Données techniques ..................................................................... 46
Estimado cliente
Muchísimas gracias por haber adquirido este aparato.
Lea con atención estas instrucciones para obtener las máximas
prestaciones y seguridad.
Índice
Precauciones de seguridad ............................................................ 4
Instalación de los altavoces ............................................................ 6
Ubicación ...................................................................................... 10
Conexiones ................................................................................... 12
Operación del altavoz de subgraves (SB-WA70) .......................... 14
Notas ............................................................................................. 16
Mantenimiento .............................................................................. 16
Especificaciones técnicas ............................................................. 46
Speaker system Speaker
SB-FS70 Front, Surround SB-FS70 X 4
SB-CW70
Center SB-PC70 X 1
Active subwoofer SB-WA70 X 1
Geachte klant
Hartelijk dank voor de aankoop van dit product.
Gelieve deze gebruiksaanwijzing aandachtig door le lezen voor een
optimale prestatie en een veilig gebruik van het systeem.
Luidsprekersysteem
Luidsprekers
SB-FS70 Voor, Surround SB-FS70 X 4
SB-CW70
Midden SB-PC70 X 1
Actieve subwoofer SB-WA70 X 1
Inhoud
Veiligheidsmaatregelen ................................................................... 5
De luidsprekers installeren .............................................................. 7
Opstelling ...................................................................................... 11
Aansluitingen ................................................................................ 13
Gebruik van de subwoofer (SB-WA70) ......................................... 15
Opmerkingen ................................................................................ 17
Onderhoud .................................................................................... 17
Technische gegevens ................................................................... 46
(REE1203C)
(REE1203A)
(RYQ0526-S)
(RYQ0521-S)
(RFA2645A)
(6 feet per sheet)
(6 patas por hoja)
(6 pieds par feuille)
(6 voetjes per vel)
(XTB4+30GFZ)
(RMR1503-W)
(XTB3+8JFN)
(REE1203A)
(RFA0631A-K)
(RJA0019-3U)
(RJL1P015B50)
(K2CJ2DA00010)
(RJA0038-2U)
Sistema de altavoces
Altavoces
SB-FS70
Delanteros, sonido ambiental
SB-FS70 X 4
SB-CW70
Central SB-PC70 X 1
Subgraves activos SB-WA70 X 1
01_RQT7693_01-09 04.03.15, 05:59 PM2

RQT7693
3
ENGLISHESPAÑOLFRANÇAIS
NEDERLANDS
CAUTION!
• DO NOT INSTALL OR PLACE THIS UNIT IN A BOOKCASE, BUILT-IN CABINET OR
IN ANOTHER CONFINED SPACE. ENSURE THE UNIT IS WELL VENTILATED. TO
PREVENT RISK OF ELECTRIC SHOCK OR FIRE HAZARD DUE TO OVERHEATING,
ENSURE THAT CURTAINS AND ANY OTHER MATERIALS DO NOT OBSTRUCT THE
VENTILATION VENTS.
• DO NOT OBSTRUCT THE UNIT’S VENTILATION OPENINGS WITH NEWSPAPERS,
TABLECLOTHS, CURTAINS, AND SIMILAR ITEMS.
• DO NOT PLACE SOURCES OF NAKED FLAMES, SUCH AS LIGHTED CANDLES,
ON THE UNIT.
• DISPOSE OF BATTERIES IN AN ENVIRONMENTALLY FRIENDLY MANNER.
AVERTISSEMENT!
• NE PAS INSTALLER NI PLACER L’APPAREIL DANS UNE BIBLIOTHÈQUE, UN PLAC-
ARD RENFERMÉ NI AUCUN AUTRE ESPACE RÉDUIT DE FAÇON À ASSURER UNE
BONNE VENTILATION. VÉRIFIER QU’AUCUN RIDEAU NI AUCUN AUTRE MATÉRIAU
NE BLOQUE LA VENTILATION DE FAÇON À ÉVITER TOUT RISQUE DE CHOC
ÉLECTRIQUE OU DE FEU DÛ À UNE SURCHAUFFE.
• NE BOUCHEZ PAS LES OUVERTURES D’AÉRATION DE L’APPAREIL AVEC DES
JOURNAUX, NAPPES, RIDEAUX OU OBJETS SIMILAIRES.
• NE PLACEZ PAS DE SOURCES DE FLAMMES VIVES TELLES QUE BOUGIES
ALLUMÉES SUR L’APPAREIL.
• JETEZ LES PILES D’UNE MANIÈRE COMPATIBLE AVEC L’ENVIRONNEMENT.
AVERTISSEMENT:
POUR RÉDUIRE LES RISQUES D’INCENDIE, D’ÉLECTROCUTION OU DE DOMMAGES
AU PRODUIT, N’EXPOSEZ PAS CET APPAREIL À LA PLUIE, L’HUMIDITÉ,
L’ÉGOUTTEMENT OU L’ÉCLABOUSSEMENT ET NE PLACEZ PAS D’OBJETS
REMPLIS DE LIQUIDES TELS QUE VASES DESSUS.
¡ADVERTENCIA!
• PARA MANTENER BIEN VENTILADA ESTA UNIDAD, NO LA INSTALE NI PONGA
EN UN ESTANTE DE LIBROS, MUEBLE EMPOTRADO U OTRO ESPACIO DE DIMEN-
SIONES REDUCIDAS. ASEGÚRESE QUE CORTINAS Y OTROS MATERIALES NO
OBSTRUYAN LAS CONDICIONES DE VENTILACIÓN PARA PREVENIR EL RIESGO
DE SACUDIDAS ELÉCTRICAS O INCENDIOS DEBIDOS AL RECALENTAMIENTO.
• NO OBSTRUYA LAS ABERTURAS DE VENTILACIÓN DE LA UNIDAD CON
PERIÓDICOS, MANTELES, CORTINAS U OBJETOS SIMILARES.
• NO COLOQUE OBJETOS CON LLAMA DESCUBIERTA, UNA VELA POR EJEMPLO,
ENCIMA DE LA UNIDAD.
• TIRE LAS PILAS DE FORMA QUE NO CONTAMINE EL MEDIO AMBIENTE.
AVISO:
PARA REDUCIR EL RIESGO DE INCENDIOS, DESCARGAS ELÉCTRICAS O DAÑOS
EN ESTE APARATO, NO LO EXPONGA A LA LLUVIA, HUMEDAD, GOTEO NI
SALPICADURAS, Y NO COLOQUE ENCIMA DE ÉL OBJETOS QUE CONTENGAN
LÍQUIDOS COMO, POR EJEMPLO, FLOREROS.
WARNING:
TO REDUCE THE RISK OF FIRE, ELECTRIC SHOCK OR PRODUCT DAMAGE, DO
NOT EXPOSE THIS APPARATUS TO RAIN, MOISTURE, DRIPPING OR SPLASHING
AND THAT NO OBJECTS FILLED WITH LIQUIDS, SUCH AS VASES, SHALL BE
PLACED ON THE APPARATUS.
THIS UNIT IS INTENDED FOR USE IN MODERATE CLIMATES.
This product may receive radio interference caused by mobile telephones during use. If
such interference is apparent, please increase separation between the product and the
mobile telephone.
ESTA UNIDAD HA SIDO DISEÑADA PARA SER UTILIZADA EN CLIMAS MODERADOS.
Este producto puede tener interferencias causadas por teléfonos móviles durante su
utilización. Si tales interferencias resultan evidentes, aumente la separación entre el
producto y el teléfono móvil.
CET APPAREIL EST DESTINÉ AUX CLIMATS TEMPÉRÉS.
Ce produit peut être perturbé par les ondes des téléphones mobiles pendant l’utilisation.
Si vous constatez une telle interférence, éloignez le téléphone mobile du produit.
WAARSCHUWING:
TENEINDE HET GEVAAR VOOR BRAND, ELEKTRISCHE SCHOK OF
PRODUCTBESCHADIGING TE VERMINDEREN, MAG DIT APPARAAT NIET WORDEN
BLOOTGESTELD AAN REGEN, VOCHT, EN DRUPPELEND OF SPATTEND WATER,
EN MOGEN ER GEEN VOORWERPEN MET WATER OF ANDERE VLOEISTOFFEN
ERIN, ZOALS BLOEMENVAZEN, OP HET APPARAAT WORDEN GEZET.
DIT APPARAAT IS BESTEMD VOOR GEBRUIK IN EEN GEMATIGD KLIMAAT.
WAARSCHUWING!
• OM EEN GOEDE VENTILATIE TE VERZEKEREN, DIT APPARAAT NIET IN EEN
BOEKENKAST, EEN INGEBOUWDE KAST OF EEN ANDERE GESLOTEN RUIMTE
INSTALLEREN OF GEBRUIKEN. ZORG ERVOOR DAT DE VENTILATIEWEGEN NIET
DOOR GORDIJNEN OF ANDERE MATERIALEN WORDEN AFGESLOTEN, OM GE-
VAAR VOOR ELEKTRISCHE SCHOK OF BRAND TEN GEVOLGE VAN
OVERVERHITTING TE VOORKOMEN.
• ZORG DAT DE VENTILATIE-OPENINGEN VAN HET APPARAAT NIET
GEBLOKKEERD WORDEN DOOR KRANTEN, TAFELKLEEDJES, GORDIJNEN, OF
IETS DERGELIJKS.
• ZET GEEN OPEN VUUR, ZOALS BRANDENDE KAARSEN, OP HET APPARAAT.
• DOE LEGE BATTERIJEN WEG OP EEN MILIEUVRIENDELIJKE MANIER.
Tijdens het gebruik is dit product vatbaar voor radiostoring veroorzaakt door een mobiele
telefoon. Wanneer dergelijke storing optreedt, moet u dit product en de mobiele telefoon
verder van elkaar vandaan gebruiken.
Caution for AC mains lead
(For United Kingdom)
(“EB” area code model only)
For your safety, please read the following text carefully.
This appliance is supplied with a moulded three pin mains plug for
your safety and convenience.
A 5-ampere fuse is fitted in this plug.
Should the fuse need to be replaced please ensure that the re-
placement fuse has a rating of 5-ampere and that it is approved by
ASTA or BSI to BS1362.
Check for the ASTA mark m or the BSI mark o on the body of the fuse.
If the plug contains a removable fuse cover you must ensure that it
is refitted when the fuse is replaced.
If you lose the fuse cover the plug must not be used until a replace-
ment cover is obtained.
A replacement fuse cover can be purchased from your local dealer.
If a new plug is to be fitted please observe the wiring code as stated
below.
If in any doubt please consult a qualified electrician.
IMPORTANT
The wires in this mains lead are coloured in accordance with the
following code:
Blue: Neutral, Brown: Live.
As these colours may not correspond with the coloured markings
identifying the terminals in your plug, proceed as follows:
The wire which is coloured Blue must be connected to the terminal
which is marked with the letter N or coloured Black or Blue.
The wire which is coloured Brown must be connected to the terminal
which is marked with the letter L or coloured Brown or Red.
WARNING: DO NOT CONNECT EITHER WIRE TO THE
EARTH TERMINAL WHICH IS MARKED WITH THE LET-
TER E, BY THE EARTH SYMBOL
nn
nn
n OR COLOURED
GREEN OR GREEN/YELLOW.
THIS PLUG IS NOT WATERPROOF—KEEP DRY.
Before use
Remove the connector cover.
How to replace the fuse
The location of the fuse differ according to the type of AC mains
plug (figures A and B). Confirm the AC mains plug fitted and follow
the instructions below.
Illustrations may differ from actual AC mains plug.
1. Open the fuse cover with a screwdriver.
2. Replace the fuse and close or attach the fuse cover.
Fuse cover
Figure A
Figure B
Fuse
(5 ampere)
Fuse
(5 ampere)
Figure A
Figure B
CAUTION!
IF THE FITTED MOULDED PLUG IS UNSUITABLE FOR THE
SOCKET OUTLET IN YOUR HOME THEN THE FUSE
SHOULD BE REMOVED AND THE PLUG CUT OFF AND DIS-
POSED OF SAFELY.
THERE IS A DANGER OF SEVERE ELECTRICAL SHOCK IF
THE CUT OFF PLUG IS INSERTED INTO ANY 13-AMPERE
SOCKET.
01_RQT7693_01-09 04.03.15, 05:59 PM3

ENGLISH
ESPAÑOL
RQT7693
4
Safety precautions
Placement
Set the unit up on an even surface away from direct sunlight, high
temperatures, high humidity, and excessive vibration. These conditions
can damage the cabinet and other components, thereby shortening
the unit’s service life.
Voltage
Do not use high voltage power sources. This can overload the unit
and cause a fire.
Do not use a DC power source. Check the source carefully when
setting the unit up on a ship or other place where DC is used.
AC mains lead protection
Ensure the AC mains lead is connected correctly and not damaged.
Poor connection and lead damage can cause fire or electric shock.
Do not pull, bend, or place heavy items on the lead.
Grasp the plug firmly when unplugging the lead. Pulling the AC
mains lead can cause electric shock.
Do not handle the plug with wet hands. This can cause electric
shock.
Foreign matter
Do not let metal objects fall inside the unit. This can cause electric
shock or malfunction.
Do not let liquids get into the unit. This can cause electric shock or
malfunction. If this occurs, immediately disconnect the unit from the
power supply and contact your dealer.
Do not spray insecticides onto or into the unit. They contain
flammable gases which can ignite if sprayed into the unit.
Service
Do not attempt to repair this unit by yourself. If sound is interrupted,
indicators fail to light, smoke appears, or any other problem that is not
covered in these operating instructions occurs, disconnect the AC
mains lead and contact your dealer or an authorized service center.
Electric shock or damage to the unit can occur if the unit is repaired,
disassembled or reconstructed by unqualified persons.
Extend operating life by disconnecting the unit from the power
source if it is not to be used for a long time.
Insertion of connector
Even when the connector is per-
fectly inserted, depending on the
type of inlet used, the front part of
the connector may jut out as shown
in the drawing.
However there is no problem us-
ing the unit.
Connector
Approx. 6 mm
Appliance inlet
Precauciones de seguridad
Ubicación
Coloque la unidad en una superficie plana lejos de la luz directa
del sol, temperatura y humedad altas, y vibración excesiva. Estas
condiciones pueden dañar el gabinete y otros componentes, y por lo
tanto acortar la vida útil de la unidad.
Voltaje
No use fuentes de alimentación de alto voltaje. Esto puede
sobrecargar la unidad y causar un incendio.
No use una fuente de alimentación de CC. Verifique
cuidadosamente la fuente cuando coloque la unidad en una
embarcación u otro lugar donde CC sea usada.
Protección del cordón de
alimentación
Asegúrese que el cordón de alimentación esté conectado
correctamente y no dañado. Una mala conexión y daño en el cordón
pueden causar un incendio o un choque eléctrico. No jale, doble el
cordón ni coloque objetos pesados sobre él.
Coja el enchufe firmemente cuando desenchufe el cordón. El jalar
el cordón puede causar choque eléctrico.
No maneje el enchufe con manos mojadas. Esto puede causar
choque eléctrico.
Objetos extraños
No permita que objetos de metal caigan dentro de la unidad. Esto
puede causar choque eléctrico o fallas.
No permita que líquidos penetren en el aparato. Esto puede causar
choque eléctrico o fallas. Si esto ocurre, desconecte inmediatamente
la unidad de su alimentación y póngase en contacto con su distribuidor.
No rocíe insecticidas sobre o dentro de la unidad. Contienen gases
inflamables que pueden encenderse si son rociados dentro de la
unidad.
Servicio
No intente reparar esta unidad por sí mismo. Si el sonido se
interrumpe, los indicadores no se iluminan, sale humo o sucede
cualquier problema que no está tratado en estas instrucciones,
desconecte el cordón de alimentación y póngase en contacto con su
distribuidor o con un centro de servicio autorizado. Puede ocurrir un
choque eléctrico o daño a la unidad si esta unidad es reparada,
desarmada o reconstruida por personas no calificadas.
Extienda la vida útil de la unidad desconectándola de la fuente de
alimentación si no va a ser usada por largo tiempo.
Inserción del conector
Incluso cuando el conector está bien
insertado, dependiendo del tipo de
toma usada, la parte delantera del
conector puede sobresalir como se
muestra en la figura.
Sin embargo, no habrá problemas
para usar el aparato.
Aprox. 6 mm
Toma del aparato
Conector
The socket outlet shall be installed near the equipment and easily
accessible or the mains plug or an appliance coupier shall remain
readily operable.
Although the AC power switch is in the “OFF” position, the unit is not
completely disconnected from the mains. Remove the plug from the
main electrical outlet if you will not be using the unit for an extended
period of time. Place the unit so the plug can be easily removed.
El equipo deberá colocarse cerca de la toma de CA, y a la clavija
del cable de alimentación deberá poder accederse fácilmente en el
caso de que se produzca un problema.
La unidad no quedará completamente desconectada de la red
eléctrica aunque el interruptor de la alimentación de CA se ponga
en “OFF” (desconectado). Desenchufe la clavija de alimentación de
la toma de corriente si no va a utilizar la unidad durante mucho
tiempo. Coloque la unidad en lugar donde la clavija de alimentación
pueda desenchufarse fácilmente.
CAUTION (SB-FS70):
Do not stand on the base and shake the speaker. Be cautious
when children are near (see page 10).
PRECAUCIÓN (SB-FS70):
No se ponga de pie encima de la base y sacuda el altavoz. Tenga
cuidado cuando haya niños cerca (véase la página 10).
01_RQT7693_01-09 04.03.15, 05:59 PM4
La página se está cargando...

ENGLISH
ESPAÑOL
RQT7693
6
270 mm
30-35 mm
ø7.5-9.5 mm
7-9 mm
Speaker setup
Take care not to apply undue pressure to the front nets when han-
dling the speakers. Lay the speakers on a flat surface over a soft
cloth when working on them.
Tighten the screws firmly.
Center speaker (SB-PC70)
Put above or below the center of the television, on a shelf or rack or
attach to the wall. Placing it directly on the television can cause the
picture to be distorted.
Do not attach this speaker to walls or ceilings using methods other
than those described here.
Attaching the rubber feet when placing on a surface
Attach the rubber feet to the base of the speaker to prevent vibration
from causing the speaker to move or fall over.
Attaching to a wall
Attach four rubber feet to the rear of the speaker.
Screw (not included)
Screw the wood screw into a thick and hard part of the wall.
The surface must be able to support over 10 kg.
Attaching to a television stand
Ensure the following conditions are met when purchasing or prepar-
ing your television stand.
Observe the diameter and length of the screws and the distance
between the screws as shown in the diagram.
Television stand (not included)
Screw (not included); diameter: 5 mm, pitch: 0.8 mm, length:
thickness of board plus 10 mm.
Distance between the centers of the holes: 60 mm.
The stand must be able to support over 10 kg.
Subwoofer (SB-WA70)
Place anywhere as long as it is a reasonable distance from the tele-
vision. Place it at least 5 cm from the wall as it has a bass reflex port
in the rear.
Do not attach the subwoofer to walls or ceilings.
Instalación de los altavoces
Tenga cuidado cuando maneje los altavoces para no aplicar una
presión excesiva a las redes delanteras. Coloque los altavoces en
una superficie plana y encima de un paño blando cuando tenga que
hacer algo con ellos.
Apriete firmemente los tornillos.
Altavoz central (SB-PC70)
Póngalo por encima o por debajo del centro del televisor, en un
estante o bastidor o instalado en la pared. Colocarlo directamente
encima del televisor puede causar distorsiones en la imagen.
No coloque este altavoz en una pared o techo utilizando métodos
diferentes de los descritos en este manual.
Colocación de las patas de goma cuando los altavoces
se ponen encima de una superficie
Coloque las patas de goma en la base del altavoz para impedir que
las vibraciones desplacen el altavoz o hagan que éste se caiga.
Colocación en una pared
Coloque las cuatro patas de goma en la parte trasera del altavoz.
Tornillo (no suministrado)
Atornille el tornillo de madera en una parte gruesa y dura de la pared.
La superficie deberá poder servir de apoyo a más de 10 kg.
Colocación en una base de televisor
Cuando adquiera o prepare su base de televisor, asegúrese de que
se cumplan las condiciones siguientes.
Tenga en cuenta el diámetro y la longitud de los tornillos y la distancia
entre los tornillos que se muestran en el diagrama.
Base de televisor (no suministrada)
Tornillo (no suministrado); diámetro: 5 mm, paso: 0,8 mm,
longitud: grosor del tablero más 10 mm.
Distancia entre los centros de los agujeros: 60 mm
La base deberá poder servir de apoyo a más de 10 kg.
Altavoz de subgraves (SB-WA70)
Deje una distancia lo más razonable posible entre este altavoz y el
televisor. Y sepárelo un mínimo de 5 cm de la pared porque tiene en
la parte trasera un orificio para el reflejo de los graves.
No instale este altavoz en paredes o techos.
01_RQT7693_01-09 04.03.15, 05:59 PM6
La página se está cargando...

ENGLISH
ESPAÑOL
RQT7693
8
1390 mm
1104 mm
Instalación de los altavoces
Altavoces delanteros y de sonido ambiental (SB-FS70)
Los 4 altavoces son idénticos.
Ponga los altavoces delanteros a ambos lados del televisor. Ponga los
altavoces de sonido ambiental a los lados o un poco por detrás del área de
escucha.
No coloque este altavoz en una pared o techo utilizando métodos diferentes
de los descritos en este manual.
Colocación del estabilizador ensamblado (suministrado) y la base
(suministrada)
Ponga el altavoz mirando hacia abajo.
Confirme que tiene el estabilizador ensamblado (suministrado).
Estabilizador
Tornillos de colocación del estabilizador
Espaciador
Conecte el cable del altavoz (suministrado) en los terminales del
altavoz, y pase el cable por el agujero
del estabilizador
ensamblado hacia la base.
•Cables para los altavoces de sonido ambiental: 10 m aproximadamente
Para los altavoces delanteros: 4 m aproximadamente
•Para obtener más información acerca de las conexiones a los terminales
de los altavoces, consulte “Conexiones” (
página 12)
Después de decidir la altura del altavoz y ajustar la longitud del cable
del mismo, coloque el estabilizador ensamblado en el altavoz
utilizando los dos tornillos de colocación del estabilizador.
Margen de ajuste de la altura del altavoz (
abajo)
Nota
Procure que el cable del altavoz no quede atrapado entre el estabilizador
ensamblado y el altavoz.
Ajuste la longitud del cable del altavoz, y utilizando los dos tornillos
de colocación de la base (incluidos), apriete la base al estabilizador
ensamblado.
Inserte el cable del altavoz en la ranura del cable del altavoz
situada en la parte inferior de la base .
Ajuste de la altura
Después de realizar el paso 3 indicado arriba, tire hacia afuera del
cable del altavoz en el lado del terminal del altavoz.
Afloje los dos tornillos de colocación del estabilizador lo suficiente
como para que pueda ajustarse el panel.
El altavoz podrá caerse si afloja demasiado los tornillos.
Después de ajustar la altura del altavoz y la longitud de su cable,
apriete firmemente los dos tornillos de colocación del estabilizador.
Margen ajustable: 1.104-1.390 mm aproximadamente
Nota
Procure que el cable del altavoz no quede atrapado entre el estabilizador
ensamblado y el altavoz.
Coloque el cable del altavoz en la ranura de la base.
(Indicado arriba en el paso 4.)
Colocación de un alambre estabilizador
Ejemplo
Abrazadera de nailon Tornillo para abrazadera de nailon
Alambre (no suministrado) Anillo (no suministrado)
Tornillo (no suministrado)
Atornille el tornillo para madera en una parte gruesa y dura de la pared. La
superficie deberá poder servir de apoyo a más de 40 kg.
Colocación en una pared
Ponga las almohadillas de goma (incluidas) en cuatro lugares de la parte
posterior del altavoz, donde éste entra en contacto con la pared, y en los dos
agujeros de colocación del estabilizador ensamblado.
Tornillo (no suministrado)
Atornille el tornillo de madera en una parte gruesa y dura de la pared.
La superficie deberá poder servir de apoyo a más de 18 kg.
Speaker setup
Front and surround speakers (SB-FS70)
The 4 speakers are the same.
Put the front speakers either side of the television. Put the surround speakers
to the side of or slightly behind the seating area.
Do not attach this speaker to walls or ceilings using methods other than those
described here.
Attaching the assembled stabilizer (included) and base (included)
Place the speaker facing down.
Confirm you have the Assembled Stabilizer (included).
Stabilizer Stabilizer attachment screws
Spacer
Connect the speaker cable (included) to the speaker terminals and
run the cable through the hole
on the assembled stabilizer to the
base.
•Speaker cable for the surround speakers : Approx. 10 m
For the front speakers: Approx. 4 m
•For more information on speaker terminal connections refer to “Connec-
tions” (
page 12)
After deciding on the speaker height and adjusting the speaker cable
length, attach the assembled stabilizer to the speaker using the two
stabilizer attachment screws.
Speaker height adjustable range (
below)
Note
Do not get the speaker cable caught between the assembled stabilizer and the
speaker.
Adjust the speaker cable length and using the two base attachment
screws (included), fasten the base to the assembled stabilizer.
Insert the speaker cable in the speaker cable groove on the
bottom side of the base
.
Adjusting the height
After step 3 indicated above, pull out the speaker cable on the speaker
terminal side.
Loosen the two stabilizer attachment screws enough so that the panel
can be adjusted.
The speaker may fall off if you loosen the screws too much.
After adjusting the speaker height and the length of the cable, se-
curely fasten the two stabilizer attachment screws.
Adjustable range: Approx. 1104-1390 mm
Note
Do not get the speaker cable caught between the assembled stabilizer and the
speaker.
Fit the speaker cable in the groove in the base.
(Indicated above in step 4)
Attaching a stabilizing wire
Example
Nylon clamp Screw for nylon clamp
Wire (not included) Ring (not included)
Screw (not included)
Screw the wood screw into a thick and hard part of the wall.
The surface must be able to support over 40 kg.
Attaching to a wall
Place the rubber pads (included) in four places on the back of the speaker
where it contacts the wall, and on the two attachment holes for the assembled
stabilizer.
Screw (not included)
Screw the wood screw into a thick and hard part of the wall.
The surface must be able to support over 18 kg.
01_RQT7693_01-09 04.03.15, 05:59 PM8
La página se está cargando...

ENGLISH
ESPAÑOL
RQT7693
10
Location
Front speaker (Left) (SB-FS70)
Center speaker (SB-PC70)
Front speaker (Right) (SB-FS70)
Surround speaker (Right) (SB-FS70)
Surround speaker (Left) (SB-FS70)
Active subwoofer (SB-WA70)
The front, center, and surround speakers should be placed at ap-
proximately the same distance from the listening position. The angles
in the diagram are approximate.
How you set up your speakers can affect the bass and the sound
field. Note the following points.
•Place on flat, level secure surface.
Use spacers or a similar item to stop them from rocking.
•Placing speakers too close to walls, and corners can result in ex-
cessive bass.
•Cover walls and windows with a thick curtain.
•Do not place anything on top of the subwoofer.
Usage and handling note (SB-FS70):
Do not stand on the base and shake the speaker. Be
cautious when children are near.
Protection circuitry (SB-WA70)
This circuitry prevents damage caused by excessive input or ab-
normal signals. When excess input is detected, the sound is au-
tomatically interrupted.
If sound is interrupted...
1. Reduce the volume level from the receiver or amplifier.
2. Press [POWER] to turn the unit off.
3. Check the sound source and connections for problems.
4. Press [POWER] to turn the unit on.
After the protection circuitry is reset...
Take care not to increase the receiver’s or amplifier’s volume
level too much.
Ubicación
Altavoz delantero (izquierdo) (SB-FS70)
Altavoz central (SB-PC70)
Altavoz delantero (derecho) (SB-FS70)
Altavoz de sonido ambiental (derecho) (SB-FS70)
Altavoz de sonido ambiental (izquierdo) (SB-FS70)
Altavoz de subgraves activo (SB-WA70)
Los altavoces delanteros, central y de sonido ambiental deberán
colocarse aproximadamente a la misma altura de la posición de
escucha. Los ángulos del diagrama son aproximados.
La forma en que instala sus altavoces puede afectar a los graves y
al campo de sonido. Tenga en cuenta los puntos siguientes.
•Colóquelos en bases planas, niveladas y seguras.
Utilice espaciadores o cosas similares para impedir que se muevan.
•La colocación de los altavoces muy cerca de las paredes o esquinas
puede crear un sonido grave excesivo.
•Tape las paredes y las ventanas con cortinas gruesas.
•No ponga nada encima del altavoz de subgraves.
Uso y nota de manejo (SB-FS70):
No se ponga de pie encima de la base y sacuda el
altavoz. Tenga cuidado cuando haya niños cerca.
Circuitos de protección (SB-WA70)
Este circuito impide los daños causados por la entrada excesiva
o las señales anormales. Cuando una entrada excesiva es
detectada, el sonido es automáticamente interrumpido.
Si el sonido es interrumpido...
1. Reduzca el nivel del volumen desde el receptor o amplificador.
2. Pulse [POWER] para apagar el aparato.
3. Compruebe la fuente de sonido y las conexiones por si hay
algún problema.
4. Pulse [POWER] para encender el aparato.
Después que la circuitería es reajustada...
Tenga cuidado de no incrementar demasiado el nivel de volumen
del receptor o del amplificador.
30°
120°
30°
SB-PC70
SB-FS70 SB-FS70
SB-FS70SB-FS70
SB-WA70
02_RQT7693_10-17 04.03.15, 05:59 PM10
La página se está cargando...

ENGLISH
ESPAÑOL
RQT7693
12
Connections
Connect to a receiver or amplifier with 6-Ω impedance for the
front, center, and surround speakers, and a pin-type output terminal
for an active subwoofer.
Before connection
Turn off the other equipment.
Do not connect the AC mains lead until all other cables and cords
are connected.
Twist off the tip.
Subwoofer
Front, center, and surround speakers
Connect the front , and center speakers with the 4-meter
cables and the surround speakers , with the 10-meter cables
.
Be sure to connect only positive (copper) wires to positive (+) termi-
nals and negative (silver) wires to negative (-) terminals.
Never short-circuit positive (+) and negative (-) speaker wires.
Subwoofer
E
Subwoofer
Connect with the included monaural connection cable
to the receiver or amplifier’s subwoofer output ter-
minal.
For the United Kingdom
BE SURE TO READ THE CAUTION FOR THE AC
MAINS LEAD ON PAGE 3 BEFORE PROCEEDING
TO STEP 2.
Connect the AC mains lead to the household AC
outlet
.
The included AC mains lead is for use with this unit only.
Do not use it with other equipment.
Note
• Do not move the speaker while the speaker cables are connected.
This may cause a short circuit.
• Make sure to bundle the speaker cable with a string etc. when
relocating the speaker cables.
Conexiones
Haga las conexiones a un receptor o amplificador con impedancia
de 6-Ω para los altavoces delanteros, central y de sonido ambiental,
y emplee un terminal de salida tipo contactos para un altavoz de
subgraves activo.
Antes de hacer la conexión
Apague el otro equipo.
No conecte el cable de alimentación de CA hasta después de haber
conectado todos los demás cables.
Retuerza la punta.
Altavoces delanteros, central y de
sonido ambiental
Conecte los altavoces delanteros , y el altavoz central con
los cables de 4 metros , y los altavoces de sonido ambiental ,
con los cables de 10 metros .
Asegúrese de conectar solamente los cables positivos (cobre) a los
terminales positivos (+) y los cables negativos (plata) a los terminales
negativos (-).
No cortocircuite nunca los cables positivos (+) y negativos (-) de los
altavoces.
Subwoofer
E
Altavoz de subgraves
Conéctelo con el cable de conexión monofónico
suministrado al terminal de salida de altavoz de
subgraves del receptor o amplificador.
Conecte el cable de alimentación de CA a la toma de
CA del hogar .
El cable de alimentación de CA suministrado es para ser utilizado
con este aparato solamente. No lo utilice con otros aparatos.
Nota
• No mueva el altavoz mientras están conectados sus cables. Esto
podría causar un cortocircuito.
• Asegúrese de juntar los cables de los altavoces con una cuerda,
etc. cuando cambie la posición de los mismos.
SB-PC70
SB-PC70
SB-FS70 SB-FS70 SB-FS70
SB-FS70SB-FS70
02_RQT7693_10-17 04.03.15, 05:59 PM12
La página se está cargando...

ENGLISH
ESPAÑOL
RQT7693
14
Subwoofer operation
(SB-WA70)
1 Set [POWER] to “ ON”.
The indicator turns green.
2 Output sound from the receiver or am-
plifier and adjust the volume to a suit-
able level.
See the operating instructions for the other equipment for de-
tails.
Do not adjust the bass as this can cause distortion.
If the amplifier volume is switched to “0” (lowest setting), and it
is left in this position for longer than 8 minutes the unit auto-
matically switches to standby and the indicator turns red. Turn-
ing the amplifier volume up will automatically switch the unit to
operation mode, and the indicator turns green.
However, the subwoofer may not switch to standby due to noise
emitted by the connected amplifier.
3 Set [LOW PASS FILTER].
Set the low pass filter on your receiver or amplifier to 200 Hz if
possible.
Refer to “Frequency response by LOW PASS FILTER setting”.
Set [LOW PASS FILTER] to 200 Hz for a full range. Reduce it if
you feel the bass is too strong.
4 Adjust [VOLUME] to a suitable level.
Refer to “Frequency response by VOLUME setting”.
5 Play something, then set [PHASE] to
“ NORMAL” or “ REVERSE” so
sound is normal.
The subwoofer and speakers cancel each other out (causing
unusual, muffled sound) if phase is incorrect.
When settings are complete
The only operation you should have to perform daily is press [POWER]
to turn the unit ON/OFF.
If you reposition the system and the acoustics change, reset the unit
as necessary.
Note
If the volume output is too loud, this unit’s amplifier can be clipped,
causing output to sound unusual.
Reduce the volume of the receiver or amplifier or the volume of this
unit if this occurs.
Operación del altavoz de
subgraves (SB-WA70)
1 Ponga [POWER] en “ ON”.
El indicador se pone verde.
2 Dé salida al sonido del receptor o
amplificador y ajuste el volumen a un
nivel apropiado.
Consulte las instrucciones de funcionamiento del otro equipo
para conocer detalles.
No ajuste los graves porque esto puede causar distorsión.
Si el volumen del amplificador se pone en “0” (el ajuste más
bajo), y si se deja en esa posición durante más de 8 minutos, la
unidad se pondrá automáticamente en el modo de espera y el
indicador se pondrá rojo. Al subir el volumen en el amplificador,
la unidad se pondrá automáticamente en el modo de
funcionamiento, y el indicador se pondrá verde.
Sin embargo, el altavoz de subgraves tal vez no se ponga en
espera debido al ruido emitido por el amplificador conectado.
3 Ajuste [LOW PASS FILTER].
Ajuste el filtro de paso bajo de su receptor o amplificador a 200
Hz si es posible.
Refiérase a “Respuesta de frecuencia del ajuste LOW PASS
FILTER”.
Ponga [LOW PASS FILTER] en 200 Hz para una gama
completa. Reduzca la frecuencia si nota que los graves son
muy fuertes.
4 Ajuste [VOLUME] a un nivel apropiado.
Refiérase a “Respuesta de frecuencia del ajuste VOLUME”.
5 Reproduzca algo y luego ajuste
[PHASE] a “ NORMAL” o “ RE-
VERSE” para que el sonido sea normal.
Si la fase no es correcta el altavoz de subgraves y los demás
altavoces se anularán entre sí (causando un sonido extraño y
apagado).
Cuando los ajustes están completos
La única operación que Ud. deberá realizar diariamente es presionar
[POWER] para encender y apagar el aparato.
Si Ud. reubica el sistema y la acústica cambia, reajuste el aparato
como fuera necesario.
Nota
Si la salida del sonido está demasiado alta, el amplificador de este
aparato podrá bloquearse, haciendo que la salida suene mal.
Si ocurre esto, reduzca el volumen del receptor, el del amplificador o
el de este aparato.
02_RQT7693_10-17 04.03.15, 06:00 PM14
La página se está cargando...

ENGLISH
ESPAÑOL
RQT7693
16
Notes
Speaker impedance and allowed input
SB-FS70 / SB-PC70 Impedance 6 Ω
Input power 100 W (RATED)
The only receivers or amplifiers you should connect to these speakers
are those whose rated output does not exceed the above figures.
Using a receiver or amplifier with higher ratings than listed above can
cause abnormal sounds to occur because of excessive input, damage
to the receiver or speakers, and fire. If equipment is damaged in any
way or unexpected trouble occurs during playback, unplug the system
from its outlet and call a serviceman for help.
Protection circuitry (SB-FS70
/
SB-PC70)
These units incorporate protection circuitry to protect them from
damage caused by excessive input or abnormal signals; when excess
input is detected, input is automatically interrupted.
If sound is interrupted...
1. Reduce the volume of the receiver (or amplifier).
2. Check the sound source and connections for any problems.
If there is no problem, the protection circuitry will reset in a few
minutes.
After the protection circuit is reset...
Take care not to increase the receiver’s volume too high.
Excessive input
You can damage your speakers and shorten their useful
life if you play sound at high levels over extended peri-
ods.
Reduce the volume in the following cases to avoid dam-
age :
•When playing distorted sound.
•When the speakers are receiving howling from a microphone or
record player, noise from FM broadcasts, or continuous signals from
an oscillator, test disc, or electronic instrument.
•When adjusting the sound quality.
•When turning the amplifier on or off.
Other notes
If irregular coloring occurs on your television :
These speakers are designed to be used close to a television, but the
picture may be affected with some televisions and set-up combinations.
If this occurs, turn the television off for about 30 minutes.
The television’s demagnetizing function should correct the problem. If
it persists, move the speakers further away from the television.
You cannot remove the speaker net.
Keep magnetized items away.
Magnetized cards, bank cards, commuter passes, etc., can be
damaged if allowed too near speaker magnets. Clocks may also be
affected.
Avoid locations such as described below :
•In direct sunlight
•Near heating appliances or other sources of heat
•Where the humidity is high
Maintenance
Clean these units with a soft, clean, dry cloth.
•Never use alcohol, paint thinner, or benzine to clean these units.
•Before using chemically treated cloth, read the instructions that came
with the cloth carefully.
Notas
Impedancia del altavoz y potencia
de entrada
SB-FS70 / SB-PC70 Impedancia 6 Ω
Potencia de entrada 100 W (RATED)
Los únicos receptores o amplificadores que deberá conectar a estos
altavoces son aquellos que cuya salida nominal no exceda las cifras
de arriba.
Al usar un receptor o un amplificador con características nominales
superiores a las indicadas arriba se pueden producir ruidos anormales
debido a la entrada excesiva, el receptor o los altavoces se pueden
estropear, y además se puede producir un incendio. Si el equipo es
dañado de alguna manera o un problema inesperado ocurre durante
la reproducción, desenchufe el sistema y llame a su distribuidor para
que envíen una persona que le ayude.
Circuitería de protección (SB-FS70 / SB-PC70)
Estos aparatos incorporan una circuitería de protección para
protegerlos de daños causados por una entrada excesiva o señales
anormales; cuando una entrada excesiva es detectada, la entrada es
automáticamente interrumpida.
Si el sonido se interrumpe...
1. Reduzca el volumen del receptor (o amplificador).
2. Verifique si hay problemas en la fuente de sonido y las
conexiones.
Si no hay problemas, la circuitería de protección se reajustará
en unos pocos minutos.
Después de que el circuito de protección sea reajustado...
Cuídese de no incrementar demasiado el volumen del receptor.
Entrada excesiva
Si reproduce el sonido con niveles altos durante períodos
de tiempo prolongados podrá estropear sus altavoces y
reducir su duración.
Para evitar daños, reduzca el volumen en los casos
siguientes:
•Cuando reproduzca sonido distorsionado.
•Cuando los altavoces reciban aullido procedente de un micrófono o
giradiscos, ruido de emisiones de FM o señales continuas
procedentes de un oscilador, disco de prueba o instrumento
electrónico.
•Cuando ajuste la calidad del sonido.
•Cuando encienda o apague el amplificador.
Otras notas
Si se producen colores irregulares en su televisor:
Estos altavoces han sido diseñados para ser utilizados cerca de un
televisor, sin embargo, con algunos televisores y combinaciones de
instalación es posible que la imagen se distorsione.
Si ocurre esto, apague el televisor durante unos 30 minutos.
La función de desmagnetización del televisor deberá corregir el
problema. Si persiste el problema, separe más los altavoces del
televisor.
La red de los altavoces no se puede retirar.
Aleje los objetos magnetizados.
Las tarjetas magnetizadas, las tarjetas de bancos, los pases de
viajeros, etc., pueden estropearse si se dejan demasiado cerca de
los imanes de los altavoces. Los relojes también pueden ser afectados.
Evite ubicaciones como las indicadas a continuación.
•Expuestas a los rayos solares directos
•Próximas a dispositivos de calefacción u otras fuentes de calor
•Donde la humedad sea excesiva
Mantenimiento
Limpie estos aparatos con un paño blando, limpio y seco.
•No utilice nunca alcohol, diluyente de pintura ni bencina para lim-
piar estos aparatos.
•Antes de utilizar un paño impregnado químicamente, lea con aten-
ción las instrucciones suministradas con él.
02_RQT7693_10-17 04.03.15, 06:00 PM16
La página se está cargando...
La página se está cargando...
La página se está cargando...
La página se está cargando...
La página se está cargando...
La página se está cargando...
La página se está cargando...
La página se está cargando...
La página se está cargando...
La página se está cargando...
La página se está cargando...
La página se está cargando...
La página se está cargando...
La página se está cargando...
La página se está cargando...
La página se está cargando...
La página se está cargando...
La página se está cargando...
La página se está cargando...
La página se está cargando...
La página se está cargando...
La página se está cargando...
La página se está cargando...
La página se está cargando...
La página se está cargando...
La página se está cargando...
La página se está cargando...
La página se está cargando...
La página se está cargando...

ENGLISH
ESPAÑOLFRANÇAIS
NEDERLANDS
RQT7693
46
Specifications
SB-FS70
Type 3 way 4 speaker system Closed type
Speaker Woofer: 8 cm cone type x 2
Tweeter: 2.5 cm semi-dome type x 1
Super Tweeter: 1.2 cm dome type x 1
Impedance 6 Ω
Input power (IEC) 200 W (MAX), 100 W (RATED)
Sound pressure level 81 dB/W (1.0 m)
Crossover frequency 2.7 kHz, 20 kHz
Frequency range 140 Hz – 100 kHz (at –16 dB)
180 Hz – 90 kHz (at –10 dB)
Dimensions (W x H x D) 262 x 1104 (MIN) – 1390 (MAX) x 264 mm
(with the stand)
Mass 8.0 kg
SB-PC70
Type 3 way 5 speaker system Bass-reflex type
Speaker Woofer: 5 cm cone type x 4
Tweeter: 2.5 cm semi-dome type x 1
Impedance 6 Ω
Input power (IEC) 200 W (MAX), 100 W (RATED)
Sound pressure level 82 dB/W (1.0 m)
Crossover frequency 3.5 kHz, 4.5 kHz
Frequency range 130 Hz – 50 kHz (at –16 dB)
150 Hz – 45 kHz (at –10 dB)
Dimensions (W x H x D) 430 x 64 x 100 mm
Mass 1.8 kg
SB-WA70
SPEAKER SECTION
Type 1 way 1 speaker system Bass-reflex type
Speaker Woofer: 17 cm cone type x 1
Sound pressure level 80 dB/W (1.0 m)
Frequency range (with amp) 32 – 300 Hz (at –16 dB)
38 – 240 Hz (at –10 dB)
AMPLIFIER SECTION
Output power 100 W (6 Ω) (THD 0.9%)
Input sensitivity / Input Impedance 300 mV/33 kΩ (RCA jack)
Phase switching NORMAL/REVERSE
Low pass filter 50 – 200 Hz Variable
GENERAL
Power supply For the United Kingdom, Australia and New Zealand
AC 230 – 240 V, 50 Hz
For others AC 230 V, 50 Hz
Power consumption 168 W
Dimensions (W x H x D) 162 x 457 x 420 mm
Mass 10.8 kg
Note
Specifications are subject to change without notice.
Mass and dimensions are approximate.
Données techniques
SB-FS70
Type Enceinte à 3 voies 4 haut-parleurs (de type fermé)
Enceinte Woofer: Type cône de 8 cm x 2
Tweeter: Type semi-dôme de 2,5 cm x 1
Super Tweeter : Type dôme de 1,2 cm x 1
Impédance 6 Ω
Puissance d’entrée (IEC) 200 W (MAX), 100 W (RATED)
Niveau de pression sonore 81 dB/W (1,0 m)
Fréquence de recouvrement 2,7 kHz, 20 kHz
Gamme de fréquences 140 Hz – 100 kHz (à –16 dB)
180 Hz – 90 kHz (à –10 dB)
Dimensions (L x H x P) 262 x 1104 (MIN) – 1390 (MAX) x 264 mm
(avec le support)
Poids 8,0 kg
SB-PC70
Type Enceinte à 3 voies 5 haut-parleurs, de type Bass-reflex
Enceinte Woofer: Type cône de 5 cm x 4
Tweeter: Type semi-dôme de 2,5 cm x 1
Impédance 6 Ω
Puissance d’entrée (IEC) 200 W (MAX), 100 W (RATED)
Niveau de pression sonore 82 dB/W (1,0 m)
Fréquence de recouvrement 3,5 kHz, 4,5 kHz
Gamme de fréquences 130 Hz – 50 kHz (à –16 dB)
150 Hz – 45 kHz (à –10 dB)
Dimensions (L x H x P) 430 x 64 x 100 mm
Poids 1,8 kg
SB-WA70
SECTION ENCEINTE
Type Enceinte à 1 voie 1 haut-parleur, de type Bass-reflex
Enceinte Woofer: Type cône de 17 cm x 1
Niveau de pression sonore 80 dB/W (1,0 m)
Gamme de fréquences (avec ampli) 32 – 300 Hz (à –16 dB)
38 – 240 Hz (à –10 dB)
SECTION AMPLIFICATEUR
Puissance de sortie 100 W (6 Ω) (DHT 0,9 %)
Sensibilité d’entrée / impédance d’entrée 300 mV/33 kΩ (prise RCA)
Inversion de phase NORMALE/INVERSE
Filtre passe-bas 50 – 200 Hz variable
GÉNÉRALITÉS
Alimentation CA 230 V, 50 Hz
Consommation 168 W
Dimensions (L x H x P) 162 x 457 x 420 mm
Poids 10,8 kg
Remarque
Spécifications sujettes à modifications sans préavis.
Le poids et les dimensions sont approximatifs.
Especificaciones técnicas
SB-FS70
Tipo Sistema de 4 altavoces de 3 vías tipo cerrado
Altavoz Altavoz de graves: Tipo cono de 8 cm x 2
Altavoz de agudos: Tipo de semicúpula de 2,5 cm x 1
Altavoz de superagudos: Tipo cúpula de 1,2 cm x 1
Impedancia 6 Ω
Potencia de entrada (IEC) 200 W (MAX), 100 W (RATED)
Nivel de presión de sonido 81 dB/W (1,0 m)
Frecuencia de cruce 2,7 kHz, 20 kHz
Gama de frecuencias 140 Hz – 100 kHz (a –16 dB)
180 Hz – 90 kHz (a –10 dB)
Dimensiones (An. x Al. x Prof.) 262 x 1.104 (MÍNIMA) – 1.390 (MÁXIMA)
x 264 mm (con el soporte)
Peso 8,0 kg
SB-PC70
Tipo
Sistema de 5 altavoces de 3 vías tipo Bass-reflex (reflejo de graves)
Altavoz Altavoz de graves: Tipo cono de 5 cm x 4
Altavoz de agudos: Tipo de semicúpula de 2,5 cm x 1
Impedancia 6 Ω
Potencia de entrada (IEC) 200 W (MAX), 100 W (RATED)
Nivel de presión de sonido 82 dB/W (1,0 m)
Frecuencia de cruce 3,5 kHz, 4,5 kHz
Gama de frecuencias 130 Hz – 50 kHz (a –16 dB)
150 Hz – 45 kHz (a –10 dB)
Dimensiones (An. x Al. x Prof.) 430 x 64 x 100 mm
Peso 1,8 kg
SB-WA70
SECCIÓN DE ALTAVOCES
Tipo
Sistema de 1 altavoz de 1 vía tipo Bass-reflex (reflejo de graves)
Altavoz Altavoz de graves: Tipo cono de 17 cm x 1
Nivel de presión de sonido 80 dB/W (1,0 m)
Gama de frecuencias (con amplificador) 32 – 300 Hz (a –16 dB)
38 – 240 Hz (a –10 dB)
SECCIÓN DEL AMPLIFICADOR
Potencia de salida 100 W (6 Ω) (D.A.T. 0,9%)
Sensibilidad de entrada / Impedancia de entrada 300 mV/33 k
Ω
(toma RCA)
Conmutación de fase NORMAL/INVERTIDA
Filtro pasabajos 50 – 200 Hz, variable
GENERALIDADES
Alimentación CA 230 V, 50 Hz
Consumo 168 W
Dimensiones (An. x Al. x Prof.) 162 x 457 x 420 mm
Peso 10,8 kg
Nota
Las especificaciones están sujetas a cambios sin previo aviso.
Los pesos y las dimensiones son aproximados.
Technische gegevens
SB-FS70
Type 3-wegs 4-luidspreker systeem [Gesloten type]
Luidspreker Woofer: 8 cm conustype x 2
Tweeter: 2,5 cm halfkoepeltype x 1
Supertweeter: 1,2 cm, koepeltype x 1
Impedantie 6 ohm
Ingangsvermogen (IEC) 200 W (MAX), 100 W (RATED)
Geluidsdrukniveau 81 dB/W (1,0 m)
Kantelfrequentie 2,7 kHz, 20 kHz
Frequentiebereik 140 Hz – 100 kHz (bij –16 dB)
180 Hz – 90 kHz (bij –10 dB)
Afmetingen (B x H x D) 262 x 1104 (MIN) – 1390 (MAX) x 264 mm
(standaard inbegrepen)
Gewicht 8,0 kg
SB-PC70
Type 3-wegs 5-luidsprekers systeem Basreflextype
Luidspreker Woofer: 5 cm conustype x 4
Tweeter: 2,5 cm halfkoepeltype x 1
Impedantie 6 ohm
Ingangsvermogen (IEC) 200 W (MAX), 100 W (RATED)
Geluidsdrukniveau 82 dB/W (1,0 m)
Kantelfrequentie 3,5 kHz, 4,5 kHz
Frequentiebereik 130 Hz – 50 kHz (bij –16 dB)
150 Hz – 45 kHz (bij –10 dB)
Afmetingen (B x H x D) 430 x 64 x 100 mm
Gewicht 1,8 kg
SB-WA70
LUIDSPREKERGEDEELTE
Type 1-weg 1-luidspreker systeem Basreflextype
Luidspreker Woofer: 17 cm conustype x 1
Geluidsdrukniveau 80 dB/W (1,0 m)
Frequentiebereik (met versterker) 32 Hz – 300 Hz (bij –16 dB)
38 Hz – 240 Hz (bij –10 dB)
VERSTERKERGEDEELTE
Uitgangsvermogen 100 W (6 ohm) (THV 0,9%)
Ingangsgevoeligheid/Ingangsimpedantie 300 mV/33 kohm (RCA-aansluiting)
Faseschakeling NORMAL/REVERSE
Onderdoorlaatfilter 50 – 200 Hz variabel
ALGEMEEN
Voeding AC 230 V, 50 Hz
Stroomverbruik 168 W
Afmetingen (B x H x D) 162 x 457 x 420 mm
Gewicht 10,8 kg
Opmerking
Specificaties onder voorbehoud van wijzigingen zonder voorafgaande
kennisgeving.
Gewicht en afmetingen zijn bij benadering opgegeven.
05_RQT7693_34-48 04.03.15, 06:24 PM46
La página se está cargando...
La página se está cargando...
Transcripción de documentos
Dear customer Thank you for purchasing this product. For optimum performance and safety, please read these instructions carefully. Speaker system SB-FS70 NEDERLANDS FRANÇAIS ESPAÑOL ENGLISH SB-CW70 Speaker Front, Surround Center Active subwoofer SB-FS70 X 4 SB-PC70 X 1 SB-WA70 X 1 Contents Caution for AC mains lead .............................................................. 3 Safety precautions .......................................................................... 4 Speaker setup ................................................................................. 6 Location ........................................................................................ 10 Connections .................................................................................. 12 Subwoofer operation (SB-WA70) .................................................. 14 Notes ............................................................................................. 16 Maintenance ................................................................................. 16 Specifications ................................................................................ 46 Estimado cliente Muchísimas gracias por haber adquirido este aparato. Lea con atención estas instrucciones para obtener las máximas prestaciones y seguridad. Sistema de altavoces Altavoces SB-FS70 Delanteros, sonido ambiental SB-FS70 X 4 Central SB-PC70 X 1 SB-CW70 Subgraves activos SB-WA70 X 1 Índice Precauciones de seguridad ............................................................ 4 Instalación de los altavoces ............................................................ 6 Ubicación ...................................................................................... 10 Conexiones ................................................................................... 12 Operación del altavoz de subgraves (SB-WA70) .......................... 14 Notas ............................................................................................. 16 Mantenimiento .............................................................................. 16 Especificaciones técnicas ............................................................. 46 Cher client Nous vous remercions pour votre achat de cet appareil. Pour en obtenir des performances idéales et pour votre sécurité, veuillez lire attentivement le présent manuel. Pack d’enceintes SB-FS70 SB-CW70 Enceintes Avant, Surround Centrale Caisson de graves actif SB-FS70 X 4 SB-PC70 X 1 SB-WA70 X 1 Tables des matières Précautions de sécurité .................................................................. 5 Installation des enceintes ................................................................ 7 Positionnement ............................................................................. 11 Raccordements ............................................................................. 13 Utilisation du caisson de graves (SB-WA70) ................................ 15 Remarques ................................................................................... 17 Entretien ........................................................................................ 17 Données techniques ..................................................................... 46 Geachte klant Hartelijk dank voor de aankoop van dit product. Gelieve deze gebruiksaanwijzing aandachtig door le lezen voor een optimale prestatie en een veilig gebruik van het systeem. Luidsprekersysteem Luidsprekers SB-FS70 Voor, Surround SB-FS70 X 4 Midden SB-PC70 X 1 SB-CW70 Actieve subwoofer SB-WA70 X 1 Inhoud Veiligheidsmaatregelen ................................................................... 5 De luidsprekers installeren .............................................................. 7 Opstelling ...................................................................................... 11 Aansluitingen ................................................................................ 13 Gebruik van de subwoofer (SB-WA70) ......................................... 15 Opmerkingen ................................................................................ 17 Onderhoud .................................................................................... 17 Technische gegevens ................................................................... 46 Supplied accessories Accessorios suministrados Accessoires fournis Bijgeleverde accessoires Please check and identify the supplied accessories. For the United Kingdom Use numbers indicated in parentheses when asking for replacement parts. Verifique e identifique los accesorios suministrados. Cocher les accessoires pour vérifier qu’ils sont bien tous dans l’emballage. Controleer de bijgeleverde accessoires en markeer in de vierkantjes. SB-FS70 Speaker cables (long: 10 m) ............... Cables de altavoces (largos: 10 m) .... Câbles d’enceinte (longs : 10 m) ........ Luidsprekerkabels (lange: 10 m) ........ 2 2 2 2 Speaker cables (short: 4 m) ............... Cables de altavoces (cortos: 4 m) ...... Câbles d’enceinte (courts : 4 m) ......... Luidsprekerkabels (korte: 4 m) ........... 2 2 2 2 Assembled stabilizer ........................... Estabilizador ensamblado .................. Stabilisateur assemblé ....................... Gemonteerde stabilisator ................... 4 4 4 4 Base ................................................... Base ................................................... Base ................................................... Voetstuk .............................................. 4 4 4 4 Rubber pads ............... 1 sheet (24 feet) Almohadillas de goma ................................... 1 hoja (24 patas) Coussinets en caoutchouc ................................. 1 feuille (24 pieds) Rubberkussentjes ...... 1 vel (24 voetjes) (RYQ0526-S) (RYQ0521-S) (RFA2645A) (6 feet per sheet) (6 patas por hoja) (6 pieds par feuille) (6 voetjes per vel) 8 8 8 8 Nylon clamp ........................................ Abrazadera de nailon ......................... Collier de serrage en nylon ................. Nylonklem ........................................... 4 4 4 4 (XTB4+30GFZ) Screw for nylon clamp ........................ Tornillo para abrazadera de nailon ..... Vis du collier de serrage en nylon ....... Schroef voor nylonklem ...................... 4 4 4 4 (RMR1503-W) SB-PC70 Speaker cables (short: 4 m) ............... Cables de altavoces (cortos: 4 m) ...... Câbles d’enceinte (courts : 4 m) ......... Luidsprekerkabels (korte: 4 m) ........... 1 1 1 1 Speaker feet ................. 1 sheet (4 feet) Patas de altavoces ...... 1 hoja (4 patas) Pieds d’enceinte ........ 1 feuille (4 pieds) Luidsprekervoetjes ...... 1 vel (4 voetjes) SB-WA70 AC mains lead .................................... Cable de alimentación de CA ............. Cordon d’alimentation ......................... Netsnoer ............................................. For Australia and New Zealand Para Australia y Nueva Zelanda Pour l’Australie et la Nouvelle-Zélande Voor Australië en Nieuw-Zeeland For others Para otros países Pour les autres pays Voor overige landen Monaural connection cable (5 m) ....... 1 Cable de conexión monofónico (5 m) ..... 1 Câble de connexion monaural (5 m) .. 1 Monokabel (5 m) ................................. 1 04.03.15, 05:59 PM (XTB3+8JFN) (REE1203A) (RFA0631A-K) 1 1 1 1 For the United Kingdom Para el Reino Unido Pour le Royaume-Uni Voor het Verenigd Koninkrijk 2 2 (REE1203A) Screw for base .................................... Tornillos para la base ......................... Vis pour la base .................................. Schroef voor luidsprekerbasis ............ RQT7693 01_RQT7693_01-09 (REE1203C) (RJA0038-2U) (K2CJ2DA00010) (RJA0019-3U) (RJL1P015B50) WARNING: TO REDUCE THE RISK OF FIRE, ELECTRIC SHOCK OR PRODUCT DAMAGE, DO NOT EXPOSE THIS APPARATUS TO RAIN, MOISTURE, DRIPPING OR SPLASHING AND THAT NO OBJECTS FILLED WITH LIQUIDS, SUCH AS VASES, SHALL BE PLACED ON THE APPARATUS. Caution for AC mains lead (For United Kingdom) (“EB” area code model only) This product may receive radio interference caused by mobile telephones during use. If such interference is apparent, please increase separation between the product and the mobile telephone. AVISO: PARA REDUCIR EL RIESGO DE INCENDIOS, DESCARGAS ELÉCTRICAS O DAÑOS EN ESTE APARATO, NO LO EXPONGA A LA LLUVIA, HUMEDAD, GOTEO NI SALPICADURAS, Y NO COLOQUE ENCIMA DE ÉL OBJETOS QUE CONTENGAN LÍQUIDOS COMO, POR EJEMPLO, FLOREROS. ¡ADVERTENCIA! • PARA MANTENER BIEN VENTILADA ESTA UNIDAD, NO LA INSTALE NI PONGA EN UN ESTANTE DE LIBROS, MUEBLE EMPOTRADO U OTRO ESPACIO DE DIMENSIONES REDUCIDAS. ASEGÚRESE QUE CORTINAS Y OTROS MATERIALES NO OBSTRUYAN LAS CONDICIONES DE VENTILACIÓN PARA PREVENIR EL RIESGO DE SACUDIDAS ELÉCTRICAS O INCENDIOS DEBIDOS AL RECALENTAMIENTO. • NO OBSTRUYA LAS ABERTURAS DE VENTILACIÓN DE LA UNIDAD CON PERIÓDICOS, MANTELES, CORTINAS U OBJETOS SIMILARES. • NO COLOQUE OBJETOS CON LLAMA DESCUBIERTA, UNA VELA POR EJEMPLO, ENCIMA DE LA UNIDAD. • TIRE LAS PILAS DE FORMA QUE NO CONTAMINE EL MEDIO AMBIENTE. ESTA UNIDAD HA SIDO DISEÑADA PARA SER UTILIZADA EN CLIMAS MODERADOS. Este producto puede tener interferencias causadas por teléfonos móviles durante su utilización. Si tales interferencias resultan evidentes, aumente la separación entre el producto y el teléfono móvil. AVERTISSEMENT: POUR RÉDUIRE LES RISQUES D’INCENDIE, D’ÉLECTROCUTION OU DE DOMMAGES AU PRODUIT, N’EXPOSEZ PAS CET APPAREIL À LA PLUIE, L’HUMIDITÉ, L’ÉGOUTTEMENT OU L’ÉCLABOUSSEMENT ET NE PLACEZ PAS D’OBJETS REMPLIS DE LIQUIDES TELS QUE VASES DESSUS. AVERTISSEMENT! • NE PAS INSTALLER NI PLACER L’APPAREIL DANS UNE BIBLIOTHÈQUE, UN PLACARD RENFERMÉ NI AUCUN AUTRE ESPACE RÉDUIT DE FAÇON À ASSURER UNE BONNE VENTILATION. VÉRIFIER QU’AUCUN RIDEAU NI AUCUN AUTRE MATÉRIAU NE BLOQUE LA VENTILATION DE FAÇON À ÉVITER TOUT RISQUE DE CHOC ÉLECTRIQUE OU DE FEU DÛ À UNE SURCHAUFFE. • NE BOUCHEZ PAS LES OUVERTURES D’AÉRATION DE L’APPAREIL AVEC DES JOURNAUX, NAPPES, RIDEAUX OU OBJETS SIMILAIRES. • NE PLACEZ PAS DE SOURCES DE FLAMMES VIVES TELLES QUE BOUGIES ALLUMÉES SUR L’APPAREIL. • JETEZ LES PILES D’UNE MANIÈRE COMPATIBLE AVEC L’ENVIRONNEMENT. CET APPAREIL EST DESTINÉ AUX CLIMATS TEMPÉRÉS. Ce produit peut être perturbé par les ondes des téléphones mobiles pendant l’utilisation. Si vous constatez une telle interférence, éloignez le téléphone mobile du produit. WAARSCHUWING: TENEINDE HET GEVAAR VOOR BRAND, ELEKTRISCHE SCHOK OF PRODUCTBESCHADIGING TE VERMINDEREN, MAG DIT APPARAAT NIET WORDEN BLOOTGESTELD AAN REGEN, VOCHT, EN DRUPPELEND OF SPATTEND WATER, EN MOGEN ER GEEN VOORWERPEN MET WATER OF ANDERE VLOEISTOFFEN ERIN, ZOALS BLOEMENVAZEN, OP HET APPARAAT WORDEN GEZET. WAARSCHUWING! • OM EEN GOEDE VENTILATIE TE VERZEKEREN, DIT APPARAAT NIET IN EEN BOEKENKAST, EEN INGEBOUWDE KAST OF EEN ANDERE GESLOTEN RUIMTE INSTALLEREN OF GEBRUIKEN. ZORG ERVOOR DAT DE VENTILATIEWEGEN NIET DOOR GORDIJNEN OF ANDERE MATERIALEN WORDEN AFGESLOTEN, OM GEVAAR VOOR ELEKTRISCHE SCHOK OF BRAND TEN GEVOLGE VAN OVERVERHITTING TE VOORKOMEN. • ZORG DAT DE VENTILATIE-OPENINGEN VAN HET APPARAAT NIET GEBLOKKEERD WORDEN DOOR KRANTEN, TAFELKLEEDJES, GORDIJNEN, OF IETS DERGELIJKS. • ZET GEEN OPEN VUUR, ZOALS BRANDENDE KAARSEN, OP HET APPARAAT. • DOE LEGE BATTERIJEN WEG OP EEN MILIEUVRIENDELIJKE MANIER. If the plug contains a removable fuse cover you must ensure that it is refitted when the fuse is replaced. If you lose the fuse cover the plug must not be used until a replacement cover is obtained. A replacement fuse cover can be purchased from your local dealer. CAUTION! IF THE FITTED MOULDED PLUG IS UNSUITABLE FOR THE SOCKET OUTLET IN YOUR HOME THEN THE FUSE SHOULD BE REMOVED AND THE PLUG CUT OFF AND DISPOSED OF SAFELY. THERE IS A DANGER OF SEVERE ELECTRICAL SHOCK IF THE CUT OFF PLUG IS INSERTED INTO ANY 13-AMPERE SOCKET. If a new plug is to be fitted please observe the wiring code as stated below. If in any doubt please consult a qualified electrician. IMPORTANT The wires in this mains lead are coloured in accordance with the following code: Blue: Neutral, Brown: Live. As these colours may not correspond with the coloured markings identifying the terminals in your plug, proceed as follows: The wire which is coloured Blue must be connected to the terminal which is marked with the letter N or coloured Black or Blue. The wire which is coloured Brown must be connected to the terminal which is marked with the letter L or coloured Brown or Red. WARNING: DO NOT CONNECT EITHER WIRE TO THE EARTH TERMINAL WHICH IS MARKED WITH THE LETTER E, BY THE EARTH SYMBOL n OR COLOURED GREEN OR GREEN/YELLOW. THIS PLUG IS NOT WATERPROOF—KEEP DRY. Before use Remove the connector cover. How to replace the fuse The location of the fuse differ according to the type of AC mains plug (figures A and B). Confirm the AC mains plug fitted and follow the instructions below. Illustrations may differ from actual AC mains plug. 1. Open the fuse cover with a screwdriver. Figure A Figure B Fuse cover 2. Replace the fuse and close or attach the fuse cover. Figure B Figure A DIT APPARAAT IS BESTEMD VOOR GEBRUIK IN EEN GEMATIGD KLIMAAT. Tijdens het gebruik is dit product vatbaar voor radiostoring veroorzaakt door een mobiele telefoon. Wanneer dergelijke storing optreedt, moet u dit product en de mobiele telefoon verder van elkaar vandaan gebruiken. ENGLISH This appliance is supplied with a moulded three pin mains plug for your safety and convenience. A 5-ampere fuse is fitted in this plug. Should the fuse need to be replaced please ensure that the replacement fuse has a rating of 5-ampere and that it is approved by ASTA or BSI to BS1362. Check for the ASTA mark m or the BSI mark o on the body of the fuse. ESPAÑOL THIS UNIT IS INTENDED FOR USE IN MODERATE CLIMATES. For your safety, please read the following text carefully. FRANÇAIS • DO NOT INSTALL OR PLACE THIS UNIT IN A BOOKCASE, BUILT-IN CABINET OR IN ANOTHER CONFINED SPACE. ENSURE THE UNIT IS WELL VENTILATED. TO PREVENT RISK OF ELECTRIC SHOCK OR FIRE HAZARD DUE TO OVERHEATING, ENSURE THAT CURTAINS AND ANY OTHER MATERIALS DO NOT OBSTRUCT THE VENTILATION VENTS. • DO NOT OBSTRUCT THE UNIT’S VENTILATION OPENINGS WITH NEWSPAPERS, TABLECLOTHS, CURTAINS, AND SIMILAR ITEMS. • DO NOT PLACE SOURCES OF NAKED FLAMES, SUCH AS LIGHTED CANDLES, ON THE UNIT. • DISPOSE OF BATTERIES IN AN ENVIRONMENTALLY FRIENDLY MANNER. NEDERLANDS CAUTION! Fuse (5 ampere) Fuse (5 ampere) 3 RQT7693 01_RQT7693_01-09 3 04.03.15, 05:59 PM Safety precautions Precauciones de seguridad Placement Ubicación ESPAÑOL ENGLISH Set the unit up on an even surface away from direct sunlight, high temperatures, high humidity, and excessive vibration. These conditions can damage the cabinet and other components, thereby shortening the unit’s service life. Coloque la unidad en una superficie plana lejos de la luz directa del sol, temperatura y humedad altas, y vibración excesiva. Estas condiciones pueden dañar el gabinete y otros componentes, y por lo tanto acortar la vida útil de la unidad. Voltaje Voltage Do not use high voltage power sources. This can overload the unit and cause a fire. Do not use a DC power source. Check the source carefully when setting the unit up on a ship or other place where DC is used. AC mains lead protection Ensure the AC mains lead is connected correctly and not damaged. Poor connection and lead damage can cause fire or electric shock. Do not pull, bend, or place heavy items on the lead. Grasp the plug firmly when unplugging the lead. Pulling the AC mains lead can cause electric shock. Do not handle the plug with wet hands. This can cause electric shock. Foreign matter Do not let metal objects fall inside the unit. This can cause electric shock or malfunction. Do not let liquids get into the unit. This can cause electric shock or malfunction. If this occurs, immediately disconnect the unit from the power supply and contact your dealer. Do not spray insecticides onto or into the unit. They contain flammable gases which can ignite if sprayed into the unit. Service Do not attempt to repair this unit by yourself. If sound is interrupted, indicators fail to light, smoke appears, or any other problem that is not covered in these operating instructions occurs, disconnect the AC mains lead and contact your dealer or an authorized service center. Electric shock or damage to the unit can occur if the unit is repaired, disassembled or reconstructed by unqualified persons. Extend operating life by disconnecting the unit from the power source if it is not to be used for a long time. Insertion of connector Even when the connector is perfectly inserted, depending on the type of inlet used, the front part of the connector may jut out as shown in the drawing. However there is no problem using the unit. Connector Approx. 6 mm Appliance inlet The socket outlet shall be installed near the equipment and easily accessible or the mains plug or an appliance coupier shall remain readily operable. Although the AC power switch is in the “OFF” position, the unit is not completely disconnected from the mains. Remove the plug from the main electrical outlet if you will not be using the unit for an extended period of time. Place the unit so the plug can be easily removed. CAUTION (SB-FS70): Do not stand on the base and shake the speaker. Be cautious when children are near (see page 10). No use fuentes de alimentación de alto voltaje. Esto puede sobrecargar la unidad y causar un incendio. No use una fuente de alimentación de CC. Verifique cuidadosamente la fuente cuando coloque la unidad en una embarcación u otro lugar donde CC sea usada. Protección del cordón de alimentación Asegúrese que el cordón de alimentación esté conectado correctamente y no dañado. Una mala conexión y daño en el cordón pueden causar un incendio o un choque eléctrico. No jale, doble el cordón ni coloque objetos pesados sobre él. Coja el enchufe firmemente cuando desenchufe el cordón. El jalar el cordón puede causar choque eléctrico. No maneje el enchufe con manos mojadas. Esto puede causar choque eléctrico. Objetos extraños No permita que objetos de metal caigan dentro de la unidad. Esto puede causar choque eléctrico o fallas. No permita que líquidos penetren en el aparato. Esto puede causar choque eléctrico o fallas. Si esto ocurre, desconecte inmediatamente la unidad de su alimentación y póngase en contacto con su distribuidor. No rocíe insecticidas sobre o dentro de la unidad. Contienen gases inflamables que pueden encenderse si son rociados dentro de la unidad. Servicio No intente reparar esta unidad por sí mismo. Si el sonido se interrumpe, los indicadores no se iluminan, sale humo o sucede cualquier problema que no está tratado en estas instrucciones, desconecte el cordón de alimentación y póngase en contacto con su distribuidor o con un centro de servicio autorizado. Puede ocurrir un choque eléctrico o daño a la unidad si esta unidad es reparada, desarmada o reconstruida por personas no calificadas. Extienda la vida útil de la unidad desconectándola de la fuente de alimentación si no va a ser usada por largo tiempo. Inserción del conector Incluso cuando el conector está bien insertado, dependiendo del tipo de toma usada, la parte delantera del conector puede sobresalir como se muestra en la figura. Sin embargo, no habrá problemas para usar el aparato. Conector Aprox. 6 mm Toma del aparato El equipo deberá colocarse cerca de la toma de CA, y a la clavija del cable de alimentación deberá poder accederse fácilmente en el caso de que se produzca un problema. La unidad no quedará completamente desconectada de la red eléctrica aunque el interruptor de la alimentación de CA se ponga en “OFF” (desconectado). Desenchufe la clavija de alimentación de la toma de corriente si no va a utilizar la unidad durante mucho tiempo. Coloque la unidad en lugar donde la clavija de alimentación pueda desenchufarse fácilmente. PRECAUCIÓN (SB-FS70): No se ponga de pie encima de la base y sacuda el altavoz. Tenga cuidado cuando haya niños cerca (véase la página 10). 4 RQT7693 01_RQT7693_01-09 4 04.03.15, 05:59 PM 270 mm ESPAÑOL ENGLISH ;; ;; ;; Speaker setup Take care not to apply undue pressure to the front nets when handling the speakers. Lay the speakers on a flat surface over a soft cloth when working on them. Tighten the screws firmly. 30-35 mm ø7.5-9.5 mm 7-9 mm Instalación de los altavoces Tenga cuidado cuando maneje los altavoces para no aplicar una presión excesiva a las redes delanteras. Coloque los altavoces en una superficie plana y encima de un paño blando cuando tenga que hacer algo con ellos. Apriete firmemente los tornillos. Center speaker (SB-PC70) Altavoz central (SB-PC70) Put above or below the center of the television, on a shelf or rack or attach to the wall. Placing it directly on the television can cause the picture to be distorted. Do not attach this speaker to walls or ceilings using methods other than those described here. Póngalo por encima o por debajo del centro del televisor, en un estante o bastidor o instalado en la pared. Colocarlo directamente encima del televisor puede causar distorsiones en la imagen. No coloque este altavoz en una pared o techo utilizando métodos diferentes de los descritos en este manual. Attaching the rubber feet when placing on a surface Attach the rubber feet to the base of the speaker to prevent vibration from causing the speaker to move or fall over. Colocación de las patas de goma cuando los altavoces se ponen encima de una superficie Coloque las patas de goma en la base del altavoz para impedir que las vibraciones desplacen el altavoz o hagan que éste se caiga. Attaching to a wall Attach four rubber feet to the rear of the speaker. Screw (not included) Screw the wood screw into a thick and hard part of the wall. The surface must be able to support over 10 kg. Attaching to a television stand Ensure the following conditions are met when purchasing or preparing your television stand. Observe the diameter and length of the screws and the distance between the screws as shown in the diagram. Television stand (not included) Screw (not included); diameter: 5 mm, pitch: 0.8 mm, length: thickness of board plus 10 mm. Distance between the centers of the holes: 60 mm. The stand must be able to support over 10 kg. Subwoofer (SB-WA70) Place anywhere as long as it is a reasonable distance from the television. Place it at least 5 cm from the wall as it has a bass reflex port in the rear. Do not attach the subwoofer to walls or ceilings. Colocación en una pared Coloque las cuatro patas de goma en la parte trasera del altavoz. Tornillo (no suministrado) Atornille el tornillo de madera en una parte gruesa y dura de la pared. La superficie deberá poder servir de apoyo a más de 10 kg. Colocación en una base de televisor Cuando adquiera o prepare su base de televisor, asegúrese de que se cumplan las condiciones siguientes. Tenga en cuenta el diámetro y la longitud de los tornillos y la distancia entre los tornillos que se muestran en el diagrama. Base de televisor (no suministrada) Tornillo (no suministrado); diámetro: 5 mm, paso: 0,8 mm, longitud: grosor del tablero más 10 mm. Distancia entre los centros de los agujeros: 60 mm La base deberá poder servir de apoyo a más de 10 kg. Altavoz de subgraves (SB-WA70) Deje una distancia lo más razonable posible entre este altavoz y el televisor. Y sepárelo un mínimo de 5 cm de la pared porque tiene en la parte trasera un orificio para el reflejo de los graves. No instale este altavoz en paredes o techos. 6 RQT7693 01_RQT7693_01-09 6 04.03.15, 05:59 PM 1390 mm 1104 mm ENGLISH ESPAÑOL Speaker setup Instalación de los altavoces Front and surround speakers (SB-FS70) Altavoces delanteros y de sonido ambiental (SB-FS70) The 4 speakers are the same. Put the front speakers either side of the television. Put the surround speakers to the side of or slightly behind the seating area. Los 4 altavoces son idénticos. Ponga los altavoces delanteros a ambos lados del televisor. Ponga los altavoces de sonido ambiental a los lados o un poco por detrás del área de escucha. Do not attach this speaker to walls or ceilings using methods other than those described here. Attaching the assembled stabilizer (included) and base (included) Place the speaker facing down. Confirm you have the Assembled Stabilizer (included). Stabilizer Stabilizer attachment screws Spacer Connect the speaker cable (included) to the speaker terminals and on the assembled stabilizer to the run the cable through the hole base. • Speaker cable for the surround speakers : Approx. 10 m For the front speakers: Approx. 4 m • For more information on speaker terminal connections refer to “Connections” ( page 12) After deciding on the speaker height and adjusting the speaker cable length, attach the assembled stabilizer to the speaker using the two stabilizer attachment screws. Speaker height adjustable range ( below) No coloque este altavoz en una pared o techo utilizando métodos diferentes de los descritos en este manual. Colocación del estabilizador ensamblado (suministrado) y la base (suministrada) Ponga el altavoz mirando hacia abajo. Confirme que tiene el estabilizador ensamblado (suministrado). Estabilizador Tornillos de colocación del estabilizador Espaciador Conecte el cable del altavoz (suministrado) en los terminales del del estabilizador altavoz, y pase el cable por el agujero ensamblado hacia la base. • Cables para los altavoces de sonido ambiental: 10 m aproximadamente Para los altavoces delanteros: 4 m aproximadamente • Para obtener más información acerca de las conexiones a los terminales de los altavoces, consulte “Conexiones” ( página 12) Después de decidir la altura del altavoz y ajustar la longitud del cable del mismo, coloque el estabilizador ensamblado en el altavoz utilizando los dos tornillos de colocación del estabilizador. Margen de ajuste de la altura del altavoz ( abajo) Note Do not get the speaker cable caught between the assembled stabilizer and the speaker. Nota Procure que el cable del altavoz no quede atrapado entre el estabilizador ensamblado y el altavoz. Adjust the speaker cable length and using the two base attachment screws (included), fasten the base to the assembled stabilizer. Insert the speaker cable in the speaker cable groove on the bottom side of the base . Ajuste la longitud del cable del altavoz, y utilizando los dos tornillos de colocación de la base (incluidos), apriete la base al estabilizador ensamblado. Inserte el cable del altavoz en la ranura del cable del altavoz situada en la parte inferior de la base . Ajuste de la altura Adjusting the height After step 3 indicated above, pull out the speaker cable on the speaker terminal side. Loosen the two stabilizer attachment screws enough so that the panel can be adjusted. The speaker may fall off if you loosen the screws too much. After adjusting the speaker height and the length of the cable, securely fasten the two stabilizer attachment screws. Adjustable range: Approx. 1104-1390 mm Después de realizar el paso 3 indicado arriba, tire hacia afuera del cable del altavoz en el lado del terminal del altavoz. Afloje los dos tornillos de colocación del estabilizador lo suficiente como para que pueda ajustarse el panel. El altavoz podrá caerse si afloja demasiado los tornillos. Después de ajustar la altura del altavoz y la longitud de su cable, apriete firmemente los dos tornillos de colocación del estabilizador. Margen ajustable: 1.104-1.390 mm aproximadamente Note Do not get the speaker cable caught between the assembled stabilizer and the speaker. Nota Procure que el cable del altavoz no quede atrapado entre el estabilizador ensamblado y el altavoz. Fit the speaker cable in the groove in the base. (Indicated above in step 4) Attaching a stabilizing wire Example Nylon clamp Screw for nylon clamp Wire (not included) Ring (not included) Screw (not included) Screw the wood screw into a thick and hard part of the wall. The surface must be able to support over 40 kg. Attaching to a wall Place the rubber pads (included) in four places on the back of the speaker where it contacts the wall, and on the two attachment holes for the assembled stabilizer. Screw (not included) Screw the wood screw into a thick and hard part of the wall. The surface must be able to support over 18 kg. Coloque el cable del altavoz en la ranura de la base. (Indicado arriba en el paso 4.) Colocación de un alambre estabilizador Ejemplo Abrazadera de nailon Tornillo para abrazadera de nailon Alambre (no suministrado) Anillo (no suministrado) Tornillo (no suministrado) Atornille el tornillo para madera en una parte gruesa y dura de la pared. La superficie deberá poder servir de apoyo a más de 40 kg. Colocación en una pared Ponga las almohadillas de goma (incluidas) en cuatro lugares de la parte posterior del altavoz, donde éste entra en contacto con la pared, y en los dos agujeros de colocación del estabilizador ensamblado. Tornillo (no suministrado) Atornille el tornillo de madera en una parte gruesa y dura de la pared. La superficie deberá poder servir de apoyo a más de 18 kg. 8 RQT7693 01_RQT7693_01-09 8 04.03.15, 05:59 PM SB-PC70 SB-FS70 SB-FS70 ENGLISH 30° 30° SB-WA70 120° SB-FS70 ESPAÑOL SB-FS70 Location Ubicación Front speaker (Left) (SB-FS70) Center speaker (SB-PC70) Front speaker (Right) (SB-FS70) Surround speaker (Right) (SB-FS70) Surround speaker (Left) (SB-FS70) Active subwoofer (SB-WA70) Altavoz delantero (izquierdo) (SB-FS70) Altavoz central (SB-PC70) Altavoz delantero (derecho) (SB-FS70) Altavoz de sonido ambiental (derecho) (SB-FS70) Altavoz de sonido ambiental (izquierdo) (SB-FS70) Altavoz de subgraves activo (SB-WA70) The front, center, and surround speakers should be placed at approximately the same distance from the listening position. The angles in the diagram are approximate. How you set up your speakers can affect the bass and the sound field. Note the following points. •Place on flat, level secure surface. Use spacers or a similar item to stop them from rocking. •Placing speakers too close to walls, and corners can result in excessive bass. •Cover walls and windows with a thick curtain. •Do not place anything on top of the subwoofer. Los altavoces delanteros, central y de sonido ambiental deberán colocarse aproximadamente a la misma altura de la posición de escucha. Los ángulos del diagrama son aproximados. La forma en que instala sus altavoces puede afectar a los graves y al campo de sonido. Tenga en cuenta los puntos siguientes. •Colóquelos en bases planas, niveladas y seguras. Utilice espaciadores o cosas similares para impedir que se muevan. •La colocación de los altavoces muy cerca de las paredes o esquinas puede crear un sonido grave excesivo. •Tape las paredes y las ventanas con cortinas gruesas. •No ponga nada encima del altavoz de subgraves. Usage and handling note (SB-FS70): Do not stand on the base and shake the speaker. Be cautious when children are near. Uso y nota de manejo (SB-FS70): No se ponga de pie encima de la base y sacuda el altavoz. Tenga cuidado cuando haya niños cerca. Protection circuitry (SB-WA70) Circuitos de protección (SB-WA70) This circuitry prevents damage caused by excessive input or abnormal signals. When excess input is detected, the sound is automatically interrupted. If sound is interrupted... 1. Reduce the volume level from the receiver or amplifier. 2. Press [POWER] to turn the unit off. 3. Check the sound source and connections for problems. 4. Press [POWER] to turn the unit on. After the protection circuitry is reset... Take care not to increase the receiver’s or amplifier’s volume level too much. Este circuito impide los daños causados por la entrada excesiva o las señales anormales. Cuando una entrada excesiva es detectada, el sonido es automáticamente interrumpido. Si el sonido es interrumpido... 1. Reduzca el nivel del volumen desde el receptor o amplificador. 2. Pulse [POWER] para apagar el aparato. 3. Compruebe la fuente de sonido y las conexiones por si hay algún problema. 4. Pulse [POWER] para encender el aparato. Después que la circuitería es reajustada... Tenga cuidado de no incrementar demasiado el nivel de volumen del receptor o del amplificador. 10 RQT7693 02_RQT7693_10-17 10 04.03.15, 05:59 PM SB-FS70 SB-FS70 SB-FS70 ENGLISH SB-PC70 SB-FS70 SB-FS70 ESPAÑOL SB-PC70 Connections Conexiones Connect to a receiver or amplifier with 6-Ω impedance for the front, center, and surround speakers, and a pin-type output terminal for an active subwoofer. Haga las conexiones a un receptor o amplificador con impedancia de 6-Ω para los altavoces delanteros, central y de sonido ambiental, y emplee un terminal de salida tipo contactos para un altavoz de subgraves activo. Before connection Turn off the other equipment. Do not connect the AC mains lead until all other cables and cords are connected. Antes de hacer la conexión Apague el otro equipo. No conecte el cable de alimentación de CA hasta después de haber conectado todos los demás cables. Twist off the tip. Retuerza la punta. Front, center, and surround speakers Subwoofer Connect the front , and center speakers with the 4-meter cables and the surround speakers , with the 10-meter cables . Be sure to connect only positive (copper) wires to positive (+) terminals and negative (silver) wires to negative (-) terminals. Never short-circuit positive (+) and negative (-) speaker wires. Altavoces delanteros, central y de sonido ambiental Conecte los altavoces delanteros , y el altavoz central con los cables de 4 metros , y los altavoces de sonido ambiental , con los cables de 10 metros . Asegúrese de conectar solamente los cables positivos (cobre) a los terminales positivos (+) y los cables negativos (plata) a los terminales negativos (-). Subwoofer E Connect with the included monaural connection cable to the receiver or amplifier’s subwoofer output terminal. For the United Kingdom BE SURE TO READ THE CAUTION FOR THE AC MAINS LEAD ON PAGE 3 BEFORE PROCEEDING TO STEP 2. Connect the AC mains lead outlet . to the household AC The included AC mains lead is for use with this unit only. Do not use it with other equipment. Note • Do not move the speaker while the speaker cables are connected. This may cause a short circuit. • Make sure to bundle the speaker cable with a string etc. when relocating the speaker cables. No cortocircuite nunca los cables positivos (+) y negativos (-) de los altavoces. E Altavoz de subgraves Subwoofer Conéctelo con el cable de conexión monofónico suministrado al terminal de salida de altavoz de subgraves del receptor o amplificador. Conecte el cable de alimentación de CA a la toma de CA del hogar . El cable de alimentación de CA suministrado es para ser utilizado con este aparato solamente. No lo utilice con otros aparatos. Nota • No mueva el altavoz mientras están conectados sus cables. Esto podría causar un cortocircuito. • Asegúrese de juntar los cables de los altavoces con una cuerda, etc. cuando cambie la posición de los mismos. 12 RQT7693 02_RQT7693_10-17 12 04.03.15, 05:59 PM ENGLISH ESPAÑOL Subwoofer operation (SB-WA70) 1 Set [POWER] to “ ON”. Operación del altavoz de subgraves (SB-WA70) 1 The indicator turns green. 2 Output sound from the receiver or amplifier and adjust the volume to a suitable level. Set [LOW PASS FILTER]. 2 3 5 Play something, then set [PHASE] to “ NORMAL” or “ REVERSE” so sound is normal. The subwoofer and speakers cancel each other out (causing unusual, muffled sound) if phase is incorrect. When settings are complete The only operation you should have to perform daily is press [POWER] to turn the unit ON/OFF. If you reposition the system and the acoustics change, reset the unit as necessary. Note If the volume output is too loud, this unit’s amplifier can be clipped, causing output to sound unusual. Reduce the volume of the receiver or amplifier or the volume of this unit if this occurs. Ajuste [LOW PASS FILTER]. Ajuste el filtro de paso bajo de su receptor o amplificador a 200 Hz si es posible. Refiérase a “Respuesta de frecuencia del ajuste LOW PASS FILTER”. Ponga [LOW PASS FILTER] en 200 Hz para una gama completa. Reduzca la frecuencia si nota que los graves son muy fuertes. Adjust [VOLUME] to a suitable level. Refer to “Frequency response by VOLUME setting”. Dé salida al sonido del receptor o amplificador y ajuste el volumen a un nivel apropiado. Consulte las instrucciones de funcionamiento del otro equipo para conocer detalles. No ajuste los graves porque esto puede causar distorsión. Si el volumen del amplificador se pone en “0” (el ajuste más bajo), y si se deja en esa posición durante más de 8 minutos, la unidad se pondrá automáticamente en el modo de espera y el indicador se pondrá rojo. Al subir el volumen en el amplificador, la unidad se pondrá automáticamente en el modo de funcionamiento, y el indicador se pondrá verde. Sin embargo, el altavoz de subgraves tal vez no se ponga en espera debido al ruido emitido por el amplificador conectado. Set the low pass filter on your receiver or amplifier to 200 Hz if possible. Refer to “Frequency response by LOW PASS FILTER setting”. Set [LOW PASS FILTER] to 200 Hz for a full range. Reduce it if you feel the bass is too strong. 4 4 Ajuste [VOLUME] a un nivel apropiado. Refiérase a “Respuesta de frecuencia del ajuste VOLUME”. 5 Reproduzca algo y luego ajuste [PHASE] a “ NORMAL” o “ REVERSE” para que el sonido sea normal. Si la fase no es correcta el altavoz de subgraves y los demás altavoces se anularán entre sí (causando un sonido extraño y apagado). Cuando los ajustes están completos La única operación que Ud. deberá realizar diariamente es presionar [POWER] para encender y apagar el aparato. Si Ud. reubica el sistema y la acústica cambia, reajuste el aparato como fuera necesario. Nota Si la salida del sonido está demasiado alta, el amplificador de este aparato podrá bloquearse, haciendo que la salida suene mal. Si ocurre esto, reduzca el volumen del receptor, el del amplificador o el de este aparato. 14 RQT7693 02_RQT7693_10-17 14 ON”. El indicador se pone verde. See the operating instructions for the other equipment for details. Do not adjust the bass as this can cause distortion. If the amplifier volume is switched to “0” (lowest setting), and it is left in this position for longer than 8 minutes the unit automatically switches to standby and the indicator turns red. Turning the amplifier volume up will automatically switch the unit to operation mode, and the indicator turns green. However, the subwoofer may not switch to standby due to noise emitted by the connected amplifier. 3 Ponga [POWER] en “ 04.03.15, 06:00 PM Notes Notas Speaker impedance and allowed input SB-FS70 / SB-PC70 Impedance 6Ω Input power 100 W (RATED) Impedancia del altavoz y potencia de entrada SB-FS70 / SB-PC70 Impedancia 6Ω ESPAÑOL ENGLISH Potencia de entrada 100 W (RATED) The only receivers or amplifiers you should connect to these speakers are those whose rated output does not exceed the above figures. Using a receiver or amplifier with higher ratings than listed above can cause abnormal sounds to occur because of excessive input, damage to the receiver or speakers, and fire. If equipment is damaged in any way or unexpected trouble occurs during playback, unplug the system from its outlet and call a serviceman for help. Protection circuitry (SB-FS70 / SB-PC70) These units incorporate protection circuitry to protect them from damage caused by excessive input or abnormal signals; when excess input is detected, input is automatically interrupted. If sound is interrupted... 1. Reduce the volume of the receiver (or amplifier). 2. Check the sound source and connections for any problems. If there is no problem, the protection circuitry will reset in a few minutes. After the protection circuit is reset... Take care not to increase the receiver’s volume too high. Excessive input You can damage your speakers and shorten their useful life if you play sound at high levels over extended periods. Reduce the volume in the following cases to avoid damage : •When playing distorted sound. •When the speakers are receiving howling from a microphone or record player, noise from FM broadcasts, or continuous signals from an oscillator, test disc, or electronic instrument. •When adjusting the sound quality. •When turning the amplifier on or off. Other notes If irregular coloring occurs on your television : These speakers are designed to be used close to a television, but the picture may be affected with some televisions and set-up combinations. If this occurs, turn the television off for about 30 minutes. The television’s demagnetizing function should correct the problem. If it persists, move the speakers further away from the television. You cannot remove the speaker net. Keep magnetized items away. Magnetized cards, bank cards, commuter passes, etc., can be damaged if allowed too near speaker magnets. Clocks may also be affected. Avoid locations such as described below : •In direct sunlight •Near heating appliances or other sources of heat •Where the humidity is high Maintenance Clean these units with a soft, clean, dry cloth. •Never use alcohol, paint thinner, or benzine to clean these units. •Before using chemically treated cloth, read the instructions that came with the cloth carefully. Los únicos receptores o amplificadores que deberá conectar a estos altavoces son aquellos que cuya salida nominal no exceda las cifras de arriba. Al usar un receptor o un amplificador con características nominales superiores a las indicadas arriba se pueden producir ruidos anormales debido a la entrada excesiva, el receptor o los altavoces se pueden estropear, y además se puede producir un incendio. Si el equipo es dañado de alguna manera o un problema inesperado ocurre durante la reproducción, desenchufe el sistema y llame a su distribuidor para que envíen una persona que le ayude. Circuitería de protección (SB-FS70 / SB-PC70) Estos aparatos incorporan una circuitería de protección para protegerlos de daños causados por una entrada excesiva o señales anormales; cuando una entrada excesiva es detectada, la entrada es automáticamente interrumpida. Si el sonido se interrumpe... 1. Reduzca el volumen del receptor (o amplificador). 2. Verifique si hay problemas en la fuente de sonido y las conexiones. Si no hay problemas, la circuitería de protección se reajustará en unos pocos minutos. Después de que el circuito de protección sea reajustado... Cuídese de no incrementar demasiado el volumen del receptor. Entrada excesiva Si reproduce el sonido con niveles altos durante períodos de tiempo prolongados podrá estropear sus altavoces y reducir su duración. Para evitar daños, reduzca el volumen en los casos siguientes: •Cuando reproduzca sonido distorsionado. •Cuando los altavoces reciban aullido procedente de un micrófono o giradiscos, ruido de emisiones de FM o señales continuas procedentes de un oscilador, disco de prueba o instrumento electrónico. •Cuando ajuste la calidad del sonido. •Cuando encienda o apague el amplificador. Otras notas Si se producen colores irregulares en su televisor: Estos altavoces han sido diseñados para ser utilizados cerca de un televisor, sin embargo, con algunos televisores y combinaciones de instalación es posible que la imagen se distorsione. Si ocurre esto, apague el televisor durante unos 30 minutos. La función de desmagnetización del televisor deberá corregir el problema. Si persiste el problema, separe más los altavoces del televisor. La red de los altavoces no se puede retirar. Aleje los objetos magnetizados. Las tarjetas magnetizadas, las tarjetas de bancos, los pases de viajeros, etc., pueden estropearse si se dejan demasiado cerca de los imanes de los altavoces. Los relojes también pueden ser afectados. Evite ubicaciones como las indicadas a continuación. •Expuestas a los rayos solares directos •Próximas a dispositivos de calefacción u otras fuentes de calor •Donde la humedad sea excesiva Mantenimiento Limpie estos aparatos con un paño blando, limpio y seco. •No utilice nunca alcohol, diluyente de pintura ni bencina para limpiar estos aparatos. •Antes de utilizar un paño impregnado químicamente, lea con atención las instrucciones suministradas con él. 16 RQT7693 02_RQT7693_10-17 16 04.03.15, 06:00 PM Specifications SB-FS70 Type Speaker SB-FS70 ENGLISH Impedance Input power (IEC) Sound pressure level Crossover frequency Frequency range Dimensions (W x H x D) Mass SB-PC70 ESPAÑOL Woofer: Tweeter: Impedance Input power (IEC) Sound pressure level Crossover frequency Frequency range FRANÇAIS Dimensions (W x H x D) Mass NEDERLANDS 3 way 4 speaker system Closed type 8 cm cone type x 2 2.5 cm semi-dome type x 1 1.2 cm dome type x 1 6Ω 200 W (MAX), 100 W (RATED) 81 dB/W (1.0 m) 2.7 kHz, 20 kHz 140 Hz – 100 kHz (at –16 dB) 180 Hz – 90 kHz (at –10 dB) 262 x 1104 (MIN) – 1390 (MAX) x 264 mm (with the stand) 8.0 kg Type Enceinte 3 way 5 speaker system Bass-reflex type 5 cm cone type x 4 2.5 cm semi-dome type x 1 6Ω 200 W (MAX), 100 W (RATED) 82 dB/W (1.0 m) 3.5 kHz, 4.5 kHz 130 Hz – 50 kHz (at –16 dB) 150 Hz – 45 kHz (at –10 dB) 430 x 64 x 100 mm 1.8 kg Type Enceinte Woofer: Tweeter: Super Tweeter: Type Speaker Données techniques SB-WA70 SPEAKER SECTION Type Speaker Woofer: Sound pressure level Frequency range (with amp) Enceinte à 3 voies 4 haut-parleurs (de type fermé) Woofer: Type cône de 8 cm x 2 Tweeter: Type semi-dôme de 2,5 cm x 1 Super Tweeter : Type dôme de 1,2 cm x 1 Impédance 6Ω Puissance d’entrée (IEC) 200 W (MAX), 100 W (RATED) Niveau de pression sonore 81 dB/W (1,0 m) Fréquence de recouvrement 2,7 kHz, 20 kHz Gamme de fréquences 140 Hz – 100 kHz (à –16 dB) 180 Hz – 90 kHz (à –10 dB) Dimensions (L x H x P) 262 x 1104 (MIN) – 1390 (MAX) x 264 mm (avec le support) Poids 8,0 kg SB-PC70 Enceinte à 3 voies 5 haut-parleurs, de type Bass-reflex Woofer: Type cône de 5 cm x 4 Tweeter: Type semi-dôme de 2,5 cm x 1 Impédance 6Ω Puissance d’entrée (IEC) 200 W (MAX), 100 W (RATED) Niveau de pression sonore 82 dB/W (1,0 m) Fréquence de recouvrement 3,5 kHz, 4,5 kHz Gamme de fréquences 130 Hz – 50 kHz (à –16 dB) 150 Hz – 45 kHz (à –10 dB) Dimensions (L x H x P) 430 x 64 x 100 mm Poids 1,8 kg SB-WA70 1 way 1 speaker system Bass-reflex type 17 cm cone type x 1 80 dB/W (1.0 m) 32 – 300 Hz (at –16 dB) 38 – 240 Hz (at –10 dB) AMPLIFIER SECTION Output power 100 W (6 Ω) (THD 0.9%) Input sensitivity / Input Impedance 300 mV/33 kΩ (RCA jack) Phase switching NORMAL/REVERSE Low pass filter 50 – 200 Hz Variable GENERAL Power supply For the United Kingdom, Australia and New Zealand AC 230 – 240 V, 50 Hz For others AC 230 V, 50 Hz Power consumption 168 W Dimensions (W x H x D) 162 x 457 x 420 mm Mass 10.8 kg Note Specifications are subject to change without notice. Mass and dimensions are approximate. Especificaciones técnicas SB-FS70 SECTION ENCEINTE Type Enceinte à 1 voie 1 haut-parleur, de type Bass-reflex Enceinte Woofer: Type cône de 17 cm x 1 Niveau de pression sonore 80 dB/W (1,0 m) Gamme de fréquences (avec ampli) 32 – 300 Hz (à –16 dB) 38 – 240 Hz (à –10 dB) SECTION AMPLIFICATEUR Puissance de sortie 100 W (6 Ω) (DHT 0,9 %) Sensibilité d’entrée / impédance d’entrée 300 mV/33 kΩ (prise RCA) Inversion de phase NORMALE/INVERSE Filtre passe-bas 50 – 200 Hz variable GÉNÉRALITÉS Alimentation CA 230 V, 50 Hz Consommation 168 W Dimensions (L x H x P) 162 x 457 x 420 mm Poids 10,8 kg Remarque Spécifications sujettes à modifications sans préavis. Le poids et les dimensions sont approximatifs. Technische gegevens SB-FS70 Tipo Altavoz Sistema de 4 altavoces de 3 vías tipo cerrado Altavoz de graves: Tipo cono de 8 cm x 2 Altavoz de agudos: Tipo de semicúpula de 2,5 cm x 1 Altavoz de superagudos: Tipo cúpula de 1,2 cm x 1 Impedancia 6Ω Potencia de entrada (IEC) 200 W (MAX), 100 W (RATED) Nivel de presión de sonido 81 dB/W (1,0 m) Frecuencia de cruce 2,7 kHz, 20 kHz Gama de frecuencias 140 Hz – 100 kHz (a –16 dB) 180 Hz – 90 kHz (a –10 dB) Dimensiones (An. x Al. x Prof.) 262 x 1.104 (MÍNIMA) – 1.390 (MÁXIMA) x 264 mm (con el soporte) Peso 8,0 kg 3-wegs 4-luidspreker systeem [Gesloten type] Woofer: 8 cm conustype x 2 Tweeter: 2,5 cm halfkoepeltype x 1 Supertweeter: 1,2 cm, koepeltype x 1 Impedantie 6 ohm Ingangsvermogen (IEC) 200 W (MAX), 100 W (RATED) Geluidsdrukniveau 81 dB/W (1,0 m) Kantelfrequentie 2,7 kHz, 20 kHz Frequentiebereik 140 Hz – 100 kHz (bij –16 dB) 180 Hz – 90 kHz (bij –10 dB) Afmetingen (B x H x D) 262 x 1104 (MIN) – 1390 (MAX) x 264 mm (standaard inbegrepen) Gewicht 8,0 kg Tipo Altavoz Sistema de 5 altavoces de 3 vías tipo Bass-reflex (reflejo de graves) Altavoz de graves: Tipo cono de 5 cm x 4 Altavoz de agudos: Tipo de semicúpula de 2,5 cm x 1 Impedancia 6Ω Potencia de entrada (IEC) 200 W (MAX), 100 W (RATED) Nivel de presión de sonido 82 dB/W (1,0 m) Frecuencia de cruce 3,5 kHz, 4,5 kHz Gama de frecuencias 130 Hz – 50 kHz (a –16 dB) 150 Hz – 45 kHz (a –10 dB) Dimensiones (An. x Al. x Prof.) 430 x 64 x 100 mm Peso 1,8 kg Type Luidspreker SECCIÓN DE ALTAVOCES Sistema de 1 altavoz de 1 vía tipo Bass-reflex (reflejo de graves) Tipo Altavoz Altavoz de graves: Tipo cono de 17 cm x 1 Nivel de presión de sonido 80 dB/W (1,0 m) Gama de frecuencias (con amplificador) 32 – 300 Hz (a –16 dB) 38 – 240 Hz (a –10 dB) SECCIÓN DEL AMPLIFICADOR Potencia de salida 100 W (6 Ω) (D.A.T. 0,9%) Sensibilidad de entrada / Impedancia de entrada 300 mV/33 kΩ (toma RCA) Conmutación de fase NORMAL/INVERTIDA Filtro pasabajos 50 – 200 Hz, variable GENERALIDADES Alimentación CA 230 V, 50 Hz Consumo 168 W Dimensiones (An. x Al. x Prof.) 162 x 457 x 420 mm Peso 10,8 kg LUIDSPREKERGEDEELTE Type 1-weg 1-luidspreker systeem Basreflextype Luidspreker Woofer: 17 cm conustype x 1 Geluidsdrukniveau 80 dB/W (1,0 m) Frequentiebereik (met versterker) 32 Hz – 300 Hz (bij –16 dB) 38 Hz – 240 Hz (bij –10 dB) VERSTERKERGEDEELTE Uitgangsvermogen 100 W (6 ohm) (THV 0,9%) Ingangsgevoeligheid/Ingangsimpedantie 300 mV/33 kohm (RCA-aansluiting) Faseschakeling NORMAL/REVERSE Onderdoorlaatfilter 50 – 200 Hz variabel ALGEMEEN Voeding AC 230 V, 50 Hz Stroomverbruik 168 W Afmetingen (B x H x D) 162 x 457 x 420 mm Gewicht 10,8 kg SB-PC70 SB-WA70 Nota Type Luidspreker SB-PC70 Woofer: Tweeter: Impedantie Ingangsvermogen (IEC) Geluidsdrukniveau Kantelfrequentie Frequentiebereik Afmetingen (B x H x D) Gewicht SB-WA70 3-wegs 5-luidsprekers systeem Basreflextype 5 cm conustype x 4 2,5 cm halfkoepeltype x 1 6 ohm 200 W (MAX), 100 W (RATED) 82 dB/W (1,0 m) 3,5 kHz, 4,5 kHz 130 Hz – 50 kHz (bij –16 dB) 150 Hz – 45 kHz (bij –10 dB) 430 x 64 x 100 mm 1,8 kg Opmerking Las especificaciones están sujetas a cambios sin previo aviso. Los pesos y las dimensiones son aproximados. Specificaties onder voorbehoud van wijzigingen zonder voorafgaande kennisgeving. Gewicht en afmetingen zijn bij benadering opgegeven. 46 RQT7693 05_RQT7693_34-48 46 04.03.15, 06:24 PM-
 1
1
-
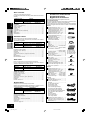 2
2
-
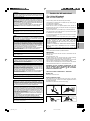 3
3
-
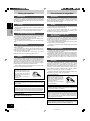 4
4
-
 5
5
-
 6
6
-
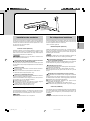 7
7
-
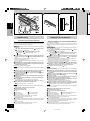 8
8
-
 9
9
-
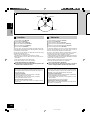 10
10
-
 11
11
-
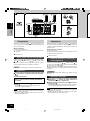 12
12
-
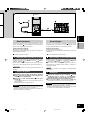 13
13
-
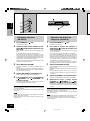 14
14
-
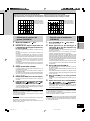 15
15
-
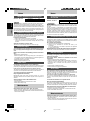 16
16
-
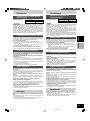 17
17
-
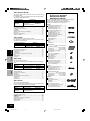 18
18
-
 19
19
-
 20
20
-
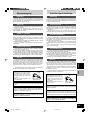 21
21
-
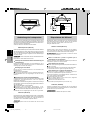 22
22
-
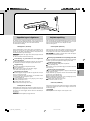 23
23
-
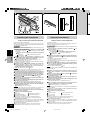 24
24
-
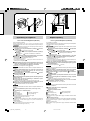 25
25
-
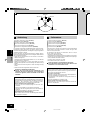 26
26
-
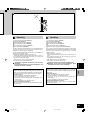 27
27
-
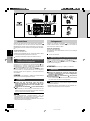 28
28
-
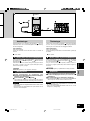 29
29
-
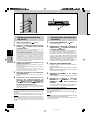 30
30
-
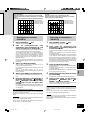 31
31
-
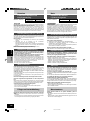 32
32
-
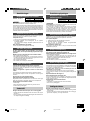 33
33
-
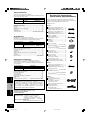 34
34
-
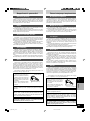 35
35
-
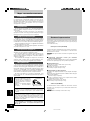 36
36
-
 37
37
-
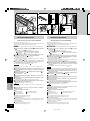 38
38
-
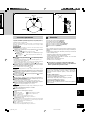 39
39
-
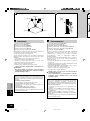 40
40
-
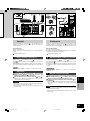 41
41
-
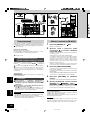 42
42
-
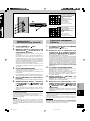 43
43
-
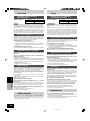 44
44
-
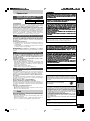 45
45
-
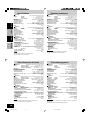 46
46
-
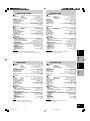 47
47
-
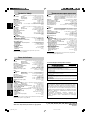 48
48


Panasonic SBTP70 El manual del propietario
- Tipo
- El manual del propietario
- Este manual también es adecuado para
en otros idiomas
- français: Panasonic SBTP70 Le manuel du propriétaire
- italiano: Panasonic SBTP70 Manuale del proprietario
- English: Panasonic SBTP70 Owner's manual
- Deutsch: Panasonic SBTP70 Bedienungsanleitung
- русский: Panasonic SBTP70 Инструкция по применению
- Nederlands: Panasonic SBTP70 de handleiding
- dansk: Panasonic SBTP70 Brugervejledning
- polski: Panasonic SBTP70 Instrukcja obsługi
- čeština: Panasonic SBTP70 Návod k obsluze
- svenska: Panasonic SBTP70 Bruksanvisning
Artículos relacionados
-
Panasonic SBTP70 El manual del propietario
-
Panasonic SBCSS250 El manual del propietario
-
-
-
Panasonic SB-AS500 El manual del propietario
-
-
Panasonic SBTP1000 El manual del propietario
-
-
-