
V3 Basic
Quick Start Guide
V3 Basic クイックスタートガイド
Guide de démarrage rapide V3 Basic
Guida di avvio rapido V3 Basic
Guía de inicio rápido V3 Basic
V3 Basic Schnellstartanleitung
FR
IT
DE
SP
JP

2
Table of Contents
English
Overview
What’s in the Box
Camera Overview
Installation
Basic Operation
日本語
概説
本製品の同梱物
カメラの概説
画面のアイコン
基本操作
Français
Aperçu
Que contient la Boîte
Aperçu de la Caméra
Installation
Opération de Base
Italiano
Panoramica
Cosa c’è nella Scatola
Panoramica della Telecamera
Installazione
Operazioni di Base
page
4
5
6
8
12
18
19
20
22
26
32
33
34
36
40
46
47
48
50
54

3
Español
Visión General
Qué hay en la Caja
Resumen de la Cámara
Instalación
Operación Básica
Deutsch
Übersicht
Schachtelinhalt
Kamera Übersicht
Installation
Grundlegender Betrieb
60
61
62
64
68
74
75
76
78
84
page

4
Facebook Instagram Site
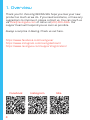
1. Overview
Thank you for choosing REXING! We hope you love your new
product as much as we do. If you need assistance, or have any
suggestions to improve it, please contact us. You can reach us
via [email protected] or call us at (203) 800-4466. Our
support team will respond you as soon as possible.
Always a surprise in Rexing. Check us out here.
https://www.facebook.com/rexingusa/
https://www.instagram.com/rexingdashcam/
https://www.rexingusa.com/support/registration/

5
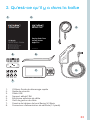
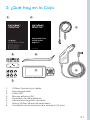
2. What’s in the Box
1. V3 Basic Quick Start Guide
2. Safety Guide
3. USB Cable
4. 3M Adhesive Mount
5. Cable Adhesive Spacer
6. Cable Management Tool
7. Rexing V3 Basic Dashboard Camera
8. Car Power Connector (12ft)
8.
1.
3.
2.
4.
5.
6.
7.
1. Overview

6
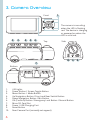
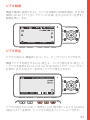
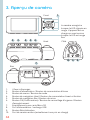
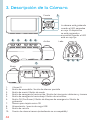
3. Camera Overview
1. 4 IR Lights
2. Power Button / Screen Toggle Button
3. Menu Button / Mode Button
4. Up Navigation Button / Front and Rear Switch Button
5. Down Navigation Button / Mic Button
6. OK (Conrm) Button / Emergency Lock Button / Record Button
7. Micro SD Card Slot
8. Power / USB Charging Port
9. Reset Button
10. Rear Camera Port (currently not support)
Top
7.
2. 4. 5.3. 6.
Bottom
Side
9.10. 8.
Front 1.
The camera is recording
when the LED is ashing
red. The device is charging
or powered on when the
LED is solid red.

7
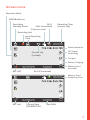
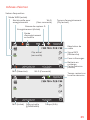
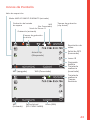
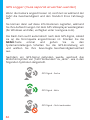
Screen Icons
Recording (on)
G Sensor Level
Wi-Fi
(Not Connected)
Wi-Fi (Connected)
Time (24h)MIC (on)
MIC (o)
Current Date
(DD/MM/YYYY)
Loop Recording
Time
Video Resolution
GPS Signal
(Searching)
IR Lights
Battery Charging
Memory Card
(Inserted)
Memory Card
Remaining Time
Recording Time
(current clip)
Current clip
(Locked))
Recording
Standby Status
WDR Mode (on)
Exposure Value

8
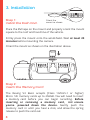
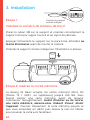
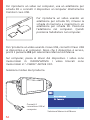
Step 1:
Install the Dash Cam
Place the 3M tape on the mount and properly orient the mount
square to the roof and hood line of the vehicle.
Firmly press the mount onto the windshield. Wait at least 20
minutes before mounting the camera.
Orient the mount as shown on the illustration above.
Step 2:
Insert the Memory Card
The Rexing V3 Basic accepts [Class 10/UHS-1 or higher]
Micro SD memory cards up to 256GB. You will need to insert
a memory card before you can begin recording. Before
inserting or removing a memory card, irst ensure
you’ve powered down the device. Gently push the
memory card in until you hear a click, and allow the spring
release to push the card out.
Orient the
mount as shown
3. Installation

9
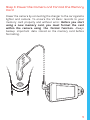
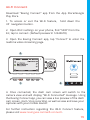
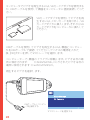
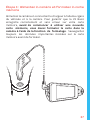
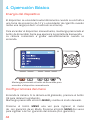
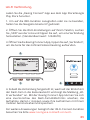
Step 3: Power the Camera and Format the Memory
Card
Power the camera by connecting the charger to the car cigarette
lighter and camera. To ensure the V3 Basic records to your
memory card properly and without error. Before you start
using a new memory card, you must format the card
within the camera using the format function. Always
backup important data stored on the memory card before
formatting.

10
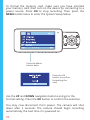
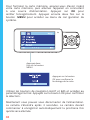
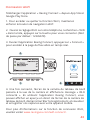
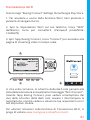
To format the memory card, make sure you have inserted
your memory card, then turn on the device by connecting to a
power source. Press OK to stop recording. Then press the
MENU button twice to enter the System Setup Menu.
Use the UP and DOWN navigation buttons and go to the
Format setting. Press the OK button to confirm the selection.
You may now disconnect from power. The camera will shut
down after 3 seconds. The camera should begin recording
automatically the next time it is powered on.
Press the OK
button to conrm
formatting the
card
Press the Menu
button twice

11
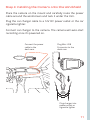
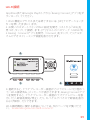
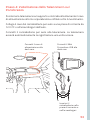
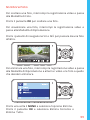
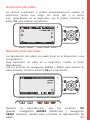
Step 4: Installing the Camera onto the Windshield
Place the camera on the mount and carefully route the power
cable around the windscreen and tuck it under the trim.
Plug the car charger cable to a 12V DC power outlet or the car
cigarette lighter.
Connect car charger to the camera. The camera will auto-start
recording once it’s powered on.
Connect the power
cable to the
dash cam
Plug Mini USB
Connector to the
dash cam
Plug charger into
power outlet or
cigarette lighter

12
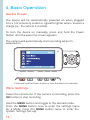
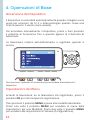
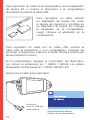
Device Power
The device will be automatically powered on when plugged
into a 12V accessory socket or cigarette lighter when receives a
charge (i.e.: the vehicle is started).
To turn the device on manually, press and hold the Power
button until the welcome screen appears.
The camera will automatically start recording when it’s
powered on.
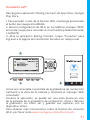
Menu Settings
Power the camera On. If the camera is recording, press the
OK button to stop recording.
Hold the MENU button and toggle to the desired mode.
Press the MENU button once to enter the settings menu
for a Mode. Press the MENU button twice to enter the
System Settings (Set up).
4. Basic Operation
Press and hold the Power button to turn the device on manually

13
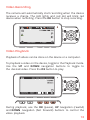
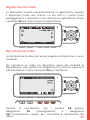
Video Recording
The camera will automatically start recording when the device
receives a charge. The LED lights and red dot will blink red
device when recording. Press the OK button to stop recording.
Video Playback
Playback of videos can be done on the device or a computer.
To playback a video on the device, toggle to the Playback mode.
Use the UP and DOWN navigation buttons to toggle to
the desired video. Press the OK button to play.
During playback, use the OK (pause), UP navigation (rewind)
and DOWN navigation (fast forward) buttons to control the
video playback.

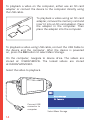
14
To playback a video using USB cable, connect the USB Cable to
the device and the computer. After the device is powered
on, press the OK button to select Mass Storage.
On the computer, navigate to device drive. The videos are
stored at: \CARDV\MOVIE. The locked videos are stored
at:\CARDV\MOVIE\RO.
Select the video to playback.
To playback a video on the computer, either use an SD card
adapter or connect the device to the computer directly using
the USB cable.
To playback a video using an SD card
adapter, remove the memory card and
insert it into an SD card adapter. Place
the adapter in the computer. Then
place the adapter into the computer.
Connect USB
connector to
computer Select Mass Storage

15
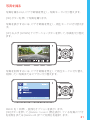
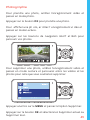
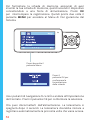
Wi-Fi Connect
Download “Rexing Connect” app from the App Store/Google
Play Store.
1. To access or exit the Wi-Fi feature, hold down the
UP navigation button.
2. Open Wi-Fi settings on your phone, find “SSID” from the
list, tap to connect. (Default password: 12345678)
3. Open the Rexing Connect app, tap “Connect” to enter the
realtime video streaming page.
4. Once connected, the dash cam screen will switch to the
camera view and will display “Wi-Fi Connected” message. Using
the Rexing Connect app, you can view a live preview of the dash
cam screen, start / stop recording, as well as view and save your
captures with your mobile device.
For further instruction regarding the Wi-Fi Connect feature,
please visit www.rexingusa.com/wi-connect/.
1.
2.
3.

16
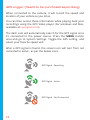
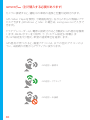
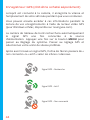
GPS Logger (Needs to be purchased separately)
When connected to the camera, it will record the speed and
location of your vehicle as you drive.
You can then access these information while playing back your
recordings using the GPS Video player (For windows and Mac,
available at rexingusa.com).
The dash cam will automatically search for the GPS signal once
it’s connected to the power source. Press the MENU button
once and go to System Settings. Toggle the GPS setting, and
select your favorite speed unit.
After a GPS signal is found, the screen icon will turn from not
connected to active - as per the below icons.
GPS Signal - Not Connected
GPS Signal - Active
GPS Signal - Searching

17
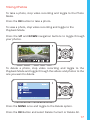
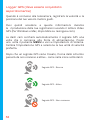
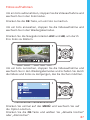
Taking Photos
To take a photo, stop video recording and toggle to the Photo
Mode.
Press the OK button to take a photo.
To view a photo, stop video recording and toggle to the
Playback Mode.
Press the UP and DOWN navigation buttons to toggle through
your photos.
To delete a photo, stop video recording and toggle to the
Playback Mode and toggle through the videos and photos to the
one you want to delete.
Press the MENU once and toggle to the Delete option.
Press the OK Button and select Delete Current or Delete All.

18
1. 概要
REXINGをお選びいただきありがとうございます! 私たちはお客様が
私たちと同じくらいこの新製品を気に入っていただくことを願ってい
ます。サポートが必要な場合、または製品を改善するための提案があ
る場合は、ご連絡ください。[email protected]に電子メールを送
ることができます。当社のサポートチームは、できるだけ早くお客様
からのお問い合わせにお答えいたします。
常にREXINGでサプライズを。こちらから最新情報をチェックしてく
ださい 。
https://www.facebook.com/rexingusa/
https://www.instagram.com/rexingdashcam/
https://www.rexingusa.com/support/registration/
Facebook Instagram ホームページ

19
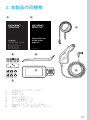
1. 概要 2. 本製品の同梱物
1. V3 Basicクイックスタートガイド
2. 安全ガイド
3. USBケーブル
4. 3Mテープマウント
5. ケーブル接着スペーサー
6. ケーブルガイドツール
7. Rexing ドライブレコーダー V3 Basic
8. 車載シガーライター用コネクター (12フィー
ト)
8.
1.
3.
2.
4.
5.
6.
7.

20
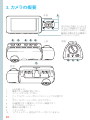
3. カメラの 概 要
1. 4 赤外線ライト
2. 電源ボタン/画面切替えボタン
3. メニューボタン/モードボタン
4. アップナビゲーションボタン/フロントとリアの切替ボタ
ン
5. ダウンナビゲーションボタン/マイクボタン
6. OK(確認)ボタン/緊急ロックボタン/録画ボタン
7. マイクロSDカードスロット
8. 電源/USB充電ポート
9. リセットボタン
10. リアカメラポート (現在はサポートされていません)
上部
7.
2. 4. 5.3. 6.
底面
側面
9.10. 8.
前面 1.
LEDが赤く点滅しているとき
はカメラが録画中です。LED
が赤色に点灯している場合、
機器は充電中または電源が
オンになっています。

21
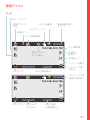
画 面アイコン
録画 (オン)
Gセンサーレベル
Wi-Fi (未接続)
Wi-Fi (接続済み)
現在の時刻
(24時間表示)
マイク(オン)
マイク(オフ)
現在の日付
(日/月/年)
ループ録画時間
ビデオ解像度
GPS信号
(検索中)
赤外線ライト
バッテリー充電中
メモリカード(挿
入済み)
メモリカードの残
り録画可能時間
録画時間 (現在の
クリップ )
現 在 のクリップ
(ロック済み)
録画スタンバイ
状態
WDRモード (オン)
露出値

22
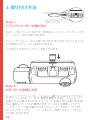
Step 1:
ドライブレコーダー の 取り付け
3Mテープをマウントに取り付け、車両のルーフとフードラインに水平
にして、正しい方向で取り付けます。
フロントガラスにしっかりと取り付けます。取り付けてから少なくとも
20分間待ってから、カメラを取り付けます。
上の図に示す向きで、マウントを取り付けます。
Step 2:
メモリカードを挿入する
Rexing ドライブレコーダー V3 Basic は最大256GBのマイクロSDメ
モリカードに対応しています。録画を開始する前に、メモリカード
を挿入する必要があります。メモリカードを挿入または取り外す場
合は、事前にデバイスの電源が切れていることを確認してくださ
い。カチッという音が聞こえるまでメモリーカードをゆっくりと押し
込んでください。メモリ ーカードをもう一度押し込むと、バネでカー
ドが押し出されます。
図のような向きでマウン
トを取り付けます
3. 取り付け方 法

23
Step 3: カメラの電源を入れ、メモリカードをフォーマット
する
カメラの充電器を車両のシガレットライターに接続して、カメラの
電源を入れます。RexingドライブレコーダーV3 Basic がメモリカード
を認識しており、エラーなしで記録できることを確認します。新しいメ
モリカ ードの使用を開始する前に、フォーマット機能を使用してカ
メラ内のカードをフォーマットする必要があります。フォーマットす
る前に、メモリカードに保存されている重要なデータを必ずバック
アップしておいてください。

24
メモリカードをフォーマットするには、メモリカードが挿入されてい
ることを確認してから、電源に接続して機器の電源を入れます。録
画を停止するには、[OK] をクリックしてください。次に、[MENU] ボ
タンを 2 回押して、システムセットアップメニューに入ります。
[UP] および [DOWN] ナビゲーションボタンを使用して、[Format] メ
ニューに移動します。[OK] ボタンを押してフォーマットを実行します。
これで、カメラの電源を切ることができます。カメラは3秒後にシャッ
トダウンします。カメラは、次回電源がオンになると自動的に録画を
開始します。
[OK]ボタンを押し
て、カードをフォー
マ ットし ま す
メニューボタンを2
回押す

25
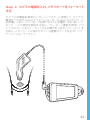
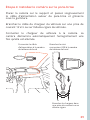
Step 4: フロントガラスへのカメラの取り付け
カメラをマウントに取り付け、電源ケーブルをフロントウィンドウの周
囲に沿って慎重に配線し、トリムの下にしまい込みます。
車載充電器のケーブルを12V DC電源コンセントまたは車のシガー
ライターに差し込みます。
車載充電器をカメラに接続します。電源が入ると、カメラは録画を自
動的に開始します。
電源ケーブルをドライブレ
コーダーに接続します
ドライブレコーダーの
ミニUSBコネクターに
接続します
車両の電源コネクター
またはシガーライ
ターに車載充電器を接
続します

26
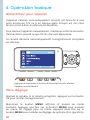
メニューの設定
カメラの電源を入れます。カメラが録画中の場合は、[OK]ボタンを押
して録画を停止します。
[ MENU] ボタンを押したまま、目的のモードに切り替えます。
[MENU]ボタンを1回押すと、モードの設定メニューに入ります。
[MENU]ボタンを2回押すと、システムの設定メニューに入りま
す。
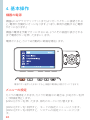
4. 基本操作
機器の電源
機器は12Vアクセサリソケットまたはシガーライターに接続される
と、電源が自動的にオンになります。(つまり、車両が起動すると電源
がオンになります。)
機器の電源を手動でオンにするには、ようこその画面が表示される
まで電源ボタンを押したままにします。
電源が入ると、カメラは自動的に録画を開始します。
電源ボタンを押したままにすると、機器の電源を手動でオンにできます。

27
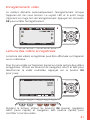
ビデオ録画
機器が電源に接続されると、カメラは自動的に録画を開始します。録
画時にはLEDライトと赤いアイコンが点滅します。[OK]ボタンを押すと
録画を停止します。
ビデオ再生
ビデオの再生は、機器またはコンピュータ上で行うことができます。
機器でビデオを再生するには、再生モードに切り替えます。再生した
いビデオを選択するには、[UP] および [DOWN] ナビゲーションボタン
を使用します。[OK]ボタンを押すとビデオが再生されます。
ビデオの再生中は、[OK] (一時停止)、[UP] (巻き戻し)、および [DOWN]
(早送り)ボタンを使用して、ビデオの再生をコントロールできます。

28
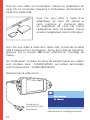
USBケーブルを使用してビデオを再生するには、機器とコンピュー
タをUSBケーブルで接続してください。デバイスの電源を入れた
後、[OK]ボタンを押してマストレージを選択します。
コンピューターで、機器のドライブに移動します。ビデオは次の場
所に保存されます: \CARDV\MOVIE。ロックされたビデオは次の
場所に保存されます: \CardV\ MOVIE\RO。
再生するビデオを選択します。
コンピュータでビデオを再生するには、SDカードアダプタを使用する
か、USBケーブルを使用して機器をコンピュータに直接接続してくだ
さい。
SDカードアダプタを使用してビデオを再
生するには、メモリカードを取り外し、SD
カードアダプタに挿入します。それからSD
カードアダプタをコンピュータに挿入して
ください。
USBケーブルとコンピュ
ータを接続する
マスストレージを選択する

29
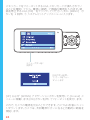
Wi-Fi接続
AppStoreまたはGoogle Playストアから「Rexing Connect」アプリをダ
ウンロードしてください。
1. Wi-Fi 機能にアクセスまたは終了するには、[UP] ナビゲーションボ
タンを押したままにします。
2. お使いのスマートフォンのWi-Fi設定を開き、リストから「SSID」を
見つけ、タップして接続します。(デフォルトのパスワード: 12345678)
3. Rexing Connectアプリを開き、「Connect」をタップしてリアルタ
イムビデオストリーミング画面を表示させます。
4. 接続すると、ドライブレコーダー画面がカメラビューに切り替わっ
て、「Wi-Fi接続済み」メッセージが表示されます。Rexing Connectアプ
リを使用すると、ドライブレコーダー画面のライブプレビューを表
示したり、録画を開始/停止したり、モバイルデバイスで録画を表示
および保存したりできます。
Wi-Fi接続機能に関する詳細については、次のページをご覧くださ
い。 w ww.rexingusa.com/wi-connect/.
1.
2.
3.

30
GPSロガー(別で購入する必要があります)
カメラに接続すると、運転中の車両の速度と位置が記録されます。
GPS Video Playerを使用して録画を再生しながらこれらの情報にアク
セスできます。(Windows と Mac の場合は、rexingusa.comで入手で
きます)。
ドライブレコーダーは、電源に接続されると自動的にGPS信号を検索
します。MENUボタンを1回押して、[システム設定]に移動しま
す。GPS設定を切り替え、希望の速度単位を選択します。
GPS信号が見つかると、画面アイコンは、以下の図のアイコンのよ
うに、未接続の状態からアクティブに変わります。
GPS信号 – 未接続
GPS信号 – アクティブ
GPS信号 – 検索中

31
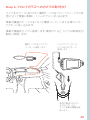
写真を撮る
写真を撮るには、ビデオ録画を停止し、写真モードに切り替えます。
[OK] ボタンを押して写真を撮ります。
写真を表示するには、ビデオ録画を停止し、再生モードに切り替えま
す。
[UP] および [DOWN] ナビゲーションボタンを押して、写真を切り替え
ます。
写真を削除するには、ビデオ録画を停止して再生モードに切り替え、
削除したい写真またはビデオに切り替えます。
MENU を 1 回押し、[削除] オプションを表示します。
[OK]ボタンを押して、[Delete Current (現在表示している写真/ビデオ
を削除)] または [Delete All (すべて削除)] を選択します。

32
1. Aperçu
Nous vous remercions pour votre choix sur REXING ! Nous
espérons que vous aimiez votre nouveau produit autant que
nous. Si vous avez besoin d’aide ou vous avez des suggestions
pour l’améliorer, veuillez nous contacter. Vous pouvez nous
joindre via [email protected]. Notre équipe d’assistance
vous répondra le plus vite possible.
Toujours une surprise à Rexing. Consultez-nous ici.
https://www.facebook.com/rexingusa/
https://www.instagram.com/rexingdashcam/
https://www.rexingusa.com/support/registration/
Facebook Instagram Site

33
1. Aperçu 2. Qu’est-ce qu’il y a dans la boîte
1. V3 Basic Guide de démarrage rapide
2. Guide de sécurité
3. Câble USB
4. Support adhésif 3M
5. Entretoise adhésive de câble
6. Outil de gestion de câble
7. Caméra de tableau de bord Rexing V3 Basic
8. Connecteur d’alimentation de véhicule (12 pieds)
8.
1.
3.
2.
4.
5.
6.
7.

34
3. Aperçu de caméra
1. 4 feux infrarouges
2. Bouton d’alimentation / Bouton de commutation d’écran
3. Bouton de menu / Bouton de mode
4. Bouton de navigation Haut / Bouton de commutation Avant et Arrière
5. Bouton de navigation Bas / Bouton de micro
6. Bouton OK (Conrmation) / Bouton de verrouillage d’urgence / Bouton
d’enregistrement
7. Emplacement pour carte Micro SD
8. Port d’alimentation / recharge USB
9. Bouton Réinitialisation
10. Port de caméra arrière (actuellement non pris en charge)
Haut
7.
2. 4. 5.3. 6.
Bas
Côté
9.10. 8.
Front 1.
La caméra enregistre
lorsque la LED clignote en
rouge. L’appareil est en
charge ou sous tension
lorsque la LED est rouge
xe.

35
Icônes d’écran
Enregistrement (Activé)
Niveau de capteur G
Wi-Fi
(Non connecté)
Wi-Fi (Connecté)
Temps (24h)MIC (Activé)
MIC (Désactivé)
Date actuelle
(JJ/MM/AAAA)
Durée
d’enregistrement
en boucle
Résolution de
vidéo
Signal GPS
(Recherche)
Feux infrarouges
Batterie en
recharge
Carte mémoire
(Inséré)
Temps restant sur
la carte mémoire
Temps d’enregistrement
(Clip actuel)
Clip actuel
(verrouillé)
Etat de veille pour
enregistrement
Mode WDR (activé)
Valeur d’exposition

36
Étape 1:
Installez la caméra de tableau de bord
Placez le ruban 3M sur le support et orientez correctement le
support carré par rapport au toit et au capot du véhicule.
Appuyez fermement le support sur le pare-brise. Attendez au
moins 20 minutes avant de monter la caméra.
Orientez le support comme indiqué sur l’illustration ci-dessus.
Étape 2: Insérez la carte mémoire
La Rexing V3 Basic accepte les cartes mémoire Micro SD
[Classe 10 / UHS-1 ou supérieure] jusqu’à 256 GB. Vous
devrez insérer une carte mémoire avant de pouvoir
commencer l’enregistrement. Avant d’insérer ou de retirer
une carte mémoire, assurez-vous d’abord d’avoir éteint
l’appareil. Poussez doucement la carte mémoire jusqu’à ce
que vous entendiez un déclic puis laissez le ress ort libérer
pour pousser la carte vers l’extérieur.
Orientez le support
comme indiqué
3. Installation

37
Étape 3 : Alimentez la caméra et formatez la carte
mémoire
Alimentez la caméra en connectant le chargeur à l’allume-cigare
du véhicule et à la caméra. Pour garantir que la V3 Basic
enregistre correctement et sans erreur sur votre carte
mémoire, avant de commencer à utiliser une nouvelle
carte mémoire, vous devez formater la carte dans la
caméra à l’aide de la fonction de formatage. Sauvegardez
toujours les données importantes stockées sur la carte
mémoire avant de formater.

38
Pour formater la carte mémoire, assurez-vous d’avoir inséré
votre carte mémoire, puis allumez l’appareil en connectant
à une source d’alimentation. Appuyez sur OK pour
arrêter l’enregistrement. Appuyez ensuite deux fois sur le
bouton MENU pour accéder au menu de con iguration du
système.
Utilisez les boutons de navigation HAUT et BAS et accédez au
paramétrage Format. Appuyez sur le bouton OK pour conrmer
la sélection.
Maintenant vous pouvez vous déconnecter de l’alimentation.
La caméra s’éteindra après 3 secondes. La caméra devrait
commencer à enregistrer automatiquement la prochaine fois
qu’elle sera allumée.
Appuyez sur le bouton
OK pour conrmer le
formatage de la carte.
Appuyez deux
fois sur le bouton
MENU

39
Étape 4: Installez la caméra sur le pare-brise
Placez la caméra sur le support et passez soigneusement
le câble d’alimentation autour du pare-brise et glissez-le
sous la garniture.
Branchez le câble du chargeur du véhicule sur une prise de
courant 12 Vcc ou sur l’allume-cigare du véhicule.
Connectez le chargeur du véhicule à la caméra. La
caméra démarrera automatiquement l’enregistrement une
fois qu’elle est allumée.
Connectez le câble
d’alimentation à la caméra
de tableau de bord
Branchez le mini
connecteur USB à la caméra
de tableau de bord
Branchez le chargeur dans
une prise de courant ou un
allume-cigare

40
Alimentation pour appareil
L’appareil s’allume automatiquement lorsqu’il est branché à une
prise accessoire 12V ou à un allume-cigare lorsqu’il est mis sous
tension (c’est-à-dire: le véhicule est démarré).
Pour allumer l’appareil manuellement, maintenez enfoncé le bouton
d’alimentation jusqu’à ce que l’écran d’accueil apparaisse.
La caméra démarre automatiquement l’enregistrement lorsqu’elle
est allumée.
Menu Réglage
Allumez la caméra. Si la caméra enregistre, appuyez sur le bouton
OK pour arrêter l’enregistrement.
Maintenez le bouton MENU enfoncé et passez au mode
souhaité. Appuyez une fois sur le bouton MENU pour accéder
au menu de réglage pour un mode. Appuyez deux fois sur le
bouton MENU pour accéder au Réglage du système (Con iguration).
4. Opération basique
Appuyez et maintenez le bouton d’alimentation pour allumer
l’appareil manuellement

41
Enregistrement vidéo
La caméra démarre automatiquement l’enregistrement lorsque
l’appareil est mis sous tension. Le voyant LED et le point rouge
clignotent en rouge lors de l’enregistrement. Appuyez sur le bouton
OK pour arrêter l’enregistrement.
Lecture des vidéos enregistrées
La lecture des vidéos enregistrées peut être eectuée sur l’appareil
ou un ordinateur.
Pour lire une vidéo sur l’appareil, passez en mode Lecture des vidéos
enregistrées. Utilisez les boutons de navigation HAUT et BAS pour
sélectionner la vidéo souhaitée. Appuyez sur le bouton OK
pour jouer.
Pendant la lecture, utilisez les boutons OK (pause), navigation
HAUT (recul rapide) et navigation BAS (avance rapide) pour
contrôler la lecture vidéo.

42
Pour lire une vidéo à l’aide d’un câble USB, connectez le câble
USB à l’appareil et à l’ordinateur. Après avoir allumé l’appareil,
appuyez sur le bouton OK pour sélectionner Stockage de
masse.
Sur l’ordinateur, accédez au drive de périphérique. Les vidéos
sont stockées dans : \CARDV\MOVIE. Les vidéos verrouillées
sont stockées dans : \CARDV\MOVIE\RO.
Sélectionnez la vidéo à lire.
Pour lire une vidéo sur l’ordinateur, utilisez un adaptateur de
carte SD ou connectez l’appareil à l’ordinateur directement à
l’aide d’un câble USB.
Pour lire une vidéo à l’aide d’un
adaptateur de carte SD, retirez la
carte mémoire et insérez-la dans
un adaptateur de carte SD. Placez
l’adaptateur dans l’ordinateur. Placez
ensuite l’adaptateur dans l’ordinateur.
Connectez le
connecteur USB à
l’ordinateur Sélectionnez le Stockage de masse

43
Connexion Wi-Fi
Téléchargez l’application « Rexing Connect » depuis App Store/
Google Play Store.
1. Pour accéder ou quitter la fonction Wi-Fi, maintenez
enfoncé le bouton de navigation HAUT.
2. Ouvrez le réglage Wi-Fi sur votre téléphone, recherchez « SSID
» dans la liste, appuyez sur la touche pour vous connecter. (Mot
de passe par défaut : 12345678)
3. Ouvrez l’application Rexing Connect, appuyez sur « Connect »
pour accéder à la page de ux vidéo en temps réel.
4. Une fois connecté, l’écran de la caméra de tableau de bord
passera à la vue de la caméra et aichera le message « Wi-Fi
connecté ». En utilisant l’application Rexing Connect, vous
pouvez acher un aperçu en direct de l’écran de la caméra de
tableau de bord, démarrer/arrêter l’enregistrement, et visualiser
et enregistrer vos captures avec votre appareil mobile.
Pour plus d’informations sur la fonction de connexion Wi-Fi,
veuillez visiter www.rexingusa.com/wi-connect/.
1.
2.
3.

44
Enregistreur GPS (doit être acheté séparément)
Lorsqu’il est connecté à la caméra, il enregistre la vitesse et
l’emplacement de votre véhicule pendant que vous conduisez.
Vous pouvez ensuite accéder à ces informations pendant la
lecture de vos enregistrements à l’aide du lecteur vidéo GPS
(pour Windows et Mac, disponible sur rexingusa.com).
La caméra de tableau de bord recherchera automatiquement
le signal GPS une fois connectée à la source
d’alimentation. Appuyez une fois sur le bouton MENU pour
passer au Réglage du système. Passez au réglage GPS et
sélectionnez votre unité de vitesse préférée.
Après avoir trouvé un signal GPS, l’icône de l’écran passera de «
non connecté » à « actif » selon les icônes ci-dessous.
Signal GPS – Non connecté
Signal GPS – Actif
Signal GPS – Recherche

45
Photographie
Pour prendre une photo, arrêtez l’enregistrement vidéo et
passez en mode photo.
Appuyez sur le bouton OK pour prendre une photo.
Pour acher une ph oto, ar rêtez l’ enregistrement vi déo et
passez en mode Lecture.
Appuyez sur les boutons de navigation HAUT et BAS pour
parcourir vos photos.
Pour supprimer une photo, arrêtez l’enregistrement vidéo et
passez en mode Lecture et parcourez entre les vidéos et les
photos pour celle que vous souhaitez supprimer.
Appuyez une fois sur le MENU et passez à l’option Supprimer.
Appuyez sur le bouton OK et sélectionnez Supprimer actuel ou
Supprimer tout.

46
Facebook Instagram Site
1. Panoramica
Grazie per aver scelto REXING! Speriamo che ami il tuo nuovo
prodotto tanto quanto noi. Se hai bisogno di assistenza o hai
suggerimenti per migliorarlo, ti preghiamo di contattarci. Puoi
contattarci tramite [email protected]. Il nostro team di
supporto ti risponderà il prima possibile.
Sempre una sorpresa in Rexing. Scoprici qui.
https://www.facebook.com/rexingusa/
https://www.instagram.com/rexingdashcam/
https://www.rexingusa.com/support/registration/

47
1. Panoramica 2. Cosa c’è nella Scatola
1. V3 Basic Guida di Avvio Rapido
2. Guida alla Sicurezza
3. Cavo USB
4. Supporto Adesivo 3M
5. Distanziatore Adesivo per Cavi
6. Strumento di Gestione dei Cavi
7. Rexing V3 Basic Telecamera da Cruscotto
8. Connettore di Alimentazione per Auto (12 Piedi)
8.
1.
3.
2.
4.
5.
6.
7.

48
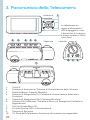
3. Panoramica della Telecamera
1. 4 Luci IR
2. Pulsante di Accensione / Pulsante di Commutazione dello Schermo
3. Pulsante Menu / Pulsante Modalità
4. Pulsante di Navigazione Su / Pulsante di Commutazione Anteriore e
Posteriore
5. Pulsante di Navigazione Giù / Pulsante Microfono
6. Pulsante OK (Conferma) / Pulsante di Blocco di Emergenza / Pulsante di
Registrazione
7. Slot Per Scheda Micro SD
8. Porta di Ricarica USB / di Alimentazione
9. Pulsante di Ripristino
10. 10. Porta della Telecamera Posteriore (al momento non supportata)
Superiore
7.
2. 4. 5.3. 6.
Inferiore
Laterale
9.10. 8.
Anteriore 1.
La telecamera sta
registrando quando il
LED lampeggia in rosso.
Il dispositivo è in carica o
è acceso quando il LED è
rosso sso.

49
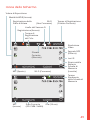
Icone dello Schermo
Registrazione (Accesa)
Livello del Sensore G
Wi-Fi
(Non Connesso)
Wi-Fi (Connesso)
Ora (24 ore)MIC
(acceso)
MIC (Spento)
Data Corrente
(GG / MM / AAAA)
Tempo di
Registrazione
del Ciclo
Risoluzione
Video
Segnale GPS
(Ricerca)
Luci IR
Ricarica della
Batteria
Scheda di
Memoria
(Inserita)
Tempo
Rimanente
della Scheda di
Memoria
Tempo di Registrazione
(Filmato Corrente)
Filmato
Corrente
(Bloccato)
Registrazione dello
Stato di Attesa
Modalità WDR (Accesa)
Valore di Esposizione

50
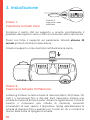
Passo 1:
Installare la Dash Cam
Posiziona il nastro 3M sul supporto e orienta correttamente il
quadrato del supporto verso il tetto e la linea del cofano del veicolo.
Premi con forza il supporto sul parabrezza. Attendi almeno 20
minuti prima di montare la telecamera.
Orienta il supporto come mostrato nell’illustrazione sopra.
Passo 2:
Inserire la Scheda di Memoria
La Rexing V3 Basic accetta schede di memoria Micro SD [Classe 10/
UHS-1 o successive] fino a 256 GB. Sarà necessario inserire una
scheda di memoria prima di poter iniziare la registrazione. Prima di
inserire o rimuovere una scheda di memoria, assicurati
innanzitutto di aver spento il dispositivo. Spingi delicatamente la
scheda di memoria fino a quando non ti senti un clic e consenti al
rilascio della molla di spingere la scheda.
Orienta il
supporto come
mostrato
3. Installazione

51
Passo 3: Alimentare la Telecamera e Formattare la
Scheda di Memoria
Alimenta la telecamera connettendo il caricabatterie
all’accendisigari e alla telecamera dell’auto. Per garantire che
la V3 Basic registri sulla tua scheda di memoria
correttamente e senza errori. Prima di iniziare a usare
una nuova scheda di memoria, devi formattare la
scheda all’interno della telecamera usando la funzione
di formattazione. Esegui sempre il backup dei dati
importanti memorizzati sulla scheda di memoria prima della
formattazione.

52
Per formattare la scheda di memoria, assicurati di aver
inserito la tua scheda di memoria, quindi accendi il dispositivo
connettendolo a una fonte di alimentazione. Premi OK
per interrompere la registrazione. Quindi premi due volte il
pulsante MENU per accedere al Menu di Con igurazione del
Sistema.
Usa i pulsanti di navigazione SU e GIÙ e andare all’Impostazione
del Formato. Premi il pulsante OK per confermare la selezione.
Ora puoi disconnetterti dall’alimentazione. La telecamera si
spegnerà dopo 3 secondi. La telecamera dovrebbe iniziare a
registrare automaticamente la prossima volta che viene accesa.
Premi il
pulsante OK per
confermare la
formattazione
della scheda
Premi due volte il
pulsante Menu

53
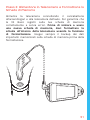
Passo 4: Installazione della Telecamera sul
Parabrezza
Posiziona la telecamera sul supporto e instrada attentamente il cavo
di alimentazione attorno al parabrezza e inlalo sotto il rivestimento.
Collega il cavo del caricabatterie per auto a una presa di corrente da
12 V CC o all’accendisigari dell’auto.
Connetti il caricabatterie per auto alla telecamera. La telecamera
avvierà automaticamente la registrazione una volta accesa.
Connetti il cavo di
alimentazione alla
dash cam
Connetti il Mini
Connettore USB alla
dash cam
Inserisci il
caricabatterie nella
presa di corrente o
nell’accendisigari

54
Accensione del Dispositivo
Il dispositivo si accenderà automaticamente quando collegato a una
presa per accessori da 12 V o all’accendisigari quando riceve una
ricarica (ovvero: il veicolo viene avviato).
Per accendere manualmente il dispositivo, premi e tieni premuto
il pulsante di Accensione no a quando appare la schermata di
benvenuto.
La telecamera inizierà automaticamente a registrare quando è
accesa.
4. Operazioni di Base
Tieni premuto il pulsante di Accensione per accendere manualmente il
dispositivo
Impostazioni del Menu
Accendi la telecamera. Se la telecamera sta registrando, premi il
pulsante OK per interrompere la registrazione.
Tieni premuto il pulsante MENU e passa alla modalità desiderata.
Premi una volta il pulsante MENU per accedere al menu delle
impostazioni per una Modalità. Premi due volte il pulsante MENU
per accedere alle Impostazioni di Sistema (Congurazione).

55
Registrazione Video
La telecamera avvierà automaticamente la registrazione quando
il dispositivo riceve una ricarica. Le luci LED e il punto rosso
lampeggeranno il dispositivo rosso durante la registrazione. Premi
il pulsante OK per interrompere la registrazione.
Riproduzione Video
La riproduzione di video può essere eseguita sul dispositivo o su un
computer.
Per riprodurre un video sul dispositivo, passa alla modalità di
Riproduzione. Usa i pulsanti di navigazione SU e GIÙ per passare al
video desiderato. Premi il pulsante OK per riprodurre.
Durante la riproduzione, usa i pulsanti OK (pausa),
Navigazione SU (riavvolgimento) e Navigazione
GIÙ (avanzamento rapido) per controllare la riproduzione del
video.

56
Per riprodurre un video usando il cavo USB, connetti il Cavo USB
al dispositivo e al computer. Dopo che il dispositivo è acceso,
premi il pulsante OK per selezionare Memoria di Massa.
Sul computer, passa al driver del dispositivo. I video sono
memorizzati in: \CARDV\MOVIE. I video bloccati sono
memorizzati in: \ CARDV \ MOVIE \ RO.
Seleziona il video da riprodurre.
Per riprodurre un video sul computer, usa un adattatore per
scheda SD o connetti il dispositivo al computer direttamente
tramite il cavo USB.
Per riprodurre un video usando un
adattatore per scheda SD, rimuovi la
scheda di memoria e inseriscila in un
adattatore per scheda SD. Posiziona
l’adattatore nel computer. Quindi
posiziona l’adattatore nel computer.
Connetti il
connettore USB al
computer Seleziona Memoria di Massa

57
Connessione Wi-Fi
Scarica l’app “Rexing Connect” dall’App Store/Google Play Store.
1. Per accedere o uscire dalla funzione Wi-Fi, tieni premuto il
pulsante di navigazione SU.
2. Apri le impostazioni Wi-Fi sul tuo telefono, trova “SSID”
dall’elenco, tocca per connetterti. (Password predenita:
12345678)
3. Apri l’app Rexing Connect, tocca “Connect” per accedere alla
pagina di streaming video in tempo reale.
4. Una volta connesso, lo schermo della dash cam passerà alla
vista della telecamera e visualizzerà il messaggio “Wi-Fi Connect”.
Usando l’app Rexing Connect, puoi vedere un’anteprima dal
vivo dello schermo della dash cam, avviare / interrompere la
registrazione, nonché vedere e salvare le tue acquisizioni con il
tuo dispositivo mobile.
Per ulteriori istruzioni sulla funzione di Connessione Wi-Fi, si
prega di visitare www.rexingusa.com/wi-connect/.
1.
2.
3.

58
Logger GPS (deve essere acquistato
separatamente)
Quando è connesso alla telecamera, registrerà la velocità e la
posizione del tuo veicolo mentre guidi.
Puoi quindi accedere a queste informazioni durante
la riproduzione delle tue registrazioni usando il lettore Video
GPS (Per Windows e Mac, disponibile su rexingusa.com).
La dash cam cercherà automaticamente il segnale GPS una
volta che è connessa alla fonte di alimentazione. Premi
una volta il pulsante MENU e vai su Impostazioni di Sistema.
Cambia l’impostazione GPS e seleziona la tua unità di velocità
preferita.
Dopo che un segnale GPS viene trovato, l’icona dello schermo
passerà da non connesso a attivo - come nelle icone sottostanti.
Segnale GPS - Non connesso
Segnale GPS - Attivo
Segnale GPS - Ricerca

59
Scattare Foto
Per scattare una foto, interrompi la registrazione video e passa
alla Modalità di Foto.
Premi il pulsante OK per scattare una foto.
Per visualizzare una foto, interrompi la registrazione video e
passa alla Modalità di Riproduzione.
Premi i pulsanti di navigazione SU e GIÙ per passare da una foto
all’altra.
Per eliminare una foto, interrompi la registrazione video e passa
alla Modalità di Riproduzione e alterna i video e le foto a quello
che desideri eliminare.
Premi una volta il MENU e seleziona l’opzione Elimina.
Premi il pulsante OK e seleziona Elimina Corrente o
Elimina Tutto.

60
Facebook Instagram Site
1. Visión General
¡Gracias por elegir REXING! Esperamos que usted ame su
nuevo producto tanto como nosotros la amamos. Si usted
necesita ayuda o tiene alguna sugerencia para mejorarla,
contáctenos. Puede comunicarse con nosotros a través de
[email protected]. Nuestro equipo de soporte le
responderá lo antes posible.
Siempre es una sorpresa en Rexing. Visítenos aquí.
https://www.facebook.com/rexingusa/
https://www.instagram.com/rexingdashcam/
https://www.rexingusa.com/support/registration/

61
1. Visión General 2. ¿Qué hay en la Caja
1. V3 Basic Guía de inicio rápido
2. Guía de seguridad
3. Cable USB
4. Montaje adhesivo 3M
5. Espaciador de cable adhesivo
6. Herramienta de gestión de cables
7. Rexing V3 Basic cámara de salpicadero
8. Conectador de alimentación para automóvil (12 pies)
8.
1.
3.
2.
4.
5.
6.
7.

62
3. Descripción de la Cámara
1. 4 luces IR
2. Botón de encendido / botón de alternar pantalla
3. Botón de menú / Botón de modo
4. Botón de navegación hacia arriba / Botón de interruptor delantero y trasero
5. Botón de navegación hacia abajo / Botón de micrófono
6. Botón OK (Conrmar) / Botón de bloqueo de emergencia / Botón de
grabación
7. Ranura para tarjeta micro SD
8. Alimentación / puerto de carga USB
9. Botón de reinicio
10. Puerto de cámara trasera (actualmente no es compatible)
Arriba
7.
2. 4. 5.3. 6.
Abajo
Lado
9.10. 8.
Frente 1.
La cámara está grabando
cuando el LED parpadea
en rojo. El dispositivo
se está cargando o
encendido cuando el LED
está en rojo jo.

63
Iconos de Pantalla
Grabación (activado)
Nivel de Sensor G
Wi
(No Conectado)
Wi (Conectado)
Hora (24h)MIC
(Activado)
MIC (apagado)
Fecha Actual
(DD / MM / AAAA)
Tiempo de grabación
en bucle
Resolución de
video
Señal de GPS
(buscando)
Luces IR
Cargando
batería
Tarjeta de
memoria
(insertada)
Tarjeta de
memoria
Tiempo
Restante
Tiempo de grabación
(clip actual)
Actual clip
(Bloqueado)
Grabación del estado
de espera
Modo AMPLIO RANGO DINÁMICO (activado)
Valor de exposición

64
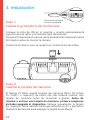
Paso 1:
Instale la grabadora de conducción
Coloque la cinta de 3M en el soporte y oriente adecuadamente
soporte hacia el techo y la línea del capó del vehículo.
Presione rmemente el soporte sobre el parabrisas. Espere al menos
20 minutos antes de montar la cámara.
Oriente la montura como se muestra en la ilustración de arriba.
Paso 2:
Inserte la tarjeta de memoria
El Rexing V3 Basic acepta tarjetas de memoria Micro SD [Clase
10 / UHS-1 o superior] de hasta 256 GB. Deberá insertar una
tarjeta de memoria antes de comenzar a grabar. Antes de
insertar o extraer una tarjeta de memoria, primero asegúrese
de haber apagado el dispositivo. Empuje suavemente la tarjeta
de memoria hacia adentro hasta que escuche un clic y permita la
liberación del resorte para empujar la tarjeta hacia afuera.
Oriente la montura
como se muestra
3. Instalación

65
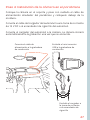
Paso 3: encienda la cámara y formatee la tarjeta
de memoria
Encienda la cámara a través de conectar el cargador al
encendedor de cigarrillos del automóvil y la cámara. Para
garantizar que el V3 Basic grabe correctamente en su
tarjeta de memoria y sin errores. Antes de comenzar a usar
una nueva tarjeta de memoria, debe formatear la tarjeta
dentro de la cámara utilizando la función de formateo.
Siempre haga una copia de seguridad de los datos
importantes almacenados en la tarjeta de memoria antes de
formatear.

66
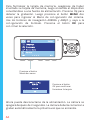
Para formatear la tarjeta de memoria, asegúrese de haber
insertado su tarjeta de memoria, luego encienda el dispositivo
conectándose a una fuente de alimentación. Presione Ok para
detener la grabación. Luego presione el botón MENÚ dos
veces para ingresar al Menú de con iguración del sistema.
Use los botones de navegación ARRIBA y ABAJO y vaya a la
con iguración de Formato. Presione el botón OK para
con irmar la selección.
Ahora puede desconectarse de la alimentación. La cámara se
apagará después de 3 segundos. La cámara debería comenzar a
grabar automáticamente la próxima vez que se encienda.
Presione el botón
OK para conrmar
formatear la tarjeta
Presione el botón
Menú dos veces

67
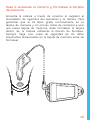
Paso 4: Instalación de la cámara en el parabrisas
Coloque la cámara en el soporte y pase con cuidado el cable de
alimentación alrededor del parabrisas y colóquelo debajo de la
moldura.
Conecte el cable del cargador del automóvil a una toma de corriente
de 12 V DC o al encendedor de cigarrillo del automóvil.
Conecte el cargador del automóvil a la cámara. La cámara iniciará
automáticamente la grabación una vez que se encienda.
Conecte el cable de
alimentación a la grabadora
de conducción
Enchufe el mini conector
USB a la grabadora de
conducción
Enchufe el cargador a
la toma de corriente
o al encendedor de
cigarrillo

68
Energía del dispositivo
El dispositivo se encenderá automáticamente cuando se enchufa a
una toma de accesorios de 12 V o encendedor de cigarrillo cuando
recibe una carga (es decir: el vehículo se arranca).
Para encender el dispositivo manualmente, mantenga presionado el
botón de Encendido hasta que aparezca la pantalla de bienvenida.
La cámara comenzará a grabar automáticamente cuando se
encienda.
Configuraciones del menú
Encienda la cámara. Si la cámara está grabando, presione el botón
OK para detener la grabación.
Mantenga presionado el botón MENÚ y cambie al modo deseado.
Presione el botón MENÚ una vez para ingresar al menú
de con iguración de un Modo. Presione el botón MENÚ dos veces
para ingresar a la Con iguración del sistema (Con iguración).
4. Operación Básica
Mantenga presionado el botón de Encendido para
encender el dispositivo manualmente

69
Grabación de vídeo
La cámara comenzará a grabar automáticamente cuando el
dispositivo reciba una carga. Las luces LED y el punto
rojo parpadearán en el dispositivo rojo al grabar. Presione el
botón OK para detener la grabación.
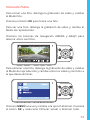
Reproducción de vídeo
La reproducción de videos se puede hacer en el dispositivo o una
computadora.
Para reproducir un video en el dispositivo, cambie al modo
Reproducción.
Use los botones de navegación ARRIBA y ABAJO para alternar al
video deseado. Presione el botón OK para reproducir.
Durante la reproducción, use los botones OK
(pausa), navegación ARRIBA (rebobinar) y navegación
ABAJO (avanzar rápido) para controlar la reproducción de
video.

70
Para reproducir un video con un cable USB, conecte el
cable USB al dispositivo y a la computadora. Después de
encender el dispositivo, presione el botón OK para seleccionar
Almacenamiento masivo.
En la computadora, navegue al controlador del dispositivo.
Los videos se almacenan en: \ CARDV \ MOVIE. Los videos
bloqueados se almacenan en: \ CARD \ MOVIE \ RO.
Seleccione el video para reproducir.
Para reproducir un video en la computadora, use un adaptador
de tarjeta SD o conecte el dispositivo a la computadora
directamente usando el cable USB.
Para reproducir un video usando
un adaptador de tarjeta SD, retire
la tarjeta de memoria e insértela en
un adaptador de tarjeta SD. Coloque
el adaptador en la computadora.
Luego, coloque el adaptador en la
computadora.
Conecte el
conector USB a la
computadora Almacenamiento Masivo
Cámara de la computadora

71
Conexión wifi
Descargue la aplicación “Rexing Connect” de App Store / Google
Play Store.
1.Para acceder o salir de la función WiFi, mantenga presionado
el botón de navegación ARRIBA.
2. Abra la conguración de Wi-Fi en su teléfono, busque “SSID”
en la lista, toque para conectarse. (Contraseña predeterminada:
12345678)
3. Abra la aplicación Rexing Connect, toque “Conectar” para
ingresar a la página de transmisión de video en tiempo real.
4.Una vez conectada, la pantalla de la grabadora de conducción
cambiará a la vista de la cámara y mostrará el mensaje “WiFi
conectado”.
Conecte la aplicación, se puede ver una vista previa en vivo
de la pantalla de la grabadora de conducción, iniciar / detener
la grabación, así como ver y guardar sus capturas con su
dispositivo móvil.
Para obtener más instrucciones sobre la función de conexión
Wi-Fi, por favor visite www.rexingusa.com/wi-connect/.
1.
2.
3.

72
Registrador de GPS (necesita ser comprado por
separado)
Cuando se conecta a la cámara, registrará la velocidad y la
ubicación de su vehículo mientras conduce.
Luego se puede acceder a esta información mientras
reproduce sus grabaciones utilizando el reproductor de video
GPS (para Windows y Mac, disponible en rexingusa.com).
La grabadora de conducción buscará automáticamente la señal
GPS una vez que esté conectada a la fuente de alimentación.
Presione el botón MENÚ una vez y vaya a Configuración del
sistema. Cambie la configuración GPS y seleccione su unidad
de velocidad favorita.
Después de encontrar una señal de GPS, el ícono de la
pantalla pasará de no conectado a activo, según los íconos
a continuación.
Señal GPS: no conectada
Señal GPS activa
Búsqueda de señal GPS

73
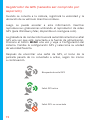
Tomando fotos
Para tomar una foto, detenga la grabación de video y cambie
al Modo foto.
Presione el botón OK para tomar una foto
Para ver una foto, detenga la grabación de video y cambie al
Modo de reproducción.
Presione los botones de navegación ARRIBA y ABAJO para
alternar entre sus fotos.
Para eliminar una foto, detenga la grabación de video y cambie
al Modo de reproducción y cambie entre los videos y las fotos a
la que desea eliminar.
Presione MENÚ una vez y cambie a la opción Eliminar. Presione
el botón OK y seleccione Eliminar actual o Eliminar todo.

74
Facebook Instagram Site
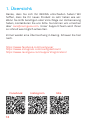
1. Übersicht
Danke, dass Sie sich für REXING entschieden haben! Wir
hoen, dass Sie Ihr neues Produkt so sehr lieben wie wir.
Wenn Sie Hilfe benötigen oder Vorschläge zur Verbesserung
haben, kontaktieren Sie uns bitte. Sie können uns erreichen
über [email protected]. Unser Support-Team wird Ihnen
so schnell wie möglich antworten.
Immer wieder eine Überraschung in Rexing. Schauen Sie hier
nach.
https://www.facebook.com/rexingusa/
https://www.instagram.com/rexingdashcam/
https://www.rexingusa.com/support/registration/

75
1. Übersicht 2. Schachtelinhalt
1. V3 Basic Schnellstartanleitung
2. Sicherheitshinweise
3. USB-Kabel
4. 3M Klebebefestigung
5. Kabel-Abstandhalter
6. Werkzeug zur Kabelverwaltung
7. Rexing V3 Basic Dashboard-Kamera
8. Auto-Stromanschluss (12 Fuß)
8.
1.
3.
2.
4.
5.
6.
7.

76
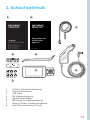
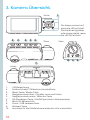
3. Kamera Übersicht
1. 4 IR-Beleuchtung
2. Ein/Aus-Schalter / Bildschirm-Umschalttaste
3. Menü-Taste / Modus-Taste
4. Navigationstaste oben / Schalter vorne und hinten
5. Navigationstaste unten / Mikrofon-Taste
6. OK (Bestätigen) Taste / Notfall-Sperrtaste / Aufnahmetaste
7. Micro SD-Kartenschlitz
8. Strom / USB-Ladeanschluss
9. Rücksetz-Taste
10. Anschluss für die Rückfahrkamera (derzeit nicht unterstützt)
Oben
7.
2. 4. 5.3. 6.
Unten
Seite
9.10. 8.
Vorne 1.
Die Kamera nimmt auf,
wenn die LED rot blinkt.
Das Gerät wird geladen
oder eingeschaltet, wenn
die LED rot leuchtet.

77
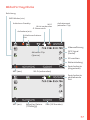
Bildschirmsymbole
Aufnahme (ein)
G Sensorstufe
Wi-Fi
(Nicht verbunden
Wi-Fi (verbunden)
Zeit (24 Stunden)MIC (ein)
MIC (aus)
Aktuelles Datum
(TT/MM/JJJJ)
Schleifenaufnahme-
Zeit
Videoauösung
GPS Signal
(Suche)
IR Leuchten
Batterieladung
Speicherkarte
(eingesteckt)
Speicherkarte
verbleibende
Zeit
Aufnahmezeit
(aktueller Clip)
Aktueller Clip
(Sperre)
Aufnahme Standby
WDR Modus (ein)
Belichtung

78
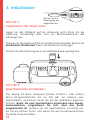
Schritt 1:
Installation der Dash-Cam
Legen Sie das 3M-Band auf die Halterung und richten Sie die
Halterung rechtwinklig dazu und zur Motorhaubenlinie des
Fahrzeugs aus.
Drücken Sie die Halterung fest an die Windschutzscheibe. Warten Sie
mindestens 20 Minuten, bevor Sie die Kamera anbringen.
Richten Sie die Halterung wie in der Abbildung oben gezeigt aus.
Schritt 2:
Speicherkarte einstecken
Der Rexing V3 Basic akzeptiert [Klasse 10/UHS-1 oder höher]
Micro SD-Speicherkarten bis zu 256 GB. Sie müssen eine
Speicherkarte einstecken, bevor Sie mit der Aufnahme beginnen
können. Bevor Sie eine Speicherkarte einstecken oder wieder
herausnehmen, vergewissern Sie sich, dass das Gerät
ausgeschaltet ist. Stecken Sie die Speicherkarte vorsichtig ein,
bis Sie ein Klicken hören, und lassen Sie den Druckmechanismus
die Karte herausschieben.
Richten Sie die
Befestigung wie
abgebildet aus
3. Installation

79
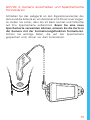
Schritt 3: Kamera einschalten und Speicherkarte
formatieren
Schließen Sie das Ladegerät an den Zigarettenanzünder des
Autos und die Kamera an, um die Kamera mit Strom zu versorgen.
So stellen Sie sicher, dass die V3 Basic korrekt und fehlerfrei
auf Ihre Speicherkarte aufzeichnet. Bevor Sie eine neue
Speicherkarte verwenden können, müssen Sie die Karte in
der Kamera mit der Formatierungsfunktion formatieren.
Sichern Sie wichtige Daten, die auf der Speicherkarte
gespeichert sind, immer vor dem Formatieren.

80
Um die Speicherkarte zu formatieren, vergewissern Sie sich,
dass Sie Ihre Speicherkarte eingesteckt haben, und schalten
Sie dann das Gerät ein, indem Sie es an eine Stromquelle
anschließen. Drücken Sie OK, um die Aufnahme zu
beenden. Drücken Sie dann zweimal die MENÜ-Taste, um
das System-Setup-Menü aufzurufen.
Benutzen Sie die Navigationstasten AUF und AB und gehen Sie
zur Einstellung der Formatierung. Drücken Sie die OK-Taste,
um die Auswahl zu bestätigen.
Sie können nun die Verbindung zur Stromversorgung trennen.
Die Kamera schaltet sich nach 3 Sekunden aus. Die Kamera
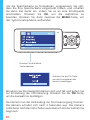
sollte beim nächsten Einschalten automatisch mit der Aufnahme
beginnen.
Drücken Sie die OK-Taste,
um das Formatieren der
Karte zu bestätigen
Drücken Sie die Menü-
Taste zweimal

81
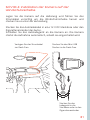
Schritt 4: Installation der Kamera auf der
Windschutzscheibe
Legen Sie die Kamera auf die Halterung und führen Sie das
Stromkabel vorsichtig um die Windschutzscheibe herum und
stecken Sie es unter die Verkleidung.
Stecken Sie das Autoladekabel in eine 12 V DC-Steckdose oder den
Zigarettenanzünder des Autos.
Schließen Sie das Autoladegerät an die Kamera an. Die Kamera
startet die Aufnahme automatisch, sobald sie eingeschaltet wird.
Verlegen Sie das Stromkabel
zur Dash-Cam
Stecken Sie den Mini USB
Stecker in die Dash-Cam
Stecken Sie das
Ladegerät in die
Steckdose oder in den
Zigarettenanzünder

82
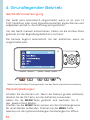
Gerät-Stromversorgung
Das Gerät wird automatisch eingeschaltet, wenn es an eine 12
V-DC Steckdose oder einen Zigarettenanzünder angeschlossen und
aufgeladen wird (d.h.: das Fahrzeug wird gestartet).
Um das Gerät manuell einzuschalten, halten Sie die Ein/Aus-Taste
gedrückt, bis der Begrüßungsbildschirm erscheint.
Die Kamera beginnt automatisch mit der Aufnahme, wenn sie
eingeschaltet wird.
4. Grundlegender Betrieb
Halten Sie die Ein/Aus-Taste gedrückt, um das Gerät manuell einzuschalten.
Menüeinstellungen
Schalten Sie die Kamera ein. Wenn die Kamera gerade aufnimmt,
drücken Sie die OK-Taste, um die Aufnahme zu beenden.
Halten Sie die MENÜ-Taste gedrückt und wechseln Sie in
den gewünschten Modus.
Drücken Sie die MENÜ-Taste einmal, um das Einstellungsmenü
für einen Modus aufzurufen. Drücken Sie die MENU-Taste
zweimal, um die Systemeinstellungen (Einstellungen) zu önen.

83
Videoaufnahme
Die Kamera beginnt automatisch mit der Aufnahme, wenn das Gerät
aufgeladen wird. Der rote Punkt blinkt während der Aufnahme
rot. Tippen Sie auf die OK-Taste, um die Aufnahme zu beenden.
Videowiedergabe
Die Wiedergabe von Videos kann auf dem Gerät oder einem
Computer erfolgen.
Um ein Video auf dem Gerät wiederzugeben, wechseln Sie in den
Wiedergabemodus. Verwenden Sie die Navigationstasten AUF
und AB, um zum gewünschten Video umzuschalten. Drücken
Sie zur Wiedergabe die OK-Taste.
Verwenden Sie während der Wiedergabe die Tasten OK
(Pause), UP-Navigation (Rücklauf) und DOWN-Navigation
(schneller Vorlauf), um die Videowiedergabe zu steuern.

84
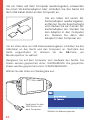
Um ein Video über ein USB-Kabel wiederzugeben, schließen Sie das
USB-Kabel an das Gerät und den Computer an. Nachdem das
Gerät eingeschaltet ist, drücken Sie die OK-Taste, um
Massenspeicher zu wählen.
Navigieren Sie auf dem Computer zum Laufwerk des Geräts. Die
Videos werden gespeichert unter: \CARDV\MOVIE. Die gesperrten
Videos werden gespeichert unter: \CARDV\MOVIE\RO.
Wählen Sie das Video zur Wiedergabe aus.
Um ein Video auf dem Computer wiederzugeben, verwenden
Sie einen SD-Kartenadapter oder schließen Sie das Gerät mit
dem USB-Kabel direkt an den Computer an.
Um ein Video mit einem SD-
Kartenadapter wiederzugeben,
entfernen Sie die Speicherkarte
und stecken Sie sie in einen SD-
Kartenadapter ein. Stecken Sie
den Adapter in den Computer
ein. Stecken Sie dann den
Adapter in den Computer ein.
Verbinden Sie den
USB Stecker mit
dem Computer Wählen Sie Massenspeicher

85
Wi-Fi Verbindung
Laden Sie die „Rexing Connect“-App aus dem App Store/Google
Play Store herunter.
1. Um auf die WiFi-Funktion zuzugreifen oder sie zu beenden,
halten Sie die Navigationstaste UP gedrückt.
2. Önen Sie die Wi-Fi-Einstellungen auf Ihrem Telefon, suchen
Sie „SSID” aus der Liste und tippen Sie auf , um eine Verbindung
herzustellen. (Standardkennwort: 12345678)
3. Önen Sie die Rexing Connect-App, tippen Sie auf „Verbinden“,
um die Seite für das Echtzeit-Videostreaming aufzurufen.
4. Sobald die Verbindung hergestellt ist, wechselt der Bildschirm
der Dash-Cam in die Kameraansicht und zeigt die Meldung „Wi-
Fi verbunden“ an. Mit der Rexing Connect App können Sie sich
eine Live-Vorschau des Dash-Cam-Bildschirms ansehen, die
Aufnahme starten / stoppen sowie Ihre Aufnahmen mit Ihrem
mobilen Gerät ansehen und speichern.
Für weitere Anweisungen bezüglich der Wi-Fi-Connect-Funktion
besuchen Sie bitte www.rexingusa.com/wi-connect/.
1.
2.
3.

86
GPS Logger (muss separat erworben werden)
Wenn die Kamera angeschlossen ist, zeichnet sie während der
Fahrt die Geschwindigkeit und den Standort Ihres Fahrzeugs
auf.
Sie können dann auf diese Informationen zugreifen, während
Sie Ihre Aufzeichnungen mit dem GPS-Videoplayer wiedergeben
(für Windows und Mac, verfügbar unter rexingusa.com).
Die Dash-Cam sucht automatisch nach dem GPS-Signal, sobald
sie an die Stromquelle angeschlossen ist. Drücken Sie die
MENÜ-Taste einmal und gehen Sie zu den
Systemeinstellungen. Schalten Sie die GPS-Einstellung um
und wählen Sie Ihre bevorzugte Geschwindigkeitseinheit
aus.
Nachdem ein GPS-Signal gefunden wurde, wechselt das
Bildschirmsymbol von „nicht verbunden“ zu „aktiv“ - wie in den
folgenden Symbolen dargestellt.
GPS Signal – Nicht verbunden
GPS Signal - Aktiv
GPS Signal - Suche

87
Fotos aufnehmen
Um ein Foto aufzunehmen, stoppen Sie die Videoaufnahme und
wechseln Sie in den Fotomodus.
Drücken Sie die OK-Taste, um ein Foto zu machen.
Um ein Foto anzusehen, stoppen Sie die Videoaufnahme und
wechseln Sie in den Wiedergabemodus.
Drücken Sie die Navigationstasten AUF und AB, um durch
Ihre Fotos zu blättern.
Um ein Foto zu löschen, stoppen Sie die Videoaufnahme und
wechseln Sie in den Wiedergabemodus und schalten Sie durch
die Videos und Fotos zu demjenigen, das Sie löschen möchten.
Drücken Sie einmal auf das MENÜ und wechseln Sie auf
die Option Löschen.
Drücken Sie die OK-Taste und wählen Sie „Aktuelle löschen”
oder „Alle löschen“.

88
FCC ID: 2AW5W-V3BASIC
This device complies with part 15 of the FCC Rules. Operation is subject to the following
two conditions: (1) This device may not cause harmful interference, and (2) this device must
accept any interference received, including interference that may cause undesired operation.
Changes or modifications not expressly approved by the party responsible for compliance
could void the user's authority to operate the equipment.
-
 1
1
-
 2
2
-
 3
3
-
 4
4
-
 5
5
-
 6
6
-
 7
7
-
 8
8
-
 9
9
-
 10
10
-
 11
11
-
 12
12
-
 13
13
-
 14
14
-
 15
15
-
 16
16
-
 17
17
-
 18
18
-
 19
19
-
 20
20
-
 21
21
-
 22
22
-
 23
23
-
 24
24
-
 25
25
-
 26
26
-
 27
27
-
 28
28
-
 29
29
-
 30
30
-
 31
31
-
 32
32
-
 33
33
-
 34
34
-
 35
35
-
 36
36
-
 37
37
-
 38
38
-
 39
39
-
 40
40
-
 41
41
-
 42
42
-
 43
43
-
 44
44
-
 45
45
-
 46
46
-
 47
47
-
 48
48
-
 49
49
-
 50
50
-
 51
51
-
 52
52
-
 53
53
-
 54
54
-
 55
55
-
 56
56
-
 57
57
-
 58
58
-
 59
59
-
 60
60
-
 61
61
-
 62
62
-
 63
63
-
 64
64
-
 65
65
-
 66
66
-
 67
67
-
 68
68
-
 69
69
-
 70
70
-
 71
71
-
 72
72
-
 73
73
-
 74
74
-
 75
75
-
 76
76
-
 77
77
-
 78
78
-
 79
79
-
 80
80
-
 81
81
-
 82
82
-
 83
83
-
 84
84
-
 85
85
-
 86
86
-
 87
87
-
 88
88


REXING 6430225 Guía de inicio rápido
- Categoría
- Grabadoras de disco
- Tipo
- Guía de inicio rápido
En otros idiomas
- français: REXING 6430225 Guide de démarrage rapide
- italiano: REXING 6430225 Guida Rapida
- Deutsch: REXING 6430225 Schnellstartanleitung
- 日本語: REXING 6430225 クイックスタートガイド
Documentos relacionados
-
REXING V3 Guía del usuario
-
REXING S1 Guía del usuario
-
-
REXING V1 Guía del usuario
-
REXING V1 Max Guía del usuario
-
REXING V5 Guía del usuario
-
REXING V5C Guía de inicio rápido
-
REXING M1 1296P Mirror Front and Rear Dash Cam Guía de inicio rápido
-
-