Samsung LN-T1953H Owner's Instructions Manual
- Categoría
- Televisores LCD
- Tipo
- Owner's Instructions Manual
Este manual también es adecuado para

Contact SAMSUNG WORLD-WIDE
If you have any questions or comments relating to Samsung products, please contact the SAMSUNG
customer care center.
Contacte con SAMSUNG WORLD-WIDE
Si tiene alguna pregunta o comentado referente a nuestros productos, por favor contacte con nuestro Servicio de
AtencJ6n al Ctiente.
Country Customer Care Center_ Web Site Address
Samsung Electronics Canada Inc., Customer
Service 55 Standish Court Mississauga,
Ontario L5R 4B2 Canada
CANADA 1-800-SAMSUNG (7267864) www.samsung.com/ca
Samsung Etectronique Canada Inc.,
Service a la Clientele 55 Standish Court
Mississauga, Ontario L5R 4B2 Canada
Samsung Electronics America, Inc.
U.S.A 1-800-SAMSUNG (7267864) www.samsung.com 105 Challenger Road
Ridgefield Park, NJ 07660-0511
..... Owner's
Instructions
Register your product at www.samsung.com/global/register
Record your Modeland Serial number here for future reference.
BN68-01184A-00 • Model •Serial No.

P[ecautions When Displaying a Still lmage
A stilt image may cause permanent damage to the TV Screen
* Do not display a stit image onthe LCD panel for more than 2 hours as it can cause screen image retention.
]-his image retention is also knOWnas !!screenburn'!.
To avoid such image retention, reduce the degree of brightness and contrast of the screen when displaying a still image.
Watching the LCD]-V in 413format for a Iong period of time may leave traces or borders displayed on the
left right and cen!er of the screen caused by thedifference of light emission on the screen.
Playing a DVD or a game console may Cause a simi!ar effect to the Screen_
Damages Caused by the above effect are not covered by the Warranty.
. Displaying still images from 'Video games and PC for longer than a certain period of time may p[0duce partial after4mages.
To prevent this effect, reduce the 'brightness' and 'contrast' when displaying stiII images.
Precauciones al mostrar en la pantalla una imagen fija
Calmagen fija puede causar da_os Dermanen[es en la Dan[aliaGel[eievlsor
• No deje una magen fija en tapan[alia LCD auran[e mas de dos noras ya que se podria proauc_runa re[ericsonde ta imogen en
la oamalla. Este fen6meno de retencidn de magenes [amDten se denomma 'auemadura de Dan[aila
Pars evlTarque se proouzca esa oersisTenclaae ia tmagen, reauzca eI nivei de tuminosidad y ae contraste de la uanTatla
cuando muestre imageries fijas
El uso del televisor LCD en formato 4:3 durante un [lempo proIongado puede dejar rast'-os de bordes en ins
Dartestzaulerda, derecha y central de 18pantaHadebido alas diferenoias en taemisidn tuminica de la oamaHa.
La reDroducoidn de un DVD o el uso aeuna consola ae waeojuegos pueaen provocar un efecto similar en ta
oantalla. ReDroauc_run DVD o una Jeoconsois pueae causar un efecto similar en ia pantatla. La garantia no
cubre estos da_os
•Ver tmagenes fijas de videojuegos y PC durante mas tlemoo del indlcado pueae produclr res[os ae imageries parciales
Para evitar este efecto reduzca ei 'brilio' yet 'contraste' cuando vea imageries fijas
© 2007 Samsung Electronics Co., Ltd. All rights reserved.

Contents
m L(S][of Features ............................................................. 2 m Selecting theAntenna .................................................... 28
Accessories .................................................................. 2 m Clearing Scrambled Channels - Digital...... 28
m viewing [heControl Pane) ............................................... 3 m Setting the Channel Lists..................................... 29
m Viewing the Connection Pane '1 • To set-up Your Favorite Shanneis .................................. 30
m Remote Control ...................................................... 5 m Using the Channel Lists......................................... 31
m (nstalhngBatteries in the Remote Control ........................ 6 • Viewing the Channel Lists....... 31
m Labeling Channels ........................................................ 32
m LNA_Low NoiseAmplifier) .................................. 32
B FineTuningAnatog Channels ..... 33
Connecting VHF and UHPAntennas .......................... _ m Checking the Digital-Signal Strength 33
m Connecting Cable TV .................................................... 7
m Connecting a VCR............................................................ 8
m Connecting a DVD Player/Set-Top Box ............................ a
m Connecting a DVD Player/Set-Top Box via HDM( ............ 9 m using Your TV as a Computer tPC_ Display 34
m Connecting a DVD Player/Set-Top Boxvia DVi ........... !0 m Display Modes.................................................. 34
m Connecting a Dig [alAudio System ................................ 10 • Setting up theTV with your PC ...................................... 35
m Connecting a PC ........................................................... ""
m Setting the Clock ............................................................ 37
m Turn ng the TV On and Off ...... 12
m Plug & Play Feature...................................................... 12
m Chang ng 3hannes .................................................... 13
m Adjusting [ne Vo(ume............ 1,_
m Viewing me Disp)ay !,_
m viewing [ne Menus .............................. 15
Memorizing the Channels .............................................. 15
To Se)ect the Source .............................................. !7
m To Edi[ [ne input Source Name.................. !7
m using Automatic F cture Set[ings ........ 8
m Adjus[ing [ne Color Tone ............................................... !9
Selecting a Menu Language .................................... 40
Using the Game Mode.............................. 40
B MenuTransparency Level ....... 40
Viewing S,Iosed Captions On-Screen Text Messages)
- Ana)og .......................................................................... 41
Viewing Closed Captions On-Screen Text Messages)
- D(g[aJ........................................................................... 42
m Setting the Function He c ............................................. 43
Setting the Light Effec[ ............................................... 43
m Using the V-Chip............................................................. 44
R Digital Noise Reduction ............... 51
m Setting me Film Mode..................................................... 19 m Upgadlng me Software ............................................... 51
m Freezin) the Picture (depending ontne mode ............. 19
m Changing the Screen Size ............................................ 2C
m viewing Picture-in-Picture ............................................ 21
HDM( Black Level .......................................................... 22 m Appendix ...................................................... 52
m Troub(eshootlng .......... 52
m InstaiIing [ne Stand ....................................... 54
B Disconnecting [ne Stans ................ 54
m Customizing the Sound ....................................... 23 • How toAdjust the Stand ................... 55
m UsingAutomatic Sound Settings ................................... 23 • using the Decoration Covers.......................................... 55
m Setting the TruSurround XT ............................................ 24 m Installing VESA cornF lain mounung oewces.................. 55
m Choosing a Multi-Channel Sound MTS/track - Digital. 24 B ms[a (lngthe Wall Mount Kit ......................................... 55
m Choosing a Multi-Channel Sound MTS' track - Analog 25 m How toAdjust the Angle of the TV ............................... 55
m Automatic Volume Control ............................................ 25 m Using theAnti-Theft Kensingtor LOCK..................... 56
m SeIec[ing [ne Internal Mute ............................................ 2_ m Specifications ....................................... 56
m Listening to the Sound of the Sub PiP Picture............. 2_
Resetting the Sound Settings to the Factory Defaults.... 27
Connecting Headphones ............................................. 27
Setting the On/Off Meoey .. 27
m
Symbol Press Imoortant Note One-Touch
Button

List of Features
* Adjustable picture settings that can be stored in the TV% memory.
Automatic timer to turn the TV on and off.
* A special sleep timer.
* V-Chip function.
Excellent Digital Interface & Networking :
With a built-in HD digital tuner, non-subscription HD broadcasts can be viewed with no Set-Top Box needed.
Remote Control
The supplied remote can be used to operate the TV as well as most DVD players, Set-top boxes, Cable Boxes and
VCRs.
SRS TruSurround XT
- SRS TruSurround XT provides a virtual Dolby surround system.
Accessories
Please make sure the following items are included with your LCD TV.
If any items are missing, contact your dealer.
RemoteControl&Batteries(AAAx 2) PowerCord Wall Mount kit
(LN-T1953H:BN59-00601A) (3903-000085) (BN96-04960A)
LN-T1954H:BN59-00608A
Owner's Instructions
Decoration Cover
Warranty Card / Registration LN-T1953H-Left:BN63-03216A, Cleaning Cloth
Card / Safety Guide Manual Right: BN63-03217A
(Not available in all locations) LN-T1954H-Left:BN63-03216B, (BNB3-01798A)
Right:BN63-O3217B
>The items color and shape may vary depending on the model.

Viewing the Control Panel
Buttons on the Lower Part of the Panel
The buttons on the side panel control your TV's basic features, including the on-screen menu.
To use the more advanced features_ you must use the remote control.
Front Panel buttons
Touch the right side of
each button to operate.
The product color and shape may vary depending onthe model.
O SOURCE _ O
Toggles between all the available input sources
(TV, AV, S-Video, Component, PC, HDMt).
In the on-screen menu, use this button as you would
use the ENTER button on the remote control.
@ MENU O
Press to see an on-screen menu of your TV's features.
0 + VOL -
Press to increase or decrease the volume.
In the on-screen menu, use the + VOL - buttons as you
would use the _1and _ buttons on the remote control.
^CHv
Press to change channels.
In the on-screen menu, use the ^ CN v buttons as
you would use the A and V butons on the remote
control.
(POWER}
Press to turn the TV on and off.
POWER INDICATOR
Blinks and turns off when the power is on and lights up
in stand-by mode.
O REMOTE CONTROL SENSOR
Aim the remote control towards this spot on the TV.
O SPEAKERS

Viewing the Connection Panel
Rear Panel Jacks
Use the rear panel jacks to connect A/V components that will be connected continuously, such as VCR or DVD players.
For more informationon connecting equipment, see pages 7-11.
na
@ Q
SERVICE I
® ® .............,
AUDIO _ {AIR) (CAB£E)
@
O AV iN O
Video and audio inputs for external devices, such as a
camcorder or VCR.
S-VIDEO O
Connect an S-Video signal from a camcorder or VCR.
DIGITAL AUDIO OUT (OPTICAL)
Connects to a Digital Audio component. Q
O SERVICE / EX-LINK
Connector for service only. Q
O HDMI/DVl IN / DVl IN (AUDIO R/L}
Connect to the HDMt jack of a device with an HDMt @
output. Use the HDMI/DVl tN terminal for DVt connection
to an external device. You should use the DVt to HDMI
cable or DVFHDMI adapter (DVl to HDMI) for video
connection, and the DVI IN 'R-AUDIO-L' terminal for
audio.
HDMI/DVI IN terminat does not support PC.
No sound connection is needed for an HDMI to HDMI
connection
e _ HEADPHONE
Connects a set of external headphones for private
listening.
ANT 1 IN/ANT 2 IN
Connects to an antenna or cable TV system.
PC IN
Connects to the video and audio output jacks on
your PC.
COMPONENT IN
Connects Component video/audio.
POWER INPUT
Connects the supplied power cord.
KENSINGTON LOCK
The Kensington lock (not supplied) is a device used to
physically fix the system when used in a public place.
If you want to use a locking device, contact the dealer
where you purchased the TV.
>-The place of the Kensington Lock may be different
depending on its model.

Remote Control
You can use the remote control up to a distance of about 23 feet from the TV. When using the remote, always point it directly at the
TV.
O POWER _ SOURCE
Turns the TV on and off. Press to display all of the available
video sources.
NUMERIC BUTTONS
Press to change the channel. _ PRE-CH
Tunes to the previous channel.
Press to select additional channels(digital _ FAV.CH
and analog) being broadcast by the same Press to switch to your favorite channels.
station. For example, to select channel
"54-3", press "54", then press "-" and "3". _ SLEEP
Press to select a preset time interval
CH LIST
Used to display Channel Lists on the
screen.
ANTENNA
Press to select "A{R" or "CABLE".
VOLC)/VOL(_
Press to increase or decrease the
volume.
_(MUTE)
Press to temporarily cut off the sound.
_]D MENU
Displays the main on-screen menu.
S.MODE
Press to select the sound mode.
RETURN
Returns to the previous menu.
RMODE
Press to select the picture mode.
I_ SRS
Selects SRS TruSurround XT mode.
_) MTS
Press to choose stereo, mono or
Separate Audio Program
(SAP broadcast).
AUTO PROG.
Press to automatically store selected
TV/Cable channels.
ADD/DEL
Use to store and delete channels
to/from memory.
for automatic ahut off.
@ cH®/CH®
Press to change channels.
_) EXIT
Press to exit the menu.
UPA ! DOWNT / LEFT*_ /
RIGNT_- / ENTER _'
Use to select on-screen menu items
and change menu values.
_) INFO
Press to display information on the TV
screen.
CAPTION
Controls the caption decoder.
_) STILL
Press to stop the action during a
particular scene.
Press again to resume normal video.
RSlZE
Picture size selection.
PiP
Picturedn Picture ON/OFF.
@ cH
Displays the available channels in
sequence. (These buttons change
channels in the PIP window only.)
@) POSITION
Change the position of the PIP screen.
>_This is a special remote control for the visually impaired, and has Braille
points on the Power, Channel and Volume buttons.
O.v--
POWER SOLIRC5
@@@
@@@
£®$
i_ENU EXIt
_@

Installing Batteries in the Remote Control
1. Lift the cover at the back of the remote control upward as shown in the figure.
.4.
2. Install two AAA size batteries. _-7"'.,,,_,_
> Make sure to match the "+" and "-" ends of the batteries with the diagram inside the compartment.
3. Replace the cover.
> Removethe batteriesandstore them in a cool,dry placeif you won't be usingthe remotecontrolfor a /4
longtime.
The remote control can be used up to about 23 feet from the TV.
............!Assur!!rig !ypica! TV usage !he bat!e[!es shc_u!!!as! !°! abC_l)!t Yea[i)......................................................................................................................
> if the remote control doesn't work, check the following:
1. Is the TV power on? _ \
2. Are the plus and minus ends of the batteries reversed?
3. Are the batteries drained?
4. Is there a power outage, or is the power cord unplugged?
5. Is there a special fluorescent light or neon sign nearby?
i
i
i
Connecting VHF and UHF Antennas
If your antenna has a set of leads that look like the diagram to the righL see "Antennas with 300
O FlatTwin Leads" below.
If your antenna has one lead that looks like diagram to the righL see "Antennas with 75 O Round
Leads".
If you have two antennas, see "Separate VHF and UHF Antennas".
Antennas with 300 _3Flat Twin Leads
If you are using an off-air antenna (such as a roof antenna or "rabbit ears") that has 300 O twin flat leads, follow the directions
below.
1. Place the wires from the twin leads under the screws on a 300-75 O adapter
(not supplied).
Use a screwdriver to tighten the screws.
2. Plug the adaptor into the ANT 2 IN (CABLE) terminal on the back of the TV.
Antennas with 75 _ Round Leads
1. Plug the antenna lead into the ANT 1 IN (AIR) terminal on the back of the TV.
Separate VHF and UHF Antennas
If you have two separate antennas for your TV (oneVHF and one UHF), you must combine thetwo antenna signals before con-
necting the antennas to the TV. This procedure requires an optional combiner-adaptor (available at most electronics shops).
1. Connect both antenna leads to the combiner.
2. Plug the combiner into the ANT 1 IN (AIR) terminal on the bottom of the rear panel.

Connecting Cable TV
To connect to a cable TV system, follow the instructionsbelow.
Cable without a Cable Box
1. Plug the incoming cable into the ANT 2 IN (CABLE) terminal on the back of the TV.
BecausethisTViscable-ready,youdonotneedacableboxtoviewunscrambledcablechannels.
Connecting totoa Cable Box that Descrambles All Channels
1. Findthe cable that is connected to the ANT OUT terminal on your cable box.
_'_Thisterminalmightbelabeled"ANTOUT","VHFOUT"orsimply,"OUT".
2. Connecttheother endofthis cabletothe ANT 2 IN(CABLE)terminalonthe backoftheTV.
Connectinqto a Cable Box that Descrambles Some Channels
Ifyour cable box descrambles only some channels (such aspremium channels)_follow the instructions below. Youwill need atwo-
way splitter, an RF (A/B) switch, and four lengths of RF cable. (These items are available at most electronics stores.)
Findand disconnect the cable that is
connected to the ANT INterminal on your
cable box.
::_ Thisterminalmightbelabeled"ANTIN",
"VHFIN"or simply,'qN".
2. Connect this cable to a two-way splitter.
Connect an RF cable between the OUTPUT
terminal on the splitter and the IN terminal
on the cable box.
Incoming
cable
Splitter
incoming
cable
Splitter
J
Cable Box
4, Connect an RF cable between the
ANT OUT terminal on the cable box and
the B-IN terminal on the RF(A/B) switch.
Incoming
cable
Splitter
Switch
Connect another cable between the other
OUT terminal on the splitter and the A-IN
terminal on the RF (A/B) switch.
_bl. SZer RF_B_
Cable BOX Switch
Connect the last RF cable between the
OUT terminal on the RF (A/B) switch and
the ANT IN terminal on the rear of the TV.
cable Splitter L _ RF(A/I v B)
Cable Box Switch
After you have madethis connection,set theA/B switchto the "A" positionfor normalviewing. SettheA/B switchto the "B"positionto
view scrambled channels.(Whenyou set the A/B switchto "B",you will need to tune your TV to thecable box'soutput channel,which is
usuallychannel 3or 4.)

Connecting a VCR
Video Connecion
These instructions assume that you have already connected your TV to an antenna or a cable TV system (according to the
instructions on pages 6-7). Skip step 1 if you have not yet connected to an antenna or a cable system.
1. Unplug the cable or antenna
from the back of the TV.
2. Connect the cableor antenna
to the ANT IN terminalonthe
backofthe VCR.
Connect an RF Cable between
theANT OUT terminalonthe
VCR andtheANT 1 tN(AIR) or
ANT 2 IN (CABLE)terminalon
the TV.
Connect a VideoCable
betweenthe VIDEO OUTjack
on the VCRandthe AV IN 1 (or
AV IN 2) [VIDEO]jack on the
TV.
Connect Audio Cables
between theAUDIO OUT
jacks on the VCR and the
AV IN 1 (orAV IN 2)
[R-AUDIO-L] jacks on the TV.
If you have a "mono"
(non-stereo) VCR, use a
Y-connector (not supplied)
to hook up to the right
and left audio input jacks
of the TV. If your VCR
is stereo, you must
connect two cables.
TV Rear Panel
VCR Rear Panel _ _ .......
iS;Audio Cable Not supplied
_1 141 Video Cable Not supplied
RF Cab e (Not supped)
Follow the instructions in "Viewing a VCR or Camcorder Tape" to view your VCR tape.
> Each VCR has a different back panel configuration.
> When connecting a VCR_match the color of the connection terminal to the cable.
S-Video Connecion
Your Samsung TV can be connected to an S-Video signal from an VCR.
(This connection delivers a better picture as compared to a standard VCR)
1. To begin, follow steps 1-3
in the previous section to
connect the antenna or
cable to your VCR and
your TV.
2. Connect an S-Video Cable
between the S-VtDEO OUT
jack on the VCR and the
AV tN1 [S-VIDEO] jack on
the TV.
Connect Audio Cables
between the AUDIO OUT
jacks on the VCR and the
AV tN1 [R-AUDIO-L] jacks
on the TV.
VCR Rear Panel
TV Rear Panel
Audio Cable (Not supplied)
2 S-Video Cable (Not supplied)
1} RF Cable (Not supplied}
AnS-Videocablemay beincludedwith a VCR.(If not,checkyour localelectronicsstore.)
>_Each VCR has a different back panel configuration.
When connecting a VCR, match the color of the connection terminal to the cable.

Connecting a DVD PlayedSet-Top Box
The rear panel jacks on your TV make it easy to connect a DVD player to your TV.
1. Connect a Component
CaNe between the
COMPONENT IN(1 or 2)
[Y,PB,PR]jacks on the TV
and the COMPONENT DVDPlayer/Set=TopBox
[Y_PB,PR] jacks on the
DVD/Set-top Box.
2. Connect Audio Cables
between the COMPONENT _
IN(1 or 2) (R-AUDIO-L]
jacks on the TV and the
AUDIO OUT jacks on the
DVD/Set-top Box
TV Rear Panel
>-Component video separates the video into Y (Luminance (brightness)), Pb (Blue) and
Pr (Red) for enhanced video quality.
Besure to match the component video and audio connections.
For example, if connecting the video cable to COMPONENT IN, connect the audio cable
to COMPONENT IN also.
:_ Each DVD Player/STB has a different back panel configuration.
>-When connecting a DVD player/STB_ match the color of the connection terminal to the
cable.
Connecting a DVD PlayedSet-Top Box via HDMI
This connection can only be made if there is an HDMI Output connector on the external device.
Connect an HDMI Cable
between the HDMI/DVI IN
connector on the TV and the
HDMI connector on the DVD
player/Set-Top Box
DVD Player Rear Panel
HDMI Cable
TV Rear Panel
(Not suppli!ed) i __
What is HDMI?
, HDMl(High-Definition Multimedia Interface), is a next-generation an interface that
enables the transmission of digital audio and video signals using a single cable.
The difference between HDMI and DVl is that the HDMI device is smaller in size,
has the HDCP (High Bandwidth Digital Copy Protection) coding feature installed.
>_ Each DVD player/STB has a different back panel configuration.

Connecting a DVD Player/Set-Top Box via DVl
This connection can only be made if there is a DVI Output connector on the external device.
1. Connect a DVI to HDMI
Cable or DVI-HDMI Adapter
between the HDMI/DVI IN
connector on the TV and the
DVI connector on the
DVD player/Set-Top Box.
2. Connect Audio Cables
between the DVI IN
[R-AUDIO-L] jack on the
TV and the AUDIO OUT jacks
on the DVD player/
Set-Top Box.
DVD Player / Set-Top Box
TV Rear Panel
!i! DVI to HDMI Cable (Not supplied)
>_ Each DVD ptayer/STB has a different back panel configuration.
>- When connecting a DVD player/STB, match the color of the connection terminal to
the cable.
_'- When using an HDMI/DVI cable connection, you must use the HDMI/DVI IN terminal.
Connecting a Digital Audio System
The rear panel jacks on your TV make it easy to connect a DigitalAudio System to your TV.
Connect an Optical Cable
between the "DIGITAL
AUDIO OUT (OPTICAL)"
jacks on the TV and the
Digital Audio Input jacks on
the Digital Audio System.
When a Digital Audio
System is connected to the
'DIGITAL AUDIO OUT
(OPTICAL)" terminal:
Decrease the volume
of the TV, and adjust the
volume level with the
system's volume control.
Digital Audio System
TV Rear Panel
>- 5.1CH audio is possiblewhen the TV is connected to an external device supporting 5.1CH.
> Each Digital Audio System has a different back panel configuration..

Connecting a PC
1. Connect a D-Sub
Cable between PC IN
[PC] connector on
the TV and the PC
output connector on
your computer.
2. Connect a PCAudio
Cable between PC IN
[AUDIO] jack on the
TV and the Audio Out
jack of the sound card
on your computer.
TV Rear Panel
>- Each PC has a different back panel configuration.
>- When connecting a PC, match the color of the connection terminal to the cable.

Turning the TV On and Off
Press the POWERO button on the remote control.
You can also use the d) button on the side of the panel.
Plug & Play Feature
When the TV is initially powered on_basic settings proceed automatically and subsequently:
Press the POWER button on the remote control.
The message "Menu language_Shop Mode_Channels and Timewilt be set." is
displayed.
Press the ENTER button, then "Select the language of the OSD" menu is
automatically displayed.
2. Press the A or _' buttons to select language, then press the ENTER button.
The message "Select Home Mode when installing this TV at home.' is displayed.
3. Press the _ or I,. buttons to select "Shop" or "Home"_then press the
ENTER button.
The message "Select the antennas to memorize." is displayed.
>'-We recommend setting the TV to Home mode for the best picture in your
home environment.
:_ Shop mode is only intended for use in retail environments.
If the unit is accidentally set to Shop mode and you want to return to Dynamic
(Home) mode, press any Volume button and then hold down the MENU button
for five seconds on the side panel of the TV.
4. Press the _, or T buttons to memorize the channels of the selected connection.
Press the ENTER button to select "Start'.
If the antenna is connected to ANT I(AIR)_ select "Air' and if it is connected to
ANT 2 (CABLE), select "Cable".
>'-If both ANT 1 (AIR) and ANT 2 (CABLE) are connected, select the 'Air + Cable'.
In Cable mode, you can select the correct signal source among STD, HRC,
and IRC by pressing the A. or V' button, then press the ENTER button.
Contact your local cable company to identify the type of cable system that
exists in your particular area.
5. The TV will begin memorizing all of the available channels.
After all the available channels are stored, theAuto program menu reappears.
Press the ENTER button when channel memorization is complete.
The message 'Select the clock mode." is displayed.
>To stop the search before it has finished, press the ENTER button with stop
selected.
Press the ENTER button.
Press the A or T buttons to select 'Manual" or 'Auto", then Press the
ENTER button.
The message "Set to daylight savings time." is displayed.

7. Pressthe_,or_'buttonstoselect"On"or"Off",thenPresstheENTERbutton.
Themessage'Selectthetimezonewhereyouarelocated."isdisplayed.
Presstheh,or_rbuttonstohighlightthetimezoneforyourlocalarea.
PresstheENTERbutton.Ifyouhavereceivedadigitalsignal,thetimewillbeset
automatically.
IfnoLseepage38tosettheclock.
9. Themessage"Enjoyyourwatching."isdisplayed.
Whenyouhavefinished,presstheENTERbutton.
If you want to reset this feature...
1. Press the MENU button to display the menu.
Press the A or T buttons to select "Setup", then press the ENTER button.
2. Press the ENTER button again, to select "Plug & Play".
3. The message "Menu language, Shop Mode, Channels and Time will be set."
is displayed.
Changing Channels
_the Channel Buttons
Press the CHG or CH® button to change channels.
When you press the CH_ or CH® button, the TV changes channels in
sequence.
You will see all the channels that the TV has memorized. (The TV must have
memorized at least three channels). You wilt not see channels that were either
erased or not memorized. See page 15 to memorize channels.
_the PRE-CH Button to select the Previous Channel
The TV will switch to the last channel viewed.
>_To quickly switch between two channels that are far apart, tune to one ("-__'_
channel, then use the number button to select the second channel. Then
use the PRE-CH button to quickly alternate between them. A,re_ CHLI$'I ,,OH SLEEP

Adjusting the Volume
1. Press the VOL ® or VOL® buttons to decrease or increase the volurne.
MUTE@_
!1
I II °°f_,P-_,_v,_,F-_'_ °
Usinq Mute
At any time, you can cut offthe sound using the MUTE button.
1. Press MUTE button and the sound cuts off.
The word "_" will appear in the Iower-leff corner of the screen.
2. To turn mute off, press the MUTE button again_or simply press the
VOL® orVOL® buttons.
Viewing the Display
The display identifies the current channel and the status of certain audio-video settings.
1. Press the INFO button on the remote control.
The TV wilt display the channel, the type of sound_
and the status of certain picture and sound settings.
[_] Press the INFO button once more or wait approximately 10 seconds and the
display disappears automatically.
RETURN INFO CAPTION
RIIX)DE

Viewing the Menus
1. With the power on, press the MENU button.
The main menu appears on the screen. The menu' s left side has five icons:
Picture, Sound, Channel, Setup, Input.
2. Use the A or 'V buttons to select one of the five icons.
Then press the ENTER button to access the icon's sub-menu.
3. Press the EXIT button to exit.
!t_jThe on-screen menus disappear from the screen after about one minute.
\.J \j
MEnU EXrf
Memorizing the Channels
Your TV can memorize and store altof the available channels for both "off-air" (Air) and "Cable" channels. After the available
channels are memorized, use the CH(_ or CHQ buttons to scan through the channels. This eliminates the need to change
channels by entering the channels digits. There are three steps for memorizing channels: selecting a broadcast source, memoriz-
ing the channels (automatic) and adding or deleting channels (Channel Lists).
Selectino the Video Siqnal-source
Before your television can begin memorizing the available channels, you must specify the type of signal source that is connected to
the TV (i.e. anAir or a Cable system).
1. Press the MENU button to display the menu.
Press the & or _r buttons to select "Channel", then press the
ENTER button.
2. Press the ENTER button select"Antenna'.
Press the _, or _r buttons to select "Air" or "Cable", then press the ENTER button.
Press the EXIT button to exit.

Storinc_Channels in Memorv_Automatic Method]
1. Press the MENU button to display the menu.
Press the A or V buttons to select "Channel', then press the ENTER button,
2. Pressthe A or _r buttons to select "Auto Program", then press the ENTER button,
Press the A or T buttons to select the antenna connection, then press the
ENTER button.
:_ Air: "Air" antenna signal. / Cable: "Cable' antenna signal. /
Air+Cable: 'Air" and 'Cable" antenna signals.
When selecting the Cable TV system: Press the ENTER button to start the auto
program. By default, the cable TV system is set to "STD'. If you want to select
another type of cable system, press the A or T button to select "STD', "HRC" or
"IRC'.
STD, HRC and IRC identify various types of cable TV systems. Contact your
local cable company to identify the type of cable system that exists inyour
particular area. At this point the signat source has been selected.
Press the ENTER button to start the auto program.
_'-To stop the search before it has finishe& press the ENTER button with stop
selected.
5. After all the available channels are store& the "Auto Program" menu reappears.
Press the EXIT buttonto exit.

To Select the Source
Use to select TV or other external input sources connected to the TV.
Use to select the input source of your choice.
1. Press the MENU buttonto display the menu.
Press theA or T buttons to select "lnput"_then press the ENTER button.
2. Press the ENTER button to select "Source List".
Pressthe A or _r buttons to select signal source, then press the ENTER button.
:_ When you connect equipment to the LCD, you can choose between the
following sets ofjacks: TV, AV_S-Video_Component, PC_HDMI on the TV's rear
panel.
HDMI input can only beselected when the external device is turned on and
connected via HDMI.
You can choose only those external devices that are connected to the TV.
Its)Press the SOURCE button on the remote control to view an external signal source. II _:_ER SOU(,.._ I_ 1
H tHI
To Edit the input Source Name
Name the device connected to the input jacks to make your input source selection easier.
Press the MENU button to display the menu.
Press theA or 'V buttons to select "lnput', then press the ENTER button.
Press the A or T buttons to select "Edit Name", then press the ENTER
button.
2. Press the A or T buttons to select "AV", "S-Video", "Component"_"PC"_"HDMI"
input jack_then press the ENTER button.
Press the & or T buttons to select "VCR", "DVD"_"D-VHS", "Cable STB"_
"HD STB", "Satellite STB", "PVR STB"_"AV Receiver", "DVD Receiver",
"Game", "Camcorder", "DVD Combo", "DVD HDD Recoder", "PC",
"lnternet TV Recv."_"lnteractive TV Recv/',"VOD STB"_"TV" input source, then
press the ENTER button.
Press the EXIT button to exit.

Using Automatic Picture Settings
Your TV has Three automatic picture settings ("Dynamic"_ "Standard", "Movie") that are preset at the factory.
You can activate either Dynamic, Standard_ Movie by making a selection from the menu.
1. Press the MENU button to display the menu.
Press the ENTER button, to select "Picture".
Press the ENTER button to select "Mode".
Press the A or V buttons to select the "Dynamic", "Standard", "Movie" picture
setting. Press the ENTER button.
ChooseDynamicto increasetheclarityandsharpnessofthepicture.
'*ChooseStandardforthestandardfactorysettings.
" ChooseMoviefora naturalImagewithoutpictureenhancements.
Press the _, or • buttons to select "Contrast", "Brightness", "Sharpness",
"Color", or "Tint(G/R)", then press the ENTER button.
Press the _ or _- buttons to decrease or increase the value of a particular item.
For example_ if you select "Contrast"_pressing the _- button increases it.
Press the EXIT button to exit.
:_ • When you make changes to ContrasL Brightness, Sharpness, Color, Tint(G/R)
OSD wilt be also adjusted accordingly.
• When in PC mode, Tint, Sharpness, and Color are not available.
[_J Press the RMODE button on the remote control
repeatedly to select the desired picture mode.
I--[I
_I2._,=_MODE S,MODE _STILL uPSIZE

Adjusting the Color Tone
You can change the color of the entire screen according to your preference.
1. Press the MENU buttonto display the menu.
Press the ENTER button to select "Picture".
2. Pressthe _, or V buttons to select "Color Tone",then press the ENTER button.
3. Press the A or T buttons to select "Cool2", "CoolI"_ "Normal"_"Warml"_
or "Warm2".
Press the ENTER button.
>- When the picture mode is set to Dynamic or Standard, Warm1 and Warm2
cannot be selected. Movie mode is only available.
This function is available in PC mode.
Resetting the Picture Settings to the Factory Defaults
1. Press the A or _' buttons to select "Reset", then press the ENTER button.
Press the A orV' button to select "OK", or "Cancel', then press the ENTER button.
Press the EXIT button to exit.
>- Each mode can be reset.
Freezing the Picture
1. Press the STILL button to freeze a moving picture.
Normal sound wilt still be heard. Press again to cancel.
:_ While V-Chip is inoperation, the Still function cannot be used.
Setting the Film Mode
You can: automatically senses and processes film signals from altsources and adjusts the picture for optimum quality.
1. Press the MENU button to display the menu.
Press the A or V buttons toselect "Setup", then press the ENTER button.
2. Pressthe h, or T buttonsto select "FlimMode"_then press the ENTER button.
3. Pressthe A or _' buttonsto select "On" or "Off'_then press the ENTER button.
Press the EXIT button to exit.
>- Film mode is supported in TV,VIDEO_ S-VIDEO, and COMPONENT480i.

Changing the Screen Size
Screensize selectiondependsontile typeofvideoinput.
1. Pressthe MENU button to display the menu.
Pressthe ENTER button, to select "Picture".
2. Pressthe A or _r buttons to select "Size", then press the ENTER button.
3. Pressthe A or V buttons to select the screen format you want.
Pressthe ENTER button.
Pressthe EXIT button to exit.
• Wide :Adjusts the picture size to Wide appropriate for DVDs OrWide
broadcasting.
,16:9 : Sets the picture to 1619wide mode.
Zeoml : Magnifies the size of the picture on the Screen.
, Zoom2 : Magnifies the size of the picture more than "zo0 m1'i.
,4:3 : Sets the picture to 4:3 normal mode.
• Just Scan ;Use the function to see the full image without any cutoff
when HDMI 720p/1080i signals are input.
Alternately, you can press the P.SlZE button on the remote control repeatedly to
change the picture size.
> Ifyou watch a still image or the4:3 mode for a long time (over 2 hours), an
image may be burned onto the screen. View the TV in 16:9mode as much as possible.
> HD (High Definition)
I6:9 - 1080i (1920x1080), 720P (I280x720)
Wide
Adjus[s me picture size [o
Wide appropriate for DVDs or
wloe broadcasting
I
16:9 Zoom1
Sets the oicture to 16:9 w ae mode. -ne screen size when Wide
screen is vertlcalIy enlarged.
Zoom2 4:3 Just Scan
The screen size'¢qenthe Setsthe plc[ure io 4:3 Use the function to see the
Zoom1 screen _sverbcalI_ "_orms mode. full image w_mout an_ cut-
enlarged, off when HDMI 720o/1080i
signals are input.
• InTV, VIDEO, S-VIDEO_and all COMPONENT (480i_480p)_DTV (480i, 480p) modes_all screen modes can be selected.
(Wide • 16:9 • Zoom1 •Zoom2 • 4:3).
You can select only the Wide, 16:9 and 4:3 screen sizes in the DTV Component (720p, 1080i) or HDMI
(720p, 1080i) mode.
In PC mode, only Wide &4:3 modes can be selected.
• You must select Zoom with R Size button on the remote if you want to move the Zoom1 or 2 picture up or down.
• When watching a DTV's HD signal, you can use. Horizontal zoom sets the optical picture format by
expanding it both horizontally and vertically. For example, you can resetthe picture in 4:3 format to 16:9. Does not
support all external devices (DVD_VCR etc.).

Viewing Picture-in-Picture
This product has one built-in tuner, which does not aitow PIP to function in the same mode. Forexample, you cannot watch one TV
channel in the main screen, and adifferent one in the PIP screen. Please see PIP Settings'below for details. You can use the PIP
feature to simultaneously watch two video sources. (See page 26 to select the PIP picture sound.)
>- While V-Chip (See page 44) in operation, the PIP function cannot be used.
Activatinq Picture=in-Picture
1. Press the MENU button to display the menu.
Press the A or _' buttons toselect "Setup", then press the ENTER button.
Press the A or T buttons to select "PIP", then press the ENTER button.
Press the ENTER button again.
Press the A or _' buttons to select "On", then press the ENTER button.
:_ If you turn the TV off while watching in PIP mode and turn it on again_the PIP
window wilt disappear.
>_You can view Analog TV broadcasts on the PIP screen (sub-picture) when the
main picture is from an external device connected to PC
I Main picture ] Sub picture
[ PC j Analog TV broadcasts only
[_1 deactivateAIternatelY'theY°UpIp.Canpressthe PIPbuttonon theremotecontrolrepeatedlyto activateor _ _,_m_ _ @_
/
3. Press the A or _' buttons to select "Channe{"_then press the ENTER button.
Press the A or _' buttons to select the desired channel in the PIP window.
Press the ENTER buttons.
>_MAIN: PC
PIP: TV(Anatog)
The channel can be active when the sub picture is set to TV.
[_] Press the PIP Channel buttons on the remote control
i i!
continued..

Chancdnq the Position of the PiP Window
4. Press the A or _' buttons to select "Position", then press the ENTER button.
Press the ENTER buttons.
Press the EXiT button to exit.
HDMI Black Level
You can select the black level on the screen to adjust the screen depth.
1. Press the MENU button to display the menu.
Press the A or V buttons toselect "Setup", then press the ENTER button.
2. Pressthe & or V buttonsto select "HDMt Black Level", then
pressthe ENTER button.
3. Pressthe A or T buttonsto select "Normal" or "Low",then press the ENTER button.
:_ This function is active only when the an external device (DVD ptayer_STB etc.)
is connected to the TV via HDMI.
Press the EXIT button to exit.

Customizing the Sound
The sound settings can be adjusted to suit your personal preference. (Alternatively, you can use one of the "automatic"
settings.)
1. Press the MENU button to display the menu.
Press the A or • buttons to select "Sound", then press the ENTER button.
2. Press the A or T buttons to select "Equalizer", then press the ENTER button.
Press the 4 or D,-buttons to select a particular frequency to adjust.
Pressthe _. or T buttonsto increase or decreasethe level ofthe particularfrequency.
Press the ENTER button.
Press the EXiT button to exit.
>_• L/R Sound Balance Adjustment :
To adjust the sound balance of the L/R speakers.
• Bandwidth Adjustment (100Hz, 300Hz, 1KHz, 3KHz, 10KHz) :
: To adjust the level of different bandwidth frequencies.
Using Automatic Sound Settings
YourTV has automatic sound settings ("Standard"_"Music", "Movie"_ "Speech", and "Custom") that are preset at the factory.
Or_you can select "Custom", which automatically recalls your personalized sound settings.
1. Press the MENU button to display the menu.
Press the A or T buttons to select "Sound"_ then press the ENTER button.
Press the ENTER button to select "Mode".
Press the A or V buttons to select "Standard"_ "Music", "Movie", "Speech",
or "Custom" sound setting, then press the ENTER button.
Press the EXiT button to exit.
, Choose Standard for the standard factory settingsl
• Choose Music when watching mus!cvideos or concerts.
, Choose Movie when watching movies.
• Choose Speech when watching a show that is mostly dialog (i.e.i news).
• Choose Custom to recall your personalized settings
(see "Customizing the Sound'!).
Press the S.MODE button on the remote control repeatedly to select one of the sound
settings.
P, -" 8,MODE 8_LL P_IZE
NTS SR8 PP
I II _ r-_ r--nr--_

Setting the TruSurround XT
TruSurround XT isa patented SRS technology that solves the problem of playing 5.1 multichannel content over two speakers.
TruSurround delivers a compelling, virtual surround sound experience through any two-speaker playback system, including internal
television speakers. It is fully compatible with atl multichannet formats.
1. Press the MENU button to display the menu.
Press the A or T buttons to select "Sound", then press the ENTER button.
2. Press the A or T buttons to select "SRS TruSurround XT", then press the
ENTER button.
3. Press the A or V buttons to select "On" or "Off", then press the
ENTER button.
Press the EXIT button to exit.
TruSurrou,,dXTSRSand o Symboare so00Es, L
trademarks0fSR'sLabSiinc. _ _ _
TruSurroundXTtechnotogyisincorporated _=,_ _ _ II
under license from SRS Labs Inc. E% _ _
Choosing a Multi-Channel Sound (MTS) track - Digital
The digitaI-TV transmission system is capable of simultaneous transmission of many audio tracks(for example, simultaneous
translations of the program into foreign languages). The availability of these additional "multitracks" depends upon the program.
Preferred Lan_
2,
3.
Press the MENU button to display the menu.
Press the _, or '_ buttons to select "Sound", then press the ENTER button.
> Quick way to access the MTS menu: Just press the "MTS' button on the
remote control. You can listen in a language other than your chosen language
by pressing the MTS button.
Press the A or _' buttons to select "Multi-Track Options", then press the ENTER
button.
Pressthe ENTER buttonto select "PreferredLanguage'.
Pressthe A or T buttonsto choose the language(English,Spanish or French)you
want then press the ENTERbutton.
Pressthe EXIT button to exit.
You can listen in a language other than the favorite language by pressing the
MTS button on the remote control.

Choosing a IVlulti-Channel Sound (MTS) track -Analog
Multi=Track Sound
1. Press the MENU buttonto display the menu.
Press the _, or V buttons to select "Sound", then press the ENTER button.
2. Pressthe A or T buttonsto select "Multi-Track Options", then press the ENTER
button.
Pressthe A or _' buttonstoselect "Multi-TrackSound",thenpress the ENTERbutton.
Pressthe A or T buttonstoselect a settingyou want,then pressthe ENTER button.
PresstheEXIT buttonto exit.
• Choose Mono for channels thatare broadcasting in mono, Orif you are having
difficulty receMng a stereo signal
, Choose Stereo for channels that are broadcasting in stereo.
• Choose SAP to listen to the Separate Audio Program, which is usually a
foreign-Ianguage translation.
Press the MTS buttons on the remote control repeatedly to select "Mono',
"Stereo", or "SAP".
Automatic Volume Control
Reduces the differences in volume levet among broadcasters.
1. Press the MENU button to display the menu.
Press the _, or _r buttons to select "Sound", then press the ENTER button.
2. Pressthe A or T buttonsto select "AutoVolume"_then pressthe ENTER button.
3. Press the A. or T buttons to set Auto Volume "On" or "Off" then press the
ENTER button.
Press the EXIT button to exit.

Selecting the Internal Mute
Sound output from theTV speakers is muted.
1. Press the MENU button to display the menu.
Press the A or • buttons to select "Sound", then press the ENTER button.
2. Pressthe A or V' buttonsto select "InternalMute",then pressthe ENTERbutton.
Press the A or T buttons to select "On", then press the ENTER button.
Press the EXIT button to exit.
>* When Internal Mute is set to "On", Sound menus except Multi-track Options
cannot be adjusted.
>*The VOL®, VOL® and MUTE buttons do not operate when the Internal Mute
is set to On.
Listening to the Sound of the Sub (PIP) Picture
When the PIP feature is activated, you can listen to the sound of the sub (PIP) picture.
1. Press the MENU button to display the menu.
Press the A or T buttons to select "Sound", then press the ENTER button.
2. Pressthe A or V' buttonsto select "SoundSelect",then press the ENTERbutton.
Press the A or T buttons to select "Main" or "Sub", then press the ENTER button.
Press the EXIT button to exit.
' Main: Used to listen to the sound of the main picture_
• Sub: Used to listen to the sound of the sub picture.
>*You can setect this option when "PIP" isset to "On".

Resetting the Sound Settings to the Factory Defaults
If Game Mode is On, the Reset Sound function is activated. Selecting the Reset function resets the equalizer setting to the factory
defaults.
1. Press the MENU button to display the menu.
Press the A or • buttons to select "Sound", then press the ENTER button.
2. Pressthe A or _r buttonsto select "Reset",then press the ENTERbutton.
Pressthe EXIT button to exit.
Connecting Headphones
You can connect a set of headphones to your set if you wish towatch a TV program without disturbing tile other peopte in the room.
:_ When you insertthe head set jack into the corresponding port, you can operate
only "Multi track option' in Sound menu.
> Prolonged use of headphones at a high volume may damage your hearing.
> You will not receive sound from the speakers when you connect headphones
to the system.
> The headphone volume and TV volume are adjusted differently.
[_/ Press the VOL button on the remote cordrol repeatedly to select one of the sound
settings.
MIIT_ (_o oo
Setting the On/Off Melody
A melody sound can be set to come on when tile TV is powered On or Off.
1. Press the MENU button to display the menu.
Press the A or _' buttons to select "Setup", then press the ENTER button.
2. Press the A or _r buttons to select "Melody", then press the ENTER button.
3. Press the A or _' buttons to select "Off"_"Low"_"Medium", "High" then press the
ENTER button.
'*Low: Sets the melody volume to low.
, Medium: Sets the metody volume to medium.
',High: Sets the melody volume to high.
Press the EXIT button to exit.
DDi-_a-_] Manufactured under !ipense irom DoIbY Laboiatodes.
o _G_TAL igotby'! and the double@ symbol are trademarks of Dolby Laboratories.

Channel Control
Selecting the Antenna
1. Press the MENU button to display the menu.
Press the A or _" buttons to select "Channel"_then press the ENTER button.
Press the ENTER button to select "Antenna".
Press the A or T buttons to select "Air" or "Cable'_ then press the ENTER
button.
Press the EXIT button to exit.
_} Pressthe ANTENNAbutton onthe remotecontrol
> tf the antenna is connected to ANT 1 IN tAIR),
select "Air' and if it is connected toANT 2 tN
CABLE_.select 'Cable".
> _ DothANT 1 N tAIR_andANT 2 IN CABLB
are connected select me antenna inpu[ you want.
tf the antenna inout is not selec[ed properly, noise
may appear on me screen
AN_NNACHLIST FA_CH SLEEP
v_ P_
Clearing ScrambJed Channels =Digital
The Clear Scrambled Channel function is used to filter out scrambled channels after Auto Program is completed.
It removes the scrambled channels from the listby tuning the digital cable channels. This process may take upto 20~30 minutes.
1. Press the MENU button to display the menu.
Press the A or _" buttons to select "Channel"_then press the ENTER button.
Press the A or T button to select "Clear Scrambled Channel", then press the
ENTER button. It searches scrambled channels, which are to be removed from
the list.
> To stop searching scrambled channels;
Press the ENTER button to select Stop
Press the .,_button to select Yes, then press the ENTER button.
3. When the scrambled channel searching is completed, press the ENTER button.
Press the EXIT button to exit.

Setting the Channel Lists
You can add or delete a channel so only channels you want are displayed.
1. Press the MENU button to display the menu.
Press the _, or _' buttons to select "Channel"_then press the ENTER button.
2. Press the A or T buttons to select "Channel List", then press the ENTER
button.
3. Pressthe ENTER button to select "All'.
Pressthe A or V buttonsto select a channel to delete, then press the
ENTER button.
Pressthe A or V buttonsto select 'Deletd, then press the ENTER button to
delete the channel.
The O mark will disappear.
Press the & or _r buttons to select a channel to add_thenpress the
ENTER button.
Press the A or T buttons to select "Add", then press the ENTER buttonto
add the channel.
The O markwill appear andthe channel will be added.
Press the EXIT button to exit.
>-AIt selected channels wilt beshown on "Added menu'.
Red (P.MODE) button:Press repeatedly to setect "A!!"_'tAdded!';Or
"Favorite'!.
i Green (S.MODE) button: Press to add all channels deleted.
* Yellow (STILL) button: Press to delete all channels memorized.

To set-up Your Favorite Channels
You can set channels you watch frequently as favorites.
1. Press the MENU button to display the menu.
Press the _, or _' buttons to select "Channel"_then press the ENTER button.
2. Press the A or _r buttons to select "Channel List", then press the ENTER button
3. Pressthe A or _r buttonsto select 'Added", then press the ENTER button.
Pressthe A. or • buttonsto select your favorite channels to watch among the
labeledchannels. Then press the ENTER button.
Pressthe A or V buttonsto select "Favorite', then press the ENTER button.
The "m," symbot will be highlighted andthe channel witl beset as a Favorite.
To can'Selyour Favorite channel selection, pressthe ENTER button untilthe
symbol is no longer highlighted.
Pressthe EXIT button to exit.
> Onty memorized channels can be set as favorite channels.
All favorite channels will be shown in the "Favorite" menu.

Using the Channel Lists
Displays the channel list automatically when you press CH LIST button on the remote. (Choose All, Added, or Favorite)
1, Press the MENU button to display the menu.
Press the _, or _' buttons to select "Channel"_then press the ENTER button.
2, Press the A or _r buttons to select "Channel List", then press the ENTER button.
Pressthe A or V buttonsto select "DefaultList Mode" (the CH.List you want to
appearwhen you press CH.LIST) then press the ENTER button,
Pressthe A. or _r buttonsto select 'All', "Added', or "Favorite' then press the
ENTER button.
:_ The CH.LIST you have chosen wilt now be set.
Pressthe EXIT button to exit.
[_] Press the CH LiST button on the remote control to bring up the Channel Lists.
Viewing the Channel Lists
You can display a list of all channels_ added channels or your favorite channels.
1, Press the MENU button to display the menu.
Press the _, or V buttons to select "Channel", then press the ENTER button.
2, Press the A or _r buttons to select "Channel List", then press the ENTER button.
3, Pressthe A or V' buttonsto select "Air', "Added" or "Favorite",then pressthe
ENTER button.
Pressthe A. or T buttonsto select "Channel",then press the ENTER button.
To toggle between your all channels,add channels, or favorite channels,
use the red (P.Mode)button on the remote control.
,,Red (P,Mode) button: Press repeatedly to select "AIl"i '!Added"i or
'_Favorite'_
At_TO_R06_ ,_D_DEL _O_iTiON J_

Labeling Channels
Channels can be labeled so that their calt letters appear whenever the channel is selected.
1. Press the MENU button to display the menu.
Press the A or V buttons to select "Channel", then press the ENTER button.
Press the A or _r buttons to select "Name', then press the ENTER button,
Press the A or V buttons to select the channel to be assigned a new name_
then press the ENTER button.
Press the A or T buttons to select a letter_a number or a blank (Results in this
sequence: A...Z. 0...9. +, -, *,/. blank).
Press the _,,button to switch to the next field, which will be selected.
Select a second letteror digit by pressing the A or _' buttons, as above.
Repeat the process to select the last three digits. When you have finished,
press the ENTER button to assign the new name.
To erase the assigned new name_select "Clear" by pressing the 4 or _ button,
then press the ENTER button.
Press the EXIT button to exit.
_'-The names of digital broadcasting channels are automatically assigned and
thus cannot be assigned by users.
LNA (Low Noise Amplifier)
Ifthe TV is operating in a weak-signal area, sometimes the LNA function can improve the reception (a low-noise preamplifier
booststhe incoming signal).
1. Press the MENU button to display the menu.
Press the _, or T buttons to select "Channet'_then press the ENTER button.
2. Press the A or _" buttons to select "LNA', then press the ENTER
button.
3. Press theft, or _' buttons to select 'On', then press the ENTER button.
Press the EXIT button to exit.
:_ LNA functions when the antenna is set toAir or Cable. Settings will be stored
separately in each channel. (See "Selecting the antenna." on page 28.)

Fine Tuning Analog Channels
Use fine tuning to manually adjust a particular channel for optimal reception.
1. Press the MENU button to display the menu.
Press the A or _' buttons to select "Channel"_then press the ENTER button.
2. Press the A or _r buttons to select "Fine Tune"_then press the ENTER button.
Press the 4 or _ buttons to adjust the fine tuning.
To store the fine tuning setting in the TV's memo% press the ENTER button.
Ifyou do not store the fine-tuned channel in memory, adjustments are not
saved.
To resetthe fine tuning setting, press the _' buttonto select "Reset",
then press the ENTER button.
Press the EXIT button to exit.
>- "." wilt appear next to the name of fine-tuned channels.
Checking the Digital-Signal Strength
Unlike analog channels, which can vary in reception quality from 'snowy' to clear, digital (HDTV) channels have either perfect
reception quality or you wilt not receive them at all. So, unlike analog channels, you cannot fine tune a digital channel. You can,
however, adjust your antenna to improve the reception of available digital channels.
1,
2.
Press the MENU button to display the menu.
Press the A or • buttons to select "Channel"_then press the ENTER button.
Press the A or _r buttons to select "Signal Strength", then press the ENTER
button.
If the signal strength meter indicates that the signal is weak_physically adjust your
antenna to increase the signal strength.
Continue to adjust the antenna until you find the best position with the strongest
signal.
Press the EXIT button to exit

Using Your TV as a Computer (PC) Display
Your PC Software [Based on Windows XP]
The Windows display-settings for a typical computer are shown below. The actual screens on your PC wilt probably be different,
depending upon your particular version of Windows and your particular video card. However, even if your actual screens look
different, the same basic set-up information will apply in almost all cases. (if not, contact your computer manufacturer or Samsung
Dealer.)
1. FirsL click on "Control Panel" on the Windows start menu.
2. When the control panel window appears, click on "Appearance and Themes" and a
display dialog-box wilt appear.
3. When the control panel window appears, click on "Display" and a display dialog-box
will appear.
4. Navigate to the "Settings" tab on the display dialog-box.
The correct size setting (resolution)
Optimum: 1360 x 768 pixels
If a vertical-frequency option exists on your display settings dialog box,
the correct value is "60" or %0 Hz". Otherwise, just click "OK" and exit the dialog box.
Display Modes
Ifthe signal from the system equals the standard signal mode, the screen is adjusted automatically, if the signal from the system
doesn't equal the standard signal mode, adjust the mode by referring to your videocard user guide; otherwise there may be no
video. For the display modes listed below, the screen image has been optimized during manufacturing.
D-Sub Input
.........................RI'i,Ut,0, ,0q00ocy,,,,)F,0q0000y,,,,F,0 0000y,M,,,,,,v,
Mode¸ .or,zonta.v/ Ve ica,i i.e,c,ock1syncPo,a,ity
VESA
640 x 480
640 x 480
800 x 600
800 x 600
800 x 600
1024 x 768
1024 x 768
1024 x 768
1360 x 768
37.861
37.500
37.879
48.077
46.875
48.363
56.476
60.823
47.712
72.889
75.000
60.317
72.188
75.000
60.884
70.069
75.829
60.015
31.508
31.500
40.800
50.008
49.500
65.808
75.000
78.750
85.800
-/-
-/-
+/+
+/+
+/+
-/-
-/-
+/+
+/+
HDMIIDVI Input
IBM
640 X 480 3t .469 59.940
800 x 600 37.879 60.3t7 40.888 +/+
VESA 1024 x 768 48.363 60.004 65.800 - / -
1360 x 768 47.712 60.015 85.800 +/+

Setting up the TV with your PC
How to Auto Adjust
Use the Auto Adjust function to have the TV set automatically adjust the video signals the monitor receives.
The function also automatically fine-tunes the settings and adjusts the frequency values and positions.
This function does not work in DVI-Digital mode.
Press the MENU button to display the menu.
Press the A or V buttons to select "Setup", thenpress the ENTER button.
Press the A or _r buttons to select "PC", then press the ENTER button.
>- Change to the PC mode first.
2. Pressthe _, or T buttonsto select "AutoAdjustment", then pressthe ENTERbutton.
Press the EXIT button to exit.
the Screen ualit
The purpose of the picture quality adjustment is to remove or reduce picture noise. If the noise is not removed by fine tuning
alone, then make the frequency adjustments to the utmost and fine tune again. After the noise has been reduced, re-adjust the
picture so that it is aligned on the center of the screen.
1. Press the MENU button to display the menu.
Press the _, or V buttons to select "Setup", then press the ENTER button.
Press the A or _r buttons to select "PC", then press the ENTER button.
> Change to the PC mode first.
2. Press the ENTER button to select "Image Lock".
Pressthe A or V buttonsto select "Coarse"or "Fine".then pressthe ENTERbutton.
Press the 41or 1_-buttons to adjust the screen quality.
>_Vertical stripes may appear or the picture may be blurry.
Press the ENTER button.
Press the EXIT button to exit.

Chancjinq the Screen Position
2.
3.
Press the MENU button to display the menu.
Press the A or V buttons to select "Setup", then press the ENTER button.
Press the A or V' buttons to select "PC", then press the ENTER button.
:_ ChangetothePCmodefirst.
Press the A or _r buttons to select "Position", then press the ENTER button.
Press the A or V buttons to adjust the V-Position.
Press the ,I or _ buttons to adjust the H-Position.
Press the ENTER button,
Press the EXIT button to exit.
InitializincLthe Screen Position or Color Settin_s
You can replace all image settings with the factory default valuse.
1. Press the MENU button to display the menu.
Press the A or V buttons to select "Setup", then press the ENTER button.
Press the A or V' buttons to select "PC", then press the ENTER button.
_- Change to the PC mode first.
2. Press the _, or V" buttons to select "image Reset", then press the ENTER button.
Press the EXIT button to exit.
Viewinq the Current Resolution
You can get the resolution information of your PC.
1. Press the MENU button to display the menu.
Press the h, or V' buttons to select "Setup", then press the ENTER button.
Press the _, or _r buttons to select "PC", then press the ENTER button.
> Change to the PC mode first.
2. Press the A or V buttons to select "Resolution".
The resolution information is displayed on the screen.
Press the EXIT button to exit.

Time Setting
Setting the Clock
Setting the clock is necessary in order to use the various timer features of the TV.
Atso_you can check the time while watching the TV. (Just press the INFO button.)
Option 1: Settinq the Clock Manually
1. Press the MENU button to display the menu.
Press the A or V buttons to select "Setup", then press the ENTER button.
Press the A or _r buttons to select "Time"_ then press the ENTER button.
2. Press the ENTER button to select "Clock".
3. Press the ENTER button to select "Clock Mode".
Press the A or _" buttons to select "Manual", then press the ENTER button.
4. Press the A or _" buttons to select "Clock Set"_then press the ENTER button.
Press the _ or _,-buttons to move to "Month", "Day", "Year", "Hour", 'Minute",
or "am/pro'. Set the date and time you want by pressing the A or _r buttons_
then press the ENTER button.
Press the EXIT button to exit.
> The current time will appear every time you press the INFO button.
> You can set the month, day, year, hour, and minute directly by pressing the
number buttons on the remote control.

Option 2:Settin(1 the Clock Automaticatl_z
1. Press the MENU button to display the menu.
Press the A or T buttons to select "Setup", then press the ENTER button.
Press the A or T buttons to select "Time", then press the ENTER button.
2. Press the ENTER button to seJect "Clock".
3. Press the ENTER button to select "Clock Mode".
Press the A or _' buttons to select "Auto", then press the ENTER button.
4. Press the A or T buttons to select "Time Zone", then press the ENTER button.
5. Press the A or T buttons to highlight the time zone for your local area,
then press the ENTER button.
Press the A or T buttons to select "DST" (Daylight Saving Time), then press
the ENTER button.
Press the A or T buttons to select "On' or 'Off", then press the ENTER button.
Press the EXIT button to exit.
>_ Depending on the broadcast station and signal, the auto time may not be
set correctly. If this occurs, set the time manually.
>- The Antenna or cable must be connected in order to set the time automatically.

Settin_ Timer
The sleep timer automatically shuts offthe TV after a preset time (from 30,60,90,120,150 and I80 minutes).
1. Press the MENU button to display the menu.
Press the A or V buttons to select "Setup", then press the ENTER button.
Press the _, or _r buttons to select "Time", then press the ENTER button.
2. Press the A or T buttons to select "Sleep Timer"_then press the ENTER button.
3. Press the A or T buttons to adjust 'Minute".
4. Press the _ button to select "Activation".
Press the _, or T buttons to select "On", then press the ENTER button.
Press the EXIT button to exit.
Simply press the SLEEP button on the
remote control for a Quick way to access the sleep timer setting.
-- "J It I
C,LIST_c. SL_E_ II I
Ovo,O OoOze"
Settinq the On/Off Timer
1. Pressthe MENU buttonto display the menu.
Press the A or V buttons to select "Setup", then press the ENTER button.
Pressthe A or T buttons to select "Time", then press the ENTER button.
2. Press the A or T buttons to select "Timer l_Timer 2_Timer3 "_then press the
ENTER-button.
3. Pressthe A or T buttons to adjust "Hour", then press the _- buttonto move
to the next step.
Set other items using the same method as above.
Activate or Inactivate Press the Aor_' button
Repeat Select a Once, Everyday, Mon-Fri, Press the Aor_r button
Mon-Sat, Sat-Sun
Volume Adjust from 0~100 Press the Aor_' button
Antenna Select Air or Cable Press the Aor_' button
Channel Change the Channel Pressthe Aor_r button
> When finished, press the RETURN button to return.
The current time wilt appear every time you press the iNFO button.
You can set the hour, minute, and channel by pressing the number
buttons on the remote control.
Press the EXiT button to exit.

Selecting a Menu Language
1. Press the MENU button to display the menu.
Press the A or V buttons to select "Setup", then press theENTER button.
Press the A or _r buttons to select "Language"_then press the ENTER button.
2. Press the A or _r buttons to select "English"_"Espai_ot",or "Frangais".
Press the ENTER button.
Press the EXIT button to exit.
Using the Game Mode
When connecting to a game console such as PlayStationTM or XboxTM, you can enjoy a
more realistic gaming experience by selecting Game mode.
1. Press the MENU button to display the menu.
Press the _, or T buttons to select "Setup", then press the ENTER button.
2. Press the A or T buttons to select "Game Mode"_then press the ENTER button.
3. Select "On" or "Off' by pressing the A or _r buttons,thenpress theENTER button.
4. Press the EXIT button to exit.
>- RestrictionsonGamemode(Caution)
• Todisconnectthegameconsoleandconnectanotherexternaldevice,set
GametoOff inthesetupmenu.
• if youdisplaythe TVmenuin Gamemode,thescreenshakesslightly.
• Themark(8) appearsonthescreenwhichmeansthatGameModeis onwith the
selectedsource.
> if GameModeisOn
• SetupModeis automaticallychangedtoCustomand userscannot
changethemode.
• SoundModein theSoundmenuisdeactivated.Adjustthesoundush'_gtheequalizer.
• TheResetintheSoundmenuisactfvated.ResetfunctioninitializestheEqualizersettingsto
thefactorydefaultsetting.
:_ GameModeisnotavailablein TVmode.
if thepictureispoorwhenexternaldeviceis connectedtoTV,checkif Game
ModeisOn.SetGameModeto Offandconnectexternaldevices
Menu Transparency Level
Adjusts the transparency of the menu screen.
1. Press the MENU button to display the menu.
Press the _, or T buttons to select "Setup", then press the ENTER button.
2. Pressthe A or T buttonsto select 'Menu Transparency",thenpress the ENTER
button.
3. Pressthe A or T buttonsto select levei,then pressthe ENTER button.
Pressthe EXIT button to exit.

Viewing Closed Captions (On-Screen Text Messages) =AnaJog
The Analog Caption function operates when watching regular analog channels or when you have an analog external component
(such as a VCR) connected.
1. Press the MENU button to display the menu.
Press the _, or _' buttons to select "Setup", then press the ENTER button.
2. Press the A or _r buttons to select "Caption'_then press the ENTER button.
3. Press the ENTER button to select "Caption".
Press the A or _r buttons to select "On"_then press the ENTER button.
Press the A or _' buttons to select "Caption Mode", then press the ENTER button.
Press the A or T buttons to select submenu (Default, CC1~CC4 or Textl~Text4)
you want, the press the ENTER button.
Press the EXIT button to exit.
• The default is "CCl".
- CO" : The Primary Syncnronous Caption Service. These are captions inthe
primary language [nat mus[ be in sync wl[n me sound, preferably
ma[cned to a sDecific frame.
• CC2: The Special Non-Synchronous Use CaD[tons
This channel carries da[a ma! s intended to augmem nformation carried
qme 3rogram.
- CC3: Secondary Synchronous Caption Service.
Alternate program-rela[ea cap[ion da[a [yplcalty secona ianguage
cao[Ions
• CC4: Speaa Non-Synchronous Use Caotiens. Similar to CC2.
• Te×tl : First Text Service. This ma[, be vanous non-program reIa[edaa[a.
• Te×t2: Second Text Service.Additional dat_ usually not program reta[ea.
• Te×t3/Text4: Third and Fourth Text Services.
These aa[a cnanneIs should be used onI_ if Text1 and Text2 are
not sufficient.
>-The Caption feature doesn't work in COMPONENT_HDMI or PC modes.
>-The availability of captions depends on the program being broadcast.
[_i Press the CAPTION button repeatedly to select 'On" or "Off".

Viewing Closed Captions (On-Screen Text Messages) - Digital
The Digital Captions function operates on digital channels.
1. Press the MENU button to display the menu.
Press the A or T buttons to select "Setup", then press the ENTER button.
2. Press the _, or T buttons to select "Caption"_then press the ENTER button.
3. Press the ENTER button to select "Caption".
Press the A or _r buttons to select "On'_then press the ENTER button.
4, Press the _, or _' buttons to select "Caption Mode", thenpress the ENTER button.
Press the A or • buttons to select submenu (Default, Servicel~Service&
CC1~CC4_or Textl~Text4) you wanL then press the ENTER button.
5. Press the A or V buttons to select "Caption Options",then press the ENTER button.
>'-"Caption Options" are available only when "Servicel~Service6" can be
selected in "Caption Mode".
> Service1~6indigital captionmode may not beavailable dependingon the broadcast
6. Press the A or T buttons to select "Size", then press the ENTER button.
Press the A or _' buttons to select the desired Caption option_then press the
ENTER button.
Press the A or _' button to select the desired sub-menu options
(see options below), then press ENTER.
Press the EXIT button to exit.
The availability of captions depends on the program being broadcast.
>--"Default" means to follow the standard set by the broadcaster.
• Size: This opuon consists of "Default. "Small". "Standa-d". and "Large". The
default is "S[andara
• Font Style: This ouuon consists of 'Default. "Style0 - Style 7". You can
cnange me font you ,rant. The default is"Style O
• Foreground Color: This option consists of "Default. "White". "Biack" "Red".
'Green. "Blue". "Yellow". "Magenta. ann "C_,an'.You can
cnange me color of the letten The default s "White.
- Background Color: This oo_lonconsists of "Default. "White". "Black". "Rea.
'Green. "Blue". "Yellow". "Magenta", and "Cyan You can
cnange me uacKgrouna color of the caption. The default is
'Black
• Foreground Opacity: This option consists of "Default". "Transparent".
'Translucent' 'Solid". and "F asn ng'. You can change
me opaca_ of me le[ter.
• Background Opacity: This option consists of "Default. "Transparent.
'Translucent' "Solid'Land "Flashing'. You can change
me background opacity of the caption.
- Return to Default: This option sets each of'Size' _FontStyle", "Foregrouna
Color". "Bakcground color". "Foreground Opacity", anc
Background Opacity to its default.
Press the CAPTION button repeatedly to select "On" or 'Off".
v
RETURN INFO
© ©
_i'_tO£E &MODE STILL

Setting the Function Help
Displays help on the menu functions.
1. Press the MENU button to display the menu.
Press the A or V buttons to select "Setup", then press the ENTER button.
2. Press the _t.or V buttons to select "Function Help", then press the ENTER button,
3. Press the A or _' buttons to select "On"_then press the ENTER button.
Press the EXIT button to exit.
>- The predetermined value of the function help is On.
Setting the Light Effect
You can turnon/off the blue LED on the front of TV,
1,
2.
3.
Press the MENU button to display the menu.
Press the A or _r buttons to select "Setup"_ then press the ENTER button.
Press the h, or T buttons to select "Light Effect"_then press the ENTER
button.
Press the A or T button to select "Always Off', "Stand By OIY',"Watch Mode"
or "Always On", then press the ENTER button.
' Off: LEDwill not come onl
, In Standby: Turns the LED Onin standby mode.
, In Watching TV: Turns the LED onwhile watching TV.
* Always: LED witl come on after you turn the TV off.
Press the EXIT button to exit.

Using the V=Chip
The V-Chip feature automatically locks out programs that are deemed inappropriate for children. The user must enter a PIN
(personal ID number) before any of the V-Chip restrictions are set up or changed.
>_When the V-chip feature is activated, the PIP features do not function.
Settinc_U_U Your Personal ID Nurnber_
1. Press the MENU button to display the menu.
Press the _, or _r buttons to select "Setup", then press the ENTER button.
2. Press the h, or T buttons to select "V-Chip', then press the ENTER button.
The message "Enter PIN" will appear. Enter your 4 digit PIN number.
>"The default PIN number of a new TV set is "O-0-0-O'.
The "V-Chip" screen will appear.
Press the A or _' buttons to select "Change PIN', then press the ENTER button.
The Change PIN screen will appear. Choose any 4 digits for your PIN and enter
them. As soon as the 4 digits are entered, the "Confirm new PIN" screen appears.
Re-enter the same 4 digits. When the Confirm screen disappears, your PIN has
been memorized.
Press the EXIT button to exit.
If you forget the PIN, press the remote-control buttons inthe following
sequence, which resets the pin to 0-O-0-0: Power Off. Mute 8 2 .........
4 Power On.
U.S.A Only ]This product is covered by the following U.S.patents :US4,930,158,US4,930,160

HowtoEnable/DisabletheV-Chip
1. Press the MENU button to display the menu.
Press the _,or T buttons to select "Setup"_ then press the ENTER button.
2. Press the A or _' buttons to select "V-Chip", then press the ENTER button.
The message 'Enter PIN" will appear. Enter your 4 digit PIN number.
The "V-Chip" screen wilt appear.
Toenable the V-Chip feature, press the ENTER button so that the "V-Chip Lock"
field is "On". (Pressing the A or _' buttons wilt alternate between "On" and "Off".)
Press the ENTER button.
Press the EXIT button to exit.
How to Set up Restrictions Usinq the "TV Parental Guidelines"
First, set up a personal identification number (PIN), and enable the V-Chip. (See
previous section.)
Parental restrictions can be set up using either of two methods: The TV guidelines or
the MPAArating.
1. Press the MENU button to display the menu.
Press the A or _' buttons to select "Setup", then press the ENTER button.
2. Press the A or _' buttons to select "V-Chip", then press the ENTER button.
The message 'Enter PIN" will appear. Enter your 4 digit PIN number.

3. The"V-Chip"screenwillappear.PresstheAor_rbuttonstoselect"TV Parental
Guidelines"_then press the ENTER button.
4. The "TV Parental Guidelines" screen will appear.
Press the ,t, or '_ buttons to select one of the six aged based categories:
• TV-G: General audience
, TV-PG: Parental guidance
• TV-14: Viewers 14 and over
• TV-MA: Mature audience
At this point, one of the TV-Ratings is selected.
Press the ENTER button. Depending on your existing setup_the" _" symbol will
be selected. (Blank = Unblocked, = Blocked)
While "_" is selected, press the ENTER button to block or unbtock the category.
To select a different TV-Rating, press the A or T buttons and then repeat the
process.
>Allow all: Press to unlock all TV ratings. / Block all: Press to lock all TV ratings.
> The TV-Y_TV-Y7, TV-G,TV-PG, TV-14 and TV-MA have additional options.
See the next step to change any of the following sub-ratings:
FV: Fantasy violence / D: Sexually Suggestive Dialog / L:Adult Language /
S: Sexual situation / V:Violence
> The V-Chip wilt automatically block certain categories that are "more
restrictive". For example, if you block 'TV-Y" category, then TV-Y7 wilt
automatically be blocked. Similarly, if you block the TV-G category, then all the
categories in the "young adult" group will be blocked (TV-G, TV-PG_TV-14_and
TV-MA). The sub-ratings (D, L_S_V) work together similarly.
(See next section.)
How to set the FV,D, L, S and V sub-ratings.
First,select one of these TV-Ratings: TV-Y,TV-Y7, TV-G, TV-PG, TV-14, or TV-MA
(See Step 4, on previous page), and press the _ button. The "_"symbol will be
displayed for each sub-rating
While "_" is selected, press the ENTER button to go to a sub rating.
Press ENTER to block the sub rating. To select a different TV-Rating, press the
A or T buttons and then repeat the process.
> The V-chip will automatically block certain categories that are "More restrictive".
For example, if you block "L"sub-rating in TV-PG, then the "L" sub-ratings in
TV-14 and TV-MA will automatically be blocked.
Press the EXIT button to clear allthe screens. (Or proceed to the next section,
and set up additional restrictions based on the MPAAcodes.)
> These categories consist of two separate groups: TV-Y and TV-Y7 (young
children through age 7), and TV-G through TV-MA (everybody else).
The restrictions for these two groups work independently: If a household
includes very young children as well as young adults, the TV guidelines must
be set up separately for each age group. (See next step.)

Now to Set up Restrictions Using{ the MPAA Ratin s: G PG PG-13 R NC-17 X NR
The MPAArating system uses the Motion PictureAssociation of America (MPAA) system, and its main application is for movies.
When the V-Chip lock is on,the TV wilt automatically block any programs that are coded with objectionable ratings
(either MPAAor TV-Ratings).
1. Press the MENU button to display the menu.
Press the A or _' buttons to select "Setup", then press the ENTER button.
2. Press the A or _' buttons to select "V-Chip", then press the ENTER button.
The message 'Enter PIN" will appear. Enter your 4 digit PIN number.
3. The "V-Chip" screen will appear. Press the A or _' buttons to select "MPAA Rating",
then press the ENTER button.
The "MPAA Rating" screen will appear. Repeatedly press the A. or T buttons to
select a particular MPAA category. Pressing the A or T buttons will cycle through
the MPAA categories:
G: General audience(no restrictions),
• PG: Parental guidance suggested.
• PG-13: Parents strongly cautioned.
• R: Restricted. Children under 17 should be accompanied by an adult.
, NC-17: No chi!dren under age !7,
• x: Adults only.
• NR: Not rated.
_'-AIIow all: Press to unlock all TV ratings. / Block all: Press to lock alt TV ratings.
While a particular category is selected, press the ENTER button to activate it.
The" _" symbol wilt be displayed. Press the ENTER button to block or
unblock the category.
_--TheV-Chip will automatically block any category that is "more restrictiveL
For example, if you block the "PG-13" category, then "R', "NC-17" and "X" wilt
automatically be blocked also.
Press the EXIT button to exit.

How to Set up Restrictions Usinq the 'Canadian Encllish'
1. Press the MENU button to display the menu.
Press the _,or T buttons to select "Setup", then press the ENTER button.
2. Press the A or T buttons to select "V-Chip", then press the ENTER button.
The message 'Enter PIN" will appear. Enter your 4 digit PIN number.
3. The "V-Chip" screen will appear. Press the A or T buttons to select
"Canadian English", then press the ENTER button.
Press the _, or T buttons to select an appropriate restriction.
Press the ENTER button to actwate the restriction selected. The "_" symbol is
indicated.
Press the EXIT button to exit.
> Allow all: Pressto unlock all TV ratings. / Block aft: Press to lock alt TV ratings.
• C: Programming intended for children under age 8
• C8÷: Programming generally considered acceptable for chi!dren 8 years and
0ver to watch on theirown.
, G: General programming, suitable for all audiences.
,PG: Parental Guidance.
,14÷: Programming contains themes Qrcontent which may not be suitable for
viewers under the age of !4
• 18÷: Adult programming.

How to Set up Restrictions Usinq the 'Canadian French'
1. Press the MENU button to display the menu.
Press the _,or T buttons to select "Setup", then press the ENTER button.
2. Press the A or T buttons to select "V-Chip", then press the ENTER button.
The message 'Enter PIN" will appear. Enter your 4 digit PIN number.
3. The "V-Chip" screen will appear. Press the A or • buttons to select
"Canadian French", then press the ENTER button.
Press the _, or V buttons to select an appropriate restriction.
Press the ENTER button to actwate the restriction selected. The "_" symbol is
indicated.
Press the EXiT button to exit.
>_AIIow all: Press to unlock all TV ratings. / Block alt: Press to lock all TV ratings.
• G: General .......
• 8 arts+: Programming genera!ly considered acceptable for child[en 8 years
and 0vet to watch 0n their own.
• 13 arts+: Programming may not be suitabte for ch!ldren under the age o1131
• 16 arts÷: Programming is not suitabte for children under the age of !6:
. 18 arts+: Programming restricted to adults.

Usin__ channels
Parental restriction information can be used while watching DTV channels.
1. Press the MENU button to display the menu.
Press the A or _' buttons to select "Setup", then press the ENTER button.
2. Press the _, or _' buttons to select "V-Chip", then press the ENTER button.
The message "Enter PIN" will appear. Enter your 4 digit PIN number.
The "V-Chip" screen will appear. Press the A or _' buttons to select
"Downloadable UsS.Rating", then press the ENTER button.
If information is not downloaded from the broadcasting station, the
Downloadable U.S. Rating menu is deactivated.
:_ Parental restriction information is automatically downloaded while watching
DTV channels. It may take several seconds.
>- The Downloadable U.S. Rating menu is available for use after information is
downloaded from the broadcasting station. However,depending on the
information from the broadcasting station, it may not be available for use.
Press the A or T buttons to select an appropriate restriction.
Press the ENTER button to activate the restriction selected. The "_" symbol is
indicated.
Press the EXIT button to exit.
>_AIIow all: Press to unlock all TV ratings. / Block all: Press to lock alt TV ratings.
Parental restriction levels differ depending on the broadcasting station.
> The default menu name and Downloadable US rating changes depending on
the downloaded information.
> Even if you set the On-screen display to your desired language, the
"Downloadable U.S. Rating" menu wilt appear in English only.
:_ The rating wilt automatically block certain categories that are more restrictive.
>-The rating titles(For example: Humor Level..etc) andTV ratings
(For example: DH,MH_H.etc) may differ depending on the broadcasting station.
Ratingi_le
The nurnr_,erof
cur_entrating
title
The nimber o
alia%§title

Digital Noise Reduction
Ifthe broadcast signal received by your TV is weak, you can activate the Digital Noise Reduction feature to help reduce any static
and ghosting that may appear on the screen.
1. Press the MENU button to display the menu.
Press the ENTER button, to select "Picture".
2, Press the A or V buttonto select "Digital NR",then press the ENTER button.
3. Press the _, or • button to select "Off", "Low", "Medium", "High", "Auto".
Press the ENTER button.
Off: Turnsthescreennoisereductionfunctionoff.
Low: Reducesscreennoiseata lowlevel.
Medium:Reducesscreennoiseatamediumlevel.
_High: Reducesscreennoiseatahigh!eveL
"Auto: Automaticallyrecognizesandreducesscreennoise.
Press the EXIT button to exit.
Upgrading the Software
Samsung may offer upgrades for your TV's firmware in the future. Please contact the Samsung calt center at 1-80O-SAMSUNG
(7267864) to receive information about downloading upgrades and using a USB drive. Upgrades will be possible by connecting a
USB drive to the USB port located on the back of your TV.
1. Insert a USB drive containing the firmware upgrade into the SERVICE prot
on the back of the TV.
2. Press the MENU button to display the menu.
Press the A or _r buttons to select "Setup", then press the ENTER button.
3. Press the _t,or T buttons to select SW Upgrade, then press the ENTER button.
4. Press the ENTER button.
The message Scanning for USB... It may take up to 30 seconds, is displayed.
Please be careful to not disconnect the power or remove the USB drive while
upgrades are being applied. The TV wilt shut off and turn on automatically after
completing the firmware upgrade. Please check the firmware version after the
upgrades are complete.
TV Rear Panel
k

/,, Appendix
Troubleshooting
If the TV seems to have a problem, first try this list of possible problems and solutions.
If none of these troubleshooting tips apply, call your nearest Samsung service center.
Problem Possible Solution
Poor Diowre
Poor sound quat_ty.
No Dlctureor souna
No sound or sound ts too towa[
maximum VOlume
Picture roils verticalt,
Try anomer cnanne
Adjus_me antenna
Check atl wire connections
Try anomer cnanne
AQjUSI[ me amenna
Try anomer cnanne
Press the SOURCE button.
Make sure the TV is plugged in.
Check the antenna connections.
First check the volume of units connected to your TV (digital broadcasting receiver, DVD_
cauie uroaacastmg receiver_VCR, etc.). Then, adjust the TV volume accordingly.
Check all wire connections
The TV opera[es eftaT:lcatb unplug the TV for 30 seconds, then try operating it again.
The TV won,t turn on, Make sure the wail outlet is working.
Remote control malfunctions Replace the remote control batteries.
Clean the upper edge of the remote control (transmission window).
Check the battery terminals.
!%heck signa! cabW' message Ensure that the signal cable is firmly connected to the PC source.
'_Not Supported Mode" message I Check the maximum resolution and the frequency of the VideoAdapter.
Compare these values with the data in the Display Modes.
DigJtaibroadcasting screen ......... Please check the digital signal strength and input antenna.
problem:
The image is too light or too darkl Adjust the Brightness and Contrast.
Adjust the Fine tuning.
Black bars on the screen. Make sure the broadcast you're receiving is High Definition (HD).
HD channels sometimes broadcast Standard Definition (SD) programming_ which can
cause black bars.
Set your cable/satellite box to stretch or widescreen mode to eliminate the bars.
Picture has a Red/Green Or Make sure the Component cables are connected to the correct jacks.
Pinktint.
Ciosed Captioning not .................................
not yourTV.
Snowy picture Your cable box may need a firmware upgrade. Please contact your Cable company.
Ghosting 0n Picture This is sometimes caused by compatibility issues with your cable box.
Try connecting Component cables instead.

Problem
Honzontalbarsappeartoflicker.
i[[erorsnimmerontheimage.
Verticalbarsappeartoflicker
.itter or shimmer on the image.
Screen _sDiaCKaria E)wer
nalca_orilgm blinks s[eaal ..
Adjust the Coarse tuning and then adjust the Fine tuning.
image is not stable and maj
appear to vibrate when you nave
a comDu[er connec[ea [o tne PC
npuL
Adjust the Coarse tuning and then adjust the Fine tuning.
On your computer check: Power,Signal Cable.
The TV is using its power management system.
Move the computer's mouse or press any key on the keyboard.
If the setting is notcorrect, use your computer utility program to change the display settings.
_"-Your T supports multiscan display functions within the following frequency domain:
Horizontal frequency (kHz)
Vertical frequency (Hz)
PC Maximum refresh rate
(at 60 Hz)
30~60
60~75
1360 x 768
Image is not centered on the Adjust the horizontal and vertical position.
screen The screer position must be adjusted on the output source (i.e. STB) with a digital signal.
Ifa still_mage_sdisplayedfor When you need to leave the monitor unused for an extended period of time, adjust the
anextenaeaperiodd time.residual setungs so that the monitor automatically goes into energy saving mode or activates the
imagesorD_umngmayappear, screen saver to display moving images..
The TFT LCD panel uses a panel consisting of sub pixels (3,147_264) which require sophisticated technology to produce. How-
ever, there may be few bright or dark pixels on the screen. These pixets will have no impact on the performance of the product.

InstaJJingthe Stand
J
<2> <3>
1. Place the TV face down on a soft cloth or cushion on a table•
2. Put the stand into the hole at the bottom of the TV.
3. Insert screw into the hole indicated and tighten.
Disconnecting the Stand
o_
m
<2> <3> <4>
1. Place the TV face down on a soft cloth or cushion on a table•
2. Remove four screws from the back of the TV.
3. Separate the stand from the TV.
4. Cover the bottom hole with a cap.

How to Adjust the Stand
(1) (2)
Button
1. Place the front of the TV onto a soft cloth
or cushion on a table as in Figure (1).
- Align the TV bottom along the table
edge.
2. Press on the center of the TV back.
Adjust the stand as in Figure (2) while
pressing the button on the back of the
stand.
3. Place the TV on the table so that the TV
sits safely.
How to Adjust the Angle of the TV
__
( 1)Angleadjustmentwhenusingthe
TVonitsstand.
( 2 )Angle adjustment when converting from
Stand to Wall mount (173, 3_1)
(3)AngleadjustmentwhenLCD
TViswall-mounted
>*When you adjust the stand, press the button on the back of the stand.
1. Figure (1) shows the adjustment angle (-2°~14°) when you use the LCD on its stand.
Excessive tilting can turn the LCD TV over which may cause damage.
2. Figure (2) shows the adjustment angle (14°~80°) when you convert the LCD from stand-based use to wall-mount.
3. Figure (3) shows the adjustment angle (0°~10°) when you mount the LCD TV to a wall.
>-You will hear a 'Click" sound when changing the angle from 1 to 2 or 3 to 2.
Installing the Wall Mount Kit
Wall mount items (sold separately) allow you to mount the TV on the wall. Forthe detailed information on installing the Wall
Mount, see the instruction in the Wall Mount items. Contact a technician for installing the waft bracket. Samsung Electronics is not
responsible for any damage to the product or injury to yourself or others if you choose to install the TV on your own.
installing VESA compliant mounting devices
1. Place the TV face down on a soft cloth or
cushion on a table.
2. Adjust the stand, pressing the button on the
back of the stand.
3. Align the mounting interface pad (not supplied)
with the holes in the stand bottom and secure
it with the four screws that come with the arm-
type base, wall mount hanger or other bases
(not supplied).
Using the Decoration Covers
(2)
1. When installing the TV on the wall without using
the stand, insert decoration covers into the
holes as described in the picture (1).
2. After inserting the decoration covers, fasten
them with 4 screws as described inthe picture
(2).

Using the Anti-Theft Kensington Lock
The Kensington lock is a device used to physically fix the system when using it in a public place. The locking device has to be purchased
separately. The appearance and locking method may differ from the illustration depending on the manufacturer.
Please refer to the manual provided with the Kensington lock for proper use.
<Optional>
The place of the Kensington Lock may be different depending on its model
1. Insert the locking device into the Kensington slot on the LCD TV (Figure I), and turn it in the locking direction (Figure 2).
2. Connect the Kensington lock cable.
3. Fix the Kensington lock to a desk or a heavy stationary object.
Specifications
Model Name
Screen Size (Diagonal}
LN.TIe53H/LN-T1954N
19 inch
Power Consumption 55 W
PC Resolution 1360 x 768 @ 60 Hz
Sound
Output 3W X 2
Dimensions (WxDxH}
Body
With stanc
18.9 X 2.7 X 142 inches
(480 X 575 X 3605 mm)
18.9 X 7.1 X 15 5 inches
(480 X 180 X 393 mm)
Weight
With Stand 1146 lbs (5.2 kg)
Environmental Considerations
Operating Temperature 50 °F to 104 °F (10 °C to 40 _C)
Operating Humldlt_ 10% to 80%, non-condensing
Storage Temperature -4 °F to 113 °F (-20 °C to 45 °C)
Storage Humidity 5% to 95%, non-condensing
Design and specifications are subject to change without prior notice.
This device is a Class B digital apparatus.
> For the power supply, refer to the label attached to the product.

Contenido
m Lls[aao aecaracteristicas ................................................ 2 m Selecci6n de la antena ................................................... 28
m Accesorios .................................................... 2 • Supreslon ae los canates coalficados digitales .............. 28
m Aspecto genera del panel de control ............................ 3 • Conf guraci6n de las listas de canates......................... 29
m Aspec[o general eel panel ae conexlones ...................... 4 m Para configurar los canales favoritos ............................. 30
m Mando a als[ancla .................................... 5 m Maneo ae ta Lista de CanaIes .................................. 31
m Instalaclon de las Dllasen el mando a als[anola ......... _ m VlSUallzaclonde _ tls[a de canales ............ 31
m Etique[aao ae canates .................................................... 32
LNA(Low NoiseAmplifier - Amplificador de ruido bajo). 32
m Sintonizaoi6n fine de ios canales anabgtoos ................. 33
Comprobaci6n de la potencia de la sehai digital ........... 33
m Conexi6n de antenas de VHF • UHF.................
m Conexi6n deTV pot cable .............................................. 7
m Conexi6n ue un reoroductor devideo ....................... 8
m Conexi6n ae un reDroauctoree DVD ......... 9
m ConexiOn a un DVD/receotor de TV dig [ala tray,s ae m Uso eel TV como oan.ratiaae oraenaaor PC ............... 34
un HDMt ...................................................................... 9 m Modos de visualizaci6n .............................................. 34
m Conexi6n ue un DVD o un Decodificador digital m AjJs[e eel [elevtsorcon el oraenaaor ............................. 35
mealan[e DVl ................................................................. !C
m Conexi6n ae un slstema de audio algltat........................ 1C
Conexi6n a un PC ............................. ""
Configuraci6n del ReIo_ ............................................ 37
Encendido o apagado del TV ................................... 12
Funoi6n Plug & Pla'_ ............................................ 12
in Cambio de canales ......................... 13
m Ajuste del volumen ....................................................... 1_.
m Visualizaci6n de la Dantalla .......................................... !,_
i VlSUallzaclonde los men0s ........ 15
m Memorizacidn de os canales ....................................... 15
m Para seleccionar la fuente .............................................. !7
Edicidn del Nombre de Ia Fuente ae entraaa ................. - _
Use de los Darametrosde imagen automatlcos ........... 18
m Ajuste del Color del fondo ....................... 19
m Congeiacidn de Ia _nagen 19
Ajuste de afunoidn Film Mode ................................. 19
m Cambio dettama_o de la 3antalla ............................... 20
m Visualizacidn imagen en Imagen .................................... 21
m Configuraci0n del N el ae negro r 3M ..................... 22
m Selecci6n eel idloma de men0.................. 40
use eel Modo Juego ................................................. 40
NivelTransoarencla del men0 ........................................ _-O
m Visi6n de subtitutos (mensajes ae [ex[o en Dan[atla
- Anatdgloo 41
m Visi6n de subtitutos (mensajes de texto en Dantalla
- Digital ......................................................................... 42
m Ajuste de la funci6n de ayuaa ................................ 43
Conflguraci6n de Efec[o ae iuz................................. 43
m uso de V-Chit ............................................................... 44
m Reducoi6ndigital eel rulao ........................................... 51
Suia de actualizaci6n del software ................................. E"
m Identificaci6n de probiemas ......................................... 52
B Instaiaci6n dei see 3Re................................................... 54
B 3esconexi6n del soDorte............................................. 54
m C6mo ajustar el soporte ................................................ 55
C6mo ajus[ar eI angulo del televisor ......... 55
Instalaci6n del eauiDo de montaje en la pared ............... 55
m Personalizaci0n del sonido.......................................... 23 m Instalaclon de dlSDOSl[IVOSae mon[aie conforme con
m Uso de los Darametrosde sonido automaticos .............. 23 VESA .............................................................................. 55
Configuracidn detTruSurround XT _SRSTS XT'. .......... 24
SeIeccidn de una pista desonido mutticanaI MTS! -
DgltaI........................................ 24
m SelecciOnde una _sta de son_domut[_cana] MTSI ......
-Analogo ..................................................................... 25
Control au[omauoo ue volumen .... 25
SeIecci6n dei silencio interno ............................. 2_
Escuchar ei sonlao ae a sup lmagen del PIP ................ 26
Reajus[e ae valores ae sontao a lOSvalores oredefinidos
de fabrioa ........ 27
ConexiOn ae los aunculares _..27
Ajus[e ae amelodia de encendldo/aDagaao ................ 27
Use de las taDetas deooratlvas ............... 55
m Use eel clerre ant_rroboKensington 56
EsDecificaciones....................................................... 56
Antes de usar ei equ_po lea es[e manual pare evitarfal-
l as y guarde pare futures referenc as. J
Simbolo Pulse tmoorIan[e Note Be[on ee una
pulsacloR

Listado de caracteristicas
* Valores ajustables de la imagen que se pueden atmacenar en la memoria del televisor.
Temporizador automatico para encender o apagar el televisor.
Temporizador de desconexi6n especial.
Funci6n V-chip.
Excelente interfaz digital y capacidad de trabajo en red:
El sintonizador digital HD incorporado permite ver tas emisiones HD que no exigen una suscripci6n sin que sea
necesario disponer de un receptor de televisi6n digital.
Mando a distancia
Con el mando a distancia suministrado se puede controlar el televisor, la mayorta de reproductores de DVD, los
receptores de televisi6n digital y de cable y los aparatos de video.
SRS TruSurround XT
- SRS TruSurround XT proporciona un sistema surround Dolby virtual.
Accesorio$
Compruebe que las opciones siguientes se incluyen con su TV LCD.
Si falta alguna opci6n_ pOngase en contacto con el proveedor.
MandoADistanciayPilas
(AAAx 2)
LN-T1953H:BN59-00601A)
LN-T1954H:BN59-00608A)
Cable de alimentaci6n
3903-900085)
Kitde MontajeenPared Manual de
(BN96-04960A) tnstrucciones
i i
_ii i_ i i i i i i i i _ _ aaaaaaaaaaaaaaaaaaaaaaaaaaaaaaaaaaaaaaaaaaaaaaaall
Tarjeta de garantia / Tapetasdecorativas
Tarjetas de registro / LN-Tt953H-Left:BN63-03216A, Patio de limpieza
Guia de seguridad Right: BN63-03217A
(no esta disponible en todas LN-T1954H-Left:BN63-03216B, (BN63-01798A)
las Iocalidades) Right:BN63-03217B
El color y la farina de los elementos puede variar seg_n el modelo.

Aspecto general dei panel de control
Botones de la parte inferior derecha det
Los botones dei panel inferior derecho controtan las funciones basicas dei televisor, incluido el men0 en pantalla.
Para usar las funciones mas avanzadas, debe usar el mando a distancia.
Botones del panel frontal
Toque el tado derecho de cada
bot6n para activar la funci6n.
> El color y la forma dei producto pueden variar seg0n el modelo.
O SOURCE _ O
Cambia entre todas las fuentes de entrada disponibles
(TV, AV, S-Video, Component, PC, HDMt).
En el menQ de la pantalla, utilice este bot6n del mismo
modo que et bot0n ENTER det mando a distancia.
@ MENU O
Pulse para ver en pantalla un menQ con las
caracteristicas del TV.
O + VOL -
Pulse para aumentar o reducir el volumen. En et men0
de la pantalta, utilice los botones + VOL - del mismo
modo que los botones _ y i_ det mando a distancia.
O
@
^CHv
Pulse para cambiar de canal.
En et menO de la pantalla, utilice estos botones
^ CH v del mismo modo que los botones A y '_"det
mando a distancia.
(ENCENDIDO)
Pulse para encender o apagar el TV.
INDICADOR DE ALIMENTACION
Parpadea y se apaga cuando se enciende el aparato y
se ilumina en el modo en espera.
SENSOR DEL MANDO A DISTANCIA
Dirija el mando a distancia hacia este punto del TV.
ALTAVOCES

Aspecto general del panel de conexiones
Conectores _osterior
Se pueden usar para conectar componentes de A/V que estaran conectados _ermanentemente como reproductores de
video o de DVD. Si preciaa informaci6n aobre laconexi6n de equipoa, conaulte iaa paginas 7 a 12.
= ........................................................................................................ =
®
e
............../ .............
O AV IN
Entradas de video y audio para dispositivos externos,
como una videocamara o un reproductor de video.
S-VIDEO
Permite conectar la sei_al de S-Video de una camara o
de un video.
0 ANT 1 IN/ANT 2 IN
Permite conectar a una antena o un sistema de TV por
cable.
O PC IN
Permite conectar alas tomas de salida de audio y de
video de su PC.
DIGITAL AUDIO OUT (OPTICAL)
Se conecta al componente de audio digital. Q
SERVICE / EX-LINK
Conector solamente para servicio.. Q
O HDMI/DVI IN, DVI IN (AUDIO R/L)
Permite conectara la toma HDMIde undispositJvoquetenga
satidaHDMI.
Use el terminal HDMI/DVt tN para conectar el DVt a un
dispositivo externo. Debe usar el cable de DVt a HDMI
o el adaptador de DVt-HDMI (DVl a HDMI) para la
conexi6n del video, y el terminal "R-AUDIO-L" de DVFIN
para el audio.
Et terminal HDMI/DVI IN no es compatible con et PC.
- No se necesita ninguna conexJ6nde sonJdo para una
conexi6n de HDMI a HDMI.
O _ HEADPHONE
Permite conectar unos auriculares externos para
audiciones privadas.
COMPONENT IN
Permite conectar el video/audio de componentes.
POWER INPUT
Permite conectar el cable de alimentaci6n suministrado.
KENSINGTON LOCK
El bloqueo Kensington (opcional) es un dispositivo que
se utiliza para fijar fisicamente el sistema cuando se
utiliza en un sitio p0blico.
Si desea usar un dispositivo de bloqueo, p6ngase en
contacto con el distribuidor donde adquiri6 el televisor.
La ubicaci6n del "Bloqueo Kensington" puede variar
seg0n et modelo.

Mando a distancia
Puede usar el mando a distancia desde una distancia maxima de alrededor de 7 metros desde el TV. Cuando utilice el mando a
distancia, se_al_ siempre directamente hacia el TV.
O POWER _)
Enciende o apaga el TV
NUMERIC BUTTONS
Pulsar para cambiar el canal
0-
Pulse este bot6n para seleccionar
canales adicionales (digitales
y analogicos) emitidos por la
misma emisora Por ejemplo, para
eleccionar el canal "54-3" pulse "54",
"-" y"3L
CH LIST
Muestra el "Gestor canales" en la
pantalla.
O ANTENNA
Pulse este bot6n para seleccionar
ARE" o CABLE".
O VOL_! VOL(_
Pulse para aumentar o reducir el
volumen
@ =_(MUTE) @
Pulse para desactivar
momentaneamente el sonido
MENU
Muestra el menO de pantalla
principal
O &MODE
Seleccion del modo de sonido.
_) RETURN
Vuelve al menO anterior
(I) RMODE
Seleccion de efectos de imagen.
e SRS
Selecciona el modo SRS
TruSurround XT.
_) MTS
Pulse para elegir estereo, mono o
pro grama de audio independiente
(emisi6n SAP).
(D AUTO PROG.
Se pulsa para memorizar
automaticamente los canales
seleccionados de TV/Cable
ADD/DEL
Se utiliza para almacenar y borrar
canates en la memoria
SOURCE
Pulse para visuallzar todos las
fuentes de video.
PRE-CH
Sintoniza el canal anterior.
_) FAV.C H
Pulse este bot6n para sintonizar sus
canales favoritos.
SLEEP
Pulse este boton para seleccionar
un intervalo prefijado para la
desconexion automatica
¢ CH_ /CHQ
Permiten cambiar de canal.
_) EXiT
Pulse el bot6n para salir.
ARRIBAA / ABAJO_t /
IZQUIERDA _ /
DERECHA_- / ENTERC_
Sirve para seleccionar los elementos
del menO en pantalla y cambiar los
valores del men&
INFO
POiselo para mostrar informaci6n en
la pantalla del televisor
_) CAPTION
Controla el decodificador de
subtitulos.
STILL
Pulse para detener la accion durante
una escena concreta Rata reanudar
la reproducci6n normal, vuelva a
pulsarlo.
RSIZE
Seleccion del tamaSo de la imagen
@ PIP
Imagen sobre imagen Encendido/
Apagado.
_) CN ^/v
Presenta secuencialmente los
canales disponibles (Estos botones
s61o cambian los canales de la
ventana PIP).
_) POSiTiON
Beeldformaat teletekst selecteren
PO_%_'R 80tJRCE
......
@®@
@@@
MUTE oo
oo o
NNU FJ(IT
-@
.....@
= .................................... =
>* Es un mando a distancia especial para personas con discapacidades visuales; presenta puntos Braille en los botones de
encendido, de canales, volumen, Stop.

Instalacibn de las pilas en el mando a distancia
1. Levante latapa de la parte posterior del mando a distancia, como se muestra en la ilustracidn.
2. Coloque dos pilas de tamai_oAAA.
:_ Compruebe que los extremos '+" y '-" de las pitas concuerdan con el diagrama del interior del
compartimiento.
3. Vaetva a colocar latapa.
Si nova a usarel mando a distanciadurante an largo periodo detiempo, extraigalaspilas y guardelasen
unlugar frescoy seco.
El mandose puede atitizarhasta unadistancia de unos 7 metrosdel televisor.
(Con an uso normal delTV, laspilas daran atrededorde an a_o).
:_ Si el mando a distancia no funciona, haga estas comprobaciones:
1. LEsta encendido eITV?
2. LEstan invertidos los polos positivo y negativo de la bateria?
3. LBe ban agotado tas baterias?
4. LHa habido an corte de luz o et cable esta desconectado?
5.6Hay cerca una luz fluorescente o un letrero de nedn?
i
i
i
Conexibn de antenas de VHF y UHF
Si su antena tiene un conjunto de cables con este aspecto, consulte "Antenas de par de cables
pianos de 300 (1"a continuaci6n.
Si ia antena tiene un cable como el que se muestra en etdiagrama de la derecha_consulte
"Antenas con cables coaxiales de 75ohmios'.
Si dispone de dos antenas, consalte "Antenas de VHF y UHF independientes'.
Antenas dejoarde cablespianosde 300Q
Si utiliza una antena externa (de techo o de "orejas de conejo') de par de cables pianos de 300 D, siga las indicaciones siguientes.
1. Coloque los condactores del par de cables bajo los torniltos del adaptador de 300-75
(no incluido).
Utilice un destornitlador para apretar los tornillos.
2. Conecte et adaptador en el terminal ANT 2 IN (CABLE) en la parte posterior del televisor..
Antenas de cable coaxial de 75
1. Conecte el cable de la antena en el terminal ANT 1 IN (AIR) de la parte inferior dei panel
posterior.
Antenas de VHF _endientes
Si dispone de dos antenas independientes para el TV (una de VHF yotra de UHF), debe combinar ambas sehales de la antena
antes de conectarlas al TV. Este procedimiento precisa an adaptador-combinador especial (disponible en la mayoria de tiendas de
eiectr6nica).
1. Conecte ambos cables de antena al combinador.
2. Conecte el combinador en el terminal ANT 1 IN (AIR) de la parte inferior del panel
posterior.

Conexibn de TV por cable
Pare conectar a unsistema de TV per cable, siga estas instrucciones.
TV==y=porcable sin decodificador
1. Conecte el cable de entrada en etterminal de la antena ANT 2 IN (CABLE) de la parle
posterior del TV.
:_ DadoqueelTVestapreparadoparelatelevisidnporcable,nosenecesitaundecodificadorparevet
canalesdecablenocodificados.
Conexi6n al decodificador que decodifica todos los canales
1. Busque el cable conectado al terminal ANT OUT det decodificador.
Esteterminalpuedeesterindicadocomo'ANTOUT","VHFOUT"o"OUT".
2. Conecteel otro extremedetcableen el terminalANT 2 IN(CABLE) de la parteposteriordel TV.
Cone×i6n a un de¢odificador que de¢odifica alqunos canales
Si su decodificador s6to decodifica algunos canales (como los canates de pago), siga las instrucciones siguientes. Necesitara
undivisor de dos vies, un conmutador de RF (A/B) y cuatro largos de cable RF. Estasopciones se encuentran en la mayoria de
tiendas de electr6nica).
Busque y desconecte el cable que esta
conectado al terminal ANT IN (entrada de
antena) del decodificador.
::_ Esteterminalpuedeesterindicadocomo"ANT
IN","VHFIN"o "IN".
"{'2
2. Conecte este cable al divisor de dos vies.
_.
Cable
entrante
Divisor
Conecte el cable RF entre un terminal
OUTPUT(satida) del divisor y et terminal IN
(entrada) del decodificador. Cable
entrante
Divisor
J
Servicio de Cabte
4, Conecte et cable RF entre el terminal ANT
OUT del decodificador y el terminal BIN del
conmutador A/B.
Cable
entrante
Servicio de Cable Conrnutador
Conecte otto cable RF entre elotto terminat
OUT del divisor y el terminal A.IN del
conmutador de RF (A/B).
entra rite Divis_ r F F_ 13)
Servicio de Cable Conrnutador
6. Conecte el Oltimocable RF entre el terminal A,T=N]
OUT del conmutador RF (A/B) y el terminal ___J'_'="='''='=_ _m=======mm_Fm_l '_==', _ A
/
ANT IN an la parle posterior del televisor. ====¢I_I I_, ,, ,,_ _J- = ,_l _]_=_ _ O_ /
Cable _ _J_ _J_r _J_ Antena /
en an e . . i v del
Divisor RF A/B
Servicio de Cable Conmutador j
Unavez hechaesta conexi6n, cotoqueel conmutadorA/B en la posici6n'A" pare la visuatizaci6nnormal Coloque el conmutadorA/B en
la posici6n"B" parever los canalescodificados.(Cuandosit0e el conmutadorA/B en "B'_deberasintonizarel TV atcanalde salida del
decodificador,que normalmentees el canal 3 o4).

Cone×i6n de un reproductor de video
Conexi6n de video
Estas instrucciones presuponen que ya ha conectado el TV a una antena o sistema de TV per cable (siguiendo las instrucciones
de las paginas 6 a 7). Si aOnno ha conectado etTV a una antena o un sistema de cable_saltese ei paso 1.
1. Desconecte el cable o la
antena de la parte posterior
dei TV.
Conecte el cableo laantena
en el terminalANT IN de la
parteposteriordet reproductor
de video.
Conecte el cable RF entreel
terminalANT OUT (salidade
antena) del reproductorde
video y el terminalANT 1 IN
(AIR)oANT 2 IN (CABLE)del
televisor.
Conecte un cablede video
entre la tomaVIDEO OUT del
reproductorde video y latoma
AV IN 1(oAV IN2)[VIDEO]
del televisor.
Conecte unjuego de cables
de audio entre los conectores
AUDIO OUT del reproductor
de VCR y los conectores
AVIN 1 (oAV IN 2)
[R-AUDIO-L] del TV.
>_Si tiene un reproductor
de video "mono' (sin
estereo), use el conector
Y (no suministrado) para
conectar los conectores de
entrada de audio izquierdo
o derecho del TV. Si el
video es estereo, tendra
que conectar dos cables.
Panel posterior del TV
Siga las instrucciones de "Visualizaci6n de una cinta de video o de camara de video" para
vet sus cintas.
Cada reproductor de video tiene una configuraci6n distinta en el panel posterior.
>_Cuando conecte un reproductor de video, debe hacer coincidir los colores del terminal de
conexi0n y detcable.
Conexi6n de S-Video
Estetelevisor Samsung se puede conectar a una sei_alS-Video procedente de un reproductor deVCR.
(Esta conexi6n ofrece meier catidad de imagen con relaci6n a un reproductor de VCR normal).
1. Para empezar, siga los
pasos 1 a 3 del apartado
anterior para conectar la
antena o el sistema de
cable al reproductor de
VCR y al TV.
2. Conecte un cable de
S-Video entre la toma
de salida de S-Video det
reproductor y la toma de
entrada de S-Video del
televisor.
Conecte un juego de
cables de audio entre los
conectores AUDIO OUT
del reproductor de VCR y
los conectores AV IN [R-
AUDIO-L] del TV.
Panel posterior del VCR
.... _@®o®®oJ
Panel posterior del TV
3' Cable de Audio No incluido)
Cable de S-Video (No incluido)
Cable RF No inoluido
Normatmentese incluyeuncableS-Videocon losreproductoresdevideo S-VHS.
(En casecontrario,consulteen la tiendadeelectr6nica).
>- Cada reproductor de video S-VHS tiene una configuraci6n distinta en el panel posterior.
Cuando conecte un reproductor de S-VHS, debe hacer coincidir los colores del terminal
de conexi6n y del cable.

Conexibn de un reproductor de DVD
Los conectores del panel posterior dei TVfacilitan la conexi6n de un reproductor de DVD al TV.
1. Conecte un cable de
componente entre las tomas
COMPONENT IN (1 o 2)
[Y,PB,PR] del televisory las Panel posterior del
tomas COMPONENT OUT reproductor de OVD
[Y,PB,PR]del reproductor de
DVD.
2. Conecte un cable de audio
entre tastomas
COMPONENT IN (1 o 2)
[R-AUDIO-L] del televisor
y las tomas AUDIO OUT
del reproductor de DVD.
Panel posterior del TV
.....I Cable de Audio
(No incluido}
Cable de Component {No irlcIuido}
> El video Componente separa el video en Y (Luminancia (brilto), et Pb (azul) y ei Pr (rojo)
para reaizar la calidad del video. Las conexiones de audio y de video componente deben
coincidir. Por ejemplo, si se conecta el cable de video a Component in, conecte tambien
eI cable de audio a la misma entrada.
> Cada reproductor de DVD tiene una configuraci6n distinta en el panel posterior.
> Cuando conecte un reproductor de DVD, debe hacer coincidir los colores del terminal de
conexi0n y dei cable.
Conexibn a un DVD/receptor de TV digital a trav6s de un HDMI
Solo es aplicable si hay un conector de salida de HDMI en et dispositivo externo.
1. Conecte un cable de HDMI Panel posterior del
entre el conector de reproductor de DVD
HDMI/DVl IN dettelevisor
y el conector HDMI del
reproductor de DVD/
reproductor de televisi6n
digital.
Panel posterior del TV
Cable de HDMI INo incluido) _L _I
_.Qu_ es HDMt?
• HDMt, o interfaz multimedia de alta definici6n, es una interfaz de la siguiente
generaci6n que permite la transmisi6n de se_ales digitales de audio y de video
mediante un cable simple sin compresiOn.
• La diferencia entre los dispositivos HDMI y DVt es queet HDMt es mas peque_o y
tiene instalada la funciOn de codificaci0n HDCP (protecci0n alta de la copia digital det
ancho de banda).
:_ Cada reproductor de DVD tiene una configuraciOn distinta en el panel posterior.

Conexibn de un DVD o un Decodificador digital rnediante DVI
Solo es aplicable si hay un conector de satida de DVi en et dispositivo externo.
1. Conecte un cable de DVI
a HDMI o un adaptador
de DVI-HDMI entre el
conector de HDMI/DVI IN
del televisor y el conector
de DVI del reproductor de
DVD/reproductor de televisi6n
digital.
2. Conecte un cable de audio
entre la toma de entrada
de DVI INJR-AUDIO-L] det
televisor y las tomas AUDIO
OUT del reproductor de DVD/
reproductor de televisi6n
digital.
DVD/reproductor de
televisi6n digital
Panel posterior del TV
__'_ _o,_o_,,__
2"[ Cable de Audio (No incluido)
3" Cable OVl a HDMI (No ineluido)
>_Cada reproductor de DVl tiene una configuraci6n distinta en el panel posterior.
_- Cuando conecte un reproductor de DVI_debe hacer coincidir los coiores del terminal
de conexi6n y del cable.
_'-Cuando se usa una conexJ6nde cable HDMI/DVI IN,se debe conectar en el terminal
HDMI/DVI IN.
Conexibn de un sistema de audio digital
Las tomas del panel posterior dettelevisor facilitan laconexJ6nde un sistema de audio digital al televisor.
Conecte un cable 6ptico entre
las tomas DIGITAL AUDIO
OUT (OPTICAL) Salida de
audio digital, 0ptica) det
televisor y las tomas Digital
Audio input Entrada de audio
digital) del sistema de audio
digital.
Cuado un sistema de audio
digital se conecta a la
terminal "DIGITALAUDIO
OUT (OPTICAL)" terminal:
Reduzca la ganancia
volumen) det TV, y ajuste el
voIumen con el control del
amplifJcador.
$istema de audio digital
Panel posterior del TV
>- La emision en 5.1 canateses posible siesta conectado a un dispositivo externo que admita
5.1 canates.
>_Cada dispositivoexterno de fuente de entrada tJeneunaconfiguraci6n diferente en el panel
posterior.

Cone×ibn a un PC
1. Connect a D-Sub
Cable between PC IN
[PC] connector on
the TV andthe PC
output connector on
your computer.
2. Connect a PCAudio
Cable between PC IN
[AUDIO] jack on the
TV and the Audio Out
jack of the sound card
on your computer.
Cada PCtiene una configuraci6n distinta en et panel posterior.
>*Cuando conecte una PC_debe hacer coincidir los cotores del terminal de conexi6n y del
cable.

Encendido o apagado del TV
Pulse el bot6n POWER d) del mando a distancia.
Tambi_n puede usar el bot6n (b button on the front of the panel.
Funcibn Plug & Play
Cuandoseenciendeel televisorporprimeravez,se configuranseguidosy automaticamentedosajustes basicosdel
usuario.
Pulse el bot6n POWER en el mando a distancia.
Aparece el mensaje ""Menu language, Shop Mode, Channels and Time will be set'.
Pulse el bot6n ENTER y aparecera automaticamente el ment_"Select the language
of the OSD".
Pulse tos botones h, o _' para seleccionar el idioma; pulse despues el bot6n
ENTER.
Se muestra el mensaje "Seleccione et modo Domicitio si instata et TV en casa."
Pulse los botones 4 o I_ para seleccionar "Comercio" o "DomicilW despu_s_
pulse el bot6n ENTER.
Se muestra el mensaje "Seleccionar las antenas que desea memorizar.'.
>_Es recomendabte configurar el televisor en el modo Domicilio para obtener la
mejor imagen en un entorno domestico.
:_ El modo Comercio s61oes necesario en los entornos comerciales.
:_ Si la unidad se ha configurado accidentalmente en el modo Comercio y se
desea votver al modo Dinamico, se debe pulsar el bot6n del votumen y, a
continuaci6n, mantener pulsado durante cinco segundos el bot6n MENU del
lateral del televisor.
Pulse los botones A o T para memorizar los canales de la conexi6n
seleccionada. Pulse el bot6n ENTER para seleccionar "lniciar".
Si la antena esta conectada a ANT 2 (CABLE)_seteccione "Cable"; siesta
conectada aANT 1(AIR), seleccione "Aire'.
Si ANT 1 (AIR) y ANT 2 (CABLE) estan conectadas, seleccione "Aire+Cabte'.
Enet modo de cable, puede seleccionar el origen de se_al correcto entre STD,
HRC e IRC pulsando los botones A o _' a continuaci0n, pulse el bot6n ENTER.
Pdngase en contacto con su proveedor de cable para saber el tipo de sistema de
cable existente en su zona.
El televisor empezara a memorizar todos los canaies disponibles.
Una vez guardados todos los canates disponibtes, volvera a aparecer el ment_
Prog.Auto. Pulse et bot6n ENTER cuando se complete la memorizaci6n de
canates. Aparece automaticamente el ment_ "Seleccionar et modo de reloj".
:_ Para detener la bt_squeda antes de que termine, pulse el bot6n ENTER con la
opci6n Detener seleccionada.
Pulse el bot6n ENTER.
Pulse los botones A o _r para seleccionar "Manual' o "Auto"despu6s_ pulse el
bot0n ENTER.
Se muestra el mensaje "Seleccionar si no observa el horario de verano.'.

7. PulselosbotonesAo_rparaseleccionar"Si"o'No"despu6s,pulseelbotdn
ENTER.
Semuestraelmensaje"Seleccionelazonahorariaenlaqueseencuentra.".
8. Pulsetosbotones_,o'f'pararesaltarlazonahorariadetarealocal.
PulseelbotdnENTER.Siharecibidounase_aldigital,seajustaralahora
automaticamente.Encasenegative,consultelapagina38paraajustaretreloj.
g. Apareceelmensaje"Disfrutarsuvisi6n."
Cuandotermine_pulseetbotdnENTER.
Si desea reiniciar esta funci6n...
1. Pulse el bot6n MENU para vet el ment_.
Pulse los botones A o _r para seleccionar 'Configuraci6n" despues, pulse et bot6n
ENTER.
2. Pulse de nuevo el bot6n ENTER para seleccionar "Plug & Play".
3. Aparece el mensaje "Se ajustaran idioma mene, Comercio, canales y hera."
(Se ajustara idioma de menes, canates y hera).
Cambio de canales
Mediante los botones de canal
Pulse los botones CH® o CH® para cambiar los canales.
>'-Cuando pulse los botones CH@ o CH® etTV cambiara los canales per orden.
Vera todos los canates que ha memorizado el TV (El TV debera haber
mernorizado come minimo tres canales). No vera los canates borrados o no
memorizados. Consulte las paginas 15 para la memorizaci6n de los canales.
v0L J c.
MUTE
o o Y
Utilizaci6n del boton PRE-CH para seleccionar el canal anterior
Pulse el bot6n PRE-CH.
El TV volvera al Qltimo canal visuelizado.
>- Para conmutar rapidamente entre dos canales bastante distantes, sintonice
un canal y use los botones numCricos para seleccionar el segundo.
Despues use et bot6n PRE-CH para conmutar r@idamente entre eflos.
,89-

Ajuste del voiumen
1. Pulse los botones VOL® o VOL® para subir o bajar el votumen.
( )oOO
ooio oo
"G
Mediante Silencio
Puede interrumpir et sonido en cualquier momento pulsando el bot6n MUTE.
1. Pulse el bot6n MUTE y el sonido se desconectar&
En la esquina inferior izquierda de la pantalla aparecera la palabra
2. Para recuperar el sonido vuelva a pulsar MUTE o, simplemente, pulse los
botones VOL® o VOL®.
II @
ii /<"f,, -'-,\
Visualizacibn de la pantalla
Lapantaila identifica el canal actual y el estado de atgunos ajustes de audio-video.
1. Pulse el bot6n INFO del mando a distancia.
El TV visualizara el canal, el tipo de sonido yel estado de determinados ajustes de
sonido e imagen.
[_j Pulse el bot0n INFO otra vez o espere unos 10 segundos y desaparecera
automaticamente.

Visualizacibn de los men s
1. Con el aparato encendido_ pulse el bot6n MENU.
En tapantalta aparece et men_ principal. En et lade izquierdo det men_ hay cinco
iconos: Imagen_Sonido_Canal _Configuraci6n, Entrada
2. Pulse tos botones A o _r para seleccionar uno de los cinco iconos.
A continuaci6n_ pulse ENTER para acceder al subment3dei icono.
3. Pulse el bot0n EXIT para salir.
!t_)Pasado aproximadamente un minuto_los men_s de la pantafla desaparecen de
_sta.
•_j -..d
MENU BCr
@
Memorizacibn de los canales
EtTV puede memorizar y almacenar todos los canales disponibles, tanto de "antena" como de cable. Una vez memorizados
los canales disponibtes, use los botones Clio y CHQ para exptorarlos. De este mode no es necesario cambiar los canaies
introduciendo los digitos. La memorizaci6n de canales tiene tres pasos: seleccionar una emisora de origen, memorizar los
canales (automatico) y agregar o borrar canaies (manual).
Selecci6n del oriqen de la sepal de video
Antes de empezar a rnemorizar los canales disponibles_debe indicar et tipo de origen de la sei_alconectada al TV
(esdecir_antena o sistema de cable).
1. Pulse el bot6n MENU para visualizar el ment_.
Pulse los botones A o _r para seleccionar "Canal" y, despues, pulse el bot6n
ENTER.
Pulse el bot0n ENTER para seleccionar "Antena'.
Pulse los botones A o _r para seleccionar "Aire" o 'Cable" despues, pulse el
bot6n ENTER.
Pulse el bot0n EXIT para salir.

Almacenamiento de los canaies en la memoria (m_todo autom&tico)
Pulse el bot0n MENU para visuatizar el men&
Pulse los botones A o T para seteccionar "Canal" y_despues_ pulse el botdn
ENTER.
Pulse los botones A o _' para seleccionar "Prog. Auto" y, despues, pulse el bot6n
ENTER.
Pulse los botones h, o _' para seleccionar laconexi6n de la antena, despu_s
pulse ENTER.
:_ Aire.: seSal de antena "Aire.'. / Cable: seSatde antena de "Cable'./Aire +
Cable: seSales de antena 'Aire." y de "Cable'.
4. At seleccionar el sistema de TV de cane: Pulse el bot0n ENTER para iniciar el
programa automatico.De forma predeterminada, el sistema de televisi6n por cable
esta establecido en "STD". Si desea seleccionar otto tipo de sistema de cable,
pulse los botones A o T para seleccionar las opciones "STD", "HRC' o "IRC'.
,-_STD, HRC e IRC identifican los distintos tipos de sistemas de TV por cable.
P6ngase en contacto con su proveedor de cable para averiguar el tipo de
sistema de cable existente en su zona.
Eneste momento ya se ha seteccionado et origen de la sepal.
Pulse ENTER para iniciar el programa automatico.
>_Para detener la bQsqueda antes de que termine, pulse el bot6n ENTER con la
opci6n Detener seleccionada.
5. Una vez memorizados todos los canales disponibles, el ment_'Prog. Auto", volvera
a aparecer.
Pulse el bot0n EXIT para satir.

Para seleccionar la fuente
Siga este procedimiento para seleccionar eI televisor uotra fuente extema de entrada
conectada al televisor. Se usa para seleccionar la pantatla deseada.
1. Pulse el bot6n MENU para ver el men_ en pantalta.
Pulse los botones A o _r buttons to select 'Entrada', then press the ENTER
button.
2. Pulse el bot6n ENTER para seleccionar "Lista de Origen".
Pulse los botones A o _r para seleccionar la fuente de la sepal, despu6s pulse el
bot6n ENTER.
_'-Cuando conecte equipos a ta pantalla LCD, podra elegir entre los siguientes
conjuntos de tomas: TV_AV, S-Video, Componente_ PC, HDMI en et panel
posterior del televisor.
:_ S61ose puede selecoionar la entrada de HDMI si et dispositivo extemo esta
encendido y conectado a traves del HDMI.
Puede elegir solamente los dispositivos extemos que esten conectados al televisor.
[15}Pulse el bot0n SOURCE del mando a distancia para ver una fuente de sepal
extema.
l POWER
Edicibn del Nombre de la Fuente de entrada
Nombre at dispositivo de entrada de informaci6n conectado con las tomas de entrada para facilitar la selecci6n de fuente
de entrada.
Pulse el bot0n MENU para ver el men_ en pantalta.
Pulse los botones h. o T buttons to select "Entrada', then press the ENTER
button.
Pulse los botones A o _r para seleccionar "Editar Nombre" y pulse el bot0n
ENTER.
2. Pulse los botones A o T para seleccionar la toma de entrada "AV","S-Video",
"Componente', "PC", o 'HDMI' y,a continuaci6n pulse el bot0n ENTER.
Pulse los botones A o T para seleccionar la fuente de entrada "Video", "DVD"_
'D-VHS', "Cable STB'_ "HD STB", "Satelite STB", "PVR STB', "Receptor AV',
"Receptor DVD'_ "Juego", "Fitmadora', "DVD Combo'_ "PC'_ "STB VOD", o "TV" y,
a continuacidn pulse el bot0n ENTER.
Pulse el bot0n EXIT para salir.

Uso de los par metros de imagen autom; ticos
EtTV tiene cuatro valores de imagen automaticos ("Dinamico', 'Normal', 'Cine') predeterminados de fabrica.
Puede activar et ajuste Dinamico, Normal o Pelicula seleccionandolo en el ment3.
1. Pulse el bot6n MENU para vet el ment_en pantatla.
Pulse et bot6n ENTER para seleccionar UmagenL
Pulse et bot6n ENTER para seteccionar 'ModoL
Pulse de nuevo et bot6n ENTER.
Pulse los botones A o V para seleccionar el ajuste de imagen "Dinamico'_
"Normal", o "Cine". Pulse et bot6n ENTER.
ElijaDin_micoparaaumentartaclaridady la defini¢i6nde!aimagen.
,.ElijaNormalparavolveralaconfiguracionestandardefabrica.
• ElijaCine paraobtenerunaimagennaturalsinmejoras.
Pulse los botones _,o V para seleccionar "Contraste", "Luminosidad',
"Definici6n', "Color", y"Tinte" despues, pulse el bot0n ENTER.
4. Pulse los botones 4 o _ para aumentar o reducir etvalor de una opci6n concreta.
Por ejemplo_si selecciona "Contraste"_ pulse _ para incrementarlo.
Pulse et bot6n EXIT para salir.
>- • Cuando haga cambios en "Contraste"_"Luminos.", "Color", o "Tinte"_el color
del OSD tambi6n se ajustara.
• Enel modo PC_las opciones Tinte, Definici6n y Color no estan disponibtes.
Pulse repetidamente el bot0n RMODE del mando a distancia para seleccionar un
modo de imagen.
Lg) L_J L.J
R_ 8.MODE STILL P,SIZE

Ajuste dei Color dei fondo
Puede cambier el color detoda lapantalta seg_n sus preferencies.
1,
2.
3.
Pulse el bot6n MENU para ver el men_ en pantalta.
Pulse el bot6n ENTER para seleccionar "lmagen".
Pulse los botones A o _' para seleccionar 'Tono Color' y, despues,pulse el bot6n
ENTER.
Pulse los botones A o • para selecciona 'Frio 2", "Frio 1","Normal", "Tibiol", o
"Tibio2". Pulse el bot6n ENTER.
Cuando el modo de imagen esta ajustado en Dinamico o Normal, nose puede
seleccionar Tibiol ni Tibio2. S61oesta disponible el modo Pelicula.
:_ Esta funci6n no esta disponibte en el modo PC.
Reajuste de valores de la imagen a los valores predefinidos de f_brica
1. Pulse los botones A o T para seleccionar "Reiniciar" y, despues, pulse el bot6n
ENTER.
Pulse los botones h, o T para seleccionar "Cancelar", "Aceptar".
Press the ENTER button.
Pulse el bot0n EXIT para salir.
:_ Se puede restaurar cada modo.
Congelacibn de la imagen
Pulse el bot0n STILL para congelar una imagen en movimiento. I_
II
P_Of)E
> El sonido normal se oira todavia. Pulse de nuevo el bot6n para cancetar.
>- Cuando V-Chip esta funcionando_no se puede utilizar la funci6n de imagen fija.
Ajuste de la funcibn Film Mode
Puede automaticamente detectar y procesar las se_ates de las peliculas procedentes de todas las fuentes y ajustar la imagen
para conseguir una calidad Optima.
2,
3.
Pulse el bot6n MENU para vet el menOen pantaila.
Pulse los botones A o _' para seleccionar 'Configuraci6n" y, despues, pulse el
bot6n ENTER.
Pulse los botones A o T para seteccionar "Modo pelicula' y, despues, pulse el bot6n
ENTER.
Pulse los botones o para seteccionar"Apagado" u "Encendido" y, a continuaci6n,
pulseel bot6n ENTER.
Pulse el bot6n EXIT para salir.
El Modo pelicula se admite en TV, VIDEO, S-VIDEO, y COMPONENTE 480i.

Cambio del tama o de la pantalla
La selecci6n del tamai_o de la pantalla depende del tipo de entrada de video.
1. Pulse et bot6n MENU para ver el men_ en pantatla.
Pulse el bot6n ENTER para seleccionar "lmagen'.
2. Pulse los botones A o • para seleccionar "Tamai_o"y_despu_s_ pulse et bot6n
ENTER.
3. Pulse los botones & o V' para seleccionar etformate de pantalta que desee.
Pulse el botdn ENTER.
Pulse et botdn EXIT para salir.
Anch01 : Enlarges the aspect ratio of the picture to fit the entire screen:
o 16:9 : Estabtece la imagen en mode panoramico 16:9.
• Zoom1 : Aumenta el tama_o de la imagen en la pantalla.
- Zoom2: Magnifies the size of the picture more than tlZooml!!.
,4:3 : Establece la imagen en modo normal 4:3.
- Solo buscar ; Use esta funcbn para ver la imagen completa sin cortes
cuando la entrada de la set, at sea HDMI 720p11080i
Alternative, pulse el boton RSIZE del mando a distancia de forma repetida para
seleccionar uno de los ajustes de tamafio de imagen.
_- • Si observa una imagen fija o el mode 4:3 durante largo tiempo (mas de 2 horns),
puede que la irnagen se"queme" en pantalta.Vea siempre que pueda la tetevisi6n en modo 16:9.
• HD (alta definici6n)
16:9 - 1080i(1920x1080), 720P (1280x720)
4
Ancho
16:9 Zoom1
Entarges me aspect ratio of the Estaelece la lmagen en moao Tamale de DantaIlacuando
picture to fit the entire screen panoramico 16:9. seamplia verticalmente eI
formato amDliO.
Zoom2
TamaSo de pantalta cuand0 Establece la imagen en Use esta funciTn para vet la
se amp!ia verticatmente el modo normal 4:3. imagen completa sin cortes
formate Zoom1. cuando !a entrada de la
seSal sea HDMI 720p/1080i
• En los modos TV, VIDEO, S-VIDEO, y COMPONENTE (480i, 488p), pueden seleccionarse todos los modos de pantalla.
(16:9 •Zoom1 • Zoom2 • 4:3).
• Puede selescionar Onicamentelos tamaSos de pantalta 16:9,4:3 yen los modos DTV, Componente (720p, 1080i) o
HDMI (720p, 1080i).
• Enel modo PC, s61opueden seteccionarse los modos 18:9 y 4:3.
• En Zoom1 y Zoom2, se puede ajustar el tamafio por medio de los botones arriba o abajo despu_s de pulsar el bot6n
RSlZE.
• Cuando se ve la seSal de alta definiciTn de un televisor digital, se puede usar la opci6n.
La ampliaci6n horizontal ajusta el formate 6ptico de la imagen amptiando 6sta horizontal y verticatmente. Por ejempIo,
puede restabtecer la imagen del formato 4:3 al formate 16:9. La opci6n no admite todos los dispositivos extemos.

Visualizacibn Imagen en imagen
Este producto Iteva un sintonizador incorporado. Per ejemplo, no es posible mirar un canal de television en la pantaIla principal y
otro en ta pantatla PIR Para mirar dos fuentes simultaneamente_ puede utitizar la funci6n PIR (Vea la pagina 39 para seleccionar
el sonido de la imagen PIP.)
>_ Mientras la opci6n V-chip activada (Consulte la pagiea 61)_la funci6n de PIP no se puede usar.
Activacion de Ima en en ima en
Pulse el bot0n MENU para ver el men_ en pantalta.
Pulse los botones A o V para seleccionar "Conflguraci6n_y, despues, pulse et
bot0n ENTER.
Pulse los botones A o _" para seleccionar "PIP" y, despues, pulse et bot6n
ENTER.
Pulse de nuevo et bot6n ENTER.
Pulse los botones A o T para seleccionar "Encendido_y_despu6s_ pulse el botdn
ENTER.
>'-Si mientras mira la televisi6n en el modo PIP, apaga ettelevisor y vuelve a
encenderlo, la ventana PIP desaparecera.
>_Puede ver emisiones de televisidn analdgicas en la pantatla PIP
(imagen secundaria) cuando la imagen principal proviene de un dispositivo
externo conectado a los modos PC.
PC S01o emisiones de television
Altemativo, pulse el bot6n PiP del mando a distancia de forma repetida para activar o
desactivar PiP.
Cambio del canal PiP
3. Pulse los botones _, o V para seleccionar "Canal de PIP" y, despu_s, pulse el
bot6n ENTER.
Pulse los botones h, o T para seleccionar el canal deseado en laventana PIP.
Pulse el bot0n ENTER.
:_ MAIN: PC
PIP: TV(Anat6gico)
:_ El canal puede estar active cuando la imagen secundaria este configurada
como TV.
!_] Pulse el bot6n Canal de PIP de} mando a distancia.
AUTO_OG ADD_EL POSITION /3
E_ r--q_ _E23
ContinOa..

Cambio de Ja posici6n de Ja ventana PiP
4. Pulse los botones _. o V para seleccionar "Posici6n" y, despues, pulse el bot6n
ENTER.
Pulse el botdn ENTER.
Pulse el botdn EXIT para salir.
Configuraci6n dei Nivel de negro HDIVll
Se puede seleccionar el nivei de negro en la pantalta para ajustar la profundidad de esta.
1. Pulse ei bot6n MENU para vet el men0 en pantatla.
Pulse los botones A o _' para seleccionar 'Configuraci6n" y despues pulse el
botdn ENTER.
2. Pulse los botones A o T para seleccionar "n.neg HDMI"y, a continuaci6n, pulseel
botdn ENTER.
3. Pulse los botones A o T para seieccionar "Normal"o" Bajo" y, a contJnuaci6n,pulse
el botdn ENTER.
, Normat: La pantatla adquiere mas britl0.
., Bajel La panta!!a se oscurece.
>- Esta funcidn s61oesta operativa cuando se ha conectado un dispositivo extemo
(reproductor DVD, decodificador, eta) al televisor a traves de HDMI.
Pulse et bot6n EXIT para satir.

Personalizacibn del sonido
Es posible ajustar los parametros det sonido segL_nsus preferencias personales.
(Tambien puede utilizar alguno de los ajustes "automaticos". )
1. Pulse el bot6n MENU para ver el men_ en pantalla.
Pulse los botones A o V para seleccionar "Sonido" y, despu_s, pulse et bot6n
ENTER.
2. Pulse los botones A o _r para seleccionar "Ecuatizador" y,despues, pulse el botdn
ENTER.
Pulse los botones & o V' para seleccionar una frecuencia determinada con etfin
de ajustarla.
Pulse los botones 4 o _ para aumentar o reducir el nivel de una frecuencia
concreta.
Pulse el bot6n ENTER.
Pulse el bot6n EXIT para salir.
:_ • Ajuste de balance de sonido L/R:
Para ajustar el balance de sonido de los altavoces L/R.
• Ajuste det ancho de banda (100Hz,300Hz, 1KHz, 3KHz, 10KHz) :
Para ajustar et nivet de las diferentes frecuencias de ancho de banda.
Use de los par; metros de sonido autom ticos
EtTV tiene cinco valores desonido automaticos ("Normal", "MOsica', "Cine", "Dialogo', o "Favorito') predeterminados defabrica.
Tambien puede seleccionar "Favorito" que recupera automaticamente sus valores de sonido personalizados.
1. Pulse el bot6n MENU para ver el menQ en pantafla.
Pulse los botones _, o V para seleccionar "Sonido" y, despuCs, pulse el bot6n
ENTER.
2. Pulse el bot6n ENTER para seleccionar 'Modo".
Pulse los botones _, o • para seteccionar el ajuste de sonido "Normal'_
"MQsica', "Cine', "Dialogo", o "Favorito" y pulse el bot6n ENTER.
Pulse el bot6n EXIT para salir.
,, Eli a Normal si desea usar los a ustes de f_brica.
• Elija M0sica Cuandomire videos musicales o conciertos.
, Elija CJne Cuando mire peliculas.
Elija D _logo cuando este v sual zando c0ntenidos de dialogos.
(p. ej. noticie[0s).
-Elija FavQrJto para recuperar sus parametros personal!zados.
(Consulte la secci6n !'Personalizaci6n del sonidd!)
[_1 Pulse el bot6n S.MODE del mando a distancia de forma repetida para seleccionar uno de
los ajustesde sonido estandar.
I I _ sRs FI_,

Configuracibn del TruSurround ×T (SRS TS XT)
TruSurround XT es una tecnologiaSRS patentada que soiventa el problema de reproducir contenido multicanat 5.1 en dos attavo-
ces.Trusurround proporciona una experiencia de sonido virtual convincente a traves de cualquier sistema de reproducci6n con
dos altavoces. Es totalmente compatible con todos losformatos multicanat.
1. Pulse el bot6n MENU para ver el men8 en pantalta.
Pulse los botones A o T para seleccionar "Sonido" y_despu6s_pulse ei bot6n
ENTER.
2. Pulse los botones A o V para seleccionar "Trusurround SRS XT" y, despu_s,
pulse ei bot6n ENTER.
3. Pulse los botones A o _' para seleccionar "Encendido_'o "Apagado _'y, despu6s,
pulse et bot6n ENTER.
Pulse el bot0n EXIT para salir.
(o) son marcas comerciates de ___ __..d_ _
SRS Labsjnc I La iecn0i0g a _
TruSurround XT esta incorporada
bajo licencia de SRS Labs,inc.
Seleccibn de una pista de sonido multicanal (MTS) =Digital
El sistema de transmisi6n de TV digital permite transmitir simultaneamente muchas pistas de audio (por ejemplo, traducciones
simultaneas del programa en otros idiomas). Ladisponibitidad de estas "multipistas" adicionales depende det programa.
Idioma#referido
2,
3.
Pulse el bot6nMENU para ver el menOen pantalla.
Pulse los botones A o T para seleccionar "Sonido_y, despu6s, pulse el bot6n
ENTER.
> Forma rapida de acceder al mene MTS: Pulse et bot6n "MTS" det mando a
distancia. Puede escuchar en un idioma distinto del elegido pulsando et bot6n
MTS.
Pulse los botones A o T para seleccionar "Opc. Multi-track" y, despu_s, pulse el
bot6n ENTER.
Pulselos botones ENTERpara seIeccionar"ldioma preferidoL
Pulselos botones A o T para elegirel idiomaquedesee
(English,Espafiol, Franc_s)y pulseel bot6n ENTER.
Pulseel botdn EXITpara salir.
[f_] Pulse et bot6n MTS en el mando a distancia. Puede escuchar en un idioma
distinto del favorito pulsando el bot0n MTS del mando a distancia.

Seleccibn de una pista de sonido rnulticanal (MTS) - Analogo
Sonido multi-track
Pulse el bot6n MENU para vet et menOen pantalta.
Pulse los botones A o _' para seteccionar "Sonido" y, despues, pulse el bot0n
ENTER.
Pulse los botones A o T para seleccionar 'Opc. Multi-track' y, despues, pulse el
bot6n ENTER.
3. Pulse los botones A o T para seleccionar 'Sonido Multi-track' y, despues, pulse
et bot6n ENTER.
Pulse los botones A o T para seteccionar una configuraci6n que desee; pulse
despues el botdn ENTER.
Pulse el botdn EXIT para satir.
• Elija Mona para canales que emiten en monoaural o si tiene dificu!!ades con la
recepcidn de sefiales estereofdnicas.
, Etija Est6reo para canates que emiten en estereo.
• Etija SAP para escuchar el Programa de audio independiente, que normal:
mente es la versidn en otro idioma.
Pulse varias veces los botones MTS del mando a distancia para seleccionar
"Mono'_ "Est_reo" o 'SAP".
_U
Control autom; tico de volumen
Reduce las diferencias en el nivel de volumen entre las emisoras.
1. Pulse el bot6n MENU para vet el men0 en pantatla.
Pulse los botones A o _' para seteccionar 'Sonido' y, despues, pulse el bot6n
ENTER.
2. Pulse los botones A o _' para seteccionar 'Vol. Auto" y_despu_s_ pulse et bot6n
ENTER.
3. Pulse los botones _. o V para seteccionar Encendido" o "Apagado" y_despues,
pulse el botdn ENTER.
Pulse el botdn EXIT para satir.

Seleccibn del silencio inferno
Sesilencia la salida de sonido desde los altavoces deI televisor.
1. Pulse el bot6n MENU para vet el ment_en pantatla.
Pulse los botones A o T para seteccionar 'Sonido' y, despues, pulse el bot6n
ENTER.
2. Pulse los botones A o T para seleccionar "SitEncendido Int" y, despu6s, pulse el
bot6n ENTER.
Pulse los botones A o T para seteccionar 'Encendido" y, despues, pulse el bot6n
ENTER.
Pulse el bot6n EXIT para salir.
>" Cuando "SitEncendido Int" se ajusta en "Encendido', et tJnico ment_de sonido
que se puede ajustar es "Opc. Multi-track'.
Los botones VOL +_VOL - y MUTE no funcionan si SilEncendido Intesta
establecido en Encendido
SilenciOdesactivadointernoi! Speaker Output SpeakerOutput Speaker Output Sound Output Sound Output Sound Output
............................................................ ..................................................................i
Silencio interno Mute Mute Mute Sound Output Sound Output , Sound Output
activado
Sin sepaldel
video Mute Mute Mute Mute Mute Mute
>*Cuando "SilEncendido lnt" se ajusta en ' Encendido', ei 8nico men8 de sonido que se puede ajustar es 'Opc. Multi-track'.
Escuchar el sonido de la sub imagen del PiP
Cuando la opci6n PIP esta activada, usted puede escuchar et sonido de la sub imagen del PIR
1. Pulse e{ bot6n MENU para vet el ment_en pantatla.
Pulse los botones A o T para seteccionar 'Sonido' y, despues, pulse el bot6n
ENTER.
2. Pulse los botones A o T para seteccionar 'Sel. Sonido' y_despu6s_ pulse et
bot6n ENTER.
Pulse los botones A o T para seleccionar 'Principal" o "Sub" y, despu_s, pulse el
bot6n ENTER.
Pulse et bot6n EXIT para satir.
• PrinciPal: Se usa para escuchar el sonido de la imagen principal
, Sub: Se usa para escuchar el sonido de ia imagen secundaria.
_'-Puede seleccionar esta opcidn cuando "PIP" esta ajustado como "Encendido".

Reajuste de valores de sonido a los valores predefinidos de f_brica
Si Mode Juego esta activado, la funci6n Reiniciar sonido se activa. Si_tras configurar etecuaiizador_ selecciona la funci6n Reini-
ciar, serestauran los parametros de fabrica de la configuraci6n del ecualizador.
1. Pulse et bot6n MENU para vet el ment_en pantatla.
Pulse los botones A o T para seleccionar 'Sonidd y, despues, pulse el bot6n
ENTER.
2. Pulse los botones A o _' para seteccionar "Reinicio del sonido" y, despu_s, pulse
etbot6n ENTER.
Pulse et bot6n EXIT para satir.
Cone×ibn de los auriculares
Puede conectar unos auriculares al equipo si desea vet un programa de tetevisi6n sin motestar alas personas que estan en ta
mismahabitacidn.
Cuando se inserta el conector det conjunto del cabezal en el puerto
correspondiente, se puede trabajar s61ocon las opciones "Opciones multi-track" del
ment_Sonido.
El usa continOo de auriculares a un volumen etevado puede da_ar lacapacidad
auditiva.
>"No recibira sonido de los altavoces cuando conecte los auricuiares at sistema.
>- El volumen de los auriculares y et del televisor se ajustan de manera distinta.
_) Pulse el baton VOL del maodo a distancia de forma repetida para seieccionar uno de los
ajustesde sonido estandar.
I1! L 2/
Ajuste de la melodia de encendido/apagado
Puede definirse un sonido de melodia para que suene cuando se encienda o se apague el TV.
1. Pulse el bot6n MENU para ver el mene en pantalta.
Pulse los botones _. o V para seleccionar "Conflguraci6n' y, despues, pulse et
bot0n ENTER.
2. Pulse los botones A o _r para seleccionar "Melodia' y, despu_s, pulse et bot6n
ENTER.
3. Pulse los botones _t.o _' para seleccionar "Encendido' o "Apagado' y, despu6s,
pulse et bot6n ENTER.
',8ajo: Estabtece el volumen de la metodia en un nivel bajo.
,'Media: Establece elvolumen de la melodia en un nivel media,
',Alto: Establece el volumen de la metodia en un nivel alto.
Pulse el bot0n EXIT para salir.
Dor6-&-_-I Eabrigade bajo !icencia de D0tbY Lab0ratories: "Do!by:: y e!simbo!o de la
D! G! "rAL doble D son marcas registradas de Do!by Laboratories.

Seleccibn de la antena
1. Pulse el bot0n MENU para ver el ment_en pantalla.
Pulse los botones A o _r para seleccionar "Canal" y, despues, pulse el bot6n
ENTER.
Pulse el bot6n ENTER para seleccionar "Antena'.
Pulse los botones A o _r para seleccionar "Aire" o 'Cable" y, despu6s, pulse el
bot0n ENTER.
Pulse el bot0n EXIT para salir..
[_! Pulse el boton ANTENNA del mando a dJstancia.
_Si taartena esta conec_ada aANT 1 tN (AIR_
seieccione "Aire' si esta conectada aANT 2
tN CABLE/. selecclone "Cable".
Si tas dos tomas ANT 1 IN (AIR) y ANT 2 IN
_CABLE es[an conectadas selecclone ta
en[raaa de antena Guedesee. Si no se selecciona
ta entrada de antena correctamente uueae
aparecer rulao en ia pantalta.
Supresibn de los canales codificados digitales
Lafunci6n Borrar canales codificados se usa para filtrar los canates codificados despues de reatizar una bQsqueda automatica.
Borra los canaies codificados de la iista y sintoniza los canales digitales per cable. Puede tardar de 20 a 30 minutes.
1. Pulse el botdn MENU para ver el men&
Pulse los botones A o V para seleccionar "Canal" y pulse el botdn ENTER.
Pulse los botones A o _' para seleccionar "Borrar canal encriptado" y pulse el
bot0n ENTER. Busca los canaies codificados para borrarlos de la lista.
Para detener la b_squeda de canales codificados:
Pulse e{ bot6n V para seleccionar Detener.
Pulse e{ bot6n 4 para seleccionar Si y, a continuaci6n, pulse el bot6n
ENTER.
Una vez completada la bt3squedade los canales codificados_pulse el bot6n
ENTER.
Pulse el bot0n EXIT para salir.

Configuracibn de las listas de canales
Puede agregar o suprimir un canal para que se muestren s01olos canales que desee.
1. Pulse el botOnMENU para ver el men_ en pantalta.
Pulse los botones A e • para seleccionar "Canal' y, despues,
pulse et betOnENTER.
2. Pulse los botones A o T para seleccionar "Lista de canales' y_despu_s_
pulse et botOnENTER.
3. Pulse los botones A o T para seleccionar "Todos" y, despa_s.
Pulse los botones A o T para seleccionar el canal que desee suprimir y
pulse et botOnENTER.
Pulse los botones A. o T para seleccionar "Borrar" y pulse et botOn ENTER
para suprimir el canal.
Desaparecera la marea_.
Pulse los botones A o V para seleccionar el canal qae desea agregar:
a continuaciOn pulse el bot0n ENTER.
Pulse los botones _, o T"para seleccionar "Agregar" y_despuOs_pulse et
bot0n ENTER.
Aparece una rnarca_ y el canal se a_ade.
Pulse el botOnEXIT para salir.
:_ Todos los canales seteccionados se rnostraran en "Agregados'.
• BotOn (P.MODE) rojo: P_tselo varias veces para seleccionar "Todos'!i
l'Agregados'! o"Eavoritos'_.
• Botbn (S.MODE) verde: P_Iselo para agregar todos !Oscanates
suprimidos.
oBotOn (STILL) amarillo: P_tselo para borrar todos !os canales
memorizados.
STILL
\'II- °
[:_E] E::] C2_

Para configurar los canales favoritos
Puede configurar como favoritos los canales que vea con m_s frecuencia.
1. Pulse el bot0n MENU para ver el men_ en pantalta.
Pulse los botones A o _r para seleccionar "Canal' y, despues, pulse el bot6n
ENTER.
2. Pulse los botones A o V para seleccionar "Lista de canaled y_despu0s_pulse
el botOnENTER.
3. Pulse los botones A o V para seleccionar "Agregados" y_despu0s_ pulse et
bot0n ENTER.
Pulse los botones A o T para seleccionar los canales favoritos que desee
vet entre los canales etiquetados.
Pulse los botones h, o _' para seleccionar "Favoritos" y_despu0s_ pulse et
bot0n ENTER.
Y el simbolo "_" se sobreindicara y el canal sera fijado como favorito.
Para cancelar su selecciOnde canales Favoritos_presione el bot6n ENTER
hasta que el simbolo "_' no este mas sobreindicado.
Pulse el bot0n EXIT para salir.
:_ S01opueden seteccionarse como favoritos los canales memorizados.
>-Todos los canales seleccionados se mostraran en "Favoritos'.

Manejo de la Lista de Canales
Muestra la lista de canales automaticamente cuando pulse CH LIST del mando a distancia. (Seleccione entre "Todos"_
"Agregados" o "Favoritos")
1. Pulse el bot6n MENU para ver el men_ en pantalta.
Pulse los botones A o _r para seleccionar "Canal" y, despues, pulse el bot6n
ENTER.
2. Pulse los botones A o T para seleccionar "Lista de canales' y_despu6s_pulse
el baton ENTER.
Pulse los botones A o V"para seleccionar "Default List Mode" (Modo de lista
predeterminada)_ esdecir, la lista de canales que desea que aparezca cuando
pulse el bot6n CH.MGR; a continuaci6n_ pulse et bot6n ENTER.
Pulse los botones _ko _' para seleccionar "Todos", "Agregados" o ' Favoritos" y,
despu6s_ pulse el bot6n ENTER.
La lista de canates que haya elegido se configurara ahora..
Pulse el bot6n EXIT para salir.
L_ AItemativo, pulse el boton CH LIST del mando a distancia para mostrar las Iistas de
canales.
A_rEN_L_,CHLIST FA'_CN SLEEP
o, !1I
Visualizacibn de la lista de canales
Puede mostrar una lista de todos los canales_ de los agregados o favoritos.
Pulse el bot6n MENU para ver el men_ en pantalla.
Pulse los botones A o _r para seleccionar "Canal" y, despues, pulse el bot6n
ENTER.
Pulse los botones A o _r para seleccionar "Lista de canaled y_despu_s_pulse
el bot6n ENTER.
3. Pulse los botones A o '_ para seleccionar "Todos", "Agregados" o 'Favoritos" y,
despu_s_ pulse et bot6n ENTER.
Pulse los botones _ko _r para seleccionar "Canal" y, despues, pulse el bot6n
ENTER..
Paraalternar entre todos los canales, los agregados o losfavoritos pulseel
bot6n (RMode) rojo del mando a distancia.
,, Bot6n (P,Mode) rojo: P_lselo varias veces para seteccionar !_Todos",
'Agregados", o "FavoritosL
P_ODE S.r_gE $_ILL

Etiquetado de canales
Los canales se pueden etiquetar con et prop6sito de que cuando 6stos se seleccionan se pueda ver su nombre.
Pulse el bot6n MENU para ver el men_ en pantalta.
Pulse los botones _, o _r para seleccionar "Canal' y, despues, pulse el bot6n
ENTER.
Pulse los botones A o _r para seleccionar "Nombre' y_despu_s_ pulse et bot6n
ENTER.
Pulse los botones A o V para seleccionar el canal al que se va a asignar
un nuevo hombre y pulse el bot0n ENTER. Pulse los botones A o '_' para
seteccionar una letra, un nQmeroo un espacio. (Se produce esta secuencia:
A...Z, 0...9, +_-, o_/, espacio).
Pulse el bot6n para pasar al siguiente carnpo, que quedara seteccionado.
Seleccione una segunda letra o digito pulsando los botones A o _', como
antes.
Repita el proceso para seleccionar los tres _ltimos digitos. Cuando haya
terminado, pulse el bot6n ENTER para asignar el hombre nuevo. Para borrar
el nuevo nombre asignado, seleccione "Supr.' pulsando los botones y pulse et
bot0n ENTER.
Pulse el bot6n EXIT para salir.
>-"Los nombres de los canatesemitidos digitatmente estan asignados
automaticamente y no pueden asignarlos los usuarios.
LNA (Low Noise Amplifier - Amplificador de ruido bajo)
Si eltelevisor esta funcionando en una zona con sei_al d6bit, la funci6n LNApuede mejorar la recepci6n (un amplificador previo de
bajo ruido refuerza la sepal entrante).
2,
3.
Pulse el botdn MENU para ver el men_ en pantalla.
Pulse los botones A o _r para seleccionar "Canal" y, despues, pulse el botdn
ENTER.
Pulse los botones A o _r para seleccionar "LNA" y, despu_s, pulse el botdn
ENTER.
Pulse los botones A o _r para seleccionar "Encendido_'y, despu6s, pulse el bot6n
ENTER.
Pulse el botdn EXIT para salir.
>- LNA funciona cuando la antena seleccionada es Aire o Cable. Los ajustes se
almacenan de manera independiente para cada canal. (Consulte "Selecci6n de
la antena' en la pagina 28).

Sintonizacibn fina de los canales analbgicos
Utitice la sintonizacidn fina para ajustar manuatmente undeterminado canal afin de que la recepci6n sea 6ptima.
1. Pulse el botdn MENU para ver el men0 en pantalta.
Pulse los botones A o _r para seleccionar "Canal' y, despues, pulse el bot6n
ENTER.
2. Pulse los botones A o _r para seleccionar "Sintonia Fina" y, despues, pulse el
botdn ENTER.
Pulse los botones 4 o I_ para ajustar la sintonia con precisi6n.
Para memorizar la sintonia fina en la memoria del televisor, pulse el bot6n ENTER.
> Si no almacena en la rnemoria el canal que ha ajustado de manera precisa, los
ajustes no se guardan.
Para memorizar la sintonia fina en la memoria dei televisor_pulse ei bot6n ENTER.
Para reiniciar la sintonizaci6n fina_pulse el bot6n V para seleccionar "Reiniciar" y
pulse et bot6n ENTER.
Pulse el bot6n EXIT para salir.
El simbolo ..... aparecera junto al nombre de los canaies cuya sintonizacion se
haya ajustado.
Comprobacibn de la potencia de la sepal digital
A diferencia de los canales anal6gicos, cuya calidad de recepci6n puede variar desde "nebuloso" a claro, los canaies digitales
(HDTV) tienen una catidadde recepci6n perfecta o no se reciben en absolute. Pot tanto, a diferencia de los canales anal6gicos_
nopuede sintonizar ningt_ncanal digital. Puede, no obstante_ajustar la antena para mejorar la recepci6n de loscanates digitates
disponibles.
1. Pulse el bot6n MENU para ver el men_ en pantalta.
Pulse los botones A o _r para seleccionar "Canal' y, despues, pulse el bot6n
ENTER.
Pulse los botones A o T para seleccionar "lntensidad sepal" y, despu6s_pulse el
bot6n ENTER.
Si el medidor de potencia de sepal indica que la sepal es debit, ajuste fisicamente
su antena para incrementar la potencia de la se_at. Contint_eajustando la antena
hasta que encuentre la mejor posici6n con la sepal mas potente.
Pulse el bot6n EXIT para salir.

Uso del TV como pantaila de ordenador (PC)
InstalaciOn del software en el eauioo slseqOnWindows XP)
A continuaci6n se muestra una pantalla de configuracidn normal en un ordenador con Windows. No obstante, las pantailas reates
en su PC probablemente seran diferentes, en funcidn de su versidn concreta de Windows yde su tarjeta de video. Pero aunque
las pantallas reales tengan un aspecto diferente, se aplicaran losmismos ajustes basicos e informaci6n en la mayoria de los
casos. (Si no es asi, pdngase en contacto con el fabricante del ordenador o con un concesionario Samsung).
1. Primero, haga clic en "Control Panel (Panel de control)" en el men0 lnicio de Windows.
2. Cuando aparezca la pantaila del Panel de control, haga ctic en "Appearance and
Themes (Apariencia y Temas)" y aparecera un cuadro de dialogo.
3. Cuando aparezca la pantalla del Panel de control, haga ctic en "Display (Pantalla)" y
aparecera un cuadro de dialogo.
4. Seteccione la ficha "Settings (Configuraci6n)" en el cuadro de dialogo.
La configuracidn de tamaSo correcto (resoiucidn)
Modo 6ptimo: 1360 x 768 pixeis
Si existe una opcidn de frecuencia vertical en el cuadro de dialogo de configuraci6n de la
pantalia_el valor correcto es "60" o "60 Hz".
Si no, haga clic en "Aceptar" y salga del cuadro de dialogo.
Modos de visuaiizacibn
Ifthe signal from the system equals the standard signal mode, the screen is adjusted automatically. If the signal from the system
doesn't equal the standard signal mode, adjust the mode by referring to your videocard user guide; otherwise there may be no
video. For the display modes listed below, the screen image has been optimized during manufacturing.
D-Sub Entrada
IBM
VESA
720 X 400
640 X 480
640 x 480
640 x 480
800 x 600
800 x 600
800 x 600
1024 x 768
1024 x 768
1024 x 768
1360 x 768
31.469 70.087 28.322
3t.469 59.946 25.175
37.861
37.500
37.879
48.077
46.875
48.363
56.476
60.023
47.712
72.809 31.500
75.000 31.500
60.317 40.000
72.188 50.000
75.000 49.500
60.004 65.000
70.069 75.000
75.029 78.750
60.015 85.800
-/+
-/-
-/-
+ I+
+ I+
+/+
-/-
-/-
+/+
+/+
HDMI/DVl Entrada
720 X 400 3t .469 70.687 28.322 - / +
IBM
640 X 480 31.469 59.946 25.175 - / -
800 x 600 37.879 60.317 40.000 +/+
VESA 1024 x 768 48.363 60.004 65.000 - / -
1360 x 768 47.712 60.015 85.800 +/+

Ajuste del televisor con el ordenador
C6mo realizar el Ajuste automatico
Utilice la funci6n de Ajuste automatico para que el aparato de TV ajuste automaticamente las se_ales de video que el
monitor recibe. La funci6n tambien ajusta automaticamente con mas configuraci6n y ajusta los vatores y las posicio-
nes de ta frecuencia.
>- Esta funci6n no esta disponible en et modo DVI-Digital.
Pulse el bot0n MENU para ver el men_ en pantalta.
Pulse los botones _, o V para seleccionar "Conflguraci6n" y_despues, pulse el
bot0n ENTER.
Pulse los botones A o T para seleccionar "PC" y, despu_s_ pulse el botdn
ENTER.
>- En primer lugar, cambie al modo PC.
2. Pulse losbotones A o T paraseleccionar'_AjusteAuto." y,despu6s_pulse el bot6n
ENTER.
Pulse el bot6nEXIT parasalir.
Ajuste de la calidad de _antalla
Etprop6sito del ajuste de la calidad de imagen es eliminar o reducir el ruido de la imagen. Si el ruido no desaparece s6to con la
sintonizaci6n fina, realice los ajustes de frecuencia hasta el maximo y vuelva a realizar la sintonizaci6n fina.
(consulte las paginas 45.) Despu_s de reducir el ruido, vuetva a ajustar la imagen para que quede alineada en et centro de la
pantalla.
Pulse el bot6n MENU para ver el men_ en pantalta.
Pulse los botones A o V para seleccionar "Conflguraci6n_y_despues, pulse et
bot0n ENTER.
Pulse los botones A o T para seleccionar "PC" y, despu6s_ pulse el bot0n
ENTER.
>_En primer lugar_cambie al modo PC.
2. Pulse los botones A o T para seleccionar "Fijar la Imagen" y, despu_s_ pulse el
bot0n ENTER.
3. Pulse los botones _, o V para seleccionar "Grueso_o "Fino" y, despues, pulse el
bot6n ENTER.
Pulse los botones 4 o I_ para ajustar la calidad de la pantalta.
>_Pueden aparecer rayas verticales o la imagen tenet poca definici6n.
Pulse el bot0n ENTER.
Pulse el bot0n EXIT para salir.

Cambio de _osici6n de _antalla
2,
3.
Pulse el bot6n MENU para ver el men_ en pantalta.
Pulse los botones _, o _' para seleccionar "Conflguraci6n" y, despues, pulse el
bot6n ENTER,
Pulse los botones A o _r para seleccionar "PC" y, despu_s, pulse el bot6n
ENTER.
En primer lugar, cambie almode PC.
Putse los botones A o T para seleccionar "Posici6n" y, despues, pulse el bot6n
ENTER.
Pulse los botones A. o _' para ajustar Posici6n V.
Pulse los botones 4 o i_ para ajustar Posici6n H.
Pulse el bot0n ENTER.
Pulse el bot0n EXIT para salir.
Inicio de la confiquraci6n de Posici6n de la pantalla o del Color
Puede recuperar todos los ajustes de imagen predeterminados de f_brica.
1. Pulse el bot0n MENU para ver el mene en pantalta.
Pulse los botones _, o T para seleccionar "Conflguraci6n" y, despues, pulse el
bot6n ENTER.
Putse los botones A o T para seleccionar "PC" y, despu_s, pulse el bot6n
ENTER.
En primer lugar, cambie almodo PC.
2. Pulse los botones A o _" para seleccionar "Reiniciar Imagen' y, despues, pulse el
bot0n ENTER.
Pulse el bot0n EXIT para salir.
Visualizaci6n de la resoluci6n actual
Puede conseguir informaci0n sobre la resotuci0n del PC.
1. Pulse el bot0n MENU para ver el men_ en pantalta.
Pulse los botones A o T para seleccionar "Conflguraci6n" y, despues, pulse el
bot0n ENTER.
Pulse los botones A o _" para seleccionar "PC" y, despu6s_pulse el bot0n
ENTER.
En primer lugar, cambie almode PC.
2. Pulse los botones A.o T para seleccionar "Resoluci6n"
>_En la pantalta se muestra la informaci6n sobre la resotuci6n.
Pulse el bot0n EXIT para salir.

Configuracibn del Reloj
Establecer el reloj es necesario para usar las distintas caracteristicas de temporizador del TM Ademas_puede comprobar la hora
mientras esta viendo etTV. (Simplemente pulse INFO).
O_uste manual del retoj
Pulse el bot6n MENU para ver el menO en pantalla.
Pulse los botones _, o V para seleccionar "Configuraci6n" y, despu_s, pulse
el bot6n ENTER.
Pulse los botones _, o V para seleccionar "Tiempo" y, despu_s, pulse et
bot6n ENTER.
2. Pulse el bot6n ENTER para seleccionar "Retoj"
3. Pulse el bot6n ENTER para seleccionar "Modo Reloj".
Pulse los botones _, o V para seleccionar "Manual" y, despues, pulse el
bot6n ENTER.
4. Pulse los botones _, o V para seleccionar "Config. Retoj" y, despu_s, pulse el
bot6n ENTER.
Pulse los botones ,,I o 1_para desplazarse a "Mes", "Dia", "A_o", "Hera",
"Minuto", o "am/pro". Seleccione la fecha y la hora que desee pulsando los
botones ,t, o T, pulse despuCs el bot6n ENTER.
Pulse el bot6n EXIT para salir..
> La hera actual aparecera siempre que se pulse el bot6n INFO.
> Puede ajustar el rues, el dia, el aSo, ta hora y el minuto directamente
pulsando los botones num_ricos det mando a distancia.

O_)ci6n 2: Aiuste autom&tico dei reto[
1. Pulse el botOn MENU para ver el men0 en pantalla.
Pulse los botones A o T para seleccionar "Configuraci0n" y, despues, pulse
el botOn ENTER
Pulse los botones A o T para seleccionar "Tiempo" y, despues, pulse el
bot6n ENTER.
2. Pulse el bot6n ENTER para seleccionar"Reloj".
3. Pulse et botOn ENTER para seleccionar"Modo Reloj"
Pulse los botones A o T para seleccionar "Auto" y, despu_s, pulse el bot0n
ENTER
4. Pulse los botones A o _' para seleccionar "Zona Tiempo" y, despues, pulse el
bot6n ENTER.
5. Pulse los botones • o '_' para resaltar la zona horaria del area local, despu_s
pulse el bot0n ENTER.
Pulse los botones A o T para seleccionar "Tiempo Verano"; despuCs pulse el
bot6n ENTER.
Pulse los botones _, o _' para seleccionar "Encendido" o "Apagado" y,
despu_s, pulse el bot6n ENTER.
Pulse el bot0n EXIT pare salir.
SegOn la estaci6n emisora y la se_at, puede que el ajuste automatico
de la hera no se realice correctamente. En este case, ajuste la hera
manualmente.
>* La antena o el cable debe estar conectado para que se ajuste la hera
autom_ticamente.

Confiquraci6n de! Temporizador de sueho
El temporizador de desconexi6n apaga automaticamente el televisor despues de un periodo prefijado
(entre 30 y 180 minutes).
Pulse el bot6n MENU para ver el men_ en pantalta.
Pulse los botones _, o T para seleccionar "Conflgaraci6n" y_despues, pulse el
bot6n ENTER,
Pulse los botones A o T para seleccionar "Tiempo" y, despues, pulse el bot6n
ENTER.
2. Pulse los botones A o _r para seleccionar "Temporizador" y, despues, pulse el
bot0n ENTER.
3. Pulse los botones A o V para ajustar 'Minuto'.
Pulse el botdn _, para seleccionar "ActivacidnL
Pulse los botones A o _r para seleccionar "Encendido_y_despu6s_pulse el botdn
ENTER.
Pulse el bot0n EXIT para salir.
_) Basta con que pulse el bot0n SLEEP del rnando a distancia para acceder
rapidamente a la configuraci0n dettemporizador.
Activacion v desactivaci6n del temporizador
Pulse el bot6n MENU para ver el men_ en pantalla.
Pulse los botones A o T para seleccionar "Configuraci6n" y_despu6s_ pulse el
bot6n ENTER.
Pulse los botones A o _r para seleccionar "Tiempd y, despues, pulse el bot6n
ENTER.
Pulse los botones A o T para seleccionar "Temporizador 1,
Temporizador 2, Temporizador 3" y_despues, pulse el bot6n ENTER.
Pulse los botones A o T para ajustar 'Hora" y pulse el bot0n 1_-para ir al paso
siguiente.
Ajuste otras opciones atitizando el mismo metodo que se indica anteriormente.
activar o inactivo Pulse los botones A o _'
Repetir Una vez_Cada dia, Lun-Vie_Lan-Sab_ Pulse los botones A o T
Sab-Dom
Volumen Seleccione el nivel de voiumen deseado Pulse los botones A o _'
Antena SelAire or Cable Pulse los botones A o _'
Canat Change the Canal Pulse los botones A o _'
Cuando haya terminado_pulse el bot6n RETURN para volver.
• La hora actual aparecera siempre que se pulse el bot6n INFO.
• Puede ajustar la hora_los minutos, el canal y etcanal directamente
pulsando los botones num_ricos del mando a distancia.
Pulse el bot0n EXIT para satir.

Descripcibn de las Funciones
Seleccibn dei idioma de rnen
1.
Pulse el bot0n MENU para ver el men_ en pantalta.
Pulse los botones A o V para seleccionar "Configuraci6n_y, despues, pulse et
botdn ENTER.
Pulse los botones A o • para seleccionar "ldioma' y_despu_s_ pulse et botdn
ENTER.
Pulse los botones _ko T para seleccionar el idioma apropiado:
"English', "Espa_ol" o "Frances'.
Pulse el bot0n ENTER.
Pulse el bot0n EXIT para salir.
Uso del IVlodoJuego
Si se conecta a una consola devideojuegos como PlayStationTM o XboxTM, podra obtener sensaciones mas realistas,
seleccionando Modejuego.
1. Pulse el bot6n MENU para ver el men_ en pantalta.
Pulse los botones A o _r para seleccionar "Conflguraci6n" y, despues, pulse el
bot6n ENTER.
2. Pulse los betones A o T para seleccionar "Mode Juego_'y,despues, pulse el
bot6n ENTER.
3. Pulse los botones A o _r para seleccionar "Encendido_'o "Apagado_'y, despu6s,
pulse et botdn ENTER.
4. Pulse el botdn EXIT para salir.
:_ si deseadesconectarsedela consoladevideojuegosyconectarseaotrodispositivoexter
no,ajustelaopci6nMododeljuegocomoApagadoenel menudeconfiguracion.
Si velatelevisionen Modojuego,la pantallatiemblaligeramente.
Modojuego noestadisponibleen elmododeTV.
Nivel Transparencia del men
Ajusta latransparencia de la pantaila del menLO.
1. Pulse el botdn MENU para vet et men_ en pantalta.
Pulse los botones A o T para seleccionar "Configuracidn" y_despu6s_ pulse el
bot6n ENTER.
2. Pulse los botones A o V' para seleccionar "Transpar. Del men_" y, despu6s, pulse
el bot0n ENTER.
3. Pulse los botones A o T para seleccionar el nivety pulse despu6s el bot0n
ENTER.
Pulse el bot0n EXIT para satir.

Visibn de subtitulos (mensajes de texto en pantalla) - Anaibgico
Lafunci6n subtituto anal6gico funciona en un mode de canal RF anal6gico o en mode de sepal externa.
Pulse el bot0n MENU para ver el men_ en pantalta.
Pulse los botones A o V para seleccionar "Conflguraci6n" y_despues, pulse el
bot0n ENTER.
Pulse los botones A o V para seleccionar "Subtitulo" y, despues, pulse el bot0n
ENTER.
3. Pulse el bot0n ENTER para seleccionar "Subtitulo". Pulse los botones A o T para
seleccionar "Encendido" y_despu6s_ pulse el bot6n ENTER.
Pulse los botones A o _r para seleccionar "Modo de Subtituld y, despues, pulse
el bot6n ENTER.
Pulse los botones A o T para seleccionar el submen_ que desee (Programado,
CC1~CC4_o Textol~Texto4); pulse despues el bot6n ENTER.
Pulse el bot6n EXIT para salir.
* El valor predeterminado es "CCl".
, CCl: EIservicio Drimariode subtituIos sincronizados. Son subtitJtos
enel laloma principal que debe estar slnoronlzaao con el sonldo.
preferibIemente que comcida con ta secuencla especifica.
, CC2: Subtituios esDeclales de uso r 3sincronizado. Este canal transporta
aa[os aue es[an destmados a amptlar ta informaci6n de programa.
, CC3: Servicio de subtitulos secunaarlos smcromzados. Datos al[ernattvos
ae subtitulos relac onaaos con ei programa, tipicamente subtitulos aei
segunao laloma
, CC4: Subtituios esDeclaIesde uso no sincronizado. Similar a CC2.
o Textol: Primer servicio de texto. Se pueae _ra_arae /anos aatos no
retacionados con programa alguno.
- Texto2: Segunao servlclO de texto. Dates aalclonaies !ormalmeme sin
reiacldn con programa aiguno
- Texto3/Texto4: Tercel y cuar[o serwc_os ae texto istos canales de datos s6to
se deben usar si Textol, Texto2 no son suficientes.
La funci6n Subtituto no esta disponible en los modos COMPONENTE, HDMI ni
PC.
_'-La disponibitidad de los subtitulos depende dei programa que se est6
emitiendo.
[t_]Pulse el bot6n CAPTION de{ mando a distancia varias veces para seleccionar
' Encendido'u "Apagado"
RE'tURN INFO CAFTIO_
P_ODE S,M_ $_ P,SIZE

Visibn de subtitulos (mensajes de texto en pantalla) - Digital
Lafunci6n Subtitulo digital funciona en canates digitales.
1. Pulse el bot6n MENU para ver el men0 en pantalta.
Pulse los botones A o V pare seleccionar '<Conflguraci6n'y, despues, pulse et
bot6n ENTER.
2. Pulse los botones _, o _' para seleccionar "Subtitulo" y, despu_s, pulse el bot6n
ENTER.
3. Pulse el bot6n ENTER para seleccionar '<Subtitulo".
Pulse los botones A o V pare seleccionar '<Encendido"y, despues, pulse et bot6n
ENTER.
Pulse los botones A o T para seleccionar "Mode de SubtituW y, despues, pulse el
bot6n ENTER.
Pulse los botones A o _' para seleccionar el submen0 (Prograrnado,
Serviciol~Servicio6, CC1~CC4 o Textol~Texto4) que desee; pulse despues el
bot6n ENTER.
5. Pulse los botones A o T para seleccionar "Opciones - Subtitulos>'y, despues,
pulse et bot6n ENTER.
Lafuncidn "Opciones - Subtitulos" s61oesta disponible cuando puede seleccionarse
"Serviciol~Servicio6" en el mode "Mode de Subtitulo'.
> Los modes de subtitulacidn Servicio 1-6 pueden no estar disponibles segt3nel tipo
de emisidn.
Pulse los botones A o T para seleccionar '<Tamale_y_despu6s_pulse et botdn
ENTER.
Pulse los botones A o • pare seleccionar la opci6n deseada para el Subtitulo;
despues pulse et bot6n ENTER.
Pulse los botones A o T para seleccionar las opciones de submenQque desee
(vea las opciones en la pagina siguiente) y pulse et botdn ENTER.
Pulse el botdn EXIT pare salir.
_'-La disponibitidad de los subtitulos depende del programa que se este emitiendo.
:_ La opcidn "Programado" significa que se sigue etestandar establecido per el
ernisor.
TamaSo:Estaooclonconsrade"Programado","PeeueSo"."NormaF_ "Grande".ElvaIor
areaerermleaaoes"Normal".
• Tpo deletra: Estaopci6ncoestade"Programaeo EstiioO-Estilo7".Puedecambiarel
l:lpoae terraqueaesee.Etvalororedeterminadoes "EsNo0".
• Colorprimer piano: Estaopcioncoestade"Programado"."Blanco"."Negro","Role"
'veree. "AzuI "AmariIW'."Magen[a,y "C in>'.PuedecambiareJ
colordettexto.E /alof preaerermleaeoes atanco.
- Colordefondo: Estaopcionconstade"Programado"."Blanco"."Negro","Role","Verde",
'AZU "Amarillo"."Magenta,y "Cian".Puedecambiarel coloraeifondo
delossubtitulos.EIvalorereae'[ermleadoes "Negro
• Opacidadprim. plano:Estaopcionconstade"Programado"."Traesparen[e.
'Traslacido"S6Iido"e"lntermitente".Puedecambiartaoeactaaa
ee la le[ra
• Opacidadde]fondo:Estaoeci6nconstade"Programado"."Transparente"."Traslucido_'
Sotido"e'lntermitente".Puedecambiartaopacidaddelfondoee
lOS eubtitulos.
- Regreearalpredeter.:Estaopcionreajusratasopciones"Tamale".<'Tipoaele[ra.
r_
<'ColorprimerFanc "CoIordefondo, "Opaclaaeprim.piano"y I I
"°#acidaddelf°Odd'asus va!°resprede!erminaa°s-
II
[_1Pulse el bot6n CAPTION dei mando a distancia varias veces para seleccionar
"Encendido'u "Apagado"

Ajuste de la funcibn de ayuda
Muestra la ayuda sobre las funciones del men_.
1. Pulse el bot6n MENU para ver et menO en pantalla.
Pulse los botones A o _' para seleccionar "Configuraci6n" y, despues, pulse
et botOn ENTER.
2. Pulse los botones A o '_ para seleccionar "Funci6n de Ayuda" y, despu_s,
pulse el bot6n ENTER.
3. Pulse los botones A o T para seteccionar "Encendido" y, despues, pulse el
bot6n ENTER.
Pulse el bot6n EXiT para salir.
El valor predeterminado de la Funci6n de Ayuda es Encendido
Configuracibn de Efecto de luz
Se puede apagar o encender el LED azul del frontal del televisor.
1. Pulse el bot6n MENU para ver el menO.
Pulse los botones A o _' para seleccionar "Configuraci6n" y despues pulse et
bot6n ENTER.
2. Pulse los botones _, o V para seleccionar "Efecto de luz" y, a continuaci6n, pulse
el bot6n ENTER.
3. Pulse los botones _, o T para seleccionar "Apagado", "En m. espera",
"Viendo la TV" o "Siempre" y, despu_s, pulse el botOn ENTER.
. En m. espera: Enciende el LEDen modo de espera.
* Viendo la TV: Enciende el LED cuando se mira ia TV.
* Siempre: El LED se encendera una vez se haya apagado el televisor.
Pulse el bot6n EXiT para salir.

Uso de V-Chip
Lafunci6n V-Chip bloquea automaticamente la programaci6n que se considera inadecuada para los ni_os. El usuario debe intro-
ducir primero un c6digo PIN (nt_merode identificaci6n personal) antes de establecer o cambiar las restricciones de V-Chip.
>_Si se ha activado ta funci6n V-chip, las opciones de PIP no funcionan.
A[uste del nlJmero de identificaci6n __
1. Pulse et bot6n MENU para ver el men_ en pantalla.
Pulse los botones A o _' para seleccionar "Configuracibn" y, despues, pulse
et bot6n ENTER.
2. Pulse los botones A o _' para seieccionar "V-Chip" y, despu_s, pulse el botbn
ENTER.
Aparecera el mensaje "lngresar COdigoL Escriba su cOdigo PIN de 4 digitos.
El cOdigo PIN predeterminado para un televisor nuevo es "0-0-0-0".
Aparecera la pantalla "V-Chip".
Pulse los botones A o _' para seleccionar "Cambiar C6digo" y, despu_s,
pulse el botOn ENTER.
Aparecera la pantalla Cambiar COdigo. Escriba un nuevo c6digo PIN de 4
digitos.
En cuanto introduzca los 4 digitos, aparece la pantalla "Confirmar Nuevo
C6digo".
Vuelva a escribir los 4 digitos. Cuando desaparezca la pantalla de confirma-
ciSn, el cOdigo quedara memorizado.
Pulse el bot6n EXIT para salir.
:_ Si olvida su c6digo, pulse los botones del mando a distancia siguiendo la
secuencia siguiente, que restablece eI c6digo a 0-0-0-0: Power Off Mute
.........8 2 4 Power On.

Como activarldesactivar V-Chie
1. Pulse el bot0n MENU para ver el menO en pantalla.
Pulse los botones A o T para seleccionar "Configuraci0n" y_despues_ pulse
el bot6n ENTER.
2. Pulse los botones _, o T para seleccionar "V-Chip" y, despues, pulse el bot6n
ENTER.
Aparecera el mensaje 'lngresar C6digo". Escriba su c6digo PIN de 4 digitos.
Aparecera la pantalla "V-Chip". Para activar la funci0n V-Chip, pulse el botOn
ENTER para que "Bloqueo V-Chip" se ajuste en "Encendido". (Si se pulsan
repetidamente los botones _, o '_"se alterna entre "Encendido" y 'Apagado".
Pulse el bot6n ENTER.
Pulse el bot6n EXIT para salir.
Confiqurad6n de Restricciones usando la seccion "Guias pater. TV"
Primero, establezca un nOmero de identificaci6n personal (PIN) y active V-Chip.
(Consulte la secci0n anterior). Las restricciones del bloqueo de programas se pueden
establecer mediante dos metodos: Las guia de programas o la clasificaci0n MPAA.
1. Pulse el bot0n MENU para ver el menO en pantalla.
Pulse los botones A o T para seleccionar "Configuraci0n" y_despues_ pulse
el bot6n ENTER.
2. Pulse los botones _, o T para seleccionar "V-Chip" y, despu_s, pulse el bot6n
ENTER.
Aparecera el mensaje 'lngresar C6digo". Escriba su c6digo PIN de 4 digitos.

3. Apareceralapantalta"V-Chip".PulselosbotonesAoTparaseleccionar"Guias
pater.TV"y,despues_pulseelbotOnENTER.
Apareceralapantalta"Guiaspater.TV".
Pulselosbotones_, o T para seleccionar una de las seis categodas basadas en
la edad:
, TV-Y: Nifios peqaefios
, TV-Y7:Nifios de mas de 7aSos
, TV-G: Todos los p_blicos
• TV-PG: Acompafiados de un adutto
,7',/-14: Mayores de 14 a_os
. TV-MA: Para adultos
5. En este punto, ya ha se seleccionado una de las clasificaciones.
Pulse el bot0n ENTER. Seg0n la configuraci0n, se seleccionara un simbolo _.
(En blanco = Desbloqueada, _ = Bloqueada)
Mientras se selecciona "_ ", pulse el bot0n ENTER para btoquear o desbloquear
la categoria. Para seleccionar una clasificacidn de TV distinta, pulse los botones
A o T y, despues, repita el proceso.
>- Perm. todo: Se pulsa para desbloquear todos los programas de television. /
BIoq. todo: Se pulsa para bloquear todos los programas de television.
:_ TV-Y,TV-Y7, TV-G, TV-PG, TV-14 y TV-MA incluyen opciones adicionales.
Consulte el paso siguiente para cambiar las subclasificaciones:
FV: Fantasia y violencia / D: Dialogos con alusiones sexuales /
L: Lenguaje adulto / S: Situaciones sexuales / V: Violencia
:_ La opci0n V-Chip bloqueara automaticamente ciertas categorias que son "mas
restrictivas".
Por ejemplo, si bloquea la categoria 'TV-Y", automaticamente se bloqueara
TV-Y7.
De manera similar, si bloquea la categoria TV-G, todas las categorias en el
grupo "adolescente" quedaran bloqueadas (TV-G, TV-PG, TV-14, yTV-MA).
Las subclasificaciones (D, L, S, V) funcionan de manera similar. (Consulte la
secci0n siguiente).
6. COmeestablecer las subclasificaciones FV, D, L, S, y V.
Primero, seleccione una de las clasificaciones de TV: TV-Y,TV-Y7 TV-G, TV-PG,
TV-14, o TV-MA (consulte el paso 4, en la pagina anterior) y pulse el bot0n _.
Por cada subclasificaci0n aparecera un simbolo "_ ".
Con el "_" seleccionado, pulse el bot0n ENTER para ira la subclasificacidn.
Pulse ENTER para bloquear la subclasificaciOn.
Para seteccionar una clasificacidn de TV distinta, pulse los botones A o _',
despues, repita el proceso.
> La opci0n V-chip bloqueara automaticamente ciertas categorias que son "mas
restrictivas".
Por ejemplo, si bloquea la subclasificaci0n "L" enTV-PG, las subclasificaciones
"L" en TV-14 y TV-MA se bloquearan automaticamente.
7. Pulse el bot0n EXIT para borrar todas las pantallas. (O contin0e en la secci0n
siguiente y establezca restricciones adicionales segOn los cddigos MPAA.)
:_ Estas categodas se dividen en dos grupos: TV-Y y TV-Y7 (nifios pequefios y
nifios a partir de 7 afios), y TV-G a TV-MA (todos los demas).
Las limitaciones para estos grupos funcionan de forma independiente.
Si en lafamilia hay nifios muy pequefios y adultos j0venes, ta opcidn Guia de
programas debe configurarse por separado para grupo de edad. (Consulte el
siguiente paso.)

Confiqurad6n de las restricciones mediante las clasificaciones MPAA: G PG PG-13 R NC-17 X NR
El sistema de clasificaci6n MPAA utitiza el sistema de la MPAA (MiotionPicture Association of America, Asociaci6n americana
de cinematografia) que se apiica principalmente en las peliculas. Si el bloqueo de V-Chip esta activado, ettelevisor bloqueara
automaticamente programas que esten codificados con ctasificaciones rechazables (de la MMPAAo de televisi6n).
1. Pulse el bot6n MENU para ver el menQ en pantalta.
Pulse los botones • o T para seleccionar "Configuraci0n" y, despu6s_
pulse el botOn ENTER.
2. Pulse los botones _. o T para seleccionar "V-Chip" y, despu_s, pulse el bot6n
ENTER.
Aparecera el mensaje 'lngresar C6digo". Escriba su c6digo PIN de 4 digitos.
3. Aparecera la pantalla "V-Chip".
Pulse los botones _, o _' para seleccionar "Clas. MPAA", y, despu_s, pulse et
bot6n ENTER.
Aparecera la pantalla "Clas. IViPAA".
Pulse varias veces los botones A o • para seleccionar una categoria concreta
de MMPAA.Pulsando los botones A o T pasara secuencialmente por todas las
categorias MMPAA:
, G: Todos los p_blicos (sin restricciones).
, PG: Se sugiere la €ompasia de un adulto.
,,PG-13: Menores acompaSados de un adulto.
,R: Restringidol Los ni_0s menores de 17asos deben estar acqmpaSados pot
un adulto.
, NC-17: Prohibida ta entrada a menores de 17asos.
, X: $61oaduitos.
, NR: Sin clasificacion.
>- Perm todo: Se pulsa para desbloquear todos los programas de televisi6n.
Btoq. todo: Se pulsa para bloquear todos los programas de televisi6n.
Con unadeterminada categoria seteccionada, pulse el bot0n ENTER para
activarla.
En la pantalta aparecera un simbolo "_" seleccionado.
Pulse el bot0n ENTER para bloquear o desbloquear lacategoria.
La opci6n V-chip btoqueara automaticamente cualquier categoria que sea "mas
restrictiva".
Por ejemplo, si bloquea la categoria "PG-13", tambien se bloquearan
automaticamente "R', "NC-17" y "X'.
Pulse el botOnEXIT para salir.

Come confi_urar las restricciones en el idioma "lnc_les Canadiense"
1. Pulse el botOn MENU para ver el menO en pantalla
Pulse los botones A o T para seleccionar "ConfiguraciOn" y, despues, pulse
el botOn ENTER.
2. Pulse los botones A o _' para seleccionar "V-Chip" y, despues, pulse el botOn
ENTER
Aparecera el mensaje 'lngresar Cedigo" Escriba su cedigo PiN de 4 digitos
3. Pulse los botones A o "_ para seleccionar "ingles Canadiense" y. despues.
pulse el botOn ENTER.
Pulse los botones A o "t" para seleccionar la restricci6n apropiada.
Pulse el botOn ENTER para activar la restricci0n seteccionada.
Esta resattada la "_ ".
Pulse el bot6n EXIT para salir.
Perm. todo: Se pulsa para desbloquear todos los programas de televisi6n.
BIoq. todo: Se pulsa para bloquear todos los programas de television.
• C: ProgramaciOn para nieos menores de 8 al_os.
, CS+:Programacien generaimente considerada aceptable para nieos may0res
de 8 aeos sin acompa_amiento de aduitos.
, G: Programaci6n general, ideal para tedas las audiencias.
, PG: Supervisien patema.
• 14÷: La programaciOn contiene temas y €ontenidos que puede que no sean
adecuados para menores de 14 a_os.
,18+: Programacien para adultos.

Como conficlurar las restricciones en el idioma 'Frances Canadiense'
1. Pulse el botOn MENU para ver el menO en pantalla.
Pulse los botones A o T para seleccionar "Configuraci6n" y, despues, pulse
el botOn ENTER.
2. Pulse los botones A o _' para seleccionar "V-Chip" y, despues, pulse el botOn
ENTER.
Aparecera el mensaje 'lngresar COdigo". Escriba su cOdigo PiN de 4 digitos.
3. Pulse los botones A o "V para seleccionar "Frances Canadiense" y, despu_s,
pulse el botOn ENTER.
Pulse los botones A o '_ para seleccionar la restricciOn apropiada.
Pulse el botOn ENTER para activar la restricciOn seleccionada.
Esta resattada la "_ ".
Pulse el botOn EXIT para salir.
>_Perm. todo: Se pulsa para desbloquear todos los programas de television.
Bloq. todo: Se pulsa para bloquear todos los programas de television.
• 13 ans÷;Es posible que !a programap!°n nosea adecuada para ni_os meno-
res de 13 aOos.
, !6 ans+: ESposibte que a programaci0n no sea adecuada para nihos meno:
res de 16 aOos.
• 18 arts+: ProgramaciOn restringida para adultos.

Uso de V-ChiP (V-Chip} con los canales diqitales
La informacidnde la restricci6n de bloqueo se puede usar mientras seven los canales DTV (DTV).
1. Pulse el botdn MENU para ver el menO en pantalta.
Pulse tos botones A o _' para seleccJonar "Configuraci0n" y, despues, pulse
el botdn ENTER.
2. Pulse los botones _. o "_ para selecclonar "V-Chip" y, despues, pulse et botdn
ENTER.
Aparecera el mensaje 'lngresar CddJgo". EscrJba su cddigo PIN de 4 digitos.
Pulse los botones J, o _' para seleccionar "Clasificaci6n U.S. Descargable" y_
despu6s_ pulse el bot0n ENTER.
>_Si la informaci0n no se descarga desde la emisora, el menO
"Clasificaci6n U.S. Descargable" esta desactivado.
>- La informaci6n de la restricci0n de btoqueo se puede descargar autom_ti-
camente mientras se yen los canales DTV. Esto puede tardar algunos seg-
undos.
El menQ "ClasificaciOn U.S. Descargable" esta disponible despu_s de que
la informaci6n se haya descargado desde la emisora. Sin embargo, segt_n
et tipo de informacl6n de la emisora, el menO podria no estar disponlble
para SU uso.
Pulse los botones A o V para seleccionar la restricci6n apropiada.
Pulse et bot0n ENTER para actlvar la restrlccl6n selecclonada.
Esta resattada la "_ ".
Pulse el bot6n EXIT para salir.
>-Aflow All (Perm. Todo): Se pulsa para desbloquear todos los programas de
televisi6n.
Block All (BIoq. Todo): Se pulsa para bloquear todos los programas de tet-
evJsJ6n.
>-Los niveles de restricci6n de bloqueo difieren segQn la emisora.
>- Et nombre de menQ predeterminado y 'ClasificaciOn U.S. Descargable"
cambian segt_n la informaci6n descargada.
>-Aunque configure la visualizaci6n en pantatla en su propio idioma_ el menO
"Clasificaci6n U.S. Descargable" siempre Io vera en ingl6s.
>- La ctasificaci6n bloquear_ autom_ticamente clertas categorias que son
"mas restrictlvas".
>*Los titulos de clasificaci6n (por ejempto, Humor Level (Nlvet humor), etc) y
las clasificaciones de televlsl0n (pot ejemplo, DH_MH_H,etc) pueden diferlr
segt_n la emisora.
T_t_1ode dasificacioll
Eln n/eTode]t_tu_o
de clasificacion
actual
EIr_mem de
todos los titulos
de dasificacioll

Reduccibn digital del ruido
Si la sepal de emisi6n que recibe et televisor es d6bil, puede activarse la funci6n de reducci6n digital dei ruido (Digital Noise
Reduction) para reducir la estatica y las imagenes superpuestas que pueden aparecer en la pantatla.
1. Pulse el bot6n MENU para ver el ment_en pantalla.
Pulse el bot6n ENTER para seleccionar "lmagen'.
2. Pulse los botones A o V para seleccionar "Digital NR"y, despues, pulse el bot0n
ENTER.
3. Pulse los botones A o V para seleccionar "Desactivado", "Bajo", "Medio", "Alto',
"Automatico". y, despues, pulse el bot6n ENTER.
Apagado:Apagatafueciondetareducci6ndel ruidodela pantalla.
_Bajo: Reduceel ruidodetapaetallaaunBivelbajo.
Medio:Reduceetruidodelapantallaain nivelree!!o:
_Alto: ReduceeIruidodetapantallaauenivelalto.
_,Autora&tico:Recoeocey reduceel ruidodelapantatlaautomaticamente.
Pulse el bot6n EXIT para salir.
Guia de actualizacibn del software
Samsung puede ofrecer actualizaciones para el firmware deItelevisor en el futuro. P6ngase en contacto con el centro de llama-
das de Samsung en 1-800-SAMSUNG(7267864) para recibir informaci6n acerca de la descarga de las actualizaciones y del use
de un controlador USB. Las actualizaciones se pueden realizar conectando una unidad USB al puerto USB situado en la parte
posterior del televisor.
1. Inserte una unidad USB que contenga las actuatizaciones de firmware en las
Panel lateral del TV
conexiones SERVICE de la parte posterior del televisor. UnidadUSB
2. Pulse et bot6n MENU para ver et menQ. Pulse los botones _, o 'V para
seleccionar Configuraci6n y despu6s pulse et bot0n ENTER. :,_
3. Pulse los botones A o V para seieccionarActualizaci6n software _--................................................................................
(Actual. software) y despues pulse ENTER.
4. Pulse los botones A o _' para seleccionar la actualizaci6n por
USB y despu_s pulse ENTER. Aparece el mensaje Scanning for USB...
It may take up to 30 seconds (Buscando USB... Puede tardar 30 segundos).
No desconecte la alimentaci0n ni retire la unidad USB mientras se aplican las
actuatizaciones. Ettelevisor se apagara y se encendera automaticamente
despues de completar la actualizaci6n de firmware. Despu6s de realizar la
actualizaci6n compruebe la versi6n del firmware.

Identificacibn de problemas
Si parece que el TV no funciona correctarnente, en prirner lugar compruebe esta Iista de posibles problernas y soluciones.
Si no funciona ninguno de estos consejos, tlame al centre de servicio mas cercano.
Problema Posible Soluci6n
tmagen deficientel Intente sintonizar otto canal.
Ajuste laantena.
Compruebe las conexiones de todos los cables.
Catidad de sonido deficiente. Intente sintonizar otto canal.
........AJus!e !aan!ena:..................................................................................................................................................................................................................................................................
NO hay imagen o Sonido. Intente sintonizar otto canal,
Pulse el bot6n SOURCE.
Cempruebe que e{ TV est_ cenectado.
Cempruebe tas oonexienes de la antena.
No se percibe ning_n sonido, Primero, compruebe et velumen de los aparatos ceneotados at TV (per ejemplo, un
o muy baj0, con et votumen al receptor digital, DTV, DVD, receptor de cable, VCR, etc.). Acontinuaci6n, ajuste el
maximo. ..........................................................................................................................................................................
La imagen iueda vertica!mente, Compruebe todas las conexiones de cable.
EtTV funciona deforma !rregu!ar. Desconecte elTV durante 30 segundos y, despues, intente que funcione otra vez.
Ettelevisor no se enciende. Compruebe que la toma de la pared funciona.
Anomalia sdel mando a .................................................................................................................................................................................
distancia: Limpie el horde superior det mando a distancia (ventana de transmisi0n).
} Compruebe los terminales de ta pila.
Mensaje :'Verificar pable se_at'!, bie de se_ai est_ ...................
Mensaje !fMod0no c0mpatible'!: Compruebe la resoluci6n maxima y la frecuencia del adaptador de video.
Compare estos valores con los dates de los modos de Pantalta.
Problema en pantalla con Ia Compruebe ta potencia de la se_at digital y la antena de entrada.
emisidn digital.
La imagen es demasiado clara o Ajuste Luminos. y Contraste.
demasiado oscura. , Ajuste lafuncidn Fine.
Barras negras en ta pantalta. Compruebe que la emisidn que se esta recibiendo es de alta definicidn (HD).
Los canales HD en ocasiones emiten una programacidn en SD (definici6n estandar) que
puede dar lugar a la aparicidn de barras negras.
Para eliminar las barras configure el decodificador de cable o satelite en los modes
Las imageaes tienen un t0no Compruebe que los cables de los componentes esten conectados en los terminates
rojo-verde o rosa. correctos.
Los subtituI0s para SOrdeSno .......................
fu_cionan. ..................................................................................
Las im_genes Se Yen con nieve Quizas se necesite actuatizar el firmware. Pdngase en contacto con el proveedor de
cable.
Se yen imagenes superpuestas Quizas haya probtemas de compatibilidad con el decodificador de cable.
Intente conectarse a traves de los cables de los componentes.

ProbJema
unas Darras nonzomates
parpaaean, tlembIan u oscltan en
a lmagen.
unas Darrasver[lcates
Damadean. tiembian u oscitan en
a lmagen.
La pan[alia es[a negra y
el indicador tuminoso de
alimentacJ6n parpadea
constamememe.
ha lmagen no es es]:aDley
aarece vlDrarcuanao se conec[a
el oraenador en la entrada de
PC
Ajus_e_afunci6n Grueso y despu_s ajuste la funci6n Fine.
Ajus_e_afunci6n Grueso y despues ajuste la funci6n Fine.
Corr 3ruebe Io siguiente en el equipo: Alimentaci0n, Cable de sepal.
El TV utiliza su sistema de gestidn de energia.
Mueva el rat6n del equipo o pulse una tecia dei teclado.
Si etajuste no es correcto_use la utilidad del ordenador para cambiar los ajustes de
Danialla
Ettelevisor adrnite funciones de visualizacJ6n multiscan dentro det sJguienterange de
frecuencJas:
Frecuenoia horizontal (kHz) 30-60
Frecuencia vertical (Hz) 60-75
"nalce de barrido maximo (60 Hz) 1360x 768
La tmagen no es[a cemraaa en
a pantalta
S se muestra una lmagen
nmdviI aurame un periodo de
_lempo prolongaao, pueaen
aparecer lmagenes res duabs o
Dorrosas.
Ajuste la posici6n horizontal y vertical.
La DOSiCi6nde la pantalla se debe ajustar respecto a la fuente de salida (per ejernplo_STB)
con una serial digital.
Cuando tenga que dejar el monitor sin utitizar per un periodo de tiempo prolongado, ajuste
la configuraci6n de rnodo que el monitor entre autornaticamente en mode de ahorro de
energia o active el protector de pantalta para visuatizar imagenes m6viles.
El panel LCD TFT utiliza un panel que consta de muchos pixeles de infimo tamafio (3,147,264) que requieren de una tec-
nologia altamente sofisticada para su fabricaci0n. Sin embargo, pueden haber unos pocos pixeles poco iluminados u oscuros
en pantalla. Estos pixetes no suponen una anomalia en el funcionamiento del producto.

Instalacibn deJsoporte
J
<2> <3>
1. Coloque hacia abajo el TV sobre un paho suave o un almohad6n sobre una mesa.
2, Cotoque el soporte en el orificio de la parte inferior del televisor.
3. Inserte et tornillo en el orificio indicado y aprieteto.
Desconexibn deJsoporte
o_
m
<2> <3> <4>
1. Coloque hacia abajo el TV sobre un paho suave o un almohad6n sobre una mesa.
2. Desmonte los 4 tornillos de la parte posterior del TV.
3. Separe el soporte del TV.
4. Cubra con una tapa et orificio inferior•

Cbmo ajustar el soporte
(1) (2)
Cbmo ajustar el _nguio dei televisor
1. Coloque el frontal del televisor sobre un
patio suave o una almohadilta encima
de una mesa tal como se muestra en la
figura (1).
- Alinee la parte inferior del televisor con el
borde de la mesa.
2. Presione el centro de la parte posterior del
televisor. Ajuste el soporte como se indica
en la figura (2) mientras pulsa el bot6n
que se encuentra en la parte posterior del
soporte.
3. Coloque el televisor sobre la mesa, de
manera que se asiente firmemente.
( 1)Ajustedel_ngulodeltelevisor
sobreelsoporte.
(2 )Ajuste del _ngulo euando pase del so-
porte al mentaje en la pared (173, 371)
(3 ) Ajuste del _ngulo
LCDestd montado en la pared.
> Cuando ajuste el soporte, pulse el bot6n qae se encuentra en la parte posterior del soporte.
1. La Figura (1) muestra el angulo de ajuste (-2°~14°) cuando utiliza la pantatla LCD en su soporte.
Una inclinaci6n excesiva puede hacer que el TV LCD vuelque y que se produzcan dafios.
2. La Figura (2) muestra el angulo de ajuste (14°~80°) cuando la pantalla LCD pase del soporte al montaje en la pared.
3. La Figura (3) muestra el angulo de ajuste (0°~10°) cuando monta ta pantalla LCD en una pared.
_"-Oira un "ctic" cuando cambie el angulo de 1a 2 o de 3 a 2.
Instalacibn del equipo de montaje en la pared
Los elementos del montaje en la pared (sevenden por separado) permiten instalar el televisor en una pared. Si desea mas
informaci6n sobre lainstalaci6n de los componentes para montaje en la pared, consulte las instrucciones que se facilitan con
dichos elementos. Para la instalaci6n del soporte mural, pOngaseen contacto con un t6cnico. Samsung Electronics no se hace
responsabie de los datos causados al producto o al usuario si _ste ha efectuado la instalaciOn del televisor.
Instalaci6n de dispositivos de montaje conforme con VESA
Uso de las tapetas decorativas
Protector de
montaje
(Se vende por
separado)
1,
2.
3.
SitOe el televisor boca abajo sobre un patio
suave o un cojin, encima de una mesa.
Ajuste el soporte presionando el bot6n de la
parte posterior.
Alinee el adaptador de montaje (no
suministrado) con los orificios de la parte
inferior del soporte y suj_telo con los cuatro
tornillos que se suministran con el brazo
basculante, et soporte de montaje en pared
o cualquier otro mecanismo de soporte (no
suministrado).
(2)
1. Cuando instale el televisor en una pared
sin utilizar et soporte_ inserte las tapetas
decorativas como se describe en la ilustraci6n
(1).
2. Una vez insertadas, afirmelas con los cuatro
tornillos como se describe en la ilustraci6n (2).

Uso del cierre antirrobo kensington
ElbloqueoKensingtones undispositivoquese usaparafijar fisicamenteel sistemacuandose usa enunlugar pQblico.
Eldispositivodebloqueodebe adquidrseporseparado.Laapafienciayel metodode bloqueopuedendifedr de}ailustracionsegunlos
fabncantes.Consulteel manualproporcionadoconelbioqueoKensingtonparausarlocorrectamente
<Opcional>
La ubicacidn del 'BIoqueo Kensington" puede variar seg0n el modelo
1. Inserte el dispositivo de bioqueo en }a ranura Kensington del TV LCD (Figura I) y girelo en el sentido del bloqueo (Figura 2).
2. Conecte el cable del bloqueo Kensington.
3. Fije el bloqueo Kensington a un mueble o a un objeto pesado que no se mueva.
Especificaciones
%.,b.eae,Moae,o ..-T,953.,..-T,9.4.............................................................................................
Tama_0 de pantatla (Diagonal) i9 pulg.
consumo de energta 55 W
PC Resoluci6n 1360 x 768 @ 60 Hz
Sonido
Salida 3W X 2
DirnensJones(An x Pr x AI)
Cuerpo pnnclpa_
Con sopoRe
480 X 57.5 X 360.5 mm
(16.9 X 27 X 14.2 pulgadas)
480 X 180 X 393 mm
(18.9 x 7.1 x 155 putgadas)
Peso
Con ei soooRe 11.46 Ibs (52 kg)
Factores medioambientales
Temperatura de func _nam_ento
Entre 10 °C y 40 °C (50 °F a 104 °F)
Humedad de funcionamiento
Temperatura de almacenamlento De110 % at 80 %, sin condensaci6n
Humedad de almacenamiento Entre -20 °C y 45 °C (-4 °F a 113 °F)
Del 5 % a195 %_sin condensaci6n
>El dise_o y las especificaciones estan sujetos a cambios sin previo aviso.
>Este dispositivo es un aparato digital de la Clase B.
>Para la fuente de alimentaciOn, consulte la etiqueta pegada al producto.
-
 1
1
-
 2
2
-
 3
3
-
 4
4
-
 5
5
-
 6
6
-
 7
7
-
 8
8
-
 9
9
-
 10
10
-
 11
11
-
 12
12
-
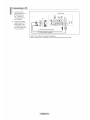 13
13
-
 14
14
-
 15
15
-
 16
16
-
 17
17
-
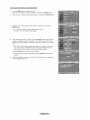 18
18
-
 19
19
-
 20
20
-
 21
21
-
 22
22
-
 23
23
-
 24
24
-
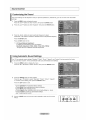 25
25
-
 26
26
-
 27
27
-
 28
28
-
 29
29
-
 30
30
-
 31
31
-
 32
32
-
 33
33
-
 34
34
-
 35
35
-
 36
36
-
 37
37
-
 38
38
-
 39
39
-
 40
40
-
 41
41
-
 42
42
-
 43
43
-
 44
44
-
 45
45
-
 46
46
-
 47
47
-
 48
48
-
 49
49
-
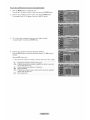 50
50
-
 51
51
-
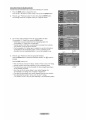 52
52
-
 53
53
-
 54
54
-
 55
55
-
 56
56
-
 57
57
-
 58
58
-
 59
59
-
 60
60
-
 61
61
-
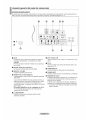 62
62
-
 63
63
-
 64
64
-
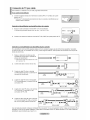 65
65
-
 66
66
-
 67
67
-
 68
68
-
 69
69
-
 70
70
-
 71
71
-
 72
72
-
 73
73
-
 74
74
-
 75
75
-
 76
76
-
 77
77
-
 78
78
-
 79
79
-
 80
80
-
 81
81
-
 82
82
-
 83
83
-
 84
84
-
 85
85
-
 86
86
-
 87
87
-
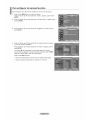 88
88
-
 89
89
-
 90
90
-
 91
91
-
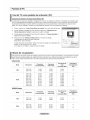 92
92
-
 93
93
-
 94
94
-
 95
95
-
 96
96
-
 97
97
-
 98
98
-
 99
99
-
 100
100
-
 101
101
-
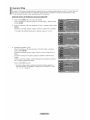 102
102
-
 103
103
-
 104
104
-
 105
105
-
 106
106
-
 107
107
-
 108
108
-
 109
109
-
 110
110
-
 111
111
-
 112
112
-
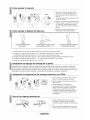 113
113
-
 114
114


Samsung LN-T1953H Owner's Instructions Manual
- Categoría
- Televisores LCD
- Tipo
- Owner's Instructions Manual
- Este manual también es adecuado para
En otros idiomas
- English: Samsung LN-T1953H
Documentos relacionados
-
Samsung LN32A330J1DXZA Manual de usuario
-
-
-
-
-
-
-
-
-