
VENTILADOR
MULTIDIRECCIONAL
Manual de Uso
Modelo: KU33515
MULTIPLE
OSCILLATING FAN
User Manual
Model: KU33515


ÍNDICE DE CONTENIDOS
Página
Instrucciones importantes 2
Partes del ventilador 3
Armado 3
Instrucciones de funcionamiento 5
Especificaciones 6
Limpieza y mantenimiento 6
Almacenamiento 7
Solución de problemas 7
Garantía 8
INSTRUCCIONES IMPORTANTES
NORMAS PARA UN FUNCIONAMIENTO SEGURO
Por favor lea y comprenda todas las instrucciones antes de utilizar este ventilador.
Al momento de utilizar cualquier electrodoméstico, debe seguirse las siguientes precauciones de seguridad básicas con el
fin de reducir el riesgo de que se produzca un incendio, una descarga eléctrica, lesiones personales o daños a la propiedad:
1. Nunca inserte objetos extraños tales como sus dedos, lápices, etc. a través de las rejillas
mientras el ventilador se encuentre funcionando.
2. Desconecte el ventilador de la electricidad al momento de trasladarlo de un lugar a otro, al
momento de retirar las rejillas y antes de proceder con la limpieza.
3. Asegúrese de que el ventilador se encuentre sobre una superficie estable y nivelada al momento
de hacerlo funcionar para evitar que se caiga.
4. NO use el ventilador en una ventana. La lluvia podría crear peligros con la electricidad. No deje el
ventilador funcionando cerca de un área en donde se acumule agua para evitar peligros potenciales con la
electricidad. No sumerja el electrodoméstico, el enchufe o el cordón en agua ni lo rocíe con líquidos.
5. Este electrodoméstico viene con un enchufe de tres extremidades. Con el fin de reducir el riesgo de una
descarga eléctrica, este enchufe deberá encajar dentro de un tomacorriente polarizado solamente de una manera.
Si no encajara, póngase en contacto con un electricista calificado. No intente eliminar esta medida de seguridad.
6. No deje el electrodoméstico funcionando u operativo en un lugar en donde los niños pequeños o
los animales puedan tener acceso al aparato sin la debida supervisión. No permita que el cordón
cuelgue del borde la mesa o de un repostero de cocina.
7. No utilice el electrodoméstico si el cordón o el enchufe se encuentran dañados, después de que
el electrodoméstico presente algún desperfecto, haya sufrido alguna caída o cualquier tipo de
daño. Póngase en contacto con un electricista calificado si esto sucediera.
NOTA: Cualquier reparación efectuada por un electricista no calificado anulará la garantía del producto.
8. No haga funcionar el ventilador en la presencia de vapores explosivos o inflamables.
9. No coloque el ventilador ni ninguna de sus partes cerca de una llama viva o de electrodomésticos de cocina o
de calentamiento.
10. No utilice el ventilador en exteriores o en donde exista agua tales como en un baño o una lavandería.
11. No utilice el ventilador sin la base en su lugar. El ventilador debe funcionar de pie en posición vertical.
12. No utilice el ventilador cerca de cortinas, plantas, accesorios de ventanas o cerca de cualquier
otro objeto que pudiera atascarse en las aspas del ventilador.
13. Para desconectar, sujete el enchufe y tire del tomacorriente. Nunca tire del cordón.
14. No coloque el cordón por debajo de una alfombra. No cubra el cordón con tapetes, felpudos u objetos similares.
Acomode el cordón lejos de cualquier zona de tránsito en donde nadie pueda tropezarse.
15. Utilice el ventilador solamente tal como se describe en este manual.
NOTA: No existen piezas útiles dentro del electrodoméstico. No intente desarmarlo.
A
DVERTENCIA: Con el fin de reducir el riesgo de que se produzca un incendio o una descarga
eléctrica, no utilice este ventilador con un dispositivo de control de velocidad de estado sólido.
GUARDE ESTAS INSTRUCCIONES
.TABLE OF CONTENTS
Page
Important instructions…………………… 2
Parts of the fan…………………………… 3
Assembly……………………………….… 3
Operating Instructions………………...… 5
Specifications…………………………….. 6
Cleaning & Maintenance…………………. 6
Storage…………………………………… 7
Troubleshooting……………………….… 7
Warranty……………………………….…. 8
IMPORTANT INSTRUCTIONS
RULES FOR SAFE OPERATION
Please read and understand all instructions before using this fan.
When using electrical appliances, basic precautions should always be followed to reduce the risk of fire,
electrical shock and injury to persons or property, including the following:
1. Never insert foreign objects such as fingers, pencils, etc. through the grille when fan is running.
2. Disconnect fan from electrical outlet when moving from one location to another, when removing grilles or
for cleaning.
3. Be sure the fan is on a stable, even surface when operating to avoid overturning.
4. DO NOT use fan in window. Rain may create an electrical hazard. Do not leave the fan operating adjacent
to an area where water has collect to avoid the potential of electrical hazard. Do not immerse unit, plug or
cord in water or spray with liquids.
5. This appliance has a three prong cord. To reduce the risk of electrical shock, this plug is intended to fit in a
polarized outlet only one way. If it does not fit, contact a qualified electrician. Do not attempt to defeat this
safety feature.
6. Do not leave the appliance running or operable in a place where young children or animals could have
access to it without supervision. Do not allow cord to hang down from table or counter.
7. Do not operate any appliance with a damaged cord or plug, after the appliance malfunctions or has been
dropped or damaged in any manner, contact a qualified electrician should this happen. NOTE: Repairs
made by unqualified electricians will void this product’s warranty.
8. Do not operate in the presence of explosive and/or flammable fumes.
9. Do not place fan or any parts near an open flame, cooking or other heating appliance.
10. Do not use this fan outdoors or where there are bodies of water such as the bathroom or laundry room.
11. Do not use fan without its base. The fan must operate standing upright.
12. Do not use fan near curtains, plants, window treatment, or where other objects can become caught in the
blades.
13. To disconnect, grip plug and pull form wall outlet. Never yank on cord.
14. Do not run cord under carpeting. Do not cover cord with throw rugs, runners or the like. Arrange cord away
from traffic area where it will not be tripped over.
15. Use this fan only as it is described in this manual.
NOTE: There are no serviceable parts in this unit. Do not attempt to dissemble.
WARNING: To reduce risk of fire or electrical shock, do not use this fan with any solid-state speed
control device.
SAVE THESE INSTRUCTIONS
2
2

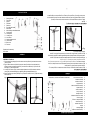
1. Plastic grille band
2. Front grille
3. Spinner
4. Fan blade
5. Plastic nut
6. Rear grille with handle
7. Motor shaft
8. Motor housing with oscillation knob
9. Upper column
10. Control panel
11. Locking screw
12. Inner column
13. Height adjustment knob
14. Lower column
15. Base cover
16. Fan base
Required tool for assembly:
Screw driver
ASSEMBLY
PARTS OF THE FAN
ASSEMBLY OF BASE #16
1. Remove parts from packaging. Set the fan base on the floor (Part #16) and attach lower column
(Part #14) onto it.
2. Fig. 3: Slide the base cover (Part #15) down the column (Part #14) and onto the base (#16).
Attach and secure cross base legs (part #17) onto each slot on the base (# 16). Secure cross
base legs (# 17) with nails provided.
3. At the top of the column (#14), loosen the height adjustment knob (#13) and retrieve the inner
column (#12); hold desired height by re-tightening the height adjustment knob (#13).
4. Fig. 4: Place the upper column (Part #9) on top of the inner column (Part #12). Tighten the locking
screw (Part #11).
Fig. 3
Fig. 4
3
3
1. Faja de plástico de la rejilla
2. Rejilla delantera
3. Girador
4. Aspas del ventilador
5. Tuerca de plástico
6. Rejilla posterior con mango
7. Fuste del motor
8. Motor con perilla de oscilación
9. Columna superior
10. Panel de control
11. Tornillo de fijación
12. Columna interior
13. Perilla de regulación de altura
14. Columna inferior
15. Cubierta de la base
16. Base del ventilador
17. Patas cruzadas de base Herramienta necesaria para el armado: Destornillador
ARMADO DE LA BASE #16
1. Fig. 2: Retire las piezas del empaque. Coloque la base del ventilador en el piso (Pieza # 16) y
acople la columna inferior (Pieza # 14) sobre la base.
2. Fig. 3: Deslice la cubierta de la base (Pieza #15) hacia abajo por la columna (Pieza # 14) hasta
alcanzar la base (#16). Coloque la patas cruzadas (parte # 17) en cada ranura de la base (# 16).
Asegurar las piernas cruzadas en la base (# 17) con los seguros.
3. En la parte superior de la columna (#14) suelte la perilla de regulación de altura (#13) y saque la
columna interior (#12). Mantenga la
altura deseada reajustando la perilla de regulación de altura (#13).
4. Fig. 4: Coloque la columna (Pieza #9) encima de la columna interna (Pieza #12). Ajuste el
tornillo de fijación (Pieza #11).
ARMADO DE LAS ASPAS Y REJILLAS (#1-7)
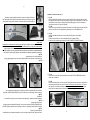
1. Fig. 5A:
Retire y deseche la manga plástica que se encuentra sobre el fuste del motor (Pieza #7).
Coloque la rejilla posterior (Pieza #6) sobre la parte delantera del motor (Pieza #8) atravesando el
fuste del motor (Pieza #7). Asegúrese de que el mango en la parte posterior de la rejilla quede de
ARMADO
PARTES DEL VENTILADOR
Fig. 3
Fig. 4

ASSEMBLY OF BLADE AND GRILLS (#1-7)
1. Fig. 5A:
Remove and discard the plastic sleeve on the motor shaft (Part #7). Position the rear grille (Part
#6) against the front of the motor housing (Part #8) through the motor shaft (Part #7). Ensure that
the handle at the back of grille is facing up and that all guiding pegs on the motor housing are
lined up with cutouts on the rear grille (Part #6).
Fig. 5B:
Secure the rear grille (Part #6) into place with the plastic nut (Part #5). Fasten the plastic nut (Part
#5) firmly onto the motor housing (Part #8) by tightening it in a CLOCKWISE direction.
2. Fig. 6A:
Install the fan blade (Part #4) onto the motor shaft (Part #7) with the cutouts fitted.
Fig. 6B:
Place spinner (Part #3) on the motor shaft (Part #7) after the blade (Part #4).
Fasten into place by tightening the spinner (Part #3) COUNTER-CLOCKWISE direction.
3. Fig. 7A:
On the bottom of the plastic grille band (Part #1) loosen, BUT DO NOT REMOVE the setting
screw with a screwdriver.
Fig. 7B:
Hook the band around the rim of the rear grille (Part #6) and note there are two thin rails inside of
the plastic grille band (Part #1). Ensure the entire rim of rear grille is on the further rail. Then put
the front grille to the band and carefully click the entire rim of front grille into the front rail of the
band. Ensure the setting screw is centered at the bottom of the grilles.
Fig. 5 Fig. 6
Fig. 7A Fig. 7B
5A
5
B
6
A
6
B
4
4
cara hacia arriba y de que todas las clavijas en el motor queden alineadas con las hendiduras en
la rejilla posterior (Pieza #6).
Fig. 5B:
Asegure la rejilla posterior (Pieza #6) en su lugar utilizando la tuerca plástica (Pieza #5). Ajuste la
tuerca plástica (Pieza #5) firmemente sobre el motor (Pieza #8) ajustándola en el SENTIDO DE
LAS AGUJAS DEL RELOJ.
2. Fig. 6A:
Instale las aspas del ventilador (Pieza #4) sobre el fuste del motor (Pieza #7) encajando las
hendiduras.
Fig. 6B:
Coloque el girador (Pieza #3) en el fuste del motor (Pieza #7) después de las aspas (Pieza #4).
Asegure en su lugar ajustando el girador (Pieza #3) en el SENTIDO CONTRARIO A LAS
AGUJAS DEL RELOJ.
3. Fig. 7A:
En la parte inferior de la faja de la rejilla de plástico (Pieza #1), suelte, PERO NO RETIRE, el
tornillo de fijación con un destornillador.
Fig. 7B:
Enganche la faja alrededor del borde de la rejilla posterior (Pieza #6). Preste atención a que hay dos
canaletas delgadas en la parte interior de la faja de la rejilla de plástico (Pieza #1). Asegúrese de que el
borde completo de la rejilla de plástico quede dentro de la canaleta interior. Luego coloque la rejilla
delantera dentro de la faja y con cuidado enganche el borde completo de la rejilla delantera dentro de la
canaleta delantera de la faja. Asegúrese de que el tornillo de fijación quede centrado en la parte inferior
de las rejillas.
4. Fig. 8: Ajuste la faja para sostener y mantener juntas ambas rejillas (Piezas
#2 y #6). Utilice una mano para sostener las dos rejillas juntas (Piezas #2 y #6)
y la otra para ajustar el tornillo en la faja de la rejilla de plástico (Pieza #1).
Fig. 5
Fig. 6
5A
5
B
6
A
6
B
Fig. 7A
Fig. 7B

4. Fig. 8: Tighten the band to hold the two grilles (Parts #2 & #6)
together. Use one hand to hold the two grilles (Parts #2 & #6)
together and the other to tighten the screw on the plastic grille band
(Part #1).
Plug fan into a 120V/60Hz outlet and follow the operating instructions:
USING THE CONTROL PANEL This fan is equipped with 3 speeds, 3 breeze modes and a timer.
BUTTON FUNCTION DISPLAYED
TIMER
Pressing this button sets the
timer in increments of 0.5
hours to a maximum of 7.5
hours. After the timer runs
out, the fan will automatically
shut off.
0.5H, 1H, 2H, 4H.
Example 1:
0.5H illuminated indicates the timer will shut off after 30 minutes.
Example 2:
0.5H and 2H illuminated indicates the timer will shut off after 2.5
hours.
Example 3:
0.5H, 1H, 2H and 4H illuminated indicates the timer will shut off
after 7.5h.
MODE
Pressing this button will cycle
the fan through different
patterns of breeze modes.
The light at this icon indicates the fan is operating on the normal
mode.
The light at this icon indicates the fan simulating a natural breeze
mode by cycling through all the speeds.
The light at this icon indicates the fan is simulating a softer
breeze mode by cycling one speed higher and lower, ideal for
resting.
SPEED
Pressing this button will cycle
the fan through 3 comfort
speeds (High/Medium/Low).
This button can be used with
any MODE.
These icons indicate the selected speed low, medium, high.
POWER
Use this button to power the fan ON/OFF.
OPERATING INSTRUCTIONS
Fig. 8
5
5
Enchufe el ventilador a un tomacorriente de 120 v / 60Hz y siga las instrucciones de funcionamiento:
CÓMO UTILIZAR EL PANEL DE CONTROL: Este ventilador viene equipado con 3 velocidades, 3
funciones de brisa y un temporizador.
BOTÓN FUNCIÓN
PANTALLA
TEMPORIZADO
R
Presionando este botón
se puede programar el
temporizador en
incrementos de 0.5 horas
hasta un máximo de 7.5
horas. Después de
transcurrido el tiempo del
temporizador, el ventilador
se apagará
automáticamente.
0.5H, 1H, 2H, 4H.
Ejemplo 1:
0.5H iluminado indica que el temporizador se apagará
dentro de 30 minutos.
Ejemplo 2:
0.5H y 2H iluminado indica que el temporizador se
apagará después de 2.5 horas.
Ejemplo 3:
0.5H, 1H, 2H y 4H iluminado indica que el temporizador se
apagará después de 7.5 horas.
MODALIDAD
Presionado este botón se
colocará el ventilador en
un ciclo que pasa por las
diferentes opciones
ventilación por brisa.
La luz indicadora en este icono indica que el ventilador se
encuentra funcionando bajo la modalidad normal.
La luz indicadora en este icono indica que el ventilador se
encuentra bajo la modalidad de simulación de brisa natural
pasando por todas las diferentes velocidades de manera
cíclica.
La luz indicadora en este icono indica que el ventilador se
encuentra bajo la modalidad de brisa suave ingresando a
un ciclo de velocidad alta y baja, ideal para descansar.
VELOCIDAD
Presionado este botón el
ventilador ingresará al
ciclo de 3 velocidades de
comodidad (Alta / Media /
Baja). Este botón puede
usarse bajo cualquier
modalidad.
Estos iconos se indican la velocidad seleccionada, es
decir baja, media o alta.
ENCENDIDO
Utilice este botón para encender o apagar el ventilador (ON/OFF).
INSTRUCCIONES DE FUNCIONAMIENTO

IMPROVED AIR CIRCULATION
This fan has 3 functions which will allow you to better customize your preferred air comfort as well as
improve air circulation in the room:
A. OSCILLATION:
This fan has a unique circular oscillation which circulates air in all four
directions, moving horizontally and vertically. To activate, push down the
oscillation knob as depicted in A.
B. TILT:
To tilt the fan head so that the breeze is targeted at an angle, steady the motor
housing of the fan with one hand and grip the fan grille with another. Carefully
tilt the head of the fan as depicted in B until it reaches the desired angle. Be
careful as to not tilt the head back further than it is intended to go, doing so will
damage the unit.
C. HEIGHT ADJUSTMENT:
To adjust the height of the fan, grip between the upper column/inner columns
and loosen the height adjustment nut as depicted in C. Extend or lower the
inner column to increase or decrease the height of the fan. Once the fan is at a
comfortable height, tighten the nut
.
CAUTION: TO PREVENT ELECTRICAL
SHOCK, MATCH BLADE AND PRONG OF
PLUG TO SLOTS IN THE OUTLET, FULLY
INSERT.
1. Always disconnect the cord from the electrical outlet when cleaning your fan.
2. Light accumulated dust may be removed by using a soft cloth to wipe away the dust at the back
grille of the fan.
3. Wipe the exterior surfaces of the fan occasionally with a damp cloth (not dripping wet) and dry
thoroughly with a soft dry cloth before operating the fan.
4. Do not use harsh cleaners or materials to clean this unit, doing so will cause damages to it.
CAUTION: DO NOT ALLOW WATER TO RUN INTO THE INTERIOR OF THE FAN AS THIS COULD CREATE A FIRE
OR ELECTRIC SHOCK HAZARD. THE FAN MOTOR IS FACTORY LUBRICATED FOR LIFE AND WILL REQUIRE NO
FURTHER LUBRICATION. NO OTHER USER MAINTENANCE IS REQUIRED OR RECOMMENDED. IF SERVICE IS
REQUIRED, SEND YOUR FAN TO THE NEAREST SUPER ELECTRIC AUTHORIZED SERVICE DEPOT.
MODEL
KU33515
VOLTAGE (V) 120V AC, 60Hz
WATTAGE (W)
55W
CLEANING & MAINTENANCE
SPECIFICATIONS
A
C
B
6
6
CIRCULACIÓN MEJORADA DE AIRE
Este ventilador cuenta con 3 funciones que le permitirán personalizar de mejor manera la ventilación
según sus preferencias así como mejorar la circulación de aire dentro de un ambiente.
A. OSCILACIÓN:
Este ventilador cuenta con una función especial de oscilación circular que
hace que el aire circule en cuatro direcciones, moviéndose horizontal y
verticalmente. Para activar la función, presione la perilla de oscilación como
se muestra en la figura A.
B. INCLINACIÓN:
Para inclinar la cabeza del ventilador de manera que la emisión de aire
quede dirigida hacia un ángulo en especial, sujete el motor del ventilador
con una mano y sujete la rejilla del ventilador con la otra. Con cuidado
incline la cabeza del ventilador como se muestra en la figura B hasta que
alcance el ángulo deseado. Tenga cuidado de no inclinar la cabeza hacia
atrás más allá de sus limitaciones ya que esto podría dañar el
electrodoméstico.
C. AJUSTE DE ALTURA:
Para regular la altura del ventilador, sujete entre las columnas superior e interior y
suelte la tuerca de regulación de altura como se muestra en la figura C. Extienda
o baje la columna y interior para aumentar o disminuir la altura del ventilador. Una
vez alcanzada la altura deseada, proceda a ajustar la tuerca.
PRECAUCIÓN: CON EL FIN DE PREVENIR
UNA DESCARGA ELÉCTRICA, ENCAJE
LAS EXTREMIDADES DEL ENCHUFE CON
LAS RANURAS CORRESPONDIENTES EN
EL TOMACORRIENTE. INSERTE
TOTALMENTE.
1. Siempre desconecte el electrodoméstico del tomacorriente al momento de efectuar la limpieza.
2. El polvo acumulado ligeramente sobre el electrodoméstico puede retirarse utilizando un paño
suave. Retire el polvo en la rejilla posterior del ventilador.
3. Limpie las partes externas del ventilador ocasionalmente con un paño húmedo (no mojado) y
seque completamente con un paño antes de volver a hacer funcionar el ventilador.
4. No utilice limpiadores o materiales fuertes para efectuar la limpieza del equipo ya que esto podría
dañarlo.
PRECAUCIÓN: NO PERMITA QUE INGRESE AG
UA DENTRO DE LA PARTE INTERNA DEL
VENTILADOR YA QUE ESTO PODRÍA CREAR UN INCENDIO O UNA DESCARGA ELÉCTRICA.
EL MOTOR DEL VENTILADOR VIENE LUBRICADO DE FÁBRICA DE POR VIDA Y POR LO
TANTO NO REQUIERE DE NINGÚN TIPO DE LUBRICACIÓN ADICIONAL. NO SE RECOMIENDA
NINGÚN TIPO DE MANTENIMIENTO ADICIONAL POR PARTE DEL USUARIO. SI SE
REQUIRIERA DE SERVICIO TÉCNICO, ENVÍE SU VENTILADOR AL CENTRO DE SERVICIO
TÉCNICO AUTORIZADO MÁS CERCANO.
MODELO KU33515
VOLTAJE (V)
120V AC, 60Hz
POTENCIA EN
WATTS (W)
55W
LIMPIEZA Y MANTENIMIENTO
ESPECIFICACIONES
A
C
B

1. Follow cleaning instructions 1-4 above. Make sure to disassemble and clean fan before storing.
2. Retain the original packaging to store your fan.
3. Always store in a dry place.
4. Never store while still plugged in.
5. Never wrap cord tightly around the fan or put any stress on the cord where it enters the fan as it
could cause the cord to fray or break.
If your fan fails to operate, please follow these procedures prior to contacting customer service:
PROBLEM PROBABLE CAUSE SOLUTION
Fan is not turning on.
Fan is not plugged into a
120V AC, 60Hz
polarized
outlet/receptacle.
Ensure unit is in the OFF position. Plug in unit
and attempt to turn on again.
Breaker/fuse has been
tripped.
Please check your electrical box to confirm the
breaker has not been blown. Ensure unit is in
OFF position. Plug in unit and attempt to turn on
again.
Attempt to plug unit in another receptacle in the
house.
The fan was working,
but suddenly turned
off.
The timer setting has
counted down to
automatic shut off.
Ensure all the timer lights on the control panel
0.5H, 1H, 2H, 4H are off. If any of them are lit,
continue to press the timer button
until all the
timer lights are off. For more information see
section:
Oscillation function is
not working.
The oscillation knob has
not been activated.
Simply press the oscillation knob down to start
the oscillation function. This can be done while
the fan is operating.
Fan is on but air
coming out of it is not
strong enough.
There is dust built up at
the back of the fan.
Turn fan OFF and unplug. Using a soft, dry
cloth, wipe the back of the grille to remove any
dust build-up. Plug in unit and turn fan back ON
to resume normal operation.
STORAGE
TROUBLESHOOTING
7
7
1. Siga las instrucciones de limpieza del 1 al 4 como se describe más arriba. Asegúrese de
desarmar y limpiar el ventilador antes de guardarlo.
2. Conserve los empaques originales para guardar su ventilador.
3. Almacene siempre el ventilador en lugar seco.
4. Nunca guarde el ventilador mientras se encuentre aún enchufado.
5. Nunca enrolle el cordón de manera ajustada alrededor del ventilador ni lo someta a mucha
presión en donde el cordón se conecta al ventilador ya que esto podría causar que se
deteriore o se rompa.
Si el ventilador presentara algún desperfecto, siga los siguientes procedimientos antes de ponerse
en contacto con servicio al cliente.
PROBLEMA CAUSA PROBABLE SOLUCIÓN
El ventilador no
enciende.
El ventilador no se
encuentra enchufado a
un tomacorriente o
receptáculo polarizado
de 120V AC, 60Hz.
Asegúrese de que el electrodoméstico se
encuentre en la posición OFF (apagado). Proceda
a enchufar el ventilador e intente ponerlo a
funcionar de nuevo.
El circuito o el fusible
se han quemado.
Verifique su caja de electricidad para confirmar que
el circuito no haya volado o se haya quemado.
Asegúrese de que el electrodoméstico se encuentre
en la posición OFF (apagado). Proceda a enchufar
el ventilador e intente ponerlo a funcionar de nuevo.
Pruebe enchufando el electrodoméstico a otro
tomacorriente dentro de su hogar.
El ventilador se
encontraba
funcionando, pero
repentinamente se
apagó.
El tiempo programado
en el temporizador ha
transcurrido hasta el
apagado automático.
Asegúrese de que todas las luces indicadoras del
temporizador en el panel de control 0.5H, 1H, 2H,
4H se encuentren apagadas. Si alguna de ellas se
encontrara iluminada, mantenga presionado el
botón del temporizador
hasta que todas las
luces se apaguen. Para mayor información, véase
la sección correspondiente.
La función de
oscilación no
funciona.
No se ha activado la
perilla de oscilación
Simplemente presione la perilla de oscilación hacia
abajo para iniciar la función de oscilación. Esto se
puede hacer mientras el ventilador se encuentre
funcionando.
El ventilador se
encuentra encendido
pero el aire emitido
no es lo
suficientemente
fuerte.
Hay polvo acumulado
en la parte posterior
del ventilador.
Apague el ventilador y desenchúfelo. Utilice un
paño seco y suave para limpiar la parte posterior de
la rejilla y retirar cualquier polvo acumulado.
Proceda a enchufar el ventilador y vuelva a encenderlo
para reanudar su funcionamiento normal.
ALMACENAMIENTO
SOLUCIÓN DE PROBLEMAS
-
 1
1
-
 2
2
-
 3
3
-
 4
4
-
 5
5
-
 6
6
-
 7
7
-
 8
8


Continental Electric Fan KU33515 Manual de usuario
- Tipo
- Manual de usuario
- Este manual también es adecuado para
en otros idiomas
Artículos relacionados

Otros documentos
-
Professional Series PS73636 Guía del usuario
-
Professional Series PS77611 Manual de usuario
-
Bionaire BSF003 El manual del propietario
-
Optimus F-1672BK Guía del usuario
-
 Pelonis FS45-3ER El manual del propietario
-
Kenmore 405.34012310 El manual del propietario
-
none FZ-18DL Instrucciones de operación
-
 Pelonis FS40-8M El manual del propietario
-
Taurus BOREAL 16 CR DIGITAL El manual del propietario
-
Honeywell EFY-041 Series El manual del propietario

