Optimus F-1672BK Guía del usuario
- Categoría
- Ventiladores domésticos
- Tipo
- Guía del usuario

WARRANTY
For your own records, staple or attach your sales receipt to this
manual. Please also write the store name /location and date
purchased below.
STORE NAME/LOCATION:
DATE PURCHASED:
ONE (1) YEAR LIMITED WARRANTY
(SAVE THIS WARRANTY INFORMATION)
Optimus Enterprise. Inc, warrants to its customers and /or
consumer of this electric fan and the parts thereof will be free from
defect in material and workmanship, under normal use, for a
period of one (1) year from the date of initial purchase. The
warranty does not apply to repairs necessitated by damage, misuse,
abuse or alteration and to any repairs of merchandise not used
within the United States unless otherwise prescribed by law.
Optimus Enterprise, Inc, shall not be liable for any personal injury,
property damage or any incidental or consequential damages of
any kind (including water damage) resulting from malfunctions,
defects, misuse, improper installation or alternation of this product.
This warranty is the only warranty extended by Optimus
Enterprise, Inc, to its original customers and /or consumers
purchasing fan, Optimus Enterprise, Inc, disclaims all other
warranties, expressed or implied, that arise by the operation of law,
specifically including the implied warranties of merchantability
and fitness for a particular purpose. Optimus Enterprise, Inc, shall
not be liable for any incidental or consequential damage, which
may have resulted from any alleged breach of warranty. Some
states do not allow limitations on how long implied warranty lasts
or the exclusion or limitation of consequential damage, so the
above limitations or exclusion may not apply to you. This
warranty gives you specific legal rights you may also have other
rights which vary from state to state.
Should the fan fail during the warranty period, the owner should:
• Within the first 30 days from date of purchase, the store from
which you purchased your Optimus product should replace
this product if it is defective in material or workmanship
(provided the store has in-stock replacement).
• Within the first 12 months from date of purchase, Optimus
Enterprise, Inc, will repair or replace the product if it is
defective in material or workmanship providing it is returned
to Optimus Enterprise, Inc. with freight prepaid, with evidence
of purchase date (cash register receipt) together with
US$13.00 CHECK OR MONEY ORDER for handling and
return packaging/shipping charges.
IMPORTANT: ANY REPAIRS SHOULD BE PERFORMED
BY AN AUTHORIZED SERVICE REPRESENTATIVE. DO
NOT ATTEMPT TO REPAIR THIS FAN YOURSELF. DOING
SO MAY VOID YOUR WARRANTY.
PLEASE RETAIN THIS WARRANTY AND SALES
RECEIPT TO INSURE YOUR PRODUCT WARRANTY.
IMPORTANT: RETURN INSTRUCTIONS:
Your warranty depends on your following these instructions if you are
returning the unit more than 30 days after the date of purchase:
● Carefully pack the fan in the original container or a suitable
container to avoid damage in shipping.
●
Seal the carton. Address an envelope as follows:
Optimus Enterprise, Inc.
2201 E. Winston Road, Unit #J
Anaheim, CA 92806
● Inside the envelope, enclose your name, full address with zip code,
daytime phone number, evidence of purchase date (cash register
receipt) AND A CHECK OR MONEY ORDER for handling and
return packaging/shipping charges. Please also include a brief
explanation of the problem you are having with the unit.
● Optimus Enterprise, Inc. recommends you insure the package as
damage in shipments is not covered by your warranty.
● All shipping charges must be prepaid by you (as noted as above).
Instruction Manual
and Owner’s Guide
16”/18" Oscillating Stand Fan
with Remote Control
Model: F-1672WH/ F-1672BK/
F-1872WH / F-1872BK
INFORMATION HOTLINE:
If, after reading this owner’s guide,
You have any questions or comments, please feel free to write us
or call us at 1-888-672-5832 or email service@optimusent.com
Our customer service representative will be happy to help you.
PLEASE READ AND SAVE THESE INSTRUCTIONS

IMPORTANT INSTRUCTIONS:
PLEASE READ AND SAVE THESE IMPORTANT
SAFEGUARDS
Thank you for choosing an Optimus fan. To ensure the best
performance from your
Fan, please read and save the following instructions.
WHEN USING ELECTRICAL APPLIANCES, BASIC
PRECAUTIONS SHOULD ALWAYS BE FOLLOWED TO
REDUCE THE RISK OF FIRE, ELECTRIC SHOCK AND INJURY
TO PERSONS, INCLUDING THE FOLLOWING:
• Read all instructions before using this product.
• Use this fan only as described in this manual. Any other use not
recommended by the manufacturer may cause fire, electrical shock or
injury to person, and may void the warranty.
• Always unplug the unit before assembling, disassembling or cleaning.
• Always unplug unit when not in use, when moving from one location to
another and before cleaning.
• To disconnect, grip the plug and pull it from the wall outlet. Never yank
the cord.
• The use of attachments not recommended or sold by the appliance
manufacturer may cause hazards.
• Avoid contact with moving parts.
• DO NOT operate this fan with a damaged cord or plug, after a
malfunction, or is dropped or damaged in any manner. Return the unit to
Optimus Enterprise, Inc. for examination, electrical or mechanical
adjustment, or repair.
• Do not operate this fan in the presence of explosive and/or flammable
fumes.
• Do not place the fan or any parts near an open flame, cooking or other
heating appliance.
• Extreme caution is necessary when fan is used by or near children or
invalids and whenever the fan is left operating and unattended.
• This product is intended for household use only and not for commercial
or industrial use. Do not use outdoors.
• Always use on a dry level surface.
• Do not operate if the fan housing is removed or damaged.
• A loose fit between the AC outlet and plug may cause over heating of the
plug. Have a qualified electrician replace the outlet.
• DO NOT run cord under carpeting. Do not cover cord with throw rugs,
runners or like. Arrange cord away from traffic area and where it could
be tripped over.
• This fan is equipped with a polarized alternating current line plug (a plug
having one blade wider than the other). This plug fits into the power
outlet only one way. This is a safety feature. If you are unable to insert
the plug fully into the outlet, try reversing the plug. If the plug should
still fail to fit, contact an electrician to replace the obsolete outlet. Do not
defeat the safety purpose of polarized plug.
• NEVER connect the fan to any power sources other than a 120 volt
alternating current polarized outlet.
• WARNING: To reduce the risk of electric shock. DO NOT use this fan
with any solid-state speed control and DO NOT insert finger or any
object into grill.
CLEANING/MAINTENANCE INSTRUCTIONS:
During Season Care:
• Before cleaning, be sure to turn off and unplug the unit.
• Keep the fan clean. Carefully wipe the unit with a soft, damp cloth.
Please be very cautious near the motor.
• DO NOT immerse the fan in water and never allow water to drip into the
Motor Housing.
• Never use gasoline, benzene or thinner. This will damage the surface of
the unit.
• After cleaning, be sure to completely dry the unit with a cloth or towel.
After Season Care:
• Your fan can be stored in the off-season.
• Before putting the fan in storage, clean it thoroughly, cover it with a
vinyl bag, and store it in a cool and dry place. We recommend using the
original (or appropriately sized) box.
SERVICE INSTRUCTIONS:
• Do not attempt to repair or adjust any electrical or mechanical functions
on this unit. Doing so will void the warranty.
• If you have any questions regarding this unit’s operation or believe any
repair is necessary, please call 1-888-672-5832 to speak with a Customer
Service Representative. Or e-mail us at [email protected]. You
will be able to get a faster response through email.
• If you need to exchange the unit, please return it, in its original carton
with a sales receipt enclosed, to the store where you purchased it. If you
are returning the unit more than 30 days after the date of purchase,
please see the enclosed warranty.
• If you have any other questions or comments, feel free to write us:
Optimus Enterprise, Inc.
Customer Service Department
2201 E. Winston Road, Unit #J
Anaheim, CA 92806
Tel: (714) 956-1300
E-mail: [email protected]
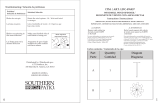
MAINTENANCE INSTRUCTIONS:
A loose fit between the AC outlet and plug may cause over heating
of the plug. If the plug over heats, it might cut off the fuse inside
the power cord plug.
If your fuse access cover is located on the side of the plug:
• Grasp plug and remove from the receptacle or other outlet device.
Do not yank the cord to unplug.
• Select a suitable tool such as a small flat screwdriver or travel
scissors.
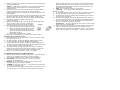
• To open the fuse cover. Slide open fuse access cover on top of
attachment plug toward blades. (see fig.1)
• Carefully remove the fuse by prying it out. (see fig.2)
• Risk of fire can result by using wrong fuse rating. Replace fuse
only with 2.5 Amp, 125 Volt rating.
• To close the fuse access cover. Slide to close access cover on top
of attachment plug. (see fig.3)
Fig.1 Fig.2 Fig.3
O
PERATING INSTRUCTIONS:
PRE-OPERATING INSTRUCTIONS:
• Carefully remove your fan from the box (please save the carton for
off-season storage).
• Make sure the unit is in the OFF position before plugging the unit
into the outlet.
• For shipping purposes, the fan is packed unassembled.
ASSEMBLY INSTRUCTIONS:
1. Loosen and remove the "L" screw and steel panel from the
tube.
2. Place the tube at the middle of the base & heavy plate, to
thread the hole and insert the "L" screw and panel.
3. Adjust telescopic tube to desired height lock in place by
tightening the knob.
4. Place the telescopic tube into the switch box by tighten set
screw.

5. Fully extend the Extension Pole and secure it by tightening
the Height Adjuster.
NOTE: If the Extension Pole is not readily visible, look
inside the Base Pole (where it is located) and pull it
completely up.
6. Remove the rear grill nut and mount the rear grill. Make
certain that the holes in the grill fit over the prongs
protruding from the motor housing. Install the grill nut and
hand tighten.
7. Insert the fan blade onto the motor shaft and make sure that
the fits as far back on the shaft as possible. Tighten the
blade spinner into place to secure the blade onto the shaft.
8. The blade spinner is tightened by turning
counter-clockwise.
9. Mount the front grill onto the rear grill with all clips open.
Then securely close the clips so that they
hold the grill firmly and evently together.
10. Attach the Front Guard to the Rear Guard:
1) Pull the Clamps on the Front Guard up.
2) Place the slot in the Rim Hook (at top
of Front Guard) onto the uppermost
prong of the Rear Guard and snap the
Rim Hook in place.
3) Push each Clamp down to secure.
11. Place the assembled fan on a flat, level, stable surface.
OPERATING INSTRUCTIONS:
1) Place the fan on a safe, flat surface where it will not fall or
be pulled by the cord.
2) To adjust height, loosen the Height Adjustment Control
Collar; adjust to the desired height and retighten.
3) Control the direction of the airflow by firmly holding the
switch box in one had and pushing the fan grille back to tilt
up or by pushing it forward to tilt down.
4) To make the fan oscillate, push down on the oscillating
knob located on the top of the motor housing. To stop the
fan from oscillating, pull up on the oscillating knob.
5) Plug into an electrical outlet (120V AC, 60Hz).
CONTROL PANEL INSTRUCTIONS:
1. Make sure the Fan is properly assembled. Plug the Power
Cord into a standard 120-volt AC electrical outlet.
2. Insert 2 AAA batteries into remote control hand unit.
3. SPEED/ON: To turn the Fan on/ change speeds by
pressing the SPEED/ON.
4. MODE: To set the mode of natural wind/ sleep wind/
normal wind by pressing the MODE.
5. TIMER: To set time from 0.5—7.5h, press timer each time
can set 0.5h cumulatively.
To select the desired length of operation, program the fan to
switch off up to 7.5 hours later in increments of 0.5 hour.
After setting the timer, the indicator light will illuminates
the desired length of time on the fan’s control panel. After
the predetermined length of time has passed, the fan will
automatically switch off.
6. OFF: To turn off the fan by pressing OFF.
NOTICE: To avoid product damage, press only one
Button at a time.
7. To oscillate the Fan, push down on the Oscillation Control.
8. To stop oscillation, pull up on the Oscillation Control.
9. To adjust the tilt angle, tilt the Motor Housing up or down
until it clicks into place.
10. To adjust Fan height, loosen the Height Adjuster, lower or
raise the Extension Pole, and retighten the Height Adjuster.
11. To turn the Fan off, press the OFF Button and unplug the
Power Cord from the electrical outlet.
WARNING: Always unplug the Fan when not in use and
before leaving it unattended.
12. The controls button located on the fan panel are exactly the
same as remote control hand unit, that means you can
operate the fan by either the remote or at the panel switch
itself. This fan offers you standard 3 speed choice options.

GARANTIA
Por su seguridad, engrape su recibo de compra a este manual.
Tambien escriba el nombre de la tienda, direccion y fechas de compra.
Nombre de la Tienda y
Direccion:____________________________________________
Fecha de Compra:______________________________________
Tres años limite de garantia
(
Guarde esta informacion de la garantia)
Optimus Enterprise, Inc. Garantiza a sus clients y/ o/ consumidores de
este Ventilador Electrico, que las partes que lo component estan libres
de defectos de fabricacion y mano de obra, bajo condiciones normales,
por el lapzo de un año a partir de la fecha de compra. La garantia no
cubre las reparaciones que puedan necesitarse por daño inadecuado,
alteraciones y cualquier reparacion que mercancia que no sea usada
en los Estados Unidos de Norte America y Canada. A no ser que sea
pedido por la Justicia. Optimus Interprise, Inc. No sera responsible
por daño personal o incidentes consecuentes de ninguna indole
incluyendo daños por humedad. Esta Garantia es la unica garantia
extendida expedida por Optimus Enterprise, Inc. A sus Clientes
Originales o Clientes que compran este producto. Optimus Enterprise,
Inc. Niega cualquier otra Garantia expresada o implicada, que pueda
surgir por la aplicacion de la Justicia, especialmente si se implica la
garantia de mercancia y que sea ajustada para un proposito especial.
Tampoco es responsable por daños consecuentes los cuales pueden
resultar de cualquier union de garantias. Algunos Estados no permiten
limitaciones en la duracion de la garantia o excluyen los daños
consecuentes, por esta razon algunos de los artinculos de garantia
puede y no puede ser aplicados a usted. Esta Garantia le da Derechos
Especificos Legales y usted puede tener muchos otros ya que esto
varian de Estato a Estado.
Si el Ventilador Falla durante le periodo de Garantia, debera hacer lo
siguiente:
• Durante los Primeros 30 Dias despues de la fecha de compra, la
tienda donde usted compro su producto le reemplazara el
producto, si este tiene defectos de fabricacion
• Dentro de los primeros 12 meses de su compra; Optimus
Enterprise, Inc. Repara o reemplazara el producto, si este tiene
un defecto de fabricacion; Regreselo a Optimus Enterprise, Inc.
Con envio pagado, recivo de compra y un Cheque o Money
Order por la cantidad de $13.00 ( Seis Dolares Norte
Americanos), para gastos de retorno de envio.
• Dentro de el Lapzo de 2 a 3 años de compra, Optimus Enterprise,
Inc. Repara o Reemplazara el producto con un producto
reconstruido. Si es que este tiene un defecto de fabricacion.
Regreselo a Optimus Enterprise, Inc., con recibo de compra,
envio pagado y un cheque o money order por la cantidad de
$17.00 ( Veinte Dolares Norte Americanos) para gastos de envio.
IMPORTANTE: CUALQUIER REPARACION DEBERA SER
ECHA POR UNA OFICINA AUTORIZADA; NO TRATE DE
HACER REPARACIONES EN ESTE VENTILADOR POR USTED
MISMO, ESTO…!!! ANULARA LA GARANTIA.
PORFAVOR GUARDE ESTA GARANTIA Y SU RECIBO DE
COMPRA … ASEGURE LA GARANTIA DE EL PRODUCTO……
IMPORTANTE: INTRUCIONES PARA REGRESAR EL
PRODUCTO
Su garantia depende de las siguientes instrucciones si es que usted
desea regresar el producto despues de los 30 dias de compra.
• Cuidadosamente empaque el ventilador en la caja original o en
alguna caja similar para evitar que pueda dañarse en la
transportacion.
• Cierre la Caja y envie un sobre a la siguiente direccion:
Optimus Enterprise, Inc.
2201 E. Winston Rd., Unit J
Anaheim, CA 92806
TEL: 888-672-5832
Email: [email protected]
• Dentro de el sobre envie la siguiente informacion: Su nombre
complete, Direccion completa, Codigo Postal, Numero
Telefonico, Recibo de Compra, Cheque o Money Order para
gastos de manejo y envoi, Also incluya una explicacion breve de
el problema de el producto.
• Optimus Enterprise, Inc. Recomienda que le ponga aseguransa a
su paquete ya que la garantia no cubre dañor por envio.
• Todos los cargos de manego y envio deberan ser cubiertos por
usted.
Manual de Instrucions y
Guía para el Usuario
Ventilador Vertical de 16 Pulgadas de Control
Remoto
Model: F-1672WH/ F-1672BK/
F-1872WH / F-1872BK
Linea de Servicio a el cliente: Si despues de leer estas
instrucciones , usted tiene alguna pregunata o comentario,
porfavor escribanos o llamenos a el telefono siguiente:
1-888-672-5832 o envienos un correo electronico a:
Nuestro representante a el cliente le ayudara gustosamente.
PORFAVOR LEA Y GUARDE ESTAS INSTRUCIONES

INSTRUCIONES IMPORTANTES:
PORFAVOR LEA Y GUARDE ESTAS INSTRUCIONES
CUANDO USE ARTICULOS ELECTRICOS, PRECAUCIONES
BASICAS DEBERAN SER SIEMPRE SEGUIDAS PARA
REDUCIR EL RIESGO DE UN INCENDIO O UN SHOCK
ELECTRICO, O DAÑAR A TERCERAS PERSONAS.
• Lea todas las instrucciones antes de usar este producto
• Use el producto unicamente como esta descrito en este manual, cualquier
otro uso no recomendado por el fabricante puede causar fuego, shock
electrico o dañar a alguna persona y pued cancelar la garantia.
• Siempre desconecte el producto antes de Ensamblar, Desensamblar o
Limpiar el producto.
• Simpre desconecte el producto cuando no lo este usando, o cuando lo
cambia de lugar
• Siempre desconecte el cable de la clavija nunca jale el cable
• El uso impropio no recomendado o vendido por el fabricante puede
causar daños
• Evite el contacto directo con las partes moviles.
• No use este Ventilador con un Cable o Clavija dañado, despues de un
malfuncionamiento o si se a caido o dañano de alguna manera
• Nunca use este ventilador en la presencia de explosives o cualquier
producto que pueda producer un incendio
• Nunca ponga el ventilador cercano a el fuego, estufa o cualquier otro
producto que produsca calor.
• Estremada precaucion es necesaria cuando el ventilador es usado
cercano a los niños o minusvalidos o cuando el ventilador esta operando
sin que aya nadie.
• Este producto fue diseñado para se usado en el hogar, no para uso
comercial o industrial
• No lo use en el exterior
• Siempre uselo en un superficie seca y plana
• Nunca use el Ventilador si la parilla protectora a sido removida
• Un enchufe defectuoso puede causar sobrecalentamiento, llame a un
electrecista que cabie el enchufe completo
• Nunca pase el cable debajo de la alfonbra, nunca cobra el cordon con
ilachos o algo similar, trate de poner el cable lejos de el paso de la gente.
• Este Ventilador esta equipado con una clavija polarizada de corriente
alterna (La clavija tiene un lado mas ancho que el otro). Esta clavija cabe
en cualquier enchufe de la pared pero de un solo lado. Esto es un puento
de seguridad, si no puede conectar la clavija en el enchufe trate de el otro
lado y si todavia no pude conectarlo, contacte a un. Electricista que
cambia los enchufes. No trate de modificar el punto de seguridad de la
clavija…!
• NUNCA conecte el Ventilador a ninguna fuente de corriente mayor de
120 voltios de corriente alterna.
•
AVISO: Para evitar el riesgo de un shock electrico; Nunca use este
Ventilador con ningun control solido de velosidad ni tampoco inserte los
dedos entre las rejillas.
INSTRUCIONES DE MANTENIMIENTO Y LIMPIEZA
CUIDADO DURANTE LA TEMPORADA
• Antes de limpiarlo, asegurese de que este apagado y desconectado.
• Mantenga el ventilador limpio. Cuidadosamente limpie la unidad con un
trapo suave y humedo. Porfavor use precausion cuando limpie cercano a
el motor.
• Nunca sumerja el Ventilador en agua y nunca permita que el motor se
moje.
• Nunca use Gasolina, Benzeno o Thiner, Estos solvents dañaran la
superficie de la unidad.
• Despues de limpiarlo, asegurese completamente de secarlo con un trapo
o toalla.
CUIDADO DESPUES DE LA TEMPORADA
• Usted puede almacenar su Ventilador despues de la temporada de calor,
lo puede desensamblar parcial o totalmente.
• Antes de poner el Ventilador en el la bodega, limpielo completamente y
metalo en una bolsa de plastico y pongalo en un lugar fresco y seco.
Recomendamos que lo almacene en la caja original o en alguna otra caja
de tamaño apropiada.
INSTRUCIONES DE SERVICIO
• Nunca intente reparar o ajustar el Ventilador Electrica o Mecanicamente
a el hacerlo la garantia sera cancelada.
• Si tiene alguna pregunta referente a las operaciones de esta unidad o cree
que necesita reparacion alguna, llamenos a el siguiente numero
1-888-672-5832 y pida hablar con un Representante de Servicio a el
Cliente.
• Si usted necesita cambiar la unidad; Porfavor regreselo en el carton
original con el recibo de compra a la tienda donde lo compro. Si lo esta
regresando despues de 30 dias despues de la compra, mire los puentos de
la garantia
• Si tiene preguntas o comentarios, escribanos:
Optimus Enterprise, Inc.
2201 E. Winston Rd., Unit J
Anaheim, CA 92806
TEL: 888-672-5832
Email: [email protected]
INSTRUCIONES DE OPERACION
INSTRUCIONES ANTES DE LA OPERACION
• Cuidadosamente saque el ventilador de la caja (porfavor guarde la
caja para almacenar el ventilador una vez que la temporada de calor
termine)
• El Ventilador viene desensamblado en el momento de ser empacado,
por rezones de envio
• Asegurese de que la unidad este en la posicion de APAGADO (OFF),
antes de conectar la unidad en la pared
INSTRUCCIONES DE ENSAMBLADO
1. Afloje y retire el panel de "L" y el tornillo de acero del tubo.
2. Coloque el tubo en el medio de la placa base y pesado, para roscar el
agujero e inserte el tornillo "L" y el panel.
3. Ajuste el tubo telescópico de bloqueo altura deseada en lugar de
apretar la perilla.
4. Coloque el tubo telescópico en la caja de interruptores por apretar el
tornillo de fijación.
5. Extienda completamente el Polo Extensión y asegúrela apretando el
ajustador de altura.
NOTA: Si el poste de extensión no es fácilmente visible, observar el
interior del Soporte Base (donde se encuentra) y tire de él por
completo.
6. Retire la tuerca de la parrilla trasera y montar la rejilla trasera.
Asegúrese de que los orificios de la parrilla se ajustan sobre las puntas
que sobresalen de la carcasa del motor. Instale la tuerca de la parrilla y
apriete con el mano.
7. Inserte el aspa del ventilador en el eje del motor y asegúrese de que
los ajustes que se remontan en el eje como sea posible. Apriete el
spinner cuchilla en su lugar para fijar la hoja en el eje.
8. El spinner cuchilla se aprieta girando en sentido antihorario.
9. Monte la rejilla frontal en la parrilla trasera con todos los clips
abiertos. A continuación, cierre firmemente los clips para que sostienen
la rejilla con firmeza y evently juntos.
10. Fije la Guardia Frente a la Retaguardia:
1) Tire de las abrazaderas en la protección delantera hacia arriba.
2) Coloque la ranura del gancho del borde (en la parte superior de la
Guardia frontal) en la punta más alta de la Retaguardia y encaje el
gancho Rim en su lugar.
3) Presione cada abrazadera hacia abajo para asegurar.
11. Coloque el ventilador montado en una superficie nivelada y plana y
estable.
INSTRUCCIONES DE OPERACION
1) Coloque el ventilador en una superficie segura y plana donde no
pueda caerse o ser tirado por la cuerda.
2) Para ajustar la altura, afloje la Altura Collar de control de ajuste;
ajustar a la altura deseada y vuelva a apretar.
3) Control de la dirección de la corriente de aire sosteniendo
firmemente la caja de interruptores en uno tuvo y empujando la rejilla
del ventilador hacia atrás para subirlo o empujando hacia adelante para
bajarlo.
4) Para hacer oscilar el ventilador, empuje hacia abajo en el mando
oscilante situado en la parte superior de la carcasa del motor. Para
detener la oscilación del ventilador, tire de la perilla para la oscilación.
5) Enchufe en una toma de corriente (120 V AC, 60 Hz).

CONTROL DE INSTRUCCIONES DEL PANEL:
1. Asegúrese de que el ventilador está montado correctamente. Conecte
el cable de alimentación a una de 120 voltios toma de corriente
estándar AC.
2. Inserte 2 pilas AAA en la unidad de control remoto manual.
3. VELOCIDAD / ON: Para encender el ventilador en la velocidad /
cambio pulsando la VELOCIDAD / ON.
4. MODE: Para establecer el modo de viento / el sueño natural viento /
viento normal pulsando MODE.
5. TIMER: Para ajustar el tiempo de 0.5-7.5h, pulse temporizador cada
vez que se puede establecer de forma acumulativa 0,5 h.
Para seleccionar la longitud deseada de la operación, el programa del
ventilador para apagar hasta 7,5 horas más tarde en incrementos de 0,5
horas. Después de ajustar el temporizador, la luz indicadora se ilumina
el período de tiempo deseado en el panel de control del ventilador.
Después de la longitud predeterminada de tiempo ha pasado, el
ventilador se apagará automáticamente.
6. OFF: Para apagar el ventilador presionando OFF.
AVISO: Para evitar daños en el producto, sólo pulsar un botón a la vez.
7. A oscilar el ventilador, empuje hacia abajo en el control de la
oscilación.
8. Para detener la oscilación, tire hacia arriba sobre el control de
oscilación.
9. Para ajustar el ángulo de inclinación, incline la cubierta del motor
hacia arriba o hacia abajo hasta que encaje en su lugar.
10. Para ajustar la altura del ventilador, afloje el ajustador de altura,
bajar o subir el poste de extensión, y vuelva a apretar el ajustador de
altura.
11. Para apagar el ventilador, presione el botón de apagado y
desenchufe el cable de alimentación de la toma eléctrica.
ADVERTENCIA: Desconecte siempre el ventilador cuando no esté
en uso y antes de dejarla sin vigilar.
12. El botón de control ubicado en el panel del ventilador son
exactamente la misma que la unidad de control remoto de mano, que
significa que puede funcionar el ventilador ya sea por la distancia o con
el interruptor propio panel. Este ventilador le ofrece opciones estándar
de elección 3 velocidad.
-
 1
1
-
 2
2
-
 3
3
-
 4
4
-
 5
5
-
 6
6


Optimus F-1672BK Guía del usuario
- Categoría
- Ventiladores domésticos
- Tipo
- Guía del usuario
en otros idiomas
- English: Optimus F-1672BK User guide
Artículos relacionados
Otros documentos
-
Infiniton DN-40DW El manual del propietario
-
Sytech SYVLR16BL El manual del propietario
-
-
Kenmore 405.34012310 El manual del propietario
-
Svan SVVE02160PR El manual del propietario
-
 Continental Electric Fan KU33515 Manual de usuario
-
BLACK+DECKER BFSD116B Manual de usuario
-
-
 Southern Patio LDC-076957A Instrucciones de operación

