Svan SVVE02160PR El manual del propietario
- Tipo
- El manual del propietario

SVAN
VENTILADOR DE PIE RETRO
Modelos:
SVVE02160PR y SVVE02180PR
MANUAL DE INSTRUCCIONES

PRECAUCIONES
Al usar cualquier aparato eléctrico, siempre se deben seguir las precauciones
básicas de seguridad, incluidas las siguientes:
1. Lea todas las instrucciones y guarde para futuras referencias.
2. Este dispositivo no está destinado a ser utilizado por personas (incluidos niños)
con capacidades físicas, sensoriales o mentales reducidas, o por falta de
experiencia y conocimiento, a menos que hayan sido supervisados o instruidos
sobre el uso del dispositivo por parte de una persona responsable de su uso. la
seguridad.
3. Los niños pequeños deben ser supervisados para asegurarse de que no
jueguen con el aparato.
4. Desenchufe siempre el aparato de la red eléctrica cuando no esté en uso.
5. Para desconectar el aparato, apague el control y luego desenchúfelo de la red
eléctrica.
6. Para desenchufar el aparato, siempre agarre el enchufe; No tire del cable.
7. Si el cable de alimentación está dañado, debe ser reemplazado por el
fabricante, su agente de servicio o una persona con calificaciones similares para
evitar un peligro.
8. No usar al aire libre. Este aparato está diseñado para uso doméstico
solamente.
9. Coloque el cable de alimentación lejos de las áreas donde la gente camina
para que no se pueda pisar o tropezar con él.
10. Utilice siempre el aparato sobre una superficie plana y estable.
11. No utilice ni almacene el aparato donde pueda estar expuesto a agua o
líquidos. No lo use en o cerca de un baño, cerca de ventanas, etc.
12. Nunca limpie este aparato cuando esté enchufado. No lo sumerja en agua.
Limpie la superficie exterior con un paño húmedo o un cepillo suave y seque con
un paño suave y seco.
13. Use el aparato solo como se indica en este manual. El mal uso podría anular
su garantía.
14. Evite el contacto con partes móviles; nunca inserte ningún objeto a través de
la rejilla cuando el ventilador esté en funcionamiento.

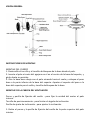
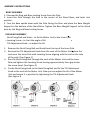
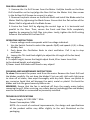
VISION GENERAL
INSTRUCCIONES DE MONTAJE
MONTAJE DEL CUERPO
1. Destornille el tornillo y el tornillo de bloqueo de la base desde el palo.
2. Inserte el palo a través del agujero en el en el centro de la base del soporte, y
gírelo hasta su posición.
3. Gire la base boca abajo con el palo mirando hacia el suelo y coloque el peso
base a la parte inferior de la base del soporte. Apretar el soporte del peso a la
base del soporte por el anillo y tornillo de bloqueo de la base.
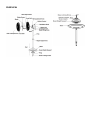
MONTAJE DE LA CABEZA DEL VENTILADOR
Perno y perilla de fijación del cuello - para fijar la unidad del motor al palo
interno.
Tornillo de posicionamiento - para limitar el ángulo de inclinación
Perilla de ajuste de inclinación - para ajustar la inclinación
1. Retire el perno y la perilla de fijación del cuello de la parte superior del palo
interior.

2. Retire la perilla de ajuste de inclinación del cuello de la unidad del motor;
colocar el cuello sobre el palo interno con el tornillo de ubicación alineado con la
ranura del lado del palo. (Ver Figura 1)
3. Pase el tornillo de fijación del cuello a través del cuello de la unidad del motor
y el interior. Coloque y apriete el tornillo de posicionamiento dejando un espacio
de aproximadamente 3 mm debajo de la cabeza del tornillo (Ver Figura 2)
4. Fije la perilla de fijación del cuello al perno y fije el ajuste de inclinación (Ver
Figura 3).
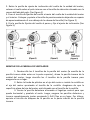
MONTAJE DE LA PARRILLA DE VENTILADOR
1. Desatornille los 4 tornillos de la parrilla del motor (la manilla de la
parrilla trasera debe estar en la parte superior), alinee la parrilla trasera de la
unidad del motor, luego atornille los 4 tornillos de la parrilla trasera para
asegurarla en su lugar.
2. Retire la funda de plástico en el eje del motor e instale la cuchilla en
el eje del motor apretando el tornillo de la cuchilla. Asegúrese de que la
superficie plana del eje del motor esté alineada con el tornillo de la cuchilla.
3. Centre la parrilla delantera alineando el logotipo central para que
quede horizontal y paralelo al suelo. Luego, asegure las parrillas delantera y
trasera completamente juntas encajando 5 Grill Clips en su lugar. Por último,
apriete el tornillo de bloqueo de la parrilla en la parte inferior de la parrilla
trasera.

INSTRUCCIONES DE USO
Asegúrese de que la tensión utilizada corresponda con la tensión indicada.
1. Use el control de interruptor para seleccionar las velocidades: 0 (apagado) y
las velocidades I, II, III, son Lento, Medio, Rápido.
2. Presione la perilla de oscilación hacia abajo para iniciar la oscilación. Tire hacia
arriba para detener la oscilación.
3. Afloje ligeramente la perilla de bloqueo de inclinación para ajustar el ángulo
de inclinación de la cabeza del ventilador, luego vuelva a apretar.
4. Para ajustar la altura, afloje la perilla de ajuste de altura, levante o baje el polo
interno a la altura deseada, y volver a apretar
5) ¡Nunca toque las cuchillas con la mano ni con ningún objeto!
INSTRUCCIONES DE LIMPIEZA Y MANTENIMIENTO
Para limpiar: Desconecte el cable de alimentación de la red eléctrica. Retire la
parrilla delantera y las cuchillas con cuidado. ¡No deje caer las cuchillas! Primero
use un paño suave con jabón suave para limpiar las manchas de aceite, luego
limpie bien con un paño seco. ¡Nunca utilice pulimento ni ningún líquido
corrosivo que dañe la pintura, el metal o el plástico! Vuelva a colocar las
cuchillas y bloquee el protector firmemente antes de usar.
ADVERTENCIA: Asegúrese de que el ventilador esté apagado de la red eléctrica
antes de retirar la parrilla. Después del servicio, cualquier dispositivo de
seguridad (incluidas las rejillas y las cuchillas) debe reinstalarse o volver a
montarse como se instaló anteriormente.
ESPECIFICACIONES TÉCNICAS
Fuente de alimentación: CA 220-240V ~ 50Hz
Consumo de energía: 50W
NOTA: Como resultado de las continuas mejoras, el diseño y las especificaciones
del producto pueden diferir ligeramente de la unidad que se ilustra en el
embalaje.

SVAN
RETRO STAND FAN
Models:
SVVE02160PR y SVVE02180PR
MANUAL DE INSTRUCCIONES

OPERATING MANUAL
SAFETY PRECAUTIONS
When using any electrical appliance, basic safety precautions should always be
followed, including the following:
1. Read all instructions and keep for future reference.
2. This appliance is not intended for use by persons (including children)
with reduced physical, sensory or mental capabilities, or lack of experience
and knowledge, unless they have been given supervision or instruction
concerning use of the appliance by a person responsible for their safety.
3. Young children should be supervised to ensure that they do not play
with the appliance.
4. Always unplug the appliance from the mains when not in use.
5. To disconnect the appliance, switch the control to OFF, then unplug from
the mains.
6. To unplug the appliance, always grasp the plug; do not pull the cord.
7. If the supply cord is damaged it must be replaced by the manufacturer,
its service agent or a similarly qualified person in order to avoid a hazard.
8. Do not use outdoors. This appliance is designed for household use only.
9. Place the power cable away from areas where people walk so that it
cannot be stepped on or tripped over.
10. Always use the appliance on a flat, stable surface.
11. Do not use or store the appliance where it may be exposed to water or
any liquids. Do not use in or near a bathroom, near windows etc.
12. Never clean this appliance when it is plugged in. Do not immerse it in
water. Clean the outside surface with a damp cloth or soft brush and dry
with a soft dry cloth.
13. Use the appliance only as directed in this manual. Misuse could void
your warranty.
14. Avoid contact with moving parts; never insert any objects through the
grille when the fan is in operation.

OVERVIEW

ASSEMBLY INSTRUCTIONS
BODY ASSEMBLY
1. Unscrew the Ring and Base Locking Screw from the Pole.
2. Insert the Pole through the hole in the center of the Stand Base, and twist into
position.
3. Turn the Base upside down with the Pole facing the floor and place the Base Weight
Support to the bottom of the Stand Base. Tighten the Base Weight Support to the Stand
base by the Ring and Base Locking Screw.
FAN HEAD ASSEMBLY
Neck Fixing Bolt and Knob – to fix the Motor Unit to the Inner Pole
Locating Screw – to limit the angle of tilt
Tilt Adjustment Knob – to adjust the tilt
1. Remove the Neck Fixing Bolt and Knob from the top of the Inner Pole.
2. Remove the Tilt Adjustment Knob from the neck of the Motor Unit; place the
neck over the Inner Pole with Locating Screw aligning with the slot on the side
of the pole. (See Figure 1)
3. Run the Neck Fixing Bolt through the neck of the Motor Unit and the Inner
Pole and tighten the Locating Screw leaving approximately 3mm gap under
the screw head. (See Figure 2)
4. Fix the Neck Fixing Knob to the Neck Fixing Bolt and fix the Tilt Adjustment
Knob to the neck of the Motor Unit. Now you can adjust the tilt of the Motor
Unit and secure it in position by tightening the Tilt Adjustment Knob.
(See Figure 3)

FAN GRILL ASSEMBLY
1. Unscrew the 4 x Grill Screws from the Motor Unit(the handle on the Rear
Grill should be on the top),align the Rear Grill on the Motor Unit, then screw
in the 4x Rear Grill Screws to secure it in place.
2. Remove the plastic sleeve on the Motor Shaft and install the Blade onto the
Motor Shaft by tightening the Blade Screw. Ensure that the flat surface of the
Motor Shaft is aligned with the Blade Screw.
3. Centre the Front Grill by aligning the central logo so it is horizontal and
parallel to the floor. Then, secure the Front and Rear Grills completely
together by snapping 5x Grill Clips into place. Lastly, tighten the Grill Locking
Screw at the bottom of the Rear Grill
OPERATING INSTRUCTIONS
Ensure voltage used corresponds with the voltage indicated.
1. Use the Switch Control to select the speeds: 0(off) and speeds I,II,III, is Slow,
Middle, Fast.
2. Push down the Oscillation Knob to start oscillation. Pull it up to stop
oscillation.
3. Loosen the Tilt-Lock Knob slightly to adjust the tilt angle of the fan head,
then re-tighten.
4. To adjust height, loosen the Height-adjust Knob, lift or lower Inner Pole
to the desired height, and retighten
5) Never touch the blades with hand or any object!
CLEANING AND MAINTENANCE INSTRUCTIONS
To clean: Disconnect the power cord from the mains. Remove the Front Grill and
the blades carefully. Do not drop the blades! First use soft cloth with light soap
to clean off oil stains, then wipe thoroughly with dry cloth. Never use polish or
any corrosive liquid that will damage the paint, metal or plastic! Put back the
blades and lock the guard securely before use.
WARNING: Ensure that the fan is switched off from the supply mains before
removing the grill. After servicing, any safety device (including grilles and blades)
must be reinstalled or remounted as previously installed.
TECHNICAL SPECIFICATIONS
Power Supply: AC 220-240V ~ 50Hz
Power Consumption: 50W
NOTE: As a result of continual improvements, the design and specifications
of the product within may differ slightly to the unit illustrated on the
packaging.
-
 1
1
-
 2
2
-
 3
3
-
 4
4
-
 5
5
-
 6
6
-
 7
7
-
 8
8
-
 9
9
-
 10
10


Svan SVVE02160PR El manual del propietario
- Tipo
- El manual del propietario
en otros idiomas
- English: Svan SVVE02160PR Owner's manual
Artículos relacionados
Otros documentos
-
Holmes HASF-1710 Manual de usuario
-
GE 681131065900 Manual de usuario
-
-
-
Bionaire BSF003 El manual del propietario
-
-
Lasko 1850 Manual de usuario
-
-
Optimus F-1672BK Guía del usuario