
OWNER’S MANUAL
SUBMERSIBLE UTILITY PUMP
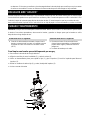
Questions, problems, missing parts? Before returning to the store call AQUAPRO
Customer Service 8 a.m. - 5 p.m., EST, Monday-Friday
1-844-242-2475
© 2015 Copyright GP Enterprises Co., Ltd.
Model 51081-0

2
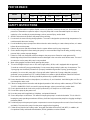
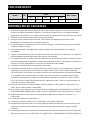
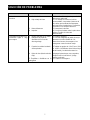
PERFORMANCE
Model HP
GPH of Water @ Total Feet Of Lift
Max. Lift
0 ft. 5 ft. 10 ft. 15 ft. 20 ft.
51081-0 1/4 2700 2400 1980 1500 720 22 ft.
SAFETY INSTRUCTIONS
1. Do not pump flammable or explosive liquids such as oil, gasoline, kerosene, ethanol, etc. Do not use in the
presence of flammable or explosive vapors. Using this pump with or near flammable liquids can cause an
explosion or fire, resulting in property damage, serious personal injury, and/or death.
2. ALWAYS disconnect the power to the pump before servicing.
3. Do not touch the motor housing during operation. The motor is designed to operate at high temperatures. Do
not disassemble the motor housing.
4. Do not handle the pump or pump motor with wet hands or when standing on a wet or damp surface, or in water
before disconnect the power.
5. Release all pressure and drain all water from the system before servicing any component.
6. Secure the discharge line before starting the pump. An unsecured discharge line will whip, possibly causing
personal injury, and/or property damage.
7. Extension cords may not deliver sufficient voltage to the pump motor. Extension cords present a life
threatening safety hazard if the insulation becomes damaged or the connection ends fall into water. The use of
an extension cord to power this pump is not permitted.
8. Wear safety goggles at all times when working with pumps.
9. This unit is designed only for use on 115 volts (single phase), 60 Hz, and is equipped with an approved
3-conductor cord and 3-prong grounded plug. Do not remove the ground pin under any circumstances. The
3-prong plug must be directly inserted into a properly installed and grounded 3-prong, grounding-type
receptacle. Do not use this pump with a 2-prong wall outlet. Replace the 2-prong outlet with a properly
grounded 3-prong receptacle (a GFCI outlet) installed in accordance with the National Electrical Code and
local codes and ordinances. All wiring should be performed by a qualified electrician.
10. Protect the electrical cord from sharp objects, hot surfaces, oil, and chemicals. Avoid kinking the cord. Do not
use damaged or worn cords.
11. Failure to comply with the instruction and designed operation of this unit may void the warranty. ATTEMPTING
TO USE A DAMAGED PUMP can result in property damage, serious personal injury, and/or death.
12. Ensure that the electrical circuit to the pump is protected by a 15 Amp fuse or circuit breaker.
13. Do not lift the pump by the power cord.
14. Know the pump and its applications, limitations, and potential hazards.
15. Secure the pump to a solid base. This will aid in keeping the pump in a vertical orientation. This is critical in
keeping the pump operating at maximum efficiency. It will also help prevent the pump from clogging resulting in
premature failure.
16. Periodically inspect the pump and system components to ensure the pump suction screen is free of mud, sand,
and debris. Disconnect the pump from the power supply before inspecting.
17. Follow all local electrical and safety codes, along with the National Electrical Code (NEC). In addition, all
Occupational Safety and Health Administration (OSHA) guidelines must be followed.

3
18. The motor of this pump has a thermal protector that will trip if the motor becomes too hot. The protector will
reset itself once the motor cools down and an acceptable temperature has been reached. The pump may start
unexpectedly if it is plugged in.
19. Ensure the electrical power source is adequate for the requirements of the pump.
20. Before using the pump, check the hose for holes or excess wear, which could cause leaks, and ensure the
hose is not kinked or making sharp angles. A straight hose allows the pump to move the greatest amount of
water quickly, and also check that all hose connections are tight to minimize leaks.
21. This pump is made of high-strength, corrosion-resistant materials. It will provide trouble-free service for a long
time when properly installed, maintained, and used. However, inadequate electrical power to the pump, dirt, or
debris may cause the pump to fail. Please carefully read the manual and follow the instructions regarding
common pump problems and remedies.
PRE-INSTALLATION
APPLICATION
This submersible utility pump is designed for water removal applications. Pump water only with this pump. It
can drain or remove water from the following: pits, sinks, window wells, basements, boats, low spot in yards,
or other flooded areas.
This unit is not designed as a waterfall or fountain pump, or for applications involving salt water or brine! Use
with waterfalls, fountains, salt water or brine will void the warranty.
Do not use where water recirculates.
Not designed for use as a swimming pool drainer.
Do not use this pump in water with fish present. If any oil leaks out of the motor it can kill fish.
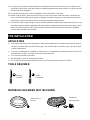
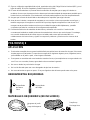
TOOLS REQUIRED
MATERIALS REQUIRED (NOT INCLUDED)
Phillips
Screwdriver
Flathead
Screwdriv
SumpPump
Discharge Hose
Garden Hose or
Hose kit

4
SPECIFICATIONS
Power supply
115V, 60 HZ., 15 Amp Circuit
Liquid Temp. Range
32 to 77°F (0- 25°C)
Discharge
1 1/2 in. Female NPT or 3/4 in. garden hose
thread
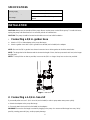
INSTALLATION
CAUTION: Always use the handle to lift the pump. Never use the power cord to lift the pump. To avoid skin burns,
unplug the pump and allow time for it to cool after periods of extended use.
CAUTION: The pump should be located and should rest on a level solid foundation.
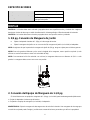
1.
Connecting a 3/4 in. garden hose
Attach a 1 1/2 in. Male adaptor to the pump discharge.
Attach a garden hose with a 3/4 in. garden hose thread (not included) to the adaptor
NOTE: Be sure the 3/4 in. garden hose thread connector has a rubber gasket to minimize water leaks.
NOTE: The larger the inside diameter and the shorter the length of hose, the less pressure that is lost (or the larger
the flow rate).
NOTE: To keep friction as low as possible, hose must be 3/4 in. or larger. Keep hose as short as possible.
2. Connecting a 1-1/4 in. hose kit
If you would prefer to use a 1-1/4 in. hose kit (not included) in order to pump water away more quickly.
Attach the adaptor to the pump discharge.
Securely attach the hose kit (not included) to the adaptor.
WARNING: Secure the discharge hose before plugging in the pump. An unsecured discharge hose may “whip”
possibly causing personal injury, and/or property damage

5
OPERATION
WARNING: Risk of electric shock. Can shock, burn or kill. Do not handle the pump or pump motor with wet hands
or when standing on a wet or damp surface, or in water. Disconnect the power from the pump before handling,
servicing, or attempting to repair the pump.
1.
Power Supply: This pump is designed for 115V, 60 HZ. Operation and requires an individual branch circuit of 15 amperes
or more capacity. It is supplied with a 3-wire cord set with grounding-type plug for use in a 3-wire, grounded outlet. For
safety, pump should always be electrically grounded to a suitable electrical ground such as a grounded water pipe or a
properly grounded metallic raceway, or ground wire system. Do not cut off the round grounding prong.
2. The pump must be standing in at least 1 in. (25.4 mm) of water before starting it. The shaft seal is water
lubricated and may be damaged if the pump runs dry.
3. After starting, the pump will lower the water level to 1/8 in. (3.2 mm) before losing suction. It will not pick up
water less than 1/8 in. deep when running and will not operate successfully if started in only 1/8 in. of water.
4. Do not leave the pump unattended! If the pump has been operating satisfactorily and the discharge stream
suddenly stops coming out of the hose, stop the pump immediately; do not allow it to run dry. A mop or
squeegee will be needed to remove remaining water
5. The motor is equipped with an automatically resetting thermal overload protector. If the motor gets too hot, the
overload protector will stop the motor before it is damaged. When the motor has cooled sufficiently, the
overload protector will reset itself and the motor will restart.
NOTE: If the overload protector stops the pump repeatedly, disconnect the power from the pump and check it to
find the problem. Low voltage, long extension cords, clogged impeller, too much back pressure in the discharge
hose (as when pumping through 50 ft. (15 M) of coiled hose), or running the pump with no load, can all cause
excessive cycling and overheating.
6. Do not try to run the pump continuously when the water level is below 4 in. (102 mm) or about 1/3 of the way up
the motor casing, as it will overheat. If the motor overheats and the overload stops the pump, allow it to cool for
one hour before restarting. Motor will not restart before the overload has cooled.

6
AIRLOCK
When a pump airlocks, it runs but does not move any water. An airlock will cause the pump to overheat and fail.
This pump has an anti-airlock hole in the bottom of the pump body. If you suspect an airlock, unplug the pump,
clean out the anti-airlock hole with a paper clip or piece of wire, and restart the pump.
CARE AND CLEANING
CAUTION: Always use the handle to lift the pump. Never use the power cord to lift the pump. To avoid skin burns,
unplug the pump and allow time for it to cool after periods of extended use.
Do
Do Not
When the power is disconnected, inspect the pump
suction screen and remove all debris, then plug the
pump back into the grounded (GFCI) outlet.
Do not disassemble the motor housing. This
motor has NO repairable internal parts, and
disassembly may cause leakage or
dangerous electrical wiring issues.
Do not lift up the pump by the power cord.
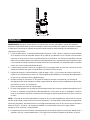
To clean a pump clogged with debris:
Unplug the pump from electrical power.
Unscrew the stainless screws (5), and remove the volute (4).
Use a flathead screwdriver to hold the shaft (1), then turn the impeller (2) counterclockwise to release the
impeller (2).
Remove debris from around the shaft (1) and on/under the impeller (2).
Reassemble the pump.

7
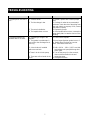
TROUBLESHOOTING
Problem
Possible Cause
Corrective Action
The pump does not start or
run.
1. A fuse is blown.
2. The line voltage is low.
3. The motor is defective.
4. The impeller does not turn.
1. If blown, replace with a fuse of proper
size.
2. If voltage is under the recommended
minimum, check the size of the wiring from
the main switch on property. If OK, contact
the power company.
3. Replace the pump.
4. If the impeller does not turn, remove the
lower base plate. Locate the source of the
binding.
The pump operates but
delivers little or no water.
1. Something is caught in the
impeller.
2. The garden hose diameter is
too small or the discharge line is
too long.
3. A check valve is installed
without a vent hole.
4.There is air lock in the pump.
5. There are coils or bends in the
hose.
1. Clean out the impeller.
2.Use a larger diameter garden hose or 1
in. flexible pipe. Eliminate any excess
hose. Short hoses work best.
3. Drill a 1/16 in. - 1/8 in. (1.6-3.2 mm) dia.
hole between the pump discharge and
check valve.
4. Turn off the pump for a few seconds,
clean out the anti-airlock hole and
restart the pump.
5. Straighten the hose.

8
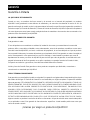
WARRANTY
Limited Warranty
WHAT THIS WARRANTY COVERS
When used and maintained in normal use and in accordance with the Owner’s Manual, your AQUAPRO product is
warranted against original defects in material and workmanship for at least one year (warranty varies depending
on model; see box for specific warranty information) from the date of purchase (the “Warranty Period”). During the
Warranty Period, AQUAPRO will repair or replace at no cost to you, to correct any such defect in products founds
upon examination by AQUAPRO to be defective in materials or workmanship.
WHAT THIS WARRANTY DOES NOT COVER
This Warranty does not cover:
Use of the product in a non-residential application, improper installation and/or maintenance of the product,
damage due to misuse, acts of God, nature vandalism or other acts beyond control of AQUAPRO, owner’s acts or
omissions, use outside the country in which the product was initially purchased and resale of the product by the
original owner. This warranty does not cover pick up, delivery, transportation or house calls. However, if you mail
your product to an AQUAPRO Sales and Service Center for warranty service, cost of shipping will be paid one way.
This warranty does not apply to products purchased outside of the United States, including its territories and
possessions, outside of U.S. Military Exchange and outside of Canada. This warranty does not cover products
purchased from a party that is not an authorized retailer, dealer or distributor of AQUAPRO products.
OTHER IMPORTANT TERMS
This warranty is not transferable and may not be assigned. This Warranty shall be governed and construed under
laws of the state of Michigan. The Warranty Period will not be extended by any replacement or repair performed
under this Warranty. THIS WARRANTY IS THE EXCLUSIVE WARRANTY AND REMEDY PROVIDED BY
AQUAPRO. ALL OTHER WARRANTIES, EXPRESSED OR IMPLIED, INCLUDING WARRANTIES OR
MERCHANTABILITY OR FITNESS FOR PARTICULAR PURPOSE, ARE DISCLAIMED. IN NO EVENT WILL
AQUAPRO BE LIABLE FOR ANY SPECIAL, INDRECT, INCIDENTAL OR CONSEQUENTIAL DAMAGES OF
ANY KIND OR NATURE TO OWNER OR ANY PARTY CLAIMING THROUGH OWNER WHETHER BASED IN
CONTRACT, NEGLIGENCE, TORT, OR STRICT PRODUCTS LIABLITY OR ARISING FROM ANY CAUSE
WHATSOEVER. Some states do not allow for the exclusion of consequential damages, so the above exclusion
may not apply to you. This warranty gives you specific rights. You may also have others that vary from state to
state.
Thank you for choosing an AQUAPRO product!

MANUAL DEL USUARIO
BOMBA DE UTILIDAD SUMERGIBLES
¿Preguntas, problemas, piezas que faltan? Antes de devolverla a la tienda,
llame a Servicio al Cliente de 8:00 AM a 5:00 pm EST de Lunes a Viernes.
1-844-242-2475
Model 51081-0

2
FUNCIONAMIENTO
Modelo HP
GPH (Galones por hora) de Agua @ Pies (Metros) de
Altura
Máx. Levante
0pi. 5pi. 10pi. 15pi. 20pi.
51081-0 1/4 2700 2400 1980 1500 720 22 pi.
INFORMACIÓN DE SEGURIDAD
1. No bombee líquidos inflamables o explosivos como aceite, gasolina, queroseno, etc. No lo use cerca o en
presencia de vapores inflamables o explosivos. El uso de este producto cerca o con líquidos inflamables
puede causar una explosión o un incendio causando daños a su propiedad, lesiones personales, y/o muerte.
2. SIEMPRE desconecte la bomba antes de hacerle mantenimiento.
3. No toque el motor mientras esté funcionando. Este producto está diseñado para funcionar a altas
temperaturas. No desmonte motor ni el protector del motor.
4. No use la bomba o el motor de la bomba con las manos mojadas, o cuando esté de pie sobre la superficie
mojada o húmeda, o en agua.
5. Descargue toda presión y desagüe toda el agua del sistema antes del mantenimiento de cualquier
componente.
6. Asegure el cable de descarga antes de empezar hacer funcionar la bomba. Un cable suelto o no asegurado
puede arrebatarse causando daños personales o daños a la propiedad.
7. Los cables de extensión no ofrecen suficiente voltaje al motor de la bomba. Los cables de extensión pueden
presentar un peligro para la seguridad si el material de aislamiento se daña o si las puntas de conexión caen
el agua. El uso de un cable extensión no está con esta bomba NO está permitida.
8. Use gafas de seguridad en todo momento que use la bomba.
9. Esta unidad está diseñada de un uso de 115 voltios (una sola fase), 60 Hz, y está equipada con un cable de 3
conductores y un enchufe de conexión de tierra (3 clavijas). NO QUITE EL ALFILER BAJO NINGUNA
CIRCUNSTANCIA. El enchufe de conexión de tierra tiene que estar directamente y correctamente instalado
en un receptáculo de conexión de tierra (3 clavijas). No use esta bomba en un receptáculo de 2 clavijas.
Reemplacé el receptáculo de 2 clavijas con un receptáculo apropiado de 3 clavijas con conexión a tierra
(GFCI) de acuerdo al Código Eléctrico Nacional y las ordenanzas locales. Todas las conexiones deben ser
hechas por un electricista profesional.
10. Proteja el cable eléctrico de objetos afilados, superficies calientes, aceite, y químicos. Evite enroscar los
cables. No use cables dañados o desgastados.
11. El no cumplir con las instrucciones de la operación de esta unidad puede anular la garantía. EL INTENTO DE
USAR UNA BOMBA DAÑADA puede resultar en daños a la propiedad, serios daños personales y/o muerte.
12. Asegúrese de que el circuito eléctrico a la bomba este protegido por un fusible de 15 amperios o un
cortacircuitos.
13. No levante la bomba por el cable eléctrico.
14. Conozca de la bomba las aplicaciones, las limitaciones y los peligros potenciales.
15. Asegúrese de que la bomba esté en una base sólida para mantenerla vertical por encima de barro y tierra
durante el funcionamiento para maximizar la eficiencia de la bomba y prevenir que se tape o una falla
prematura.
16. Periódicamente inspeccione la bomba y los componentes del sistema para asegurar que las entradas estén
libres de barro, arena y mugre. DESCONECTE DEL ENCHUFE LA BOMBA ANTES DE INSPECCIONARLA.

3
17. Siga sus códigos de seguridad eléctrica local, especialmente los del Código Eléctrico Nacional (NEC) y en el
lugar de trabajo. El Acta de Seguridad y Salud Ocupacional. (OSHA).
18. El motor de la bomba tiene un protector térmico automático de reajuste que se apaga si la bomba se
recalienta. Una vez que el protector térmico detecte que la bomba ha bajado de temperatura permitirá que la
bomba funcione normalmente. Si la bomba está conectada puede empezar a funcionar inesperadamente.
19. Asegure que la fuente de electricidad es adecuada para los requisitos que exige la bomba.
20. Antes de usar la bomba, compruebe la manguera por uso excesivo o huecos que pueden causar fugas, y
también asegure que la manguera no esté torcida ni que haya ángulos exagerados en ésta misma. Una
manguera recta permite la bomba mover la mayor cantidad de agua posible rápidamente, y también
compruebe que todas las conexiones de la manguera estén apretadas.
21. Esta bomba está hecha de materiales de alta fuerza y resistentes a la corrosión. Cuando ha sido
correctamente instalada no tendrá problemas de mantenimiento o de uso por mucho tiempo. Sin embargo,
una conexión inadecuada de la bomba mugre o suciedad puede causar que la bomba falle. Lea
cuidadosamente las instrucciones y sígalas con respecto a problemas y soluciones más comunes de la
bomba.
PRE-MONTAJE
APLICACIÓN
Esta bomba sumergible de uso general está diseñada para aplicaciones de extracción de agua. Únicamente
bombee agua con esta bomba. Es capaz de sacar agua de los siguientes lugares: pozos, fregaderos,barcos,
profundidades en el jardín o patio, u otros lugares inundados.
Este aparato no esta disenado como bomba de cascada o fuente, ni para aplicaciones con agua salada o de
mar. El uso con cascadas, fuentes, agua salada o de mar anulara la garantia.
No usar en donde hay recirculacion de agua.
No ha sido disenado para usar como desaguador de piscinas de natacion.
No use esta bomba en agua con peces. Si hay una fuga de aceite del motor puede matar a los peces.
HERRAMIENTAS REQUERIDAS
MATERIALES REQUERIDOS (NO INCLUIDOS)
Destornillador
de Phillips
Destornillador
deCabeza
Plana
SumpPump
Discharge Hose
Manguera de Jardín
o
Juego de Mangueras

4
ESPECIFICACIONES
Voltaje
115V, 60 HZ., Circuito de 15 Amperios
Rango de Temperatura de Líquido
32 a 77°F (0 a 25°C)
Descarga NPT Mujer de 1 1/2 pg. o conector de 3/4
manguera de jardín
MONTAJE
CAUTELA : La bomba debe estar colocada y apoyada sobre una superficie maciza y nivelada. No cuelgue la
bomba por el tubo de descarga o cordón de alimentación. Mantenga limpio el filtro de entrada de la bomba.
CAUTELA : La bomba debe estar colocada y apoyada sobre una superficie maciza y nivelada.
1. 3/4 pg. Conexión de Manguera de Jardín
Sujete el adaptador hembra de 1 1/2pg. a la descarga de bomba.
Sujete la manguera de jardín con un conector de 3/4 manguera de jardín (no incluido) al adaptador.
NOTA: Asegúrese de que la punta de la manguera de jardín de 3/4 pg. tenga una junta para minimizar goteras.
NOTA:Entre más grande el diámetro y más corta la longitud de la manguera, menos presión se pierde (o más
eficiente se vuelve la bomba en cuanto a la velocidad de flujo).
NOTA: Para mantener la fricción reducida a un minimo, la manguera debe tener un diametro de 3/4 in. o más
grande. La manguera debe ser tan corta como sea posible.
2. Conexión del Equipo de Manguera de 1-1/4 pg
Si Usted desea usar un equipo de manguera de 1-1/4 pg. (no incluido) para bombearaguamásrápidamente:
Sujete el adaptador a la descarga de bomba .
Sujetebien el equipo de manguera (no incluido) al adaptador .
ADVERTENCIA: Sujete la manguera de descarga antes de enchufar la bomba. Una manguera de descarga que
no está bien sujetada puede "fustigar," posiblemente causando lesiones personales y/o daño a la propiedad.

5
OPERACIÓN
ADVERTENCIA: Riesgo de choque eléctrico. Puede provocar choque, quemadura o muerte. No maneje la
bomba ni el motor de la bomba con manos humedas o cuando este parado sobre superficies humedas o mojadas,
o sobre agua. Desconecte la corriente electrica de la bomba antes de realizar trabajos de mantenimiento o
reparaciones en la bomba.
1. Fuente de alimentacion: La bomba esta disenada para operar a 115V y 60 Hz y requiere un ramal individual
de 15 amperes o mas de capacidad. Dispone de un cable de 3 conductores con un enchufe con linea a tierra
para usar en una toma de corriente conectada a tierra de 3 conductores. Por razones de seguridad, la bomba
debe estar conectada siempre a una tierra electrica adecuada tal como una tuberia de agua conectada a tierra
o una canalizacion electrica metalica conectada a tierra de forma adecuada o un sistema de cables conectado
a tierra. No corte la clavija redondeada de tierra.
2. La bomba debe estar por lo menos en 1 pulgada (25,4 mm) de agua antes de comenzar a funcionar. El sello
del eje esta lubricado por agua y se puede danar si la bomba funciona en seco.
3. Despues de arrancar, la bomba reducira el nivel del agua a 1/8 in. (3.2 mm) antes de perder la potencia de
aspiracion. No aspirara agua en menos de 1/8 de pulgada de profundidad y no funcionara adecuadamente si
se arranca con solamente 1/8 de pulgada de agua.
4. No deje la bomba sin supervision. Si la bomba ha estado funcionando correctamente y la corriente de
descarga que viene de la manguera se detiene repentinamente, pare la bomba inmediatamente. No permita
que funcione en seco. Se necesitara un
pano o escurridor para sacar el resto del agua.
5. El motor viene equipado con un protector de sobrecarga termica que se vuelve a graduar automaticamente. Si
el motor se recalienta, el protector de sobrecarga detiene el motor antes de que se perjudique. Cuando el
motor se ha enfriado lo suficiente, el protector de sobrecarga se gradua automaticamente y vuelve a arrancar
el motor.
NOTA: Si el protector de sobrecarga detiene la operacion de la bomba repetidamente, desconecte la corriente
electrica de la bomba e inspeccione para encontrar el problema. Tensiones bajas, cables largos de alargamiento,
impulsores bloqueados, demasiada presion en la manguera de descarga (como en los casos en que se bombea a
traves de 50 pies - 15 metros - de manguera enredada), o una bomba que funciona sin carga, pueden.
resultar en ciclos excesivos y recalentamiento.
6. No trate de hacer marchar la bomba continuamente cuando el nivel del agua se encuentre por debajo de las 4
pulgadas (102 mm) o aproximadamente a 1/3 de camino hacia arriba en entubado de la bomba, ya que se

6
recalentara. Si el motor se recalienta y la sobrecarga detiene la bomba, deje que se enfrie por una hora antes
de volver a encenderla. El motor no volvera a funcionar antes de que la sborecarga se haya enfriado.
BOLSAS DE AIRE “AIRLOCK”
Cuando el flujo de la bomba disminuye o se para debido a bolsas de aire, la bomba marcha pero no mueve agua.
Una bolsa de aire puede hacer que la bomba se recaliente y falle. Esta bomba posee un orificio "anti-airlock" en el
fondo del cuerpo de la bomba para eliminar las bolsas de aire. Si usted sospecha que hay una bolsa de aire,
desenchufe la bomba, limpie el orificio "anti-airlock"con un clip de papel o un trozo de alambre y vuelva a activarla.
CUIDADO Y MANTENIMIENTO
CAUTELA: Siempre use la manilla para levantar la bomba. Nunca use el cordón o el cable eléctrico para levantar
la bomba. Para evitar quemaduras, desconecte la bomba y permita un tiempo para que la bomba se enfríe
después de un largo tiempo de uso.
Usted Debe Hacer lo Siguiente
Usted NO Debe Hacer lo Siguiente
Cuando el cable esta desconectado, inspeccione la
bomba y remueva todo la mugre, en seguida conecte
la bomba de nuevo a la toma con conexión a tierra
(GFCI).
Desarme el motor. Este motor NO tiene
piezas internas reparables y el desarmarla
puede causar fuga o problemas eléctricos
peligrosos.
Levantar la bomba por el cable.
Para limpiar una bomba que está bloqueada por mugre:
Desconecte la bomba de la energía eléctrica.
Aflojar los tornillos de acero inoxidable (5), y retire la voluta (4).
Utilice un destornillador plano para sujetar el eje (1), gire el impulsor (2) hacia la izquierda para liberar el
impulsor (2).
Retire los residuos de todo el eje (1) y sobre / debajo del impulsor (2).
Volver a montar la bomba

7
SOLUCIÓN DE PROBLEMAS
Problema
Causa Posible
Acción Correctiva
La bomba no arrancao no
funciona.
1. Fusible fundido
2. Bajo voltaje de linea
3. Motor defectuoso
4. Impulsor
1. Si esta fundido reeplacelo por unfusible
del tamano adecuado
2. Si el voltaje es inferioro al minimo
recomendado, compruebe el tamano de
los cables procendentes del interruptor
principal de las instalaciones. Si esta bien,
consulte con la compania electrica.
3. Reemplace la bomba.
4. Si no gira el rodete, retire la placa base
inferior. Localice la causa del
atascamiento.
La bomba funcionapero no
suministra agua o muy
poca aqua.
1. Objeto atascado en el rodete
2. Manguera de jardin de
diametrochico o linea de
descarga larga
3. Examine la valvula instalada
sinRespiradero
4. Bolsa de aire (disminucion de
flujo)
5. Espirales o dobleces en la
manguera
1. Limpie el impulsor.
2. Use una manguera de jardin de mayor
diametro o un tubo flexible de 1 in..
Deseche el exceso de manguera. Las
mangueras cortas funcionan mejor.
3.Taladre un agujero de 1,6 a 3,2mm (1/16
in. a 1/8 in.) de diametro entre la de scarga
de la bomba y la valvula de retencion.
4.Apague la bomba por unos segundos,
limpie el orficio “anti-airlock” y luego
vuelva a activarla
5. Enderece la manguera

8
GARANTÍA
Garantía Limitada
LO QUE CUBRE ESTA GARANTÍA
Cuando se usa y se mantiene de forma normal y de acuerdo con el manual del propietario, su producto
AQUAPRO está garantizado contra defectos de materiales y de mano de obra durante al menos un año (la
garantía varía según el modelo; revise la caja para obtener información específica sobre la garantía) a partir de la
fecha de comprar (el "Período de Garantía"). Durante el Período de Garantía, AQUAPRO reparará o reemplazará
sin costo alguno para usted, para corregir cualquier defecto de materiales o de mano de obra encontrado en los
productos al ser examinados por AQUAPRO.
LO QUE NO CUBRE ESTA GARANTÍA
Esta garantía no cubre:
El uso del producto en un ambiente no residencial, instalación incorrecta y/o mantenimiento incorrecto del
producto, daño a causa del uso indebido, actos sobrenaturales, actos de la naturaleza, vandalismo u otros actos
fuera del control de AQUAPRO, acciones u omisiones del propietario, el uso fuera del país en el que el producto
fue comprado inicialmente y la reventa del producto por el propietario inicial. Esta garantía no cubre el recogido, el
envío, la transportación o las reparaciones en casa. Sin embargo, si usted manda su producto por correo al
departamento de ventas y servicios de AQUAPRO para servicios que cubre la garantía, el costo del envío será
pagado únicamente de ida. Esta garantía no se aplica a productos comprados fuera de los Estados Unidos,
incluyendo sus territorios y posesiones, fuera del Intercambio Militar de los Estados
Unidos y fuera de Canadá. Esta garantía no cubre productos comprados por distribuidor, comerciante o
concesionario no autorizado por AQUAPRO.
OTROS TÉRMINOS IMPORTANTES
Esta garantía no es transferible ni podrá ser asignada. Esta garantía será gobernada e interpretada bajo las leyes
del estado de Michigan. El Periodo de Garantía no será extendido por ningún reemplazo ni reparación realizado
bajo esta garantía. ESTA GARANTÍA ES LA GARANTÍA Y RECURSO PROVISTO POR AQUAPRO. TODAS LAS
DEMÁS GARANTÍAS, EXPLÍCITAS O IMPLÍCITAS, INCLUYENDO GARANTÍAS O COMERCIABILIDAD O QUE
SEA ACOPLADA PARA ALGÚN PROPOSITO EN PARTICULAR, SON DENEGADAS. EN NINGÚN CASO
AQUAPRO SERÁ RESPONSABLE POR CUALQUIER DAÑO ESPECIAL, INDIRECTO, INCIDENTAL O
CONSECUENTE DE CUALQUIER TIPO O ÍNDOLE AL PROPIETARIO O CUALQUIER INDIVIDUO HACIENDO
LA RECLAMACION POR EL PROPIETARIO YA SEA BASADO EN CONTRATO, NEGLIGENCIA, AGRAVIO O
ESTRICTA RESPONSABILIDAD DEL PRODUCTO O QUE SE DERIVE DE ALGUN OTRO TIPO DE CAUSA.
Algunos estados no permiten la exclusión de daños consecuentes. Así que la exclusión antes mencionada podría
no ser aplicable a usted. Esta garantía le ofrece derechos específicos. Usted también podría tener otros que
varíen de estado a estado.
¡Gracias por elegir un producto AQUAPRO!
-
 1
1
-
 2
2
-
 3
3
-
 4
4
-
 5
5
-
 6
6
-
 7
7
-
 8
8
-
 9
9
-
 10
10
-
 11
11
-
 12
12
-
 13
13
-
 14
14
-
 15
15
-
 16
16


En otros idiomas
- English: AquaPRO 51081-0 User manual
Documentos relacionados
-
AquaPRO 51081-0 Instrucciones de operación
-
-
-
-
-
-
-
-
-
AquaPRO 41011-3 Instrucciones de operación


