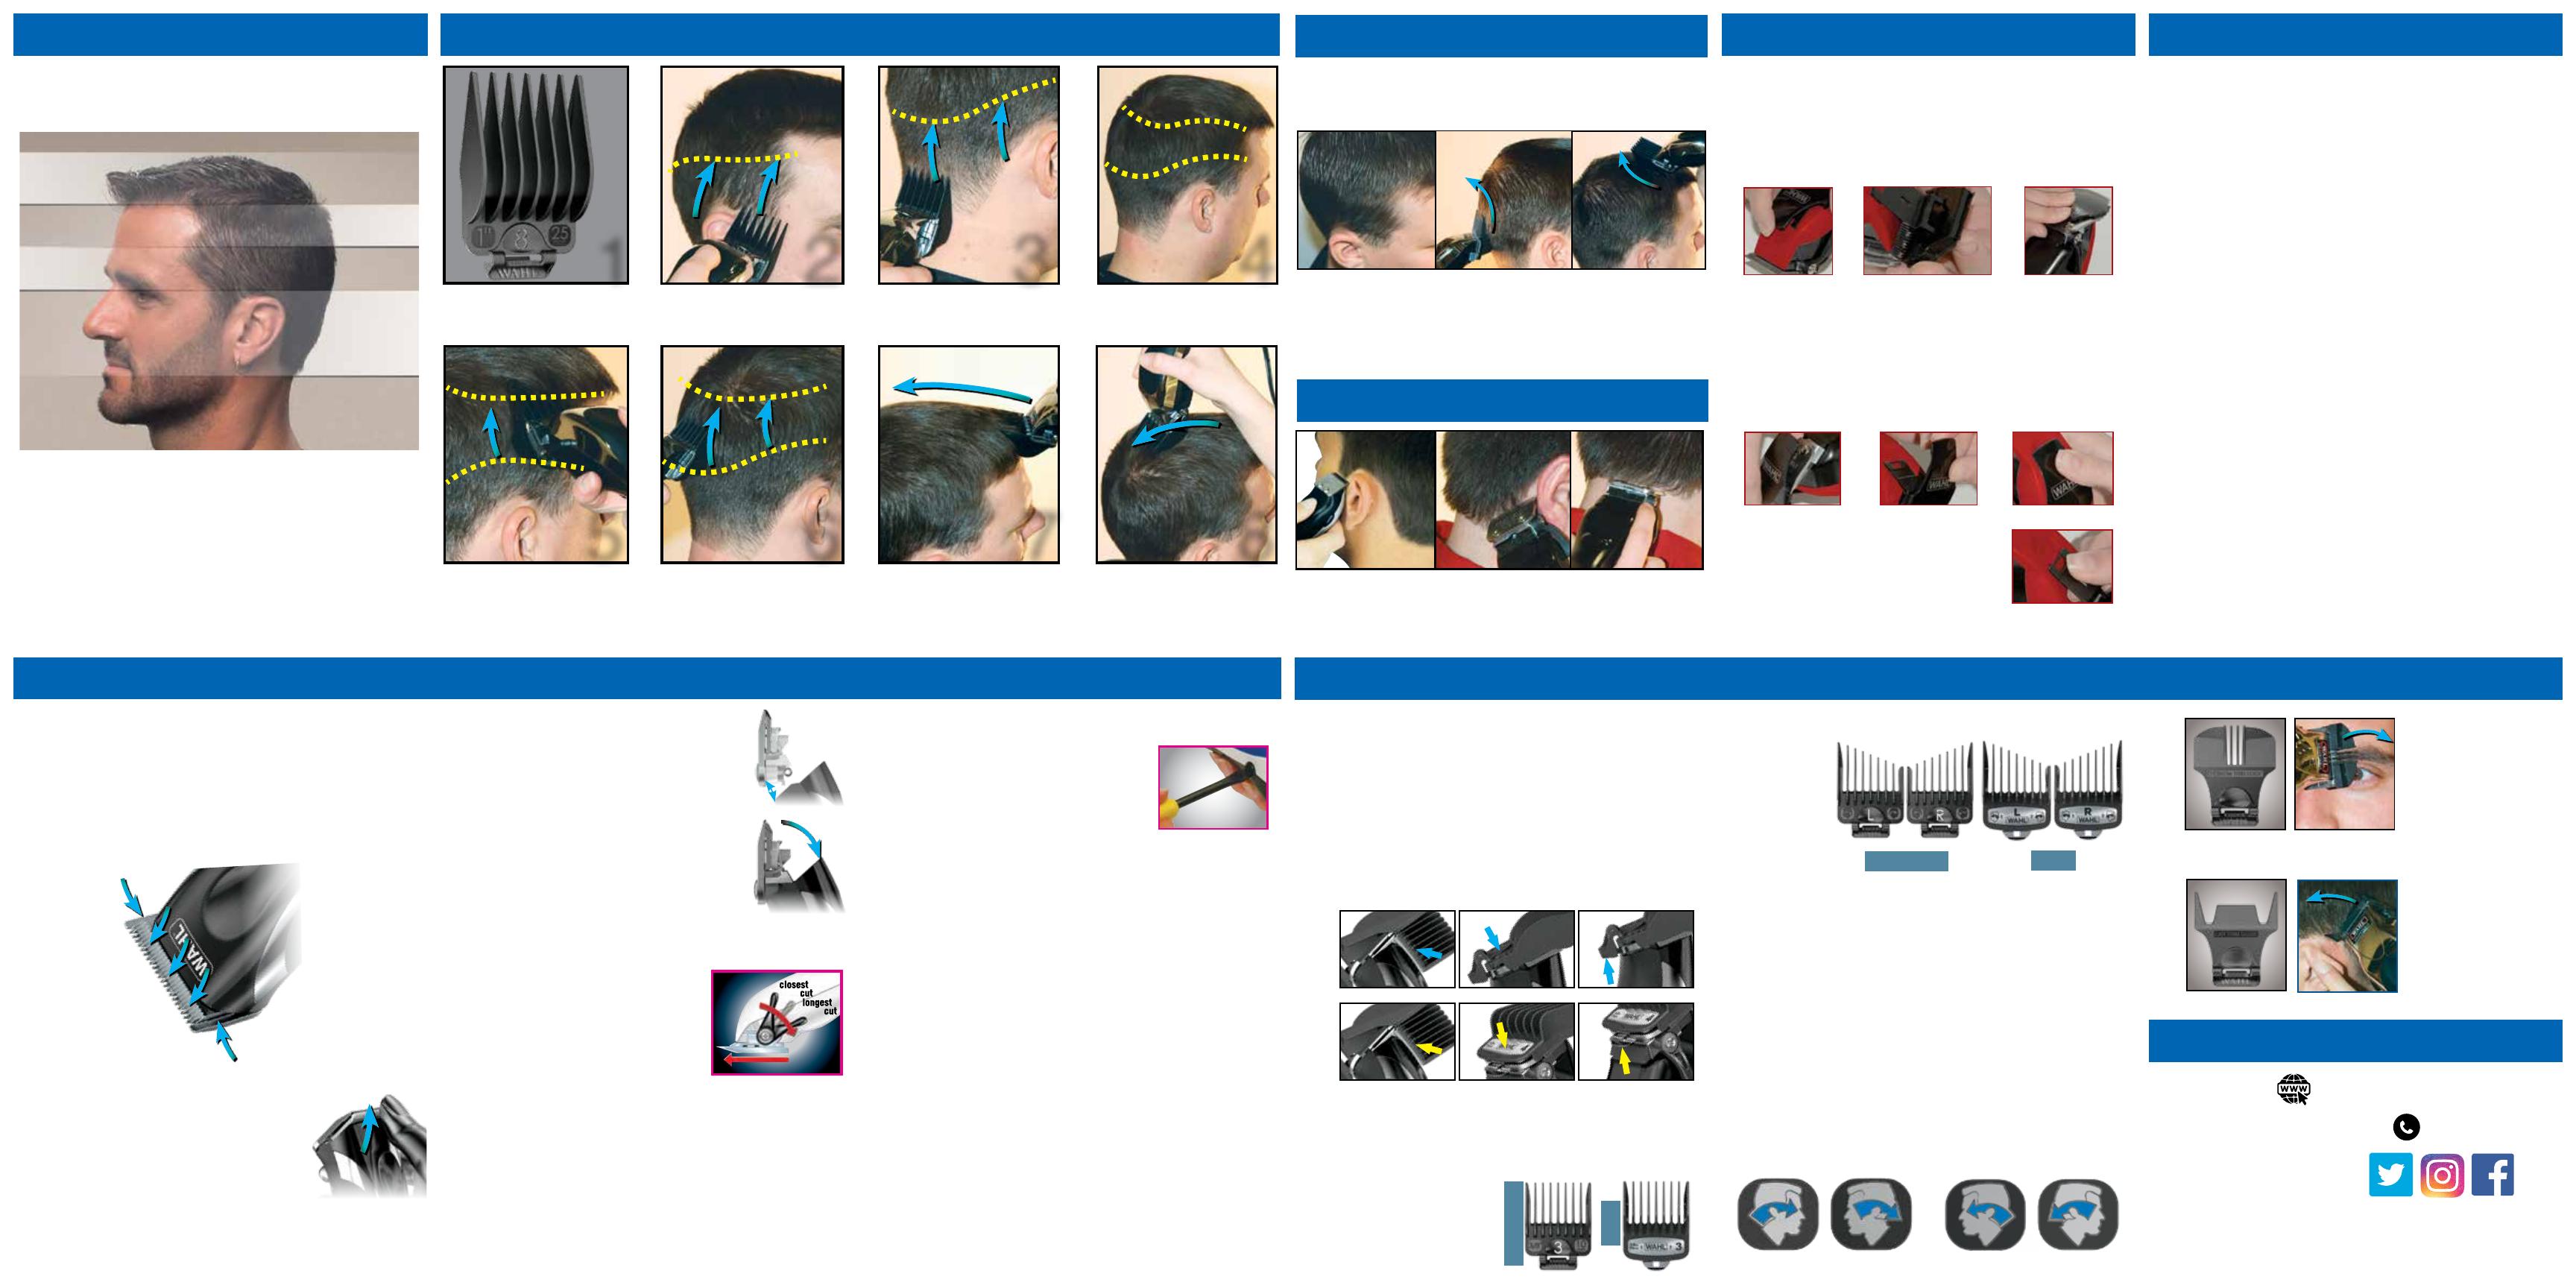
GUÍA PARA CORTAR EL CABELLO PASO A PASO
CONSEJOS Y TÉCNICAS
MANTENIMIENTO DE LA CORTADORA PROTECTORES DE USO FÁCIL
GARANTÍA
RECORTADORA INTEGRADA
DESVANECIDO
ATENCIÓN AL CLIENTE
Find us on social media:
@WAHLGROOMING
wahlUSA.com
1.800.767.9245help@wahlclipper.com
Middle
1. Peine el cabello y elimine los
nudos. Coloque el peine protector más
grande en la cortadora.
2. Comience en la línea de crecimiento
del cabello y corte hasta la mitad de la
cabeza.
Continúe alrededor de la cabeza, repitiendo
el paso 2. 4. Ahora está listo para cortar
la parte media del cabello.
5. Use el peine protector con el
siguiente número más alto que el
que utilizó en el paso 3. Ejemplo: Si
usó el peine protector 6 en el paso 3,
seleccione el peine protector 7.
6. Continúe cortando alrededor de la
porción media de la cabeza como en los
pasos 2 y 3.
7. Para cortar la parte superior de la cabeza,
use el peine protector con el siguiente
número más alto que el del paso 6.
Comience en el área del cabello de la frente.
8. Corte en toda la parte superior de
la cabeza. Peine el cabello de toda
la cabeza para determinar si necesita
cortar más.
1. No necesita accesorios.
Comience con las patillas.
2. Continúe alrededor de la
oreja, como se muestra. 3. Recorte la línea del cuello,
como se muestra.
Cuando desee desvanecer una sección con la siguiente, necesitará practicar cómo mover
la cortadora en un movimiento oscilante hacia arriba. Este movimiento dejará el cabello
levemente más largo en la zona en que la cortadora se aleja del cuero cabelludo, permitiéndole
desvanecer la separación entre las secciones y obtener una transición uniforme desde una
longitud de cabello a la siguiente. Esta técnica mejorará el aspecto de sus cortes de cabello.
1. Desvanezca todas las
líneas de corte. Se pueden
formar líneas en las partes
en las que cambia el tamaño
del peine protector. Use el
mismo peine protector que
usó en el paso 3.
3. Con el peine protector
que usó en el paso 8,
repita el desvanecido en el
contorno superior, conforme
se requiera.
2. Con un movimiento
oscilante, desvanezca la
línea media de corte.
DETALLAD / CONTORNO
Use la cortadora o la recortadora a baterías
(no todos los kits incluyen una recortadora)
GARANTÍA LIMITADA DE 5 AÑOS
Válida solamente en EE.UU. Si su producto Wahl no funciona de forma satisfactoria durante
un período de cinco (5) años contados a partir de la fecha original de compra o de recibirlo
como regalo, Wahl reparará o reemplazará el producto a su criterio y se lo devolverá SIN
CARGO.
SOLO PARA CORTADORA ELITE PRO / PRO SERIES / LIFEPROOF PRO
GARANTIA LIMITADA DE POR VIDA (EXCLUYE CUCHILLAS)
Válida solamente en EE.UU. Si su producto Wahl no funciona de forma satisfactoria , Wahl
reparará o reemplazará el producto a su criterio y se lo devolverá SIN CARGO.
CÓMO OBTENER EL SERVICIO DE LA GARANTÍA
No devuelva este producto a la tienda donde fue adquirido. Los productos que necesiten ser
reparados conforme a esta garantía deben enviarse con franqueo pagado a:
Wahl Clipper Corp.
Attn: Repair Department
3001 Locust Street
Sterling, Illinois 61081
O llame al 1-800-767-9245 para recibir asistencia.
Cuando envíe un correo, incluya una nota que describa el defecto y la fecha original en que
se compró o se recibió como regalo. Los productos fuera de garantía se repararán aplicando
nuestros cargos de reparación estándar.
ESTA GARANTÍA NO CUBRE LO SIGUIENTE
Esta garantía no cubre los productos dañados por las siguientes causas: (1) Modificación o
reparación efectuada por alguna persona que no pertenezca a Wahl Clipper Corporation ni a
un centro de servicio autorizado por Wahl; (2) Uso comercial (no doméstico) o no razonable.
Esta garantía le otorga derechos legales específicos y usted también puede tener otros
derechos que varían en cada estado. No se otorga ninguna otra garantía explícita por escrito.
No se asume responsabilidad alguna por daños indirectos o consecuentes de cualquier tipo,
ni por el uso de accesorios no autorizados. Algunos estados pueden prohibir la exclusión
o la limitación de daños indirectos o consecuentes, de modo que esta limitación puede no
aplicarse a su caso. Garantía sólo válida en EE.UU. Fuera de EE.UU., consulte en la tienda
sobre la garantía del distribuidor autorizado de Wahl.
PEINES PROTECTORES ESPECIALES:
No todos los juegos incluyen lo protectores que se muestran a continuación
PROTECTORES PARA OREJAS:
Coloque el peine protector DERECHO (R) en
la cortadora como se indicó antes.
Comenzando DETRÁS de la oreja derecha
(de modo que la parte del protector con
los dientes más cortos esté más cerca de
la oreja), mueva la cortadora hacia arriba y
alrededor, hacia la parte frontal de la oreja,
repitiendo el movimiento si es necesario.
(Fig. A)
Deje el peine protector “R” en la cortadora.
Comenzando en la parte DELANTERA de la
oreja izquierda (de modo que la parte del
protector con los dientes más cortos esté
más cerca de la oreja), mueva la cortadora
hacia arriba y alrededor, hacia la parte trasera
de la oreja, repitiendo el movimiento si es
necesario. (Fig. B)
La longitud de corte
de los protectores para
orejas va desde 3/16
pulg. (#1-1/2) a 1/4
pulg. (#4)
Quite el peine protector DERECHO “R” y
coloque el peine protector IZQUIERDO “L”.
Comenzando DETRÁS de la oreja izquierda
(de modo que la parte del protector con
los dientes más cortos esté más cerca de
la oreja), mueva la cortadora hacia arriba y
alrededor, hacia la parte frontal de la oreja,
repitiendo el movimiento si es necesario.
(Fig. C)
Deje el peine protector “L” en la cortadora.
Comenzando en la parte DELANTERA de
la oreja derecha (de modo que la parte del
protector con los dientes más cortos esté
más cerca de la oreja), mueva la cortadora
hacia arriba y alrededor, hacia la parte trasera
de la oreja, repitiendo el movimiento si es
necesario. (Fig. D)
PEINES PROTECTORES:
Los peines protectores lo ayudan a cortar el cabello a un largo deseado al mantener las
cuchillas a una distancia específica de la piel, lo que ayuda a garantizar que la longitud del
cabello sea uniforme después de cortarlo con un peine protector colocado en la cortadora.
Como referencia fácil, cada protector esté numerado, y también especifica qué largo tendrá el
cabello después de cortarlo con el peine protector del tamaño indicado. Siempre inicie con un
protector de más longitud (siempre puede utilizar un protector más corto si descubre que el
cabello no está lo suficientemente corto). La primera vez que corte el cabello, corte solo una
pequeña cantidad hasta que se acostumbre al largo del cabello que logra con cada protector.
Para lograr un corte “desvanecido” uniforme alrededor de las orejas, utilice las protecciones
con reducción IZQUIERDA y DERECHA. Para recortar el pelo de las cejas, use el peine protector
BROW (para cejas). Antes de añadir o retirar protectores de la cortadora, asegúrese de que el
interruptor de energía esté apagado (o en la posición “0”). No todos los kits incluyen todos los
tamaños y estilos de protectores que se indican en este instructivo.
fig. Cfig. A fig. Dfig. B
Estándar Élite
(fig 1) (fig 2) (fig 3)
(fig 6)(fig 5)
(fig 7)
(fig 4)
Cuando corte su cabello, debe visualizar la cabeza como si estuviera dividida
en cuatro secciones. La siguiente imagen muestra las diferentes secciones. El
uso de técnicas adecuadas cuando se desplaza de una sección a la siguiente lo
ayudará a combinar las secciones para obtener resultados de aspecto profesional.
• La primera vez que corte el cabello, corte solo una pequeña cantidad hasta que
se acostumbre al largo del cabello que logra con cada protector.
• Para obtener los mejores resultados, el cabello debe estar seco antes de
utilizar la cortadora.
• Para obtener los mejores resultados, al cortar el cabello recórralo a una
velocidad lenta y uniforme. No haga fuerza sobre la cortadora al pasarla por
el cabello.
• Para obtener los mejores resultados, corte el cabello en contra de la dirección
del crecimiento, para que pueda tomar más cabello con la protección.
• Las cuchillas de su nueva cortadora se deben aceitar cada varios cortes.
Sección 2:
Debajo del borde
de la cabeza
Sección 4:
Parte superior
de la cabeza
Sección 1:
El cuello
Sección 3:
El borde o costado
COLOCACIÓN:
Mientras lo sostiene ligeramente inclinado,
coloque el protector sobre la cortadora
de manera que las puntas de la cuchilla
queden sobre las ranuras en los dientes del
protector. (Fig. A)
Utilice su pulgar para empujar el protector
hacia abajo, en donde se encuentra el
número de tamaño, hasta que escuche un
chasquido. (Fig. B)
DESMONTAJE:
Mientras sostiene la parte superior del
protector, coloque su pulgar en la parte inferior
de la lengüeta del protector. Levante la lengüeta
para sacar el protector de la cortadora. (Fig. C)
Su kit incluirá un juego de peines
protectores ‘estándar’ o ‘élite’.
Estándar
Élite
(fig B) (fig C)(fig A)
Estándar
Élite
CÓMO QUITAR LAS CUCHILLAS: Solo para cortadoras 79610
Antes de quitar las cuchillas, asegúrese de que el interruptor de
encendido/apagado se encuentre en la posición “0” o “APAGADO”.
• Sostenga la cortadora con ambas manos. Utilizando los dos
pulgares empuje las cuchillas, separándolas del frente de la
cortadora.
• El conjunto de cuchillas, con la cuchilla superior e inferior,
saldrá en una sola pieza.
CUCHILLAS DESMONTABLES: Solo para cortadoras 79610
ACEITE LAS CUCHILLAS:
Las cuchillas de su nueva cortadora se
deben aceitar cada varios cortes.
Cuando lubrique su recortadora, colóquela en posición de encendido (“ON – I”), sostenga la
unidad con las cuchillas mirando hacia ABAJO y escurra tres gotas por la parte delantera de las
cuchillas y una en cada lado de la parte plana de la cuchilla. Limpie el exceso de aceite con un
paño suave.
IMPORTANTE: ¡NO COLOQUE ACEITE EN EXCESO!
La aplicación excesiva de aceite o líquidos ocasionará daños si se filtran hacia el motor.
NO USE ACEITE PARA CABELLO, GRASA NI OTRO ACEITE MEZCLADO CON
QUEROSENO U OTRO SOLVENTE.
CÓMO COLOCAR LAS CUCHILLAS:
Solo para cortadoras 79610
Antes de volver a colocar las cuchillas, asegúrese de que el interruptor
de encendido/apagado se encuentre en la posición “0” o “APAGADO”.
•
Las cuchillas se pueden lavar directamente alrededor
del área de las cuchillas en la carcasa únicamente.
Evite lavar las áreas alrededor del interruptor de
apagado/encendido y las áreas de conexión del
adaptador de electricidad.
LIMPIEZA DE LAS CUCHILLA:
Use los cepillos de limpieza incluidos para eliminar el cabello entre
las cuchillas. Las cuchillas desmontables pueden enjuagarse
con agua, pero el resto de la cortadora NO es lavable.
PEINE PROTECTOR
DE CEJAS
PEINE PROTECTOR
DE OÍDO
PALANCA GUÍA:
Solo para cortadoras MC, MC2, CNT2-M, MC3, PVCM, 79050
La palanca guía agrega versatilidad a su cortadora,
permitiéndole cambiar gradualmente la cercanía del corte,
y es ideal para mezclar y desvanecer. Palanca en posición
“arriba” = corte más cercano; palanca en posición
“abajo” = corte más largo. Si las cuchillas se atascaran con
cabello, mueva la palanca hacia arriba y abajo varias veces
para ayudar a despejar las cuchillas.
CABLE / ENCHUFE:
El cable no debe usarse para tirar de la cortadora. Dado que es necesario mantener la libertad
de movimiento, se debe tener cuidado de mantener el cable sin torcer y sin obstrucciones.
Su cortadora tiene un enchufe polarizado: Para reducir el riesgo de descarga
eléctrica, este aparato tiene un enchufe polarizado (una clavija es más ancha que la otra).
Este enchufe encaja en un tomacorriente polarizado de una sola manera. En caso de que el
enchufe no entre completamente en el tomacorriente, invierta el enchufe. NO CAMBIES EL
ENCHUFE DE NINGUNA MANERA.
AJUSTE DE POTENCIA MÁXIMA:
Solo para cortadoras MC, SC, SC2, MC2, CNT2-M, MC3
AJUSTE DEL TORNILLO DE POTENCIA PARA UN AJUSTE MÁXIMO DE POTENCIA:
1) Enciende tu cortadora.
2) Utilice el extremo de su cepillo de limpieza de detalles o un destornillador para girar
el tornillo de potencia en SENTIDO HORARIO hasta que comience a escuchar un ruido de
traqueteo.
3) Luego, gire el tornillo de potencia en la dirección opuesta (en sentido contrario a las
agujas del reloj) al menos ¼ de vuelta (el sonido de traqueteo debería haberse detenido).
SI SU CORTADORA ES DEMASIADO RUIDOSO:
Solo para cortadoras MC, SC, SC2, MC2, CNT2-M, MC3
(A) Engrase las cuchillas como se indica en la parte anterior del
folleto de instrucciones.
(B) Puede reducir el “sonido de traqueteo” ajustando
el tornillo de potencia. El tornillo de potencia se ajustó
para lograr la máxima eficiencia antes de salir de fábrica.
Sin embargo, si el voltaje en su hogar es demasiado alto o
bajo, es posible que sea necesario ajustar el tornillo de
potencia de la cortadora.
AJUSTE DEL TORNILLO DE POTENCIA PARA REDUCIR EL RUIDO DE LA CORTADORA
(ruido excesivo):
1) Enciende tu cortadora
2) Utilice el extremo de su cepillo de limpieza de detalles o un destornillador para girar el
tornillo de potencia en sentido CONTRARIO a las agujas del reloj hasta que desaparezca
el ruido.
CONVERTIR A RECORTADORA: Solo para cortadora CNT2-M
• Abra su recortadora de detalles desabrochando la tapa de la recortadora
de detalles (Fig 1).
• Guíe la tapa de la recortadora de detalles sobre la cuchilla de la cortadora (como agregar
un protector de accesorios). La cuchilla de la cortadora debe colocarse entre la tapa de la
cortadora y los dedos guía de la cortadora de detalles (Fig 2).
• Presione hacia abajo en el centro superior de la tapa de la recortadora de detalles para
encajar en la cuchilla (Fig 3). No presione la cuchilla de la recortadora de detalles.
CONVERTIR A UN CORTADORA:
• Desenganche la tapa de la recortadora de detalles de la cuchilla de la recortadora
levantando la parte posterior de la tapa de la recortadora (como quitar un protector de
accesorios) Fig (4). Levante la tapa de la cortadora de detalles alrededor de la cuchilla
de la cortadora de detalles.
• Cierre la recortadora de detalles metiendo la cuchilla de la recortadora de detalles hacia
abajo comenzando por el lado superior (Fig 5).
• Encaje en su lugar presionando hacia abajo en la parte superior central de la tapa de la
recortadora de detalles (Fig 6).
• Cuando se expone a una fuerza excesiva como
cayendo, el recortador de detalles está diseñado para
estallar en lugar de romperse. Para volver a colocar la
recortadora de detalles, simplemente vuelva a colocar el
brazo de la recortadora de detalles en su lugar (Fig 7).
1. Coloque el protector de orejas en la
cortadora.
2. Sostenga la maquinilla en un ángulo
de 45 grados.
3. Use su dedo para inclinar la oreja
hacia adelante lejos de la línea del
cabello.
4. Recorta lentamente a lo largo de
la línea del cabello de atrás hacia
adelante.
Evite meter los ojos.
Coloque la protección del accesorio
CEJAS en la cortadora como se indica
arriba.
Para un corte más largo, comience
justo por encima de la nariz y guíe
lentamente el cortapelos hacia el
exterior de la cara.
Para una longitud de corte más corta,
comience desde el exterior de la cara
y guíe lentamente la cortadora hacia el
interior de la cara.

