Magic Chef MCSCD6W5 El manual del propietario
- Categoría
- Lavaplatos
- Tipo
- El manual del propietario

1
PLEASE READ THIS MANUAL CAREFULLY BEFORE USING YOUR
DISHWASHER AND KEEP IT FOR FUTURE REFERENCE.
Model MCSCD6W5
Countertop Dishwasher
User’s Manual

2
PRODUCT REGISTRATION
Thank you for purchasing a Magic Chef® product. The first step to protect your new product is to complete the product
registration on our website: www.mcappliance.com/register. The benefits of registering your product include the following:
1. Registering your product will allow us to contact you regarding a safety notification or product update.
2. Registering your product will allow for more efficient warranty service processing when warranty service is required.
3. Registering your product could act as your proof of purchase in the event of insurance loss.
Once again, thank you for purchasing a Magic Chef product.

3
CONTENTS
PRODUCT REGISTRATION . . . . . . . . . . . . . . . . . . . . . . . . . . . . . . . . . . . . . . . . . . . . . . . . . . . . . 2
IMPORTANT SAFETY INSTRUCTIONS
. . . . . . . . . . . . . . . . . . . . . . . . . . . . . . . . . . . . . . . . . . . 4
SPECIFICATIONS
. . . . . . . . . . . . . . . . . . . . . . . . . . . . . . . . . . . . . . . . . . . . . . . . . . . . . . . . . . . . . . 6
PARTS AND FEATURES
. . . . . . . . . . . . . . . . . . . . . . . . . . . . . . . . . . . . . . . . . . . . . . . . . . . . . . . . 7
INSTALLATION INSTRUCTIONS
. . . . . . . . . . . . . . . . . . . . . . . . . . . . . . . . . . . . . . . . . . . . . . . . 9
BEFORE USE
. . . . . . . . . . . . . . . . . . . . . . . . . . . . . . . . . . . . . . . . . . . . . . . . . . . . . . . . . . . . . . . . 11
OPERATING INSTRUCTIONS
. . . . . . . . . . . . . . . . . . . . . . . . . . . . . . . . . . . . . . . . . . . . . . . . . . 15
CARE AND MAINTENANCE . . . . . . . . . . . . . . . . . . . . . . . . . . . . . . . . . . . . . . . . . . . . . . . . . . . 18
TROUBLESHOOTING. . . . . . . . . . . . . . . . . . . . . . . . . . . . . . . . . . . . . . . . . . . . . . . . . . . . . . . . 21
LIMITED WARRANTY . . . . . . . . . . . . . . . . . . . . . . . . . . . . . . . . . . . . . . . . . . . . . . . . . . . . . . . . 23

4
IMPORTANT SAFETY INSTRUCTIONS
This manual contains Safety Instructions, Installation and Operating Instructions, and Troubleshooting Tips.
Please carefully read this manual before using your countertop dishwasher for instructions on how to use and
maintain the product properly. Be sure to follow the safety instructions to avoid injury or damage to the product.
Keep this manual. When passing on/selling the device to a third party, the manual must be handed over along
with the device.
Before calling for service, please make sure unit is installed and being used correctly, and read the troubleshooting
section.
WARNING: When using your dishwasher, follow the precautions listed below:
NOTE: Specifications may change at any time without notice.
GROUNDING INSTRUCTIONS
This appliance must be grounded. In the event of a malfunction or breakdown, grounding will reduce the risk
of electric shock by providing a path of least resistance of electric current. This appliance is equipped with a
grounded cord and must be plugged into an appropriate outlet that is installed and grounded in accordance with
all local codes and ordinances.
WARNING: Using with an improperly grounded outlet can result in a risk of electric shock. Check with a
qualified electrician or service representative if you are not sure whether the outlet is properly grounded. DO NOT
modify the plug in any way. If it does not fit the outlet, have a proper outlet installed by a qualified electrician.
WARNING: DO NOT use an extension cord or an adaptor plug with this appliance.
1. DO NOT use this appliance for other than its intended use.
2. DO NOT unplug your appliance by pulling on the power cord. ALWAYS grasp the plug firmly and pull it
straight out from the outlet.
3. If the power cord gets damaged, it must be replaced by a qualified service person.
4. All packing materials should be kept away from children and disposed of properly.
5. DO NOT put anything flammable or explosive in the dishwasher.
6. DO NOT operate if any parts are broken or missing.
7. DO NOT use for commercial dishwashing purposes.
8. DO NOT sit on, stand on, or misuse the door or dish rack of the dishwasher.
9. DO NOT touch the heating element during or immediately after use.
10. When using your dishwasher, you should prevent plastic items from coming into contact with heating
element.
11. DO NOT operate your dishwasher unless all enclosure panels are properly in place. Open the door very
carefully if the dishwasher is operating; there is a risk of water squirting out.
12. DO NOT use outdoors.
13. DO NOT place heavy objects or push down on the door while it is open, as it could tip the dishwasher.
14. This appliance should not be operated by anyone that is not able to follow proper safety procedures or
does not have experience with this type of equipment, unless under supervision.
15. Children should ALWAYS be supervised around the dishwasher.
16. DO NOT tamper with or modify the controls.

5
17. When disposing of or removing from service, be sure to remove the door from the front of the unit.
18. When loading items to be washed, place sharp items so that they are not likely to damage the door seal
WARNING: Knives and other utensils with sharp points must be loaded in the basket with their points
down or placed in a horizontal position.
19. DO NOT wash plastic items unless they are marked dishwasher safe.
20. Only use detergent and rinse additives designed for an automatic dishwasher. DO NOT use soap, laundry
detergent, or hand washing detergent in your dishwasher. Keep these products out of the reach of children.
21. Dishwasher detergents are strongly alkaline; they can be extremely dangerous if swallowed. Avoid contact
with skin and eyes and ALWAYS keep children away from the dishwasher when the door is open, as there
could still be some residue left inside.
22. ALWAYS check that the detergent receptacle is empty at the end of the wash cycle.
23. The dishwasher should be connected to the water supply using new hoses. DO NOT reuse old or damaged
hoses.
24. The water pressure supplied to the dishwasher should have a maximum water pressure of 145 psi (1Mpa) and
a minimum of 5.8 psi (0.04Mpa).
25. Disconnect electrical power and water intake hose before cleaning and/or servicing.
26. DO NOT attempt to repair or replace any part of the appliance service unless specifically recommended in
this user manual.
READ AND FOLLOW THIS
SAFETY INFORMATION CAREFULLY
SAVE THESE INSTRUCTIONS

6
SPECIFICATIONS
21.7” (550 mm)
17.3” (440 mm)
19.7” (500mm)
32.0” (812 mm)
Height 17.3” (440mm)
Width 21.7” (550 mm)
Depth 19.7” (500 mm)
Voltage 120V AC
Water Pressure 5.80-145.04psi (0.04-1.0Mpa)
Hot Water Temperature 120 °F (49 °C)
Power Supply 5.72A Total (Heater – 5A, Motor - .72A)
Capacity 6 Place Settings

7
PARTS AND FEATURES
CONTROL PANEL
INSIDE AND REAR OF DISHWASHER
a. Power Button
b. Rinse Aid Warning Light
c. Program End Indicator
a
f
e d
g
h
b
c
f g
a b c d e
h i
Inside of Dishwasher Rear of Dishwasher
Figure 1
Figure 2
d. Display
e. Program Indicator
f. Delay Button
g. Program Select Button
h. Start/Pause Button
a. Detergent Dispenser
b. Cutlery Basket
c. Filter Assembly
d. Rinse Aid Dispenser
e. Spray Arms
f. Cup Shelf
g. Basket
h. Inlet Pipe Connector
i. Drain Pipe Connector
c d
Drain Hose
a b
Inlet
Hose
e
f
Faucet Adapter Quick Connect
QUICK CONNECT ASSEMBLY
i
j
k
g h
Figure 3

8
a. Inlet Port Connection
b. Quick Connect Connection
c. Drain Port Connection
d. Quick Connect Connection
e. Faucet Adapter
f. Faucet Washer
g. Pressure Relief Valve
h. Faucet Adapter Connection
i. Locking Collar
j. Inlet Hose Connection
k. Drain Hose Connection

9
INSTALLATION INSTRUCTIONS
WARNING: Electrical Shock Hazard - Disconnect electrical power before installing dishwasher. Failure to do so
can result in electrical shock or death.
Installation of water supply pipes or electrical outlets should be performed by qualified professionals.
Set up the dishwasher on a countertop with a minimum clearance of 17.75” to the cabinet above and so the
appliance is not overhanging the edge of the countertop. Make sure that the unit is close enough to electrical
and water supply for the hoses and cord to reach, and that the surface is capable of supporting the weight of the
dishwasher fully loaded. Have 2 people move into position to prevent injury.
ELECTRICAL REQUIREMENTS
The electrical supply should be a properly installed and grounded 3-prong outlet that meets all local codes and
standards on a 10A circuit. It is recommended to use a dedicated circuit with a time delay fuse or circuit breaker.
WARNING: Using with an improperly grounded outlet can result in a risk of electric shock. Check with a
qualified electrician or service representative if you are not sure whether the appliance is properly grounded.
DO NOT modify the plug in any way. If it does not fit the outlet, have a proper outlet installed by a qualified
electrician.
WARNING: DO NOT use an extension cord or an adaptor plug with this appliance.
The dishwasher should be placed near the water supply (faucet) and a sink for draining, as well as a properly
installed and grounded electrical outlet. Position the appliance in the desired location. It can be up against a wall
in the back or on the sides if needed. The water inlet and drain can be set to face to the right or left as needed.
WATER CONNECTION
Your dishwasher includes a ‘Quick Connect’ assembly that includes an inlet and a drain hose. The faucet adapter
must first be installed on the faucet before you can connect the dishwasher. This adapter is included inside your
dishwasher and is compatible with faucets using either male (outside) or female (inside) threads on the aerator.
Please check and make sure you have all parts and locate the water inlet and drain ports on the back of the washer.
f g
Drain Hose
d e
Inlet
Hose
a b c
Rear of Dishwasher
h
i
Faucet Adapter
l
m
n
j k
Quick Connect
Figure 4

10
a. Power Cord
b. Inlet Port
c. Drain Port
d. Inlet Port Connection
e. Quick Connect Connection
f. Drain Port Connection
g. Quick Connect Connection
h. Faucet Adapter
i. Faucet Washer
j. Pressure Relief Valve
k. Faucet Adapter Connection
l. Locking Collar
m. Inlet Hose Connection
n. Drain Hose Connection
1. Screw the faucet adapter (Figure 4, h) onto or into the faucet tap, depending on the style of the faucet. Check
for leaks (use Teflon tape to eliminate if necessary).
2. Connect the drain port connection side of the drain hose (Figure 4, f) to the drain port on the back of the
dishwasher (Figure 4, c). Be careful not to over-tighten (to avoid damaging the threads).
3. Connect the inlet port connection side of the water inlet hose (Figure 4, d) to the inlet port on the back of
the dishwasher (Figure 4, b). Be careful not to over-tighten (to avoid damaging the threads).
4. Connect the quick connect side of the drain hose (Figure 4, g) onto the longer (bottom) male connection on
the quick connect (Figure 4, n).
5. Connect the quick connect side of the inlet hose (Figure 4, e) onto the shorter (top) male connection on the
quick connect (Figure 4, m).
6. Attach the quick connect onto the faucet adapter by pulling the outer locking collar on the quick connect
(Figure 4, k) down while pushing the quick connect upward onto the faucet adapter.
7. When the quick connect snaps onto the faucet adapter, release the locking collar. Verify the connection is
secure.
8. Slowly open the hot water line and check all connections for any sign of water leakage. If leaks are located,
immediately close the water supply and repair the hose connections.
NOTE: Once you open the water supply line, (even if it is closed immediately thereafter), the inlet hose will be
pressurized. To relieve water pressure from inside the inlet hose, first make sure the water line is closed, and then
press and hold the red pressure relief button on the quick connect (Figure 4, j) until the flow of water stops.
WARNING: Failure to relieve water pressure before disconnecting the quick-connect from the faucet will result
in back-pressure causing the water to spray. The temperature of incoming water can be very hot and could cause
severe burns and/or scalding.
WARNING: DO NOT let children disconnect the dishwasher. Close supervision of children is ALWAYS important
around the appliance.
DISCONNECTING THE WATER
1. Shut off the water supply at the faucet.
2. Relieve water pressure from the hose using the red relief release button.
3. Unplug the dishwasher by firmly grasping the plug and pulling straight out from the outlet.
4. Let water drain from water inlet hose.

11
FILLING THE RINSE AID DISPENSER
The rinse aid is released during the final rinse to prevent water droplets that can leave spots and streaks from
forming on your dishes. It also improves drying by allowing water to sheet off the dishes. Your dishwasher
is designed to use liquid rinse aids. The rinse aid dispenser is located inside the door next to the detergent
dispenser. To fill, open the cap and pour the rinse aid into the dispenser until the level indicator turns completely
black. The rinse aid container holds about 3.7oz (110ml).
NOTE: Only use branded rinse aid for dishwasher. Never fill the rinse aid dispenser with any other substances
(Dishwasher cleaning agent, liquid detergent), as it may damage the appliance.
You can determine the amount of rinse-aid using the optical level indicator (see below). There is a Rinse-Aid
Warning light on the control panel that will indicate when it needs to be filled. You should not let it get below
1/4 full.
As the rinse aid is used up the size of the black dot on the rinse aid level indicator changes, as illustrated below.
ADJUSTING RINSE AID DISPENSER
The rinse aid dispenser has four settings. The recommended setting is “3”. If
the dishes still are not drying properly or are spotted, adjust the dial to “4”.
Increase the setting if there are drops of water or lime spots on the dishes
after washing. Reduce it if there are sticky whitish stains on your dishes or
a bluish film on glassware or knife blades.
To open the Rinse-Aid dispenser, turn the cap counter-clockwise about 1/4 turn and lift out. Pour the rinse aid
into the dispenser carefully, to avoid overfilling. Replace the cap and turn clockwise to lock. Be sure to wipe up
any spilled rinse aid.
BEFORE USE
Full
3/4 full
1/2 full
1/4 full - Should refill to eliminate spotting
Empty
Rinse Aid
Indicator
Figure 5
Figure 6
Adjust
Lever
(Rinse)
Figure 7

12
DETERGENT DISPENSER
Dishwasher detergent is necessary to remove food from dishes and help move it out of the dishwasher. Only
use detergents that are specifically made for dishwashers. Fill the detergent dispenser before the start of each
wash per the instructions provided in the Wash Cycle Table. Your dishwasher uses less detergent and rinse aid
then conventional dishwashers. Generally, only one tablespoon of detergent is needed for a normal wash load,
though more heavily soiled items may need more detergent. ALWAYS add the detergent just before starting the
dishwasher to avoid it getting wet as that may prevent it from dissolving properly.
DETERGENTS
If powdered detergents that do not contain phosphate are used with hard water, white spots may appear on
dishes. If this occurs, add more detergent to dishwasher for better results. Detergents that do not have chlorine
may not completely remove food and spots from dishes. If this occurs, choose a wash program with a higher
temperature.
Based on their chemical composition, dishwasher detergents can be split in two basic types:
t Conventional, alkaline detergents with caustic ingredients
t Concentrated, low alkaline detergents with natural enzymes
Using concentrated detergents reduces pollution, is easier on your dishes, and the normal wash programs are
designed to maximize the dirt-dissolving properties of the enzymes, allowing a normal wash program with
concentrated detergent to give the same results normally achieved using a heavy wash program.
DETERGENT TABLETS
Different brands of detergent tablets dissolve at different rates. For this reason, some tablets may not fully
dissolve and therefore may not fully clean the dishes. When using tablets, be sure to use a longer wash program
to ensure that the tablet dissolves and that all residual detergents are rinsed out of the dishwasher.
NOTE: Detergent tablets should only be used in models with 3-in-1 function.
FILLING DETERGENT DISPENSER
If the door to the dispenser is closed, push the release latch and it will spring open. Fill the dispenser to required
level based on washing cycle.
Fill the detergent dispenser with detergent. The smaller compartment on the left side(Figure 8, a) is for 0.50oz (15g)
of detergent, and the larger compartment on the right side(Figure 8, b) holds 0.88oz (25g). Be sure to observe the
manufacturers use and storage recommendations as stated on the detergent packaging. Close the lid and press until
it locks in place. If the dishes are heavily soiled, put additional detergent in the pre-wash detergent chamber.
Spring
Latch
Pre-Wash Chamber
Figure 8
a b

13
NOTE: See Wash Cycle Table for more information on amount of detergent to use.
NOTE: Water hardness and how soiled dishes are can vary the amount of detergent needed.
LOADING THE DISHWASHER
NOTE: DO NOT wash items that are not listed as dishwasher safe.
NOTE: Some types of glasses may become dull after a large number of washes.
NOTE: Silver and aluminum may tarnish or discolor during washing.
For best performance, follow these guidelines when loading:
1. Scrape off any large amounts of leftover food. Soak burnt food in pans to loosen. It is not necessary to rinse
the dishes under running water.
2. Place items such as cups, glasses, pots/pans etc. face down so that water will not collect in them.
3. Curved items, or those with recesses, should be loaded at a slant so that water can run off.
4. All utensils should be placed in a manner so that they cannot tip over.
5. All utensils should be placed in the way that prevents them from interfering with the spray arm during washing.
6. Items should not be inside one another, or covering other items.
7. DO NOT let large glasses touch each other. Doing so may damage them.
8. Most silverware should be placed in cutlery basket handles down.
9. Small knives and sharp objects should be placed handle up to prevent injury.
10. Large sharp objects such as long bladed knives can present a hazard, and should be placed horizontally in the rack.
11. DO NOT put small items that can fall out of the basket in the dishwasher.
12. DO NOT overload your dishwasher.
WARNING: DO NOT allow any item to stick out below the dish rack as that may interfere with the spray arm
and damage the dishwasher.
WARNING: DO NOT load any sharp objects point up. Place them point down or lay them horizontally in the rack.
ALWAYS position the dishes and cookware in a manner that will prevent them from being moved by spraying water.
a. Cups
b. Glasses
c. Saucers
d. Fruit Bowls
e. Serving Bowls
f. Bread and Butter Plates
g. Dinner Plates
h. Oval Platters
i. Cutlery Basket
a
a
b
c c
d
e
e
f
g
h
i
Figure 9

14
Cutlery should be placed handles down in the cutlery basket, unless it is a sharp
object such as a knife. Sharp objects that fit in the cutlery basket should be
placed handle up. Avoid having spoons and forks nest together. If an item is too
large for the basket, or has a tip or point that would stick out of the bottom of
the basket, place it horizontally in the dish rack.
Figure 10


16
The display lights indicate the status of the Wash Cycle.
t Program Indicator lights off: Stand-by
t Non-blinking Program Indicator lights: Paused
t Blinking lights: Running
NOTE: If the dishwasher is standing by without any operation, it will turn off automatically after 30 minutes.
WASH CYCLE TABLE
NOTE: indicates Rinse Aid Dispenser should be filled.
Program Used For
Description
of Cycle
Detergent
Pre/Main (g)
Running
Time (min)
Energy
(Kwh)
Water
(l)
Rinse
Aid
Heavy
For the heaviest loads,
pots, pans, plates that
have food dried on.
Pre-Wash
Pre-Wash (122°F/50°C)
Wash (131°F/55°C)
Wash (122°F/50°C)
Rinse
Rinse (154°F/68°C)
Drying
18 100 0.49 12.5
Normal
For normally soiled loads,
such as pots, plates,
glasses, and lightly soiled
pans.
Pre-Wash
Pre-Wash
Wash (125°F/52°C)
Rinse
Rinse (149°F/65°C)
Drying
18 110 0.36 10.8
Light
For lightly soiled loads,
such as glasses and
crystal.
Pre-Wash
Pre-Wash (122°F/50°C)
Wash (122°F/50°C)
Rinse
Rinse (140°F/60°C)
Drying
18 75 0.27 10
Glass
For lightly soiled crockery
and glass
Pre-Wash
Wash (122°F/50°C)
Rinse
Rinse (140°F/60°C)
Drying
15 70 0.28 8.5
Speed
Shorter wash for lightly
soiled loads that do not
need drying
Pre-Wash
Pre-Wash (122°F/50°C)
Wash (122°F/50°C)
Rinse
Rinse (131°F/55°C)
15 45 0.31 10.5
Rinse
For rinsing dishes, glasses,
and silverware that will
not be washed right away
Pre-Wash
Wash
/ 24 0.03 4.3
END OF THE WASH CYCLE
When the wash cycle is finished, a buzzer will sound for 8 seconds. Turn the dishwasher off using the ON/OFF
button, shut off the water supply, and carefully open the door. Leave the door open for about 15 minutes before
handling the dishes, as they are more susceptible to breakage when hot, and to allow them to dry completely. It is
normal for the inside of the dishwasher to be wet when it is done running.

USING THE DELAY FEATURE
The start of the dishwasher can be delayed between 1 and 24 hours, using one hour increments.
To utilize this feature:
1) Press “ON/OFF” button to “ON” position
2) Press “PROGRAM” button
3) Press “DELAY” button once for each hour of delay. Press again after 24 hours to reset.
(e.g. press button 3 times to delay start by 3 hours)
To cancel the delay feature:
4) Press “ON/OFF” button to “OFF” position.
17

CARE AND MAINTENANCE
FILTER SYSTEM
The filters prevent food remnants and other objects from getting inside
the pump. The filter system consists of three parts (Refer to Figure 11): a
Coarse filter (a), a Fine filter (b), and a Main filter (c).
a. Coarse Filter: Larger items that could block the drain are trapped
in the coarse filter. To remove items caught by the coarse filter,
first remove the Fine Filter (b), then turn it upside down and
gently push on the bottom of the Coarse Filter (a) until it is
released. (Refer to Figure 12.) Carefully empty filter and replace
into position once clean.
NOTE: The Coarse Filter (a) should ONLY be removed if large,
potentially hazardous items are trapped. If food particles or
residue are trapped, please refer to Fine Filter (b) below.
b. Fine Filter: This filter holds soil and food residue in the sump area
and prevents it from being deposited onto dishes during the wash
cycle. To remove items caught by this filter, please see section
entitled “Filter Assembly System” below.
c. Main Filter: Food and soil particles trapped by this filter are
pulverized by a special jet on the spray arm and washed down to
drain.
b
a
c
CLEANING THE FILTER SYSTEM ASSEMBLY
For best performance and results, the filter must be cleaned regularly. For this reason, it is a good idea to remove
the larger food particles trapped in the filters after each wash cycle by rinsing the filters under running water.
NOTE: The entire filter assembly should be cleaned once a week
WARNING: Never run the dishwasher without the filters in place.
b
b
a
a
c c
Figure 11
Figure 12
Figure 13
1. Rotate the filter assembly (Figure 13, a, b and c) counterclockwise, then lift upward.
2. Remove the fine filter (Figure 13, b) and coarse filter (Figure 13, a) by carefully pushing up on the fine filter
from the bottom of the main filter (Figure 13, c).
NOTE: When separating the filters, only push on the hard plastic on the bottom of the assembly. DO
NOT apply pressure to the screen.
3. Remove coarse filter (Figure 13, a) from fine filter (Figure 13, b) by pushing up from the bottom on the tabs
holding it to the fine filter.
18

4. To re-assemble and replace the filter assembly, follow above directions in reverse order.
CAUTION: Inspect the filters every time the dishwasher has been used.
WARNING: Improper replacement of the filter may reduce the performance level of the appliance and damage
dishes and utensils.
CLEANING THE FILTER
To clean the coarse filter and the fine filter, use a soft cleaning brush. Remove any food remnants and clean the
filters under running water.
NOTE: When cleaning the filters, DO NOT knock them against hard surfaces as that could damage them,
affecting the performance of the dishwasher.
NOTE: Hard water can adversely affect the performance of your dishwasher. Hard water conditions will also
contribute to ‘lime’ (white filmy substance) deposits and/or ‘scaling’ on the surface of the dishwasher tub and
heater element, located in the sump underneath the removable filter screen. It is recommended to run the
washer empty and rinse the inside using 1 cup of white vinegar at least once a week.
DISHWASHER CARE
The control panel can be cleaned by using a lightly dampened cloth. Dry thoroughly. Dishwasher exterior can be
cleaned with a regular, non-abrasive multipurpose cleaner or polish wax. Never use sharp objects, scouring pads
or harsh cleaners on any part of the dishwasher.
Figure 14
CLEANING THE DOOR
To clean the edge around the door, you should use only a warm, damp
cloth. To avoid water contact between the door lock and electrical
components, DO NOT use a spray cleaner of any kind.
WARNING:
t Never use a spray cleaner to clean the door panel as it may
damage the door lock and electrical components.
t Abrasive cleaners and some types of paper towels may scratch the
finish, and should not be used.
PROTECT AGAINST FREEZING
If the dishwasher will be exposed to cold temperatures, it is necessary to take the following steps to prevent
damage from freezing.
After each wash cycle:
1. Turn off and unplug the dishwasher.
2. Turn off the water supply and disconnect the water inlet pipe from the water valve.
3. Drain water from the inlet pipe and water valve, using a pan to catch the water.
4. Reconnect the water inlet pipe to the water valve.
5. Remove the filter at the bottom of the tub and use a sponge to absorb water in sump.
NOTE: Contact a qualified service technician if frost or ice buildup prevents the dishwasher from working.
19

CLEANING THE SPRAY ARMS
The spray arms can be easily removed for periodic cleaning of
the nozzles, to prevent possible clogging. Wash them under
running water and carefully replace them, checking that their
rotary movement is in no way impeded. Grasp the middle of
the spray arm and pull upwards to remove it. Wash the arms
under running water and return them carefully to their place.
After reassembly, check that the spray arms turn freely. If they
do not, check that they have been installed correctly.
Figure 15
KEEPING YOUR DISHWASHER IN GOOD CONDITION
t After Every Wash: Turn off the water supply to the appliance and leave the door slightly open so that
moisture and odors are not trapped inside.
t Remove the Plug: Before cleaning or performing maintenance, ALWAYS remove the plug from the socket.
t No Solvents or Abrasive Cleaners: DO NOT use abrasive cleaners or solvents to clean the exterior or rubber
parts of the dishwasher. Only use a cloth with warm, soapy water. To remove spots or stains from the
surfaces of the interior, use a cloth dampened with water and a little vinegar.
t After Long Periods of No Use: It is recommend that you run a wash cycle with the dishwasher empty and
then unplug, turn off the water supply and leave the door of the appliance slightly open. This will help the
door seals to last longer and prevent odors from forming within the appliance.
t Moving the Appliance: If the appliance must be moved, try to keep it in the vertical position. If absolutely
necessary, it can be positioned on its back.
t Seals: Food particles that remain trapped in the seals may cause odors. Periodic cleaning with a damp
sponge will prevent this from occurring.
20

TROUBLESHOOTING
Problem Possible Causes What to Do
Technical
Problems
Dishwasher does
not start
Fuse blown or circuit
breaker tripped.
Replace fuse or reset circuit breaker. Remove any other ap-
pliances sharing the same circuit with the dishwasher.
Power supply not
turned on.
Make sure the dishwasher is turned on and the door is
closed securely. Make sure the power cord is properly
plugged into the wall socket.
Door of dishwasher
not properly closed.
Close door completely and make sure it is latched.
Water not
pumped from
dishwasher
Kink in drain hose. Check drain hose.
Filter is clogged. Check filter system.
Kitchen sink clogged.
Check sink to make sure it is draining well. If sink is clogged,
you may need a plumber.
General
Problems
Suds in the tub
Improper detergent.
Use only dishwasher detergent to avoid suds. If this occurs,
open the dishwasher and let suds evaporate. Add
1 gallon of cold water to the tub. Close and latch the door
then Start the “Rinse” wash cycle to drain out the water.
Repeat if necessary.
Spilled Rinse Aid. ALWAYS wipe up rinse-aid spills immediately.
Stained tub
interior
Detergent with color-
ant was used.
DO NOT use detergents with colorants or dyes.
White film on
inside surface
Hard water minerals.
To clean the interior, use a damp sponge with dishwasher de-
tergent and wear rubber gloves. Never use any other cleaner
than dishwasher detergent for the risk of foaming or suds.
Rust stains on
cutlery
Cutlery is not corro-
sion resistant.
Only put corrosion resistant items in the dishwasher.
A program was not
run after dishwasher
detergent was added.
Traces of detergent
have gotten into the
wash cycle.
Run the Quick Wash program without any dishes or utensils
in the dishwasher after adding dishwasher detergent.
Noise
Knocking noise
inside the wash
cabinet
The spray arm is
hitting an item in the
basket.
If you are able to, interrupt the program and rearrange the
items which are obstructing the spray arm.
If you are unable to interrupt the program, fix the spray arm
position after cycle is complete.
Rattling noise in
the wash cabinet
Item inside is loose.
If you are able to, interrupt the program and rearrange items
in the dishwasher.
Knocking
noise in
the water pipes
This may be caused by
on-site installation or
the cross-section of
the piping.
This has no influence on dishwasher function.
If in doubt, contact a suitably plumber.
Unsatisfactory
Washing
The dishes are
not clean
Dishes not loaded
correctly.
Make sure dishes are loaded correctly per the “Loading the
Dishwasher” section.
21

Unsatisfactory
Washing
The dishes are
not clean
Improper wash
program selected.
Select a more intensive program. Refer to “Wash Cycle
Table”.
Not enough detergent
was dispensed.
Use more detergent, or change your detergent.
Items are blocking the
path of spray arms.
Rearrange the items so that the spray arms can rotate freely.
The filter system
in the base of wash
cabinet is not clean or
is not correctly fitted.
This may cause the
spray arm jets to get
blocked.
Clean and/or fit the filter correctly. Clean the spray arm jets.
Refer to “Dishwasher Care” section.
Glassware is
cloudy
Combination of soft
water and too much
detergent.
Use less detergent if you have soft water and select a short
cycle to wash the glassware and to get it clean. See “Wash
Cycle Table”
Black or gray
marks on dishes
Aluminum utensils
have rubbed against
dishes.
Use a mild abrasive cleaner to eliminate the marks.
Detergent left in
dispenser cups
Dishes blocking deter-
gent cups.
Re-load the dishes properly. See the “Loading the Dish-
washer” section.
Unsatisfactory
Drying
The dishes are
not drying
Dishes not loaded
correctly.
Load the dishwasher as suggested in the directions.
Too little rinse aid.
Increase the amount of rinse aid or refill the rinse aid
dispenser.
Dishes removed too
soon.
DO NOT empty your dishwasher immediately after washing.
Open the door slightly so that the steam can escape. Begin
unloading the dishwasher only once the dishes are cool
enough to touch. Empty the low basket first. This prevents
water from dripping off dishes in the upper basket.
Wrong program
Selection.
Short wash cycles use lower temperatures which lessen
performance. Choose a longer wash program.
Using cutlery with a
low-quality coating.
Water drainage is more difficult with these items. Cutlery
or dishes of this type are not suitable for washing in the
dishwasher.
ERROR CODES
Codes Meanings Possible Causes
E1 Longer water inlet time
Faucet not fully open.
Water intake restricted.
Low water pressure.
E4 Overflow Dishwasher is leaking.
WARNING: If overflow error occurs, turn off the main water supply before calling for service. If there is water
in the base from an overflow or leak, the water should be removed before restarting the dishwasher.
22

LIMITED WARRANTY
MC Appliance Corporation warrants each new Countertop Dishwasher to be free from defects in material and workmanship, and
agrees to remedy any such defect or to furnish a new part(s), at the company’s option, for any part(s) of the unit that has failed
during the warranty period. Parts and labor expenses are covered on this unit for a period of one year from the date of purchase.
A copy of the dated sales receipt/invoice is required to receive warranty service, replacement or refund.
This warranty covers appliances in use within the contiguous United States, Alaska, Hawaii and Puerto Rico. This warranty does not
cover the following:
t Damages due to shipping damage or improper installation.
t Damages due to misuse or abuse.
t Content losses due to failure of the unit.
t Repairs performed by unauthorized service agents.
t Service calls that do not involve defects in material and workmanship such as instructions on proper use of the
product or improper installation.
t Replacement or resetting of house fuses or circuit breakers.
t Failure of this product if used for other purposes than its intended purpose.
t Disposal costs for any failed unit not returned to our factory.
t Any delivery/installation costs incurred as the result of a unit that fails to perform as specified.
t Expenses for travel and transportation for product service if your appliance is located in a remote area where
service by an authorized service technician is not available.
t The removal and reinstallation of your appliance if it is installed in an inaccessible location or is not installed in
accordance with published installation instructions.
t Refunds for non repairable products are limited to the price paid for the unit per the sales receipt.
t This warranty is non transferable. This warranty applies only to the original purchaser and does not extend to any
subsequent owner(s).
Limitations of Remedies and Exclusions:
Product repair in accordance with the terms herein, is your sole and exclusive remedy under this limited warranty. Any and all
implied warranties including merchantability and fitness for a particular purpose are hereby limited to one year or the shortest
period allowed by law. MC Appliance Corporation is not liable for incidental or consequential damages and no representative or
person is authorized to assume for us any other liability in connection with the sale of this product. Under no circumstances is
the consumer permitted to return this unit to the factory without the prior written consent of MC Appliance Corporation.
Some states prohibit the exclusion or limitation of incidental or consequential damages, or limitations on implied warranties.
This warranty gives you specific legal rights, and you may also have other rights which vary from state to state.
Model Parts Labor Type of Service
MCSCD6W5 One Year One Year Carry In
For Service or Assistance please call 888-775-0202 or visit us on the web at www.mcappliance.com to request warranty service
or order parts.
23

24
CNA Interna
tional, Inc. d/b/a MC Appliance Corporation. All rights reserved.
Magic Chef® logo is a registered trademark of CNA International, Inc.
www.mcappliance.com Printed in China

24
POR FAVOR LEA CUIDADOSAMENTE ESTE MANUAL ANTES DE USAR SU
LAVAPLATOS Y CONSÉRVELO PARA FUTURAS REFERENCIAS.
Modelo MCSCD6W5
Lavaplatos de encimera
Manual del usuario

26
REGISTRA
CIÓN DEL PRODUCTO
Gracias por c
omprar el producto Magic Chef®. El primer paso para proteger su nuevo producto es completar la forma de registración
en nuestra pagina web: www.mcappliance.com/register. Los beneficios de registrar su producto incluyen lo siguiente:
1. Al registrar su producto nos permite contactarle para notificarle de un cambio de seguridad o actualización del
producto.
2. Si llegara a necesitar servicio bajo garantía, registrando su producto nos permite ser más eficiente en procesar el
servicio.
3. En el evento que usted tenga una perdida que esta cubierto por un seguro, registrando su producto puede servir
como prueba de su compra.
Una vez más gracias por comprar un producto marca Magic Chef.

27
ÍNDICE
REGISTRA
CIÓN DEL PRODUCTO . . . . . . . . . . . . . . . . . . . . . . . . . . . . . . . . . . . . . . . . . . . . . . 26
INSTRUCCIONES DE SEGURIDAD IMPORTANTES . . . . . . . . . . . . . . . . . . . . . . . . . . . . . . . . 28
ESPECIFICACIONES . . . . . . . . . . . . . . . . . . . . . . . . . . . . . . . . . . . . . . . . . . . . . . . . . . . . . . . . . . 30
PARTES Y CARACTERÍSTICAS. . . . . . . . . . . . . . . . . . . . . . . . . . . . . . . . . . . . . . . . . . . . . . . . . . 31
INSTRUCCIONES DE INSTALACIÓN . . . . . . . . . . . . . . . . . . . . . . . . . . . . . . . . . . . . . . . . . . . . 33
INSTRUCCIONES DEL PRIMER USO . . . . . . . . . . . . . . . . . . . . . . . . . . . . . . . . . . . . . . . . . . . 35
INSTRUCCIONES DE FUNCIONAMIENTO. . . . . . . . . . . . . . . . . . . . . . . . . . . . . . . . . . . . . . . 39
CUIDADO Y MANTENIMIENTO . . . . . . . . . . . . . . . . . . . . . . . . . . . . . . . . . . . . . . . . . . . . . . . 42
SOLUCIÓN DE PROBLEMAS. . . . . . . . . . . . . . . . . . . . . . . . . . . . . . . . . . . . . . . . . . . . . . . . . . 45
GARANTÍA LIMITADA . . . . . . . . . . . . . . . . . . . . . . . . . . . . . . . . . . . . . . . . . . . . . . . . . . . . . . . . 48

28
INSTRUC
CIONES DE SEGURIDAD IMPORTANTES
Este manual c
ontiene instrucciones de seguridad, instrucciones de instalación y operación, y consejos para
solucionar problemas. Lea atentamente este manual antes de utilizar su lavaplatos de encimera para conocer las
instrucciones sobre cómo utilizar y mantener el producto correctamente. Asegúrese de seguir las instrucciones de
seguridad para evitar lesiones o daños al producto.
Conserve este manual. Al transferir o vender el aparato a un tercero, el manual debe entregarse junto con el aparato.
Antes de contactar a servicio técnico, por favor cerciórese de que la unidad esté instalada y se esté usando de
manera correcta, y lea la sección de solución de problemas.
ADVER
TENCIA: Cuando use su lavaplatos, siga las precauciones que se indican a continuación:
N
O
TA: Las especificaciones pueden cambiar en cualquier momento sin aviso previo.
INSTRUC
CIONES DE CONEXIÓN A TIERRA
Este apar
ato debe contar con una conexión a tierra. En caso de mal funcionamiento o avería, la conexión a tierra
reducirá el riesgo de descargas eléctricas al crear un paso de menor resistencia para la corriente eléctrica. Este
aparato está equipado con un cable de puesta a tierra y debe conectarse a un tomacorriente apropiado que esté
instalado y puesto a tierra conforme a los códigos y ordenanzas locales.
ADVER
TENCIA: El uso de un tomacorriente que no cuenta con una conexión a tierra adecuada puede suponer
un riesgo de descarga eléctrica. Verifique con un electricista o agente de servicio calificado si no está seguro de
si el tomacorriente cuenta con una conexión a tierra adecuada. NO haga ninguna modificación al enchufe Si no
encaja en el tomacorriente, haga que un electricista calificado instale un tomacorriente adecuado.
ADVER
TENCIA: NO utilice un cable de extensión o un enchufe adaptador con este electrodoméstico.
1. NO use este electrodoméstico para un propósito distinto al que fue diseñado
2. NO desenchufe su electrodoméstico halando el cable de alimentación. SIEMPRE sujete el enchufe
firmemente y retírelo del tomacorriente.
3. Si el cable de alimentación se daña, deberá reemplazarlo un agente de servicio calificado.
4. Todo el material de embalaje debe mantenerse fuera del alcance de los niños y desecharse adecuadamente.
5. NO coloque nada inflamable o explosivo en el lavaplatos.
6. NO opere el equipo si hay partes rotas o faltantes.
7. NO use el equipo para fines comerciales
8. NO se siente ni se pare en la puerta o el escurridor del lavaplatos ni haga uso indebido de estos.
9. NO toque la resistencia (componente térmico) durante o inmediatamente después del uso.
10. Al usar su lavaplatos, debe evitar que objetos plásticos entren en contacto con la resistencia.
11. NO opere su lavaplatos a menos que todos los paneles de cerramiento estén en su lugar. Abra la puerta con
cuidado si el lavaplatos está en funcionamiento; existe un riesgo de salpicadura de agua.
12. NO lo utilice al aire libre.
13. NO coloque objetos pesados o empuje hacia abajo la puerta cuando está abierta; esto podría hacer volcar
el lavaplatos.
14. Este electrodoméstico no debe ser operado por alguien que no esté en capacidad de seguir los
procedimientos de seguridad adecuados o que no tenga experiencia con este tipo de equipos, a menos que
se haga bajo atenta supervisión.

29
15. Los niño
s SIEMPRE deben estar bajo supervisión cuando se encuentren cerca del lavaplatos.
16. NO altere ni modifique los controles.
17. Al desechar o retirar de servicio, asegúrese de retirar la puerta de la parte frontal de la unidad.
18. Al cargar objetos para lavar, coloque lo objetos afilados de una forma en la que no puedan dañar los sellos
de la puerta.
AD
VER
TENCIA: Los cuchillos y otros utensilios con extremos puntiagudos deben cargarse en la cesta con
las puntas hacia abajo o colocarse horizontalmente.
19. NO lave objetos plásticos a menos que tengan marcas que indiquen que son aptos para lavaplatos.
20. Use solo detergente y aditivos abrillantadores diseñados para su uso con lavaplatos automáticos. NO use
jabón, detergente de ropa o detergente de lavado a mano en su lavaplatos. Mantenga estos productos fuera
del alcance de los niños.
21. Los detergentes para lavaplatos son altamente alcalinos y pueden ser extremadamente peligrosos si se
ingieren. Evite el contacto con la piel y los ojos, y SIEMPRE mantenga a los niños alejados del lavaplatos
cuando la puerta esté abierta, pues aún pueden quedar residuos en la parte interna.
22. SIEMPRE verifique que el recipiente de detergente está vacío al finalizar el ciclo de lavado.
23. EL lavaplatos debe conectarse a la toma de agua con mangueras nuevas. NO reutilice mangueras viejas o
dañadas.
24. La presión de agua de suministro a la lavaplatos debe tener un máximo de 145 psi (1 Mpa) y un mínimo de 5.8
psi (0.04 Mpa).
25. Desconecte el cable de alimentación eléctrica y la manguera de entrada de agua antes de limpiar o hacer
mantenimiento al equipo.
26. NO intente reparar o reemplazar ninguna parte del electrodoméstico a menos que sí lo recomiende
específicamente este manual.
LEA ES
TA INFORMACIÓN DE SEGURIDAD
Y SÍGALA CUIDADOSAMENTE
GUARDE ESTAS INSTRUCCIONES

30
ESPECIFICACIONES
21.7” (550 mm)
17.3” (440 mm)
19
.7” (500mm)
32.0” (812 mm)
Altur
a 17
.3” (440mm)
Ancho 21.7” (550 mm)
Profundidad 19.7” (500 mm)
Voltaje 120V AC
Presión de agua 5.80-145.04psi (0.04-1.0Mpa)
Temperatura del agua caliente 120 °F (49 °C)
Suministro eléctrico 5.72A Total (Calentador – 5A, Motor - .72A)
Capacidad Configuración de 6 posiciones

31
PIEZAS Y FUNCIONES
PANEL DE C
ONTROL
PARTE INTERIOR Y POSTERIOR DEL LAVAPLATOS
a. Botón de encendido
b. Luz de advertencia del abrillantador
c. Indicador de fin de programa
a
f
e d
g
h
b
c
f g
a b c d e
h i
Par
te interior del lavaplatos Parte posterior del lavaplatos
Figura 1
Figura 2
d. Pantalla
e.
Indicador de programa
f. Botón de retraso
g. Botón de selección
de programa
h. Botón de inicio/pausa
a. Dosificador de detergente
b. Cesta para cubiertos
c. Montaje de filtros
d. Dosificador de abrillantador
e. Brazos Rociadores
f. Bandeja para tazas y copas
g. Cesta
h. Conector de la tubería de entrada
i. Conector para la
tubería de desagüe
c d
Manguera
de des
agüe
a
b
Manguera
de entr
ada
e
f
Adaptador para el grif
o
MONTAJE DE C
ONEXIÓN RÁPIDA
Conec
tor rápido
i
j
k
g h
Figura 3

32
a. Puert
o de conexión de
entrada
b. Conexión para el
conector rápido
c. Puerto de conexión
para el desagüe
d. Conexión para el
conector rápido
e. Adaptador para el grifo
f. Lavadora de grifo
g. Válvula de alivio de
presión
h. Conexión para el
adaptador de grifo
i. Collarín de cierre
j. Conexión para manguera
de entrada
k. Conexión para manguera
de desagüe

33
INSTRUC
CIONES DE INSTALACIÓN
ADVER
TENCIA: Riesgo de descarga eléctrica: desconecte el suministro de energía eléctrica antes de instalar el
lavaplatos. No seguir estas instrucciones puede ocasionar descarga eléctrica o la muerte.
La instalación de las tuberías de suministro de agua o tomas eléctricas debe realizarse por profesionales
calificados.
Coloque el lavaplatos en una encimera con una distancia mínima de 17.75” del gabinete de arriba y de forma que
no sobresalga del borde de la encimera. Asegúrese de que la unidad está suficientemente cerca de los puntos de
suministro eléctrico y de agua para poder conectar las mangueras y el cable, y de que la superficie puede soportar
el peso del lavaplatos con carga completa. Haga que 2 personas muevan el equipo para evitar lesiones.
REQUISITO
S ELÉCTRICOS
El suministro eléc
trico debe ser un tomacorriente de 3 puntas y puesto a tierra debidamente que cumpla con
todos los códigos y estándares de un circuito de 10 A. Se recomienda usar un circuito dedicado con un fusible
retardado o un interruptor de circuito.
ADVER
TENCIA: El uso de un tomacorriente que no cuenta con una conexión a tierra adecuada puede suponer
un riesgo de descarga eléctrica. Verifique con un electricista o agente de servicio calificado si no está seguro de si
electrodoméstico está puesto a tierra debidamente. NO haga ninguna modificación al enchufe. Si no encaja en el
tomacorriente, haga que un electricista calificado instale un tomacorriente adecuado.
ADVER
TENCIA: NO utilice un cable de extensión o un enchufe adaptador con este electrodoméstico. El
lavaplatos debe ubicarse cerca del suministro de agua (grifo) y de un lavadero para el desagüe, así como de un
tomacorriente debidamente instalado y puesto a tierra. Coloque el electrodoméstico en el sitio deseado. Puede
colocarse contra una pared en la parte posterior o lateral si es necesario. La entrada de agua y el desagüe pueden
configurarse viendo hacia la derecha o la izquierda según sea necesario.
C
ONE
XIÓN PARA EL AGUA
Su lav
aplatos incluye un montaje de ‘conexión rápida’ con una manguera de entrada y una manguera de desagüe.
El adaptador para el grifo debe instalarse primero en el grifo antes de conectar el lavaplatos. Este adaptador se
incluye dentro de su lavaplatos y es compatible con grifos que usen roscas macho (externa) o hembra (interna) en el
aireador.
Asegúrese que cuenta con todas las partes y ubique la entrada de agua y el puerto de desagüe en la parte posterior
del lavaplatos.
f g
d e
a b c
Par
te posterior
del lavaplatos
h
i
l
m
n
j k
Figura 4
Manguer
a
de desagüe
Manguera
de entrada
Adaptador para el grifo Conector rápido

34
a. Cable de electricidad
b.
Puerto de entrada
c. Puerto de desagüe
d. Puerto de conexión de
entrada
e. Conexión para el conector
rápido
f. Puerto de conexión para
el desagüe
g. Conexión para el conector
rápido
h. Adaptador para el grifo
i. Lavadora de grifo
j. Válvula de alivio de
presión
k. Conexión para el
adaptador de grifo
l. Collarín de cierre
m. Conexión para manguera
de entrada
n. Conexión para manguera
de desagüe
1. Enrosque el adaptador para el grifo (figura 4, h) en la boquilla del grifo, por dentro o por fuera dependiendo
del tipo de grifo. Verifique que no haya fugas (use teflón para eliminarlas si es necesario).
2. Conecte el lado del puerto de conexión de desagüe de la manguera de desagüe (figura 4, f) al puerto de
desagüe en la parte posterior del lavaplatos (figura 4, c). Tenga cuidado de no ajustar demasiado la conexión
(para evitar daños en la rosca).
3. Conecte el lado del puerto de conexión de entrada de la manguera de entrada (figura 4, d) al puerto de
entrada en la parte trasera del lavaplatos (figura 4, b). Tenga cuidado de no ajustar demasiado la conexión
(para evitar daños en la rosca).
4. Conecte el lado del conector rápido de la manguera de desagüe (figura 4, g) a la conexión macho más larga
(inferior) del conector rápido (figura 4, n).
5. Conecte el lado del conector rápido de la manguera de entrada (figura 4, e) a la conexión macho más corta
(inferior) del conector rápido (figura 4, m).
6. Acople el conector rápido al adaptador para el grifo halando el collarín de cierre externo hacia el conector
rápido (figura 4, k) y al mismo tiempo empujando el conector rápido hacia el adaptador para el grifo.
7. Cuando el conector rápido se acople al adaptador para el grifo, suelte el collarín de cierre Verifique que la
conexión es firme.
8. Abra lentamente la línea de agua caliente y verifique todas las conexiones para asegurarse de que no
existan fugas. Si observa fugas, cierre inmediatamente el suministro de agua y repare las conexiones de las
mangueras.
NO
TA: Una vez abierto la línea de suministro de agua (incluso si se cierra inmediatamente), la manguera de
entrada estará presurizada. Para aliviar la presión dentro de la manguera de entrada, primero asegúrese de que la
línea de agua está cerrada y luego presione y sostenga el botón de alivio de presión en el conector rápido (figura
4, j) hasta que el flujo de agua se detenga.
ADVER
TENCIA: NO aliviar la presión de agua antes de desconectar el conector rápido del grifo resultará en una
contrapresión que causará que el agua salpique. La temperatura del agua de entrada puede ser muy alta y podría
causar quemaduras o escaldaduras graves.
AD
VER
TENCIA: NO permita que niños desconecten el lavaplatos. SIEMPRE es importante mantener a los niños
bajo supervisión cuando estén cerca del electrodoméstico.
DESC
ONECTADO DEL AGUA
1. Cierre el suministr
o de agua en el grifo.
2. Alivie la presión de agua en la manguera usando el botón rojo para alivio de presión.
3. Desconecte el lavaplatos sujetando firmemente el enchufe y halándolo hacia afuera del tomacorriente.
4. Deje que escurra el agua de la manguera de entrada.

35
LLENADO DEL DOSIFICADOR DE ABRILL
ANTADOR
El abrillantador se liber
a durante el enjuagado final para evitar que las gotas de agua dejen marcas y vetas en sus
platos. También mejora el secado ayudando a liminar el agua de los platos. Su lavaplatos está diseñado para usar
abrillantadores líquidos. El dosificador de abrillantador está ubicado dentro de la puerta, junto al dosificador de
detergente. Para llenarlo, abra la tapa y vierta el abrillantador dentro de dosificador hasta que el indicador de nivel se
torne completamente negro. El contenedor de abrillantador tiene una capacidad de aproximadamente 3.7oz (110ml).
NO
TA: Use solo abrillantadores para lavaplatos de marcas reconocidas. Nunca llene el dosificador de
abrillantador con ninguna otra sustancia (producto de limpieza para lavaplatos, detergente líquido), pues puede
dañar el electrodoméstico.
Puede determinar la cantidad de abrillantador usando el indicador óptico de nivel (vea más abajo). Hay una luz de
advertencia de abrillantador en el panel de control que le indicará cuándo necesita llenarse. No deje que alcance
niveles inferiores a 1/4 de su capacidad total.
A medida que se usa abrillantador, el tamaño del punto negro en el indicador de nivel de abrillantador cambia,
como se muestra a continuación.
Para abrir del dosificador de abrillantador, gire la topa en sentido antihorario aproximadamente 1/4 de vuelta y
levántela. Vierta el abrillantador en el dosificador con cuidado para evitar el sobrellenado. Coloque nuevamente
la tapa y gire en sentido horario para cerrarla. Asegúrese de limpiar cualquier resto de abrillantador.
ANTES DE SU USO
Lleno
¾ lleno
½ lleno
¼ lleno - debe llenarlo nuev
amente para
evitar que se formen marcas de agua.
Vacío
Indicador de
abrillantador
Figura 5
Figura 6
AJUSTE DEL DO
SIFICADOR DE ABRILLANTADOR
El dosificador de abrillantador tiene cuatro configuraciones. La
configuración recomendada es la “3”. Si los platos aún no se secan bien o
tienen marcas de agua, ajuste el dial a la posición “4”.
Incremente la configuración si observa marcas de agua o depósitos de
minerales luego del lavado. Redúzcala si observa manchas blanquecinas en
sus platos o una capa azulada en vasos de vidrio o cuchillos.
Ajuste la
palanca
(
enjuague)
Figura 7

36
DOSIFICADOR DE DETER
GENTE
EL deter
gente para lavaplatos es necesario para eliminar los restos de comida de los platos y ayudar a retirarlos
del lavaplatos. Use solo detergentes que están específicamente diseñados para su uso en lavaplatos. Llene el
dosificador de detergente antes de comenzar cada ciclo de lavado según se indica en las instrucciones en la Tabla
de Ciclo de Lavado. Su lavaplatos usa menos detergente y abrillantador que los lavaplatos convencionales. Gen-
eralmente solo se necesita una cucharada de detergente para una carga normal de lavado, aunque objetos muy
sucios podrían necesitar el uso de una cantidad mayor de detergente. SIEMPRE añada el detergente justo antes de
iniciar el lavaplatos para evitar que se moje, pues esto podría evitar que se disuelva adecuadamente.
DETERGENTES
Si se us
an detergentes en polvo que no contienen fosfatos junto con agua dura, pueden aparecer manchas blancas
en los platos. Si esto ocurre, añada más detergente al lavaplatos para obtener mejores resultados. Los detergentes
que no contienen cloro podrían no remover completamente la comida y las manchas de los platos. Si esto ocurre,
escoja un programa de lavado con una temperatura más alta.
Los detergentes pueden clasificarse en dos tipos diferentes basado en su composición química:
t Convencionales, detergentes alcalinos con ingredientes cáusticos.
t Concentrados, detergentes de baja alcalinidad con encimas naturales
El uso de detergentes concentrados reduce la contaminación, es mejor para los platos y los programas de lavado
normales están diseñados para maximizar las propiedades de disolución de sucio de las encimas, lo que permite
el uso un programa de lavado normal con detergentes concentrados para producir los mismos resultados que se
alcanzarían normalmente usando un programa de lavado profundo.
TABLET
AS DE DETERGENTE
Difer
entes marcas de tabletas de detergente se disuelven a ritmos diferentes. Por esta razón, algunas tabletas
podrían no disolverse completamente y por lo tanto no limpiar completamente los platos. Al usar tabletas,
asegúrese de usar un programa de lavado más largo para garantizar que las tabletas se disuelvan y que todo el
detergente residual se elimine del lavaplatos.
NO
TA: Las tabletas de detergentes solo deben usarse en modelos con función 3 en 1.
LLENADO DEL DOSIFICADOR DE DETER
GENTE
Si la puerta del do
sificador está cerrada, presione el pestillo y se abrirá. Llene el dosificador al nivel requerido
basado en el ciclo de lavado.
Pestillo
de r
esorte
Cámara de prelavado
Figura 8
a b

37
Llene el dosificador de det
ergente. El compartimiento más pequeño en el lado izquierdo (figura 8, a) es para 0.50oz
(15g) de detergente y el compartimiento más grande al lado derecho (figura 8, b) tiene una capacidad de 0.88oz
(25g). Asegúrese de consultar las recomendaciones de uso y almacenamiento del fabricante como se indica en el
empaque del detergente. Cierre la tapa y presiónela hasta que se bloquee. Si los platos están muy sucios, añada
detergente adicional en la cámara de detergente para prelavado.
NO
TA: Consulte la tabla de ciclo de Lavado para más información sobre la cantidad de detergente a usar.
NO
TA: La dureza del agua y cuan sucio están los platos puede hacer variar la cantidad de detergente requerido.
CARGA DEL L
AVAPLATOS
NO
TE
: NO lave objetos que no indican que son aptos para el uso en lavaplatos.
NOTE: Algunos tipos de vasos pueden tornarse opacos luego de muchas lavadas.
NOTE
: La plata y el aluminio empañarse o descolorarse durante el lavado.
Para optimizar el desempeño, sigua estas directrices cuando cargue el lavaplatos.
1. Elimine restos grandes de comida. Remoje los sartenes con comida quemada para ablandarlo. No es necesario
enjuagar los platos bajo el grifo.
2. Coloque objetos como tazas, vasos, ollas o sartenes, etc. boca abajo de forma que no recolecten agua.
3. Los objetos curvos o con cavidades deben colocarse inclinados de forma que el agua pueda escurrirse sobre ellos.
4. Todos lo utensilios deben colocarse de manera que no puedan volcar.
5. Todos los utensilios deben colocarse de forma que no interfieran con el brazo rociador durante el lavado.
6. Los objetos no deben colocarse uno dentro de otro o cubriendo a otros objetos.
7. NO deje que vasos grandes entren en contacto. Esto podría dañarlos.
8. La mayoría de la cubertería de plata debe colocarse en cesta de cubiertos con las asas hacia abajo.
9. Los cuchillos pequeños y objetos filosos deben colocarse con las asas hacia arriba para prevenir lesiones.
10. Los objetos filosos grandes como cuchillos de hojas largas pueden ser peligrosos y deben colocarse horizon-
talmente en la parilla.
11. NO coloque objetos pequeños que puedan caerse de la cesta en el lavaplatos.
12. NO sobrecargue el lavaplatos.
WARNING
: NO permita que objetos sobresalgan hacia abajo de la parrilla, pues podrían interferir con el brazo
rociador y dañar el lavaplatos.
WARNING
: NO cargue objetos filosos con los bordes cortantes hacia arriba. Colóquelos con los bordes cortantes
hacia abajo o de forma horizontal en la parrilla.
SIEMPRE coloque los platos y artículos de cocina de manera que al agua rociada no los mueva.
a. T
azas
b. Vasos
c. Platillos
d. Bol para frutas
e. Bol para servir
a
a
b
c
c
d
e
e
f
g
h
i
Figur
a 9
f
. Platos para pan y mantequilla
g. Platos de cena
h. Platos ovalados
i. Cesta para cubiertos

38
Los cubier
tos deben colocarse con las asas hacia abajo en la cesta para cubiertos,
a menos que se trate de objetos filosos como cuchillos. Los objetos filosos que
caben en la cesta para cubiertos deben colocarse con las asas hacia arriba. Evite
colocar cucharas o tenedores interconectados. Si un objeto es muy grande para
la cesta para cubiertos, colóquelo horizontalmente en la parrilla de platos.
Figura 10

39

40
NO
TA: Si la unidad ya liberó el detergente deberá recargar el contenedor de detergente.
ADVER
TENCIA: Abrir la puerta cuando el lavaplatos esta en funcionamiento es peligroso debido al riesgo de
ser escaldado por agua caliente. Si tiene que abrir la puerta, asegúrese de que el ciclo está en pausa y que el brazo
rociador se ha detenido.
Las luces de la pantalla indican el estatus del ciclo de lavado.
t Luces indicadoras de programa apagadas: Modo espera (Stand-by)
t Luces indicadoras de programa no parpadeantes: En pausa
t Luces parpadeantes: En funcionamiento
NO
TA: Si el lavaplatos está en modo espera sin ninguna operación, se apagará automáticamente después de 30
segundos.
TABL
A DE CICLOS DE LAVADO
NO
TA:
indica que el dosificador de abrillantador debe llenars
e.
Progr
ama Se usa para Descripción del ciclo
Detergente
prelavado/
PRINCIPAL (g)
Tiempo de
funcionamiento
(min)
Energía
(Kwh)
Agua
(l)
Abrillantador
Profundo
(Heavy)
Par
a las cargas
más pesadas,
ollas,
sartenes,
platos con
restos de
comida seca.
Prelavado
Prelavado (122°F/50°C)
Lavado (131°F/55°C)
Lavado (122°F/50°C)
Enjuague
Enjuague (154°F/68°C)
Secado
18 100 0.49 12.5
Normal
(Normal)
Par
a cargas
con niveles
normales de
suciedad,
como ollas,
platos, vasos y
sartenes
ligeramente
sucios.
Prelavado
Prelavado
Lavado (125°F/52°C)
Enjuague
Enjuague (149°F/65°C)
Secado
18 110 0.36 10.8
Liger
o
(Light)
Para cargas
ligeramente
sucias como
vasos y
cristales.
Prelavado
Prelavado (122°F/50°C)
Lavado (122°F/50°C)
Enjuague
Enjuague (140°F/60°C)
Secado
18 75 0.27 10
Va
sos
(Glass)
Par
a vajillas y
vasos ligera-
mente sucios
Prelavado
Lavado (122°F/50°C)
Enjuague
Enjuague (140°F/60°C)
Secado
15 70 0.28 8.5
Rápido
(Speed)
Lav
ado más
corto para
cargas
ligeramente
sucias que no
necesitan
secarse
Prelavado
Prelavado (122°F/50°C)
Lavado (122°F/50°C)
Enjuague
Enjuague (131°F/55°C)
15 45 0.31 10.5

41
Enjuague
(Rinse)
Par
a enjuagar
platos, vasos
y platería que
no se lavará de
inmediato.
Prelavado
Lavado
/ 24 0.03 4.3
FIN DEL CICLO DE L
AVADO
Cuando el ciclo de lav
ado finaliza, sonará un indicador acústico durante 8 segundos. Apague el lavaplatos usando
el botón de encendido/apagado (ON/OFF), cierre el suministro de agua y abra la puerta con cuidado. Deje la
puerta abierta durante 15 minutos antes de manipular los platos, pues son más susceptibles a que se rompan
cuando están calientes, y para permitir que se sequen completamente. Es normal que el interior del lavaplatos
esté mojado cuando termine de funcionar.
USO DE LA FUNCIÓN DE RETARDO
El encendido del lavavajillas se puede tener un retardo de 1 a 24 horas, con incrementos de una hora.
Para utilizar esta función:
1) Presione el botón “ON/OFF” en la posición “ON” (Encendido)
2) Oprima el botón “PROGRAM” (Programar)
3) Oprima el botón “DELAY” (Retardar) una vez por cada hora de retardo. Presione de nuevo después de 24 horas para
(por ejemplo, presione el botón 3 veces para retardar el encendido por 3 horas)
Para cancelar la función de retardo:
4) Presione el botón “ON/OFF” en la posición “OFF” (Apagado)
restablecer a 0.

CUIDADO Y MANTENIMIENT
O
SISTEMA DE FIL
TRADO
Los filtr
os evitan que los restos de comida y otros objetos se introduzcan
en la bomba. El sistema de filtrado consta de tres partes (vea la figura 11):
un filtro basto (a), un filtro fino (b) y un filtro principal (c).
a. Filtro Basto: Objetos grandes que no pueden bloquear el desagüe
quedan retenidos en el filtro basto. Para eliminar objetos retenidos
por el filtro basto, primero retire el filtro fino (b) y luego voltéelo
y presione suavemente la parte inferior del filtro basto (a) hasta
que se libere. (vea la figura 12). Vacíe cuidadosamente el filtro y
colóquelo nuevamente en su lugar una vez limpio.
NO
TE
: El filtro basto (a) SOLO debe retirarse si tiene objetos
grandes y potencialmente peligrosos retenidos. Si existen residuos
o partículas de comida atrapados, vea la sección del filtro fino (b)
a continuación.
b. Filtro fino: Este filtro retiene sucio y restos de comida en el área de
drenaje y evita que se depositen en los platos durante el ciclo de
lavado. Para eliminar objetos retenidos en este filtro, vea la sección
“montaje del sistema de filtrado” más abajo.
c. Filtro principal: Los restos de comida y el sucio retenido en este
filtro se pulveriza con una boquilla especial en el brazo rociador y
se eliminan por el desagüe.
b
a
c
LIMPIEZA DE LO
S MONTAJE DEL SISTEMA DE FILTRADO
Par
a obtener mejores resultados y desempeño, los filtros deben limpiarse regularmente. Por esta razón, es buena
idea remover los restos grandes de comida retenidos en los filtros después de cada ciclo de lavado enjuagando en
el filtro bajo el grifo.
N
O
TA: El montaje completo de los filtros debe limpiarse una vez a la semana.
ADVER
TENCIA: Nunca haga funcionar el lavaplatos si los filtros no están en su lugar.
b
b
a
a
c c
Figur
a 11
Figur
a 12
Figura 13
1. Rote el montaje de lo
s filtros (figura 13, a, b y c) en sentido antihorario y luego levántelo.
2. Retire el filtro fino (figura 13, b) y el filtro basto (figura 13, a) empujando cuidadosamente hacia arriba el
filtro fino desde la parte inferior del filtro principal (figura 13, c).
NOTA: Al separar los filtros, solo empuje el plástico duro en la parte inferior del montaje. NO aplique
presión en el tamiz.
42

3. Retire el filtr
o basto (figura 13, a) del filtro fino (figura 13, b) empujando hacia arriba desde la parte inferior
de las pestañas que lo mantienen unido al filtro fino.
4. Para reensamblar y reemplazar el montaje, siga las instrucciones anteriores en orden inverso.
PRECAUCIÓN: Revis
e el filtro cada vez que use el lavaplatos.
ADVER
TENCIA: Reemplazar incorrectamente los filtros puede reducir el nivel de desempeño del
electrodoméstico y dañar los platos y utensilios.
LIMPIEZA DEL FILTR
O
P
ar
a limpiar el filtro basto y el filtro fino, use un cepillo blando. Retire los restos de comida y limpie los filtros
bajo el grifo.
NOTA: Al limpiar los filtros, NO los golpee contra superficies duras, pues esto puede dañarlos y afectar el
desempeño del lavaplatos.
NO
TA: El agua dura puede afectar negativamente el desempeño de su lavaplatos. La presencia de agua dura
también puede contribuir a la formación de depósitos de minerales (capa de una sustancia blanca) o ‘sarro’ en la
superficie de la tina del lavaplatos y la resistencia, ubicada en el drenaje debajo del tamiz removible del filtro.
Se recomienda hacer funcionar el lavaplatos vacío y enjuagar la parte interna usando 1 taza de vinagre blanco al
menos una vez a la semana.
CUIDADO
S DEL LAVAPLATOS
El panel de contr
ol puede limpiarse con un paño ligeramente húmedo. Seque completamente. EL interior del
lavaplatos puede limpiarse un limpiador multipropósito regular y no abrasivo o con cera de pulir. Nunca utilice
objetos filosos, estropajos o limpiadores fuertes en ninguna parte del lavaplatos.
Figura 14
LIMPIEZA DE LA PUER
TA
Para limpiar el borde de la puerta, solo debe usar un paño tibio y húmedo.
para evitar el contacto entre el mecanismo de cierre de la puerta y los
componentes eléctricos, NO utilice limpiadores con rociadores de ningún tipo.
AD
VER
TENCIA:
t Nunca utilice limpiadores con rociadores para limpiar el panel de la puerta, pues esto dañar el mecanismo
de cierre y los componentes eléctricos.
t Los limpiadores abrasivos y algunos tipos de papel absorbente pueden rayas el acabado, por lo que no
deben usarse.
PRO
TECCIÓN CONTRA EL CONGELAMIENTO
Si el la
v
aplatos estará expuesto a bajas temperaturas, es necesario tomar las siguientes medidas para evitar daños
por congelamiento.
Luego de cada ciclo de lavado:
1. Apague y desenchufe el lavaplatos.
2. Cierre el suministro de agua y desconecte la tubería de entrada de agua de la válvula.
3. Escurra el agua de la tubería de entrada y de la válvula de agua usando una olla para recogerla.
4. Conecte nuevamente la tubería de entrada de agua y la válvula.
5. Retire el filtro del fondo de la tina y use una esponja para absorber el agua en el drenaje.
NO
TA: Contacte a un técnico de servicio calificado si la formación de escarcha o hielo evita que el lavaplatos
funcione.
43

LIMPIEZA DE LO
S BRAZOS ROCIADORES
Los br
azos rociadores pueden removerse fácilmente para
limpiezas periódicas de las boquillas y evitar posibles
obstrucciones. Lávelos bajo el grifo y colóquelos nuevamente
con cuidado, verificando que su movimiento rotativo no está
obstaculizado de ninguna forma. Sujete la parte media del
brazo rociador y hálelo hacia arriba para removerlo. Lave los
brazos bajo el grifo y vuélvalos a colocar cuidadosamente
en su lugar. Luego del reensamble, verifique que los brazos
rociadores puedan girar libremente. Si no lo hacen, verifique
que se hayan instalado correctamente.
Figure 15
MANTENER EL LA
VAPLATOS EN BUEN ESTADO
t Luego de cada la
vada: Cierre el suministro de agua hacia el electrodoméstico y abra un poco la puerta para
que la humedad y los olores no queden atrapados adentro.
t Retire el enchufe: Antes de limpiar o realizar mantenimiento, SIEMPRE retire el enchufe del de la toma.
t No use solventes o limpiadores abrasivos: NO use limpiadores abrasivos o solventes para limpiar las partes
exteriores o de goma del lavaplatos. Solo use un paño con agua tibia con un poco de jabón. Para remover los
puntos o manchas de la superficie interior, use un paño húmedo con agua y un poco de vinagre.
t Luego períodos largos sin usar: Se recomienda que inicie un ciclo de lavado con el lavaplatos vacío y
luego lo desenchufe, cierre el suministro de agua y deje la puerta del electrodoméstico ligeramente
abierta. Esto ayudará a que los sellos de las puertas duren más y evita que se generen olores dentro del
electrodoméstico.
t Al mover el electrodoméstico: Si debe mover el electrodoméstico, trate de mantenerlo en posición vertical.
Si es absolutamente necesario, puede colocarse sobre su parte posterior.
t Sellos: Las partículas de comida que queden atrapadas en los sellos pueden generar olores. La limpieza
periódica con una esponja húmeda evitará que esto ocurra.
44

SOLUCIÓN DE PROBLEMAS
Problema Causas posibles Qué hacer
Problemas
técnicos
El lavaplatos no
inicia
Fusible fundido o
interruptor activado.
Reemplace el fusible o reestablezca el interruptor.
Desconecte cualquier otro electrodoméstico que comparta
el mismo circuito con el lavaplatos.
El suministro eléctrico
no está activado
Asegúrese de que el lavaplatos está encendido y que la
puerta está bien cerrada. Asegúrese de que el cable de
alimentación está bien conectado en el tomacorriente.
La puerta del
lavaplatos no cierra
correctamente.
Cierre completamente la puerta y asegúrese que el pasador
está enganchado.
El agua no es
bombeada desde
el lavaplatos
Torcedura en la
manguera de desagüe.
Verifique la manguera de desagüe.
Filtro obstruido. Revise el sistema de filtrado.
Drenaje del fregadero
obstruido
Verifique el fregadero para asegurarse de que está drenando
bien. Si el drenaje está tapado, es posible que necesite
llamar a un plomero.
Problemas
generales
Agua de lavado
en la tina
Detergente incorrecto.
Solo use detergente para lavaplatos para evitar el agua de
lavado. Si esto ocurre, abra el lavaplatos y deje que el agua
de lavado se evapore. Añada 1 galón de agua fría a la tina.
Cierre el pasador e inicie el ciclo de lavado “Enjuague” para
drenar el agua. Repita si es necesario.
Derrame de
abrillantador
Derrame de abrillantador
Parte interna de
la tina manchada
Se utilizó un
detergente con
colorante.
NO use detergentes con colorantes o tintes.
Película blanca
en superficie
interna
Minerales de agua
dura.
Para limpiar el interior, use una esponja húmeda con
detergente para lavaplatos y guantes de goma. Nunca use
ningún otro limpiador que detergente para lavaplatos para
evitar riesgos de formación de espuma o agua de lavado.
Manchas de
óxido en los
cubiertos
Los cubiertos no son
resistentes a la
corrosión.
Solo ponga objetos resistentes a la corrosión en el
lavaplatos.
No se inició un
programa luego de que
se añadió el
detergente para
lavaplatos. Trazas de
detergente se filtraron
al ciclo de lavado
Inicie el programa de lavado rápido sin platos o utensilios
en el lavaplatos después de añadir el detergente para
lavaplatos.
Ruidos
Ruidos de
golpeteo dentro
de gabinete de
lavado
El brazo rociador está
golpeando a un objeto
en la cesta.
Si puede, interrumpa el programa y reorganice los objetos
que obstruyen al brazo rociador. Si no puede interrumpir
el programa, fije la posición del brazo hasta que el ciclo
finalice.
45

Ruidos
Ruidos de
traquetea en
el gabinete de
lavado
Hay objetos sueltos
dentro.
Si puede, interrumpa el programa y reorganice los objetos
dentro del lavaplatos.
Sonidos de
golpeteo en las
tuberías de agua
Esto puede originarse
por la instalación en el
sitio o la sección
trasversal de la tubería.
Esto no afecta el funcionamiento del lavaplatos. SI tiene
dudas, contacte a un plomero.
Lavado
insatisfactorio
Los platos no
están limpios
Los platos no se
colocaron
correctamente.
Asegúrese de que los platos se coloquen correctamente
según lo descrito en la sección “Carga del lavaplatos”.
Se seleccionó un
programa de lavado
incorrecto.
Seleccione un programa más intensivo. Vea la “Tabla de
ciclos de lavado”.
No había suficiente
detergente en el
dosificador.
Use más detergente o cambie de detergente.
Hay objetos que
bloquean el
recorrido de los brazos
rociadores
Reorganice los objetos de forma que los brazos rociadores
puedan girar libremente.
El sistema de filtrado
en la base del gabinete
de lavado no esta
limpio o no está
colocado
correctamente. Esto
puede ocasionar que
las boquillas de los
brazos rociadores se
bloqueen.
Limpie o ajuste correctamente el filtro. Limpie las boquillas
del brazo rociador. Vea la sección “cuidados del lavaplatos”.
Los objetos de
vidrio se han
opacado.
Una combinación de
agua blanda y
demasiado detergente.
Use menos detergente si tiene agua blanda y seleccione un
ciclo corto de para lavar los objetos de vidrio. Vea la “tabla
de ciclos de lavado”
Marcas negras
o grises en los
platos
Utensilios de aluminio
han entrado en
contacto con los
platos.
Use un limpiador abrasivo suave para eliminar las marcas.
Detergente
remanente en
los recipientes
dosificadores
Hay platos bloqueando
los recipientes de
detergente.
Hay platos bloqueando los recipientes de detergente.
Secado
insatisfactorio
Los platos no se
secan
Los platos no se
colocaron
correctamente.
Cargue el lavaplatos como se indica en las instrucciones.
Poco abrillantador.
Aumente la cantidad de abrillantador o llene nuevamente el
dosificador de abrillantador.
46

Secado
insatisfactorio
Los platos no se
secan
Los platos se retiraron
muy pronto.
NO vacíe el lavaplatos inmediatamente después del lavado.
Abra ligeramente la puerta para que el vapor escape.
Comience a descargar el lavaplatos solo cuando los platos
están suficientemente fríos al tacto. Vacíe primero la cesta
inferior. Esto evita que el agua que escurre de la bandeja
superior caiga en los platos.
Se ha seleccionado un
programa incorrecto.
Los ciclos de lavado corto usan temperaturas más bajas,
lo cual reduce el desempeño. Seleccione un programa de
lavado más largo.
Uso de cubertería con
revestimiento de baja
calidad.
El escurrimiento de agua es más difícil en estos objetos. Los
cubiertos o los platos de este tipo no son aptos para lavar
en lavaplatos.
CÓDIGOS DE ERROR
Códigos Significados Causas posibles
E1 Tiempos mayores de entrada de agua
EL grifo no está completamente abierto.
La entrada de agua está obstruida.
Baja presión de agua.
E4 Desbordamiento El lavaplatos tiene una fuga
ADVERTENCIA: SI ocurre un error de desbordamiento, apague el suministro de agua antes de llamar al personal
de servicio. Si hay agua en la base debido a un desbordamiento o fuga, el agua de removerse antes de volver a
encender el lavaplatos.
47

GARANTÍA LIMITADA
MC Appliance Corporation garantiza que todas las Lavavajillas para encimera carecen de defectos en el material y la mano de obra
y acuerda solucionar cualquiera de estos defectos o instalar la(s) parte(s) nueva(s) (a elección de la compañía) en caso de que la
unidad haya fallado durante el periodo de garantía. Las partes y gastos de reparación están cubiertos en esta unidad por un periodo
de un año a partir de la fecha de compra. Es necesario presentar una copia del recibo o factura de compra con fecha para obtener
los servicios de la garantía, el reemplazo o el reembolso.
Esta garantía cubre los aparatos que se usen dentro de los Estados Unidos contiguos, Alaska, Hawái y Puerto Rico. La garantía no
cubre lo siguiente:
t Daños debido al daño del envío o a la instalación incorrecta.
t Daños debido al mal uso o abuso.
t Pérdidas de contenido debido a falla de la unidad.
t Las reparaciones se realizaron por los agentes desautorizados del servicio.
t Llamadas de servicio que no implican defectos en material y la ejecución tal como instrucción en el uso apropiado
del producto o de la instalación incorrecta.
t Reemplazo o reajuste de los fusibles o de los interruptores de la casa.
t Falla de este producto si se usa con fines distintos a los que fue diseñado.
t Costes de la disposición de unidades falladas no vueltas a nuestra fábrica.
t Todos los gastos de entrega/instalación incurridos como resultado de una unidad que no cumple con lo especificado.
t Gastos de viajes y el transporte de los productos principales de servicio si su aparato está situado en una zona remota
donde el servicio por un técnico de servicio no está disponible.
t La remoción y reinstalación de su gran aparato, si está instalado en un lugar inaccesible o no está instalado de
conformidad con las instrucciones de instalación publicadas.
t Restituciones por productos no reparables se limita al precio pagado por la unidad por el recibo de compra.
t Esta garantía es intransferible. Esta garantía es válida exclusivamente para el comprador original y no se extiende a
ningún otro propietario o propietarios subsiguientes.
Limitaciones de remedios y exclusiones:
La reparación del producto de acuerdo con los términos de este documento, es el único y exclusivo remedio determinado en
esta garantía limitada. Todas y cada una de las garantías implicadas, incluyendo la calidad de comerciable y capacidad para un
propósito particular, se limitan mediante la presente a un año o el periodo más corto permitido por la ley. MC Appliance
Corporation no es responsable por daños incidentales ni resultantes y ningún representante o persona alguna están autorizados
para asumir de parte nuestra ninguna otra responsabilidad en relación con la venta de este producto. Bajo ninguna circunstancia
se le permite al consumidor regresar esta unidad a la fábrica sin consentimiento previo por escrito de MC Appliance Corporation.
Algunos estados prohíben la exclusión o limitación por daños incidentales o resultantes, o limitaciones en las garantías implícitas.
Esta garantía le otorga a usted derechos legales específicos, y usted puede también tener otros derechos que varían según la
entidad federa!va donde se encuentre.
Modelo Piezas Trabajo Tipo de servicio
MCSCD6W5 Uno año Uno año Lleve adentro
Para servicio o asistencia, llame por favor al 888-775-0202.
O visítenos en www.mcappliance.com para solicitar el servicio de garantía o repuestos.
48

49
CNA Interna
tional, Inc. realiza negocios bajo el nombre de MC Appliance
Corporation. Derechos reservados.
El logotipo Magic Chef® es una marca registrada de CNA International, Inc.
www.mcappliance.com Impreso en China
-
 1
1
-
 2
2
-
 3
3
-
 4
4
-
 5
5
-
 6
6
-
 7
7
-
 8
8
-
 9
9
-
 10
10
-
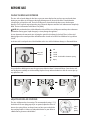 11
11
-
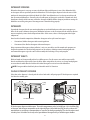 12
12
-
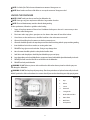 13
13
-
 14
14
-
 15
15
-
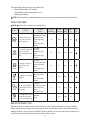 16
16
-
 17
17
-
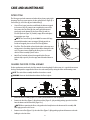 18
18
-
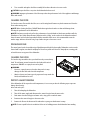 19
19
-
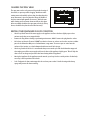 20
20
-
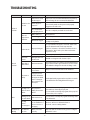 21
21
-
 22
22
-
 23
23
-
 24
24
-
 25
25
-
 26
26
-
 27
27
-
 28
28
-
 29
29
-
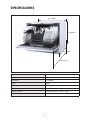 30
30
-
 31
31
-
 32
32
-
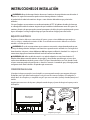 33
33
-
 34
34
-
 35
35
-
 36
36
-
 37
37
-
 38
38
-
 39
39
-
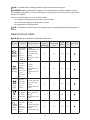 40
40
-
 41
41
-
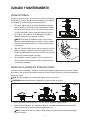 42
42
-
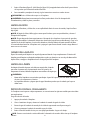 43
43
-
 44
44
-
 45
45
-
 46
46
-
 47
47
-
 48
48
-
 49
49


Magic Chef MCSCD6W5 El manual del propietario
- Categoría
- Lavaplatos
- Tipo
- El manual del propietario
En otros idiomas
- English: Magic Chef MCSCD6W5 Owner's manual
Documentos relacionados
Otros documentos
-
Avanti DW6W Manual de usuario
-
Danby Products DDW621WDB Manual de usuario
-
Danby DDW631SDB El manual del propietario
-
Haier DW12-EFET El manual del propietario
-
-
-
-
Nostalgia FCD06ASWWHC Manual de usuario
-
-
Ega Master 56077 El manual del propietario