QFX TV-1010 Manual de usuario
- Categoría
- Televisores LCD
- Tipo
- Manual de usuario

USER GUIDE
ATSC-T DIGITAL TUNER LCD TV


Content
1.Safety Precautions 1
2.Accessories 2
3.Instruction for Keys and Interfaces 2
4.Instruction for Function Keys on Remote Control (Some machines are
different, prevail in kind ) 3
5.Connection with External Devices 4
6.Description of the Operating Menu 5
(6.1) Select the Input Signal Source 5
(6.2) System Menu Setup 5
(6.2.1) PICTURE 5
(6.2.2) SOUND MENU 5
(6.2.3) TIME MENU 5
(6.2.4) OPTION MENU 6
(6.2.5) LOCK MENU 6
(6.2.6) CHANNEL 6
7.USB Function Operating Instruction 7
(7.1) PHOTO PLAY 7
(7.2) MUSIC PLAY 7
(7.3) MOVIE PLAY 7
8.Common Troubleshooting 8
9.Technical Specifications 9
… …… …… … … … …… … … … … … …… … … … … … ……
… … … …… … … … …… … … … … … …… … … … … … …… … … … … … … …… … … … …… … … … … … …… … … … … … …… … … …
… … … …… … … … …… … … … … … ……
… …… …… … … … …… … … … … … …… … … … … …
… …… …… … … … …… … … … … … ……
… …… …… … … … …… … … … … … ……
… …… …… … … … …… … … … … … …
… …… …… … … … …… … … … … … …… … … … …
… …… …… … … … …… … … … … … …… … … … … … …… …
… …… …… … … … …… … … … … … …… … … … … …
… …… …… … … … …… … … … … … …… … … … … … ……
… …… …… … … … …… … … … … … …… … … … … …
… …… …… … … … …… … … … … … …… … … … … … …
… …… …… … … … …… … … … … … …… … … … … … ……
… …… …… … … … …… … … … … … ……
… …… …… … … … …… … … … … … …… … … … … … ……
… …… …… … … … …… … … … … … …… … … … … … ……
… …… …… … … … …… … … … … … …… … … … … … ……
… …… …… … … … …… … … … … … …… … … … …
… …… …… … … … …… … … … … … …… … … … …

1.Safety Precautions
1.1 Storage
This product shall be kept far away from too high or two low temperatures.
This product shall be stored at -20°С-60°С and its working temperature shall be
-5°С -40°С.
Do not use this product in wet environment, such as in a bathtub, wash basin,
kitchen, sink or basement, swimming pool, etc.
Do not place TV in an environment with high humidity, dust or full of mist.
Do not drop or throw this product.
Avoid strong vibration of the machine to avoid the strong collision with other
objects.
Do not squeeze or scratch the product with sharp objects.
The rear recess of the product and the opening in the shell are used for
ventilation, at the same time, they are used to ensure the reliability of
components and components and avoid overheating. Do not place the TV and
power adapter in bed, on sofa, carpet or other similar surface to avoid blocking
the radiator opening. Do not place the television and the power adapter near or
on heater or heat sources unless it is equipped with a complete ventilation
device; The television and power adapter are prohibited from being placed in an
insert-type installation device.
When in use, make sure the TV is at least 3 inches (76 mm) away from walls
or other objects.
Please use the specified type of power on the TV label. If you have questions
about the type of power source that shall be used, please consult your dealer or
local power supply department.
Make sure that the power plug and wire you are using can withstand the sum
of the rated current of all the powered products.
Do not place the TV in a place where users can easily touch it.
All the notes and instructions in the guide shall be observed.
Do not overload the power plug or extend the power cord, otherwise it may
cause fire or electric shock.
Do not fix the TV without authorization, because the cabinet is subject to high
voltage or other hazards. Qualified service personnel shall be required to repair
the TV.
Please unplug the power adapter from the socket and ask qualified service
personnel for repair if:
1.2Maintenance
Before cleaning, first, disconnect all the cables of this device.
Wipe the case, screen and keys with a soft cloth soaked with a small amount
of mild detergent.
When cleaning the TV, do not use polishing cloths, disinfectants orany kind of
fuel or chemical cleaners such as alcohol and gasoline, etc.
Attention!
To ensure your own safety and the safety of the people around you, do not
watch TV or turn on the TV receiver.
It’s dangerous to watch a TV program or use a TV receiver when driving a car.
1

Special Instruction
Bright spots and dark spots may appear on the screen. This is normal and
related to active matrix screens and is not a symptom of failure. Do not try to
conduct technology maintenance yourself. If anything goes wrong, turn the TV
receiver off and contact us or your dealer. The device contains a large number
of small electronic components. Disassembly or modification may cause
damage or breakdown to the device.
2.Accessories
1.User Guide 2. DC / AC Power Adapter
3.12V Automotive Adapter 4. Remote Control
5. Audio and Video Combination Cable 6. Antenna
7. Mounting Bracket 8. Battery
Open the package and check if all the accessories are complete.
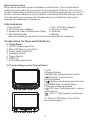
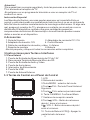
3.Instruction for Keys and Interfaces
3.1 Side Panel
1. 12V DC Power Input Port
2. Micro SD Memory Card Slot
3. Audio-video Input Port
4. Headphone Port
5. Power Switch
6. USB Port
7. External Antenna Port
3.2 Control Keys on the Control Panel
1.LCD
2.Sound System
3.MODE Key:mode selector switch.
4. /CH-Key: Previous/next
period/Channel.
5. /CH+Key:previous/period/channel
6.OK/MENUkey: Confirm/ Menu
7.Remote receiving window
8. /VOL-key: Fast backward / volume
down button.
9. / VOL +: Fast forward / volume up
key.
10. Return/LCD/ key: Turn off the
screen/exit menu
◎
2

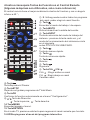
4.Instruction for Function Keys on Remote Control (Some
machines are different, prevail in kind)
The remote control has the best performance within 5 meters and with angel
below60°。
①.B:LISTKey can display all the channel
programs; able to choose the favorite
②. Key
Turn on working mode/standby mode
③.MUTEKey
Turn on/off the sound output
④.INPUTKey
System working mode selector key:press
thekey each time, the system operating mode
is cycled in the following order:
DTV/ATV/AV/USB/CARD
⑤. Key
Fast forward Key
⑥. Key
Fast backward Key
⑦. Key
Previous
⑧. Key
Next
⑨.CH+ /CH- Key
CH+ : Choose up channel
CH- :choose down channel
Switch Channel
⑩. Key
Play/pause Key
⑪.STOP/EXITKey
Stop watching/recording TVprograms from Menu
⑫.OKKey
Confirm the selected function in the “Settings” menu.
⑬ / Direction Key
:Left Key, :Right Key
⑭.MENUKey
Turn on/off the menu
15.RETURNKey
Under TV mode, press this key to return to the recent channel you have
watched.
16.EPGKeyenter interactive program menu
17.VOL+/-Key
3
FAV
1
5
9
2
6
0
3
7
4
8
INFO
MENU
INPUT
RETURN
PIC
VOL- VOL+
CH+
CH-
AUDIO
LIST
ENTER
MTS
SLEEP
ZOOM
DASH
EPG
CC
channel

Volume up/down key
18.DigitalKey0~9
Digital Key0-9 is used for inputting channel number and editing all parameters
19.DASH Key
Postfix of program frequency
20.CCKey
Turn on/off subtitles
21.INFOKey
Look through the information about the current channel
22.FAVKey
Turn on/set the favorite channel
23.AUDIOKey
Switch to audio mode or available sound track
24.B:MTSKey
NICAM function
25-28
Operation key under TV TEXT MODE; Control Key under Editing Mode
REDKey
Operating according to the information on screen
B:PICKey
Image pattern
B:SLEEPKey
Sleep function settting
B:ZOOWKey
Narrowing or amplifying images
5.Connection with External Devices
Audio - Video input signal
Audio-Video Cable Access: Plug the audio-video plug into the audio-video input
port and press the INPUT Key. At this point, the input of audio-video signal is
complete and the AV symbol is displayed on the screen.
Connecting Headphones
To use headphones to listen to music, first volume down, and then insert the
headset, adjustto the right volume. When using headphones, the volume shall
not be too large, so as not to hurt the hearing.
Connecting the Signal Cable under HDMI Mode
Please set the TV to HDMI Mode, then connect the HDMI Cable
Connecting to AC Power Supply
Plug the AC adapter’s AC plug into the power supply (100-240 V, 50-60 Hz AC)
socket and the AC adapter’s DC plug into the 12 VDC input port.
(12 Volt Car Charger can be used for this device).
USB/SD CARDPlay
Insert a USB / SD card into the device and select USB / SD format as the format
of the image / audio / video card included in the card (memory capacity shall be
32G or less).
4

6.Description of the Operating Menu
6.1 Select the Input Signal Source
A.Press“INPUT” key,the input signal source details appear
B.Press “ / “ key,select the signal source,press ENTER Key to confirm the
choice
C.TV would switch to the mode that you choose
6.2 System Menu Setup
A.Press the Menu Key,to enter system setting menu for system setup。
B.Press direction Key,to choose sections
C.Press ►/ ENTER Key to enter the submenu and choose the option in the
menu
D.Choose the option and press the Enter Key to confirm and finish the system
setup
E.Press MENU, return to the main menu
F.Press STOP/ EXIT Key, to exit the system setup mode.
Attention: If the option is gray, it means the item cannot be set in this mode,
please select the options available.
6.2.1 PICTURE
•Press MENU Key,the main menu appears,then press
key to choose Picture Menu
•Picture Menu: Personalized /Dynamic/Standard/Mild.
•Color Temperature:Personal/cold/Normal/Warm.
•Aspect Ratio:Auto/I6:9/4:3
•Noise Reduction:Low/ Middle /High/Off.
•Screen: Adjust PC picture position
6.2.2 SOUND MENU
•Press MENU Key,the main menu appears,then press
key to choose Sound Menu
•Sound Mode: Standard/Music/Movie/Sports/Personal.
•Balance: Adjust the volume of the left and right
loudspeaker
•Auto Volume: under this mode, the fast adjustment
would switch to smooth adjustment
• Surround Sound:SURROUND /OFF.
6.2.3 TIME MENU
•Press MENU Key, the main menu appears, then press
Key to choose Time Menu
•Clock: Adjust the time part:Day Month/ Year/ Hour/
Minute.
•Off Time: Setting 60s before off
►
►
5

•On Time: Setting to turn off after some minutes (enter the sleeping mode)
•Sleep timer:240/180/120/90/60/30/20/10
•ChooseTime zone
6.2.4 OPTION MENU
•Press MENU Key, the main menu appears, then press Key to choose Option
Menu.
•OSD Language: select display OSD Language
•Audio Language: setting the audio language
•Subtitle Language: setting up the subtitle language
•Restore Default:restore all default settings
6.2.5 LOCK MENU
•Press MENU Key, the main menu appears, and then
press / Key to select Lock Menu.
• Before entering settings, please enter the default
password (0000) to enter the set value.
• Lock System: Enter the password to lock up the
critical system settings, such as program searches.
Before restoring defaults, you shall enter the
password and then make the system settings.
• Cancel LOCK: Unlock.
• Set Password.
• Block Channel: Indicates the channel you want to
lock.
•Parental Guidance: Set the age level of the
television program (Age 4-18).
6.2.6 CHANNEL
Search for TV Programs:
1) Select DTV / ATV mode.
2) Press MENU Key, selectAuto search / ATV Manual Search mode to find the
TV program.
3) Select Auto Search and select Search Type: DTV
+ ATV / DTV / ATV. Then select your country, press
Enter to start auto search.
4) Press CH + / CH- Key after Auto Scan is
completed to select the desired program.
• Channel Edit: Set DTV / ATV and channel
information.
• Signal Information: Check information about the
television signal.
►
►
6

7.USBFunction Operating Instruction
USBMode (Multimedia).
• Press “INPUT or USB” Key to display the input source list, then press Key to
select the source, press ENTER Key to confirm and display the multimedia
mode.
The color of the icon indicates if there is a TV USB
DRIVER. Yellow: Yes; Gray: No.
• Press ◄►Key to select the type of media
(Photo/Music/Movie/Text) you want to play. Press
ENTER to confirm, and press Key to move to the
directory and select what you want to play.
• Select C and press “ENTER” Key to enter the
submenu.
7.1 PHOTO PLAY
• Insert the USB DRIVER into the USB slot.
• Press “◄ / ►” Key, select the picture and press
“ENTER” Key to enter the submenu.
• Select C and press “ENTER” Key to enter the
submenu.
• Select a picture, press Key to display the picture,
press Key to display the last image played, and
press Key to display the next image to be played.
• Press “STOP / EXIT” Key to exit.
7.2 MUSIC PLAY
• Insert the USB DRIVER into the USB slot.
• Press “◄ / ►” Key, select MUSIC and press
“ENTER” Key to enter the submenu.
• Select C and press “ENTER” Key to enter the
submenu.
• Select music, press Key to display, press Key to
display the last song played, and press Key to show
the next song to be played.
• Press “STOP / EXIT” Key to exit.
7.3 MOVIE PLAY
• Insert the USB DRIVER into the USB slot.
• Press “◄ / ►” Key, select Movie and press
“ENTER” Key to enter the submenu.
• Select C and press “ENTER” Key to enter the
submenu.
• Select movie, press Key to display, press Key to
display the last section played, and press Key to
show the next section to be played.
• Press “STOP / EXIT” Key to exit.
7

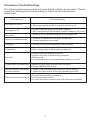
8.Common Troubleshooting
The following phenomenon does not mean that the display has problem. Please
check the following items before asking for help from the maintenance
department.
Phenomenon
No image or sound
No image on TV
No sound
Blurry or unstable image
Ghosting
Snowflake
No color
Unable to play USB Memorizer
No sound when connected
to other devices
Remote control does not work
Troubleshooting
1.Unauthorized power supply is in use.
2. The power switch, monitor or remote control is off.
1. Check if the right channel has been chosen.
2. Still under the multimedia mode, please change to TV mode.
1. Sound is off or the sound system is not properly set.
1. Check is the antenna is correctly connected;
2. Ground signaling is too weak
1. Nearby buildings or top places reflects signals.
1.Car or train electrimagetic radiation;
2.High-voltage lines or neon lighting radiation.
1.Check if the color setting is correct.
2.Check if the color system setting is correct
3.Weak signal.
4.Check whether the color suppression mode is on or off.
1.Make sure the USB has been correctly open
2.Check USB DRIVER format
1. Check if the connection with other devices is correct
2. Check the input status of the corresponding devices
1.Check if there is battery inserted;
2.Check the battery status;
3.To make the remote control align with the receive window
8

9.Technical Specifications
•Full support for dedicated analog television / digital television system in the
United States and Mexico—ATSC-T.
•Analog TV band range: 55.25-861.25 MHz (for all TV channels).
•Input Frequency: UHF 177.14MHz-213.14MHz, UHF 474.14MHz-803.14MHz.
Modulation: QPSK/16-QAM/64- QAM /256 QAM.
•Decoding Standard:The decoding standard for HL is МРЕG1,2МР, the
decoding standard for L5HD is МРЕG-4 SP & ASP, Divx13.11; 4.х; 6.х.
•Image Format: JPEG, BMP, PMG.
•Audio format: МРЗ, WMA.
•Video Format: MKV, AVI, DIVX, XVID, MOV, VOB, FLV, 3GP, DAT, MPEG, MPG,
MP4, TS, TRP.
Basic Specifications
• Display: color TFT LCD
• Screen Size: 7/9 /10.1 Inches
• Aspect Ratio: 16: 9.
• 7-Inch Resolution: 800 (Horizontal) X S (RGB) X 480 (Vertical)
• 7-Inch Resolution: 1024 (Horizontal) X S (RGB) X 600 (Vertical)
• 9-Inch Resolution: 1024 (Horizontal) X S (RGB) X 600 (Vertical)
•10.1 Inches Resolution: 1024 (Horizontal) X S (RGB) X 600(Vertical)
• Speaker: 2 x 2 Watts
• Power: 12 V DC
• Socket: Input Socket for External Antenna; Stereo Headphone Connecting
Port;
Audio / video input port (AV); USB port
• AC Power - AC Adapter
• Power Consumption:About30W
• Working Temperature:-5°Cto 40°C
• Storage Temperature:-20°C to 60°C
Notice:
•This manual is for reference only. The information in this manual is subject to
change without notice. The right to clarify any unknown conditions, errors or
omissionsis reserved by our company.
•No part in this device can be repaired by user. It is forbidden to attempt to open
the device housing to remodel the television receiver. Internal components at
high voltage can be hazardous to health. Equipment maintenance and
adjustment shall be carried out by specialists.
•To avoid personal injury, the product shall be securely fastened to the floor /
wall according to the installation instructions.
•Do not drip or splash water on this device. Do not place any objects containing
liquids such as vases on this device.
•Do not place sources of ignition such as lighted candles on the device.
•Do not expose this device to extreme heat, such as direct sunlight, flames, etc.
9

Contenido
1.Precauciones de Seguridad 1
2.Accesorios 2
3.Instrucciones para Teclas e Interfaces 2
4.Instrucciones para Teclas de Función en el Control Remoto (Algunas máquinas
son diferentes, solo como referencia ) 3
5.Conexión con Dispositivos Externos 4
6.Descripción del Menú deFuncionamiento 5
(6.1) Seleccionar la Fuente de Entrada de la Señal 5
(6.2) Configuración del Menú del Sistema 5
(6.2.1) IMAGEN 5
(6.2.2) MENÚ DEL SONIDO 5
(6.2.3) MENÚ DETIEMPO 6
(6.2.4) MENÚ DE OPCIONES 6
(6.2.5) MENÚ DE BLOQUEO 6
(6.2.6) CANAL 6
7.Instrucciones de Manejo de la Función del USB 7
(7.1) REPRODUCCIÓN DE IMAGEN 7
(7.2) REPRODUCCIÓN DE MÚSICA 7
(7.3) REPRODUCCIÓN DEPELÍCULA 8
8.Solución de Problemas Frecuentes 8
9.Especificaciones Técnicas 9
… …… …… … … … …… … … … … … …… … … …
… … … …… … … … …… … … … … … …… … … … … … …… … … … …
… … … …… … … … …… … … … … … …
… …… …… … … … …… … … … … … ……
… …… …… … … … …… … … … … … ……
… …… …… … … … …… … … … …
… …… …… … … … ……
… …… …… … … … …… … … … …
… …… …… … … … …… … … … … … …… … … … … … …… …
… …… …… … … … …… … … … … … …… … … …
… …… …… … … … …… … … … … … …… … … … …
… …… …… … … … …… … … … … … …… … …
… …… …… … … … …… … … … … … …… … … …
… …… …… … … … …… … … … … … …… … … … … … …… … …
… …… …… … … … …… … …
… …… …… … … … …… … … … … … …
… …… …… … … … …… … … … … … …
… …… …… … … … …… … … … … … …
… …… …… … … … …… … … … … … ……
… …… …… … … … …… … … … … … …… … … … …

1.Precauciones de Seguridad
1.1Almacenamiento
-Este producto se mantendrá alejado de temperaturas demasiado altas o bajas,
se debe almacenar a -20 ° С-60 ° С, y su temperatura de trabajo será de -5 ° С -
40 ° С.
-No utilice este producto en ambientes húmedos, como en la bañera, el lavabo,
la cocina, el fregadero o sótano, la piscina, etc.
-No coloque el televisor en un ambiente con mucha humedad, polvo o lleno de
niebla.
-No deje caer ni arrojen este producto.
-Evite fuertes vibraciones de la máquina para prevenir la fuerte colisión con
otros objetos.
-No apriete ni raye el producto con objetos agudos.
-El hueco trasero del producto y la abertura en el armazón sirven para la
ventilación, y a la vez también para garantizar la seguridad de componentes y
evitar el sobrecalentamiento de los mismos.No coloque el televisor y el
adaptador de corriente en la cama, en el sofá, la alfombra u otra superficie
similar para evitar bloquear la abertura del radiador.No coloque el televisor y el
adaptador de corriente cerca o sobre el calentador o fuentes de calor a menos
que esté equipado con un dispositivo de ventilación completa;El televisor y el
adaptador de corriente tienen prohibido colocarse en un dispositivo de
instalación tipo inserción.
-Cuando esté en uso, asegúrese de que el televisor esté al menos a 3 pulgadas
(76 mm) de distancia de las paredes u otros objetos.
-Utilice el tipo de potencia especificado en la etiqueta de TV.Si tiene preguntas
sobre el tipo de fuente de alimentación que se utilizará, consulte a su
distribuidor o departamento local de suministro de energía.
-Asegúrese de que el enchufe y el cablede alimentación que usted está
utilizando puedan soportar la suma de la corriente nominal de todos los
productos alimentados.
-No coloque el televisor en un lugar donde los usuarios puedan tocarlo fácilmente.
- Todas las notas e instrucciones en la guía deben ser observadas.
-No sobrecargue el enchufe de alimentación ni extienda el cable de
alimentación, de lo contrario, podría provocar un incendio o una descarga
eléctrica.
-No arregle el televisor sin autorización, ya que el gabinete está sujeto a alto
voltaje u otros peligros. Se requerirá el personal de servicio cualificado para
reparar el televisor.
-Desconecte el adaptador de alimentación de la toma de corriente y solicite la
reparación al personal de servicio cualificado si:
1.2Mantenimiento
-Desconecte primero todos los cables de este dispositivo antes del
limpiamiento.
-Limpie la carcasa, la pantalla y las teclas con un paño suave humedecido con
una pequeña cantidad del detergente suave.
-Al limpiar el televisor, no use paños de pulido, desinfectantes ni ningún tipo de
combustible o limpiadores químicos como el alcohol y la gasolina, etc.
1

¡Atención!
-Para garantizar su propia seguridad y la de las personas a su alrededor, no vea
TV ni encienda el receptor de TV.
-Es peligroso ver un programa de televisión o usar un receptor de TV al
conducir un carro.
Instrucción Especial
Las Manchas brillantes y oscuras pueden aparecer en la pantalla.Esto es
normal y está relacionado con pantallas de matriz activa y no es un síntoma de
falla.No intente realizar mantenimiento de tecnología usted mismo. Si algo sale
mal, apague el receptor de TV y póngase en contacto con nosotros o con su
distribuidor.El dispositivo contiene una gran cantidad de pequeños
componentes electrónicos.El desmontaje o la modificación pueden causar
daños o averías en el dispositivo.
2.Accesorios
1.Guía de Usuario 2. Adaptador de corriente CC / CA
3.Adaptador Automotriz 12V 4. ControlRemoto
5.Cable de combinación de audio y video 6. Antena
7.Soporte de montaje 8. Batería
Abra el paquete y cheque si todos los accesorios están completos.
3.Instrucciones para Teclas e Interfaces
3.1Panel lateral
1. Puerto de Entrada de Alimentación de CC de 12V
2. Ranura para Tarjeta de Memoria Micro de SD
3. Puerto de Entrada de Audio y Video
4. Puerto de Auriculares
5. Interruptor de Alimentación
6. Puerto de USB
7. Puerto de Antena Externa
3.2 Teclas de Control en el Panel de Control
1.LCD
2.Sistema del sonido
3.Tecla MODE:selector del modo.
4.Tecla /CH-: Período/Canal Anterior/
Siguiente
5.Tecla /CH+:anterior/período/canal
6. Tecla OK/MENU: Confirmar/Menú
7.Ventana de recepción remota
8.Tecla /VOL-: Botón de retroceso
rápido / bajar el volumen.
9. / VOL +: Botón de avance rápido /
subir el volumen.
10. Tecla de Return/LCD/ : Apagar la
pantalla/salir del menú.
◎
2

4.Instruccionespara Teclas de Función en el Control Remoto
(Algunas máquinas son diferentes, solo como referencia)
El control remoto tiene el mejor rendimiento dentro de 5 metros y con un ángulo
inferior a 60 °。
①. B: listkey puede mostrar todos los
del canal; poder elegir el canal favorito
②. Tecla
Encender el modo de trabajo / de espera.
③. TeclaMUTE
Activar/desactivar la salida del sonido.
④. TeclaINPUT
Tecla de selección del modo de trabajo del
sistema:presione la tecla cada vez, y el
modo de funcionamiento del sistema se cicla
en el siguiente
orden:DTV/ATV/AV/USB/CARD.
⑤. Tecla
Tecla de avance rápido.
⑥. Tecla
Tecla de retroceso rápido.
⑦. Tecla
Anterior
⑧. Tecla
Siguiente
⑨. TeclaCH+ /CH-
CH+ :Elegir arriba un canal
CH- :Elegir abajo un canal
Cambiar canal.
⑩.Tecla
TeclaReproducir/Pausar
⑪.TeclaSTOP
Dejar de ver/grabar programas de TVdel Menú
⑫.TeclaOK
Confirmar la función seleccionada en el menú "Configuración".
⑬ / Tecla de Dirección
:Tecla izquierza, :Tecla derecha
14.TeclaMENU
Encender/apagar el menú.
15.TeclaRETURN
En el modo TV, presione esta tecla para regresar al canal reciente que ha visto.
16.EPGkeyingresar al menú del programa interactivo
3
FAV
1
5
9
2
6
0
3
7
4
8
INFO
MENU
INPUT
RETURN
PIC
VOL- VOL+
CH+
CH-
AUDIO
LIST
ENTER
MTS
SLEEP
ZOOM
DASH
EPG
CC
programas

17.TeclaVOL+/-
Tecla de subir/bajar el volumen.
18.Tecla Digital0~9
La tecla digital 0-9 se usa para ingresar el número de canal y editar todos los
parámetros.
19.TeclaDASH
Postfix de frecuencia del programa
20.Tecla CC
Encender/apagarsubtítulos.
21.TeclaINFO
Revisar la información sobre el canal actual.
22.TeclaFAV
Encender/ajustarel canal favorito.
23.TeclaAUDIO
Cambiar al modo de audio o la pista de sonido disponible.
24.B: mtskey
Función de NICAM.
25-28
Teclas de operación en el MODO de TEXTO de TV; Teclas de Control en el
Modo Editorial
Tecla RED
Operar según la información en la pantalla.
B:PICKey
Image pattern
B:SLEEPKey
Sleep function settting
B:ZOOWKey
Narrowing or amplifying images
5.Conexión con Dispositivos Externos
-Señal de entrada Audio-Video
Acceso del Cable Audio-Video: Conecte el enchufe de audio-video en el puerto
de entrada de audio-video y presione la tecla INPUT.En este momento, la
entrada de la señal de audio y video está completa y el símbolo AV se muestra
en la pantalla.
-ConexióndeAuriculares
-Para usar auriculares para escuchar la música, baje primero el volumen y
luego inserte los auriculares, ajústelos al volumen correcto.Al usarlos, el
volumen no debe ser demasiado grande para no dañar la audición.
-Conexión del Cable de Señal en elModo HDMI
Favor de ajustar el televisor al modo HDMI, y luego conectar el cable HDMI
-Conexión a la fuente de alimentación de CA
Conecte el enchufe de CA del adaptador de CA en la fuente de alimentación
(100-240 V, 50-60 Hz CA) y el enchufe de CC del adaptador de CA en el puerto
de entrada de 12 V CC.
(Cargador para automóvilde 12 voltios puede ser utilizado para este dispositivo).
4

-ReproducirUSB/SD CARD
Inserte una tarjeta USB / SD en el dispositivo y seleccione el formato USB / SD
como el formato de la tarjeta de imagen / audio / video incluida en la tarjeta (la
capacidad de memoria será 32G o menos).
6.Descripción del Menú de Funcionamiento
6.1Seleccionar la Fuente de Entrada de la Señal
A. Presione la tecla“INPUT”, y los detalles de la fuente de entrada de la señal
pueden aparecer.
B. Presionela tecla “ / “, seleccione la fuente de señal, y presionela tecla
ENTERpara confirmar la opción.
C. El televisor cambiaría al modo que usted elijas.
6.2Configuración del Menú del Sistema
A. Presione la tecla de menú para ingresar al menú de configuración del
sistema para el ajuste del sistema.
B. Presione la tecla de dirección para elegir las secciones.
C.Presionela tecla ►/ ENTERpara ingresar al submenú y elegir la opción en el
menu.
D. Elija la opción y presione la tecla ENTER para confirmar y terminar la
configuración del sistema.
E.Presione la teclaMENUpara regresar al menú principal.
F.Presionela tecla STOP/ EXITpara salir del modo de la configuración del
sistema.
Atención: Si la opción es gris, significa que el elemento no se puede configurar
en este modo. Favor de seleccionarlasopcionesdisponibles.
6.2.1 IMAGEN
-Presione la tecla MENÚ, y aparecerá el menú
principal, luego presione la tecla para elegir el Menú
de Imagen.
-Menú de Imagen: Personalizado / Dinámico /
Estándar / Suave.
-Temperatura del Color:Personal / Frío / Normal /
Cálido.
-Relación de aspecto:Auto/I6:9/4:3
-Reducción de ruido:Bajo / Medio / Alto / Apagado.
- Pantalla: Ajusta la posición de la imagen de PC
6.2.2MENÚ DEL SONIDO
- Presione la tecla MENÚ, y aparecerá el menú
principal, luego presione la tecla para elegir el Menú
de Sonido.
-Modo de Sonido: Estándar / Música / Película /
Deportes / Personal.
-Equilibrio:ajuste el volumen del altavoz izquierdo y
derecho
-Volumen Automático: en este modo, el ajuste rápido
►
►
5

cambiaría a un ajuste suave
- Sonido Envolvente: Sonido Envolvente /Apagado.
6.2.3MENÚ DE TIEMPO
- Presione la tecla MENÚ, y aparecerá el menú
principal, luego presione la tecla para elegir el Menú
de Tiempo.
- Reloj:Ajusta la parte del tiempo:día / mes / año /
hora / minuto.
- Tiempo de Apagado: Ajusta 60s antes de apagado.
- Tiempo de Encendido: Ajusta para apagar después
de unos minutos (ingresa al modo de dormir)
- Temporizador de
desconexión:240/180/120/90/60/30/20/10
- Elegir la zona horaria.
6.2.4MENÚ DE OPCIONES
- Presione la tecla MENÚ, y aparecerá el menú
principal, luego presione la tecla para elegir el Menú
de Opciones.
-Idioma OSD:seleccionar el Idioma OSD en la
pantalla.
-Idioma del Audio: ajustar el idioma del audio.
-Idioma del subtítulos:configurar el idioma de los
subtítulos
-Restaurar por Defecto:restaurar todas las
configuraciones predeterminadas
6.2.5MENÚ DE BLOQUEO
- Presione la tecla MENÚ, y aparecerá el menú principal,yluego presione la
tecla / para elegir el Menú de Bloqueo.
- Antes de ingresar a las configuraciones, ingrese la contraseña
predeterminada (0000) para ingresar el valor establecido.
- Sistema de Bloqueo: Ingrese la contraseña para
bloquear la configuración crítica del sistema, como
las búsquedas de programas. Usted debe ingresar la
contraseña y luego establecer la configuración del
sistema antes de restablecer los valores
predeterminados
-Cancelar LOCK: Desbloquear.
- Establecer la Contraseña.
- Bloquear el Canal: Indique el canal que desea
bloquear.
- Guía Parental: Establezca el nivel de edad del
programa de televisión (Edad 4 a 18).
6.2.6CANAL
Buscar programas de TV:
1) Seleccionar modo DTV / ATV.
6

2) Presione la tecla MENÚ, seleccione Búsqueda
automática / Modo de Búsqueda Manual ATV para
encontrar el programa de TV.
3) Seleccione Búsqueda Automática y el Tipo de
Búsqueda: DTV + ATV / DTV / ATV. Luego seleccione
su país, presione Enter para iniciar la búsqueda
automática.
4) Presione la tecla CH + / CH- después de terminar
elEscaneo Automático para seleccionar el programa
deseado.
- Edición del canal: Establece DTV / ATV y la información del canal.
-Información de señal: Revisa la información sobre la señal de televisión.
7. Instrucciones de Manejo de la Función del USB
ModoUSB(Multimedia).
-Presione la tecla "INPUT o USB" para mostrar la
lista de fuentes de entrada, y luego presione la tecla
para seleccionar la fuente, presione la tecla ENTER
para confirmar y mostrar el modo multimedia.
El color del icono indica si hay un CONTROLADOR
USB DE TV. Amarillo: Sí; Gris: No.
- Presione la tecla ◄►para seleccionar el tipo de
medio (Foto / Música / Película / Texto) que desea
reproducir.Presione ENTER para confirmar y
presione la tecla para moverse al directorio y seleccionar lo que desea
reproducir.
- Seleccione C y presione la tecla "ENTER" para ingresar al submenú.
7.1 REPRODUCCIÓN DE IMAGEN
- Inserte el controlador USB en la ranura USB.
- Presionela tecla “◄ / ►”, seleccione la imagen y
presione la tecla "ENTER" para ingresar al
submenú.
- Seleccione C y presione la tecla "ENTER" para
ingresar al submenú.
- Seleccione una imagen, presione la tecla para
mostrar la imagen, presione la tecla para mostrar la
última imagen reproducida y presione la tecla para mostrar la siguiente imagen
que se reproducirá.
-Presione la tecla “STOP / EXIT”para salir.
7.2 REPRODUCCIÓN DE MÚSICA
-Inserte el controlador USB en la ranura USB.
- Presione la tecla “◄ / ►”, seleccione MUSIC y
presione la tecla “ENTER” para ingresar al submenú.
- Seleccione C y presione la tecla "ENTER" para
ingresar al submenú.
-Seleccione música, presione la tecla para
mostrarla, presione la tecla para mostrar la última
7

canción reproducida, y presione la tecla para mostrar la siguiente canción que
se reproducirá.
-Presione la tecla “STOP / EXIT” para salir.
7.3REPRODUCCIÓN DE PELÍCULA
-Inserte el controlador USB en la ranura USB.
- Presione la tecla “◄ / ►”, seleccionePelículay
presione la tecla “ENTER” para ingresar al submenú.
- Seleccione C y presione la tecla "ENTER" para
ingresar al submenú.
- Seleccione la película, presione la tecla para
mostrarla, presione la tecla para mostrar la última
sección reproducida, y presione la tecla para
mostrar la siguiente sección que se reproducirá.
-Presione la tecla “STOP / EXIT” para salir.
8.Solución de Problemas Frecuentes
El siguiente fenómeno no significa que la pantalla tenga problemas. Revise los
siguientes artículos antes de solicitar ayuda del departamento de
mantenimiento.
fenómeno
Ninguna imagen o ningún sonido
Ninguna imagen en la televisión
Ningún sonido
Imagen borrosa o inestable
Imagen fantasma
Copo de nieve
Ningún color
Incapaz de reproducir el
memorizador USB
Ningún sonido al conectado
a otros dispositivos
Controlremotono sirve
Solución de problemas
1.Se está utilizando una fuente de alimentación no autorizada.
2. El interruptor, el monitor o el control remoto están apagados.
1.Compruebe si se ha elegido el canal correcto.
2.Favor de cambiar al modo TV si aún en el modo multimedia.
1.El sonido está apagado o el sistema de sonido no está
configurado correctamente.
1. Compruebe si la antena está conectada correctamente;
2. La señalización terrestre está demasiado débil.
1. Los edificios cercanos o los lugares superiores reflejan señales.
1.Radiación electromagnética del coche o tren;
2.Líneas de alta tensión ola radiación de iluminación de neón.
1.Compruebe si la configuración de color es correcta.
2.Compruebe si la configuración del sistema de color es correcta
3.Señal débil
4.Compruebe si el modode supresión de color está encendido
o apagado.
1.Asegúrese de que el USB se haya abierto correctamente
2.Compruebe el formato del CONTROLADOR USB
1.Compruebe si la conexión con otros dispositivos es correcta
2.Compruebe el estado de entrada de los dispositivos correspondientes
1.Compruebe si hay batería insertada;
2.Compruebe el estado de la batería;
3. Apunte el control remoto a la ventana de recepción
8

9.Especificaciones Técnicas
•Pleno apoyo dedicada la television analogica / sistema de televisión digital en
los Estados Unidos y mexico-atsc-t.
•Analog TV Band Range: 55.25-861.25 MHz (para todos los canales de TV).
•Frecuencia de entrada: 177.14mhz-213.14mhz UHF, UHF 474.14mhz-
803.14mhz.Modulación: QPSK / MAQ - 16 / 64 - QAM / 256 QAM.
Modulación: QPSK / 16-QAM / 64-QAM / 256 QAM.
•Estándar de Decodificación: El estándar de decodificación para HL es
МРЕG1,2МР, y el para L5HD esМРЕG-4 SP & ASP, Divx13.11; 4.х; 6.х.
•Formato de Imagen: JPEG, BMP, PMG.
•Formato de Audio: МРЗ, WMA.
•Formato de Video: MKV, AVI, DIVX, XVID, MOV, VOB, FLV, 3GP, DAT, MPEG,
MPG, MP4, TS, TRP.
Especificaciones Básicas
• Pantalla: TFT LCD de color
• Tamaño de la Pantalla: 7/9 /10.1 Pulgadas
• Relación de Aspecto: 16: 9.
• Resolución de 7 pulgadas: 800 (Horizontal) X S (RGB) X 480 (Vertical)
• Resolución de 7 pulgadas: 1024 (Horizontal) X S (RGB) X 600 (Vertical)
• Resolución de 9 pulgadas: 1024 (Horizontal) X S (RGB) X 600 (Vertical)
• Resolución de 10.1 pulgadas: 1024 (Horizontal) X S (RGB) X 600 (Vertical)
• Altavoz: 2 x 2 vatios
• Potencia: 12 V CC
• Toma de corriente: Toma de Entrada para la antenna externa; Puerto de
conexión de auriculares estéreos; Puerto de entrada de audio/video (AV);
Puerto USB
• Alimentación de CA - Adaptador de CA
• Consumo de Energía:Aproximadamente30W
• Temperatura de Trabajo:de -5°Ca40°C
• Temperatura de Almacenamiento:de -20°Ca60°C
Aviso:
•Este manual solo sirve para la referencia.La información en este manual está
sujeta a cambios sin previo aviso. Nuestra empresa reserva el derecho de
aclarar cualquier condición desconocida, error u omisión.
•Ninguna parte de este dispositivo puede ser reparada por el usuario. Está
prohibido intentar abrir la carcasa del dispositivo para remodelar el receptor de
televisión. Los componentes internos a alto voltaje pueden ser peligrosos para la salud.
El mantenimiento y ajuste del equipo debe ser llevado a cabo por especialistas.
•Con el fin de evitar lesiones personales, el producto debe estar bien sujeto al
piso / pared de acuerdo con las instrucciones de instalación.
•No gotee ni salpique agua en este dispositivo. No coloque ningún objeto que
contenga líquidos como jarrones en este dispositivo.
•No coloque fuentes de ignición como velas encendidas en el dispositivo.
•No exponga este dispositivo al calor extremo, como la luz solar directa, llamas,
etc.
9


-
 1
1
-
 2
2
-
 3
3
-
 4
4
-
 5
5
-
 6
6
-
 7
7
-
 8
8
-
 9
9
-
 10
10
-
 11
11
-
 12
12
-
 13
13
-
 14
14
-
 15
15
-
 16
16
-
 17
17
-
 18
18
-
 19
19
-
 20
20
-
 21
21
-
 22
22
-
 23
23
-
 24
24


QFX TV-1010 Manual de usuario
- Categoría
- Televisores LCD
- Tipo
- Manual de usuario
en otros idiomas
- English: QFX TV-1010 User manual
Otros documentos
-
 Continental Electric CELED48157 Manual de usuario
-
 Continental Electric CELED48157 Manual de usuario
-
Premier TV-4553LED Manual de usuario
-
Haier LE40B650CF Manual de usuario
-
Haier LEC24B3320 Manual de usuario
-
-
Haier LE29C810C Manual de usuario
-
Haier 50UG6550G Manual de usuario
-
Premier TV-5438LSM Manual de usuario

