
4
ITEM/ARTÍCULO#0482287/5017006
MODEL/MODELO#JEM1691A
JEM1691A ORB
Questions?/¿Preguntas?
Call customer service at 888-251-1003, 8 a.m. - 8 p.m.,
EST, Monday - Sunday. You could also contact
us at [email protected].
Llame a de Servicio al Cliente al 888-251-1003
De lunes a domingo, de 8 a. m. a 8 p. m., Hora estándar
del este. También puede ponerse en contacto con
nosotros en [email protected].
Note: Hardware shown actual size./ Nota: los aditamentos se muestran en tamaño real.
PACKAGE CONTENTS/CONTENIDO DEL PAQUETE
HARDWARE CONTENTS/ADITAMENTOS
A
AA BB
B
x 2 x 3
(Not to scale/no se muestra
en tamaño real))
x 2
Mounting Screw (preassembled to Fixture (C))
Tornillo de montaje (preensamblada a la lámpara (C))
x 1
AS21794 1
7
12
220°
30 ft.
6.5
ft.
1
15°
2
8
9
5.
BB
5
5
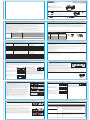
ASSEMBLY INSTRUCTIONS/INSTRUCCIONES DE ENSAMBLAJE
Install light bulb (not included).
Use 100-watt max. standard-base
incandescent bulb or CFL/LED
equivalent.
Note: The life of the bulb is
affected by the frequent on/off of
the fixture.
7. 7
Attach fixture (C) to mounting plate
(A). Secure with previously
removed mounting screws (B).
Fije la lámpara (C) a la placa de
montaje (A). Asegure con los
tornillos de montaje que retiró
previamente (B).
6.
B
C
6
Use silicone caulk (not included) to
seal between wall plate and wall as
well as the area around B.
CAUTION: Leave bottom unsealed
so moisture can drain out.
8. 8
B
Note: The wall switch must remain
in the ON position for the motion
detector to operate properly.
ASSEMBLY INSTRUCTIONS/INSTRUCCIONES DE ENSAMBLAJE
4
A
1.
A
C
B
2
Unscrew the mounting screws (B)
from fixture (C). Save for later use.
Separate the mounting plate (A)
from wall plate of fixture (C).
Desatornille los tornillos de montaje (B)
de la lámpara (C). Apártelos para su uso
posterior.
Separe la placa de montaje (A) de la
placa de pared de la lámpara (C).
2.
A
AA
3
Attach the mounting plate (A) to
outlet box (not included) using
outlet box screws (AA)
Fije la placa de montaje (A) a la
caja de salida (no se incluye) con los
tornillos de la caja de salida (AA).
3.
4
Strip 3/4 in. of insulation from
fixture wire ends. Twist stripped
ends together with pliers (not
included), black to black (power),
white to white (neutral). Snip ends.
Wrap the ground wire from the
outlet box around the green screw
preassembled on the mounting
plate (A), and then connect the
ground wire from the outlet box to
the ground wire from the fixture.
Helpful hint: If the outlet box doesn’t have a ground wire,
you can attach the ground wire from the fixture directly to
the green screw on the mounting plate (A).
4.
6
DUSK
TO
DAWN TIMER
10 4 TEST
11
Turn off the power and remove
existing fixture.
Desconecte la alimentación y retire
la lámpara existente, si hubiera.
Pele 1,91 cm del aislamiento en los extremos de los
cables de la lámpara. Enrosque los extremos pelados con
pinzas (no se incluyen) y junte negro con negro (energía) y
blanco con blanco (neutros). Recorte los extremos.
Envuelva el conductor de puesta a tierra de la caja de
salida (no se incluye) alrededor del tornillo verde
preensamblado de la placa de montaje (A) y conecte el
conductor de puesta a tierra de la caja de salida con el
conductor de puesta a tierra de la lámpara.
Consejo útil: si la caja de salida no cuenta con un cable
de puesta a tierra, puede conectar el cable de puesta a
tierra de la lámpara directamente al tornillo verde de la
placa de montaje (A).
Attach wire connectors (BB) to
connections with electrical tape
(not included).
Use cinta aislante (no se incluye)
para fijar los conectores de los
cables (BB) a las conexiones.
Instale la bombilla (no se incluye). Use una bombilla
incandescente de base estándar de 100 vatios como
máximo o una bombilla CFL/LED equivalente.
Nota: la vida útil de la bombilla se ve afectada si enciende
y apaga la lámpara de manera frecuente.
Use masilla de calafateo de silicona (no se incluye) para
sellar el espacio entre la placa para pared y la pared, así
como también el área que rodea los B.
PRECAUCIÓN: deje la parte inferior sin sellar para que
la humedad pueda drenarse.
Nota: el interruptor de pared debe permanecer en la
posición ON (Encendido) para que el detector de
movimiento funcione adecuadamente.
Tornillo para la caja de salida
Wire Connector
Conector de cables
Outlet Box Screw
Mounting Plate
(preassembled to Fixture (C))
Placa de montaje
(preensamblada a la lámpara (C))
C
x 1
Fixture
Lámpara
OUTDOOR WALL LANTERN
FAROL DE PARED
PARA EXTERIORES
2
SAFETY INSTRUCTIONS/INSTRUCCIONES DE SEGURIDAD
WARNING
CAUTION/
Please read and understand this entire manual before attempting to assemble, operate or install the product.
Assurez-vous de lire et de comprendre l’intégralité du présent manuel avant de tenter d’assembler, d’utiliser ou d’installer l’article.
Lea y comprenda por completo este manual antes de intentar ensamblar, usar o instalar el producto.
• All electrical connections must by in accordance with local and National Electrical Code standards. If you are unfamiliar with
proper electrical wiring connections, obtain the services of a qualified electrician.
• This light fixture is designed to fit standard outlet box as defined by the National Electrical Code. Please contact a qualified
electrician if you have any questions regarding the installation.
• Toutes les connexions électriques doivent être conformes aux normes du code national de l’électricité et des codes locaux.
Si la façon de connecter correctement le câblage ne vous est pas familière, faites appel aux services d’un électricien qualifié.
• Ce luminaire est conçu pour être connecté à une boîte de sortie standard conformément au Code national de l’électricité.
Veuillez communiquer avec un électricien qualifié si vous avez des questions au sujet de l’installation.
• Se deben realizar todas las conexiones eléctricas según las normas locales y el Código eléctrico nacional.
Si no está familiarizado con las conexiones adecuadas del cableado eléctrico, contrate a un electricista calificado y certificado.
• Esta lámpara está diseñada para adaptarse a la caja de salida estándar según lo define el Código eléctrico nacional.
Si tiene preguntas relacionadas con la instalación, póngase en contacto con un electricista calificado.
• Turn off the main power at circuit breaker before installing fixture.
• There is no serviceable part inside the motion sensor.
DO NOT try to repair or disassemble the unit. Doing so could damage
the unit and cause possible electrical shock and void the warranty. Consult a qualified electrician is needed.
KEEP THESE INSTRUCTIONS FOR FURTHER REFERENCE. / GUARDE ESTAS INSTRUCCIONES PARA REFERENCIA
FUTURA.
• Coupez la source d’alimentation principale au panneau central de disjoncteurs avant d’installer le luminaire.
• Le détecteur de mouvement ne contient aucune pièce réparable par l’utilisateur. Ne tentez
PAS de le réparer ni de le
démonter. Vous risqueriez de l’endommager et de provoquer une décharge électrique, ainsi que d’annuler la garantie.
Au besoin, consultez un électricien qualifié.
• Desconecte la alimentación principal en el interruptor de circuito antes de instalar la lámpara.
• No hay piezas en el interior del sensor de movimiento que se puedan reparar.
NO intente reparar ni desensamblar la unidad.
Esto podría dañar la unidad y provocar una posible descarga eléctrica y anular la garantía. Si es necesario, consulte con un
electricista calificado.
/ADVERTENCIA
/PRECAUCIÓN
• For the best performance, mount the fixture about 6.5 feet above the ground.
• The lamp fixture is designed to be mounted so the motion detector controls face toward the ground. If the lamp fixture is
mounted in any other position, it may be possible for water to enter the unit and cause damage to the unit and cause possible
electric shock.
• Para obtener el mejor rendimiento, instale la lámpara a aproximadamente 1,98 m sobre el piso.
• El ensamble de la lámpara está diseñado para colocarse de forma de que los controles del detector de movimiento miren
hacia el suelo. Si el ensamble de la lámpara se coloca en cualquier otra posición, puede ser que entre agua en la unidad,
provocándole daños a esta y una posible descarga eléctrica.
Note: Before mounting the fixture, refer to Selecting a Location on page 8.
Nota: antes de instalar la lámpara, consulte Selección de una ubicación, en la página 8.
• When selecting a location, be aware of the motion sensor’s maximum range of
30 ft. and 220° detection angle (Fig.1). In addition, be aware of its 15º detection
down-angle (Fig.2). Mounting the fixture too high or in front of a sloped surface,
such as an uphill walkway or driveway, may affect the motion sensor’s
effectiveness.
• Select locations away from heat sources, such as heating vents, air
conditioners, and heated swimming pools.
• When selecting a location, be aware of the motion sensor is more sensitive to
movement across its coverage area and less sensitive to movement toward or
away from the motion sensor (Fig.3).
• Select locations away from nighttime light sources, such as street lamps or
other light fixtures. They may shine light onto the fixture’s photocell sensor
(located inside motion detecting lens, Fig.4). This light might cause the circuit to
“think” that it is daytime and disable the light to turn on at the presence of
motion detected.
• Be aware that shade from a porch or an eave may not allow enough daylight
to shine onto the photocell sensor and may cause the circuit to “think” that it is
nighttime, and subsequently cause the light to come on during the daytime.
• Be aware that motorized equipment, such as power tools, on the same
electrical circuit may cause oscillations on the electrical line that might cause
the fixture to malfunction.
• Al seleccionar una ubicación, tenga en cuenta el alcance máximo del sensor
de movimiento de 9,14 m y el ángulo de detección de 220° (fig. 1). Además,
tenga en cuenta el ángulo inferior de detección de 15° (fig. 2). Colocar la
lámpara demasiado alta o en frente de una superficie inclinada, como un
sendero o entrada de garaje cuesta arriba, puede afectar la eficacia del
sensor de movimiento.
• Seleccione ubicaciones que estén lejos de fuentes de calor, como los
conductos de calefacción, los acondicionadores de aire y las piscinas
climatizadas.
• Al seleccionar una ubicación, tenga en cuenta que el sensor de movimiento
tiene mayor sensibilidad al movimiento a lo largo del área de cobertura que al
movimiento dirigido directamente hacia o desde el sensor de movimiento
(fig. 3).
• Seleccione ubicaciones lejos de fuentes de iluminación nocturnas, como
luces de la calle u otras lámparas. Estas podrían iluminar el sensor de
fotocélula de la lámpara (que se encuentra en el interior del lente de
detección de movimiento) (fig. 4). Esta luz puede causar que el circuito "crea"
que es de día y no permita que la luz se encienda cuando detecte
movimiento.
• Tenga en cuenta que la sombra de un porche o alero puede evitar que la luz
de día ilumine bien la fotocélula, lo que puede causar que el circuito "crea"
que es de noche, haciendo que la luz se encienda durante el día.
• Tenga en cuenta que los equipos motorizados (como herramientas
eléctricas) en el mismo circuito eléctrico pueden causar oscilaciones en la
línea eléctrica y pueden hacer que la lámpara falle.
Nota adicional
• La temperatura mínima de inicio de la lámpara es de -0 °F (-17.8 °C).
Selecting A Location / Selección de una ubicación
OPERATING INSTRUCTIONS / INSTRUCCIONES DE FUNCIONAMIENTO
Getting Started / Inicio
After installing the fixture, slide the “TIMER” switch (located on the bottom right of
the backplate on fixture (C)) to “TEST”. Restore power at the circuit breaker and
turn on your wall switch. The light will turn on and remain on for approximately 20
seconds. Then the light will flash 3 times and turn off.
Note: In TEST mode, the motion sensor will turn on the light when it senses
movement. Four to five seconds after movement has stopped, the light will turn off.
Después de instalar la lámpara, deslice el interruptor "TIMER" (Temporizador) (ubicado en la parte inferior derecha de la
placa posterior de la lámpara (C)) hacia "TEST" (Prueba). Vuelva a conectar la alimentación en el interruptor del circuito y
encienda el interruptor de pared. La luz se encenderá y permanecerá encendida durante aproximadamente 20 segundos.
Luego, la luz parpadeará tres veces y se apagará.
Nota: en el modo TEST, el sensor de movimiento encenderá la luz cuando detecte movimiento. Cuatro a cinco segundos
después de que se detuvo el movimiento, la luz se apagará.
OPERATING INSTRUCTIONS / INSTRUCCIONES DE FUNCIONAMIENTO
After setting the sensitivity, select the function by sliding the “TIMER” switch to one of the following positions:
Después de ajustar la sensibilidad, seleccione la función al deslizar el interruptor "TIMER" hacia una de las siguientes
posiciones:
/ Selección de la funciónSelecting Function
OPERATING INSTRUCTIONS / INSTRUCCIONES DE FUNCIONAMIENTO
CAUTION/PRECAUCIÓN
SPECIFICATIONS / ESPECIFICACIONES
SPECIFICATIONS
ESPECIFICACIONES
Maximum Load•
Carga máxima
100-watt max. standard-base incandescent bulb or CFL/LED
equivalent.
Bombillas incandescentes de base estándar de 100 vatios como máximo
o bombillas.
• Electrical Requirements
Requisitos eléctricos 120VAC, 60Hz / 120 VCA, 60 Hz
• Sensor Detection Angle
Ángulo de detección del sensor Up to 220º / Hasta 220º.
• Motion Sensor Range
Alcance del sensor de movimiento
Up to 30 ft (Varies with surrounding temperature).
Hasta 9,14 m (varía según la temperatura de los alrededores).
PROBLEMA CAUSA POSIBLE ACCIÓN CORRECTIVA
1. Active el interruptor o el interruptor de circuito.
2. Pruebe la bombilla en una lámpara que funcione; si es
necesario, reemplace la bombilla.
3. Apriete la bombilla en el portalámpara.
4. Revise las conexiones del cableado.
5. Reubique la lámpara lejos de una pared que mira hacia el
oeste.
6a. Elimine o apague otras fuentes de iluminación.
6b. Bloquee otra fuente de iluminación que brilla sobre el
sensor de la fotocélula.
6c. Reubique la lámpara.
7. Reubique la lámpara a una posición más baja o a una
ubicación diferente.
1. El interruptor de pared o el interruptor de circuito está
apagado.
2. La bombilla puede estar agotada.
3. La bombilla está floja.
4. Conexiones de cableado sueltas o incorrectas.
5. Demasiada luz solar brilla sobre el sensor de la fotocélula
temprano al atardecer.
6. Demasiada luz ilumina el sensor de la fotocélula debido a
otra fuente de luz, como una luz de la calle u otra luz.
7. Hay personas o vehículos en movimiento debajo de la vista
del sensor de movimiento, debido a que el sensor de
movimiento se encuentra demasiado alto.
En el modo de detección
de movimiento, la luz no
se enciende cuando hay
un movimiento.
a. Elimine la fuente de calor.
b. Reubique la lámpara.
Activación falsa causada por una fuente de calor, como un
ventilador secador o calentador o una piscina climatizada.
En el modo de detección de
movimiento, la luz permanece
encendida continuamente.
1. El tránsito de la calle o de la acera está activando el sensor
de movimiento.
2. Activación falsa causada por una fuente de calor, como un
ventilador secador o calentador o una piscina climatizada.
La luz se enciende sin
razón aparente.
1. Baje la sensibilidad.
2a. Elimine la fuente de calor.
2b. Reubique la lámpara.
La lámpara puede estar instalada en un área con sombra,
como debajo de un porche o alero, y evita que la luz del día
ilumine el sensor de la fotocélula.
La luz se enciende durante
el día o demasiado
temprano al atardecer.
Reubique la lámpara.
Demasiada luz solar brilla sobre el sensor de la fotocélula
temprano al atardecer.
En la función
anochecer-amanecer, la
luz se enciende muy tarde
durante la noche.
Reubique la lámpara lejos de una pared que mira hacia el
oeste.
Demasiada luz ilumina el sensor de la fotocélula debido a otra
fuente de luz, como la luz de la calle u otra lámpara.
En la función
anochecer-amanecer, la luz
no se enciende en la noche.
1a. Elimine o apague otras fuentes de iluminación.
1b. Bloquee otra fuente de iluminación que brilla sobre el
sensor de la fotocélula.
3
SENSOR/Sensor
Least Sensitivity
Menor sensibilidad
SENSOR/Sensor
Best Sensitivity
La mejor sensibilidad
Photocell sensor
(located inside motion detection lens)
Sensor de la fotocélula
(ubicado dentro del lente
de detección de movimiento)
Motion detecting lens
Lente de detección de movimiento
SENSITIVITY
H M L
In TEST mode, slide the “SENSITIVITY” switch (located on the bottom left of the
backplate on fixture (C)) to a desired lever: “L” for low, “M” for medium, or “H” for
high. From a distance, walk through the coverage area. When the light turns on,
note your distance from the fixture. Try different approaches toward the fixture
from various angles. Try pathways where you expect high traffic, such as walkways
and driveways.
If necessary, select a different “SENSITIVITY” switch position to increase or
decrease sensitivity/range. Repeat the steps above. Continue to adjust the
sensitivity until optimum results are attained.
En el modo TEST, deslice el interruptor "SENSITIVITY" (Sensibilidad) (que se
encuentra en la parte inferior izquierda de la placa posterior de la lámpara (C)) hacia
el nivel deseado: "L" para bajo, "M" para medio o "H" para alto. Desde una distancia,
camine por el área cubierta. Cuando la luz se enciende, observe su distancia desde
la lámpara. Pruebe acercarse desde lugares diferentes a la lámpara y desde varios
ángulos. Pruebe en senderos donde espera que haya mucho tráfico, como caminos
y entradas de garaje.
Si es necesario, seleccione una posición del interruptor "SENSITIVITY" diferente
para aumentar o disminuir la sensibilidad/alcance. Repita los pasos anteriormente
descritos. Continúe ajustando la sensibilidad hasta que se obtengan resultados
óptimos.
TROUBLESHOOTING/SOLUCIÓN DE PROBLEMAS
PROBLEM POSSIBLE CAUSE CORRECTIVE ACTION
In motion sensing mode, the
light stays on on continuously.
False triggering caused by a heat source, such as a heater
or dryer vent, or heated swimming pool.
a. Eliminate heat source.
b. Relocate fixture.
Relocate fixture.
The light comes on for
no apparent reason.
1. Street or sidewalk traffic is triggering the motion sensor.
2. False triggering caused by a heat source, such as a heater
or dryer vent, or heated swimming pool.
1. Lower the sensitivity
2a. Eliminate heat source.
2b. Relocate fixture.
The light comes on during
the daytime or too early
in the evening.
The fixture may be installed in a shaded area, such as under
a porch or eave, preventing daylight from shining onto the
photocell sensor.
Relocate fixture away from a western facing wall.In the Dusk-to-Dawn function,
the light comes on too late
in the evening.
Too much sunlight is shining onto the photocell sensor
in the early evening.
1a. Eliminate or turn off other light source.
1b. Block other light source from shining onto photocell sensor.
1c. Cover the motion detecting lens with black electrical tape, to
verify that the light will turn on when there is enough darkness.
1d. Relocate fixture..
In the Dusk-to-Dawn
function, the light does
not come on at night.
Too much light is shining onto the photocell sensor due to
another light source, such as a street lamp or other light fixture.
In motion sensing mode,
the light does not turn on
when there is motion.
1. Wall switch or circuit breaker is off.
2. Light bulb may be dead.
3. Light bulb is loose.
4. Incorrect or loose wire connections.
5. Too much sunlight is shining onto photocell sensor in the
early evening.
6. Too much light is shining onto photocell sensor due to
another light source, such as a street lamp or other light fixture.
7. Moving persons or vehicles are below the view of the
motion sensor because motion sensor is mounted too high.
1. Turn on switch or circuit breaker.
2. Test the light bulb in a known working light fixture;
replace bulb as needed.
3. Tighten light bulb in socket.
4. Check wire connections.
5. Relocate fixture away from a western facing wall.
6a. Eliminate or turn off other light source.
6b. Block other light source from shining onto photocell sensor.
6c. Relocate fixture.
7. Relocate fixture to a lower position or to a different location.
Manual Override / Anulación manual
•
You may manually turn on the light from inside your home using the
wall switch that controls your light fixture. This feature may be used
during nighttime when the light is off, while the circuit is in the Motion
Sensing Mode.
•
To manually turn on the light and activate the Manual Override, quickly
flip you wall switch OFF-ON-OFF-ON within 3 second span. The light will
remain on until the override is deactivated.
•
To turn off the light and deactivate the Manual Override, flip your wall
switch OFF-ON-OFF-ON again. This will return the circuit back to the
Motion Sensing Mode.
Note: If you do not deactivate the Manual Override, the light will remain
on for 8 hours or until dawn, at which time the light will turn off
automatically. You may toggle the switch in this manner as many times
as you need, to alternate between the two modes, Manual Override
Mode (light on) and Motion Sensing Mode (light off).
• Puede encender la luz de forma manual desde el interior de su casa con el interruptor de pared que controla la lámpara. Esta
función se puede usar durante la noche cuando la luz esté apagada, cuando el circuito esté en el modo de detección de
movimiento.
• Para encender la luz de forma manual y activar la anulación manual, deslice rápidamente el interruptor de pared de apagado
a encendido dos veces en un lapso de 3 segundos. La luz permanecerá encendida hasta que la anulación se desactive.
• Para apagar la luz y desactivar la anulación manual, deslice otra vez el interruptor de pared de apagado a encendido dos
veces. Esto hará que el circuito entre otra vez en el modo de detección de movimiento.
Nota: si no desactiva la anulación manual, la luz permanecerá encendida durante 8 horas o hasta el amanecer, y en ese
momento la luz se apagará automáticamente. Puede deslizar el interruptor de esta manera la cantidad de veces que lo necesite
para alternar entre los dos modos, el modo de anulación manual (luz encendida) y el modo de detección de movimiento (luz
apagada).
2
1
3
4
Motion detecting lens
Lente de detección
de movimiento
• The motion detecting lens is coated with a specially painted finish and requires special care when cleaning; use only a soft
dry cloth to dust or wipe the lens area.
• El lente de detección de movimiento está cubierto con un acabado especialmente pintado y requiere de un cuidado especial
cuando se limpia. Para esto, use solo un paño suave y seco para desempolvar o limpiar el área del lente.
CARE AND MAINTENANCE/ CUIDADO Y MANTENIMIENTO
OPERATING INSTRUCTIONS / INSTRUCCIONES DE FUNCIONAMIENTO
"TIMER" SWITCH POSITION
FUNCIÓN DE LAS POSICIONES
DEL INTERRUPTOR "TIMER"
FUNCTION
FUNCIÓN
DESCRIPTION
DESCRIPCIÓN
4
10
Anochecer-amanecer
Dusk-to-Dawn
Anochecer
-amanecer
Dusk-to-Dawn
Sensor de
movimiento
Motion Sensor
At dusk, the motion sensor will activate (Motion Sensing Mode). Any
movement within the coverage area will cause the light to turn on.
After movement has stopped, the light will remain on for the preset
time limit (4 or 10 minutes). At the time limit, the light will turn off.
The motion
sensor will remain active throughout the night. At dawn, the motion
sensor will deactivate.
Al anochecer, el sensor de movimiento se activará (modo de
detección de movimiento). Cualquier movimiento dentro del área de
cobertura hará que la luz se encienda. Después de que se detuvo el
movimiento la luz permanecerá encendida durante el límite de
tiempo preseleccionado (4 o 10 minutos). En el límite de tiempo, la
luz se apagará. El sensor de movimiento permanecerá activo
durante la noche. Al amanecer, el sensor de movimiento se
desactivará.
• At dusk, the light will turn on. The light will remain on throughout
the night until dawn.
• At dawn, the light will turn off. The light will remain off throughout
the day until dusk.
• Al anochecer, la luz se encenderá. La luz permanecerá encendida
toda la noche hasta el amanecer.
• Al amanecer, la luz se apagará. La luz permanecerá apagada
durante el día hasta el anochecer.
10
PREPARATION/PREPARACIÓN
Before beginning assembly of product, make sure all parts are present. Compare parts with package contents list and hardware contents list If any part is
missing or damaged, do not attempt to assemble the product.
Estimated Assembly Time: 30-45 minutes
Tools Required for Assembly (not included): Flathead screwdriver, Phillips screwdriver, Pliers, Wire cutters, Electrical tape, Safety goggles, Step ladder and
Silicone caulking.
Helpful Tools (not included): Wire stripper, Level.
Avant de commencer l’assemblage de l’article, assurez-vous d’avoir toutes les pièces. Comparez les pièces dans l’emballage avec les listes des pièces
et de la quincaillerie incluse. S’il y a des pièces manquantes ou endommagées, ne tentez pas d’assembler le produit.
Tiempo estimado de ensamblaje: 30-45 minutos
Herramientas necesarias para el ensamblaje (no se incluyen): destornillador de cabeza plana, destornillador Phillips, pinzas, pinzas cortacables, cinta aislante,
gafas de seguridad, escalera de tijera y calafateo de silicona.
Herramientas útiles (no se incluyen): pinzas pelacables, nivel.
SAFETY INSTRUCTIONS/INSTRUCCIONES DE SEGURIDAD
Note: This equipment has been tested and found to comply with the limits for a Class B digital device, pursuant to Part 15 of the FCC Rules. These limits are designed to provide
reasonable protection against harmful interference in a residential installation. This equipment generates, uses and can radiate radio frequency energy and, if not installed and used in
accordance with the instructions, may cause harmful interference to radio communications. However, there is no guarantee that interference will not occur in a particular installation. If
this equipment does cause harmful interference to radio or television reception, which can be determined by turning the equipment off and on, the user is encouraged to try to correct
the interference by one or more of the following measures:
– Reorient or relocate the receiving antenna.
– Increase the separation between the equipment and receiver.
– Connect the equipment into an outlet on a circuit different from that to which the receiver is connected.
– Consult the dealer or an experienced radio/TV technician for help.
Precaución: tenga presente que cualquier cambio o modificación que no esté expresamente aprobado por la parte responsable del cumplimiento podría anular la autorización
del usuario para utilizar el equipo.ment.
Nota: este equipo ha sido probado y se ha verificado que cumple con los límites para un dispositivo digital clase B, conforme a la sección 15 de las reglas de la FCC. Estos límites se
han diseñado para proporcionar una protección razonable contra la interferencia perjudicial en una instalación residencial. Este equipo genera, utiliza y puede irradiar energía de
radiofrecuencia y, si no se instala y usa de acuerdo con las instrucciones, puede causar interferencia perjudicial a las comunicaciones de radio. Sin embargo, no se garantiza que no
se producirán interferencias en una instalación en especial. Si este equipo genera una interferencia perjudicial para la recepción de radio o televisión, que se puede determinar
apagando y encendiendo el equipo, se recomienda al usuario que intente corregir la interferencia con una o más de las siguientes medidas:
– Reoriente o reubique la antena de recepción.
– Aumente la separación entre el equipo y el receptor.
– Conecte el equipo a un tomacorriente de un circuito distinto al que usa el receptor.
– Solicite ayuda al distribuidor o a un técnico con experiencia en radio/TV.
Caution: Please note that changes or modifications not expressly approved by the party responsible for compliance could void the user's authority to operate the equipment.
This device complies with part 15 of the FCC Rules. Operation is subject to the following two conditions:
(1) This device may not cause harmful interference, and (2) this device must accept any interference received, including interference that may cause undesired operation.
Importer Name: Lowe’s Home Centers LLC
Importer Address: 1000 Lowe’s Blvd.Mooresville, NC 28117
Telephone number: 888-251-1003
Product Name: Outdoor wall light
Model No.: JEM1691A & JEM1691A ORB
Este dispositivo cumple con la Sección 15 de las reglas de la FCC,El funcionamiento está sujeto a las siguientes dos condiciones:
(1) Este dispositivo no debe causar interferencia perjudicial y (2) debe aceptar cualquier interferencia recibida, incluida la interferencia que pudiese causar un funcionamiento
no deseado.
Nombre del importador: Lowe’s Home Centers LLC
Dirección del importador: 1000 Lowe’s Blvd. Mooresville, NC 28117
Número de teléfono: 888-251-1003
Nombre del producto: Luz de pared para exteriores
Modelo No.: JEM1691A & JEM1691A ORB
HARBOR BREEZE and logo design are trademarks
or registered trademarks of LF, LLC. All rights reserved.
HARBOR BREEZE y el diseño del logotipo son marcas
comerciales o marcas registradas de LF, LLC.
Todos los derechos reservados.
REPLACEMENT PARTS/LISTA DE PIEZAS DE REPUESTO
For replacement parts, call our customer service department at 888-251-1003.
Para obtener piezas de repuesto, llame a nuestro Departamento de Servicio al Cliente al 888-251-1003.
A
B
AA
BB
0482287/5017006-A
0482287/5017006-B
0482287/5017006-AA
0482287/5017006-BB
AA
BB
B
A
PART DESCRIPTION PART #
PIEZA DESCRIPCIÓN PIEZA #
Mounting Screw
Tornillo de montaje
WARRANTY/GARANTÍA
Mounting Plate
Placa de montaje
Outlet Box Screw
Tornillo para la caja de salida
Wire Connector
Conector de cables
The manufacturer warrants this lighting fixture against defects in materials and workmanship for a period of three (3) years
from the date of purchase. If within this period the product is found to be defective in material or workmanship, the product
must be returned, with a copy of the bill of sale as proof of purchase, to the original place of purchase. The manufacturer will,
at its option, repair, replace or refund the purchase price to the original purchaser consumer. This warranty does not cover
light bulbs or the fixture becoming damaged due to misuse, accidental damage, improper handling and/or installation and
specifically excludes liability for direct, incidental or consequential damages. As some states do not allow exclusions or
limitations on an implied warranty, the above exclusions and limitations may not apply. This warranty gives you specific
rights and you may also have other rights that vary from state to state.
El fabricante garantiza que esta lámpara no presentará defectos en los materiales ni en la mano de obra por un período de
tres (3) años a partir de la fecha de compra. Si dentro de este período el producto presenta defectos en el material o la
fabricación, se debe devolver el producto, junto con una copia del recibo de venta como prueba de la adquisición, al lugar
donde se compró. El fabricante, a su elección, reparará, reemplazará o devolverá el monto de la compra al comprador
original. Esta garantía no cubre las bombillas ni daños en la lámpara debido al mal uso, al daño accidental, la manipulación o
la instalación inadecuadas y excluye específicamente toda responsabilidad por daños directos, accidentales o resultantes.
Debido a que algunos estados no permiten exclusiones o limitaciones en una garantía implícita, las exclusiones y
limitaciones anteriores pueden no aplicarse. Esta garantía le otorga derechos específicos pero podría tener también otros
derechos que varían según el estado.
Made in China
Hecho en China
3
-
 1
1

en otros idiomas
- English: Harbor Breeze JEM1691A User manual
Artículos relacionados
Otros documentos
-
Portfolio JEL1691A BN Guía de instalación
-
-
Home Decorators Collection HB7251MA-292 Guía de instalación
-
Origin21 KYW3001LX-02 Manual de usuario
-
-
Project Source FEW1691A-7 Manual de usuario
-
 Hampton Bay IZD1691LS-3 Instrucciones de operación
-
-
Heath Zenith HZ-5525-BZ Manual de usuario
-
Defiant DF-5512-WH-D Guía de instalación
