Kyosho EP TWIN STORM 800 VE El manual del propietario
- Categoría
- Juguetes a control remoto
- Tipo
- El manual del propietario
Este manual también es adecuado para

*
Technische Änderungen sind ohne vorherige Ankündigungen möglich!
*Les spécifications peuvent changer sans préavis!
The product you have purchased is powered by a rechargeable battery. The battery is
recyclable. At the end of its useful life, under various national / state and local laws, it
may be illegal to dispose of this battery into the municipal waste stream. Check with
your local solid waste officials for details in your area for recycling options or proper
disposal.
Dieses Modell wird von einem Nickel-Cadmium Akkumulator betrieben. Er ist wieder
aufladbar. Entsorgen Sie einen verbrauchten Akku fachgerecht an entsprechender
Stelle.
Ce modèle est alimenté par un accu Ni-Cad. Il est rechergeable. Notez qu’à la fin de
sa vie utile, l’accu doit être traité comme déchet apart
Este kit utiliza una batería NiCd recargable, la cual es reciclable. No la arroje a la
basura. Devuélvala a la tienda donde la adquirió cuando se estropee.
VE
Ni-MH
R
EP
Version
2
2
3 5
5 6
6 12
13 16
16 18
18 20
20 21
23 25
26
Before beginning assembly, please read these instructions thoroughly.
Bitte lesen Sie die Anweisungen vor Gebrauch genau durch.
Veuillez attentivement lire les instructions avant l’emploi.
Lea cuidadosamente este manual antes de comenzar el montaje.
No.40031VE
SAFETY PRECAUTIONS
This radio control model is not a toy!
First-time builders should seek the advice of experienced modellers before
beginning assembly and if they do not fully understand any part of the
construction.
Assemble this kit only in places out of children’s reach!
Take enough safety precautions prior to operating this model. You are responsible
for this model’s assembly and safe operation!
Always keep this instruction manual ready at hand for quick reference, even after
completing the assembly.
Taking out liability insurance is recommended.
ACHTUNG!
Dieses Modell ist kein Spielzeug!
Anfänger sollten möglichst Rat bei Modellbaukundigen einholen, um das Modell
richtig zusammenzubauen und gefahrlos bedienen zu können.
Bauen Sie dieses Modell nur außer Reichweite von Kindern zusammen!
Treffen Sie genügend Sicherheitsvorkehrungen, bevor Sie Ihr Modell bedienen!
Sie alleine tragen die Verantwortung für Ihr Modell und dessen gefahrlose
Bedienung!
Bitte bewahren Sie diese Dokumentation zur späteren Verwendung auf.
ATTENTION!
Ce modèle n’est pas un jouet!
CONSEJOS DE SEGURIDAD
Este modelo de Radio Control no es un juguete
Si vous êtes débutant dans le modèle réduit, prenez conseils auprès de modélistes
confirmés afin d’utiliser votre modèle dans des conditions optimales.
Assemblez ce kit en dehors de la portée de jeunes enfants!
Prenez des précautions lors de l’utilisation. Vous seul êtes responsable des
évolutions de votre modèle. La société KYOSHO ou son distributeur ne peuvent en
aucun cas être tenus responsables des accidents pouvant survenir lors de l’utilisation
de ce modèle!
Gardez cette notice à portée de main afin de vous y référer rapidement.
Los no inicados en este hobby deberán ser aconsejados por expertos antes de
comenzar el montaje de este modelo.
Realice el montaje en un lugar fuera del alcance de los niños.
Siempre extreme las medidas de seguridad. Usted es el único responsable del
funcionamiento de su modelo.
Mantenga este manual a mano.
40031VE-T01
1:16 Scale
Radio Controlled Twin Electric Powerd Racing Boat
LENGTH: 935mm (36.8")
*Hereby, KYOSHO CORPORATION, declares that this product is in compliance with
the essential requirements and other relevant provisions of Directive 1999/5/EC.
*Hiermit erklärt die KYOSHO Corporation, dass dieses Produkt in Übereinstimmung
mit der Richtlinie 1999/5/EC ist und ihr in allen relevanten Punkten entspricht.
*Par la présente, KYOSHO CORPORATION déclare que cet
équipement est conforme aux exigences essentielles et aux autres
dispositions de la directive 1999/5/CE qui lui sont applicables.
*
Por medio de la presente KYOSHO declara que este producto cumple con los
requisitos esenciales y cualesquiera otras disposiciones aplicables o
exigibles de la Directiva 1999/5/CE.
Instruction Manual
Bedienungsanleitung
Manuel d'instructions
Manual de Instrucciones
Checking Movement & Adjustment / Die Bewegungen und Montage ueberpruefen / VERIFICATIONS avant départ / Comprobaciones y ajustes
Contents / Inhalt / CONTENU DE VOTRE VALISETTE / Contenido
Required Additional / Erforderliches Werkzeug / OUTILS NECESSAIRES (NON INCLUS !) / Equipo Necesario
Transmitter Preparation / Der Sender / PREPARATION RADIO / Preparación Equipo R/C
Pre-Assembly Cautions / Bevor Sie beginnen / Avant de commencer / Antes de empezar
Assembly / Das Bauen / Assemblage / Montaje
Operating Precautions / Bedienungshinweise / Précautions d'emploi / Consejos de seguridad
Before Operating / Bevor Sie beginnen / Avant de commencer. / Antes de rodar
AFTER RUNNING . . . / Nach dem Betrieb / APRES UTILISATION / DESPUES DE NAVEGAR
Exploded View / Explosionszeichnung / Eclaté / Despiece
Spare parts & optional parts
*Specifications are subject to change without prior notice!
*
El fabricante se reserva el derecho de introducir modificaciones en los kits sin previo aviso!
©

< >
< >
< >
< >
/
< >
Ou
/ O
/ Or / Oder
+–
Grease
ST
.TRIM
D/R
T
H.T
RI
M
Dig
it
al
P
r
o
po
r
ti
o
n
a
l
Radi
o
Con
trol
S
ys
t
e
m
P
E
R
FE
X
K
T-
6
R
TH
E
F
I
N
ES
T
R
A
D
I
O
C
O
N
T
R
O
L
M
O
DE
L
S
< >
< >
< >
< >
< >
/
3 8
1.5mm, 2mm, 2.5mm
/
*
No.ORI14113 / ORI14115
< >
< >
< >
< >
< >
2
Transmitter (Controller)
Fernsteuerung
Radiocommande 2 voies
Emisora
Transmitter Antenna
Senderantenne
Antenne radio
Antena emisora
TOOLS INCLUDED
GELIEFERTE WERKZEUGE
OUTILS FOURNIS
HERRAMIENTAS INCLUIDAS
Contents / Inhalt / CONTENU DE VOTRE VALISETTE / Contenido
OUTILS NECESSAIRES (NON INCLUS !) / Equipo Necesario
Required Additional / Erforderliches Werkzeug
WARNING
VORSICHT
ATTENTION
AVISO
Tape
Klebeband
Adhésif transparent
Cinta adhesiva transparente
Hex Wrench (1.5mm, 2mm, 2.5mm)
Sechskantschlüssel (1.5mm, 2mm, 2.5mm)
Clé allen (1.5mm,
2mm,
2.5mm)
Llaves allen (1.5mm,
2mm,
2.5mm)
AA Alkaline Dry Batteries
8 pieces
8 St. AA Trockenbatterien
8 batteries de type R6 pour
votre radiocommande
8 Pilas alcalinas AA
Battery
Akku
Accu
Bateria
Pour la radiocommande
For Transmitter
Für den Sender
Para la emisora
*NOTE: Oxyride batteries cannot be used!
*Verwenden Sie keine Oxyride Batterien!
*NOTE : Ne pas utiliser de batteries de type
OXYRIDE.
*NOTA: No utilice baterías Oxyride.
Caution / Achtung! / Precautions ! / Precauciones
*When using Nickel Metal-Hydride batteries (AA-size), the transmitter battery compartment has partitions to stop reverse
flow of current. The plus (+) terminal on some types of batteries is not long enough so please check when purchasing.
*Achten Sie beim Kauf von Zellen darauf, dass der Plus-Kontakt an der Zelle lang genug ist, um sicheren
Kontakt im Batteriefach herzustellen. Das Batteriefach schuetzt durch diese Bauweise vor Verpolungen.
*Dans le cas de l'utilisation de batteries R6 Ni-MH, vérifier avant de les acheter,
que la borne du (+) effectue correctement le contact dans le boitier.
*Al utilizar baterías Ni-MH (AA), instale las baterías respetando la polaridad indicada en el portapilas.
Además compruebe que las baterías poseen la longitud adecuada y que el terminal + contacta
correctamente ya que algunas poseen el terminal + más corto de lo normal.
Plus terminal height more than 1.4mm.
Pluspol muss groesser als 1.4 mm sein!
La borne du + doit être sup. à 1,4mm.
El terminal + debe medir más de 1.4mm.
Hull
Rumpf
Coque
Casco
Phillips Screwdriver
Kreuzschlitzschraubendreher
Tournevis cruciforme
Destornilladores Phillips
*Cutter/X-Acto Knife
*Bastelmesser
*Cutter
*Cutter
*Grease
*Fett
*Graisse
*Grasa
Charger
Ladegerät
Chargeur
Cargador
*Stand
*Bootsständer
*Stand de maintenance
*Soporte
Do not use any damaged batteries.
Keine beschädigten Akkus verwenden!
Ne pas utiliser de batteries endommagées
No utilice nunca baterias en mal estado
Damaged
beschädigt
Endommagées
Estropeada
Cross Wrench (5.5 / 7 / 8 / 10mm)
Kreuzschlüssel(5.5 / 7 / 8 / 10mm)
Clé en croix (5.5 / 7 / 8 / 10mm)
Llave de cruz (5.5 / 7 / 8 / 10mm)
Only use with Team Orion batteries with Super (Deans) plugs (connectors).
Bitte nur Team-Orion-Akkus mit Super-Plug verwenden.
N’utiliser qu’avec les batteries Team Orion avec les prises haute intensité
Utilice solamente con Team Orion con super (Deans) enchufes (connector).
Team Orion 7.4V (2S-1P) Lipo Battery x 2 2
Team Orion 7,4 V (2s1p) LiPo x 2 2
Batterie Lipo Team Orion 7.4V (2S-1P) x 2
2
Team Orion 7.4v (2S-1P) bateria lipo x 2 2
Team Orion 7.2V Ni-MH Battery x 2 1
Team Orion 7,2 V NiMH x 2 1
Batterie Ni-MH Team Orion 7.2V x 2
1
Team Orion 7.2v Ni-HH bateria x2 1
Minimum capacity of 3300mAh required.
Mindestens 3.300 mAh Kapazität benötigt.
Capacité de 3300 mAh minimum requise
.
Capacidad minima 3300mAh requerido.
When using No.ORI14000 / 14007 / 14008 / 14009 / 14010, the Battery
Wire Set (No.ORI40030) with Super plug is also required.
Bei Verwendung von ORI14000 / 14007 / 14008 / 14009 / 14010 wird das
Akkukabel-Set ORI40030 mit Super-Plug benötigt.
En cas d’utilisation des réf. Suivantes ORI14000 / 14007 / 14008 / 14009 /
14010, le set de câbles (ORI40030) avec les prises haute intensité est requis.
Al usar No. ORI14000/14007/14008/14009/14010, el sistema de alabre
de la bateria (No. ORI40030) con el enchufe super tambien se require.
/ for Ni-MH Battery / Für NiMH-Akku
Pour batterie Ni-MH
/ Para bateria Ni-MH
POWER ZONE AC/DC CHARGER
No.72301
Avionics Advanced Clubman Lipo Charger
No.ORI30126
/ for Lipo Battery / Für LiPo-Akku
Pour batterie Lipo
/ Para bateria Lipo
1.5mm
2mm
2.5mm

ST.TRIM
D/R
TH.TRIM
Digital Proportional Radio Control System PERFEX KT-6
R
THE FINEST RADIO CONTROL MODELS
BATT.
X'TAL
ST.REV
N
R
N
R
POWER
D/R
BATT.
ST.REV
TH.REV
N
N
R
R
POWER
/
3
Transmitter Preparation / Der Sender
PREPARATION RADIO / Preparación Equipo R/C
Transmitter KT-6 / Sender KT-6
Emetteur KT-6 / Emisora KT-6
LED Indicator
LED Anzeige
Indicateur de batterie
Indicador LED
Verwenden Sie ausschließlich die beiliegende Fernsteuerung zur Steuerung des EP TWINSTORM 800 VE.
Transmitters other than the one included cannot be used with this product.
Utiliser votre EP TWINSTORM 800 VE uniquement avec la radio fournie dans la valisette.
Utilice siempre la emisora incluida con su modelo. No intente utilizar otro tipo de emisora.
Crystal
Quarzpaar
Quartz
Cristal emisora
Adjusts the throttle in small increments so the
model will not move at neutral.
Neutrallage so justieren, daß das Modell sich
nicht bewegt.
Ajuster pas à pas le trim de la commande
d’accélération pour obtenir le neutre.
Permite ajustar el recorrido del gas en
pequeños incrementos para impedir que
el modelo se mueva en el punto neutral.
Controls forward movement and
braking functions.
Gas- und Bremsfunktion
Permet le contrôle de la marche avant,
du frein et de la marche arrière.
Controla la velocidad y el freno.
When changing or replacing frequency crystal, please
purchase or replace with Futaba AM27MHz or Futaba
compatible AM27MHz crystals.
Beim Wechseln oder Austauschen des Quarzes, verwenden
Sie den Futaba AM 27 MHz oder einen Futaba der mit AM 27
MHz Quarzen
kompatibel ist.
Lors du changement ou du remplacement d'un quartz, utiliser
uniquement un quartz Futaba 27Mhz AM ou compatible.
Cuando cambie los cristales de frecuencia, por favor utilice
cristales AM27MHz marca Futaba o compatibles.
Power Switch
Ein-/Ausschalter
Interrupteur M/A
Interruptor
Throttle Trigger
Gas-/Bremshebel
Gâchette de commande de gaz
Gatillo de Gas
Battery Cover
Batteriefachdeckel
Couvercle porte piles
Tapa portapilas
Antenna
Antenne
Antenne
Antena
Servo Reversing Switch
Servo-Reverse-Schalter
Interrupteur d'inversion des servos
Interruptor de inversión de los servos
Throttle Trim
Trimmschieber für Gashebel
Trim de gaz/frein
Trim de Gas
When the power switch is ON, the lamp will light up.
Bei eingeschaltetem Sender leuchtet die LED auf.
Lorsque la radiocommande est en marche,
la diode est allumée.
Al estar la emisora conectada, se iluminará.
Throttle Reverse Switch
Servoreverse
Inverseur de servos
Interruptor Inversión
Normal
Normal
Normal
Normal
Reverse
Reverse
Inversé
Invertido
This model uses normal position for
steering, and reverse for the throttle.
Schalter Lenkservo auf Normal,
Schalter Gas-Funktion auf Reverse.
Utiliser la position NORMALE pour la
direction et REVERSE pour les gaz.
En este modelo sitúe la posición normal
en la dirección y la inversa en el gas.

TH.TRIM
ST.TRIM
D/R
ST.TRIM
D/R
TH.TRIM
Digital Proportional Radio Control System PERFEX KT-6
R
THE FINEST RADIO CONTROL MODELS
BATT.
X'TAL
ST.REV
N
R
N
R
POWER
ST.TRIM
D/R
TH.TRIM
/
/
/
4
Comment utiliser l'émetteur / Cómo utilizar la emisora
Quartz / Cristales de frecuencia
Left
links
Gauche
Izquierda
Right
rechts
Droite
Derecha
Neutral
neutral
Neutre
Neutral
Forward
vorwärts
Avant
Adelante
Reverse
Rückwärts
Arrière
Atrás
Neutral
neutral
Neutre
Neutral
Crystal for Receiver (RX)
Empfängerquarz (RX)
Quartz d'récepteur (RX)
Cristal receptor (RX)
Crystal for Transmitter (TX)
Senderquarz (TX)
Quartz d'émission (TX)
Cristal emisora (TX)
How To Use Transmitter / Bedienung des Senders /
Use left hand to control throttle trigger and right hand to control the steering wheel.
Nehmen Sie fuer den Gashebel die linke Hand und kontrollieren Sie damit die Geschwindigkeit. Fuer den Drehknopf nehmen
Sie die rechte Hand.
Utiliser la main gauche pour contrôler les gaz moteur et la main droite pour commander la direction.
Utilice la mano izquierda para controlar el gatillo de gas y la mano derecha para controlar el volante.
Frequency Crystals / Quarze
Crystals 01 - 12 can be used in the R/C system for this set (12 channels / sold separately / Japan only) so up to 12 boats can be run together at the same time.
Verwenden Sie Quarze mit den Kanälen 1 bis 12. So können bis zu 12 Boote gleichzeitig betrieben werden. Die Quarze müssen separat erworben werden.
Les quartzs en 27Mhz adaptés peuvent être utilisé pour ce système Readyset et permettent d'utiliser plusieurs bateaux en même temps.
Pueden utilizarse cristales desde el 1 hasta el 12 de manera que puedan navegar hasta 12 lanchas al mismo tiempo.
Corresponding crystals are used for the transmitter (TX) and the receiver (RX). Makes sure they are correct.
Sender und Empfaenger muessen stets den selben Quarze verwenden. Stellen Sie sicher, dass diese richtig eingesetzt werden.
Les quartzs émission (TX) et réception (RX) doivent impérativement avoir la même fréquence.
Los cristales utilizados son diferentes en la emisora TX y en el receptor RX. Asegúrese de instalarlos correctamente.
Installation of Antenna / Montage der Antenne
Installation de l'antenne / Instalación de la antena
Transmitter Antenna
Senderantenne
Antenne d'émission
Antena emisora
Screw-in to the base
Antenne einschrauben
Pas de vis de fixation
Enroscar en la base

D/R
BATT.
ST.REV
TH.REV
N
N
R
R
POWER
/
/
3 8
TP
5
Loading Battery / DasLaden der Akkus
Batteries radio / Instalación de las baterías
Changing Batteries / Das Wechseln der Batterien
Changer les batteries / Cambio de baterías
Lid
Deckel
Cache radio
Tapa
Remove the lid.
Deckel abnehmen
Retirer le cache
Retire la tapa
Close the lid. It is snapped into place.
Deckel schließen
Replacer le cache batterie comme indiqué.
Cierre la tapa y colóquela en su lugar
Load 8 AA Alkaline Batteries as shown in the
following illustration.
8 Batterien oder geladene Akkus in den Sender einsetzen
Placer selon le schéma çi-dessous les 8 piles ou
batterie de type R6
Instale 8 pilas alcalinas AA tal y como muestra el dibujo.
LED Indicator
LED Anzeige
Indicateur de batterie
Indicador LED
Do NOT operate when transmitter and/or receiver batteries are low or else the control of the model will be lost.
Beim Aufleuchten der roten LED am Sender muß der Modellbetrieb sofort eingestellt werden!
Ne jamais attendre que les piles de la radio soient déchargées pour les changer.
Nunca deje que las baterías se descarguen completamente ya que podría perder el control de su modelo.
When the LED indicator flashes, replace batteries as soon as possible.
Wenn die LED Anzeige aufleuchtet, Akkus so schnell es geht austauschen.
Lorsque diode se met a clignotter, remplacer immediatement les batteries.
Cuando el LED parpadee, cambie las baterías cuanto antes.
/ PRE-ASSEMBLY CAUTIONS
BEVOR SIE BEGINNEN / AVANT DE COMMENCER / ANTES DE EMPEZAR
1
Lesen Sie folgendes vor dem Zusammenbau aufmerksam durch:
Lesen Sie zuerst die Bauanleitung ganz durch und verstehen Sie den Aufbau
Ihres Modelles.
Überprüfen Sie den Verpackungsinhalt.
Sollten Teile fehlen, wenden Sie sich direkt an Ihren Fachhändler oder an den
Kyosho-Vertreiber in Ihrem Land.
Verwechseln Sie Schrauben sowie kleine Bauteile nicht! Vergleichen Sie sie vor
dem Einbau mit den Darstellungen in Originalgröße in den Baustufen.
Beachten Sie beim Festziehen einer Treibschraube folgendes:
Schrauben Sie solange, bis das anzubringende Teil sicher und fest sitzt.
Achten Sie jedoch darauf, daß Sie den Gewindegang im Material nicht überdrehen!
Before assembling, please read the following carefully:
First, read this instruction manual and understand the model’s construction.
Check the contents of this kit.
Should parts be missing, immediately contact the retail shop or your nearest
Kyosho distributor.
Do not take the wrong screw or small part. Compare it to the true-to-scale
diagram in each assembly step, then install it.
When tightening a self-tapping (TP) screw:
Even if hard to turn, tighten a TP screw until the part is securely attached.
However, do not overtighten as the plastic thread inside the part may strip!
Avant l’assemblage, veuillez lire les points suivants attentivement:
Lisez d’abord complètement cette notice; ainsi vous aurez un aperçu du
déroulement et pourrez mieux vous orienter.
Vérifiez ensuite le contenu du kit.
Si jamais il y a des pièces manquantes, adressez-vous directement à votre
magazin spécialisé ou au distributeur Kyosho dans votre pays.
Ne confondez pas les vis et les petites pièces! Vérifiez-les à l’aide des
illustrations dans chaque plage de montage, puis assemblez les.
Lorsque vous serrez une vis autotaraudeuse:
Serrez jusqu’à ce que la pièce à monter soit bien installée. Pourtant, veillez à
ne pas trop la serrer puisque vous risquez d’abîmer le filet dans la pièce.
Antes de comenzar el montaje, lea atentamente lo siguiente:
Lea, en primer lugar, este manual para obtener una idea general.
Compruebe la conformidad de todas las piezas.
Si faltara alguna pieza, contacte con la tienda donde lo adquirió.
No se admitirán reclamaciones en modelos en proceso de montaje.
Antes de colocar las piezas y tornillos, asegurese mirando la tabla en cada
paso.
A la hora de apretar Tornillos Autorroscantes(TP):
Apriételos firmemente en la pieza donde corresponda.
No intente apretarlos demasiado, ya que podrían deformar la pieza.
Correct
Richtig
Bon
Correcto
Wrong
Falsch
Mauvais
Mal
1 2 3

10
A:
B:
C:
No.
No.
D:
TP
6
Understanding this manual / So funktioniert die Bauanleitung: /
Comment lire les instruction: / Cómo leer el manual de instrucciones:
2
A:
Numéro de la plage de montage et le nom de
la pièce à assembler.
B:
Numéro de référence de la pièce, nom, illustration
en grandeur réelle et quantité utilisée.
C:
Toutes les pièces, exceptées les vis, sont
identifiées par un numéro de référence. Pour
l’achat de pièces de rechange, trouvez ce
numéro dans la liste pour pièces de rechange
à
la fin de cette notice. Toute à la gauche de
cette même liste, vous trouverez ainsi le
numéro de commande correspondant.
D:
Cette notice utilise des icônes dans les plages
de montage. Référez-vous au bas de chaque
page pour savoir leur signification.
A:
Indica el número del Paso y la Parte a ser
montada.
B:
Número, Nombre de la Pieza, Dibujo a
escala real, Cantidad utilizada.
C:
Todas las piezas, excepto los tornillos vienen
identificadas por un número. Para
comprarlas por separado,
mire el número en la lista de piezas y apunte
la referencia de la columna izquierda.
D:
Este manual de instrucciones utiliza diversos
símbolos.
Téngalos en cuenta durante el montaje.
A:
Die Nummer der Baustufe sowie das zu
bauende Teil werden angegeben.
B:
Teilenummer, Teilename, Darstellung in
Originalgröße und Anzahl.
C:
Die Teilenummer stellt den Bezug zu unserer
Bestellnummer her. Am Ende der
Bauanleitung finden Sie eine Ersatzteilliste,
die zu der Teilenummer die entsprechende
Bestellnummer liefert.
D:
Diese Bauanleitung verwendet verschiedene
Piktogramme, deren Bedeutungen unten auf
jeder Seite erklärt werden.
A: Indicates the assembly step and the
section that will be assembled.
B:
Key Number, Part Name, True-to-scale
Diagram, Quantity Used.
C: All parts (except screws) are identified
by key numbers. For purchasing spare
parts, refer to the key number of the part
needed.
D: This instruction manual uses several
symbols. Pay close attention to these
symbols at the bottom of each page
during assembly.
A
D
3
/ Radio
RC-Anlage / Radio / Equipo de radio
Double-sided Tape
Doppelseitiges Klebeband
Adhésif double face
Cinta de doble cara
Speed Amp.
Steller
Variateur électronique
Variador
TP Screw
RK Treibschr
Vis TP 3x12mm
Tornillo 2x6mmTP
3 x 16mm
C
B
< Example > < Exemple > < Beispiel > < Ejemplo >
16
2
2
1
/ Cabin
Deck / Cabine / Cabina
/ Radio
RC-Anlage / Radio / Equipo de radio
Open.
Offen
Ouvert
Abrir
Close.
Verriegelt
Fermé
Cerrar
19
18
20
1
2
17
16
17
Go to Step 11 for Readyset version.
Fuer die ReadySet-Version gehen Sie zu Baustufe 11.
Pour la version Readyset se rendre à l'étape 11.
Ir al paso 11 para la versión Readyset.

x5
Warning!
x2
Warning!
7
3
/ Radio
RC-Anlage / Radio / Equipo de radio
Double-sided Tape
Doppelseitiges Klebeband
Adhésif double face
Cinta de doble cara
Speed Amp.
Steller
Variateur
électronique
Speed Amp.
Steller
Variateur électronique
Variador
Cut off shaded portion.
Schneiden Sie die schraffierten
Flächen heraus.
Coupez la partie grisée.
Corte la zona oscurecida.
Double-sided Tape
Doppelseitiges Klebeband
Adhésif double face
Cinta de doble cara
Motor Leads
Motorkabel
Cables moteur
Cables Motor
Nylon Strap
Verwenden Sie Kabelbinder
Collier nylon
Abrazadera nylon
Battery
Akkupacks
Batterie
Batería
Attach connectors in correct polarity. Connecting
in wrongpolarity may cause damage to amp. or
accidents.
Stecker durchf¸hren und wieder einsetzen, unbedingt
auf die korrekte Polung achten!
Fixer les connecteurs en respectant les pôlarités.
Effectuer cette étape avec attention !!!
Instale los conectores respetando la polaridad.
Si se equivoca en la polaridad el variador de
velocidad podría resultar dañado.
Pay close attention here!
Vorsicht! Wichtiger Hinweis!
Attention! Avis important!
Preste atención.
/ Red / Rot
/ ROUGE / Rojo
/ Black / Schwarz
/ NOIR / Negro
Assemble as many times as specified.
Schritt x-mal wiederholen
Assemblez autant de fois qu'indiqué.
Repetir las veces indicadas
Rest abschneiden
Couper l'excès.
Cortar el sobrante
Read carefully at this symbol!
Hinweise beachten!
Lire attentivement ces symboles.
Fijarse bien cuando aparece este símbolo.
/ Red / Rot
/ ROUGE / Rojo
/ Black / Schwarz
/ NOIR / Negro
16
16
7

8
Cut silicone tube before use
Silikonschlauch abschneiden
Découper la durite comme
indiqué.
Cortar el tubo de silicona
12
5
Speed Amp.
Steller
Variateur électronique
Variador velocidad
5
4
/ Radio
RC-Anlage / Radio / Equipo de radio
/ Radio
RC-Anlage / Radio / Equipo de radio
120mm 120mm
50mm
20
Pay close attention here!
Vorsicht! Wichtiger Hinweis!
Attention! Avis important!
Preste atención.
Silicone Tube 120mm
Silikonschlauch 120mm
Durite silicone 120mm
Tubo Silicona 120mm
8
Detached at step 2
aus Baustufe 2
Détaché à l'étape 2
Desmontado en paso 2
Align direction
Richtung beachten
Aligner la direction
Alinear
Silicone Tube 120mm
Silikonschlauch 120mm
Durite silicone 120mm
Tubo Silicona 120mm
Silicone Tube 50mm
Silikonschlauch 50mm
Durite silicone 50mm
Tubo Silicona 50mm
8
Note the direction.
Einbaurichtung beachten.
Notez le sens.
Fíjese en el dibujo.
Switch
Schalter
Interrupteur
Interruptor
Switch
Schalter
Interrupteur
Interruptor
OFF
ON
3
1
2
20
9
10
14
13
12
11
Assemble in the specified order.
Bauen Sie die Stufen in der angegebenen
Reihenfolge.
Assemblez dans l’ordre indiqué.
Realice el montaje en el orden señalado.
Front
vorn
Devant
Parte
8
2
8

4
2
mm
2
mm
2
mm
TP
2mm
9
6
/ Radio
RC-Anlage / Radio / Equipo de radio
11mm11mm
Use this hole.
Dieses Loch benutzen.
Utilisez ce trou
Utilice este agujero.
Align correctly
Montieren wie
dargestellt
Aligner correctement
Alinear correctamente
With servo
Vom Servo
Avec servo
Incluido en
el servo
Rudder Servo
Ruderservo
Servo de gouvernail
Servo Dirección
Connector
Stecker
Connecteur
Servo Dirección
3
2
2
1
1
TP Screw
LK Treibschr.
Vis TP
Tornillo TP
3 x 8mm
4
7
/ Radio
RC-Anlage / Radio / Equipo de radio
Pay close attention here!
Vorsicht! Wichtiger Hinweis!
Attention! Avis important!
Preste atención.
Connect as per radio instruction manual.
Schließen Sie die Servos gemäß der
Bedienungsanleitung Ihrer RC-Anlage an.
Branchez selon la notice de la radio.
Conecte siguiendo las instrucciones del
manual del equipo de radio.
Receiver
Empfaenger
Récepteur
Receptor
15
Drill holes with the specified diameter.
Loch bohren wie dargestellt
Percer un trou au diamètre indiqué.
Perforar agujeros
Cut off shaded portion.
Schneiden Sie die schraffierten
Flächen heraus.
Coupez la partie grisée.
Corte la zona oscurecida.
Receiver
Double-Sided Tape
Doppelseitiges Klebeband
Adhésif double face
Cinta adhesiva doble cara

3
20
10
/ Radio
RC-Anlage / Radio / Equipo de radio
10
<OFF>
<
ON>
Pay close attention here!
Vorsicht! Wichtiger Hinweis!
Attention! Avis important!
Preste atención.
Attach tape without gaps.
Tragen Sie das Klebeband lückenlos auf.
Appliquer l'adhésif sans laisser d'ouverture.
Coloque la cinta adhesiva transparente
sin dejar huecos
Tape
Klebeband
Adhésif transparent
Cinta adhesiva transparente
/ Radio
RC-Anlage / Radio / Equipo de radio
9
Align and fix with 2.6x12mm TP screws
Ausrichten und mit 2,6x12mm
Treibschrauben fixieren
Aligner et fixer la vis TP de 2,6x12mm
Alinear y fijar con tornillos 2.6x12mm TP
TP Screw
Treibschraube
Vis TP
Tornillo TP
/ Radio
RC-Anlage / Radio / Equipo de radio
8
22
22
Antenna Cord
Antennenkabel
Cable d'antenne
Cable antena
Remove first
Erst demontieren
Retirer en premier
Desmontar

18
8
2
Warning!
Warning!
(20mm)
11
/ Battery
Akkupacks / Batterie / Batería
12
/ Radio
RC-Anlage / Radio / Equipo de radio
11
Battery
Akkupacks
Batterie
Batería
Connect when using the model.
Verbindung herstellen zum Betrieb
des Modells.
Brancher lors de l'utilisation du modele.
Conectar a la hora de utilizar el modelo.
Connect when using the model.
Verbindung herstellen zum Betrieb
des Modells.
Brancher lors de l'utilisation du modele.
Conectar a la hora de utilizar el modelo.
Always use 2 fully charged batteries of the same type.
Stets den gleichen Akkutyp mit gleichem Ladezustand verwenden!
Utiliser toujours 2 batteries charger en même temps.
Utilice siempre 2 baterías cargadas del mismo tipo
Detached at step 2
aus Baustufe 2
Détaché à l'étape 2
Desmontado en el paso 2
Antenna
Antenne
Antenne
Antena
Read carefully at this symbol!
Hinweise beachten!
Lire attentivement ces symboles !
Fijarse bien cuando aparece
Must be purchased separately!
Nicht enthalten
Doit-être acheté séparément !
Debe comprarse por separado
Pay close attention here!
Vorsicht! Wichtiger Hinweis!
Attention! Avis important!
Preste atención.
Silicone Tube (20mm)
Silikonschlauch (20mm)
Durite silicone (20mm)
Tubo Silicona (20mm)

12
15
/ Decals
Aufkleber / Autocollants / Adhesivos
14
/ Hull
Rumpf / Coque / Casco
13
/ Cabin
Deck / Cabine / cabina
Open.
Offen
Ouvert
Abrir
Close.
Verriegelt
Fermé
Cerrar
Apply the decals to the positions indicated in numerical order.
Tragen Sie die Aufkleber in der Reihenfolge ihrer Nummern auf.
Appliquez les autocollants dans l’ordre de leur numéro.
Coloque los adhesivos siguiendo el orden.
The decal numbers between brackets are only for the opposite side.
Die Aufkleber in Klammern slnd für die andere Selte.
Les autocollants entre parenthéses sont pour le côté opposé.
Los números entre paréntesis son para el lado opuesto.
Decal already applied on Readyset version.
Die Dekorteile sind in der ReadySet-Version bereits aufgebracht.
Les autocollants sont déjà apposés sur la version Readyset.
Adhesivos ya pegados en la versión Readyset.
Detached at step 1
aus Baustufe1
Détaché à l'étape 1
Desmontado en el paso 1
Detached at step 2
aus Baustufe 2
Détaché à l'étape 2
Desmontado en el paso 2
Detached at step 1
aus Baustufe1
Détaché à l'étape 1
Desmontado en el paso 1
1 2 3 4 5
6
8
12
16 20
26 18
15 19
34
33
36
3529 321725
28
27
31
30
10
97
1
17
19
2
1
16
1

ST.TRIM
D/R
TH.TRIM
Digital Proportional Radio Control System PERFEX KT-6
R
THE FINEST RADIO CONTROL MODELS
D/R
BATT.
ST.REV
TH.REV
N
N
R
R
POWER
/
Die Bewegungen und Montage ueberpruefen
VERIFICATIONS avant départ / Comprobaciones y ajustes
Checking Movement & Adjustment
CAUTION : Although basic setting is complete at time of shipment, always check for safety.
When checking, make sure the motor cords are NOT connected before switching power ON.
Achtung : Obwohl Sie Ihr Modell schon fahrfertig erworben haben, ueberpruefen Sie alle Teile auf deren Richtigkeit.
Waehrend der Ueberpruefung, stellen Sie sicher, dass das Motorkabel NICHT angeschlossen ist, bevor Sie
den Empfaenger angeschaltet haben.
ATTENTION : Même si les réglages sont déjà effectués, TOUJOURS vérifier par précaution que les connecteurs du moteur
NE SONT PAS CONNECTES lors de la mise sous tension.
PRECAUCION : Aunque el ajuste básico viene realizado de fábrica, realice una comprobación de seguridad.
Asegúrese que los cables del motor NO están conectados antes de conectar la alimentación.
Throttle Reverse Switch
Servoreverse
Inverseur de servos
Interruptor Inversión
Reverse
Reverse
Inversé
Invertido
Make sure the Reverse Switch on the lower side of the transmitter is positioned on 'R'.
Stellen Sie sicher, dass der Rückwärtsschalter an der unteren Seite des Senders die Position “R” aufweist.
Vérifier que l'interrupteur de marche arrière sur le côté de l'émetteur (voir illustration) est positionné sur "R".
Asegúrese que el Interruptor de Inversión en la parte inferior de la emisora está en la posición "R".
A few seconds later, after the lamp flashes green twice, it will flash red 4 times.
Following this the red and green lamps will remain on.
This indicates setting is complete.
Einige Sekunden später, nachdem die grüne LED zweimal geblinkt hat,
blinkt die rote LED viermal. Danach leuchten beide LEDs permanent,
die Programmierung ist abgeschlossen.
Quelques secondes plus tard, après que la diode clignote 2 fois verte,
elle clignotera 4 fois rouge. Ensuite les diodes rouge et verte reviendrons normales.
Unos segundos más tarde, una vez la luz parpadee en verde dos veces,
parpadeará en rojo 4 veces.
Después, las luces roja y verde permanecerán encendidas.
Esto indica que el proceso se ha completado.
Lamp
LED
Diode
Lampara
Make sure the throttle trim is in the center position.
Switch the transmitter ON and then the receiver.
Bitte sicherstellen, dass die Gastrimmung in mittlerer Position steht.
Anschließend den Hauptschalter am Sender auf ON stellen, erst dann
den Empfänger einschalten.
Assurez vous que le trim des gaz est au neutre.
Mettre en route l’émetteur puis le récepteur.
Asegúrese que el trim de gas está en la posición neutral.
Conecte la emisora y luego el receptor.
Connect the motor cord. Hold the throttle trigger gently. If the screw starts rotating in the forward direction, the boat is ready to be run.
(If the screw rotates in the reverse direction, swap the connection of the two motor cords and check rotating direction again).
Schließen Sie den Motor am Regler an. Geben Sie vorsichtig Gas und prüfen Sie die Drehrichtung der Schraube.
Dreht sich die Schraube in der falschen Richtung, müssen zwei beliebige Kabel des Motors am Regler vertauscht werden.
Connecter le câble moteur. Maintenir la command de gaz sans forcer. Si l'axe tourne dans le sens de la marche avant,
le bateau est prêt a être utilisé.
(Si l'axe tourne dans le sens inverse intervertir 2 câbles moteur et vérifier de nouveau le sens de direction)
Conecte el cable de motor. Apriete el gatillo de gas suavemente, si la hélice comienza a girar en sentido correcto,
la lancha está lista para navegar.
(Si la hélice gira en sentido contrario, cambie la situación de conexión de los dos cables y compruebe la dirección de la rotación de nuevo).
13

/
14
The speed controller features circuit breaker protection and automatically cuts out if it overheats.
Der Regler bestitzt einen Überlastungsschutz und schaltet automatisch ab, wenn dieser überhitzt.
Le variateur électronique de vitesse est équipé d'un système coupe circuit en cas de sur-chauffe.
El variador de velocidad incorpora un circuito de protección que corta automáticamente en caso
de sobrecalentamiento. (the rest must be delete).
< Overheating Protection Function >
< Überhitzungs-Schutzfunktion >
<
Protection thermique
>
< Función Protección Sobrecalentamiento >
< Lost Rx Protection Function >
< Empfangsverlust-Schutzfunktion >
<
Fail Safe
>
< Funcion de la proteccion de señal perdida >
Cautions !
Achtung !
Attention !
Precaución
Brakes are automatically applied if, for example, the transmitter batteries run down while driving.
(except when the throttle is in neutral.)
This safety function is designed to prevent loss of control.
Die Bremse greift automatisch, wenn beispielsweise die Senderzellen während der Fahrt zu viel Spannung verlieren
(außer der Gashebel steht in Neutralposition).
Diese Sicherheitsfunktion soll den Kontrollverlust des Modells verhindern.
Les freins s’actionnent automatiquement si, par exemple, les batteries de l’émetteur se vident entièrement
pendant que vous roulez (sauf si la gâchette des gazs est au neutre).
Cette fonction permet de prévenir les pertes de contrôle.
El freno es automáticamente aplicado si, por ejemplo, las baterías de la emisora de descargan durante
el funcionamiento (excepto cuando el gas está en neutral).
< Auto-Cut Off Function >
< Automatische Abschalt-Funktion >
<
Coupure automatique
>
< Función de Corte Automático >
The auto-cut function operates to prevent the battery power from running too low. When the
speed controller
lamp flashes and the throttle stops, cease operating the model and recharge the battery.
Die Auto-Cut-Funktion verhindert eine Tiefentladung des Akkus. Wenn der Motor stehen bleibt und die LED am
Regler blinkt, Betrieb einstellen und den Akku erneut laden.
La fonction auto-cut agit pour empêcher que la batterie devienne trop faible. Lorsque la diode du variateur clignote
et que les gaz s'arrêtent, cesser d'utiliser le modèle et recharger la batterie.
La función corte automático funciona para prevenir que la batería se descargue por completo.
Cuando la luz del variador de velocidad parpadea y el gas se detiene, detenga el modelo y recargue la batería.
When using a Nickel Metal Hydride battery, a sudden surge in power can cause the boat to stop temporarily.
Beim Betrieb des Modells mit NiMH-Zellen kann es zu einem plötzlichen Einbruch der Leistung kommen,
wenn die Zellen leer sind.
Dans le cas de l'utilisation d'une batterie NiMh, des coupures soudaines de puissance peuvent se produire et stopper
le bateau temporairement.
Cuando utilice una batería Ni-MH, una repentina subida del voltaje puede causar que la lancha se detenga momentáneamente.
Spécifications de moteur / Características Motor
Motor Spec / Features des Motors
Resistance
InnenWiderstand
Résistance
Resistencia
No-load Current @8.4V
Lehrlauf Stromstärkeaufnahme
Consommation
Corriente sin carga
No. of Turns
Anzahl der Wicklungen
Bobinage
No. de vueltas
Turn
Turn
tours
Vueltas
KV Value
Leistung
Régime (en KV)
Rev por voltio
Continuous Max. Current
Dauerlast
Courrant maximum en continu
Corriente Continua Max.
A
A
A
A
Max. Current
maximaler Strom
Courant maximum
Corriente max.
A
A
A
A
:
:
:
:
:
:
:
:
:
:
:
:
:
:
:
:
:
:
:
:
:
:
:
:

/
8~14 9.6V ~ 16.8V
3~5 11.1V ~ 18.5V
3x14mm
Spécifications du variateur / Variador de Velocidad
Speed Controller Spec / Features des Reglers
Input Voltage
Betriebsspannung
Voltage
Voltaje entrada
8~14-cell Ni-MH battery x 1 ~ 2 (9.6V ~ 16.8V)
or 3~5 cell Lipo Battery (11.1V ~ 18.5V)
8~14-Zellen-NiMH-Akku x 1 - 2 (9.6V ~ 16.8V)
oder 3- bis 5-Zellen-LiPo-Akku (11.1V ~ 18.5V)
Batterie
8~14
éléments Ni-MH x 1 – 2 (
9.6V ~ 16.8V
)
ou batterie Lipo 3 - 5 éléments (
11.1V ~ 18.5V
)
8~14-celula bateria Ni-MH x1 (9.6V ~ 16.8V)
O 3~5 celula bateria Lipo (11.1V ~ 18.5V)
:
:
:
:
Continuous Max. Current
Dauerlast
Courant maximum en continu
Corriente Continua Max.
A
A
A
A
:
:
:
:
Peak Current
Spitzenstrom
Courant en crête
Corriente Max inst.
A
A
A
A
:
:
:
:
Weight
Gewicht
Poids
Peso
g
g
g
g
:
:
:
:
Size
Abmessungen
Dimensions
Tamaño
mm
mm
mm
mm
:
:
:
:
Automatic transmitter and setup functions (setup by buttons is not required).
Automatisches Setup, kein Setupknopf notwendig.
Reconnaissance automatique de l'émetteur et des fonctions de réglages.
Ajuste de funciones automático (no es necesario ajustar con los botones).
Forward, Brake, Reverse.
Vorwärts, Bremse, Rückwärts.
Avance, Frein, Marche Arrière.
Delante, freno, reversa.
Only compatible with sensorless motors.
Nur kompatibel mit sensorlosen Motoren.
Uniquement compatible avec les moteur de type sensorless.
Solo compatible con motores sin sensores.
Auto-cut off voltage function.
Automatische spannungsbedingte Abschaltfunktion.
Coupure automatique en cas surtension.
Auto-corte funcion del voltaje.
Overheating protection function.
Überhitzungs-Schutzfunktion.
Protection contre la surchauffe.
Funcion de la proteccion de recalentamiento.
Lost Rx protection function.
Empfangsverlust-Schutzfunktion
Fail Safe.
Funcion de la proteccion de señal perdida.
/ Adjust Running
/ Justierung des Antriebs / Réglages / Ajustes
Adjusting the running posture and the speed by adjusting the angle of propeller.
Die Justierung des Antriebs
Ajuster le gouvernail selon le schéma suivant. Eviter de changer l'angle de manière excessive par rapport à la position standard.
Ajuste la velocidad cambiando el ángulo de la hélice
Adjust the angle by
loosening the 3x14 screws.
Winkel justieren durch
Loesen der 3x14 mm
Schrauben
Ajuster l'angle en
desserrant la vis de 3x14mm
Ajuste el ángulo
aflojando los tornillos
3x14mm
Bow will be up.
Bug hebt sich
L'étrave va monter.
Proa se levanta
Standard position.
Standard Position
Position standard.
Posición normal
Bow will be down.
Bug senkt sich
L'étrave va descendre.
Proa baja
Do not adjust the rudder beyond this point.
Nicht unter diesenPunkt gehen!
Ne pas ajuster le gouvernail au-delà de ce point.
No intente ajustar el timón más allá de
este punto.
Wind : light
Waves : low
Wind : schwach
Wellen : schwach
Vent FAIBLE
Vague PETITES
Viento : flojo
Olas : pequeñas
Bow will be up.
Bug hebt sich
L'étrave va monter.
Proa se levanta
Wind : strong
Waves : high
Wind : stark
Wellen : stark
Vent FORT
Vague GROSSES
Viento : fuerte
Olas : altas
Bow will be down.
Bug senkt sich
L'étrave va
descendre.
Proa baja
15
Make sure that there is no gap.
Spaltfrei justieren
S'assurer qu'il n'y a pas d'espace.
Asegurarse de no dejar espacio

Li-Po Battery
3 x 35mm
16
Slightly lower the right Trim Tab to adjust the axis of the hull when running straight.
Rechte Trimmklappe nach unten stellen, damit das Boot gerade im Wasser liegt.
Diminuer légèrement le trim du flap droit afin d'ajuster l'axe de la coque lorsqu'il navigue droit.
Baje ligeramente la Aleta derecha para ajustar el eje del casco al navegar en línea recta.
/ Trim Tab Adjustment / Justierung der Trimmklappen
Réglage du trim des flaps / Ajuste de las aletas
Cut off.
Abschneiden
Découper
Cortar
/ OPERATING YOUR MODEL SAFELY / Bedienungshinweise
/ UTILISER VOTRE MODELE EN TOUTE SECURITE / CONSEJOS DE SEGURIDAD
With R/C boats, discover a new world of pleasure. Whether you run your boat on lakes, rivers or else-where,
take precautionary measures to avoid accidents.
Bitte beachten Sie beim Betrieb Ihres Modellbootes die folgenden Sicherheitshinweise, um Verletzungen oder
Gefaehrdungen zu vermeiden:
Avec votre bâteau, découvrez un nouveau monde de plaisir. Partout ou vous utilisez votre bâteau (lac, rivière ou autres),
respecter les consignes suivantes :
Descubra un nuevo mundo de diversión con los barcos R/C de KYOSHO. Lea atentamente los siguientes
consejos para evitar accidentes que pudieran causar daños a personas y/o propiedades.
Do not put your hands or any objects into rotating parts,
as this could result in serious accidents!
Fassen Sie niemals in bewegte Teile des Antriebs
Ne jamais mettre votre main ou un objet sur des pièces
en mouvements.
Mantenga las manos alejadas de las piezas móviles.
The motor and battery get hot from running.
Do not touch them for a while after running.
Die Teile des Antriebs werden im Betrieb sehr warm, nicht beruehren,
erst abkuehlen lassen.
Le moteur et la batterie chauffent au cours de leur utilisation.
Ne pas les toucher après utilisation !!!
El motor y la batería Ni-Cd se calientan durante el funcionamiento.
Evite tocarlos con las manos mientras o después del funcionamiento.
In order to avoid accidents and personal injury, be sure to observe the following:
Bitte beachten Sie die folgenden Sicherheitshinweise
Afin d'éviter tout incidents et problèmes, respecter les conseils suivants :
Lea los siguientes consejos para prevenir posibles accidentes:
Adjust with 3 x 35mm Cap Screw.
Mit 3x35mm Schraube justieren
Ajuster la vis de 3 x 35mm
Ajuste con el Tornillo Allen 3 x 35mm
Tighten
Anziehen
Serrer
Apretando
Loosen
Lösen
Dévisser
Aflojando
Lowers Trim Tab
Klappe senkt sich
Baisser le trim du flap
Baja la Aleta
Raises Trim Tab
Klappe hebt sich
Augmenter le trim du flap
Se eleva la Aleta
Wind
Waves
Wind
Wellen
Vent
Vagues
Viento
Olas
: light
: low
: leicht
: niedrig
: léger
: petites
: Suave
: bajas
Wind
Waves
Wind
Wellen
Vent
Vagues
Viento
Aolas
: strong
: high
: stark
: hoch
: fort
: hautes
: fuerte
: altas
Raise both Trim Tabs
Beide Trimmklappen nach oben trimmen
Augmenter les deux trim de flap
Ambas Aletas se elevan
Lower both Trim Tabs
Beide Trimmklappen nach unten trimmen
Baisser les deux trim de flap
Ambas Aletas bajan

17
Li-Po Battery
Li-Po Battery
BATTERY
BATTERY
BATTERY
BATTERY
EXPLOSIVE
Explosionsgefahr
EXPLOSION
RIESGO DE EXPLOSION
EXPLOSIVE
Explosionsgefahr
EXPLOSION
RIESGO DE EXPLOSION
Never put the charger and battery near flammable material
while charging as this may cause fires!
Legen Sie das Ladegeraet und den Akku niemals auf
eine brennbare Unterlage, Brandgefahr
Ne jamais exposer votre batterie à une source de chaleur,
celle-çi pourrait prendre feu !!!
Nunca coloque el cargador y la batería NiCd cerca de
materiales inflamables mientras esté cargando.
Never disassemble or modify batteries.
Batterien nicht gewaltsam oeffnen!
Ne jamais démonter ou modifier une batterie.
Nunca intente modificar ni desmontar baterías NiCd.
Never dispose of batteries into a fire, as these can explode
or emit noxious gases from heavy metals used in batteries !
Akkus niemals ins Feuer werfen!
Ne jamais jeter une batterie dans le feu,
les gazs alors émis sont très nocifs !!!
Nunca arroje baterías NiCd al fuego ya que podrían
explotar emanando gases nocivos.
Follow these warnings to avoid short circuits that may result in fires or other accidents:
Vermeiden Sie unbedingt Kurzschluesse mit den Akkus!
Dans les circonstances suivantes un court circuit pourrait survenir :
Para evitar cortocircuitos no realice las operaciones abajo indicadas:
For accident prevention, do not run your model under the following circumstances:
Zur Vermeidung von Schaeden oder Unfaellen, beachten Sie bitte die folgenden Punkte
Dans les cas suivants, ne pas utiliser votre bâteau afin d'éviter tout problème.
No navegue con su modelo bajo las siguientes condiciones:
In the sea or in other salt water.
Modell nicht im offenen Meer oder in Salzwasser betreiben
En mer ou autre plan d'eau salée.
En el mar ni aguas saladas
In high waves or when storm warnings are in effect.
Modell nicht bei starkem Wellengang oder starker Stroemung betreiben.
Lorsque qu'il y a de grosses vagues ou de l'orage !
En aguas profundas o con corrientes fuertes.
Always be considerate of other waterway users whilst using this model.
Beachten Sie andere Boote oder Menschen im Wasser!
Lorsque d'autre personne sont autour de vous ou évolue sur le plan d'eau !
Utilice su modelo con precaución cuando haya más embarcaciones navegando.
When rivers are swollen or their current is strong!
Fahren Sie niemals in der Fahrrinne grofler Schiffe!
Lorsque le plan d'eau à un fort courant !
En aguas profundas con corrientes fuertes
Also, make sure that nobody is using the same frequency as you do at the same time!
Sprechen Sie ihre Frequenz mit anderen Modellpiloten ab!
Aussi, s'assurer que personne n'utilise la même fréquence que vous.
Simpre compruebe si hubiera algún otro modelista navegando con la misma frecuencia
With weak radio batteries!
Nicht mit leeren Akkus starten!
Lorsque les piles ou batteries sont déchargées.
Cuando las baterías estén descargadas
When the boat behaves or operates strangely!
Wenn das Modell nicht auf Ihre Steuerbefehle rea-
giert, Betrieb sofort einstellen!
Lorsque votre bâteau se comporte étrangement !
Cuando el modelo se comporte de forma extraña

Do not dispose of batteries! Return them to the retail shop!
Alte Akkus nur an fachgerechter Stelle entsorgen,nicht in den Hausmuell werfen!
Ne pas jeter une batterie !La rapporter à votre magasin.
No tire nunca las baterías a la basura. Devuélvalas a la tienda donde las adquirió.
CHECK
Achtung
ATTENTION
AVISO
When NOT using the model, always
switch off the receiver and transmitter!
Then disconnect the battery
and remove it from the model as it may
lead to overheating and fires!
Wenn das Modell lange Zeit nicht
benutzt wird, Akkus aus Modell
& Sender entfernen!
Lorsque vous n'utilisez pas votre bâteau toujours éteindre le récepteur
puis l'émetteur. Débrancher ensuite la batterie et retirer les piles afin d'éviter
un court-circuits.
Cuando no utilice el modelo siempre desconecte la emisora y el receptor
y retire la batería NiCd del modelo.
/ Before Operating
/ Bevor Sie beginnen / Avant de commencer. / Antes de rodar
Ensure all screws are securely tightened.
Ensure all moving parts move without binding.
Are they greased for non-binding movement?
Ensure the radio batteries are fresh. Are they securely installed?
Ensure servos and linkages move without binding.
Ensure all cords are not touching any moving parts.
Ensure the area of operation is safe.
Ensure nobody is on your frequency at the same time.
Assurez-vous que toutes lesvis soien bien serrées.
Assurez-vous que les pièces en mouvement ne cognent rien.
Sont elles bein graissées?
Assurez-vous que les batteries soient bien chargées. Sont-elles bien fixées?
Assurez-bous que les servos et leurs connections peuvent être utilisés sans rien cogner.
Assurez-vous que les cables ne touches pas les pièces en mouvements.
Assurez-vous que la piste où vous roule est sûre.
Assurez-vous que personne n'emploie la même fréquence que vous en même temps.
Überprüfen Sie, ob alle Schrauben festgezogen sind.
Überprüfen Sie, ob alle beweglichen Teile leichtgängig und an den
entsprechenden Stellen gefettet sind.
Überprüfen Sie, ob die Akkus / Batterien für die RC-Anlage geladen / frisch sind.
Überprüfen Sie, ob die Servoanlenkungen sich leichtgängig bewegen können.
Achten Sie darauf, dass keine Kabel in den Antriebsstrang geraten.
Achten Sie darauf, daß das Gelände für den Betrieb Ihres Modells geeignet ist.
Achten Sie auf eine Frequenzkontrolle!
Asegúrese que todos los tornillos y tuercas están bien fijados
Asegúrese que todas las piezas móviles se mueven suavemente.
Asegúrese que las baterías están perfectamente cargadas.
Asegúrese que los varillajes se mueven perfectamente.
Asegúrese que los cables no contactan con piezas móviles.
Asegúrese que el área está despejada
También que nadie esté utilizando la misma frecuencia que usted.
18

ST.TRIM
D/R
TH.TRIM
BATT.
ST.REV
TH.REV
N
N
R
R
POWER
ST.TRIM
D/R
TH.TRIM
ST.TRIM
ST.TRIM
D/R
TH.TRIM
/
/
19
Cautions
Achtung
Attention !
Atención
Left
links
Gauche
Izquierda
Right
rechts
Droite
Derecha
Neutral
neutral
Neutre
Posición Neutral
Right
rechts
Droite
Derecha
Left
links
Gauche
Izquierda
Transmitter (Switch)
Schalter für Fernsteuerung
Radiocommande
Emisora (Interruptor)
Servo Reversing Switch / Servo-Reverse-Schalter
Interrupteur d'inversion des servos / Interruptor de inversión de los
servos
IMPORTANT
WICHTIG / IMPORTANT / IMPORTANTE
Always turn the transmitter's power switch ON first!
Schalten Sie zuerst den Sender ein!
Toujours allumer la radiocommande en premier !
Siempre conecte el interruptor de la emisora en
primer lugar.
Stand
Bootsständer
Stand de maintenance
Soporte
If rudder is moving in opposite direction, refer to page 3 of this guide and
check position of Reverse Switch.
Falls sich das Ruder in die falsche Richtung bewegt Servo Reverse
Schalter betaetigen (siehe Seite 3)
Si la direction bouge dans le sens inverse, se référer à la page 3 de cette
notice et vérifier la position de l'inverseur de servo.
Si el timón se mueve en la dirección opuesta, lea la página 3 y compruebe
la posición del interruptor de inversión.
Move the rudder wheel and check movement of rudder.
Bewegen Sie das Lenkrad und pruefen Sie die
Bewegung des Ruders
Actionner le volant de la radio afin de vérifier la
commande de direction
Mueva el volante y compruebe el movimiento del timón.
Checking Rudder
Ruderkontrolle
Vérification de la direction
Comprobación de la dirección
This model uses normal position for steering, and reverse for the throttle.
Schalter Lenkservo auf Normal, Schalter Gas-Funktion auf Reverse.
Utiliser la position NORMALE pour la direction et REVERSE pour les gaz.
En este modelo sitúe la posición normal en la dirección y la inversa en el gas.
Hull (Switch)
Schalter für Rumpf
Coque
Casco (Interruptor)
Before switching power ON always rest boat on
the stand and make sure propeller is clear should
it spin.
Bevor Sie das Modell einschalten, unbedingt darauf
achten, daß die Schraube sich frei drehen kann!
Avant de mettre sur marche ("ON") l'interrupteur, toujours
laisser le bateau sur son stand et s'assurer que l'hélice tourne
librement.
Antes de conectar el interruptor , coloque siempre
el modelo en el soporte asegurándose de no
acercarse a la hélice por si comenzara a girar.
<ON>
1
2
3
Adjust again when running.
Die Feinjustierung erfolgt im Fahrbetrieb
Ajuster la direction avec le trim lorsque la voiture roule.
Ajuste de nuevo al rodar con el modelo
Left
links
Gauche
Izquierda
Right
rechts
Droite
Derecha
Rudder Trim
Die Ruder Trimmung
Trim de direction
Trim Dirección
Adjust Rudder Trim so rudder is straight when rudder wheel is in neutral (hands off position).
Ruder so justieren, dass es exakt auf neutral steht, wenn das Lenkrad auf neutral steht.
Ajuster le trim de direction si le bâteau ne navigue pas droit lorsque le volant de la radio est au neutre.
Ajuste el trim de dirección de manera que el timón esté recto al estar el volante en posición neutral.
Adjust if rudder is not straight when
power is switched ON.
Mit der Trimmung kann die Neutral-
stellung des Ruders korrigiert werden.
Ajuster si la bâteau ne va pas droit
lorsqu'il fonctionne.
Ajuste si el timón no está recto al
conectar el equipo RC.
4

ST.TRIM
D/R
TH.TRIM
OFF
OFF
BATT.
ST.REV
TH.REV
N
N
R
R
POWER
/ Throttle Trigger / Gashebel
/ Gachette de gaz / frein / Gatillo de Gas
/ Throttle Trim / Trimmung für Gas
/ Trim de gaz / frein / Trim Gas
Neutral
neutral
Neutre
Posición Neutral
Leave Throttle Trigger in neutral, then adjust Throttle Trim until propeller comes to a complete stop.
Gashebel auf neutral stellen, anschließend den Motor komplett auf ìAUSî trimmen.
Placer le manche des gaz de la radio au neutre puis, ajuster le trim de gaz jusqu'à ce qu'elle s'arrête complètement.
Sitúe el Gatillo de Gas en posición neutral, ahora ajuste el Trim de Gas hasta que la hélice no gire.
Neutral
neutral
Neutre
Neutro
Forward
vorwärts
Avant
Adelante
Check Speed Controller
Ueberpruefung des Fahrtenreglers
Vérification du variateur de vitesse
Comprobación Variador Velocidad
Cautions
Achtung
Attention !
Atención
Place boat on stand, ensure propeller is clear,
then check model is working properly.
Boot so aufbocken, daß sich die Schraube frei
drehen kann - prüfen Sie alle Funktionen!
Placer le bateau sur son stand et s'assurer que l'hélice et les
autres pièces en rotation tournent librement.
Coloque el modelo en el soporte, asegurándose
que la hélice no contacta con ningún
objeto, ahora compruebe si el timón se mueve
correctamente al mover el volante de su emisora.
Disconnect the battery.
Akkus trennen
Retirer la batterie.
Desconecte la batería NiCd
Remove dirt from the hull.
Modell reinigen und trocknen
Essuyer le bateau.
Limpie el modelo
CHECK
Achtung
ATTENTION
AVISO
When NOT using the model, always switch off the receiver and transmitter! Furthermore, disconnect the battery
and remove it from the model!This may lead to overheat and fires!
Nach dem Betrieb alles ausschalten,Akku vom system trennen und aus
dem Modell herausnehmen!
Après utilisation TOUJOURS étaindre la radio et le récepteur et TOUJOURS retirer la batterie.
Cuando no utilice el modelo, desconecte el receptor y la emisora.
También desconecte la batería NiCd y retírela del modelo.
After finishing running, collect your
boat.
Boot aus dem Wasser
Récupérer votre bateau après utilisation.
Retire su modelo del agua
Switch off the receiver.
Empfaenger ausschalten
Eteindre le récepteur.
Desconecte el receptor
Switch off the transmitter.
Sender ausschalten
Eteindre la radio.
Desconecte la emisora.
/ AFTER RUNNING . . .
/ Nach dem Betrieb / APRES UTILISATION / DESPUES DE NAVEGAR
5
4
1
2
3
5
20

21
Make sure screws and nuts are securely tightened
and other parts are not worn.
Grease all rotating parts.
Repair the wiring should cords be damaged or caught
in rotating parts.
Should servo cords and the receiver antenna be
damaged, return them to the manufacturer for repair.
Make sure all parts are neither worn nor damaged.
Remove dirt from the hull.
Draw out water from inside the hull.
Oil the metal parts.
Alle Verschraubungen auf festen Sitz pruefen
Alle beweglichen Teile nachfetten
Alle Kabel auf Beschaedigungen pruefen,
ggf. neu isolieren oder erstzen.
Pruefen Sie die Antriebsteile auf Verschleifl
Modell nach jeder Fahrt reinigen
Entfernen Sie saemtliche Feuchtigkeit aus
dem Inneren des Rumpfes
/ Die Wartung / MAINTENANCE / Después de navegar
S'assurer que les vis et autres pièces
soient bien serrées.
Graisser toutes les pièces en mouvement.
Vérifier toutes les tringleries.
Vérifier le branchement des cables. S'assurer qu'ils
ne soient pas coupés.
S'assurer que les pièces ne soient pas endomagées.
Essuyer la coque du bateau.
Retirer l'eau du bateau.
Nettoyer avec de l'huile les pièces métales.
Asegúrese que los tornillos y tuercas están bien fijados
y que todas las piezas estén en correcto estado.
Engrase todas las piezas móviles.
Repare los cables y piezas defectusas.
Utilice siempre recambios originales KYOSHO
Si observa que los cables de servo o antena del receptor están rotos,
acuda a la tienda donde los adquirió para su reparación.
Compruebe periódicamente todas las piezas mecánicas.
Limpie la suciedad del casco.
Vacíe el agua del interior del casco.
/ TROUBLE SHOOTING
/ Probleml sungen / EN CAS DE PROBLEMES... / GUIA DE PROBLEMAS
/ EVERYDAY MAINTENANCE.
La página se está cargando...

66
Batería descargada
Variador no funciona.
Conectores sueltos
Instalación equipo de
radio mal efectuada.
Recargar o colocar baterías nuevas
Corregir siguiendo las instrucciones del
equipo de radio
Recargar batería
Volver a efectuar la conexión
ConectarEmisora y/o receptor desconectados
Baterías emisora descargadas
El Motor no gira.
Equipo de radio mal instalado Corregir
Suciedad en las piezas
mecánicas.
Limpiar y reengrasar.
Al girarla con la mano,
la hélice no gira o es difícil hacerla girar
El modelo no se detiene.
Varillaje mal ajustado Ajustar el trim de gas en la emisora.
Si el variador de velocidad no retorna
a la posición neutral, reajustar el varillaje.
El Motor funciona pero el
modelo no navega
Junta no instalada,
o tornillos sueltos
Apretar tornillos.
Motor estropeado. Instalar un nuevo motor
PROBLEMA CAUSA
SOLUCION
El Variador de Velocidad
se para y no funciona.
El eje no gira suavemente. Limpiar el eje y aplicar grasa.
Sobrecalentamiento. Dejar enfriar.
Bateria descargada. Una vez enfriada, recargar la batería.
23
© 2010 KYOSHO CORPORATION
64
65
66
67
3x3mm
94302
94302
94302
94302
94302
94302
94302
94302
94302
94302
94302
94302
94302
94302
3x35mm
3x12mm TP
64
65
67
3x3mm
3x35mm
3x12mm TP
/ EXPLODED VIEW 1 / Explosionszeichnung 1
/ VUE ECLATEE 1 / DESPIECE 1
Note that some parts are not sold as spare parts!
Einige Teile sind nur im Sammelpack erhaeltlich!
Les pièces signalées uniquement par un nombre
clé ne sont pas vendues seules !
Algunas piezas no se venden individualmente.

24
/ EXPLODED VIEW 2 / Explosionszeichnung 2
/ VUE ECLATEE 2 / DESPIECE 2
Note that some parts are not sold as spare parts!
Einige Teile sind nur im Sammelpack erhaeltlich!
Les pièces signalées uniquement par un nombre
clé ne sont pas vendues seules !
Algunas piezas no se venden individualmente.
9
10
12
11
14
58
60
13
54
8
8
3
1
37
8
25
59
36
18
17
53
19
55
56
22
25
59
57
57
20
17
58
16
23
7
61
24
25
24
2.6x8mmTP
2.6x8mmTP
2.6x8mmTP
TN022VE
1705
TN003C
TN003C
TN003C
1889
TN003C
TN003C
TN003C
TN003C
TN003C
TN003C
TN003C
TN008C
TN021VE
96183
94852
94856
94856
HJ12
TN025
TN025
33
TN025
BRG003SUS
33
TN025
BRG003SUS
94881
94881
94881
94881
94881
94881
ORG02BK
ORG05
94852
94105C
94851
94752
94856
HJ12
TN003C
TN003C
63
94201Z
TN003C
TN003C
TN003C
1889
1704
1700
120mm
96183
120mm
8
96183
50mm
8
96183
20mm
96183
10mm
2.6x8mmTP
3x8mmTP
TN003
3x8mmTP
© Copyright 2010 KYOSHO CORPORATION /

25
32
8
8
8
29
29
35
28
26
51
50
41
41
47
39
40
48
42
43
44
45
46
30
31
33
33
33
27
4x4mm
2.6x6mm
TN004C
TN004C
TN004C
TN004C
TN004C
TN004C
TN004C
TN004C
TN004C-1
TN004C
TN004C-3
TN004C
TN004C
TN004C
TN004C
TN004C-3
TN004C
TN004C-1
TN004C
TN004C
TN004C
96183
96183
96441B
TN004C-4
TN004C
TN004C
BRG003SUS
TN007C
TN007C
TN007C
TN007C
TN007C
TN007C
TN007C
TN004C-2
TN004C
TN004C-3
3x3mm
3x6mm
3 mm
W0148
TN004C
W0148
3x10mm
16
68
52
49
3x10mm
3x8mmTP
190mm
120mm
ORI61116
16
96441B
ORI62059
3x10mm
3x6mm
3x6mm
3x8mmTP
2.6x12mmTP
2.6x8mmTP
3x12mmTP
2.6x8mmTP
4x4mm
190mm
3x14mm
94907
94907
94907
94907
94907
94907
94907
94905-3
94907
94907
94907
94905-3
94907
94905-1
94907
94907
94907-1
94907
94907
94907
94905-3
94907
96183
94905-3
94901-3
94907
94907
94905-2C
94907
94434
94905-2C
BRG003SUS
94907
94907
BRG003SUS
94907
3x8mmTP
3x8mmTP
3x8mmTP
4x4mm
3mm
E3.0 E-ring
E-Ring E3.0
Clips 3.0mm
Clip E3.0
62
62
TN004C
W0148
62
TN004C
W0148
62

26
:
FOR JAPANESE MARKET ONLY.
O (P2)
Silicone O-Ring(P2)Black
O (P5)
Silicone O-Ring(P5)Orange
VOLTEX Marine 800 BL Motor
VOLTEX Marine 120 BL Contoroller
800VE
Hull (Twin Storm 800VE)
27T
Pinion Gear 27T
40T
Spur Gear 40T
Spur Gear Holder
Shaft Holder
800VE
Cabin (Twin Storm 800VE)
800
Hatch Set (Twin Storm 800)
800
Gear Box Set (Twin Storm 800)
4x8x3
Stainless Ball Bearing 4x8x3
Pipe Set
4x95
Joint Pipe 4x95
NiCd Strap
Color Antenna
286 800
Stern Tube Set (286) (Twin Storm 800)
800
Radio Tray (Twin Storm 800)
800VE
Decal(Twin Storm 800VE)
M3 Head Washer
Color Silicone Tube (Blue / Smoke gray)
Body Pin
Cord Boots
D42 x P1.4
Propeller D42 x P1.4
(L)
Waterproof Flexible Boots (L)
4mm
4mm Grommet
Waterproof Switch Holder
Antenna Grommet
Thrust Collar
SP
SP Out Drive Rudder.28
1mm)
Sponge Tape (1mm)
Rudder Joint Set.28
SP
SP Out Drive Rudder
4mm
4mm Reversible Stopper Set
Trim Tab W/Fin
No.No.
:
FOR JAPANESE MARKET ONLY.
Hobby Grease
7 18
31
32
1.68 1
1
42 25
800
Low Gear Set 42:25
(Twin Storm 800)
25T
Pinion Gear 25T
1
42T
Spur Gear 42T
60g
Setting Weight
42
1
4x9x4
Stainless Thrust Bearing 4x9x4
D37xP1.4/3
Metal Propeller (D37xP1.4/3 Blade)
44
LL
Turn Fin (LL size Carbon)
Digital Set up Box
1
S
Fluorescent Strap (S)
WaterProofing Tape
3
SPARE PARTS
TN022VE
TN021VE
TN003C
TN004C
ORG05
ORI
61116
ORI
62059
TN004C-1
TN004C-2
TN004C-3
TN004C-4
BRG003SUS
ORG02BK
HJ12
TN025
TN008C
1704
1705
TN007C
TN029VE
W0148
96183BL/SG
1889
210
420
7140
10500
8925
2100
1680
2940
630
420
735
735
210
19
20
53 54
55 56
x1
57
58
x2
1
x1
26
27
28 30
31 33
x1
29
32
x2
62
x8
51
x1
2100
36
37
x1
33
x2
1050
263
1890
630
420
525
Decal
1set
10 x10
11 x10
16 x1
32 x1
31 x1
30 x1
27 x1
61 x6
18 x6
52 x 2
60 x 1
62 x 4
33 x2
59 x1
35 x1
68 x1
420
105
578
8
(1000mm)x2
17 x5
39
40
x1
43
45
x1
46
47 48
x1
47
48 50
x1
94105C
94434
315
315
263
263
3885
1050
420
9
10
11 12
13 14
x1
64
65 66
67
x2
39
40
42 43
45 46
x1
315
23 x4
94201Z
315
1890
63 x2
44 x2
210
94851
94852
94856
94881
94907
94901-3
94907-1
94905-2C
96441B
22 x5
24 x2
25 x5
525
94905-3
42 x10
16 x12
49 x 2
33
41 49
x2
683
210
94302
No. Part Names
Description
(Key No. & Qty.)
No. Part Names
Description
(Key No. & Qty.)
OPTIONAL PARTS
No. Part NamesNo. Part Names
Description Description
Some of the parts included are not available as spare parts.
Purchase optional parts instead.
1879
TNW001C
ORI65026
TNW001C-1
TNW001C-2
96161
BRG102SUS
BPM437-3
FV016
1700
94752
2g x1
Instead of & . Offers more
running time (Gear Ratio / 1.68 : 1).
1Pc
1Pc
504
Setting weight for adjusting boat position. Includes 60g.
Instead of
3
, 1pc
Instead of
42
, 1pc.
Instead of
7
, 18pcs.
630
Instead of
44
Improves turning stability. Includes 1pc.
Set-Up tool for the ESC
2730
2310
3675
1575
630
420
189
158
473
31 32
La página se está cargando...

The service mentioned below is available only for Japanese market.
R
THE FINEST RADIO CONTROL MODELS
243-0034 153
046-229-4115
( )13 00 19 00
www.kyosho.com
PRINTED IN CHINA85291003-1
No.40031VE
Transcripción de documentos
※ご使用前にこの説明書を良くお読みになり十分に理解してください。 Before beginning assembly, please read these instructions thoroughly. Bitte lesen Sie die Anweisungen vor Gebrauch genau durch. Veuillez attentivement lire les instructions avant l’emploi. Lea cuidadosamente este manual antes de comenzar el montaje. R EP Version 1:16 Scale Radio Controlled Twin Electric Powerd Racing Boat 組立/取扱説明書 Instruction Manual Bedienungsanleitung Manuel d'instructions Manual de Instrucciones EP ツインストーム 800 VE VE LENGTH: 935mm (36.8") ●セット内容 Contents / Inhalt / CONTENU DE VOTRE VALISETTE / Contenido ●セットの他に必要な物 Required Additional / Erforderliches Werkzeug / OUTILS NECESSAIRES (NON INCLUS !) / Equipo Necesario ●送信機の準備 Transmitter Preparation / Der Sender / PREPARATION RADIO / Preparación Equipo R/C ●組立て前の注意 Pre-Assembly Cautions / Bevor Sie beginnen / Avant de commencer / Antes de empezar ●本体の組立て Assembly / Das Bauen / Assemblage / Montaje ●動作の確認と調整 / Checking Movement & Adjustment / Die Bewegungen und Montage ueberpruefen / VERIFICATIONS avant départ / Comprobaciones y ajustes ●取扱いの注意 Operating Precautions / Bedienungshinweise / Précautions d'emploi / Consejos de seguridad ●走航前のチェック Before Operating / Bevor Sie beginnen / Avant de commencer. / Antes de rodar ●走航が終わったら AFTER RUNNING . . . / Nach dem Betrieb / APRES UTILISATION / DESPUES DE NAVEGAR ●分解図 Exploded View / Explosionszeichnung / Eclaté / Despiece ●スペアパーツ/オプションパーツ Spare parts & optional parts 安全のための注意事項 ATTENTION! この無線操縦模型は玩具ではありません! ●この商品は高い性能を発揮するように設計されています。組立てに不慣れな方は、 模型を良く知っている人にアドバイスを受け確実に組立ててください。 ●小さい部品があるので、組立て作業は幼児の手がとどかない所で必ずおこなってください。 ●動かして楽しむ場所は、万一の事故を考えて安全を確認してから、責任をもってお 楽しみください。 ●組立てた後も、説明書がいつでも見られるように大切に保管してください。 ●ラジコン保険に加入して安全に楽しみましょう。 SAFETY PRECAUTIONS Ce modèle n’est pas un jouet! ●Si vous êtes débutant dans le modèle réduit, prenez conseils auprès de modélistes confirmés afin d’utiliser votre modèle dans des conditions optimales. ●Assemblez ce kit en dehors de la portée de jeunes enfants! ●Prenez des précautions lors de l’utilisation. Vous seul êtes responsable des évolutions de votre modèle. La société KYOSHO ou son distributeur ne peuvent en aucun cas être tenus responsables des accidents pouvant survenir lors de l’utilisation de ce modèle! ●Gardez cette notice à portée de main afin de vous y référer rapidement. CONSEJOS DE SEGURIDAD This radio control model is not a toy! ●First-time builders should seek the advice of experienced modellers before beginning assembly and if they do not fully understand any part of the construction. ●Assemble this kit only in places out of children’s reach! ●Take enough safety precautions prior to operating this model. You are responsible for this model’s assembly and safe operation! ●Always keep this instruction manual ready at hand for quick reference, even after completing the assembly. ●Taking out liability insurance is recommended. 2 2 3〜5 5〜6 6〜12 13〜16 16〜18 18〜20 20〜21 23〜25 26 Este modelo de Radio Control no es un juguete ●Los no inicados en este hobby deberán ser aconsejados por expertos antes de comenzar el montaje de este modelo. ●Realice el montaje en un lugar fuera del alcance de los niños. ●Siempre extreme las medidas de seguridad. Usted es el único responsable del funcionamiento de su modelo. ●Mantenga este manual a mano. ACHTUNG! Dieses Modell ist kein Spielzeug! ●Anfänger sollten möglichst Rat bei Modellbaukundigen einholen, um das Modell richtig zusammenzubauen und gefahrlos bedienen zu können. ●Bauen Sie dieses Modell nur außer Reichweite von Kindern zusammen! ●Treffen Sie genügend Sicherheitsvorkehrungen, bevor Sie Ihr Modell bedienen! Sie alleine tragen die Verantwortung für Ihr Modell und dessen gefahrlose Bedienung! ●Bitte bewahren Sie diese Dokumentation zur späteren Verwendung auf. *Hereby, KYOSHO CORPORATION, declares that this product is in compliance with the essential requirements and other relevant provisions of Directive 1999/5/EC. *Hiermit erklärt die KYOSHO Corporation, dass dieses Produkt in Übereinstimmung mit der Richtlinie 1999/5/EC ist und ihr in allen relevanten Punkten entspricht. Ni-MH ・不要になった充電式バッテリーは、貴重な資源を守るために廃棄しないでリサイクル 協力店へお持ちください。 ・The product you have purchased is powered by a rechargeable battery. The battery is recyclable. At the end of its useful life, under various national / state and local laws, it may be illegal to dispose of this battery into the municipal waste stream. Check with your local solid waste officials for details in your area for recycling options or proper disposal. ・Dieses Modell wird von einem Nickel-Cadmium Akkumulator betrieben. Er ist wieder aufladbar. Entsorgen Sie einen verbrauchten Akku fachgerecht an entsprechender Stelle. ・Ce modèle est alimenté par un accu Ni-Cad. Il est rechergeable. Notez qu’à la fin de sa vie utile, l’accu doit être traité comme déchet apart ・Este kit utiliza una batería NiCd recargable, la cual es reciclable. No la arroje a la basura. Devuélvala a la tienda donde la adquirió cuando se estropee. *Par la présente, KYOSHO CORPORATION déclare que cet équipement est conforme aux exigences essentielles et aux autres dispositions de la directive 1999/5/CE qui lui sont applicables. *Por medio de la presente KYOSHO declara que este producto cumple con los requisitos esenciales y cualesquiera otras disposiciones aplicables o exigibles de la Directiva 1999/5/CE. ※製品改良のため、予告なく仕様を変更する場合があります。*Specifications are subject to change without prior notice! *Technische Änderungen sind ohne vorherige Ankündigungen möglich! *Les spécifications peuvent changer sans préavis! *El fabricante se reserva el derecho de introducir modificaciones en los kits sin previo aviso! © Copyright 2010 KYOSHO CORPORATION / 禁無断転載複製 40031VE-T01 (和英独仏西) No.40031VE セット内容 / Contents / Inhalt / CONTENU DE VOTRE VALISETTE / Contenido 送信機(コントローラー) Transmitter (Controller) Fernsteuerung Radiocommande 2 voies Emisora 送信アンテナ Transmitter Antenna Senderantenne Antenne radio Antena emisora D/R ST.TRIM TH.TRIM セットに入っている工具 TOOLS INCLUDED GELIEFERTE WERKZEUGE OUTILS FOURNIS HERRAMIENTAS INCLUIDAS R THE FINEST RADIO CONTROL MODELS Digital Proportional Radio Control System PERFEX KT-6 六角レンチ(1.5mm, 2mm, 2.5mm) Hex Wrench (1.5mm, 2mm, 2.5mm) Sechskantschlüssel (1.5mm, 2mm, 2.5mm) Clé allen (1.5mm, 2mm, 2.5mm) Llaves allen (1.5mm, 2mm, 2.5mm) 船体 Hull Rumpf Coque Casco 防水テープ Tape Klebeband Adhésif transparent Cinta adhesiva transparente *船台 *Stand *Bootsständer *Stand de maintenance *Soporte 十字レンチ (5.5 / 7 / 8 / 10mm) Cross Wrench (5.5 / 7 / 8 / 10mm) Kreuzschlüssel(5.5 / 7 / 8 / 10mm) Clé en croix (5.5 / 7 / 8 / 10mm) Llave de cruz (5.5 / 7 / 8 / 10mm) 1.5mm 2mm 2.5mm セットの他に必要な物 / Required Additional / Erforderliches Werkzeug OUTILS NECESSAIRES (NON INCLUS !) / Equipo Necesario < < < < < 送信機用 > For Transmitter > Für den Sender > Pour la radiocommande > Para la emisora > 単3アルカリ乾電池………8本 AA Alkaline Dry Batteries 8 pieces 8 St. AA Trockenbatterien 8 batteries de type R6 pour votre radiocommande 8 Pilas alcalinas AA *グリス *カッター *Grease *Fett *Graisse *Grasa *Cutter/X-Acto Knife *Bastelmesser *Cutter *Cutter Grease +ドライバー Phillips Screwdriver Kreuzschlitzschraubendreher Tournevis cruciforme Destornilladores Phillips 警告 WARNING VORSICHT ATTENTION AVISO カバーの破れ Damaged beschädigt Endommagées Estropeada カバーが破れている電池や種類の違う電池を まぜて使わないでください。 Do not use any damaged batteries. Keine beschädigten Akkus verwenden! Ne pas utiliser de batteries endommagées No utilice nunca baterias en mal estado 注意 / Caution / Achtung! / Precautions ! / Precauciones ※送信機に、ニッケル水素(単3形)電池を使用する場合、電池ボックスに安全上逆接防止リブ(仕切り)が付いています。 一部の電池で、プラス端子の形状が短く通電しない物が有りますので、電池を購入する前に必ず確認してください。 *When using Nickel Metal-Hydride batteries (AA-size), the transmitter battery compartment has partitions to stop reverse flow of current. The plus (+) terminal on some types of batteries is not long enough so please check when purchasing. *Achten Sie beim Kauf von Zellen darauf, dass der Plus-Kontakt an der Zelle lang genug ist, um sicheren Kontakt im Batteriefach herzustellen. Das Batteriefach schuetzt durch diese Bauweise vor Verpolungen. *Dans le cas de l'utilisation de batteries R6 Ni-MH, vérifier avant de les acheter, que la borne du (+) effectue correctement le contact dans le boitier. *Al utilizar baterías Ni-MH (AA), instale las baterías respetando la polaridad indicada en el portapilas. Además compruebe que las baterías poseen la longitud adecuada y que el terminal + contacta correctamente ya que algunas poseen el terminal + más corto de lo normal. < バッテリー > < Battery > < Akku > < Accu > < Bateria > ※注意:オキシライド乾電池は、 電圧が高いため使用できません! – + プラス端子の突起が1.4mm以上 Plus terminal height more than 1.4mm. Pluspol muss groesser als 1.4 mm sein! La borne du + doit être sup. à 1,4mm. El terminal + debe medir más de 1.4mm. ティームオリオン製 7.2Vニッケル水素バッテリー・・・・・2本 ※1 Team Orion 7.2V Ni-MH Battery x 2 ※1 又は / Or / Oder Team Orion 7,2 V NiMH x 2 ※1 Ou / O Batterie Ni-MH Team Orion 7.2V x 2 ※1 Team Orion 7.2v Ni-HH bateria x2 ※1 *NOTE: Oxyride batteries cannot be used! *NOTE : Ne pas utiliser de batteries de type OXYRIDE. *Verwenden Sie keine Oxyride Batterien! *NOTA: No utilice baterías Oxyride. No.ORI14113 / ORI14115 ティームオリオン製 7.4V(2S-1P)Lipoバッテリー・・・・・2本 ※2 Team Orion 7.4V (2S-1P) Lipo Battery x 2 ※2 Team Orion 7,4 V (2s1p) LiPo x 2 ※2 Batterie Lipo Team Orion 7.4V (2S-1P) x 2 ※2 Team Orion 7.4v (2S-1P) bateria lipo x 2 ※2 ※1 容量が3300mAh以上のものに限ります。 Minimum capacity of 3300mAh required. Mindestens 3.300 mAh Kapazität benötigt. Capacité de 3300 mAh minimum requise. Capacidad minima 3300mAh requerido. ※2 No.ORI14000 / 14007 / 14008 / 14009 / 14010を使用する場合は 別途Superプラグ付バッテリーワイヤーセット(No.ORI40030)が必要です。 When using No.ORI14000 / 14007 / 14008 / 14009 / 14010, the Battery Wire Set (No.ORI40030) with Super plug is also required. Bei Verwendung von ORI14000 / 14007 / 14008 / 14009 / 14010 wird das ※ いずれかのティームオリオン製バッテリーで、 Akkukabel-Set ORI40030 mit Super-Plug benötigt. Super(Deans)プラグ(コネクター)付きのものに限ります。 En cas d’utilisation des réf. Suivantes ORI14000 / 14007 / 14008 / 14009 / Only use with Team Orion batteries with Super (Deans) plugs (connectors). 14010, le set de câbles (ORI40030) avec les prises haute intensité est requis. Bitte nur Team-Orion-Akkus mit Super-Plug verwenden. Al usar No. ORI14000/14007/14008/14009/14010, el sistema de alabre N’utiliser qu’avec les batteries Team Orion avec les prises haute intensité de la bateria (No. ORI40030) con el enchufe super tambien se require. Utilice solamente con Team Orion con super (Deans) enchufes (connector). < 充電器 > < Charger > < Ladegerät > < Chargeur > < Cargador > 2 ニッケル水素バッテリー用 / for Ni-MH Battery / Für NiMH-Akku Pour batterie Ni-MH / Para bateria Ni-MH No.72301 パワーゾーンAC / DCチャージャー POWER ZONE AC/DC CHARGER Lipoバッテリー用 / for Lipo Battery / Für LiPo-Akku Pour batterie Lipo / Para bateria Lipo No.ORI30126 AvionicsアドバンスドクラブマンLipoチャージャー Avionics Advanced Clubman Lipo Charger 送信機の準備 / Transmitter Preparation / Der Sender PREPARATION RADIO / Preparación Equipo R/C 送信機 KT-6 Transmitter KT-6 / Sender KT-6 Emetteur KT-6 / Emisora KT-6 アンテナ Antenna Antenne Antenne Antena スロットルトリム Throttle Trim Trimmschieber für Gashebel Trim de gaz/frein Trim de Gas LEDインジケーター LED Indicator LED Anzeige Indicateur de batterie Indicador LED 車が走り出さないように調整します。 Adjusts the throttle in small increments so the model will not move at neutral. Neutrallage so justieren, daß das Modell sich nicht bewegt. Ajuster pas à pas le trim de la commande d’accélération pour obtenir le neutre. Permite ajustar el recorrido del gas en pequeños incrementos para impedir que el modelo se mueva en el punto neutral. 電源スイッチが ONの時に、ランプが点灯します。 When the power switch is ON, the lamp will light up. Bei eingeschaltetem Sender leuchtet die LED auf. Lorsque la radiocommande est en marche, la diode est allumée. Al estar la emisora conectada, se iluminará. 電源スイッチ Power Switch Ein-/Ausschalter Interrupteur M/A Interruptor D/R ST.TRIM N POWER BATT. TH.TRIM ST.REV R X'TAL N ※クリスタルを交換する場合は、フタバ製(AM27MHz) 用をお買い求めください。 When changing or replacing frequency crystal, please purchase or replace with Futaba AM27MHz or Futaba compatible AM27MHz crystals. Beim Wechseln oder Austauschen des Quarzes, verwenden Sie den Futaba AM 27 MHz oder einen Futaba der mit AM 27 MHz Quarzen kompatibel ist. Lors du changement ou du remplacement d'un quartz, utiliser uniquement un quartz Futaba 27Mhz AM ou compatible. Cuando cambie los cristales de frecuencia, por favor utilice cristales AM27MHz marca Futaba o compatibles. R サーボリバーススイッチ Servo Reversing Switch Servo-Reverse-Schalter Interrupteur d'inversion des servos Interruptor de inversión de los servos R THE FINEST RADIO CONTRO L MODELS Digital Prop ortional Radio Cont rol Syst em PER FEX KT-6 スロットルトリガー Throttle Trigger Gas-/Bremshebel Gâchette de commande de gaz Gatillo de Gas 前進、ブレーキの操作を行います。 Controls forward movement and braking functions. Gas- und Bremsfunktion Permet le contrôle de la marche avant, du frein et de la marche arrière. Controla la velocidad y el freno. ノーマル側 Normal Normal Normal Normal D/R N ST.REV R POWER BATT. N リバース側 Reverse Reverse Inversé Invertido 送信機用クリスタル Crystal Quarzpaar Quartz Cristal emisora TH.REV R スロットルリバーススイッチ Throttle Reverse Switch Servoreverse Inverseur de servos Interruptor Inversión ラダー、スロットルの動作方向を反 転させる時に使用します。 このモデルではステアリングはノーマル側、 スロットルはリバース側で使用します。 This model uses normal position for steering, and reverse for the throttle. Schalter Lenkservo auf Normal, Schalter Gas-Funktion auf Reverse. Utiliser la position NORMALE pour la direction et REVERSE pour les gaz. En este modelo sitúe la posición normal en la dirección y la inversa en el gas. バッテリーカバー Battery Cover Batteriefachdeckel Couvercle porte piles Tapa portapilas 付属の送信機以外はご使用になれません。 Transmitters other than the one included cannot be used with this product. Verwenden Sie ausschließlich die beiliegende Fernsteuerung zur Steuerung des EP TWINSTORM 800 VE. Utiliser votre EP TWINSTORM 800 VE uniquement avec la radio fournie dans la valisette. Utilice siempre la emisora incluida con su modelo. No intente utilizar otro tipo de emisora. 3 プロポの持ち方と操作の仕方 / How To Use Transmitter / Bedienung des Senders / Comment utiliser l'émetteur / Cómo utilizar la emisora ニュートラル Neutral 左 右 neutral Left Right Neutre links rechts Neutral Gauche Droite Izquierda Derecha D/R ST.TRIM N POWER BATT. TH.TRIM ST.REV R X'TAL N R 後進 Reverse Rückwärts Arrière Atrás 前進 Forward vorwärts Avant Adelante R THE FINEST RADIO CONTROL MODELS Digital Propo rtional Radio Control System PERFEX KT-6 ニュートラル Neutral neutral Neutre Neutral 左手でスロットルトリガー、右手でラダーホイールを操作します。 Use left hand to control throttle trigger and right hand to control the steering wheel. Nehmen Sie fuer den Gashebel die linke Hand und kontrollieren Sie damit die Geschwindigkeit. Fuer den Drehknopf nehmen Sie die rechte Hand. Utiliser la main gauche pour contrôler les gaz moteur et la main droite pour commander la direction. Utilice la mano izquierda para controlar el gatillo de gas y la mano derecha para controlar el volante. クリスタルについて / Frequency Crystals / Quarze Quartz / Cristales de frecuencia セットのプロポは01〜12(12種類 / 別売 / 日本国内専用)までのクリスタルを使用することが出来、これにより12台までの同時走行が可能です。 Crystals 01 - 12 can be used in the R/C system for this set (12 channels / sold separately / Japan only) so up to 12 boats can be run together at the same time. Verwenden Sie Quarze mit den Kanälen 1 bis 12. So können bis zu 12 Boote gleichzeitig betrieben werden. Die Quarze müssen separat erworben werden. Les quartzs en 27Mhz adaptés peuvent être utilisé pour ce système Readyset et permettent d'utiliser plusieurs bateaux en même temps. Pueden utilizarse cristales desde el 1 hasta el 12 de manera que puedan navegar hasta 12 lanchas al mismo tiempo. クリスタルには送信機用(TX)と受信機用(RX)があるので間違えないように注意してください。 Corresponding crystals are used for the transmitter (TX) and the receiver (RX). Makes sure they are correct. Sender und Empfaenger muessen stets den selben Quarze verwenden. Stellen Sie sicher, dass diese richtig eingesetzt werden. Les quartzs émission (TX) et réception (RX) doivent impérativement avoir la même fréquence. Los cristales utilizados son diferentes en la emisora TX y en el receptor RX. Asegúrese de instalarlos correctamente. D/R 送信機用クリスタル(TX) Crystal for Transmitter (TX) Senderquarz (TX) Quartz d'émission (TX) Cristal emisora (TX) ST.T RIM TH.T RIM 受信機用クリスタル(RX) Crystal for Receiver (RX) Empfängerquarz (RX) Quartz d'récepteur (RX) Cristal receptor (RX) 送信機用アンテナ取付け / Installation of Antenna / Montage der Antenne Installation de l'antenne / Instalación de la antena 止まるまでネジ込む。 Screw-in to the base Antenne einschrauben Pas de vis de fixation Enroscar en la base D/R ST.TRIM TH.TRIM 送信アンテナ Transmitter Antenna Senderantenne Antenne d'émission Antena emisora 4 電池の入れ方 / Loading Battery / DasLaden der Akkus Batteries radio / Instalación de las baterías 1 フタをはずす。 Remove the lid. Deckel abnehmen Retirer le cache Retire la tapa 2 フタ Lid Deckel Cache radio Tapa 単3乾電池8本を図のように入れる。 Load 8 AA Alkaline Batteries as shown in the following illustration. 8 Batterien oder geladene Akkus in den Sender einsetzen Placer selon le schéma çi-dessous les 8 piles ou batterie de type R6 Instale 8 pilas alcalinas AA tal y como muestra el dibujo. 3 フタをしめる。 Close the lid. It is snapped into place. Deckel schließen Replacer le cache batterie comme indiqué. Cierre la tapa y colóquela en su lugar 乾電池の交換時期 / Changing Batteries / Das Wechseln der Batterien Changer les batteries / Cambio de baterías D/R LEDインジケーターが点滅したらすぐに乾電池を新品と交換してください。 When the LED indicator flashes, replace batteries as soon as possible. Wenn die LED Anzeige aufleuchtet, Akkus so schnell es geht austauschen. Lorsque diode se met a clignotter, remplacer immediatement les batteries. Cuando el LED parpadee, cambie las baterías cuanto antes. N ST.REV R POWER BATT. N TH.REV LEDインジケーター LED Indicator LED Anzeige Indicateur de batterie Indicador LED R 送信機の電池が無くなるとコントロールが不能になり大変危険です。 Do NOT operate when transmitter and/or receiver batteries are low or else the control of the model will be lost. Beim Aufleuchten der roten LED am Sender muß der Modellbetrieb sofort eingestellt werden! Ne jamais attendre que les piles de la radio soient déchargées pour les changer. Nunca deje que las baterías se descarguen completamente ya que podría perder el control de su modelo. 組立て前の注意 / PRE-ASSEMBLY CAUTIONS BEVOR SIE BEGINNEN / AVANT DE COMMENCER / ANTES DE EMPEZAR 1 組立ての前に下記のことに注意してください。 ●この説明書を良く読み、構造を理解する。 ●キットの内容を確かめる。 ※万一不良、不足がありましたら、お買い求めの販 売店か、当社「ユーザー相談室」までご連絡くださ い。 ●小さな部品の形やサイズを間違えないようにする。図 を参考にして確認しながら組立てる。 ●TPビス締をめるときは・・・ 締めこみが固くても部品が固定されるまで締めて ください。 ただし、部品が変形するまで締めるとビスがきか なくなります。 Correct Richtig Bon Correcto Wrong Falsch Mauvais Mal Before assembling, please read the following carefully: Avant l’assemblage, veuillez lire les points suivants attentivement: ●First, read this instruction manual and understand the model’s construction. ●Check the contents of this kit. Should parts be missing, immediately contact the retail shop or your nearest Kyosho distributor. ●Do not take the wrong screw or small part. Compare it to the true-to-scale diagram in each assembly step, then install it. ●When tightening a self-tapping (TP) screw: Even if hard to turn, tighten a TP screw until the part is securely attached. However, do not overtighten as the plastic thread inside the part may strip! ●Lisez d’abord complètement cette notice; ainsi vous aurez un aperçu du déroulement et pourrez mieux vous orienter. ●Vérifiez ensuite le contenu du kit. Si jamais il y a des pièces manquantes, adressez-vous directement à votre magazin spécialisé ou au distributeur Kyosho dans votre pays. ●Ne confondez pas les vis et les petites pièces! Vérifiez-les à l’aide des illustrations dans chaque plage de montage, puis assemblez les. ●Lorsque vous serrez une vis autotaraudeuse: Serrez jusqu’à ce que la pièce à monter soit bien installée. Pourtant, veillez à ne pas trop la serrer puisque vous risquez d’abîmer le filet dans la pièce. Lesen Sie folgendes vor dem Zusammenbau aufmerksam durch: Antes de comenzar el montaje, lea atentamente lo siguiente: ●Lesen Sie zuerst die Bauanleitung ganz durch und verstehen Sie den Aufbau Ihres Modelles. ●Überprüfen Sie den Verpackungsinhalt. Sollten Teile fehlen, wenden Sie sich direkt an Ihren Fachhändler oder an den Kyosho-Vertreiber in Ihrem Land. ●Verwechseln Sie Schrauben sowie kleine Bauteile nicht! Vergleichen Sie sie vor dem Einbau mit den Darstellungen in Originalgröße in den Baustufen. ●Beachten Sie beim Festziehen einer Treibschraube folgendes: Schrauben Sie solange, bis das anzubringende Teil sicher und fest sitzt. Achten Sie jedoch darauf, daß Sie den Gewindegang im Material nicht überdrehen! ●Lea, en primer lugar, este manual para obtener una idea general. ●Compruebe la conformidad de todas las piezas. Si faltara alguna pieza, contacte con la tienda donde lo adquirió. No se admitirán reclamaciones en modelos en proceso de montaje. ●Antes de colocar las piezas y tornillos, asegurese mirando la tabla en cada paso. ●A la hora de apretar Tornillos Autorroscantes(TP): Apriételos firmemente en la pieza donde corresponda. No intente apretarlos demasiado, ya que podrían deformar la pieza. 5 2 説明書の見かた Understanding this manual / So funktioniert die Bauanleitung: / Comment lire les instruction: / Cómo leer el manual de instrucciones: A: この項目で組立てるおおよその場所。 B: 小物部品の名前、原寸図、使用数。 C: キット内の部品は、ビス類を除いてキー <説明例> < Example > < Exemple > < Beispiel > < Ejemplo > No.が付けられています。スペアパーツを 購入する時はキーNo.を参照してください。 D: 説明書内では多くのマークが使用されて います。マークに注意して組立てを進め てください。マークの説明は、各ページ の下にあります。 3 プロポ / Radio RC-Anlage / Radio / Equipo de radio アンプ Speed Amp. Steller Variateur électronique Variador A D A: Indicates the assembly step and the section that will be assembled. B: Key Number, Part Name, True-to-scale 16 両面テープ Diagram, Quantity Used. C: All parts (except screws) are identified by key numbers. For purchasing spare parts, refer to the key number of the part needed. D: This instruction manual uses several symbols. Pay close attention to these symbols at the bottom of each page during assembly. Double-sided Tape Doppelseitiges Klebeband Adhésif double face Cinta de doble cara 3 x 16mm TPビス TP Screw RK Treibschr Vis TP 3x12mm Tornillo 2x6mmTP 2 C B A: Die Nummer der Baustufe sowie das zu A: Numéro de la plage de montage et le nom de bauende Teil werden angegeben. la pièce à assembler. B: Teilenummer, Teilename, Darstellung in B: Numéro de référence de la pièce, nom, illustration Originalgröße und Anzahl. en grandeur réelle et quantité utilisée. C: Die Teilenummer stellt den Bezug zu unserer C: Toutes les pièces, exceptées les vis, sont Bestellnummer her. Am Ende der identifiées par un numéro de référence. Pour Bauanleitung finden Sie eine Ersatzteilliste, l’achat de pièces de rechange, trouvez ce die zu der Teilenummer die entsprechende numéro dans la liste pour pièces de rechange à Bestellnummer liefert. la fin de cette notice. Toute à la gauche de cette même liste, vous trouverez ainsi le D: Diese Bauanleitung verwendet verschiedene numéro de commande correspondant. Piktogramme, deren Bedeutungen unten auf D: Cette notice utilise des icônes dans les plages jeder Seite erklärt werden. de montage. Référez-vous au bas de chaque page pour savoir leur signification. 1 A: Indica el número del Paso y la Parte a ser montada. B: Número, Nombre de la Pieza, Dibujo a escala real, Cantidad utilizada. C: Todas las piezas, excepto los tornillos vienen identificadas por un número. Para comprarlas por separado, mire el número en la lista de piezas y apunte la referencia de la columna izquierda. D: Este manual de instrucciones utiliza diversos símbolos. Téngalos en cuenta durante el montaje. 17 キャビン / Cabin Deck / Cabine / Cabina 17 1 16 2 2 プロポ / Radio RC-Anlage / Radio / Equipo de radio 18 19 開く。 Open. Offen Ouvert Abrir 閉まる。 Close. Verriegelt Fermé Cerrar レディセットの場合は 10 へ進む。 Go to Step 11 for Readyset version. Fuer die ReadySet-Version gehen Sie zu Baustufe 11. Pour la version Readyset se rendre à l'étape 11. Ir al paso 11 para la versión Readyset. 6 20 3 アンプ Speed Amp. Steller Variateur électronique Variador プロポ / Radio RC-Anlage / Radio / Equipo de radio アンプ Speed Amp. Steller Variateur électronique Variador 16 両面テープ Double-sided Tape Doppelseitiges Klebeband Adhésif double face Cinta de doble cara 16 両面テープ Double-sided Tape Doppelseitiges Klebeband Adhésif double face Cinta de doble cara Warning! 黒 / Black / Schwarz / NOIR / Negro 赤 / Red / Rot / ROUGE / Rojo コネクターの極性を間違えないように組み立てる。 間違えると逆接続になりアンプを破損し事故につな がります。 Attach connectors in correct polarity. Connecting in wrongpolarity may cause damage to amp. or accidents. Stecker durchf¸hren und wieder einsetzen, unbedingt auf die korrekte Polung achten! Fixer les connecteurs en respectant les pôlarités. Effectuer cette étape avec attention !!! Instale los conectores respetando la polaridad. Si se equivoca en la polaridad el variador de velocidad podría resultar dañado. x5 赤 / Red / Rot / ROUGE / Rojo 黒 / Black / Schwarz / NOIR / Negro 7 ナイロンストラップ Nylon Strap Verwenden Sie Kabelbinder Collier nylon Abrazadera nylon バッテリー Battery Akkupacks Batterie Batería モーターコード Motor Leads Motorkabel Cables moteur Cables Motor 注意して組立てる所。 Pay close attention here! Vorsicht! Wichtiger Hinweis! Attention! Avis important! Preste atención. 余分をカットする。 Cut off excess. Rest abschneiden Couper l'excès. Cortar el sobrante x2 2セット組立てる(例)。 Assemble as many times as specified. Schritt x-mal wiederholen Assemblez autant de fois qu'indiqué. Repetir las veces indicadas をカットする。 Cut off shaded portion. Schneiden Sie die schraffierten Flächen heraus. Coupez la partie grisée. Corte la zona oscurecida. 重要な注意事項があるマークです。必ずお読みください。 Read carefully at this symbol! Hinweise beachten! Lire attentivement ces symboles. Fijarse bien cuando aparece este símbolo. Warning! 7 4 プロポ / Radio RC-Anlage / Radio / Equipo de radio 8 シリコンチューブをカット して使う。 Cut silicone tube before use Silikonschlauch abschneiden Découper la durite comme indiqué. Cortar el tubo de silicona 8 シリコンチューブ 120mm Silicone Tube 120mm Silikonschlauch 120mm Durite silicone 120mm Tubo Silicona 120mm 120mm 120mm 50mm 前 Front vorn Devant Parte delantera 8 シリコンチューブ 50mm Silicone Tube 50mm Silikonschlauch 50mm Durite silicone 50mm Tubo Silicona 50mm 8 シリコンチューブ 120mm Silicone Tube 120mm Silikonschlauch 120mm Durite silicone 120mm Tubo Silicona 120mm アンプ Speed Amp. Steller Variateur électronique Variador velocidad 5 プロポ / Radio RC-Anlage / Radio / Equipo de radio 9 10 12 スイッチ Switch Schalter Interrupteur Interruptor 2 11 20 90° 1 向きを合わせる Align direction Richtung beachten Aligner la direction Alinear 注意して組立てる所。 Pay close attention here! Vorsicht! Wichtiger Hinweis! Attention! Avis important! Preste atención. 8 2 で外した 20 Detached at step 2 aus Baustufe 2 Détaché à l'étape 2 Desmontado en paso 2 ON 13 14 番号の順に組立てる。 Assemble in the specified order. Bauen Sie die Stufen in der angegebenen Reihenfolge. Assemblez dans l’ordre indiqué. Realice el montaje en el orden señalado. OFF 3 スイッチ付属 Switch Schalter Interrupteur Interruptor 向きに注意。 Note the direction. Einbaurichtung beachten. Notez le sens. Fíjese en el dibujo. 6 プロポ / Radio RC-Anlage / Radio / Equipo de radio 3 x 8mm TPビス TP Screw LK Treibschr. Vis TP Tornillo TP サーボ付属 With servo Vom Servo Avec servo Incluido en el servo 3 4 11mm 11mm 2 2 2mm 1 この穴を使う。 Use this hole. Dieses Loch benutzen. Utilisez ce trou Utilice este agujero. 2mm 合わせる。 Align correctly Montieren wie dargestellt Aligner correctement Alinear correctamente 1 90° ラダーサーボ Rudder Servo Ruderservo Servo de gouvernail Servo Dirección 47 コネクター Connector Stecker Connecteur Servo Dirección プロポ / Radio RC-Anlage / Radio / Equipo de radio プロポの説明書を参考に、コネクターを 接続する。 Connect as per radio instruction manual. Schließen Sie die Servos gemäß der Bedienungsanleitung Ihrer RC-Anlage an. Branchez selon la notice de la radio. Conecte siguiendo las instrucciones del manual del equipo de radio. 15 両面テープ Receiver Double-Sided Tape Doppelseitiges Klebeband Adhésif double face Cinta adhesiva doble cara 受信機 Receiver Empfaenger Récepteur Receptor 注意して組立てる所。 Pay close attention here! Vorsicht! Wichtiger Hinweis! Attention! Avis important! Preste atención. 2mm 2mmの穴をあける(例)。 Drill holes with the specified diameter. Loch bohren wie dargestellt Percer un trou au diamètre indiqué. Perforar agujeros をカットする。 Cut off shaded portion. Schneiden Sie die schraffierten Flächen heraus. Coupez la partie grisée. Corte la zona oscurecida. 9 8 プロポ / Radio RC-Anlage / Radio / Equipo de radio 22 アンテナ Antenna Cord Antennenkabel Cable d'antenne Cable antena 一度外す Remove first Erst demontieren Retirer en premier Desmontar 9 プロポ / Radio RC-Anlage / Radio / Equipo de radio 22 平行になるように2.6x12mm TPビス を締め込む。 Align and fix with 2.6x12mm TP screws Ausrichten und mit 2,6x12mm Treibschrauben fixieren Aligner et fixer la vis TP de 2,6x12mm Alinear y fijar con tornillos 2.6x12mm TP 2.6 x 12 TPビス TP Screw Treibschraube Vis TP Tornillo TP 10 プロポ / Radio RC-Anlage / Radio / Equipo de radio <ON > 3 防水テープ Tape Klebeband Adhésif transparent Cinta adhesiva transparente <OFF > 20 注意して組立てる所。 Pay close attention here! Vorsicht! Wichtiger Hinweis! Attention! Avis important! Preste atención. 10 すき間のないように貼る。 Attach tape without gaps. Tragen Sie das Klebeband lückenlos auf. Appliquer l'adhésif sans laisser d'ouverture. Coloque la cinta adhesiva transparente sin dejar huecos 11 プロポ / Radio RC-Anlage / Radio / Equipo de radio アンテナ Antenna Antenne Antenne Antena シリコンチューブ(20mm) 8 Silicone Tube (20mm) Silikonschlauch (20mm) Durite silicone (20mm) Tubo Silicona (20mm) 12 2 で外した 18 Detached at step 2 aus Baustufe 2 Détaché à l'étape 2 Desmontado en el paso 2 バッテリー Battery Akkupacks Batterie バッテリー / Battery Akkupacks / Batterie / Batería Batería 走行時のみ接続する。 Connect when using the model. Verbindung herstellen zum Betrieb des Modells. Brancher lors de l'utilisation du modele. Conectar a la hora de utilizar el modelo. 走行時のみ接続する。 Connect when using the model. Verbindung herstellen zum Betrieb des Modells. Brancher lors de l'utilisation du modele. Conectar a la hora de utilizar el modelo. Warning! バッテリーは、必ず同じ種類のものを2本満充電して使用してください。 Always use 2 fully charged batteries of the same type. Stets den gleichen Akkutyp mit gleichem Ladezustand verwenden! Utiliser toujours 2 batteries charger en même temps. Utilice siempre 2 baterías cargadas del mismo tipo 注意して組立てる所。 Pay close attention here! Vorsicht! Wichtiger Hinweis! Attention! Avis important! Preste atención. 別購入品。 Must be purchased separately! Nicht enthalten Doit-être acheté séparément ! Debe comprarse por separado 重要な注意事項があるマークです。必ずお読みください。 Read carefully at this symbol! Hinweise beachten! Lire attentivement ces symboles ! Fijarse bien cuando aparece Warning! 11 13 船体 / Hull Rumpf / Coque / Casco 2 で外した 19 Detached at step 2 aus Baustufe 2 Détaché à l'étape 2 Desmontado en el paso 2 閉まる。 Close. Verriegelt Fermé Cerrar 開く。 Open. Offen Ouvert Abrir 14 1 で外した 17 Detached at step 1 aus Baustufe1 Détaché à l'étape 1 Desmontado en el paso 1 キャビン / Cabin Deck / Cabine / cabina 1 で外した 16 Detached at step 1 aus Baustufe1 Détaché à l'étape 1 Desmontado en el paso 1 15 レディセットは組立済みです。 Decal already applied on Readyset version. Die Dekorteile sind in der ReadySet-Version bereits aufgebracht. Les autocollants sont déjà apposés sur la version Readyset. Adhesivos ya pegados en la versión Readyset. デカール / Decals Aufkleber / Autocollants / Adhesivos 図の位置に 1 から順にデカールをはる。 Apply the decals to the positions indicated in numerical order. Tragen Sie die Aufkleber in der Reihenfolge ihrer Nummern auf. Appliquez les autocollants dans l’ordre de leur numéro. Coloque los adhesivos siguiendo el orden. 1 2 3 4 カッコの中は反対側用のデカールナンバーです。 The decal numbers between brackets are only for the opposite side. Die Aufkleber in Klammern slnd für die andere Selte. Les autocollants entre parenthéses sont pour le côté opposé. Los números entre paréntesis son para el lado opuesto. 5 25 17 15 27 30 19 29 32 35 33 6 26 18 16 28 31 20 36 34 8( 7 ) 12 10( 9 ) 12( 11 ) 動作の確認と調整 / Checking Movement & Adjustment Die Bewegungen und Montage ueberpruefen VERIFICATIONS avant départ / Comprobaciones y ajustes 注意:工場出荷時に調整済ですが、安全のため必ずチェックをしてください。 チェック時、スイッチを入れる前にモーターコードを外してあることを確認してください。 CAUTION : Although basic setting is complete at time of shipment, always check for safety. When checking, make sure the motor cords are NOT connected before switching power ON. Achtung : Obwohl Sie Ihr Modell schon fahrfertig erworben haben, ueberpruefen Sie alle Teile auf deren Richtigkeit. Waehrend der Ueberpruefung, stellen Sie sicher, dass das Motorkabel NICHT angeschlossen ist, bevor Sie den Empfaenger angeschaltet haben. ATTENTION : Même si les réglages sont déjà effectués, TOUJOURS vérifier par précaution que les connecteurs du moteur NE SONT PAS CONNECTES lors de la mise sous tension. PRECAUCION : Aunque el ajuste básico viene realizado de fábrica, realice una comprobación de seguridad. Asegúrese que los cables del motor NO están conectados antes de conectar la alimentación. 送信機のスロットル側のリバーススイッチが“R”になっていることを確認します。 Make sure the Reverse Switch on the lower side of the transmitter is positioned on 'R'. Stellen Sie sicher, dass der Rückwärtsschalter an der unteren Seite des Senders die Position “R” aufweist. Vérifier que l'interrupteur de marche arrière sur le côté de l'émetteur (voir illustration) est positionné sur "R". Asegúrese que el Interruptor de Inversión en la parte inferior de la emisora está en la posición "R". D/R D/R ST.TRIM N TH.TRIM ST.REV R POWER リバース側 Reverse Reverse Inversé Invertido BATT. N TH.REV R スロットルリバーススイッチ Throttle Reverse Switch Servoreverse Inverseur de servos Interruptor Inversión スロットルトリムが中立になっていることを確認します。 送信機→受信機の順にスイッチをONにします。 R THE FINEST RADIO CONTROL MODELS Digital Propo rtional Radio Control System PERFEX KT-6 Make sure the throttle trim is in the center position. Switch the transmitter ON and then the receiver. Bitte sicherstellen, dass die Gastrimmung in mittlerer Position steht. Anschließend den Hauptschalter am Sender auf ON stellen, erst dann den Empfänger einschalten. Assurez vous que le trim des gaz est au neutre. Mettre en route l’émetteur puis le récepteur. Asegúrese que el trim de gas está en la posición neutral. Conecte la emisora y luego el receptor. 数秒後に、緑のランプが2回点滅した後、赤いランプが4回点滅します。 その後、赤と緑のランプが点灯します。この状態で設定の完了です。 A few seconds later, after the lamp flashes green twice, it will flash red 4 times. Following this the red and green lamps will remain on. This indicates setting is complete. Einige Sekunden später, nachdem die grüne LED zweimal geblinkt hat, blinkt die rote LED viermal. Danach leuchten beide LEDs permanent, die Programmierung ist abgeschlossen. Quelques secondes plus tard, après que la diode clignote 2 fois verte, elle clignotera 4 fois rouge. Ensuite les diodes rouge et verte reviendrons normales. Unos segundos más tarde, una vez la luz parpadee en verde dos veces, parpadeará en rojo 4 veces. Después, las luces roja y verde permanecerán encendidas. Esto indica que el proceso se ha completado. ランプ Lamp LED Diode Lampara モーターコードをつなぎます。ゆっくりとスロットルトリガーをにぎります。この時、前進側にスクリューが回転していればそのまま 走航可能です。 (もし逆に後進側にスクリューが回転していた場合は、モーターコードの任意の2本を差し替えもう一度チェックしてください。) Connect the motor cord. Hold the throttle trigger gently. If the screw starts rotating in the forward direction, the boat is ready to be run. (If the screw rotates in the reverse direction, swap the connection of the two motor cords and check rotating direction again). Schließen Sie den Motor am Regler an. Geben Sie vorsichtig Gas und prüfen Sie die Drehrichtung der Schraube. Dreht sich die Schraube in der falschen Richtung, müssen zwei beliebige Kabel des Motors am Regler vertauscht werden. Connecter le câble moteur. Maintenir la command de gaz sans forcer. Si l'axe tourne dans le sens de la marche avant, le bateau est prêt a être utilisé. (Si l'axe tourne dans le sens inverse intervertir 2 câbles moteur et vérifier de nouveau le sens de direction) Conecte el cable de motor. Apriete el gatillo de gas suavemente, si la hélice comienza a girar en sentido correcto, la lancha está lista para navegar. (Si la hélice gira en sentido contrario, cambie la situación de conexión de los dos cables y compruebe la dirección de la rotación de nuevo). 13 <ヒートプロテクション機能> < Overheating Protection Function > < Überhitzungs-Schutzfunktion > < Protection thermique > < Función Protección Sobrecalentamiento > スピードコントローラーには過負荷防止回路が組み込まれており、高温になると自動的に動作を停止します。 The speed controller features circuit breaker protection and automatically cuts out if it overheats. Der Regler bestitzt einen Überlastungsschutz und schaltet automatisch ab, wenn dieser überhitzt. Le variateur électronique de vitesse est équipé d'un système coupe circuit en cas de sur-chauffe. El variador de velocidad incorpora un circuito de protección que corta automáticamente en caso de sobrecalentamiento. (the rest must be delete). <ロストRxプロテクション機能> < Lost Rx Protection Function > < Empfangsverlust-Schutzfunktion > < Fail Safe > < Funcion de la proteccion de señal perdida > 注意 Cautions ! Achtung ! Attention ! Precaución 走航中に万が一送信機の電源が途切れた場合、自動的にブレーキがかかります。 (スロットルトリガーがニュートラルの場合を除く) この安全機能により暴走による危険を防止します。 Brakes are automatically applied if, for example, the transmitter batteries run down while driving. (except when the throttle is in neutral.) This safety function is designed to prevent loss of control. Die Bremse greift automatisch, wenn beispielsweise die Senderzellen während der Fahrt zu viel Spannung verlieren (außer der Gashebel steht in Neutralposition). Diese Sicherheitsfunktion soll den Kontrollverlust des Modells verhindern. Les freins s’actionnent automatiquement si, par exemple, les batteries de l’émetteur se vident entièrement pendant que vous roulez (sauf si la gâchette des gazs est au neutre). Cette fonction permet de prévenir les pertes de contrôle. El freno es automáticamente aplicado si, por ejemplo, las baterías de la emisora de descargan durante el funcionamiento (excepto cuando el gas está en neutral). <オートカットオフ機能> < Auto-Cut Off Function > < Automatische Abschalt-Funktion > < Coupure automatique > < Función de Corte Automático > バッテリーの過放電を防ぐため、オートカットオフ機能が搭載されています。スピードコントローラーの ランプが点滅し、スロットルが停止したら走航をやめ、バッテリーを充電してください。 The auto-cut function operates to prevent the battery power from running too low. When the speed controller lamp flashes and the throttle stops, cease operating the model and recharge the battery. Die Auto-Cut-Funktion verhindert eine Tiefentladung des Akkus. Wenn der Motor stehen bleibt und die LED am Regler blinkt, Betrieb einstellen und den Akku erneut laden. La fonction auto-cut agit pour empêcher que la batterie devienne trop faible. Lorsque la diode du variateur clignote et que les gaz s'arrêtent, cesser d'utiliser le modèle et recharger la batterie. La función corte automático funciona para prevenir que la batería se descargue por completo. Cuando la luz del variador de velocidad parpadea y el gas se detiene, detenga el modelo y recargue la batería. ※ニッケル水素バッテリー使用時、急激な負荷がかかった時などにボートが一時的にストップする場合があります。 When using a Nickel Metal Hydride battery, a sudden surge in power can cause the boat to stop temporarily. Beim Betrieb des Modells mit NiMH-Zellen kann es zu einem plötzlichen Einbruch der Leistung kommen, wenn die Zellen leer sind. Dans le cas de l'utilisation d'une batterie NiMh, des coupures soudaines de puissance peuvent se produire et stopper le bateau temporairement. Cuando utilice una batería Ni-MH, una repentina subida del voltaje puede causar que la lancha se detenga momentáneamente. モータースペック / Motor Spec / Features des Motors Spécifications de moteur / Características Motor 抵抗 Resistance InnenWiderstand Résistance Resistencia : : : : : : 無負荷時電流 : No-load Current @8.4V Lehrlauf Stromstärkeaufnahme : : Consommation : Corriente sin carga ターン数 No. of Turns Anzahl der Wicklungen Bobinage No. de vueltas 14 : : : : : : : : : : 0.0094Ω 0.0094Ω 0.0094Ω 0.0094Ω 0.0094Ω KV値 KV Value Leistung Régime (en KV) Rev por voltio 2.9A 2.9A 2.9A 2.9A 2.9A : 連続最大電流 Continuous Max. Current : : Dauerlast Courrant maximum en continu : Corriente Continua Max. : 9ターン 9 Turn 9 Turn 9 tours 9 Vueltas 最大電流 Max. Current maximaler Strom Courant maximum Corriente max. : : : : : 2250RPM/V 2250RPM/V 2250RPM/V 2250RPM/V 2250RPM/V 80A 80A 80A 80A 80A 100A 100A 100A 100A 100A スピードコントローラースペック / Speed Controller Spec / Features des Reglers Spécifications du variateur / Variador de Velocidad 入力電圧 : Input Voltage : Betriebsspannung : Voltage : Voltaje entrada : 8~14セルニッケル水素バッテリー(Ni-MH)1本〜2本(9.6V ~ 16.8V) および3~5セルLipoバッテリー(11.1V ~ 18.5V) 8~14-cell Ni-MH battery x 1 ~ 2 (9.6V ~ 16.8V) or 3~5 cell Lipo Battery (11.1V ~ 18.5V) 8~14-Zellen-NiMH-Akku x 1 - 2 (9.6V ~ 16.8V) oder 3- bis 5-Zellen-LiPo-Akku (11.1V ~ 18.5V) Batterie 8~14 éléments Ni-MH x 1 – 2 (9.6V ~ 16.8V) ou batterie Lipo 3 - 5 éléments (11.1V ~ 18.5V) 8~14-celula bateria Ni-MH x1 (9.6V ~ 16.8V) O 3~5 celula bateria Lipo (11.1V ~ 18.5V) 連続最大電流 : Continuous Max. Current : : Dauerlast Courant maximum en continu : Corriente Continua Max. : 160A 160A 160A 160A 160A ピーク電流 Peak Current Spitzenstrom Courant en crête Corriente Max inst. : : : : : 200A 200A 200A 200A 200A 重量 Weight Gewicht Poids Peso : : : : : 104g 104g 104g 104g 104g サイズ Size Abmessungen Dimensions Tamaño : : : : : 57 x 50 x 35mm 57 x 50 x 35mm 57 x 50 x 35mm 57 x 50 x 35mm 57 x 50 x 35mm 自動送信機および設定機能(ボタンによる設定不要) Automatic transmitter and setup functions (setup by buttons is not required). Automatisches Setup, kein Setupknopf notwendig. Reconnaissance automatique de l'émetteur et des fonctions de réglages. Ajuste de funciones automático (no es necesario ajustar con los botones). 前進、ブレーキ、後進 Forward, Brake, Reverse. Vorwärts, Bremse, Rückwärts. Avance, Frein, Marche Arrière. Delante, freno, reversa. センサーレスモーターのみ対応 Only compatible with sensorless motors. Nur kompatibel mit sensorlosen Motoren. Uniquement compatible avec les moteur de type sensorless. Solo compatible con motores sin sensores. オートカットオフボルテージ機能 Auto-cut off voltage function. Automatische spannungsbedingte Abschaltfunktion. Coupure automatique en cas surtension. Auto-corte funcion del voltaje. ヒートプロテクション機能 Overheating protection function. Überhitzungs-Schutzfunktion. Protection contre la surchauffe. Funcion de la proteccion de recalentamiento. ロストRxプロテクション機能 Lost Rx protection function. Empfangsverlust-Schutzfunktion Fail Safe. Funcion de la proteccion de señal perdida. 走航調整 / Adjust Running / Justierung des Antriebs / Réglages / Ajustes ●スクリューの角度を変更する事により走航姿勢とスピードの調整を行ないます。 Adjusting the running posture and the speed by adjusting the angle of propeller. Die Justierung des Antriebs Ajuster le gouvernail selon le schéma suivant. Eviter de changer l'angle de manière excessive par rapport à la position standard. Ajuste la velocidad cambiando el ángulo de la hélice 風→弱い 波→低い Wind : light Waves : low Wind : schwach Wellen : schwach Vent FAIBLE Vague PETITES Viento : flojo Olas : pequeñas 風→強い 波→高い Wind : strong Waves : high Wind : stark Wellen : stark Vent FORT Vague GROSSES Viento : fuerte Olas : altas 船首を上げる。 Bow will be up. Bug hebt sich L'étrave va monter. Proa se levanta 船首を上げたい時。 Bow will be up. Bug hebt sich L'étrave va monter. Proa se levanta 基準位置。 Standard position. Standard Position Position standard. Posición normal 船首を下げたい時。 Bow will be down. Bug senkt sich L'étrave va descendre. Proa baja すき間が無い様にする。 Make sure that there is no gap. Spaltfrei justieren S'assurer qu'il n'y a pas d'espace. Asegurarse de no dejar espacio 船首を下げる。 Bow will be down. Bug senkt sich L'étrave va descendre. Proa baja これより後ろの目盛は使用しない。 Do not adjust the rudder beyond this point. Nicht unter diesenPunkt gehen! Ne pas ajuster le gouvernail au-delà de ce point. No intente ajustar el timón más allá de este punto. 3x14mmビスをゆるめ て調整。 Adjust the angle by loosening the 3x14 screws. Winkel justieren durch Loesen der 3x14 mm Schrauben Ajuster l'angle en desserrant la vis de 3x14mm Ajuste el ángulo aflojando los tornillos 3x14mm 15 フラップの調整 / Trim Tab Adjustment / Justierung der Trimmklappen Réglage du trim des flaps / Ajuste de las aletas 基本的には、右側のフラップを少し下げて直進時のかたむきを調整します。 Slightly lower the right Trim Tab to adjust the axis of the hull when running straight. Rechte Trimmklappe nach unten stellen, damit das Boot gerade im Wasser liegt. Diminuer légèrement le trim du flap droit afin d'ajuster l'axe de la coque lorsqu'il navigue droit. Baje ligeramente la Aleta derecha para ajustar el eje del casco al navegar en línea recta. カットする。 Cut off. Abschneiden Découper Cortar 3 x 35mmキャップビスで調整する。 Adjust with 3 x 35mm Cap Screw. Mit 3x35mm Schraube justieren Ajuster la vis de 3 x 35mm Ajuste con el Tornillo Allen 3 x 35mm しめ込む Tighten Anziehen Serrer Apretando フラップが上がる Lowers Trim Tab Klappe senkt sich Baisser le trim du flap Baja la Aleta ゆるめる Loosen Lösen Dévisser Aflojando フラップが下がる Raises Trim Tab Klappe hebt sich Augmenter le trim du flap Se eleva la Aleta 風→弱い 波→低い Wind : light Waves : low Wind : leicht Wellen : niedrig Vent : léger Vagues : petites Viento : Suave Olas : bajas 風→強い 波→高い Wind : strong Waves : high Wind : stark Wellen : hoch : fort Vent Vagues : hautes Viento : fuerte Aolas : altas 両方のフラップを上げる。 Raise both Trim Tabs Beide Trimmklappen nach oben trimmen Augmenter les deux trim de flap Ambas Aletas se elevan 両方のフラップを下げる。 Lower both Trim Tabs Beide Trimmklappen nach unten trimmen Baisser les deux trim de flap Ambas Aletas bajan 取扱いの注意 / OPERATING YOUR MODEL SAFELY / Bedienungshinweise / UTILISER VOTRE MODELE EN TOUTE SECURITE / CONSEJOS DE SEGURIDAD 事故やケガ等の危険防止のため、次のことを必ずお守りください In order to avoid accidents and personal injury, be sure to observe the following: Bitte beachten Sie die folgenden Sicherheitshinweise Afin d'éviter tout incidents et problèmes, respecter les conseils suivants : Lea los siguientes consejos para prevenir posibles accidentes: ● R/Cボートは、湖や河川などの水辺で楽しむものです。操縦する方や同行の方が思わぬ事故に合わないように 注意し、必ず安全な場所で走航させてください。 With R/C boats, discover a new world of pleasure. Whether you run your boat on lakes, rivers or else-where, take precautionary measures to avoid accidents. Bitte beachten Sie beim Betrieb Ihres Modellbootes die folgenden Sicherheitshinweise, um Verletzungen oder Gefaehrdungen zu vermeiden: Avec votre bâteau, découvrez un nouveau monde de plaisir. Partout ou vous utilisez votre bâteau (lac, rivière ou autres), respecter les consignes suivantes : Descubra un nuevo mundo de diversión con los barcos R/C de KYOSHO. Lea atentamente los siguientes consejos para evitar accidentes que pudieran causar daños a personas y/o propiedades. ● ケガの恐れがあるので回転部分に手や物を入れないようにしてください。 Do not put your hands or any objects into rotating parts, as this could result in serious accidents! Fassen Sie niemals in bewegte Teile des Antriebs Ne jamais mettre votre main ou un objet sur des pièces en mouvements. Mantenga las manos alejadas de las piezas móviles. ● 走航直後はモーターやバッテリーなど熱くなっているのでしばらくさわらない。また、連続走航はさせない。 The motor and battery get hot from running. Do not touch them for a while after running. Die Teile des Antriebs werden im Betrieb sehr warm, nicht beruehren, erst abkuehlen lassen. Le moteur et la batterie chauffent au cours de leur utilisation. Ne pas les toucher après utilisation !!! El motor y la batería Ni-Cd se calientan durante el funcionamiento. Evite tocarlos con las manos mientras o después del funcionamiento. 16 ry atte oB Li-P ● 次のような場合ショートの原因となり火災等事故の恐れがあり非常に危険です。 Follow these warnings to avoid short circuits that may result in fires or other accidents: Vermeiden Sie unbedingt Kurzschluesse mit den Akkus! Dans les circonstances suivantes un court circuit pourrait survenir : Para evitar cortocircuitos no realice las operaciones abajo indicadas: Y ER TT BA ● 充電中は、バッテリー、充電器ともに発熱するので燃えやすい物の上での充電は火災等、 事故の恐れがありますのでおやめください。 Never put the charger and battery near flammable material while charging as this may cause fires! Legen Sie das Ladegeraet und den Akku niemals auf eine brennbare Unterlage, Brandgefahr Ne jamais exposer votre batterie à une source de chaleur, celle-çi pourrait prendre feu !!! Nunca coloque el cargador y la batería NiCd cerca de materiales inflamables mientras esté cargando. ry atte oB Li-P 破裂危険 EXPLOSIVE Explosionsgefahr EXPLOSION RIESGO DE EXPLOSION ■バッテリーの分解、改造は絶対にしない。 Never disassemble or modify batteries. Batterien nicht gewaltsam oeffnen! Ne jamais démonter ou modifier une batterie. Nunca intente modificar ni desmontar baterías NiCd. ■バッテリーは有害重金属が使用されています。火中に投げ入れて破裂すると 非常に危険ですので、絶対にしない。 Never dispose of batteries into a fire, as these can explode or emit noxious gases from heavy metals used in batteries ! Akkus niemals ins Feuer werfen! Ne jamais jeter une batterie dans le feu, les gazs alors émis sont très nocifs !!! Nunca arroje baterías NiCd al fuego ya que podrían explotar emanando gases nocivos. ry atte oB Li-P 破裂危険 EXPLOSIVE Explosionsgefahr EXPLOSION RIESGO DE EXPLOSION ● 次のような時や、次のような場所では絶対に走航させないでください。思わぬ事故やケガの原因となります。 For accident prevention, do not run your model under the following circumstances: Zur Vermeidung von Schaeden oder Unfaellen, beachten Sie bitte die folgenden Punkte Dans les cas suivants, ne pas utiliser votre bâteau afin d'éviter tout problème. No navegue con su modelo bajo las siguientes condiciones: ■海または海水面など。 In the sea or in other salt water. Modell nicht im offenen Meer oder in Salzwasser betreiben En mer ou autre plan d'eau salée. En el mar ni aguas saladas ■強風や波浪等の注意報が出ているとき。 In high waves or when storm warnings are in effect. Modell nicht bei starkem Wellengang oder starker Stroemung betreiben. Lorsque qu'il y a de grosses vagues ou de l'orage ! En aguas profundas o con corrientes fuertes. ■人が多い場所。 Always be considerate of other waterway users whilst using this model. Beachten Sie andere Boote oder Menschen im Wasser! Lorsque d'autre personne sont autour de vous ou évolue sur le plan d'eau ! Utilice su modelo con precaución cuando haya más embarcaciones navegando. ■河川が増水しているとき、また流れが速いとき。 When rivers are swollen or their current is strong! Fahren Sie niemals in der Fahrrinne grofler Schiffe! Lorsque le plan d'eau à un fort courant ! En aguas profundas con corrientes fuertes ■同じバンドの無線操縦模型がそばにいるとき。 Also, make sure that nobody is using the same frequency as you do at the same time! Sprechen Sie ihre Frequenz mit anderen Modellpiloten ab! Aussi, s'assurer que personne n'utilise la même fréquence que vous. Simpre compruebe si hubiera algún otro modelista navegando con la misma frecuencia ■プロポの電池残量が少ないとき。 With weak radio batteries! Nicht mit leeren Akkus starten! Lorsque les piles ou batteries sont déchargées. Cuando las baterías estén descargadas ?? ■船の動きがおかしい???とき。 When the boat behaves or operates strangely! Wenn das Modell nicht auf Ihre Steuerbefehle reagiert, Betrieb sofort einstellen! Lorsque votre bâteau se comporte étrangement ! Cuando el modelo se comporte de forma extraña ? ? ? 17 ●走航させない時は、必ず電源スイッチを『OFF』にし、安全のため必ずバッテリー のコネクターを抜き、本体より外しておく。発熱、発火の原因になります。 確認する CHECK Achtung ATTENTION AVISO When NOT using the model, always switch off the receiver and transmitter! Then disconnect the batteryand remove it from the model as it may lead to overheating and fires! Wenn das Modell lange Zeit nicht benutzt wird, Akkus aus Modell & Sender entfernen! Lorsque vous n'utilisez pas votre bâteau toujours éteindre le récepteur puis l'émetteur. Débrancher ensuite la batterie et retirer les piles afin d'éviter un court-circuits. Cuando no utilice el modelo siempre desconecte la emisora y el receptor y retire la batería NiCd del modelo. ● 不要になったバッテリーは捨てずに販売店にお戻しください。 Do not dispose of batteries! Return them to the retail shop! Alte Akkus nur an fachgerechter Stelle entsorgen,nicht in den Hausmuell werfen! Ne pas jeter une batterie !La rapporter à votre magasin. No tire nunca las baterías a la basura. Devuélvalas a la tienda donde las adquirió. 走航前のチェック / Before Operating / Bevor Sie beginnen / Avant de commencer. / Antes de rodar ビスなどのゆるみはありませんか? 可動部分はスムーズに動きますか?また、グリス等適切に塗ってありますか? 送・受信機の電池はありますか?また、確実に固定されていますか? サーボ、リンケージはスムーズで正確に動作しますか? コード類が可動部分にこすれたりしていませんか? 走航場所は安全ですか? 近くで同じバンドで無線操縦模型をしている人はいませんか? Ensure all screws are securely tightened. Ensure all moving parts move without binding. Are they greased for non-binding movement? Ensure the radio batteries are fresh. Are they securely installed? Ensure servos and linkages move without binding. Ensure all cords are not touching any moving parts. Ensure the area of operation is safe. Ensure nobody is on your frequency at the same time. Assurez-vous que toutes lesvis soien bien serrées. Assurez-vous que les pièces en mouvement ne cognent rien. Sont elles bein graissées? Assurez-vous que les batteries soient bien chargées. Sont-elles bien fixées? Assurez-bous que les servos et leurs connections peuvent être utilisés sans rien cogner. Assurez-vous que les cables ne touches pas les pièces en mouvements. Assurez-vous que la piste où vous roule est sûre. Assurez-vous que personne n'emploie la même fréquence que vous en même temps. Überprüfen Sie, ob alle Schrauben festgezogen sind. Überprüfen Sie, ob alle beweglichen Teile leichtgängig und an den entsprechenden Stellen gefettet sind. Überprüfen Sie, ob die Akkus / Batterien für die RC-Anlage geladen / frisch sind. Überprüfen Sie, ob die Servoanlenkungen sich leichtgängig bewegen können. Achten Sie darauf, dass keine Kabel in den Antriebsstrang geraten. Achten Sie darauf, daß das Gelände für den Betrieb Ihres Modells geeignet ist. Achten Sie auf eine Frequenzkontrolle! Asegúrese que todos los tornillos y tuercas están bien fijados Asegúrese que todas las piezas móviles se mueven suavemente. Asegúrese que las baterías están perfectamente cargadas. Asegúrese que los varillajes se mueven perfectamente. Asegúrese que los cables no contactan con piezas móviles. Asegúrese que el área está despejada También que nadie esté utilizando la misma frecuencia que usted. 18 1 送信機(スイッチ) Transmitter (Switch) Schalter für Fernsteuerung Radiocommande Emisora (Interruptor) ●重要 / IMPORTANT WICHTIG / IMPORTANT / IMPORTANTE サーボリバーススイッチ / Servo Reversing Switch / Servo-Reverse-Schalter Interrupteur d'inversion des servos / Interruptor de inversión de los servos ステアリング、スロットルの動作方向を反転させる時に使用します。 このモデルではステアリングはノーマル側、スロットルはリバース側で使用 します。 This model uses normal position for steering, and reverse for the throttle. Schalter Lenkservo auf Normal, Schalter Gas-Funktion auf Reverse. Utiliser la position NORMALE pour la direction et REVERSE pour les gaz. En este modelo sitúe la posición normal en la dirección y la inversa en el gas. N ST.REV R POWER BATT. D/R ST.TRIM TH.TRIM N TH.REV R 2 船体(スイッチ) Hull (Switch) Schalter für Rumpf Coque Casco (Interruptor) 注意 Cautions Achtung Attention ! Atención 船体は必ず船台の上に置き、万が一スクリューが回転しても 何も触れない事を確かめてからスイッチを入れてください。 <ON > 船台 Stand Bootsständer Stand de maintenance Soporte 3 ラダーのチェック Checking Rudder Ruderkontrolle Vérification de la direction Comprobación de la dirección 中立 左旋回 Neutral neutral Neutre Posición Neutral Left links Gauche Izquierda ラダーホイールを操作してラダーの動きをチェック。 Move the rudder wheel and check movement of rudder. Bewegen Sie das Lenkrad und pruefen Sie die Bewegung des Ruders Actionner le volant de la radio afin de vérifier la commande de direction Mueva el volante y compruebe el movimiento del timón. 右旋回 Right rechts Droite Derecha D/R ST.TRIM TH.TRIM 右旋回 Right rechts Droite Derecha 左旋回 Left links Gauche Izquierda 4 ラダートリム Rudder Trim Die Ruder Trimmung Trim de direction Trim Dirección ●船体にバッテリーをつないだ時、 ラダーが左右に曲っている場合に調整 します。 Adjust if rudder is not straight when power is switched ON. Mit der Trimmung kann die Neutralstellung des Ruders korrigiert werden. Ajuster si la bâteau ne va pas droit lorsqu'il fonctionne. Ajuste si el timón no está recto al conectar el equipo RC. Before switching power ON always rest boat on the stand and make sure propeller is clear should it spin. Bevor Sie das Modell einschalten, unbedingt darauf achten, daß die Schraube sich frei drehen kann! Avant de mettre sur marche ("ON") l'interrupteur, toujours laisser le bateau sur son stand et s'assurer que l'hélice tourne librement. Antes de conectar el interruptor , coloque siempre el modelo en el soporte asegurándose de no acercarse a la hélice por si comenzara a girar. 電源をいれるときは必ず送信機のスイッチを先に入れてく ださい。 Always turn the transmitter's power switch ON first! Schalten Sie zuerst den Sender ein! Toujours allumer la radiocommande en premier ! Siempre conecte el interruptor de la emisora en primer lugar. ラダーが左右逆の動きになる時は送信機のリバーススイッチの位置を 確認してください。 If rudder is moving in opposite direction, refer to page 3 of this guide and check position of Reverse Switch. Falls sich das Ruder in die falsche Richtung bewegt Servo Reverse Schalter betaetigen (siehe Seite 3) Si la direction bouge dans le sens inverse, se référer à la page 3 de cette notice et vérifier la position de l'inverseur de servo. Si el timón se mueve en la dirección opuesta, lea la página 3 y compruebe la posición del interruptor de inversión. D/R ST.TRIM ST.TRIM 右 Right rechts Droite Derecha TH.TRIM 左 Left links Gauche Izquierda ラダーホイールに指を触れない(ニュートラル)ときラダーがまっすぐになるように ラダートリムで微調整します。 Adjust Rudder Trim so rudder is straight when rudder wheel is in neutral (hands off position). Ruder so justieren, dass es exakt auf neutral steht, wenn das Lenkrad auf neutral steht. Ajuster le trim de direction si le bâteau ne navigue pas droit lorsque le volant de la radio est au neutre. Ajuste el trim de dirección de manera que el timón esté recto al estar el volante en posición neutral. 走航させる時に再調整します。 Adjust again when running. Die Feinjustierung erfolgt im Fahrbetrieb Ajuster la direction avec le trim lorsque la voiture roule. Ajuste de nuevo al rodar con el modelo 19 5 スピードコントローラーのチェック Check Speed Controller Ueberpruefung des Fahrtenreglers Vérification du variateur de vitesse Comprobación Variador Velocidad 注意 Cautions Achtung Attention ! Atención 船台の上でスクリューに何も触れない状態で操作と動きを 確認してください。 Place boat on stand, ensure propeller is clear, then check model is working properly. Boot so aufbocken, daß sich die Schraube frei drehen kann - prüfen Sie alle Funktionen! Placer le bateau sur son stand et s'assurer que l'hélice et les autres pièces en rotation tournent librement. Coloque el modelo en el soporte, asegurándose que la hélice no contacta con ningún objeto, ahora compruebe si el timón se mueve correctamente al mover el volante de su emisora. 前進 Forward vorwärts Avant Adelante 中立 Neutral neutral Neutre Neutro スロットルトリガーを中立に保ち、スクリューが止まるようスロットルトリムを回して調整します。 Leave Throttle Trigger in neutral, then adjust Throttle Trim until propeller comes to a complete stop. Gashebel auf neutral stellen, anschließend den Motor komplett auf ìAUSî trimmen. Placer le manche des gaz de la radio au neutre puis, ajuster le trim de gaz jusqu'à ce qu'elle s'arrête complètement. Sitúe el Gatillo de Gas en posición neutral, ahora ajuste el Trim de Gas hasta que la hélice no gire. スロットルトリガー / Throttle Trigger / Gashebel / Gachette de gaz / frein / Gatillo de Gas スロットルトリム / Throttle Trim / Trimmung für Gas / Trim de gaz / frein / Trim Gas D/R ST.TRIM TH.TRIM 中立 Neutral neutral Neutre Posición Neutral 走航が終わったら / AFTER RUNNING . . . / Nach dem Betrieb / APRES UTILISATION / DESPUES DE NAVEGAR 1 船を回収する。 After finishing running, collect your boat. Boot aus dem Wasser Récupérer votre bateau après utilisation. Retire su modelo del agua 2 受信機のスイッチを切る。 Switch off the receiver. Empfaenger ausschalten Eteindre le récepteur. Desconecte el receptor 3 送信機のスイッチを切る。 Switch off the transmitter. Sender ausschalten Eteindre la radio. Desconecte la emisora. N OFF OFF ST.REV R POWER BATT. N TH.REV R 4 船体内部の水分を良く乾かす。 Remove dirt from the hull. Modell reinigen und trocknen Essuyer le bateau. Limpie el modelo 5 バッテリーのコネクター をはずす。 Disconnect the battery. Akkus trennen Retirer la batterie. Desconecte la batería NiCd ●走航させない時は、必ず電源スイッチを『OFF』にし、安全のため必ずバッテリーのコネクターを抜き、本体より外しておく。 発熱、発火の原因になります。 When NOT using the model, always switch off the receiver and transmitter! Furthermore, disconnect the battery and remove it from the model!This may lead to overheat and fires! Nach dem Betrieb alles ausschalten,Akku vom system trennen und aus dem Modell herausnehmen! Après utilisation TOUJOURS étaindre la radio et le récepteur et TOUJOURS retirer la batterie. Cuando no utilice el modelo, desconecte el receptor y la emisora. También desconecte la batería NiCd y retírela del modelo. 20 確認する CHECK Achtung ATTENTION AVISO 日常の整備 / EVERYDAY MAINTENANCE. / Die Wartung / MAINTENANCE / Después de navegar ねじ、ナットのゆるみ、老化をチェック。 回転部分にはグリスを塗っておく。 コードが可動部分にこすれたりして破損している ときは修理する。 サーボのコードや受信機のアンテナ線が破損して いるときは、使用しているプロポメーカーに修理を 依頼する。 部品が摩耗または破損していないかチェック。 船体の汚れをとる。 船体に入っている水をよくふき取り、よく乾かす。 金属部品にオイルを塗る。 Make sure screws and nuts are securely tightened and other parts are not worn. Grease all rotating parts. Repair the wiring should cords be damaged or caught in rotating parts. Should servo cords and the receiver antenna be damaged, return them to the manufacturer for repair. Make sure all parts are neither worn nor damaged. Remove dirt from the hull. Draw out water from inside the hull. Oil the metal parts. Alle Verschraubungen auf festen Sitz pruefen S'assurer que les vis et autres pièces soient bien serrées. Graisser toutes les pièces en mouvement. Vérifier toutes les tringleries. Alle beweglichen Teile nachfetten Alle Kabel auf Beschaedigungen pruefen, ggf. neu isolieren oder erstzen. Vérifier le branchement des cables. S'assurer qu'ils ne soient pas coupés. S'assurer que les pièces ne soient pas endomagées. Essuyer la coque du bateau. Retirer l'eau du bateau. Nettoyer avec de l'huile les pièces métales. Pruefen Sie die Antriebsteile auf Verschleifl Modell nach jeder Fahrt reinigen Entfernen Sie saemtliche Feuchtigkeit aus dem Inneren des Rumpfes Asegúrese que los tornillos y tuercas están bien fijados y que todas las piezas estén en correcto estado. Engrase todas las piezas móviles. Repare los cables y piezas defectusas. Utilice siempre recambios originales KYOSHO Si observa que los cables de servo o antena del receptor están rotos, acuda a la tienda donde los adquirió para su reparación. Compruebe periódicamente todas las piezas mecánicas. Limpie la suciedad del casco. Vacíe el agua del interior del casco. 故障かなと思う前に / TROUBLE SHOOTING / Probleml sungen / EN CAS DE PROBLEMES... / GUIA DE PROBLEMAS 症 状 アンプが動かない。 モーターがまわらない。 原 因 対 策 送、受信機のスイッチがはいっていない。 送、受信機のスイッチを入れる。 送信機の電池がない。 新しいものに交換する。 配線をまちがえている。 プロポの説明書をよく読んでコネクターを 接続する。 バッテリーの容量不足。 バッテリーを充電する。 配線をまちがえている。 説明書をよく読んで配線する。 コネクターの接触不良。 コネクターのはめこみをきつくする。 モーターの故障。 モーターを交換する。 モーターはまわるが走らない。 ジョイントがついていない。 または、ビスがゆるんでいる。 ジョイントを止めているビスを しめる。 スクリューを手でまわすと重い またはまわらない。 回転部分にゴミやホコリがつまっている。 ゴミやホコリを取り除きグリスを塗っておく。 スピードコントロールスティ ックをはなしても船がとまら ない。 アンプの調整不良。 プロポのトリムで調整する。 このとき、全開に入らないようなら説明書 を読んでアンプをもう一度調整する。 走航中アンプの保護回路が作動して 一時的に走航できなくなる 駆動が重い。 回転部分のゴミを取除きグリスを塗る。 オーバーヒートしている。 アンプが冷めるまで休ませる。 バッテリーの残量が不足している。 バッテリーを冷ましてから充電する。 21 PROBLEMA CAUSA Variador no funciona. El Motor no gira. SOLUCION Emisora y/o receptor desconectados Conectar Baterías emisora descargadas Recargar o colocar baterías nuevas Instalación equipo de radio mal efectuada. Corregir siguiendo las instrucciones del equipo de radio Batería descargada Equipo de radio mal instalado Recargar batería Corregir Conectores sueltos Volver a efectuar la conexión Motor estropeado. Instalar un nuevo motor El Motor funciona pero el modelo no navega Junta no instalada, o tornillos sueltos Apretar tornillos. Al girarla con la mano, la hélice no gira o es difícil hacerla girar Suciedad en las piezas mecánicas. Varillaje mal ajustado Limpiar y reengrasar. El modelo no se detiene. Ajustar el trim de gas en la emisora. Si el variador de velocidad no retorna a la posición neutral, reajustar el varillaje. Limpiar el eje y aplicar grasa. Dejar enfriar. Una vez enfriada, recargar la batería. El eje no gira suavemente. Sobrecalentamiento. Bateria descargada. El Variador de Velocidad se para y no funciona. 分解図1 / EXPLODED VIEW 1 / Explosionszeichnung 1 / VUE ECLATEE 1 / DESPIECE 1 一部パーツ販売していないパーツがあります。 Note that some parts are not sold as spare parts! Einige Teile sind nur im Sammelpack erhaeltlich! Les pièces signalées uniquement par un nombre clé ne sont pas vendues seules ! Algunas piezas no se venden individualmente. 65 94302 94302 3x3mm 66 94302 67 94302 94302 3x35mm 64 94302 65 94302 94302 3x3mm 66 94302 67 94302 94302 3x12mm TP 94302 3x35mm 64 94302 94302 3x12mm TP © 2010 KYOSHO CORPORATION /禁無断転載複製 23 分解図 2 / EXPLODED VIEW 2 / Explosionszeichnung 2 / VUE ECLATEE 2 / DESPIECE 2 7 1700 一部パーツ販売していないパーツがあります。 Note that some parts are not sold as spare parts! Einige Teile sind nur im Sammelpack erhaeltlich! Les pièces signalées uniquement par un nombre clé ne sont pas vendues seules ! Algunas piezas no se venden individualmente. 16 TN022VE 61 1704 18 1705 TN003C 2.6x8mmTP 17 1889 58 TN003C 20 TN003C 9 94881 10 94881 ORG02BK TN003C 2.6x8mmTP 53 TN003C 96183 8 20mm 12 94881 96183 8 120mm 57 TN003C TN003C 2.6x8mmTP 55 TN003C 11 94881 ORG05 24 94852 57 TN003C 13 94881 14 94881 96183 8 120mm 19 TN003C 60 TN008C 59 HJ12 25 94856 24 94852 96183 8 50mm 23 94105C TN003C 2.6x8mmTP 25 94856 TN003C 3x8mmTP 54 TN003C TN003 3x8mmTP 58 TN003C 22 94851 56 TN003C 17 1889 3 94752 1 TN021VE 63 94201Z 25 94856 59 HJ12 8 96183 10mm 37 TN025 TN025 33 BRG003SUS TN025 33 BRG003SUS 36 TN025 © Copyright 2010 KYOSHO CORPORATION / 禁無断転載複製 24 TN004C 3x10mm TN004C TN004C-1 3x3mm W0148 TN004C 62 TN004C 3x10mm 29 TN004C W0148 TN004C 62 TN004C 32 TN004C-1 TN004C 3x6mm 62 W0148 TN004C TN004C TN004C-3 4x4mm TN004C 3x6mm TN004C TN004C-3 2.6x6mm TN004C 3x10mm TN004C 3x6mm 62 W0148 TN004C TN004C 31 TN004C-2 TN004C 30 TN004C-3 TN004C 3 mm 29 TN004C 96183 8 120mm 28 TN004C 26 TN004C 27 TN004C TN004C-4 35 ORI61116 33 TN004C BRG003SUS 52 TN007C 96183 8 190mm TN007C 3x8mmTP TN007C 3x8mmTP TN007C 3x8mmTP 16 96441B TN007C 3x8mmTP 51 TN007C 94907 2.6x12mmTP TN007C 3x8mmTP 68 ORI62059 96183 8 190mm 16 96441B 94907 49 94905-3 94907 3x14mm 50 94907 41 94907 94907 4x4mm 94907 E3.0Eリング E3.0 E-ring E-Ring E3.0 Clips 3.0mm Clip E3.0 47 94907 94905-3 94907 2.6x8mmTP 94907 3x12mmTP 46 94907 94905-3 94907 39 94905-1 41 94907 94907 33 BRG003SUS 45 94907 94905-2C 48 94907 94905-3 44 94434 94907 2.6x8mmTP 40 94907 94907-1 94907 4x4mm 43 94907 94905-2C 42 94901-3 94907 33 94907 BRG003SUS 94907 3mm 25 スペアパーツ SPARE PARTS 品番 No. パーツ名 Part Names 内容(キーNo.と入数)★定価 Description (Key No. & Qty.) (税込) ★: FOR JAPANESE MARKET ONLY. パーツ名 Part Names 品番 No. 内容(キーNo.と入数)★定価 Description (Key No. & Qty.) (税込) 33 x2 735 94105C コードブーツ Cord Boots 23 x4 315 59 x1 210 94201Z クリート Cleat 63 x2 315 ORG02BK シリコンOリング(P2)ブラック Silicone O-Ring(P2)Black 10 x10 210 94302 フィン付フラップ Trim Tab W/Fin ORG05 シリコンOリング(P5)オレンジ Silicone O-Ring(P5)Orange 11 x10 420 94434 スクリュー D42 x P1.4 Propeller D42 x P1.4 44 x2 315 ORI 61116 ボルテックスマリン800BLモーター VOLTEX Marine 800 BL Motor 35 x1 7140 94851 アンテナグロメット Antenna Grommet 22 x5 210 ORI 62059 ボルテックスマリン120BLコントローラー VOLTEX Marine 120 BL Contoroller 68 x1 10500 94852 24 x2 263 1 x1 8925 94856 防水フレキシブルブーツ (L) Waterproof Flexible Boots (L) 4mmグロメット 4mm Grommet 25 x5 263 防水レシーバースイッチホルダー Waterproof Switch Holder 9 10 11 12 13 14 x1 683 スラストカラー Thrust Collar BRG003SUS ステンレスベアリング 4x8x3 Stainless Ball Bearing 4x8x3 HJ12 パイプセット Pipe Set TN021VE 船体(ツインストーム800VE) Hull (Twin Storm 800VE) TN022VE キャビン(ツインストーム800VE) Cabin (Twin Storm 800VE) TN003C ハッチセット(ツインストーム800) Hatch Set (Twin Storm 800) TN004C ギヤボックスセット(ツインストーム800) Gear Box Set (Twin Storm 800) 16 x1 2100 94881 19 20 53 54 55 56 x1 57 58 x2 1680 94901-3 42 x10 210 2940 4mmリバーシブルストッパーセット 94905-2C 4mm Reversible Stopper Set 43 45 x1 420 46 47 48 x1 26 27 28 30 31 33 x1 29 32 x2 62 x8 TN004C-1 ピニオンギヤ 27T Pinion Gear 27T 32 x1 630 SPアウトドライブラダー 94905-3 SP Out Drive Rudder TN004C-2 スパーギヤ 40T Spur Gear 40T 31 x1 420 TN004C-3 スパーギヤホルダー Spur Gear Holder 30 x1 735 SPアウトドライブラダー28用 SP Out Drive Rudder.28 ラダージョイントセット28用 94907-1 Rudder Joint Set.28 27 x1 420 TN004C-4 シャフトホルダー Shaft Holder TN025 スタンチューブセット(286) (ツインストーム800) 36 37 x1 33 x2 Stern Tube Set (286) (Twin Storm 800) TN007C ラジオトレイ(ツインストーム800) Radio Tray (Twin Storm 800) 吸水ジョイントパイプ 4x95 Joint Pipe 4x95 デカール(ツインストーム800VE) TN029VE Decal(Twin Storm 800VE) TN008C M3ヘッドワッシャー W0148 M3 Head Washer 51 x1 52 x 2 1050 60 x 1 263 デカール 一式 Decal 1set スポンジテープ(1mm) 96441B Sponge Tape (1mm) 630 1704 61 x6 420 1705 カラーアンテナ Color Antenna 18 x6 525 96183BL/SG カラーシリコンチューブ(ブルー/スモークグレー) 8 (1000mm)x2 Color Silicone Tube (Blue / Smoke gray) 578 105 17 x5 パーツ名 Part Names BPM437-3 金属プロペラD37xP1.4/3ブレード Metal Propeller (D37xP1.4/3 Blade) BRG102SUS ステンレススラストベアリング4x9x4 Stainless Thrust Bearing 4x9x4 FV016 ターンフィン(LLサイズ、カーボン) Turn Fin (LL size Carbon) 内容 Description ★定価 (税込) 44 と交換 Instead of 44 42 と交換1ヶ入り Instead of 42 , 1pc. 旋回性を向上。1枚入り。 Improves turning stability. Includes 1pc. デジタルセットアップボックス (VORTEX ESC用) ESCの各種セッティング用 Set-Up tool for the ESC ORI65026 Digital Set up Box (for VORTEX ESC) ローギヤセット42:25 (ツインストーム800) TNW001C Low Gear Set 42:25 (Twin Storm 800) ピニオンギヤ25T TNW001C-1 Pinion Gear 25T スパーギヤ42T TNW001C-2 Spur Gear 42T 39 40 42 43 45 46 x1 47 48 50 x1 33 41 49 x2 3885 39 40 x1 1050 16 x12 315 キットの部品の一部にはスペアパーツとして販売してないものがあります。 京商ではオプションパーツを販売していますのでお買い求めください。 Some of the parts included are not available as spare parts. Purchase optional parts instead. オプションパーツ OPTIONAL PARTS 品番 No. 525 1890 62 x 4 ボディピン Body Pin 94907 49 x 2 2100 ニカドストラップ NiCd Strap 1889 1890 64 65 66 67 x2 31 32 と交換。ロングラン タイプギヤ比1.68:1 Instead of 31 & 32 . Offers more 品番 No. ★: FOR JAPANESE MARKET ONLY. パーツ名 Part Names 3675 1700 蛍光ストラップ(S) Fluorescent Strap (S) 630 1879 ホビーグリス Hobby Grease 2730 94752 防水クリアーテープ 2310 セッティングウェイト 96161 Setting Weight WaterProofing Tape 内容 Description 7 ★定価 (税込) と交換。18本入り。 Instead of 7 , 18pcs. 189 158 2g x1 3 と交換。 Instead of 3 , 1pc 473 走行姿勢調整用ウェイト60g入り。 Setting weight for adjusting boat position. Includes 60g. 504 1575 running time (Gear Ratio / 1.68 : 1). 1ヶ入り 1Pc 1ヶ入り 1Pc 630 420 ※平成22年3月31日現在。 26 The service mentioned below is available only for Japanese market. 組立や、操作上で不明な点のお問い合せ方法 これらのサービスは日本国内に限らせて頂きます 組立てたり、操作してみて上手くいかない点などございましたら、ご購入いただいた 販売店または、京商ユーザー相談室へお問い合せください。 京商ユーザー相談室へお問い合せの際は、お電話いただくか、下記のお問い合せ用紙 に必要事項をご記入のうえ、FAXまたは郵便でお送りください。 京商へのお問い合せ先 → 「京商ユーザー相談室」 京商にお問い合せの際は、「京商ユーザー相談室」にご連絡ください。 お問い合せの際は、お手元に商品や組立/取扱説明書をご用意のうえ、組立/取扱説明書のページ数, 行程番号, 部品番号 (キーNo.)を用いるなど、なるべく具体的にお知らせください。 046-229-4115 FAXでのお問い合せは:0 4 6 - 2 2 9 - 1 5 0 1 電話でのお問い合せは、 月曜〜金曜(祝祭日を除く)13:00〜19:00。 電話でのお問い合せは: 郵便でのお問い合せは:〒 243-0034 F A X では、24時間お問い合せの受付をして居ります。回答は、翌営業日 以降となる場合があります。営業日:月曜〜金曜(祝祭日を除く) 神奈川県 厚木市 船子153 京商株式会社 ユーザー相談室宛 キリトリ線 お問い合せ用紙 お問い合せ用紙は、F A X または郵便でお送りください。回答方法は、京商で検討のうえ考慮させて頂きます。 郵送の場合は、お問い合せ用紙のコピーを保管してください。 No.40031VE 品番 EP ツインストーム 800 VE 商品名 店名 都道府県 ご購入店 ご使用 プロポ (電 話 メーカー名 商品名 ご使用の ご購入 ) 年月日 平成 年 月 日 モーター エンジン フリガナ R/C歴 ご氏名 ご自宅 住所 約 年 〒_ _ _ −_ _ _ _ 都道 府県 ご自宅の 電話 連絡先 平日の昼間に 可能な連絡先 電話 ( ) FAX ( ) ( ) FAX ( ) 月曜〜金曜(祝祭日を除く)10:00〜18:00で電話連絡可能な時間帯 : 頃 受付No.(京商記入欄) お問い合せご記入欄:組立/取扱説明書のページ数や部品番号(キーNo.)を用いるなど、なるべく具体的にご記入ください。 ※京商株式会社では、お客様の個人情報の保護に力を入れております。お客様よりの、注文及びお問い合せを通じて知りえたお客様の個人情報につきましては、(1)〜(3)の場合を除き無断で第三者に提供 したり開示するようなことはありません。 (1)お客様の事前の承諾を受けた場合。(2)法律に基づき開示請求を受けた場合。(3)サービスの提供のため当社の委託先に開示する場合。 京商株式会社 R THE FINEST RADIO CONTROL MODELS 京商ホームページ www.kyosho.com 〒243-0034 神奈川県厚木市船子153 ●ユーザー相談室直通電話 046-229-4115 お問い合せは:月曜〜金曜(祝祭日を除く)13:00〜19:00 85291003-1 PRINTED IN CHINA-
 1
1
-
 2
2
-
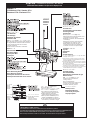 3
3
-
 4
4
-
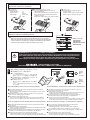 5
5
-
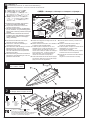 6
6
-
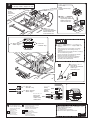 7
7
-
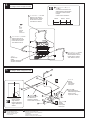 8
8
-
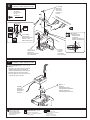 9
9
-
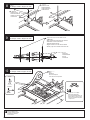 10
10
-
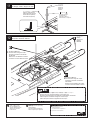 11
11
-
 12
12
-
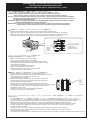 13
13
-
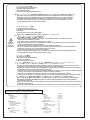 14
14
-
 15
15
-
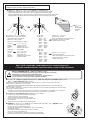 16
16
-
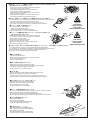 17
17
-
 18
18
-
 19
19
-
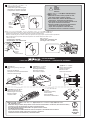 20
20
-
 21
21
-
 22
22
-
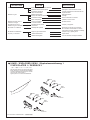 23
23
-
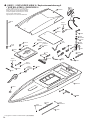 24
24
-
 25
25
-
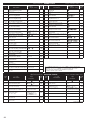 26
26
-
 27
27
-
 28
28


Kyosho EP TWIN STORM 800 VE El manual del propietario
- Categoría
- Juguetes a control remoto
- Tipo
- El manual del propietario
- Este manual también es adecuado para
en otros idiomas
Artículos relacionados
-
Kyosho EP AIR STREAK 500 VE El manual del propietario
-
-
-
-
-
-
-
-
-
