
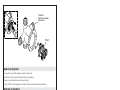
Remove the Cap
□ Turn off the water supply.
□ Remove the valve trim.
□ Note the position of the tab or the word “UP” on the cap.
□ Remove the screws.
□ Style A: Remove the cap and adapter (if present).
□ Style B: Remove the collar and cap.
Retirer le capuchon
□ Couper l’alimentation en eau.
□ Retirer la garniture de robine erie.
□ Noter la position de la pa e ou du mot “UP” (Vers le haut) sur le capuchon.
□ Retirer les vis.
□ Style A: Retirer le capuchon et l’adaptateur (le cas échéant).
□ Style B: Retirer le collier et le capuchon.
Retire la tapa
□ Cierre el suministro de agua.
□ Retire la guarnición de la válvula.
□ Fíjese en la posición de la lengüeta o de la palabra “UP” en la tapa.
□ Saque los tornillos.
□ Estilo A: Retire la tapa y el adaptador (si hay uno).
□ Estilo B: Retire el anillo y la tapa.
1250244-9-B Kohler Co.
Service Kit Instructions
Instructions pour le kit d’entretien
Instrucciones para el kit de servicio
1
Tab
Languette
Lengüeta
"UP"
Adapter
Adaptateur
Adaptador
Style A
Style A
Estilo A
Style B
Style B
Estilo B

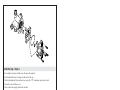
Replace the Regulator
□ Use a pliers to pull the regulator from the valve body.
□ Install two new O-rings to the back of the new regulator.
□ Remove any debris from inside the valve body.
□ Align “COLD” on the regulator with the cold inlet and fully insert into the body.
Remplacer le régulateur
□ Utiliser une pince pour tirer sur le régulateur afi n de le retirer du corps de la vanne.
□ Installer deux joints toriques neufs sur l’arrière du nouveau régulateur.
□ Retirer tous les débris de l’intérieur du corps de la vanne.
□ Aligner la marque “COLD” (Froid) du régulateur sur le port d’entrée de l’eau froide et insérer
entièrement dans le corps.
Cambie el regulador
□ Con unas pinzas saque el regulador del cuerpo de la válvula.
□ Instale 2 nuevos arosellos en la parte de atrás del nuevo regulador.
□ Retire todos los residuos del interior del cuerpo de la válvula.
□ Alinee la palabra “COLD” en el regulador con el puerto de entrada de agua fría, e introdúzcalo
por completo en el cuerpo.
Kohler Co. 1250244-9-B2
Cold Inlet
Entrée d'eau froide
Entrada fría
"COLD"

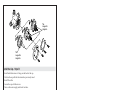
Install the Cap - Style A
□ If an adapter is present, install a new O-ring in the adapter.
□ Install and lubricate new O-rings on the back of the cap.
□ Position the adapter (if present) and new cap with “UP” oriented as previously noted.
□ Secure the cap with the screws.
□ Turn on the water supply and check for leaks.
□ Position the handle on the stem to check proper operation.
□ Reinstall the valve trim.
Installer le capuchon - Style A
□ Si un adaptateur est présent, installer un joint torique neuf dans l’adaptateur.
□ Installer et lubrifi er les joints toriques neufs sur l’arrière du capuchon.
□ Positionner l’adaptateur (le cas échéant) et le capuchon neuf avec la marque “UP” (Vers le haut)
dirigée tel que noté auparavant.
□ Sécuriser le capuchon avec les vis.
□ Ouvrir l’alimentation en eau et rechercher des fuites.
□ Positionner la poignée sur la tige pour vérifi er le bon fonctionnement.
□ Réinstaller la garniture de robine erie.
Instale la tapa - Estilo A
□ Si hay un adaptador, instale un nuevo arosello en el adaptador.
□ Instale y lubrique los nuevos arosellos en la parte de atrás de la tapa.
□ Coloque el adaptador (si hay uno) y la nueva tapa con la palabra “UP” orientada como estaba
anteriormente.
□ Fije la tapa con los tornillos.
□ Abra el suministro de agua y verifi que que no haya fugas.
□ Coloque la manija en la espiga para verifi car el funcionamiento.
□ Vuelva a instalar la guarnición de la válvula.
1250244-9-B Kohler Co.3
"UP"

Install the Cap - Style B
□ Install and lubricate new O-rings on the back of the cap.
□ Position the cap with the tab oriented as previously noted.
□ Install the collar.
□ Secure the cap with the screws.
□ Turn on the water supply and check for leaks.
□ Position the handle on the stem to check proper operation.
□ Reinstall the valve trim.
Installer le capuchon - Style B
□ Installer et lubrifi er les joints toriques neufs sur l’arrière du capuchon.
□ Positionner le capuchon avec la pa e dirigée tel que noté auparavant.
□ Installer le collier.
□ Sécuriser le capuchon avec les vis.
□ Ouvrir l’alimentation en eau et rechercher des fuites.
□ Positionner la poignée sur la tige pour vérifi er le bon fonctionnement.
□ Réinstaller la garniture de robine erie.
Instale la tapa - Estilo B
□ Instale y lubrique los nuevos arosellos en la parte de atrás de la tapa.
□ Coloque la tapa con la lengüeta orientada como estaba anteriormente.
□ Instale el anillo.
□ Fije la tapa con los tornillos.
□ Abra el suministro de agua y verifi que que no haya fugas.
□ Coloque la manija en la espiga para verifi car el funcionamiento.
□ Vuelva a instalar la guarnición de la válvula.
©2018 Kohler Co. 1250244-9-B
USA/Canada: 1-800-4KOHLER
México: 001-800-456-4537
kohler.com
Tab
Languette
Lengüeta
Tab
Languette
Lengüeta
Transcripción de documentos
Service Kit Instructions Instructions pour le kit d’entretien Instrucciones para el kit de servicio Style B Style B Estilo B Tab Languette Lengüeta Style A Style A Estilo A Adapter Adaptateur Adaptador "UP" Remove the Cap □ □ □ □ □ □ Turn off the water supply. Remove the valve trim. Note the position of the tab or the word “UP” on the cap. Remove the screws. Style A: Remove the cap and adapter (if present). Style B: Remove the collar and cap. Retirer le capuchon □ □ □ □ □ □ Couper l’alimentation en eau. Retirer la garniture de robinetterie. Noter la position de la patte ou du mot “UP” (Vers le haut) sur le capuchon. Retirer les vis. Style A: Retirer le capuchon et l’adaptateur (le cas échéant). Style B: Retirer le collier et le capuchon. Retire la tapa □ □ □ □ □ □ Cierre el suministro de agua. Retire la guarnición de la válvula. Fíjese en la posición de la lengüeta o de la palabra “UP” en la tapa. Saque los tornillos. Estilo A: Retire la tapa y el adaptador (si hay uno). Estilo B: Retire el anillo y la tapa. 1250244-9-B 1 Kohler Co. Cold Inlet Entrée d'eau froide Entrada fría "COLD" Replace the Regulator □ □ □ □ Use a pliers to pull the regulator from the valve body. Install two new O-rings to the back of the new regulator. Remove any debris from inside the valve body. Align “COLD” on the regulator with the cold inlet and fully insert into the body. Remplacer le régulateur □ □ □ □ Utiliser une pince pour tirer sur le régulateur afin de le retirer du corps de la vanne. Installer deux joints toriques neufs sur l’arrière du nouveau régulateur. Retirer tous les débris de l’intérieur du corps de la vanne. Aligner la marque “COLD” (Froid) du régulateur sur le port d’entrée de l’eau froide et insérer entièrement dans le corps. Cambie el regulador □ □ □ □ Con unas pinzas saque el regulador del cuerpo de la válvula. Instale 2 nuevos arosellos en la parte de atrás del nuevo regulador. Retire todos los residuos del interior del cuerpo de la válvula. Alinee la palabra “COLD” en el regulador con el puerto de entrada de agua fría, e introdúzcalo por completo en el cuerpo. Kohler Co. 2 1250244-9-B "UP" Install the Cap - Style A □ □ □ □ □ □ □ If an adapter is present, install a new O-ring in the adapter. Install and lubricate new O-rings on the back of the cap. Position the adapter (if present) and new cap with “UP” oriented as previously noted. Secure the cap with the screws. Turn on the water supply and check for leaks. Position the handle on the stem to check proper operation. Reinstall the valve trim. Installer le capuchon - Style A □ Si un adaptateur est présent, installer un joint torique neuf dans l’adaptateur. □ Installer et lubrifier les joints toriques neufs sur l’arrière du capuchon. □ Positionner l’adaptateur (le cas échéant) et le capuchon neuf avec la marque “UP” (Vers le haut) dirigée tel que noté auparavant. □ Sécuriser le capuchon avec les vis. □ Ouvrir l’alimentation en eau et rechercher des fuites. □ Positionner la poignée sur la tige pour vérifier le bon fonctionnement. □ Réinstaller la garniture de robinetterie. Instale la tapa - Estilo A □ Si hay un adaptador, instale un nuevo arosello en el adaptador. □ Instale y lubrique los nuevos arosellos en la parte de atrás de la tapa. □ Coloque el adaptador (si hay uno) y la nueva tapa con la palabra “UP” orientada como estaba anteriormente. □ Fije la tapa con los tornillos. □ Abra el suministro de agua y verifique que no haya fugas. □ Coloque la manija en la espiga para verificar el funcionamiento. □ Vuelva a instalar la guarnición de la válvula. 1250244-9-B 3 Kohler Co. Tab Languette Lengüeta Tab Languette Lengüeta Install the Cap - Style B □ □ □ □ □ □ □ Install and lubricate new O-rings on the back of the cap. Position the cap with the tab oriented as previously noted. Install the collar. Secure the cap with the screws. Turn on the water supply and check for leaks. Position the handle on the stem to check proper operation. Reinstall the valve trim. Installer le capuchon - Style B □ □ □ □ □ □ □ Installer et lubrifier les joints toriques neufs sur l’arrière du capuchon. Positionner le capuchon avec la patte dirigée tel que noté auparavant. Installer le collier. Sécuriser le capuchon avec les vis. Ouvrir l’alimentation en eau et rechercher des fuites. Positionner la poignée sur la tige pour vérifier le bon fonctionnement. Réinstaller la garniture de robinetterie. Instale la tapa - Estilo B □ □ □ □ □ □ □ Instale y lubrique los nuevos arosellos en la parte de atrás de la tapa. Coloque la tapa con la lengüeta orientada como estaba anteriormente. Instale el anillo. Fije la tapa con los tornillos. Abra el suministro de agua y verifique que no haya fugas. Coloque la manija en la espiga para verificar el funcionamiento. Vuelva a instalar la guarnición de la válvula. ©2018 Kohler Co. USA/Canada: 1-800-4KOHLER México: 001-800-456-4537 kohler.com 1250244-9-B-
 1
1
-
 2
2
-
 3
3
-
 4
4


Kohler GP876851 Guía de instalación
- Tipo
- Guía de instalación
- Este manual también es adecuado para
en otros idiomas
- français: Kohler GP876851 Guide d'installation
- English: Kohler GP876851 Installation guide
Artículos relacionados
-
Kohler K-408-K-NA Guía de instalación
-
-
-
-
-
-
Kohler K-11748-KS-NA Guía de instalación
-
-
-
Kohler 11748-KS-NA Guía de instalación