Generac 005939-2 El manual del propietario
- Categoría
- Generadores de poder
- Tipo
- El manual del propietario
Este manual también es adecuado para

GENERAC _
Owner'sM
GPSeriesPortableGenerator

introduction.............................................................1
ReadthisManualThoroughly.................................1
Safety Rules...........................................................1
StandardsIndex.............................................................3
Generalinformation................................................4
1.1 Unpacking......................................................................4
1.1.1 Accessory Box..................................................4
1.2 Assembly.......................................................................4
1.2.1 Assemblingthe AccessoryKit............................4
1.2.2 BatteryCableConnection(ElectricStart Only)....5
Operation................................................................5
2.1 Knowthe Generator.......................................................5
2.2 Hourmeter......................................................................7
2.3 CordSets andConnectionPlugs....................................7
2.3.1 120 VAC,20 Amp, DuplexReceptacle...............7
2.3.2 120/240VAC,30 Amp, Receptacle....................7
2.3.3 120 VAC,20 Amp, GFCIDuplexReceptacle.......7
2.3.4 120/240VAC,30 Amp Receptacle.....................8
2.4 Howto Usethe Generator..............................................8
2.4.1 Groundingthe GeneratorWhenUsed
asa Portable.....................................................8
2.4.2 Connectingthe Generatorto a Building's
ElectricalSystem...............................................9
2.5 Don'tOverloadthe Generator..........................................9
2.6 WattageReferenceGuide...............................................9
2.7 BeforeStartingtheGenerator.......................................10
2.7.1 Adding EngineOil............................................10
2.7.2 Adding Gasoline...............................................10
2.8 Starting Pull Start Engines............................................11
2.9 Starting ElectricStart Engines......................................11
2.9.1 ManualStart....................................................12
2.10 Stoppingthe Engine.....................................................12
2.11 LowOil LevelShutdownSystem..................................12
2.11.1 SensingLowOil Level......................................12
2.12 Chargingthe Battery(ElectricStart UnitsOnly).............12
Maintenance.........................................................13
3.1 PerformingScheduledMaintenance.............................13
3.2 MaintenanceSchedule.................................................13
3.3 ProductSpecifications..................................................13
3.3.1 GeneratorSpecifications..................................13
3.3.2 EngineSpecifications.......................................13
3.3.3 EmissionsInformation.....................................13
3.4 GeneralRecommendations...........................................13
3.4.1 GeneratorMaintenance....................................13
3.4.2 ToCleanthe Generator.....................................14
3.4.3 EngineMaintenance.........................................14
3.4.4 CheckingOil Level...........................................14
3.4.5 Changingthe Oil..............................................14
3.4.6 Replacingthe SparkPlug.................................14
3.4.7 BatteryReplacement(if applicable)..................14
3.5 ServiceAir Cleaner.......................................................15
3.5.1 CleanSparkArrestor Screen(CARDmodels)...15
3.6 ValveClearance............................................................15
3.7 General........................................................................15
3.8 Long TermStorage.......................................................16
3.9 OtherStorageTips.......................................................16
Troubleshooting....................................................17
4.1 TroubleshootingGuide..................................................17
Warranty...............................................................18
MANUALDELPROPIETARIO.............................23
MANUELD'ENTRETIEN......................................47

iNTRODUCTiON
Thankyou for purchasingthis modelby GeneracPowerSystems,
Inc. This model is a compact, high performance, air-cooled,
engine driven generatordesigned to supply electrical power to
operateelectrical loads where no utility power is availableor in
placeof utility dueto a poweroutage.
BEADTHISMANUALTHOROUGHLY
If anyportion ofthis manualis notunderstood,contactthenearest
AuthorizedDealerfor starting, operatingandservicingprocedures.
The operator is responsible for proper and safe use of the
equipment.We strongly recommendthat the operator read this
manualandthoroughlyunderstandallinstructionsbeforeusingthe
equipment.Wealsostronglyrecommendinstructingotherusersto
properlystart andoperatethe unit.This preparesthemifthey need
to operatetheequipmentin an emergency.Savethese instructions
for future reference.If you loanthis unitto someone,ALWAYSloan
these instructionsto the individualaswelt.
Thegeneratorcan operatesafely,efficiently and reliablyonly if it
is properlylocated,operatedand maintained.Beforeoperatingor
servicingthe generator:
• Becomefamiliarwith and strictly adhereto alt local, stateand
nationalcodes and regulations.
• Study all safety warnings in this manual and on the product
carefully.
• Becomefamiliarwith this manualandthe unitbeforeuse.
Themanufacturercannot anticipateevery possible circumstance
that might involvea hazard.Thewarnings in this manual,and on
tags and decals affixedto the unit are,therefore,not all inclusive.
If usinga procedure,work method or operatingtechniquethat the
manufacturerdoes not specifically recommend,ensurethat it is
safe for others. Also make sure the procedure,work method or
operatingtechnique utilizeddoes not renderthe generatorunsafe.
THE INFORMATIONCONTAINEDHEREIN WAS BASED ON
MACHINESIN PRODUCTIONAT THE TIME OF PUBLICATION.
GENERACRESERVESTHERIGHTTOMODIFYTHISMANUALAT
ANYTIME.
SAFETYRULES
Throughoutthis publication,and on tags and decals affixedto the
generator,DANGER,WARNING,CAUTIONand NOTEblocks are
usedto alert personnelto special instructionsabout a particular
operation that may be hazardous if performed incorrectly or
carelessly.Observethem carefully.Theirdefinitionsareasfollows:
INDICATES A HAZARDOUS SITUATION OR ACTION
WHICH, IF NOT AVOIDED, WILL RESULT IN DEATH
OR SERIOUS INJURY.
Indicates a hazardous situation or action which, if
not avoided, could result in death or serious injury.
_,CAUTION!
Indicates a hazardous situation or action which,
if not avoided, could result in minor or moderate
injury.
NOTE:
Notes containadditional informationimportantto a procedure
and will be found withinthe regulartextbody of thismanual.
These safety warnings cannot eliminate the hazards that they
indicate. Common sense and strict compliancewith the special
instructionswhileperforming theaction or serviceareessentialto
preventingaccidents.
Four commonly used safety symbols accompany the BANGER,
WARNINGand CAUTIONblocks. The type of information each
indicatesis asfollows:
,_This symbol points out important safety
information that, if not followed, could
endanger personal safety and/or property of
others.
This symbol points out potential explosion
hazard.
i/_This symbol points out potential fire hazard.
This symbol points out potential electrical
shock hazard.
GENERAL HAZARDS
• NEVERoperatein an enclosed area, in a vehicle, or indoors
EVENIFdoorsand windows areopen.
• For safety reasons, the manufacturer recommends that the
maintenanceof this equipmentis carried out by an Authorized
Dealer.Inspectthe generatorregularly,and contactthe nearest
AuthorizedDealerfor parts needingrepairor replacement.
• Operategeneratoronly onlevelsurfacesandwhereit will notbe
exposedto excessivemoisture,dirt, dust or corrosivevapors.
• Keephands,feet, clothing, etc., away from drive belts, fans,
and othermoving parts. Neverremoveany fan guardor shield
whilethe unit isoperating.
• Certain parts of the generator get extremely hot during
operation. Keep clear of the generator until it has cooled to
avoidsevereburns.
• Do NOToperategeneratorinthe rain.
• Do not alter the construction of the generator or change
controlswhich might createanunsafeoperatingcondition.
• Neverstart or stop the unit with electrical loads connected
to receptaclesAND with connecteddevicesturned ON. Start
the engine and let it stabilize before connecting electrical
loads. Disconnectall electricalloads beforeshutting downthe
generator.
• Do notinsert objectsthrough unit's cooling slots.
• When working on this equipment, remain alert at all times.
Never work on the equipment when physically or mentally
fatigued.

• Neverusethe generatoror anyof its parts as a step. Stepping
on the unit can stress and break parts, and may result in
dangerousoperating conditions from leakingexhaust gases,
fuel leakage,oil leakage,etc.
• Onelectricstart models,disconnectthe POSITIVE(+) battery
cable from the engine starter ORthe NEGATIVE(=) battery
cable from the battery terminal, whichever is easier, before
transportingthe generator.
EXHAUST& LOCATIONHAZARDS
• Never operate in an enclosed area or indoors!NEVERuse
in the home, in a vehicle,or in partlyenclosed areassuch
as garages,evenif doors and windowsare open! ONLYuse
outdoors and far from openwindows,doors, vents,andinan
areathatwill notaccumulatedeadly exhaust.
Using a generator indoors CAN KiLL YOU IN MINUTES,
Generator exhaust contains carbon monoxide. This is
a poison you cannot see or smell.
NEVER use inside a home
or garage, EVENIF doors
and windows are open.
Only use OUTSIDE and
far away from windows,
doors_ and vents,
• The engine exhaustfumes contain carbon monoxide, which
you cannot see or smell. This poisonous gas, if breathedin
sufficientconcentrations,can causeunconsciousnessor even
death.
• Adequate, unobstructed flow of cooling and ventilating air
is critical to correct generator operation. Do not alter the
installation or permit even partial blockage of ventilation
provisions, as this can seriously affect safe operationof the
generator.ThegeneratorMUSTbeoperatedoutdoors.
• Thisexhaustsystemmust be properlymaintained.Do nothing
that mightrendertheexhaustsystemunsafeorinnoncompliance
with any localcodes and/orstandards.
• Alwaysuseabatteryoperatedcarbonmonoxidealarmindoors,
installedaccordingto themanufacturersinstructions.
• If you start to feet sick, dizzy,or weak after the generatorhas
beenrunning,moveto fresh air IMMEDIATELYSeea doctor,as
you couldhavecarbonmonoxidepoisoning.
ELECTRICALHAZARDS
• The generator produces dangerouslyhigh voltage when in
operation.Avoidcontactwithbarewires,terminals,connections,
etc., while the unit is running,even on equipmentconnected
to the generator. Ensureall appropriate covers, guards and
barriersarein placebeforeoperatingthegenerator.
• Never handle any kind of electrical cord or device while
standinginwater,while barefootorwhile handsor feet arewet.
DANGEROUSELECTRICALSHOCKMAYRESULT.
• TheNationalElectricCode(NEC)requirestheframe andexternal
electrically conductive parts of the generator be properly
connectedto an approvedearthground.Local electricalcodes
may also require proper grounding of the generator.Consult
with a localelectricianfor groundingrequirementsin thearea.
• Use a ground fault circuit interrupter in any damp or highly
conductivearea(such as metaldecking or steelwork).
• Do not useworn, bare,frayedor otherwisedamagedelectrical
cord setswith the generator.
• Beforeperforminganymaintenanceonthegenerator,disconnect
the enginestarting battery (if equipped)to preventaccidental
start up. Disconnectthe cablefrom the batterypost indicated
by a NEGATIVE,NEGor (-) first. Reconnectthat cable last.
• In caseof accidentcausedby electricshock,immediatelyshut
down the source of electrical power. If this is not possible,
attempt to free the victim from the live conductor. AVOID
DIRECTCONTACTWITH THEVICTIM. Use a non-conducting
implement,such asa rope or board,to freethevictim from the
live conductor.If the victim is unconscious,applyfirst aid and
getimmediatemedical help.
FIREHAZARDS
• Gasolineishighly FLAMMABLEand itsvaporsare EXPLOSIVE.
Do not permitsmoking,open flames, sparksor heat in the
vicinitywhile handling gasoline.
• Neveraddfuel whileunit isrunningor hot. Allow engineto cool
completelybeforeaddingfuel.
• Never fill fuel tank indoors, Comply with all laws regulating
storageand handlingof gasoline.
• Do not overfill the fuel tank. Always allow roomfor fuel
expansion.If tank is over=filled,fuel can overflow onto a hot
engineandcauseFIREor an EXPLOSION.Neverstoregenerator
with fuel in tank where gasolinevapors might reachan open
flame, spark or pilot light (as on a furnace, water heateror
clothes dryer). FIREor EXPLOSIONmay result. Allow unit to
cool entirelybeforestorage.
• Wipe up any fuel or oil spills immediately.Ensure that no
combustiblematerialsareleft on or nearthegenerator.Keepthe
areasurroundingthe generatorcleanandfree from debrisand
keepa clearanceof five (5) feet on all side to allow for proper
ventilationofthe generator.

* Do notinsert objectsthrough unit's cooling slots.
* Do not operatethe generatorif connected electrical devices
overheat,if electricaloutputislost, if engineor generatorsparks
or ifflames or smokeare observedwhileunit is running.
* Keepafire extinguishernearthe generatoratall times.
STANDARDS/NDEZ
1. NationalFireProtectionAssociation(NFPA)70:TheNATIONAL
ELECTRICCODE(NEC)availablefrom www.nfpa.org
2. NationalFire ProtectionAssociation (NFPA)5000: BUILDING
CONSTRUCTIONAND SAFETYCODEavailablefrom www.
nfpa.org
3. InternationalBuildingCodeavailablefrom www.iccsafe.org
4. Agricultural Wiring Handbookavailablefrom www.rerc.org ,
Rural ElectricityResourceCouncil RO.Box 309 Wilmington,
OH45177-0309
5. ASAEEP-364.2Installationand Maintenanceof FarmStandby
Electric Power available from www.asabe.org, American
Society of Agricultural & Biological Engineers2950 Niles
Road,St. Joseph,MI 49085
This list is not all inclusive.Checkwith theAuthority HavingLocal
Jurisdiction (AHJ)for any localcodesor standardswhich may be
applicableto yourjurisdiction.
MODELNO:
SERIALNO:
Unit ID Location
I
I
DECAL
DATA
CALIFORNIAPROPOSITION65 WARNING
Engineexhaustand someof its constituentsareknown
to theStateof Californiato causecancer,birth defects
andotherreproductiveharm.
CALIFORNIAPROPOSITION65 WARNING
This productcontainsor emitschemicalsknown tothe
Stateof Californiato causecancer,birth defectsand
otherreproductiveharm.

1.1 UNPACKING
• Removeallpackagingmaterial.
• Removeseparateaccessorybox.
• Removethe generatorfrom carton.
1.1.1 ACCESSORYBOX
• 1-Owner's manual
• 1-Bottleof OilSAE30
• 3-ProductRegistrationCards (English,Spanish,French)
• 1-BatteryCharger(electricstart only)
• 1-HandleAssembly
• 1-FrameFoot(E)
• 2-Never-FlatWheels(H)
• 1-Hardwarebag(containingthefollowing):
- 2-LongCurvedHeadBolts(A)
- 2-AcornNuts(B)
- 4-Flangednuts(C)
- 2-RubberFeet(D)
- 2-ShortBolts(F)
- 2-AxlePins(G)
- 2-Washers(1)
- 2-CotterPins(J)
- 2-FlangeNuts(electricstartonly)
1.2 ASSEMBLY
The generator requires some assembly prior to using it. If
problems arise when assemblingthe generator,please call the
GeneratorHetplineat 1-888-436-3722.
1.2.1 ASSEMBLINGTHEACCESSORYKIT
Refer to the instructions below and Figures 1A, 1B, and 1C to
installthe handle,feet,and wheels.Note:the handlecomponents
are already pre-assembledfrom the factory. The wheels are
designedto greatly improve the portability of the generator.You
will needthefollowing tools to properlyinstallthe accessorykit:
• Ratchetanda 13mm [1/2"] socket
• 13mm [1/2"] boxwrench
• Needlenosepliers
Handle
1. Installthehandleassemblyto theframeby usingbolts (A) and
nuts (B).
Feet
2. Use nuts (C)to mount the rubberfeet (D)to thefoot bracket
(E).
3. Mountthefoot bracket(E)to theframewith two bolts (F)and
nuts (C).
Wheels
4. Slideaxlepin (G)through wheel(H), washer (I), andthrough
thebracketon theframe.
5. Secureaxlepin (G)to the frame with the cotterpin (J).
6. Usea pliersandbendonetab of cotterpin (J)outwardto lock
into place.
7. Repeatsteps5, 6, & 7 for otherwheel.
Figure 1A - Handle Assembly
Figure 1B - Foot Assembly
I

Figure lC - Wheel Assembly
BEND ONETAB
AFTERAXLE
PIN(G)IS
INSERTED _
THROUGH
THEFRAME
1.2.2 BATTERYCABLECONNECTION(ELECTRICSTART
ONLY)
The unit has been deliberately shipped with the battery cables
disconnected.Youwill needa lOmm wrenchto securethe battery
cables.
Toconnectthe battery(seeFigure17 for connectiondetails):
1. Cut off cable ties securing battery cables and remove red
coversfrom batteryterminals.
2. First,connectthe redcableto thepositive(+) batteryterminal
with the bolt, lock washer andnut supplied.
3. Connectthe black cable to the negative(-) batteryterminal
with the bolt, lock washer andnut supplied.
4. Make sureall connectionsare secure.Slidethe rubber boots
overtheterminalsand connectionhardware.
NOTE:
if the battery is unable to start the engine,chargeit with the
12V chargerincludedinthe accessory box (seethe "Charginga
Battery"sectionfor details).
2.1 KNOWTHEGENERATOR
Read the Owner'sManual and Safety Rules before operating
this generator.
Compare the generator to Figures 2 through 4 to become
familiarizedwith thelocationsofvariouscontrolsandadjustments.
Savethis manualfor future reference.
1. 120 Volt AC, 20 Amp, Duplex Receptacle - Supplies
electrical power for the operationof 120 Volt AC, 20 Amp,
single-phase,60 Hz electrical lighting, appliance, tool and
motor loads. CARBmodels areequippedwith GFCIoutlets.
2. 120/240 Volt AC, 30 Amp LockingReceptacle - Supplies
electricalpowerfor the operationof 120 and/or240 VoltAC,
30 Amp, single-phase,60 Hz, electrical lighting, appliance,
tool andmotor loads.
3. Circuit Breakers(AC)- Eachreceptacleis providedwith a
push-to-reset circuit breakerto protectthe generatoragainst
electricaloverload.
4. Oil Drain- Useto drainengineoil.
5. Air Filter- Filtersintakeairas it isdrawn intothe engine.
6. ChokeKnob- Usedwhen startinga cold engine.
7. FuelTank- SeegeneratorSpecificationsfor tank capacity.
8. GroundingLug- Groundthe generatorto an approvedearth
groundhere.See"Groundingthe Generator"for details.
g. Run/Stop Switch - Controls the operationof the generator
(pullstart models).
gA. Start Switch - Used to start engine from the starter motor
(electricstart modelsonly).
10. Muffler - Quietsthe engine.
11. Handle - Pivot and retract for storage. Press the spring-
loadedbuttonto move handles.
12. GasCap- Fuelfill location.
13. FuelGauge- Showsfuel levelin tank.
14. Oil Fill- Add oil here.
15. Recoil Starter - Useto start enginemanually.
15. FuelShut Off - Valvebetweenfueltank and carburetor.
17. BatteryCharger Input -This receptacleallowsthe capability
to rechargethe 12 volt DO storage battery provided with
the 12 Volt Adaptor Plug Chargerwhich is included in the
Accessory Box. Located behindthe battery chargerinput is
a 1.50 Amp in-line fuse which is insidethe control panelto
protectthe battery(electricstart models only).
18. Battery - Powersthe electric starter (electric start models
only).
lg. Hourmeter- Trackshoursof operation.
28. Spark Arrestor - Reducesfire hazardsby containing sparks
(CARBmodels only).

Figure2,4- Contro/Pane/(4g StateModels) Figure3 - GeneratorControls
Figure2B - Contro/Panel (CARBModels)
Figure4 - GeneratorControls
Figure 2C - Contro/Panel(CSAModels)

2.2 HOURIVIETER
TheHourmetertrackshoursofoperationforscheduledmaintenance
(Figure5):
Therewill be a "CHGOIL"messageevery100 hours.Themessage
will flash one hour before and one hour after each 100 hour
interval,providingatwo hourwindow to perform service.
This messagewill actuallybeginflashing at 99 hoursand disable
itselfat 101 hoursagain,providingatwo hourwindow to perform
the service.
Every200 hoursthe "SVC"icon on the lower left hand corner of
the display will flash. Themessagewill flash one hourbeforeand
onehourafter each200 hourintervalprovidingatwo hourwindow
to perform service.
Whenthe hour meter is inthe FlashAlert mode, the maintenance
message will always alternate with elapsedtime in hours and
tenths. The hours wilt flash four times, then alternatewith the
maintenancemessagefour timesuntil themeter resetsitself.
• 100 hours- CHGOIL-- Oil ChangeInterval(Every100 hrs)
• 200 hours- SVC-- ServiceAir Filter(Every200 hrs)
Note:
The hour glassgraphicwill flash on and off when the engine
is running.This signifiesthat the meter is tracking hours of
operation.
Figure 5 - Hourmeter
0000.0
,
HOURGLASS RESETBUTTON
GRAPHIC (IF EQUIPPED)
2.3 CORDSETSANDCONNECTIONPLUGS
2.3.1 120VAC,20 AMP,DUPLEXRECEPTACLE
This is a 120 Volt outlet protectedagainst overloadby a 20 Amp
push-to-resetcircuitbreaker(Figure6). Useeachsocketto power
120 VoltAC, singlephase,60 Hzelectricalloadsrequiringupto a
combined 2400 watts (2.4 kW) or 20 Amps of current. Useonly
high quality,well-insulated, 3-wire grounded cord sets ratedfor
125 Volts at 20 Amps (or greater).
Keep extensioncords as short as possible, preferablyless than
15 feet long, to preventvoltage drop and possibleoverheatingof
wires.
Figure 6 - 120 Volt AC, 20 Amp, Duplex Receptacle
D
2.3.2 120/240VAC,30 AMPRECEPTACLE
Use a NEMA L14-30 plug with this receptacle (rotate to lock!
unlock). Connecta suitable4-wire groundedcord set to the plug
andto thedesiredtoad.Thecordset shouldbe ratedfor 250 Volts
ACat 30 Amps (or greater)(Figure7).
Figure 7 - 120/240 VAC, 30 Amp Receptacle
12OV/24OV
3CA
Use this receptacleto operate120 Volt AC, 60 Hz, singlephase
loadsrequiringup to 3600 watts (3.6kW) of powerat30 Amps or
240 VoltAC,60 Hz,singlephaseloadsrequiringup to 7200 watts
(7.2 kW) of powerat 30 Amps. Theoutlet is protectedby two 30
Amp push-to-resetcircuit breakers.
2.3.3 120VAC,20AMP,GFC/OUPLEXRECEPTACLE
This is a 120 Volt outlet protectedagainst overloadby a 20 Amp
push-to=resetcircuitbreaker(Figure8). Useeachsocketto power
120 VoltAC, singlephase,60 Hzelectricalloadsrequiringup to a
combined 2400 watts (2.4 kW) or 20 Amps of current.Use only
high quality,well-insulated, 3-wire grounded cord sets ratedfor
125 Volts at 20 Amps (or greater).
Keepextensioncords as short as possibleto preventvoltagedrop
and possibleoverheatingof wires.

Figure 8 - 120 Vo/t AC, 20 Amp, GFC/ Duplex Receptac/e
2.3.4 120/240VAC,30 AMPRECEPTACLE
Use a NEMA L14-30 plug with this receptacle (rotate to lock!
unlock). Connecta suitable4-wire groundedcord set to the plug
andto thedesiredtoad.Thecordset shouldbe ratedfor 250 Volts
ACat30 Amps (or greater)(Figure9).
Figure 9 - 120/240 VAC, 30 Amp Receptac/e
_t he engine exhaust fumes contain carbon
monoxide, which can you cannot see or smell.
This poisonous gas, if breathed in sufficient
concentrations, can cause unconsciousness Or
even death.
_t Adequate, unobstructed flow of cooling and
ventilating air is critical to correct generator
operation. Do not alter the installation or permit
even partial blockage of ventilation provisions,
as this can seriously affect safe operation
of the generator. The generator MUST be
operated outdoors.
_t This exhaust system must be properly
maintained. Do nothing that might render the
exhaust system unsafe or in noncompliance
with any local codes and/or standards.
_t Always use a battery operated carbon
monoxide alarm indoors, installed according to
the manufacturers instructions.
12OV/24OV
3CA
Using a generator indoors CAN KiLL YOU iN MINUTES.
Generator exhaust contains carbon monoxide. This is
a poison you cannot see or smell.
NEVER use inside a home
or garage, EVEN iF doors
and windows are open.
Only use OUTSIDE and
far away from windows,
doors, and vents.
Use this receptacleto operate120 Volt AC, 60 Hz, singlephase
loads requiringup to 3600 watts (3.6 kW) of powerat 30 Amps
or 240 Volt AC, 60 Hz,single phase loads requiringup to 7200
watts (7.2 kW) of power at 30 Amps. The outlet is protectedby
two 25 Amp (5.0/5.5kW) or two 30 Amp (6.5kW) push-to-reset
circuit breakers.
2.4 H0WTOUSETHEGENERATOR
Seethe "ToStart the Engine"sectionfor howto safelystart and
stop the generatorand how to connect and disconnect loads. If
there are any problems operatingthe generator,pleasecall the
generatorhelplineat 1-888-436-3722.
_t ever operate in an enclosed area or indoors!
NEVER use in the home, in a vehicle, or in
partly enclosed areas such as garages, EVEN
IF doors and windows are open! ONLY use
outdoors and far from open windows, doors,
vents, and in an area that will not accumulate
deadly exhaust.
2.4.1 GROUNDINGTHEGENERATORWHENUSEDASA
PORTABLE
This generator has an equipment ground that connects the
generatorframe componentsto the ground terminals on the AC
output receptacles (see NEC 250.34 (A) for explanation).This
allows the generatorto be used as a portablewithout grounding
theframe ofthe generatoras specifiedin NEC250.34.
SpecialRequirements
There may be Federalor State OccupationalSafety and Health
Administration(OSHA)regulations,localcodes,or ordinancesthat
applyto the intendeduse ofthe generator.
Pleaseconsult a qualified electrician, electricalinspector, or the
local agencyhavingjurisdiction:
* In some areas, generators are requiredto be registeredwith
local utilitycompanies.
* If the generatoris used at a construction site, there may be
additionalregulationswhich must be observed.

2.4.2 CONNECT/NGTHEGENERATORTOABU/LD/NG'$
ELECTR/CALSYSTEM
Connectionsfor standby power to a building's electricalsystem
must be made by a qualifiedelectricianand in strict compliance
with all national and local electrical codes and laws. The
connectionmust isolatethe generatorpowerfrom utility poweror
otheralternativepowersources.
NOTE:
Because the generatorequipment ground is bonded to the AC
neutral wires in the generator(see Figure8), either a 3-pole
transferswitch or a 2 pole transferswitch with a switching
neutral kit is requiredto connectthis generatorto a building
load. in this application the generator becomes a separately
derived system(see NEC250.20 (D)), and mustbe grounded
in accordance with the national or local electrical code
requirements.
GroundingtheGeneratorina BuildingStandbyApplication
_ he National Electrical Code requires that the
frame and external electrically conductive parts
of this generator be properly connected to an
approved earth ground.
Local electrical codes may also require proper grounding of the
unit (Figure 10). For that purpose, connecting a No. 10 AWG
(AmericanWire Gauge)strandedcopperwireto the groundinglug
and to an earth=drivencopperor brass groundingrod (electrode)
provides adequateprotection against electricalshock. However,
local codes mayvary widely.Consultwith a localelectrician for
grounding requirementsinthe area.
Proper groundingof the generator will help preventelectrical
shockintheeventof a groundfault condition inthe generatoror in
connectedelectricaldevices.Propergroundingalsohelpsdissipate
static electricity,which often buildsup in ungroundeddevices.
Figure 10- Grounding theGenerator
2.5 DON'TOVEBLOADTHEGENEBATOB
Overloadinga generatorin excess of its ratedwattage capacity
can result in damageto the generatorand to connectedelectrical
devices.Observethefollowing to preventoverloadingthe unit:
* Addupthetotal wattageofall electricaldevicesto beconnected
at one time. This total should NOT be greater than the
generator'swattagecapacity.
* Theratedwattageof lights can betaken from light bulbs. The
ratedwattageof tools, appliancesand motors can usually be
found on a data labelor decalaffixedto the device.
* If the appliance,toot or motor does not give wattage,multiply
voltstimes ampereratingto determinewatts (volts x amps =
watts).
* Someelectric motors, such as induction types, require about
threetimes morewatts of powerfor startingthan for running.
This surge of power lasts only a few seconds when starting
suchmotors. Makesureto allowfor high startingwattagewhen
selectingelectricaldevicesto connectto the generator:
1. Figurethe watts neededto start the largestmotor.
2. Add to that figure the running watts of all other connected
loads.
TheWattageReferenceGuideis providedto assist in determining
how many itemsthegeneratorcanoperateat onetime.
NOTE:
All figures are approximate.See data label on appliancefor
wattage requirements.
2.6 WATTAGEBEFEBENCEGUIDE
Device ................................... RunningWatts
*Air Conditioner(12,000 Btu).......................... 1700
*Air Conditioner(24,000 Btu).......................... 3800
*Air Conditioner(40,000 Btu).......................... 6000
BatteryCharger(20 Amp).............................. 500
BeltSander(3") .................................... 1000
ChainSaw ........................................ 1200
CircularSaw(6-1/2") ........................... 800to 1000
*Clothes Dryer (Electric) ............................. 5750
*Clothes Dryer (Gas) ................................. 700
*Clothes Washer ................................... 1150
CoffeeMaker ...................................... 1750
*Compressor (1 HP)................................. 2000
*Compressor (3/4 HP)............................... 1800
*Compressor (1/2 HP)............................... 1400
CurlingIron......................................... 700
*Dehumidifier....................................... 650
DiscSander(9").................................... 1200
EdgeTrimmer....................................... 500
Electric Blanket...................................... 400
Electric NailGun.................................... 1200
Electric Range(per element)........................... 1500
ElectricSkillet...................................... 1250
*Freezer............................................ 700
*FurnaceFan(3/5 HP) ................................ 875
*GarageDoor Opener............................ 500 to 750
HairDryer......................................... 1200
HandDrill .................................... 250to 1100

HedgeTrimmer...................................... 450
ImpactWrench...................................... 500
Iron.............................................. 1200
*JetPump......................................... 800
LawnMower....................................... 1200
LightBulb.......................................... 100
MicrowaveOven............................... 700to1000
*MilkCooler....................................... 1100
OilBurneronFurnace................................. 300
OilFiredSpaceHeater(140,000Btu)..................... 400
OilFiredSpaceHeater(85,000Btu)...................... 225
OilFiredSpaceHeater(30,000Btu)...................... 150
*PaintSprayer,Airless(1/3HP)......................... 600
PaintSprayer,Airless(handheld)......................... 150
Radio......................................... 50to200
*Refrigerator........................................ 700
SlowCooker........................................ 200
*SubmersiblePump(1-1/2HP)........................ 2800
*SubmersiblePump(1HP)........................... 2000
*SubmersiblePump(1/2HP).......................... 1500
*SumpPump................................. 800to1050
*TableSaw(10")............................. 1750to2000
Television..................................... 200to500
Toaster..................................... 1000to1650
WeedTrimmer...................................... 500
*Allow3timesthelistedwattsforstartingthesedevices.
2.7 BEFORESTARTIN6THEGENERATOR
Priorto operatingthe generator,engineoil and gasolinewill need
to be added,asfollows:
2.7.1 AL}gitVGEtVGIflEO/L
All oil should meet minimum American PetroleumInstitute (API)
Service Class SJ, SL or better.Use no special additives. Select
the oil's viscosity grade according to the expected operating
temperature(also seechart).
* Above40° F,useSAE30
* Below40° Fand downto 10° F,use10W-30
* Below10° F,usesynthetic5W-30
mEm
°F -20 -10 0 10 20 32 40 60 80 100
oc-3'o -_o -lo o lo 2'0 3'o 4b
Temperature Range of Expected Use
1. Placegeneratoron a levelsurface (notto exceed15° in any
direction).
2. Cleanareaaroundoil fill andremoveoil fill cap.
3. Slowly fill enginewith oil until the dipstick readsfull. Stop
filling occasionallyto checkoil level.
4. Installdipstick andfingertighten securely.
5. Checkengineoil levelbeforestarting eachtime thereafter.
2.7.2 ADD/NGGASOLINE
NEVER fill fuel tank indoors. Avoid spilling
gasoline on hot engine. Allow engine to cool
entirely before adding fuel. NEVER fill fuel tank
when engine is running or hot. DO NOT light
a cigarette or smoke when filling the fuel tank.
Gasoline is highly flammable and its vapors are
EXPLOSIVE.
Do not overfill the fuel tank. Always leave room
for fuel expansion. If the fuel tank is overfilled,
fuel can over flow onto a hot engine and cause
fire or an explosion. Wipe up any spilled fuel
immediately.
1. UseregularUNLEADEDgasolinewith thegeneratorengine.Do
not usepremiumgasoline.Do notmix oil with gasoline.
2. Cleanareaaroundfuelfill cap, removecap.
3. Slowly add unleaded regular gasoline to fuel tank. Fill to
bottom of screenfilter. Be carefulnottooverfill (Figure11).
4. Installfuelcap andwipe up any spilledgasoline.
IMPORTANT:Itis importantto preventgum depositsfrom forming
in fuel system parts such as the carburetor,fuel hose or tank
during storage. Alcohol-blendedfuels (called gasohol, ethanol
or methanol)can attract moisture, which leadsto separationand
formationof acids duringstorage.Acidicgascandamagethefuel
system of an enginewhile in storage.Toavoid engineproblems,
the fuel system should be emptiedbefore storage of 30 days or
longer.Seethe "Storage"section. Neveruseengineor carburetor
cleanerproductsinthefueltank aspermanentdamagemay occur.
Figure 11 - Fuel Tank
FueJTank
T
Fuel/ Do NOTFillAboveLip
_CAUTION!
Any attempt to crank or start the engine
before it has been properly serviced with the
recommended oil may result in an engine
failure.
1o

2.8 STARTINGPULLSTARTENGINES
Never start or stop engine with electrical
devices plugged into the receptacles AND
devices turned on.
1. Unplugall electrical loadsfrom the unit's receptaclesbefore
startingthe engine.
2. Make surethe unitis in a levelposition (notto exceed15° in
anydirection).
3. OPENthe FuelShut-offValve(Figure12).
4. TurnengineRUN/STOPswitch to ONposition (Figure13).
5. Slide engine choke to the LEFT to FULL CHOKEposition
(Figure14).
Figure 12- FuelShut-off Valve
Figure 13 - Engine ON/OFF Switch
ENGINE ON/OFF SWITCH
(PULL START ENGINES ONLY)
\
lllh
FUEL SHUTOFF
Figure 14 - Choke Position
CHOKELEVER
LEFT= CHOKE(START)
RIGHT= RUN
.
7.
Tostart engine,firmly graspthe recoilhandleandpull slowly
until increasedresistanceisfelt. Pullrapidlyup and away.
Whenenginestarts,move chokeknobto 1/2-CHOKEposition
until engine runs smoothly and then fully into RUNposition.
If enginefalters,move chokeback outto 1/2-CHOKEposition
untilengine runssmoothly andthento RUNposition.
NOTE:
if enginefires, but does not continueto run,move chokelever
to FULLCHOKEand repeatstarting instructions.
IMPORTANT:Donotoverloadthe generator.Also, do not overload
individual panel receptacles.These outlets are protectedagainst
overload with push-to-reset-type circuit breakers. If amperage
rating of any circuit breakeris exceeded,that breakeropensand
electricaloutputtothat receptacleislost. Read"Don't Overloadthe
Generator"carefully.
2.9 STARTINGELECTRICSTARTENGINES
Never start or stop engine with electrical
devices plugged into the receptacles AND
devices turned on.
1. Unplugall electricalloads from the unit's receptaclesbefore
startingthe engine.
2. Makesurethe unit is in a levelposition (notto exceed15° in
anydirection).
3. Openthefuel shut-off valve (Figures12).
4. Move engineCHOKEknoboutward to FULLCHOKEposition
(Figure14).
5. Tostart engine,press and hold the Start/Run/Stopswitch in
the"Start" position.Theenginewill crankandattemptto start.
Whentheenginestarts, releasethe switchto the run position.
11

.
Whenthe engine starts, move choke knob to "1/2 Choke"
position untilthe enginerunssmoothly andthenfully into the
"Run" position.If enginefalters,move chokeknobbackoutto
"1/2 Choke"position untiltheengineruns smoothly andthen
to "Run" position.
2.9.1 MANUALSTART
Thisgeneratoris alsoequippedwith a manualrecoilstarterwhich
may be usedif the batteryis discharged.
NOTE:
The switch must be in the RUN position. Use one of the
generator's receptacle outletsalong with the includedbattery
chargerto chargethe battery while the generator is running.
Tostart manually,firmly grasptherecoil handleand pull slowly
until increasedresistanceis felt. Pull rapidly up and away to
start engine.Thenfollow thesame choke sequence.
NOTE:
If enginefires, but does not continueto run, move chokelever
to FULLCHOKEand repeatstarting instructions.
IMPORTANT:Donotoverloadthe generator.Also, do not overload
individual panel receptacles.These outlets are protectedagainst
overload with push-to-reset-type circuit breakers. If amperage
ratingof any circuit breakeris exceeded,that breakeropens and
electricaloutputto that receptacleislost. Read"Don't Overloadthe
Generator"carefully.
2.10STOPPINGTHEENGINE
1. Shut off all loads, then unplug the electrical loads from
generatorpanel receptacles.Never start or stop the engine
with electricaldevicespluggedin andturnedon.
2. Let enginerun at no-load for severalminutesto stabilizethe
internaltemperaturesof engineandgenerator.
3. Move Run/Stopswitch to OFFposition.
4. Closefuelvalve.
2.11LOW01LLEVELSHUTDOWNSYSTEM
Theengineis equippedwith a low oil levelsensorthat shutsdown
the engineautomaticallywhenthe oil leveldropsbelowa specified
level. If the engine shuts down by itself and the fuel tank has
enoughgasoline,check engineoil level.
2.11.1 SENSINGLOWOILLEVEL
If the system senses a low oil levelduring operation,the engine
shuts down. Theenginewill not rununtil the oil has beenrefilled
to the proper level.
2.12 CHARGINGTHEBATTERY(ELECTRICSTART
UNITSONLY)
Storage batteries give off explosive hydrogen
gas while recharging. An explosive mixture will
remain around the battery for a long time after
it has been charged. The slightest spark can
ignite the hydrogen and cause an explosion.
Such an explosion can shatter the battery and
cause blindness or other serious injury.
_tDo not permit smoking, flame, sparks
open
or any other source of heat around a battery.
Wear protective goggles, rubber apron and
rubber gloves when working around a battery.
Battery electrolyte fluid is an extremely
corrosive sulfuric acid solution that can cause
severe burns, if spill occurs flush area with
clear water immediately.
NOTE:
The battery shipped withthe generator hasbeen fully charged.
A battery may lose some of its chargewhen not in use for
prolongedperiodsof time. If the battery is unable to crankthe
engine,plugin the12V chargerincludedin the accessory box.
RUNNINGTHEGENERATORDOESNOTCHARGETHEBATTERY.
Usebatterychargerplugto keepthebatterychargedandreadyfor
use. Batterychargingshouldbe done in a dry location.
1. Plugchargerinto "BatteryChargerInput"jack, locatedon the
control panel.Plugwall receptacleend of the batterycharger
into a 120 VoltACwall outlet.
2. Unplugbatterychargerfrom wall outletand control paneljack
whengeneratoris goingto be in use.
NOTE:
Do not use the battery chargerfor more than 48 hoursat one
charge.
Figure 15 - Battery Charger Jack
BATTERY
CHARGER
INPUT
12

3.1 PERFORMINGSCHEDULEDMAINTENANCE
It is importantto perform serviceas specifiedin the Maintenance
Schedulefor proper generatoroperation,and to ensurethat the
generatorcomplieswith the applicableemissionstandardsfor the
durationof its useful life.Serviceandrepairsmay be performedby
any capablepersonor repairshop. Additionally,emissionscritical
maintenancemust be performed as scheduled in order for the
Emissions Warrantyto be valid. Emissions critical maintenance
consists of servicing the air filter and spark plugs in accordance
with the MaintenanceSchedule.
3.2 MAINTENANCESCHEDULE
Follow the calendar intervals. More frequent service is required
whenoperatingin adverseconditionsnotedbelow.
CheckOil Level
ChangeOil
CheckValveClearance
ServiceAir Filter
ReplaceSparkPlug
At EachUse
*Every 100 hoursor EverySeason
***Every Season
** Every200 hoursor EverySeason
EverySeason
:i: Changeoil after first 30 hours of operationthenevery season.
* Changeoiland oilfilter everymonth whenoperatingunderheavy load or in high
temperatures.
** Clean more often under dirty or dusty operating conditions. Replaceair filter
parts if they cannot beadequatelycleaned.
*** Check valve clearance and adjust if necessary after first 50 hours of
operationand every 100 hoursthereafter.
3.3 PRODUCTSPECIFICATIONS
3.3.1 GENERATORSPEC/F/CATiONS
RatedPower............................................................... 5.0/5.5/6.5 kW**
SurgePower............................................................... 6.25/6.88/8.0 kW
RatedACVoltage...................................................................... 120/240
RatedAC Load
Current@ 240V (5.0/5.5/6.5 kW)..................20.8/22.9/27.1 Amps**
Current@ 120V (5.0/5.5/6.5 kW)..................41.6/45.8/54.2 Amps**
RatedFrequency.................................................... 60 Hz@ 3600 RPM
Phase................................................................................ SinglePhase
** Maximumwattageandcurrentaresubjectto,andlimitedby,suchfactors
asfuelBtucontent,ambienttemperature,altitude,enginecondition,etc..
Maximumpowerdecreasesabout3.5%foreach1,000feetabovesealevel;
andwillalsodecreaseabout1%for each6° C(10° F)above16° C(60° F)
ambienttemperature.
3.3.2 ENGINESPECIFICATIONS
Displacement.............................................................................. 389 cc
SparkPlugType................................ NHSPLDF7TCor ChampionN9YC
SparkPlug PartNo........................................................... 0G84420101
SparkPlug Gap.............................0.028-0.031 inch or (0.70-0.80 mm)
GasolineCapacity......................................................... 7.2 U.S.gallons
OilType.................. SeeChartin "Before Startingthe Generator"Section
OilCapacity.................................................................... 1 L (1.06 Qts.)
RunTimeat 50% Load (5.0/5.5/6.5 kW)..................................10 Hours
3.3.3 EM/SS/ONS/NFORIVIAT/ON
TheEnvironmentalProtectionAgency(and CaliforniaAir Resource
Board for generators certified to CA standards) require(s)that
this generator comply with exhaust and evaporative emission
standards.Locate the emissions compliancedecalon the engine
to determinewhat standardsthe generatormeets. This generator
is certified to operateon gasoline.The emission control system
includesthefollowing components(if equipped):
Air Induction System • Ignition System
- IntakePipe/ Manifold -- SparkPlug
- Air Cleaner -- IgnitionModule
Fuel System • Exhaust System
- Carburetor -- ExhaustManifold
- FuelTank/Cap -- Muffler
- FuelLines -- PulsedAir Valve
- EvaporativeVentLines -- Catalyst
- CarbonCanister
3.4 GENERALRECOMMENDATIONS
Thewarrantyof thegeneratordoes notcover itemsthat havebeen
subjectedto operator abuseor negligence.To receivefull value
from the warranty, the operator must maintain the generatoras
instructed inthis manual.
Some adjustmentswilt need to be made periodically to properly
maintainthegenerator.
All adjustmentsin the Maintenancesectionof this manualshould
be madeat leastonceeachseason.Followthe requirementsinthe
"MaintenanceSchedule".
NOTE:
Once a year replacethe spark plug and replacethe air filter.
A new spark plug and clean air filter assure properfuel-air
mixture andhelpthe engine runbetter andlast longer.
3.4.1 GENERATORMAINTENANCE
Generatormaintenanceconsistsof keepingthe unitcleanand dry.
Operateand storethe unit in a cleandry environmentwhereit will
not be exposedto excessivedust,dirt, moistureor any corrosive
vapors.Coolingair slotsin thegeneratormustnot becomeclogged
with snow, leaves,or anyotherforeign material.
Checkthe cleanlinessof the generatorfrequentlyand cleanwhen
dust, dirt, oil, moistureor otherforeign substancesarevisible on
its exteriorsurface.
,ACAUTION!
,_ Never insert any object or tool through the air
cooling slots, even if the engine is not running.
NOTE:
DONOTusea garden hoseto cleangenerator. Water canenter
the enginefuel systemand causeproblems.In addition,ifwater
enters thegenerator throughcoolingair slots,some waterwill
be retainedin voidsand crevicesof therotorand stator winding
insulation.Water and dirt buildup on the generator internal
windingswill eventually decrease the insulationresistanceof
these windings.
13

3.4.2 TOCLEANTHEGENERATOR
• Usea dampcloth to wipe exteriorsurfaces clean.
• A soft, bristlebrush may be usedto loosencaked on dirt, oil,
etc.
• A vacuumcleanermay be usedto pick up loosedirt anddebris.
• Low pressure air (not to exceed 25 psi) may be used to
blow away dirt. Inspect cooling air slots and openings
on the generator.These openings must be kept clean and
unobstructed.
3.4.3 ENG/NEMA/NTENANCE
//_When working on the generator, always
disconnect negative cable from battery. Also
disconnect spark plug wire from spark plug and
keep wire away from spark plug.
3.4.4 CNECK/NGO/LLEVEL
Seethe "BeforeStartingthe Generator"sectionfor informationon
checkingthe oil level.Theoil levelshouldbe checkedbeforeeach
use, or at least every eight hours of operation. Keepthe oil level
maintained.
3.4.5 CNANG/NGTHEO/L
Changethe oil after the first 30 hours of operation. Changethe
oil every 100 hours or every season thereafter. If running this
unit underdirty or dusty conditions, or in extremelyhot weather,
changethe oil moreoften.
,A CAUTION!
,l_ Hot oil may cause burns. Allow engine to
cool before draining oil. Avoid prolonged
or repeated skin exposure with used oil.
Thoroughly wash exposed areas with soap.
Usethefollowinginstructionstochangetheoil aftertheengine
coolsdown:
1. Cleanareaaroundoil drain plug.
2. Removeoil drain plugfrom engineandoil fill plugto drainoil
completely intoa suitablecontainer.
3. When oil has completely drained, install oil drain plug and
tighten securely.
4. Filloil sumpwith recommendedoil. (See"BeforeStartingthe
Generator"for oil recommendations).
5. Wipeup any spilledoil.
6. Disposeof usedoil ata propercollectioncenter.
3.4.6 REPLACINGTHESPARKPLUG
SeeEngineSpecificationsfor recommendedspark plug.Replace
theplugonceeachyear.This will helptheenginestarteasierand
run better.
1. Stopthe engineand pull the spark plug wire off of the spark
plug.
2. Cleanthe areaaroundthe spark plug and remove itfrom the
cylinder head.
3. Setthe spark plug'sgap to 0.70-0.80 mm (0.028-0.031 in.).
Installthe correctly gappedspark plug intothe cylinder head
(Figure16).
Figure 16 - Spark Plug Gap
3.4.7 BATTERYREPLACEMENT{IFAPPLICABLE)_
NOTE:
Thebattery shippedwith thegenerator hasbeen fully charged.
A battery may lose some of its chargewhen not in use for
prolongedperiodsof time. If the battery is unable to crank
the engine,plugin the 12V chargerincludedin the accessory
box (see the Charging a Battery section). RUNNINGTHE
GENERATORDOES NOT CHARGETHE BATTERY.The part
numberfor this batteryis 0G9449.
,_ CAUTION!
,l_The NEGATIVE battery terminal should:
1. Always be DISCONNECTEDFIRST.
2. Alwaysbe CONNECTEDLAST.
Figure17- Battery Connections
14

3.5 SERVICEAiRCLEANER
The engine will not run properly and may be damagedif using
a dirty air cleaner.Clean or replacethe air cleaner paper filter
once a year.Cleanor replacemore often if operatingunder dusty
conditions(Figure18). Theair filter part numberis 0G84420151.
Tocleanor replacepaperair filter:
1. Removeair cleanercover andremove paperfilter.
2. Cleanpaperfilter bytappingit gently on a solid surface. If the
filter is too dirty, replaceit with a newone. Disposeofthe old
filter properly.
3. Cleanair cleanercover,then insert new paper filter into the
baseof theair cleaner.Re-installair cleanercover.
Figure 18- Air Filter
8.5.1CLEANSPARKARRESTORSCREEN(CARB
MOOELS
The engineexhaustmuffler has a spark arrestor screen. Inspect
and cleanthe screenat leastonce eachyear (Figure19). If unit is
usedregularly,inspectand cleanmoreoften.
i,_lf using the generator on any forest=covered,
brush=covered or grass=covered unimproved
land, it must equipped with a spark arrestor.
The spark arrestor must be maintained in good
condition by the owner/operator.
Cleanandinspectthe sparkarrestorwhenthe engineisat ambient
temperatureasfollows:
1. Remove the spark arrestor screen from the muffler by
looseningthe clamp andremovingthe screw.
2. Inspect screen and replace if torn, perforated or otherwise
damaged. DONOTUSEa defective screen. If screen is not
damaged,cleanit with commercialsolvent.
3. Replacethe spark arrestor and secure with the clamp and
screw.
Figure 19 - Spark Arrestor Screen
ARRESTDR
SPARK
ARRESTOR
SCREEN2
NOTE:
Toorder a newair filteror sparkarrestor screen,pleasecontact
the nearestauthorizedservice centerat 1-800-333-1322.
3.6 VALVECLEARANCE
* Intake-- 0.15 _ O.02mm(cold), (0.006" _ 0.0008" inches)
* Exhaust-- 0.20 _ O.02mm(cold) (0.008" _ 0.0008" inches)
After the first 50 hoursof operation, checkthe valve clearance
in the engineand adjustif necessary.
Important: If feelinguncomfortable aboutdoing this procedureor
the propertools are not available,pleasetakethe generatorto the
nearestservicecenterto havethevalveclearanceadjusted.Thisis
a very important stepto ensurelongestlifefor the engine.
3.7 GENERAL
Thegeneratorshouldbestartedatleastonceeverythirty days and
be allowedto run at least30 minutes. If this cannot be done and
the unitmust be stored for morethan 30 days, usethe following
informationasa guideto prepareit for storage.
NEVER store engine with fuel in tank indoors
or in enclosed, poorly ventilated areas where
fumes may reach an open flame, spark or pilot
light as on a furnace, water heater, clothes dryer
or other gas appliance.
,_AIIow unit to cool entirely before storage.
15

3.8 LONGTERMSTORAGE
It is importantto preventgum depositsfrom forming in essential
fuel systemparts such asthe carburetor,fuel hoseor tank during
storage. Also, experience indicates that alcohol-blendedfuels
(calledgasohol,ethanolor methanol)can attract moisture,which
leadsto separationand formation of acids during storage.Acidic
gas candamagethefuel systemof an enginewhile in storage.
To avoid engine problems, the fuel system should be emptied
beforestorageof 30 days or longer,asfollows:
1. Addaqualitygasolinestabilizertothefuelperthemanufacturers
specifications,and run theunitfor 10-15 minutes.
2. After enginecools down, remove all gasolinefrom the fuel
tank. Usea commercially available,non-conductivevacuum
siphon.
Drain fuel into approved container outdoors,
away from open flame, Be sure engine is cool,
Do not smoke.
3. Start andrun engineuntilenginestops from lack offuel.
4. After engine cools down, drain oil from engine. Refill with
recommendedgrade.
5. Removespark plug and pour about 1/2 ounce (15 mt) of
engine oil into the cylinder.Cover spark plug hole with rag.
Pull the recoil starter a coupletimes to lubricatethe piston
ringsand cylinder bore.A fogging agentcan also be used in
the placeof oil.
• , CAUTION!
Avoid spray from spark plug hole when
cranking engine.
6. Installandtightenspark plug.Donotconnectsparkplugwire.
7. Cleanthe generatorouter surfaces. Check that cooling air
slots and openingson generatorare openand unobstructed.
8. Storethe unitin a clean,dry place.
3.9 OTHERSTORAGETiPS
* Donot store gasolinefrom oneseasonto another.
* Replacethe gasolinecan if it starts to rust. Rustand/or dirt in
the gasolinewill cause problems with the carburetorand fuel
system.
* If possible,storethe unitindoorsandcover itto giveprotection
from dust and dirt. BESURETOEMPTYTHEFUELTANK,
, If it is not practical to emptythe fuel tank and the unit is to
be stored for some time, use a commercially availablefuel
stabilizer added to the gasoline to increase the life of the
gasoline.Runtheunitfor 10-15 minutes,turn off thefuel valve
andallow to run untilenginestopsfrom lack of fuel.
, Coverthe unit with a suitable protective cover that does not
retainmoisture.
_t NEVER cover the generator while engine and
exhaust areas are warm,
16

4.1 TROUBLESHOOTINGGUIDE
Engineisrunning,but noACoutput
is available.
1. Circuit breakeris open.
2. Poorconnectionor defectivecord set.
3. Connecteddevice is bad.
4. Faultin generator.
1. Resetcircuit breaker.
2. Checkand repair.
3. Connectanotherdevicethat is in good condition.
4. ContactAuthorizedServiceFacility.
=
Engine runs well hut bogsdown 1. Short circuit in a connectedload. 1. Disconnectshorted electricalload.
whenloads areconnected. 2. Generatoris overloaded. 2. See"Don't Overloadthe Generator".
3. Enginespeedis too slow. 3. ContactAuthorizedServiceFacility.
4. Shorted generatorcircuit. 4. ContactAuthorizedServiceFacility.
Enginewiil notstart; orstartsand
runsrough.
,
2.
3.
4.
5.
6.
FuelShut-off is OFF. 1.
Dirtyair filter. 2.
Out of gasoline. 3.
Stale gasoline. 4.
Spark plugwire not connectedto sparkplug. 5.
Badsparkplug. 6.
TurnFuelShut-offto ON.
Cleanor replaceair filter.
Fillfuel tank.
Drainfuel tank and fill with fresh fuel.
Connectwireto sparkplug.
Replacesparkplug.
7. Waterin gasoline.
8. Over-choking.
9. Lowoil level.
10. Excessiverich fuel mixture.
11. Intakevalvestuck open or closed.
12. Enginehas lost compression.
7. Drainfuel tank; fill with fresh fuel.
8. Put choke knobto No Chokeposition.
9. Fillcrankcaseto proper level.
10. ContactAuthorizedServiceFacility.
11. ContactAuthorizedServiceFacility.
12. ContactAuthorizedServiceFacility.
i i
Engineshuts down during 1. Out of gasoline. 1. Fillfuel tank.
operation. 2. Lowoil level. 2. Fillcrankcaseto proper level.
3. Faultinengine. 3. ContactAuthorizedServiceFacility.
=
Engine lacks power. 1. Loadis toohigh. 1. Reduceload (see"Don'tOverloadthe Generator").
2. Dirtyair filter. 2. Cleanor replaceair filter.
3. Engineneedsto beserviced. 3. ContactAuthorizedServiceFacility.
Engine "hunts" orfalters. 1. Chokeis openedtoosoon. 1. Movechoketo halfway position untilengineruns
smoothly.
2. Carburetoris runningtoo rich or too lean. 2. ContactAuthorizedServiceFacility.
1"7

U,S, EPA EMiSSiON CONTROL WARRANTY STATEMENT
YOUR WARRANTY RIGHTS AND OBLiGATiONS
TheUnited StatesEnvironmentalProtectionAgency (EPA)andGeneracPowerSystems,Inc. (Generac)arepleasedto explainthe EmissionControl
SystemWarranty(ECSWarranty)on yournew 2011 andlaterequipment.New equipmentthat use smallspark-ignitedenginesmust bedesigned,built,
andequippedto meetstringentanti-smog standardsfor the federalgovernment.Generacwill warrantthe emission control systemon your equipment
for the period of time listed belowprovidedtherehas beenno abuse, neglect,unapprovedmodificationor impropermaintenanceofyour equipment.
Theemission control system on this equipmentincludesall componentswhose failurewould increasethe emissionsof anyregulatedpollutant.These
componentsarelisted in the Emissions Information sectionofthis manual.
MANUFACTURER'S WARRANTY COVERAGE:
This ECSWarranty is validfor two years,orfor the sameperiod as specifiedin the GeneracLimitedWarranty,whicheveris longer.Forequipmentwith
hourmeters,the warranty period is anumber of hours equalto halfthe UsefulLifeto whichthe equipmentis certified, or the warrantyperiod specified
abovein years,whicheveris less.TheUsefulLife can befound on the EmissionControlLabelon the engine.If, during suchwarranty period,any
emission-relatedpart on yourequipment isfound to be defectivein materials or workmanship, repairsor replacementwill be performedby a Generac
AuthorizedWarrantyServiceDealer.
OWNER'S WARRANTY RESPONSiBiLiTiES:
Asthe equipmentowner,you areresponsiblefor the completion of all requiredmaintenanceaslisted in your factory suppliedOwner'sManual.For
warranty purposes,Generacrecommendsthat you retainall receiptscovering maintenanceon your generator,but Generaccannotdeny warranty
solelydueto the lack of receipts.
Youshould beawarethat Generacmay deny anyand/or all warrantycoverageor responsibilityif your equipment,or a part!componentthereof,has
failed due to abuse,neglect, impropermaintenance,or unapprovedmodifications.
Youare responsiblefor contactingaGeoeracAuthorizedWarrantyDealeras soonas a problemoccurs.Thewarranty repairsshouldhe
completed in a reasonable amount oftime, not to exceed 30 days.
Warrantyservice can bearrangedby contactingeitheryour sellingdealeror aGeneracAuthorizedWarrantyServiceDealer.Tolocate the Generac
AuthorizedWarrantyServiceDealernearestyou, call ourtoll free numberbelow, or email[email protected].
1-800-333-1322
IMPORTANTNOTE:This warranty statementexplainsyour rights and obligationsunderthe EmissionControlSystemWarranty,which is providedto
you by Generacpursuantto federallaw. Seealsothe "GeneracLimitedWarrantiesfor GeneracPowerSystems,Inc.," which is enclosedherewith on a
separatesheet,also providedto you by Generac.Notethat this warranty shallnot applyto any incidental,consequentialor indirect damagescaused
bydefects in materialsor workmanship or any delayin repairor replacementof the defectivepart(s). This warranty is in place of all other warranties,
expressedor implied.Specifically,Generacmakesno otherwarrantiesasto the merchantabilityor fitness for aparticular purpose.Any implied
warrantieswhich areallowed by law, shallbe limited in durationto the terms of the expresswarranty providedherein.Somestates do not allow
limitationson how long an impliedwarrantylasts, sothe abovelimitation may not applyto you.
TheECSWarrantyappliesonly to the emissioncontrol system of your newequipment.Boththe ECSWarrantyandthe GeneracWarrantydescribe
importantrights and obligationswith respectto your new engine.
Warrantyservice can beperformed onlyby a GeneracAuthorizedWarrantyServiceFacility.When requestingwarranty service,evidencemust be
presentedshowingthe dateofthe saleto the originalpurchaser/owner.
Ifyou haveany questionsregardingyour warranty rightsandresponsibilities,you shouldcontact Generacatthe following address:
ATTENTION WARRANTY DEPARTMENT
GENERAC POWER SYSTEMS, INC.
P.O. BOX 297 • WHITEWATER, Wi 53190
PartI of 2
18
PartNo. 0J3335 Rev.C 11/11

EMiSSiON CONTROL SYSTEM WARRANTY
EmissionControlSystemWarranty (ECSWarranty)for equipmentusing small spark-ignitedengines:
(a) Applicability: This warrantyshall applyto equipmentthat usessmall off-road engines.TheECSWarrantyperiodshall beginon the datethe new
equipmentis purchasedby/deliveredto its original, end-usepurchaser/ownerand shallcontinue for the lesserof:
(1) The periodof time specifiedin the GeneracLimitedWarrantyenclosedherewith,but not lessthan24 months, or
(2) Forenginesequippedwith hour meters,a numberof operatinghours equalto half ofthe engine'susefullife.The usefullife is specifiedon the
EmissionsControl Labelon the engine.
(b) GeneralEmissionsWarrantyCoverage:Generacwarrantsto the original,end-usepurchaser/ownerof the newengineor equipment andto each
subsequentpurchaser/ownerthat the ECSwhen installed was:
(1) Designed,built and equippedso asto conform with all applicableregulations;and
(2) Freefrom defectsin materialsand workmanship which causethe failureof a warrantedpart at anytime duringthe ECSWarrantyPeriod.
(c) Thewarranty on emissions-relatedparts will be interpretedasfollows:
(1) Any warrantedpart that is not scheduledfor replacementas requiredmaintenanceinthe Owner'sManualshall bewarrantedfor the ECS
WarrantyPeriod.If any such partfails during the ECSWarrantyPeriod, it shallbe repairedor replacedby Generacaccordingto Subsection
(4) below. Any such part repairedor replacedunderthe EOSWarrantyshallbewarrantedfor the remainderof the ECSWarrantyPeriod.
(2) Any warrantedpart that is scheduledonlyfor regularinspection asspecifiedin the Owner'sManualshall be warrantedfor the EOSWarranty
Period.A statementin the Owner's Manualtothe effectof "repair or replaceasnecessary"shall not reducethe ECSWarrantyPeriod.Any
such part repairedor replacedunderthe ECSWarrantyshallbewarrantedfor the remainderofthe ECSWarranty Period.
(3) Any warrantedpart that is scheduledfor replacementasrequiredmaintenancein the Owner'sManualshallbe warrantedfor the periodof time
priorto first scheduledreplacementpointfor that part. If the part fails prior to thefirst scheduledreplacement,the part shall berepairedor
replacedby Generacaccordingto Subsection(4) below.Any such emissions-relatedpart repairedor replacedunderthe ECSwarranty shall
bewarrantedfor the remainderof the periodprior to thefirst scheduledreplacementpointfor thatpart.
(4) Repairor replacementof anywarranted,emissions-relatedpart underthis ECSWarrantyshall beperformedat no chargetothe ownerat a
GeneracAuthorizedWarrantyServiceFacility.
(5) Notwithstandingthe provisions of subsection (4) above,warranty services or repairsmust beprovidedat GeneracAuthorizedService
Facilities.
(6) Whenthe engineis inspectedby aGeneracAuthorizedWarrantyServiceFacility,the purchaser/ownershallnot beheld responsiblefor
diagnosticcosts if the repairis deemedwarrantable.
(7) Throughoutthe ECSWarrantyPeriod, Generacshall maintaina supply of warrantedemission-relatedparts sufficient to meetthe expected
demandfor such parts.
(8) Any Generacauthorizedand approvedemission-relatedreplacementparts may beused in the performanceof any ECSWarrantymaintenance
or repairsandwill beprovidedwithout chargeto the purchaser/owner.Such useshall not reduceGenerac'sEOSWarranty obligations.
(9) No modifications,other thanthose explicitlyapproved byGenerac,maybe madeto the generator.Unapprovedmodificationsvoid this ECS
Warrantyand shall be sufficientgroundfor disallowingan EOSWarrantyclaim.
(10) Generacshall not be heldliablehereunderfor failures of any non-authorizedreplacementparts, or failures of anyauthorizedparts causedby
the use of non-authorizedreplacementparts.
EMiSSiON RELATED PARTS MAY iNCLUDE THE FOLLOWING (iF EQUIPPED):
1) FUELMETERINGSYSTEM 3) IGNITIONSYSTEM
A. CARBURETORANDINTERNALPARTS A. SPARKPLUGS
B. FUELTANK/CAP B. IGNITIONCOILS/MODULE
C. FUELLINES 4) AIRINJECTIONSYSTEM
D. EVAPORATIVEVENTLINES A. PULSEAIRVALVE
E. REGULATOR(GASEOUSFUELS) 5) EXHAUSTSYSTEM
2) AIRINDUCTIONSYSTEM A. CATALYST
A. INTAKEMANIFOLD B. EXHAUSTMANIFOLD
B. AIRFILTER
Part2 of 2
PartNo. 0J3335 Rev.C 11/11
19

EM/$$/ONWARRANTYFORCARBCERT/F/EDEOU/PMENT
CALiFORNiA AND U.S, EPA EMiSSiON CONTROL WARRANTY STATEMENT
YOUR WARRANTY RIGHTS AND OBLiGATiONS
The CaliforniaAir Resource Board (CARB)and the UnitedStates EnvironmentalProtectionAgency (EPA),together with GeneracPower Systems, Inc.
(Generac)arepleasedto explainthe EmissionControlSystemWarranty(ECSWarranty)onyour new2012 equipment.Newequipmentthat usesmallspark-
ignitedenginesmust be designed,built, and equippedto meetstringentanti-smogstandardsfor the stateof Californiaandthe federalgovernment.Generac
will warrantthe emission control system on your equipment for the period of time listed below providedthere has been no abuse, neglect, unapproved
modificationor impropermaintenanceof your equipment.
The emissioncontrol system on this equipmentincludes all components whose failure would increasethe emissions of any regulatedpollutant.These
componentsarelistedin the EmissionsInformation section of this manual.
MANUFACTURER'S WARRANTY COVERAGE:
This ECSWarrantyis validfor two years, orfor the sameperiod asspecifiedinthe GeneracLimitedWarranty,whicheveris longer.Forequipmentwith hour
meters,the warranty periodis anumberof hoursequalto halfthe Useful Lifeto whichthe equipmentis certified, orthe warrantyperiod specifiedabovein
years,whicheveris less.TheUseful Life canbe found on the EmissionControl Labelon the engine. If, during such warrantyperiod,any emission-related
part on your equipmentis found to be defectivein materialsor workmanship, repairsor replacementwill be performedby a GeneracAuthorizedWarranty
ServiceDealer.
OWNER'S WARRANTY RESPONSiBiLiTiES:
Asthe equipmentowner,you areresponsiblefor the completionofall requiredmaintenanceaslistedinyour factory suppliedOwner'sManual.Forwarranty
purposes,Generacrecommendsthat you retain all receipts covering maintenanceon your generator,but Generaccannot denywarranty solelydue to the
lack of receipts.
You shouldbe awarethat Generacmay denyany and/or all warranty coverageor responsibilityif your equipment,or a part!componentthereof, hasfailed
dueto abuse,neglect,impropermaintenance,or unapprovedmodifications.
Youare responsiblefor contacting a Genera¢Authorized Warranty Dealer as soon as a problemoccurs.The warranty repairsshould be completed
in a reasonable amount of time, not to exceed30 days.
Warrantyservicecan bearrangedby contactingeitheryoursellingdealeror aGeneracAuthorizedWarrantyServiceDealer.TolocatetheGeneracAuthorized
1-800-333-1322
IMPORTANTNOTE: This warrantystatement explainsyour rights and obligations underthe EmissionControlSystemWarranty,which is providedto you
by Generacpursuantto federallaw.Seealsothe "GeneracLimitedWarrantiesfor GeneracPowerSystems, Inc.,"which is enclosedherewithon a separate
sheet,also providedto you by Generac.Notethat this warranty shallnot apply to any incidental,consequentialor indirect damagescausedby defects in
materialsor workmanshipor anydelayin repairor replacementofthe defectivepart(s).This warrantyisin placeof allotherwarranties,expressedorimplied.
Specifically,Generacmakesno other warrantiesas to the merchantabilityor fitness for a particular purpose.Any implied warranties allowed by law shall
be limited in durationto theterms ofthe expresswarranty providedherein.Somestates do not allow limitationson how long an impliedwarranty lasts, so
the abovelimitationmaynot apply to you.
TheECSWarrantyappliesonlytothe emissioncontrol system ofyour newequipment.Boththe ECSWarrantyand the GeneracWarrantydescribeimportant
rightsandobligations with respectto your new engine.
Warrantyservice canbe performedonlyby a GeneracAuthorizedWarrantyServiceFacility.Whenrequestingwarrantyservice,evidencemust bepresented
showingthe dateof the saleto the originalpurchaser/owner.
Ifyou haveany questionsregardingyourwarranty rights andresponsibilities,you shouldcontact Generacatthe following address:
ATTENTION WARRANTY DEPARTMENT
GENERAC POWER SYSTEMS, INC.
P.O. BOX 297 * WHITEWATER, WI 53190
Part 1of 2
2O
PartNo. 0J8147CRev.A 01/12

EMISSIONWARRANTYFORCARBCERTIFIEDEQUIPMENT
EMiSSiON CONTROL SYSTEM WARRANTY
EmissionControlSystemWarranty (ECSWarranty)for equipmentusing small spark-ignitedengines:
(a) Applicability: This warrantyshall applyto equipmentthat usessmall off-road engines.TheECSWarrantyperiodshall beginon the datethe new
equipmentis purchasedby/deliveredto its original, end-usepurchaser/ownerand shallcontinue for the lesserof:
(1) Theperiod of time specifiedin the GeneracLimitedWarrantyenclosedherewith,but not lessthan 24 months, or
(2) Forenginesequippedwith hourmeters, a numberof operatinghours equalto half of the engine'suseful life. Theusefullife is specifiedonthe
EmissionsControl Labelon the engine.
(b) GeneralEmissionsWarrantyCoverage:Generacwarrantsto the original,end-usepurchaser/ownerof the newengineor equipment andto each
subsequentpurchaser/ownerthat the ECSwhen installed was:
(1) Designed,builtand equippedso asto conform with all applicableregulations;and
(2) Freefrom defects in materials andworkmanship which cause thefailure of awarrantedpart at anytime duringthe ECSWarrantyPeriod.
(c) Thewarranty on emissions-relatedparts will be interpretedasfollows:
(1) Any warrantedpart that is not scheduledfor replacementas requiredmaintenanceinthe Owner'sManualshall be warrantedfor the ECS
WarrantyPeriod.If any such part fails duringthe ECSWarrantyPeriod,it shall berepairedor replacedby Generacaccordingto Subsection(4)
below.Any such part repairedor replacedunderthe ECSWarrantyshallbewarrantedfor the remainderof the ECSWarrantyPeriod.
(2) Any warrantedpart that is scheduledonly for regularinspectionas specifiedin the Owner'sManualshall bewarrantedforthe ECSWarranty
Period.A statementin theOwner's Manualto the effectof "repairor replaceas necessary"shall not reducethe ECSWarrantyPeriod.Any
such part repairedor replacedunderthe ECSWarrantyshallbe warrantedfor the remainderof the ECSWarrantyPeriod.
(3) Any warrantedpart that is scheduledfor replacementas requiredmaintenanceinthe Owner'sManual shall be warrantedfor the periodoftime
prior to first scheduledreplacementpointfor that part. If the part fails prior to the first scheduledreplacement,the part shallbe repairedor
replacedbyGeneracaccordingto Subsection (4) below.Any such emissions-relatedpart repairedor replacedunderthe ECSwarrantyshallbe
warrantedfor the remainderof the periodpriorto thefirst scheduled replacementpointfor that part.
(4) Repairor replacementof any warranted,emissions-relatedpart underthis ECSWarranty shall be performedat no chargeto the ownerat a
GeneracAuthorizedWarranty ServiceFacility.
(5) Notwithstandingthe provisions of subsection(4) above,warrantyservicesor repairs must be providedatGeneracAuthorizedService
Facilities.
(6) Whenthe engineis inspected bya GeneracAuthorizedWarrantyServiceFacility,the purchaser/ownershallnot be held responsiblefor
diagnostic costs if the repairis deemedwarrantable.
(7) Throughoutthe ECSWarrantyPeriod,Generacshallmaintaina supply of warrantedemission-relatedparts sufficientto meetthe expected
demandfor such parts.
(8) Any Generacauthorizedand approvedemission-relatedreplacementparts may be used in theperformanceof any ECSWarranty maintenance
or repairsand will be providedwithout charge tothe purchaser/owner.Suchuse shallnot reduceGeneracECSWarrantyobligations.
(9) No modifications, otherthan thoseexplicitly approvedby Generac,may be madeto the generator.Unapprovedmodificationsvoidthis ECS
Warrantyandshall besufficient groundfor disallowing an ECSWarranty claim.
(10) Generacshall not be heldliablehereunderfor failures of any non-authorizedreplacementparts, or failures of anyauthorizedparts causedby
the use of non-authorizedreplacementparts.
EMISSION RELATED PARTS MAY iNCLUDE THE FOLLOWING (IF EQUIPPED):
1) FUELMETERINGSYSTEM 3) IGNITIONSYSTEM
A. CARBURETORANDINTERNALPARTS A. SPARKPLUGS
B. FUELTANK/CAP B. IGNITIONCOILS/ MODULE
C. FUELLINES 4) AIRINJECTIONSYSTEM
D. EVAPORATIVEVENTLINES A. PULSEAIRVALVE
E. REGULATOR(GASEOUSFUELS) 5) EXHAUSTSYSTEM
E CARBONCANISTER A. CATALYST
2) AIRINDUCTIONSYSTEM B. EXHAUSTMANIFOLD
A. INTAKEMANIFOLD
B. AIRFILTER
Part2 of 2
Part No.0J8147C Rev.A 01/12
2T

GENERAC POWER SYSTEMS "TWO YEAR" LiMiTED WARRANTY
FOR GP SERIES PORTABLE GENERATORS
Fora period of two (2) yearsfrom the dateof originalsale,GeneracPowerSystems,Inc. (Generac)warrants its GPSeriesgeneratorswill befree from defectsin materials
andworkmanship for the itemsand period set forth below. Generacwill, at its discretion,repair or replaceany part that, upon examination,inspection andtesting by
Generacor a GeneracAuthorizedWarranty Service Dealer,isfound to be defective.Repairor replacementpursuant to this limited warranty shall not renew or extendthe
originalwarranty period. Any repairedproduct shall bewarranted for the remainingoriginalwarranty period only. Any equipmentthatthe purchaser/owner claims to be
defectivemust be returnedto andexamined by the nearestGeneracAuthorizedWarranty Service Dealer.All transportation costs underthe warranty, including return to
the factory, areto be borneand prepaid bythe purchaser/owneKThis warranty appliesonly to GeneracGPSeriesportable generators andis nottransferablefrom original
purchaser.Saveyour proof-of-purchase receipt.If you donot provide proof of the initialpurchase date,the manufacturer's shipping date of the product will be usedto
determinethe warranty period.
WARRANTY SCHEDULE
Consumerapplicationsare warrantedfor two (2) years. Commercial andRentalapplications arewarranted for one(1) year or 1000 hours maximum, whichever comes first.
CONSUMERAPPLICATIONFORTHE UNITEDSTATESANDCANADAONLY
YEARONE- Limited comprehensivecoverageon Laborand Part(s) listed (proof of purchaseand maintenanceis required):
• Engine-All Components
• Alternator-All Components
YEARTWO- Limitedcomprehensivecoverageon Part(s) listed (proof of purchaseandmaintenanceis required):
• Engine-All Components
• Alternator-All Components
COMMERCIAL_!RENTALAPPLICATION
YEARONE- Limited comprehensivecoverageon Laborand Part(s) listed (proof of purchaseand maintenanceis required):
• Engine-All Components
• Alternator-All Components
NOTE: Forthe purpose of this warranty "consumer use" meanspersonal residentialhousehold or recreational use byoriginal purchaser.This warranty does not applyto
unitsused for PrimePowerin placeof utility whereutility power service is present or where utility power service does not normally exist.Oncea generatorhas experienced
commercialor rental use, itshallthereafter beconsidered a non-consumer use generatorfor the purpose ofthis warranty.
GUiDELiNES:
1. All warranty repairs, must be performed and/oraddressedby anAuthorized/CertifiedGeneracDealer,or branchthereof.
2. Units that havebeen resoldare not coveredunderthe GeneracWarranty,as this Warrantyis nottransferable.
3. Use of Non-Generacreplacementpart(s) will void the warrantyin its entirety.
4. Generacmay choose to Repair,Replaceor Refunda piece of equipment.
5. Warranty Labor Ratesare basedon normal working hours. Additionalcosts for overtime,holiday or emergencylaborcosts for repairs outsideof normal businesshours
will bethe responsibilityof the customer.
6. Warranty Parts shipment costs are reimbursedat groundshipment rates. Costsrelated to requestsfor expeditedshippingwill bethe responsibility of the customer.
7. Batteries arewarranted by the battery manufacturer.
8. Verification of required maintenancemay be requiredfor warranty coverage.
THiS WARRANTY SHALL NOT APPLY TO THE FOLLOWING:
1. Costs of normal maintenanceand adjustments.
2. Failurescausedby any contaminatedfuels, oils or lack of proper oil levels.
3. Repairs or diagnostics performed by individuals otherthan Generacauthorizeddealersnot authorizedin writing by Generac.
4. Failuresdue,but not limitedto, normal wear andtear,accident, misuse, abuse, negligenceor improper use.
5. As with all mechanical devices,the Generacengines needperiodic part(s) service and replacementto perform as designed.This warranty will notcover repairwhen
normal use has exhaustedthe life of a part(s) or engine.
6. Failurescausedby any externalcause or act of God,such as collision, theft, vandalism,riot or wars, nuclearholocaust,fire, freezing,lightning, earth-quake, windstorm,
hail, volcanic eruption, water or flood, tornado or hurricane.
7. Damage relatedto rodentand/or insect infestation.
8. Products that are modifiedor alteredin a mannernot authorized by Generacinwriting.
9. Any incidental, consequentialor indirectdamagescaused by defectsin materials or workmanship, or any delayinrepair or replacementofthe defectivepart(s).
10. Failuredueto misapplication.
11. Expensesrelated to "customer instruction" or troubleshooting where no manufacturingdefect is found.
12. Rentalequipmentused while warranty repairs are beingperformed.
13. Starting batteries,fuses, light bulbs and enginefluids.
THISWARRANTYISIN PLACEOFALL OTHERWARRANTIES,EXPRESSEDORIMPLIED.SPECIFICALLY,GENERACMAKESNO OTHERWARRANTIESAS TOTHE
MERCHANTABILITYOR FITNESSFORA PARTICULARPURPOSE.Any impliedwarranties allowed by law shall be limited in durationto theterms ofthe expresswarranty
providedherein.Some states do notallow limitations on how long animplied warranty lasts, so theabove limitationmay notapply to you. GENERAC'SONLYLIABILITY
SHALLBETHEREPAIRORREPLACEMENTOFPART(S)AS STATEDABOVE.INNO EVENTSHALLGENERACBELIABLEFORANY INCIDENTALOR CONSEQUENTIAL
DAMAGES,EVENIFSUCHDAMAGESAREA DIRECTRESULTOFGENERAC'SNEGLIGENCE.Some statesdo not allow theexclusion or limitationof incidental or
consequentialdamages,sotheabove limitation may not applyto you. This warranty gives you specific legalrights.You also haveother rights from state to state.
GENERAC POWER SYSTEMS, INC. • P.O.BOX 8 • Waukesha, Wl 53187 • Ph: (888) GENERAC (436-3722) • Fax: (262) 544-4851
To locate the nearest Authorized Dealer visit our website www.generac.com
PartNo. 0H8902 RevisionF (02/12)
Manual Part No. 0J3821 Rev. E (05/29/12) Printed in China

GENERAC _
ld ratio
=eradoresportatilesserieGP
23

Introduccion..........................................................25
Leaestemanualcornpletarnente..........................25
Reglasde seguridad.............................................25
indicedeestandares....................................................27
Inforrnaciongeneral..............................................28
1.1 Uesempaque................................................................28
1.1.1 Cajade accesorios..........................................28
1.2 Ensamble.....................................................................28
1.2.1 Ensambledelkit deaccesorios........................28
1.2.2 Conexiondetcablede la bateria(solo para
arranqueelectrico)...........................................29
Operation .............................................................29
2.1 Conozcaetgenerador...................................................29
2.2 Horometro....................................................................31
2.3 Cablesy enchufesde conexion....................................31
2.3.1 Recept_,culodone de 120 VAC,20 amperios...31
2.3.2 Recept_,culode120/240 VAC,30 amperios.....31
2.3.3 Recept_,culodobleGFCI,120 VAC,
20 amperios....................................................31
2.3.4 Recept_,culode120/240 VAC,30 amperios.....32
2.4 Como usaretgenerador...............................................32
2.4.1 Como ponera tierra el generadorcuando
se usacomo portatil.........................................32
2.4.2 Como conectaretgeneradora un sistema
etectricode edificio...........................................33
2.5 Nosobrecargueetgenerador........................................33
2.6 Guiade referenciade potencia.....................................33
2.7 Antes de arrancaretgenerador.....................................34
2.7.1 Agregadode aceitede motor ...........................34
2.7.2 Agregadode combustible................................34
2.8 Arranquede motoresconcablede arranque................35
2.9 Arranquede motoresconarranqueelectrico................35
2.9.1 Manualde inicio..............................................36
2.10 Paradodetmotor..........................................................36
2.11 Sistemade apagadopor bajo nivelde aceite................36
2.11.1 Deteccionde nivetbajo de aceite.....................36
2.12 Como cargarla bateria(solopara unidades
con arranqueetectrico)................................................ 36
iViantenirniento......................................................37
3.1 Como realizarmantenimientoprogramado....................37
3.2 Programade mantenimiento.........................................37
3.3 Especificacionesdetproducto......................................37
3.3.1 Especificacionesdelgenerador........................37
3.3.2 Especificacionesdelmotor ..............................37
3.3.3 Informacionde emisiones................................37
3.4 Recomendacionesgenerales........................................37
3.4.1 Mantenimientodetgenerador...........................37
3.4.2 Paralimpiaretgenerador.................................38
3.4.3 Mantenimientodetmotor .................................38
3.4.4 Verificaciondetnivelde aceite......................... 38
3.4.5 Cambiodel aceitede motor..............................38
3.4.6 Reemplazode la bujia......................................38
3.4.7 Reemplazode la bateria(si corresponde).........38
3.5 Servicio detlimpiadorde aire.......................................39
3.5.1 Limpieetfiltro detsupresorde chispas
(modetosCARB)..............................................39
3.6 Espaciode la vatvula....................................................39
3.7 Generales.....................................................................39
3.8 Almacenamientoa largoplazo......................................40
3.9 Otrosconsejos dealmacenamiento..............................40
Detecciondefallas ...............................................41
4.1 Guiade deteccionde problemas..................................41
Garantia................................................................42
24

INTRODUCCION
Gracias por comprar este modelo de Generac Power Systems, Inc.
Este modeloes un generadorimpulsadopor motor, refrigeradopor aire,
compacto y de alto rendimiento disefiado para proporcionar energia
electrica para operar cargas electricas donde no haya servicio publico
de electricidado en reemplazode laredelectrica encaso de apagones.
LEAESTEMANUALCOMPLETNVlENTE
Si alguna parte de este manual no se entiende bien, pongase en
contacto con el concesionarioautorizadomas cercanopara conocer los
procedimientosde arranque,operaciony servicio.
El operador es responsabledel uso apropiadoy segurode este equipo.
Recomendamos encarecidamenteque el operador lea este manual y
entienda completamente todas las instrucciones antes de usar este
equipo. Asimismo recomendamos con igual firmeza el instruir a otros
usuarios para arrancar y operar apropiadamente la unidad. Esto los
preparasi necesitan operarel equipoen algunaemergencia.
El generadorpuede operar enforma segura,eficientey confiable solo si
se le ubica, sele opera y mantieneen forma apropiada.Antesde operar
o darservicio al generador:
• Familiaricese y adhierase estrictamente a todos los codigos y
regulacioneslocales,estatalesy nacionales.
• Estudietodas las advertencias de seguridad en este manual yen el
producto con mucho cuidado.
• Familiaricesecon este manualy la unidadantesdeusarla.
El fabricante no puede anticipar todas las posibles circunstancias
que puedan involucrar peligros. Las advertencias en este manual y
en las etiquetasy calcomanias fijadas en la unidad son, por tanto, no
completamenteinclusivas.Si seusaun procedimiento,metododetrabajo
otecnica de operacionque el fabricanteno recomiendaespecificamente,
aseguresede que sea seguropara los demas. Asimismo asegureseque
el procedimiento,metodo detrabajo o tecnica de operacionutilizada no
vuelvainseguroal generador.
LA INFORMACIONCONTENIDAAQU[ SE BASO EN MAQUINASEN
PRODUCCIONAL MOMENTO DE LA PUBLICACION.GENERACSE
RESERVAELDERECHODEMODtFICARESTEMANUALENCUALQUIER
MOMENTO.
REGLASDESEGURIDAD
A Io largo de esta publicacion, yen Io que respecta alas etiquetas
y calcomanias fijadas en el generador, los bloques de PELIGRO,
ADVERTENCIA,CUIDADOY NOTAse usan para alertaral personalsobre
instruccionesespecialessobre unaoperacionen particular quepuedeser
peligrosasi seejecutaen formaincorrecta o sin cuidado. Observelascon
cuidado. Susdefiniciones son como sigue:
INDICA UNA SITUACION PELIGROSA O ACCION
SI NO SE EVITA,TRAERA COMO RESULTADOQUE,
LA MUERTE O UN DANO SERIO.
Indica una situaci6n peligrosa o acci6n que, si no
se evita, podria traer como resultado la muerte o un
clafio serio.
_CUIDADO
Indica una situaci6n peligrosa o acci6n que, si no
se evita, puede traer como resultado un clafio menor
o moderado.
NOTA:
Lasnotas contieneninformaci6nadicional importantepara un
procedimientoy se les encontrar;identro del cuerpode este
manual.
Estas advertencias de seguridad no pueden eliminar los peligros que
indican.Elsentidocomun y un estricto cumplimientodelas instrucciones
especialescuando se realiza la accion o servicio son esenciales para
evitaraccidentes.
Ouatro simbolos de seguridad usados comunmente acompafian los
bloquesde PELIGRO,ADVERTENCIAy CUIDADO.Eltipo de informacion
quecada uno indica escomo sigue:
,_Este s_mbolo seSala importante informaci6n de
seguridad que, si no se sigue, puede porter en
peligro la seguridad personal y/o las propiedades
de otros.
Este simbolo indica un peligro potencial de
explosi6n.
/_Este simbolo indica un peligro potencial de
incendio.
//_Este simbolo indica un peligro potencial de
choque el_ctrico.
PELIGROSGENERALES
* NUNCA opere en un area cerrada o en interiores, en un vehiculo,
incluso si laspuertasy ventanasestanabiertas.
* Por razones de seguridad, el fabricante recomienda que el
mantenimientodeesteequiposeaIlevadoacabo porun concesionario
autorizado.Inspeccioneel generadorcon regularidad,y pongaseen
contacto con el concesionario autorizado mD,s cercano si necesita
repararloo conseguirrepuestos.
* Opere el generador solo en superficies planas y donde no este
expuestoaexcesivahumedad,suciedad,polvo ovaporescorrosivos.
* Mantengalas manos, pies, ropa, etc, lejos delas correasdetraccion,
ventiladoresy otras partesmoviles. Nuncaretire ningunaprotecciono
escudodeventiladormientrasla unidaesteoperando.
* Ciertas partes del generador se calientan en extremo durante la
operacion. Alejese del generadorhasta que se haya enfriado para
evitarquemadurasseveras.
, NOopereel generadoren laIluvia.
* No altere la construccion del generadorni cambie los controles de
modo quepuedancrearuna condicion deoperacion no segura.
, Nuncaarranqueo detengala unidadcon cargaselectricasconectadas
alas tomas Ycon dispositivos conectadosy encendidos.Arranqueel
motory dejeque seestabiliceantesdeconectarlas cargas electricas.
Desconectetodas las cargaselectricasantesde apagarel generador.
* Noinserte objetosa travesdelasranurasdeenfriamientode launidad.
* AI trabajar con este equipo, mantengase alerta en todo momento.
Nuncatrabajeen elequipo cuandoestefisica o mentalmentefatigado.

* Nuncauseelgeneradornialgunadesuspartescomeescabn.Pararse
sobrelaunidadpuedetensaryromperpartes,ypuedetraercome
resultadocondicionespeligrosasdeoperacioncomeescapedegases,
combustibleoaceite.
* Enlosmodelosdearranqueelectrico,desconecteelcablede
bateriaPOSITtVO(+)delarrancadordelmotor0elcabledebateria
NEGATIVO(-)delterminaldelabateria,Ioqueseama.sfa.cil,antesde
transportarelgenerador.
PELIGROSDELESCAPEY UBICACI0N
• iNuncaopereenareascerradasointeriores!iNUNCAopereenun
areaterraria,en unvehiculo;oen el interiorAUNQUElaspoertas
y ventanasestanabiertas!UseloSOLOen exterioresy lejosde
ventanasabiertas,puertas,duties deventilaci6ny enareasqueno
acumularanel mortalescape.
El use del generador en ambientes cerrados PUEDE
MATARLO EN MINUTES.
El los gases de escape del generador contienen mon6×ido
de carbono. Este es un venenos que no se puede vet ni oler.
NUNCAIo utilicedentrode una
casa o garaje,INCLUSOSllas
puertasy lasventanasestan
abiertas.
Utilicelo SOLAMENTEalaire
librey lejosde ventanas,
puertas,respiraderos.
* Los humos del escape del motor contienen monoxide de carbono,
que no se puedeoler ni ver. Este gas venenoso, si se aspira en
concentraciones suficientes, puede hacerle perder la conciencia y
causarlela muerte.
* El flujo adecuado y sin obstrucciones de aire para ventilacion y
refrigeraciones critico para la correcta operacion del generador.No
altere la instalacbn ni permita que haya siquiera un bloqueo parcial
de la provision de ventilacbn, ya queesto puede afectarseriamente
la operacbn seguradel generador.El generadorDEBEser operadoen
exteriores.
* Este sistema de escape debetener un apropiadomantenimiento.No
haganadaque puedaponer en peligro la seguridaddel escapeo que
no cumpla con alguncodigolocal o estandar.
* Siempre use una alarma de monoxide de carbono operada con
bateriasen los interiores,instaladadeacuerdoa las instrucciones del
fabricante.
* Si empiezaa sentirsemal, mareadoo debilluegode que el generador
este en funcionamiento,busque aire fresco INMEDtATAMENTE.Vaya
al medico, ya que podria tener envenenamientoper monoxide de
carbono.
PELIGROSELi::CTRICOS
* El generador produce alto voltaje peligroso durante la operacion.
Evite el contacto con cables pelados, terminales conexiones, etc.
mientras la unidad esta funcionando, aun con equipo conectado al
generador.Aseguresequetodaslas cubiertas,proteccionesy barreras
apropiadasseencuentrenen su lugarantesde operarel generador.
* Nunca manipule ningun cable electrico ni dispositivo mientras este
de pie sobre agua, con los pies descalzoso con las manes o pies
humedos. PUEDE HABER UNA DESCARGAELECTRICA COMO
RESULTADO.
* El Codigo Electrico Nacional (NEC) requiere que el marco y las
partes externas que son conductores electricos esten conectadas
apropiadamente a una conexion a tierra aprobada. Los codigos
electricoslocalespuedenasimismo requeriruna apropiadaconexbn a
tierradelgenerador.Consulteconunelectricistalocallos requerimientos
deconexionatierra parasu a_rea.
* Useuncircuito interrupterdefalla detierra encualquierareahumedao
altamenteconductiva(come estanteriasdemetalotrabajos enacero).
* No usecableselectricosgastados,pelados,deshilachadoso de algun
mode dafiadoscon el generador.
* Antesderealizarcualquiermantenimientoal generador,desconectelos
cablesde arranquedel motor (st los hubiera) para evitarun arranque
accidental. Desconecte primero el cable del borne de la bateria
indicadocome NEGATIVO,NEG;o (-). Reconecteese cableal final.
* En case de un accidente causado per descarga electrica, apague
inmediatamentela fuente de energiaelectrica. Si esto no es posible,
intenteliberar a la victima del conductor vivo. EVITEEL CONTACTO
DIRECTOCONLAViCTIMA.Uneun implementono conductive,come
unasoga o una tabla, paraliberar a la victima del conductor vivo. Si
la victima esta inconsciente,aplique los primeros auxiliosy consiga
ayudamedicainmediatamente.
PELIGROSDEINCENDI0
* La gasolina es altamente INFLAMABLE y sus vaperes son
EXPLOSIVOS.No permitaque fumen, hagafuegos abiertos,chispas
otaler en la vecindadmientras manipula gasolina.
* Nunca anada gasolina mientras la unidad esta funcionando o esta
caliente. Deje enfriar al motor completamente antes de ahadir
combustible.
. Nunca llene el tanque de combustible en el interior de la casa.
Cumplatodas lasleyesqueregulanel almacenamientoy manipulacbn
degasolina.
* No sobrecargue el tanque de combustible. Deje siempre espacio
para la expansi6ndel combustible.Si el tanque esta_sobrecargado,
el combustiblepuededesparramarsesobre el motor calientey causar
un INCENDIOo una EXPLOSION.Nunca almaceneel generadorcon
combustible en el tanque donde los vapores de la gasolina pueden
alcanzar llamas abiertas, chispas o fuegos piloto (come en una
chimenea,calentador de agua o secadorde ropa). Puedegenerarse
unINCENDIOo una EXPLOSION.Dejeenfriarla unidadcompletamente
antesde almacenarse.
* Limpie cualquier derrame de combustible o aceite inmediatamente.
Asegurese de que no haya materiales combustible dejados sobre o
cercadel generador.Mantengaelarea alrededordel generadorlimpia
y libre deresidues y conserveuna claridad de cinco (5) pies atodos
los lades parapermitir una ventilacionapropiadaparael generador.
* Noinserte objetosa travesdelasranurasdeenfriamientode launidad.
* No opere el generador si los dispositivos electricos conectados
sobrecalientan, si la salida electrica se pierde, si el motor o el
generadorbeta chispas o se observa humo mientras la unidad esta.
funcionando.
* Tengaun extinguidorcercaal generadoren todo memento.
26

#NB/CEBEESTANBARES
1. Asociacion nacional de proteccion contra incendios (NFPA)70: El
CODIGOELF_CTRICONACIONAL(NEC)disponibleenwww.nfpa.org
2. Asociacion nacional de proteccion contra incendios (NFPA)5000:
CODtGODEEDIFICACI(::)NY SEGURIDADdisponibleen www.nfpa.org
3. El Codigo internacional de la construccion disponible en www.
iccsafe.org
4. Manualde CableadoAgricola disponible enwww.rerc.org, Consejo
de Recursos de Electricidad Rural P.O.Box 309 Wilmington, OH
45177-0309
5. ASAE EP-364.2 Instalacion y mantenimiento de energia electrica
de respaldo en granjas disponible en www.asabe.org, Sociedad
AmericanadeIngenierosAgricolasy Biologicos2950 NilesRoad,St.
Joseph, MI49085
Estalista no esinclusiva.Verifiquecon la Autoridadcon jurisdiccion local
(AHJ) cualesquieracodigos locales o normas que puedanser aplicables
asu jurisdiccion.
MODELON°:
NoDESERIE:
Ubicaci6nde/IP dela unidad
I
CALCOIVlANiA
DATOS DEL
iVIODELO
ADVERTENCIAPROPOSICION65 DECALIFORNIA
EtEstadode Californiasabeque el escapedetmotor y algunos
desus componentescausancancer,defectosde
nacimientoy otros dahosreproductivos.
ADVERTENCIAPROPOSICION65 DECALIFORNIA
Esteproductocontieneo emitequfmicosqueel Estado
de Californiasabequecausancancer,defectosde
nacimientou otros dahosreproductivos.
27

1.1 DESElVlPAO.UE
• Retiretodo etmaterialde empaque.
• Retirela cajaseparadadeaccesorios.
• Retireel generadorde la caja.
1.1.1 CAJAOEACCESOR/OS
®
®
®
®
®
®
®
®
l-Manual delpropietario
l-Botella deaceite SAE30
3-Tarjetasderegistro delproducto (ingles, espahol,frances)
l-Cargador de la bateria(arranqueelectricosolamente)
l-Ensamble de la manija
l-Pata delmarco (E)
2-Llantasdesinfladasnunca(H)
1 - Bolsade hardware(quecontiene Io siguiente):
- 2-Pernosdecabezaredondalargos (A)
- 2-Tuercasciegas (B)
- 4-Tuercasde brida (C)
- 2-Patasdegoma (D)
- 2-Pernoscortos (F)
- 2-Clavijasde eje (G)
- 2-Arandelas(I)
- 2-Pasadoresdechaveta (J)
- 2-Tuercasde brida (arranqueelectricosolamente)
1.2 ENSAMBLE
Et generador requiere algun ensamble antes de usarse. Si se
presentanproblemasal ensamblaretgenerador,por favor Itamea
la Generator Hetpline al 1-888-436-3722.
1.2.1 ENSAMBLAJEDELKITDEACCESORIOS
Consultelasinstruccionesqueaparecenacontinuaciony lasfiguras
1A, 1By 1Cparainstalarlasmanijas,laspatasy lasruedas.Nota:
loscomponentesdela manijayaestanpreensambladosdefabrica.
Lasruedasest_,ndise_adasparamejorarmucho la portabilidaddet
generadorUstednecesitaralassiguientesherramientasparainstalar
apropiadamenteetkit de accesorios.
• Trinquetey untoma de 13mm [1/2"]
• Llavede cubo de13mm [1/2"]
• Alicatesde puntafina
Manija
1. Instaleetensamblede la manijaal marco usandolos pernos
(A) y lastuercas(B).
Patas
2. Usetuercas(C)paramontarlaspatasdegoma (D)al soporte
de la pata(E).
3. Monte etsoporte de la pata (E)al marco con dos pernos (F)
y tuercas(C).
Ruedas
4. Desticelaclavijade eje(G)atravesdela Itanta(H), laarandeta
(I) y a travesdel soporte en etmarco.
5. Asegure la ctavija del eje (G) al marco con et pasador de
chaveta(J).
28
6. Use unos alicates y doble una lengiJetadet pasador de
chaveta(J) haciaafueraparacerraren su posicion.
7. Reepitalos pasos 5, 6, y 7 parala otra rueda.
Figura 1A- Montaje de la manija
Figura 1B - Montaje de la pata

FiguralC - Montaje de la rueda
BEND ONETAB
AFTERAXLE
PIN(G)IS
INSERTED _
THROUGH
THEFRAME
1.2.2 CONEXIONDELCABLEBELABATERiA(SOLOPARA
ARRANQUEELE-CTR/CO)
La unidad ha sido enviadadeliberadamentecon los cables de la
bateriadesconectados.Ustednecesitara,una Ilavede 10 mm para
sujetarloscablesdela bateria.
Paraconectarla bateria(verlos detallesdela conexionen la Figura
17):
1. Cortelosamarresdelcablequeaseguranloscablesdelabateria
y retirelascubiertasrojasdelosterminalesdela bateria.
2. Primero,conecteel cable rojo al terminal positivo (+) de la
bateriaconelperno,arandeladecierrey tuercasuministrados.
3. Conecteel cablenegroalterminalnegativo(-) de labateriacon
el perno,arandeladecierreytuercasuministrados.
4. Aseguresede quetodas las conexionesestenseguras.Deslice
las botas de goma sobre los terminalesy la ferreteria de
conexion.
NOTA:
Si la baterianopuedearrancarelmotor,carguelaconelcargador
de 12 voltiosincluidoenla cajade accesorios(vet detalles en la
seccionCargandounabateria).
2.1 CONOZCAELGENEBADOB
Leael manualdel propietarioy ins reglasde seguridadantes de
operareste generador.
CompareelgeneradorconlasFigurasdela2 ala 4 parafamiliarizarse
conlasubicacionesde losdiversoscontrolesy ajustes.Guardeeste
manualparareferenciasfuturas.
1. Receptaculoduplexde 120 VoltAC, 20 Amp- Proporciona
energiaelectricapara la operacionde cargasde iluminacion
electrica,aparatos,herramientaso motoresde 120 VoltAC,20
Amp, monofa.sicosde60 Hz.Modelosde hidratosde carbono
esta.nequipadoscontomasGFCI.
2. Receptaculo con cierre de 120/240 Volt AC, 30 Amp -
Proporcionaenergiaelectricapara la operacionde cargasde
iluminacionelectrica,aparatos,herramientaso motoresde 120
y/o 240VoltAC,30Amp,monofasicosde60 Hz.
3. Interruptoresde circuito(AC) -Cada recepta.culoesta.provisto
conuninterruptordecircuitodepresionarparareiniciarconelfin
deprotegeralgeneradorcontrasobrecargaselectricas.
4. Drenajede aceite- Usarparadrenarelaceitedelmotor.
5. Filtro de aire - Filtrael airedeingresoal motor.
6. Palancadechoke- Sele usaal arrancarunmotorfrio.
7. Tanquede combustible- Revisela capacidaddeltanqueen las
especificacionesdelgenerador.
8. Lengiietade tierra - Conecteel generadora una conexiona
tierra aprobadadesdeaqui. Vea "Conectandoel generadora
tierra"paramayoresdetalles.
9. Interrupter defuncionamiento/parada- Controlala operacion
delgenerador(modelossolodearranquedetiro).
9A. interrupterde arranque- Seusaparaarrancarel motordesde
el motorarrancador(modelosdearranqueelectricosolamente).
10. Silenciador- Silenciael motor.
11. Manubrio- Pivoteay seretractaparaalmacenarse.Presionelos
botonescon resorteparamoverlosmanubrios.
12. Tapade gasolina- UbicaciondeIlenadodecombustible.
13. Medidorde combustible- Muestraelniveldecombustibleenel
tanque.
14. Llenadode aceite-Agregue aceiteaqui.
15. Arranquede culata- Useparaarrancarel motormanualmente.
16. Cierrede combustible- Va.lvulaentreeltanquede combustible
y elcarburador.
17. Entradadel cargador de bateda - Este receptaculopermite
recargarlabateriadealmacenamientode12voltiosproporcionada
conelconectoradaptadorde12voltiosqueseincluyeenlacaja
de accesorios.Detra.sde la entradadelcargadorde bateriasse
encuentraunfusibleenlineade1.5amperiosqueestadentrodel
paneldecontrolparaprotegerlabateria(soloarranqueelectrico).
18. Bateria - Energizael arrancador electrico (solo arranque
electrico).
lg. Medidordehorns- Midelashorasdeoperacion.
20. Supresordechispas- Reducelosriesgosdeincendioreteniendo
laschispas.(modelosCARBsolamente).
29

Figura 2,4- Paneldecontrol (Mode/os 4g State) Figura3 - Contro/esdelgenerador
Figure 2B - Control Panel (Nlodelos CARB)
Figura4 - Controles delgenerador
Figure 2C - Control Panel (Modelos CSA)
3O

2.2 HOBOMETBO
El medidor de horas mide el tiempo de operacion para seguir los
mantenimientosprogramados.
Habraun mensajede "OHGOIL:'cada 100 horas. El mensajedestellara
una hera antes y una hera despues de cada intervalo de 100 horas,
proporcionandounaventanade dos horas pararealizarel servicio.
Este mensaje realmente empezara a destellar alas 99 horas y se
deshabilitaraa las 101 horas proporcionandounaventanade dos horas
pararealizarel servicio.
Cada 200 horas el icono "SVC" en la esquina inferior izquierda de la
pantalla destellara_.El mensaje destellara,una hera antes y una hera
despuesde cadaintervalode 200 horas, proporcionandouna ventanade
dos horas pararealizarel servicio.
Cuandoel medidor dehoras esta en el mode de alerta dedestello (Flash
Alert), el mensaje de mantenimiento siempre alternara con el tiempo
transcurrido en horas y decimos. Las horas destellarancuatro veces,
luego alternaracon los mensajes de mantenimientocuatro veces hasta
queel medidorse reinicia.
• 100 hrs - CHGOILi Intervalocambio de aceite(c/100 hrs)
• 200 horas - SVCi Serviciodefiltro de aire (cada200 horas)
NOTA:
La gr;ifica de reloj de arena centellear_i intermitentementecuando el
meter este funcionando. Estosignificaque la unidadle est_isiguiendo
la pistaa las horasde operation.
Figura 5 - Horometro
GRAFICODE
RELOJDE
ARENA
0000.0
BOTONDEREINIClO
(SIESTAINSTALADO)
2.3 CABLESYENCHUFESDECONEXION
2.3.1 RECEPTACULODOBLEDE120 VAC,20AMPERiOS
Esta es una toma de 120 voltios protegida contra sobrecarga per un
interrupterde circuito de presionar para reiniciarde 20 amperios (Figura
6). Use cada una de lastomas para alimentar cargas electricasde 120
volts,monofasicasde 60 Haquerequieranhastaunapotenciacombinada
de 2,400 vatios (2.4 Kw) o 20 amperiosde corriente.Usesolojuegos de
cables dealta calidad,bien aislados,detres conductorescon conexiona
tierra para125 voltios a20 amperios (o mas).
Mantengalos cablesde extensionIoma_scortes posible,preferiblemente
menos de 15 pies (5 metros) de largo, para evitar caidas de voltaje y
posiblesobrecalentamientode loscables.
Figura 6 - receptacu/o dlJp/exde 120 Vo/t AC, 20 Amp
2.3.2 RECEPTACULODE 120/240VAC,30AMPERiOS
Use un conector NEIViAL14-30 con este receptaculo (girarpara cerrar/
abrir). Conecte un juego de cables de 4 conductores con conexion a
tierra al conectory ala carga deseada.Elcable debera,ser de250 VACy
30 Amperios nominal (o ma.s)(Figura7).
Figura 7 - Receptaculo de 120/240 VAC, 30 Amp
120V/240V
30A
Use este receptaculo para operar cargas monofasicas de 120 Voltios
AC a 60 Hzque requieranhasta 3600 vatios (3.6 Kw) de potenciaa 30
amperioso240 VAC,60 hz,monofasicasquerequieranhasta7200 vatios
(7.2 KW) de potencia a 30 amperios. Estatoma esta protegidaper dos
interruptoresde circuitode presionar parareiniciarde 30A.
2.3.3 RECEPT,4CULODOBLEGFCl,120VAC,
20AMPERiOS
Esta es una toma de 120 voltios protegida contra sobrecarga per un
interuptor de circuito de presionarpara reiniciar de 20 amperios (Figura
8). Use cada una de lastomas para alimentar cargas electricasde 120
volts,monofasicasde 60 Haquerequieranhastaunapotenciacombinada
de 2,400 vatios (2.4 Kw) o 20 amperiosde corriente.Usesolojuegos de
cablesde alta calidad,bien aislados,detres conductorescon conexiona
tierra para125 voltios a20 amperios (o ma.s).
Mantengalos cablesdeextensionIomas cortes posibleparaevitarcaidas
de voltajey posiblesobrecalentamientode loscables.
31

Figura8 - receptacu/odup/exGFC/de 120 Vo/tAC,20
Amp
2.3.4 RECEPTACULOBE 120/240VAC,30AMPERiOS
Use un conector NEMAL14-30 con estereceptaculo (girarpara cerrar/
abrir). Conecte un juego de cables de 4 conductores con conexion a
tierra al conectory ala carga deseada.Elcable debera,serde 250 VACy
30 Amperios nominal (o ma.s)(Figura9).
Figura 9 - Receptaculo de 120/240 VAC, 30 Amp
120 V/240 V
3OA
Use este receptaculo para operar cargas monofasicas de 120 Voltios
AC a 60 Hzque requieranhasta 3600 vatios (3.6 Kw) de potenciaa 30
amperioso240 VAO,60 hz,monofasicasquerequieranhasta7200 vatios
(7.2 KW) de potenciaa 30 amperios. Latoma de salida esta protegida
por dos interruptores de circuito de presionar para reiniciar de 25 Amp
(5.0/5.5kW) o de 30 Amp (6.5kW).
2.4 cOM0USARELGENERADOR
Oonsultela seccion "Paraarrancar el motor" para ver como arrancar y
pararelgeneradorconseguridady como conectary desconectarcargas.
Si surgenproblemas con la operacion del generador,Ilame a la linea de
ayudadelgenerador1-888-436-3722.
,t_Ne jamais faire fonctionner darts un espace clos ou
I'int_rieur. NE JAMAIS faire fonctionner darts un
espace clos, darts un v_hicule, ou _ I'int_rieur m_me
si les portes et les fen6tres sont ouvertes ! Utiliser
UNIQUEMENT & I'ext6rieur et loin des fen6tres,
portes ouvertes, ventilations, et dans un espace
dans lequel le gaz d'6chappement ne s'accumulera
pas de fa£on mortelle.
32
,_Les fum6es d'6chappement du moteur contiennent
du monoxyde de carbone, un gaz toxique invisible
et inodore. Ce gaz toxique, s'il est respir6 en
concentrations suffisantes, peut entraP'net une perte
de conscience ou m6me la mort.
,j_k Un d6bit obstru6 d'air de
appropri_,
non
refroidissement et de ventilation est important
pour corriger le fonctionnement du g6n6rateur. Ne
pas modifier I'installation ou ne pas laisser m6me
un blocage partiel de I'alimentation de ventilation,
6tant donn6 que cela peut s6rieusement affecter
le fonctionnement sQr du g6n6rateur. II FAUT faire
fonctionner le g6n6rateur & I'ext6rieur.
,_Ce dolt 6tre correctement
syst_me d'6chappement
entretenu. Ne rien faire qui pourrait rendre le
syst_me d'6chappement dangereux ou non conforme
aux codes Iocaux et/ou normes locales.
,_ Toujours utiliser un d6tecteur d'oxyde de carbone
alimentation par batterie & I'int6rieur, conform6ment
aux instructions du fabricant.
i L'utilisation d'une generatrice a I'interieur PEUT VOUS TUER
EN QUELQUES MINUTES.
Les generatrices rejettent du monoxyde de carbone. II s'agit
d'un gaz toxique invisible et inodore.
NE JAMAIS utiliser la generatrice
ia I'interieurd'uneresidenceou
id'ungarageMEMESl lesportes
i ^
iet les fenetres sent ouvertes.
Utiliser uniquement
L'EXTERIEURetloin des
fen6tres, portes et events.
2.4.1 COMOPONER11TIERRAELGENERAOORCUANOO
SEUSACOMOPORT/JIlL
Estegeneradortiene una tierra de equipoque conecta los componentes
delmarco delgeneradoralas terminales detierra en los receptaculosde
salidadeCA (verNEC250.34 (A)para unaexplicacion).Estopermiteque
el generadorsea usadocomo un portatil sin poner a tierra el marco del
generadorcomo seespecificaen NEC250.34.
Requerimient0sespeciales
Puede haber regulacionesfederales o estatales respecto a la salud y
seguridad ocupacional (0SHA), codigos locales,u ordenanzasque se
apliquenal uso quese quieradaral generador.
Porfavor consultecon un electricistacalificado, inspector electrico o la
agencialocal que tengajurisdiccion:
• En algunas areas, los generadoresdeben ser registrados con las
compaSiaslocalesde electricidad.
• Si el generador se usa en un sitio de construccion, puede haber
regulacionesadicionalesque sedebanobservar.

2.4.2 COMOCONECTARELGENERADORAUNS/STEMA
EK-CTR/CODEEB/F/C/O
Lasconexionesparaenergiaderespaldoaun sistemaelectricode edificio
debenser hechasporun electricistacalificadoyen estricto cumplimiento
detodos los codigosy leyeselectricasnacionalesy locales. Laconexbn
debeaislar laenergiadel generadorde la energiapublica u otras fuentes
alternativasde energia.
NOTA:
Debido a que la tierra del equipo del generador est;i cooectadaa los
cables neutralesde CAen el generador (vet Figura 8), se requiereun
interrupterdetransferenciade 3 polosode 2 poloscon unkit neutral
de interrupcionparaconectareste generadora unacarga de edificio.
En esta aplicaci6n, el generador se vuelve un sistema derivado
separadamente (vet NEC250.20 (D)), y debe set poestoa tierra de
acuerdo con losrequisites delcodigoelectrico local.
Comeponeratierrael generadorenunaaplicacionde
respaldodeedificio
,t_EI C6digo El_ctrico National requiere que el marco
y las partes externas de este generador que son
conductores el_ctricos est_n conectadas en forma
apropiada a una conexi6n a tierra aprobada.
Los codigos electricos locales puedenasimismo requerirunaapropiada
conexbn atierra de la unidad(Figura10). Paraesteproposito, elconectar
un conductor de cobre No 10 AWGtrenzadoa la tuercade tierra y a una
varade bronceo cobre de tierra (electrodo) proporciona una proteccbn
adecuadacontra descargaselectricas. Sinembargo,los codigos locales
pueden variar ampliamente. Censulte con un electricista local los
requerimientosde conexionatierra parasu ;ire&
La apropiada conexiona tierra del generader ayudar;i a evitar una
descarga eleclrica en el caso en que se presenteuna falla de tierra en
el generadoro enlos dispositivos conectados.Unaapropiadaconexiona
tierra tambien ayudaa disipar la electricidadesta.tica,quegeneralmente
se acumulaen dispositivos no enterrados.
Figura10- Conexi6na tierra de/generader
DECONEXlON
ATIERRA
2.5 NO SOBRECARGUEELGENERADOR
Sobrecargarungeneradorenexcesodesucapacidaddepotencianominal
puede traer como resultado dahos al generador y a los dispositivos
electricos conectados. Observe Io siguiente para evitar sobrecargar la
unidad:
* Sume el total de potencia de todos los dispositivos electricos a
conectarsea lavez. Estetotal NOdebera,ser mayorque la capacidad
de potenciadelgenerador.
* La potencia nominal de las luces puede leerse en las mismas
bombillas. La potencia nominal de las herramientas, aparatos y
motores normalmente se puede encontraren la etiqueta de datos o
calcomaniafijada en el dispositivo.
* Si elaparato,herramientaomotorno muestranla potencia,multiplique
voltios por amperios nominalespara determinar los vatios (volts x
amps = vatios).
* Algunos motores electricos, como los del tipo induccion, requieren
alrededor de tres veces mas potencia para arrancar que para
funcionar.Estetransitoriode potenciadurasolounospocos segundos
al arrancar tales motores. Asegurese de tener en cuenta esta alta
potencia de arranque al seleccionar dispositivos electricos que se
conectaranal generador:
1. Sepala potencianecesariapara arrancarel motor ma.sgrande.
2. Sume a esa cifra la potencia de funcionamientodetodas las otras
cargasconectadas.
La guia de referencia de potencias se proporciona para ayudarle a
determinarcua.ntositemspuedeoperarel generadoral mismotiempo.
NOTA:
Todaslas cifras son aproximadas. Vea la etiqueta de dates en los
aparatos parasaber los requerimientosde potencia.
2.6 GUJADEREFERENCIADEPOTENCIA
Dispositivo............................................... Vatiosen funcionamiento
*Aire acondicionado(12,000 Btu)............................................ 1700
*Aire acondicionado(24,000 Btu)............................................ 3800
*Aireacondicionado(40,000 Btu)............................................ 6000
Cargadordebaterias(20 Amp)................................................... 500
Lijadorade bandas(3") ............................................................ 1000
Sierraelectrica.......................................................................... 1200
Sierracircular (6-1/2") ................................................de 800 a1000
*Secadorade ropa (Electrica) .................................................. 5750
*Secadorade ropa (a gas) ......................................................... 700
*Lavadorade ropa.................................................................... 1150
Cafetera.................................................................................... 1750
*Compresor (1 HP).................................................................. 2000
*Compresor (3/4 HP)............................................................... 1800
*Compresor (1/2 HP)............................................................... 1400
Rizadorde pelo........................................................................... 700
*Deshumedecedor...................................................................... 650
Lijadoradedisco (9") ............................................................... 1200
Cortadora................................................................................... 500
Frazadaelectrica......................................................................... 400
Pistolaelectricade clavos......................................................... 1200
Rangoelectrico (por elemento)................................................. 1500
Sartenelectrica......................................................................... 1250
*Congeladora....................................................................... 700
*Ventilador dechimenea(3/5 HP)................................................ 875
*Garaje de aperturaautoma.tica....................................de 500 a 750
Secadordepelo........................................................................ 1200
Taladrode mano.........................................................de 250 a1100
Cortador desetos....................................................................... 450
33

Herramientade impacto.............................................................. 500
Plancha.................................................................................... 1200
* Eyector.................................................................................... 800
Oortadoradecesped................................................................ 1200
Bombillade luz........................................................................... 100
Homode microondas................................................. de 700 a 1000
*Enfriador deleche................................................................... 1100
Quemadorde aceitesobre chimenea.......................................... 300
Calentadorde chispadeaceite(140,000 Btu).............................400
Calentadorde chispadeaceite(85,000 Btu)............................... 225
Oalentadorde chispa deaceite (30,000 Btu)............................... 150
*Pulverizadordepintura, sin aire (1/3 HP).................................. 600
Pulverizadorde pintura,sinaire (demano).................................. 150
Radio.............................................................................. de 50 a 200
*Refrigeradora............................................................................ 700
Oocinalenta................................................................................ 200
*Bomba sumergible (1-1/2 HP)................................................ 2800
*Bomba sumergible (1HP)....................................................... 2000
*Bomba sumergible (1/2 HP).................................................... 1500
*Bomba de desagiJe...................................................de 800 a 1050
*Sierra de banco (10") ............................................. de1750 a 2000
Televisor.......................................................................de 200 a 500
Tostadora.................................................................. de1000 a1650
Podadorade cesped................................................................... 500
* Calcule3 veces lapotenciade la lista paraarrancarestos
dispositivos.
2.7 ANTESDEARRANCARELGENERADOR
Antes de operar el generador,es necesario agregaraceite de motor y
gasolina,de estamanera:
2.7.1 AGREGADODEACEITEDEMOTOR
Todo aceitedebecumplir el estandarminimo de la American Petroleum
Institute(APt)ServiceOlassSJ, SLosuperior.Nouse aditivosespeciales.
Seleccioneel grado deviscosidaddel aceite deacuerdoa la temperatura
esperadadeoperacion(verelgra.ficotambien).
• Por encimade 40° F,useSAE30
• Por debajode 40° Fy hasta10° F,use 10W-30
• Por debajode 10° F,use5W-30 sintetico
mEm
°F =20 =10 0 10 20 32 40 60 80 100
oc-3'0 -_o Xo o lo 20 3'0 4;
Rango de ternperatura del uso esperado
a, CUIDADO
,_ Cualquier intento de el motor antes de
arranoar
que
se le haya dado servicio apropiado con el aceite
recomendado puede traer como resultado una falla
del motor.
1. Coloqueel generadoren unasuperficie nivelada(no excedalos 15°
en ningunadirecci6n).
2. Limpieela_reaalrededorde latoma deaceite y retirela tapa.
3. Llenelentamenteel aceitehastaquela varilla marqueIleno.Dejede
Ilenarocasionalmentepararevisar el nivelde aceite.
4. Instalelavarillay ajustelaseguramente.
5. Luego,reviseel niveldeaceiteantesdearrancarcadavez.
2.7.2 AGREGADODECOMBUSTIBLE
NUNCA Ilene el tanque de combustible en el interior
de la casa. Evite derramar gasolina sobre un motor
caliente. Deje enfriar al motor completamente antes
de aSadir combustible. NUNCA llene el tanque de
gasolina mientras el motor est_ funcionando o est_
caliente. NO encienda cigarrillos o fume cuando
est6 llenando el tanque de combustible. La gasolina
es altamente INFLAMABLE y sus vapores son
EXPLOSIVOS.
No sobrecargue el tanque de combustible. Deje
siempre espacio para la expansi6n del combustible.
Si el tanque est_ muy lleno, el combustible puede
caer sobre el motor caliente y causar un incendio o
explosi6n. Limpie cualquier derrame de combustible
inmediatamente.
1. Usegasolina sin plomo REGULARpara el motor del generador.No
use gasolinaPremium.No use aceitecon gasolina.
2. Limpie el area alrededor de la tapa de Ilenado de combustible,
sa_quela.
3. Lentamente aSada gasolina regular sin plomo al tanque de
combustible. Llene hasta el fondo del filtro de pantalla. Teaga
cuidadodenoIlenarlo demasiado(Figura11).
4. Instale la tapa del combustible y limpie la gasolina que se haya
derramado.
IMPORTANTE:Esimportanteevitarque seformen depositosde goma en
las partes del sistema de combustible como el carburador,la manguera
de combustibleo eltanqueduranteel almacenamiento.Loscombustibles
mezclados con alcoholes (llamados gasohol, etanol o metanol) pueden
atraer la humedad,Io que Ilega a la separaciony formaci6n de a_cidos
durante el almacenamiento.Los gases acidos puedenda_arel sistema
de combustible de un motor durante el almacenamiento. Para evitar
problemascon el motor,el sistemadecombustible debera,vaciarseantes
de almacenarsepot 30 diaso ma_s.Vet la secci6n de "Almacenamiento".
Nuncause productos limpiadoresde motor o carburadoren eltanquede
combustibleya que puedeocasionardahopermanente.
Figura 11 - Tanque de combustible
Tanque de combustible
.......,..,r0m_,,s_k_e NOLLENARm_sall_
de esta separaci6n
34

2.8 ARRANQUEDEMOTORESCONCABLEDE
ARRANQUE
/_Nunca arranque ni detenga el motor con
los dispositivos el_ctricos conectados a los
recept_cuios ni encendidos.
1. Desconectetodas las cargas electricas de los recepta.culosde la
unidadantesde arrancarelmotor.
2. Aseg0resedequelaunidadesteenunaposicionnivelada(noexceda
los15° en ningunadireccbn).
3. ABRAla valvulade cierre de combustible(Figura12).
4. Gireel interruptor RUN/STOPa la posicbn ON (Figura13.)
5. Deslicela palancade CHOKEdel motora laposicbn IZQUIERDAde
"FULLCHOKE"(completo) (Figura14).
6. Paraarrancar el motor,tome firmemente el manubriodel recule y
tire lentemantehasta que se sientaque aumentala resistencia.Tire
rapidamentehaciaafuera.
7. Cuandoelmotor arranque,muevala palancade Chokea 1/2 CHOKE
hastaqueel motor funcione enforma suavey luegocompletamente
a la posicion RUN.Si el motor arranca,muevala palancade Choke
a 1/2 CHOKEhastaqueel motor funcione enforma suavey luegoa
laposicbn RUN.
NOTA:
Si el motor dispara, per0n0 siguefunci0oaod0, mueva la palaocade
chokea FULLCHOKEy repita las instrucciooesde arranque.
Figura 12 - Va/vu/a de cierre de combustible
Figura 13- lnterruptor ON/OFFde/motor
INTERRUPTOR DE
ENCENDIDO/APAGADO DEL MOTOR
(SOLAMENTE MOTORES CON
CABLE DE ARRANQUE)
\
Figura 14 -Posicion de Choke
PALANCADEL ESTRANGULADOR
IZQUIERDA-- ESTRANGULACION(ARRANQUE)
DERECHA-- ARRANQUE
-CIERREDECOMBUSTIBLE
2.9 ARRANQUEDEMOTORESCONARRANQUE
ELECTBICO
IMPORTANTE:No sobrecargueel generador.Asimismo, no sobrecargue
los receptaculos individuales. Estas tomas estan protegidas contra
sobrecargas con interruptores de circuito tipo presionar para reiniciar.
Si la corriente nominal decualquierade los interruptoresse excede,ese
interruptor se abre y la salida electricaa ese recepta.culose pierde.Lea
"No sobrecargueel generador"con muchocuidado.
Nunca arranque ni detenga el motor con
los dispositivos el6ctricos conectados a los
recept_culos ni encendidos.
1. Desconectetodas las cargas electricas de los recepta.culosde la
unidadantesde arrancarelmotor.
2. Aseguresede que la unidad esteen una posicbn nivelada.
3. Abrala valvula decierre delcombustible (Figura12).
4. Mueva la palancade CHOKEdel motor a la posicion FULLCHOKE
(completo)(Figura14).
5. Para arrancar el motor, mantenga presionado el interruptor de
Start!Run/Stop en la posicion "Start". El motor intentara arrancar.
Cuandoel motor arranque, suelte el interruptor a la posicion "run"
(funcionamiento).
35

Cuandoel motor arranque,muevala palancadeCholea "1/2 choke"
hastaqueel motor funcione enforma suavey luegocompletamente
a la posicion "Run". Si el motor decae, muevala palancade Chole
nuevamentea "1/2 choke" hasta que el motor funcione en forma
suavey luegoala posicion "Run".
2.9.1 MANUALDE/N/C/O
Este generador tambien esta,equipado con un arrancador manual de
reculeque sepuedeusar si labateria esta,descargada.
NOTA:
EI iaterruptor debe estar en la posici6nARRANQUE.Useuno de los
receptaculosdel paneldel generador juntocon el cargador de bateria
incluidoparacargarlabateria mientras elgenerador este funcionando.
* Paraarrancarmanualmente,tome firmemente el manubrio del recule
y tire lentemantehasta que se sienta que aumenta la resistencia.
Tire rapidamentearriba para arrancarel motor. Luego siga la misma
secuenciadechoke.
NOTA:
Si el motor dispara, perono sigue funcionando, mueva la palancade
chokea FULLCHOKEy repitalas instruccionesde arranque.
IIVlPORTANTE:No sobrecargueel generador.Asimismo, no sobrecargue
los recepta_culosindividuales. Estas tomas estan protegidas contra
sobrecargas con interruptores de circuito tipo presionar para reiniciar.
Si la corriente nominalde cualquierade los interruptoresse excede,ese
interruptorse abre y la salida electricaa ese recepta.culose pierde.Lea
"No sobrecargueel generador"con mucho cuidado.
2.10PARADODELMOTOR
1. Apaguetodaslas cargas, luegodesconectelascargas electricasde
los receptaculosdel paneldel generador.Nuncaarranqueni detenga
el motor con dispositivos electricos conectadosy encendidos.
2. Deje que el motor funcione sin carga pot algunos minutos para
estabilizarlas temperaturasinternas delmotor y del generador.
3. Muevael interruptorde Run/Stopa la posicion OFE
4. Oierrelava,lvula decombustible.
2.11SISTEMADEAPAGAD0P0RBAJ0NiVELDE
ACEiTE
Elmotor esta.equipadocon un sensordebajo nivelde aceitequeapagael
motorenforma automaticacuandoel nivelde aceitecaepordebajodeun
nivelespecificado.Si el motor se apagay el tanquede combustibletiene
suficientegasolina,revise el nivel de aceitede motor.
2.11.1 DETECC/OtVDEtV/VELBAJODEACE/TE
Si elsistemadetectaun bajonivel deaceitedurantela operacion,el motor
se apaga. El motor no funcionara,hasta que se haya Ilenado aceite de
nuevoa su nivel apropiado.
2.12C0iVlOCARGARLABATERIA(SOLOPARA
UNIDADES{3ONARRANQUEELI CTRICO)
Las baterias alrnacenadas sueltan un explosivo gas
de hidr6geno al recargarse. Una rnezcla explosiva
permanecera alrededor de la bateria pot largo tiernpo
luego de que se haya cargado. La rn_s ligera chispa
puede encender el hidr6geno y causar una explosi6n.
Una explosi6n asi puede destruir la bateria y causar
ceguera y otros daflos serios.
,_No perrnita que furnen, hagan fuego abierto,
chispas o cuaiquier otra fuente de caior airededor
de la bateria. Use guantes protectores, galas y
delantal de gorna cuando trabaje airededor de
la bateria. El fiuido electroiitico de la bateria es
una soluci6n de _cido sulfQrico extrernadarnente
corrosiva que puede causar severas quernaduras.
Si ocurre un derrarne lave el _rea con agua lirnpia
inrnediatarnente.
NOTA:
La bateria inciuida en el generador ha sido cargadacompietamente.
Una bateria puedeperder aigo de su carga cuando no se le usa pot
tiempo prolongado.Si la bateria es incapaz de arrancar el motor,
¢onecteel ¢argador de 12 voitiosincluidoen la cajade aocesorios. EL
HACERFUNCIONARELGENERADORNOCARGALABATERiA.
Useel conectordelcargadordebateriaparamantenerlabateriacargaday
lista parausarse. La cargade la bateriadebera,hacerseen unaubicacion
seca.
1. Conecte el cargador en el conector de "Entrada de cargador de
bateria", ubicado en el panel de control. Conecteel extremo del
receptaculode pareddel cargadorde la bateriaen unatoma de 120
VCA (Figura15).
2. Desconecteel cargador de bateria de la toma de la pared y del
conectordel paneldecontrol cuandoel generadorvayaa usarse.
NOTA:
No useel cargadordembaterias pot re;is de48 hrs en carga.
Figura 15 - Conector del cargador de bateria
BATERiA
ENTRADA
DEL
CARGADOR
36

r
3.1 COIVlOBEALiZABMANTENiIV]iENTO
PBOGBAMADO
Es importante realizar el servicio especificado en el Programa de
mantenimientopara unfuncionamiento apropiadoy asegurarsede queel
generadorcumplecon las normasde emisionaplicablesparala duracbn
de suvidautil. Elservicio y las reparacionesdebenser realizadospor una
personacapaz o porel taller de reparaciones.Adema.s,el mantenimiento
critico de las emisionesdebe ser realizadosegun el programacon elfin
de quela Garantiade lasEmisionesseavalida. El mantenimientocritico
de lasemisionesconsiste de darleservicio al filtro deairey las bujias de
acuerdoal Programade mantenimiento.
3.2 PBOGBAMADEiVIANTENIIVIIENTO
Siga los intervalos del calendario.Se requiereun servicio mas frecuente
cuando seoperaen condicionesadversascomo las que seindica abajo.
Reviseel nivelde aceite encada uso
Cambieel aceite$ *Cada 100horas o cambio deestacion
Revisela claridad dela va_lvula ***Cada cambio deestacion
Serviciodelfiltro de aire ** Cada200 horas o cambio deestacion
Reemplazode bujias Cadacambio deestacion
$ Cambieel aceite luegode las primeras30 horasdeoperaciony luego encada
cambio deestacion.
* Cambie el aceite y el filtro de aceite cada mes si opera bajo condiciones
pesadas decargao altastemperaturas.
** Limpiecon mas frecuencia bajocondiciones deoperacionque involucrenpolvo
y suciedad. Reemplace las partesdel filtro deaire si no se les puede limpiar
adecuadamente.
*** Revise la claridad de la valvula y ajustela si es necesario luego de las
primeras 50 horas de operaciony cada 100 horas luego deello.
3.3 ESPECIFICACIONESDELPBODUCTO
3.3.1 ESPEC/F/CAC/ONESDEL GENERADOR
Capacidadelectrica.....................................................5.0/5.5/6.5 kW**
Potenciadetransitorio.................................................6.25/6.88/8.0 kW
VoltajeACnominal.................................................................... 120/240
CargaAOnominal
Corriente@ 240V (5.0/5.5/6.5 kW)................20.8/22.9/27.1 Amps**
Corriente@ 120V (5.0/5.5/6.5 kW)................41.6/45.8/54.2 Amps**
Frecuencianominal................................................ 60 Hz@ 3600 RPM
Fase..................................................................................... Monofa.sico
** Las potenciasy corrientes maximasestan sujetasa, y limitadas por,factores
talescomo contenidoen BTUsdel combustible, altitud, condiciones del motor,
etc. La potenciamaxima disminuye alrededor del3.5% por cada 1000 pies
sobre el nivel del mar,y tambien disminuiraalrededordel 1%por cada 6°0
(10°F)por encimade los 16°C (60°F) detemperaturaambiente.
3.3.2 ESPEC/F/CAC/ONESDELMOTOR
Desplazamiento........................................................................... 389 cc
Tipode bujias.................................... NHSPLDF7TCo ChampionN9YC
BujiaNOde parte.............................................................. 0G84420101
Espaciamientode la bujia........0.028-0.031 pulgadaso (0.70-0.80 mm)
Capacidadde gasolina......................................7.2 galonesamericanos
Tipode aceite..............Verla cartilla en laseccbn "Antesdearrancarel
generador"
Capacidadde aceite........................................................ 1 L (1.06 Qts.)
Tiempodefuncionamiento a 50% de carga(5.0/5.5/6.5 kW)... 10 horas
3.3.3 /NFORMAC/ONDEEM/S/ONES
La Agenciade Proteccbn Ambiental (y la Juntade RecursosAereosde
California para generadorescertificados para normas de CA standards)
requiere(n) que este generador cumpla con las normas de emision
para gases de escape. Ubiquela calcomania de cumplimiento para las
emisionesen el motorpara determinarquenormas cumple el generador.
Estemotorestacertificado paraoperarcon gasolina.Elsistemadecontrol
de emisionesincluye los siguientescomponentes(siesta instalado):
Sistema de induccion de aire
- Tuberia/m[_ltipledeadmision
- Limpiadorde aire
Sistema de combustible
- Carburador
- Tanque/taponde combustible
- Lineas decombustible
- Lineas deventeo evaporativo
- Oartuchode carbon
Sistema de ignicion
-- Bujia
-- Modulo de ignicion
Sistema de escape
-- Multiple de escape
-- Silenciador
-- Valvulade induccionde aire
por impulsos
-- Oatalizador
3.4 BECOIVIENDACIONESGENERALES
La garantiadel generadorno cubre items quehayansido objeto deabuso
o negligenciadel operador.Para recibir el valor total de la garantia, el
operadordebehacerel mantenimientodel generadortalcomo se instruye
en estemanual.
Se necesitara hacer algunos ajustes perbdicamente para mantener
apropiadamenteeste generador.
Todos los ajustes en la seccion de Mantenimiento de este manual
deberanhacerse al menos unavez en cadacambio de estacbn. Siga los
requerimientosdel "Programademantenimiento".
NOTA:
Una vezal a_o, reemplace las bujias y el filtro deaire. Bujias nuevas
y filtro de aire limpio aseguran una apropiada mezcla de aire-
combustibley ayudan aque el motorfuncione mejor y duremas.
3.4.1 MANTENIM/ENTODELGENERADOR
Elmantenimientodelgeneradorconsiste en mantenerala unidadlimpia y
seca. Operey almacenela unidaden un ambientelimpio y seco dondeno
esteexpuestaaexcesivopolvo,suciedad,humedadnivaporescorrosivos.
Lasranurasde airede enfriamientoen elgeneradorno debera.nobstruirse
con nieve,hojas ni ningun materialextraho.
Revise la limpieza del generadorfrecuentementey limpielo cuando el
polvo, suciedad,humedad y otras sustancias extrahassean visibles en
su superficie exterior.
AC UIDADO
,_Nunca inserte ni herramienta travOs
ningQn objeto
a
de las ranuras de aire de refrigeraciOn, aQn si el
motor no est_ funcionando.
NOTA:
NO use una manguera de jardin para limpiar el generad0r. El agua
puede ingresar al sistema de combustible del motor y causar
problemas.Adicionalmente, si el agua ingresa al generador a traves
de las ranuras de aire, algo delagua sera retenida en vaci0s 0 grietas
del aislamiento del bobinado del rotory estator. La acumulacion del
aguay el polvoen los bobinados infernosdel generador eventualmente
disminuir;inla resistencia de aislamiento de esos bobinados.
3"7

3.4.2 PARAUMP/ARELGENERADOR
* Use untrapo humedoparaiimpiar ias superficies exteriores.
* Una escobilla suave de cerdas puede usarse para soltar suciedades
pegadas,aceite,etc.
* Puedeusarseunaaspiradoraparaievantarsuciedady restos.
* Sepuedeusaruna bajapresionde aire(queno excedalas 25 psi) para
soplarla suciedad.Inspeccionelasranurasdeaire deventilaciony las
aberturasdelgenerador.Estasaperturasdebenmantenerselimpiasy
sin obstrucciones.
3.4.3 MANTENIMIENTODELMOTOR
i/_kCuando se trabaja en el generador, siempre se debe
desconectar el cable negativo de la baterfa. Tambi_n
desconecte el cable de la bujia y mant_ngalo lejos
de esta.
3.4.4 VERIFICAC/ONgELN/VELDEACEITE
Vea la seccion "ANTESDE ARRANCAREL GENERADOR"para mayor
informacion sobre ia revisiondel nivel de aceite.El nivel de aceitedebe
revisarseantesde cadauso, o al menos cadaocho horas de operacion.
Siempremantengael nivel de aceite.
3.4.5 CAMBiODELACEITEBEMOTOR
Cambieel aceiteluegodeias primeras30 horas deoperacion.Cambieel
aceitecada 100 horaso cadacambio de estacion iuegode ello. Siesta_
haciendofuncionar la unidaden condicionesde poivo o suciedad, o en
clima extremadamenteca.lido,cambieel aceite con ma.sfrecuencia.
_CUIDADO
,_EI aceite caliente puede causar quemaduras.
Permita que el motor enfrfe antes de drenar el
aceite. Evite una e×posici6n prolongada o repetida
de la piel con el aceite usado. Lave completamente
las _reas e×puestas con jab6n.
Use las siguieotesinstrucciooes para cambiarel aceite luegoque el
motor enfrie:
1. Limpieel areaalrededorde iamanguerade drenajedelaceite.
2. Retireia tapa de drenajede aceite delmotor y la tapade ilenadode
aceiteparaque drenecompietamenteen un contenedoradecuado.
3. Cuando el aceite haya drenadocompletamente,instale la tapa de
drenajede aceitey cierreia confirmeza.
4. Llene el ca_rterde aceite con el aceite recomendado. (Vea "Antes
de arrancarel generador" para mayoresrecomendacionessobre el
aceite).
5. Limpieelaceite quese haya derramado.
6. Dispongadelaceiteusadoen uncentrode recoleccionapropiado.
3.4.6 REEMPLAZOBELABUJiA
Vet la bujia recomendada en las especificaciones del motor.
Reemplace la bujia una vez al a_0. Est0 ayudara a que el motor
arranquecon mayorfacilidad y funci0nemej0r.
1. Detengael motor y tire del cable de bujias coloca.ndololejos de las
mismas.
2. Limpieelareaalrededordela bujiay retirelade lacabezadelcilindro.
3. Coloqueel espaciamientodelabujiaen 0.70-0.80 mm (0.028-0.031
in.). Instalela bujia con el espaciamientocorrecto en la cabezadel
cilindro (Figura16).
38
Figura 15- Espaciamiento dela bujia
3.4.7 REEMPLAZODELABATERiA(S/ CORRESPONDEL
NOTA:
La bateria incluidaeo el geoerad0r ha sid0 cargadacompietameote.
Una bateria puedeperderaigo de su carga cuaodono se le usa pot
tiempo prolongado.Si la bateria es incapaz de arraocar el motor,
cooecte el cargadorde 12 voitiosincluidoen la caja de accesorios
(ver la secci6n Cargand0uoa bateria). EL HACER FUNCIONAREL
GENERADORNO CARGALA BATERIA.EIn0mero de parte para esta
bateria es OGg44g.
_,CUIDADO
,_EI terminal NEGATIVO de Jabater{a deber_:
1. Estarsiempre DESCONECTADOPRJMERO.
2. Estarsiempre CONECTAD0AL FINAL.
Figura 17 - Conexionesde la bateria
_. CAUTION!
,_La terminal NEGATIVAde la bateria richer;i:
1. Siernpre ser DESCONECTADAPRIMERO.
2. Siempre ser CONECTADAPOR 0LTIMO.

3.5 SERViCIODELLliVlPIADORDEAiRE
El motor no funcionara apropiadamentey puede daharsesi se usa un
limpiadordeaire sucio. Limpieo reemplaceelfiltro depapeldellimpiador
cada aide. Limpielo o reemplacelocon mayor frecuencia si se opera
en condiciones de suciedad (Figura 18). El n0mero de parte para esta
limpiadorde airees0G84420151.
Limpiezaoreemplazodelfiltro deaire depapel:
1. Retireia cubierta deliimpiadorde airey quiteel filtro de papel.
2. Limpieelfiltro depapelgolpeandololigeramentesobre unasuperficie
solida. Si elfiltro estademasiadosucio, reemplacelocon uno nuevo.
Dispongadelfiitro viejo enforma apropiada.
3. Limpiela cubierta del limpiador deaire, luegoinserte un nuevofiltro
de papelen la base del limpiador de aire. Reinstalela cubierta del
limpiadorde aire.
Figura18- Filtrode aire
PASADOR _
3.5.1 UMP/EELF/LTRODELSUPRE$ORDECHISPAS
El silenciad0r del escape del motor tiene una pantalla de supresbn de
chispa. Inspecci0ney limpie lapantallaal men0s una vezal ah0 (Figura
19). Si la unidadse usa conregularidad,efectueinspecci0nesy limpiezas
con mayorfrecuencia.
//_kSi usa el generador sobre algun terreno cubierto de
c6sped, arbustos o plantas, debe estar equipado
con un supresor de chispa. El dueho o el operador
deben mantener el supresor de chispa en buenas
condiciones.
Limpieeinspeccioneel supresor dechispa cuando elmotorseencuentre
atemperaturaambiental,comesigue:
1. Retireel fiitro del supresor de chispas del silenciadoraflojando la
abrazaderay retirandoeltornillo.
2. Inspeccioneia pantaiiay reempiaceiasiesta rasgadao dahadade
aigunaforma. NOUSEunapantaiiadefectuosa.Si lapantallano esta.
dahada,limpielacon un soiventecomercial.
3. Reemplaceelsupresor de chispas y asegurecon laabrazaderay el
tornillo.
Figura 19- Filtrodelsupresor dechispas
ABRAZADERADE
PANTALLADEL
SUPRESOR
i
I PANTALLA DEL ,
TORNILLO..... SUPRESOR/
DECHISPAS
NOTA:
Para pedir un nuevofiltro de aire o unfiltro de supresor de chispas,
contactealcentredeservicio auterizadomas cercanoal 1-800-333-1322.
3.6 ESPACIODELAVALVULA
* Tomadeentrada-- 0.15 _ 0.02mm (frio), (0.006" _+0.0008" pulg)
* Escape-- 0.20 _ 0.02mm (frio) (0.008" _ 0.0008" pulg)
Luegode las primeras50 herbsde operation, revisela claridad de la
v;ilvulaen el motor y ajuslela si es necesario.
Importante: Si se siente incomodo haciendo este procedimiento o no
tienedisponibleslas herramientasapropiadas,porfavor Ileveel generador
al centro de servicio mas cercano para ajustar la claridad de la valvula.
Esteesunpaso muy importanteparaasegurarla mayor vidadesu motor.
3.7 GENERALES
El generador debera arrancarse al menos una vez cada 30 dias y
permitirselefuncionar al menos 30 minutes. Si esto no se puedehacery
launidaddebeguardarsepermas de30 dias,use lasiguienteinformacbn
come guia paraprepararloparasu almacenamiento.
NUNCA almacene un motor con combustible en
el tanque en interiores o en _reas cerradas poco
ventiiadas en deride los humos pueden alcanzar una
llama abierta, chispa o llama piloto come en una
chimenea, calentador de agua, secadora de ropa u
otros aparatos a gas.
_l Deje enfriar la unidad de
completamente
antes
almacenarse.
39

3.8 ALMA(;ENAMiENTOALABGOPLAZO
Esimportante evitar que se formen depositos de goma en las partes
esencialesdel sistemade combustiblecomo el carburador,la manguera
de combustible o el tanque durante el almacenamiento. Asimismo,
la experienciaindica que los combustibles mezclados con alcoholes
(llamadosgasohol,etanol o metanol) puedenatraer la humedad,Io que
Ilegaa la separaciony formaci6n de acidos duranteel almacenamiento.
Los gasesacidos puedendaharel sistemade combustiblede un motor
durante el almacenamiento.
Paraevitar problemas con el motor, el sistema de combustible deberb,
vaciarseantesde almacenarsepot30 diaso mas, como sigue:
1. Agregue un estabilizador de gasolina de calidad al combustible
segunlas especificacionesdelfabricante,y hagafuncionarla unidad
durante 10-15 minutos.
2. Despuesdequeelmotorseenfrie, quitetoda lagasolinadeldeposito
de combustible. Necesarioutilizarun adaptador,no conductor sifon
vacio.
Drene el combustible en contenedores apropiados
en exteriores, lejos de las flamas abiertas. Aseg_rese
de que el motor est6 frfo. No fume.
3. Arranquey hagafuncionarel motorhastaquese detengaporfalta de
combustible.
4. Luegode queel motor enfrie, dreneel aceite del motor.ReNenecon
el gradorecomendado.
5. Retirela bujia y Ilenealrededorde 1/2 onza (15 ml) de aceite de
motor enlos cilindros.Cubraelagujerodela bujia con untrapo.Tire
del arrancadorde reculeunparde vecespara lubricarlos anillosdel
pist6n y el recorridodel cilindro. Unagentede condensacionpuede
tambienser usadoen lugardel aceite.
ACUIDADO
,_ Evite la pulverizaci6n del agujero de la bujfa en el
arranque.
6. Instaley ajuste labujia. No conecteel cabledebujia.
7. Limpielasotras superficies delgenerador.Revisequelas aberturas
y ranurasde airede ventilaci6nen el generadorestenabiertasy sin
obstrucciones.
8. Almacenela unidaden un lugarlimpio y seco.
3.90TBOS CONSEJOSDEALMACENAMiENTO
• No almacenegasolinade una estacionaotra.
• Reemplace la gasolina si empieza a oxidarse. El oxido o suciedad
en la gasolinacausara,problemas con el carburador y el sistema de
combustible.
• Si fuera posible, almacene la unidad en interiores y cubrala para
protegerla del polvo y la suciedad. ASEGURESEDE VAOIAR EL
TANQUE DE COMBUSTIBLE.
• Si no fuerapractico vaciarel tanquede combustibley la unidadtiene
quealmacenarsepor un tiempo, use un estabilizadorde combustible
comercial disponibley afiadaloa la gasolinaparaprolongarlavidade
esta.Hagafuncionar la unidaddurante 10-15 minutos, gire la valvula
delcombustiblea la posicion"OFF"y permitaquefuncione hastaque
el motor se apaguepor falta de combustible.
• Cubrala unidadcon una cubiertaprotectoraadecuadaqueno retenga
humedad.
_k UNCA cubra el generador mientras las _reas del
motor y el escape est_n calientes.
40

4.1 GUiADEDETECCIONDEPROBLEMAS
Elmotor eshi funciooando, perono
haysalidade ACdispooible.
1. El interruptor de circuitoesta_abierto.
2. Pobreconexiono cable defectuoso.
3. El dispositivo conectadoesta.mal.
4. Fallaenel generador.
El motor funciona bien perose 1. Cortocircuito en la cargo conectada.
sieote sobrecargado cuaodolas 2. El generadorestasobrecargado.
cargaseshia cooectadas. 3. La velocidaddelmotor es muy lenta.
4. Circuito delgeneradoren corto.
1. Reinicieel interruptor de circuito.
2. Revisey repare.
3. Conecteotro dispositivoqueeste en buenas
condiciones.
4. Contactea un servicio autorizado.
1. Desconectelacargaelectricaencorto.
2. Vea"Nosobrecargueelgenerador"
3. Contactea unservicioautorizado.
4. Contactea unservicioautorizado.
,
Elmotor ao arraoca, oarraaca 1. El cierrede combustibleesta en OFR 1. Gireel cierre decombustible aON.
porefuaciooa en forma aspera.
2. Filtrode aire sucio.
3. Faltagasolina.
4. Gasolinapasada.
5. El cablede la bujia no esta.conectadoa esta.
6. Bujiasen mal estado.
7. Aguaen lagasolina.
8. Over-choking.
9. Nivelde aceitebajo
10. Mezclade combustibledemasiadorico.
11. Va.lvulade entradaatascadao cerrada.
12. Elmotor ha perdidocompresion.
2. Limpieo reemplaceelfiltro de aire.
3. Lleneel tanquede combustible.
4. Dreney Ileneel tanquede combustiblecon
gasolinafresca.
5. Conecteelcable ala bujia.
6. Reemplacela bujia.
7. Dreney Ileneel tanquede combustiblecon
gasolinafresca.
8. Ooloquelapalancade chokeen posicion No
Choke.
9. Lleneel ca_rteren el nivelapropiado.
10. Contacteaun servicio autorizado.
11. Contacteaun servicio autorizado.
12. Contacteaun servicio autorizado.
Elmotor se apagadurante la 1. Faltagasolina. 1. Lleneel tanquede combustible.
operaci6a. 2. Nivelde aceitebajo 2. Lleneel carteren el nivelapropiado.
3. Fallaenel motor. 3. Contactea un servicio autorizado.
I I
Elmotor pierdepotencia. 1. La cargaes demasiadoalta. 1. Reduzcala carga (Yea"Nosobrecargueel
2. Filtrode aire sucio, generador").
3. El motor necesitaservicio. 2. Limpieo reemplaceelfiltro de aire.
3. Contactea un servicio autorizado.
I !
! !
El motor se pierde otartamudea. 1. El choke esta.abierto demasiadopronto. 1. Muevael choke ala posicbn mediahastaqueel
motorfuncione suavemente.
2. El carburadoresta.funcionandomuy rico o muy 2. Contactea un servicioautorizado.
ralo.
41

DECLARACION DE GARANTiA DE CONTROL DE EMISIONES DE LA EPA EE,UU,
SUS DERECHOS DE GARANTiA Y OBLIGACIONES
LaAgenciade ProteccJ6nAmbientai(EPA)delosEE.UU.y GeneracPowerSystems,Inc.(Generac)secomplacenenexplJcarla garantiadelSistemadeControl
deEmJsJonesensunuevoequipode2011y posteriores.Los equiposnuevosqueutilizanpeque_osmotoresencendidosconchispase debendJse_ar,construir,
y equJpardetaiformaquecumplanconlas estrictasnormascontrael smogdelgobiernofederal.Generacgarantizaelsistemade controldeemisionesensu
equipoporel perJodoquese enumeraacontinuacJ6nsJemprequeno hayahabidoabuso,negligencJa,modificaci6nno aprobadao mantenimientoincorrectode
suequipo.ElsistemadecontroldeemJsJonesdeesteequJpoincluyetodoslos componentescuyafailaaumentarialaemJsi6ndetodocontamJnanteregulado.
EstoscomponentesseenumeranenlaseccionInformacionsobreEmJsJonesdeestemanual.
COBERTURA DE LA GARANTJA DEL FABRICANTE:
EstaGarantiaECSesva.lidapordosa_os,o porelmismoperJodoqueseespecifiqueenla GarantJaLimJtadaGenerac,elqueseama.slargo.Paralos equipos
quetienenmedidorde horas,el periodode garantiaes un numerodehorasigualalamitaddela vidautil paralaqueesta.certificadoel equipo,oel periodode
garantiaespecificadoena_os,el queseamenor.Lavidautilse puedeencontrarenla etiquetade Controlde Emisionesdelmotor.Si durantedicho periodode
garantiaseidentificaquecuaiquierpartedesuequiporelacionadacon lasemJsionesesta.defectuosaencuantoasusmateriaiesofabricacion,unCentrode
ServiciodeGarantiaAutorizadodeGeneracrealizara,las reparacioneso remplazos.
RESPONSABILIDADES DEL DUENO EN LA GARANTiA:
Comoduellodelequipo,ustedesresponsabledela reaiizacJ6ndetodoel mantenimientorequeridocomoseindicaensuManualdelUsuariosuminJstradode
fa.brica.Paralos propositosde lagarantia,Generacrecomiendaqueguardetodoslosrecibosdemantenimientodesugenerador,peroGeneracnopuedeinvaiidar
la garantiasolamentedebidoa lafaitaderecibos.
UsteddebesaberqueGeneracpuedenegarcuaiquiery/otodagarantiadecoberturaoresponsabilidadsi suequipo,ounaparteocomponentedelmismo,ha
failadodebidoaiabuso,mantenimientoinapropiado,o modificacionesnoautorizadas.
Ustedesresponsablede ponerseen contactoconunCentrade GarantiaAutorizadode Generactanprontocomaocurraunprablerna.Lasreparacianesper
garantiadebenterrninarseen unperiadodetiernporazonable,qua noexcedade 30 dias.
ElservJcJoporgarantJapuedesercoordJnadoponiendoseencontactocon sudistribuJdorautorizadoo conunCentrodeServicJode GarantJaAutorizadode
Generac.Paraubicarai DistribuidordeServiciodeGarantiaAutorizadodeGeneracma.scercano,flameainumerogratuitoqueaparecedebajo,oconta.ctenosa
travesdelcorreoelectronico:[email protected].
1-800-333-1322
NOTAIIVlPORTANTE:EstadeclaracJ6ndegarantiaexplicasusderechosy oblJgacionessegunla GarantJadelSistemadeControldeEmJsiones(GarantJaECS),
quelees proporcJonadaporGeneracconformeala leyfederal.Veatambienlas "GarantiasLimitadasdeGeneracparaGeneracPowerSystems,Inc.", quese
incluyenenotrahojaenestedocumento,y quetambienlesonproporcJonadasporGenerac.Observeque estagarantJano seaplicar_ta los da_osincJdentaies,
consecuenteso indJrectosocasJonadospordefectosenmateriaiesofabricaci6noaaigunretrasoenlareparacionoel reemplazodelaspartesdefectuosas.
Estagarantiaremplazaalasotrasgarantias,expresadasoimplicJtas.Especificamente,Generacnoofreceningunaotragarantiaencuantoa lacomercJabilidad
o idoneidadparaalgunpropositoenparticular.CuaiquiergarantJaimplicitapermitidaporley,sera.IJmJtadaensuduracJ6na losterminosdela garantJaexpresa
proporcionadaenel presente.Algunosestadosnopermitenlimitacionesencuantoala duraciondeuna garantiaimplicita,asique la limitacionanteriorpuedeno
aplicarseausted.
LaGarantiadelECSseaplJcasolamenteai sistemadecontroldeemisionesdesunuevoequJpo.LaGarantJadelECSy la GarantiadeGeneracdescriben
derechosy obligacionesimportantesrelacionadascon sunuevomotor.
ElserviciodegarantiapuedereaiJzarsesolamenteporunCentrodeServicJodeGarantiaAutorizadodeGenerac.AIpedirelserviciodegarantia,sedeben
presentarpruebasenlas queseindiquelafechadelaventaai comprador/due[]ooriginal.
Sitieneaigunapreguntasobresusderechosy responsabilidadesdela garantia,debecontactarsecon Generac,enla direccionsiguJente:
A LA ATENCIC)N DEL DEPARTAMENTO DE GARANTJAS
GENERAC POWER SYSTEMS, |NC.
P.O. BOX 297 • WHITEWATER, W| 53190
Parte 1de 2
42
NOdeparte 0J3335 Rev.C 11/11

GARANTiA DEL SISTEMA DE CONTROL DE EMISIONES
GarantiadelSistemadeControldeEmJsiones[ECS,porsussJglaseningles](garantJadelECS)paraequiposqueusanpeque_osmotoresencendJdoscon
chJspa:
(a) AplicacJ6n:EstagarantiaseaplJcar_ta los equiposqueutJlJzanpequefiosmotoresnoparavehiculos.Elperiodode garantiadelECScomenzar_tenlafechaen
queelequiponuevoescompradooentregadoasucomprador/due_ooriginaly usuariofinal, y continuar_tpor24 mesesconsecutivosdespuesdeesafecha.
(1) ElperJodoespecifJcadoenla presenteGarantiaLimJtadadeGenerac,peronomenosde24 meses,o
(2) Paramotoresequipadosconmedidordehoras,unnumerodehorasdeoperacioniguaialamJtaddelavidautildemotor.Lavidautil sepuedeencontrar
enla etiquetadeControldeEmJsJonesdelmotor.
(b) CoberturaGeneraldela GarantiadeEmisJones:Generacgarantizaai comprador/due[_ooriginaly usuariofinaldelnuevomotoro equipoy acadacomprador/
due_osubsJguientequeel ECScuandoseinstaio:
(1) EstabadJse_ado,construJdoy equipadoparacumplJrcontodaslas normas@Babies;y
(2) Estabalibrede defectosenlosmateriaiesyfabricacionquepudieranocasionarfailasde unapiezacon garantiaencuaiquJermomentoduranteel Periodo
deGarantJadel ECS.
(c) Lagarantiaparalas piezasrelacJonadascon emJsionessera.interpretadacomosigue:
(1) Cualquierpiezacon garantiaquenoesteprogramadaparareemplazocomopartedelmantenimientonecesarioin@ado enelManualdelUsuariosera.
garantizadaporel PeriododeGarantiadelECS.Si cuaiquierade estaspiezasfailaduranteelPeriododeGarantiadelECS,sera.reparadaoreemplazada
porGeneracsegunlasubseccion(4) siguiente.Dichapartereparadao reemplazadabajola GarantiadelECSsera.garantizadaporel restodelPeriodode
GarantiadelECS.
(2) Cualquierpartegarantizadaqueesteprogramadasolamenteparalasinspeccionesregularessegunseespecifiqueen elManualdelUsuariosera.
garantizadaporel PeriododeGarantiadelECS.Unenunciadoenel ManualdelUsuarioqueindique"repareo reemplacecuantoseanecesario"no
reducira,el PeriododeGarantiadelECS.Dichaparte reparadaoreemplazadabajolaGarantiadelECSsera.garantizadaporel restodelPeriodode
GarantiadelECS.
(3) Cualquierpiezacon garantiaqueesteprogramadaparareemplazocomopartedelmantenimientonecesarioenelManualdelUsuariosera.garantizada
porelperiododetiempoprevioal primerreemplazoprogramadoparadichapieza.Sila piezafailaantesdelprimerreemplazoprogramado,la pieza
sera.reparadao reemplazadaporGeneracsegunla subseccion(4) siguiente.Dichapiezarelacionadaconlas emisionesquehayasidoreparadao
reemplazadabajola garantiadelECSsera.garantizadaporelrestodelperiodoprevioalprimerreemplazoprogramadoparaesapieza.
(4) Lareparaciono elreemplazodecualquierpiezagarantizadarelacionadaconlas emisionesbajoestaGarantiadelECSsera.sin cargoparaeldue_oenun
CentrodeServiciodeGarantiaAutorizadodeGenerac.
(5) A pesardelasdisposicionesdela subseccion(4)anterior,los serviciosdegarantiao dereparacionesse debenproporcionarenunCentrodeServicio
Autorizadode Generac.
(6) Cuandoel motores examinadoporunCentrodeServiciode GarantiaAutorizadodeGenerac,elcomprador/due_ono sera.responsabledelcostode
diagnosticosi la reparacionesta.cubiertaporlagarantia.
(7) Duranteel PeriododeGarantiadelECS,Generactendra,el inventariode piezasrelacionadascon lasemisionesbajogarantiasuficienteparacubrirla
demandaprevistaparatalespiezas.
(8) Laspiezasde recambiorelacionadasconlasemisionesquehayansidoautorizadasy aprobadasporGeneracsepuedenutilizardurantecualquier
mantenimientoo reparaciondeGarantiadelECSy sera.nproporcionadassin cargoai comprador/due_o.Dichouso noreducira,las obligacionesdela
GarantiadelECSdeGenerac.
(9) Nosepuedenrealizarotrasmodificacionesal generador,exceptoaquellasexplicitamenteaprobadasporGenerac.Lasmodificacionesnoaprobadas
anulanlaGarantiaECSy sonmotivosuficienteparainvaiidarun reclamoaesta.
(10) Generacnosera.responsableporfallasde repuestosno autorizados,o fallasdepiezasautorizadascausadasporel usoderepuestosno autorizados.
LAS PIEZAS RELACIONADAS CON EiVlISIONES PUEDEN INCLU|R LAS SIGUIENTES
(SI ESTAN INSTALADAS):
1) SISTEMADEDOSIFICACIONDELCOMBUSTIBLE 3) SISTEMADEIGNICION
A. CARBURADORYPLEASINTERNAS A. BUJJAS
B. TANQUE/TAPONDECOMBUSTIBLE B. BOBINAS/MOBULODEARRANQUE
C. LJNEASDECOMBUSTIBLE 4) SISTEMADEINYECCIONDEAIRE
B. LJNEASDEVENTEOEVAPORATIVO A. VALVULADEINDUCCIONBEAIREPORIMPULSOS
E. REGULADOR(COMBUSTIBLESGASEOSOS) 5) SISTEMADEESCAPE
2) SISTEMADEINDUCCIONDEAIRE A. CATALIZADOR
A. MULTIPLEDEADMISION B, CANODEESCAPE
B. FILTRODEAIRE
Parte2 de 2
NOdeparte 0J3335 Rev.C 11/11
43

EM/S/ONDELA8ARAflTJAPARALOSEQU/POSCERT/F/CADOSCARB
CALiFORNiA Y LA EPA DE EE,UU. DECLARACION DE CONTROL DE ENiiSiONES DE
GARANTiA SUS DERECHOS Y OBLIGACIONES
LaJuntadeRecursosAereosdeCalifornia(CaliforniaAir ResourceBoard,CARB)y laAgenciade Proteccbn Ambientalde los EstadosUnidos(UnitedStates
EnvironmentalProtectionAgency,EPA),junto con GeneracPowerSystems, Inc. (Generac)se complacen en explicarla garantiadel sistema de control
de emisiones (garantiaECS)en su nuevoequipo de 2012. Los equipos nuevosqueutilizanpequefiosmotores encendidoscon chispa se deben disefiar,
construir,y equipardetalforma quecumplan con las estrictasnormas contra el smog del gobiernofederaly el estado deCalifornia.Generacgarantizael
sistemadecontrol de emisionesensu equipoper el per|odequese enumeraa continuacbn siempreque no hayahabido abuse,negligencia,modificacbn
no aprobadao mantenimientoincorrecto de suequipo.
El sistemade control deemisiones deeste equipo incluyetodos los componentescuya falla aumentarialaemision detodo contaminanteregulado.Estos
componentesse enumeranenla seccion Informacbn sobre Emisionesdeeste manual.
COBERTURA DE LA GARANTiA DEL FABRICANTE:
EstaGarantiaECSesva_lidaperdosaries,oper elmismo per|odequeseespecifiqueenla GarantiaLimitadaGenerac,el queseama_slargo.Paralosequipos
quetienenmedidorde horas,elper|odede garantiaes un numerode horasigual ala mitadde lavida util parala que estacertificado el equipo,o el per|ode
de garantiaespecificado en aries, el que seamenor. La vida util se puedeencontrar en la etiquetade Control de Emisionesdel motor. Si durantedicho
9eriododegarantiaseidentificaquecualquierparte desu equiporelacionadacon las emisionesesta.defectuosaencuanto asus mater|alesofabricacion,
un Centrede ServiciodeGarantiaAutorizadode Generacrealizara,las reparacioneso remplazos.
RESPONSABILiDADES DEL DUEI_IO EN LA GARANTiA:
Comeduefiodelequipo,ustedesresponsabledela realizaciondetodo el mantenimientorequeridocome seindica ensu Manualdel Usuariosuministrado
defabrica. Paralos propositos delagarantia,Generacrecomiendaqueguardetodos los recibos demantenimientode sugenerador,peroGeneracnopuede
invalidarla garantiasolamentedebido ala falta de recibos.
Usteddebesaberque Generacpuedenegarcualquiery/o toda garantiade coberturao responsabilidadsi suequipo,o unaparte ocomponentedelmismo,
ha falladodebido alabuse,mantenimiento inapropiado,omodificaciones no autorizadas.
UstedesresponsabledeponerseencontactoconunCentrede GarantiaAutorizadodeGeneractanprontocomeocurraunproblema.Lasreparaciones
pergarantia deben terminarseen unper|odede tiemporazenabie,quenoexceda de 30 dias.
El servicio per garantiapuede ser coordinadoponiendoseen contactocon su distribuidor autorizadoo con un Centrede Servicio de GarantiaAutorizado
de Generac.Paraubicar al Distribuidorde Servicio de GarantiaAutorizadode Generacma.scercano, Ilameal numero gratuito que aparecedebajo, o
conta.ctenosa traves delcorreo electron|co:[email protected].
1-800-333-1322
NOTAIMPORTANTE:Estadeclaracionde garantiaexplicasus derechosy obligacionessegun la Garantiadel Sistemade Controlde Emisiones(Garantia
ECS),quele esproporcionadaper Generacconforme a la leyfederal.Veatambien las "GarantiasLimitadasde GeneracparaGeneracPowerSystems,Inc.",
quese incluyen en otrahojaen este documento,y que tambienle son proporcionadasper Generac.Observeque esta garantiano seaplicara_a los daises
incidentales,consecuentesoindirectos ocasionadosper defectosenmater|alesofabricacionoa algunretrasoenlareparacionoelreemplazodelas partes
defectuosas.Estagarantiaremplazaalas otras garantias,expresadaso implicitas. Especificamente,Generacno ofrece ningunaotra garantiaen cuanto a
la comerciabilidado |done|dadparaalgunproposito en particular.Cualquier garantia implicita permitida per ley, sera limitada en su duraci6n
a los terminos de ta garantia expresa proporcionada en et presente. Algunosestados no permitenlimitacionesen cuanto ala duracionde una
garantiaimplicita, as|quela limitacbn anterior puedeno aplicarsea usted.
La Garantiadel ECSse aplicasolamenteal sistema decontrol deemisiones de sunuevoequipo. La Garantiadel ECSy la Garantiade Generacdescriben
derechosy obligacionesimportantesrelacionadascon su nuevomotor.
El servicio de garantiapuederealizarsesolamenteper un Centrede Serviciode GarantiaAutorizadode Generac.AIpedirel servicio de garantia,sedeben
presentarpruebas enlas que se indiquela fechade la ventaal comprador/duefio original.
Si tiene algunapreguntasobre susderechosy responsabilidadesde lagarantia,debecontactarsecon Generac,en ladireccion siguiente:
A LA ATENC|ON DEL DEPARTAMENTO DE GARANTJAS
GENERAC POWER SYSTEMS, iNC.
Re. BOX 297 * WHJTEWATER, W| 53190
Parte 1de 2
No departe 0J8147C Rev.A 01/12
44

EM/$/ONDELAGARAflflAPARALOSEQU/POSCERT/F/CADOSCARB
GARANTIA DEL SISTEMA DE CONTROL DE EMiSiONES
Garantiadel SistemadeControlde Emisiones[ECS,porsus siglaseningles](garantiadelECS)paraequiposqueusan pequehosmotoresencendidoscon
chispa:
(a) Aplicaci6n:Estagarantiase aplicaraa los equiposqueutilizanpeque_osmotoresno paraveNculos.ElperiododegarantiadelECScomenzaraen la
fecha enqueel equiponuevoes compradooentregadoasu comprador/duehooriginaly usuafiofinal, y continuarapor24 mesesconsecutivosdespues
deesafecha.
(b)
(1) El periodoespecificadoen la presenteGarantiaLimitada de Generac,perono menosde24 meses,o
(2) Paramotoresequipadoscon medidorde horas,unnumerode horasdeoperaci6niguala la mitaddelavidautil demotor.Lavidautil se puede
encontrarenlaetiquetadeControlde Emisionesdelmotor.
CoberturaGeneralde laGarantiade Emisiones:Generacgarantizaal comprador/duehooriginaly usuafiofinal delnuevomotoroequipoy a cada
comprador/duehosubsiguientequeel ECScuandoseinstal6:
(1) Estabadisehado,construidoy equipadoparacumplircontodas las normasaplicables;y
(2) Estabafibrededefectosenlos matefialesy fabficaci6nque pudieranocasionarfallasdeuna piezacon garantiaencualquiermomentoduranteel
Pefiodode Garantiadel ECS.
(c) Lagarantiaparalas piezasrelacionadascon emisionesserainterpretadacomosigue:
(1) Cualquierpiezacongarantiaquenoeste programadaparareemplazocomoparte delmantenimientonecesafioindicadoen elManualdel Usuario
seragarantizadaporel Periodode GarantiadelECS.Si cualquieradeestaspiezasfalladuranteel Pefiodode Garantiadel ECS,serareparadao
remplazadapot Generacsegunla subsecci6n(4) siguiente.Dichaparte reparadao remplazadabajo laGarantiadelECSseragarantizadapor elresto
delPefiodode GarantiadelECS.
(2) Cualquierparte garantizadaque esteprogramadasolamenteparalas inspeccionesregulatessegunseespecifiqueen elManualdel Usuariosera
garantizadaporel PefiododeGarantiadelECS.Unenunciadoenel ManualdelUsuafioqueindique"repareo remplacecuantoseanecesafio"no
reducirael PefiododeGarantiadelECS.Dichapartereparadao remplazadabajola Garantiadel ECSseragarantizadaporel restodel Pefiodode
GarantiadelECS.
(3) Cualquierpiezacongarantiaque esteprogramadapararemplazocomopartedelmantenimientonecesafioenel Manualdel Usuafioseragarantizada
pot el periododetiempoprevioalprimerremplazoprogramadoparadichapieza.Si la piezafallaantesdelprimerreemplazoprogramado,la piezasera
reparadaoremplazadapot Generacsegunla subsecci6n(4) siguiente.Dichapiezarelacionadaconlasemisionesquehayasidoreparadao remplazada
bajola garantiadelECSseragarantizadaporel restodelperiodoprevioalprimerremplazoprogramadoparaesapieza.
(4) Lareparaci6noel reemplazodecualquierpiezagarantizadarelacionadacon las emisionesbajoestaGarantiadel ECSserasin cargoparael dueho
enun CentrodeServiciodeGarantiaAutodzadode Generac.
(5) A pesardelasdisposicionesdela subsecci6n(4) anterior,losservicios degarantiaode reparacionessedebenproporcionarenun Centrode
ServicioAutofizadodeGenerac.
(6) Cuandoel motoresexaminadopor unCentrode ServiciodeGarantiaAutofizadodeGenerac,el comprador/duehono seraresponsabledelcosto de
diagn6sticosilareparaci6nestacubierta porla garantia.
(7) DuranteelPeriodode GarantiadelECS,Generactendraelinventafiodepiezasrelacionadascon las emisionesbajogarantiasuficienteparacubfir la
demandaprevistaparatalespiezas.
(8) Laspiezasde recambiorelacionadasconlas emisionesque hayansido autofizadasy aprobadasporGeneracsepuedenutilizardurantecualquier
mantenimientoo reparaci6nde Garantiadel ECSy seranproporcionadassin cargo al comprador/dueho.Dichouso noreduciralasobligacionesde
la GarantiadelECSde Generac.
(9) No sepuedenrealizarotrasmodificacionesal generador,exceptoaquellasexplicitamenteaprobadasporGenerac.Lasmodificacionesnoaprobadas
anulanla GarantiaECSy sonmotivosuficienteparainvalidarun reclamoaesta.
(10) Generacno seraresponsableporfallasde repuestosno autofizados,ofallasdepiezasautofizadascausadaspor el usode repuestosno
autofizados.
LAS PiEZAS RELACIONADA$ CON EiVlISIONES PUEDEN INCLU|R LAS $1GUIENTE$
(SI ESTAN INSTALADAS):
1) SISTEMADEDOSIFICACIONDELCOMBUSTIBLE 3) SISTEMADEIGNICION
A. CARBURADORY PIEZASINTERNAS A. BUJiAS
B. TANQUE/TAPONDECOMBUSTIBLE B. BOBINAS/MODULODEARRANQUE
C. LiNEASDECOMBUSTIBLE 4) SISTEMADEINYECCIONDEAIRE
D. LiNEASDEVENTEOEVAPORATIVO A. VALVULADEINDUCCIONDEAIREPORIMPULSOS
E. REGULADOR(COMBUSTIBLESGASEOSOS) 5) SISTEMADEESCAPE
E CARBONACTIVO A. CATALIZADOR
2) SISTEMADEINDUCCIONDEAIRE B, CAI']ODEESCAPE
A. MULTIPLEDEADMISION
B. FILTRODEAIRE
Parte2 de 2
NOde parte0J8147C Rev.A 01/12
45

GARANTiA UMITADA DE "DOS AhiOS" DE SISTEMAS DE POTENCIA GENERAC PARA
GENERADORES PORTATILES SERIE GP
Porun periodo dedos afios (2) desdela fecha de la venta original, GeneracPowerSystems, Inc. (Generac)garantizasus generadoresserie GPcomo libres dedefectos en
materialesy manodeobra por los itemsy periodos indicados abajo. Generac,a su discrecion,repararao reemplazaracualquierparte que,luego de unexamen,inspeccion y
pruebasrealizadaspor un concesionariode servicio degarantia autorizadode Generac,se encuentreque estadefectuosa. Lareparacion o reemplazoconforme a Io indicado
enesta garantialimitada no renovarani extenderael periodo degarantiaoriginal. Cualquierproducto reparadodeberaestarbajo garantia s01opor elperiodo de garantia
originalquereste.Cualquierequipoque el comprador/propietario reclamecomo defectuoso debeser regresadoa y examinadopor el concesionario de serviciode garantia
autorizadopor Generacmas cercano.Todos los costos detransporte bajo la garantia,incluyendo el retornoa la fabrica, seran por cuentay prepagadospor el propietario/
compradoKEstagarantia se aplica s01oa los generadoresportatiles serie GPde Generacy noes transferible del propietariooriginal. Guardesu comprobantede compra. Si
ustedno proporciona unapruebade la fecha de la comprainicial, se usaralafecha de embarquedel producto delfabricante paradeterminar elperiodo de garantia.
PROGRAMAC|ON DE GARANTiA
Lasaplicaciones paraconsumidor estan garantizadaspor dos (2) anos. Las aplicaciones comerciales y dealquiler estan garantizadaspor un(1) anos o 1000 horas como
maximo, Io que Ilegueprimero.
DEAPLICACIONESPARACONSUMIDORESDELOSESTADOSUNIDOSY CANADA
ANDUNO- Coberturacompleta limitada en manodeobra y repuestoslistados (se requierecomprobantede compra y mantenimiento):
• Motor- Todoslos componentes
• Alternador -Todos los componentes
ANODOS- Cobertura completalimitada enrepuestoslistados (se requierecomprobante decompra y mantenimiento):
• Motor- Todoslos componentes
• Alternador-Todos los componentes
APLICACIONCOMERCIAL/ DEALQUILER
ANOUNO - Coberturacompleta limitada en mano de obray repuestoslistados (se requierecomprobante decompra y mantenimiento):
• Motor- Todoslos componentes
• Alternador -Todos los componentes
NOTA: Parael propositode esta garantia"uso deconsumidor" significa uso personalencasa residencial o recreacionalpor el comprador original. La garantiano aplica
a unidades usadasparaFuentePrimaria deEnergiaenlugardel servicio pflblico donde elservicio pflblico se encuentrepresenteo dondeelservicio publico de energiano
existanormalmente.Unavez que el generadorhaexperimentadouso comercial o de alquiler,se le consideraraenadelanteun generadorno parauso delconsumidor para
propositos deesta garantia.
LINEAM|ENTOS:
1. Todaslasreparacionesporgarantfadebenserrealizadasy/oatendidasporunconcesionariodeGeneracPowerSystemsautorizadoy/o certificadoosusfiliales.
2. Unidadesquehayansidorevendidasnoestancubiertasporla garantiadeGenerac,yaqueestagarantianoestransferible.
3. ElusoderepuestosquenosondeGeneracinvalidala garantiaensutotalidad.
4. Generacpuedeelegirreparar,reemplazaro reembolsarunequipo.
5. Loscostosdemanodeobracubiertosporgarantiasebasanenhorasnormalesdetrabajo.Costosadicionalesporsobretiempos,feriadosotrabajosdeemergenciafueradehorasnormalesde
trabajoseranresponsabilidaddelcliente.
6. Elcostodelembarquederepuestoscubiertosporgarantiaesreembolsadoaunatarifadeembarqueportierra.Loscostosrelacionadosporunasolicituddeembarque
expeditoseranresponsabilidaddelcliente.
7. Lasbateriasestangarantizadasporelfabricantedelasmismas.
8. Talvezserequieraverificarelmantenimientoparaquela coberturadegarantiaaplique.
ESTA GARANTIA NO SE APLICARA A LO SIGUIENTE:
1. Costosdemantenimientonormaly ajustes.
2. Fallascausadasporcombustiblesoaceitescontaminados,olafaltadenivelesapropiados.
3. Reparacioneso diagnosticosrealizadospotindividuosdiferentesalosconcesionariosautorizadosporGeneracquenoestenautorizadospotescritoporGenerac.
4. Fallasdebidoa,peronolimitandosea,el usoy desgastenormal,accidente,maluso,abuso,negligenciao usoinapropiado.
5. ComotododispositivomecO,nico,losmotoresGeneracnecesitanservicioy repuestosperi6dicamenteparafuncionarcomoest_.ndiseriados.Estagarantianocubrereparacionescuandoel uso
normalhaagotadolavidafltildeunaparteomotor.
6. LasfallascausadasporcualquiercausaexternaoactodeDios,comocolisi6n,robo,vandalismo,disturbiosoguerra,holocaustonuclear,incendio,congelamiento,electricidadatmosf_rica,
terremoto,tormentas,granizo,erupci6nvolcanica,aguaoinundaciones,tornadosohuracanes.
7. Eldahorelacionadoaroedoresy/o plagadeinsectos.
8. LosproductosquesonmodificadosoalteradosdemaneranoautorizadaporGeneracporescrito.
9. Cualquierdafioincidental,consecuencialoindirectocausadopordefectosenlosmaterialesy manodeobra,ocualquierretrasoenrepararoreemplazarlaspartesdefectuosas.
10. Falladebidoaunamalaaplicaci6n.
11. Gastosrelacionadosa"instruccionesdelcliente"o detecci6ndeproblemasdondenoseencuentredefectodefO.brica.
12. Equipodealquilerusadomientrasserealizalasreparacionesdegarantia.
13. Bateriasdearranque,fusibles,bombillosdeluzyfluidosdemotor.
ESTAGARANTiAREEMPLAZAA TODASLAS OTRASGARANTiAS,EXPRESASO IMPLiCITAS.ESPECiFICAMENTE,GENERACNO OFRECEOTRASGARANTiASCOMODE
MERCANTIBILIDADOADECUACIONA UN USOPARTICULAR.Cualquiergarantia implicita permitida por ley,estara limitada enduracion a losterminos dela garantia expresa
dispuestaaqui. Algunos estadosnopermiten limitaciones respectoa la duracion deunagarantia implicita, de modo quela limitacion expresadaarriba puede noaplicarse
a usted. LA 0NICA RESPONSABILIDADDEGENERACSERALAREPARACIONOREEMPLAZODELASPARTESTALCOMOSEESPECIFICAARRIBA.ENNINGONCASO
GENERACSERARESPONSABLEPORCUALQUIERDANOINCIDENTALO CONSECUENCIAL,A0N SI TALESDANOSSEANUNRESULTADODIRECTODEUNANEGLIGENCIA
DEGENERAC.Algunos estadosno permiten laexclusiono limitacion de da_osaccidentaleso resultantes, demodo quela limitacion mencionadas mas arriba podrian no
aplicarse a usted.Esta garantiale da a ustedderechos legalesespecificos. Ustedtambientiene otros derechosdependiendodel Estado.
GENERAC POWER SYSTEIVIS, INC. • RO. BOX 8 • Waukesha, Wl 53187 • Tel:: (888) GENERAC (436-3722} • Fax: (262) 544-4851
Pata ubicar al concesionario autorizado re;is cercano visite nuestto sitio web: www.generac.com
No.de parte 0H8902 RevisionF (02/12)
Manual Parte No. 0J3821 Rev. E (29/05/12) Impreso en China

GENEPlAC _
[]
eldentret=en
_urportabese_eur
47

introduction...........................................................49
Lireattentivementce manuel...............................49
Regiesde securite................................................49
Indexdes normes.........................................................51
Informationsgenerales.........................................52
1.1 Deballage.....................................................................52
1.1.1 Boited'accessoires..........................................52
1.2 Assemblage.................................................................52
1.2.1 Montagedu kit d'accessoires...........................52
1.2.2 Connexionduc_blede la batterie
(demarrageelectriqueseutement)....................53
Fonctionnernent....................................................53
2.1 Conna_trela g@eratrice................................................53
2.2 Horometre....................................................................55
2.3 Cordonset prises deconnexion...................................55
2.3.1 Prisedoublede 120 Volts CA, 20 Amp............55
2.3.2 Prisede 120/240 Volts CA,30 Amp................55
2.3.3 Prisedoubledu disjoncteurGFCIde
120 VoltsCA,20 Amp.....................................55
2.3.4 Prisede 120/240 Volts CA,30 Amp................56
2.4 Commentutiliser la g@eratrice....................................56
2.4.1 Misea la terre de la g@eratriceIorsqu'utitis@
comme portable...............................................56
2.4.2 Brancherla g@eratriceau systeme
electriqued'unb_timent....................................57
2.5 Nepassurchargerlag6neratrice..................................57
2.6 Guidede referencedewattage.....................................57
2.7 Avantde demarrerlag@eratrice..................................58
2.7.1 AjouterI'huilea moteur....................................58
2.7.2 Ajouterde I'essence.........................................58
2.8 Demarrerlesmoteursa demarragemanuel..................59
2.9 Demarrerlesmoteur a demarrageelectrique................59
2.9.1 Demarragemanuel..........................................60
2.10 Arr_terle moteur..........................................................60
2.11 Systemed'arr_tde niveaubasd'huile...........................60
2.11.1 Detectiondu bas niveaud'huile........................60
2.12 Chargerla batterie(appareilsa demarrage
electriqueseutement)...................................................60
Entretien...............................................................61
3.1 Effectuerle Programmed'entretien...............................61
3.2 Programmed'entretien.................................................61
3.3 Sp@ificationsdu produit..............................................61
3.3.1 Sp@ificationsde la g@eratrice........................61
3.3.2 Sp@ificationsdu moteur .................................61
3.3.3 Informationa propos desemissions................61
3.4 Recommandationsg@erales........................................61
3.4.1 Entretiende la g@eratrice................................61
3.4.2 Nettoyerla g@eratrice.....................................62
3.4.3 Entretiendu moteur.........................................62
3.4.4 Verifierle niveaud'huite....................................62
3.4.5 Changementde rhuile......................................62
3.4.6 Remplacerla bougied'allumage.......................62
3.4.7 Remptacementdela batterie(si applicable).....62
3.5 Entretiendu filtre a air ..................................................63
3.5.1 Entretiende l'@ranpare-etincelles
(mo@lesCARB)..............................................63
3.6 Jeudes soupapes........................................................63
3.7 G@eralit6s...................................................................63
3.8 Entreposagealong terme.............................................64
3.9 Autresconseils d'entreposage......................................64
Depannage..........................................................65
4.1 Guidede d@annage.....................................................65
Garantie...............................................................66
48

iNTRODUCTiON
Merci d'avoirachetece modelefabriquepar GeneracPowerSystems,Inc.
Ce modele est une generatrice entraTnepar moteur compacte, a haute
performance, refroidiea fair, congue pourfournir I'alimentationelectrique
afin de faire fonctionner les charges electriques Iorsqu'aucun reseau
electriquen'estdisponibleou a.laplace dureseauen raisond'unecoupure
de courant.
LIREATTENTIVEMENTCEMANUEL
En cas d'incomprehension d'une partie de ce manuel, contacter le
depositaire agree le plus proche pour connakre les procedures de
demarrage,de fonctionnementetd'entretien.
L'operateurestresponsabledeI'utilisationcorrecteets_redeI'equipement.
Nous recommandons fortement a I'operateur de fire ce manuel et
de comprendre completement toutes les instructions avant d'utiliser
I'equipement.Nous recommandons egalementfortement d'apprendre
d'autres utilisateurscomment correctementdemarreret faire fonctionner
I'unite.Cela les prepareau casou ils auraientbesoindefaire fonctionner
I'equipementpour uneurgence.
La generatrice peut fonctionner en toute securite, de fagon efficace et
de fa9on fiable uniquementsi erie est correctementinstallee,utilisee et
entretenue.Avant d'utiliserou entretenirlageneratrice'
• Se familiariser avec et respecter strictement tous les codes et
reglementationsIocaux,d'Etatet nationaux.
• Life attentivementtousles avertissementsde securitefigurant dartsce
manuelet sur leproduit.
• Sefamiliariseravec ce manuel etI'uniteavantde I'utiliser.
Le fabricant ne peut pas anticiper toutes les situations possibles qui
peuventimpliquerundanger.Lesavertissementsde cemanueletfigurant
sur les etiquetteset les autocollantsapposessur I'unitene sont,toutefois,
pas exhaustifs.Si vous suivezune procedure, une methodede travail ou
unetechniquedefonctionnementquelefabricant nerecommandepas en
particulier,assurez-vousqu'elleestsans dangerpour les autres.S'assurer
quela procedure,la methodedetravail ou la techniquedefonctionnement
choisie nerende pas la generatricedangereuse.
LES INFORMATIONSCONTENUESBANS LE PRI_SENTMANUEL SE
BASENTSUR LES MACHINESEN PRODUCTIONAU MOMENTBE LA
PUBLICATION.GENERACSE RESERVELE DROIT DE MODIFIERCE
MANUELATOUTMOMENT.
r r
REGLESDESECURITE
Danstout cemanuel,etsur les etiquetteset sur ies autocollantsapposes
sur la generatrice,les blocs DANGER,AVERTISSEMENT,ATTENTIONet
REMARQUEservent aalerterle personneld'instructionsspecialesausujet
d'uneoperation specifique qui peut s'averer dangereusesi erie n'est pas
effectueecorrectementou avec precaution.Les respecter attentivement.
Leurs definitionssont les suivantes:
INDIQUEUNE SITUATIONOU UNE ACTIONDANGEREUSE QUI,
SIELLEN'ESTPAS EVITEE,ENTRA|NERALA MORT OU DES
BLESSURES GRAVES,
Indiqueunesituation onune action dangereuse qui, si elle n'est pas
evitee, pourraitentrainer la mort on desbiessures graves.
A ATTENTION
Indiqueunesituationouuneactiondangereusequi,siellen'estpas
evitee,entraineradesblessureslegeresonmnderees.
REMARQUE'
Les remarques contiennent des infermations supplementaires
importantes relatives a une procedure et se trouventdarts le corps de
texte regulier de ce manuel.
Cesavertissementsdesecuritene peuventpaseliminerlesdangersqu'ils
signalent.Le sens commun etle respect strict des instructions speciales
Iorsde faction ou I'entretiensent essentielspour eviterlesaccidents.
Quatre symboles de securite couramment utilises accompagnent les
blocs DANGER,AVERTISSEIVIENTetATTENTION.Chacunindiquele type
d'informationssuivant:
,t_Ce symbole indiquedes informationsimportantesrelatives a la
securite qui, si elles ne sentpas suivies, ponrraientmettre en
danger la securite personnelleet/ou les biens.
Cesymbole indiqueun risquepotentield'explnsinn.
//_Ce symbole indiqueun risquepotentield'incendie.
Cesymbole indiqueun risquepotentield'electrocutinn.
DANGERSGI'NI'RAUX
• NEJAMAISfairefonctionnerdans unespaceclos, dansunvehicule,ou
a.I'interieurmeme si les portes et lesfenetressont ouvertes.
• Pour des raisons de securite, le fabricant recommande que la
maintenance de cet equipement soit effectuee par un depositaire
agree.Inspecterregulierementlageneratriceet contacterledepositaire
agreele plus proche pourles piecesqui necessitentunereparationou
un remplacement.
• Fairefonctionnerla generatriceuniquementsur dessurfaces deniveau
etou erieneserapas exposeea_I'humidite,auxsaletes,alapoussiere
ou auxvapeurscorrosives excessives.
• Tenirles mains,les pieds,les vetements,etc., a distancedescourroies
detransmission, desventilateursetd'autrespieces mobiles.Nejamais
retirertout protege-ventilateurpendantqueI'unitefonctionne.
• Certaines piecesde la generatrice deviennentextremementchaudes
pendantle fonctionnement. Restera distance de la generatricetant
qu'ellen'a pasrefroidieafin d'eviterdes brQluresgraves.
• NePASfairefonctionner la generatricesous la pluie.
• Nepasmodifierla constructiondelageneratriceni les commandes,ce
quipourrait creer unecondition defonctionnementdangereuse.
• Ne jamais demarrer ou arreter I'unite avec les charges electriques
brancheesaux prises ET avecdes dispositifs branchessous tension.
Bemarrerle moteur et le laisser se stabiliser avant de brancher les
chargeselectriques.Bebranchertoutes les chargeselectriquesavant
d'arreterla generatrice.
• Nepas insererd'objetdans lesfentes de refroidissementde I'unite.
• Lors du travail sur cet equipement,conserver I'alerteatout moment.
Ne jamais travailler sur I'equipementen cas de fatigue physique ou
mentale.
49

Ne jamais utiliser la generatrice ou n'importe laquelle de ses pieces
comme marche. Montersur I'unitepeut ecraseret casser les pieces,
et peutentraTnerdes conditions defonctionnementdangereusessuite
une fuite de gaz d'echappement,unefuite de carburant, une fuite
d'huile,etc.
REMARQUE:
Cettegeneratrice est equipee d'unport d'echappementpare-etincelles.
Le proprietaire / I'operateur de la generatrice devra garder le pare-
etincelles en ben etat de fonctionnement. Bans I'Etat de Califomie, un
pare-etincelles est requis par la Ioi (Article 4442 du California Public
Resources Code). O'autres Etatspeuvent avoir des lois similaires. Les
lois federales s'appliquent sur le territoire federal
DANGERSD'ECNAPPEIVlENTET
D'EMPLACEIVlENT
Ne jamais faire fonctionner dans un espace clos ou
I'interieur.NEJAMAISfake fonctionner dansun espaceclos,
dans un vehicule,ou a I'interieurm_me si les porteset les
fen_tres sentouvertes! UtiliserUNIQUEIVIENTa I'exterieur
et loindesfen_tres, portesouvertes, ventilations,et dansun
espacedans lequel le gaz d'echappement ne s'accumulera
pasde fa_on mortelle.
L'utilisation d'une generatrice a rinterieur PEUT VOUS TUER
EN QUELQUES MINUTES,
Les generatrices rejettent du mono×yde de carbone. II s'agit
d'un gaz toxique invisible et inodore.
NEJAMAISutiliser lageneratrice
rinterieur d'une residenceeu
d'un garageMe:MESlles portes
et lesfen_tres sent ouvertes.
Utiliser uniquement
L'EXTERIEURet loindes
fen_tres, portes et events.
• Les gaz d'echappement du moteur contiennent du monoxyde de
carbone,qui est invisible etinodore. Cegaztoxique, s'il est respire en
concentrationssuffisantes, peutentra;neruneperte de conscienceou
m_me la mort.
• Un debit approprie, non obstrue d'air de refroidissement et de
ventilationest important pour corriger le fonctionnement de la
generatrice.Ne pas modifier I'installationou ne pas laisser meme un
blocage partiel de I'alimentationde ventilation,etant donne que cela
peutserieusementaffecterlefonctionnementsQrde lageneratrice.La
generatriceDOlTfonctionnera I'exterieur.
• Ce systeme d'echappementdolt _trecorrectement entretenu.Ne rien
fairequi pourrait rendre lesystemed'echappementdangereuxou non
conformeauxcodes Iocauxet!ou hermeslocales.
• Toujours utiliser un detecteurd'oxyde de carbone a alimentation par
batteriea I'interieur,conformement auxinstructions dufabricant.
• Sivous commenceza voussentirmalade,aavoirdesetourdissements
ou a vous sentir faible apres le fonctionnement de la generatrice,
respirezdeI'airfrais IMMEDIATEMENT.Consultezunmedecincar vous
pourriezavoir ereempoisonneau monoxydedecarbone.
RISQUESELECTRiO U__ES_
• La generatrice produit une tension dangereusementhaute pendant
son fonctionnement. Eviter le contact avec les ills nus, les bornes,
les branchements,etc., pendant le fonctionnementde I'unite, meme
sur I'equipementbranche a. la generatrice.S'assurer que tous les
couvercles,les dispositifs de protection et lesbarrieressent en place
avantde fairefonctionnerla generatrice.
• Ne jamais manipuler tout type de cordon ou de dispositif dectrique
qui est dans I'eau, alors que vous _tes pieds nus ou que vos
mains ou vos pieds sent mouilles. CELAENTRAINERAUN RISQUE
D'ELECTROCUTION.
• Le NationalElectric Code (NEC,Code electrique national) exige que
le b__tiet que les pieces externeselectriquementconductrices de la
generatricesoient correctement relies a unemise a_terre approuvee.
Les codeselectriquesIocauxpeuventegalementexigerunemise a la
terre appropriede la generatrice. Consulter un electricienlocal pour
conna_treles exigencesde raisea_laterre darts la region.
• Utiliser un disjoncteur de fuite a la terre dartstoute zonehumide ou
tres conductrice (tellequele carter protecteurmetallique ou I'acierie).
• N'employez pas des cordons amovibles electriques uses, nus,
effilochesou autrementendommagesaveclageneratrice.
• Avant d'effectuertoute maintenancesur la generatrice,debrancherla
batteriede demarragedu moteur (le cas echeant)afin d'emp_cherun
demarrageaccidentel.Debrancherle c_ble de la borne de la batterie
signaleepar I'inscription NEGATIVE(Negatif), NEGou (-) en premier.
Reconnecterle c__bleala fin.
• En cas d'accident causepar electrocution,couper immediatementla
source d'alimentationelectrique. Si cela est !mpossible, essayer de
libererlavictime du conducteursous tension.EVITERTOUTCONTACT
DIRECTAVECLAVICTIME.Utiliserun objetnon conducteur,comme
unecordeou uneplanche,pour liberer la victime du conducteursous
tension. Silavictime est inconsciente,assurerlespremierssecourset
demanderuneaidemedicale immediate.
RISQUESD'INCENDIE
• L'essenceestires iNFLAMMABLEet sesvapeurssentEXPLOSIVES.
Ne pas produirede fumee, fiammes hues, etincelles ouchaleur
prcximitede I'endrcitou I'essenceest manipulee.
• Nejamaisajouter de¢arburantIorsqueI'unitefoncUonneouestchaude.
Laisserle moteurcompletementrefroidiravantd'ajouterdu carburant.
• Ne jamais remplir le reservoir de carburanta I'interieur. Respecter
toutesleslois reglementantI'entreposageetlamanipulationdeI'essence.
• Ne pastrop remplir le reservoir decarburant.Toujours laisser de la
placepourI'expansion du carburant.Si le reservoirest trop rempli,
I'essencepeutdebordersur unmoteurchaudet entrainerun INCENDIE
ou une EXPLOSION.Ne jamais entreposer la generatrice avec le
reservoir rempli de carburant etantdonne que les vapeurs d'essence
pourraient atteindre une flamme ouverte, des etincelles ou une
veilleuse (comme il y en a sur une chaudiere,un chauffe-eauou sur
un seche-linge).Celapeutentrainerun INCENDtEou uneEXPLOSION.
LaisserI'unitecompletementrefroidir avantI'entreposage.
• Nettoyer immediatementtoute eclaboussurede carburant ou d'huile.
S'assurerqu'aucunematierecombustible ne reste sur ou a proximite
dela generatrice.GarderI'espaceenvironnantdelageneratricepropre
etsansdebriset garderunjeu decinq (5) piedssur tousles c6tes afin
depermettre uneaerationadapteede la generatrice.
_o

* Ne pasinsererd'objetdans les fentesde refroidissementde I'unite.
* Ne pas faire fonctionner la generatricesi des dispositifs electriques
branches surchauffent ; si la puissance electriqueest perdue ; si le
moteur ou la generatricefait des etincelles; si des flammes ou de la
fumee sont detect6esalorsque I'unitefonctionne.
* Garderun extincteura.proximite de lagen6ratricea.tout moment.
INDEXDESNOR/V/E$
,
,
,
4.
NationalFire ProtectionAssociation (Associationnationale pour la
protection contre les incendies) 70: Le NATIONALELECTRICCODE
(Codeelectriquenational)disponibleaupresde www.nfpa.org
NationalFire ProtectionAssociation (Associationnationale pour la
protectioncontreles incendies)5000 : LeBUILDINGCONSTRUCTION
ANDSAFETYCODEdisponibleaupres dewww.nfpa.org
InternationalBuildingCodedisponibleaupres dewww.iccsafe.org
Agricultural Wiring Handbook disponible aupres de www.rerc.org
, Rural Electricity ResourceCouncil P.O.Box 309 Wilmington, OH
45177-0309
5,
ASAE EP-364.2 Installation and Maintenance of Farm Standby
Electric Power(Installationet maintenancedes systemeselectriques
de secours pour les fermes), disponible aupresde www.asabe.org,
AmericanSociety of Agricultural& Biological Engineers,2950 Niles
Road,St. Joseph, MI49085
Cette liste n'est pas exhaustive. Verifier avec I'autorite locale ayant
juridiction pour les codes et normes Iocauxqui peuvent_treappliquesa.
votrejuridiction.
N° DEMOD!_LE:
N° DES¢:RIE:
Emplacement/BdeI'unR#.
I
I
IViODi:LE
D'F:TIQUETTE
AVERTISSEMENTPROPOSITION65 CALIFORNIE
L'6chappementdu moteuret certainsdeses constituantssont
susceptiblessetonI'l_tatdeCaliforniedtentrafnerdescancers,
desmalformationscongenitalesou pouvant_trenocifs pour le
systemereproductif.
AVERTISSEMENTPROPOSITION65 CAUFORNIE
Ceproduitcontientou 6metdesproduitschimiquessusceptibles
setonI'!_tatdeCalifornied'entrafnerdescancers,des
malformationscong6nitalesou autresmaladiespouvant_tre
nocivespourle systemereproductif.
51

1.1 DI BALLAGE
• Retirertousles el6mentsd'emballage.
• Enleverla boited'accessoires separ6e.
• Retirerle g6nerateurdu carton.
1.1.1 BOJTED'ACCESSOIRES
e
e
e
e
e
e
e
e
1-Manuel de I'utilisateur
1-Bouteille d'huile SAE 30
3-Fiches d'enregistrement du produit (Angtais, Espagnol, Fran£ais)
1-Chargeur de batterie (demarrage electrique seulement)
1-Assemblage de la poignee
1-Pied du b&ti (E)
2-Roues jamais plates (H)
1-Sac pour quincailterie (contenant ce qui suit) :
- 2-Boulons at6te courbeelongs (A)
- 2-1_croushexagonales(B)
- 4-f_crousaembase(C)
- 2-Pieds encaoutchouc (D)
- 2-Boulons courts (F)
- 2-Goupillesaxiales(G)
- 2-Rondelles(I)
- 2-Goupillesfendues(J)
- 2-1_crousD.brides (demarrageelectriqueseulement)
1.2 ASSEMBLAGE
II est necessaired'effectuerquelquesetapesde montage avantd'utiliser
le generateur.Si des problemes se presentent Iors du montage du
generateur,merci d'appeler la ligne d'assistance pour les g6nerateurs
au 1-888-436-3722.
1.2.1 ASSEMBLAGEDEL'ENSEMBLEB'ACCESSOIRES
Oonsulterles instructions ci-dessous et les FiguresIA, IB et 10 pour
installerla poignee,lespieds etles roues. Remarque:les composants de
la poigneesont deja assemblesa I'usine. Les roues sont con(}ues pour
ameliorerconsiderablement la portabilite de la g6neratrice. Vous aurez
besoin des outils suivantspour installerde fagon approprieeI'ensemble
d'accessoires:
• Rochetet douille de 13 mm [1/2 po]
• Clespolygonalesde 13 mm [1/2 po]
• Unepince D.bec
Poignee
1. InstallerI'assemblagede la poigneeau cadre enutilisant les boulons
(A) et les ecrous (B).
Feet
2. Utiliserlesecrous(O)pourmonterlespiedsencaoutchouc(D)au
supportdupied(E).
3. Monterlesupportdupied(E)aub_.tiavecdeuxboulons(F)etdes
ecrous(C).
Roues
4. Glisserla goupilleaxiale (G)sur la roue (H), la rondelle (1)et sur le
support du b_.ti.
5. Fixerla goupilleaxiale (G)aubD.tiavec la goupillefendue (J).
6. Utiliserles pinces et plier un ongletde la goupillefendue(J) vers le
devantpour verrouilleren place.
7. Rep6terlesetapes5, 6 et 7pour I'autreroue.
Figure 1A- Assemblagede la poignee
Figure 1B - Assemblage du pied
52

Figure 1C- Assemblage de la roue
BEND ONETAB
AFTERAXLE
PIN(G)IS
INSERTED _
THROUGH
THEFRAME
1.2.2 CONNEXION#U CABLEDEUI BATTERIE
EL_TRIQUESEULEMEflT
L'unitea et6 envoyeeavecles c_blesde batteriedebranches.Vousaurez
besoind'unecle de lOmm pourfixer les c_.blesde batterie.
Pourbrancherlabatterie(voirSchema17pourlesinformationsrelatives
aubranchement):
1. Couperlesattachesdec_blefixant lesc_blesdebatterieet retirezles
couverclesrougesdes bomes de la batterie.
2. Brancherd'abordlec_ble rougea la borne positive(+) delabatterie
I'aidedu boulon, du contre4crou et de I'ecroufoumis.
3. Brancherlec_blenoir ala bornenegative(-) dela batteriea.I'aidedu
boulon, du contre4crou et deI'ecroufoumis.
4. S'assurer que tousles branchements sont fixes. Faire glisser
les enveloppes de caoutchouc sur les bomes et le materiel de
branchement.
REIVlARQUE:
S'il est impossiblede demarrer le moteur a I'aide de la batlerie,
brancherle chargeurde 12 V inclusdansla boited'accessoires (voir
la section <,Chargementde la batlerie ,>pourplusd'informations).
2.1 CONNAITRELA6ENERATRICE
Merci de life le Manuel d'entretienet les Regles desecurite avant de
fake fonctionner ce generateur.
Comparerle generateuraux Schemas2 a 4 pour vous familiariser avec
les emplacementsdesdivers contrCleset reglages.Oonserverce manuel
pour memoire.
1. Prise doublea DDFT 120 V c.a., 20 A - Fournitune alimentation
electrique pour le fonctionnement d'un eclairage electrique,
d'appareils, d'outils et de charges de moteur 120 V c.a., 20 A,
monophase,60 Hz. CARBmodeles sont equipesde prisesGFCI.
2. Prisea verrouillage120/240 V c.a.,30 A- Fournitune alimentation
electrique pour le fonctionnement d'un eclairage electrique,
d'appareils,d'outils et de charges de moteur 120 Vet / ou 240 V
c.a., 30 A, monophase,60 Hz.
3. Disjoncteurs(c.a.) - Chaqueprise estfournie avec un disjoncteur
de type <<pousser pour reenclencher>>pour protegerle generateur
contre les surchargeselectriques.
4. Vidanged'huile - Utilisepour vidangerI'huilede moteur.
5. Filtre a air - FiltrePairaspireparle moteur.
6. F:trangleur- Utiliseau demarraged'un moteurfroid.
7. Reservoir d'essence - Voir les Oaracteristiquestechniques du
generateurpour la contenancedu reservoir.
8. Borne de raise a la terre - Relie le generateur a une terre
approuvee.Voirla section <<Misea.la terre dugenerateur>>pour plus
d'informations.
9. InterrupteurRun/Stop (IVlarche/Arret)- OontrClele fonctionnement
du generateur(modelesademarragemanuel).
9A. Interrupteur de demarrage- Utilise pour demarrer le moteur
partir du demarreur du moteur (modeles a.demarrage electrique
uniquement).
18. Pot d'echappement- Rendsilencieuxle moteur.
11. Poignee - Pivoter et retracter pour le stockage. Appuyer sur le
boutona ressort pour d@lacerles poignees.
12. Chapeaude gazassis - Emplacementde remplissaged'huile.
13. Jauge de carburant - Indique le niveau de carburant darts le
reservoir.
14. Remplissage d'huile - Ajouter de I'huileici.
15. Lanceur a rappel- Utiliser pour demarrerlemoteur manuellement.
16. Soupape d'arret - Soupape entre le reservoir d'essence et le
carburateur.
17. Entree du chargeur de batterie - Cette prise a la capacite de
recharger la batterie rechargeablec.c. de 12 volts, equipee d'un
chargeur d'adaptateur de 12 volts qui est inclus darts la boite
d'accessoires. Derriere I'entree du chargeur de la batterie, il y a
un fusible en ligne de 1,50 A qui setrouve b.I'interieurdu panneau
de commande afin de proteger la batterie (demarrage electrique
uniquement).
18. Batterie - Met sous tension le demarreurelectrique (modeles de
demarrageelectriqueuniquement).
19. Horometre- Releveles heuresdefonctionnement.
28. Pare-etincelles - Reduit les risques d'incendie en contenantles
etincelles(modelesCARBseulement).
53

Schema2,4- Panneaudecommande(Modelesde49etats) SchP.ma3 - CommandesdugP.nP.rateur
Schema 2B - Contro/ Pane/ (Modeles CARB)
Schema 2C - Control Panel (Modeles CSA)
Schema 4 - Commandesdugenerateur
54

2.2 HOROMI:TRE
L'horometre releve les heures de fonctionnement pour la
maintenanceprogrammee:
Un message<<CHGOIL>>s'afficheratoutes les 100 heures.Le message
clignotera une heure avant et une heure apres chaque intervalle de
lOO heures,laissantunemargede deuxheurespour effectuerI'entretien.
Cemessagecommenceraa clignoter a la 99eme heureet sedesactivera
la 1Oleme heure,laissant une marge de deux heurespour effectuer
I'entretien.
Toutesles 200 heures,I'ic6ne<<SVO>>situee enbas a gauchede I'ecran
clignotera. Le message clignotera une heureavant et une heure apres
chaqueintervallede 200heures,laissant unemargede deuxheurespour
effectuerI'entretien.
Lorsque I'horometre est en mode Flash Alert (Alerte clignotante), le
message de maintenance s'affichera toujours en alternance avec le
temps ecoul6enheureset endixiemes.Lesheuresferontclignoter quatre
heures,puiss'afficheront enalternanceavecle messagede maintenance
quatrefois jusqu'a ce que la reinitialisationde I'horometre.
• 100 heures- OHGOIL-- Intervallede changementd'huile(Toutesles
100 heures)
• 200 heures- SVO-- Servicede filtre D.air (toutesles 200 heures)
REIVlARQUE:
Le graphiquedesablierclignoleraet s'eleindraIorsquele moleur
esl en marche.Ceci signifieque I'unilesurveille les heuresde
fonctionnement.
2.3.2
Schema 6 - Prise double, 120 V c.a., 20 A
D
PRISEDE120/240VOLTSCA,30AMP
Utiliserunefiche NEMAL14-30 aveccette prise (tournerpour verrouiller/
deverrouiller).Brancherun cordona 4 fils avecmise alaterreadaptea la
priseeta la chargesouhaitee.Le cordondolt etre congupour 250 Vc.a.
D.30 A (ouplus) (Schema7).
Schema 7 - Prise 120/240 V c.a., 30 A
Figure5 - Hommetre
GRAPHIQUE
DE SABLIER
0000.0
BOUTONDE
REINITIALISATION
(LE CAS I_CHI_ANT)
2.3 CORDONSETPRISESDE CONNEXION
2.3.1 PRISEDOUBLEDE120 VOLTSCA,20 AMP
II s'agit d'une prise de 120 volts protegee contre la surcharge par un
disjoncteur detype ,<pousser pour reenclencher>>de 20 A (Schema6).
Utiliserchaque prisepour alimenterlescharges electriquesmonophasees
de 120 V c.a., 60 Hz necessitant 2 400 watts (2,4 kW) ou 20 A de
courant. Utiliseruniquementdes cordonsatrois fils avecmise a la terre,
bien isoles,de hautequaliteconguspour 125Volts a 20 A (ou plus).
Garderlescordonsprolongateursaussicourts que possible,depr6ference
D.uneIongueurinferieurea 15pieds, afind'empecherunechutedetension
et unesurchauffepotentielledes cD.bles.
120 V/240 V
3CA
Utiliser cette prise pour faire fonctionner les charges monophasees de
120 V c.a., 60 Hz necessitant 3 600 watts (3,6 kW) d'alimentation
30 A ou des charges monophasees de 240 V c.a., 60 Hz necessitant
7200 watts (7,2kW)d'alimentationa30 A. Lapriseestprotegeepardeux
disjoncteursdetype ,<pousserpour reenclencher>>de30 A.
2.3.3 PRISEDOUBLEDUDISJONCTEURGFC/DE 120
VOLTSCA,20AMP
II s'agit d'une prise de 120 volts protegee contre la surcharge par un
disjoncteurde type ,<pousser pour reenclencher>>de 20 A (Schema8).
Utiliserchaque prisepour alimenterlescharges electriquesmonophasees
de 120V c.a., 20 A, 60 Hznecessitant2 400 watts (2,4 kW) ou 20 A de
courant. Utiliseruniquementdes cordonsatrois fils avecmise a la terre,
bien isoles,de hautequalitecongus pour 125VoltsD.20 A (ou plus).
Garder les cordons prolongateurs aussi courts que possible afin
d'empecherunechutedetensionet unesurchauffepotentielledes cD.bles.

Schema8 - Prisedoub/eDDFT,120 V c.a.,20 A
2.3.4 PRISEDE 120/240 VOLTSCA,30 AMP
Utiliserune fiche NEMAL14-30 aveccette prise (toumer pourverrouilier/
deverrouiNer).Brancherun cordona 4 ills avec misea laterre adaptea la
priseet ala charge souhaitee.Lecordon dolt etrecon£u pour 250V c.a.
a.30 A (ou plus) (Schema9).
Schema9 - Prise 120/240 Vc.a., 30 A
,_Les fumCes d'Cchappement du moteur contiennent
du monoxyde de carbone, un gaz toxique invisible
et inodore. Ce gaz toxique, s'il est respire en
concentrations suffisantes, peut entrainer une perte
de conscience ou mCme la mort.
,_Un debit obstru6 d'air de
appropri_,
non
refroidissement et de ventilation est important
pour corriger le fonctionnement du gCnCrateur. Ne
pas modifier I'installation oune pas laisser mCme
un blocage partiel de I'alimentation de ventilation,
6tant donne que cela peut sCrieusement affecter
le fonctionnement sQr du gCnCrateur. II FAUT faire
fonctionner le gCnCrateur & I'extCrieur.
,_Ce doit 6tre correctement
syst_me d'Cchappement
entretenu. Ne rien faire qui pourrait rendre le
syst_me d'Cchappement dangereux ou non conforme
aux codes Iocaux et/ou normes locales.
,_ Toujours utiliser un dCtecteur d'oxyde de carbone
alimentation par batterie & I'intCrieur, conformCment
aux instructions du fabricant.
120 V/240 V
3O A
Utiiiser cette prise pour faire fonctionner ies charges monophaseesde
120 V c.a., 60 Hz necessitant 3 600 watts (3,6 kW) d'alimentation
30 A ou des charges monophaseesde 240 V c.a., 60 Hz necessitant
7200 watts (7,2 kW) d'alimentationa30A. Laprise estprotegeepardeux
disjoncteursdetype <<pousserpour reenclencher>>de 25 A (5/5,5 kW)
ou deuxdisjoncteursde 30 A (6,5 kW).
2.4 COMMENTUTILISERLAGENERATRICE
Voir la section "Demarrerle moteur"pour connaitre la fa£on de demarrer
et d'arr_terde manieresecuritaire la generatriceet la fa£on de brancher
et debrancher les charges. Si des problemes se presentent Iors du
fonctionnement de la generatrice, merci d'appelerla ligne d'assistance
pour lesgeneratricesau 1-888-436-3722.
,_Ne jamais faire fonctionner dans un espace clos ou
I'intCrieur. NE JAMAIS faire fonctionner dane un
espace clos, dane un vChicule, ou & I'int_rieur m_me
si lee portes et les fen_tres sont ouvertes ! Utiliser
UNIQUEMENT _ I'ext_rieur et loin des fen_tres,
portes ouvertes, ventilations, et dans un espace
dans lequel le gaz d'_chappement ne s'accumulera
pas de fa£on mortelle.
_6
L'utiiieation d'une generatrice a I'interieur PEUT VOUS TUER
EN QUELQUES MINUTES.
Lee generatrices rejettent du monoxyde de carbone. II s'agit
d'un gaz toxique invisible et inodore.
NE JAMAIS utiliser la generatrice
I'interieurd'uneresidenceou
d'ungarageMEME Sllesportes
et lesfenCtressontouvertes.
Utiliser uniquement
L'EXTERIEURet Joindes
fenCtres, portes et events.
2.4.1 M/SEA LA TERREDELAGENERATR/CE
LORSQ_UT/L/SEECOM/VIEPORTABLE
Cettegeneratricea une mise a ia terre de i'equipementqui branche ies
composantsde la structure delageneratriceauxbomes deterredartsles
prisesde sortie CA (voir NEC250.34 (A)pour I'explication).Ceci permet
lageneratriced'etreutiliseecommeportablesans mettreala terreleb_.ti
dela generatricetel qu'etabliedartsla norme NEC250.34.
_eciales
Desreglementations,codes Iocauxou ordonnancesfederauxouau niveau
de I'Etat en matiere d'Occupational Safety and Health Administration
(OSHA)(Gestionde la securite et la santeautravail) peuvents'appliquer
a.I'utilisationprevue du generateur.
Veuillezconsulterun electricien qualifie,un inspecteur electriqueou une
agencelocalecompetente:
* Bans certaines regions,il faut enregistrerles generateursaupres des
servicespublics Iocaux.
* Si legenerateurest utilise sur un chantierdeconstruction, ilfaudra se
conformera.d'autresreglementations.

2.4.2 BRANCHERLAG£-N£-RATRICEAU SYST£-ME
ELECTR/QUED'UNBAT/MENT
Les branchementspour I'alimentationde secours au systeme electrique
d'un b_timent doivent etre faits par un electricien qualifie et en tout
conformite avec les codes et lois electriques Iocaux et nationaux. Le
branchementdolt isoler I'alimentationde la generatricede I'alimentation
utilitaire,ou d'autressources d'alimentationalternatives.
REMARQUE:
Puisque la raise a la terre de I'equipement de la generatrice est
attachee aux fils neutre CA dans la generatrice (volt Figure 8), un
commutateurde transfert a 3 p6les on un commutateurde transfert
2 p_les avec unkit de commutationneutre estexige pourbrancher
cettegeneratrice a unechargedub_timent. Danscette application, la
generatrice devient un systeme derive separe (volt NEC250.20 (D)),
et dolt _tre raise ala terre selon lesexigences ducodeelectriquelocal
et national.
Misealaterredelageneratricedansuneapplicationde
secoursd'unb_timent
,_Le National Electrical Code (Code _lectrique national)
e×ige que le b&ti et que les pi_ces externes
_lectriquement conductrices de ce g_n_rateur soient
correctement reli_es & une terre approuv_e.
Lescodes electriquesIocauxpeuventegalementexigerlabonne mise;_la
terre de I'unite(Schema10). A cettefin, brancherun fil toronne encuivre
de 10 AWG (calibre americain des fils) ;_la borne de mise a_la terre et
a.unetige en cuivre conduite ;_la terre ou unetige ;_la terre (electrode)
en laiton fournit une protection appropriee contre les electrocutions.
Cependant,les codes Iocaux peuventfortement varier. Consulter un
electricien local pourconnaitreles exigences de raise a la terre darts
la region.
La bonne raise a la terre du generateur aidera a emp_cher une
electrocutionen cas de condition de defaut de mise a_la terre dans le
generateuroudansles dispositifselectriquesbranches.Labonnemise;_la
terreaideegalementa_dissiperI'electricitestatique,quis'accumulesouvent
dansles dispositifs nonmisa.la terre.
Schema 10 - Mise a la terre du generateur
MISE A LA
TEl:IREPATTE
2.5 NEPASSURCHARGERLAGENERATRICE
Surchargerun generateurau-dessusde sa capacitenominalede wattage
peut endommager le generateuret les dispositifs electriquesbranches.
Respecterles consignessuivantespourempecherla surchargedeI'unite:
* Calculerle wattagetotal de tous les dispositifselectriquesa brancher
enmeme temps. Cetotal nedolt PASdepasserlacapacitedewattage
du generateur.
* Le wattage nominal des lumieres peutetre indiquesur les ampoules.
Lewattagenominal des outils,des appareilsetdes moteurs setrouve
generalementsur une etiquette ou un autocollant appose(e) sur le
dispositif.
* Si I'appareil,I'outil ou le moteur n'indiquepas le wattage, multiplier la
valeurnominaledes voltsfois la valeurnominaledes amperesafin de
determinerles watts (volts x amperes= watts).
* Certains moteurs electriques,tels que ceux a.induction, necessitent
environ trois fois plus de watts d'alimentation pour le demarrage
que pour le fonctionnement. Cette surtension d'alimentation dure
seulement quelques secondes Iors du demarrage des moteurs en
question.S'assurerde laisser un wattagede demarrageeleveIors du
choixdes dispositifs electriquespour brancherle generateur:
1. Calculer les watts necessaires pour demarrer le moteur le plus
grand.
2. Ajouterace chiffreleswatts defonctionnementdetoutes les autres
chargesbranchees.
Le Guidede referencede wattage sert a determinercombien d'elements
le generateurpeutfaire fonctionneren memetemps.
REMARQUE:
Tonsles chiffres sont arrondis. Volt les etiquettes sur I'unite pour
connaitreles exigences de wattage.
2.6 GUIDEDERe:FlORENCEDEWATTAGE
Dispositif......................... Watts de fonctionnement
*Climatiseur (12000 Btu)............................. 1 700
*Climatiseur (24000 Btu)............................. 3 800
*Olimatiseur (40000 Btu)............................. 6 000
Chargeurdebatterie(20 A)............................. 500
Ponceuseabande (3 po.)............................. 1 000
Sciea cha_ne...................................... 1 200
Sciecirculaire (6,5 po.) ......................... 800 a.1 000
*Seche-linge(electrique) ............................. 5 750
*Seche-linge(a_gaz).................................. 700
*Machine a.laver ................................... 1 150
Cafetiere.......................................... 1 750
*Compresseur (1 HP)................................ 2 000
*Compresseur (0,75 HP) ............................. 1 800
*Compresseur (0,5 HP).............................. 1400
Ferafriser ......................................... 700
*Deshumidificateur .................................. 650
Ponceuseadisque (9 po.) ............................ 1 200
Coupe-bordures..................................... 500
Couverturechauffanteelectrique......................... 400
Cloueuseelectrique.................................. 1 200
Cuisiniereelectrique(parelement) ...................... 1 500
Poeleelectrique .................................... 1 250
*Freezer............................................ 700
*Ventilateurde chaudiere(0,6 HP)....................... 875
*Ouvre-porte de garage.......................... 500 a.750
Seche-cheveux .................................... 1 200
Perceusea main............................... 250 a.1 100
Taille-haie ......................................... 450
_7

Cle#.chocs ........................................ 500
Fer.............................................. 1 200
*Pompe __jet ....................................... 800
Tondeuseagazon................................... 1 200
Ampoule........................................... 1O0
Foura micro-ondes ............................ 700 a.1 000
*Refroidisseur de lair ................................ 1 100
BrOleura.mazout dechaudiere .......................... 300
Radiateuramazout(140 000 Btu) ....................... 400
Radiateuramazout(85 000 Btu) ........................ 225
Radiateura_mazout (30 000 Btu) ........................ 150
*Pistolet a peinture,sans air (0,3 HP)..................... 600
Pistolet a.peinture,sans air (portable)..................... 150
Radio......................................... 50 a.200
*R6frigerateur....................................... 700
Cocottemijoteuse.................................... 200
*Pompe immergee(1,5 HP)........................... 2 800
*Pompe immergee(1 HP) ............................ 2 000
*Pompe immergee(0,5 HP)........................... 1 500
*Pompe devidange ............................ 800 a_1 050
*Scie circulaire#.table (10 po.) ................. 1750 a.2 000
Television..................................... 200 __500
Grille-pain.................................. 1000 a.1 650
Coupe-mauvaisesherbes .............................. 500
* Laisser3 foisles watts indiquespourle demarragede cesdispositifs.
2.7 AVANTDEDEMARRERLAGI NI RATRICE
Avant de faire fonctionner le generateur, de I'huile de moteur et de
I'essencedevrontetreajoutes,de la fagon suivante
2.7.1 AJOUTERL'HU/LEA MOTEUR
Toutehuiledolt respecterlacategoriedeserviceminimaleSJ, SLou mieux
de I'American Petroleum Institute (API) (tnstitut americain du petrole).
N'utiliseraucun additif special. Selectionnerle degre de viscosite d'huile
selon la temperatured'exploitation(se reporter egalementautableau).
• Au-dessusde40 °F,utiliserle SAE30
• Endessousde 40 °F etjusqu'a 10 oF,utiliser le 10W-30
• Endessousde 10 oF,utiliser le 5W-30 synthetique
mmml
I
°F -20 -10 0 10 20
oc-3o -_0 -10
32 40 60 80 100
Gamme de temperature d'utilisation anticipee
,&,ATTENTION!
,i& Toute tentative de faire tourner ou de d6rnarrer le
moteur avant qu"il ait 6t6 correctement entretenu
avec I'huile recommand6e peut entrainer une panne
du moteur.
1. Installerle generateursurune surface deniveau(nepas d@asser15
° dans aucunedirection).
2. NettoyerI'espaceautourdeI'orifice deremplissaged'huileetretirerle
bouchon.
3. Remplirlentementle moteur avec de I'huilejusqu'a,ce quela jauge
d'huile lise plein. Interrompre regulierement le remplissage pour
verifierle niveaud'huile.
4. Installerla jauged'huileet la serrerfermementau doigt.
5. Verifierle niveaud'huiledemoteur avantle demarragea.chaquefois
parla suite.
2.7.2 AJOUTERBEL'ESSENCE
NE JAMAIS remplir le r6servoir d'essence
I'int6rieur. Eviter de renverser de I'essence sur un
moteur chaud. Laisser le moteur compl_tement
refroidir avant d'ajouter du carburant. NE JAMAIS
remplir le r6servoir d'essence Iorsque le moteur
fonctionne ou est chaud. NE PAS allumer une
cigarette ni fumer lots du rernplissage du
r6servoir d'essence. L'essence est extr6mement
INFLAMMABLE et ses vapeurs sont EXPLOSIVES.
Ne pas trop remplir le r6servoir d'essence. Toujours
laisser de la place pour I'expansion du carburant.
En cas de suremplissage du r6servoir, le carburant
peut d6border sur un moteur chaud et entrainer un
incendie ou une explosion. Nettoyer imm6diatement
toute 6claboussure de carburant.
1. Utiliser de I'essence SANS PLOMB reguliere avec le moteur du
generateur.Nepasutiliser desupercarburant.NepasmelangerI'huile
avec Pessence.
2. Nettoyer I'espace autour du bouchon de I'orifice de remplissage
d'essence,retirerle bouchon.
3. Ajouterlentementde I'essenceregulieresansplomb dansle reservoir
d'essence.Remplirjusqu'aufond dufiltre a.tamis. Faire attention de
ne pastrop remplir (Schema11).
4. Mettre le bouchon du reservoir d'essence et nettoyer toute
eclaboussured'essence.
iMPORTANT: IIestimportantd'empecherlaformationdedep6tsdegomme
dartsles pieces du circuit de carburant,telles que le carburateur,le tuyau
pour combustibleou le reservoirpendantle stockage.L'experiencemontre
egalementque lescarburants__based'alcool(appelesgazohol,ethanolou
methanol)peuventabsorberI'humidite,ce qui entra;neune separationet la
formationd'acidespendantle stockage.Ungaz acidepeutendommagerle
circuitdecarburantd'unmoteurpendantlestockagedecelui-ci.Afind'evitertout
problemeaveclemoteur,lecircuitdecarburantdolt§trevideavantlestockage
dumoteursi celui-ciestd'aumoins30jours.Voirlasection<<Stockage>>.Ne
jamaisutiliserdeproduitnettoyantpourmoteurou carburateurdartslereservoir
d'essenceetantdonnequecelapourraitcauserdesdommagespermanents.
Schema 11 - Reservoir d'essence
R_servoir de carburant
/ NE PAS rernplir au-
Carburant dessus de la I_vre
58

2.8 DEMARRERLESMOTEURSADB_ARRAGEMANUEL
z_Ne jamais d_marrer ou arr_ter le moteur avec les
dispositifs _lectriques branch_s darts les prises ET
les dispositifs sous tension.
1. Debranchertoutes les charges dectriques desprises de I'uniteavant
de demarrerlemoteur.
2. S'assurer que I'unite est dans une position de niveau (ne pas
depasser15 ° dans aucune direction).
3. OUVRIRla soupaped'arr_t(Schema12).
4. Mettre I'interrupteur RUN/STOP(Marche/Arr_t) du moteur sur la
position ON(Marche) (Schema13).
5. Faireglisser I'etrangleurdu moteurdelaposition LEFT(Gauche)vers
la position FULLCHOKE(t_trangleurplein) (Schema14).
6. Pour demarrer le moteur, attraperfermement la poigneede rappel
et tirer jusqu'a ce qu'une resistance se fasse sentir. Remonter
rapidementetdemarrer.
7. Lorsquele moteur demarre,mettrele boutonChoke(l_trangleur)sur
la position 1/2 CHOKE(l_trangleura moitie) jusqu'a ce que le moteur
fonctionne doucement et ensuite sur la position RUN (Marche). Si
le moteurvibre, remettrele levier Choke(Etrangleur)sur la position
1/2 CHOKE(l_trangleura moitie)jusqu'a,cequele moteurfonctionne
doucementetensuitesur la positionRUN (Marche).
REMARQUE'
Si le moteurchauffe, mais ne continue pas a fonctionner, mettre Io
levier de I'etrangleur sur FULLCHOKE(Etrangleur plein)et repeter les
instructionsde demarrage.
Schema 12 - Soupape d'arret
Figure 13- lnterrupteurON/OFFdumoteur
INTERRUPTEUR ON/OFF DU MOTEUR
(MOTEURS .&DI_MARRAGE MANUEL UNIQUEMENT)
\
Schema 14- PositiondeI'etrangleur
LEVIERD'C:TRANGLEUR
GAUCHE- €:TRANGLEUR(COMMENCER)
DROITE= MARCHE
2.9 DI_MARRERLESMOTEURADI_MARRAGE&ECTRIQUE
iMPORTANT: Nepas surchargerle g6nerateur.Aussi, nepas surcharger
les prisesindividuellesdu panneau.Ces prises sont prot6geescontre la
surchargeavecdes disjoncteurs detype <<pousserpour reenclencher,.
Si la valeur nominale d'amperage d'un disjoncteur est d@assee, ce
disjoncteur s'ouvre et la puissance electriquede cetteprise est perdue.
Lireattentivementla section <,Ne pas surchargerle generateur-.
/_Ne jamais d6marrer ou arr6ter le moteur avec les
dispositifs 61ectriques branch6s darts les prises ET
les dispositifs sous tension.
1. Debranchertoutes les charges dectriques desprises de I'uniteavant
de demarrerle moteur.
2. S'assurer que I'unite est dans une position de niveau (ne pas
depasser15 ° dans aucune direction).
3. Ouvrirla soupaped'arr6t(Schema12).
4. Mettre le bouton CHOKE(E_trangleur)du moteur a I'exterieursur la
position <<FullChoke, (Etrangleurplein)(Schema14).
5. Pourdemarrer le moteur,appuyeretmaintenirenfonceI'interrupteur
Start/Run/Stop (Demarrage/Marche/Arr_t)sur la position <<Start,
(Demarrage). Le moteur tournera et commencera a demarrer.
Lorsque le moteur demarre, relD.cherI'interrupteur sur la position
Run (Marche).
59

Lorsque le moteur demarre, mettre le bouton Choke (i_trangleur)
sur la position ,, 1/2 Choke ,, (l_trangleura moitie) jusqu'a,ce que
le moteur fonctionne doucementet ensuite sur la position ,, Run >,
(Marche). Si le moteurvibre, remettrele bouton Choke(Etrangleur)
sur la position ,, 1/2 Choke, (l_trangleura moitie) jusqu'a,ce que
le moteur fonctionne doucementet ensuite sur la position ,, Run >,
(Marche).
2.9.1 Dt-MARRAGEMANUEL
CegenGrateurest egalementequiped'unlanceura rappel manuelquipeut
_treutilise en cas dedechargementdelabatterie.
REMARQUE:
L'interrupteurdolt _tre a la positionRUN (Marche). UtJiiserufl des
tableaux des prises avec le chargeur de batterie pour charger la
batterielersquela generatriceest en fonctiennement.
• Pour demarrer manuellement, attraper fermement la poignee de
rappel ettirer jusqu'a ce qu'une resistancese fasse sentir.Remonter
rapidementet demarrerle moteur.Puis, suivre la m_me sequencede
I'etrangleur.
REMARQUE'
Si le moteur chauffe, mais ne continue pas a fonctionner,mettre le
levier de I'etrangleur sur FULLCHOKE(Etrangleurplein)et repeter les
instructionsde demarrage.
iMPORTANT: Nepas surchargerle generateur.Aussi, nepas surcharger
les prisesindividuellesdu panneau.Ces prises sont protegeescontre la
surchargeavecdes disjoncteurs detype <,pousserpour reenclencher,.
Si la valeur nominale d'amperage d'un disjoncteur est depassee, ce
disjoncteur s'ouvre et la puissance electriquede cetteprise est perdue.
Lireattentivementla section <,Ne pas surchargerle generateur-.
2.10ARRETERLEMOTEUR
1. Arr_tertoutes les charges,puis debrancherles chargeselectriques
des prisesdu panneaudu generateur.Nejamais demarrerou arr_ter
le moteur avecles dispositifs electriquesbrancheset soustension.
2. Laisser le moteur fonctionner a circuit ouvert pendant plusieurs
minutes pour stabiliser les temperaturesinternes du moteur et du
generateur.
3. MettreI'interrupteurRun/Stop(Marche/Arr_t)surla positionOFF(Arr_t).
4. Fermerla vannede combustible.
2.11SYSTi:lVlED'ARRI TDENIVEAUBASD'HUILE
Le moteur est equiped'un detecteur de bas niveau d'huile qui arr_te le
moteur automatiquement Iorsque le niveau d'huile chute en dessous
d'un niveauspecifique.Si le moteur s'arr_tetout seul et que le reservoir
d'essencea assezd'essence,verifier le niveaud'huile du moteur.
2.11.1Dt-TECT/ONDL/BASN/VEAUD'/-/U/LE
Si le systemedetecteun niveaud'huilebas pendantle fonctionnement,le
moteur s'arrete.Le moteur ne fonctionnerapas tant quede I'huilen'aura
pas eterajouteepour atteindrele bon niveau.
2.12CHARGERLABATTERIE(APPAREIL$A
DI MARRAGEI LECTRIQUESEULEMENT)
Les batteries rechargeables _mettent un gaz
hydrog_ne explosif lots du rechargement. Un
m_lange explosif restera autour de la batterie
Iongtemps apr_s son chargement. La plus petite
_tincelle peut enflammer I'hydrog_ne et causer une
explosion. Cette explosion peut faire voler en _clats
la batterie et causer la c_cit_ ou d'autres blessures
graves.
,_Ne de fum_e, flammes _tinceHes
pas produire hues,
ou Butte source de chaleur _ proximit_ de la
batterie. Porter des lunettes de protection, un
tablier en caoutchouc et des gants en caoutchouc
lots du travail autour de la batterie. Le fluide
d'_lectrolyte de la batterie est une solution d'acide
sulfurique extr_mement corrosive qui peut causer
des br_lures graves. En cas d'_claboussure, tinter
imm_diatement la zone a I'eau claire.
REMARQUE•
La batterie env0yee avec le generateur a ere c0mpietementchargee.
Une batterie peut perdre une pattie de sa charge Iorsqu'elle n'est
pas utilisee pendant des periedes prelengees. S'il est impossible
de demarrer le moteur a I'aide de la batterie, brancher le chargeur
de 12 V inclusdans la b0ite d'access0ires. FAIREFONCTIONNERLE
GENERATEURNECHARGEPASLABATTERIE.
Utiliserla prise du chargeurde batterieafin de garderla batteriechargee
etprateaI'emploi.Lechargementde la batteriedolt _treeffectuedansun
endroitsec.
1. Brancher le chargeur dans la prise jack <, Entreedu chargeur de
batterie,, situeesur le panneaudecommande. BrancherI'extremite
de laprise decourant muraledu chargeurde batteriedans uneprise
muralec.a. de 120volts (Schema15).
2. Debrancherle chargeurde batteriede la prise muraleet de laprise
jack du panneaudecommandeIorsquele generateurva _treutilise.
REMARQUE•
Ne pasutiliser le chargeurde batterie pendantplusde 48 heures
consecutives.
Schema 15 - Prise jack du chargeur de la batterie
BATTERIE
Entree du
chargeur
60

3.1 EFFECTUERLEPROGRAMMED'ENTRETIEN
IIest important d'effectuerI'entretiencomme indiquedans le Programme
d'entretien pour le fonctionnement approprie de la generatrice,et afin
d'assurer que la generatrice est conforme aux normes d'emission
applicables pour la duree de sa vie utile. L'entretienet les reparations
peuvent 6tre effectues par une personne competente ou un atelier de
reparation. En outre, I'entretiencritique des emissions dolt 6tre effectue
comme prevu pour que la Garantie d'emissions soit valide. L'entretien
critique des emissions inclut I'entretien du filtre a air et les bougies
d'allumageconformementau Programmed'entretien.
3.2 PROGRAMMED'ENTRETIEN
Suivre les intervalles du calendrier. Un entretien plus frequent est
necessaire Iors du fonctionnement darts les conditions defavorables
indiqueesci-dessous.
Verifierle niveaud'huile Lors dechaqueutilisation
ChangerI'huile$ *Toutesles 100 heuresou achaque saison
Verifierle jeu des soupapes ***A chaque saison
Entretiendufiltre a air ** Toutesles 200 heuresou a.chaque saison
Remplacerlabougie d'allumage A chaquesaison
:i: ChangerI'huileapres les30 premieresheures defonctionnement puisa chaque
saison.
* ChangerI'huileet lefiltre ahuiletousles mois Iors dufonctionnementsous une
charge Iourdeou a destemperatureselevees.
** Nettoyerplus souventdans desconditions defonctionnement sales. Remplacer
les pieces dufiltre aair s'il est impossible deles nettoyer correctement.
*** Wrifier lejeu des soupapes et reglersi necessaireapresles 50 premieres
heures defonctionnementet toutes les 100 heurespar la suite.
3.3 SPECiFiCATiONSDUPRODUIT
3.3.1 SPECIFICATIONSDELAGENERATRICE
Puissancenominale.................................................... 5/5,5/6,5 kW**
Puissancedesurtension............................................. 6,25/6,88/8 kW
Tensionc.a. nominale............................................................... 120/240
Chargec.a. nominale.
Couranta 240 V (5/5,5/6,5 kW) .......................20,8/22,9/27,1 A**
Couranta 120 V (5/5,5/6,5 kW) .......................41,6/ 45,8/54,2 A**
Frequencenominale................................................ 60 Hza 3 600 RPM
Phase................................................................................ Monophasee
** Lewattageetlecourantmaximumsontsoumisa,etlimitespar,cesfacteurs
telsquelecontenuenBtudecarburant,latemperatureambiante,I'altitude,I'etat
dumoteur,etc.Lapuissancemaximalediminued'environ3,5%pourchaque
tranchede1 000piedsau-dessusduniveaudelamer; etdiminueraegalement
d'environ1%pourchaquetranchede6°C(10°F)au-dessusde16°C(60°F)
detemperatureambiante.
3.3.2 SPEC/FICATiONSDUMOTE/JR
Deplacement............................................................................................. 389 cc
Typede bougied'allumage............................. NHSPLDF7TCou ChampionN9YC
N° de piece de bougied'allumage.................................................... 0G84420101
Ecartementde bougied'allumage......0,028 - 0,031 poucesou (0,70 - 0,80 mm)
Capacited'essence..................................................................... 7,2 gallons U.S.
Typed'huile.....Voir tableaudans la section ,<Avantle demarragedu generateur,
Capacited'huile............................................................................. 1 L (1,06 Qts.)
Tempsd'executiona unecharge de 50 % (5/5,5/6,5 kW)................... 10 heures
3.3.3 INFORMATIONJiPROPOSDESB!/I/SS/ONS
L'Agence de protection de I'environnement (EPA) (et la California Air
Resource Boad pour les generatrices conformes aux normes CA)
exige(nt) que votre generatrice soit conforme aux normes d'emission
d'echappement.LocaliserI'etiquettedeconformite auxnormes d'emission
sur le moteur pour determiner les normes auxquelles la generatriceest
conforme. Cette generatrice est certifiee pour operer a I'essence. Le
systeme de contrele d'emission comprend les composants suivants (le
cas echeant) :
• Systeme d'admissiond'air
- Collecteur/Tuyaud'admission
- Filtre aair
Systemed'alimentationencarburant
- Carburateur
- Capuchon/Reservoirde carburant
- Canalisationsde carburant
- Canalisationsde tuyauxd'evacuation
- Reservoira charbon actif
• Systeme d'allumage
-- Bougied'allumage
-- Module d'allumage
• Systeme d'echappement
-- Collecteur d'echappement
-- Pot d'echappement
-- Soupapea impulsion d'air
-- Catalyseur
3.4 RECOlVliVIANDATIONSGI NI RALES
Lagarantiedugenerateurnecouvrepasles elementsqui ont etesoumis
un abusouune negligencedeI'operateur.Afin de recevoirle montanttotal
de lagarantie,I'operateurdolt entretenirle generateurde la fagonindiquee
dansce manuel.
Certains reglages doivent 6tre effectues regulierement pour entretenir
correctementlegenerateur.
Tousles reglages de la section Maintenancede ce manuel doivent 6tre
effectuesau moins une fois par saison. Respecterles exigencesdartsle
tableaude <,Programmedemaintenance>>.
REMARQUE:
Une fois par an, remplacer la bougied'allumage et le filtre a air. Une
nouvelle beagled'allumage et an filtre aair propregarautisseut an boa
m6iange carbar6et aide le motear a mieax fonctionner et a darerplus
Iongtemps.
3.4.1 ENTRET/ENBELAGENERATR/CE
Lamaintenancedu generateurconsisteagarderI'unitepropreetseche.Faire
fonctionneret stockerI'unitedansun environnementsec et propreouil ne
serapasexposeatrop depoussieres,desaletes,d'humiditeou devapeurs
corrosives.Lesfentesde refroidissementdu generateurne doiventpas 6tre
obstrueesparla neige,lesfeuillesoutout autrecorpsetranger.
Verifierregulierementque legenerateurestpropreetnettoyerlapoussiere,
les saletes,I'huile,I'eauou lesautrescorps etrangersquisont visibles sur
sa surface exterieure.
,AATTENTION!
,t_Ne jamais ins6rerd'objet ca d'outilduns losfentes de
refroidissement,meme si le moteur ne fonctionne pus.
REiMIARQUE:
NEPAS atiliseran tuyaad'arrosage pournettoyer le gen6ratear. L'eau
peat entrer duns le systeme de carbarant du moteur et causer des
problemes.En outre, si I'eau entre duns le generateur par los fentes
de refroidissement,de I'eau restera duns los vides et los crevasses
du bobiflaged'isolement du rotor et da stator. L'accamulationd'eaa
et de saletes sat les bobinagesinternes du generateur diminuera
potentiellementla r6sistanced'isolementde ces bobinages.
61

3.4.2 NETTOYERLA8ENERATR/CE
• Utiliser un chiffon humidepour le nettoyagedes surfaces externes.
• II est possible d'utilise une brosse douce en polls pour decoller les
agglutinementsde saletes,d'huile,etc.
• Unaspirateurpourra_treutilisepourrecupGrerles saletesetlesdebris.
• Un air projeteavec unefaible pression (inferieura25 livrespar pouce
carre) pourra_treutilisepour scuffler lasalete.Inspecterles fentesde
refroidissementet les orificesdu genGrateur.Ces orifices doivent _tre
propres etnonobstrues.
3.4.3 ENTRETIENLTUMOTEUR
f31rd 3g
Toujours dGbrancher le c&ble nGgatif de la batterie en
cas de travail sur le g_nGrateur. Toujours dGbrancher
les fils de bougie des bougies d'allumage et les tenir
_loign_s de celles-ci.
3.4.4 VER/F/ERLEN/VEAUB'HU/LE
8e reportera_la section,, Avantle demarragedu genGrateur>>pour plus
d'informationssur la verificationdu niveaud'huile. Le niveaud'huiledolt
_treverifi6 avantchaqueutilisation,ou auminimumtoutes leshuit heures
defonctionnement.IIestnecessairedeconserveruncertainniveaud'huile.
3.4.5 CHANGEMENTBEL'HU/LE
Changer I'huile apres les 30 premieres heures de fonctionnement.
ChangerI'huiletoutes les 100 heuresoua chaque saison par la suite.
ChangerI'huileplus souvent en cas d'utilisation de cette unite dans un
environnement sale ou poussiereux, ou dans des temperatures tres
elev6es.
`&ATTENTION !
,_De I'huilechaude entrainerdes br01ures.Laisserle
pout
moteur refroidiravant devidangerI'huile.f:viter uncontact
prolongeourepetede lapeauavec de I'huileusagee.Laver
minutieusement los zones exposees avec du savon.
Respecter les instructions suivantes pourchangerI'huileapres que le
moteur ait refroidi :
1. Nettoyerla zone autourdutuyau de vidanged'huile.
2. Retirerle bouchon de vidanged'huiledu moteur et le bouchonpour
le remplissaged'huileafin de vidangertoute I'huiledartsun recipient
adapte.
3. Lorsque I'huile est totalement vidangee, revisser le bouchon de
vidanged'huileet le resserrersolidement.
4. Remplir le carter d'huile avec I'huile recommandee(volt la section
,<Avantle demarragedu genGrateur>>pourles recommandationssur
I'huileautiliser).
5. Nettoyertoute trace d'huilerenversee.
6. EliminerI'huileusageedans un centrede collecteapproprie.
3.4.6 REMPLACERLABOUS/EB'ALLUMAGE
Voir Caracteristiques techniques du moteur pour la bougie
d'allumage recommandee. Remplacer les bougies une fois par an.
Celapermettra un demarrage plus facile et un meilleur fonctionnement
du moteur.
1. Arr_ter le moteur et debrancher le fil de bougie de la bougie
d'allumage.
2. Nettoyerla zone autour de la bougie d'allumageet la retirer de la
culasse.
3. ReglerI'ecartementdebougied'allumagea 0,70- 0,80 mm (0,028-
0,031 pc.). Installerla bougied'allumagecorrectementecartGedarts
la culasse (Schema16).
Schema 16 - E-cartement de la hoagie d'allumage
3.4.7 REMPLACEMENTBELABATTERIE(S!APPLICABLE_
REIVlARQUE•
La batterie envoyee avec le generateur a ete completementchargee.
Une batterie peat perdre une pattie de sa charge Iorsqu'elle n'est
pasutilisee pendantdes periodesprolongees.S'il est impossiblede
demarrer le moteur a I'aide de la batterie, brancher le chargeurde
12 V inclusdansla boite d'aocessoires (volt !a section,, Chargement
de la batterie ,>).FAIREFONCTIONNERLEGENERATEURNE CHARGE
PASLABATTERIE.Le numero de piecepourcettebatterie est 069449.
,&ATTENTION!
,_La borneNf:GATIVEde la batteriedolt •
1. Toujours _tre DEBRANCHEEENPREIVllER.
2. Toujours_tre BRANCHEEENDERNIER.
Schema 17 - Branchements de la batterie
,_La borne NI_GATIVEde la batterie dolt"
1. toujours _tre DEBRANCHf_EENPREMIER.
2. toujours _tre BRANCHEEENDERNIER.
62

3.5 ENTRETIENDUFiLTREAAiR
Le moteur ne fonctionnera pas correctementet pourra _tre endommage
en cas d'utilisationd'un filtre a air sale. Nettoyerou remplacerle papier
du filtre a air unefois par an. IIsera necessairede le nettoyer ou de le
remplacerplus souvent en cas de fonctionnement dans des conditions
de salete (Schema 18). Le numero de piece pour cette filtre a.air est
0G84420151.
Pournetloyerou remplacer le papier du filtre a air :
1. Retirerle couvercledu filtre a air etretirer lefiltre en papier.
2. Nettoyerle filtre en papier en le tapant legerementsur une surface
sonde.Sile filtre esttrop sale,il estnecessairede leremplacer.Jeter
I'ancienfiltre de maniereadaptee.
3. Nettoyerle couvercledufiltre a air,puisinsererle nouveaufiltreenpapier
dartsla basedufiltrea.air.Remettrele couvercledufiltre a.airenplace.
Schema18 - Fi/trea air
CLIP
3.5.1 ENTRETIENBEL'_CRANPARE-_TINCELLES
__fMOOtLESCARB
Le silencieux du pot d'echappement du moteur est equip6 d'un ecran
pare-etincelles.Inspecteret nettoyerI'ecranau minimum une fois par an
(Schema 19). Si I'unite fonctionne regulierement, inspecter et nettoyer
I'ecranplus souvent.
,i_Si le g_n_rateur est utilis_ sur un terrain brut couvert
d'arbres, de buissons ou d'herbe, il devra _tre _quip_
d'un pare=_tincelles. Le propri_taire / I'op_rateur du
g,_n_rateur devra garder le pare=_tincelles en bon
_tat.
Nettoyeret inspecterle pare-etincellesIorsquele moteuresta.temperature
ambiantedela manieresuivante'
1. EnleverI'ecranpare-etinceNesdu pot d'echappementendesserrantla
brideet en enlevantlavis.
2. InspecterI'ecranetle remplacers'il esttordu,perfore ouendommage
d'unequelconqueautrefa£on. NEPASUTtLtSERun ecrandefectueux.
Si I'ecran n'est pas endommage, le nettoyer avec un solvant du
commerce.
3. Remplacerle pare-etincelleset serreravec la brideet la vis.
Schema 19 - E-cranpare-etincefles
COLLIERDE
L'l'-"CRANDU
PARE=€:TINCELLES
ECRAN
VIS PARE-I'-TINCELLES
REMARQUE•
Pourcommanderunnouveaufiltreaair ouecranpare-etincelles,veuillez
contacterlecentredeserviceautoriselepluspresau1-800-333-1322.
3.6 JEUDESSOUPAPES
• Admission-- 0,15 _+0,02 mm (froid), (0,006 _+0,0008 pouces)
• Echappement-- 0,20 _+0,02 mm (froid), (0,008 _+0,0008 pouces)
Verifier le jeu des soupapes dunsle moteur apres los 58 premieres
heuresde f0ncti0nnemeut et I'ajuster si celaest necessaire.
IIVlPORTANT: Encas de doute quanta la realisationde cetteprocedure,
ou d'absencedesoutils adaptes,merci defairereglerlejeu dessoupapes
du generateurdans le centre de reparationle plus proche. II s'agitd'une
etapetres importantepour garantir lameilleureduree devie du moteur.
3.7 GI NI RALITI S
La generatrice dolt _tre demarreeau moins une fois par mois et dolt
fonctionner pendantau moins 30 minutes. Si cela est impossible et que
I'uniten'estpas utiliseependantplus de30 jours, utiliser lesinformations
suivantesentantqueguidepour preparerson entreposage.
NE JAMAIS ranger le moteur avec un r_servoir rempli
d'essence a I'int_rieur ou duns des zones ferrules et
faiblement aCrCes oQ des furn_es peuvent atteindre
une flamme nue, des 6tincelles ou une veilleuse telle
qu'il yen a sur une chaudi_re, un chauffe=eau, un
s_che=linge ou d'autres appareils fonctionnant au
gaz.
,_t Laisser I'unit6 compl_tement refroidir avant le
stockage.
63

3.8 ENTREPOSAGEALONGTERME
Pendantle stockage,il est important d'emp_cherla formation de dep6ts
de gommedans les pieces essentiellesdu circuit decarburant,telles que
le carburateur,le tuyau pour combustible ou le reservoir. L'experience
montre egalementque les carburantsa_base d'alcool (appelesgazohol,
ethanol ou methanol) peuvent absorberI'humidite, ce qui entraTneune
separation et la formation d'acides pendant le stockage. Un gaz acide
peutendommagerlecircuit de carburantd'un moteurpendantle stockage
de celui-ci.
Afind'evitertout problemeaveclemoteur,lecircuitdecarburantdolt_trevide
avantle stockagedu moteursi celui-ciestd'aumoins30 jours.Pourcela:
1. Ajouterun stabilisateurdecarburantde qualiteaI'essenceselon les
specifications desfabricants,etfairefonctionner la machinede 10 a.
15 minutes.
2. Apres que le moteur est refroidi, enlever toute le carburant du
reservoir de carburant. LJtilisezune commercialement disponibles,
siphonagenon-conducteur.
Vider I'essence dons des conteneurs adapt_s situ_s
I'ext6rieur, loin de toute flamrne hue. S'assurer que
le moteur est froid. Ne pas fumer.
3. Demarreretfairefonctionner le moteurjusqu'a,ce qu'il s'arr_tesuite
a.unepanned'essence.
4. Apres le refroidissementdu moteur,vider I'huiledu moteur.Remplir
jusqu'auniveaurecommand&
5. Retirer la bougie d'allumageet verser environ 0,5 onces (15 ml)
d'huile pour moteur darts le cylindre. Couvrir I'orifice de la bougie
d'allumageavec un chiffon. Tirer plusieursfois le lanceur a rappel
pour lubrifier les segments de piston et I'alesagedu cylindre. LJn
agent defumigation peutegalement_tre utilise a.la placede I'huile.
,AATTENTION!
,_ Eviter d'aspergera partir destrous de la bougied'allumage
lersque le moteur tourne.
6. Remettreet serrer la bougie d'allumage.Ne pas brancherle fil de
bougie.
7. Nettoyerles surfaces externesdu generateur.Verifierque les fentes
de refroidissementet les orifices du generateursont ouvertset non
obstrues.
8. Stocker I'unitedartsun endroitpropreet sec.
3.9 AUTRESCONSEILSD'ENTREPOSAGE
• Ne passtocker I'essenced'unesaison sur I'autre.
• Remplacerle bidon d'essences'il commencea rouiller. De la rouille
et/ ou de la saletedans I'essenceentrainerontdesproblemesdans le
carburateuret le circuit de carburant.
• Si cela est possible,stocker I'unite a I'interieuret la recouvrir afin de
la protegerde la saleteet de la poussiere.S'ASSURERDEVIDERLE
RESERVOIRD'ESSENCE.
• S'il n'est paspossiblede viderle reservoir d'essenceet que I'uniteest
rangeependantune Iongueperiode,ajouterun stabilisateurd'essence
(disponibledarts lecommerce) a I'essenceafin d'augmenterla duree
devie deI'essence.Fairefonctionnerla machinepour10- 15 minutes,
eteindrela vannede combustibleetfairefonctionnerjusqu'a,ce quele
moteurs'arretesuitea une panned'essence.
• OouvrirI'uniteavecuneprotection adapteene retenantpasI'humidit&
,t_NE JNVIAIScouvrirle Biers lemoteur et la
generateur que
zonedupotd'echappementsootchauds.
64

4.1 GUIDEDEDI':PANNAGE
Le moteur tnurne,mais aucun 1. Disjoncteurest ouvert. 1. Rearmerledisjoncteur.
courantalternatif n'estproduit. 2. Cordonmal brancheou defectueux. 2. Verifieret r@arer.
3. Dispositifbranchedefectueux. 3. Brancherun autre dispositif en bun etat.
4. Erreurau niveaudu g6nerateur. 4. Contacterun centred'entretienagre6.
1. Court-circuit dansI'unedes chargesbranchees.
2. Surchargedu g6nerateur.
Le moleur fonclionne bien mais
connaitdes defaillancesIorsque
deschargessont branchees.
3. Vitessedumoteur tropfaible.
4. Court-circuit du generateur.
1. Debrancherla charge@ctrique court-circuitee.
2. Voir la section <<Nepas surchargerle
generateur>>.
3. Contacterun centred'entretienagre6.
4. Contacterun centred'entretienagre6.
,
2.
3.
4.
Le moleur ne demarre pas,
oudemarre et connaitdes
defaillances.
5.
6.
7.
8. Sur-etranglementdes gaz.
Lasoupaped'arr_test sur OFF(Arr_t). 1.
Filtrea airsale. 2.
Panned'essence. 3.
Essenceviciee. 4.
Filde bougiedebranchede labougie d'allumage. 5.
Bougied'allumagedefectueuse. 6.
Presenced'eau dans I'essence. 7.
8.
Mettrelasoupaped'arretsur ON(Marche).
Nettoyerou remplacerlefiltre aair.
Remplirle reservoird'essence.
Vidangerle reservoird'essenceetle rempliravec
de I'essencenouvelle.
Brancherle fil a_la bougie d'allumage.
Remplacerlabougie d'allumage.
Vidangerle reservoird'essenceetle rempliravec
de I'essencenouvelle.
Placerlelevierd'etrangleursur la positionNo Choke
(Aucunetrangleur).
9. Niveaud'huilefaible. 9. Remplirle carterjusqu'auniveaunecessaire.
10. Melanged'essencetrop fiche. 10. Contacterun centred'entretienagre6.
11. Soupaped'admission bloqueeenposition ouverte 11. Contacterun centred'entretienagree.
oufermee.
12. Pertede compressiondu moteur. 12. Contacterun centred'entretienagree.
I
Le muteurs'arrete pendant le 1. Panned'essence. 1. Remplirlereservoird'essence.
fonctJonnement. 2. Niveaud'huilefaible. 2. Remplirle carterjusqu'auniveaunecessaire.
3. Erreurau niveaudu moteur. 3. Contacterun centre d'entretienagree.
Moteur pusassez puissant. 1. Chargetrop elevee. 1. Diminuerla charge (voirlasection <<Ne pas
2. Filtrea airsale. surchargerle generateur>>).
3. Reparationnecessairedu moteur. 2. Nettoyerou remplacerlefiltre aair.
3. Contacterun centred'entretienagree.
A-coupsou declin du moteur. 1. Etrangleurouvert trop t6t. 1. Placerle levierd'etrangleura mi-cheminjusqu'a,ce
quele moteurfonctionne correctement.
2. Melangetropficheoutrop pauvredanslecarburateur. 2. Contacterun centre d'entretienagree.
65

ENONCI_ DE LA GABANTIE EPA AiVi_:BICAINE DU CONTBOLE DES EMISSIONS
VOS DBOITS ET OBLiGATiONS DE GARANTIE
L'Agencepourla ProtectiondeI'EnvJronnementamedcaine(ci-apresdenomm6eEPA)etlasociet6GeneracPowerSystems,Inc.(ci-apresdenomm6eGenerac)
sentheureuxdevous explJquerce qu'estlagarantiedevotrenouvelequipement2011 etulterieur.LenouvelequipementutJlisedespetitsmoteurs_tailumage
commandedoJvent_trecongus,construJtsetequip6sdansle respectdesnormesnationaiesrigoureusesenmatieredepollutionpourle gouvernementfed6rai.
Generacgarantirale systemedecontr61edesemissionsdevotreappareilpourlesperiodesindiqueesci-apres,enI'absenced'acteabusif,de negligence,de
modificationnonapprouveeoudemaintenanceinadapteedevotreequipement.Le systemedecontrOledesemissionssurcatappareilcomprendtousles
composantsdentla ddaillancepourraitaugmenterles emissionsdespolluantsreglement6s.Cescomposantssentlistes dansla sectionInformationssurles
emissionsdece manuel.
COUVEBTURE DE GARANTIE DU FABRICANT :
CettegarantieappreilsSCEestvaiidepourdeuxans,oupourla m_meperiodecommeindiquedansla garantielimiteedeGenerac,selonla plusIongue.Pourles
appareilavecun compteurhoraire,la periodedelagarantieestunnombred'heuresegai_tlamoitiede ladureedevieutilecertifieedeI'appareil,oulaperiodede
garantiespecifi6eci-dessusenannees,salonlapossibiliteinfedeure.Ladureedevie utilepeut_tretrouveesur I'etiquettedecontr61edesemissionssurle moteur.
Siuncomposantousystemedevotreequipementrelatifauxemissionscomporteunepieceddectueuseou presenteunddaut defabricationpendantla dureede
lagarantie,les r@arationsou remplacementsdepiecesseronteffectuesparund@ositaired'entretiendegarantieagre6parGenerac.
RESPONSABlUTi'S DE GARANTIE DU PROPRIETAIRE :
EntantquaproprietairedeI'appareil,vous_tesresponsabledela reaiisationdetoutelamaintenancenecessairetellequalisteedanslemanueld'entretienquJvous
aat6remisparI'usJne.Auxfinsde lagarantJe,Generacvousrecommandedeconservertousles regusrelatifs_tlamaintenanceeffectu@survotregen6ratrice,
maisGeneracnepeutpasrefuserla garantJeuniquementenraisondela non-presentationdesregus.
VousdevezcependantsavoirquaGeneracpourrarefusertout et/ oupartiedelacouverturedela garantieoudela responsabilitesJvotreappareilet/ outoute
piecedecelle-cJnefonctionneplusdufait d'unusageabusif,d'unenegligence,d'unemauvaisemaintenanceou demodificationsnonapprouvees.
Veus_tes chargede centacterundepasitairedegarantieagre6par Generacdesqu'unpreblernese presente.Lesrepara|ienseffectueesdansle cadrede
la garantiedevrant_trefaites dansuneperi0deraisonnable,inferieurea30 jours,
Leservicedegarantiepeut_treorganiseencontactantvotred@osJtaireouun d@ositairedeservicedegarantieagreeparGenerac.PourconnaJtrele d@ositaire
deservicedegarantieagreeparGeneracsituelepluspres,appelernotrenumeroci-dessous,ou envoyerun courrier_t[email protected].
1-800-333-1322
RFIVIARQUEIIVIPORTANTE: Getenoncedegarantieexpliqueyes droltsetobligationsdansle cadrede lagarantiedu SystemedeContr61edesf_missionsqui
vousestfournieparGeneracconformementaudroitdeI'Etatfederal.Consulteregaiementles_ GarantieslimiteesdeGeneracpourGeneracPowerSystems,
Inc.>_joJntesaupresentdocumentsur unfeuillets@are,quivousestegaiementremJsparGenerac.Veuilleznoterquala presentegarantienes'applJquepasaux
dommagesaccessoires,importantsouindirectscausespardesddaillancesmateriellesoudefabrication,oupartout retardder@arationouderemplacementde
laou despiece(s)ddectueuses.Lapresentegarantieremplacetouteslesautresgaranties,implJcJtesou explicites.EnparticulJer,Generacn'emetaucunegarantie
deconformiteoud'usagepourun objectJfparticulJer.Certainsl_tatsetprovincesnepermettentpaslalimitationdela dureedesgarantiesimplJcites.Toutesles
garantJesimplJcitesquisent autoriseesparIoi,serontlimiteesdansla dureesalonlestermesdelapresentegarantie.Lalimitationmentionneeci-dessuspourrait
doncnepass'appliquer_tvotrecas.
LagarantieduSCEnes'applJquequ'ausystemede contr61edesemissionsdevotrenouvelequipement.Lesgarantiesdu SCEetdeGeneracdecriventlesdroitset
obligationsimportantesrelatives_tvotrenouvelequipement.
Leservicedegarantienepeut_trereaiisequaparuneentreprisedeserviceagreeeparGenerac.Encas dedemandeduservicedegarantie,despreuves
mentionnantladatedevente_tI'acquereur/ auproprietaired'originedoivent_trepresentees.
Pourtoutequestionconcernantvos droitsetresponsabilitesdegarantie,mercidecontacterGeneraca.I'adressesuivante:
ATTENTION WARRANTY DEPARTMENT
GENERAC POWER SYSTEMS, INC.
Re. BOX (boite postale) 297 • WHITEWATER, Wi 53190
Pattie1 de2
66
N° depiece0J3335 Rev.C 11/11

GARANTIE DU SYSTEME DE CONTROLE DES EMiSSiONS
GarantieduSystemedeOontr61edesEmissions(garantieduSOE)pourI'equipementutflisantdepetitsmoteursa.allumagecommande:
(a) Applicabilite:la presentegarantJes'appliquea.I'equipementquiutilisedepetitsmoteurshorsroute.Laperiodedela garantieduSCEcommenceraa.la date
d'achat/ delivraisondu nouvelequipementa.sonacquereur/ proprietaired'origine,final,etdurerapourmoins de:
(1) Laperiodedetempsspecifi6edansla presenteGarantielimiteedeGenerac,maispasmoinsde24 moJs,ou
(2) Pourlesmoteursequip6sd'uncompteurhoraire,uncertainnombred'heuresdefonctionnementegalea.la moitiedela dureedevieutiledumoteur.La
dureedevieutilepeutestindiqueesur I'etiquettedecontr01edesemissionssurle moteur.
(b) Couverturegen6raledegarantied'emissions: Generacgarantita.I'acquereur/ auproprietaired'origine,final,du nouveaumoteurouequipementeta.chacun
desacquereurs/ proprietairessuivantqueIorsqullestinstallele SCE:
(1) Estcongu,construitetequip6dansle respectdetouteslesreglementationsapplicables; et
(2) NecomporteaucunepieceddectueusenJnepresenteaucunddaut defabricationa.tout momentdelaperiodedegarantieduSCE.
(c) Lagarantiesur lespiecesrelativesauxemissionsserainterpret6edelafagonsuivante:
(1) Toutepiecegarantie,dontle remplacementn'estpasprwu au coursdesmaintenancesobligatoiresmentionneesdansle Manueld'entretiensera
garantiepourtouteladureedelaGarantieduSCE.SiI'unedecespiecesdevientddectueusependantla dureedela GarantJedu SCE,erieserar@aree
ou remplaceeparGeneracconformementauparagraphe(4)quisuit.Cespiecesr@areesou remplaceesdansle cadredela GarantieduSCEseront
garantiespourle restedela dureedela GarantJeduSCE.
(2) Toutepiecegarantiedontil estprwu uneinspectionregulieredansle Manueld'entretienseragarantiependanttoutela dureedela GarantieduSCE.Toute
declarationauniveaudu Manueld'entretienetrelativea.I'effetde,_r@arationouremplacementsi necessaire_nereduirapasla dureedelaGarantiedu
SCE.Cespiecesr@areesou remplaceesdansle cadredelaGarantieduSCEserontgarantiespourle restedela dureedelaGarantiedu SCE.
(3) ToutepiecegarantJe,dontleremplacementestpasprwu aucoursdesmaintenancesobligatoiresmentionneesdansle Manueld'entretienseragarantie
pourla periodeprec6dantla datedu premierremplacementprwu. Sila piecedevientddectueuseavantle premierremplacementprevu,erieserar@aree
ou remplaceeparGenerac,conformementauparagraphe(4)quisuit. Oespiecesrelativesauxemissionsr@areesou remplaceesdansle cadredela
Garantiedu SCEserontgarantJespourlerestede ladureeprec6dantla datedeleurpremierremplacementprwu.
(4) Lar@arationouleremplacementdetoutepiecerelativeauxemissionsetgarantiedansle cadredela Garantiedu SCEserarealis6sansfrais pourle
proprietairedansunservicedegarantieagre6parGenerac.
(5) Nonobstantlesdispositionsdelasous-section(4) ci-dessus,les servicesour@arationssousgarantiedoiventetreeffectuesauxcentresd'entretien
agreesparGenerac.
(6) Si lemoteurestinspecteparunservicedegarantieagreeparGenerac,lesfrais dediagnosticneserontpasa.la chargede I'acquereur/ duproprietairesi
la r@arationentredansle cadredelagarantJe.
(7) Generacesttenu,pendantladureedelaGarantieduSCE,deconserverun stockde piecesrelativesauxemissionsetgarantiessuffisantafinder@ondre
a.lademandedesditespieces.
(8) ToutepiecederechangerelativeauxemissionsagreeeetapprouveeparGeneracpourraetreutiliseepourla realisationdetoutemaintenanceou
r@arationeffectueedanslecadredelagarantiedu SCEetserafournJesansfraisa.lachargedeI'acquereur/ duproprietaire.Cetteutilisationnereduira
pasles obligationsdeGeneracdartsle cadredelaGarantJeduSCE.
(9) Aucunemodification,autresquecellesexplicJtementapprouveesparGenerac,nepeuventetreapporteesa.la generatrice.Lesmodificationsnon
approuveesannulentlaGarantiedu SCEetconstitueraunmotifsuffJsantpourrejetertoutedemandedebendice dela GarantieduSCE.
(10) Generacneserapasresponsabledesddaillancesdespiecesderechangenon autorisees,ou ddaillancedespiecesautoriseescauseesparI'utilisation
depiecesderechangenonautorisees.
LES PIECES RELATIVES AUX EMISSIONS PEUVENT INCLURE CE QUI SUiT
(LE CAS ECHI_ANT) :
1) DISPOSITIFMESUREURDECARBURANT 3) SYSTI_MED'ALLUMAGE
A. CARBURATEURETPIt_CESINTERNES A. BOUGIESD'ALLUMAGE
B. CAPUCHON/Rt_SERVOIRDECARBURANT B. MODULE/BOBINESD'ALLUMAGE
C. CANALISATIONSDECARBURANT 4) SYSTEMED'ADMISSIOND'AIR
D. CANALISATIONDETUYAUXD'EVACUATION A. SOUPAPEA IMPULSIOND'AIR
E. Rt_GULATEUR(CARBURANTSGAZEUX) 5) SYSTI_MED't_CHAPPEMENT
2) SYSTI_MED'ADMISSIOND'AIR A. CATALYSEUR
A. COLLECTEURD'ADMISSION B. COLLECTEURD'I_CHAPPEMENT
B. FILTREA AIR
Partie2 de2
N° depiece0J3335 Rev.C 11/11
6'7

GARANT/ED' M/88/ONPOURL' QU/PEMENTCERT/F/£-CARB
CAUFORNIE ET DES EMISSIONS EPA AMERICAINE! DECLARATION DE GARANTIE DE
CONTROLE VOS DROITS ET OBLIGATIONS DE GARANTIE
Le conseil CaliforniaAir ResourceBoard (ci-apres CARB)et I'Agencepour la Protectionde I'Environnementamericaine (ci-apres denommeeEPA)et la
societ6GeneracPowerSystems, Inc. (ci-apres denommeeGenerac)sont heureuxde vous expliquerla Garantiedu Systeme de Contr61edes l_missions
(ci-apres GarantieSCE)de votre nouvel appareil2012. Le nouvel equipementutilise des petits moteurs a allumagecommande doivent _tre con(_us,
construits et equipes dansle respect des normes nationalesrigoureusesen matierede pollution pour le gouvernementfed6ral et I'Etatde la Califomie.
Generacgarantirale systemedecontr61edes emissionsdevotregen6ratricepour lesperiodesindiqueesci-apres,en I'absenced'acte abusif,de negligence,
demodification non approuveeou de maintenanceinadapteedevotre equipement.
Le systeme de contr61edes emissions sur cet equipementinclut tousles composants dont la defaillanceaugmenteraitles emissions de tout polluant
reglement6.Cescomposants sont indiquesa.laliste de la section Informationsur les emissions dece manuel.
COUVERTURE DE GARANTIE DU FABRICANT :
LagarantieSCEestvalidepour deuxans,ou pour la m_meperiodequecelleindiqueea la garantielimitee Generac,la periodela plus Iongues'appliquant.
PourI'equipementmuni d'horometres,laperiodede garantieestun hombred'heuresegal alamoitie dela vieutile pourlaquelleI'equipementestcertifie, ou
laperiodedegarantieindiqueeci-dessus enannees,la periodela pluscourtes'appliquant.Lavie utile estindiqueesur I'etiquettede contr61edes emissions
surle moteur.Si uncomposant ou systemedevotreequipementrelatifauxemissionscomporte une piecedefectueuseou presenteundefautdefabrication
pendantla dureede la garantie,les reparationsou remplacementsde pieces seront effectuespar un depositaired'entretiendegarantieagre6par Generac.
RESPONSABILITES DE GARANTIE DU PROPRIETAIRE :
Entant que proprietairede la generatrice,vous _tes responsablede la realisation de toute la maintenancenecessairetelle que listee darts le manuel
d'entretienquivous aet6remisparI'usine.Auxfins delagarantie,Generacvousrecommandedeconservertousles re£usrelatifsa.la maintenanceeffectuee
survotre gen6ratrice,mais Generacnepeutpas refuserla garantieuniquementen raisonde lanon-presentationdes re£us.
Vous devezcependantsavoir queGeneracpourra refusertout et/ ou partie dela couverturede lagarantieou de laresponsabilitesi votre appareilet/ ou
toute piece decelle-ci nefonctionne plus dufait d'unusageabusif,d'unenegligence,d'une mauvaisemaintenanceou demodifications non approuvees.
Vous_tes charge de contacterun depositaire de garantie agree par Genera¢des qu'un problemese presente.Les reparationseffecluees darts le
cadre de la garanlie devrnnt _tre faites darts uneperioderaisonnable,inferieurea 30 jours.
Le servicede garantiepeut _tre organiseen contactant votre d@ositaireou un d@ositaire de service de garantieagre6 par Generac.Pourconna_trele
d@ositairede service de garantieagre6parGeneracsitue le pluspres, appelernotrenumero ci-dessous,ou envoyerun courtier a.emissions@generac.
com.
1-800-333-1322
REMARI:IUEIMPORTANTE: Cetenonce degarantieexpliquevos droits etobligations dans le cadrede la garantiedu Systemede Contr61edes l_missions
quivous estfournie parGeneracconformement audroit de I'l_tatfederal.Consulter egalementles <_Garantieslimiteesde Generacpour GeneracPower
Systems,Inc. ,>jointes aupresentdocument sur un feuillets@are, qui vous estegalementremispar Generac.Veuilleznoter quela presentegarantie
nes'applique pasaux dommagesaccessoires,importants ou indirectscauses pardes defaillancesmateriellesou defabrication, ou partout retardde
reparationou de remplacementde la ou des piece(s)defectueuses.La presentegarantieremplacetoutes les autresgaranties,implicites ou explicites.
Enparticulier,Generacn'emet aucunegarantiede conformite ou d'usagepour un objectif particulier.Certainsl_tatset provincesne permettentpas la
limitationdela dureedes garantiesimplicites.Toutesles garantiesimplicites qui sont autoriseesparIoi, seront limiteesdans la dureeselon les termes de
la presentegarantie. Lalimitationmentionneeci-dessus pourrait donc ne pas s'appliquera.votre cas.
Lagarantiedu SCEnes'appliquequ'ausysteme de contr61edesemissions devotre nouvelequipement.Les garantiesdu SCEet de Generacdecrivent les
droitset obligationsimportantes relativesavotrenouvelequipement.
Leservice de garantiene peutetrerealiseque parune entreprisede serviceagreeeparGenerac.Encas de demandedu service de garantie,des preuves
mentionnantla datede venteaI'acquereur/ auproprietaired'originedoivent_trepresentees.
Pourtoute question concemantvos droits etresponsabilitesde garantie,mercide contacterGeneraca.I'adressesuivante:
ATTENTION WARRANTY DEPARTMENT
GENERAC POWER SYSTEMS, INC.
RO. BOX (bo_te postaie) 297 * WHITEWATER, WI 53190
Pattie1 de2
68
N° depiece0J8147C Rev.A 01/12

GARANT/ED'£-MiSS/ONPOURL'£-QU/PEMENTCERTIF/£=CARB
GARANTIE DU SYSTEME DE LUTTE ANTli_iVlISSION
Garantiedu Systemede Oontr61edes Emissions(garantiedu SOE)pourI'equipementutilisantde petits moteurs aallumagecommande:
(a) Applicabilite:la presentegaranties'appliquea I'equipementqui utilisede petits moteurshors route.La periodede la garantiedu SOEcommenceraa.
la dated'achat/ de livraison du nouvelequipementa son acquereur/ proprietaired'origine,final, etdurerapendantles 24 mois suivant laditedate.
(1) Laperiodedetemps specifi6edartsla presenteGarantielimiteede Generac,mais pas moinsde 24 mois, ou
(2) Pourlesmoteurs munisd'horometres,un hombre d'heuresdefonctionnementegala.la moitie de lavie utile du moteur.Lavie utile est indiquee
sur I'etiquettede contr61edes emissionssur le moteur.
(b) Oouverturegen6ralede garantied'emissions: Generacgarantita I'acquereur/au proprietaired'origine,final, du nouveaumoteurou equipementeta.
chacundes acquereurs/ proprietairessuivantque Iorsqu'il est installeleSOE:
(1) Estcongu, construit etequip6dartslerespect detoutes les reglementationsapplicables; et
(2) Ne comporte aucunepiece defectueusenine presenteaucundefaut defabrication atout momentde la periodede garantiedu SCE.
(c) La garantiesur les piecesrelativesauxemissions serainterpret6ede la fagonsuivante:
(1) Toutepiece garantie,dont le remplacementn'estpas prevuau cours des maintenancesobligatoiresmentionneesdartsle Manueld'entretiensera
garantiepourtoute la dureede la Garantiedu SCE.Si I'unedeces piecesdevientdefectueusependantla dureede laGarantiedu SOE,ellesera
r@areeou remplaceeparGeneracconformementauparagraphe(4) qui suit.Oespiecesr@areesou remplaceesdartsle cadrede la Garantie
du SOEseront garantiespour lereste dela dureede la Garantiedu SOE.
(2) Toutepiece garantiedont il estprevu uneinspectionregulieredartsleManueld'entretienseragarantiependanttoute ladureede la Garantiedu
SOE.Toutedeclarationauniveaudu Manueld'entretienetrelativeaI'effetde <,reparationou remplacementsi necessaire>>ne reduirapasla
dureedela Garantiedu SOE.Oespiecesr@areesou remplaceesdartsle cadre de laGarantiedu SOEseront garantiespourle restede laduree
de laGarantiedu SCE.
(3) Toutepiece garantie,dont le remplacementest pas prevuau coursdes maintenancesobligatoiresmentionneesdartsle Manueld'entretien
seragarantiepour laperiodeprecedantladatedu premierremplacementprevu. Si la piecedevientdefectueuseavantle premierremplacement
prevu, elleserar@areeou remplaceeparGenerac,conformementau paragraphe(4) qui suit. Oespiecesrelativesauxemissions r@arees
ou remplaceesdans le cadre de laGarantiedu SCEseront garantiespour le restede la dureeprecedantla datedeleurpremier remplacement
prevu.
(4) La reparationou le remplacementdetoute piecerelativeaux emissionsetgarantiedans le cadre dela Garantiedu SCEserarealisesansfrais
pour leproprietairedartsun service de garantieagreeparGenerac.
(5) Nonobstantlesdispositionsde la sous-section (4) ci-dessus, lesservices ou reparationssous garantiedoivent_tre effectuesaux centres
d'entretienagreesparGenerac.
(6) Si le moteurest inspecteparun service de garantieagreeparGenerac,les frais de diagnostic neseront pas a.la chargede I'acquereur/ du
proprietairesi la reparationentre dartslecadrede la garantie.
(7) Generacesttenu, pendantla dureede la Garantiedu SCE,de conserverun stock de piecesrelativesauxemissions etgarantiessuffisantafin de
r@ondre ala demandedesditespieces.
(8) Toutepiece derechangerelativeauxemissionsagreeeetapprouveepar Generacpourra etreutilisee pour la realisationdetoute maintenanceou
reparationeffectueedartsle cadre de lagarantiedu SCEet serafourniesansfrais a.la charge deI'acquereur/ du proprietaire.Cetteutilisation ne
reduirapas les obligations deGeneracdartsle cadre dela Garantiedu SCE.
(9) Aucunemodification, autre quecelles specifiquementapprouveesparGenerac,ne peut@e apporteea cette generatrice.Les modificationsnon
approuveesannulentcettegarantieSCEetrepresententuneraisonsuffisante pour declinertoute reclamationenvertu dela garantieSCE.
(10) Envertu des presentes,Generacneserapas tenupour responsabledes defaillancesde pieces de rechangenon autorisees,ou desdefaillances
des pieces autoriseescauseesparI'utilisation de piecesde rechangenonautorisees.
LES PIECES RELATIVES AUX EMISSIONS PEUVENT INCLURE CE QUI SUIT
(LE CAS ECHEANT) :
1) DtSPOSITIFMESUREURDECARBURANT 3) SYSTEMED'ALLUMAGE
A. CARBURATEURETPtI_CESINTERNES A. BOUGIESD'ALLUMAGE
B. CAPUCHON/RESERVOIRDECARBURANT B. MODULE/BOBINESD'ALLUMAGE
C. CANALISATIONSDECARBURANT 4) SYSTEMED'ADMISSIOND'AIR
D. CANALISATIONDETUYAUXD'EVACUATION A. SOUPAPEA IMPULSIOND'AIR
E. REGULATEUR(CARBURANTSGAZEUX) 5) SYSTEMED't!CHAPPEMENT
E RESERVOIRDECARBONE A. CATALYSEUR
2) SYSTEMED'ADMISSIOND'AIR B. COLLECTEURD'ECHAPPEMENT
A. COLLECTEURD'ADMISSION
B. FILTREAAIR
Partie2 de2
N° depiece0J8147C Rev.A 01/12
69

GARANT|E L|MITEE DE <, DEUX ANS ,, DE GENERAC POWER SYSTEMS
POUR LES GENERATEURS PORTABLES SI'=RIE GP
La societe GeneracPower Systems, Inc. (Generac) garantit que, pendant uneperiode dedeux (2) anneesa compter de la date d'achat d'origine, ses generateurs serie
GP nepresenteront aucun defaut materiel ni defabrication pour les elements et la periode mentionneeci-apres. Generacrepareraou remplacera, comme il le jugera
necessaire, toute piece jugee defectueuse apres un examen,une inspection et untest realises par Generacou un depositaire de service de garantie agreepar Generac.
Tout(e) reparation ou remplacement dans le cadre de la presente garantie limitee ne renouvelle pas ou neprolonge pas la dureede garantie initiale. Tout produit repare
est uniquementgaranti pendant laduree restante de garantie initiale. Toutequipement declaredefectueux par I'acquereur/ le proprietaire dolt _tre retourne et examine
par le depositaire de service de garantieagree par Generacle plus proche. Tousles frais d'envoi a,payer dans le cadrede la garantie, dont le retour a I'usine, seront
supportes et payes aI'avance par I'acquereur/le proprietaire. Cette garantie ne s'applique qu'auxgenerateurs portables de la serie GPet n'est pas transferable par
I'acquereur d'origine. II est conseille de conserver les preuves d'achat. Si vous nefournissez pas de preuvede la dated'achat d'origine, la dated'envoi du produit par son
fabricant servira a determinerla periode de garantie.
PROGRAMME DE GARANTIE
Les applications des clients sont garantiespendantdeux (2) ans. Les applications commerciales etde location sont garantiespendant un(1) ans ou 1 000 heures
maximum, a la premieredes deux dates.
DENIANDEDESCONSONINIATEURSPOURLESETATS-UNISETAU CANADASEULENIENT
ANNEEUNE- Couverturecomplete limitee pour la main d'oeuvreetla (les) piece(s) listee(s) (il est necessairede presenterunepreuved'achat etde maintenance) :
• Moteur- tousles composants
Alternateur- tousles composants
ANNEEDEUX- Couverturecomplete limitee pour la (les)piece(s) listee(s) (il est necessairedepresenter une preuve d'achat etde maintenance):
Moteur - tousles composants
Alternateur- tousles composants
APPLICATIONSCOIVllVIERCIALES/ DELOCATION
ANNEEUNE- Couverturecomplete limitee pour la main d'oeuvreetla (les) piece(s) listee(s) (il est necessairede presenterunepreuved'achat etde maintenance) :
• Moteur- tousles composants
• Alternateur- tousles composants
REMARQUE : Auxfins delapresente garantie,<<utilisation du consommateur _ designe uneutilisation menagerepersonnelleou recreativede la part deI'acquereur
d'origine. Lapresente garantiene s'appliquepas aux unites utilisees pour deI'energieprimaire au lieudu reseau Iorsquele reseau dectrique principal est presentou
n'existe normalementpas. Unelois que le generateura eteutilise de manierecommerciale ou locative,il seraconsidere par la suite comme un generateura utilisation non
personnelledans le cadre de lapresente garantie.
DIRECTIVES :
1. Toutereparationsousgarantiedoltetreeffectueeet!outraiteeparundepositaireautorise/ agreepar Generac,ouunefilialedeGenerac.
2. Les unitesqui onteterevenduesnesontpas couvertesparla garantiedeGeneracetantdonnequelapresentegarantien'estpastransferable.
3. L'utilisationdepiece(s)derechangeautre(s)queGeneracannuleraentierementlagarantie.
4. Generacpeutchoisirdereparer,de remplacerouderembourserunepiecedeI'equipement.
5. Letauxdemain-d'oeuvresousgarantieest basesur lesheuresnormalesdetravail.Lesautresfraisrelatifsauxheuressupplementaires,auxvacancesouauxcootssatariauxpour
lesreparationsd'urgenceendehorsdesheuresnormatesdetravailserontala chargeduclient.
6. Lesfraisdetransportdespiecessousgarantiesontremboursesa destarifs detransportterrestre.Lesfraisassociesauxdemandesdetransportseronta lachargeduclient.
7. Les batteriessontgarantiesparle fabricantdebatteries.
8. Laverificationdelamaintenancenecessairepeutetreexigeepourla couverturedela garantie.
LA PRI'="SENTEGARANTIE NE S'APPLIQUE PAS AUX ELI'==MENTSSUIVANTS :
1. Les cootsdemaintenanceet desmodificationsnormales.
2. Les ddaillancesentraineespar deI'essenceou deI'huilecontaminee,ou parI'utilisationdeniveauxd'huilenon appropries.
3. Les reparationsoudiagnosticsrealisespardesdepositairesnonagreesparGeneracet nonautorisesparecrit parGenerac.
4. Les ddaillancesdues,sanss'ylimiter,aI'usurenormale,adesaccidents,mauvaisesutilisations,usagesabusifs,negligenceouutilisationinadaptee.
5. Commepourtousles dispositifsmecaniques,les moteursGeneracnecessitentunereparationetunremplacementperiodiquesdeleurspiecespourfonctionnercommeprevu.La
presentegarantienecouvrepas lesreparationsIorsqueleproblemedelaoulespiece(s)oudumoteurdecouled'uneutilisationnormale.
6. Les ddaillancescauseespartoutecauseexterieureoutout casdeforce majeure,tel qu'unchoc,unvot,unacte devandalisme,uneemeute,uneguerre,unholocaustenucleaire,
unincendie,ungel,la foudre,unseisme,unetempete,lagrele,uneeruptionvolcanique,I'eauou uneinondation,unetomadeou unouragan.
7. Les dommagesdus ades rongeurset/ouinsectes.
8. Les produitsmodifiesoualteresd'unefagonn'ayantpaseteautoriseeparecrit parGenerac.
9. Les dommagesaccessoires,importantsou indirectscausespardes ddaillancesmateriellesoudefabrication,oupartout retarddereparationouderemplacementdelaou des
piece(s)ddectueuses.
10. Lesddaillancesduesaune mauvaiseapplication.
11. Lesdepenseslieesa.I1nstructionduclientouaudepannageIorsqu'aucunddautn'estdetecte.
12. LesequipementsIouesutilisespendantlareatisationdesreparationsdanslecadredela garantie.
13. Lesbatteriesdedemarrage,fusibles,ampoulesetfiuidesdumoteur.
LA PRESENTEGARANTIEREMPLACETOUTESLESAUTRESGARANTIES,IMPLIClTESOUEXPLIClTES.ENPARTICULIER,GENERACN'EMETAUCUNEGARANTIEDE
OONFORMITEOUD'USAGEPOURUNOBJEOTIFPARTIOULIER.Toutegarantieimplicite autoriseeparla Ioi dolt 6tre limitee en dureeconformementaux conditions de
garantieexplicite stipuleesdans lapresente. Certainsetats nepermettent pas de poserunelimite a la dureedela garantieimplicite, !a limite susmentionneene s'applique
donc pas aces derniers.GENERACNESERARESPONSABLEQUEDELAREPARATIONOU DUREMPLACEMENTDELA OUDESPIECESTELQUESUSMENTIONNE.EN
AUCUNCASGENERACNEPOURRAETRETENURESPONSABLEDETOUTDOMMAGEACCESSOIREOUIMPORTANT,MEMESI CEDOMMAGEDECOULEDIRECTEMENT
D'UNENEGLIGENCEDEGENERAC.Certains etatsne permettentpas d'exclureou de poser unelimite aux dommagesaccessoires ou importants, la limite susmentionneene
s'applique donc pas aces derniers.La presentegarantievous confere des droits juridiques specifiques. Votreetatvous confere egalementd'autresdroits.
GENERACPOWERSYSTEMS,INC. ,, P.O.BOX8 ,, Waukesha,Wl 53187 ,, Tel. : (888) GENERAC(436-3722) ,, Fax : (262) 544-4851
Reference0H8902
Manuel,reference0J3821
PourIocaliser le deposiiaire leplus proche,visiteznotre site Interactwww.generac.com
Rev.E (29/05/12)
RevisionF(02/12)
Imprimeen Chine
-
 1
1
-
 2
2
-
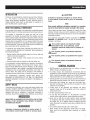 3
3
-
 4
4
-
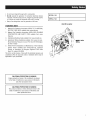 5
5
-
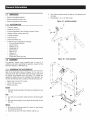 6
6
-
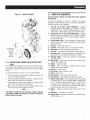 7
7
-
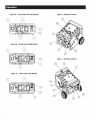 8
8
-
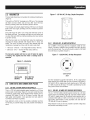 9
9
-
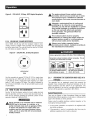 10
10
-
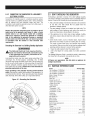 11
11
-
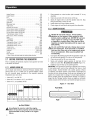 12
12
-
 13
13
-
 14
14
-
 15
15
-
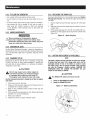 16
16
-
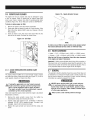 17
17
-
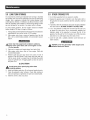 18
18
-
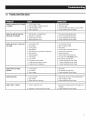 19
19
-
 20
20
-
 21
21
-
 22
22
-
 23
23
-
 24
24
-
 25
25
-
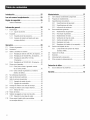 26
26
-
 27
27
-
 28
28
-
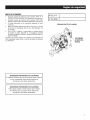 29
29
-
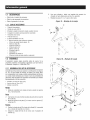 30
30
-
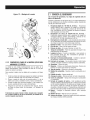 31
31
-
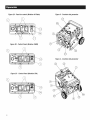 32
32
-
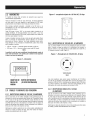 33
33
-
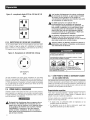 34
34
-
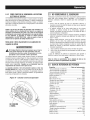 35
35
-
 36
36
-
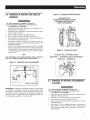 37
37
-
 38
38
-
 39
39
-
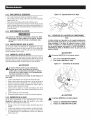 40
40
-
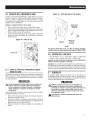 41
41
-
 42
42
-
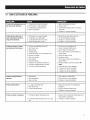 43
43
-
 44
44
-
 45
45
-
 46
46
-
 47
47
-
 48
48
-
 49
49
-
 50
50
-
 51
51
-
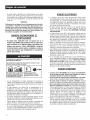 52
52
-
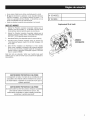 53
53
-
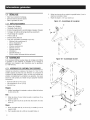 54
54
-
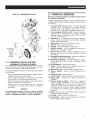 55
55
-
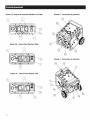 56
56
-
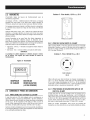 57
57
-
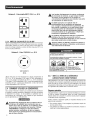 58
58
-
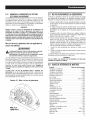 59
59
-
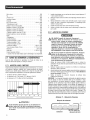 60
60
-
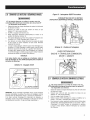 61
61
-
 62
62
-
 63
63
-
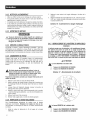 64
64
-
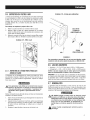 65
65
-
 66
66
-
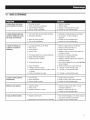 67
67
-
 68
68
-
 69
69
-
 70
70
-
 71
71
-
 72
72


Generac 005939-2 El manual del propietario
- Categoría
- Generadores de poder
- Tipo
- El manual del propietario
- Este manual también es adecuado para
en otros idiomas
- français: Generac 005939-2 Le manuel du propriétaire
- English: Generac 005939-2 Owner's manual
Artículos relacionados
-
Generac 5943-0 El manual del propietario
-
Generac GP7500E-5943-5 El manual del propietario
-
-
Generac GP6500-5940-0 El manual del propietario
-
-
Generac 005788-0 XG4000 El manual del propietario
-
-
Generac Power Systems 005800-0 (XGSO00) El manual del propietario
-
-