dBTechnologies RDNet EH El manual del propietario
- Tipo
- El manual del propietario

RDNet-EH
420120283Q REV.1.0
RDNet-EH
ISTRUZIONI / INSTRUCTIONS / BEDIENUNGSANLEITUNG /
INSTRUCTIONS DE MONTAGE / INSTRUCCIONES
atte
e
IMPORTANTE: LEGGERE ATTENTAMENTE QUESTE ISTRUZIONI
PRIMA DI MANEGGIARE IL PRODOTTO
ITA
ENG
DEU
FRA
ESP
IMPORT
ANT: READ THESE INSTRUCTIONS CAREFULLY
BEFORE HANDLING THE PRODUCT
WICHTIG: VOR GEBRAUCH DES PRODUKTS AUFMERKSAM
DIESE
ANWEISUNGEN LESEN
IMPORT
ANT : LISEZ ATTENTIVEMENT CES INSTRUCTIONS
A
VANT DE MANIPULER LE PRODUIT.
IMPORT
ANTE: LEA ATENTAMENTE ESTAS INSTRUCCIONES
ANTES DE MANIPULAR EL PRODUCT
O.
!
AGGIORNAMENT
O
FIRMWARE
UPDATING THE
FIRMWARE
UPDATE DER
FIRMWARE
MISE À JOUR
DU FIRMWARE
ACTUALIZACIÓN
DEL FIRMWARE
ITA ATTENZIONE - Le seguenti operazioni devono essere eseguite con la massima cautela e va scongiurato ogni ri-
schio di danneggiamento da scariche elettrostatiche (ESD). Operare sempre a dispositivo disconnesso dalla rete elet-
trica, salvo indicazione esplicita delle istruzioni. In caso di necessità rivolgersi a un centro di assistenza autorizzato.
ENG WARNING - Carry out the following operations with the utmost care and avoid any risk of dama-
ge due to electrostatic discharge (ESD). Always work with the device disconnected from the mains power, un-
less the instructions explicitly indicate otherwise. In the event of need, contact an authorised assistance centre.
DEU WICHTIG - Die folgenden Schritte sollten mit größter Sorgfalt durchgeführt werden, um das Ri-
siko einer Beschädigung durch elektrostatische Entladungen (engl. Abk.: „ESD“) zu vermeiden. Bei der Dur-
chführung dieser Schritte darf das Gerät – falls in den Anweisungen nicht ausdrücklich anders erwähnt –nie
an das Stromnetz angeschlossen sein. Bei Bedarf wenden Sie sich sich bitte an ein ofzielles Service-Center.
FRA IMPORTANT - Les opérations suivantes doivent être effectuées avec une extrême précaution et tout risque
d’endommagement par décharges électrostatiques (ESD) doit être évité. Toujours travailler sur un appareil déconn-
ecté de l’alimentation électrique, sauf instructions explicites. Si nécessaire, contactez un centre d’assistance agréé.
ESP IMPORTANTE - Las operaciones siguientes deben realizarse con el máximo cuidado y evitando todo riesgo de
daño por descargas electrostáticas (ESD). Trabaje siempre con el dispositivo desconectado de la red eléctrica, sal-
vo indicación contraria en las instrucciones. En caso de necesidad, contacte con un centro de asistencia autorizado.

RDNet-EH
420120283Q REV.1.0
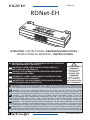
ITA 1 Operare in sicurezza su una supercie piana e pulita, con lo speaker pri-
vo di qualsiasi connessione audio ed elettrica. Utilizzare gli accorgimenti ido-
nei ad evitare scariche elettrostatiche (ESD). RDNet-EH va montato al posto del-
la maniglia inferiore. Capovolgere lo speaker INGENIA per operare nella zona
evidenziata. 2 Con una chiave a brugola (3 mm) svitare le 4 viti della maniglia indicata.
ENG 1 Work safely on a at, clean surface, with no audio or electrical connections to the
speaker. Take suitable measures to prevent electrostatic discharge (ESD). The RDNet-EH
must be tted in place of the bottom handle. Overturn the INGENIA speaker to work on
the area shown in the gure. 2 Use a hex key (3 mm) to undo the 4 handle screws indicated.
DEU 1 Diese Aufgaben sollten zur Sicherheit auf einer sauberen, ebenen Oberäche dur-
chgeführt werden; der Lautsprecher darf weder an eine Audio- noch an eine Stromquelle
angeschlossen sein. Ein umsichtiges Vorgehen vermeidet elektrostatische Entladungen
(„ESD“) . Die RDNet-EH-Schnittstelle muss am unteren Griff montiert sein. Dazu den INGE-
NIA-Lautsprecher auf den Kopf stellen, um an den in der Abbildung gezeigten Bereich zu ge-
langen. 2 Mit einem 3 mm-Imbusschlüssel die vier Schrauben des abgebildeten Griffs lösen.
FRA 1 Travaillez en sécurité sur une surface plane et propre, avec l’enceinte sans aucu-
ne connexions audio et électrique. Utilisez les précautions appropriées pour éviter les
décharges électrostatiques (ESD). L’interface RDNet-EH doit être montée à la place de la
poignée inférieure. Retournez l’enceinte INGENIA pour travailler dans la zone indiquée
sur la gure. 2 À l’aide d’une clé Allen (3 mm), dévissez les 4 vis de la poignée indiquée.
ESP 1 Trabaje de modo seguro, sobre una supercie limpia y llana, con el altavoz desco-
nectado de todas las fuentes de audio y electricidad. Tome las precauciones necesarias
para evitar descargas electrostáticas (ESD). La interfaz RDNet-EH se monta en lugar del
asa inferior. Ponga cabeza abajo el altavoz INGENIA para trabajar en la zona indicada en
la gura. 2 Con una llave Allen de 3 mm, desenrosque los 4 tornillos del asa indicada.
TOP
BOTTOM
TOP
BOTTOM
1
2

RDNet-EH
420120283Q REV.1.0
3
4
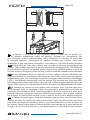
ITA 3 Individuare il mini connettore a 5 pin collegato alla scheda elettronica, sollevan-
do delicatamente la parte superiore della maniglia. Potrebbe essere presente silicone.
Disconnettere il connettore dal socket premendo lateralmente come indicato. 4 Rimuo-
vere la parte inferiore della maniglia, facendo passare il connettore nell’apertura a lato.
ENG 3 Gently lift the top part of the handle to locate the 5-pin mini connec-
tor to the electronic board. There may be some silicone. Disconnect the con-
nector from the socket by pressing on the sides as indicated. 4 Remove the bot-
tom part of the handle and pass the connector through the opening to the side.
DEU 3 Den an der Platine festgesteckten 5-Pin-Ministecker lokalisieren; dann
den oberen Teil des Griffs vorsichtig anheben. Achtung: Hier kann Silikon
vorhanden sein. Stecker durch seitliches Drücken wie gezeigt lösen. 4 Unte-
ren Teil des Griffs durch Schieben des Steckers in die seitliche Öffnung entfernen.
FRA 3 Localisez le mini connecteur à 5 broches branché à la carte électronique, en sou-
levant doucement le haut de la poignée. De la silicone peut être présente. Débranc-
hez le connecteur de la prise en appuyant sur le côté comme indiqué. 4 Retirez la par-
tie inférieure de la poignée, en passant le connecteur à travers l’ouverture sur le côté.
ESP 3 Levante delicadamente la parte superior del asa para acceder al minico-
nector de 5 pines conectado a la tarjeta electrónica. Puede haber silicona. Desco-
necte el conector de la toma, presionando lateralmente como se indica. 4 Qui-
te la parte inferior del asa y haga pasar el conector por la abertura que está al lado.

RDNet-EH
420120283Q REV.1.0
5
6
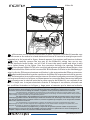
ITA 5 Rimuovere con la massima attenzione la parte superiore di RDNet-EH avendo cura
di non toccare o far cadere la scheda elettronica interna. 6 Inserire la maniglia aperta alli-
neandola ai 4 fori mostrati in gura, facendo passare il connettore nell’apertura indicata.
ENG 5 Very carefully remove the top part of the RDNet-EH, taking care not to tou-
ch the electronic board inside, nor let it fall. 6 Insert the open handle and align it with
the 4 holes shown in the gure. Pass the connector through the opening indicated.
DEU 5 Den oberen RDNet-EH-Teil sehr vorsichtig abnehmen und dabei darauf achten, dass
die darin bendliche Platine nicht herunterfällt. 6 Geöffneten Griff wie in der Abbildung ge-
zeigt in die vier Öffnungen einsetzen und Stecker in die entsprechende Öffnung einsetzen.
FRA 5 Retirez délicatement la partie supérieure du RDNet-EH en prenant soin de ne pas tou-
cher ou faire tomber la carte électronique interne. 6 Insérez la poignée ouverte en l’alignant
sur les 4 trous illustrés sur la gure, en faisant passer le connecteur dans l’ouverture indiquée.
ESP 5 Extraiga con la máxima atención la parte superior de RDNet-EH, con cuidado de no
tocar ni dejar caer la tarjeta electrónica interior. 6 Coloque el asa abierta, alineada con
los 4 oricios ilustrados en la gura, y haga pasar el conector por la abertura indicada.
Le caratteristiche, le speciche e l’aspetto dei prodotti sono soggetti a possibili cambiamenti senza pre-
via comunicazione. dBTechnologies si riserva il diritto di apportare cambiamenti o miglioramenti nel design o nelle
lavorazioni senza assumersi l’obbligo di cambiare o migliorare anche i prodotti precedentemente realizzati.
The characteristics, specications and appearance of the product are subject to change without prior notice.
dBTechnologies reserves the right to make changes or improvements in the design or workmanship without being required
to also change or improve previously manufactured products.
Die Eigenschaften, die Spezikationen sowie das Erscheinungsbild der Produkte können ohne vorherige
Ankündigung geändert werden. dBTechnologies behält sich das Recht vor, Änderungen und Verbesserungen am De-
sign oder den Ausführungen vornehmen zu können, ohne die Verpichtung einzugehen, zuvor hergestellte Produkte
ändern oder verbessern zu müssen.
Les caractéristiques, les spécications et l’aspect des produits sont sujets à changement sans préavis.
dBTechnologies se réserve le droit d’apporter des modications ou des améliorations de design ou de fabrication, sans
obligation de modier ou d’améliorer également les produits déjà réalisés.
Las características, especicaciones y el aspecto de los productos pueden cambiar sin previo aviso.
dBTechnologies se reserva el derecho de modicar o mejorar el diseño o la fabricación sin asumir la obligación de
modicar o mejorar también los productos realizados anteriormente.
La página se está cargando...

RDNet-EH
420120283Q REV.1.0
LINE
MIC
INPUT
INPUT
LINK
LINK
B
d
TECHNOLOGIES
Functions
Control
Functions
Control
Service
D
ata
Input sens
Peak
Input sens
Peak
B
A
C
TOP
BOTTOM
TOP
BOTTOM
9
5
10
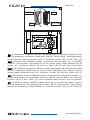
ITA 9 Capovolgere lo speaker INGENIA. 10 Nel pannello di controllo rimuovere il tap-
pino di protezione, se presente, dalla presa USB [A] “Service Data”. Nell’aggiornamen-
to del rmware saranno coinvolti anche il “Functions Control” [B] e il led “Peak” [C].
ENG 9 Overturn the INGENIA speaker. 10 Remove the protective cap, if provided,
from the “Service Data” USB socket [A] on the control panel. When updating the r-
mware, the “Functions Control” [B] and the “Peak” LED [C] will also be involved.
DEU 9 Den INGENIA-Lautsprecher wieder auf den Kopf stellen. 10 Am Bedienfeld dann
die evtl. vorhandene Abdeckung der „Service Data“-USB-Buchse [A] entfernen. Ein Fir-
mware-Update beinhaltet auch die „Functions Control“ [B] und die „Peak“-LED [C].
FRA 9 Retournez l’enceinte INGENIA. 10 Dans le panneau de commande, retirez le ca-
puchon de protection, le cas échéant, de la prise USB [A] « Service Data ». Le « Functions
Control » [B] et la led « Peak » [C] seront impliqués dans la mise à jour du rmware.
ESP 9 Ponga el altavoz INGENIA cabeza arriba. 10 En el panel de control, quite la
tapa de protección (si está presente) de la toma USB [A] “Service Data”. Para la actua-
lización del rmware se utilizan también el “Functions Control” [B] y el led “Peak” [C].

RDNet-EH
420120283Q REV.1.0
LINE
MIC
INPUT
INPUT
LINK
LINK
B
d
TECHNOLOGIES
Functions
Control
Functions
Control
Service
D
ata
Input sens
Peak
Input sens
Peak
USB BURNER MANAGER
USB CABLEUSB CABLE
USB MINI TYPE B CONNECTOR
5
11
FIRMWARE (FROM REV. 3.0)
+
ITA 11 Scaricare ed installare USB BURNER MANAGER sul proprio PC e scaricare ed
aprire l’ultima versione del rmware (rev. 3.0 o successiva), seguendo poi le istruzio-
ni a video. E’ necessario l’utilizzo di un cavo USB con connettore mini di tipo B. Con-
cludere l’aggiornamento rmware. N.B. In caso l’aggiornamento non riesca per
insufciente alimentazione USB, potrebbe essere necessario ripetere l’operazione, con-
nettere il cavo USB ed accendere lo speaker INGENIA collegato all’alimentazione di rete.
ENG 11 Download and install the USB BURNER MANAGER software on your PC,
download and open the latest rmware version (rev. 3.0 or later), and then follow
the instructions on the screen. Use a USB cable with a type-B mini connector. Com-
plete the rmware update. N.B. If the update is unsuccessful because there is insuf-
cient USB power, it may be necessary repeat the operation with the USB cable con-
nected, and the INGENIA speaker connected to the mains power and switched on.
DEU 11 USB BURNER MANAGER auf dem PC herunterladen und installieren, die
letzte Version der Firmware (Version 3.0 oder höher) herunterladen und öffn-
en und dabei die im Video gegebenen Anweisungen befolgen. Man benötigt ein
USB-Kabel mit einem Ministecker vom Typ B. Firmware-Update abschließen. Bit-
te beachten: Sollte das Update aufgrund mangelnder USB-Kapazität nicht durch-
geführt werden, kann es erforderlich sein, den Vorgang zu wiederholen; USB-Kabel an-
schließen und den mit dem Stromnetz verbundenen INGENIA-Lautsprecher einschalten.
FRA 11 Téléchargez et installez USB BURNER MANAGER sur votre PC et téléchargez
et ouvrez la dernière version du rmware (rév. 3.0 ou ultérieur), puis en suivant
les instructions à l’écran. Utilisez un câble USB avec un connecteur mini de type B.
Terminez la mise à jour du rmware. N.B. Si la mise à jour échoue en raison d’u-
ne alimentation USB insufsante, il peut être nécessaire de répéter l’opération, con-
necter le câble USB et allumer l’enceinte INGENIA connectée à l’alimentation secteur.
ESP 11 Descargue e instale USB BURNER MANAGER en su PC y descargue y abra la
última versión del rmware (rev. 3.0 o posterior), siguiendo las instrucciones que
aparecen en la pantalla. Se debe utilizar un cable USB con conector mini del tipo
B. Termine la actualización del rmware. Nota. Si la actualización no se puede re-
alizar por falta de alimentación USB, puede ser necesario repetir la operación, co-
nectar el cable USB y encender el altavoz INGENIA conectado a la alimentación de red.
La página se está cargando...
Transcripción de documentos
RDNet-EH RDNet-EH ISTRUZIONI / INSTRUCTIONS / BEDIENUNGSANLEITUNG / INSTRUCTIONS DE MONTAGE / INSTRUCCIONES ITA IMPORTANTE: LEGGERE ATTENTAMENTE QUESTE ISTRUZIONI atte DI MANEGGIARE IL PRODOTTO PRIMA e ENG IMPORTANT: READ THESE INSTRUCTIONS CAREFULLY BEFORE HANDLING THE PRODUCT DEU WICHTIG: VOR GEBRAUCH DES PRODUKTS AUFMERKSAM DIESE ANWEISUNGEN LESEN FRA IMPORTANT : LISEZ ATTENTIVEMENT CES INSTRUCTIONS AVANT DE MANIPULER LE PRODUIT. ESP IMPORTANTE: LEA ATENTAMENTE ESTAS INSTRUCCIONES ANTES DE MANIPULAR EL PRODUCTO. ! AGGIORNAMENTO FIRMWARE UPDATING THE FIRMWARE UPDATE DER FIRMWARE MISE À JOUR DU FIRMWARE ACTUALIZACIÓN DEL FIRMWARE ITA ATTENZIONE - Le seguenti operazioni devono essere eseguite con la massima cautela e va scongiurato ogni rischio di danneggiamento da scariche elettrostatiche (ESD). Operare sempre a dispositivo disconnesso dalla rete elettrica, salvo indicazione esplicita delle istruzioni. In caso di necessità rivolgersi a un centro di assistenza autorizzato. ENG WARNING - Carry out the following operations with the utmost care and avoid any risk of damage due to electrostatic discharge (ESD). Always work with the device disconnected from the mains power, unless the instructions explicitly indicate otherwise. In the event of need, contact an authorised assistance centre. DEU WICHTIG - Die folgenden Schritte sollten mit größter Sorgfalt durchgeführt werden, um das Risiko einer Beschädigung durch elektrostatische Entladungen (engl. Abk.: „ESD“) zu vermeiden. Bei der Durchführung dieser Schritte darf das Gerät – falls in den Anweisungen nicht ausdrücklich anders erwähnt –nie an das Stromnetz angeschlossen sein. Bei Bedarf wenden Sie sich sich bitte an ein offizielles Service-Center. FRA IMPORTANT - Les opérations suivantes doivent être effectuées avec une extrême précaution et tout risque d’endommagement par décharges électrostatiques (ESD) doit être évité. Toujours travailler sur un appareil déconnecté de l’alimentation électrique, sauf instructions explicites. Si nécessaire, contactez un centre d’assistance agréé. ESP IMPORTANTE - Las operaciones siguientes deben realizarse con el máximo cuidado y evitando todo riesgo de daño por descargas electrostáticas (ESD). Trabaje siempre con el dispositivo desconectado de la red eléctrica, salvo indicación contraria en las instrucciones. En caso de necesidad, contacte con un centro de asistencia autorizado. 420120283Q REV.1.0 RDNet-EH 1 TOP BOTTOM BOTTOM TOP 2 ITA 1 Operare in sicurezza su una superficie piana e pulita, con lo speaker privo di qualsiasi connessione audio ed elettrica. Utilizzare gli accorgimenti idonei ad evitare scariche elettrostatiche (ESD). RDNet-EH va montato al posto della maniglia inferiore. Capovolgere lo speaker INGENIA per operare nella zona evidenziata. 2 Con una chiave a brugola (3 mm) svitare le 4 viti della maniglia indicata. ENG 1 Work safely on a flat, clean surface, with no audio or electrical connections to the speaker. Take suitable measures to prevent electrostatic discharge (ESD). The RDNet-EH must be fitted in place of the bottom handle. Overturn the INGENIA speaker to work on the area shown in the figure. 2 Use a hex key (3 mm) to undo the 4 handle screws indicated. DEU 1 Diese Aufgaben sollten zur Sicherheit auf einer sauberen, ebenen Oberfläche durchgeführt werden; der Lautsprecher darf weder an eine Audio- noch an eine Stromquelle angeschlossen sein. Ein umsichtiges Vorgehen vermeidet elektrostatische Entladungen („ESD“) . Die RDNet-EH-Schnittstelle muss am unteren Griff montiert sein. Dazu den INGENIA-Lautsprecher auf den Kopf stellen, um an den in der Abbildung gezeigten Bereich zu gelangen. 2 Mit einem 3 mm-Imbusschlüssel die vier Schrauben des abgebildeten Griffs lösen. FRA 1 Travaillez en sécurité sur une surface plane et propre, avec l’enceinte sans aucune connexions audio et électrique. Utilisez les précautions appropriées pour éviter les décharges électrostatiques (ESD). L’interface RDNet-EH doit être montée à la place de la poignée inférieure. Retournez l’enceinte INGENIA pour travailler dans la zone indiquée sur la figure. 2 À l’aide d’une clé Allen (3 mm), dévissez les 4 vis de la poignée indiquée. ESP 1 Trabaje de modo seguro, sobre una superficie limpia y llana, con el altavoz desconectado de todas las fuentes de audio y electricidad. Tome las precauciones necesarias para evitar descargas electrostáticas (ESD). La interfaz RDNet-EH se monta en lugar del asa inferior. Ponga cabeza abajo el altavoz INGENIA para trabajar en la zona indicada en la figura. 2 Con una llave Allen de 3 mm, desenrosque los 4 tornillos del asa indicada. 420120283Q REV.1.0 RDNet-EH 3 4 ITA 3 Individuare il mini connettore a 5 pin collegato alla scheda elettronica, sollevando delicatamente la parte superiore della maniglia. Potrebbe essere presente silicone. Disconnettere il connettore dal socket premendo lateralmente come indicato. 4 Rimuovere la parte inferiore della maniglia, facendo passare il connettore nell’apertura a lato. ENG 3 Gently lift the top part of the handle to locate the 5-pin mini connector to the electronic board. There may be some silicone. Disconnect the connector from the socket by pressing on the sides as indicated. 4 Remove the bottom part of the handle and pass the connector through the opening to the side. DEU 3 Den an der Platine festgesteckten 5-Pin-Ministecker lokalisieren; dann den oberen Teil des Griffs vorsichtig anheben. Achtung: Hier kann Silikon vorhanden sein. Stecker durch seitliches Drücken wie gezeigt lösen. 4 Unteren Teil des Griffs durch Schieben des Steckers in die seitliche Öffnung entfernen. FRA 3 Localisez le mini connecteur à 5 broches branché à la carte électronique, en soulevant doucement le haut de la poignée. De la silicone peut être présente. Débranchez le connecteur de la prise en appuyant sur le côté comme indiqué. 4 Retirez la partie inférieure de la poignée, en passant le connecteur à travers l’ouverture sur le côté. ESP 3 Levante delicadamente la parte superior del asa para acceder al miniconector de 5 pines conectado a la tarjeta electrónica. Puede haber silicona. Desconecte el conector de la toma, presionando lateralmente como se indica. 4 Quite la parte inferior del asa y haga pasar el conector por la abertura que está al lado. 420120283Q REV.1.0 RDNet-EH 5 6 ITA 5 Rimuovere con la massima attenzione la parte superiore di RDNet-EH avendo cura di non toccare o far cadere la scheda elettronica interna. 6 Inserire la maniglia aperta allineandola ai 4 fori mostrati in figura, facendo passare il connettore nell’apertura indicata. ENG 5 Very carefully remove the top part of the RDNet-EH, taking care not to touch the electronic board inside, nor let it fall. 6 Insert the open handle and align it with the 4 holes shown in the figure. Pass the connector through the opening indicated. DEU 5 Den oberen RDNet-EH-Teil sehr vorsichtig abnehmen und dabei darauf achten, dass die darin befindliche Platine nicht herunterfällt. 6 Geöffneten Griff wie in der Abbildung gezeigt in die vier Öffnungen einsetzen und Stecker in die entsprechende Öffnung einsetzen. FRA 5 Retirez délicatement la partie supérieure du RDNet-EH en prenant soin de ne pas toucher ou faire tomber la carte électronique interne. 6 Insérez la poignée ouverte en l’alignant sur les 4 trous illustrés sur la figure, en faisant passer le connecteur dans l’ouverture indiquée. ESP 5 Extraiga con la máxima atención la parte superior de RDNet-EH, con cuidado de no tocar ni dejar caer la tarjeta electrónica interior. 6 Coloque el asa abierta, alineada con los 4 orificios ilustrados en la figura, y haga pasar el conector por la abertura indicada. Le caratteristiche, le specifiche e l’aspetto dei prodotti sono soggetti a possibili cambiamenti senza previa comunicazione. dBTechnologies si riserva il diritto di apportare cambiamenti o miglioramenti nel design o nelle lavorazioni senza assumersi l’obbligo di cambiare o migliorare anche i prodotti precedentemente realizzati. The characteristics, specifications and appearance of the product are subject to change without prior notice. dBTechnologies reserves the right to make changes or improvements in the design or workmanship without being required to also change or improve previously manufactured products. Die Eigenschaften, die Spezifikationen sowie das Erscheinungsbild der Produkte können ohne vorherige Ankündigung geändert werden. dBTechnologies behält sich das Recht vor, Änderungen und Verbesserungen am Design oder den Ausführungen vornehmen zu können, ohne die Verpflichtung einzugehen, zuvor hergestellte Produkte ändern oder verbessern zu müssen. Les caractéristiques, les spécifications et l’aspect des produits sont sujets à changement sans préavis. dBTechnologies se réserve le droit d’apporter des modifications ou des améliorations de design ou de fabrication, sans obligation de modifier ou d’améliorer également les produits déjà réalisés. Las características, especificaciones y el aspecto de los productos pueden cambiar sin previo aviso. dBTechnologies se reserva el derecho de modificar o mejorar el diseño o la fabricación sin asumir la obligación de modificar o mejorar también los productos realizados anteriormente. 420120283Q REV.1.0 RDNet-EH 9 TOP BOTTOM BOTTOM TOP 10 5 B Functions Control Peak Peak LINK Service Data Input sens MIC dB INPUT INPUT LINE Input sens TECHNOLOGIES Functions Control LINK C A ITA 9 Capovolgere lo speaker INGENIA. 10 Nel pannello di controllo rimuovere il tappino di protezione, se presente, dalla presa USB [A] “Service Data”. Nell’aggiornamento del firmware saranno coinvolti anche il “Functions Control” [B] e il led “Peak” [C]. ENG 9 Overturn the INGENIA speaker. 10 Remove the protective cap, if provided, from the “Service Data” USB socket [A] on the control panel. When updating the firmware, the “Functions Control” [B] and the “Peak” LED [C] will also be involved. DEU 9 Den INGENIA-Lautsprecher wieder auf den Kopf stellen. 10 Am Bedienfeld dann die evtl. vorhandene Abdeckung der „Service Data“-USB-Buchse [A] entfernen. Ein Firmware-Update beinhaltet auch die „Functions Control“ [B] und die „Peak“-LED [C]. FRA 9 Retournez l’enceinte INGENIA. 10 Dans le panneau de commande, retirez le capuchon de protection, le cas échéant, de la prise USB [A] « Service Data ». Le « Functions Control » [B] et la led « Peak » [C] seront impliqués dans la mise à jour du firmware. ESP 9 Ponga el altavoz INGENIA cabeza arriba. 10 En el panel de control, quite la tapa de protección (si está presente) de la toma USB [A] “Service Data”. Para la actualización del firmware se utilizan también el “Functions Control” [B] y el led “Peak” [C]. 420120283Q REV.1.0 RDNet-EH 5 USB BURNER MANAGER 11 + FIRMWARE (FROM REV. 3.0) Functions Control Peak Peak LINK Input sens Service Data MIC dB INPUT LINK INPUT LINE Input sens TECHNOLOGIES Functions Control USB CABLE USB MINI TYPE B CONNECTOR ITA 11 Scaricare ed installare USB BURNER MANAGER sul proprio PC e scaricare ed aprire l’ultima versione del firmware (rev. 3.0 o successiva), seguendo poi le istruzioni a video. E’ necessario l’utilizzo di un cavo USB con connettore mini di tipo B. Concludere l’aggiornamento firmware. N.B. In caso l’aggiornamento non riesca per insufficiente alimentazione USB, potrebbe essere necessario ripetere l’operazione, connettere il cavo USB ed accendere lo speaker INGENIA collegato all’alimentazione di rete. ENG 11 Download and install the USB BURNER MANAGER software on your PC, download and open the latest firmware version (rev. 3.0 or later), and then follow the instructions on the screen. Use a USB cable with a type-B mini connector. Complete the firmware update. N.B. If the update is unsuccessful because there is insufficient USB power, it may be necessary repeat the operation with the USB cable connected, and the INGENIA speaker connected to the mains power and switched on. DEU 11 USB BURNER MANAGER auf dem PC herunterladen und installieren, die letzte Version der Firmware (Version 3.0 oder höher) herunterladen und öffnen und dabei die im Video gegebenen Anweisungen befolgen. Man benötigt ein USB-Kabel mit einem Ministecker vom Typ B. Firmware-Update abschließen. Bitte beachten: Sollte das Update aufgrund mangelnder USB-Kapazität nicht durchgeführt werden, kann es erforderlich sein, den Vorgang zu wiederholen; USB-Kabel anschließen und den mit dem Stromnetz verbundenen INGENIA-Lautsprecher einschalten. FRA 11 Téléchargez et installez USB BURNER MANAGER sur votre PC et téléchargez et ouvrez la dernière version du firmware (rév. 3.0 ou ultérieur), puis en suivant les instructions à l’écran. Utilisez un câble USB avec un connecteur mini de type B. Terminez la mise à jour du firmware. N.B. Si la mise à jour échoue en raison d’une alimentation USB insuffisante, il peut être nécessaire de répéter l’opération, connecter le câble USB et allumer l’enceinte INGENIA connectée à l’alimentation secteur. ESP 11 Descargue e instale USB BURNER MANAGER en su PC y descargue y abra la última versión del firmware (rev. 3.0 o posterior), siguiendo las instrucciones que aparecen en la pantalla. Se debe utilizar un cable USB con conector mini del tipo B. Termine la actualización del firmware. Nota. Si la actualización no se puede realizar por falta de alimentación USB, puede ser necesario repetir la operación, conectar el cable USB y encender el altavoz INGENIA conectado a la alimentación de red. 420120283Q REV.1.0-
 1
1
-
 2
2
-
 3
3
-
 4
4
-
 5
5
-
 6
6
-
 7
7
-
 8
8


dBTechnologies RDNet EH El manual del propietario
- Tipo
- El manual del propietario
en otros idiomas
Artículos relacionados
-
dBTechnologies RDNet EH El manual del propietario
-
-
-
-
dB Technologies VIO L212 Manual de usuario
-
-
-
 dB VIOS118 Manual de usuario
-
-
