La página se está cargando ...
La página se está cargando ...
La página se está cargando ...

4
1. Pantalla 7” (pantalla táctil)
2. Tecla apagado
3. App:
toque para pasar a la página de información donde hay un QR Code que le permite
bajarse la app DOOR ENTRY para interactuar con su dispositivo.
4. Fecha y hora
5. Conexión Wi-Fi
6. Asociación dispositivo/app y envío llamada habilitado/deshabilitado
7. Exclusión timbre
8. Activación Oficina Profesional
9. Micrófono
10. Activación Contestador
11. Acciones rápidas
12. Guías táctiles para invidentes
13. Tecla conexión:
el encendido del led verde parpadeante indica una llamada entrante
el encendido del led verde fijo indica la comunicación en curso
14. Autoencendido/Visualización cíclica:
al presionar la tecla el LED rojo se enciende
15. Tecla Favoritos:
al presionar la tecla el LED rojo se enciende
(Configuración base = LUZ ESCALERAS. Para una configuración distinta, consulte la
tabla de la configuración física en las páginas sucesivas.)
16. Tecla apertura cerradura:
al presionar la tecla el LED rojo se enciende
17. Estado Wi-Fi:
Led rojo parpadeante = Wi-Fi activado pero no conectado a una red
Led apagado = Wi-Fi deshabilitado o correctamente en marcha
Led verde fijo = el Classe 300X está cruzando datos con la app DOOR ENTRY
(envío llamada, autoencendido)
1. Display 7” (touchscreen)
2. Uitschakeltoets
3. App:
Aanraken om de informatiepagina te openen waarop een QR-code weergegeven wordt.
Gebruik deze code om de DOOR ENTRY-app voor het gebruik van uw apparaat kunt
downloaden.
4. Datum en tijd
5. WiFi-verbinding
6. Koppelen apparaat/app en doorschakelen oproep in-/uitgeschakeld
7. Uitsluiting beltoon
8. Activering professionele studio
9. Microfoon
10. Activering antwoordapparaat
11. Sneltoetsen
12. Tastgeleiders voor blinden
13. Toets verbinding:
de groene led knippert om een binnenkomende oproep aan te geven
de groene led brandt om een lopend gesprek aan te geven
14. Automatische inschakeling/cyclische weergave:
bij een druk op de toets gaat de rode led branden
15. Toets Favorieten:
bij een druk op de toets gaat de rode led branden
(Standaardconfiguratie = TRAPHUISVERLICHTING. Voor een andere configuratie
raadpleeg de tabel met de fysieke configuratie op de volgende pagina’s.)
16. Toets slotontgrendeling:
bij een druk op de toets gaat de rode led branden
17. Status WiFi:
Rode led knippert = WiFi geactiveerd maar niet met een netwerk verbonden
Led uit = WiFi gedeactiveerd of werkt correct
Groene led aan = Classe 300X wisselt gegevens uit met de DOOR ENTRY-app
(doorschakelen oproep, automatische inschakeling)
18. Estado presencia notas:
Led rojo parpadeante = nueva/s notas o mensaje/s en el contestador no leídos
19. Estado Exclusión timbre:
Led rojo encendido = Timbre llamada desactivado
20. Funciones (aparecen solamente los iconos de las funciones configuradas)
21. Alojamiento configuradores (véase “Funciones configuradores”)
22. Configurador J1: extraiga la alimentación adicional si está presente (borne 1 & 2)
23. Configurador J2: para el funcionamiento correcto, no efectúe la extracción
24. Microinterruptor ON/OFF terminal de tramo
25. Toma mini USB para actualización del firmware del dispositivo
26. Altavoz
27. Bornes (1 - 2) para alimentación adicional
28. Bornes para la conexión al BUS SCS 2 HILOS
29. Bornes (
) para la conexión de un pulsador externo de llamada a la planta
30. Bornes (1 - 5M) para la conexión de un timbre adicional. Ha de efectuar la conexión
punto - punto en los bornes de los timbres adicionales
18. Status notities aanwezig:
Rode led knippert = Ongelezen nieuwe aantekening(en)/bericht(en) op het
antwoordapparaat
19. Status uitsluiting beltoon:
Rode led brandt = Beltoon oproep gedeactiveerd
20. Functies (uitsluitend de iconen van de geconfigureerde functies worden weergegeven)
21. Plaats van de configuratiemodules (Zie “Functies configuratoren”)
22. Configurator J1: uitnemen als een extra voeding aanwezig is (aansluitklem 1 & 2)
23. Configurator J2: niet uitnemen voor een correcte werking
24. Microschakelaar ON/OFF van beëindiging traject
25. Mini-UBS-aansluiting voor de update van de firmware van het apparaat
26. Luidspreker
27. Aansluitklemmen (1 - 2) voor extra voeding
28. Aansluitklemmen voor de verbinding met de SCS 2-DRAADS BUS
29. Morsetti (
) voor de verbinding van een externe knop op de etage
30. Aansluitklemmen (1 - 5M) voor de verbinding van een extra beltoon. Verricht een punt -
punt verbinding op de aansluitklemmen van de extra beltonen
21
24
25
2626
22
23
27282930
1 2 4 5 6 3 7 8 10 9
19
18
17
20
121314151612
11
Nota: Cuando la app DOOR ENTRY se conecta al equipo (ej. contestar a una llamada,
visualizar una placa exterior, etc.), no se pueden ejecutar otras operaciones salvo la
de la tecla de apertura cerradura y tecla Favoritos (configurada para la función Luces
Escaleras o Mando Directo Cerradura) que sigue funcionando
Opmerking: Op het moment dat de DOOR ENTRY-app op de installatie aangesloten is
(bijv. beantwoorden van een oproep, weergave van een buitenpost, enz.), kunnen geen
andere handelingen worden verricht m.u.v. het gebruik van de toets openen slot en de
toets Favorieten (geconfigureerd voor de functie Traphuisverlichting of Directe Bediening
Slot), welke wel blijven werken
Nota: La imagen* representa el dispositivo con todas las funciones habilitadas.
Busque en el manual del instalador cómo habilitar las funciones.
* El fondo y los iconos ilustrados podrían no corresponder a los del dispositivo.
Opmerking: De afbeelding* toont het apparaat met ingeschakelde functies.
Raadpleeg de installatiehandleiding voor de inschakeling van de functies.
* De achtergrond en de weergegeven iconen kunnen van de achtergrond en de iconen op het apparaat afwijken.
La página se está cargando ...
La página se está cargando ...
La página se está cargando ...

8
Nota: Para receber as chamadas no smartphone, configurar exclusivamente como
Mestre
Funções dos configuradores
J1 J2 N
P M
J1 = Extrai caso esteja presente a alimentação adicional (borne 1 & 2)
J2 = para o correto funcionamento não extrair
NN = Endereço do dispositivo
PP = Endereço da UE através da qual você abre a fechadura com a UI em repouso e à
qual endereça o autoacendimento
MM = Modalidade de funcionamento segundo as tabelas das próximas páginas
M unidade = Configuração do botão capacitivo PREFERIDOS
M dezenas = Configurando das AÇÕES RÁPIDAS em Home page
Σημείωση: Για να λαμβάνετε κλήσεις στο smartphone σας, διαμορφώστε αποκλειστικά ως
Master
Λειτουργίες διαμορφωτών
J1 J2 N
P M
J1 = Αφαιρέστε αν υπάρχει μια πρόσθετη παροχή ηλεκτρικού ρεύματος (τερματικό 1 & 2)
J2 = Για την σωστή λειτουργία μην το αφαιρείται
NN = Διεύθυνση συσκευής
PP = Διεύθυνση του PE όπου ανοίγει την Κλειδαριά με PI κατά την ανάπαυση και το
οποίο πραγματεύεται την αυτοέναυση
MM = τρόπος λειτουργίας σύμφωνα με τους πίνακες στις σελίδες που ακολουθούν
Μ μονάδα = Διαμόρφωση χωρητικού πλήκτρου ΑΓΑΠΗΜΕΝΑ
Μ δεκάδες Διαμόρφωση ΓΡΗΓΟΡΩΝ ΔΡΑΣΕΩΝ στην Home page
Uwaga: W celu uzyskania połączenia na smartfonie, należy skonfigurować wyłącznie
jako Master
Funkcje konfiguratorów
J1 J2 N
P M
J1 = Wyjmij, jeśli jest obecny zasilacz pomocniczy (zacisk 1& 2)
J2 = Dla zapewnienia prawidłowego działania - nie wyjmuj
NN = Adres urządzenia
PP = Adres PZ, którego Zamek otwierasz za pomocą AW w stanie spoczynkowym, do
którego kierujesz samowłączenie
MM = Tryb pracy według tabel na następnych stronach
M jednostki = Konfiguracja klawisza pojemnościowego ULUBIONE
M dziesiątki = Konfiguracja funkcji SZYBKIE KROKI na Home page.
Pozn.: Abyste mohli přijímat hovory na smartphonu, nakonfigurujte výlučně jako Master
Funkce konfigurátorů
J1 J2 N
P M
J1 = Vytáhněte doplňkové napájení (svorka 1 & 2), pokud je přítomno
J2 = Pro správné fungování nevytahujte
NN = Adresa zařízení
PP = Adresa PE, z níž se otvírá zámek s PI v klidu a na kterou bude adresováno
samozapínání
MM = Mód fungování podle tabulek na následujících stránkách
M jednotky = Konfigurace kapacitního tlačítka OBLÍBENÉ
M desítky = Konfigurace RYCHLÝCH AKCÍ na Home page
Nota: è consigliato installare il Classe300X in prossimità del router Wi-Fi
Nota: è possibile installare un solo Classe300X per ogni rete Wi-Fi (SSID)
Nota: è possibile installare un solo Classe300X per appartamento
Note: It is recommended that the Classe300X is installed near the Wi-Fi router
Note: It is possible to install just one Classe300X for each Wi-Fi (SSID) network
Note: It is possible to install just one Classe300X for each apartment
Note : il est recommandé d’installer le dispositif Classe 300X à proximité du router Wi-Fi
Note : il est possible d’installer un seul dispositif Classe 300X pour chaque réseau Wi-Fi (SSID)
Note: un seul Classe300X peut être installé par appartement
Anmerkung: das Gerät Classe 300X möglichst in der Nähe des Routers Wi-Fi installieren
Anmerkung: es kann nur ein Gerät Classe 300X für jedes Wi-Fi-Netz (SSID) installiert werden
Anmerkung: Es kann nur eine Classe200X pro Wohnung installiert werden
Nota: es aconsejable instalar el Classe300X cerca del router Wi-Fi
Nota: se pueden instalar un solo Classe300X por cada red Wi-Fi (SSID)
Nota: posible instalar solamente un Classe300X por apartamento
Opmerking: het wordt aanbevolen om Classe300X in de buurt van de WiFi-router te installeren
Opmerking: per WiFi-netwerk (SSID) kan slechts één Classe300X worden geïnstalleerd
Opmerking: per appartement kan slechts één Classe300X worden geinstalleerd
Nota: recomenda-se instalar o Classe300X em proximidade do router Wi-Fi
Nota: é possível instalar apenas um Classe300X para cada rede Wi-Fi (SSID)
Nota: é possível instalar apenas um Classe300X por apartamento
Σημείωση: Σας συνιστούμε την εγκατάσταση του Classe300X δίπλα στο δρομολογητή Wi-Fi
Σημείωση: μπορείτε να εγκαταστήσετε μόνο ένα Classe300X για κάθε δίκτυο Wi-Fi (SSID)
Σημείωση: είναι δυνατή η εγκατάσταση μόνο ενός Classe300X ανά διαμέρισμα
Uwaga: zaleca się zainstalowanie Classe 300X niedaleko routera Wi-Fi
Uwaga: można zainstalować tylko jedno urządzenie Classe300X dla każdej z sieci Wi-Fi (SSID)
Uwaga: w mieszkaniu można zainstalować tylko jeden wideodomofon Classe300X
Pozn.: doporučujeme nainstalovat Classe300X do blízkosti routeru Wi-Fi
Pozn.: je možné nainstalovat pouze jeden Classe300X pro každou síť Wi-Fi (SSID)
Pozn.: je možné nainstalovat pouze jeden Classe300X do jednoho bytu
• Installazione Wi-Fi
• Wi-Fi Installation
• Installation Wi-Fi
• Installation Wi-Fi
• Instalación Wi-Fi
• WiFi-installatie
• Instalação Wi-Fi
• Wi-Fi Εγκατάσταση
• Instalacja Wi-Fi
• Instalace Wi-Fi
Verifica la qualità del segnale Wi-Fi dal display del dispositivo (vedi Manuale
Installatore), se è bassa o inesistente, assicurati che:
– il dispositivo non è installato vicino a grossi oggetti metallici o dispositivi
elettrici che possono generare campo elettromagnetico;
– tra il router/access point ed il Classe 300X ci siano meno pareti possibili.
Check the Wi-Fi signal quality from the device display (see the Installer Manual).
If it is low or does not exist, make sure that:
– the device is not installed near large metal objects or electric devices that can
generate electromagnetic field;
– there are fewer possible walls between the router/access point and the Classe 300X.
Zkontrolujte kvalitu signálu Wi-Fi z displeje zařízení (viz instalační příručka), pokud je
nízká nebo neexistuje, zkontrolujte, zda:
– zařízení není nainstalováno v blízkosti velkých kovových předmětů nebo
elektrických zařízení, které by mohly vytvářet elektromagnetické pole;
– mezi routerem/vstupním místem a Classe 300X je co nejméně stěn.
Sprawdź jakość sygnału Wi-fi z wyświetlacza urządzenia (patrz Instrukcja
instalatora), jeśli jest niska lub nie istnieje, upewnij się, że:
– urządzenie nie jest zainstalowane w pobliżu dużych metalowych przedmiotów
lub urządzeń elektrycznych, które mogą wytworzyć pole magnetyczne;
– między routerem/punktem dostępu a urządzeniem Classe300X jest możliwie
jak najmniej ścian
Ελέγξτε την ποιότητα του σήματος Wi-Fiαπό την οθόνη (δείτε Εγχειρίδιο τεχνικού
εγκατάστασης, αν είναι χαμηλή ή ανύπαρκτη, βεβαιωθείτε ότι:
– Η συσκευή δεν έχει εγκατασταθεί κοντά σε μεγάλα μεταλλικά αντικείμενα ή
ηλεκτρικές συσκευές με ισχυρό μαγνητικό πεδίο.
– Μεταξύ του σημείου router/access point και της Κλάσης 300X να υπάρχουν
λιγότεροι πιθανοί τοίχοι.
Verificar a qualidade do sinal Wi-Fi mediante o ecrã do dispositivo (consultar a
Manual do Instalador), se for baixa ou inexistente, certificar-se que:
– o dispositivo não esteja instalado em proximidade de grandes objetos
metálicos ou dispositivos elétricos que podem gerar campo eletromagnético;
– Entre o router/ponto de acesso e o Classe 300X haja o menor número de
paredes possível.
Verifieer de kwaliteit van het WiFi-signaal op het display van het apparaat (zie de
installatiehandleiding). Controleer het volgende als het zwak is of ontbreekt:
– het apparaat is niet geïnstalleerd in de buurt van grote metalen voorwerpen of
elektrische apparaten die een sterk elektromagnetisch veld kunnen opwekken;
– tussen de router/het access point en Class300X bevindt zich het kleinst mogelijke
aantal muren
Verifique la calidad de la señal Wi-Fi en la pantalla del dispositivo (véase el Manual
del Instalador), si es baja o inexistente, asegúrese de que:
– el dispositivo no se encuentre instalado cerca de objetos metálicos grandes o
dispositivos eléctricos que puedan generar un campo electromagnético;
– entre el router/access point y el Classe 300X haya menos paredes posibles.
Die Qualität des Wi-Fi-Signals am Display der Vorrichtung kontrollieren (siehe
Installationshandbuch). Wenn es zu schwach oder nicht vorhanden ist, Folgendes prüfen:
– Die Vorrichtung darf nicht in der Nähe von großen Metallgegenständen oder
elektrischen Vorrichtungen installiert sein, die ein Magnetfeld erzeugen können;
– Zwischen Router/Access Point und das Gerät Classe 300X sollten sich so wenig
Wände wie möglich befinden.
Contrôler la qualité du signal Wi-Fi depuis l'écran du dispositif (voir Manuel
Installateur) : si elle est basse ou si le signal est inexistant, s'assurer :
– que le dispositif n'est pas installé à proximité d'objets métalliques
volumineux ou de dispositifs électriques susceptibles de générer un champ
électromagnétique ;
– qu’entre le router/access point et le dispositif Classe 300X soit présent un
nombre minime de cloisons, si possible aucune.

9
– Tabiques de albañilería
– Paredes de madera
– Paredes de pladur
– Cloisons en dur
– Cloisons en bois
– Cloisons en placoplâtre
– Paredes divisórias de alvenaria
– Paredes de madeira
– Paredes de gesso cartonado
– Przegrody ścienne murowane
– Ściany drewniane
– Ściany gipsowo-kartonowe
– Partition masonry walls
– Wood walls
– Plasterboard walls
– Zděné příčky
– Dřevěné stěny
– Sádrokartonové stěny
– Muren van metselwerk
– Houten muren
– Gipsplaten muren
– Trennwände aus Mauerwerk
– Holzwände
– Wände aus Gipskarton
– Διαχωριστικοί τοίχοι από τούβλα
– Ξύλινοι τοίχοι
– Τοίχοι από γυψοσανίδα
– Pareti in cemento armato
– Pareti portanti
– Pareti in pietra
– Pareti metalliche
– Paredes de hormigón armado
– Paredes portantes
– Paredes de piedra
– Paredes metálicas
– Murs en ciment armé
– Murs porteurs
– Murs en pierre
– Cloisons métalliques
– Paredes de cimento armado
– Paredes estruturais
– Paredes de pedra
– Paredes metálicas
– Ściany z betonu zbrojonego
– Ściany nośne
– Ściany z kamienia
– Ściany metalowe
– Walls in reinforced concrete
– Load-bearing walls
– Stone walls
– Metal walls
– Železobetonové stěny
– Nosné stěny
– Kamenné stěny
– Kovové stěny
– Muren van gewapend beton
– Dragende muren
– Stenen muren
– Metalen muren
– Betonwände
– Tragende Wände
– Wände aus Stein
– Wände aus Metall
– Τοίχοι από οπλισμένο σκυρόδεμα
– Φέροντες τοίχοι
– Τοίχοι από πέτρα
– Μεταλλικοί τοίχοι
– Pareti divisorie in muratura
– Pareti in legno
– Pareti in cartongesso
Suggerito
Suggested
Recommandé
Empfohlen
Aconsejado
Aanbevolen
Sugere-se
Προτείνεται
Propozycja
Doporučeno
1
Verificare sempre il segnale Wi-Fi sul display del dispositivo, prima
dell’installazione definitiva degli oggetti.
Always check the Wi-Fi signal on the device display before final installation of the
objects.
Veiller à toujours contrôler le signal Wi-Fi sur l'écran du dispositif avant de
procéder à l'installation définitive des objets.
Immer das Wi-Fi.Signal immer am Display der Vorrichtung kontrollieren, bevor
Objekte endgültig installiert werden.
Verifique siempre la señal Wi-Fi en la pantalla del dispositivo antes de instalar
definitivamente los objetos.
Verifieer altijd het WiFi-signaal op het display van het apparaat alvorens de
elementen definitief te installeren.
Roga-se verificar sempre o sinal Wi-Fi no display do dispositivo, antes da
instalação definitiva dos objetos.
Eλέγξτε πάντα το σήμα Wi-Fi στην οθόνη του συστήματος, πριν από την οριστική
εγκατάσταση των αντικειμένων.
Zawsze należy sprawdzić sygnał Wi-Fi na wyświetlaczu urządzenia, przed
ostatecznym montażem obiektów.
Zkontrolujte vždy signál Wi-Fi zařízení před definitivní instalací předmětů.
La connessione del dispositivo ad una rete Wi-Fi è stata attivata
correttamente e configurata nell’apposita sezione.
The device has been correctly connected to the Wi-Fi network and configured
in the appropriate section.
La connexion du dispositif à un réseau Wi-Fi a été correctement activée et
configurée dans la section prévue à cet effet.
Der Anschluss der Vorrichtung an ein Wi-Fi-Netz wurde richtig aktiviert und im
entsprechenden Abschnitt konfiguriert.
La conexión del dispositivo a una red Wi-Fi se ha activado correctamente y
configurado en la sección correspondiente.
De WiFi-verbinding van het apparaat is correct geactiveerd en in het specifieke
deel geconfigureerd.
A conexão do dispositivo em uma rede Wi-Fi foi ativada corretamente e
configurada na secção a tal fim predisposta.
Η σύνδεση του συστήματος σε ένα δίκτυο Wi-Fi ενεργοποιήθηκε σωστά και
διαμορφώθηκε στην ειδική παράγραφο.
Połączenie urządzenia z siecią Wi-Fi zostało prawidłowo aktywowane i
skonfigurowane w odpowiedniej sekcji.
Připojení zařízení k síti Wi-Fi bylo správně aktivováno a konfigurováno v
příslušné sekci.
Il segnale Wi-Fi non è sufficiente per garantire il corretto trasferimento della
chiamata e le altre funzioni allo smartphone. Verifica le prescrizioni installative
Wi-Fi.
The Wi-Fi signal is not sufficient to ensure the correct call transfer and other
smartphone features. Check the Wi-Fi installation requirements.
Le signal Wi-Fi est insuffisant pour garantir correctement le transfert de
l'appel et les autres fonctions au smartphone. Contrôler les prescriptions
d'installation Wi-Fi.
Das Wi-Fi-Signal genügt nicht, um den Anruf und andere Funktionen an das
Smartphone übertragen zu können. Die Anweisungen zur Wi-Fi-Installation
kontrollieren.
La señal Wi-Fi no es suficiente para garantizar la transferencia correcta de la
llamada y las otras funciones al smartphone. Verifique las indicaciones para la
instalación Wi-Fi.
Het WiFi-signaal is niet sterk genoeg om de de doorschakeling van de oproep en
de andere functies op de smartphone. Verifieer de WiFi-installatievoorschriften.
O sinal Wi-Fi não é suficiente para garantir a correta transferência da chamada
e as demais funções ao smartphone. Roga-se verificar as prescrições de
instalação Wi-Fi.
Το σήμα Wi-Fi δεν είναι κατάλληλο για να εγγυηθεί την σωστή μεταφορά
κλήσης και τις άλλες λειτουργίες του smartphone. Ελέγξτε τις εγκατεστημένες
προδιαγραφές του Wi-Fi.
Sygnał Wi-Fi nie jest wystarczający, aby zagwarantować przekazanie
połączenia oraz innych funkcji do smartfona. Sprawdź wymagania
instalacyjne Wi-Fi.
Signál Wi-Fi není dostatečný, aby zaručil správné přepojení volání a dalších funkcí
na smartphone. Kontrola instalačních požadavků Wi-Fi.
1

10
Il configuratore fisico MM – (decine) decide quali sono le 4 icone di AZIONI RAPIDE che compaiono sulla HOME PAGE e che puoi attivare dal touch del display.
The MM - (tenths) physical configurator decides which are the 4 QUICK ACTIONS icons that appear on the HOME PAGE, and can be activated by touching the display.
Le configurateur physique MM – (dizaines) établit quelles sont les 4 icônes d’ACTIONS RAPIDE qui s’affiche sur la PAGE D’ACCUEIL et qu’il est possible d’activer depuis l’écran tactile.
Der physische Konfigurator MM - (Zehner) entscheidet welche 4 Symbole der SCHNELLFUNKTIONEN auf der HOMEPAGE angezeigt werden und über den Touchscreen aktiviert werden können.
El configurador físico MM – (decenas) decide los 4 iconos de las ACCIONES RÁPIDAS que aparecen en la Página de Inicio y que puede activar en la pantalla táctil.
De fysieke configurator MM – (tienden) bepaalt welke 4 iconen van de SNELTOETSEN op de HOMEPAGINA worden weergegeven en op het touchscreen geactiveerd kunnen worden.
O configurador físico MM - (dezenas) decide quais são os quatro ícones de AÇÕES RÁPIDAS que aparecem na HOME PAGE e que você pode ativar mediante o toque do display.
Ο φυσικός διαμορφωτής MM - (αποφασίζει) αποφασίζει ποια είναι τα τέσσερα εικονίδια στις ΓΡΗΓΟΡΕΣ ΔΡΑΣΕΙΣ που εμφανίζονται στην HOME PAGE και μπορείτε να ενεργοποιήσετε την οθόνη
αφής.
Konfigurator fizyczny MM – (dziesiątki) decyduje, jakie są cztery ikony funkcji SZYBKIE KROKI, które pojawiają się na HOME PAGE, i które możesz włączyć dotykowym wyświetlaczem.
Fyzický konfigurátor MM – (desítky) rozhoduje, jaké čtyři ikony RYCHLÝCH AKCÍ se zobrazí na HOME PAGE a bude možné je aktivovat pomocí dotykové obrazovky displeje.
Ti riportiamo le possibili configurazioni nella tabella seguente
The possible configurations are shown in the following table
Dans le tableau suivant sont indiquées les différentes configurations
possibles
In nachstehender Tabelle sind die möglichen Konfigurationen
zusammengefasst
La tabla siguiente contiene las configuraciones posibles
De volgende tabel bevat de mogelijke configuraties
Referimos as possíveis configurações na tabela a seguir
Αναφέρουμε τις πιθανές διαμορφώσεις στον ακόλουθο πίνακα
W poniższej tabeli podajemy możliwe konfiguracje
V následující tabulce jsou uvedeny možné konfiguracess
J1 J2 N
P M
• Configurazione fisica
• Physical configuration
• Configuration physique
• Physische Konfiguration
• Configuración física
• Fysieke configuratie
• Configuração física
• Φυσική Διαμόρφωση
• Konfiguracja fizyczna
• Fyzická konfigurace
Le funzioni che puoi attribure al tasto Preferiti (
) in modo fisico (tramite configuratore inserito nella sede MM-(unità)) sono le seguenti:
The functions that can be attributed to the Preferred key (
) using the physical procedure (configurator inserted in the MM - (units) socket) are the following:
Les fonctions qu’il est possible d’attribuer à la touche Favoris (
) en mode physique (à travers le configurateur placé dans le logement MM-(unité) sont les suivantes :
Die Funktionen, die der Taste Favoriten (
) physisch zugeordnet werden können (Konfigurator im Sitz MM-(Einheit)) sind folgende:
Las funciones a las que puede atribuir la tecla Favoritos (
) físicamente (mediante un configurador en el alojamiento MM-(unidad)) son las siguientes:
De volgende functies kunnen op fysieke wijze aan de toets Favorieten (
) worden toegekend (met de configuratie in MM-(eenheden)):
As funções que você pode atribuir ao botão Preferidos (
) em modo físico (por meio de configurador inserido no alojamento MM [unidade]) são as seguintes:
Οι λειτουργίες που μπορούν να αποδοθούν στο πλήκτρο Αγαπημένων (
) σε ένα φυσικό τρόπο (μέσω του διαμορφωτή σε θέση ΜΜ (μονάδα)) έχουν ως εξής:
Funkcje , które możesz przypisać klawiszowi Ulubione (
) w sposób fizyczny (za pomocą konfiguratora wprowadzonego do gniazda MM-(jednostki) są następujące:
Funkce, které je možné fyzicky přiřadit tlačítku Oblíbené (
) (pomocí konfigurátoru umístěného v uložení MM-(jednotka)), jsou následující:
MM =
0
Comando Luce Scale
Staircase Light Control
Commande Lumières Escaliers
Steuerung Treppenlicht
Mando Luz Escaleras
Bediening traphuisverlichting
Comando da Luz das Escadas
Εντολή Φως Κλίμακας
Sterowanie oświetleniem klatki schodowej
Ovládání osvětlení schodů
MM =
1
Comando diretto Serratura del P+1
Direct control of P+1 Door lock
Commande directe Serrure du P+1
Direkte Schlosssteuerung der S+1
Mando directo Cerradura del P+1
Directe bediening slot P+1
Comando direto da Fechadura do P+1
Εντολή άμεση Κλειδαριάς του P+1
Bezpośrednie sterowanie zamkiem P+1
Přímé ovládání zámku P+1
P
+1
MOD=9
P
+1
P
+2
MOD=9
P
+2
P
+1
MOD=5
P
+1
P
+1
2
3
1 32
346210
1
P
+2
MOD=5
P
+2
P
+2
2
3
1 32
346210
1
P
+3
MOD=5
P
+3
P
+3
2
3
1 32
346210
1
P
+3
MOD=9
P
+3
MM =
2
Comando diretto Serratura del P+2
Direct control of P+2 Door lock
Commande directe Serrure du P+2
Direkte Schlosssteuerung der S+2
Mando directo Cerradura del P+2
Directe bediening slot P+2
Comando direto da Fechadura do P+2
Εντολή άμεση Κλειδαριάς του P+2
Bezpośrednie sterowanie zamkiem P+2
Přímé ovládání zámku P+2
P
+1
MOD=9
P
+1
P
+2
MOD=9
P
+2
P
+1
MOD=5
P
+1
P
+1
2
3
1 32
346210
1
P
+2
MOD=5
P
+2
P
+2
2
3
1 32
346210
1
P
+3
MOD=5
P
+3
P
+3
2
3
1 32
346210
1
P
+3
MOD=9
P
+3
MM =
3
Comando diretto Serratura del P+3
Direct control of P+3 Door lock
Commande directe Serrure du P+3
Direkte Schlosssteuerung der S+3
Mando directo Cerradura del P+3
Directe bediening slot P+3
Comando direto da Fechadura do P+3
Εντολή άμεση Κλειδαριάς του P+3
Bezpośrednie sterowanie zamkiem P+3
DPřímé ovládání zámku P+3
P
+1
MOD=9
P
+1
P
+2
MOD=9
P
+2
P
+1
MOD=5
P
+1
P
+1
2
3
1 32
346210
1
P
+2
MOD=5
P
+2
P
+2
2
3
1 32
346210
1
P
+3
MOD=5
P
+3
P
+3
2
3
1 32
346210
1
P
+3
MOD=9
P
+3
MM =
4
Autoaccensione diretta del P+1
P+1 direct auto-switching on
Auto-allumage direct du P+1
Direkte Selbstschaltung der S+1
Autoencendido directo del P+1
Directe automatische P+1
Autoacendimento direto do P+1
Αυτοέναυση άμεση Ρ + 1
Samowłączenie bezpośrednie P+1
Přímé samozapínání P+1
P
+1
MOD=9
P
+1
P
2
3
1 32
346210
1
P
+2
MOD=9
P
+2
2
3
1 32
346210
1
P
+3
MOD=9
P
+3
2
3
1 32
346210
1
MM =
5
Autoaccensione diretta del P+2
P+2 direct auto-switching on
Auto-allumage direct du P+2
Direkte Selbstschaltung der S+2
Autoencendido directo del P+2
Directe automatische P+2
Autoacendimento direto do P+2
Αυτοέναυση άμεση Ρ + 2
Samowłączenie bezpośrednie P+2
Přímé samozapínání P+2
P
+1
MOD=9
P
+1
P
2
3
1 32
346210
1
P
+2
MOD=9
P
+2
2
3
1 32
346210
1
P
+3
MOD=9
P
+3
2
3
1 32
346210
1
MM =
6
Autoaccensione diretta del P+3
P+3 direct auto-switching on
Auto-allumage direct du P+3
Direkte Selbstschaltung der S+3
Autoencendido directo del P+3
Directe automatische P+3
Autoacendimento direto do P+3
Αυτοέναυση άμεση P+3
Samowłączenie bezpośrednie P+3
Přímé samozapínání P+3
P
+1
MOD=9
P
+1
P
2
3
1 32
346210
1
P
+2
MOD=9
P
+2
2
3
1 32
346210
1
P
+3
MOD=9
P
+3
2
3
1 32
346210
1
MM =
7
Cercapersone
Paging
Cherche-personne
Personenrufgerät
Busca
Personenzoeksysteem
Localizador
Δέκτης τηλεειδοποίησης
Pager
Pager
MM =
8
Intercom su se stesso
Internal intercom
Intercom sur soi-même
Intercom auf sich selbst
Intercomunicación en sí misma
Intercom op zich
Intercom sobre si mesmo
Ενδοεπικοινωνία για τον εαυτό του
Interkom w tym samym mieszkaniu
Intercom se stejným názvem
MM =
9
Attivazione/Disattivazione studio
professionale
Enabling/disabling Office function
Activation/Désactivation Bureau
Büro-Funktion aktivieren/deaktivieren
Activación/Desactivación Oficina Profesional
Activering/Deactivering professionele studio
Ativação/Desativação do Estúdio profissional
Ενεργοποίηση/Απενεργοποίηση Studio
Professional
Aktywacja/Dezaktywacja Gabinet Zawodowy
Aktivace/Deaktivace Profesionálního studia
J1 J2 N
P M
La configurazione deve essere eseguita a dispositivo disalimentato.
Attendere che i LED terminino di lampeggiare prima di utilizzarlo.
The configuration must be performed with the device disconnected from the power
supply. Before using it, wait for the LEDs to stop flashing.
La configuration doit être effectuée alors que le dispositif n’est pas alimenté.
Attendre que les voyants cessent de clignoter avant de l’utiliser.
Die Konfiguration muss bei ausgeschalteter Vorrichtung erfolgen.
Warten, bis die LED zu blinken aufhören, bevor Sie die Vorrichtung verwenden.
La configuración se ha de efectuar con el dispositivo no alimentado.
Espere hasta que los LEDs dejen de parpadear antes de usarlo.
Verricht de configuratie als het apparaat van de voeding is afgekoppeld.
Wacht tot de led niet langer knippert, alvorens het te gebruiken.
A configuração deve ser realizada sob condições de inactividade do dispositivo
(sem alimentação). Aguardar até que os LEDs parem de piscar antes de utilizá-lo.
Η διαμόρφωση θα πρέπει να δημιουργείται με την συσκευή εκτός τροφοδοσίας.
Αναμείνατε ώστε τα LED να σταματήσουν να αναβοσβήνουν πριν από την χρήση.
Konfiguracja musi być wykonana przy odłączonym urządzeniu.
Poczekaj przed użyciem, aż diody LED przestaną migać.
Konfiguraci je třeba provádět na odpojeném zařízení. Před použitím počkejte, až
kontrolky přestanou blikat.

11
Legenda Legend Légende Erläuterung Leyenda Legende Legenda Υπόμνημα Legenda Legenda
IT EN FR DE ES NL PT EL PL CZ
P
+1
MOD=9
P
+1
P
+2
MOD=9
P
+2
P
P
+1
MOD=5
P
+1
P
+1
2
3
1 32
346210
1
P
+2
MOD=5
P
+2
P
+2
2
3
1 32
346210
1
P
+3
MOD=5
P
+3
P
+3
2
3
1 32
346210
1
P
+4
MOD=5
P
+4
P
+4
2
3
1 32
346210
1
1–+ 23 4
P
+3
MOD=9
P
+3
1–+ 23 4
2
3
1 32
346210
1
Attivazione del PE
(configurato con P+1)
in mo do di ret to sen za
la chia mata op pu re
at tivazione at tua to re
art. 346200/346210
(con fi gu rato con P+1
e MOD=9).
Activating the EP
(configured with
P+1) directly without
the call or ac ti va-
ting actuator Item
346200/346210 (con-
fi gured with P+1 and
MOD=9).
Activation du PE
(con fi guré avec P+1)
en mode direct sans
l’appel ou activation
actionneur réf.
346200/346210
(configuré avec P+1
et MOD=9).
Aktivierung der
Türstation (mit P+1
konfiguriert) auf
direkte Weise ohne
Ruf oder Aktivierung
über den Aktivator art.
346200/346210 (mit
P+1 und MOD=9).
Activación del PE
(configurado con
P+1) en modo
directo sin lla ma-
da o activación
del actuador art.
346200/346210
(configurado con P+1
y MOD=9).
Rechtstreekse
activering van het
deur station (als P+1
ge con fi gu reerd)
zonder oproep of ac ti-
ve ring van het toestel
art. 346200/346210
(ge con fi gureerd als
P+1 en MOD = 9).
Ligação da UE (con-
figurada com P+1) de
maneira directa sem
a cha ma da ou então
ligação do ac tua dor
art. 346200/346210
(configurado com
P+1 e MOD=9).
Ενεργοποίηση του ΡΕ
(διαμορφωμένο με Ρ
+ 1) απευθείας, χωρίς
προηγούμενη κλήση
ή ενεργοποίηση
του ενεργοποιητή
αντ. 346200/346210
(διαμορφωμένο με Ρ +
1 και MOD = 9).
Włączenie Panelu
Zewnętrznego (PZ)
(skonfigurowanego
z P+1) w sposób
bezpośredni
bez wywołania
lub włączenie
przekaźnika art
.346200/346210
(skonfigurowanego z
P+1 i MOD=9)
Aktivace PE
(nakonfigurován
s P+1) přímým
způsobem bez
volání nebo aktivace
akčního členu ref.
346200/346210
(nakonfigurován s P+1
a MOD=9).
P
+1
MOD=9
P
+1
P
+2
MOD=9
P
+2
P
P
+1
MOD=5
P
+1
P
+1
2
3
1 32
346210
1
P
+2
MOD=5
P
+2
P
+2
2
3
1 32
346210
1
P
+3
MOD=5
P
+3
P
+3
2
3
1 32
346210
1
P
+4
MOD=5
P
+4
P
+4
2
3
1 32
346210
1
1–+ 23 4
1–+ 23 4
P
+3
MOD=9
P
+3
1–+ 23 4
Apertura serratura
del PE (con fi gurato
con P+1) in mo do
di retto senza la
chia mata op pu re
at ti va zione attuatore
art.346200/346210
(con figurato con P+1
e MOD=5) op pu re
at ti va zione attuatore
art.346230 (con-
figurato con P+1).
Door lock opening of
EP (con figured with
P+1) directly without
the call or activating
the actuator Item
346200/346210 (con-
figured with P+1 and
MOD=5) or activating
the actuator Item
346230 (configured
with P+1).
Ouverture serrure
du PE (con fi gu ré
avec P+1) en mode
di rect sans l’appel ou
ac ti vation ac tion neur
réf. 346200/346210
(con fi gu ré avec P+1
et MOD=5) ou ac ti-
va tion ac tion neur réf.
346230 (con fi gu ré
avec P+1).
Türöffnung der
Türstation (mit P+1
konfiguriert) oder
Aktivierung über
den Aktivator Art.
346200/346210 (mit
P+1 und MOD=5) oder
Aktivierung über den
Aktivator Art. 346230
(mit P+1 konfiguriert).
Apertura cerradura
del PE (con figurado
con P +1) en modo
directo sin llamada
o activación del
actuador art.
346200/346210 (con-
fi gurado con P+1 y
MOD=5) o ac ti vación
del actuador art.
346230 (con fi gu rado
con P+1).
Rechtstreekse opening
van het deurslot van het
als P+1 ge con figureerde
deurstation, zonder
oproep of activering
van het to e stel art.
346200/346210 (ge-
con fi gu re erd als P+1 en
MOD=5) of ac ti ve ring
van het toestel art.
346230 (ge con figureerd
als P+1).
Abertura da
fechadura da UE
(configurada com
P+1) de ma nei-
ra directa sem a
chamada ou então
ligação do actuador
art. 346200/346210
(configurado com
P+1 e MOD=5) ou
então ligação do
actuador art. 346230
(con fi gu ra do com
P+1).
Άνοιγμα κλειδαριάς
του ΡΕ (διαμορφωμένο
με Ρ + 1) απευθείας,
χωρίς προηγούμενη
κλήση ή ενεργοποίηση
του ενεργοποιητή
αντ. 346200/346210
(διαμορφωμένο με
Ρ + 1 και MOD = 5)
ή ενεργοποίηση
του ενεργοποιητή
αντ.346230
(διαμορφωμένο με
Ρ+1).
Otwieranie
zamka Panelu
zewnętrznego (PZ) w
sposób bezpośredni
bez wywołania
lub uaktywnienie
przekaźnika
art.346200/346210
(skonfigurowanego
z P1+1 i MOD=5)
lub przekaźnika
art. 346230
(skonfigurowanego
z P+1).
Otvírání zámku PE
(nakonfigurován
s P+1) přímým
způsobem bez
volání nebo aktivace
akčního členu ref.
346200/346210
(nakonfigurován s
P+1 a MOD=5) nebo
aktivace akčního
členu ref. 346230
(nakonfigurován s
P+1).
P
+1
MOD=9
P
+1
P
+2
MOD=9
P
+2
P
P
+1
MOD=5
P
+1
P
+1
2
3
1 32
346210
1
P
+2
MOD=5
P
+2
P
+2
2
3
1 32
346210
1
P
+3
MOD=5
P
+3
P
+3
2
3
1 32
346210
1
P
+4
MOD=5
P
+4
P
+4
2
3
1 32
346210
1
1–+ 23 4
1–+ 23 4
P
+3
MOD=9
P
+3
1–+ 23 4
Apertura serratura
del PE (con fi gurato
con P+2) in mo do
di retto senza la
chia mata op pu re
at ti va zione attuatore
art.346200/346210
(con figurato con P+2
e MOD=5) op pu re
at ti va zione attuatore
art.346230 (con-
figurato con P+2).
Door lock opening of
EP (con figured with
P+2) directly without
the call or activating
the actuator Item
346200 (con figured
with P+2 and MOD=5)
or activating the
actuator Item 346230
(configured with P+2).
Ouverture serrure
du PE (con fi gu ré
avec P+2) en mode
di rect sans l’appel ou
ac ti vation ac tion neur
réf. 346200 (con fi gu ré
avec P+2 et MOD=5)
ou ac ti va tion ac tion-
neur réf. 346230 (con-
fi gu ré avec P+2).
Türöffnung der
Türstation (mit P+2
konfiguriert) oder
Aktivierung über
den Aktivator Art.
346200/346210 (mit
P+2 und MOD=5) oder
Aktivierung über den
Aktivator Art. 346230
(mit P+2 konfiguriert).
Apertura cerradura
del PE (con figurado
con P+2) en modo
di recto sin llamada
o activación del
actuador art.
346200/346210 (con-
fi gurado con P+2 y
MOD=5) o ac ti vación
del actuador art.
346230 (con fi gu rado
con P+2).
Rechtstreekse opening
van het deurslot van
het als P+2 ge con-
figureerde deurstation,
zonder oproep of
activering van het to e-
stel art. 346200/346210
(ge con fi gu re erd als
P+2 en MOD=5) of ac-
ti ve ring van het toestel
art. 346230 (ge con-
figureerd als P+2).
Abertura da
fechadura da UE
(configurada com
P+2) de ma nei-
ra directa sem a
chamada ou então
ligação do actuador
art. 346200/346210
(configurado com
P+2 e MOD=5) ou
então ligação do
actuador art. 346230
(con fi gu ra do com
P+2).
Άνοιγμα κλειδαριάς
του ΡΕ (διαμορφωμένο
με Ρ +2) απευθείας,
χωρίς προηγούμενη
κλήση ή ενεργοποίηση
του ενεργοποιητή
αντ. 346200/346210
(διαμορφωμένο με
Ρ + 2 και MOD =
5) ή ενεργοποίηση
του ενεργοποιητή
αντ.346230
(διαμορφωμένο με
Ρ+2).
Otwieranie zamka PZ
(skonfigurowanego
z P+2) w sposób
bezpośredni bez
wywołania lub
uaktywnienie
przekaźnika
art.346200/346210
(skonfigurowanego
z P+2 i MOD=5)
lub przekaźnika
art.346230
(skonfigurowanego
z P+2).
Otvírání zámku PE
(nakonfigurován
s P+2) přímým
způsobem bez
volání nebo aktivace
akčního členu ref.
346200/346210
(nakonfigurován s
P+2 a MOD=5) nebo
aktivace akčního
členu ref. 346230
(nakonfigurován s
P+2).

12
Legenda Legend Légende Erläuterung Leyenda Legende Legenda Υπόμνημα Legenda Legenda
IT EN FR DE ES NL PT EL PL CZ
P
+1
MOD=9
P
+1
P
+2
MOD=9
P
+2
P
P
+1
MOD=5
P
+1
P
+1
2
3
1 32
346210
1
P
+2
MOD=5
P
+2
P
+2
2
3
1 32
346210
1
P
+3
MOD=5
P
+3
P
+3
2
3
1 32
346210
1
P
+4
MOD=5
P
+4
P
+4
2
3
1 32
346210
1
1–+ 23 4
1–+ 23 4
P
+3
MOD=9
P
+3
1–+ 23 4
Apertura serratura
del PE (con fi gurato
con P+3) in mo do
di retto senza la
chia mata op pu re
at ti va zione attuatore
art.346200/346210
(con figurato con P+3
e MOD=5) op pu re
at ti va zione attuatore
art.346230 (con-
figurato con P+3).
Door lock opening of
EP (con figured with
P+3) directly without
the call or activating
the actuator Item
346200/346210 (con-
figured with P+3 and
MOD=5) or activating
the actuator Item
346230 (configured
with P+3).
Ouverture serrure du
PE (con fi gu ré avec
P+3) en mode di rect
sans l’appel ou ac-
ti vation ac tion neur
réf. 346200/346210
(con fi gu ré avec P+3
et MOD=5) ou ac ti-
va tion ac tion neur
réf. 346230 (con fi gu-
ré avec P+3).
Türöffnung der
Türstation (mit P+3
konfiguriert) oder
Aktivierung über
den Aktivator Art.
346200/346210 (mit
P+3 und MOD=5)
oder Aktivierung
über den Aktivator
Art. 346230 (mit P+3
konfiguriert).
Apertura cerradura
del PE (con figurado
con P+3) en modo
di recto sin llamada
o activación del
actuador art.
346200/346210 (con-
fi gurado con P+3 y
MOD=5) o ac ti vación
del actuador art.
346230 (con fi gu rado
con P+3).
Rechtstreekse
opening van het
deurslot van het als
P+3 ge con figureerde
deurstation, zonder
oproep of activering
van het to e stel art.
346200/346210
(ge con fi gu re erd als
P+3 en MOD=5) of
ac ti ve ring van het
toestel art. 346230
(ge con figureerd als
P+3).
Abertura da
fechadura da UE
(configurada com
P+3) de ma nei-
ra directa sem a
chamada ou então
ligação do actuador
art. 346200/346210
(configurado com
P+3 e MOD=5) ou
então ligação do
actuador art. 346230
(con fi gu ra do com
P+3).
Άνοιγμα κλειδαριάς
του ΡΕ
(διαμορφωμένο με Ρ
+3) απευθείας, χωρίς
προηγούμενη κλήση
ή ενεργοποίηση
του ενεργοποιητή
αντ. 346200/346210
(διαμορφωμένο με
Ρ + 3 και MOD =
5) ή ενεργοποίηση
του ενεργοποιητή
αντ.346230
(διαμορφωμένο με
Ρ+3).
Otwieranie
zamka PZ
(skonfigurowanego
z P+3) w sposób
bezpośredni bez
wywołania lub
uaktywnienie
przekaźnika
art.346200/346210
(skonfigurowanego
z P+3 i MOD=5)
lub przekaźnika
art.346230
(skonfigurowanego
z P+3).
Otvírání zámku PE
(nakonfigurován
s P+3) přímým
způsobem bez
volání nebo aktivace
akčního členu ref.
346200/346210
(nakonfigurován s
P+3 a MOD=5) nebo
aktivace akčního
členu ref. 346230
(nakonfigurován s
P+3).
P
+1
MOD=9
P
+1
P
+2
MOD=9
P
+2
P
P
+1
MOD=5
P
+1
P
+1
2
3
1 32
346210
1
P
+2
MOD=5
P
+2
P
+2
2
3
1 32
346210
1
P
+3
MOD=5
P
+3
P
+3
2
3
1 32
346210
1
P
+4
MOD=5
P
+4
P
+4
2
3
1 32
346210
1
1–+ 23 4
1–+ 23 4
P
+3
MOD=9
P
+3
1–+ 23 4
Apertura serratura
del PE (con fi gurato
con P+4) in mo do
di retto senza la
chia mata op pu re
at ti va zione attuatore
art.346200/346210
(con figurato con P+4
e MOD=5) op pu re
at ti va zione attuatore
art.346230 (con-
figurato con P+4).
Door lock opening of
EP (con figured with
P+4) directly without
the call or activating
the actuator Item
346200/346210 (con-
figured with P+4 and
MOD=5) or activating
the actuator Item
346230 (configured
with P+4).
Ouverture serrure du
PE (con fi gu ré avec
P+4) en mode di rect
sans l’appel ou ac-
ti vation ac tion neur
réf. 346200/346210
(con fi gu ré avec P+4
et MOD=5) ou ac ti-
va tion ac tion neur
réf. 346230 (con fi gu-
ré avec P+4).
Türöffnung der
Türstation (mit P+4
konfiguriert) oder
Aktivierung über
den Aktivator Art.
346200/346210 (mit
P+4 und MOD=5)
oder Aktivierung
über den Aktivator
Art. 346230 (mit P+4
konfiguriert).
Apertura cerradura
del PE (con figurado
con P+4) en modo
di recto sin llamada
o activación del
actuador art.
346200/346210 (con-
fi gurado con P+4 y
MOD=5) o ac ti vación
del actuador art.
346230 (con fi gu rado
con P+4).
Rechtstreekse
opening van het
deurslot van het als
P+4 ge con figureerde
deurstation, zonder
oproep of activering
van het to e stel art.
346200/346210
(ge con fi gu re erd als
P+4 en MOD=5) of ac-
ti ve ring van het toestel
art. 346230 (ge con-
figureerd als P+4).
Abertura da
fechadura da UE
(configurada com
P+4) de ma nei-
ra directa sem a
chamada ou então
ligação do actuador
art. 346200/346210
(configurado com
P+4 e MOD=5) ou
então ligação do
actuador art. 346230
(con fi gu ra do com
P+4).
Άνοιγμα κλειδαριάς
του ΡΕ
(διαμορφωμένο με Ρ
+4) απευθείας, χωρίς
προηγούμενη κλήση
ή ενεργοποίηση
του ενεργοποιητή
αντ. 346200/346210
(διαμορφωμένο με
Ρ + +4 και MOD =
5) ή ενεργοποίηση
του ενεργοποιητή
αντ.346230
(διαμορφωμένο με
Ρ+4).
Otwieranie
zamka PZ
(skonfigurowanego
z P+4) w sposób
bezpośredni bez
wywołania lub
uaktywnienie
przekaźnika
art.346200/346210
(skonfigurowanego
z P+4 i MOD=5)
lub przekaźnika
art.346230
(skonfigurowanego
z P+4).
Otvírání zámku PE
(nakonfigurován
s P+4) přímým
způsobem bez
volání nebo aktivace
akčního členu ref.
346200/346210
(nakonfigurován s
P+4 a MOD=5) nebo
aktivace akčního
členu ref. 346230
(nakonfigurován s
P+4).
Intercom tra
appartamenti in
impianti con interfaccia
da appartamento art.
346850.
Intercommunicability
between apartments
in systems with
apartment interface
item 346850.
Intercommunication
entre appartements
sur installations
avec interface
d’appartement réf.
346850.
Gegenseitige Kom-
munikation zwischen
Wohnungen für
Anlagen mit Woh-
nungsschnittstelle
Art. 346850.
Intercomunicación
entre apartamentos
en instalaciones
con interfaz de
departamento Art.
346850.
Intercom tussen
appartementen
in installaties
met interface van
appartement art.
346850.
Intercom entre
apartamentos
em instalações
com interface de
apartamento art.
346850.
Ενδοεπικοινωνία
σε διαμερίσματα
με συστήματα
με διεπαφή από
διαμέρισμα αντ.
346850.
Interkom między
mieszkaniami
w instalacjach
z interfejsem
mieszkania art.
346850.
Intercom mezi byty v
systémech s bytovým
rozhraním ref.
346850.

13
Legenda Legend Légende Erläuterung Leyenda Legenda Legenda Υπόμνημα Legenda Legenda
IT EN FR DE ES NL PT EL PL CZ
Intercom all’interno
dell’appartamento
in impianti con
interfaccia di
appartamento
art.346850; oppure
intercom tra
appartamenti in
impianti senza
interfaccia di
appartamento.
Intercommunicability
inside an apartment
in systems with
apartment interface
item 346850 or
intercommunicability
between apartments
in systems without
apartment interface.
Intercommunication
à l’intérieur de
l’appartement
sur installations
avec interface
d’appartement
réf. 346850 ou
intercommunication
entre appartements
sur installations
sans interface
d’appartement.
Gegenseitige
Kommunikation
innerhalb der Wohnung
für Anlagen mit
Wohnungsschnittstelle
Art. 346850 oder
gegenseitige
Kommunikation
zwischen Wohnungen
für Anlagen ohne
Wohnungsschnittstelle.
Intercomunicación
en el apartamento
en instalaciones
con interfaz de
apartamento
Art. 346850 o
intercomunicación
entre apartamentos
en instalaciones
sin interfaz de
apartamento.
Intercom binnen in
het appartement
in installaties
met interface van
appartement art.
346850 ofwel intercom
tussen appartementen
in installaties
zonder interface van
appartement.
Intercom dentro
do apartamento
em instalações
com interface de
apartamento art.
346850 ou então
intercom entre
apartamentos
em instalações
sem interface de
apartamento.
Ενδοεπικοινωνία
μέσα στο διαμέρισμα
σε συστήματα
με διεπαφής
διαμερίσματος
αντ. 346850 ή
ενδοεπικοινωνίας
μεταξύ
διαμερισμάτων
σε συστήματα
χωρίς διασύνδεση
διαμερίσματος.
Interkom pomiędzy
aparatami
wewnętrznymi
w mieszkaniu
w instalacjach
z interfejsem
art.346850; lub
interkom pomiędzy
mieszkaniami
w instalacjach
bez interfejsu
mieszkania.
Intercom uvnitř
bytu v systémech s
bytovým rozhraním
ref. 346850; nebo
intercom mezi byty
v systémech bez
bytového rozhraní.
Intercom su se
stesso, invia la
chiamata a tutti
gli apparecchi con
uguale indirizzo
Intercom on itself,
sends the call to all
the devices with the
same address.
Intercom sur
lui-même, envoie
l’appel à tous les
appareils ayant une
adresse identique.
Intercom mit einseitiger
Funktion: sendet den
Ruf an alle Geräte mit
derselben Adresse.
Intercomunicación
hacia los aparatos
iguales, envía la
llamada a todos los
aparatos con igual
dirección
Intercom op zichzelf,
verstuurt de oproep
naar alle toestellen met
hetzelfde adres
Intercomunicador
sobre si mesmo,
envia a chamada a
todos os aparelhos
com endereço
igual
Ενδοεπικοινωνία
στον εαυτό του,
στέλνει την κλήση σε
όλες τις συσκευές με
την ίδια διεύθυνση
Interkom w tym
samym mieszkaniu
wywołuje wszystkie
aparaty z tym
samym adresem.
Intercom se stejným
názvem, odesílá
volání všem
přístrojům je stejnou
adresou
Cercapersone,
effettua una
intercom generale,
invia una chiamata a
tutti gli apparecchi
dell’impianto.
Paging, it makes
general intercom
and sends a call to all
the handsets of the
system.
Cherche-personne,
effectue une
intercom générale,
envoie un appel à
tous les appareils de
l’installation.
Personenrufgerät,
Intercom mit
allgemeiner Funktion,
sendet den Ruf an alle
Geräte der Anlage
Busca, realiza una
intercom general,
envía una llamada a
todos los aparatos
del sistema.
Personenzoeksysteem,
verricht een algemene
intercom, stuurt een
oproep naar alle
apparaten van de
installatie.
Localizador,
efetua uma
intercomunicação
geral, envia uma
chamada a todas
as unidades da
instalação.
Δέκτης
τηλεειδοποίησης,
πραγματοποιεί
μια γενική
ενδοειδοποίηση,
αποστέλλει μια
κλήση σε όλες
τις συσκευές του
συστήματος.
Pager, poprzez
interkom ogólny,
wysyła wywołanie
do wszystkich
aparatów w
systemie.
Pager provádí
všeobecnou
interkomunikaci,
odesílá volání všem
přístrojům systému.
La página se está cargando ...

15
Per un corretto accoppiamento magnetico tra PI ed apparecchio acustico ti consigliamo di posizionarti frontalmente al dispositivo ad una distanza di 25 – 35 cm.
Ti ricordiamo che la presenza di metallo e rumore di fondo generato da apparecchiature elettriche/elettroniche (es. computer), può compromettere la qualità e le perfomace del
dispositivo di accoppiamento.
To ensure correct magnetic coupling between the IU and the acoustic device, we recommend a position in front of the device, at a distance of 25 – 35 cm.
It is reminded that the presence of metal and background noise generated by electric/electronic devices (e.g. computer) may compromise the performance and the quality of the coupling
device.
Pour garantir un bon accouplement magnétique entre PI et appareil acoustique, il est recommandé de se placer face au dispositif à une distance de 25 – 35 cm.
Il est rappelé que la présence de métal et de bruit de fond généré par des appareillages électriques/électroniques (ex. ordinateurs) peut compromettre la qualité et les performances
du dispositif d’accouplement.
Zur richtigen magnetischen Kopplung zwischen TS und akustisches Gerät, empfehlen wir, sich vor das Gerät in einem Abstand von 25 – 35 cm zu stellen.
Bitte beachten Sie, das Metallgegenstände und Grundgeräusche elektrischer/elektronischer Geräte (z.B. PC) die Qualität und Leistung der Kopplungsvorrichtung beeinträchtigen können.
Para un correcto acoplamiento magnético entre la UI y el aparato acústico, le aconsejamos situarse en frente del dispositivo a una distancia aproximada de 25 – 35 cm.
Recuerde que la presencia de metal y ruido de fondo generado por aparatos eléctricos/electrónicos (por ejemplo un PC) puede comprometer la calidad y la eciencia del dispositivo de
acoplamiento.
Voor een correcte magnetische koppeling tussen de binnenpost en het akoestische apparaat raden we aan om op circa 25 – 35 cm voor het apparaat te gaan staan.
Onthoud dat de aanwezigheid van metaal en achtergrondgeluid veroorzaakt door elektrische/elektronische apparatuur (bijv. computer) de kwaliteit en de prestaties van het koppelapparaat
kunnen beïnvloeden.
Para um correto acoplamento magnético entre a Unidade Interna e o aparelho acústico sugerimos-lhe posicionar-se frontalmente ao dispositivo numa distância de 25 – 35 cm.
Lembramos-lhe que a presença de metal e ruído de fundo, gerado por equipamentos elétricos/eletrônicos (por exemplo: computador), pode afetar a qualidade e o desempenho do
dispositivo de acoplamento.
Για τη σωστή μαγνητική σύζευξη μεταξύ του PI και της ακουστικής συσκευής σας προτείνουμε την εμπρόσθια θέση στο σύστημα σε μια απόσταση 25 – 35 cm.
Παρακαλώ σημειώστε ότι η παρουσία του μετάλλου και του θορύβου που παράγεται από ηλεκτρικές/ηλεκτρονικές συσκευές (π.χ.. Υπολογιστών), μπορούν να επηρεάσουν την ποιότητα και την
απόδοση της διάταξης ζεύξης.
W celu prawidłowego sprzężenia magnetycznego pomiędzy aparatem wewnętrznym (AW) i aparatem akustycznym, należy się ustawić naprzeciw urządzenia w odległości 25 – 35 cm.
Należy pamiętać, że obecność metalu i hałas generowany przez sprzęt elektryczny/elektroniczny (np. komputer) może mieć wpływ na jakość i wydajność urządzenia sprzęgającego.
Pro správné magnetické spojení mezi PI a akustickým zařízením doporučujeme se postavit čelně k zařízení do vzdálenosti 25 – 35 cm.
Připomínáme, že přítomnost kovu a šumu na pozadí vytvářeného elektrickými/elektronickými přístroji (např. počítače) by mohla ovlivnit kvalitu a výkonnost spojovacího zařízení.
• Commuta l’apparecchio acustico in posizione T
• Switch the acoustic device to the T position
• Commuter l’appareil acoustique sur la position T
• Umschalten des akustischen Geräts auf Position T
• Conmuta el aparato acústico a la posición T
• Schakelt het akoestische apparaat in positie T om
• Comuta o aparelho acústico em posição T
• Ματαγάγει την ακουστική συσκευή σε θέση του Τ
• Przełącza aparat akustyczny w położenie T
• Přepojuje akustické zařízení do polohy T
• Utilizzo teleloop
• Inductive loop use
• Utilisation teleloop
• Gebrauch des Teleloops
• Uso del teleloop
• Gebruik teleloop
• Utilização teleloop
• Χρήση Teleloop
• Zastosowanie teleloop (pętli indukcyjnej)
• Použití teleloop
2
5
-35
c
m
4
0
cm
• Funzione Stato porta
• Door state function
• Fonction État porte
• Funktion Türzustand
• Función Estado puerta
• Staat deur
• Função Estado porta
• Λειτουργία Κατάστασης θύρας
• Funkcja Stan drzwi
• Funkce Stav dveří
Questa funzione segnala lo stato della serratura (solo se l’impianto è predisposto mediante apposito attuatore). Se è aperta il “led serratura” lampeggia, se è chiusa rimane spento. La funzione non
è attivabile contemporaneamente alla funzione Studio Professionale.
This function indicates the status of the door lock (only for systems preset with appropriate actuator). If open the „door lock LED“ flashes, and if closed, the LED stays off. The function cannot be activated
together with the Office function.
Cette fonction signale l’état de la serrure (uniquement si l’installation est prévue à cet effet avec actionneur). Si elle est ouverte, le “Voyant serrure” clignote, si elle est fermée, il reste éteint. La fonction
ne peut pas être activée conjointement à la fonction Bureau.
Diese Funktion meldet den Status des Schlosses (nur wenn die Anlage mit entsprechendem Aktor versehen ist). Wenn geöffnet, blinkt die „Led Schloss“; wenn geschlossen bleibt die Led ausgeschaltet. Die
Funktion kann nicht gleichzeitig mit der Büro-Funktion aktiviert werden.
Esta función indica el estado de la cerradura (solamente con el sistema predispuesto mediante el actuador correspondiente). Si está abierta, el “led cerradura” parpadea y si está cerrada permanece
apagado. La función no se puede activar al mismo tiempo que la función Oficina Profesional.
Deze functie geeft de status van het slot (uitsluitend als de installatie daarvoor is voorbereid met de specifieke actuator). De „led slot“ knippert als het slot ontgrendeld is. De led is uit als het slot vergrendeld
is. Deze functie en de functie Professionele studio kunnen niet tegelijkertijd worden geactiveerd.
Esta função indica o estado da fechadura (apenas se a instalação estiver predisposta mediante expresso atuador). Se estiver aberta o “led fechadura” resulta intermitente, se estiver fechada, permanece
desligado. A função não pode ser ativada simultaneamente à função Estúdio profissional.
Αυτή η λειτουργία δείχνει την κατάσταση της κλειδαριάς (μόνο αν το σύστημα είναι σχεδιασμένο χρησιμοποιώντας το κατάλληλο ενεργοποιητή). Εάν είναι ανοικτή το „led κλειδαριάς“ αναβοσβήνει, αν είναι
κλειστή παραμένει σβηστό. Η λειτουργία δεν ενεργοποιείται μαζί με τη λειτουργία Studio Professional.
Ta funkcja wskazuje stan zamka (tylko wtedy, gdy system jest zaprojektowany z wykorzystaniem odpowiedniego siłownika). Jeśli drzwi są otwarte „ led zamka” miga, jeśli są zamknięte, pozostaje
wyłączony. Funkcja nie jest aktywna razem z funkcją Gabinet Zawodowy.
Tato funkce signalizuje stav zámku (pouze pokud je k tomu systém přizpůsoben pomocí příslušného akčního členu). Jestliže je otevřen, “kontrolka zámku” bliká, jestliže je zavřen, zůstane zhasnutá. Tuto
funkci nelze aktivovat současně s funkcí Profesionální Studio

16
• Funzione Studio Professionale
• Office function
• Fonction Bureau
• Funktion Büro
• Función Oficina Profesional
• Functie professionele studio
• Função Escritório profissional
• Λειτουργία Studio Professional
• Funkcja Gabinet Zawodowy
• Funkce Profesionální Studio
La funzione Studio Professionale ti permette di impostare l’apertura automatica della serratura in caso di chiamata dal Posto Esterno, non puoi attivarla contemporaneamente alla funzione
Stato Porta. Il lampeggio del tasto serratura
( ) indica che la funzione è attivata.
The Office function gives the possibility of setting the automatic opening of the door lock in case of call from the Entrance Panel. It cannot be activated at the same time as the Door Status function. The
door lock key flashing ( ) indicates that the functions is active
.
La fonction Bureau permet de programmer l’ouverture automatique de la serrure en cas d’appel depuis le Poste Externe ; elle n’est pas activable conjointement à la fonction État Porte. Le
clignotement de la touche serrure
( ) indique que la fonction est activée.
Mit der Büro-Funktion kann das Schloss nach einem Ruf von der Türstation automatisch geöffnet werden; diese Funktion kann nicht gleichzeitig mit der Funktion Tür-Status aktiviert werden. Das Blinken
der Schlosstaste ( ) meldet, dass die Funktion aktiv ist
.
La función Oficina Profesional le permite configurar la apertura automática de la cerradura al recibir una llamada de la PE pero no la puede activar al mismo tiempo que la función Estado Puerta.
El parpadeo de la tecla cerradura
( ) indica la activación de la función.
Met de functie Professionele studio kunt u de automatische ontgrendeling van het slot bij een oproep vanaf de buitenpost instellen. Deze functie en de functie Status deur kunnen niet tegelijkertijd
worden geactiveerd. De toets slot ( ) knippert om aan te geven dat de functie geactiveerd is
.
A função Estúdio profissional permite-lhe definir a abertura automática da fechadura em caso de chamada da Unidade Externa, não pode ativá-la simultaneamente à função Estado da Porta.
A intermitência do botão da fechadura
( ) indica que a função está ativada.
Η λειτουργίαStudio Professional σας επιτρέπει να ορίσετε το αυτόματο άνοιγμα της κλειδαριάς σε περίπτωση κλήσης από την Εξωτερική Θέση, δεν μπορείτε να την ενεργοποιήσετε ταυτόχρονα κατά
την λειτουργία της Κατάστασης Θύρας. Η αναλαμπή του πλήκτρου κλειδώματος ( ) δείχνει ότι η λειτουργία είναι ενεργοποιημένη
.
Funkcja Gabinet Zawodowy umożliwia ustawienie automatycznego otwierania zamka w przypadku wywołania z Panelu Zewnętrznego, nie można jej włączyć razem z funkcją Stan Drzwi.
Miganie klawisza zamka
( ) wskazuje, że funkcja jest aktywna.
Funkce Profesionální Studio umožňuje nastavit automatické otvírání zámku v případě volání z Vnějšího místa, nelze ji aktivovat současně s funkcí Stavu dveří. Blikání tlačítka zámku ( ) označuje,
že funkce je aktivována.
• Funzione Cerca persone
• Paging function
• Fonction cherche-personnes
• Funktion Personensuche
• Función buscapersonas
• Functie buzzer
• Função de procura pessoas
• Λειτουργία Αναζήτησης ατόμων
• Funkcja Szukaj osoby
• Funkce Pager
Questa funzione ti permette di diffondere un messaggio vocale, dettato al microfono del dispositivo, tramite gli altoparlanti dell’impianto Diffusione sonora. Per attivarla devi toccare
l’apposita icona presente nel menù Intercom, il led verde acceso del tasto “Connessione” indica che la funzione è attiva. Per terminare la funzione premi il tasto “Connessione”.
This function can be used to send voice messages using the microphone of the device through the speakers of the sound system. To activate the function touch the appropriate icon on the Intercom
menu. The green “Connection” LED on indicates that the function is active. To disable the function press the ”Connection” key.
Cette fonction permet de diffuser un message vocal dicté au micro du dispositif, à travers les haut-parleurs du système de Diffusion sonore. Pour l’activer, il est nécessaire de toucher
l’icône présente dans le menu Intercom, le voyant vert allumé de la touche « Connexion » indique que la fonction est active. Pour mettre fin à la fonction, appuyer sur la touche
“Connexion”.
Mit dieser Funktion kann eine vokale Nachricht abgespielt werden, die über das Mikrophon der Vorrichtung aufgenommen worden ist und durch die Lautsprecher der Schalldiffusionsanlage
ausgetragen wird. Um sie zu aktivieren, das entsprechende Symbol im Intercom-Menü berühren. Wenn die grüne Led der Taste “Verbindung” leuchtet, ist die Funktion aktiv. Um die Funktion zu
beenden, die Taste “Verbindung” drücken.
Esta función le permite difundir un mensaje vocal, dictado al micrófono del dispositivo, mediante los altavoces del sistema de Difusión sonora. Para activarla ha de tocar el icono
correspondiente en el menú Intercomunicación, el led verde encendido de la tecla “Conexión” indica la activación de la función. Presione la tecla “Conexión” para interrumpir la función.
Met deze functie kan een stembericht (ingesproken in de microfoon van het apparaat) door de luidsprekers van de geluidsinstallatie worden afgespeeld. Om dit bericht te kunnen activeren dient u op
de specifieke icoon in het menu Intercom te drukken. De groene led van de toets “Verbinding” brandt als de functie geactiveerd is. Druk op de toets “Verbinding” om de functie te beëindigen.
Esta função permite-lhe divulgar uma mensagem de voz, ditada ao microfone do dispositivo, por meio de altifalantes da instalação de Difusão Sonora. Para ativá-la deverá tocar no
expresso ícone, presente no menu Intercom, o led verde aceso do botão “Conexão” indica que a função está ativa. Para concluir a função carregue no botão “Conexão”.
Αυτή η λειτουργία σας επιτρέπει να διαδώσετε ένα φωνητικό μήνυμα, στο μικρόφωνο της συσκευής, μέσω των ηχείων του ήχου. Για να το ενεργοποιήσετε θα πρέπει να πατήσετε το κατάλληλο εικονίδιο
στο Intercom μενού, το πράσινο LED στο πλήκτρο “Σύνδεση” υποδεικνύει ότι η λειτουργία είναι ενεργή. Για να τερματίσετε την λειτουργία, πιέστε το “Σύνδεση”.
Ta funkcja pozwala na rozpowszechnienie wiadomości głosowej, podyktowanej do mikrofonu urządzenia przez głośniki instalacji Systemu Dźwięku. Aby ją uaktywnić, należy dotknąć
specjalnej ikony w menu Interkom, włączona zielona dioda led klawisza „Połączenie” wskazuje, że funkcja jest aktywna. Aby wyłączyć funkcję, nacisnąć klawisz „Połączenie”.
Tato funkce umožňuje šířit hlasové zprávy nadiktované do mikrofonu zařízení pomocí reproduktorů zvukového systému. Chcete-li ji aktivovat, je třeba se dotknout příslušné ikony v menu Intercom.
Rozsvícená zelená kontrolka tlačítka “Připojení” označuje, že funkce je aktivní. Pro ukončení funkce stiskněte tlačítko “Připojení”.
Attention: le vidéophone doit respecter les règles d’installation suivantes:
– il doit être monté seulement à l’intérieur
– il ne doit pas être exposé à des suintements ou à des éclaboussures
– ne pas boucher les ouvertures d’aération
– il doit être utilisé uniquement sur des systèmes 2 fils SCS BTicino.
Tout usage impropre de la référence.
Caution: the video handset must respect the following installation rules:
– it must only be installed indoors
– it must not be exposed to water drops or splashes
– do not block the ventilation openings
– it must be used only on SCS BTicino 2-wire systems
An improper use of the item can compromise its safety features.
Attenzione: il videocitofono deve rispettare le seguenti regole installative:
– deve essere installato solo in ambienti interni
– non deve essere esposto a stillicidio o a spruzzi d’acqua
– non ostruire le aperture di ventilazione
– deve essere usato unicamente su sistemi 2 fili SCS BTicino.
Ogni uso improprio dell’articolo puó comprometterne le caratteristiche di sicurezza.
Achtung: die Videogegensprechanlage muss nach folgenden Regeln installiert werden:
- sie darf nur im Inneren installiert werden
- sie darf nicht Tropfen oder Spritzer ausgesetzt werden
- die Belüftungsschlitze dürfen nicht abgedeckt werden
- es darf nur eine 2-Draht SCS-System von BTicino verwendet werden.
Ein ungeeigneter Gebrauch der Vorrichtung kann die Sicherheitseigenschaften
beeinträchtigen.
Atención: el videoportero ha de respetar las siguientes reglas de instalación:
- se ha de instalar solamente en ambientes internos
- no se ha de exponer a goteos o a chorros de agua
- no se han de tapar las aperturas de ventilación
- se ha de usar únicamente en sistemas de 2 hilos SCS BTicino.
Un uso impropio del artículo puede comprometer sus características de seguridad
Προσοχή: το θυροτηλέφωνο πρέπει να τηρεί τους ακόλουθους κανόνες εγκατάστασης:
– Πρέπει να εγκατασταθεί μόνο σε εσωτερικούς χώρους
– Δεν πρέπει να εκτίθεται σε στάξιμο ή πιτσίλισμα του νερού
– Να μην εμποδίζει τις οπές εξαερισμού
– Πρέπει να χρησιμοποιείται μόνο για την SCS BTicino συστήματα 2 καλωδίων.
Οποιοδήποτε ακατάλληλη χρήση μπορεί να θέσει σε κίνδυνο τα χαρακτηριστικά ασφαλείας του.
Atenção: o intercomunicador vídeo deve respeitar as seguintes regras de instalação:
– deve ser instalado exclusivamente em ambientes internos
– não deve ficar exposto a gotejamentos ou a salpicos de água
– não obstruir as aberturas de ventilação
– deve ser utilizado exclusivamente em sistemas SCS BTicino de 2 fios.
Qualquer uso impróprio do artigo pode comprometer as suas características de segurança.
Uwaga: przy instalacji wideodomofonu należy przestrzegać poniższych przepisów:
– musi być zainstalowany w pomieszczeniach zamkniętych
– nie może być narażony na kapanie lub pryskanie wodą
– nie wolno zatykać otworów wentylacyjnych
– musi być użyty wyłącznie w 2-przewodowych systemach SCS Bticino.
Każde niewłaściwe użycie produktu może zmniejszyć jego bezpieczeństwo.
Opgelet: voor de beeldhuistelefoon gelden de volgende installatievoorschriften:
– uitsluitend binnen geïnstalleerd
– niet blootgesteld aan druppelend of spattend water
– de ventilatie-openingen worden niet afgesloten
– mag uitsluitend worden gebruikt in SCS 2-draads systemen van BTicino.
Door oneigenlijk gebruik van het artikel kan de veiligheid worden beïnvloed.
Pozor: domovní videotelefon musí dodržovat následující instalační pravidla:
– musí být nainstalován pouze v interiéru
– nesmí být vystaven kapající nebo stříkající vodě
– neblokujte větrací otvory
– musí být používán pouze s dvoukabelovými systémy SCS BTicino.
Jakékoliv nesprávné použití výrobku by mohlo ohrozit jeho bezpečnostní
charakteristiky.
Transcripción de documentos
1 2 3 4 5 6 7 21 8 9 10 22 23 24 25 11 20 19 18 17 26 12 16 15 14 13 26 30 29 28 27 12 Nota: La imagen* representa el dispositivo con todas las funciones habilitadas. Busque en el manual del instalador cómo habilitar las funciones. Opmerking: De afbeelding* toont het apparaat met ingeschakelde functies. Raadpleeg de installatiehandleiding voor de inschakeling van de functies. * El fondo y los iconos ilustrados podrían no corresponder a los del dispositivo. * De achtergrond en de weergegeven iconen kunnen van de achtergrond en de iconen op het apparaat afwijken. 1. Pantalla 7” (pantalla táctil) 2. Tecla apagado 3. App: toque para pasar a la página de información donde hay un QR Code que le permite bajarse la app DOOR ENTRY para interactuar con su dispositivo. 4. Fecha y hora 5. Conexión Wi-Fi 6. Asociación dispositivo/app y envío llamada habilitado/deshabilitado 7. Exclusión timbre 8. Activación Oficina Profesional 9. Micrófono 10. Activación Contestador 11. Acciones rápidas 12. Guías táctiles para invidentes 13. Tecla conexión: el encendido del led verde parpadeante indica una llamada entrante el encendido del led verde fijo indica la comunicación en curso 14. Autoencendido/Visualización cíclica: al presionar la tecla el LED rojo se enciende 15. Tecla Favoritos: al presionar la tecla el LED rojo se enciende (Configuración base = LUZ ESCALERAS. Para una configuración distinta, consulte la tabla de la configuración física en las páginas sucesivas.) 16. Tecla apertura cerradura: al presionar la tecla el LED rojo se enciende 17. Estado Wi-Fi: Led rojo parpadeante = Wi-Fi activado pero no conectado a una red Led apagado = Wi-Fi deshabilitado o correctamente en marcha Led verde fijo = el Classe 300X está cruzando datos con la app DOOR ENTRY (envío llamada, autoencendido) 1. Display 7” (touchscreen) 2. Uitschakeltoets 3. App: Aanraken om de informatiepagina te openen waarop een QR-code weergegeven wordt. Gebruik deze code om de DOOR ENTRY-app voor het gebruik van uw apparaat kunt downloaden. 4. Datum en tijd 5. WiFi-verbinding 6. Koppelen apparaat/app en doorschakelen oproep in-/uitgeschakeld 7. Uitsluiting beltoon 8. Activering professionele studio 9. Microfoon 10. Activering antwoordapparaat 11. Sneltoetsen 12. Tastgeleiders voor blinden 13. Toets verbinding: de groene led knippert om een binnenkomende oproep aan te geven de groene led brandt om een lopend gesprek aan te geven 14. Automatische inschakeling/cyclische weergave: bij een druk op de toets gaat de rode led branden 15. Toets Favorieten: bij een druk op de toets gaat de rode led branden (Standaardconfiguratie = TRAPHUISVERLICHTING. Voor een andere configuratie raadpleeg de tabel met de fysieke configuratie op de volgende pagina’s.) 16. Toets slotontgrendeling: bij een druk op de toets gaat de rode led branden 17. Status WiFi: Rode led knippert = WiFi geactiveerd maar niet met een netwerk verbonden Led uit = WiFi gedeactiveerd of werkt correct Groene led aan = Classe 300X wisselt gegevens uit met de DOOR ENTRY-app (doorschakelen oproep, automatische inschakeling) Nota: Cuando la app DOOR ENTRY se conecta al equipo (ej. contestar a una llamada, visualizar una placa exterior, etc.), no se pueden ejecutar otras operaciones salvo la de la tecla de apertura cerradura y tecla Favoritos (configurada para la función Luces Escaleras o Mando Directo Cerradura) que sigue funcionando Opmerking: Op het moment dat de DOOR ENTRY-app op de installatie aangesloten is (bijv. beantwoorden van een oproep, weergave van een buitenpost, enz.), kunnen geen andere handelingen worden verricht m.u.v. het gebruik van de toets openen slot en de toets Favorieten (geconfigureerd voor de functie Traphuisverlichting of Directe Bediening Slot), welke wel blijven werken 18. Status notities aanwezig: Rode led knippert = Ongelezen nieuwe aantekening(en)/bericht(en) op het antwoordapparaat 19. Status uitsluiting beltoon: Rode led brandt = Beltoon oproep gedeactiveerd 20. Functies (uitsluitend de iconen van de geconfigureerde functies worden weergegeven) 21. Plaats van de configuratiemodules (Zie “Functies configuratoren”) 22. Configurator J1: uitnemen als een extra voeding aanwezig is (aansluitklem 1 & 2) 23. Configurator J2: niet uitnemen voor een correcte werking 24. Microschakelaar ON/OFF van beëindiging traject 25. Mini-UBS-aansluiting voor de update van de firmware van het apparaat 26. Luidspreker 27. Aansluitklemmen (1 - 2) voor extra voeding 28. Aansluitklemmen voor de verbinding met de SCS 2-DRAADS BUS ) voor de verbinding van een externe knop op de etage 29. Morsetti ( 30. Aansluitklemmen (1 - 5M) voor de verbinding van een extra beltoon. Verricht een punt punt verbinding op de aansluitklemmen van de extra beltonen 18. Estado presencia notas: Led rojo parpadeante = nueva/s notas o mensaje/s en el contestador no leídos 19. Estado Exclusión timbre: Led rojo encendido = Timbre llamada desactivado 20. Funciones (aparecen solamente los iconos de las funciones configuradas) 21. Alojamiento configuradores (véase “Funciones configuradores”) 22. Configurador J1: extraiga la alimentación adicional si está presente (borne 1 & 2) 23. Configurador J2: para el funcionamiento correcto, no efectúe la extracción 24. Microinterruptor ON/OFF terminal de tramo 25. Toma mini USB para actualización del firmware del dispositivo 26. Altavoz 27. Bornes (1 - 2) para alimentación adicional 28. Bornes para la conexión al BUS SCS 2 HILOS ) para la conexión de un pulsador externo de llamada a la planta 29. Bornes ( 30. Bornes (1 - 5M) para la conexión de un timbre adicional. Ha de efectuar la conexión punto - punto en los bornes de los timbres adicionales 4 Funções dos configuradores J1 J2 N P Funkcje konfiguratorów M J1 J2 N P M J1 = Extrai caso esteja presente a alimentação adicional (borne 1 & 2) J2 = para o correto funcionamento não extrair Nota: Para receber as chamadas no smartphone, configurar exclusivamente como Mestre J1 = Wyjmij, jeśli jest obecny zasilacz pomocniczy (zacisk 1& 2) J2 = Dla zapewnienia prawidłowego działania - nie wyjmuj Uwaga: W celu uzyskania połączenia na smartfonie, należy skonfigurować wyłącznie jako Master NN = Endereço do dispositivo PP = Endereço da UE através da qual você abre a fechadura com a UI em repouso e à qual endereça o autoacendimento MM = Modalidade de funcionamento segundo as tabelas das próximas páginas M unidade = Configuração do botão capacitivo PREFERIDOS M dezenas = Configurando das AÇÕES RÁPIDAS em Home page NN = Adres urządzenia PP = Adres PZ, którego Zamek otwierasz za pomocą AW w stanie spoczynkowym, do którego kierujesz samowłączenie MM = Tryb pracy według tabel na następnych stronach M jednostki = Konfiguracja klawisza pojemnościowego ULUBIONE M dziesiątki = Konfiguracja funkcji SZYBKIE KROKI na Home page. Λειτουργίες διαμορφωτών Funkce konfigurátorů J1 J2 N P M J1 J2 J1 = Αφαιρέστε αν υπάρχει μια πρόσθετη παροχή ηλεκτρικού ρεύματος (τερματικό 1 & 2) J2 = Για την σωστή λειτουργία μην το αφαιρείται Σημείωση: Για να λαμβάνετε κλήσεις στο smartphone σας, διαμορφώστε αποκλειστικά ως Master J1 J2 • Installation Wi-Fi • Installation Wi-Fi • Instalación Wi-Fi • WiFi-installatie P M = Vytáhněte doplňkové napájení (svorka 1 & 2), pokud je přítomno = Pro správné fungování nevytahujte Pozn.: Abyste mohli přijímat hovory na smartphonu, nakonfigurujte výlučně jako Master NN = Διεύθυνση συσκευής PP = Διεύθυνση του PE όπου ανοίγει την Κλειδαριά με PI κατά την ανάπαυση και το οποίο πραγματεύεται την αυτοέναυση MM = τρόπος λειτουργίας σύμφωνα με τους πίνακες στις σελίδες που ακολουθούν Μ μονάδα = Διαμόρφωση χωρητικού πλήκτρου ΑΓΑΠΗΜΕΝΑ Μ δεκάδες Διαμόρφωση ΓΡΗΓΟΡΩΝ ΔΡΑΣΕΩΝ στην Home page • Installazione Wi-Fi • Wi-Fi Installation N NN = Adresa zařízení PP = Adresa PE, z níž se otvírá zámek s PI v klidu a na kterou bude adresováno samozapínání MM = Mód fungování podle tabulek na následujících stránkách M jednotky = Konfigurace kapacitního tlačítka OBLÍBENÉ M desítky = Konfigurace RYCHLÝCH AKCÍ na Home page • Instalação Wi-Fi • Wi-Fi Εγκατάσταση • Instalacja Wi-Fi • Instalace Wi-Fi Nota: è consigliato installare il Classe300X in prossimità del router Wi-Fi Nota: è possibile installare un solo Classe300X per ogni rete Wi-Fi (SSID) Nota: è possibile installare un solo Classe300X per appartamento Opmerking: het wordt aanbevolen om Classe300X in de buurt van de WiFi-router te installeren Opmerking: per WiFi-netwerk (SSID) kan slechts één Classe300X worden geïnstalleerd Opmerking: per appartement kan slechts één Classe300X worden geinstalleerd Note: It is recommended that the Classe300X is installed near the Wi-Fi router Note: It is possible to install just one Classe300X for each Wi-Fi (SSID) network Note: It is possible to install just one Classe300X for each apartment Nota: recomenda-se instalar o Classe300X em proximidade do router Wi-Fi Nota: é possível instalar apenas um Classe300X para cada rede Wi-Fi (SSID) Nota: é possível instalar apenas um Classe300X por apartamento Note : il est recommandé d’installer le dispositif Classe 300X à proximité du router Wi-Fi Note : il est possible d’installer un seul dispositif Classe 300X pour chaque réseau Wi-Fi (SSID) Note: un seul Classe300X peut être installé par appartement Σημείωση: Σας συνιστούμε την εγκατάσταση του Classe300X δίπλα στο δρομολογητή Wi-Fi Σημείωση: μπορείτε να εγκαταστήσετε μόνο ένα Classe300X για κάθε δίκτυο Wi-Fi (SSID) Σημείωση: είναι δυνατή η εγκατάσταση μόνο ενός Classe300X ανά διαμέρισμα Anmerkung: das Gerät Classe 300X möglichst in der Nähe des Routers Wi-Fi installieren Anmerkung: es kann nur ein Gerät Classe 300X für jedes Wi-Fi-Netz (SSID) installiert werden Anmerkung: Es kann nur eine Classe200X pro Wohnung installiert werden Uwaga: zaleca się zainstalowanie Classe 300X niedaleko routera Wi-Fi Uwaga: można zainstalować tylko jedno urządzenie Classe300X dla każdej z sieci Wi-Fi (SSID) Uwaga: w mieszkaniu można zainstalować tylko jeden wideodomofon Classe300X Nota: es aconsejable instalar el Classe300X cerca del router Wi-Fi Nota: se pueden instalar un solo Classe300X por cada red Wi-Fi (SSID) Nota: posible instalar solamente un Classe300X por apartamento Pozn.: doporučujeme nainstalovat Classe300X do blízkosti routeru Wi-Fi Pozn.: je možné nainstalovat pouze jeden Classe300X pro každou síť Wi-Fi (SSID) Pozn.: je možné nainstalovat pouze jeden Classe300X do jednoho bytu Verifica la qualità del segnale Wi-Fi dal display del dispositivo (vedi Manuale Installatore), se è bassa o inesistente, assicurati che: – il dispositivo non è installato vicino a grossi oggetti metallici o dispositivi elettrici che possono generare campo elettromagnetico; – tra il router/access point ed il Classe 300X ci siano meno pareti possibili. Verifieer de kwaliteit van het WiFi-signaal op het display van het apparaat (zie de installatiehandleiding). Controleer het volgende als het zwak is of ontbreekt: – het apparaat is niet geïnstalleerd in de buurt van grote metalen voorwerpen of elektrische apparaten die een sterk elektromagnetisch veld kunnen opwekken; – tussen de router/het access point en Class300X bevindt zich het kleinst mogelijke aantal muren Check the Wi-Fi signal quality from the device display (see the Installer Manual). If it is low or does not exist, make sure that: – the device is not installed near large metal objects or electric devices that can generate electromagnetic field; – there are fewer possible walls between the router/access point and the Classe 300X. Verificar a qualidade do sinal Wi-Fi mediante o ecrã do dispositivo (consultar a Manual do Instalador), se for baixa ou inexistente, certificar-se que: – o dispositivo não esteja instalado em proximidade de grandes objetos metálicos ou dispositivos elétricos que podem gerar campo eletromagnético; – Entre o router/ponto de acesso e o Classe 300X haja o menor número de paredes possível. Contrôler la qualité du signal Wi-Fi depuis l'écran du dispositif (voir Manuel Installateur) : si elle est basse ou si le signal est inexistant, s'assurer : – que le dispositif n'est pas installé à proximité d'objets métalliques volumineux ou de dispositifs électriques susceptibles de générer un champ électromagnétique ; – qu’entre le router/access point et le dispositif Classe 300X soit présent un nombre minime de cloisons, si possible aucune. Ελέγξτε την ποιότητα του σήματος Wi-Fiαπό την οθόνη (δείτε Εγχειρίδιο τεχνικού εγκατάστασης, αν είναι χαμηλή ή ανύπαρκτη, βεβαιωθείτε ότι: – Η συσκευή δεν έχει εγκατασταθεί κοντά σε μεγάλα μεταλλικά αντικείμενα ή ηλεκτρικές συσκευές με ισχυρό μαγνητικό πεδίο. – Μεταξύ του σημείου router/access point και της Κλάσης 300X να υπάρχουν λιγότεροι πιθανοί τοίχοι. Die Qualität des Wi-Fi-Signals am Display der Vorrichtung kontrollieren (siehe Installationshandbuch). Wenn es zu schwach oder nicht vorhanden ist, Folgendes prüfen: – Die Vorrichtung darf nicht in der Nähe von großen Metallgegenständen oder elektrischen Vorrichtungen installiert sein, die ein Magnetfeld erzeugen können; – Zwischen Router/Access Point und das Gerät Classe 300X sollten sich so wenig Wände wie möglich befinden. Sprawdź jakość sygnału Wi-fi z wyświetlacza urządzenia (patrz Instrukcja instalatora), jeśli jest niska lub nie istnieje, upewnij się, że: – urządzenie nie jest zainstalowane w pobliżu dużych metalowych przedmiotów lub urządzeń elektrycznych, które mogą wytworzyć pole magnetyczne; – między routerem/punktem dostępu a urządzeniem Classe300X jest możliwie jak najmniej ścian Verifique la calidad de la señal Wi-Fi en la pantalla del dispositivo (véase el Manual del Instalador), si es baja o inexistente, asegúrese de que: – el dispositivo no se encuentre instalado cerca de objetos metálicos grandes o dispositivos eléctricos que puedan generar un campo electromagnético; – entre el router/access point y el Classe 300X haya menos paredes posibles. Zkontrolujte kvalitu signálu Wi-Fi z displeje zařízení (viz instalační příručka), pokud je nízká nebo neexistuje, zkontrolujte, zda: – zařízení není nainstalováno v blízkosti velkých kovových předmětů nebo elektrických zařízení, které by mohly vytvářet elektromagnetické pole; – mezi routerem/vstupním místem a Classe 300X je co nejméně stěn. 8 1 Suggerito Suggested Recommandé Empfohlen Aconsejado Aanbevolen Sugere-se Προτείνεται Propozycja Doporučeno Verificare sempre il segnale Wi-Fi sul display del dispositivo, prima dell’installazione definitiva degli oggetti. Always check the Wi-Fi signal on the device display before final installation of the objects. Veiller à toujours contrôler le signal Wi-Fi sur l'écran du dispositif avant de procéder à l'installation définitive des objets. Immer das Wi-Fi.Signal immer am Display der Vorrichtung kontrollieren, bevor Objekte endgültig installiert werden. Verifique siempre la señal Wi-Fi en la pantalla del dispositivo antes de instalar definitivamente los objetos. Verifieer altijd het WiFi-signaal op het display van het apparaat alvorens de elementen definitief te installeren. Roga-se verificar sempre o sinal Wi-Fi no display do dispositivo, antes da instalação definitiva dos objetos. Eλέγξτε πάντα το σήμα Wi-Fi στην οθόνη του συστήματος, πριν από την οριστική εγκατάσταση των αντικειμένων. Zawsze należy sprawdzić sygnał Wi-Fi na wyświetlaczu urządzenia, przed ostatecznym montażem obiektów. Zkontrolujte vždy signál Wi-Fi zařízení před definitivní instalací předmětů. La connessione del dispositivo ad una rete Wi-Fi è stata attivata correttamente e configurata nell’apposita sezione. The device has been correctly connected to the Wi-Fi network and configured in the appropriate section. 1 La connexion du dispositif à un réseau Wi-Fi a été correctement activée et configurée dans la section prévue à cet effet. Der Anschluss der Vorrichtung an ein Wi-Fi-Netz wurde richtig aktiviert und im entsprechenden Abschnitt konfiguriert. La conexión del dispositivo a una red Wi-Fi se ha activado correctamente y configurado en la sección correspondiente. De WiFi-verbinding van het apparaat is correct geactiveerd en in het specifieke deel geconfigureerd. A conexão do dispositivo em uma rede Wi-Fi foi ativada corretamente e configurada na secção a tal fim predisposta. Η σύνδεση του συστήματος σε ένα δίκτυο Wi-Fi ενεργοποιήθηκε σωστά και διαμορφώθηκε στην ειδική παράγραφο. Połączenie urządzenia z siecią Wi-Fi zostało prawidłowo aktywowane i skonfigurowane w odpowiedniej sekcji. – Pareti divisorie in muratura – Pareti in legno – Pareti in cartongesso – Partition masonry walls – Wood walls – Plasterboard walls – Cloisons en dur – Cloisons en bois – Cloisons en placoplâtre – Trennwände aus Mauerwerk – Holzwände – Wände aus Gipskarton – Tabiques de albañilería – Paredes de madera – Paredes de pladur – Muren van metselwerk – Houten muren – Gipsplaten muren – Paredes divisórias de alvenaria – Paredes de madeira – Paredes de gesso cartonado – Διαχωριστικοί τοίχοι από τούβλα – Ξύλινοι τοίχοι – Τοίχοι από γυψοσανίδα – Przegrody ścienne murowane – Ściany drewniane – Ściany gipsowo-kartonowe – Zděné příčky – Dřevěné stěny – Sádrokartonové stěny Připojení zařízení k síti Wi-Fi bylo správně aktivováno a konfigurováno v příslušné sekci. Il segnale Wi-Fi non è sufficiente per garantire il corretto trasferimento della chiamata e le altre funzioni allo smartphone. Verifica le prescrizioni installative Wi-Fi. The Wi-Fi signal is not sufficient to ensure the correct call transfer and other smartphone features. Check the Wi-Fi installation requirements. Le signal Wi-Fi est insuffisant pour garantir correctement le transfert de l'appel et les autres fonctions au smartphone. Contrôler les prescriptions d'installation Wi-Fi. Das Wi-Fi-Signal genügt nicht, um den Anruf und andere Funktionen an das Smartphone übertragen zu können. Die Anweisungen zur Wi-Fi-Installation kontrollieren. La señal Wi-Fi no es suficiente para garantizar la transferencia correcta de la llamada y las otras funciones al smartphone. Verifique las indicaciones para la instalación Wi-Fi. Het WiFi-signaal is niet sterk genoeg om de de doorschakeling van de oproep en de andere functies op de smartphone. Verifieer de WiFi-installatievoorschriften. O sinal Wi-Fi não é suficiente para garantir a correta transferência da chamada e as demais funções ao smartphone. Roga-se verificar as prescrições de instalação Wi-Fi. Το σήμα Wi-Fi δεν είναι κατάλληλο για να εγγυηθεί την σωστή μεταφορά κλήσης και τις άλλες λειτουργίες του smartphone. Ελέγξτε τις εγκατεστημένες προδιαγραφές του Wi-Fi. Sygnał Wi-Fi nie jest wystarczający, aby zagwarantować przekazanie połączenia oraz innych funkcji do smartfona. Sprawdź wymagania instalacyjne Wi-Fi. Signál Wi-Fi není dostatečný, aby zaručil správné přepojení volání a dalších funkcí na smartphone. Kontrola instalačních požadavků Wi-Fi. 9 – Pareti in cemento armato – Pareti portanti – Pareti in pietra – Pareti metalliche – Walls in reinforced concrete – Load-bearing walls – Stone walls – Metal walls – Murs en ciment armé – Murs porteurs – Murs en pierre – Cloisons métalliques – Betonwände – Tragende Wände – Wände aus Stein – Wände aus Metall – Paredes de hormigón armado – Paredes portantes – Paredes de piedra – Paredes metálicas – Muren van gewapend beton – Dragende muren – Stenen muren – Metalen muren – Paredes de cimento armado – Paredes estruturais – Paredes de pedra – Paredes metálicas – Τοίχοι από οπλισμένο σκυρόδεμα – Φέροντες τοίχοι – Τοίχοι από πέτρα – Μεταλλικοί τοίχοι – Ściany z betonu zbrojonego – Ściany nośne – Ściany z kamienia – Ściany metalowe – Železobetonové stěny – Nosné stěny – Kamenné stěny – Kovové stěny • Configurazione fisica • Physical configuration • Configuration physique • Physische Konfiguration • Configuración física • Fysieke configuratie • Configuração física • Φυσική Διαμόρφωση • Konfiguracja fizyczna • Fyzická konfigurace ) in modo fisico (tramite configuratore inserito nella sede MM-(unità)) sono le seguenti: Le funzioni che puoi attribure al tasto Preferiti ( ) using the physical procedure (configurator inserted in the MM - (units) socket) are the following: The functions that can be attributed to the Preferred key ( ) en mode physique (à travers le configurateur placé dans le logement MM-(unité) sont les suivantes : Les fonctions qu’il est possible d’attribuer à la touche Favoris ( ) physisch zugeordnet werden können (Konfigurator im Sitz MM-(Einheit)) sind folgende: Die Funktionen, die der Taste Favoriten ( ) físicamente (mediante un configurador en el alojamiento MM-(unidad)) son las siguientes: Las funciones a las que puede atribuir la tecla Favoritos ( ) worden toegekend (met de configuratie in MM-(eenheden)): De volgende functies kunnen op fysieke wijze aan de toets Favorieten ( ) em modo físico (por meio de configurador inserido no alojamento MM [unidade]) são as seguintes: As funções que você pode atribuir ao botão Preferidos ( ) σε ένα φυσικό τρόπο (μέσω του διαμορφωτή σε θέση ΜΜ (μονάδα)) έχουν ως εξής: Οι λειτουργίες που μπορούν να αποδοθούν στο πλήκτρο Αγαπημένων ( ) w sposób fizyczny (za pomocą konfiguratora wprowadzonego do gniazda MM-(jednostki) są następujące: Funkcje , które możesz przypisać klawiszowi Ulubione ( ) (pomocí konfigurátoru umístěného v uložení MM-(jednotka)), jsou následující: Funkce, které je možné fyzicky přiřadit tlačítku Oblíbené ( J1 J2 N P M La configurazione deve essere eseguita a dispositivo disalimentato. Attendere che i LED terminino di lampeggiare prima di utilizzarlo. The configuration must be performed with the device disconnected from the power supply. Before using it, wait for the LEDs to stop flashing. La configuration doit être effectuée alors que le dispositif n’est pas alimenté. Attendre que les voyants cessent de clignoter avant de l’utiliser. P+1 Die Konfiguration muss bei ausgeschalteter PVorrichtung +1 MOD=9erfolgen. Warten, bis die LED zu blinken aufhören, bevor Sie die Vorrichtung verwenden. P+1 +1 MOD=9 La configuración se ha de efectuar con elP dispositivo no alimentado. Espere hasta que los LEDs dejen de parpadear antes de usarlo. P+1 P+1 MOD=9 MM = MM = MM = MM = MM = 0 1 2 3 4 Comando Luce Scale Staircase Light Control Commande Lumières Escaliers Steuerung Treppenlicht Mando Luz Escaleras Bediening traphuisverlichting Comando da Luz das Escadas Εντολή Φως Κλίμακας Sterowanie oświetleniem klatki schodowej Ovládání osvětlení schodů Comando diretto Serratura del P+1 Direct control of P+1 Door lock Commande directe Serrure du P+1 Direkte Schlosssteuerung der S+1 Mando directo Cerradura del P+1 Directe bediening slot P+1 Comando direto da Fechadura do P+1 Εντολή άμεση Κλειδαριάς του P+1 Bezpośrednie sterowanie zamkiem P+1 Přímé ovládání zámku P+1 Comando diretto Serratura del P+2 Direct control of P+2 Door lock Commande directe Serrure du P+2 Direkte Schlosssteuerung der S+2 Mando directo Cerradura del P+2 Directe bediening slot P+2 Comando direto da Fechadura do P+2 Εντολή άμεση Κλειδαριάς του P+2 Bezpośrednie sterowanie zamkiem P+2 Přímé ovládání zámku P+2 Comando diretto Serratura del P+3 Direct control of P+3 Door lock Commande directe Serrure du P+3 Direkte Schlosssteuerung der S+3 Mando directo Cerradura del P+3 Directe bediening slot P+3 Comando direto da Fechadura do P+3 Εντολή άμεση Κλειδαριάς του P+3 Bezpośrednie sterowanie zamkiem P+3 DPřímé ovládání zámku P+3 Autoaccensione diretta del P+1 P+1 direct auto-switching on Auto-allumage direct du P+1 Direkte Selbstschaltung der S+1 Autoencendido directo del P+1 Directe automatische P+1 Autoacendimento direto do P+1 Αυτοέναυση άμεση Ρ + 1 Samowłączenie bezpośrednie P+1 Přímé samozapínání P+1 P+2 P+2 MOD=9 MM = P+2 P+2 MOD=9 5 P+2 P+2 MOD=9 P+3 P+3 MOD=9 P+3 P+3 MOD=9 P+3 P+3 MOD=9 MM = P+1 3 2 1 1 2 3 346210 6 P+1 P+1 P+1 P+1 MOD=5 P+1 P+1 MOD=5 3 2 1 1 2 3 346210 3 2 1 1 2 3 346210 P+1 P+1 P+2 MOD=5 3 2 1 1 2 3 346210 MM = 7 MM = 8 MM = 9 P+2 P+2 P+2 P+2 MOD=5 P+2 P+2 MOD=5 3 2 1 1 2 3 346210 3 2 1 1 2 3 346210 P+2 P+2 P+3 MOD=5 3 2 1 1 2 3 346210 P+3 P+3 P+3 P+3 MOD=5 P+3 P+3 MOD=5 3 2 1 1 2 3 346210 1 3 2 1 2 3 346210 P+3 P+3 MOD=5 P 3 2 1 1 2 3 346210 P+1 P+1 MOD=9 3 2 1 1 2 3 346210 Verricht de configuratie als het apparaat van de voeding is afgekoppeld. Wacht tot de led niet langer knippert, alvorens het te gebruiken. A configuração deve ser realizada sob condições de inactividade do dispositivo (sem alimentação). Aguardar até que os LEDs parem de piscar antes de utilizá-lo. Η διαμόρφωση θα πρέπει να δημιουργείται με την συσκευή εκτός τροφοδοσίας. P την χρήση. Αναμείνατε ώστε τα LED να σταματήσουν να αναβοσβήνουν πριν από Konfiguracja musi być wykonana przy odłączonym urządzeniu. Poczekaj przed użyciem, aż diody LED przestaną migać. Konfiguraci je třeba provádět na odpojeném zařízení. Před použitím počkejte, až kontrolky přestanou blikat. P 3 2 1 1 2 3 346210 P+1 Autoaccensione diretta del P+2 P+2 direct auto-switching on Auto-allumage direct du P+2 Direkte Selbstschaltung der S+2 Autoencendido directo del P+2 Directe automatische P+2 Autoacendimento direto do P+2 Αυτοέναυση άμεση Ρ + 2 Samowłączenie bezpośrednie P+2 Přímé samozapínání P+2 Autoaccensione diretta del P+3 P+3 direct auto-switching on Auto-allumage direct du P+3 Direkte Selbstschaltung der S+3 Autoencendido directo del P+3 Directe automatische P+3 Autoacendimento direto do P+3 Αυτοέναυση άμεση P+3 Samowłączenie bezpośrednie P+3 Přímé samozapínání P+3 P+1 MOD=9 3 2 1 1 2 3 346210 3 2 1 1 2 3 P+1 P+1 MOD=9 346210 P+2 P+2 MOD=9 3 2 1 1 2 3 346210 1 P+2 P+3 3 2 1 2 3 P+2 MOD=9 P+3 MOD=9 346210 3 2 1 1 2 3 346210 P+3 P+3 MOD=9 Cercapersone Paging Cherche-personne Personenrufgerät Busca Personenzoeksysteem Localizador Δέκτης τηλεειδοποίησης Pager Pager Intercom su se stesso Internal intercom Intercom sur soi-même Intercom auf sich selbst Intercomunicación en sí misma Intercom op zich Intercom sobre si mesmo Ενδοεπικοινωνία για τον εαυτό του Interkom w tym samym mieszkaniu Intercom se stejným názvem Attivazione/Disattivazione studio professionale Enabling/disabling Office function Activation/Désactivation Bureau Büro-Funktion aktivieren/deaktivieren Activación/Desactivación Oficina Profesional Activering/Deactivering professionele studio Ativação/Desativação do Estúdio profissional Ενεργοποίηση/Απενεργοποίηση Studio Professional Aktywacja/Dezaktywacja Gabinet Zawodowy Aktivace/Deaktivace Profesionálního studia P+2 P+2 MOD=9 Il configuratore fisico MM – (decine) decide quali sono le 4 icone di AZIONI RAPIDE che compaiono sulla HOME PAGE e che puoi attivare dal touch del display. The MM - (tenths) physical configurator decides which are the 4 QUICK ACTIONS icons that appear on the HOME PAGE, and can be activated by touching the display. Le configurateur physique MM – (dizaines) établit quelles sont les 4 icônes d’ACTIONS RAPIDE qui s’affiche sur la PAGE D’ACCUEIL et qu’il est possible d’activer depuis l’écran tactile. Der physische Konfigurator MM - (Zehner) entscheidet welche 4 Symbole der SCHNELLFUNKTIONEN auf der HOMEPAGE angezeigt werden und über den Touchscreen aktiviert werden können. P+3que aparecen en la Página de Inicio y que puede activar en la pantalla táctil. El configurador físico MM – (decenas) decide los 4 iconos de las ACCIONESP RÁPIDAS +3 MOD=9 De fysieke configurator MM – (tienden) bepaalt welke 4 iconen van de SNELTOETSEN op de HOMEPAGINA worden weergegeven en op het touchscreen geactiveerd kunnen worden. O configurador físico MM - (dezenas) decide quais são os quatro ícones de AÇÕES RÁPIDAS que aparecem na HOME PAGE e que você pode ativar mediante o toque do display. Ο φυσικός διαμορφωτής MM - (αποφασίζει) αποφασίζει ποια είναι τα τέσσερα εικονίδια στις ΓΡΗΓΟΡΕΣ ΔΡΑΣΕΙΣ που εμφανίζονται στην HOME PAGE και μπορείτε να ενεργοποιήσετε την οθόνη αφής. Konfigurator fizyczny MM – (dziesiątki) decyduje, jakie są cztery ikony funkcji SZYBKIE KROKI, które pojawiają się na HOME PAGE, i które możesz włączyć dotykowym wyświetlaczem. Fyzický konfigurátor MM – (desítky) rozhoduje, jaké čtyři ikony RYCHLÝCH AKCÍ se zobrazí na HOME PAGE a bude možné je aktivovat pomocí dotykové obrazovky displeje. 3 2 1 1 2 3 346210 J1 J2 N P M Ti riportiamo le possibili configurazioni nella tabella seguente The possible configurations are shown in the following table Dans le tableau suivant sont indiquées les différentes configurations possibles In nachstehender Tabelle sind die möglichen Konfigurationen zusammengefasst La tabla siguiente contiene las configuraciones posibles 10 De volgende tabel bevat de mogelijke configuraties Referimos as possíveis configurações na tabela a seguir Αναφέρουμε τις πιθανές διαμορφώσεις στον ακόλουθο πίνακα W poniższej tabeli podajemy możliwe konfiguracje V následující tabulce jsou uvedeny možné konfiguracess 11 1 1 2 2 3 3 –+ 1 23 P+1 346210 4 1 23 1 23 4 4 –+ –+ 1 23 1 23 4 4 P+3 P+3 MOD=9 1 23 4 1 1 2 2 3 2 2 3 3 3 –+ 1 23 P+1 4 2 2 3 2 3 3 1 23 4 P+2 P+3 –+ P+2 2 3 2 2 2 3 2 2 3 3 3 3 3 P+3 P+1 P+3 2 2 2 3 2 2 2 3 3 3 3 P+4 P+2 2 3 2 2 3 3 P+3 1 1 2 2 3 3 P+4 P+3 P+3 MOD=5 346210 1 1 346210 P+2 P+2 MOD=5 P+4 P+4 MOD=5 1 1 346210 P+4 P+4 MOD=5 1 1 346210 1 1 MOD=5 P+3 P+3 MOD=5 P+4 346210 1 1 P+3 P+3 MOD=5 P+1 P+1 346210 1 1 346210 1 1 P+2 P+2 MOD=5 346210 1 1 P+2 P+2 MOD=5 346210 P+3 MOD=9 1 1 P+1 P+1 MOD=5 346210 P+1 P+2 P+1 MOD=5 P +2 MOD=9 1 1 346210 P+1 P+1 MOD=9 P+1 –+ P+3 MOD=9 P+3 P P+2 MOD=9 P+2 –+ P+2 MOD=9 P+2 –+ MOD=9 P+1 P+1 MOD=9 P+1 P P Apertura serratura del PE (configurato con P+2) in modo diretto senza la chiamata oppure attivazione attuatore art.346200/346210 (configurato con P+2 e MOD=5) oppure attivazione attuatore art.346230 (con figurato con P+2). Door lock opening of EP (configured with P+2) directly without the call or activating the actuator Item 346200 (configured with P+2 and MOD=5) or activating the actuator Item 346230 (configured with P+2). Door lock opening of EP (configured with P+1) directly without the call or activating the actuator Item 346200/346210 (con figured with P+1 and MOD=5) or activating the actuator Item 346230 (configured with P+1). Ouverture serrure du PE (configuré avec P+2) en mode direct sans l’appel ou activation actionneur réf. 346200 (configuré avec P+2 et MOD=5) ou activation action neur réf. 346230 (con figuré avec P+2). Ouverture serrure du PE (configuré avec P+1) en mode direct sans l’appel ou activation actionneur réf. 346200/346210 (configuré avec P+1 et MOD=5) ou acti vation actionneur réf. 346230 (configuré avec P+1). Türöffnung der Türstation (mit P+2 konfiguriert) oder Aktivierung über den Aktivator Art. 346200/346210 (mit P+2 und MOD=5) oder Aktivierung über den Aktivator Art. 346230 (mit P+2 konfiguriert). Türöffnung der Türstation (mit P+1 konfiguriert) oder Aktivierung über den Aktivator Art. 346200/346210 (mit P+1 und MOD=5) oder Aktivierung über den Aktivator Art. 346230 (mit P+1 konfiguriert). Apertura cerradura del PE (configurado con P+2) en modo directo sin llamada o activación del actuador art. 346200/346210 (con figurado con P+2 y MOD=5) o activación del actuador art. 346230 (configurado con P+2). Apertura cerradura del PE (configurado con P +1) en modo directo sin llamada o activación del actuador art. 346200/346210 (con figurado con P+1 y MOD=5) o activación del actuador art. 346230 (configurado con P+1). Rechtstreekse opening van het deurslot van het als P+2 gecon figureerde deurstation, zonder oproep of activering van het toe stel art. 346200/346210 (geconfigureerd als P+2 en MOD=5) of ac tivering van het toestel art. 346230 (gecon figureerd als P+2). Rechtstreekse opening van het deurslot van het als P+1 geconfigureerde deurstation, zonder oproep of activering van het toestel art. 346200/346210 (ge configureerd als P+1 en MOD=5) of activering van het toestel art. 346230 (geconfigureerd als P+1). Abertura da fechadura da UE (configurada com P+2) de manei ra directa sem a chamada ou então ligação do actuador art. 346200/346210 (configurado com P+2 e MOD=5) ou então ligação do actuador art. 346230 (configurado com P+2). Abertura da fechadura da UE (configurada com P+1) de manei ra directa sem a chamada ou então ligação do actuador art. 346200/346210 (configurado com P+1 e MOD=5) ou então ligação do actuador art. 346230 (configurado com P+1). Άνοιγμα κλειδαριάς του ΡΕ (διαμορφωμένο με Ρ +2) απευθείας, χωρίς προηγούμενη κλήση ή ενεργοποίηση του ενεργοποιητή αντ. 346200/346210 (διαμορφωμένο με Ρ + 2 και MOD = 5) ή ενεργοποίηση του ενεργοποιητή αντ.346230 (διαμορφωμένο με Ρ+2). Άνοιγμα κλειδαριάς του ΡΕ (διαμορφωμένο με Ρ + 1) απευθείας, χωρίς προηγούμενη κλήση ή ενεργοποίηση του ενεργοποιητή αντ. 346200/346210 (διαμορφωμένο με Ρ + 1 και MOD = 5) ή ενεργοποίηση του ενεργοποιητή αντ.346230 (διαμορφωμένο με Ρ+1). Otwieranie zamka PZ (skonfigurowanego z P+2) w sposób bezpośredni bez wywołania lub uaktywnienie przekaźnika art.346200/346210 (skonfigurowanego z P+2 i MOD=5) lub przekaźnika art.346230 (skonfigurowanego z P+2). Otwieranie zamka Panelu zewnętrznego (PZ) w sposób bezpośredni bez wywołania lub uaktywnienie przekaźnika art.346200/346210 (skonfigurowanego z P1+1 i MOD=5) lub przekaźnika art. 346230 (skonfigurowanego z P+1). Otvírání zámku PE (nakonfigurován s P+2) přímým způsobem bez volání nebo aktivace akčního členu ref. 346200/346210 (nakonfigurován s P+2 a MOD=5) nebo aktivace akčního členu ref. 346230 (nakonfigurován s P+2). Otvírání zámku PE (nakonfigurován s P+1) přímým způsobem bez volání nebo aktivace akčního členu ref. 346200/346210 (nakonfigurován s P+1 a MOD=5) nebo aktivace akčního členu ref. 346230 (nakonfigurován s P+1). Aktivace PE (nakonfigurován s P+1) přímým způsobem bez volání nebo aktivace akčního členu ref. 346200/346210 (nakonfigurován s P+1 a MOD=9). Włączenie Panelu Zewnętrznego (PZ) (skonfigurowanego z P+1) w sposób bezpośredni bez wywołania lub włączenie przekaźnika art .346200/346210 (skonfigurowanego z P+1 i MOD=9) Ενεργοποίηση του ΡΕ (διαμορφωμένο με Ρ + 1) απευθείας, χωρίς προηγούμενη κλήση ή ενεργοποίηση του ενεργοποιητή αντ. 346200/346210 (διαμορφωμένο με Ρ + 1 και MOD = 9). Ligação da UE (con figurada com P+1) de maneira directa sem a chamada ou então ligação do actuador art. 346200/346210 (configurado com P+1 e MOD=9). Rechtstreekse activering van het deurstation (als P+1 geconfigureerd) zonder oproep of acti vering van het toestel art. 346200/346210 (geconfigureerd als P+1 en MOD = 9). Activación del PE (configurado con P+1) en modo directo sin llama da o activación del actuador art. 346200/346210 (configurado con P+1 y MOD=9). Aktivierung der Türstation (mit P+1 konfiguriert) auf direkte Weise ohne Ruf oder Aktivierung über den Aktivator art. 346200/346210 (mit P+1 und MOD=9). Activation du PE (configuré avec P+1) en mode direct sans l’appel ou activation actionneur réf. 346200/346210 (configuré avec P+1 et MOD=9). Activating the EP (configured with P+1) directly without the call or activa ting actuator Item 346200/346210 (con figured with P+1 and MOD=9). Attivazione del PE (configurato con P+1) in modo diretto senza la chiamata oppure attivazione attuatore art. 346200/346210 (configurato con P+1 e MOD=9). Apertura serratura del PE (configurato con P+1) in modo diretto senza la chiamata oppure attivazione attuatore art.346200/346210 (configurato con P+1 e MOD=5) oppure attivazione attuatore art.346230 (con figurato con P+1). CZ PL EL Legenda PT Legenda NL Υπόμνημα ES Legenda DE Legende FR Leyenda EN Erläuterung IT Légende Legend Legenda 12 –+ 1 23 1 1 2 3 3 1 23 4 P+1 P+2 –+ 1 2 2 2 2 3 3 –+ 1 23 4 2 2 3 3 3 3 P+3 P+1 2 2 2 2 3 3 3 3 P+4 P+2 1 1 2 2 3 3 2 2 3 3 P+4 P+4 P+4 MOD=5 346210 1 1 P+3 P+3 MOD=5 346210 P+3 P+4 P+4 P+2 P+2 MOD=5 MOD=5 346210 346210 1 1 1 1 P+3 P+3 P+1 P+1 MOD=5 MOD=5 346210 346210 1 1 1 1 346210 P+3 P+3 MOD=9 P+2 P+2 MOD=5 1 P+2 PMOD=5 +2 MOD=9 P+1 2 P+1 P+1 346210 4 P+1 MOD=9 Intercom tra appartamenti in impianti con interfaccia da appartamento art. 346850. Intercommunicability between apartments in systems with apartment interface item 346850. Door lock opening of EP (configured with P+4) directly without the call or activating the actuator Item 346200/346210 (con figured with P+4 and MOD=5) or activating the actuator Item 346230 (configured with P+4). Intercommunication entre appartements sur installations avec interface d’appartement réf. 346850. Ouverture serrure du PE (configuré avec P+4) en mode direct sans l’appel ou ac tivation actionneur réf. 346200/346210 (configuré avec P+4 et MOD=5) ou acti vation actionneur réf. 346230 (configu ré avec P+4). Gegenseitige Kommunikation zwischen Wohnungen für Anlagen mit Wohnungsschnittstelle Art. 346850. Türöffnung der Türstation (mit P+4 konfiguriert) oder Aktivierung über den Aktivator Art. 346200/346210 (mit P+4 und MOD=5) oder Aktivierung über den Aktivator Art. 346230 (mit P+4 konfiguriert). Intercomunicación entre apartamentos en instalaciones con interfaz de departamento Art. 346850. Apertura cerradura del PE (configurado con P+4) en modo directo sin llamada o activación del actuador art. 346200/346210 (con figurado con P+4 y MOD=5) o activación del actuador art. 346230 (configurado con P+4). Otwieranie zamka PZ (skonfigurowanego z P+4) w sposób bezpośredni bez wywołania lub uaktywnienie przekaźnika art.346200/346210 (skonfigurowanego z P+4 i MOD=5) lub przekaźnika art.346230 (skonfigurowanego z P+4). Interkom między mieszkaniami w instalacjach z interfejsem mieszkania art. 346850. Άνοιγμα κλειδαριάς του ΡΕ (διαμορφωμένο με Ρ +4) απευθείας, χωρίς προηγούμενη κλήση ή ενεργοποίηση του ενεργοποιητή αντ. 346200/346210 (διαμορφωμένο με Ρ + +4 και MOD = 5) ή ενεργοποίηση του ενεργοποιητή αντ.346230 (διαμορφωμένο με Ρ+4). Ενδοεπικοινωνία σε διαμερίσματα με συστήματα με διεπαφή από διαμέρισμα αντ. 346850. Abertura da fechadura da UE (configurada com P+4) de manei ra directa sem a chamada ou então ligação do actuador art. 346200/346210 (configurado com P+4 e MOD=5) ou então ligação do actuador art. 346230 (configurado com P+4). Intercom entre apartamentos em instalações com interface de apartamento art. 346850. Rechtstreekse opening van het deurslot van het als P+4 geconfigureerde deurstation, zonder oproep of activering van het toestel art. 346200/346210 (geconfigureerd als P+4 en MOD=5) of ac tivering van het toestel art. 346230 (gecon figureerd als P+4). Intercom tussen appartementen in installaties met interface van appartement art. 346850. Intercom mezi byty v systémech s bytovým rozhraním ref. 346850. Otvírání zámku PE (nakonfigurován s P+4) přímým způsobem bez volání nebo aktivace akčního členu ref. 346200/346210 (nakonfigurován s P+4 a MOD=5) nebo aktivace akčního členu ref. 346230 (nakonfigurován s P+4). Otvírání zámku PE (nakonfigurován s P+3) přímým způsobem bez volání nebo aktivace akčního členu ref. 346200/346210 (nakonfigurován s P+3 a MOD=5) nebo aktivace akčního členu ref. 346230 (nakonfigurován s P+3). Otwieranie zamka PZ (skonfigurowanego z P+3) w sposób bezpośredni bez wywołania lub uaktywnienie przekaźnika art.346200/346210 (skonfigurowanego z P+3 i MOD=5) lub przekaźnika art.346230 (skonfigurowanego z P+3). Άνοιγμα κλειδαριάς του ΡΕ (διαμορφωμένο με Ρ +3) απευθείας, χωρίς προηγούμενη κλήση ή ενεργοποίηση του ενεργοποιητή αντ. 346200/346210 (διαμορφωμένο με Ρ + 3 και MOD = 5) ή ενεργοποίηση του ενεργοποιητή αντ.346230 (διαμορφωμένο με Ρ+3). Abertura da fechadura da UE (configurada com P+3) de manei ra directa sem a chamada ou então ligação do actuador art. 346200/346210 (configurado com P+3 e MOD=5) ou então ligação do actuador art. 346230 (configurado com P+3). Rechtstreekse opening van het deurslot van het als P+3 geconfigureerde deurstation, zonder oproep of activering van het toestel art. 346200/346210 (geconfigureerd als P+3 en MOD=5) of activering van het toestel art. 346230 (geconfigureerd als P+3). Apertura cerradura del PE (configurado con P+3) en modo directo sin llamada o activación del actuador art. 346200/346210 (con figurado con P+3 y MOD=5) o activación del actuador art. 346230 (configurado con P+3). Türöffnung der Türstation (mit P+3 konfiguriert) oder Aktivierung über den Aktivator Art. 346200/346210 (mit P+3 und MOD=5) oder Aktivierung über den Aktivator Art. 346230 (mit P+3 konfiguriert). Ouverture serrure du PE (configuré avec P+3) en mode direct sans l’appel ou ac tivation actionneur réf. 346200/346210 (configuré avec P+3 et MOD=5) ou acti vation actionneur réf. 346230 (configu ré avec P+3). Door lock opening of EP (configured with P+3) directly without the call or activating the actuator Item 346200/346210 (con figured with P+3 and MOD=5) or activating the actuator Item 346230 (configured with P+3). Apertura serratura del PE (configurato con P+3) in modo diretto senza la chiamata oppure attivazione attuatore art.346200/346210 (configurato con P+3 e MOD=5) oppure attivazione attuatore art.346230 (con figurato con P+3). Apertura serratura del PE (configurato con P+4) in modo diretto senza la chiamata oppure attivazione attuatore art.346200/346210 (configurato con P+4 e MOD=5) oppure attivazione attuatore art.346230 (con figurato con P+4). CZ Legenda PL Legenda EL Υπόμνημα PT Legenda NL Legende ES Leyenda DE Erläuterung FR Légende EN Legend IT Legenda 13 FR Intercommunication à l’intérieur de l’appartement sur installations avec interface d’appartement réf. 346850 ou intercommunication entre appartements sur installations sans interface d’appartement. Intercom sur lui-même, envoie l’appel à tous les appareils ayant une adresse identique. Cherche-personne, effectue une intercom générale, envoie un appel à tous les appareils de l’installation. EN Intercommunicability inside an apartment in systems with apartment interface item 346850 or intercommunicability between apartments in systems without apartment interface. Intercom on itself, sends the call to all the devices with the same address. Paging, it makes general intercom and sends a call to all the handsets of the system. IT Intercom all’interno dell’appartamento in impianti con interfaccia di appartamento art.346850; oppure intercom tra appartamenti in impianti senza interfaccia di appartamento. Intercom su se stesso, invia la chiamata a tutti gli apparecchi con uguale indirizzo Cercapersone, effettua una intercom generale, invia una chiamata a tutti gli apparecchi dell’impianto. Légende Legend Legenda Personenrufgerät, Intercom mit allgemeiner Funktion, sendet den Ruf an alle Geräte der Anlage Busca, realiza una intercom general, envía una llamada a todos los aparatos del sistema. Intercomunicación hacia los aparatos iguales, envía la llamada a todos los aparatos con igual dirección Intercomunicación en el apartamento en instalaciones con interfaz de apartamento Art. 346850 o intercomunicación entre apartamentos en instalaciones sin interfaz de apartamento. Gegenseitige Kommunikation innerhalb der Wohnung für Anlagen mit Wohnungsschnittstelle Art. 346850 oder gegenseitige Kommunikation zwischen Wohnungen für Anlagen ohne Wohnungsschnittstelle. Intercom mit einseitiger Funktion: sendet den Ruf an alle Geräte mit derselben Adresse. ES Leyenda DE Erläuterung Personenzoeksysteem, verricht een algemene intercom, stuurt een oproep naar alle apparaten van de installatie. Localizador, efetua uma intercomunicação geral, envia uma chamada a todas as unidades da instalação. Intercomunicador sobre si mesmo, envia a chamada a todos os aparelhos com endereço igual Intercom dentro do apartamento em instalações com interface de apartamento art. 346850 ou então intercom entre apartamentos em instalações sem interface de apartamento. Intercom binnen in het appartement in installaties met interface van appartement art. 346850 ofwel intercom tussen appartementen in installaties zonder interface van appartement. Intercom op zichzelf, verstuurt de oproep naar alle toestellen met hetzelfde adres PT Legenda NL Legenda Δέκτης τηλεειδοποίησης, πραγματοποιεί μια γενική ενδοειδοποίηση, αποστέλλει μια κλήση σε όλες τις συσκευές του συστήματος. Pager, poprzez interkom ogólny, wysyła wywołanie do wszystkich aparatów w systemie. Interkom w tym samym mieszkaniu wywołuje wszystkie aparaty z tym samym adresem. Interkom pomiędzy aparatami wewnętrznymi w mieszkaniu w instalacjach z interfejsem art.346850; lub interkom pomiędzy mieszkaniami w instalacjach bez interfejsu mieszkania. Ενδοεπικοινωνία μέσα στο διαμέρισμα σε συστήματα με διεπαφής διαμερίσματος αντ. 346850 ή ενδοεπικοινωνίας μεταξύ διαμερισμάτων σε συστήματα χωρίς διασύνδεση διαμερίσματος. Ενδοεπικοινωνία στον εαυτό του, στέλνει την κλήση σε όλες τις συσκευές με την ίδια διεύθυνση PL Legenda EL Υπόμνημα Pager provádí všeobecnou interkomunikaci, odesílá volání všem přístrojům systému. Intercom se stejným názvem, odesílá volání všem přístrojům je stejnou adresou Intercom uvnitř bytu v systémech s bytovým rozhraním ref. 346850; nebo intercom mezi byty v systémech bez bytového rozhraní. CZ Legenda • Utilizzo teleloop • Inductive loop use • Utilisation teleloop • Gebrauch des Teleloops • Uso del teleloop • Gebruik teleloop • Utilização teleloop • Χρήση Teleloop • Zastosowanie teleloop (pętli indukcyjnej) • Použití teleloop • Commuta l’apparecchio acustico in posizione T • Switch the acoustic device to the T position • Commuter l’appareil acoustique sur la position T • Umschalten des akustischen Geräts auf Position T • Conmuta el aparato acústico a la posición T • Schakelt het akoestische apparaat in positie T om • Comuta o aparelho acústico em posição T • Ματαγάγει την ακουστική συσκευή σε θέση του Τ • Przełącza aparat akustyczny w położenie T • Přepojuje akustické zařízení do polohy T 40 cm 2535 c m Per un corretto accoppiamento magnetico tra PI ed apparecchio acustico ti consigliamo di posizionarti frontalmente al dispositivo ad una distanza di 25 – 35 cm. Ti ricordiamo che la presenza di metallo e rumore di fondo generato da apparecchiature elettriche/elettroniche (es. computer), può compromettere la qualità e le perfomace del dispositivo di accoppiamento. To ensure correct magnetic coupling between the IU and the acoustic device, we recommend a position in front of the device, at a distance of 25 – 35 cm. It is reminded that the presence of metal and background noise generated by electric/electronic devices (e.g. computer) may compromise the performance and the quality of the coupling device. Pour garantir un bon accouplement magnétique entre PI et appareil acoustique, il est recommandé de se placer face au dispositif à une distance de 25 – 35 cm. Il est rappelé que la présence de métal et de bruit de fond généré par des appareillages électriques/électroniques (ex. ordinateurs) peut compromettre la qualité et les performances du dispositif d’accouplement. Zur richtigen magnetischen Kopplung zwischen TS und akustisches Gerät, empfehlen wir, sich vor das Gerät in einem Abstand von 25 – 35 cm zu stellen. Bitte beachten Sie, das Metallgegenstände und Grundgeräusche elektrischer/elektronischer Geräte (z.B. PC) die Qualität und Leistung der Kopplungsvorrichtung beeinträchtigen können. Para un correcto acoplamiento magnético entre la UI y el aparato acústico, le aconsejamos situarse en frente del dispositivo a una distancia aproximada de 25 – 35 cm. Recuerde que la presencia de metal y ruido de fondo generado por aparatos eléctricos/electrónicos (por ejemplo un PC) puede comprometer la calidad y la eficiencia del dispositivo de acoplamiento. Voor een correcte magnetische koppeling tussen de binnenpost en het akoestische apparaat raden we aan om op circa 25 – 35 cm voor het apparaat te gaan staan. Onthoud dat de aanwezigheid van metaal en achtergrondgeluid veroorzaakt door elektrische/elektronische apparatuur (bijv. computer) de kwaliteit en de prestaties van het koppelapparaat kunnen beïnvloeden. Para um correto acoplamento magnético entre a Unidade Interna e o aparelho acústico sugerimos-lhe posicionar-se frontalmente ao dispositivo numa distância de 25 – 35 cm. Lembramos-lhe que a presença de metal e ruído de fundo, gerado por equipamentos elétricos/eletrônicos (por exemplo: computador), pode afetar a qualidade e o desempenho do dispositivo de acoplamento. Για τη σωστή μαγνητική σύζευξη μεταξύ του PI και της ακουστικής συσκευής σας προτείνουμε την εμπρόσθια θέση στο σύστημα σε μια απόσταση 25 – 35 cm. Παρακαλώ σημειώστε ότι η παρουσία του μετάλλου και του θορύβου που παράγεται από ηλεκτρικές/ηλεκτρονικές συσκευές (π.χ.. Υπολογιστών), μπορούν να επηρεάσουν την ποιότητα και την απόδοση της διάταξης ζεύξης. W celu prawidłowego sprzężenia magnetycznego pomiędzy aparatem wewnętrznym (AW) i aparatem akustycznym, należy się ustawić naprzeciw urządzenia w odległości 25 – 35 cm. Należy pamiętać, że obecność metalu i hałas generowany przez sprzęt elektryczny/elektroniczny (np. komputer) może mieć wpływ na jakość i wydajność urządzenia sprzęgającego. Pro správné magnetické spojení mezi PI a akustickým zařízením doporučujeme se postavit čelně k zařízení do vzdálenosti 25 – 35 cm. Připomínáme, že přítomnost kovu a šumu na pozadí vytvářeného elektrickými/elektronickými přístroji (např. počítače) by mohla ovlivnit kvalitu a výkonnost spojovacího zařízení. • Funzione Stato porta • Door state function • Fonction État porte • Funktion Türzustand • Función Estado puerta • Staat deur • Função Estado porta • Λειτουργία Κατάστασης θύρας • Funkcja Stan drzwi • Funkce Stav dveří Questa funzione segnala lo stato della serratura (solo se l’impianto è predisposto mediante apposito attuatore). Se è aperta il “led serratura” lampeggia, se è chiusa rimane spento. La funzione non è attivabile contemporaneamente alla funzione Studio Professionale. This function indicates the status of the door lock (only for systems preset with appropriate actuator). If open the „door lock LED“ flashes, and if closed, the LED stays off. The function cannot be activated together with the Office function. Cette fonction signale l’état de la serrure (uniquement si l’installation est prévue à cet effet avec actionneur). Si elle est ouverte, le “Voyant serrure” clignote, si elle est fermée, il reste éteint. La fonction ne peut pas être activée conjointement à la fonction Bureau. Diese Funktion meldet den Status des Schlosses (nur wenn die Anlage mit entsprechendem Aktor versehen ist). Wenn geöffnet, blinkt die „Led Schloss“; wenn geschlossen bleibt die Led ausgeschaltet. Die Funktion kann nicht gleichzeitig mit der Büro-Funktion aktiviert werden. Esta función indica el estado de la cerradura (solamente con el sistema predispuesto mediante el actuador correspondiente). Si está abierta, el “led cerradura” parpadea y si está cerrada permanece apagado. La función no se puede activar al mismo tiempo que la función Oficina Profesional. Deze functie geeft de status van het slot (uitsluitend als de installatie daarvoor is voorbereid met de specifieke actuator). De „led slot“ knippert als het slot ontgrendeld is. De led is uit als het slot vergrendeld is. Deze functie en de functie Professionele studio kunnen niet tegelijkertijd worden geactiveerd. Esta função indica o estado da fechadura (apenas se a instalação estiver predisposta mediante expresso atuador). Se estiver aberta o“led fechadura”resulta intermitente, se estiver fechada, permanece desligado. A função não pode ser ativada simultaneamente à função Estúdio profissional. Αυτή η λειτουργία δείχνει την κατάσταση της κλειδαριάς (μόνο αν το σύστημα είναι σχεδιασμένο χρησιμοποιώντας το κατάλληλο ενεργοποιητή). Εάν είναι ανοικτή το „led κλειδαριάς“ αναβοσβήνει, αν είναι κλειστή παραμένει σβηστό. Η λειτουργία δεν ενεργοποιείται μαζί με τη λειτουργία Studio Professional. Ta funkcja wskazuje stan zamka (tylko wtedy, gdy system jest zaprojektowany z wykorzystaniem odpowiedniego siłownika). Jeśli drzwi są otwarte „ led zamka” miga, jeśli są zamknięte, pozostaje wyłączony. Funkcja nie jest aktywna razem z funkcją Gabinet Zawodowy. Tato funkce signalizuje stav zámku (pouze pokud je k tomu systém přizpůsoben pomocí příslušného akčního členu). Jestliže je otevřen, “kontrolka zámku” bliká, jestliže je zavřen, zůstane zhasnutá. Tuto funkci nelze aktivovat současně s funkcí Profesionální Studio 15 • Funzione Studio Professionale • Office function • Fonction Bureau • Funktion Büro • Función Oficina Profesional • Functie professionele studio • Função Escritório profissional • Λειτουργία Studio Professional • Funkcja Gabinet Zawodowy • Funkce Profesionální Studio La funzione Studio Professionale ti permette di impostare l’apertura automatica della serratura in caso di chiamata dal Posto Esterno, non puoi attivarla contemporaneamente alla funzione Stato Porta. Il lampeggio del tasto serratura ( ) indica che la funzione è attivata. The Office function gives the possibility of setting the automatic opening of the door lock in case of call from the Entrance Panel. It cannot be activated at the same time as the Door Status function. The door lock key flashing ( ) indicates that the functions is active. La fonction Bureau permet de programmer l’ouverture automatique de la serrure en cas d’appel depuis le Poste Externe ; elle n’est pas activable conjointement à la fonction État Porte. Le clignotement de la touche serrure ( ) indique que la fonction est activée. Mit der Büro-Funktion kann das Schloss nach einem Ruf von der Türstation automatisch geöffnet werden; diese Funktion kann nicht gleichzeitig mit der Funktion Tür-Status aktiviert werden. Das Blinken der Schlosstaste ( ) meldet, dass die Funktion aktiv ist. La función Oficina Profesional le permite configurar la apertura automática de la cerradura al recibir una llamada de la PE pero no la puede activar al mismo tiempo que la función Estado Puerta. El parpadeo de la tecla cerradura ( ) indica la activación de la función. Met de functie Professionele studio kunt u de automatische ontgrendeling van het slot bij een oproep vanaf de buitenpost instellen. Deze functie en de functie Status deur kunnen niet tegelijkertijd worden geactiveerd. De toets slot ( ) knippert om aan te geven dat de functie geactiveerd is. A função Estúdio profissional permite-lhe definir a abertura automática da fechadura em caso de chamada da Unidade Externa, não pode ativá-la simultaneamente à função Estado da Porta. A intermitência do botão da fechadura ( ) indica que a função está ativada. Η λειτουργίαStudio Professional σας επιτρέπει να ορίσετε το αυτόματο άνοιγμα της κλειδαριάς σε περίπτωση κλήσης από την Εξωτερική Θέση, δεν μπορείτε να την ενεργοποιήσετε ταυτόχρονα κατά την λειτουργία της Κατάστασης Θύρας. Η αναλαμπή του πλήκτρου κλειδώματος ( ) δείχνει ότι η λειτουργία είναι ενεργοποιημένη. Funkcja Gabinet Zawodowy umożliwia ustawienie automatycznego otwierania zamka w przypadku wywołania z Panelu Zewnętrznego, nie można jej włączyć razem z funkcją Stan Drzwi. Miganie klawisza zamka ( ) wskazuje, że funkcja jest aktywna. Funkce Profesionální Studio umožňuje nastavit automatické otvírání zámku v případě volání z Vnějšího místa, nelze ji aktivovat současně s funkcí Stavu dveří. Blikání tlačítka zámku ( ) označuje, že funkce je aktivována. • Funzione Cerca persone • Paging function • Fonction cherche-personnes • Funktion Personensuche • Función buscapersonas • Functie buzzer • Função de procura pessoas • Λειτουργία Αναζήτησης ατόμων • Funkcja Szukaj osoby • Funkce Pager Questa funzione ti permette di diffondere un messaggio vocale, dettato al microfono del dispositivo, tramite gli altoparlanti dell’impianto Diffusione sonora. Per attivarla devi toccare l’apposita icona presente nel menù Intercom, il led verde acceso del tasto “Connessione” indica che la funzione è attiva. Per terminare la funzione premi il tasto “Connessione”. This function can be used to send voice messages using the microphone of the device through the speakers of the sound system. To activate the function touch the appropriate icon on the Intercom menu. The green “Connection” LED on indicates that the function is active. To disable the function press the ”Connection” key. Cette fonction permet de diffuser un message vocal dicté au micro du dispositif, à travers les haut-parleurs du système de Diffusion sonore. Pour l’activer, il est nécessaire de toucher l’icône présente dans le menu Intercom, le voyant vert allumé de la touche « Connexion » indique que la fonction est active. Pour mettre fin à la fonction, appuyer sur la touche “Connexion”. Mit dieser Funktion kann eine vokale Nachricht abgespielt werden, die über das Mikrophon der Vorrichtung aufgenommen worden ist und durch die Lautsprecher der Schalldiffusionsanlage ausgetragen wird. Um sie zu aktivieren, das entsprechende Symbol im Intercom-Menü berühren. Wenn die grüne Led der Taste “Verbindung” leuchtet, ist die Funktion aktiv. Um die Funktion zu beenden, die Taste “Verbindung” drücken. Esta función le permite difundir un mensaje vocal, dictado al micrófono del dispositivo, mediante los altavoces del sistema de Difusión sonora. Para activarla ha de tocar el icono correspondiente en el menú Intercomunicación, el led verde encendido de la tecla “Conexión” indica la activación de la función. Presione la tecla “Conexión” para interrumpir la función. Met deze functie kan een stembericht (ingesproken in de microfoon van het apparaat) door de luidsprekers van de geluidsinstallatie worden afgespeeld. Om dit bericht te kunnen activeren dient u op de specifieke icoon in het menu Intercom te drukken. De groene led van de toets “Verbinding” brandt als de functie geactiveerd is. Druk op de toets “Verbinding” om de functie te beëindigen. Esta função permite-lhe divulgar uma mensagem de voz, ditada ao microfone do dispositivo, por meio de altifalantes da instalação de Difusão Sonora. Para ativá-la deverá tocar no expresso ícone, presente no menu Intercom, o led verde aceso do botão “Conexão” indica que a função está ativa. Para concluir a função carregue no botão “Conexão”. Αυτή η λειτουργία σας επιτρέπει να διαδώσετε ένα φωνητικό μήνυμα, στο μικρόφωνο της συσκευής, μέσω των ηχείων του ήχου. Για να το ενεργοποιήσετε θα πρέπει να πατήσετε το κατάλληλο εικονίδιο στο Intercom μενού, το πράσινο LED στο πλήκτρο “Σύνδεση” υποδεικνύει ότι η λειτουργία είναι ενεργή. Για να τερματίσετε την λειτουργία, πιέστε το “Σύνδεση”. Ta funkcja pozwala na rozpowszechnienie wiadomości głosowej, podyktowanej do mikrofonu urządzenia przez głośniki instalacji Systemu Dźwięku. Aby ją uaktywnić, należy dotknąć specjalnej ikony w menu Interkom, włączona zielona dioda led klawisza „Połączenie” wskazuje, że funkcja jest aktywna. Aby wyłączyć funkcję, nacisnąć klawisz „Połączenie”. Tato funkce umožňuje šířit hlasové zprávy nadiktované do mikrofonu zařízení pomocí reproduktorů zvukového systému. Chcete-li ji aktivovat, je třeba se dotknout příslušné ikony v menu Intercom. Rozsvícená zelená kontrolka tlačítka “Připojení” označuje, že funkce je aktivní. Pro ukončení funkce stiskněte tlačítko “Připojení”. Attenzione: il videocitofono deve rispettare le seguenti regole installative: – deve essere installato solo in ambienti interni – non deve essere esposto a stillicidio o a spruzzi d’acqua – non ostruire le aperture di ventilazione – deve essere usato unicamente su sistemi 2 fili SCS BTicino. Ogni uso improprio dell’articolo puó comprometterne le caratteristiche di sicurezza. Opgelet: voor de beeldhuistelefoon gelden de volgende installatievoorschriften: – uitsluitend binnen geïnstalleerd – niet blootgesteld aan druppelend of spattend water – de ventilatie-openingen worden niet afgesloten – mag uitsluitend worden gebruikt in SCS 2-draads systemen van BTicino. Door oneigenlijk gebruik van het artikel kan de veiligheid worden beïnvloed. Caution: the video handset must respect the following installation rules: – it must only be installed indoors – it must not be exposed to water drops or splashes – do not block the ventilation openings – it must be used only on SCS BTicino 2-wire systems An improper use of the item can compromise its safety features. Atenção: o intercomunicador vídeo deve respeitar as seguintes regras de instalação: – deve ser instalado exclusivamente em ambientes internos – não deve ficar exposto a gotejamentos ou a salpicos de água – não obstruir as aberturas de ventilação – deve ser utilizado exclusivamente em sistemas SCS BTicino de 2 fios. Qualquer uso impróprio do artigo pode comprometer as suas características de segurança. Attention: le vidéophone doit respecter les règles d’installation suivantes: – il doit être monté seulement à l’intérieur – il ne doit pas être exposé à des suintements ou à des éclaboussures – ne pas boucher les ouvertures d’aération – il doit être utilisé uniquement sur des systèmes 2 fils SCS BTicino. Tout usage impropre de la référence. Προσοχή: το θυροτηλέφωνο πρέπει να τηρεί τους ακόλουθους κανόνες εγκατάστασης: – Πρέπει να εγκατασταθεί μόνο σε εσωτερικούς χώρους – Δεν πρέπει να εκτίθεται σε στάξιμο ή πιτσίλισμα του νερού – Να μην εμποδίζει τις οπές εξαερισμού – Πρέπει να χρησιμοποιείται μόνο για την SCS BTicino συστήματα 2 καλωδίων. Οποιοδήποτε ακατάλληλη χρήση μπορεί να θέσει σε κίνδυνο τα χαρακτηριστικά ασφαλείας του. Achtung: die Videogegensprechanlage muss nach folgenden Regeln installiert werden: - sie darf nur im Inneren installiert werden - sie darf nicht Tropfen oder Spritzer ausgesetzt werden - die Belüftungsschlitze dürfen nicht abgedeckt werden - es darf nur eine 2-Draht SCS-System von BTicino verwendet werden. Ein ungeeigneter Gebrauch der Vorrichtung kann die Sicherheitseigenschaften beeinträchtigen. Uwaga: przy instalacji wideodomofonu należy przestrzegać poniższych przepisów: – musi być zainstalowany w pomieszczeniach zamkniętych – nie może być narażony na kapanie lub pryskanie wodą – nie wolno zatykać otworów wentylacyjnych – musi być użyty wyłącznie w 2-przewodowych systemach SCS Bticino. Każde niewłaściwe użycie produktu może zmniejszyć jego bezpieczeństwo. Atención: el videoportero ha de respetar las siguientes reglas de instalación: - se ha de instalar solamente en ambientes internos - no se ha de exponer a goteos o a chorros de agua - no se han de tapar las aperturas de ventilación - se ha de usar únicamente en sistemas de 2 hilos SCS BTicino. Un uso impropio del artículo puede comprometer sus características de seguridad Pozor: domovní videotelefon musí dodržovat následující instalační pravidla: – musí být nainstalován pouze v interiéru – nesmí být vystaven kapající nebo stříkající vodě – neblokujte větrací otvory – musí být používán pouze s dvoukabelovými systémy SCS BTicino. Jakékoliv nesprávné použití výrobku by mohlo ohrozit jeho bezpečnostní charakteristiky. 16-
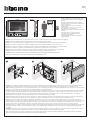 1
1
-
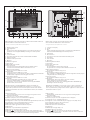 2
2
-
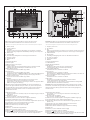 3
3
-
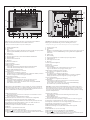 4
4
-
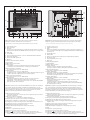 5
5
-
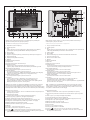 6
6
-
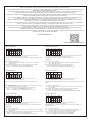 7
7
-
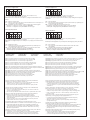 8
8
-
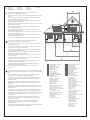 9
9
-
 10
10
-
 11
11
-
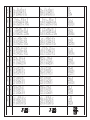 12
12
-
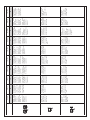 13
13
-
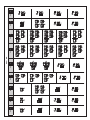 14
14
-
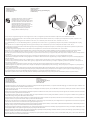 15
15
-
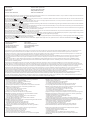 16
16


Bticino 344643 Instrucciones de operación
- Tipo
- Instrucciones de operación
- Este manual también es adecuado para
En otros idiomas
- français: Bticino 344643 Mode d'emploi
- italiano: Bticino 344643 Istruzioni per l'uso
- English: Bticino 344643 Operating instructions
- Deutsch: Bticino 344643 Bedienungsanleitung
- Nederlands: Bticino 344643 Handleiding
- português: Bticino 344643 Instruções de operação
- polski: Bticino 344643 Instrukcja obsługi
- čeština: Bticino 344643 Operativní instrukce
Documentos relacionados
-
Bticino 363911 Instrucciones de operación
-
-
-
-
-
-
-
-
-
