
IT
Attenzione: il videocitofono deve rispettare le seguenti regole
installative:
- deve essere installato solo in ambienti interni
- non deve essere esposto a stillicidio o a spruzzi d’acqua
- non ostruire le aperture di ventilazione
- deve essere usato unicamente su sistemi 2 fili SCS BTicino.
Ogni uso improprio dell’articolo puó comprometterne le
caratteristiche di sicurezza.
3
PART. U2804D
03/11-01 CT
344182
344192
1
Attention: le vidéophone doit respecter les règles d’installation
suivantes:
- il doit être monté seulement à l’intérieur
- il ne doit pas être exposé à des suintements ou à des éclaboussures
- ne pas boucher les ouvertures d’aération
- il doit être utilisé uniquement sur des systèmes 2 fils SCS BTicino.
Tout usage impropre de la référence.
FR
Caution: the video handset must respect the following installation rules:
- it must only be installed indoors
- it must not be exposed to water drops or splashes
- do not block the ventilation openings
- it must be used only on SCS BTicino 2-wire systems
An improper use of the item can compromise its safety features.
UK
Achtung: die Gegensprechanlage muss unter Beachtung folgender
Regeln installiert werden:
- es darf nur im Inneren installiert werden
- es darf nicht Wassertropfen oder -spritzer ausgesetzt werden
- Belu ftungsschlitze nicht verstopfen
- Es darf nur mit “2-Draht-Bus-System” der SCS BTicino verwendet werden.
Jeder ungeeigneter Gebrauch des Geräts kann seine
Sicherheitseigenschaften beeinträchtigen.
DE
Atenção: o intercomunicador vídeo deve respeitar as seguintes
regras para ser instalado:
- deve ser instalado somente internamente
- não deve ser exposto a estilicídio ou borrifos de água
- não deve obstruir as aberturas de ventilação
- deve ser usado somente em sistemas de 2 fios da SCS BTicino.
Qualquer uso impróprio do artigo pode comprometer as suas
características de segurança.
PT
Atención: el videoportero debe respetar las siguientes normas de
instalación:
- se debe instalar sólo al cubierto
- no debe estar expuesto a goteo o salpicones de agua
- no tape las aberturas de ventilación
- se debe utilizar exclusivamente en sistemas 2 hilos SCS BTicino.
Cualquier uso impropio del artículo puede comprometer sus
características de seguridad.
ES
Let op: Bij de installatie van de beeld-deurtelefoon moet men de
volgende voorschriften in acht nemen:
- binnenshuis installeren
- niet aan waterdruppels en -stralen blootstellen
- de ventilatieopeningen niet versperren
- uitsluitend in 2-dradige SCS BTicino systemen installeren
Ieder oneigenlijk gebruik kan de veiligheid van het product
schaden.
NL
2
30 mm
168 mm
150 mm
160 ÷ 165 cm
Altezza consigliata salvo diversa normativa vigente.
Empfohlene Höhe falls die gesetzlichen Vorschriften
nichts anderes vorschreiben.
Hauteur conseillée sauf autre norme en vigueur.
Recommended height, unless different regulations
are specified.
Altura recomendada salvo normativa vigente diferente
Aanbevolen hoogte behoudens andere normen in voege.
Altura aconselhada a não ser se a norma em vigor for
diferente.
Рекомендуемая высота, если не указаны другие
требования.
Предостережение: при монтаже видеодомофона необходимо
соблюдать следующие правила:
- устройство следует устанавливать только внутри помещений
- устройство следует защищать от попадания на него капель или
брызг воды
- запрещается перекрывать вентиляционные отверстия
- устройство должно использоваться только с двухпроводными
системами SCS BTicino
Нарушение правил эксплуатации может привести к выходу
прибора из строя.
RU
La página se está cargando...

Legenda Erläuterung Légende Legend Leyenda Legenda Legenda Условные обозначения
I D F GB E NL P RU
P
+1
MOD=5
P
+1
P
+1
P
+1
MOD=9
P
+1
P
+2
MOD=9
P
+2
P
+3
MOD=9
P
+3
P
+2
MOD=5
P
+2
P
+2
P
+3
MOD=5
P
+3
P
+3
P
+4
MOD=5
P
+4
P
+4
P
Attivazione del PE (configu-
rato con P+1) in mo do di-
ret to sen za la chia mata op-
pu re at tivazione at tua to re
art.346200 (con fi gu rato con
P+1 e MOD=9).
Aktivierung der Türstation
(mit P+1 konfiguriert) auf
direkte Weise ohne Ruf oder
Aktivierung über den Akti-
vator Art.346200 (mit P+1
und MOD=9).
Activation du PE (con fi guré
avec P+1) en mode direct
sans l’appel ou activation
actionneur réf. 346200
(configuré avec P+1 et
MOD=9).
Activating the EP (config-
ured with P+1) directly
without the call or ac ti va-
ting actuator Item 346200
(con fi gured with P+1 and
MOD=9).
Activación del PE (confi-
gurado con P+1) en modo
directo sin lla ma da o ac-
tivación del actuador art.
346200 (configurado con
P+1 y MOD=9).
Rechtstreekse activering van
het deur station (als P+1 ge-
con fi gu reerd) zonder oproep
of ac ti ve ring van het toestel
art. 346200 (ge con fi gureerd
als P+1 en MOD = 9).
Ligação da UE (con figurada
com P+1) de maneira direc-
ta sem a cha ma da ou então
ligação do ac tua dor art.
346200 (configurado com
P+1 e MOD=9).
Включение панели вызова
(P+1) без вызова или вклю-
чение активатора, арт.
346200 (P+1 и MOD=9).
P
+1
MOD=5
P
+1
P
+1
P
+1
MOD=9
P
+1
P
+2
MOD=9
P
+2
P
+3
MOD=9
P
+3
P
+2
MOD=5
P
+2
P
+2
P
+3
MOD=5
P
+3
P
+3
P
+4
MOD=5
P
+4
P
+4
P
Attivazione del PE (configu-
rato con P+2) in mo do di-
ret to sen za la chiamata op-
pu re at tivazione at tua to re
art.346200 (con fi gu rato con
P+2 e MOD=9).
Aktivierung der Türstation
(mit P+2 konfiguriert) auf
direkte Weise ohne Ruf oder
Aktivierung über den Akti-
vator Art.346200 (mit P+2
und MOD=9).
Activation du PE (con fi guré
avec P+2) en mode direct
sans l’appel ou activation
ac tion neur réf. 346200
(configuré avec P+2 et
MOD=9).
Activating the EP (config-
ured with P +2) directly
without the call or ac ti va-
ting actuator Item 346200
(con fi gured with P+2 and
MOD=9).
Activación del PE (confi-
gurado con P+2) en modo
directo sin lla ma da o ac-
tivación del actuador art.
346200 (configurado con
P+2 y MOD=9).
Rechtstreekse activering van
het deur station (als P+2 ge-
con fi gu reerd) zonder oproep
of ac ti ve ring van het toestel
art. 346200 (ge con fi gureerd
als P+2 en MOD = 9).
Ligação da UE (con figurada
com P+2) de maneira direc-
ta sem a cha ma da ou então
ligação do ac tua dor art.
346200 (configurado com
P+2 e MOD=9).
Включение панели вызова
(P+2) без вызова или вклю-
чение активатора, арт.
346200 (P+2 и MOD=9).
P
+1
MOD=5
P
+1
P
+1
P
+1
MOD=9
P
+1
P
+2
MOD=9
P
+2
P
+3
MOD=9
P
+3
P
+2
MOD=5
P
+2
P
+2
P
+3
MOD=5
P
+3
P
+3
P
+4
MOD=5
P
+4
P
+4
P
Attivazione del PE (configu-
rato con P+3) in mo do di-
ret to sen za la chiamata op-
pu re at tivazione at tua to re
art.346200 (con fi gu rato con
P+3 e MOD=9).
Aktivierung der Türstation
(mit P+3 konfiguriert) auf
direkte Weise ohne Ruf oder
Aktivierung über den Aktiva-
tor Art.346200 (mit P+3 und
MOD=9).
Activation du PE (con fi guré
avec P+3) en mode direct
sans l’appel ou activation
ac tion neur réf. 346200
(configuré avec P+3 et
MOD=9).
Activating the EP audio (con-
figured with P+3) directly
without the call or ac ti va-
ting actuator Item 346200
(con fi gured with P+3 and
MOD=9).
Activación del PE (confi-
gurado con P+3) en modo
directo sin lla ma da o ac-
tivación del actuador art.
346200 (configurado con
P+3 y MOD=9).
Rechtstreekse activering van
het deur station (als P+3 ge-
con fi gu reerd) zonder oproep
of ac ti ve ring van het toestel
art. 346200 (ge con fi gureerd
als P+3 en MOD = 9).
Ligação da UE (con figurada
com P+3) de maneira direc-
ta sem a cha ma da ou então
ligação do ac tua dor art.
346200 (configurado com
P+3 e MOD=9).
Включение панели вызова
(P+3) без вызова или вклю-
чение активатора, арт.
346200 (P+3 и MOD=9).
P
+1
MOD=5
P
+1
P
+1
P
+1
MOD=9
P
+1
P
+2
MOD=9
P
+2
P
+3
MOD=9
P
+3
P
+2
MOD=5
P
+2
P
+2
P
+3
MOD=5
P
+3
P
+3
P
+4
MOD=5
P
+4
P
+4
P
Apertura serratura del PE
(con fi gurato con P+1) in
mo do di retto senza la chia-
mata op pu re at ti va zione
attuatore art.346200 (con-
figurato con P+1 e MOD=5)
op pu re at ti va zione attuato-
re art.346230 (con figurato
con P+1).
Türöffnung der Türstation
(mit P+1 konfiguriert) oder
Aktivierung über den Akti-
vator Art. 346200 (mit P+1
und MOD=5) oder Aktivie-
rung über den Aktivator
Art. 346200 (mit P+1 konfi-
guriert).
Ouverture serrure du PE
(con fi gu ré avec P+1) en
mode di rect sans l’appel ou
ac ti vation ac tion neur réf.
346200 (con fi gu ré avec P+1
et MOD=5) ou ac ti va tion ac-
tion neur réf. 346230 (con fi-
gu ré avec P+1).
Door lock opening of EP
(con figured with P+1) di-
rectly without the call or
activating the actuator Item
346200 (con figured with
P+1 and MOD=5) or activat-
ing the actuator Item 346230
(configured with P+1).
Apertura cerradura del PE
(con figurado con P +1) en
modo directo sin llamada o
activación del actuador art.
346200 (con fi gurado con
P+1 y MOD=5) o ac ti vación
del actuador art. 346230
(con fi gu rado con P+1).
Rechtstreekse opening van
het deurslot van het als P+1
ge con figureerde deursta-
tion, zonder oproep of ac-
tivering van het to e stel art.
346200 (ge con fi gu re erd als
P+1 en MOD=5) of ac ti ve ring
van het toestel art. 346230
(ge con figureerd als P+1).
Abertura da fechadura da
UE (configurada com P+1)
de ma nei ra directa sem a
chamada ou então ligação
do actuador art. 346200
(configurado com P+1 e
MOD=5) ou então ligação
do actuador art. 346230
(con fi gu ra do com P+1).
Открытие дверного замка
панели вызова (P+1) без
вызова или включение ак-
тиватора, арт. 346200 (P+1
и MOD=9) или включение
активатора, арт. 346230
(P+1).
P
+1
MOD=5
P
+1
P
+1
P
+1
MOD=9
P
+1
P
+2
MOD=9
P
+2
P
+3
MOD=9
P
+3
P
+2
MOD=5
P
+2
P
+2
P
+3
MOD=5
P
+3
P
+3
P
+4
MOD=5
P
+4
P
+4
P
Apertura serratura del PE
(con fi gurato con P+2) in
mo do di retto senza la chia-
mata op pu re at ti va zione
attuatore art.346200 (con-
figurato con P+2 e MOD=5)
op pu re at ti va zione attuato-
re art.346230 (con figurato
con P+2).
Türöffnung der Türstation
(mit P+2 konfiguriert) oder
Aktivierung über den Akti-
vator Art. 346200 (mit P+2
und MOD=5) oder Aktivie-
rung über den Aktivator
Art. 346200 (mit P+2 konfi-
guriert).
Ouverture serrure du PE
(con fi gu ré avec P+2) en
mode di rect sans l’appel ou
ac ti vation ac tion neur réf.
346200 (con fi gu ré avec P+2
et MOD=5) ou ac ti va tion ac-
tion neur réf. 346230 (con fi-
gu ré avec P+2).
Door lock opening of EP
(con figured with P+2) di-
rectly without the call or
activating the actuator Item
346200 (con figured with
P+2 and MOD=5) or activat-
ing the actuator Item 346230
(configured with P+2).
Apertura cerradura del PE
(con figurado con P+2) en
modo di recto sin llamada o
activación del actuador art.
346200 (con fi gurado con
P+2 y MOD=5) o ac ti vación
del actuador art. 346230
(con fi gu rado con P+2).
Rechtstreekse opening van
het deurslot van het als P+2
ge con figureerde deursta-
tion, zonder oproep of ac-
tivering van het to e stel art.
346200 (ge con fi gu re erd als
P+2 en MOD=5) of ac ti ve ring
van het toestel art. 346230
(ge con figureerd als P+2).
Abertura da fechadura da
UE (configurada com P+2)
de ma nei ra directa sem a
chamada ou então ligação
do actuador art. 346200
(configurado com P+2 e
MOD=5) ou então ligação
do actuador art. 346230
(con fi gu ra do com P+2).
Открытие дверного замка
панели вызова (P+2) без
вызова или включение ак-
тиватора, арт. 346200 (P+2
и MOD=9) или включение
активатора, арт. 346230
(P+2).
P
+1
MOD=5
P
+1
P
+1
P
+1
MOD=9
P
+1
P
+2
MOD=9
P
+2
P
+3
MOD=9
P
+3
P
+2
MOD=5
P
+2
P
+2
P
+3
MOD=5
P
+3
P
+3
P
+4
MOD=5
P
+4
P
+4
P
Apertura serratura del PE
(con fi gurato con P+3) in
mo do di retto senza la chia-
mata op pu re at ti va zione
attuatore art.346200 (con-
figurato con P+3 e MOD=5)
op pu re at ti va zione attuato-
re art.346230 (con figurato
con P+3).
Türöffnung der Türstation
(mit P+3 konfiguriert) oder
Aktivierung über den Akti-
vator Art. 346200 (mit P+3
und MOD=5) oder Aktivie-
rung über den Aktivator
Art. 346200 (mit P+3 konfi-
guriert).
Ouverture serrure du PE
(con fi gu ré avec P+3) en
mode di rect sans l’appel ou
ac ti vation ac tion neur réf.
346200 (con fi gu ré avec P+3
et MOD=5) ou ac ti va tion ac-
tion neur réf. 346230 (con fi-
gu ré avec P+3).
Door lock opening of EP
(con figured with P+3) di-
rectly without the call or
activating the actuator Item
346200 (con figured with
P+3 and MOD=5) or activat-
ing the actuator Item 346230
(configured with P+3).
Apertura cerradura del PE
(con figurado con P+3) en
modo di recto sin llamada o
activación del actuador art.
346200 (con fi gurado con
P+3 y MOD=5) o ac ti vación
del actuador art. 346230
(con fi gu rado con P+3).
Rechtstreekse opening van
het deurslot van het als P+3
ge con figureerde deursta-
tion, zonder oproep of ac-
tivering van het to e stel art.
346200 (ge con fi gu re erd als
P+3 en MOD=5) of ac ti ve ring
van het toestel art. 346230
(ge con figureerd als P+3).
Abertura da fechadura da
UE (configurada com P+3)
de ma nei ra directa sem a
chamada ou então ligação
do actuador art. 346200
(configurado com P+3 e
MOD=5) ou então ligação
do actuador art. 346230
(con fi gu ra do com P+3).
Открытие дверного замка
панели вызова (P+3) без
вызова или включение ак-
тиватора, арт. 346200 (P+3
и MOD=9) или включение
активатора, арт. 346230
(P+3).
P
+1
MOD=5
P
+1
P
+1
P
+1
MOD=9
P
+1
P
+2
MOD=9
P
+2
P
+3
MOD=9
P
+3
P
+2
MOD=5
P
+2
P
+2
P
+3
MOD=5
P
+3
P
+3
P
+4
MOD=5
P
+4
P
+4
P
Apertura serratura del PE
(con fi gurato con P+4) in
mo do di retto senza la chia-
mata op pu re at ti va zione
attuatore art.346200 (con-
figurato con P+4 e MOD=5)
op pu re at ti va zione attuato-
re art.346230 (con figurato
con P+4).
Türöffnung der Türstation
(mit P+4 konfiguriert) oder
Aktivierung über den Akti-
vator Art. 346200 (mit P+4
und MOD=5) oder Aktivie-
rung über den Aktivator
Art. 346200 (mit P+4 konfi-
guriert).
Ouverture serrure du PE
(con fi gu ré avec P+4) en
mode di rect sans l’appel ou
ac ti vation ac tion neur réf.
346200 (con fi gu ré avec P+4
et MOD=5) ou ac ti va tion ac-
tion neur réf. 346230 (con fi-
gu ré avec P+4).
Door lock opening of EP
(con figured with P+4) di-
rectly without the call or
activating the actuator Item
346200 (con figured with
P+4 and MOD=5) or activat-
ing the actuator Item 346230
(configured with P+4).
Apertura cerradura del PE
(con figurado con P+4) en
modo di recto sin llamada o
activación del actuador art.
346200 (con fi gurado con
P+4 y MOD=5) o ac ti vación
del actuador art. 346230
(con fi gu rado con P+4).
Rechtstreekse opening van
het deurslot van het als P+4
ge con figureerde deurstation,
zonder oproep of activering
van het to e stel art. 346200
(ge con fi gu re erd als P+4 en
MOD=5) of ac ti ve ring van het
toestel art. 346230 (ge con-
figureerd als P+4).
Abertura da fechadura da
UE (configurada com P+4)
de ma nei ra directa sem a
chamada ou então ligação
do actuador art. 346200
(configurado com P+4 e
MOD=5) ou então ligação
do actuador art. 346230
(con fi gu ra do com P+4).
Открытие дверного замка
панели вызова (P+4) без
вызова или включение ак-
тиватора, арт. 346200 (P+4
и MOD=9) или включение
активатора, арт. 346230
(P+4).
6

6 bis
Legenda Erläuterung Légende Legend Leyenda Legenda Legenda Условные обозначения
I D F GB E NL P RU
Attivazione scenario memo-
rizzato nel modulo scenari
Aktivierung des Szenarios,
das im Szenariomodul ge-
speichert ist.
Activation scénario mémo-
risé sur le module scénarios.
Scenario activation stored in
scenario module.
Activación del escenario
memorizado en el módulo
de escenarios.
Activering scenario opgesla-
gen in het geheugen van de
module scenario’s
Activação cenário memori-
zado no módulo cenários.
Запуск сценария, сохра-
ненного в модуле управле-
ния сценариями
MOD=5
P
+1
P
+1
P
+1
MOD=9
P
+1
P
+2
MOD=9
P
+2
P
+3
MOD=9
P
+3
P
+2
MOD=5
P
+2
P
+2
P
+3
MOD=5
P
+3
P
+3
P
+4
MOD=5
P
+4
P
+4
P
P
+1
Intercom tra appartamenti
in impianti con interfac-
cia da appartamento art.
346850.
Gegenseitige Kommunika-
tion zwischen Wohnungen
für Anlagen mit Wohnungs-
schnittstelle Art. 346850.
Intercommunication entre
appartements sur installa-
tions avec interface d’appar-
tement réf. 346850.
Intercommunicability
between apartments in
systems with
apartment interface item
346850.
Intercomunicación entre
apartamentos en instalacio-
nes con interfaz de departa-
mento Art. 346850.
Intercom tussen apparte-
menten in installaties met
interface van appartement
art. 346850.
Intercom entre apartamen-
tos em instalações com in-
terface de apartamento art.
346850.
Внутренняя связь между
квартирами в системах
с квартирным распреде-
лительным блоком, арт.
346850.
MOD=5
P
+1
P
+1
P
+1
MOD=9
P
+1
P
+2
MOD=9
P
+2
P
+3
MOD=9
P
+3
P
+2
MOD=5
P
+2
P
+2
P
+3
MOD=5
P
+3
P
+3
P
+4
MOD=5
P
+4
P
+4
P
P
+1
Intercom all’interno dell’ap-
partamento in impianti con
interfaccia da appartamento
art. 346850 oppure intercom
tra appartamenti in impianti
senza interfaccia da appar-
tamento.
Gegenseitige Kommunikation
innerhalb der Wohnung für
Anlagen mit Wohnungsschnitt-
stelle Art. 346850 oder gegen-
seitige Kommunikation zwi-
schen Wohnungen für Anlagen
ohne Wohnungsschnittstelle.
Intercommunication à l’in-
térieur de l’appartement sur
installations avec interface
d’appartement réf. 346850
ou intercommunication
entre appartements sur
installations sans interface
d’appartement.
Intercommunicability inside
an apartment in systems
with apartment interface
item 346850 or intercom-
municability between apart-
ments in systems without
apartment interface.
Intercomunicación en el
apartamento en insta-
laciones con interfaz de
apartamento Art. 346850
o intercomunicación entre
apartamentos en instalacio-
nes sin interfaz de aparta-
mento.
Intercom binnen in het ap-
partement in installaties met
interface van appartement
art. 346850 ofwel intercom
tussen appartementen in
installaties zonder interface
van appartement.
Intercom dentro do aparta-
mento em instalações com
interface de apartamento
art. 346850 ou então inter-
com entre apartamentos em
instalações sem interface de
apartamento.
Внутренняя связь внутри
квартиры в системах с
квартирным распреде-
лительным блоком, арт.
346850 или внутренняя
связь между квартирами
в системах без квартир-
ного распределительного
блока.
Intercom su se stesso, invia la
chiamata a tutti gli apparec-
chi con uguale indirizzo
Intercom mit einseitiger Funkti-
on: sendet den Ruf an alle Gerä-
te mit derselben Adresse.
Intercom sur lui-même,
envoie l’appel à tous les ap-
pareils ayant une adresse
identique.
Intercom on itself, sends the
call to all the devices with the
same address.
Intercomunicación hacia los
aparatos iguales, envía la
llamada a todos los aparatos
con igual dirección
Intercom op zichzelf, ver-
stuurt de oproep naar alle
toestellen met hetzelfde
adres
Intercomunicador sobre si
mesmo, envia a chamada a
todos os aparelhos com en-
dereço igual
Интерком передает вызов
на все устройства с одним
и тем же адресом.
Intercom generale, invia una
chiamata a tutti gli apparec-
chi dell’impianto
Intercom mit allgemeiner Funk-
tion: sendet den Ruf an alle Ge-
räte der Anlage.
Intercom général, envoie
l’appel à tous les appareils
de l’installation
General intercom, sends a
call to all the system devices
Intercomunicación general,
envía una llamada a
todos los aparatos de la
instalación
Algemene Intercom, ver-
stuurt een oproep naar alle
toestellen van de installatie
Intercomunicador geral, en-
via uma chamada a todos os
aparelhos da instalação
Общий интерком передает
вызов на все устройства
системы.

Tasti
MOD=M
MOD=00 MOD=10 MOD=01 MOD=02 MOD=12 MOD=03 MOD=13 MOD=04 MOD=05 MOD=06 MOD=16 MOD=07 MOD=08
1
N=1N=3
1
N=2N=1
1
N=3N=1
1
N=1
1
N=1N=5
1
N=2N=1
1
N=3N=1
1
N=4N=1
1
N=5N=1
P
+1
MOD=5
P
+1
P
+1
P
+1
MOD=9
P
+1
P
+2
MOD=9
P
+2
P
+3
MOD=9
P
+3
P
+2
MOD=5
P
+2
P
+2
P
+3
MOD=5
P
+3
P
+3
P
+4
MOD=5
P
+4
P
+4
P
P
+1
MOD=5
P
+1
P
+1
1 1
1
N=1N=3
1
N=2N=1
1
N=3N=1
1
P
+1
MOD=5
P
+1
P
+1
P
+1
MOD=9
P
+1
P
+2
MOD=9
P
+2
P
+3
MOD=9
P
+3
P
+2
MOD=5
P
+2
P
+2
P
+3
MOD=5
P
+3
P
+3
P
+4
MOD=5
P
+4
P
+4
P
P
+1
MOD=5
P
+1
P
+1
P
+1
MOD=9
P
+1
P
+2
MOD=9
P
+2
P
+3
MOD=9
P
+3
P
+2
MOD=5
P
+2
P
+2
P
+3
MOD=5
P
+3
P
+3
P
+4
MOD=5
P
+4
P
+4
P
2
N=1N=2
2
N=2N=1
2
N=1N=2
2
N=2N=3
2
N=3N=2
2
N=1N=2
2
N=2N=5
2
N=3N=2
2
N=4N=2
2
N=5N=2
2
N=1N=2
2
N=2N=1
P
+2
MOD=5
P
+2
P
+2
2 2
2
N=1N=2
2
N=2N=3
2
N=3N=2
2
P
+1
MOD=5
P
+1
P
+1
P
+1
MOD=5
P
+1
P
+1
P
+1
MOD=5
P
+1
P
+1
P
+1
MOD=9
P
+1
P
+2
MOD=9
P
+2
P
+3
MOD=9
P
+3
P
+2
MOD=5
P
+2
P
+2
P
+3
MOD=5
P
+3
P
+3
P
+4
MOD=5
P
+4
P
+4
P
P
+1
MOD=5
P
+1
P
+1
P
+1
MOD=5
P
+1
P
+1
3
N
=
1N
=
3
3
N=2N=3
3
N=3N=5
3
N=4N=3
3
N=5N=3
P
+1
MOD=5
P
+1
P
+1
P
+3
MOD=5
P
+3
P
+3
P
+1
MOD=5
P
+1
P
+1
1 3
P
+2
MOD=5
P
+2
P
+2
P
+2
MOD=5
P
+2
P
+2
P
+1
MOD=5
P
+1
P
+1
P
+2
MOD=5
P
+2
P
+2
P
+2
MOD=5
P
+2
P
+2
4
N=1N=4
4
N=2N=4
4
N=3N=4
4
N=4N=5
4
N=5N=4
P
+2
MOD=5
P
+2
P
+2
P
+4
MOD=5
P
+4
P
+4
P
+2
MOD=5
P
+2
P
+2
P
+1
MOD=5
P
+1
P
+1
2 4
P
N M
P M
N
Scelta modalità di funzionamento dei pulsanti programmabili
Wahl des Betriebsmodus der programmierbaren Tasten
Choix modalité de fonctionnement des touches programmables
Choice of programmable pushbutton operating mode
Elección modo de funcionamiento de los pulsadores programables
Keuze werkmodus van de programmeerbare drukknoppen
Escolha modalidade de funcionamento dos botões programáveis
Выбор рабочего режима программируемых кнопок
7
1
N=1
2
N=2
3
N=3
4
N=4
2
N=2
1
N=1
1
2
3 4
1 2
3
4
1 2 3
4
1
2 3 4
In caso di riconfigurazione dell’apparecchio attendere un minuto prima di riconnetterlo all’impianto.
IFalls das Gerät neu konfiguriert werden soll, eine Minute warten bevor es an die Anlage geschlossen wird.
En cas de nouvelle configuration de l’appareil, laisser s’écouler une minute avant de le rebrancher à l’installation.
When configuring the device, wait one minute before connecting it to the system again.
En caso de reconfiguración del aparato, espere un minuto antes de volverlo a conectar a la instalación.
In geval van een herconfiguratie van het toestel een minuut wachten voordat men het terug aansluit
op de installatie.
ISe o aparelho for configurado novamente esperar um minuto antes de conectá-lo de novo com
o sistema.
При конфигурировании устройства перед его повторным подключением к системе
подождите одну минуту.

8
A
Configurazione scelta per funzionamento tasti.
Gewählte Konfiguration für die Tastenfunktionen.
Configuration choisie pour fonctionnement touches.
Configuration chosen for key operation.
Configuración modo de funcionamiento botones.
Gekozen configuratie voor de functie van de toetsen.
Configuração escolhida para o funcionamento das teclas.
Конфигурация, выбранная для режима работы кнопок.
B
Configurazione scelta per funzionamento tasti e funzione Studio professionale.
Gewählte Konfiguration für die Tastenfunktionen und die Funktion Professionelle Studio.
Configuration choisie pour fonctionnement touches et fonction Bureau professionnel.
Configuration chosen for key operation and Professional Studio function.
Configuración modo de funcionamiento botones y función Oficina Profesional.
Gekozen configuratie voor de functie van de toetsen en de kantoorfunctie.
Configuração escolhida para o funcionamento das teclas e da função Escritório profissional.
Конфигурация, выбранная для режима работы кнопок и функции Professional Studio (Кабинет специалиста).
C
Configurazione scelta per funzionamento tasti e funzione Cerca persone.
Gewählte Konfiguration für die Tastenfunktionen und die Funktion Personensuche.
Configuration choisie pour fonctionnement touches et fonction Cherche-personnes.
Configuration chosen for key operation and Paging function.
Configuración modo de funcionamiento botones y función Buscapersonas.
Gekozen configuratie voor de functie van de toetsen en de Buzzer.
Configuração escolhida para o funcionamento das teclas e da função Procura pessoas.
Конфигурация, выбранная для режима работы кнопок и функции Paging (Оповещение).
D
Configurazione scelta per funzionamento tasti e funzione Mani libere.
Gewählte Konfiguration für die Tastenfunktionen und die Funktion Freie Hände.
Configuration choisie pour fonctionnement touches et fonction Mains Libres.
Configuration chosen for key operation and Hands Free function.
Configuración modo de funcionamiento botones y función Manos Libres.
Gekozen configuratie voor de functie van de toetsen en de Handsfreefunctie.
Configuração escolhida para o funcionamento das teclas e da função Mãos Livres.
Конфигурация, выбранная для режима работы кнопок и функции Hands Free (Громкая связь).
E
Configurazione scelta per funzionamento tasti e funzione Studio professionale + Cerca persone.
Gewählte Konfiguration für die Tastenfunktionen und die Funktion Professionelle Studio + Personensuche.
Configuration choisie pour fonctionnement touches et fonction Bureau professionnel + Cherche-personnes.
Configuration chosen for key operation and Professional Studio + Paging function.
Configuración modo de funcionamiento botones y función Oficina Profesional + Buscapersonas.
Gekozen configuratie voor de functie van de toetsen en de kantoorfunctie + Buzzer.
Configuração escolhida para o funcionamento das teclas e da função Escritório profissional + Procura pessoas.
Конфигурация, выбранная для режима работы кнопок и функции Professional Studio (Кабинет специалиста) + Paging (Оповещение).
A
B
C
D E
0 0
+
20 = B
40 = C
60 = D
80 = E
20 40 60 80
1 0 30 50 70 90
0 1 21 41 61 81
0 2 22 42 62 82
1 2 32 52 72 92
0 3 23 43 63 83
1 3 33 53 73 93
0 4 24 44 64 84
0 5 25 45 65 85
0 6 26 46 66 86
1 6 36 56 76 96
0 7 27 47 67 87
0 8 28 48 68 88
Configurazione MOD
Konfiguration MOD
Configuration MOD
MOD configuration
Configuración MOD
Configuratie MOD
Configuração MOD
Конфигурация MOD

9
Funzione Studio professionale attiva
Funktion Professionelles Studio aktiv
Fonction Bureau professionnel activée
Professional studio function active
2
1
CLAK
3
Función Oficina Profesional activada
Kantoorfunctie actief
Função Escritório profissional activa
Использование функция Professional Studio (Кабинет специалиста)
Per disattivare la funzione
Zum Deaktivieren der Funktion
Pour désactiver la fonction
To deactivate la fonction
Para desactivar la función
Om de functie te deactiveren
Para desactivar a função
Деактивация функции
Per attivare la funzione
Zum Aktivieren der Funktion
Pour activer la fonction
To activate la fonction
Para activar la función
Om de functie te activeren
Para activar a função
Активация функции
>3s
Led ON
Led ON
>3s
BEEP
BEEP
BEEP
EXIT
EXIT
>3s
Led ON
Led ON
>3s
BEEP
BEEP
BEEP
EXIT
EXIT
10
Funzione Stato porta
Funktion Türzustand
Fonction État porte
Door state function
Función Estado puerta
Staat deur
Função Estado porta
Функция Door state (Состояние двери)
Questa funzione segnala lo stato della serratura, se è aperta il “led serratura” lampeggia, se è chiusa rimane spento.
NOTA: è attivabile solo se l’impianto lo prevede; non è attivabile contemporaneamente alla funzione Studio Professionale.
Diese Funktion meldet den Zustand des Schlosses; wenn es geöffnet ist, blinkt die „Leuchte Schloss“, wenn es geschlossen ist, bleibt die Leuchte ausgeschaltet.
BEMERKUNG: kann nur aktiviert werden, wenn diese Funktion vorgesehen ist; kann nicht gleichzeitig mit der Professionelles Studio aktiviert werden.
Cette fonction signale l’état de la serrure: si elle est ouverte, le voyant «serrure» clignote, il est éteint si elle est fermée.
NOTE: la fonction est activable uniquement si l’installation le prévoit; l’activation n’est pas possible conjointement à la fonction Bureau Professionnel.
This function tells you about the door lock state. If it is open the “door lock LED” flashes, if it is closed it remains OFF.
NOTE: it can only be activated if the system allows it; it can not be activated at the same time as the Professional Studio function.
Esta función señaliza el estado de la cerradura, si está abierta el “led cerradura” parpadea, si está cerrada está apagado.
NOTA: se puede activar sólo si su sistema está predispuesto; no es activable contemporáneamente a la función Oficina Profesional.
Deze functie meldt je de staat van het slot, indien het open is knippert de “led slot”, indien gesloten blijft de led uit.
OPMERKING: kan alleen geactiveerd worden indien je installatie dit voorziet; kan niet geactiveerd worden tegelijkertijd met de functie Professionele Studio.
Esta função assinala o estado da fechadura, se estiver aberta o “indicador luminoso fechadura” fica a piscar, se estiver fechada ele fica apagado.
NOTA: pode ser activada somente se a instalação o previr; não pode ser activada contemporaneamente com a função Escritório profissional.
Данная функция указывает состояние дверного замка. Если дверь открыта, то светодиод дверного замка мигает, если закрыта – остается
выключенным.
ПРИМЕЧАНИЕ: возможность использования данной функции зависит от настроек системы. Эта функция не может быть задействована одновременно
с функцией Professional Studio (Кабинет специалиста).

12
Funzione Mani Libere
Funktion Freie Hände
Fonction Mains Libres
Hands Free function
Función Manos Libres
Handsfreefunctie
Função Mãos Livres
Функция Hands Free (Громкая связь)
La funzione Mani Libere attiva automaticamente microfono ed altoparlante in caso di chiamata, evitando di dover premere il tasto Connessione per rispondere
(la connessione si stabilisce immediatamente al momento della chiamata).
Die Funktion Freie Hände aktiviert automatisch Mikrofon und Lautsprecher wenn ein Ruf eintrifft, so dass man die Verbindungstaste nicht mehr drücken
muss, um den Ruf zu beantworten (die Verbindung stellt sich sofort beim Eintreffen des Rufes her).
La fonction Mains Libres active automatiquement micro et haut-parleur en cas d’appel, évitant ainsi de devoir appuyer sur la touche Connexion pour répondre
(la connexion est immédiatement établie au moment de l’appel).
The Hands Free function automatically activates the microphone and loudspeaker when there is a call, avoiding having to press the Connection key to answer
(the connection is established immediately the call is made).
La función Manos Libres activa automáticamente el micrófono y el altavoz en caso de llamada, evitándole tener que presionar la tecla de conexión para
contestar (la conexión se establece inmediatamente al momento de la llamada).
De functie Handsfree activeert automatisch microfoon en luidspreker in geval van een oproep, en vermijdt dat je de toets Aansluiting moet indrukken om te
antwoorden (de aansluiting komt onmiddellijk tot stand op het ogenblik van de oproep).
A função Mãos Livres activa automaticamente o microfone e o altifalante em caso de chamada evitando-lhe ter de pressionar a tecla Conexão para atender
(a conexão se estabelece imediatamente no momento da chamada).
Функция Hands Free (Громкая связь) автоматически включает микрофон и динамик при поступлении вызова, исключая необходимость нажатия
кнопки Connection (Ответ) для ответа (соединение устанавливается сразу после отправки вызова).
11
Funzione Cerca persone
Funktion Personensuche
Fonction cherche-personnes
Paging function
Función buscapersonas
Functie buzzer
Função de procura pessoas
Функция Paging (Оповещение)
Questa funzione permette di diffondere un messaggio vocale, dettato al microfono del dispositivo, tramite gli altoparlanti dell’impianto Diffusione sonora. L’attivazione
avviene premendo brevemente il tasto “Connessione” con il dispositivo in stato di riposo, il led verde acceso indica che la funzione è attiva. Per terminare la funzione
premere nuovamente il tasto “Connessione”.
Mit dieser Funktion kann man eine Audiomeldung durch das Mikrophon der Vorrichtung über die Lautsprecher der Schalldiffusionsanlage aussenden. Die Aktivierung
erfolgt durch einen kurzen Druck der Taste „Verbindung“ wenn die Vorrichtung auf Ruhestand geschaltet ist. Die grüne eingeschaltete Leuchte meldet dass die Funktion
aktiv ist. Um die Funktion auszuschalten, die Taste „Verbindung“ nochmals drücken.
Cette fonction permet de diffuser un message vocal dicté au micro du dispositif par l’intermédiaire des haut-parleurs du système de Diffusion sonore. L’activation est
obtenue en appuyant brièvement sur la touche “Connexion” quand le dispositif est au repos; allumé, le voyant vert indique que la fonction est active. Pour désactiver la
fonction, appuyer à nouveau sur la touche “Connexion”.
This function plays a voice message, spoken at the device microphone, through the Sound system loudspeakers. It is activated by pressing the “Connection” key with the
device in rest state. The ON green LED indicates that the function is active. To end the function press the “Connection” key again.
Esta función permite difundir un mensaje vocal, dictado al micrófono del dispositivo, por medio de los altavoces del sistema de difusión sonora. La activación se realiza
pulsando brevemente la tecla “Conexión” con el dispositivo en el estado de reposo; el led verde encendido indica que la función está activada. Para terminar la función,
presione de nuevo la tecla “Conexión”.
Deze functie staat toe een vocale boodschap te verspreiden, gedicteerd aan de microfoon van de inrichting, middels de luidsprekers van de installatie Geluidsdiffusie.
De activering geschiedt door te drukken op de toets “Aansluiting” met de inrichting in de ruststand, de brandende groene led wijst erop dat de functie actief is. Om de
functie te beëindigen, opnieuw drukken op de toets “Aansluiting”.
Esta função permite difundir uma mensagem vocal, ditada ao microfone do dispositivo, por meio de altifalantes do sistema de Difusão sonora. A activação realiza-se
premindo brevemente a tecla “Conexão” com o dispositivo em espera, o indicador luminoso verde aceso indica que a função está activada. Para cessar a função pressionar
novamente a tecla “Conexão”.
С помощью этой функции через динамики звуковой системы воспроизводятся речевые сообщения, произнесенные в микрофон устройства. Чтобы задействовать
функцию нажмите кнопку Connection (Ответ), когда устройство находится в состоянии ожидания. Если функция активна, загорится зеленый светодиод. Для
отключения функции еще раз нажмите кнопку Connection (Ответ).
Per attivare la funzione
Zum Aktivieren der Funktion
Pour activer la fonction
To activate la fonction
Para activar la función
Om de functie te activeren
Para activar a função
Активация функции
Per disattivare la funzione
Zum Deaktivieren der Funktion
Pour désactiver la fonction
To deactivate la fonction
Para desactivar la función
Om de functie te deactiveren
Para desactivar a função
Деактивация функции
>3s
>3s
BEEP
EXIT
EXIT
BEEP
BEEP
>3s
>3s
BEEP
EXIT
EXIT
BEEP
BEEP

13
Modalità Push to Talk
Modus Push to Talk
Modalité Push to Talk
Push to Talk mode
Función Push to Talk
Push to Talk functie
Função Push to Talk
Режим Push to Talk (Нажми и говори)
Se il posto esterno si trova in un ambiente particolarmente rumoroso è
possibile, durante la conversazione, attivare la funzione Push to Talk al fine di
ottenere una comunicazione meno disturbata.
Durante la conversazione è possibile attivare la funzione Push to Talk nel
seguente modo.
- Premere il tasto Connessione per almeno 2 secondi per parlare con il posto
esterno.
Il Led rimane verde.
- Rilasciare il tasto per poter ascoltare dal posto esterno.
Il Led diventa rosso.
- Per terminare la connessione premere brevemente il tasto Connessione.
Il Led si spegne.
Si la placa exterior se encuentra en un ambiente con un alto nivel de ruido,
durante la conversación es posible activar la función
Push to Talk
para
obtener una comunicación con menor interferencias.
Durante la conversación es posible activar la función
Push to Talk
en el
modo siguiente.
- Presione la tecla de conexión almenos 2 segundos para conversar con la
placa exterior.
El led permanece verde.
- Suelte la tecla para poder escuchar desde la placa exterior.
El led se vuelve rojo.
- Para terminar la conexión, presione brevemente la tecla de conexión.
El led se apaga.
Wenn die Türstation in einem besonders geräuschvollen Bereich installiert
ist, kann man während des Gesprächs die Funktion Push to Talk drücken, um
diese Geräusche zu überwinden. Während des Gesprächs kann die Funktion
Push to Talk folgendermaßen aktiviert werden.
- Die Verbindungstaste mindestens 2 Sekunden lang drücken, um mit der
Türstation zu sprechen.
Die grüne Meldeleuchte leuchtet immer noch.
- Taste loslassen, um die Türstation hören zu können.
Die Meldeleuchte leuchtet rot auf
- Um die Verbindung abzubrechen, die Verbindungstaste kurz drücken. Die
Meldeleuchte erlischt.
Indien het extern punt zich op een bijzonder lawaaierige plaats bevindt, is
het mogelijk, tijdens het gesprek, de functie Push to Talk te activeren tenein-
de een minder gestoorde communicatie te verkrijgen. Tijdens het gesprek is
het mogelijk de functie
Push to Talk
te activeren op de volgende manier.
- De drukknop van Verbinding gedurende minstens 2 seconden indrukken
om met het externe punt te communiceren.
De led blijft groen.
- De toets loslaten om vanuit het externe punt te kunnen luisteren.
De led wordt rood.
- Om de verbinding te beëindigen, eventjes de toets van verbinding indruk-
ken. De led gaat uit.
Si le poste externe se trouve dans un environnement particulièrement
bruyant, il est possible d’activer durant la conversation la fonction Push to
Talk pour obtenir une meilleure communication.
Durant la conversation, il est possible d’activer la fonction
Push to Talk
en
procédant comme suit.
- Appuyer sur la touche Connexion pendant au moins 2 secondes pour parler
avec le poste externe.
Le voyant reste vert.
- Relâcher la touche pour pouvoir écouter depuis le poste externe.
Le voyant devient rouge.
- Pour mettre fin à la connexion, appuyer brièvement sur la touche connexion.
Le voyant s’éteint.
Esta função permite difundir uma mensagem vocal, ditada ao microfone do
dispositivo, por meio de altifalantes do sistema de Difusão sonora. A activa-
ção realiza-se premindo brevemente a tecla “Conexão” com o dispositivo em
espera, o indicador luminoso verde aceso indica que a função está activada.
Para cessar a função pressionar novamente a tecla “Conexão”.
- Pressionar a tecla de conexão por pelo menos 2 segundos para falar com a
unidade externa.
O indicador luminoso continua verde
- Soltar a tecla para poder escutar a unidade externa.
O indicador luminoso fica vermelho
- Para desligar pressionar ligeiramente a tecla da conexão
O indicador luminoso apaga
If the entrance panel is in a particularly noisy place, during the conversation
the Push to Talk function can be activated for a less disturbed call. During the
conversation the
Push to Talk
function can be activated as follows.
- Press the Connection key for at least 2 seconds to talk to the entrance
panel.
The LED remains green.
- Release the key to hear from the entrance panel.
The LED becomes red.
- To end the connection press the connection key briefly.
The LED goes out.
Если панель вызова установлена в очень шумном месте, то чтобы
избежать искажения речи во время разговора можно воспользоваться
функцией Push to Talk (Нажми и говори). Для использования функции
Push to Talk (Нажми и говори) во время разговора:
- Нажмите кнопку Connection (Ответ) и удерживайте ее в нажатом
положении не менее 2 секунд для разговора через панель вызова,
Светодиод продолжает гореть зеленым цветом.
- Отпустите кнопку для прослушивания ответа через панель вызова.
Светодиод загорается красным цветом.
- Для завершения соединения нажмите и сразу отпустите кнопку Con-
nection (Ответ).
Светодиод погаснет.

EXIT
OK
1
17
2
>3s
2
2
2
EXIT
OK
1
17
2
>3s
1
1
1
EXIT
OK
1
17
2
>3s
3
3
3
EXIT
OK
1
17
2
>3s
4
4
4
EXIT
OK
1
17
2
>3s
Selezione suoneria chiamata intercom esterno (solo con art. 346850)
Änderung externer Rufton (nur mit Art. 346850)
Sélection sonnerie d’appel intercom externe (uniquement avec réf. 346850)
Selection external intercom call ring (only with item 346850)
Selección del timbre llamada de intercomunicación
exterior (sólo con Art. 346850)
Selectie belgeluid oproep externe intercom (alleen met art. 346850)
Selecção do toque para chamada de intercomunicador
externo (só com o art. 346850)
Выбор звонка для вызова с внешнего интеркома (только для арт. 346850)
EXIT
OK
1
17
2
>3s
2
2
2
EXIT
OK
1
17
2
>3s
1
1
1
EXIT
OK
1
17
2
>3s
3
3
3
EXIT
OK
1
17
2
>3s
4
4
4
EXIT
OK
1
17
2
>3s
Selezione suoneria chiamata intercom
Änderung interner Rufton
Sélection sonnerie appel intercom
Selection call intercom bell
Selección timbre llamada intercomunicante
Kies belgeluid intercom oproep gebouw
Selecção do toque para chamada intercomomunicador
Выбор звонка для вызова с интеркома
EXIT
OK
1
17
2
>3s
2
2
2
EXIT
OK
1
17
2
>3s
1
1
1
EXIT
OK
1
17
2
>3s
3
3
3
EXIT
OK
1
17
2
>3s
4
4
4
EXIT
OK
1
17
2
>3s
Selezione suoneria da posto esterno secondario (S=1)
Änderung Rufton von einer Nebentürstation (S=1)
Sélection sonnerie appel d’un poste extérieur secondaire (S=1)
Selection call from secondary outdoor station (S=1) bell
Selección timbre llamada desde el puesto exterior secundario (S=1)
Kies belgeluid oproep vanuit tweede externe post (S=1)
Selecção do toque para chamada da unidade externa secundária (S=1)
Выбор звонка для вызова с дополнительной панели вызова (S=1)
14
Programmazione suonerie
wählbare Ruftöne
Programmation sonneries
Programming bells
Programación timbres
Programmering belgeluid
Programação dos toques
Программирование звонков
EXIT
OK
1
17
2
>3s
2
2
2
EXIT
OK
1
17
2
>3s
1
1
1
EXIT
OK
1
17
2
>3s
3
3
3
EXIT
OK
1
17
2
>3s
4
4
4
EXIT
OK
1
17
2
>3s
Selezione suoneria da posto esterno principale (S=0)
Änderung Rufton Etagentaster
Sélection sonnerie appel d’un poste extérieur principal (S=0)
Selection call from main outdoor station (S=0) bell
Selección timbre llamada desdeel puesto exterior principal (S=0)
Kies belgeluid oproep vanuit eerste externe post (S=0)
Selecção do toque parachamada da unidade externa principal (S=0)
Выбор звонка для вызова с основной панели вызова (S=0)
Selezione suoneria chiamata al piano
Änderung Rufton Etagentaster
Sélection sonnerie appel à l’étage
Selection call to the floor bell
Selección timbre llamada al piso
Kies belgeluid oproep aan verdieping
Selecção do toque para chamada ao andar
Выбор звонка для вызова с этажного блока
EXIT
OK
1
17
2
>3s
2
2
2
EXIT
OK
1
17
2
>3s
1
1
1
EXIT
OK
1
17
2
>3s
3
3
3
EXIT
OK
1
17
2
>3s
4
4
4
EXIT
OK
1
17
2
>3s

15
Attivazione/Disattivazione suono tasti
Tastenton aktivieren/deaktivieren
Activation/Désactivation son des touches
Key sound ON/OFF
BEEP
BEEP
>3s
Activación/Desactivación sonido de las teclas
Activering/Deactivering geluid toetsen
Activação/ Desactivação do som teclas
Включение/выключение звукового сигнала при
нажатии кнопок
Nella configurazione base è previsto che alla pressione dei tasti venga emesso un BEEP, questa funzione può essere disabilitata/riabilitata con la seguente
procedura.
Bei der Grundkonfiguration ist vorgesehen, dass bei einem Tastendruck ein BEEP-Ton ertönt. Diese Funktion kann folgendermaßen deaktiviert/wieder aktiviert
werden.
Dans la configuration de base, il est prévu qu’un BIP soit émis à chaque pression sur une touche; cette fonction peut être activée/désactivée comme suit.
In the basic function when the keys are pressed a BEEP sounds. This function can be disabled/enabled with the following procedure.
En la configuración básica, está previsto que al pulsar las teclas se produzca un ‘BIP’; esta función se puede deshabilitar/restablecer con el siguiente
procedimiento.
In de basisconfiguratie is voorzien dat bij het drukken op de toetsen een BEEP wordt uitgezonden, deze functie kan gedeactiveerd/terug geactiveerd worden met
de volgende procedure.
Na configuração de base está prevista que ao se carregar sobre as teclas se escutará o som de um BEEP, esta função pode ser desabilitada ou reabilitada com o
seguinte método.
По умолчанию при нажатии кнопки раздается звуковой сигнал. Эта функция может быть включена/отключена следующим образом:
BEEP
BEEP
>3s
Per attivare la funzione
Zum Aktivieren der Funktion
Pour activer la fonction
To activate la fonction
Para activar la función
Om de functie te activeren
Para activar a função
Активация функции
Per disattivare la funzione
Zum Deaktivieren der Funktion
Pour désactiver la fonction
To deactivate la fonction
Para desactivar la función
Om de functie te deactiveren
Para desactivar a função
Деактивация функции

16
Conmute el aparato acústico a la posición T
Het akoestisch toestel naar de stand T schakelen
Comutar o aparelho acústico para a posição T
Установите переключатель слухового аппарата в положение Т
Commutare l’apparecchio acustico in posizione T
Das akustische Gerät auf Position T umschalten
Commuter l’appareil acoustique sur la position T
Switch hearing device in T position
25
-3
5
c
m
4
0
c
m
- Per un corretto accoppiamento magnetico tra PI ed apparecchio acustico si consiglia di posizionarsi frontalmente al dispositivo ad una distanza di 25-35cm.
- Si ricorda che la presenza di metallo e rumore di fondo generato da apparecchiature elettriche/elettroniche (es. computer), può compromettere la qualità e
le perfomace del dispositivo di accoppiamento.
- Für eine einwandfreie magnetische Kopplung zwischen Hausstation und akustisches Gerät, stellen Sie sich in einem Abstand von 25-35 cm vor das Gerät.
- Bitte beachten Sie, dass Metallgegenstände und Hintergrundgeräusche elektrischer/elektronischer Geräte (z.B. PC), die Qualität und Leistung der Kopp-
lungsvorrichtung beeinträchtigen können.
- Pour assurer le bon couplage magnétique entre PI et appareil acoustique, il est recommandé de se placer face au dispositif à une distance de 25-35 cm.
- Il est rappelé que la présence de métal et de bruit de fond généré par des appareillages électriques/électroniques (ordinateurs par exemple) peut compro-
mettre la qualité et les performances du dispositif de couplage.
- For proper magnetic coupling between the Handset and the sound device, it is recommended to stay 25-35 cm from the front side of the device.
- Remember that the presence of metal and background noise generated by electric/electronic equipment (e.g. computers), can affect the quality and the
performance of the coupling device.
- Para un correcto acoplamiento magnético entre la PI y el aparato acústico le aconsejamos ubicarse delante del dispositivo a una distancia de 25-35 cm.
- Recuerde que la presencia de metal y ruido de fondo generado por aparatos eléctricos/electrónicos (por ejemplo, PC) puede comprometer la calidad y la
eficiencia del dispositivo de acoplamiento.
- Voor een correcte magnetische koppeling tussen IP en akoestisch toestel raadt men aan zich frontaal tegenover de inrichting te plaatsen op een afstand
van 25-35 cm.
- Men herinnert eraan dat de aanwezigheid van metaal en achtergrondruis gegenereerd door elektrische/elektronische apparatuur (vb. computer) de kwali-
teit en de performance van de koppelingsinrichting kan compromitteren.
- Para um acoplamento magnético certo entre PI e aparelho acústico recomenda-se posicionar-se frontalmente ao dispositivo com uma distância de 25-35cm.
- Lembra-se que o metal e rumor de fundo gerado por aparelhagens eléctricas/electrónicas (ex. computador), pode comprometer a qualidade e a perfor-
mance do dispositivo de acoplamento.
- Для обеспечения хорошей связи между внутренним блоком и слуховым аппаратом рекомендуется оставаться на расстоянии 25-35 см от лицевой
панели устройства.
- Необходимо учитывать, что наличие металлических конструкций и фоновых помех, исходящих от электрического/электронного оборудования
(например, компьютеров), могут негативно отразиться на работе устройства связи.
Sólo para el art. 344182
Alleen voor art. 344182
Só para o art. 344182
Только для арт. 344182
Solo per art. 344182
Nur für Art. 344182
Uniquement pour réf. 344182
Only for item 344182
Transcripción de documentos
344182 344192 PART. U2804D 1 30 mm 150 mm 160 ÷ 165 cm 168 mm 03/11-01 CT Altezza consigliata salvo diversa normativa vigente. Empfohlene Höhe falls die gesetzlichen Vorschriften nichts anderes vorschreiben. Hauteur conseillée sauf autre norme en vigueur. Recommended height, unless different regulations are specified. Altura recomendada salvo normativa vigente diferente Aanbevolen hoogte behoudens andere normen in voege. Altura aconselhada a não ser se a norma em vigor for diferente. Рекомендуемая высота, если не указаны другие требования. 2 3 Attenzione: il videocitofono deve rispettare le seguenti regole installative: - deve essere installato solo in ambienti interni - non deve essere esposto a stillicidio o a spruzzi d’acqua - non ostruire le aperture di ventilazione - deve essere usato unicamente su sistemi 2 fili SCS BTicino. Ogni uso improprio dell’articolo puó comprometterne le caratteristiche di sicurezza. ES Atención: el videoportero debe respetar las siguientes normas de instalación: - se debe instalar sólo al cubierto - no debe estar expuesto a goteo o salpicones de agua - no tape las aberturas de ventilación - se debe utilizar exclusivamente en sistemas 2 hilos SCS BTicino. Cualquier uso impropio del artículo puede comprometer sus características de seguridad. DE Achtung: die Gegensprechanlage muss unter Beachtung folgender Regeln installiert werden: - es darf nur im Inneren installiert werden - es darf nicht Wassertropfen oder -spritzer ausgesetzt werden - Belu ftungsschlitze nicht verstopfen - Es darf nur mit “2-Draht-Bus-System” der SCS BTicino verwendet werden. Jeder ungeeigneter Gebrauch des Geräts kann seine Sicherheitseigenschaften beeinträchtigen. NL Let op: Bij de installatie van de beeld-deurtelefoon moet men de volgende voorschriften in acht nemen: - binnenshuis installeren - niet aan waterdruppels en -stralen blootstellen - de ventilatieopeningen niet versperren - uitsluitend in 2-dradige SCS BTicino systemen installeren Ieder oneigenlijk gebruik kan de veiligheid van het product schaden. FR Attention: le vidéophone doit respecter les règles d’installation suivantes: - il doit être monté seulement à l’intérieur - il ne doit pas être exposé à des suintements ou à des éclaboussures - ne pas boucher les ouvertures d’aération - il doit être utilisé uniquement sur des systèmes 2 fils SCS BTicino. Tout usage impropre de la référence. PT Atenção: o intercomunicador vídeo deve respeitar as seguintes regras para ser instalado: - deve ser instalado somente internamente - não deve ser exposto a estilicídio ou borrifos de água - não deve obstruir as aberturas de ventilação - deve ser usado somente em sistemas de 2 fios da SCS BTicino. Qualquer uso impróprio do artigo pode comprometer as suas características de segurança. UK Caution: the video handset must respect the following installation rules: - it must only be installed indoors - it must not be exposed to water drops or splashes - do not block the ventilation openings - it must be used only on SCS BTicino 2-wire systems An improper use of the item can compromise its safety features. RU Предостережение: при монтаже видеодомофона необходимо соблюдать следующие правила: - устройство следует устанавливать только внутри помещений - устройство следует защищать от попадания на него капель или брызг воды - запрещается перекрывать вентиляционные отверстия - устройство должно использоваться только с двухпроводными системами SCS BTicino Нарушение правил эксплуатации может привести к выходу прибора из строя. IT 6 P+1 P+1 P+2 P+4 P+4 MOD=5 P+4 P+4 MOD=5 P+4 P+4 P+4 P+3 P+3 MOD=5 MOD=5 P+4 P+4 P+4 MOD=5 P+4 P+4 MOD=5 P+4 P+4 P+3 P+3 P+4 P+4 MOD=5 MOD=5 P+3 P+3 P+2 P+3 P+2 MOD=5 MOD=5 P+3 P+3 P+3 P+4 P+4 P+4 MOD=5 P+3 P+3 MOD=5 P+4 P+3 P+4 P+2 P+2 P+3 P+3 MOD=5 MOD=5 P+2 P+3 P+2 P+2 P+1 P+1 MOD=5 P+2 P+2 P+3 P+3 P+3 MOD=5 P+2 MOD=5 P+2 P+2 MOD=5 P+3 P+2 P+2 P+3 P+2 P+2 P+1 P+1 MOD=5 MOD=5 P+1 P+1 MOD=5 P+2 P+1 P+1 P+1 P+2 P+2 P+1 P+2 P+1 MOD=5 P+1 MOD=5 P+1 P+1 P+1 P+2 P+3 P+1 P+1 P +3 MOD=9 MOD=5 P+3 MOD=9 P+1 P+1 MOD=5 P+3 P+2 MOD=9 P+3 P+3 MOD=9 P+1 P+2 P+1 P+2 P+3 MOD=9 P+3 P+3 +3 MOD=9 P MOD=9 P+1 P P+3 +2 P+1 P+3 P+2 MOD=9 MOD=9 MOD=9 P+3 P+1 MOD=9 P+1 MOD=9 P+2 P+2 P P+2 MOD=9 MOD=9 P+3 PP +2 P+1 MOD=9 P+1 MOD=9 P+2 P+1 P P+1 P MOD=9 P+1 +1 MOD=9 P+1 MOD=9 P P+2 P+2 MOD=9 P P P+1 MOD=9 P P Apertura serratura del PE (con fi gurato con P+4) in modo diretto senza la chia mata oppure attivazione attuatore art.346200 (con figurato con P+4 e MOD=5) oppure attivazione attuatore art.346230 (con figurato con P+4). Apertura serratura del PE (con fi gurato con P+3) in modo diretto senza la chia mata oppure attivazione attuatore art.346200 (con figurato con P+3 e MOD=5) oppure attivazione attuatore art.346230 (con figurato con P+3). Apertura serratura del PE (con fi gurato con P+2) in modo diretto senza la chia mata oppure attivazione attuatore art.346200 (con figurato con P+2 e MOD=5) oppure attivazione attuatore art.346230 (con figurato con P+2). Apertura serratura del PE (con fi gurato con P+1) in modo diretto senza la chia mata oppure attivazione attuatore art.346200 (con figurato con P+1 e MOD=5) oppure attivazione attuatore art.346230 (con figurato con P+1). Attivazione del PE (configurato con P+3) in modo di retto senza la chiamata op pure attivazione attuatore art.346200 (configurato con P+3 e MOD=9). Attivazione del PE (configurato con P+2) in modo di retto senza la chiamata op pure attivazione attuatore art.346200 (configurato con P+2 e MOD=9). Türöffnung der Türstation (mit P+4 konfiguriert) oder Aktivierung über den Aktivator Art. 346200 (mit P+4 und MOD=5) oder Aktivierung über den Aktivator Art. 346200 (mit P+4 konfiguriert). Türöffnung der Türstation (mit P+3 konfiguriert) oder Aktivierung über den Aktivator Art. 346200 (mit P+3 und MOD=5) oder Aktivierung über den Aktivator Art. 346200 (mit P+3 konfiguriert). Türöffnung der Türstation (mit P+2 konfiguriert) oder Aktivierung über den Aktivator Art. 346200 (mit P+2 und MOD=5) oder Aktivierung über den Aktivator Art. 346200 (mit P+2 konfiguriert). Türöffnung der Türstation (mit P+1 konfiguriert) oder Aktivierung über den Aktivator Art. 346200 (mit P+1 und MOD=5) oder Aktivierung über den Aktivator Art. 346200 (mit P+1 konfiguriert). Aktivierung der Türstation (mit P+3 konfiguriert) auf direkte Weise ohne Ruf oder Aktivierung über den Aktivator Art.346200 (mit P+3 und MOD=9). Aktivierung der Türstation (mit P+2 konfiguriert) auf direkte Weise ohne Ruf oder Aktivierung über den Aktivator Art.346200 (mit P+2 und MOD=9). F D Aktivierung der Türstation (mit P+1 konfiguriert) auf direkte Weise ohne Ruf oder Aktivierung über den Aktivator Art.346200 (mit P+1 und MOD=9). I Attivazione del PE (configurato con P+1) in modo di retto senza la chiamata op pure attivazione attuatore art.346200 (configurato con P+1 e MOD=9). Ouverture serrure du PE (configuré avec P+4) en mode direct sans l’appel ou activation actionneur réf. 346200 (configuré avec P+4 et MOD=5) ou activation ac tionneur réf. 346230 (confi guré avec P+4). Ouverture serrure du PE (configuré avec P+3) en mode direct sans l’appel ou activation actionneur réf. 346200 (configuré avec P+3 et MOD=5) ou activation ac tionneur réf. 346230 (confi guré avec P+3). Ouverture serrure du PE (configuré avec P+2) en mode direct sans l’appel ou activation actionneur réf. 346200 (configuré avec P+2 et MOD=5) ou activation ac tionneur réf. 346230 (confi guré avec P+2). Ouverture serrure du PE (configuré avec P+1) en mode direct sans l’appel ou activation actionneur réf. 346200 (configuré avec P+1 et MOD=5) ou activation ac tionneur réf. 346230 (confi guré avec P+1). Activation du PE (configuré avec P+3) en mode direct sans l’appel ou activation actionneur réf. 346200 (configuré avec P+3 et MOD=9). Activation du PE (configuré avec P+2) en mode direct sans l’appel ou activation actionneur réf. 346200 (configuré avec P+2 et MOD=9). Activation du PE (configuré avec P+1) en mode direct sans l’appel ou activation actionneur réf. 346200 (configuré avec P+1 et MOD=9). Légende Erläuterung Legenda Door lock opening of EP (con figured with P+4) directly without the call or activating the actuator Item 346200 (con figured with P+4 and MOD=5) or activating the actuator Item 346230 (configured with P+4). Door lock opening of EP (con figured with P+3) directly without the call or activating the actuator Item 346200 (con figured with P+3 and MOD=5) or activating the actuator Item 346230 (configured with P+3). Door lock opening of EP (con figured with P+2) directly without the call or activating the actuator Item 346200 (con figured with P+2 and MOD=5) or activating the actuator Item 346230 (configured with P+2). Door lock opening of EP (con figured with P+1) directly without the call or activating the actuator Item 346200 (con figured with P+1 and MOD=5) or activating the actuator Item 346230 (configured with P+1). Activating the EP audio (configured with P+3) directly without the call or ac ti va ting actuator Item 346200 (con fi gured with P+3 and MOD=9). Activating the EP (configured with P +2) directly without the call or ac ti va ting actuator Item 346200 (con fi gured with P+2 and MOD=9). Activating the EP (configured with P+1) directly without the call or ac ti va ting actuator Item 346200 (con fi gured with P+1 and MOD=9). GB Legend Apertura cerradura del PE (con figurado con P+4) en modo directo sin llamada o activación del actuador art. 346200 (configurado con P+4 y MOD=5) o activación del actuador art. 346230 (configurado con P+4). Apertura cerradura del PE (con figurado con P+3) en modo directo sin llamada o activación del actuador art. 346200 (configurado con P+3 y MOD=5) o activación del actuador art. 346230 (configurado con P+3). Apertura cerradura del PE (con figurado con P+2) en modo directo sin llamada o activación del actuador art. 346200 (configurado con P+2 y MOD=5) o activación del actuador art. 346230 (configurado con P+2). Apertura cerradura del PE (configurado con P +1) en modo directo sin llamada o activación del actuador art. 346200 (configurado con P+1 y MOD=5) o activación del actuador art. 346230 (configurado con P+1). Activación del PE (configurado con P+3) en modo directo sin lla ma da o activación del actuador art. 346200 (configurado con P+3 y MOD=9). Activación del PE (configurado con P+2) en modo directo sin lla ma da o activación del actuador art. 346200 (configurado con P+2 y MOD=9). Activación del PE (configurado con P+1) en modo directo sin lla ma da o activación del actuador art. 346200 (configurado con P+1 y MOD=9). E Leyenda Rechtstreekse opening van het deurslot van het als P+4 geconfigureerde deurstation, zonder oproep of activering van het to e stel art. 346200 (geconfigureerd als P+4 en MOD=5) of activering van het toestel art. 346230 (ge con figureerd als P+4). Rechtstreekse opening van het deurslot van het als P+3 geconfigureerde deurstation, zonder oproep of activering van het toestel art. 346200 (geconfigureerd als P+3 en MOD=5) of activering van het toestel art. 346230 (geconfigureerd als P+3). Rechtstreekse opening van het deurslot van het als P+2 geconfigureerde deurstation, zonder oproep of activering van het toestel art. 346200 (geconfigureerd als P+2 en MOD=5) of activering van het toestel art. 346230 (geconfigureerd als P+2). Rechtstreekse opening van het deurslot van het als P+1 geconfigureerde deurstation, zonder oproep of activering van het toestel art. 346200 (geconfigureerd als P+1 en MOD=5) of activering van het toestel art. 346230 (geconfigureerd als P+1). Rechtstreekse activering van het deurstation (als P+3 ge configureerd) zonder oproep of activering van het toestel art. 346200 (geconfigureerd als P+3 en MOD = 9). Rechtstreekse activering van het deurstation (als P+2 ge configureerd) zonder oproep of activering van het toestel art. 346200 (geconfigureerd als P+2 en MOD = 9). Rechtstreekse activering van het deurstation (als P+1 ge configureerd) zonder oproep of activering van het toestel art. 346200 (geconfigureerd als P+1 en MOD = 9). NL Legenda Abertura da fechadura da UE (configurada com P+4) de ma nei ra directa sem a chamada ou então ligação do actuador art. 346200 (configurado com P+4 e MOD=5) ou então ligação do actuador art. 346230 (configurado com P+4). Abertura da fechadura da UE (configurada com P+3) de ma nei ra directa sem a chamada ou então ligação do actuador art. 346200 (configurado com P+3 e MOD=5) ou então ligação do actuador art. 346230 (configurado com P+3). Abertura da fechadura da UE (configurada com P+2) de ma nei ra directa sem a chamada ou então ligação do actuador art. 346200 (configurado com P+2 e MOD=5) ou então ligação do actuador art. 346230 (configurado com P+2). Abertura da fechadura da UE (configurada com P+1) de ma nei ra directa sem a chamada ou então ligação do actuador art. 346200 (configurado com P+1 e MOD=5) ou então ligação do actuador art. 346230 (configurado com P+1). Ligação da UE (configurada com P+3) de maneira directa sem a chamada ou então ligação do ac tua dor art. 346200 (configurado com P+3 e MOD=9). Ligação da UE (configurada com P+2) de maneira directa sem a chamada ou então ligação do ac tua dor art. 346200 (configurado com P+2 e MOD=9). Ligação da UE (configurada com P+1) de maneira directa sem a chamada ou então ligação do ac tua dor art. 346200 (configurado com P+1 e MOD=9). P Legenda Открытие дверного замка панели вызова (P+4) без вызова или включение активатора, арт. 346200 (P+4 и MOD=9) или включение активатора, арт. 346230 (P+4). Открытие дверного замка панели вызова (P+3) без вызова или включение активатора, арт. 346200 (P+3 и MOD=9) или включение активатора, арт. 346230 (P+3). Открытие дверного замка панели вызова (P+2) без вызова или включение активатора, арт. 346200 (P+2 и MOD=9) или включение активатора, арт. 346230 (P+2). Открытие дверного замка панели вызова (P+1) без вызова или включение активатора, арт. 346200 (P+1 и MOD=9) или включение активатора, арт. 346230 (P+1). Включение панели вызова (P+3) без вызова или включение активатора, арт. 346200 (P+3 и MOD=9). Включение панели вызова (P+2) без вызова или включение активатора, арт. 346200 (P+2 и MOD=9). Включение панели вызова (P+1) без вызова или включение активатора, арт. 346200 (P+1 и MOD=9). RU Условные обозначения 6 bis Erläuterung D Aktivierung des Szenarios, das im Szenariomodul gespeichert ist. Gegenseitige Kommunikation zwischen Wohnungen für Anlagen mit Wohnungsschnittstelle Art. 346850. Gegenseitige Kommunikation innerhalb der Wohnung für Anlagen mit Wohnungsschnittstelle Art. 346850 oder gegenseitige Kommunikation zwischen Wohnungen für Anlagen ohne Wohnungsschnittstelle. Intercom mit einseitiger Funktion: sendet den Ruf an alle Geräte mit derselben Adresse. Intercom mit allgemeiner Funktion: sendet den Ruf an alle Geräte der Anlage. Legenda I Attivazione scenario memorizzato nel modulo scenari Intercom tra appartamenti in impianti con interfaccia da appartamento art. 346850. Intercom all’interno dell’appartamento in impianti con interfaccia da appartamento art. 346850 oppure intercom tra appartamenti in impianti senza interfaccia da appartamento. Intercom su se stesso, invia la chiamata a tutti gli apparecchi con uguale indirizzo Intercom generale, invia una chiamata a tutti gli apparecchi dell’impianto Intercom général, envoie l’appel à tous les appareils de l’installation Intercom sur lui-même, envoie l’appel à tous les appareils ayant une adresse identique. Intercommunication à l’intérieur de l’appartement sur installations avec interface d’appartement réf. 346850 ou intercommunication entre appartements sur installations sans interface d’appartement. Intercommunication entre appartements sur installations avec interface d’appartement réf. 346850. Activation scénario mémorisé sur le module scénarios. F Légende General intercom, sends a call to all the system devices Intercom on itself, sends the call to all the devices with the same address. Intercommunicability inside an apartment in systems with apartment interface item 346850 or intercommunicability between apartments in systems without apartment interface. Intercommunicability between apartments in systems with apartment interface item 346850. Scenario activation stored in scenario module. GB Legend Intercomunicación general, envía una llamada a todos los aparatos de la instalación Intercomunicación hacia los aparatos iguales, envía la llamada a todos los aparatos con igual dirección Intercomunicación en el apartamento en instalaciones con interfaz de apartamento Art. 346850 o intercomunicación entre apartamentos en instalaciones sin interfaz de apartamento. Intercomunicación entre apartamentos en instalaciones con interfaz de departamento Art. 346850. Activación del escenario memorizado en el módulo de escenarios. E Leyenda Algemene Intercom, verstuurt een oproep naar alle toestellen van de installatie Intercom op zichzelf, verstuurt de oproep naar alle toestellen met hetzelfde adres Intercom binnen in het appartement in installaties met interface van appartement art. 346850 ofwel intercom tussen appartementen in installaties zonder interface van appartement. Intercom tussen appartementen in installaties met interface van appartement art. 346850. Activering scenario opgeslagen in het geheugen van de module scenario’s NL Legenda Intercomunicador geral, envia uma chamada a todos os aparelhos da instalação Intercomunicador sobre si mesmo, envia a chamada a todos os aparelhos com endereço igual Intercom dentro do apartamento em instalações com interface de apartamento art. 346850 ou então intercom entre apartamentos em instalações sem interface de apartamento. Intercom entre apartamentos em instalações com interface de apartamento art. 346850. Activação cenário memorizado no módulo cenários. P Legenda Общий интерком передает вызов на все устройства системы. Интерком передает вызов на все устройства с одним и тем же адресом. Внутренняя связь внутри квартиры в системах с квартирным распределительным блоком, арт. 346850 или внутренняя связь между квартирами в системах без квартирного распределительного блока. Внутренняя связь между квартирами в системах с квартирным распределительным блоком, арт. 346850. Запуск сценария, сохраненного в модуле управления сценариями RU Условные обозначения 2 3 4 1 2 3 1 3 P+1 P P+1 4 P+1 P+1 P+1 P+1 P+1 P+1 P+2 P+2 MOD=5 P+2 P+2 MOD=5 P +2 P +2 P+3 P+3 MOD=9 P+3 MOD=9 P+3 P+1 P+1 MOD=5 P+1 P+1 MOD=5 4 P+2 MOD=9 P P+2 +1 P+1 MOD=9 4 3 MOD=10 P+2 MOD=9 P P+2 +1 P+1 MOD=9 P 2 MOD=00 P P+1 2 N=2 N=2 P+3 P+3 MOD=9 P+1 P+1 MOD=5 P+2 P+2 MOD=9 P +1 P+1 MOD=9 2 N=1 MOD=01 N=1 2 N=1 1 N=1 P+2 P+2 MOD=5 P +2 P+1 P+1 MOD=5 2 N=3 N=3 1 N=1 N=3 P +1 2 N=2 N=2 1 N=3 N=2 MOD=02 N=2 N=1 N=2 P+2 P+2 MOD=5 P +2 P+1 P+1 MOD=5 P +1 2 1 N=1 MOD=12 4 N=1 3 N=1 2 N=1 1 N=1 4 N=4 N=2 3 N=3 N=2 2 N=2 N=2 1 N=5 N=2 4 N=4 N=3 3 N=3 N=3 2 N=5 N=3 1 N=1 N=3 4 N=4 N=4 3 N=5 N=4 2 N=2 N=4 1 N=1 N=4 MOD=03 4 N=5 N=5 3 N=3 N=5 2 N=2 N=5 1 N=1 N=5 MOD=M In caso di riconfigurazione dell’apparecchio attendere un minuto prima di riconnetterlo all’impianto. IFalls das Gerät neu konfiguriert werden soll, eine Minute warten bevor es an die Anlage geschlossen wird. En cas de nouvelle configuration de l’appareil, laisser s’écouler une minute avant de le rebrancher à l’installation. When configuring the device, wait one minute before connecting it to the system again. En caso de reconfiguración del aparato, espere un minuto antes de volverlo a conectar a la instalación. In geval van een herconfiguratie van het toestel een minuut wachten voordat men het terug aansluit op de installatie. ISe o aparelho for configurado novamente esperar um minuto antes de conectá-lo de novo com o sistema. При конфигурировании устройства перед его повторным подключением к системе подождите одну минуту. Scelta modalità di funzionamento dei pulsanti programmabili Wahl des Betriebsmodus der programmierbaren Tasten Choix modalité de fonctionnement des touches programmables Choice of programmable pushbutton operating mode Elección modo de funcionamiento de los pulsadores programables Keuze werkmodus van de programmeerbare drukknoppen Escolha modalidade de funcionamento dos botões programáveis Выбор рабочего режима программируемых кнопок Tasti N=4 N=3 N=2 N=1 N 4 3 2 1 N=4 N=3 N=2 N=1 MOD=13 P P P+1 MOD=04 P+2 P+2 MOD=5 P+2 P+2 P+2 MOD=5 P +2P+1 P+1 MOD=5 P+1 P+1 P+1 MOD=5 P +1 P+3 2 P+3 MOD=9 2 P+2 MOD=9 N=2 N=2 P+2 P+1 MOD=9 N=1 M N=1 P+4 P+4 MOD=5 P +4 P+3 P+3 MOD=5 P +3 P+2 P+2 MOD=5 P +2 P+1 P+1 MOD=5 P +1 MOD=05 N P+2 P+2 MOD=5 P +2 P+1 P+1 MOD=5 P +1 2 1 MOD=06 P M P+1 P+1 MOD=5 P +1 2 1 MOD=16 1 2 N=1 1 N=1 N=1 2 1 2 N=2 N=2 1 N=3 N=2 2 N=3 N=3 1 N=1 N=3 MOD=07 N=2 N=1 4 3 2 1 MOD=08 7 8 Configurazione MOD Konfiguration MOD Configuration MOD MOD configuration Configuración MOD Configuratie MOD Configuração MOD Конфигурация MOD A B C D E 0 0 20 40 60 80 1 0 30 50 70 90 0 1 21 41 61 81 0 2 22 42 62 82 1 2 32 52 72 92 0 3 23 43 63 83 1 3 33 53 73 93 0 4 24 44 64 84 0 5 25 45 65 85 0 6 26 46 66 86 1 6 36 56 76 96 0 7 27 47 67 87 0 8 28 48 68 88 + 20 = B 40 = C 60 = D 80 = E A Configurazione scelta per funzionamento tasti. Gewählte Konfiguration für die Tastenfunktionen. Configuration choisie pour fonctionnement touches. Configuration chosen for key operation. Configuración modo de funcionamiento botones. Gekozen configuratie voor de functie van de toetsen. Configuração escolhida para o funcionamento das teclas. Конфигурация, выбранная для режима работы кнопок. B Configurazione scelta per funzionamento tasti e funzione Studio professionale. Gewählte Konfiguration für die Tastenfunktionen und die Funktion Professionelle Studio. Configuration choisie pour fonctionnement touches et fonction Bureau professionnel. Configuration chosen for key operation and Professional Studio function. Configuración modo de funcionamiento botones y función Oficina Profesional. Gekozen configuratie voor de functie van de toetsen en de kantoorfunctie. Configuração escolhida para o funcionamento das teclas e da função Escritório profissional. Конфигурация, выбранная для режима работы кнопок и функции Professional Studio (Кабинет специалиста). C Configurazione scelta per funzionamento tasti e funzione Cerca persone. Gewählte Konfiguration für die Tastenfunktionen und die Funktion Personensuche. Configuration choisie pour fonctionnement touches et fonction Cherche-personnes. Configuration chosen for key operation and Paging function. Configuración modo de funcionamiento botones y función Buscapersonas. Gekozen configuratie voor de functie van de toetsen en de Buzzer. Configuração escolhida para o funcionamento das teclas e da função Procura pessoas. Конфигурация, выбранная для режима работы кнопок и функции Paging (Оповещение). D Configurazione scelta per funzionamento tasti e funzione Mani libere. Gewählte Konfiguration für die Tastenfunktionen und die Funktion Freie Hände. Configuration choisie pour fonctionnement touches et fonction Mains Libres. Configuration chosen for key operation and Hands Free function. Configuración modo de funcionamiento botones y función Manos Libres. Gekozen configuratie voor de functie van de toetsen en de Handsfreefunctie. Configuração escolhida para o funcionamento das teclas e da função Mãos Livres. Конфигурация, выбранная для режима работы кнопок и функции Hands Free (Громкая связь). E Configurazione scelta per funzionamento tasti e funzione Studio professionale + Cerca persone. Gewählte Konfiguration für die Tastenfunktionen und die Funktion Professionelle Studio + Personensuche. Configuration choisie pour fonctionnement touches et fonction Bureau professionnel + Cherche-personnes. Configuration chosen for key operation and Professional Studio + Paging function. Configuración modo de funcionamiento botones y función Oficina Profesional + Buscapersonas. Gekozen configuratie voor de functie van de toetsen en de kantoorfunctie + Buzzer. Configuração escolhida para o funcionamento das teclas e da função Escritório profissional + Procura pessoas. Конфигурация, выбранная для режима работы кнопок и функции Professional Studio (Кабинет специалиста) + Paging (Оповещение). Funzione Studio professionale attiva Funktion Professionelles Studio aktiv Fonction Bureau professionnel activée Professional studio function active 9 Función Oficina Profesional activada Kantoorfunctie actief Função Escritório profissional activa Использование функция Professional Studio (Кабинет специалиста) 2 K CLA 1 3 Led ON Per attivare la funzione Zum Aktivieren der Funktion Pour activer la fonction To activate la fonction Para activar la función Om de functie te activeren Para activar a função Активация функции Per disattivare la funzione Zum Deaktivieren der Funktion Pour désactiver la fonction To deactivate la fonction Para desactivar la función Om de functie te deactiveren Para desactivar a função Деактивация функции Funzione Stato porta Funktion Türzustand Fonction État porte Door state function Led ON EXIT EXIT BEEP BEEP >3s >3s Led ON EXIT EXIT Led ON >3s >3s BEEP BEEP BEEP BEEP Función Estado puerta Staat deur Função Estado porta Функция Door state (Состояние двери) 10 Questa funzione segnala lo stato della serratura, se è aperta il “led serratura” lampeggia, se è chiusa rimane spento. NOTA: è attivabile solo se l’impianto lo prevede; non è attivabile contemporaneamente alla funzione Studio Professionale. Diese Funktion meldet den Zustand des Schlosses; wenn es geöffnet ist, blinkt die „Leuchte Schloss“, wenn es geschlossen ist, bleibt die Leuchte ausgeschaltet. BEMERKUNG: kann nur aktiviert werden, wenn diese Funktion vorgesehen ist; kann nicht gleichzeitig mit der Professionelles Studio aktiviert werden. Cette fonction signale l’état de la serrure: si elle est ouverte, le voyant «serrure» clignote, il est éteint si elle est fermée. NOTE: la fonction est activable uniquement si l’installation le prévoit; l’activation n’est pas possible conjointement à la fonction Bureau Professionnel. This function tells you about the door lock state. If it is open the “door lock LED” flashes, if it is closed it remains OFF. NOTE: it can only be activated if the system allows it; it can not be activated at the same time as the Professional Studio function. Esta función señaliza el estado de la cerradura, si está abierta el “led cerradura” parpadea, si está cerrada está apagado. NOTA: se puede activar sólo si su sistema está predispuesto; no es activable contemporáneamente a la función Oficina Profesional. Deze functie meldt je de staat van het slot, indien het open is knippert de “led slot”, indien gesloten blijft de led uit. OPMERKING: kan alleen geactiveerd worden indien je installatie dit voorziet; kan niet geactiveerd worden tegelijkertijd met de functie Professionele Studio. Esta função assinala o estado da fechadura, se estiver aberta o “indicador luminoso fechadura” fica a piscar, se estiver fechada ele fica apagado. NOTA: pode ser activada somente se a instalação o previr; não pode ser activada contemporaneamente com a função Escritório profissional. Данная функция указывает состояние дверного замка. Если дверь открыта, то светодиод дверного замка мигает, если закрыта – остается выключенным. ПРИМЕЧАНИЕ: возможность использования данной функции зависит от настроек системы. Эта функция не может быть задействована одновременно с функцией Professional Studio (Кабинет специалиста). Funzione Cerca persone Funktion Personensuche Fonction cherche-personnes Paging function 11 Función buscapersonas Functie buzzer Função de procura pessoas Функция Paging (Оповещение) Questa funzione permette di diffondere un messaggio vocale, dettato al microfono del dispositivo, tramite gli altoparlanti dell’impianto Diffusione sonora. L’attivazione avviene premendo brevemente il tasto “Connessione” con il dispositivo in stato di riposo, il led verde acceso indica che la funzione è attiva. Per terminare la funzione premere nuovamente il tasto “Connessione”. Mit dieser Funktion kann man eine Audiomeldung durch das Mikrophon der Vorrichtung über die Lautsprecher der Schalldiffusionsanlage aussenden. Die Aktivierung erfolgt durch einen kurzen Druck der Taste „Verbindung“ wenn die Vorrichtung auf Ruhestand geschaltet ist. Die grüne eingeschaltete Leuchte meldet dass die Funktion aktiv ist. Um die Funktion auszuschalten, die Taste „Verbindung“ nochmals drücken. Cette fonction permet de diffuser un message vocal dicté au micro du dispositif par l’intermédiaire des haut-parleurs du système de Diffusion sonore. L’activation est obtenue en appuyant brièvement sur la touche “Connexion” quand le dispositif est au repos; allumé, le voyant vert indique que la fonction est active. Pour désactiver la fonction, appuyer à nouveau sur la touche “Connexion”. This function plays a voice message, spoken at the device microphone, through the Sound system loudspeakers. It is activated by pressing the “Connection” key with the device in rest state. The ON green LED indicates that the function is active. To end the function press the “Connection” key again. Esta función permite difundir un mensaje vocal, dictado al micrófono del dispositivo, por medio de los altavoces del sistema de difusión sonora. La activación se realiza pulsando brevemente la tecla “Conexión” con el dispositivo en el estado de reposo; el led verde encendido indica que la función está activada. Para terminar la función, presione de nuevo la tecla “Conexión”. Deze functie staat toe een vocale boodschap te verspreiden, gedicteerd aan de microfoon van de inrichting, middels de luidsprekers van de installatie Geluidsdiffusie. De activering geschiedt door te drukken op de toets “Aansluiting” met de inrichting in de ruststand, de brandende groene led wijst erop dat de functie actief is. Om de functie te beëindigen, opnieuw drukken op de toets “Aansluiting”. Esta função permite difundir uma mensagem vocal, ditada ao microfone do dispositivo, por meio de altifalantes do sistema de Difusão sonora. A activação realiza-se premindo brevemente a tecla “Conexão” com o dispositivo em espera, o indicador luminoso verde aceso indica que a função está activada. Para cessar a função pressionar novamente a tecla “Conexão”. С помощью этой функции через динамики звуковой системы воспроизводятся речевые сообщения, произнесенные в микрофон устройства. Чтобы задействовать функцию нажмите кнопку Connection (Ответ), когда устройство находится в состоянии ожидания. Если функция активна, загорится зеленый светодиод. Для отключения функции еще раз нажмите кнопку Connection (Ответ). Funzione Mani Libere Funktion Freie Hände Fonction Mains Libres Hands Free function 12 Función Manos Libres Handsfreefunctie Função Mãos Livres Функция Hands Free (Громкая связь) La funzione Mani Libere attiva automaticamente microfono ed altoparlante in caso di chiamata, evitando di dover premere il tasto Connessione per rispondere (la connessione si stabilisce immediatamente al momento della chiamata). Die Funktion Freie Hände aktiviert automatisch Mikrofon und Lautsprecher wenn ein Ruf eintrifft, so dass man die Verbindungstaste nicht mehr drücken muss, um den Ruf zu beantworten (die Verbindung stellt sich sofort beim Eintreffen des Rufes her). La fonction Mains Libres active automatiquement micro et haut-parleur en cas d’appel, évitant ainsi de devoir appuyer sur la touche Connexion pour répondre (la connexion est immédiatement établie au moment de l’appel). The Hands Free function automatically activates the microphone and loudspeaker when there is a call, avoiding having to press the Connection key to answer (the connection is established immediately the call is made). La función Manos Libres activa automáticamente el micrófono y el altavoz en caso de llamada, evitándole tener que presionar la tecla de conexión para contestar (la conexión se establece inmediatamente al momento de la llamada). De functie Handsfree activeert automatisch microfoon en luidspreker in geval van een oproep, en vermijdt dat je de toets Aansluiting moet indrukken om te antwoorden (de aansluiting komt onmiddellijk tot stand op het ogenblik van de oproep). A função Mãos Livres activa automaticamente o microfone e o altifalante em caso de chamada evitando-lhe ter de pressionar a tecla Conexão para atender (a conexão se estabelece imediatamente no momento da chamada). Функция Hands Free (Громкая связь) автоматически включает микрофон и динамик при поступлении вызова, исключая необходимость нажатия кнопки Connection (Ответ) для ответа (соединение устанавливается сразу после отправки вызова). Per attivare la funzione Zum Aktivieren der Funktion Pour activer la fonction To activate la fonction Para activar la función Om de functie te activeren Para activar a função Активация функции Per disattivare la funzione Zum Deaktivieren der Funktion Pour désactiver la fonction To deactivate la fonction Para desactivar la función Om de functie te deactiveren Para desactivar a função Деактивация функции BEEP BEEP EXIT EXIT BEEP BEEP BEEP BEEP EXIT EXIT >3s >3s >3s >3s Modalità Push to Talk Modus Push to Talk Modalité Push to Talk Push to Talk mode Función Push to Talk Push to Talk functie Função Push to Talk Режим Push to Talk (Нажми и говори) 13 Se il posto esterno si trova in un ambiente particolarmente rumoroso è possibile, durante la conversazione, attivare la funzione Push to Talk al fine di ottenere una comunicazione meno disturbata. Durante la conversazione è possibile attivare la funzione Push to Talk nel seguente modo. Si la placa exterior se encuentra en un ambiente con un alto nivel de ruido, durante la conversación es posible activar la función Push to Talk para obtener una comunicación con menor interferencias. Durante la conversación es posible activar la función Push to Talk en el modo siguiente. - Premere il tasto Connessione per almeno 2 secondi per parlare con il posto esterno. Il Led rimane verde. - Presione la tecla de conexión almenos 2 segundos para conversar con la placa exterior. El led permanece verde. - Rilasciare il tasto per poter ascoltare dal posto esterno. Il Led diventa rosso. - Suelte la tecla para poder escuchar desde la placa exterior. El led se vuelve rojo. - Per terminare la connessione premere brevemente il tasto Connessione. Il Led si spegne. - Para terminar la conexión, presione brevemente la tecla de conexión. El led se apaga. Wenn die Türstation in einem besonders geräuschvollen Bereich installiert ist, kann man während des Gesprächs die Funktion Push to Talk drücken, um diese Geräusche zu überwinden. Während des Gesprächs kann die Funktion Push to Talk folgendermaßen aktiviert werden. Indien het extern punt zich op een bijzonder lawaaierige plaats bevindt, is het mogelijk, tijdens het gesprek, de functie Push to Talk te activeren teneinde een minder gestoorde communicatie te verkrijgen. Tijdens het gesprek is het mogelijk de functie Push to Talk te activeren op de volgende manier. - Die Verbindungstaste mindestens 2 Sekunden lang drücken, um mit der Türstation zu sprechen. Die grüne Meldeleuchte leuchtet immer noch. - De drukknop van Verbinding gedurende minstens 2 seconden indrukken om met het externe punt te communiceren. De led blijft groen. - Taste loslassen, um die Türstation hören zu können. Die Meldeleuchte leuchtet rot auf - De toets loslaten om vanuit het externe punt te kunnen luisteren. De led wordt rood. - Um die Verbindung abzubrechen, die Verbindungstaste kurz drücken. Die Meldeleuchte erlischt. - Om de verbinding te beëindigen, eventjes de toets van verbinding indrukken. De led gaat uit. Si le poste externe se trouve dans un environnement particulièrement bruyant, il est possible d’activer durant la conversation la fonction Push to Talk pour obtenir une meilleure communication. Durant la conversation, il est possible d’activer la fonction Push to Talk en procédant comme suit. Esta função permite difundir uma mensagem vocal, ditada ao microfone do dispositivo, por meio de altifalantes do sistema de Difusão sonora. A activação realiza-se premindo brevemente a tecla “Conexão” com o dispositivo em espera, o indicador luminoso verde aceso indica que a função está activada. Para cessar a função pressionar novamente a tecla “Conexão”. - Appuyer sur la touche Connexion pendant au moins 2 secondes pour parler avec le poste externe. Le voyant reste vert. - Pressionar a tecla de conexão por pelo menos 2 segundos para falar com a unidade externa. O indicador luminoso continua verde - Relâcher la touche pour pouvoir écouter depuis le poste externe. Le voyant devient rouge. - Soltar a tecla para poder escutar a unidade externa. O indicador luminoso fica vermelho - Pour mettre fin à la connexion, appuyer brièvement sur la touche connexion. Le voyant s’éteint. - Para desligar pressionar ligeiramente a tecla da conexão O indicador luminoso apaga If the entrance panel is in a particularly noisy place, during the conversation the Push to Talk function can be activated for a less disturbed call. During the conversation the Push to Talk function can be activated as follows. Если панель вызова установлена в очень шумном месте, то чтобы избежать искажения речи во время разговора можно воспользоваться функцией Push to Talk (Нажми и говори). Для использования функции Push to Talk (Нажми и говори) во время разговора: - Press the Connection key for at least 2 seconds to talk to the entrance panel. The LED remains green. - Release the key to hear from the entrance panel. The LED becomes red. - To end the connection press the connection key briefly. The LED goes out. - Нажмите кнопку Connection (Ответ) и удерживайте ее в нажатом положении не менее 2 секунд для разговора через панель вызова, Светодиод продолжает гореть зеленым цветом. - Отпустите кнопку для прослушивания ответа через панель вызова. Светодиод загорается красным цветом. - Для завершения соединения нажмите и сразу отпустите кнопку Connection (Ответ). Светодиод погаснет. Programmazione suonerie wählbare Ruftöne Programmation sonneries Programming bells Selezione suoneria da posto esterno principale (S=0) Änderung Rufton Etagentaster Sélection sonnerie appel d’un poste extérieur principal (S=0) Selection call from main outdoor station (S=0) bell Selección timbre llamada desdeel puesto exterior principal (S=0) Kies belgeluid oproep vanuit eerste externe post (S=0) Selecção do toque parachamada da unidade externa principal (S=0) Выбор звонка для вызова с основной панели вызова (S=0) 1 1 1 1 1 2 >3s 1 2 1 1 1 17 >3s 1 1 1 1 12 >3s Selezione suoneria da posto esterno secondario (S=1) Änderung Rufton von einer Nebentürstation (S=1) Sélection sonnerie appel d’un poste extérieur secondaire (S=1) Selection call from secondary outdoor station (S=1) bell Selección timbre llamada desde el puesto exterior secundario (S=1) Kies belgeluid oproep vanuit tweede externe post (S=1) Selecção do toque para chamada da unidade externa secundária (S=1) Выбор звонка для вызова с дополнительной панели вызова (S=1) >3s >3s >3s >3s >3s >3s Selezione suoneria chiamata intercom Änderung interner Rufton Sélection sonnerie appel intercom Selection call intercom bell Selección timbre llamada intercomunicante Kies belgeluid intercom oproep gebouw Selecção do toque para chamada intercomomunicador Выбор звонка для вызова с интеркома >3s >3s >3s >3s >3s Selezione suoneria chiamata intercom esterno (solo con art. 346850) Änderung externer Rufton (nur mit Art. 346850) >3s >3s Sélection sonnerie d’appel intercom externe (uniquement avec réf. 346850) Selection external intercom call ring (only with item 346850) >3s Selección del timbre llamada de intercomunicación exterior (sólo con Art. 346850) >3s Selectie belgeluid oproep externe intercom (alleen met art. 346850) Selecção do toque para chamada de intercomunicador externo (só com o art. 346850) Выбор звонка для вызова с внешнего интеркома (только для арт. 346850) >3s >3s >3s >3s Selezione suoneria chiamata al piano Änderung Rufton Etagentaster Sélection sonnerie appel à l’étage Selection call to the floor bell Selección timbre llamada al piso Kies belgeluid oproep aan verdieping Selecção do toque para chamada ao andar Выбор звонка для вызова с этажного блока 14 Programación timbres Programmering belgeluid Programação dos toques Программирование звонков >3s >3s >3s 11 2 2 1 2 12 2 22 2 2 23 2 23 3 2 3 3 2 3 33 3 3 34 3 34 4 3 4 3 4 44 4 4 4 4 4 12 17 1 21 17 21 2 17 2 1 17 17 12 17 1 21 17 21 2 17 2 1 17 17 12 17 1 21 17 21 2 17 2 1 17 17 12 17 1 21 17 21 2 4 17 2 1 4 17 17 12 17 1 2 17 2 17 17 OK OK EXIT OK OK EXIT OK OK EXIT OK EXIT EXIT OK EXIT OK EXIT OK OK EXIT OK EXIT EXIT OK EXIT OK EXIT OK OK EXIT OK EXIT OK EXIT EXIT EXIT OK OK OK EXIT OK EXIT OK EXIT EXIT EXIT OK OK EXIT EXIT EXIT Attivazione/Disattivazione suono tasti Tastenton aktivieren/deaktivieren Activation/Désactivation son des touches Key sound ON/OFF Activación/Desactivación sonido de las teclas Activering/Deactivering geluid toetsen Activação/ Desactivação do som teclas Включение/выключение звукового сигнала при нажатии кнопок 15 Nella configurazione base è previsto che alla pressione dei tasti venga emesso un BEEP, questa funzione può essere disabilitata/riabilitata con la seguente procedura. Bei der Grundkonfiguration ist vorgesehen, dass bei einem Tastendruck ein BEEP-Ton ertönt. Diese Funktion kann folgendermaßen deaktiviert/wieder aktiviert werden. Dans la configuration de base, il est prévu qu’un BIP soit émis à chaque pression sur une touche; cette fonction peut être activée/désactivée comme suit. In the basic function when the keys are pressed a BEEP sounds. This function can be disabled/enabled with the following procedure. En la configuración básica, está previsto que al pulsar las teclas se produzca un ‘BIP’; esta función se puede deshabilitar/restablecer con el siguiente procedimiento. In de basisconfiguratie is voorzien dat bij het drukken op de toetsen een BEEP wordt uitgezonden, deze functie kan gedeactiveerd/terug geactiveerd worden met de volgende procedure. Na configuração de base está prevista que ao se carregar sobre as teclas se escutará o som de um BEEP, esta função pode ser desabilitada ou reabilitada com o seguinte método. По умолчанию при нажатии кнопки раздается звуковой сигнал. Эта функция может быть включена/отключена следующим образом: Per attivare la funzione Zum Aktivieren der Funktion Pour activer la fonction To activate la fonction Para activar la función Om de functie te activeren Para activar a função Активация функции Per disattivare la funzione Zum Deaktivieren der Funktion Pour désactiver la fonction To deactivate la fonction Para desactivar la función Om de functie te deactiveren Para desactivar a função Деактивация функции BEEP BEEP >3s BEEP BEEP >3s 16 Solo per art. 344182 Nur für Art. 344182 Uniquement pour réf. 344182 Only for item 344182 Sólo para el art. 344182 Alleen voor art. 344182 Só para o art. 344182 Только для арт. 344182 Commutare l’apparecchio acustico in posizione T Das akustische Gerät auf Position T umschalten Commuter l’appareil acoustique sur la position T Switch hearing device in T position Conmute el aparato acústico a la posición T Het akoestisch toestel naar de stand T schakelen Comutar o aparelho acústico para a posição T Установите переключатель слухового аппарата в положение Т c 40 m 2535 c m - Per un corretto accoppiamento magnetico tra PI ed apparecchio acustico si consiglia di posizionarsi frontalmente al dispositivo ad una distanza di 25-35cm. - Si ricorda che la presenza di metallo e rumore di fondo generato da apparecchiature elettriche/elettroniche (es. computer), può compromettere la qualità e le perfomace del dispositivo di accoppiamento. - Für eine einwandfreie magnetische Kopplung zwischen Hausstation und akustisches Gerät, stellen Sie sich in einem Abstand von 25-35 cm vor das Gerät. - Bitte beachten Sie, dass Metallgegenstände und Hintergrundgeräusche elektrischer/elektronischer Geräte (z.B. PC), die Qualität und Leistung der Kopplungsvorrichtung beeinträchtigen können. - Pour assurer le bon couplage magnétique entre PI et appareil acoustique, il est recommandé de se placer face au dispositif à une distance de 25-35 cm. - Il est rappelé que la présence de métal et de bruit de fond généré par des appareillages électriques/électroniques (ordinateurs par exemple) peut compromettre la qualité et les performances du dispositif de couplage. - For proper magnetic coupling between the Handset and the sound device, it is recommended to stay 25-35 cm from the front side of the device. - Remember that the presence of metal and background noise generated by electric/electronic equipment (e.g. computers), can affect the quality and the performance of the coupling device. - Para un correcto acoplamiento magnético entre la PI y el aparato acústico le aconsejamos ubicarse delante del dispositivo a una distancia de 25-35 cm. - Recuerde que la presencia de metal y ruido de fondo generado por aparatos eléctricos/electrónicos (por ejemplo, PC) puede comprometer la calidad y la eficiencia del dispositivo de acoplamiento. - Voor een correcte magnetische koppeling tussen IP en akoestisch toestel raadt men aan zich frontaal tegenover de inrichting te plaatsen op een afstand van 25-35 cm. - Men herinnert eraan dat de aanwezigheid van metaal en achtergrondruis gegenereerd door elektrische/elektronische apparatuur (vb. computer) de kwaliteit en de performance van de koppelingsinrichting kan compromitteren. - Para um acoplamento magnético certo entre PI e aparelho acústico recomenda-se posicionar-se frontalmente ao dispositivo com uma distância de 25-35cm. - Lembra-se que o metal e rumor de fundo gerado por aparelhagens eléctricas/electrónicas (ex. computador), pode comprometer a qualidade e a performance do dispositivo de acoplamento. - Для обеспечения хорошей связи между внутренним блоком и слуховым аппаратом рекомендуется оставаться на расстоянии 25-35 см от лицевой панели устройства. - Необходимо учитывать, что наличие металлических конструкций и фоновых помех, исходящих от электрического/электронного оборудования (например, компьютеров), могут негативно отразиться на работе устройства связи.-
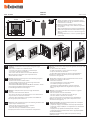 1
1
-
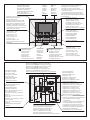 2
2
-
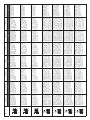 3
3
-
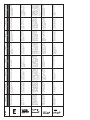 4
4
-
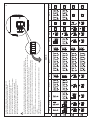 5
5
-
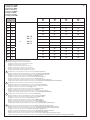 6
6
-
 7
7
-
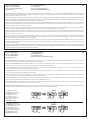 8
8
-
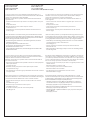 9
9
-
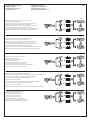 10
10
-
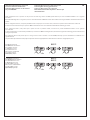 11
11
-
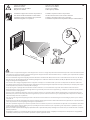 12
12


Bticino 344192 Instrucciones de operación
- Tipo
- Instrucciones de operación
- Este manual también es adecuado para
en otros idiomas
- français: Bticino 344192 Mode d'emploi
- italiano: Bticino 344192 Istruzioni per l'uso
- English: Bticino 344192 Operating instructions
- Nederlands: Bticino 344192 Handleiding
- português: Bticino 344192 Instruções de operação
Artículos relacionados
-
Bticino 344704 Instrucciones de operación
-
-
Bticino 344643 Instrucciones de operación
-
-
-
-
-
-
-
