
INSTALLATION INSTRUCTIONS
Models: 16070xxx27R
16070xxx30R
SAFETY INSTRUCTIONS
READ THIS FIRST
KEEP THESE INSTRUCTIONS
This fixture is intended for installation in accordance with the
National Electric Code (NEC) and Local code specifications.
Failure to adhere to these codes and instructions may result in
serious injury and/or property damage and will void the warranty.
1) WARNING: This fixture is not to be installed within 10 feet
(3M) of a pool, spa or fountain.
2) This fixture is to be used only with a power unit (transformer)
rated a maximum of 300 W (25 AMPS) 15 volts.
3) The #18 ga. fixture wire is not intended for direct burial.
4) Direct burial rated wire is to be buried a minimum of 6”
(152mm) beneath the surface of the ground.
NOTE: If additional Direct Burial wire is needed, contact
your local Kichler
®
landscape distributor.
• 8GAwirecanbepurchasedinlengthof250’(76M),
15503-BK.
• 10GAwirecanbepurchasedinlengthof250’(76M),
15504-BK.
•12GAwirecanbepurchasedinlengthsof100’(30M),
15501-BK;250’(76M),15502-BK;500’(152M),15505-BK;
and1000’(304M),15506-BK.
5) Wiring connections must be made with approved/listed wire
connection device(s) suitable for the application. Do not
exceedmanufacturers’wiringcombinationspecicationsfor
size and quantity of conductors.
INSTRUCTIONS PERTAINING TO A RISK OF FIRE, OR INJURY TO PERSONS
IMPORTANT SAFETY INSTRUCTIONS
Lighted lamp is HOT!
WARNING — To reduce the risk of FIRE OR INJURY TO PERSONS.
1) There are no user replaceable components inside the fixture.
2) Do not look directly at lighted lamp.
3) Keep lamp away from materials that may burn.
4) Do not operate the fixture with a damaged or missing lens.
CAUTION
WHEN INSTALLING KICHLER LANDSCAPE LIGHTING (LINE VOLTAGE OR LOW
VOLTAGE), CARE SHOULD BE TAKEN TO KEEP CLEAR OF POTENTIALLY COM-
BUSTIBLE MATERIALS.
WHEN MAINTAINING THE FIXTURES, BE SURE TO REMOVE LEAVES, PINE NEE-
DLES, GRASS CLIPPINGS, MULCH, OR ANY DEBRIS THAT HAS ACCUMULATED
ON THE LIGHT BULB, LENS, OR BODY OF THE FIXTURE.
ASSEMBLY AND INSTALLATION
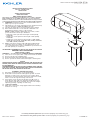
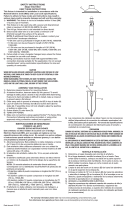
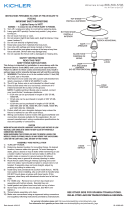
1) Determine desired location for mounting fixture.
2) At desired location, hammer stake (A) into ground. To avoid
damage to stake, place a board on top of stake while
hammering. If ground is hard and stake is difficult to install,
make a crosscut in ground using a flat shovel.
3) Clear away area in ground at wireway slot (B) in top of
stake (A). Lay 12V cable into wireway slot (B) and screw
stem (C) into stake (A). If assembly does not look straight,
adjust by pushing or pulling on stake only.
4) TURN OFF POWER.
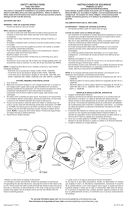
5) Make wire connections using supplied wire nuts following
instructions on bag.
Date Issued: 12/12/14 IS-16070R-US
For warranty information please visit: http://www.landscapelighting.com/portal/warranty_page
Para informacion de la garantia por favor visite: www.landscapelighting.com/portal/warranty_page
C
B
A
We’re here to help 866-558-5706
Hrs: M-F 9am to 5pm EST

INSTRUCCIONES DE INSTALACIÓN
Models: 16070xxx27R
16070xxx30R
INSTRUCCIONES DE SEGURIDAD
PRIMERO LEA ESTO
GUARDE ESTAS INSTRUCCIONES
Este artefacto se debe instalar de acuerdo con el Código Eléc-
trico Nacional (NEC, por sus siglas en inglés) y con las especifi-
caciones del código local. No cumplir con estos códigos e in-
strucciones puede resultar en lesiones graves y/ o en daños a
la propiedad y anulará la garantía.
1) Advertenciaertencia: Este artefacto no debe instalarse a
menos de 10 pies (3 m) de una piscina (alberca), spa o
fuente.
2) Este artefacto debe utilizarse solamente con una unidad de
potencia (tranformador) con capacidad nominal máxima de
300 vatios (25 amp.) 15 voltios.
3) El alambre del artefacto calibre No. 18 no es para soterrado
directo.
4) El alambre clasificado para soterrado directo se debe enterrar
un mínimo de 6 pulgadas (152 mm) debajo de la superficie
del terreno.
NOTA: Si necesita alambre de soterrado directo adicional,
comuníquese con su distribuidor local Kichler® de productos de
jardinería ornamental.
• Elalambrecalibre8puedecomprarseenlongitudde250’
(76m.),15503-BK
•Elalambrecalibre10puedecomprarseenlongitudde250’
(76m.),15504-BK
•Elalambrecalibre12puedecomprarseenlongitudesde75’
(22m.),15550-BK;100’(30m.),15501-BK;250’(76m.),
15502-BK;500’(152m.),15505-BK;y1000’(304m.),
15506-BK.
5) Las conexiones de cableado se deben hacer con las
conexiones del(los) dispositivos) de conexión de cableado
aprobados/ de la lista, adecuados para la aplicación. No
exceda las especificaciones de combinación de cableado del
fabricante para el tamaño y cantidad de conductores.
INSTRUCCIONES PERTINENTES A UN RIESGO DE ICENDIO O
LESION A LAS PERSONAS
INSTRUCCIONES IMPORTANTES DE SEGURIDAD
¡La lámpara encendida es CALIENTE!
ADVERTENCIA — Para disminuir el riesgo de INCENDIO O
LESION A LAS PERSONAS.
1) No hay componentes reemplazables por el usuario en el
interior del aparato.
2) No mirar directamente a la lámpara encendida.
3) Mantener la lámpara alejada de materiales inflamables.
4) No operar el artefacto con una lente dañada o sin lente.
PRECAUCION
CUANDO SE INSTALE SISTEMAS DE ALUMBRADO KICHLER PARA JARDINES
(YA SEA DE VOLTAJE DE LINEA O CON VOLTAJE BAJO) SE DEBE TENER CUI-
DADO DE MAINTNERLOS ALEJADOS DE MATERIALES QUE PUEDAN SER COM-
BUSTIBLES EN POTENCIA.
AL DAR SERVICIO DE MANTENIMIENTO A ESTOS SISTEMAS, ASEGURESE DE
DESPEJAR LAS HOJAS, CONOS DE PINO, RECORTES DEL PASTO, CUBIERTA DE
PAJA O CUALQUIER BASURA QUE SE HAYA ACUMULADO EN LA BOMBILLA DE
LUZ, EL LENTE O EL SOPORTE DE LA BOMBILLA.
MONTAJE E INSTALACIÓN
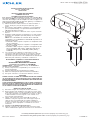
1) Determine el lugar deseado para montar el artefacto.
2) En el lugar deseado, martille la estaca (A) en el suelo. Para
evitar dañar la estaca, coloque una tabla en la parte superior
de la estaca mientras esté martillando. Si el suelo es duro y
es difícil instalar la estaca, haga un corte cruzado en el
suelo usando una pala plana.
3) Limpie el área del suelo en la ranura (B) del canal de
alambres en la parte superior de la estaca (A). Coloque el
cable de 12 V en la ranura (B) del canal de alambres y
atornille el vástago (C) en la estaca (A). Si el montaje no se
ve derecho, ajuste empujando o estirando de la estaca
solamente.
4) APAGUELAALIMENTACIÓNELÉCTRICA.
5) Haga las conexiones de cableado usando las tuercas para
cables suministrados siguiendo las instrucciones de la bolsa.
Date Issued: 12/12/14 IS-16070R-US
For warranty information please visit: http://www.landscapelighting.com/portal/warranty_page
Para informacion de la garantia por favor visite: www.landscapelighting.com/portal/warranty_page
We’re here to help 866-558-5706
Hrs: M-F 9am to 5pm EST
C
B
A

INSTALLATION INSTRUCTIONS
Models: 16070xxx27R
16070xxx30R
FOR USE WITH LANDSCAPE LIGHTING SYSTEMS ONLY.
1) The device is accepted as a component of a landscape
lighting system where the suitability of the CSA or UL labeled
combination shall be determined by CSA, UL respectively or
the local inspection authorities having jurisdiction.
2) Fixture shall be connected to an extra low voltage transformer
approved for use with landscape lighting systems.
3) This fixture is to be connected to a secondary wiring of the
following type:
12 GA 60°C minimum type;
SPT-3 suitable for outdoor use; or
approved landscape lighting cable.
INSTRUCTIONS PERTAINING TO A RISK OF FIRE, OR INJURY TO PERSONS
IMPORTANT SAFETY INSTRUCTIONS
Lighted lamp is HOT!
WARNING — To reduce the risk of FIRE OR INJURY TO PERSONS.
1) There are no user replaceable components inside the fixture.
2) Do not look directly at lighted lamp.
3) Keep lamp away from materials that may burn.
4) Do not operate the fixture with a damaged or missing lens.
CAUTION
WHEN INSTALLING KICHLER LANDSCAPE LIGHTING (LINE VOLTAGE OR LOW
VOLTAGE), CARE SHOULD BE TAKEN TO KEEP CLEAR OF POTENTIALLY COMBUS-
TIBLE MATERIALS.
WHEN MAINTAINING THE FIXTURES, BE SURE TO REMOVE LEAVES, PINE NEE-
DLES, GRASS CLIPPINGS, MULCH, OR ANY DEBRIS THAT HAS ACCUMULATED ON
THE LIGHT BULB, LENS, OR BODY OF THE FIXTURE.
ASSEMBLY AND INSTALLATION
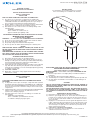
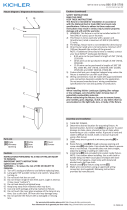
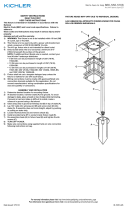
1) Determine desired location for mounting fixture.
2) At desired location, hammer stake (A) into ground. To avoid
damage to stake, place a board on top of stake while hammering.
If ground is hard and stake is difficult to install, make a
crosscut in ground using a flat shovel.
3) Clear away area in ground at wireway slot (B) in top of stake (A).
Lay 12V cable into wireway slot (B) and screw stem (C) into
stake (A). If assembly does not look straight, adjust by pushing
or pulling on stake only.
4) TURN OFF POWER.
5) Make wire connections using supplied wire nuts following
instructions on bag.
INSTRUCTIONS D’INSTALLATION
Models: 16070xxx27R
16070xxx30R
A UTILISER UNIQUEMENT POUR LES SYSTÈMES D’ÉCLAIRAG
PAYSAGER
1) Le dispositif est accepté en tant que composant d’un système
d’éclairage paysager lorsque la compatibilité de la combinaison
étiquetée UL ou CSA (ACNOR) doit être déterminée par CSA,
UL respectivement ou les autorités d’inspection locales ayant
compétence.
2) L’appareil doit étre connecté à un transformateur supplémentaire
à basse tension approuvé pour une utilisation avec les
systémes d’éclairage paysager.
3) Cet apareil doit étre connecté à un câblage secondaire du
type suivant:
12GA 60°C type minimum;
SPT-3 combatible pour utilisation extreme;
ou câble d’éclairage paysager agréé.
Date Issued: 12/12/14 IS-16070R-CB
OUTDOOR USE ONLY
DOM ETRE INSTALLE A L’EXTERIEUR
INSTRUCTIONS
For Assembling and Installing Fixtures in Canada
Pour L’assemblage et L’installation Au Canada
For warranty information please visit: http://www.landscapelighting.com/portal/warranty_page
Pour de plus amples informations sur la garantie, cliquez sur le lien ci-dessous : http://www.landscapelighting.com/portal/warranty_page
INSTRUCTIONS POUR EVITER TOUT RISQUE D’INCENDIE OU DE BLESSURE
INSTRUCTIONS DE SECURITE IMPORTANTES
Une lampe allumée est BRULANTE!
AVERTISSEMENT — Pour éviter tout risque d’INCENDIE OU DE
BLESSURE
1) Aucun composant n’est remplaçable par l’utilisateur dans le
luminaire.
2) Ne pas fixer directement la lampe allumée.
3) Tenir la lampe à l’écart des matériaux qui risquent de prendre feu.
4) Ne pas utiliser le luminaire si une lentille est endommagée ou
manquante.
ATTENTION
LORS DE L’INSTALLATION D’ECLAIRAGE DE JARDIN KICHLER 9TNESION DU
SECTEUR OU BASSE TENSION), PRENEZ SOIN DE LE MAINTENIR DEGAGE DE
TOUT MATERIAU COMBUSTIBLE.
LORS DE L’ENTRETIEN DE LA LAMPE, ASSUREZ - VOUS DE RETIRER LES FEULLES,
LES AIGUILLES DE PIN, LES BRINS D’HERBE, L’HUMUS, ET TOUT DEBRIS QUI
S’EST ACCUMULE SUR L’AMPOULE DE LA LAMPE, LE DIFFUSEUR OU LE CORP DE
LA LAMPE.
MONTAGE ET INSTALLATION
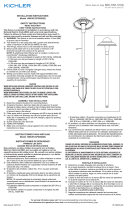
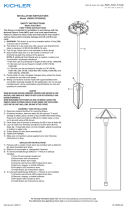
1) Déterminer l’emplacement où installer le luminaire.
2) Planter le poteau (A) dans le sol. Pour éviter d’endommager le
poteau avec le marteau, poser dessus un morceau de bois. Si
le sol est très dur, faire deux entailles en croix dans le sol avec
une pelle plate.
3) Dégager le sol au niveau de la fente guide-fils (B) située sur la
partie supérieure du poteau (A). Passer le fil électrique de 12 V
dans la fente guide-fils (B) et visser la tige (C) dans le poteau (A).
Si le montage n’est pas droit, le redresser en poussant ou en
tirant seulement le poteau)
4) COUPER LE COURANT ÉLECTRIQUE.
5) Faire les connexions de fil en utilisant les écrous fournis en
suivant les instructions sur le sac.
C
B
A
We’re here to help 866-558-5706
Hrs: M-F 9am to 5pm EST
-
 1
1
-
 2
2
-
 3
3


Kichler Lighting 16070AZT27R Manual de usuario
- Tipo
- Manual de usuario
- Este manual también es adecuado para
en otros idiomas
Artículos relacionados
-
 Kichler Lighting 15843TZT Manual de usuario
-
Kichler Lighting 16154AZT27 Manual de usuario
-
 Kichler Lighting 15850CO30R Manual de usuario
-
 Kichler Lighting 15711SS Manual de usuario
-
 Kichler Lighting 15844AZT Manual de usuario
-
Kichler Lighting 15576BK Manual de usuario
-
 Kichler Lighting 15826AZT30R Manual de usuario
-
 Kichler Lighting 15478CBR Manual de usuario
-
 Kichler Lighting 15322AGZ Manual de usuario
-
Kichler Lighting 15861AZT27R Manual de usuario


