
MANUAL DE INSTRUCCIONES
Para su seguridad y para disfrutar plenamente
de este producto, siempre lea cuidadosamente
las instrucciones antes del uso.
VAPORIZADOR
DE PRENDAS
MODELOS GS51
(TODAS LAS VERSIONES)
MEDIDAS
DE SEGURIDAD
IMPORTANTES
Al usar aparatos eléctricos, especialmente
en presencia de niños, siempre debe tomar
precauciones básicas de seguridad, entre
ellas las siguientes:
LEA TODAS LAS
INSTRUCCIONES
ANTES DEL USO
PELIGRO –
Cualquier aparato
enchufado permanece bajo tensión, aunque
esté apagado.
Para reducir el riesgo de electrocución:
1. Siempre desenchufe el aparato
inmediatamente después del uso y antes
de limpiarlo.
2.. No coloque ni guarde el aparato don
pueda caerse o ser empujado a una bañera o
un lavabo.
3.. No coloque el aparato ni lo deje caer
agua u otro líquido.
4.. No trate de alcanzar el aparato despu
de que se haya caído al agua; desenchúfelo
inmediatamente.
5.. Úselo solamente en un lugar sec
ADVERTENCIA – Para reducir
el riesgo de quemaduras, descarga eléctrica,
incendio o heridas:
1. Nunca descuide/deje el aparato sin
vigilancia mientras está conectado.
2. Este aparato no es un juguete; no debe
ser usado por niños.
3.. Supervise el uso de este apara
cuidadosamente cuando sea usado cerca de
niños o personas con ciertas discapacidades.
El uso sin supervisión de este aparato puede
causar un incendio o una herida.
4.. Use este aparato únicamente con
propósito para el cual fue diseñado y
solamente según las instrucciones. Solo use
accesorios recomendados por el fabricante.
5.. Coloque la base del aparato sobre u
superficie llana y segura.
6. No use este aparato si el cable o el
enchufe están dañados, si no funciona
correctamente, si está dañado, o
después de que se haya caído, incluso
en el agua; No intente reparar el aparato.
El ensamblar las partes de manera
incorrecta aumenta los riesgos de
incendio, descarga eléctrica y heridas.
devuélvalo a un centro de servicio
autorizado para su revisión y reparación.
7.. No permita que el cable tenga contac
con superficies calientes. No jale ni retuerza
el cable. Permita que el aparato se enfríe
completamente antes de guardarlo. Enrolle el
cable sin apretar alrededor del aparato para
guardarlo.
8.. El cable de este aparato cuenta con
enchufe polarizado (una pata es más ancha
que la otra). Como medida de seguridad, se
podrá enchufar de una sola manera en la
toma de corriente polarizada. Si no entra en
la toma de corriente, inviértalo. Si aun así no
entra completamente, comuníquese con un
electricista. No intente alterar esta función de
seguridad.
9.. Nunca deje caer ni inserte ningún obje
en ninguna de las aberturas.
10.0. No use el aparato en exteriores, ni
haga funcionar donde se estén usando
productos en aerosol (spray) o donde se esté
administrando oxígeno.
11.1. No use un cable alargador/de extens
con este aparato.
12.2. Las superficies de este aparato se po
muy calientes durante el uso; mantenga
los ojos y la piel alejados de las superficies
calientes.
13.3. No coloque la boquilla sobre ning
superficie mientras está caliente o mientras
el aparato está enchufado, y manténgala
alejada del cable eléctrico.
14.4. Desenchufe el aparato antes de llena
vaciar el depósito de agua.
15.5. Siempre llene el depósito de agua
agua destilada antes de encender el aparato.
16.6. Nunca jale el cable para desconectar
agárrelo por el enchufe.
17.7. Las piezas calientes, el agua calient
el vapor pueden causar quemaduras. Tenga
cuidado al vaciar el depósito de agua o al
voltear el aparato, puesto que el depósito
puede contener agua caliente. Siempre
oriente la boquilla de tal manera que el vapor
no esté dirigido a nadie, incluso cuando
encienda el aparato.
18.8. No ponga la mano frente al vap
19.9. Para evitar el riesgo de sobrecarga,
conecte otro aparato de alta potencia al
mismo circuito eléctrico que este aparato.
20.0. Tenga cuidado al instalar/sac accesorios,
puesto que pueden estar calientes o contener
agua caliente. Compruebe que el aparato está
apagado y que los accesorios están secos y
fríos antes de manipularlos.
21.1. Nunca use el aparato en prendas
usted o alguien lleven puestas.
22.2. El vapor que sale de la boquilla pu
causar quemaduras si usa la unidad muy
cerca de la piel, del cuero cabelludo o de los
ojos, o si la usa en forma incorrecta. Para
reducir el riesgo de quemaduras, pruebe el
vapor lejos de su cuerpo antes de usar el
aparato.
GUARDE ESTAS
INSTRUCCIONES
IMPORTANTE
PARA USO DOMÉSTICO
SOLAMENTE
LLENADO DEL DEPÓSITO
1.. Cerciórese
que el aparato está
desenchufado.
2.. Coloque la unid
sobre una mesa y
agárrela con una
mano.
3.. Con la otra man
jale el depósito de
agua para separarlo
de la unidad.
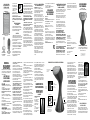
FAMILIARÍCESE CON SU VAPORIZADOR DE PRENDAS
Cable de 8 pies
(2.45m)
Depósito de agua
de fácil llenado
Accesorio 2 en 1
Accesorio con tira de
silicona - Estira la tela para
un desarrugado más fácil.
Cepillo duro - Suelta las
fibras para una penetración
más profunda del vapor.
Botón de
encendido/apagado
Botón de
vaporización
Botón de
selección
del modo
Suela/Placa de aluminio
con revestimiento
antiadherente
5.. Localice el tapón de caucho ubica
arriba del depósito de agua.
6.. Abra el tapón de caucho y llene
depósito con agua (preferiblemente agua
destilada, disponible en la mayoría de
los supermercados). Nota: Para evitar los
depósitos minerales, los cuales pueden
perjudicar el rendimiento del aparato o tapar
el sistema de vaporización, le aconsejamos
que use agua destilada solamente.
7.. Cierre el tapón y vuelva a instalar
depósito de manera segura.
INSTRUCCIONES
DE OPERACIÓN
1.. Llene el depósito de agua con agu
preferiblemente agua destilada (véase la
sección “Instrucciones de llenado”).
2.. Enchufe el cable en una toma de corrient
3.. Oprima el botón de encendido/apaga
para encender el aparato.
4.. La luz azul y roja “READY” se encenderá
empezará a parpadear. Permita que la unidad
se caliente por 35 segundos. El aparato está
listo cuando la luz roja deja de parpadear
y permanece encendida. NOTA: Antes del
primer uso o cuando la unidad no haya sido
usada por un tiempo prolongado, el depósito
interno se cebará (es decir, se llenará con
agua) durante el calentamiento. Escuchará
un pequeño golpeteo durante el proceso de
calentamiento; esto es normal.
5.. Este vaporizador de prendas tiene tr
opciones de vapor. Para elegir el modo de
vaporización deseado, presione el botón
de selección del modo +/-. El modo bajo
(indicado por una luz
encendida) es para
desarrugar telas delicadas
o para refrescar prenda
ligeramente arrugadas.
El modo medio (indicador
por dos luces encendidas)
es para algodón y telas de
poliéster moderadamente
arrugadas. El modo turbo
alto (indicado por tres luces encendidas)
es para telas más gruesas y telas muy
arrugadas.
6.. Sostenga la unidad de tal manera q
el vapor no esté dirigido hacia su cuerpo y
presione el botón de vaporización. Siempre
oriente la boquilla de tal manera que el
vapor no esté dirigido a nadie.
7.. Antes del primer uso, haga una prue
en un trapo para eliminar el polvo y otros
residuos acumulados durante la fabricación y
el transporte.
8.. Suelte el botón de vaporización pa
detener el flujo de vapor.
9.. Para apagar la unidad, oprima el bot
ON/OFF.
10.0. Desenchufe la unidad cuando no esté
uso.
MODO DE EMPLEO DEL
ACCESORIO 2 EN 1
Primero, compruebe que el aparato está
apagado y frío. Instale el cepillo con tira de
silicona sobre la boquilla, cerciorándose de
que está firmemente sujetado. Puede usar el
cepillo con tira de silicona solo o instalarlo
ACCESORIOS PARA
VAPORIZADORES DE
PRENDAS CONAIR
(vendidos por separado)
Soporte de
almacenamiento
para vaporizador
Modelo DH1
Guante protector
para planchado
con vapor
Modelo GPP1
Almohadilla protectora para puerta
Modelo GDPP1
por encima el cepillo
duro, introduciéndolo
en la ranura arriba del
cepillo duro. Presione
el botón de encendido/
apagado para
encender el aparato.
NOTA: Solamente puede usar una función del
accesorio 2 en 1 a la vez.
PRECAUCIÓN: Tenga sumo cuidado al
cambiar los accesorios durante el uso, ya
que el cabezal de vaporización estará muy
caliente.
FUNCIÓN DE APAGADO
AUTOMÁTICO
La unidad se apagará automáticamente
después de 15 minutos de uso continuo. La
luz de encendido parpadeará para indicar
que la unidad se está apagando.
CONSEJOS
1.. Haga una prueba en un área discreta
la tela antes de desarrugar la prenda, usando
la función de vaporización, para comprobar
que la tela soporta el vapor. En caso de daño,
NO use el vaporizador.
2.. Cepille las prendas con el cepillo ant
de desarrugarlas; esto soltará las fibras del
tejido para una mejor penetración del vapor.
3.. Cuelgue la prenda o la tela NOTA: En
lo posible, evite usar perchas/ganchos de
metal.
4.. Pase la boquilla lentamente por enci
de las arrugas. Puede que sea necesario
dar varias pasadas para desarrugar
completamente la tela.
5.. Para desarrugar las telas gruesas o m
arrugadas, mantenga la boquilla por unos
segundos directamente contra la tela. Nota:
Tenga cuidado al desarrugar telas delicadas.
6.. Después del uso, oprima el botón
encendido/apagado para apagar la unidad.
Vacíe el depósito de agua para evitar las
pérdidas. Con las manos secas, desenchufe
el aparato de la toma de corriente.
CERCIÓRESE DE APAGAR LA UNIDAD,
PRESIONANDO EL BOTÓN DE ENCENDIDO/
APAGADO, ANTES DE DESCONECTAR EL
CABLE.
7. PRECAUCIÓN: Si cuelga las prendas
atrás de una puerta, tenga cuidado de no
dañar la puerta con el vapor.
8.
. Mueva constantemente la unidad duran
el uso. No sostenga la unidad en el mismo
sitio por un tiempo prolongado y no permita
que la boquilla haga contacto con la tela;
esto podría encoger, desteñir o derretir
ciertos tipos de material.
9.. Al desarrugar telas gruesas, tales co
abrigos de lana o sábanas de algodón
pesado, puede que sea necesario usar el
modo alto y usar pasadas más lentas para
conseguir los resultados deseados. Como
siempre, haga una prueba preliminar en un
área discreta de la tela, usando la función
de vaporización, para comprobar que la tela
soporta el vapor.
AVISO DE LA COMISIÓN FEDERAL
DE COMUNICACIONES (FCC)
ADVERTENCIA: Se advierte que las
modificaciones no aprobadas expresamente
por la autoridad competente en materia de
conformidad podrían rescindir el permiso del
usuario para operar el equipo.
Este artefacto cumple con la Sección 15 de
la Normativa FCC. Su funcionamiento está
sujeto a las dos condiciones siguientes: (1) Este
artefacto no puede causar ninguna interferencia
perjudicial, y (2) Este artefacto debe aceptar
cualquier interferencia recibida, incluso aquellas
que pueden causar un funcionamiento no
deseado.
NOTA: Este equipo ha sido probado y se ha
determinado que cumple con los límites de un
dispositivo digital de Clase B, según la Sección
15 de la Normativa FCC. Estos límites están
diseñados para proporcionar una protección
razonable contra las interferencias perjudiciales
en una instalación residencial. Este equipo
genera, usa y puede irradiar energía de
radiofrecuencia (RF) y, si no ha sido instalado
o usado conforme a las instrucciones, pued
ocasionar interferencias perjudiciales para las
comunicaciones por radio. No obstante, no
hay garantía de que aquellas interferencias no
ocurran en una instalación particular. Si este
equipo produce alguna interferencia perjudicial
en la recepción de radio o televisión, lo que
podrá determinarse encendiendo y apagando
el equipo, se recomienda tratar de corregir
la interferencia, adoptando una o más de las
siguientes medidas:
• Reorientar o reubicar la antena receptora
• Aumentar la distancia entre el equipo y e
receptor.
• Conectar el equipo a un circuito distinto al qu
esté conectado el receptor.
• Consultar con el distribuidor o un técnic
especializado en radio/TV.
DECLARACIÓN
DE CONFORMIDAD
DEL PROVEEDOR
Marca: Conair
Modelo: GS51
Descripción: Vaporizador de prendas portátil
Parte responsable: Conair Corporation,
1 Cummings Point Road,
Stamford, CT 06902, (203) 351-9000
Normas: Normas de la FCC, Sección 15,
subsección B,
ANSI C63.4-2014
Este artefacto cumple con la Sección 15 de la
Normativa FCC. Su funcionamiento está sujeto a
las dos condiciones siguientes:
(1)1) Este artefacto no puede causar ning
interferencia perjudicial, y (2) Este artefacto debe
aceptar cualquier interferencia recibida, incluso
aquellas que pueden causar un funcionamiento
no deseado.
FECHA DE PUBLICACIÓN: 12/12/2020
GARANTÍA LIMITADA DE UN AÑO
(VÁLIDA EN LOS EE.UU. Y EN
CANADÁ SOLAMENTE)
Conair reparará o remplazará (a su opción) este
producto sin cargo por un período de 12 meses
a partir de la fecha de compra si presenta
defectos de fabricación o materiales.
Para obtener servicio técnico bajo esta garantía,
devuelva el producto defectuoso al Centro de
Servicio indicado a continuación, junto con su
recibo de compra.
Los residentes de California solo necesitan
dar una prueba de compra y deben llamar al
1-1-800-3-CONAIR para recibir instrucciones
envío. En ausencia del recibo de compra, el
período de garantía será de 12 meses a partir
de la fecha de fabricación.
CUALQUIER GARANTÍA, OBLIGACIÓN
O RESPONSABILIDAD IMPLÍCITAS,
INCLUYENDO, PERO NO LIMITADAS A LA
GARANTÍA IMPLÍCITA DE COMERCIABILIDAD
Y APTITUD PARA UN PROPÓSITO ESPECÍFICO,
ESTARÁN LIMITADAS POR LOS 12 MESES DE
LA PRESENTE GARANTÍA ESCRITA. Algunos
Estados no permiten limitaciones en la duración
de una garantía implícita, de modo que las
limitaciones mencionadas pueden no regir para
usted.
CONAIR NO SERÁ RESPONSABLE, EN NINGÚN
CASO, POR NINGÚN DAÑO ESPECIAL,
INCIDENTAL O CONSECUENTE DEBIDO AL
INCUMPLIMIENTO DE ESTA O CUALQUIER
OTRA GARANTÍA, EXPRESA O IMPLÍCITA.
Algunos Estados no permiten la exclusión o
limitación de daños especiales, incidentales o
consecuentes, de modo que las limitaciones
mencionadas pueden no regir para usted. Esta
garantía le otorga derechos legales específicos
y usted puede tener otros derechos que varían
de un Estado a otro.
Centro de servicio
Conair Corporation
Service Department
7475 N. Glen Harbor Blvd.
Glendale, AZ 85307
Para más información sobre los productos
Conair, llame al 1-800-3-CONAIR o visítenos en
www.conair.com
Para registrar este producto, visítenos en:
www.conair.com/registration
©2021 Conair Corporation
Hecho en China
20PA076530
IB-17040


 1
1
 2
2


Conair GS108 Manual de usuario
Conair GS39 Manual de usuario
Conair GS2WB Instrucciones de operación
Conair GS15RN Manual de usuario