
1
K68629036/7/18 506-7339
www.mopar.com
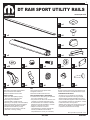
x2 x8
x4
x4
x4
x8 x8 x4
x8 x8 x8
x2
x28
x4
x8
x4
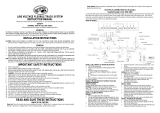
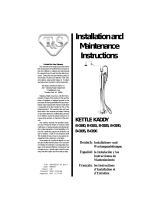
DT RAM SPORT UTILITY RAILS
A D
C
E
F
i J K
N O P
B
G
L
H
M
EN = English / ES = Spanish / FR = French
EN
Parts must not be tted until registration
of the vehicle has been obtained.
Subject to alteration without notice.
SAFETY NOTES
• Bars have 150lbs (68KG) capacity,
which includes carriers and load.
• After driving a short distance
(and thereafter at refular intervals,
depending on the quality of the road surface)
tighten the boted joints and ensure that the
load is still securely fastened in position.
• Remeber that the load may change
the behaviour of the vehilce on the road
(side winds, cornering, braking).
FR
Ne pas monter les pièces avant l’enregistrement du
véhicule. Sous réserve de modications techniques.
CONSIGNES DE SÉCURITÉ
• Les barres ont une capacité de 150 lb (68 kg);
le poids des dispositifs et de la charge compris.
• Après seulement quelques kilomètres de route et
ensuite à intervalles réguliers à dénir suivant l’état
de la chaussée, resserrer les vis de liaison, contrôle
l’assise et la xation du chargement.
• Adapter votre conduite à la nouvelle tenue de route
de la voiture (sensibilité au vent latéral, tenue de
route dans les tournants et au freinage.
ES
No se permite montar las piezas antes
de registrar el vehículo.
Revervadas modicaciones técnicas.
INDICACIONES PARA LA SEGURIDAD
•Las barras tienen 150 lb (68 kg) de capacidad
que incluye portadoras y carga.
• Por primera vez, al cabo de un recorrido corto
y después en intervalos adecuados, según
las caracteristicas de la calzada, se deberán
reapretar las uniones atornilladas y controlar
el asiento y la jación de la carga.
• Adaptar la manera de conducir al
comportamiento en carretera cambiado del
vehículo (sensibilidad al viento lateral,
comportamiento en curvas y en el frenado).

www.mopar.com
K68629036/7/18
2
506-7339
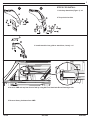
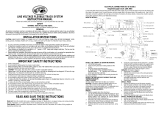
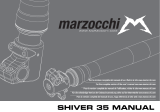
3. Install stanchion bar guide to stanchions, loosely - x4
4. Remove CMR end cap from front of bed by using #25 Torx Head both Driver/Passenger side
5. Remove factory tie-downs from CMR
F
L
D
G
L
M
G
i
H
G
O
NG J
K
L
P
STEPS FOR INSTALL
1. Sub-Assy Stanchion (Figure 1)- x4
2. Torque bolt i to 4Nm.
21

www.mopar.com
K68629036/7/18
3
506-7339
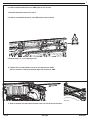
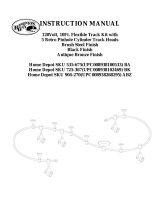
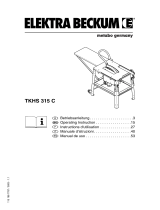
9. Repeat (step 5, 6, 7) on passenger side
10. Tighten drivers side thumb screw to secure stanchion to CMR.
Be sure notches in stanchion bracket align with notches in CMR.
6. Install assembled stanchion onto CMR (slide to rear of bed)
7. Reinstall tie-downs removed in step 4
8. Install 2
nd
assembled stanchion onto CMR (leave at front of bed)
11. Slide crossbars onto stanchion brackets from one side of bed to the other.

www.mopar.com
K68629036/7/18
4
506-7339
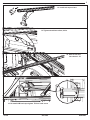
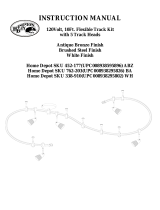
15. Re install CMR end caps- tighten T25 torx head screw
13. Tighten stanchions to bars, 4 Nm.
14. Slide to rub strip
into channel - x2
12. Install end caps on bars
E
C
D
Transcripción de documentos
1 DT RAM SPORT UTILITY RAILS www.mopar.com C x4 A x2 D x8 E x4 B x2 G x28 H x8 i L x4 M x4 N x8 x8 EN ES SAFETY NOTES • Bars have 150lbs (68KG) capacity, which includes carriers and load. • After driving a short distance (and thereafter at refular intervals, depending on the quality of the road surface) tighten the boted joints and ensure that the load is still securely fastened in position. • Remeber that the load may change the behaviour of the vehilce on the road (side winds, cornering, braking). INDICACIONES PARA LA SEGURIDAD •Las barras tienen 150 lb (68 kg) de capacidad que incluye portadoras y carga. • Por primera vez, al cabo de un recorrido corto y después en intervalos adecuados, según las caracteristicas de la calzada, se deberán reapretar las uniones atornilladas y controlar el asiento y la fijación de la carga. • Adaptar la manera de conducir al comportamiento en carretera cambiado del vehículo (sensibilidad al viento lateral, comportamiento en curvas y en el frenado). Parts must not be fitted until registration of the vehicle has been obtained. Subject to alteration without notice. 6/7/18 No se permite montar las piezas antes de registrar el vehículo. Revervadas modificaciones técnicas. 506-7339 F x4 J x8 K x4 O x8 P x8 FR Ne pas monter les pièces avant l’enregistrement du véhicule. Sous réserve de modifications techniques. CONSIGNES DE SÉCURITÉ • Les barres ont une capacité de 150 lb (68 kg); le poids des dispositifs et de la charge compris. • Après seulement quelques kilomètres de route et ensuite à intervalles réguliers à définir suivant l’état de la chaussée, resserrer les vis de liaison, contrôle l’assise et la fixation du chargement. • Adapter votre conduite à la nouvelle tenue de route de la voiture (sensibilité au vent latéral, tenue de route dans les tournants et au freinage. EN = English / ES = Spanish / FR = French K6862903 2 www.mopar.com 1 STEPS FOR INSTALL 2 1. Sub-Assy Stanchion (Figure 1)- x4 L G G H 2. Torque bolt i to 4Nm. L i O M K G N J P F L G 3. Install stanchion bar guide to stanchions, loosely - x4 D 4. Remove CMR end cap from front of bed by using #25 Torx Head both Driver/Passenger side 5. Remove factory tie-downs from CMR 6/7/18 506-7339 K6862903 3 www.mopar.com 6. Install assembled stanchion onto CMR (slide to rear of bed) 7. Reinstall tie-downs removed in step 4 8. Install 2nd assembled stanchion onto CMR (leave at front of bed) 9. Repeat (step 5, 6, 7) on passenger side 10. Tighten drivers side thumb screw to secure stanchion to CMR. Be sure notches in stanchion bracket align with notches in CMR. 11. Slide crossbars onto stanchion brackets from one side of bed to the other. 6/7/18 506-7339 K6862903 4 www.mopar.com 12. Install end caps on bars E C D 13. Tighten stanchions to bars, 4 Nm. 14. Slide to rub strip into channel - x2 15. Re install CMR end caps- tighten T25 torx head screw 6/7/18 506-7339 K6862903-
 1
1
-
 2
2
-
 3
3
-
 4
4


En otros idiomas
- français: Mopar 82215789 Manuel utilisateur
- English: Mopar 82215789 User manual
Documentos relacionados
Otros documentos
-
 Hampton Bay EC053ABZ Guía del usuario
-
 Hampton Bay EC052ABZ Guía del usuario
-
 Hampton Bay EC6827BK Guía de instalación
-
 Hampton Bay EC9580BA Guía de instalación
-
 T & S Brass & Bronze Works B-0190 Guía de instalación
-
 MARZOCCHI SHIVER 32 El manual del propietario
-
 MARZOCCHI SHIVER 45 El manual del propietario
-
 MARZOCCHI SHIVER 35 El manual del propietario
-
 Elektra Beckum TKHS 315 C Manual de usuario


