
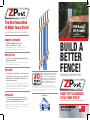
BUILD A
BETTER
FENCE!
HEAVY DUTY GALVANIZED
STEEL FENCE POSTS!
PRO Quality
DIY Friendly
Calidad Profesional
Hágalo usted mismo amigable
Construir un mejor valla!
De servicio pesado postes de la cerca de acero galvanizado
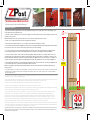
GARANTÍA 30 AÑOS
The Next Generation
of Metal Fence Posts!
Superior Strength
Heavy Duty 10 Gauge Galvanized Steel.
Will not rot, wind rated up to 73 mph.
Fuerza superior de calibre pesado de trabajo del 10 de acero
galvanizado. No se pudre, el viento tiene hasta 73 mph.
Versatile
The same post can be used for line posts, end posts, gate
posts and gate stops. The continuous, top-to-bottom hole
pattern allows for easy installation of kick boards, top
caps, lattice work and more!
Attractive
The unique in-line arrangement of Z-Post makes it easy to
cover for the perfect good neighbor fence. Z-Post can be
painted or left with their natural galvanized finish.
Easy to Use
No brackets or special fittings required. Designed for use
with standard size lumber.
¡La próxima geneación de postes de la cerca de metal!
Fácil de usar sin soportes o accesorios especiales. Diseñado para
usar con la madera de tamaño estándar.
Versátil El mismo mensaje puede ser utilizado para postes de línea, los
mensajes finales, postes de la puerta y las paradas de puerta. El patrón
de agujeros continua, de arriba a abajo permite una fácil instalación de
tableros de patada, tapas superiores, celosía y mucho más!
Atractivo La disposición única en línea de la Z-Post hace que sea fácil
de cubrir por el bien valla vecino perfecto. Z-Post se puede pintar o se
fue con su acabado galvanizado natural.
Distributed by:
Jurupa Valley, CA 91752
Patent Pending
Patent Pending
Z-Post, Inc. warrants the original purchaser that the
Z-Post galvanized G90 steel fence post is free from
defects in material and/or workmanship, including
structural failure for a period of thirty years from the
date of the original purchase. Structural failure is
defined as a permanent bend in the post of more
than 10%. See warranty for complete details.
Garantía limitada de 30 años Z-Post, Inc. garantiza al comprador original que el Z-Post
galvanizado G90 poste de la cerca de acero está libre de defectos de materiales y / o mano de
obra, incluyendo insuficiencia estructural para un período de treinta años a partir de la fecha de
la compra original. Fallo estructural se define como una curva permanente en el puesto de más
de 10%. Consulte la garantía para obtener más detalles.

The Next Generation of Metal Fence Posts!
Patent Pending
Estas pautas de instalación son para su uso con aplicaciones típicas o estándar. Siempre es recomendable buscar el consejo de un profesional con licencia, y que consulte con su inspector de construcción o
edificio de oficinas permiso local para las aprobaciones y las posibles variaciones que puedan aplicarse. Póngase en contacto con su compañía de servicios públicos para verificar si hay tuberías o cables
subterráneos antes de la construcción de su valla.
1. Fence posts should be set approximately 6 to 8 feet apart, depending on the type of fence, terrain, purpose of fence, and height. We recom-
mend setting the posts in 8 inch diameter holes.
2. Take time to measure and position the posts accurately. The appearance and the structural strength of your fence depends a great deal on the
positioning of the fence posts.
Note: Standard rails are 8 feet long; you want to make sure you set your posts at or slightly less than 8 foot centers.
3. Set the corner or end posts first, then stretch a line to align all the posts in between.
4. Drive a stake, then use chalk or paint every 6' to 8' to mark the exact position were the posthole is to be dug.
5. Set Z-Posts with 24" buried in the ground. Note: Posts will be anchored more firmly by making the postholes slightly larger at the bottom than
the top. Also, place a large stone or two shovels full of gravel in the bottom of each hole for drainage
6. Use a level to ensure the posts are exactly straight and upright. Once the posts are level and in position, fill the hole around the post with
concrete, sloping slightly away from the post and rounding it off with a trowel. Tamp the concrete lightly to eliminate any air bubbles.
7. Once the concrete is set (a process that can take 24 to 48 hours depending on weather conditions), you can begin to frame the fence. The
hole patterns in the Z-Post make framing easy! Simply screw the rails into the flanges of the post with 1 1/2" galvanized or coated screws - the
rails will sit flush with the flange design of the Z-Post, ensuring a straight fence line. Note: The top of the posts can either be set to height or can
easily be cut off with a reciprocating or band saw. For additional protection, apply cold galvanized spray to the cut end of the standing ZPost.
8. The final step will be to install the fence boards, beginning by installing the boards at each end of the fence. Then string a line tightly at the top
of each of these boards. Nail or screw the fence boards using the string as a reference.
Note: For a standard fence, the boards should extend approximately 8" above the top rail, and the bottom rail should be approximately 10"
above the ground.
These installation guidelines are for use with typical or standard applications. It is always recommended to seek advice from a licensed professional, and to check with your
local building inspector or building permit office for approvals and possible variations that may apply. Contact your utility company to check for underground pipelines or
cables before building your fence.
1. Los puestos de la cerca deben establecerse aproximadamente de 6 a 8 pies de distancia, dependiendo del tipo de valla, el terreno, el propósito de la cerca, y la altura. Se recomienda el
establecimiento de los puestos en los agujeros de diámetro 8 pulgadas.
2. Tómese el tiempo para medir y posicionar los mensajes con precisión. El aspecto y la resistencia estructural de su valla depende en gran medida de la posición de los postes de la cerca
Nota: raíles estándar son 8 pies de largo;.? usted quiere asegurarse de que usted fija sus mensajes en o ligeramente menos de 8 centros en los pies.
3. Establezca los postes de las esquinas o extremos primero y luego estirar una línea para alinear todos los puestos en el medio.
4. Conducir un juego, la tiza uso o pintar cada 6 "a 8" para marcar la posición exacta fuera el hoyo de poste debe ser excavado.
Estará anclado Mensajes con más firmeza al hacer los hoyos de poste un poco más grandes en la parte inferior de la parte superior también, coloque una piedra grande o dos palas llenas
de grava en la parte inferior: 5. Conjunto Z-24 Mensajes con "enterrado en el suelo. Nota. de cada orificio para el drenaje
6. Utilice un nivel para asegurarse de que los mensajes son exactamente recta y en posición vertical. Una vez que los mensajes están al mismo nivel y en posición, llenar el agujero
alrededor del poste con concreto, inclinado un poco lejos del poste y el redondeo apagado con una llana. Apisonar el hormigón ligeramente para eliminar las burbujas de aire.
7. Una vez que el concreto se establece (un proceso que puede durar de 24 a 48 horas dependiendo de las condiciones climáticas), usted puede comenzar a enmarcar la valla. Los
patrones de agujeros en la Z-Post hacen enmarcar fácil! Simplemente atornille los rieles en las bridas del puesto con tornillos de 1 1/2 "galvanizados o recubiertos - los carriles se
sentarán a ras con el diseño de la brida de la Z-Post, asegurando una línea de valla recta Nota: La parte superior de los postes puede. o bien ajustarse a la altura o se puede cortar
fácilmente con un movimiento alternativo o banda de sierra. Para protección adicional, aplique aerosol de galvanizado frío al extremo cortado del ZPost pie.
8. El último paso será instalar las tablas de la cerca, comenzando por la instalación de los tableros en cada extremo de la valla. Entonces cadena una línea fuertemente en la parte superior
de cada una de estas tablas. Clave o atornille las tablas de la cerca usando la cadena como una referencia. ? Nota: Para una valla estándar, las juntas deben extienden aproximadamente
8" por encima de la baranda superior y el riel inferior debe ser de aproximadamente 10" por encima del suelo.
Make a strong 3-rail fence A dependable gate stop No special fittings required Easily add a lattice top
La próxima generación de valla metálica Mensajes!
Installation / Instalación
24"
Concrete
7' 6"
4-8"
Top Rail
Bottom Rail
10"
Typical Installation
6'
Approx.
ZP76
SKU # 1001327106
-
 1
1
-
 2
2


en otros idiomas
- English: Z Post ZP76 Operating instructions
Otros documentos
-
Barrette Outdoor Living 73024592 Guía de instalación
-
Veranda 73045697 Instrucciones de operación
-
Freedom 73023177 Instrucciones de operación
-
 Veranda 73024871 Guía de instalación
-
Barrette Outdoor Living 73014396 Guía de instalación
-
 Veranda 73012194 Instrucciones de operación
-
-
-
 Veranda 73011310 Instrucciones de operación


