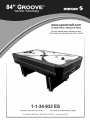
Sportcraft 1-1-34-933ES Guía de instalación
- Categoría
- Accesorios de la consola de juegos
- Tipo
- Guía de instalación

www.sportcraft.com
TO ORDER PARTS / ORDENAR DE PIEZAS
Visit our website before returning to store
Visite nuestro sitio web antes de devolver ala tienda
1-1-34-933
Assembly, Instructions and Rules Instrucciones de ensamblaje y reglas
313 Waterloo Valley Road / Budd Lake, NJ 07828 / www, sportcraft,com

I English I
IMPORTANTSAFETYINSTRUCTIONS
5.
6.
1, Read all instructions - All the safety and operating instructions
should be read carefully before this turbo hockey game is
played.
2. Caution - This is not a toy and is intended for use by or under the
supervision of adults. Adults should review safety guidelines with
children to avoid possible risk of electric shock or other injuries.
3. Power sources - This hockey game should be operated only from
100-125V A.C., 60 cycle current as indicated on the identification
label. If you are not sure of the type of power supply to your home,
consult your appliance dealer or local power company.
4. Power cord protection - Power cord should be routed so that it is not
likely to be walked on or pinched by items placed upon or against it.
Pay particular attention to cords at plugs, convenience receptacles,
and the point of exit from the game.
Overloading - Do not overload wall outlets and extension cords as
this can result in a risk of fire or electric shock.
Object and liquid entry - Never push objects of any kind into this
game through openings as they may touch dangerous voltage
points or short-out parts which could result in a fire or electric shock.
Never spill liquid of any kind on the game.
7. Ventilation - Openings in the game are provided for the exhaust
air to create a cushion effect. The openings on the air blower are
for the intake air. Keep clear of the air blower when it is on. Do
not put hand or other objects near the intake openings. To ensure
reliable operation of the game and protect itfrom overheating these
openings must not be blocked or covered.
8. Damage requiring service - Unplug the game from the wall outlet. Do
not attempt to service the blower yourself as opening or removing
covers may expose you to dangerous voltage or other hazards.
Refer servicing to qualified service personnel under the following
conditions.
A. When the power supply cord or plug is damaged.
B. If liquid has spilled, or objects have fallen into the blower.
C. When the air blower exhibits a distinct change in performance
e.g. abnormal noise, this indicates a need for service.
9. Grounding or Polarization - This game is equipped with a polarized
alternating current line plug (a plug having one blade wider than the
other). This plug will fit into the power outlet only one way. This is a
safety feature. If you are unable to insert the plug fully into the outlet,
try reversing the plug. if the plug should still fail to fit, contact your
electrician to replace your obsolete outlet. Do not defeat the safety
purpose of the polarized plug.
10. CAUTION - ELECTRICALLY OPERATED PRODUCT - Not
recommended for children under 8 years of age. As with all electrical
products, precautions should be observed during handling and use
to reduce the risk of electric shock.
11. We recommend that the game be periodically examined for
conditions that may result in the risk of fire, electrical shock, or injury
to persons. In the event such conditions exist, the game should not
be used until properly repaired.
SAVE THESE INSTRUCTIONS
WARNING: To Reduce The Risk Of Fire Or Electric Shock, Do Not
Use This Fan With Any Solid-State Speed Control Device
I Espafiol ]
INSTRUCCIONES)RTANTESDESEGURIDAD
1. Lea todas las instrucciones - todas las instrucciones de seguridad y
operaci6n se deben leer con ouidado antes de utilizar este juego de
hockey,
2. Advertencia - Esto no es un juguete y es para el uso de adultos o menores
con la supervisi6n de adultos. Las personas adultas deben revisar las
pautas de seguridad en cuanto a los niEos para evitar cualquier posible
riesgo de electrocuci6n u otras lesiones.
3. Fuentes de poder- Este juego de hockey s61o se debe operar con corriente
alterna de I00-125V C.A., y 60 ciclos segt_n se indica en la etiqueta de
identificaci6n. Si usted no sabe con seguridad que tipo de energia tiene
en su hogar, consulte con un vendedor de electrodomesticos o con la
compa_ia local de electricidad.
4. Proteccion del cordon - Se debe colocar el cordon de manera que no
se pueda pisar, ni aplastar con objetos que se le coloquen encima o al
lado. Preste mucha atencion a los cordones en la parte del enchufe, los
recept&cules y los puntos de salida del juege.
5. Sobrecarga - No sobrecargue los tomacorrientes ni las extensiones ya que
esto puede ocasionar riesgo de incendio o electrocuci6n.
6. Entrada de objetos y liquidos - Nunca inserte ninguna clase de objeto en
las aberturas de este juego ya que pueden entrar en contacto con puntos
de voltaje peligrosos o partes que causan cortocircuito Io cual puede causar
un incendio o electrocuci6n. Nunca se debe derramar ning_n tipo de liquido
sobre este juege.
7. Ventilaci6n - Las aberturas del juego est&n disefiadas para que el aire de
salida cree un efecto de "colch6n". Las aberturas en el soplador de aire
son para la entrada de aire. Mantengase alejado del soplador cuando est&
encendido. No coloque las manos ni otros objetos cerca de las aberturas
de entrada de aire. Para asegurar el funcionamiento confiable del juego
y evitar que se sobrecaliente, estas aberturas no se deben bloquear ni
cubrir.
8. Dar_os que requieran servicios de reparaci6n - Desenchufe el juego.
No trate de reparar el soplador usted mismo ya que el abrir o quitar las
cubiertas Io expone a voltajes peligrosos u otros peligros. Los servicios
de reparaci6n los deben proporcionar una persona calificada bajo las
siguientes condiciones:
A. Cuando el cord6n o el enchufe est&n dafiados.
B. Si se ha derramado un liquido o se han dejado caer objetos dentro
del soplador.
C. Cuando el soplador de aire muestra un cambio marcado en su
desempeEo
9. Polarizaci6n o conexi6n a tierra - Este juege viene con un enchufe de
linea de corriente alterna polarizada (un enchufe que tiene un diente m&s
ancho que el otro). Este enchufe s61o entra en el tomacorriente de una
manera. #sta es una medida de seguridad. Si no puede insertar el enchufe
por completo en el tomacorriente, trate de invertirlo. Si, alan asi, no entra,
contacte a un electricista para que reemplace el tomacorriente obsoleto. No
intente violar esta medida de seguridad.
10. PRECAUCION - PRODUCTO EL#CTRICAMENTE MANEJADO - No
recomendado para nifios bajo 8 argos. Como con todos los productos
electricos, las precauciones deberian ser ebservadas durante el manejo y
el empleo para reducir el riesgo de choque electrico.
11. Recomendamos que el juego sea examinado de vez en cuando de las
condiciones que pueden causar el riesgo de fuego, la descarga electrica, o
la herida a personas. Si estes condiciones existen, el juege no debeHa ser
usado hasta que est& reparado.
GUARDE ESTA8 INSTRUCCIONE8
ADVERTENCIA: Para disminuir el riesgo de incendio o electrocuci6n, no
use este ventilador con un dispositivo de control de velocidad de estado
s61ido.
@2009 Sportcraft, Ltd.
1-1-34-933 ES P. 1 www.sportcraft.com

English I
Conqratulations! We hope you will have many
hours of enjoyable use with your new Sportcraft
Turbo Hockey!
PLEASE KEEP YOURINSTRUCTIONS!
* Your Model number is necessary should you
need to contact us.
* Please read through this instruction book to
familiarize yourself with all the parts and assembly
steps.
* Refer to the Parts Identifier and verify that all parts
have been included.
* For questions that may arise or for missing parts,
DO NOT RETURN THE GAME TO THE STORE.
CONTACT INFORMATION:
Hours: Mon.-Fri., 9:00am to 5:00pm EST
Replacement Parts: order online at: www.sportcraft.
corn or call: (866) 206-4321
Technical Support: (800) 526-0244
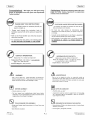
WARNING!
This is not a child's toy. Adult supervision is required for
children playing this game. Please read instructions carefully.
Proper use of this set can avoid damage or injury.
BEFORE ASSEMBLY:
• Did you receive 1 box?
• Did you inspect your playfield/main table frame before
assembly? It is not replaceable and must be returned to the
original place of purchase if damaged.
TOOLS REQUIRED FOR ASSEMBLY:
• Phillips and Slotted Head Screwdrivers / or Power Driver (not
included)
• Allen Wrench (included)
I EspaSol ]
jFelicitaciones! iNosotros esperamos que este nuevo
juego de Turbo Hockey Sportcraft le proporcione
muchas horas de diversibn!
iPOR FAVOR GUARDE ESTAS INSTRUCCIONES!
• Su nQmero de modelo es necesario en caso de que
deba comunicarse con nosotros.
• Por favor leer este manual de instrucciones para
familiarizarse con todas las piezas y los pasos a seguir en
el montaje.
• Consultar la lista Identificaci6n de las Piezas y asegQrese
de que todas las piezas hayan sido incluidas.
• Para preguntas o para piezas que no se hayan incluidos,
NO DEVUELVA EL JUEGO A LA TIENDA DONDE LO
COMPRO.
INFORMACION DE CONTACTO:
Horas: lunes a viernes, 9:00am a 5:00pm EST
Piezas de reeambio: ordenar a la pagina de internet:
www.sportcraft.com o Ilame: (866) 2064321
Soporte t_cnico: (800) 526-0244
_ iADVERTENCIA!
Esto no es un juguete de ni_os. La supervision adulta es
requerida para jugar este juego por los niSos. Por favor leer las
instrucciones con cuidado. El empleo apropiado de este juego
puede evitar el daSo o la herida.
_ ANTES DE ASAMBLEAR:
• &Recibi6 usted 1_!.= caja?
• &lnspeccion6 usted su campo de juego/marco de mesa antes
de la asamblea? N..._oes reemplazable y debe ser devuelto al
lugar original de compra.
_] HERRAMIENTAS NECESARIAS PARA MONTAR:
• Destornilladores Phillips y de cabeza ranurada / o destomillador
electrico (no incluido)
• Llaves inglesa y hexagonal (incluidas)
1009 - M @2009Sportcraft, Ltd.
1-1-34-933 ES P.2 www.sportcraft.com

I English I
FoRMISSING OR DEFECTIVE PARTS_ VISIT
www.sportcraft.com
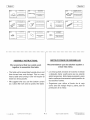
PARTS iDENTiFiER
IDENTIFICACION DE LAS PIEZAS
I Espa5ol ]
PARA LAS PIEZAS QUE FALTAN O DEFECTUOSAS_
VlSITE www.sportcraft.com
(Add a Check (_") to the box [-] to indicate receipt of each part.)
-- _ [ - - SIDE APRON
TABLA LATERAL
PiERNA
[ 9-3-34-933ES02 (2) J
9-3-34-933ES05 4
LEG END PANEL
PANEL DE PIERNA
i 1
u== = LEG SiDE BRACE
SOPORTE DE
PtERNA LATERAL
3-34-933ES66 (2)
(A_ada una marca (x') a la caja [[] para indicar el recibo de cada pieza.)
ENDAPRON
TABLA DE
EXTREMO
[ 9-3-34-933ES03 (2) J
TABLERO DE
PtERNA
-3-34- ES0
i IENDAPRONWTH
__ OPENING
TABLA DE EXTREMO
CON APERTURA
[ 9-3-34-933ES04 (2)!
ANAQUEL EN LA
FORMA DE "U"
3- 0
IW_ i 6"LBGLBvBLER
[__
NIVELADOR DE LA
PIERNA 5 "
3-34-711SS07 (4)
l
HEAD SCREW
T_ZA
PLANA DE 4 X44,5 MM
3-36- S2
APRON CORNER
ESQUINA DE TABLA
1 i__18X36MMHBXBO_
DE8X38MM
[ 9-3-34-771SS14 (8)J
i (]]==i [4x16MMwAsHBR
- - HEAD SCREW
TORNILLO CONCABEZA DE
ARANDELADE 4X /5MM
[ 9-3-34-510SS07 (7) J
PERNO HEXAGONAL
DE 6.5 X 32 MM
[ 9-3-34-503SS23 (8)J
1 l X12MMWASHER
- - HEAD SCREW
TORNILLO CONCABEZA DE
ARANDELADE 4X /2MM
[ 9-3-32-531SS17 (36)j[
1
ARANDELA DE
8X23MM
I 9-3-36-039SS44 (8) .[
ARANDELA DE
6,5X15MM
- S1
i,_D! 166x'BMMW'NG
- - NUT BOLT
PERNODE MARIPOSA
DE 6,5 X/8 MM
[ 9-3-34-583SS07 (12)1
19 " PUCK RETURN BOX
W
CAJA PARA LA
DEVOLUCJON DEL DISCO
l_ -- [ CONTROL BOX WITH
WIRE
CAJA DECONMUTADORY
ENCHUFE DE CONTROL
I 9-3-34-933ES20 (1) |
FASTENER
SUJETADOR
ll_'- -[ SCORER BASE BOX
WITHWIRE
(PRE-INSTALLED)
BASE DEMARCADOR CON
CABLE(PRE INSTALADO)
[ 9-3-34-933ES22 (1)J
_{__1 #_ky&..,_s
JBUPE_SOE
3-34-933ES23 (1) 1
(PRE _NSTALLED)
SOPLADOR DE A_RE
(PRE INSTALADO)
,1
, _ _ DOWEL [ _ _ SURFACE - A
CLAVUA DE MADERA SUPERHCEEDE TENIS DE
6 MM MESA A
-34-933ES25 (12) ! 9-3-34-933ES26 (2)
® ® U • ® U @ ® ® • ® ® • • ® U • ® ® @ ® ® • • ® U • ® Q @ ® ® • ® ® • • Q U • ® ® @ ® ® • • ® U Q ® U @ ® ® • ® ® U
ACCESSORIES/Pre-lnstalied Parts IAVAILABLE FOR PURCHASE ONLINE,_
A CCESORIOS/Piezas preinstaladas (DISPONIBLE PARA COMPRA POR INTERNET.)
A1 I i NAME PLATE
_ _ (PRE _NSTALLED)
PLACA DE NOMBRE
(PRE _NSTALADA)
9-3-34-510SS19 (2)
A2 I i PUCK RETURN WITH TRAY
u (PRE _NSTALLED)
CAJA PARA LA DEVOLUCION
DEL DISCO Y DISPARADOR
(PRE FNSTALADA_
9-3-34-510SS26 (2)
A3_ i PUCK CATCHER WIREWITH
SENSOR(PREINSTALLED)
CABLE DE LAUNIDAD
DISPARADOR
(PREINSTALADO)
9-3-34-933ES28 (2)
i WRENCH
LLAVEINGLESA
9-3-32-531 SS27 (1)
A5_ _ TOP CORNER CAP
=_ _ (PRE INSTALLED)
9-3-34-933ES29 (4)
A6_ _ HOCKEY PUSHER -
BLACK
EMPUJADOR
9-3-34-933ES30 (4) 9-3-34-933ES31 (3)
HOCKEY PUCK - 22 G
(BLACK)
%
9-3-35-730SS27 (1)
ADAPTER-7.SV, 350mA
ADAPTADOR DE CA 75V.
350mA
@2009 Sportcraft, Ltd.
1-1-34-933 ES (Continued on the next page.) P.3 (Siga a la pagina siguiente.) www.sportcraft.com

I English I I Espa_°l ]
A_pJ
9-3-34-933ES32 (4)
PUSHER FELT
F{ELTRO PARA EL
EMPDJADOR DE HOCKEY
i GOAL COVER
=- - {PRE INSTALLED)
gUBiERTA DEL ARCO DE GOL
ADJUSTABLE
(pRF IN,STAI ABA/
9-3-34-510SS28 (2)
i SCORER-WITH 47"
• -- WIRE(PREINSTALLED)
MARCADOR CON CABLE
47"(PREINSTALADO)
9-3-34-933ES34 (1)
i NET
j RED
9-3-34-933ES35 (1)
TIMER WITH WIRE (PRE
INSTALLED)
MARDADOR-RELOJ
CON CABLE
/PREINSTALADO/
i i TABLE TENNIS PADDLE
PALA DE TENIS DE MESA
9-3-36-559SS27 (2)
_ TABLE TENNIS NET
[__ POST
JUEGO DE POSTE DE
TENIS DE MESA
9-3-34-933ES36 (2)
9-3-34-933ES37 (1)
9-3-36-933ES30 (I 0)
1.5" CUHSHiON
COJIN 1,5"
i TABLE TENNIS BALL
(_ PELOTA DE TENIS
DE MESA
9-3-36-039SS37 (2)
HEAD SCREW
-- {PRE INSTALLED)
TORNILLO CON CABEZA DE
ARANDELA DE 3 X 25 MM
/PRE INSTALADO)
[ 9-3-34-933ES27 (2) J
ASSEMBLY INSTRUCTIONS:
We recommend that two adults work
together to assemble this table.
The table will be assembled upside down and
then turned over onto its legs. This is a very
heavy table and turning it over will require at
least two strong adults.
We suggest that you use the bottom carton
as a clean fiat work area to protect the table.
INSTRUCCIONES DE ENSAMBLAJE
Recomendamos que dos adultos ayuden a
armar esta mesa.
La mesa puede armarse de manera invertida
y despu6s darse vuelta para que se asiente
sobre las piemas. Esta mesa es pesado y para
darle vuelta ser_ necesaria la participaci6n de
dos adultos fuertes.
Sugerimos que utilice el rondo de la caja
como _rea de trabajo limpia y plana para la
protecci6n de la mesa.
©2009 Sportcraft, Ltd.
1-1-34-933 ES (Continued on the next page.) P. 4 (Siga a la pagina siguiente.) www.sportcraft.com

I English I
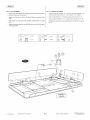
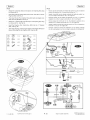
FIG. 1: LEG ASSEMBLY
Attach each Apron Corner (#10) between the Side and End Aprons
using six Screws (#12). See Fig. 1.
Attach one Side Apron (#2) to the Main Cabinet using four Bolts
(#18).
Then attach one End Apron (#3) to Main Cabinet using two Bolts
(#18).
Repeat the above steps for the other Side Apron and the End Apron
with Opening (#4).
I EspaSol ]
FIG. 1: ASAMBLEA DE PIERNA
Fijar cada esquina de tabla (no. 10) entre las tablas laterales y de
extremo usando seis tornillos (no. 12) por esquina. Ver la figura 1.
Fijar una tabla lateral (no. 2) al caj6n usando cuatro pernos (no. 18).
Fijar una tabla de extremo (no. 3) al cajon usando dos pernos (no. 18).
Repetir estos pasos para las otras tablas lateral y de extremo con agujero
(no. 4).
(_ _ =(2) (_) _ =(1)
G @
©
i ABINET
I CAJON
@2009 Sportcraft, Ltd.
1-1-34-933 ES (Continued on the next page.) P. 5 (Siga a la pagina siguiente.) www.sportcraft.com

I English I I Espa_°l ]
@
©
®
G
®
=(5)
= (10)
= (2)
= (2)
=(1)
CABINET
I CAJON !
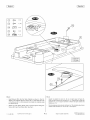
FIG. 2:
Insert Blower (#24) into the Main Cabinet as shown in Fig. 2A.
Attach to the Cabinet using five Screws (#11), Then attach the wire
of the Blower (#21) to the connector box inside the Cabinet using
two Screws (#12).
Attach two Puck Return Boxes (#19) to the End Aprons using four
Screws (#12) per Puck Return Box. See Fig. 2.
FIG. 2:
Insertar el soplador de aire (no. 24) en el cajon segun la figura 2A.
Fijarlo al cajon usando cinco tornillos (no. 11). Entonces fijar el cable del
soplador (no. 21) a la caja de conexion al interior del cajon usando dos
tornillos (no. 12).
Fijar las cajas para la devolucion del disco (no. 19) alas tablas de extremo
usando cuatro tomillos (no. 12) por caja. Ver la figura 2.
@2009 Sportcraft, Ltd.
1-1-34-933 ES (Continued on the next page.) P. 6 (Siga a la pagina siguiente.) www.sportcraft.com

I English I I Espaff°l ]
=(4)
= (24)
©
©
= (4)
@ =(4)
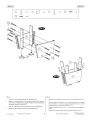
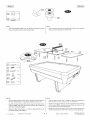
FIG. 3:
Screw two Leg Levelers (#9) into the Leg Boards (#7).
Attach two Leg Boards (#7) to one Leg End Panel (#5) using six
Screws (#13). Place a second Leg End Panel (#5) over the assembly
and attach using six Screws (#13).
Slide one Leg Brace (#1) into each groove of the Leg assembly.
Repeat the above steps for the other Leg Board/Panel.
FIG. 3:
Atomillar dos niveledores de piema (no. 9) en los tableros de piema (no.
7).
Fijar dos tableros de piema (no. 7) a un panel de pierna (no. 5) usando
seis tomillos (no. 13). Colocar un segundo panel de piema (no. 5) sober
la asamble y fijarlo usando seis tomillos (no. 13).
Deslizar un soporte de pierna (no. 1) en cada surco de la asamblea de
pierna.
Repetir los susodichos pasos para el otro tablero/panel de piema.
@2009 Sportcraft, Ltd.
1-1-34-933 ES (Continued on the next page.) P.7 (Siga a la pagina siguiente.) www.sportcraft.com

I English I I Espa_°l ]
=(2)
0
0
FIG. 4:
Attach one Leg Side Brace (#6) between the leg assemblies using
four Bolts (#15) and four Washers (#17).
Repeat the same for the other Leg Side Brace.
FIG. 4:
Fijar un soporte de piema lateral (no. 6) entre las asambleas de piernas
usando cuatro pemos (no. 15) y cuatro arandelas (no. 17).
Repetir el mismo para el otro soporte lateral de pierna.
@2009 Sportcraft, Ltd.
1-1-34-933 ES (Continued on the next page.) P. 8 (Siga a la pagina siguiente.) www.sportcraft.com

] English] [ Espa5ol ]
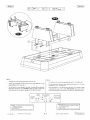
FIG. 5:
Carefully turn over the leg assemblies. See Fig. 5A.
Attach leg assemblies to Main Cabinet using eight Bolts (#14) and
eight Washers (#15). See Fig. 5.
You will need 2 or more adults for this step. Carefully lift the assembly
off the floor and turn it over. CAUTION: Make sure that you place the
table squarely onto its legs or damage to the table may occur.
FIG. 5:
Con cuidoso, dar vuelta alas asambleas de pierna. Ver la figura 5A.
Fijar la asamblea de pierna al cajon usando ocho pernos (no. 14) y ocho
arandelas (no. 15). Ver la figura 5.
Usted necesitara 2 o mas adultos para este paso. Con cuidado levantar
la asamblea del piso y darlo vuelta. PRECAUCI6N: Asegurarse colocar
la mesa directamente en sus piernas o el dafio a la mesa puede ocurrir.
DO NOT LEAN THE
TABLE ON iTS LEGS
NO APOYE LA MESA
EN SUS PIERNAS
I
CAUTION: Two strong adults are recommended to turn I
the table over as shown. ]
1. Lift the table off the ground. ]
2. Turn the table over.
3. P ace t on a four feet at the same t me on the ground.
1-1-34-933 ES (Continued on the next page.)
P.9
PRECAUCION: Se recomienda que dos adultos fuertes le I
den vuelta la mesa como se muestra en el grafico. I
I. Levante la mesa del suelo. ]
2. Vuelque la mesa. I
3. Apoye las cuatro piernas en el suelo al mismo tiempo. ]
@2009 Sportcraft, Ltd.
(Siga a la pagina siguiente.) www.sportcraft.com

] English]
FIG 6:
Attach the Control Box (#20) to End Apron with Opening (#4) using
two Screws (#11 ).
insert Plug (with the square head) of the Contro Wire (#All) into the
Plug Box (#20) .See Fig. 6.
Then insert the two Puck Catcher Wires (#A3) and one Adapter wire
(#A8) into Plug Box(#20). See Fig. 6.
Attach the "U" Bracket (#8) to the End Apron with Opening (#4) using
two Screws (#12). See Fig. 6A.
insert the Plug Box from Control Box (#20) into the "U" Bracket
(#24). See Fig. 6A.
Then insert the plug (with the square head) of theAdapter (#A8) and
Blower (#24) plug into the Plug Box (#20). See Fig. 6B
[ EspaSol ]
FIG 6:
Fijar la caja de conmutador con enchufe de control (no. 20) a la tabla de
extremo con apertura (no. 4) usando dos tornillos (no. 11).
Insertar el enchufe (con la cabeza cuadrada) del cable de control (no.
All) en la caja de enchufes (no. 20). Ver la figura 6.
Entonces insertar los dos cables de disparador (no. A3) y un cable de
adaptador (no. A8) en la caja de enchufes (no. 20). Ver la figura 6.
Fijar el anaquel en la forma de "U" (no. 8) al tablero de extremo con la
apertura (no. 4) usando dos tornillos (no. 12). Ver la figura 6A.
Insertar la caja de enchufe de la caja de control (no. 20) en el anaquel en
forma de "U" (no. 24). Ver la figura 6A.
Entonces, insertar el enchufe del adaptador (con la cabeza cuadrada)
(no. A8) y del soplador (no. 24) en la caja de enchufes. Ver la figura 6B.
@
@2009 Sportcraft, Ltd.
1-1-34-933 ES (Continued on the next page.) P. 1 0 (Siga a la pagina siguiente.) www.sportcraft.com

I English I I Espaff°l ]
_ = (4)
(4)
FIG 7:
Tear off the backside papers from the Hockey Felts (#A9) and stick
them at the bottom of the Hockey Pushers (#A6).
FIG 7:
Quitar los papeles de trasero de los fieltros de hockey (no. A9) y pegarlos
al fondo de los empujadores de hockey (#A6).
(_ = (12)
G =/2)
=/2)
S =/1)
=(10)
FIG. 8:
Peal the backing off the Cushion (#A17) and stick it on the bottom of
the Table Tennis Surface -A and B (#26 and #23). See Fig. 8A.
insert the Wooden Dowels (#25) into the holes in the Table Tennis
Surface. NOTE: Make sure the Wooden Dowels (#25) match the
holes when connecting together.
Slide one Table Tennis Surface - A onto the table gently lift up the
end of the Surface while sliding in.
FIG. 8:
Quitar el trasero del cojin (#A17) y pegarlo al fondo de la superficie de
tenis de mesa - A y la B ( no. 26 y no. 23). Ver la figura 8A.
Insertar las clavijas de madera (no. 25) en los agujeros de la superifice de
tenis de mesa. NOTA: Asegurarse que las clavijas de madera (no. 25)
van en las aperturas cuando uniendo juntos.
Deslizar una superficie de tenis de mesa -A (no. 22) sobre la mesa y con
cuidado, levantar sobre el extremo de la superficie cuando deslizando.
@2009 Sportcraft, Ltd.
1-1-34-933 ES (Continued on the next page.) P. 11 (Siga a la pagina siguiente.) www.sportcraft.com

I English I I Espa_°l ]
TABLE
SURFACE
(Mesa)
PUCKS
(Discos)
FASTER PLAY
(Jugar m&s
r&pido)
TABLE MAINTENANCE (MANTENIMIENTO DE LA MESA)
Wipe playing surface with a clean clothbefore and after each use.While table is on, vacuum gently with a soft brush
attachment on a vacuum cleaner.
m
Limpie !a superficie de juego con Unpado limpio antes y despues de usarla.Con la mesa encendida, aspirela Con delicadezal
usando el aditamento de cepillo de la aspiradora.
In the event the puck becomes rough or scuffed, use a sheet of extra fine sand paper to lightly rub until the puck is smooth.
Si la superficie de un0 de los tejos se vuelve &spera o se raya, use una lija muy fina para lijar el disco hasta que quede lisa.
For faster play, wipe down the playing surface with a spray wax and cloth. (NOTE: Do not spray the wax directly on the table.
Spray it on a cloth first.)
w
Para juegos de maYor rapidez, roc[e !a supefficie de]uego Concera y p_se!e un paso (NOTA no rocie ia superficie directamente,
primero roe/e e! pa_o). Aseg_rese que el seplador est_ encendido para evitar que las aperturas se ebstruyan.
ELECTRONIC SCORER OPERATION:
1,
Plug the adapter into the connecting box turn on the power of the
"MOTORIONIOFF" switch and then press the SCORER/ON/OFF
button. You will hear music and the scores 0-9 will automatically
show on the scoreboard.
2. There is one pre-set period of 15 minutes which can be adjusted
to 10 minutes, 5 minutes, or "No Time Limit" mode by pressing the
"TIME SELECT" button.
3. Press "START/RESET" button to begin the game.
4. After your game, while the table is still on, press "START/RESET"
and the scoreboard will clear all scores to 0. The time will show the
previously-selected time period.
5. Once a score reach 99 points, the next score will show "00" on the
scoreboard. Cheering sounds will activate. Time will revert to the
mode of the last game, the score will not change, and the game
ends. No additional points will then be counted for any puck that
enters the goal box.
6. NOTE: the scoreboard will shut off automatically after 5 minutes,
if not used. However we suggest turning the power off when the
game will not be used for an extended period of time. However, do
not turn the power off when playing in the "No Time Limit" mode.
HOCKEY GAME RULES:
1 This game is designed to be played with two (2) players, one at each
end, or with four (4) players, two at each end of the game table.
2) Flip a coin to determine who will begin play, or a face-off can be held
at the center of the table.
3) Play begins when the puck is placed on the playing surface. Players
must hit the puck with the hand-held pushers and attempt to shoot
into the opponent's goal.
4) One point is awarded when a puck is shot into the opponent's goal.
5) Winning the game: the winning score is accomplished by being the
first player to reach a predetermined score or by being the player to
score the most points within a given period of time.
OPERACION DE DEL MARCADOR ELECTRONICO:
1. Enchufar el adaptador en la caja de conexion y presionar el interruptor
MOTOR/ON/OFF (motor/encender/apagar) y entonces apretar el boton
"SCORER/ON/OFF" (marcador/encender/apagar). Usted oira la mOsica
y las marcas 0-9 autom&ticamente mostraran sobre el marcador.
2. Hay un periodo predeterminado de 15 minutos que pueden ser ajustados
a 10 minutos, 5 minutos, o el modo de "ningOn limite de tiempo" pot
presionando el boton "TIME SELECT" (escoger el tiempo).
3. Presionar el boton "START/RESET" (comenzar/reponer) para comenzar
el juego.
4. Despues de su juego, mientras que la mesa es todavia conectada,
presionar el boton "START/RESET" (comenzar/reponer) y el marcador
repondra todos las marcas al 0. El tiempo Io dira el periodo de tiempo
antes seleccionado.
5. Una vez que una cuenta alcanza 99 puntos, la siguiente cuenta mostrara
"00" sobre el marcador. Los sonidos de ovaciones activaran. El tiempo
volvera al modo del t31timo juego, la cuenta no se cambiar&, y el juego
terminara. Ningunos puntos adicionales entonces seran contados para
cualquier disco que entra en la caja de gol.
6. NOTA: el marcador cerrara automaticamente despues de 5 minutos.
Si no esta empleado, sin embargo, sugerimos apagar el poder cuando
el juego no sera usado durante un periodo de tiempo. Sin embargo, no
apagar el poder jugando en el modo de "ningQn limite de tiempo".
REGLAS DE JUEGO DE HOCKEY:
1) Este juego esta disehado para que jugadores jueguen frente a frente,
uno en cada extremo de la mesa.
2) Lancen una moneda al aire para determinar quien empezara.
3) El juego comienza cuando se coloca el tejo en el area de juego. Los
jugadores deben pegarle al tejo con las aletas y tratar de marcar un gol
en el arco del oponente.
4) Se anota un punto cada vez que se introduzca el tejo en el arco del
oponente.
5) Quien gana el juego: Gana el primer jugador que alcance un nQmero
predeterminado de puntos o el jugador que marque mas puntos durante
un periodo determinado.
SCHEMATIC DIAGRAM
THERMALPROTECTOR CONNECTOR
PROTECTORTERMAL CONECTOR
ON/OFFSWITCH_
CONMUTADOR
SP%2POWER CORD
CORDON SP%2
AC 180-125V
CAde 100-I25V
POLARIZED PLUG
ENCHUFE POLARIZADO
ELECTRIC RATING : AC 100-125 V, 60 HZ, 129 W, 2800 RPM
GRADO ELECTRtCO : CA 100-125 V, 60 HZ, t29 W, 2800 RPM
@2009 Sportcraft, Ltd.
1-1-34-933 ES P. 12 www.sportcraft.com

I English I
LIMITED WARRANTY
Limited Warranty
Sportcraft, Ltd. (the "Company") warrants the Product to be free from defects in workmanship
and materials under normal use and conditions FOR A PERIOD OF 90 DAYS FROM TH E DATE
OF ORIGINAL PURCHASE in the United States and Canada.
Product Registration Card
The Product Registration Card must be filled out completely and mailed to the Company at the
address printed on the card within 10 days from the date of your purchase of the Product•
What Is Covered
Except as provided below, this Limited Warranty covers all defects inmaterials and workmanship.
This Limited Warranty is void if the Product is:
Damaged through improper usage, negligence, misuse, abuse, transportation damage,
acts of nature, or accident (including failure to follow the instructions supplied with the
Product)
Used in commercial applications or rentals
Modified or repaired by anyone not authorized by the Company.
What Is Not Covered
This Limited Warranty does not cover expendable items such as batteries, light bulbs, fuses,
accessories, cosmetic parts, tools and other items that wear out due to normal usage•
What The Company Will Pay For
if during the Limited Warranty period, any part or component of the Product is found by the
Company to be defective, the Company will, at itsoption, repair the Product, replace the Product
with a new Product (either the same or an equivalent model) or cause the original retailer of the
Product to exchange the Product with a new Product (either the same or an equivalent model)
or refund the original purchase price of the Product, without charge for labor or parts. The
Company's obligation to repair, replace or exchange the Product, however, shall be limited to
the amount of the original purchase price of the Product.
How To Obtain Warranty Service
in order to enforce your rights under this Limited Warranty, you must follow these procedures:
You must have completed and mailed the Product Registration Card to the Company within
10 days of purchase of the Product•
You must include THE ORIGINAL COPY OF YOUR SALES RECEIPT•
You must call the Company's Consumer Service Department at 1-800-526-0244 from 9:00
A.M. to 5:00 P.M. (EST) to notify the Company of the nature of the problem and to obtain
instructions for how to obtain servicing• At the Company's option, the Product may be
serviced at your location or at a location designated by the Company•
If you are instructed to return the Product to the Company for servicing, you are responsible
for shipping the Product, at your expense, to the address designated by the Company in
packaging that will protect against further damage•
You must also include your name, address, daytime telephone number, model number of
the Product and a description of the problem•
The Company will pay for any shipping charges to return the repaired or replaced Product
to you.
THIS LIMITED WARRANTY IS AVAILABLE ONLY TO THE ORIGINAL PURCHASER OF THE
PRODUCT AND IS VALID IN THE UNITED STATES AND CANADA ONLY.
THE COMPANY'S LIABILITY IS LIMITED TO THE REPAIR OR REPLACEMENT, AT ITS
OPTION, OF ANY DEFECTIVE PRODUCT AND SHALL NOT INCLUDE ANY LIABILITY FOR
INDIRECT, iNCIDENTAL OR CONSEQUENTIAL DAMAGES OF ANY KIND.
THIS WARRANTY IS EXPRESSLY MADE IN LiEU OF ALL OTHER WARRANTIES,
EXPRESSED OR IMPLIED.
SOME STATES DO NOT ALLOW LIMITATIONS ON HOW LONG AN IMPLIED WARRANTY
LASTS OR DO NOT ALLOW FOR EXCLUSION OF INCIDENTAL OR CONSEQUENTIAL
DAMAGES. TO THAT EXTENT, THE ABOVE LIMITATIONS MAY NOT APPLY TO YOU.
This Limited Warranty gives you specific legal rights, but you may also have other rights that
vary from state to state•
if you have questions regarding this Limited Warranty or the operation of the Product, you may
call or write us:
Consumer Service Department
313 Waterloo Valley Rd.
Budd Lake, NJ 07828
1-800-526-0244
www.sportcraft.com
0408 TG-CA
**NOTE: Please save your original proof of purchase as it is needed should you
require warranty service,
Come Explore our Wabsite! (www.sportcraft.com) Join our mailing list to 1
receive more information on product updates and event announcements.
1
You can even order replacement parts, and learn more about our company.
1-1-34-933 ES
Budd Lake, NJ 07828
www.sportcraft.com
Printedin China
P. 13
I Espadol ]
GARANTIA LIMITADA
Garantia limitada
Sportcraft, Ltd. (la "Compadia") garantiza que este producto no tiene defectos de fabficacion ni
materiales bajo condiciones y uso normales POR UN PERIODO DE 90 DiAS A PARTIR DE LA
FECHA DE COMPRA ORIGINAL, en Estados Unidos y Canad&
Tarjeta de registro del producto
La tarjeta de registro det producto se debe Ilenar por complete y enviar por correo a la Compadia
a la direccidn impreso sobre la tarjeta dentro de I0 dias a partir de la fecha de compra del
Producto.
La cobertura
Esta garantia cubre todos los defectos de fabricacidn y materiales, excepto Io que se indica a
continuaci6n. Esta garantia Iimitada no tiene validez si el producto:
• Se daBa pot uso inapropiado, negligencia, mal uso, abuso, dada de transporte, fen0menos
naturaies o accidentes (induyendo el no seguir las instrucciones que se proporcionan con
e} producto).
• Se usa en aplicaciones comerciales o se alquila
•Alguna persona no autorizada por la Compadia Io modifica o repara.
Lo qua la garantia no cubre
La garantia ]imitada no cubre articulos perecederos tales como baterias, focos, fusibies,
accesorios, partes cosmeticas, herramientas, y otros articulos que se gastan con el uso normal
Pagos de la Compadia
Si durante el periodo de la Garantia Limitada, la Compadia determina que alguna pieza o
componente del producto tiene defectos, a su discrecidn, Ioreparara o reemplazar_t el Producto
con un nuevo Producto (ya sea con un modelo similar o equNalente) o causa la tienda original
del Producto para cambiar el Producto con un Producto nuevo (sea con un modelo similar o
aquNalente) o reembolsa el precio de compra original del Producto, sin cargos por }a mano de
obra o las piezas. La obligacion de la CompaBia de reparar, sustituir, o reemplazar el Producto,
sin embargo, sera Iimitada con el precio de compra original del Producto.
Como obtener servicios de garantia
Para hacer cumpiir sus derechos de esta Garantia Limitada, debe seguir estos procedimientos:
•Debe haber completado y ha enviado la tarjeta de registro de Producto a {a Compadia dentro
de 10 dias de compra del Producto.
• Debe incluir LA COPIA ORIGINAL DE SU RECIBO DE LAS VENTAS.
• Debe }lamar al departamento de Servicio al Cliente de la Compa_ia al 1-800-526-0244 entre
las 9:00 A.M. y 5:00 RM. (hora del este) para notificar la Compa_ia la natura del problema y
para obtener los instrucciones como adquirir la manutenci6n. En la opcidn de }aCompadia,
el Producto puede ser revisado en su sitio o en un sitio designado pot la Compafiia.
•Si esta instruido a devolver e} Producto a laCompadia para la manutencidn, esta responsable
para el envio del Producto, a su gasto, a la Compadia ala direccidn situada debajo, en un
embalaje que protegara contra el remoto dado.
•Asimismo, debe induir su nombre, direccion, nlJmero de telefono durante el dia, el mode}o del
producto y una descripcion del problema.
•La Compadia pagara cualquier gasto de envio para enviarle de regreso el producto reparado
o reempiazado.
ESTA GARANTJA LIMtTADA ES DISPONIBLE SOLO AL COMPRADOR ORIGINAL DEL
PRODUCTO Y ES VALIDA SOLAMENTE EN ESTADOS UNIDOS Y CANADA,
LA RESPONSABtLIDAD DE LA COMPAI_JA SE LIMITA A REPARAR O REEMPLAZAR, A SU
DISCREDION, CUALQUIER PRODUCTO DEFECTUOSOYNOINCLUIRA RESPONSABILIDAD
POR DAi_OS INDIRECTOS, INCIDENTALES O CONSECUENTES DE NINGUNA CLASE.
ESTA GARANTiA OTORGADA SUPERSEDE A CUALQUtER OTRA GARANTiA, EXPRESO
O IMPLJCITO.
ALGUNOS ESTADOS NO PERMtTEN LIMITACIONES EN LA DURACION DE GARANTJAS
IMPLJCITAS O NO PERMtTEN LA EXCLUSION DE DA_IOS CONSEDUENTES O
INCIDENTALES. EN ESE CASO, LAS LIMITACtONES MENCIONADAS ARRBA NO SE
APLICAN A USTED.
Esta garantia Iimitada le otorga derechos legales especificos, pero usted tambien tiene otros
derechos que varian de un estado a otto.
Si tiene alguna pregunta con respecto a esta Garantia Limitada o la operacion del producto,
usted puede Ilamar o escfibir a:
Sporteraft, Ltd.
Consumer Service Department
313 Waterloo Valley Rd.
Budd Lake, NJ 07828
1-800-526-0244
www.sportcraft.com
0408 TG
**NOTA: Pot favor guarde su prueba de compra original porque es necesario si
requiere el servicio de la garantia.
1
iVenga y explore nuestro pagina de Internet! (wwwsportcraft.com) ]nscribaseen nuestra lista /
de correopara recibir mas informaci6nacercade productos actualizadosy anuncios de eventos.
1
Ademas, se puede pedirpiezas de repuesto,informaci6npara la compra de piezasadicionales y
obtenermas informaci6nacercade nuestracompadia.
Budd Lake, NJ 07828
www.sportcraft.eom
Impreso en China @2009 Sportcraft, Ltd.
www.sportcraft.com

X
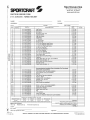
PARTS RE-ORDER FORM
# 1-1-34-933 ES - TURBO HOCKEY
Sportcessories
313 Waterloo Valley Road
Budd Lake, NJ 07828
www.sportcraft.com
I
I--
NAME: DATE:
ADDRESS: PHONE:
CITY:
REF QUANTITY PART #
ORDERED
1 9-3-34-933ES01
2 9-3-34-933ES02
3 ' 9-3-34-933ES03
4 9-3-34-933ES04
5 ' 9-3-34-933ES05
6 9-3-34-933ES06
7 ' 9-3-34-933ES07
8 9-3-34-933ES08
9 " 9-3-34-711SS07
10 9-3-34-933ES10
11 9-3-34-510SS07
12 9-3-32-531SS17
13 ' 9-3-36-559SS23
14 9-3-34-771SS14
15 ' 9-3-34-503SS23
16 9-3-36-039SS44
17 ' 9-3-32-531SS15
18 9-3-34-503SS07
19 9-3-34-510SS27
20 9-3-34-933ES20
21 ' 9-3-34-771SS41
22 9-3-34-933ES22
23 9-3-34-933ES23
24 9-3-34-730SS33
25 ' 9-3-34-933ES25
26 9-3-34-933ES26
STATE: ZIP CODE:
UNIT TOTAL
DESCRIPTION PRICE AMOUNT
Leg Brace " 12.00 ea '
Side Apron 12.00 ea
End Apron 12.00 ea '
End Apron with Hole 12.00 ea
Leg End Panel " 10.00 ea '
Leg Side Brace 8.00 ea
Leg Board 4.00 ea '
"U" Bracket 2.00 ea
5" Leg Leveler " 5.00 ea '
Apron Corner 6.00 ea
4x 15 mm Washer Head Screw 0.75ea '
4 x 12 mm Washer Head Screw 0.75 ea
4 x 44.5 mm Flat Head Screw 0.75 ea '
8 x 38 mm Hex Bolt 0.75 ea
6.5x32mm HexBolt _ 0.75ea '
8 x 23 mm Washer 0.75 ea
6.5 x 15 mm Washer " 0.75 ea '
6.5 x 18 mm Wing Nut Bolt 0.75 ea
Puck Return Box ' 0.75 ea '
Switch Box And Control Plug 18.00 ea
Fastener 2.00 ea '
Scorer Base Box with Wire (pre-installed) 15.00 ea
Table Tennis Surface - B 10.00 ea
Blower and Wire (pre-installed) 20.00 ea
Wooden Dowel " 1.00 ea '
Table Tennis Surface - A 15.00 ea
• " Accessories/pre-installed Parts (Available For Purchase) " "
A1 9-3-34-510SS19 Name Plate (pre-installed) 3.00 ea
A2 9-3-34-510SS26 Puck Return with Tray (pre-installed) " 3.00 ea '
A3 9-3-34-933ES28 Puck Catcher Wire (pre-installed) 3.00 ea
A4 9-3-32-531SS27 Wrench = 3.00 ea '
A5 9-3-34-933ES29 Top Corner Cap (pre-installed) 2.00 ea
A6 9-3-34-933ES30 Pusher' Black = 3.00 ea '
A7 9-3-34-933ES31 Hockey Puck - 22 g (Black) 5.00 ea
A8 9-3-35-730SS27 Adapter-7.5V, 350 mA ' 15.00 ea '
A9 9-3-34-933ES32 Pusher Felt 1.00 ea
A10 9-3-34-510SS28 Goal Cover (pre-installed) " 5.00 ea '
1009 - M
1-1-34-933 ES
A12 9-3-34-933ES34
A13 9-3-34-933ES35
A14 9-3-36-559SS27
A15 9-3-34-933ES36
A16 9-3-34-9355537
A17 9-3-36-933E$30
A18 9-3-36-039SS37
Scorer - With 47" Wire (pre-installed) ' 10.00
Timer with Wire (pre-installed) 10.00
I
Table Tennis Paddle 6.00
Table Tennis Net Post 8.00
Net ' 6.00
1.5" Cushion 2.00
Table Tennis Ball " 2.00
ea
ea
ea
ea
ea
ea
A19 9-3-34-933ES27 3 x 25 mm Washer Head Screw (pre-installed) 0.75 ea
Shipping and Handling Charges* (in US $)
ShipmentValue $0-20 $21-40 $41-60 $61and over
Charge $7.00 $9.00 $11.O0 $15.00
*=Prices valid for Continental USand Canada only,all other please call for quote.
Method of Payment:
Visa [] Mastercard [] American Express []
Card #:
Exp. Date:
Name (as printed on card):
Subtotal:
(Residents Add State Sales Tax)
NJ (7%)and IL (6.25%)and CA(7.75%):
Shipping and Handling Charges:
TOTAL:
Signature:
**NOTE: PRICES IN US DOLLARS AND SUBJECT TO CHANGE WITHOUT NOTICE.
@2009 Sportcraft, Ltd.
www.sportcraft.com

FORMULARIO DE PEDIDO DE PIEZAS
No. 1-1-34-933 ES - MESA DE HOCKEY
NOBMRE:
DIRECCION:
CIUDAD: ESTADO
Sportcessories
313 Waterloo Valley Road
Budd Lake, NJ 07828
www.sportcraft.com
FECHA:
TELE_FONO:
CODIGO POSTAL:
X
REF CANTIDAD NO. DE PIEZAS
PEDIDAS
1 9-3-34-933ES01
2 9-3-34-933ES02
3 ' 9-3-34-933ES03
4 9-3-34-933ES04
5 9-3-34-933ES05
6 9-3-34-933ES06
7 ' 9-3-34-933ES07
8 9-3-34-933ES08
9 ' 9-3-34-711SS07
10 9-3-34-933ES10
11 9-3-34-5!0S807
12 9-3-32-531SS17
DESCRIPCION PRECtOPOR CANTIDAD
UNIDAD TOTAL
Soporte de pierna 12;00 '
Tabla lateral 12,00
Tabla de extremo ' 12100
Tabla de extremo con apertura 12,00
Panel de pierna ' 10,00
Soporte de piema lateral 8,00
Tablero de pierna ' 4,00 •
Anaquel en la forma de "U" 2,00
Nivelador de la pierna 5" ' 5,00 '
Esquina de tabla 6,00
Tornillo con cabeza de arandela de 4 x 15 mm ' 0;75 '
Tornillo con cabeza de arandela de 4 x 12 mm 0,75
13 • 9-3-36-559SS23
14 9-3-34-771S$14
15 ' 9-3-34-503$S23
16 9-3-36-039SS44
17 ' 9-3-32-5315515
18 9-3-34-503SS07
19 " 9-3-34-5!0S$27
20 9-3-34-9335$20
21 ' 9-3-34-77!$$41
22 9-3-,34-9335522
Tornillo con cabeza plana de 4 x 44 5 mm ' 0175 '
Perno hexa,qonal de 8 x 38 mm 0,75
Perno hexaqonal de 6,5 x 32 mm • 0,75 '
Arandela de 8 x 23 mm 0,75
Arandela de 6,5 x 15 mm ' 0,75 '
Perno de mariposa de 6,5 x 18 mm 0,75
Caia para la devoluci6n del disco ' 0,75 •
Caia de conmutador y enchufe de control 18,00
Sujetador ' 2,00 •
Base de marcador con cable (pre-instalado) 20,00
23 ! 9-3-34-933ES23 Superficie de tenis de mesa - B 10,00
24 ! 9-`3-`34-7`30$$`3,3 Soplador de aire (pre-instalado) 15,00
25 I 9-3'34'933ES25 Clavija de madera 1,00
26 ! 9-,3-34-933ES26 . Superficie de tenis de mesa -A I 15,00 I
A1 " 9-3-34-5!0SS19
A2 9-`3-:34-510SS26
A3 ' 9-3-34-933ES28
A4 9-3-32-531SS27
A5 ' 9-3-34-933E$29
A6 9-3-34-933ES30
A7 9-.3-34-933F£31
A8 9-,3-35-730SS27
A9 " 9-3-34-933ES32
A10 9-3-34-510SS28
Accesorios/Piezas preinstaladas (disponible para comprad
Placa de nombre pre-instalada) ' 3,00 '
Caja para la devolucion del disco y disparador (pre-instalada) 3,00
Cable de la unidad disDarador ([re-instalado/ ' 3,00 "
Llave inglesa 3,00
Tapa de esquina de tablero (pre-instalado) ' 2,00 '
Empujador 3,00
Disco redondo - 22 a ' 5,00 '
Adaptador de CA 7,5V, 350 mA 15,00
Fieltro para el empujador de hockey ' 1,00 '
Cubierta del arco de aol adiustable _Dre-instalada_ 5,00
A12
A13
A14
A15
A16
A17
A18
A19
9-`3-,34-933ES34 Marcador- con cable 47"(pre-instalad0) 10,00
9-3-34-933ES35 Marcador- reloi (bre-instalado/ ' 10,00 '
9-3-36-559SS27 Pala de tenis de mesa 6,00
9-3-34-933F£36 " Jueao de uoste de tenis de mesa ' 8,00 "
9-3-34-933ES37 Red 6,00
9-3-36-933ES30 C0iin de 1.5" ' 2,00 "
9-3-36-039SS37 Pelota de tenis de mesa 2,00
9-3-34-933ES27 Tornillo Con cabeza de arandela de 4 x 15 mm tbre-instalado/ ' 0,75
Cargos pot envio* (en SUS)
Valor de envio $0-20 $21-40 $41-60 superior a $61
Cargo $7.00 $9.00 $11.00 $15.00
*=preciosvalidosparalos EE.UUcontinentalesyCanad_ts61o,en otraparte pot favorpideunacotizacion.
M_todo de pago:
Visa [] Mastercard [] American Express []
NOmero de tarjeta:
Fecha de vencimiento:
Subtotal
Residentes de NJ (7%), de IL (6,25%) y de CA
(7,75%) adadan de impuesto sobre la venta:
Cargos por envio:
TOTAL:
Nombre (indicado sobre la tarjeta):
Firma:
1009 - M **NOTA: LOS PRECIOS ESTAN EN DOLARES AMERICANOS Y PUEDEN CAMBIAR SIN AVISO @2009 Sportcraft, Ltd.
1-1-34-933 ES www.sportcraft.com
-
 1
1
-
 2
2
-
 3
3
-
 4
4
-
 5
5
-
 6
6
-
 7
7
-
 8
8
-
 9
9
-
 10
10
-
 11
11
-
 12
12
-
 13
13
-
 14
14
-
 15
15
-
 16
16


Sportcraft 1-1-34-933ES Guía de instalación
- Categoría
- Accesorios de la consola de juegos
- Tipo
- Guía de instalación
En otros idiomas
Documentos relacionados
-
Sportcraft 1-1-34-832SS Guía de instalación
-
-
-
Sportcraft 1-1-36-933FES Guía de instalación
-
-
-
-
-
Sportcraft 24042 HD Assembly Instructions And Rules
-

