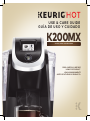
Keurig Hot K200MX Manual de usuario
- Categoría
- Pequeños electrodomésticos de cocina
- Tipo
- Manual de usuario

USE & CARE GUIDE
GUÍA DE USO Y CUIDADO
READ CAREFULLY BEFORE
USING THE PRODUCT.
LEA CUIDADOSAMENTE
ANTES DE UTILIZAR EL PRODUCTO.
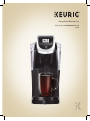
SINGLE SERVE COFFEE MAKER
K200MX

When using electrical appliances, basic
safety precautions should be followed,
including the following:
1. Read all instructions before using.
2. Do not touch hot surfaces. Use
handles and knobs when available.
3. This appliance must be properly
installed and located in accordance
with these instructions before
it is used.
4. The use of accessory attachments
not recommended by the appliance
manufacturer may result in fire,
electrical shock, or injury to persons.
5. Do not place on or near a hot
gas or electric burner, or in a
heated oven.
6. Do not use outdoors.
7. To protect against fire, electric
shock, and injury do not immerse
cords, plugs, or the appliance in
water or any other liquid.
8. Do not fill the Water Reservoir
above the MAX FILL line.
9. Use only water in this appliance!
Do not put any other liquids or
foods in the Water Reservoir
except as instructed in the cleaning
instructions in this guide.
10. Turn off and unplug the brewer
before cleaning or maintenance.
Allow to cool before putting on
or taking off parts and before
cleaning the appliance.
11. For best operation, plug the
appliance into its own electrical
outlet on a dedicated circuit to
prevent flickering of lights, blowing
of fuses, or tripping a circuit
breaker.
12. Do not operate any appliance with
a damaged Power Cord or plug or
after the appliance malfunctions
or is damaged in any manner.
Contact Keurig Customer Service
to report any malfunction of or
damage to the brewer. Mexico City
and the metropolitan area:
58 13 88 85. Interior without cost:
01 800 97 618 00.
13. Do not let the Power Cord hang
over the edge of the table or
counter, or touch hot surfaces.
14. To disconnect, press the Power
Button on the brewer to “OFF”
status and then remove the plug
from the wall outlet.
15. Close supervision is necessary
when any appliance is used by
or near children.
16. Do not lift the brewer handle while
brewing is in progress.
17. Always keep the Water Reservoir
Lid on the Water Reservoir unless
you are refilling it.
18. This appliance is equipped with a
Power Cord having a grounding
wire with a grounding plug.
The appliance must be grounded
using a 3-hole properly grounded
outlet. In the event of an electrical
short circuit, grounding reduces
the risk of electrical shock.
IMPORTANT SAFEGUARDS

19. If the outlet is a standard 2-prong
wall outlet, it is your personal
responsibility and obligation to
have it replaced with a properly
grounded 3-prong wall outlet.
20. Do not, under any circumstances,
cut or remove the third (ground)
prong from the Power Cord or use
an adapter.
21. Consult a qualified electrician if
the grounding instructions are not
completely understood, or
if doubt exists as to whether the
appliance is properly grounded.
22. Do not use the appliance for other
than its intended use.
23. Remove the shipping disk
before brewing.
24. This appliance is not intended
to be used by people (including
children) whose physical, sensory
or mental capabilities are different
or reduced, or who lack experience
or knowledge, unless such persons
receive supervision or training for
the operation of the appliance.
The person is responsible for
their safety.
25. Children must be monitored to
ensure they do not use the devices
as toy.
26. If the power supply cord is
damaged , it must be replaced by
the manufacturer or authorized
personnel qualified in order to
avoid a hazard service agent.
WARNING TO USERS
AND PARENTS:
1. DO NOT permit children to use
the brewer unless there is adult
supervision. Brewer dispenses very
hot water.
2. SPECIAL NOTICE FOR
HOT COCOA/OTHER USERS:
IMMEDIATELY AFTER USING
A HOT COCOA/OTHER POD,
RUN A HOT WATER BREW
CYCLE without a pod to avoid
the possibility of clogging the exit
needle. DO NOT assume the next
user will do this.
SAVE THESE
INSTRUCTIONS.
WARNING
!
RISK OF FIRE OR
ELECTRIC SHOCK
DO NOT OPEN
WARNING: TO REDUCE THE RISK OF
FIRE OR ELECTRIC SHOCK, DO NOT
REMOVE THE BOTTOM COVER. NO USER
SERVICEABLE PARTS ARE INSIDE. REPAIR
SHOULD BE DONE BY AUTHORIZED
SERVICE PERSONNEL ONLY.

CAUTION: There are three sharp
needles that puncture pods, two
above the Pod Holder and the
other in the bottom of the Pod
Holder. To avoid risk of injury, do
not put your fingers in the Pod
Holder Assembly.
CAUTION: There is extremely hot
water in the Pod Holder during
the brew process. To avoid risk of
injury, do not lift the Handle or
open the Pod Holder Assembly
during the brewing process.
CAUTION: Do not fill above the
MAX FILL line. If you fill the Water
Reservoir above this point, you
may occasionally get a larger
brew than you selected for your
first brew of the day. If you prefer
to have your Water Reservoir
filled to the top, we recommend
you use a large mug for your first
brew of the day to avoid any risk
of overflow.
CAUTION: Please always keep the
brewer in its upright position to
avoid potential injury and/or
damage to your brewer.
CAUTION: Very hot liquid. Adult
supervision required.
SHORT CORD INSTRUCTIONS:
A short power-supply cord is
provided to reduce the risk of
becoming entangled in or tripping
over a longer cord. Longer detachable
power-supply cords or extension cords
are available and may be used if care
is exercised in their use. If an extension
cord is used,
(1) the marked electrical rating of the
cord set or extension cord should be at
least as great as the electrical rating
of the appliance;
(2) the cord should be arranged
so that it will not drape over the
countertop or tabletop where it
can be pulled on by children or tripped
over unintentionally; and
(3) the extension cord must include
a 3-prong grounding plug.
THIS PRODUCT IS FOR HOUSEHOLD
USE ONLY.
SOME FEATURES AND PRODUCTS
NOT AVAILABLE IN ALL COUNTRIES.
PLEASE CHECK WITH YOUR LOCAL
DISTRIBUTOR FOR DETAILS.

USER GUIDE TABLE OF CONTENTS
KEURIG
®
BREWING SYSTEM | K200MX SERIES
Features 6
Touch-Screen Controls 7
Quick Tips & To Dos 7
1 Let’s Get Brewing 8
Setup 9
Cleansing Brew 10
Brew Your First K-Cup
®
Pod 11
Dispensing Hot Water 12
Settings Menu 13
2 Tips and Maintenance 15
Caring For Your Brewer 15
Stopping the Brew Process 23
Adding Water 23
Water FIlter Alert 24
Brewer Alerts 24
3 Troubleshooting 25
4 Warranty 27
Para istructions españolas , por favor refiérase a la página 28

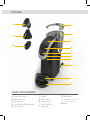
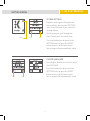
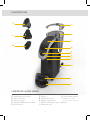
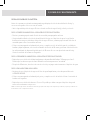
6
K
L
M
F
G
D
E
C
B
A
I
J
H
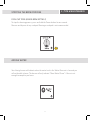
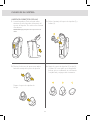
FEATURES
K200MX SERIES BREWER
A. Water Reservoir Lid
B. Water Reservoir
C. Top Housing
D. Touch Display/Power Button
E. Brew Button
F. Handle
G. Brew Head
H. Power Cord
I. Drip Tray Plate
J. Drip Tray
K. Pod Holder
L. Housing (K and L are the
Pod Holder Assembly)
M. Base

7
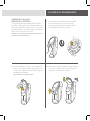
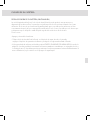
C
D
B
A
B
A
TOUCH DISPLAY CONTROLS
A. STRONG
(only available for coffee)
B. HOT COCOA/OTHER
(for select non-coffee
beverages)
C. Brew Size
D. Power Button
HOME SCREEN
A. Settings Button
B. Power Button
SCREEN FOR
KCUP
®
PODS
QUICK TIPS & TO DOS
QUICK TIPS
Be sure to use Keurig® brand pods: Your Keurig
®
brewer is able
to brew various varieties of coffee, tea, and hot cocoa, plus seasonal and
café-style beverages.
TO DO
Register your brewer at Keurig.com.mx. We’ll send you a special “thank you”
when you do. Subject to availability and assortment/count will vary.

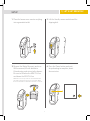
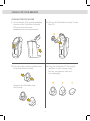
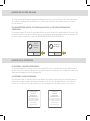
8
1
|
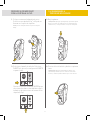
LET’S GET BREWING!

SETUP
1. Place the brewer on a counter and plug
into a grounded outlet.
3. Remove the Water Reservoir and rinse.
While removed, fill with bottled or
filtered water, and return to the brewer.
Be sure to fill below the MAX FILL line
and above the MIN FILL line.
NOTE: The reservoir only needs to be removed and filled for
the initial set up. After the first fill, you can refill the Water
Reservoir either while it is attached to the brewer or removed.
2. Lift the Handle, remove and discard the
shipping disk.
4. Press the Power button and wait
for preheating to complete, about
three minutes.
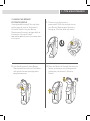
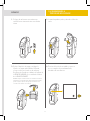
9
1
|
LET’S GET BREWING!

10
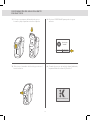
CLEANSING BREW
1. To begin a cleansing brew, place a
355 ml (12oz) mug on the Drip Tray.
3. Press CONTINUE to dispense hot water.
Select a 237 ml ( 8 oz) Brew Size and
press the Brew button.
2. Lift and lower the Handle. Do not place a
Keurig® brand pod in the Pod Holder.
4. You are now ready to use your brewer!

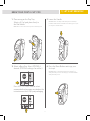
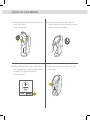
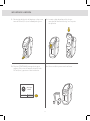
11
1
|
LET’S GET BREWING!
BREW YOUR FIRST KCUP
®
POD
1. Place a mug on the Drip Tray.
Select a K-Cup
®
pod, place firmly in
the Pod Holder.
NOTE: Do not remove the foil lid or puncture the K-Cup
®
pod.
3. Select a Brew Size. Select STRONG if
desired. (STRONG setting is for coffee.)
Press HOT COCOA/OTHER for select
cocoa and other beverages as noted on the
instructions on the K-Cup® pod packaging.
2. Lower the Handle.
CAUTION: There are sharp needles that puncture the K-Cup
®
pod above and below the Pod Holder. To avoid injury, do not put
your fingers in the Pod Holder.
4. Press the Brew Button and enjoy your
first cup!
CAUTION: There is extremely hot water in the K-Cup
®
pod
during the brew process. To avoid injury, do not lift the Handle
during the brew process.

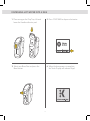
12
DISPENSING HOT WATER INTO A MUG
1. Place a mug on the Drip Tray. Lift and
lower the Handle without a pod.
2. Press CONTINUE to dispense hot water.
3. Select your Brew Size and press the
Brew button.
4. When the brew process is complete,
the Touch Display will indicate Enjoy!

13
1
|
LET’S GET BREWING!
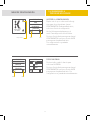
ACCESS SETTINGS
Explore everything your Keurig
®
brewer
has to offer by accessing the SETTINGS
menu. From the home screen, select the
Settings button.
Use the arrows to scroll through the
menu. To exit, press the back button.
Press the back button to return to the
SETTINGS menu or press the HOME
button to return to the home screen.
Your settings will be automatically saved.
CHOOSE LANGUAGE
Press English, Spanish, or French to select
the LANGUAGE.
Press the back button to return to the
SETTINGS menu or press the HOME
button to return to the home screen.
Your settings will be automatically saved.
SETTINGS MENU
backsettings
back
home
home

14
SETTINGS MENU
ENABLE WATER FILTER REMINDER
If you are using a Keurig
®
Water Filter,
select ENABLE to activate the WATER
FILTER REMINDER notices.
Press the back button to return to the
SETTINGS menu or press the HOME
button to return to the home screen.
Your settings will be automatically saved.
Refer to page 24 for more information.
ENABLE HIGH ALTITUDE
To ensure your brewer works properly at
higher altitudes 1524m ENABLE the HIGH
ALTITUDE mode.
Press the back button to return to the
SETTINGS menu or press the HOME
button to return to the home screen.
Your settings will be automatically saved.
HIGH ALTITUDE IS THE RECOMMENDED
SETTING.
back home
back home

15
2
|
TIPS & MAINTENANCE
CLEANING THE BREWER EXTERIOR
Keep your Keurig
®
brewer looking its best by cleaning the
exterior from time to time. Just clean with a damp, soapy,
lint-free, non-abrasive cloth. Never immerse
the brewer in water or other liquids. ALWAYS DISCONNECT
BREWER FROM POWER SUPPLY BEFORE ANY CLEANING
OPERATION.
CLEANING THE DRIP TRAY
The Drip Tray can accumulate up to 8 ounces of overflow.
The Drip Tray and the Drip Tray Plate should occasionally be
rinsed clean. To remove the Drip Tray, simply slide it toward
you, keeping it level at all times to avoid spilling. Clean with
a damp, soapy, lint-free, non-abrasive cloth.
CLEANING THE WATER RESERVOIR AND THE WATER
RESERVOIR LID
Clean the Water Reservoir and the Water Reservoir Lid
with a damp, soapy, lint-free, non-abrasive cloth and
rinse thoroughly.
Do not dry the inside of the Water Reservoir with a cloth
as lint may remain. Be sure to rinse the Water Reservoir
thoroughly after cleaning to ensure that no cleaning
solutions remain as they may contaminate the water
supply in the brewer. DO NOT PLACE THESE ITEMS
IN THE DISHWASHER.
CARING FOR YOUR BREWER

16
CARING FOR YOUR BREWER
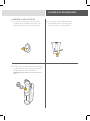
CLEANING THE POD HOLDER
1. Lift the Handle. Push up while grabbing
the sides of the Pod Holder Assembly.
Pull away from the brewer.
CAUTION: Sharp needles. Do not put fingers in chamber.
2. Pull out the Pod Holder Assembly (1) and
Base (2).
4. Clean the Pod Holder (1), Housing (2),
and Base (3) with a damp, soapy,
lint-free, non-abrasive cloth and
rinse thoroughly.
3. Press the release buttons on both sides
of the Pod Holder Assembly.
Separate the Pod Holder from
the Housing.

17
2
|
TIPS & MAINTENANCE
CLEANING THE BREWER
ENTRANCE NEEDLE
Having trouble brewing? You may have
coffee grounds stuck in the brewer’s
Entrance Needle. Use your Brewer
Maintenance Accessory and get back to
brewing in a few quick steps!
NOTE: The Brewer Maintenance Accessory comes with the brewer.
It is an orange tool.
1. Please ensure the brewer is
powered off. With the printed text on
your Brewer Maintenance Accessory
facing up, fill silicon bulb with water.
3. Raise and lower the Handle five times to
loosen and remove any coffee grounds
retained in your brewer’s Entrance
Needle.
2. Lift Handle, properly place Brewer
Maintenance Accessory in Pod Holder
with printed arrows pointing down.
Warning: Avoid sharp needles.

18
CARING FOR YOUR BREWER
4. Remove Brewer Maintenance Accessory
from Pod Holder.
Warning: Avoid sharp needles.
5. Once you have removed the Brewer
Maintenance Accessory from the brewer,
power the brewer back on.
7. Brew your favorite Keurig
®
K-Cup
®
pod
and enjoy!
6. Place a 355 ml (12oz) mug on the Drip
Tray and perform a cleansing brew (refer
to page 10 for how to perform a
cleansing brew).

19
2
|
TIPS & MAINTENANCE
CLEANING THE EXIT NEEDLE
1. If a clog arises in the Exit Needle, push
the lever of the Pod Holder to reveal the
Exit Needle.
2. Use a paper clip or similar tool to
loosen the clog. Rinse thoroughly
with hot water.
3. After all the pieces are cleaned, place the
Base then the Pod Holder assembly into
the Brew Head. Lower the Handle.
CAUTION: Sharp needles. Do not put fingers in chamber.

20
Descaling is good
maintenance.
Refer to User Guide.
CARING FOR YOUR BREWER
TIME TO DESCALE THE BREWER
Depending on the mineral content of your water, calcium deposits or scale may build
up in your brewer, this is why we recommend using bottled or filtered water. Scale is
non-toxic but if left unattended can hinder brewer performance. Regularly descaling your
brewer every three to six months helps maintain the heating element, and other internal
parts that come in contact with water. Calcium deposits may build up faster, making it
necessary to descale more often.
You should promptly descale when the Touch Display indicates “Time to descale the
brewer!” However, even if this is not indicated, you should continue to descale your brewer
every three to six months.

21
2
|
TIPS & MAINTENANCE
DESCALING YOUR BREWER
Before you begin, you will need a large mug, fresh water, Keurig
®
Descaling Solution, and
access to a sink. Do not use a paper cup.
• Empty the water from the Water Reservoir. If there is a Keurig
®
Water Filter, remove and
set aside.
STEP 1: FIRST DESCALING SOLUTION RINSE
• Press and hold the Power button to power the brewer off.
• Pour the entire bottle of Keurig
®
Descaling Solution into the Water Reservoir. Then
fill the empty bottle with water and pour into the Water Reservoir. Press and hold
the Power button to turn the brewer back on.
• Place a large mug on the Drip Tray and run a cleansing brew by lifting and lowering
the Handle, selecting a 296 ml (10oz) Brew Size and pressing the Brew button. The brewer
will stop dispensing after 296 ml (10oz). Do not use a Keurig brand pod. Pour the contents
of the mug into the sink.
STEP 2: SECOND DESCALING SOLUTION RINSE
• Repeat the cleansing brew process until the Touch Display indicates “More Water Please.”
Let the brewer stand for at least 30 minutes while still on.
• After 30 minutes, discard any residual solution and rinse the Water Reservoir thoroughly.
STEP 3: FRESH WATER RINSE
• Ensure the Water Reservoir is filled with fresh water to and not beyond the MAX FILL line.
• Place a large mug on the Drip Tray and run a cleansing brew. Pour the contents of the mug
into the sink.
• Repeat the cleansing brew process at least 12 times. You may need to refill the Water
Reservoir at least one time during this process.
NOTE: If “Time to descale the brewer!” is still indicated after completing the procedure, repeat the descaling procedure above.

22
DESCALING YOUR BREWER (CONTINUED)
The cleaning action of Keurig
®
Descaling Solution may result in a foam dispensed from the
brewer. This is natural, as the solution is reacting with the scale inside. For a brewer that is
heavily scaled, the brewer may not fill properly after the descaler is added. If this occurs, you
may see only a small or no output dispensed followed by the sound of air blowing out.
If this occurs:
• Turn off and unplug the brewer.
• If there is Keurig
®
Descaling Solution in the Water Reservoir, discard the contents,
rinse the Water Reservoir thoroughly and refill with bottled or filtered water.
• Plug the brewer back in, power on, and repeat STEP 3: FRESH WATER RINSE (refer to
page 10). The brewer should begin to function normally as the solution is rinsed out and the
scale is removed. If the problem persists, allow the brewer to sit unplugged for at least 30
minutes then continue with the fresh water rinse.
CARING FOR YOUR BREWER

23
2
|
TIPS & MAINTENANCE
STOPPING THE BREW PROCESS
ADDING WATER
FOR K-CUP
®
PODS (KEURIG BREW SETTING 1)
To stop the brewing process, press and hold the Power button for one second.
Remove and dispose of any used pod. Brewing a used pod is not recommended.
Your Keurig
®
brewer will indicate when the water level in the Water Reservoir is low and you
will not be able to brew. The brewer will only indicate “More Water Please.” if there is not
enough to complete your brew.

24
WATER FILTER ALERT
BREWER ALERTS
Your brewer is designed to deliver the perfect cup time after time, year after year. To keep
it working at peak performance, your Keurig
®
brewer will let you know when it needs a little
attention.
TIME TO REPLACE THE KEURIG
®
WATER FILTER (VISIT KEURIG.COM.MX TO PURCHASE)
Your brewer will indicate “Time to replace the Water Filter.” fter every 2 months or 60 refills
of the water reservoir. Once you’ve replaced the Keurig
®
Water Filter, press YES to reset the
WATER FILTER REMINDER notices.
SORRY, BREW INTERRUPTED
Your brewer will indicate “Sorry, brew interrupted” if there is a problem brewing. To clear the
problem, slowly lift and lower the Handle, remove the pod, and attempt a cleansing brew
(see page 10). Caution hot content.
SORRY, THERE IS A PROBLEM
If the brewer indicates “Sorry, there is a problem,” coffee grounds may be stuck in the
Entrance Needle. To release the clogged Needle, use the Brewer Maintenance Accessory
included with your brewer. Refer to the instructions on page 17 or the guide included with
the Accessory.
Sorry, brew interrupted.
WATER UNDER PRESSURE.
SLOWLY OPEN HANDLE.
To reset, remove pod and lower
handle. Perform Needle Maintenance
if problem persists.
Questions?
Refer to User Guide.
Sorry, there is a problem.
WATER UNDER PRESSURE.
SLOWLY OPEN HANDLE.
To reset, remove pod and lower
handle. Perform Needle Maintenance
if problem persists.
Questions?
Refer to User Guide.

25
TROUBLESHOOTING
2
|
TIPS & MAINTENANCE
BREWER DOES NOT HAVE POWER
• Plug the brewer into an independent outlet without dimmer control.
• Check to be sure that the brewer is plugged in securely.
• Plug the brewer into a different outlet.
• Reset your home’s circuit breaker if necessary.
• Press and hold the Power button and ensure the Touch Display is illuminated.
BREWER WILL NOT BREW
• After placing a pod in the Pod Holder, make sure the Handle is lowered completely and the
Touch Display displays the appropriate brew screen. Follow the brewing instructions in
SECTION 1 (refer to pages 11 – 12).
• If the Touch Display indicates “More Water Please.” add water to the Water Reservoir or
make sure the Water Reservoir is seated properly in its Base.
• If the Touch Display indicates “More Water Please.” even after refilling, remove the Water
Reservoir and empty the water. Then thoroughly clean (refer to page 15). Fill the Water
Reservoir to the MAX FILL line, return it to the brewer and ensure it is seated properly in
its Base.
• The Pod Holder may need to be cleaned (refer to pages 16) or the brewer may need to be
descaled (refer to pages 21 – 22).
• If you have completed the above procedure two times and this situation persists, contact
Customer Service. Mexico City and the metropolitan area: 58 13 88 85.
Interior without cost: 01 800 97 618 00.

26
BREWER BREWS ONLY A PARTIAL CUP
• Clean the Pod Holder if necessary (refer to page 16).
• The Water Reservoir may have been removed during brewing. Replace the Water Reservoir
and perform a cleansing brew (refer to page 10) without a pod.
• Descale the brewer (refer to pages 21 – 22).
• If you have repeated the descale procedure on your brewer two times and it is still only
brewing a partial cup, contact Customer Service. Mexico City and the metropolitan area:
58 13 88 85. Interior without cost: 01 800 97 618 00.
THE TOUCH DISPLAY INDICATES “MORE WATER PLEASE.”
• If the water level is not low, remove the Water Reservoir and empty the water. Then
thoroughly clean (refer to page 15). Fill the Water Reservoir to the MAX FILL line, return it
to the brewer, and ensure it is seated properly in its Base.
THE TOUCH DISPLAY INDICATES “SORRY, BREW INTERRUPTED.”
OR “SORRY, THERE IS A PROBLEM.”
• These screens indicate there are coffee grounds stuck in the Entrance Needle. Use caution
and slowly lift the Handle and remove the pod from the brewer. To release the clogged
needle, use the Brewer Maintanance Accessory included with your brewer. Refer to the
instructions on page 17 or the guide included with the Accessory.
THE K-CUP
®
POD HAS A KEURIG
®
LOGO, BUT TOUCH DISPLAY INDICATES “OOPS!”
• Keurig cannot guarantee that pods without the Keurig
®
logo will work in the Keurig
®
brewer.
Some Keurig brand pods produced prior to January 2014 may not be enabled to work with
the Keurig
®
brewer. Please contact Customer Service for a solution. Mexico City and the
metropolitan area: 58 13 88 85. Interior without cost: 01 800 97 618 00.
STILL HAVING TROUBLE? VISIT KEURIG.COM.MX FOR MORE INFORMATION.
TROUBLESHOOTING

27
4
|
WARRANTY
GUARANTEE POLICY
This warranty covers all the pieces and components of the product including labor.
The importer is obligated to replace any piece or component with defects without
any additional cost. That includes the freight cost of the product derived from the
compliance of the warranty within the service network.
Imported by: PLANTAS INDUSTRIALES S.A., Rubén Darío No. 115 Piso 10, Colonia
Bosques de Chapultepec, C.P. 11580, México D.F., PIN 560523 DN1, Teléfono 52622600
TRADE MARK: Keurig
MODEL: K200MX
Name and address of the place where the warranty can be executed:
Jugos De Valle SAPI de CV
PLANTA TEPOTZOTLÁN EDO. DE MÉXICO Avenida Insurgentes No. 30, Col. Barrio de
Texcacoa, Tepotzotlán, Edo. de México. C.P. 54600
For further details call the Consumer Care Center numbers. 58 13 88 85 ó
01 800 70444 00
Duration of the warranty: 365 days from the purchase date.
What is covered by the warranty: This warranty covers the whole brewer.
Limitations or exceptions: This gaurantee will not apply in the following cases. a) When
the brewer has been used in conditions different to those considered as normal. b)
when the brewer has not been operated in accordance to the user manual provided
with the brewer, c) when the brewer has been altered or repaired by any third party
not authorized by the respective responsible national manufacturer, importer or seller.
The consumer can obtain warranty service wherever the product was sold provided
they can provide the proof of purchase showing the model details. No additional
information would be necessary except the proof of purchase and date of purchase.
Date when the product is received by the consumer: (dd/mm/yyyy) .

28
Cuando se usan aparatos eléctricos, se
deben seguir las precauciones de seguridad
básicas, que incluyen las siguientes:
1. Lea todas las instrucciones antes de
usar el producto.
2. No toque las superficies calientes. Use
asas y perillas si están disponibles.
3. Este aparato debe ser instalado y
ubicado de forma adecuada según
estas instrucciones antes de ser usado.
4. El uso de accesorios no recomendados
por el fabricante del aparato podría
causar incendios, descargas eléctricas o
lesiones a las personas.
5. No lo coloque cerca o sobre una hornilla
caliente eléctrica o a gas, tampoco lo
coloque en un horno caliente.
6. No lo use al aire libre.
7. Para protegerse del riesgo de incendios,
descargas eléctricas o lesiones a las
personas, no sumerja los cables, los
enchufes o el electrodoméstico en agua
ni en ningún otro líquido.
8. No llene el depósito de agua por encima
de la línea de LLENADO MÁXIMO.
9. ¡Use solamente agua en este
electrodoméstico! No coloque ningún
otro líquido o alimento, excepto lo
indicado en las Instrucciones de
limpieza de esta guía.
10. Apague y desenchufe la cafetera antes
de su limpieza o mantenimiento. Deje
enfriar el aparato antes de agregar o
retirar piezas y antes de limpiarlo.
11. Para un mejor funcionamiento, enchufe
el aparato en su propio tomacorriente
en un circuito exclusivo para evitar
el parpadeo de las luces, quema de
fusibles o activación del disyuntor.
12. No encienda ningún electrodoméstico
que tenga un cable o enchufe
dañado, ni luego de que el aparato
haya tenido un funcionamiento
defectuoso o haya sido dañado de
alguna manera. Comuníquese con
el Servicio de atención al cliente de
Keurig para informar cualquier falla de
funcionamiento o daño en la cafetera.
Cd. De México y área metropolitana:
58 13 88 85, Interior Sin Costo al 01
800 97 618 00
13. No deje que el cable cuelgue del borde
de una mesa o encimera, ni que entre
en contacto con superficies calientes.
14. Para desconectarlo, coloque el botón
de encendido de la cafetera en “OFF”
(“APAGADO”) y luego quite el enchufe
del tomacorriente.
15. Cuando el aparato es usado por
niños, o cerca de ellos, es necesario
supervisarlos cuidadosamente.
16. No levante la palanca de la cafetera
mientras se prepara la infusión.
17. Mantenga siempre la tapa del depósito
de agua en el depósito de agua a
menos que la esté recargando.
18. Este aparato está equipado con un
cable que tiene conexión y enchufe a
tierra. El aparato debe ser conectado
a tierra en un tomacorriente de
3agujeros correctamente conectado
a tierra. En el caso de que se produzca
un cortocircuito eléctrico, la conexión
a tierra reduce el riesgo de descarga
eléctrica.
MEDIDAS DE SEGURIDAD IMPORTANTES

29
19. Si el tomacorriente es una toma
estándar de pared para 2clavijas, es su
responsabilidad y obligación personal
hacerla reemplazar con una toma para
3clavijas correctamente conectada a
tierra.
20. Bajo ninguna circunstancia debe cortar
o quitar la tercera clavija (de conexión
a tierra) del cable de alimentación o
usar un adaptador.
21. Consulte a un electricista calificado si
las instrucciones de conexión a tierra
no le resultan totalmente claras, o
si tiene alguna duda sobre si el
aparato se ha conectado a tierra
correctamente.
22. No use este aparato para ningún fin
ajeno al que fue diseñado.
23. Retire el disco de envío antes de
preparar la infusión.
24. Este aparato es destinado para ser
usado por personas (incluyendo niños)
cuyas capacidades fisicas, sensoriales
or mentales sean diferentes o esten
reducidas, o carezcan de experiencia
o conocimiento, a menos que dichas
personas reciban una supervisión a
capacitación para el funcionamiento
del aparato por una persona
responsible de su seguridad.
25. Los niños deben supervisarse para
asegurar que no empleen los aparatos
como juguete.
26. Si el cordón de alimentación es
danado, esta debe sustituirse por el
fabricante, por su agente de servicio
autorizado o por personal calificado
con el fin de evitar un peligro.
ADVERTENCIA A USUARIOS
Y PADRES:
1. NO permita que los niños usen
la cafetera sin la supervisión de un
adulto. La cafetera contiene agua muy
caliente.
2. AVISO ESPECIAL PARA USUARIOS
DE CHOCOLATECALIENTE/OTRO:
INMEDIATAMENTE DESPUÉS
DE USAR UNA CÁPSULA CON
CHOCOLATECALIENTE/OTRO,
COMPLETE UN CICLO DE INFUSIÓN
DE AGUA CALIENTE sin una cápsula
para evitar la posibilidad de obstruir
la aguja de salida. NO dé por sentado
que el próximo usuario lo hará.
CONSERVE ESTAS
INSTRUCCIONES.
ADVERTENCIA
!
RIESGO DE INCENDIO
O DESCARGA
ELÉCTRICA
NO ABRIR
ADVERTENCIA: PARA REDUCIR EL RIESGO DE
INCENDIO O DESCARGA ELÉCTRICA, NO RETIRE
LA TAPA POSTERIOR. EL INTERIOR NO CONTIENE
PARTES QUE EL USUARIO PUEDA REPARAR.
ÚNICAMENTE EL PERSONAL AUTORIZADO DE
SERVICIO PUEDE HACER REPARACIONES.

30
PRECAUCIÓN: Hay tres agujas
puntiagudas que perforan las
cápsulas, dos por encima del soporte
de cápsulas y la otra en la parte
inferior del soporte de cápsulas. Para
evitar el riesgo de lesión, no coloque
los dedos en el montaje del soporte de
cápsulas.
PRECAUCIÓN: Hay agua
extremadamente caliente en el
soporte de cápsulas durante el
proceso de infusión. Para evitar riesgo
de lesión, no levante la palanca ni abra
el montaje del soporte de cápsulas
durante el proceso de infusión.
PRECAUCIÓN: No llene el depósito
de agua por encima de la línea de
LLENADO MÁXIMO. Si llena el
depósito de agua por encima de este
punto, es posible que ocasionalmente
obtenga una infusión más grande
que la que seleccionó para su primera
infusión del día. Si prefiere que el
depósito de agua esté lleno hasta el
punto máximo, recomendamos que
use una taza más grande para la
primera infusión del día para evitar
cualquier riesgo de derrames.
PRECAUCIÓN: Mantenga siempre
la cafetera en posición vertical para
evitar posibles lesiones y/o
daños en esta.
PRECAUCIÓN: Líquido muy caliente.
Se requiere la supervisión de un
adulto.
INDICACIONES SOBRE EL CABLE
CORTO:
Se proporciona un cable corto de
alimentación eléctrica a fin de reducir el
riesgo de enredos o tropiezos con un cable
más largo. Se encuentran disponibles
cables de alimentación eléctrica
desmontables más largos o cables de
extensión y se pueden usar si lo hace con
cuidado. Si se usa un cable de extensión,
(1) el voltaje eléctrico del cable o del cable
de extensión debe tener como mínimo la
misma clasificación eléctrica del aparato;
(2) el cable debe colocarse de manera que
no cuelgue del mostrador o mesa donde
pueda ser jalado por niños o pueda
tropezarse con él accidentalmente; y
(3) el cable de extensión debe incluir
un enchufe de 3clavijas.
ESTE PRODUCTO ES SOLO PARA USO
DOMÉSTICO.
ALGUNAS DE LAS CARACTERÍSTICAS
Y DE LOS PRODUCTOS QUE NO ESTÁN
DISPONIBLES EN TODOS LOS PAÍSES.
POR FAVOR, CONSULTE CON SU
DISTRIBUIDOR LOCAL PARA OBTENER
MÁS DETALLES

31
ÍNDICE DE LA GUÍA DEL USUARIO
CAFETERA DE LA KEURIG
®
| SERIE K200MX
Características 32
Controles de la pantalla táctil 33
Consejos rápidos y pasos a seguir 33
1 Comencemos a preparar infusiones 34
Armado 35
Infusión de limpieza 36
Prepare su primer café con la cápsula K-Cup
®
37
Dispensación de agua caliente en una taza 38
Menú de configuración 39
2 Consejos y mantenimiento 41
Cuidado de su cafetera 41
Detención del proceso de infusión 49
Adición de agua 49
Alerta del filtro de agua 50
Alertas de la cafetera 50
3 Solución de problemas 51
4 Garantía 53

32
K
L
M
F
G
D
E
C
B
A
I
J
H
CARACTERÍSTICAS
CAFETERA DE LA SERIE K200MX
A. Tapa del depósito de agua
B. Depósito de agua
C. Cubierta superior
D. Pantalla táctil/Botón de encendido
E. Botón Infusión
F. Palanca
G. Cabezal de infusión
H. Cable de alimentación
I. Rejilla de la bandeja de goteo
J. Bandeja de goteo
K. Soporte para cápsulas
L. Caja (K y L conforman el
montaje del soporte de cápsulas)
M. Base

33
Levante la palanca
para comenzar
FUERTE
CHOCOLATE
CALIENTE
OTRO
LISTO
C
D
B
A
B
A
CONTROLES DE LA PANTALLA TÁCTIL
A. FUERTE
(solamente disponible para el café)
B. CHOCOLATECALIENTE/
OTRO
(para bebidas que no son café
exclusivamente)
C. Tamaño de infusión
D. Botón de encendido
PANTALLA DE INICIO
A. Botón de configuración
B. Botón de encendido
PANTALLA PARA
CÁPSULAS KCUP
®
CONSEJOS RÁPIDOS Y PASOS A SEGUIR
CONSEJOS RÁPIDOS
Asegúrese de usar las cápsulas de marca Keurig®: Su cafetera de la Keurig
®
puede preparar variedades de café, té y chocolate caliente, más bebidas
de estación y al estilo del café.
PASOS A SEGUIR
Registre su cafetera en Keurig.com.mx. Le enviaremos un detalle a modo
de agradecimiento cuando lo haga. Sujeto a disponibilidad y el surtido/
stock variará.

34
1
|
COMENCEMOS A PREPARAR INFUSIONES!

35
1
|
COMENCEMOS A
PREPARAR INFUSIONES!
ARMADO
1. Coloque la cafetera en una encimera y
enchúfela a un tomacorriente conectado a
tierra.
3. Retire el depósito de agua y enjuáguelo.
Llénelo con agua embotellada o filtrada,
y luego vuelva a colocarlo en la cafetera.
Asegúrese de llenarlo por debajo de la línea de
LLENADO MÁXIMO y por encima de la línea
de LLENADO MÍNIMO.
NOTA: El depósito solamente debe ser retirado de la cafetera
para llenarlo en el armado inicial. Después del primer llenado,
puede recargar el depósito de agua ya sea mientras está
colocado en la cafetera o fuera de ella.
2. Levante la palanca, retire y deseche el disco de
envío.
4. Presione el botón de encendido y espere a
que se complete el precalentamiento,
alrededor de tres minutos.

36
¿Desea agua
caliente?
CONTINUARCANCELAR
INFUSIÓN DE LIMPIEZA
1. Para iniciar la infusión de limpieza, coloque una
taza de 356 ml (12 oz) en la bandeja de goteo.
3. Presione CONTINUAR para producir agua
caliente. Seleccione el tamaño de infusión de
237 ml (8 oz) y presione el botón Infusión.
2. Levante y baje la palanca. No coloque
una cápsula de marca Keurig® en el soporte
de cápsulas.
4. Ahora está listo para usar la cafetera.

1
|
COMENCEMOS A
PREPARAR INFUSIONES!
37
LISTO
FUERTE
CHOCOLATE
CALIENTE
OTRO
LISTO
FUERTE
CHOCOLATE
CALIENTE
OTRO
PREPARE SU PRIMER CAFÉ
CON LA CÁPSULA KCUP
®
1. Coloque una taza en la bandeja de goteo.
Seleccione una cápsula K-Cup
®
, colóquela con
firmeza en el soporte de cápsulas.
NOTA: No retire la tapa de aluminio ni perfore la cápsula
K-Cup
®
.
3. Seleccione el tamaño de infusión. Seleccione
FUERTE si lo desea. (La configuración FUERTE
es para el café).
Presione CHOCOLATE CALIENTE/OTRO para
seleccionar chocolate u otras bebidas según lo
indicado en las instrucciones del envase de las
cápsulas K-Cup®.
2. Baje la palanca.
PRECAUCIÓN: Hay agujas puntiagudas que perforan la cápsula
K-Cup
®
por encima y por debajo del soporte de cápsulas. Para
evitar lesiones, no coloque los dedos en el soporte de cápsulas.
4. Presione el botón Infusión y disfrute su primera
taza.
PRECAUCIÓN: Hay agua extremadamente caliente en la
cápsula K-Cup® durante el proceso de infusión. Para evitar
lesiones, no levante la palanca durante el proceso de infusión.

38
¿Desea agua
caliente?
CONTINUARCANCELAR
Su infusión está terminada. ¡Disfrute!
DISPENSACIÓN DE AGUA CALIENTE
EN UNA TAZA
1. Coloque una taza en la bandeja de goteo.
Levante y baje la palanca sin una cápsula.
2. Presione CONTINUAR para producir agua
caliente.
3. Seleccione el tamaño de infusión y presione el
botón Infusión.
4. Cuando el proceso de infusión haya finalizado,
la pantalla táctil indicará “¡Disfrute!”.

39
1
|
COMENCEMOS A
PREPARAR INFUSIONES!
IDIOMA
INGLÉS
ESPAÑOL
FRANCÉS
CONFIGURACIÓN
IDIOMA
GRAN ALTITUD
RECORDATORIO DE
FILTRO DE AGUA
CONFIGURACIÓN
IDIOMA
GRAN ALTITUD
RECORDATORIO DE
FILTRO DE AGUA
Levante la palanca
para comenzar
ACCEDER A LA CONFIGURACIÓN
Explore todo lo que su cafetera de la Keurig
®
tiene para ofrecerle mediante el menú
CONFIGURACIÓN. En la pantalla de inicio,
seleccione el botón de configuración.
Use las flechas para desplazarse por el
menú. Para salir, presione el botón Atrás.
Presione el botón Atrás para regresar al menú
CONFIGURACIÓN o presione el botón INICIO
para regresar a la pantalla de inicio.
Sus configuraciones se guardarán
automáticamente.
ELEGIR UN IDIOMA
Presione inglés, español o francés para
seleccionar el IDIOMA.
Presione el botón Atrás para regresar al menú
CONFIGURACIÓN o presione el botón INICIO
para regresar a la pantalla de inicio. Sus
configuraciones se guardarán automáticamente.
MENÚ DE CONFIGURACIÓN
atrásconfiguración
atrás
inicio
inicio

40
MENÚ DE CONFIGURACIÓN
GRAN ALTITUD
ACTIVAR
RECORDATORIO DE
FILTRO DE AGUA
CONFIGURACIÓN
IDIOMA
GRAN ALTITUD
RECORDATORIO DE FILTRO DE AGUA
ACTIVAR
RECORDATORIO DE
FILTRO DE AGUA
CONFIGURACIÓN
IDIOMA
GRAN ALTITUD
ACTIVAR RECORDATORIO DEL FILTRO
DE AGUA
Si usa un filtro de agua Keurig
®
, seleccione
ACTIVAR para activar los avisos de
RECORDATORIO DEL FILTRO DE AGUA.
Presione el botón Atrás para regresar al menú
CONFIGURACIÓN o presione el botón INICIO
para regresar a la pantalla de inicio.
Sus configuraciones se guardarán
automáticamente.
Consulte la página 50 para obtener más
información.
ACTIVAR EL MODO GRAN ALTITUD
Para garantizar que su cafetera funcione
correctamente a altitudes superiores 1524m
ACTIVE el modo GRAN ALTITUD.
Presione el botón Atrás para regresar al menú
CONFIGURACIÓN o presione el botón INICIO
para regresar a la pantalla de inicio.
Sus configuraciones se guardarán
automáticamente.
GRAN ALTITUD ES LA CONFIGURACIÓN
RECOMENDADA.
atrás inicio
atrás inicio

41
CUIDADO DE SU CAFETERA 2
|
CONSEJOS Y MANTENIMIENTO
LIMPIEZA DE LA PARTE EXTERNA DE LA CAFETERA
Para mantener su cafetera de la Keurig
®
en óptimas condiciones,
limpie periódicamente la parte externa. Solo use un paño que no
desprenda pelusas, que no sea abrasivo, ni esté húmedo o enjabonado.
No sumerja nunca la cafetera en agua u otros líquidos.
LIMPIEZA DE LA BANDEJA DE GOTEO
La bandeja de goteo puede acumular hasta 237ml (8 oz) de líquido
derramado. La bandeja de goteo y la rejilla de la bandeja de goteo
se deben enjuagar ocasionalmente para limpiarlas. Para retirar la
bandeja de goteo, simplemente deslícela hacia usted, mientras la
mantiene nivelada todo el tiempo para evitar derrames. Límpiela
con un paño que no desprenda pelusas, que no sea abrasivo, ni
esté húmedo o enjabonado.
LIMPIEZA DEL DEPÓSITO DE AGUA Y LA TAPA DEL DEPÓSITO
DE AGUA
Limpie el depósito de agua y la tapa del depósito de agua con un
paño que no desprenda pelusas, que no sea abrasivo, ni esté
húmedo o enjabonado y enjuague minuciosamente.
No seque el interior del depósito de agua con un paño ya que puede
dejar pelusas. Asegúrese de enjuagar minuciosamente el depósito de
agua después de limpiarlo para garantizar que no queden soluciones
de limpieza, ya que pueden contaminar el suministro de agua en la
cafetera. NO COLOQUE ESTOS ELEMENTOS EN EL LAVAVAJILLAS.

42
CUIDADO DE SU CAFETERA
42
LIMPIEZA DEL SOPORTE DE CÁPSULAS
1. Levante la palanca. Presione hacia arriba
mientras sujeta los laterales del montaje del
soporte de cápsulas. Tire en dirección contraria
a la cafetera.
PRECAUCIÓN: Agujas puntiagudas. No coloque los dedos en la
cámara.
2. Retire el montaje del soporte de cápsulas (1) y
la base (2).
4. Limpie el soporte de cápsulas (1), la caja (2),
y la base (3) con un paño que no desprenda
pelusas, que no sea abrasivo, ni esté húmedo
o enjabonado y enjuague minuciosamente.
3. Presione los botones de apertura en ambos
lados del montaje del soporte de cápsulas.
Separe el soporte de cápsulas de
la caja.

43
2
|
CONSEJOS Y MANTENIMIENTO
LIMPIEZA DE LA AGUJA DE
ENTRADA DE LA CAFETERA
¿Tiene problemas para preparar infusiones? Es
posible que haya granos de café atascados en la
aguja de entrada de la cafetera. ¡Use su accesorio
de mantenimiento de la cafetera y vuelva a hacer
café con solo unos pasos sencillos!
NOTA: El accesorio de mantenimiento de la cafetera viene incluido con
la cafetera. Es una herramienta naranja.
1. Asegúrese de que la cafetera esté apagada.
Con el texto impreso de su accesorio de
mantenimiento de la cafetera hacia arriba,
llene la ampolla de silicio con agua.
3. Suba y baje la palanca cinco veces para aflojar
y remover cualquier grano de café retenido en
la aguja de entrada de su cafetera.
2. Levante la palanca, coloque correctamente el
accesorio de mantenimiento de la cafetera en
el soporte de cápsulas con las flechas impresas
apuntando hacia abajo.
Advertencia: Evite usar agujas puntiagudas.

CUIDADO DE SU CAFETERA
Servir agua
caliente?
CONTINUERANNULER
4. Retire el accesorio de mantenimiento de la
cafetera del soporte de cápsulas.
Advertencia: Evite usar agujas puntiagudas.
5. Una vez que haya retirado de la cafetera
el accesorio de mantenimiento, vuelva a
encenderla.
7. Prepare su cápsula K-Cup
®
Keurig
®
favorita y
disfrute.
6. Coloque una taza de 355 ml (12 oz) en la
bandeja de goteo y realice una infusión de
limpieza (consulte la página 36 para realizar
una infusión de limpieza).
44

2
|
CONSEJOS Y MANTENIMIENTO
45
LIMPIEZA DE LA AGUJA DE SALIDA
1. Si se produce una obstrucción en la aguja
de salida, empuje la palanca del soporte de
cápsulas para descubrir la aguja de salida.
2. Use un clip o una herramienta similar
para aflojar la obstrucción. Enjuague
minuciosamente con agua caliente.
3. Después de que todas las piezas estén limpias,
coloque la base, luego el montaje del soporte
de cápsulas en el cabezal de infusión.
PRECAUCIÓN: Agujas puntiagudas. No coloque los dedos en la
cámara.

46
¡Es hora
descalcicar la
cafetera!
CONTINUARAHORA NO
Quitar la cal, un buen
mantenimiento.
Consulte la Guía
del usuario.
ACEPTARCANCELAR
CUIDADO DE SU CAFETERA
ES HORA DE DESCALCIFICAR LA CAFETERA
Dependiendo del contenido mineral del agua, se pueden formar depósitos de calcio o sarro en su
cafetera, y por este motivo recomendamos usar agua embotellada o filtrada. El sarro no es tóxico,
pero si se lo deja estar, puede entorpecer el rendimiento de la cafetera. Descalcificar regularmente su
cafetera cada tres a seis meses ayuda a mantener el elemento de calor, y otras piezas internas que
entran en contacto con el agua. Es posible que los depósitos de calcio se formen más rápidamente y
por consiguiente sea necesario descalcificar más seguido.
Debe descalcificar lo antes posible cuando la pantalla táctil indique “¡Es hora descalcificar la cafetera!”.
Sin embargo, aunque no aparezca esta indicación, debe continuar descalcificando su cafetera cada
tres a seis meses.

47
2
|
CONSEJOS Y MANTENIMIENTO
DESCALCIFICACIÓN DE SU CAFETERA
Antes de comenzar, necesitará una taza grande, agua limpia, solución de descalcificación Keurig® y
acceso a un fregadero. No use un vaso de cartón.
• Vacíe el agua del depósito de agua. Si tiene colocado un filtro de agua Keurig
®
, retírelo y resérvelo.
PASO1: PRIMER ENJUAGUE CON LA SOLUCIÓN DE DESCALCIFICACIÓN
• Presione y mantenga presionado el botón de encendido para apagar la cafetera.
• Vierta toda la botella de solución de descalcificación Keurig
®
en el depósito de agua. Luego llene la
botella vacía con agua y viértala en el depósito de agua. Presione y mantenga presionado el botón de
encendido para volver a encender la cafetera.
• Coloque una taza grande en la bandeja de goteo y complete un ciclo de infusión, para lo cual deberá
levantar y bajar la palanca, seleccionar un tamaño de infusión de 10onzas y presionar el botón Infusión.
La cafetera dejará de dispensar líquido después de 10onzas. No use una cápsula de marca Keurig.
Vierta el contenido de la taza en el fregadero.
PASO2: SEGUNDO ENJUAGUE CON LA SOLUCIÓN DE DESCALCIFICACIÓN
• Repita el proceso de infusión de limpieza hasta que la pantalla táctil indique “Más agua por favor”.
Permita que la cafetera repose durante 30minutos mientras permanece encendida.
• Después de 30minutos, deseche todo resto de solución y enjuague minuciosamente el depósito de agua.
PASO3: ENJUAGUE CON AGUA LIMPIA
• Asegúrese de que el depósito de agua esté lleno de agua limpia hasta y sin sobrepasar la línea de
LLENADO MÁXIMO.
• Coloque una taza grande en la bandeja de goteo y complete un ciclo de infusión. Vierta el contenido de
la taza en el fregadero.
• Repita el proceso de infusión al menos 12veces. Es posible que deba recargar el depósito de agua al
menos una vez durante este proceso.
NOTA: Si el mensaje “¡Es hora de descalcificar la cafetera!”, sigue apareciendo después de completar el procedimiento, repita el procedimiento de
descalcificación como se explicó anteriormente.

48
DESCALCIFICACIÓN DE SU CAFETERA (CONTINUACIÓN)
La acción limpiadora de la Keurig
®
solución de descalcificación puede producir una espuma que se
dispensará de la cafetera. Esto es normal, pues significa que la solución está reaccionando con el sarro
del interior. En el caso de que la cafetera tenga abundante sarro, es posible que la cafetera no se llene
correctamente después de que se agrega el descalcificador. Si esto ocurre, es posible que solo observe que
se dispensa un poco de líquido o nada de líquido seguido del sonido de un chorro de aire.
Si esto ocurre:
• Apague y desenchufe la cafetera.
• Si hay solución de descalcificación Keurig
®
en el depósito de agua, deseche el contenido,
enjuague el depósito de agua minuciosamente y recárguelo con agua embotellada o filtrada.
• Vuelva a enchufar la cafetera, enciéndala y repita el PASO3: ENJUAGUE CON AGUA LIMPIA (consulte la
págin 36). La cafetera debería comenzar a funcionar normalmente a medida que se enjuaga la solución y
se elimina el sarro. Si el problema persiste, permita que la cafetera permanezca desenchufada durante al
menos 30minutos, luego continúe con el enjuague con agua limpia.
CUIDADO DE SU CAFETERA

49
2
|
CONSEJOS Y MANTENIMIENTO
DETENCIÓN DEL PROCESO
DE INFUSIÓN
CALIENTE: ¡NO LEVANTE
LA PALANCA!
Infusión en proceso
CALIENTE: ¡NO LEVANTE
LA PALANCA!
Infusión en proceso
Más agua
por favor.
AGREGADO DE AGUA
PARA LAS CÁPSULAS K-CUP
®
(CONFIGURACIÓN1 DE KEURIG BREW)
Para detener el proceso de infusión, presione y mantenga presionado el botón de encendido durante un
segundo. Retire y deseche las cápsulas usadas. No se recomienda preparar una infusión con una cápsula
usada.
Su cafetera de la Keurig
®
le indicará cuándo el nivel de agua del depósito de agua esté bajo y no pueda
preparar infusiones. La cafetera solo indicará “Más agua por favor.” si no hay agua suficiente para
completar la infusión.
Por ejemplo: Una jarra Keurig
®
requerirá más agua que una taza de 296 ml (10 oz).

50
ALERTA DEL FILTRO DE AGUA
ALERTA DE LA CAFETERA
¡Es hora
descalcicar la
cafetera!
CONTINUARAHORA NO
¿Reemplazó el
ltro de agua?
SÍAHORA NO
Su cafetera está diseñada para preparar la taza perfecta una y otra vez, año tras año. Para mantenerla
en condiciones óptimas de funcionamiento, su cafetera de la Keurig
®
le hará saber cuándo necesita un
poco de atención.
ES HORA DE REEMPLAZAR EL FILTRO DE AGUA KEURIG
®
(VISITE KEURIG.COM.MX PARA
COMPRARLO)
Su cafetera indicará “Es hora de reemplazar el filtro de agua” después de cada Después de 2 meses o 60
recargas del depósito de agua o cada dos meses. Una vez que haya reemplazado el filtro de agua Keurig
®
,
presione SÍ para restablecer los avisos de RECORDATORIO DEL FILTRO DE AGUA.
LO SENTIMOS, INFUSIÓN INTERRUMPIDA
Su cafetera indicará “Lo sentimos, infusión interrumpida” si existe un problema con la preparación de la
infusión. Para solucionar el problema, levante y baje lentamente la palanca, retire la cápsula e intente una
elaboración de limpieza (consulte la página 36).
LO SENTIMOS, HUBO UN PROBLEMA.
Si la cafetera indica “Lo sentimos, hubo un problema”, es posible que haya granos de café atascados en
la aguja de entrada. Para liberar la aguja obstruida, use el accesorio de mantenimiento de la cafetera
incluido con su cafetera. Consulte las instrucciones en la página 43 o la guía incluida con el accesorio.
Lo sentimos, infusión
interrumpida.
AGUA BAJO PRESIÓN.
ABRA LA PALANCA DESPACIO.
Para reiniciar, retire la cápsula y
baje la palanca. Realice el mantenimiento
de la aguja si sigue el problema.
¿Tiene alguna pregunta?
Consulte la Guía del usuario.
Lo sentimos, hay
un problema.
AGUA BAJO PRESIÓN.
ABRA LA PALANCA DESPACIO.
Para reiniciar, retire la cápsula y
baje la palanca. Realice el mantenimiento
de la aguja si sigue el problema.
¿Tiene alguna pregunta?
Consulte la Guía del usuario.

51
SOLUCIÓN DE PROBLEMAS 3
|
SOLUCIÓN DE PROBLEMAS
LA CAFETERA NO TIENE POTENCIA
• Enchufe la cafetera en un tomacorriente independiente sin control de atenuación.
• Revise para asegurarse de que la cafetera está enchufada firmemente.
• Enchufe la cafetera en un tomacorriente diferente.
• Reinicie el disyuntor de su casa si es necesario.
• Presione y mantenga presionado el botón de encendido y asegúrese de que la pantalla táctil esté
iluminada.
LA CAFETERA NO PREPARA INFUSIONES
• Después de colocar una cápsula en el soporte de cápsulas, asegúrese que la palanca quede
completamente baja y que la pantalla táctil muestre la pantalla de infusión adecuada. Siga las
instrucciones de preparación de infusiones en la SECCIÓN1 (consulte las páginas 37 a 38).
• Si la pantalla táctil indica “Más agua por favor.” agregue agua al depósito de agua o asegúrese de que el
depósito de agua esté bien asentado en la base.
• Si la pantalla táctil indica “Más agua por favor.” aún después de haber recargado el depósito de agua,
retírelo y vacíe el agua. Luego limpie minuciosamente (consulte a página 41). Llene el depósito de agua
hasta la línea de LLENADO MÁXIMO, vuelva a colocarlo en la cafetera y asegúrese de que esté bien
asentado en la base.
• Es posible que deba limpiar el soporte de cápsulas (consulte la página42) o que deba descalcificar la
cafetera (consulte las páginas 46 a 47).
• Si ha completado el procedimiento anterior dos veces y la situación persiste, comuníquese con el
Servicio de atención al cliente. Cd. de México y área metropolitana: 58 13 88 85,
Interior Sin Costo al 01 800 97 618 00

52
LA CAFETERA PREPARA INFUSIONES QUE SOLO LLENAN LA TAZA PARCIALMENTE
• Limpie el soporte de cápsulas si es necesario (consulte la página59).
• Es posible que haya retirado el depósito de agua durante la infusión. Reemplace el depósito de agua y
realice una infusión de limpieza (consulte la página45) sin una cápsula.
• Descalcifique la cafetera (consulte las páginas 54 y 56).
• Si ha repetido el procedimiento de descalcificación en su cafetera dos veces y aún las infusiones
llenan la taza parcialmente, comuníquese con el Servicio de atención al cliente. Cd. de México y área
metropolitana: 58 13 88 85, Interior Sin Costo al 01 800 97 618 00
LA PANTALLA TÁCTIL INDICA “MÁS AGUA POR FAVOR.”
• Si el nivel del agua no está bajo, retire el depósito de agua y vacíe el agua. Luego limpie minuciosamente
(consulte a página48). Llene el depósito de agua hasta la línea de LLENADO MÁXIMO, vuelva a
colocarlo en la cafetera y asegúrese de que esté bien asentado en la base.
LA PANTALLA TÁCTIL INDICA “LO SENTIMOS, INFUSIÓN INTERRUMPIDA.”
O “LO SENTIMOS, HUBO UN PROBLEMA.”
• Estas pantallas indican que hay granos de café atascados en la aguja de entrada. Con cuidado, levante
lentamente la palanca y retire la cápsula de la cafetera. Para liberar la aguja obstruida, use el accesorio
de mantenimiento de la cafetera incluido con su cafetera. Consulte las instrucciones en la página50 o la
guía incluida con el accesorio.
LA CÁPSULA K-CUP
®
TIENE EL LOGOTIPO KEURIG
®
, PERO LA PANTALLA TÁCTIL INDICA “¡Oh, oh!”
• Keurig no puede garantizar que las cápsulas que no tienen el logotipo Keurig funcionarán en la cafetera
de Keurig
®
. Es posible que algunas cápsulas de marca Keurig producidas antes de enero de 2014 no
puedan usarse con la cafetera de la Keurig
®
. Comuníquese con el Servicio de atención al cliente. Cd. de
México y área metropolitana: 58 13 88 85, Interior Sin Costo al 01 800 97 618 00.
¿AÚN NO SE RESUELVE EL PROBLEMA? VISITE KEURIG.COM.MX PARA OBTENER MÁS INFORMACIÓN.
SOLUCIÓN DE PROBLEMAS

53
4
|
GARANTÍAPOLIZA DE GARANTÍA.
La presente garantía ampara todas las piezas y componentes del producto e incluye la mano
de obra.
El importador está obligado a reemplazar cualquier pieza o componente defectuoso sin costo
adicional. Se incluyen los gastos de transportación del producto que deriven de su cumplimiento,
dentro de la red de servicio.
Importado por: PLANTAS INDUSTRIALES S.A., Rubén Darío No. 115 Piso 10, Colonia Bosques de
Chapultepec, C.P. 11580, México D.F., PIN 560523 DN1, Teléfono 52622600
MARCA: Keurig
MODELO: K200MX
Electrical: 127V ~ 60Hz 1390W
Nombre y dirección del establecimiento en donde se puede hacer efectiva la garantía y lugar donde
se pueden obtener las partes, componentes, consumibles y accesorios:
Jugos De Valle SAPI de CV
PLANTA TEPOTZOTLÁN EDO. DE MÉXICO Avenida Insurgentes No. 30, Col. Barrio de
Texcacoa, Tepotzotlán, Edo. de México. C.P. 54600
Para mayores detalles llamar al Centro de Atención al Consumidor a los números
58 13 88 85, del interior sin costo al 01 800 70444 00.
Duración de la garantía: 365 días a partir de la fecha de compra.
Conceptos que cubre la garantía: La presente garantía cubre el aparato en su totalidad.
Limitaciones o excepciones: La presente garantía no será válida en los siguientes casos.
a) Cuando el aparato se hubiera utilizado en condiciones distintas a las normales, b) cuando
el aparato no hubiese sido operado de acuerdo de acuerdo con el instructivo de uso que se le
acompaña, c) Cuando el aparato hubiera sido alterado o reparado por personas no autorizadas
por el fabricante nacional, importador o comercializador responsable respectivo.
Para hacer válida la garantía no deben exigirse mayores requisitos que la presentación del
producto acompañado de la póliza correspondiente, debidamente sellada por el establecimiento
que la vendió, o la factura el recibo o el comprobante, en el que consten los datos específicos del
producto objeto de la compraventa. El consumidor puede solicitar que se haga efectiva la garantía
ante la propia casa comercial en donde adquirió su producto, siempre y cuando el fabricante,
importador o comercializador no cuente con talleres de servicio.
Fecha en la que se recibe el producto por parte del consumidor: (dd/mm/aaaa) .

Keurig Green Mountain, Inc.
P/N | Pieza n° DC0000000598 Rev.B
02/17
-
 1
1
-
 2
2
-
 3
3
-
 4
4
-
 5
5
-
 6
6
-
 7
7
-
 8
8
-
 9
9
-
 10
10
-
 11
11
-
 12
12
-
 13
13
-
 14
14
-
 15
15
-
 16
16
-
 17
17
-
 18
18
-
 19
19
-
 20
20
-
 21
21
-
 22
22
-
 23
23
-
 24
24
-
 25
25
-
 26
26
-
 27
27
-
 28
28
-
 29
29
-
 30
30
-
 31
31
-
 32
32
-
 33
33
-
 34
34
-
 35
35
-
 36
36
-
 37
37
-
 38
38
-
 39
39
-
 40
40
-
 41
41
-
 42
42
-
 43
43
-
 44
44
-
 45
45
-
 46
46
-
 47
47
-
 48
48
-
 49
49
-
 50
50
-
 51
51
-
 52
52
-
 53
53
-
 54
54


Keurig Hot K200MX Manual de usuario
- Categoría
- Pequeños electrodomésticos de cocina
- Tipo
- Manual de usuario
en otros idiomas
- English: Keurig Hot K200MX User manual
Otros documentos
-
Keurig 2.0 K550 Brewer El manual del propietario
-
-
-
 Mr. Coffee AD10 Manual de usuario
-
 Mr. Coffee BVMC-KG1 Manual de usuario
-
 Mr.Coffee BVMC-SC Single Serve Manual de usuario
-
Grindmaster RC400 Manual de usuario
-
Ninja COFFEE BAR CF112 Serie Manual de usuario
-
-


