
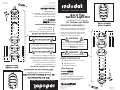
3 or 4 Tier
Garden Light Kit
Installation Instructions
For Outdoor use ONLY!
K330, K330BR
K440, K440BR
IMPORTANT SAFEGUARDS:
Please read and understand all instructions
before beginning assembly or installation.
Check your local electrical codes to make
sure that your materials and method of
installation comply with all codes.
WARNING
TURN OFF THE POWER:
Remove the fuse, turn OFF the circuit
breaker or otherwise disconnect power at
the source BEFORE beginning any
electrical job.
Tools Required:
TA03936 B
Page 1 of 4
If you have any questions, call us toll free
Monday-Friday 8:00 AM to 4:30 PM (Central
Standard Time) at 1-888-862-3289.
A
B
C
© 2008 Thomas & Betts Corp.
Memphis, Tennessee 38125
Made in Mexico
www.tnb.com
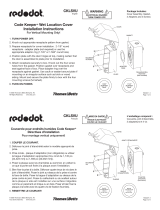
A
SiteLight
®
Landscape Series
C
PARTS IDENTIFICATION
A Light (1) (either three-tier or four tier)
B Wire Connectors (2)
C Lubricating Sealant (1)
WARNING
Keep away from combustible materials.
Kit de iluminación
de 3 o 4 hileras para jardín
Instrucciones de instalación
¡SÓLO para uso en exteriores!
K330, K330BR
K440, K440BR
CONSEJOS DE SEGURIDAD IMPORTANTES
Lea cuidadosamente las siguientes
instrucciones de instalación antes de
comenzar la instalación o ensamblaje.
Consulte los códigos eléctricos locales para
asegurarse de que los materiales y el método
de instalación cumplan con los mismos.
ADVERTENCIA
DESCONECTE LA ELECTRICIDAD
Retire el fusible, APAGUE el interruptor automático
o desconecte el suministro de electricidad de la fuente
ANTES de comenzar cualquier trabajo eléctrico.
Herramientas necesarias:
TA03936 B
Página 3 de 4
Si tiene dudas, llame gratis de lunes
a viernes de 08:00 a.m. a 4:30 p.m.
(Hora estándar del centro de los EE.UU.)
al 1-888-862-3289.
B
© 2008 Thomas & Betts Corp.
Memphis, Tennessee 38125
Hecho en México
www.tnb.com
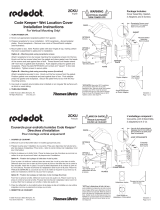
SiteLight
®
Landscape Series
IDENTIFICACIÓN DE PARTES
A Luminaria (1) (de tres o de cuatro hileras)
B Conectores de cables (2)
C Sellador lubricante (1)
ADVERTENCIA
Mantenga alejado de materiales combustibles.

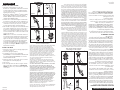
Figure 6Figure 5
Figure 3 Figure 4
Figure 1 Figure 2
1/2”
INSTALL THE LIGHT FIXTURE
1. This fixture can be mounted in one of two ways.
A. Mount onto a rigid threaded conduit which is mounted on
an outlet box. Once the outlet box is installed and supply
wires are fed into the box, continue with these instructions
beginning with step 2, below.
B. Mount onto a Red•Dot
®
QuickPost
®
Landscape Lighting
and Power Outlet Installation System. Sold separately,
Model No. K805BR. Complete installation instructions are
supplied with the K805BR package.
2. Feed the wires from the fixture though the conduit and into
the outlet box. Screw the fixture onto the conduit (Figure 1).
3. Strip off 1/2” of the insulation from the ends of the two wires
on the fixture. If necessary, also strip off 1/2” of insulation
from the supply wires and the ground wire (Figure 2).
4. Wire the fixture to the supply wires as follows: Hold the white
wires together and twist a wire connector over the ends of
the wires in a clockwise direction (Figure 3). In the same
manner, connect the black wires. Make sure wire connectors
are secure and that no bare conductors are visible. Push all
wiring into the outlet box.
NOTE: If fixture is connected to a non-metallic outlet box or
post, the fixture must be grounded. Insert the green ground
screw into the ground boss in the base of the fixture and
tighten one turn. (This is a self-tapping screw which creates
its own thread as it is tightened.) Feed the supply ground
wire through the threaded hole in the fixture. Bring the
ground wire from underneath the socket and install it under
the ground screw and tighten. DO NOT overtighten as you
may break the screw head.
INSTALL THE BULB
1. Remove the screws from the top of the light (Figure 6) and
lift off the tiers (Figure 4).
2. Remove the glass globe (Figure 5).
3. Screw bulb into socket. For a 3-tier garden light
(K330/K330BR) use a 75-watt maximum medium base bulb.
For a 4-tier garden light (K440/K440BR), use a 100-watt
maximum medium base bulb.
4. Replace the globe, tiers, and top (globe does not screw into
base). Tighten the screws firmly (Figure 6).
5. Turn on power.
6. Turn on the light switch. If the unit does not light, check the
bulb in another fixture. If the bulb works, TURN OFF THE
POWER and return to step 1, under Install The Light Fixture
section, above.
TURN POWER OFF!
TA03936 B
Page 2 of 4
THOMAS & BETTS CORPORATION
TWO YEAR LIMITED WARRANTY
Thomas & Betts Corporation sells this product with the understanding
that the user will perform all necessary tests to determine the
suitability of this product for the user's intended application, and
warrants to the original purchaser that this product will be free from
defects in material and workmanship for two (2) years from the date of
purchase. Subject to the limitations set forth below, Thomas & Betts
Corporation will repair or replace, at its sole option, any product that
proves to be defective under normal installation, use and service.
Thomas & Betts Corporation reserves the right to replace any
warranted product with a substitute product of similar function if the
warranted product is no longer available. Installation, operation or use
of the product for which this warranty is issued shall constitute
acceptance of the terms hereof.
This warranty is void if the product has been subjected to misuse,
neglect, accident, fire, flood, physical damage, improper installation,
unauthorized modification, or use in violation of our instructions or any
applicable laws, codes or ordinances.
ALL IMPLIED WARRANTIES OF MERCHANTABILITY AND FITNESS
FOR A PARTICULAR PURPOSE ARE DISCLAIMED TO THE
EXTENT ALLOWED BY LAW. ANY IMPLIED WARRANTIES THAT
CANNOT BE DISCLAIMED ARE LIMITED IN DURATION TO A TERM
OF ONE YEAR FROM THE DATE OF PURCHASE. Some states do
not allow limitations on how long an implied warranty lasts, so the
above limitation may not apply to you.
THOMAS & BETTS CORPORATION’S OBLIGATIONS UNDER THIS
WARRANTY ARE LIMITED TO REPAIR OR REPLACEMENT OF THE
PRODUCT ONLY. THOMAS & BETTS CORPORATION WILL NOT BE
LIABLE FOR ANY INCIDENTAL, SPECIAL OR CONSEQUENTIAL
DAMAGES, OR FOR DIRECT DAMAGES IN EXCESS OF THE
PURCHASE PRICE OF THE PRODUCT. THIS DISCLAIMER OF
LIABILITY SHALL CONTINUE TO BE ENFORCEABLE IN THE
EVENT THAT ANY REMEDY HEREIN SHALL FAIL OF ITS
ESSENTIAL PURPOSE. Some states do not allow the exclusion or
limitation of incidental or consequential damages, so the above
limitations or exclusions may not apply to you.
To report a defective product, call customer service at 1-888-862-3289.
This warranty gives you specific legal rights, and you may also have
other rights which vary from state to state.
Figura 6Figura 5
Figura 3 Figura 4
Figura 1 Figura 2
1/2 pulgada
INSTALE EL ARTEFACTO DE ILUMINACIÓN
1. Esta lámpara puede instalarse de dos maneras:
A. Móntela en una tubería rígida roscada, la cual a su vez se
monta en una caja de salida. Después de que la caja de
salida esté instalada y los conductores de alimentación se
hayan conectado a la caja de salida, siga estas instrucciones
comenzando por el paso 2 que se indica a continuación.
B. Móntela en un Sistema de instalación para equipo de
iluminación para jardines Red•Dot
®
QuickPost
®
con toma
de corriente. El Modelo No. K805BR se vende por separado.
El paquete del Modelo No.K805BR incluye instrucciones de
instalación completas.
2. Pase los conductores del artefacto a través de la tubería
y dentro de la caja de salida. Entornille el artefacto en la
tubería (Figura 1).
3. Pele 1/2 pulgada del aislante de los extremos de los dos
cables en el artefacto. Si es necesario, también pele 1/2
pulgada del aislante de los conductores de alimentación y
del conductor de puesta a tierra (Figura 2).
4. Conecte el artefacto a los conductores de alimentación de la
manera siguiente: Junte los conductores blancos y coloque un
empalme plástico en los extremos de los conductores y gírelo
en el sentido de las manecillas del reloj (Figura 3). De la misma
manera, conecte los conductores negros. Asegúrese de que
los conectores de los conductores se encuentren firmemente
ajustados y que no haya ningún conductor desnudo visible.
Empujetodo el cableado dentro de la caja de salida.
NOTA: Si el artefacto se conecta a una caja de salida no
metálica o a un poste no metálico, deberá conectar el
artefacto a tierra. Introduzca el tornillo verde de puesta a tierra
en la protuberancia de puesta a tierra en la base del artefacto
y ajústelo una vuelta. (Este es un tornillo autorroscante que
forma su propia rosca a medida que se va ajustando.) Pase el
conductor de puesta a tierra a través del orificio roscado del
artefacto. Pase el conductor de puesta a tierra por debajo del
portalámpara e instálelo debajo del tornillo de puesta a tierra
y ajuste. NO apriete demasiado ya que podría romperse la
cabeza del tornillo.
INSTALE LA BOMBILLA
1. Retire los tornillos de la parte superior del artefacto de
iluminación (Figura 6) y retire todas las hileras (Figura 4).
2. Retire la pantalla de vidrio (Figura 5).
3. Enrosque la bombilla en el portalámparas. Para un equipo de
iluminación de 3 hileras (K330/K330BR) use una bombilla de
rosca mediana de 75 vatios como máximo. Para un equipo de
iluminación de 4 hileras (K440/K440BR), use una bombilla de
rosca mediana de 100 vatios como máximo.
4. Reemplace la pantalla, las hileras, y la parte superior
(la pantalla no se enrosca a la base). Ajuste los tornillos
firmemente (Figura 6).
5. Conecte la electricidad.
6. Encienda el interruptor de luz. Si la unidad no enciende,
verifique la bombilla en otro artefacto. Si la bombilla funciona,
DESCONECTE LA ELECTRICIDAD y vuelva al paso 1, en la
sección Instale el artefacto de iluminación, arriba.
¡DESCONECTE LA ELECTRICIDAD!
TA03936 B
Página 4 de 4
THOMAS & BETTS CORPORATION
GARANTÍA LIMITADA POR DOS AÑOS
Thomas & Betts Corporation vende este producto asumiendo que el usuario
realizará todas las pruebas necesarias para determinar la idoneidad de este
producto para la aplicación deseada del usuario, y garantiza al comprador
original que este producto no tendrá fallas en materiales ni mano de obra
durante dos (2) años a partir de la fecha de compra. De acuerdo con las
limitaciones establecidas a continuación, Thomas & Betts Corporation reparará
o reemplazará, a su exclusivo criterio, cualquier producto que se compruebe
defectuoso en condiciones normales de instalación, utilización y servicio.
Thomas & Betts Corporation se reserva el derecho de reemplazar cualquier
producto bajo garantía con un producto sustituto de funcionamiento similar si
el producto bajo garantía ya no está disponible. La instalación, operación o uso
del producto para el cual se emite esta garantía constituirá la aceptación de los
términos de dicha garantía. Esta garantía es nula si el producto ha estado sujeto a
mal uso, negligencia, accidentes, fuego, inundaciones, daños físicos, instalación
incorrecta, modificación no autorizada, o utilización incumpliendo nuestras
instrucciones o alguna ley, código u ordenanza aplicables.
Esta garantía es nula si el producto ha estado sujeto a mal uso, negligencia,
accidentes, fuego, inundaciones, daños físicos, instalación incorrecta, modificación
no autorizada, o utilización que haya incumplido nuestras instrucciones o alguna
ley, código u ordenanza aplicables.
SE NIEGA TODA GARANTÍA IMPLÍCITA DE COMERCIABILIDAD E IDONEIDAD
PARA UN PROPÓSITO PARTICULAR HASTA EL GRADO PERMITIDO POR LA
LEY. CUALQUIER GARANTÍA IMPLÍCITA QUE NO PUEDA SER NEGADA ESTÁ
LIMITADA EN DURACIÓN AL PLAZO DE UN AÑO A PARTIR DE LA FECHA DE
COMPRA. Algunos estados no permiten limitaciones sobre cuanto dura una
garantía implícita, de modo que la limitación antes mencionada puede no aplicarse
a usted.
DE ACUERDO CON ESTA GARANTÍA, LAS OBLIGACIONES DE THOMAS &
BETTS CORPORATION SÓLO SE LIMITAN A LA REPARACIÓN O AL
REEMPLAZO DEL PRODUCTO. THOMAS & BETTS CORPORATION NO SERÁ
RESPONSABLE POR NINGÚN DAÑO INCIDENTAL, ESPECIAL O EMERGENTE,
NI POR DAÑOS DIRECTOS EN EXCESO DEL PRECIO DE COMPRA DEL
PRODUCTO. ESTE DESCARGO DE RESPONSABILIDAD SEGUIRÁ SIENDO
APLICABLE EN EL CASO DE QUE ALGÚN RECURSO AQUÍ MENCIONADO NO
CUMPLA CON SU PROPÓSITO ESENCIAL. Algunos estados no permiten la
exclusión ni la limitación de daños incidentales ni emergentes, de modo que las
limitaciones o exclusiones mencionadas anteriormente pueden no aplicarse a usted.
Para informar sobre un producto defectuoso, llame al Servicio al cliente al
1-888-862-3289. Esta garantía le da derechos legales específicos, pero usted
también puede tener otros derechos que varían de estado a estado.
Transcripción de documentos
© 2008 Thomas & Betts Corp. Memphis, Tennessee 38125 Made in Mexico www.tnb.com TA03936 B Page 1 of 4 C If you have any questions, call us toll free Monday-Friday 8:00 AM to 4:30 PM (Central Standard Time) at 1-888-862-3289. B Tools Required: A Light (1) (either three-tier or four tier) B Wire Connectors (2) C Lubricating Sealant (1) PARTS IDENTIFICATION SiteLight ® Landscape Series Kit de iluminación de 3 o 4 hileras para jardín Instrucciones de instalación ¡SÓLO para uso en exteriores! CONSEJOS DE SEGURIDAD IMPORTANTES K330, K330BR K440, K440BR Lea cuidadosamente las siguientes instrucciones de instalación antes de comenzar la instalación o ensamblaje. ADVERTENCIA WARNING Consulte los códigos eléctricos locales para asegurarse de que los materiales y el método de instalación cumplan con los mismos. Keep away from combustible materials. A TURN OFF THE POWER: Remove the fuse, turn OFF the circuit breaker or otherwise disconnect power at the source BEFORE beginning any electrical job. WARNING DESCONECTE LA ELECTRICIDAD Retire el fusible, APAGUE el interruptor automático o desconecte el suministro de electricidad de la fuente ANTES de comenzar cualquier trabajo eléctrico. ADVERTENCIA Mantenga alejado de materiales combustibles. Check your local electrical codes to make sure that your materials and method of installation comply with all codes. Please read and understand all instructions before beginning assembly or installation. IMPORTANT SAFEGUARDS: Installation Instructions For Outdoor use ONLY! K330, K330BR K440, K440BR 3 or 4 Tier Garden Light Kit SiteLight ® Landscape Series A IDENTIFICACIÓN DE PARTES A Luminaria (1) (de tres o de cuatro hileras) B Conectores de cables (2) C Sellador lubricante (1) Herramientas necesarias: B Si tiene dudas, llame gratis de lunes a viernes de 08:00 a.m. a 4:30 p.m. (Hora estándar del centro de los EE.UU.) al 1-888-862-3289. © 2008 Thomas & Betts Corp. Memphis, Tennessee 38125 Hecho en México www.tnb.com C TA03936 B Página 3 de 4 ¡DESCONECTE LA ELECTRICIDAD! INSTALE EL ARTEFACTO DE ILUMINACIÓN 1. Esta lámpara puede instalarse de dos maneras: A. Móntela en una tubería rígida roscada, la cual a su vez se monta en una caja de salida. Después de que la caja de salida esté instalada y los conductores de alimentación se hayan conectado a la caja de salida, siga estas instrucciones comenzando por el paso 2 que se indica a continuación. B. Móntela en un Sistema de instalación para equipo de iluminación para jardines Red•Dot ® QuickPost® con toma de corriente. El Modelo No. K805BR se vende por separado. El paquete del Modelo No.K805BR incluye instrucciones de instalación completas. Figura 1 1/2 pulgada Figura 2 2. Pase los conductores del artefacto a través de la tubería y dentro de la caja de salida. Entornille el artefacto en la tubería (Figura 1). 3. Pele 1/2 pulgada del aislante de los extremos de los dos cables en el artefacto. Si es necesario, también pele 1/2 pulgada del aislante de los conductores de alimentación y del conductor de puesta a tierra (Figura 2). 4. Conecte el artefacto a los conductores de alimentación de la manera siguiente: Junte los conductores blancos y coloque un empalme plástico en los extremos de los conductores y gírelo en el sentido de las manecillas del reloj (Figura 3). De la misma manera, conecte los conductores negros. Asegúrese de que los conectores de los conductores se encuentren firmemente ajustados y que no haya ningún conductor desnudo visible. Empujetodo el cableado dentro de la caja de salida. NOTA: Si el artefacto se conecta a una caja de salida no metálica o a un poste no metálico, deberá conectar el artefacto a tierra. Introduzca el tornillo verde de puesta a tierra en la protuberancia de puesta a tierra en la base del artefacto y ajústelo una vuelta. (Este es un tornillo autorroscante que forma su propia rosca a medida que se va ajustando.) Pase el conductor de puesta a tierra a través del orificio roscado del artefacto. Pase el conductor de puesta a tierra por debajo del portalámpara e instálelo debajo del tornillo de puesta a tierra y ajuste. NO apriete demasiado ya que podría romperse la cabeza del tornillo. INSTALE LA BOMBILLA 1. Retire los tornillos de la parte superior del artefacto de iluminación (Figura 6) y retire todas las hileras (Figura 4). 2. Retire la pantalla de vidrio (Figura 5). 3. Enrosque la bombilla en el portalámparas. Para un equipo de iluminación de 3 hileras (K330/K330BR) use una bombilla de rosca mediana de 75 vatios como máximo. Para un equipo de iluminación de 4 hileras (K440/K440BR), use una bombilla de rosca mediana de 100 vatios como máximo. Figura 3 Figura 5 Figura 4 Figura 6 Figure 6 4. Reemplace la pantalla, las hileras, y la parte superior (la pantalla no se enrosca a la base). Ajuste los tornillos firmemente (Figura 6). Figure 5 5. Conecte la electricidad. Figure 4 6. Encienda el interruptor de luz. Si la unidad no enciende, verifique la bombilla en otro artefacto. Si la bombilla funciona, DESCONECTE LA ELECTRICIDAD y vuelva al paso 1, en la sección Instale el artefacto de iluminación, arriba. Figure 3 THOMAS & BETTS CORPORATION GARANTÍA LIMITADA POR DOS AÑOS Thomas & Betts Corporation vende este producto asumiendo que el usuario realizará todas las pruebas necesarias para determinar la idoneidad de este producto para la aplicación deseada del usuario, y garantiza al comprador original que este producto no tendrá fallas en materiales ni mano de obra durante dos (2) años a partir de la fecha de compra. De acuerdo con las limitaciones establecidas a continuación, Thomas & Betts Corporation reparará o reemplazará, a su exclusivo criterio, cualquier producto que se compruebe defectuoso en condiciones normales de instalación, utilización y servicio. Thomas & Betts Corporation se reserva el derecho de reemplazar cualquier producto bajo garantía con un producto sustituto de funcionamiento similar si el producto bajo garantía ya no está disponible. La instalación, operación o uso del producto para el cual se emite esta garantía constituirá la aceptación de los términos de dicha garantía. Esta garantía es nula si el producto ha estado sujeto a mal uso, negligencia, accidentes, fuego, inundaciones, daños físicos, instalación incorrecta, modificación no autorizada, o utilización incumpliendo nuestras instrucciones o alguna ley, código u ordenanza aplicables. Esta garantía es nula si el producto ha estado sujeto a mal uso, negligencia, accidentes, fuego, inundaciones, daños físicos, instalación incorrecta, modificación no autorizada, o utilización que haya incumplido nuestras instrucciones o alguna ley, código u ordenanza aplicables. SE NIEGA TODA GARANTÍA IMPLÍCITA DE COMERCIABILIDAD E IDONEIDAD PARA UN PROPÓSITO PARTICULAR HASTA EL GRADO PERMITIDO POR LA LEY. CUALQUIER GARANTÍA IMPLÍCITA QUE NO PUEDA SER NEGADA ESTÁ LIMITADA EN DURACIÓN AL PLAZO DE UN AÑO A PARTIR DE LA FECHA DE COMPRA. Algunos estados no permiten limitaciones sobre cuanto dura una garantía implícita, de modo que la limitación antes mencionada puede no aplicarse a usted. DE ACUERDO CON ESTA GARANTÍA, LAS OBLIGACIONES DE THOMAS & BETTS CORPORATION SÓLO SE LIMITAN A LA REPARACIÓN O AL REEMPLAZO DEL PRODUCTO. THOMAS & BETTS CORPORATION NO SERÁ RESPONSABLE POR NINGÚN DAÑO INCIDENTAL, ESPECIAL O EMERGENTE, NI POR DAÑOS DIRECTOS EN EXCESO DEL PRECIO DE COMPRA DEL PRODUCTO. ESTE DESCARGO DE RESPONSABILIDAD SEGUIRÁ SIENDO APLICABLE EN EL CASO DE QUE ALGÚN RECURSO AQUÍ MENCIONADO NO CUMPLA CON SU PROPÓSITO ESENCIAL. Algunos estados no permiten la exclusión ni la limitación de daños incidentales ni emergentes, de modo que las limitaciones o exclusiones mencionadas anteriormente pueden no aplicarse a usted. Para informar sobre un producto defectuoso, llame al Servicio al cliente al 1-888-862-3289. Esta garantía le da derechos legales específicos, pero usted también puede tener otros derechos que varían de estado a estado. This warranty is void if the product has been subjected to misuse, neglect, accident, fire, flood, physical damage, improper installation, unauthorized modification, or use in violation of our instructions or any applicable laws, codes or ordinances. ALL IMPLIED WARRANTIES OF MERCHANTABILITY AND FITNESS FOR A PARTICULAR PURPOSE ARE DISCLAIMED TO THE EXTENT ALLOWED BY LAW. ANY IMPLIED WARRANTIES THAT CANNOT BE DISCLAIMED ARE LIMITED IN DURATION TO A TERM OF ONE YEAR FROM THE DATE OF PURCHASE. Some states do not allow limitations on how long an implied warranty lasts, so the above limitation may not apply to you. THOMAS & BETTS CORPORATION TWO YEAR LIMITED WARRANTY Thomas & Betts Corporation sells this product with the understanding that the user will perform all necessary tests to determine the suitability of this product for the user's intended application, and warrants to the original purchaser that this product will be free from defects in material and workmanship for two (2) years from the date of purchase. Subject to the limitations set forth below, Thomas & Betts Corporation will repair or replace, at its sole option, any product that proves to be defective under normal installation, use and service. Thomas & Betts Corporation reserves the right to replace any warranted product with a substitute product of similar function if the warranted product is no longer available. Installation, operation or use of the product for which this warranty is issued shall constitute acceptance of the terms hereof. Figure 2 1/2” TA03936 B Página 4 de 4 TA03936 B Page 2 of 4 To report a defective product, call customer service at 1-888-862-3289. This warranty gives you specific legal rights, and you may also have other rights which vary from state to state. THOMAS & BETTS CORPORATION’S OBLIGATIONS UNDER THIS WARRANTY ARE LIMITED TO REPAIR OR REPLACEMENT OF THE PRODUCT ONLY. THOMAS & BETTS CORPORATION WILL NOT BE LIABLE FOR ANY INCIDENTAL, SPECIAL OR CONSEQUENTIAL DAMAGES, OR FOR DIRECT DAMAGES IN EXCESS OF THE PURCHASE PRICE OF THE PRODUCT. THIS DISCLAIMER OF LIABILITY SHALL CONTINUE TO BE ENFORCEABLE IN THE EVENT THAT ANY REMEDY HEREIN SHALL FAIL OF ITS ESSENTIAL PURPOSE. Some states do not allow the exclusion or limitation of incidental or consequential damages, so the above limitations or exclusions may not apply to you. 6. Turn on the light switch. If the unit does not light, check the bulb in another fixture. If the bulb works, TURN OFF THE POWER and return to step 1, under Install The Light Fixture section, above. 5. Turn on power. 4. Replace the globe, tiers, and top (globe does not screw into base). Tighten the screws firmly (Figure 6). 3. Screw bulb into socket. For a 3-tier garden light (K330/K330BR) use a 75-watt maximum medium base bulb. For a 4-tier garden light (K440/K440BR), use a 100-watt maximum medium base bulb. 2. Remove the glass globe (Figure 5). 1. Remove the screws from the top of the light (Figure 6) and lift off the tiers (Figure 4). INSTALL THE BULB NOTE: If fixture is connected to a non-metallic outlet box or post, the fixture must be grounded. Insert the green ground screw into the ground boss in the base of the fixture and tighten one turn. (This is a self-tapping screw which creates its own thread as it is tightened.) Feed the supply ground wire through the threaded hole in the fixture. Bring the ground wire from underneath the socket and install it under the ground screw and tighten. DO NOT overtighten as you may break the screw head. 4. Wire the fixture to the supply wires as follows: Hold the white wires together and twist a wire connector over the ends of the wires in a clockwise direction (Figure 3). In the same manner, connect the black wires. Make sure wire connectors are secure and that no bare conductors are visible. Push all wiring into the outlet box. 3. Strip off 1/2” of the insulation from the ends of the two wires on the fixture. If necessary, also strip off 1/2” of insulation from the supply wires and the ground wire (Figure 2). Figure 1 2. Feed the wires from the fixture though the conduit and into the outlet box. Screw the fixture onto the conduit (Figure 1). 1. This fixture can be mounted in one of two ways. A. Mount onto a rigid threaded conduit which is mounted on an outlet box. Once the outlet box is installed and supply wires are fed into the box, continue with these instructions beginning with step 2, below. B. Mount onto a Red•Dot ® QuickPost ® Landscape Lighting and Power Outlet Installation System. Sold separately, Model No. K805BR. Complete installation instructions are supplied with the K805BR package. INSTALL THE LIGHT FIXTURE TURN POWER OFF!-
 1
1
-
 2
2


en otros idiomas
- English: Red Dot B330BBR Installation guide
Artículos relacionados
-
 Red Dot CKLSVU-R Instrucciones de operación
-
Red Dot CKMUV-R Instrucciones de operación
-
 Red Dot 2CKU-R Instrucciones de operación
-
 Red Dot CKMU-R Instrucciones de operación
-
 Red Dot B805BR Instrucciones de operación
-
 Red Dot S121E-R Instrucciones de operación
-
 Red Dot CKPS-G Instrucciones de operación
-
 Red Dot DKG Guía de instalación


