Reliable G4 Manual de usuario
- Categoría
- Limpiadores a vapor de ropa
- Tipo
- Manual de usuario
Este manual también es adecuado para


01
G4 & G4M PARTS IDENTIFIER 01
INSTRUCTION MANUAL ENGLISH 03
GUIDE D’UTILISATION FRANÇAIS 13
MANUAL DE INSTRUCCIONES ESPAÑOL 23
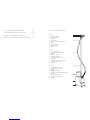
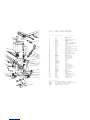
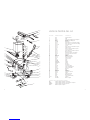
G4 PARTS IDENTIFIER
ENGLISH
1 Brush (removable)
2 PVC steam head
3 Handle
4 Steam hose
5 Rod set (supports steam hose)
6 Bottle
7 Rod set holder
8 Body of steamer
9 Wheels
FRANÇAIS
1 Brosse (amovible)
2 Collecteur de vapeur en PVC
3 Manette
4 Boyau de vapeur
5 Ensemble de tirant
(soutient le boyau de vapeur)
6 Bouteille
7 Support pour ensemble de tirant
8 Corps du vaporisateur
9 Volants
ESPAÑOL
1 Cepillo (para remover)
2 Cabezal de vapor de PVC
3 Mango
4 Manguera de vapor
5 Varilla (soporta la manguera de vapor)
6 Botella
7 Soporte de la varilla
8 Cuerpo del vaporizador
9 Ruedas
3
1
2
4
5
6
7
8
9

0302
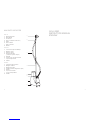
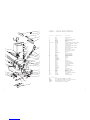
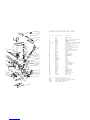
G4M PARTS IDENTIFIER
ENGLISH
1 Metal steam head
2 Wood handle
3 Steam hose
4 Rod set (supports steam hose)
5 Bottle
6 Rod set holder
7 Body of steamer
8 Wheels
FRANÇAIS
1 Collecteur de vapeur métallique
2 Manette en bois
3 Boyau de vapeur
4 Ensemble de tirant
(soutient le boyau de vapeur)
5 Bouteille
6 Support pour ensemble de tirant
7 Corps du vaporisateur
8 Volants
ESPAÑOL
1 Cabezal de vapor metálico
2 Mango de madera
3 Manguera de vapor
4 Varilla (soporta la manguera de vapor)
5 Botella
6 Soporte de la varilla
7 Cuerpo del vaporizador
8 Ruedas
2
1
3
4
5
6
7
8
G4 & G4M
INSTRUCTION MANUAL
ENGLISH

0504
Thank you for purchasing the Reliable™ G4/G4m fabric
steamer. Please follow the instructions carefully. With proper
care and maintenance, your steamer will provide years of
dependable service.
IMPORTANT SAFETY INSTRUCTIONS
Your Reliable™ G4/G4m steamer is made for professional and home use.
Please follow these basic instructions to ensure your safety:
•Readallinstructionsbeforeusingthesteamer.
•Usethesteamerforitsintendeduseonly.
•Inordertopreventharm,whenthesteamerbeginstosteam,besuretoface
the steam head away from your body.
•Toprotectagainstelectricalshock,donotimmersethesteamerinwateror
other liquids.
•Todisconnecttheplugfromthewalloutlet,gentlyremovetheplug(donotpull
on the cord).
•Donotallowthecordtotouchahotsurface.Afteruse,allowtocompletely
cool before storage.
•Whenllingwithwater,emptyingorwhilenotinuse,alwaysmakesurethatthe
steamer is disconnected.
•Makesurethepowerswitchisintheoffpositionwhenpluggingorunplugging
the unit from the wall circuit.
• Beforeturningthepowerswitchon,makesurethewaterbottlehasbeenlled.
• Donotoperatethefabricsteamerwithadamagedcord,plugorifthesteamer
has been dropped or damaged. This will void any and all warranties. Please
contact the place of purchase for repair procedure.
•Closesupervisionisnecessaryforanysteamerbeingusedbyornearchildren.
Donotleavethesteamerunattendedwhileconnected
•Cautionmustbeusedwhenthesteamerison,assomepartscangetveryhot.
Please use care when you turn a steamer upside down as there may be hot
water in the reservoir.
•Neversteamnearaperson’sbody,asthesteamisextremelyhot.
• Ifanextensioncordisnecessary,usea15ampheavy-dutygroundedextension
cord only.
FEATURES & PERFORMANCE
•One-gallonwatercapacity
•Heavy-dutybrassheatingelement
•Super-ex™steamhose
•Bottlewontfalloffsteamer
•Noneedtoemptysteameraftereachuse
•Automaticshut-offfeaturewiththermalfuse
•Storesuprightinasmallspace
•PVCsteamhead–2xthethicknessofotherbrands(G4model)
•Removablebrush(G4model)
•Metalheadwithwoodhandle(G4mmodel)
•Easyrollcastersformaneuverability
HOW TO STEAM
Fabriccareprofessionalsknowandappreciatethevalueofsteamforgently
de-wrinklingalltypeoffabrics.Fabricsteamingisfastandsafe,andhasamyriad
ofapplicationsincludingclothing,upholstery,(autoandhome)windowfashions,
and linens. Your Reliable G4/G4m fabric steamer has been designed to provide the
bestqualitysteamforthesetasks.Hereareafewtips:
1. Itisimportanttomakesurethatthesteamhoseisinanupright(vertical)
positionsothatanycondensationcanowbacktothesteamer.Ifyoudo
have to steam in a low position it is suggested that you frequently lift the
steamheadupsothatthehoseisextended.
2. Forverylongarticleslightpantsorcoats,itmightbehelpfultoputthegarment
on a hanger and place the hanger on the top of a doorframe (or any high
shelf that would accommodate a hanger).
3. Thiswillallowyoutosteamhigherup,andreducethechanceofcondensation
forming in the steam hose.
4. Itmaybehelpfultogentlypullthebottomofthegarment(hem)toallow
thesteamtopenetratethefabricandreleasethewrinkles.Thismaybe
particularly useful at the seam of a garment.
5. Itisnotnecessaryto“push”thesteamheadontothefabric.Lightlytouching
thematerialisallthatisusuallyneeded.Forfabricswithanap(corduroy,
velvet,velour),thebrushthatisincludedwiththeG4modelisveryhelpfulfor
refreshing the fabric while protecting the nap of the fabric.

0706
HOW TO STEAM CONTINUED…
6. Some garments may react better if they are steamed from the inside.
7. Retailclothingstoresknowtheadvantageofhavingagarmentsteameron
thesalesoor,readyforquicktouchupstomakethegarmentlooklikenew
again. While you can easily store the G4/G4m when not in use (the water
should be drained from the unit if it will be stored for a long period of time)
thebestwaytousethesteamerislikethepros.Haveitinaconvenient
spot where you will use it the most frequently. For some people that would be
intheirlaundryroom,forothersit’sintheirbedroom.BecausetheG4/G4m
heatsupsoquickly(lessthanoneminute)itistheperfectsolutiontotheun-
wearablewrinkledblouseorsweater.Plugitin,turniton,sixtyseconds
laterafewwavesofthesteamheadandyouarelookingyourbest…everyday.
DIRECTIONS FOR USE
TheG4/G4miseasytouse,andeasytosetup.
1. The3-piecerodsetthatholdsupthesteamheadneedstobescrewed
together.Whendone,placetherodsetintothedevicethatholdsitinplace.
2. Withthesuppliedwrench,attachthehosetothebodyofthesteamerand
tighten until it is snug.
3. The same wrench can also be used for tightening the device that holds the
rod set. The steam head can be placed in the upper portion of the rod set until
it is ready for use.
4. Remove the cap from the water bottle. Fill the water bottle with regular tap
ordistilledwater;replacethecapandturninvertthebottle,placing
it in the body of the steamer.
5. Alwaysmakesurethereiswaterinthebottle.DONOTALLOWTHESTEAMERTO
RUNDRY.
6. Turntheuniton,waitforaboutsixtysecondsforthesteamtostart.
7. Itisagoodideatoperiodicallypouroldwateroutofthesteamertoavoid
mineralbuild-up.
NOTE: If rinsing the unit does not improve the performance, the steamer
may require more thorough cleaning. This must be done by an authorized service
center only, or the warranty will be void.
TROUBLESHOOTING
Donotoperatethefabricsteamerwithadamagedcord,plugorifthesteamer
hasbeendroppedordamaged.Toavoidriskofelectricshock,donotdisas-
semble or attempt to repair the unit on your own. Return the unit to Reliable
Corporation(seewarranty)forexamination,repairorreplacement.
PROBLEM
Steamer does not get hot.
The unit is not
producing steam.
Unitproduceslittlesteam
and cycles on/off.
The switch light does not
illuminate when the switch is
turned to the on position.
Water drips from nozzle.
REMEDY
1. Plug the steamer in.
Turn it on.
2. Push the on/off switch to
the off position. Fill the
waterbottleandtitin
place. Turn on.
1. Push the on/off switch to
theoffposition.Rellthe
waterbottleandtitin
place. Turn on.
2. Replace heating element.
1. Throw the old water out
andushtheunit.
2. Replace thermostat.
1. Replace part.
2. Replace part.
3. Replace part.
4. Try plugging into a different
outlet.
1. Hold the hose upright and
allowtodrainbackintothe
base of the unit.
POSSIBLE CAUSES
1. Steam unit is not plugged
in or turned on.
2. Automaticshut-offhas
engaged. The water bottle
is empty and the reservoir
has drained.
1. Water level is too low.
2. Element may not be
functioning.
1. Unitisdirtyandrequires
cleaning.
2. The thermostat may be
defective.
1. Switchisnotworking.
2. Cord is not good.
3. Fuse wire is bad.
4. The outlet may not have
power.
1. Condensation has formed
inside the steamer hose.

08 09
G4
1
2
3
20
21
22
23
24
25
26
27
28
29
30
31
32
33
34
35
36
37
38
39
4
40
41
42
43
44
45
5
6
7
8
9
10
11
12
13
14
15
16
17
18
19
G4 PARTS LIST
REF. NO. PART NUMBER DESCRIPTION
1 HS-3 OuterHousing
2 HS-9 Cap
3 HS-10 HoseBarbNut
4 HS-11 HoseBarb
5 HS-12 Spring
6 HS-14W Hose
7 HS-20 HandleCoverBottom
8 HS-21 HandleCoverTop
9 HS-22/23 SteamHead
10 HS-32 Brush
11 HS-19 HangerRodTop
12 HS-18 NutCap
13 HS-17 HangerRodMiddle
14 HS-16 ThreadedConnector
15 HS-24 HangerRodBottom
16 HS-13 RodBase
17 HS-29 RodBasewasher
18 HS-28 RodBaseFitting
19 HS-8 Washer
20 GB818-85 Screw
21 HS-7 ElementCap
22 HS-2-0 Heaterelement
23 HS-1-0 SiliconeTubing
24 HS-4 ElbowConnector
25 HS-SP Spanner
26 HS-MAG Magnet
27 GB845-85 Screw
28 GB5285-85 Screw
29 HS-A-6 Caster
30 HS-1 BasePlate
31 HS-2W CordBushing
32 HS-A-3 PowerCord
33 HS-A-1 On/OffSwitch
34 HS-27W NamePlate
35 HS-25 Footer
36 GB818-85 Screw
37 HS-A-2 Thermostat
38 HS-A-5 Clamp
39 HS-A-4 Fuse
40 HS-5 BottleCap
41 HS-15 WaterBottle
42 HS-4 Elbow(sameasHS-24)
43,44 HS-CLIP Clip
45 HS-SEAL Seal
ASSEMBLIES: NOT SHOWN IN DIAGRAM
HHC Plastic Head and Handle Complete
HSHHC Plastic Head/Handle w/Hose Complete
HSMHHC Metal Head w/Hose Complete
HS-HR HangerRodComplete

1110
G4m
1
2
3
20
21
22
23
2425
26
27
28
29
30
31
32
33
34
35
36
37
38
39
4
40
41
42
43
44
45
46
5
6
7
8
11
12
13
14
15
16
17
18
19
9
10
G4M PARTS LIST
REF. NO. PART NUMBER DESCRIPTION
1 HS-3 OuterHousing
2 HS-9 Cap
3 HS-10 HoseBarbNut
4 HS-11 HoseBarb
5 HS-12 Spring
6 HS-14W Hose
7-9,45,46 METALH MetalHeadw/WoodHandle
10 HS-19 HangerRodTop
11 HS-18 NutCap
12 HS-17 HangerRodMiddle
13 HS-16 ThreadedConnector
14 HS-24 HangerRodBottom
15 HS-13 RodBase
16 HS-29 RodBasewasher
17 HS-28 RodBaseFitting
18 HS-8 Washer
19 GB818-85 Screw
20 HS-7 ElementCap
21 HS-2-0 Heaterelement
22 HS-1-0 SiliconeTubing
23 HS-4 ElbowConnector
24 HS-SP Spanner
25 HS-MAG Magnet
26 GB845-85 Screw
27 GB5285-85 Screw
28 HS-A-6 Caster
29 HS-1 BasePlate
30 HS-2W CordBushing
31 HS-A-3 PowerCord
32 HS-A-1 On/OffSwitch
33 HS-27W NamePlate
34 HS-25 Footer
35 GB818-85 Screw
36 HS-A-2 Thermostat
37 HS-A-5 Clamp
38 HS-A-4 Fuse
39 HS-5 BottleCap
40 HS-15 WaterBottle
41 HS-4 Elbow(sameasHS-24)
42,43 HS-CLIP Clip
44 HS-SEAL Seal
ASSEMBLIES: NOT SHOWN IN DIAGRAM
HHC Plastic Head and Handle Complete
HSHHC Plastic Head/Handle w/Hose Complete
HSMHHC Metal Head w/Hose Complete
HS-HR HangerRodComplete

1312
LIMITED 1 YEAR WARRANTY
Foraperiodofoneyearfromdateofpurchasewewill,freeofcharge,repairdefects
inmaterialorworkmanshipwhichappearinthemechanicalorelectricalpartsofall
Reliable™brandproductsexcludingallwearandtearcomponents.
Wear&TearComponentList:
• SteamEquipment:presspadandcover,Teon®seals,Teon®shoe,
steam-electrichoses
• SewingEquipment:hooks,loopers,stitchplates,feeddogs,needles,
motorclutchdisc,brushes
• ClothCuttingEquipment:blades,stones,sharpeningbands,shoe
• HalogenLights:bulbs
LIMITED 90-DAY WARRANTY
Foraperiodof90daysfromdateofpurchasewewill,freeofcharge,providerequired
adjustments and repairs to your Reliable™ product.
Warranty service is available by returning the product with this warranty document and
proof of purchase to your nearest authorized Reliable™ service center.
This limited warranty is in effect provided that your machine is used for normal purposes
forwhichitwasintended,andisgivenreasonablegoodcareandmaintenancein
accordancewiththeinstructionscontainedintheinstructionbooklet.
Your authorized dealer (or Reliable Corporation) will not be held responsible for damage
if the machine has been repaired by an unauthorized dealer.
Thesewarrantiesgiveyouspeciclegalrightsandyoumayhaveotherrights,whichvary
from province/state to province/state.
Ifyouhaveanyquestionsregardingthesewarranties,youmaywriteto:
Reliable Corporation
100WingoldAvenue,Unit5
Toronto,Ontario
Canada M6B 4K7
www.reliablecorporation.com
RELIABLEPRODUCTSWARRANTY
RELIABLE PRODUCTS WARRANTY
LIMITED 1 YEAR WARRANTY
For a period of one year from date of purchase we will, free of charge, repair defects in material or workmanship
which appear in the mechanical or electrical parts of all Reliable™ brand products excluding all wear and tear com-
ponents.
Wear and Tear Component List:
• Steam Equipment: Press pad and cover, Teflon®seals, Teflon®shoe, steam-electric hoses
• Sewing Equipment: Hooks, loopers, stitch plates, feed dogs, needles, motor clutch disc, brushes, fuse
• Cloth Cutting Equipment: Blades, stones, sharpening bands, shoe
• Halogen Lights: Bulbs
LIMITED 90-DAY WARRANTY ON ALL PARTS AND ADJUSTMENTS
For a period of 90 days from date of purchase we will, free of charge, pro-vide required adjustments and repairs to
your Reliable™ product.
Warranty service is available by returning the product with this warranty document and proof of purchase to your
nearest authorized Reliable™ service center.
This limited warranty is in effect provided that your machine is used for normal purposes for which it was
intended, and is given reasonable good care and maintenance in accordance with the instructions contained
in the instruction booklet.
Your authorized dealer (or Reliable Corporation) will not be held responsible for damage if the machine has been
repaired by an unauthorized dealer.
These warranties give you specific legal rights and you may have other rights, which vary from province/state
to province/state.
If you have any questions regarding these warranties, you may write to:
Reliable Corporation
100 Wingold Avenue, Unit 5
Toronto, Ontario
Canada M6B 4K7
www.reliablecorporation.com
G4 & G4M
GUIDE D’UTILISATION
FRANÇAIS

1514
Merci d’avoir acheté un défroisseur à vapeur ReliableMC
G4/G4m. Veuillez suivre les consignes suivantes attentivement.
Prenez bien soin de votre défroisseur et de son entretien
afin de lui assurer plusieurs années de service fiable.
IMPORTANTES CONSIGNES DE SÉCURITÉ
Votre défroisseur ReliableMCG4/G4mestconstruitpourl’usageprofessionnel
ainsi que ménager. Suivez toujours les précautions suivantes pour assurer votre
sécurité :
•Liretouteslesinstructionsavantl’utilisationdevotredéfroisseur.
•N’utilisezvotredéfroisseurquepourlesapplicationsprévues.
•Pouréviterlesblessures,assurez-vousdepointerlediffuseurdevapeurloin
ducorpsaussitôtquelavapeurcommenceàs’échapperdel’appareil.
•Pourréduiretoutrisquedechocélectrique,n’immersezjamaisvotreappareil
dansl’eauoutoutautreliquide.
•Nedébranchezjamaisledéfroisseurentirantsurlecordonélectrique,saisis-
sezplutôtlached’alimentationetretirez-ladelaprisedecourant.
•Protégezlecordondessurfaceschaudes.Aprèschaqueutilisation,laissez
l’appareilrefroidiravantdeleranger.
•Assurez-vousquel’appareilestdébranchélorsduremplissageetduvidage
ainsiquelorsquel’appareiln’estpasutilisé.
•Assurez-vousquel’interrupteurestenpositiond’arrêt(OFF)avantdebrancher
oudedébrancherl’appareild’uneprisedecourant.
•Assurez-vousquelebacd’eauaétérempliavantdemettreledéfroisseur
en marche.
•N’utilisezpasledéfroisseursilecordonoulacheestendommagéousi
l’appareilaétééchappéouendommagé.Toutegarantieneseraplusvalable.
Veuillezcontacterlemagasind’achatpourtouteréparationnécessaire.
• Uneétroitesurveillanceestnécessairelorsquecetappareilestutiliséparouprès
d’unenfant.Nejamaislaisserunappareilbranchésanssurveillance.
• Soyezprudentlorsqueledéfroisseurestenmarchepuisquecertainsdeses
composantspeuventdevenirtrèschauds.Veuillezinverserledéfroisseuravec
leplusgrandsoinpuisqueleréservoirpourraitencorecontenirdel’eauchaude.
• N’utilisezjamaisledéfroisseurprèsducorpspuisquelavapeurestextrême-
ment chaude.
•Siunerallongeestnécessaire,n’utilisezqu’unerallongerobustede15Aavec
mise à la terre.
CARACTÉRISTIQUES ET PERFORMANCE
•Capacitéd’eau–4litres
•Élémentchauffantdurableenlaiton
•TuyauàvapeurSuper-exMC
•Bacd’eaurestantbienenplace
•Aucunbesoindeviderl’appareilaprèschaqueusage
•Arrêtautomatiquedesécuritéavecfusiblethermique
•Serangeverticalementdansunespacerestreint
• DiffuseurdevapeurenPVC–2foisl’épaisseurd’autresmarques(modèleG4)
•Brosseamovible(modèleG4)
•Diffuseurenmétalavecpoignéeenbois(modèleG4m)
•Roulettesfacilitantledéplacement
COMMENT DÉFROISSER
Lesprofessionnelsd’entretiendetextilesconnaissentetapprécientlavaleurdela
vapeurpourenleverdoucementlesplisdetoutessortesdetissus.Ledéfroissage
detissusgrâceàlavapeuraplusieursapplicationstelleslesvêtements,lestissus
d’ameublement(autoetmaison),lestenturesetlesliteriestoutenétantrapideet
sécuritaire. Votre défroisseur Reliable G4/G4m a été conçu pour offrir la meilleure
qualité de vapeur requise pour ces tâches. Voici quelques suggestions:
1. Ilestimportantdes’assurerqueletuyauàvapeursoitdansuneposition
verticalepourquetoutecondensations’égouttedansleréservoir.Sivous
deveztravaillerdansunepositionhorizontale,ilestpréférabledeleverle
diffuseurdevapeurfréquemmentanqueletuyaupuisses’égoutter.
2. Pourdesarticleslongstelsdespantalonsouunmanteau,ilestsuggéréde
lesplacersurunporte-vêtementsoutenuparlehautd’uncadredeporte
(outouteétagèrehautepouvantsoutenirunporte-vêtement).
3. Cette méthode garde le tuyau de vapeur vertical et permet de réduire la
formation de condensation dans ce dernier.
4. Ilestsuggérédetirerdoucementsurlebasduvêtement(ourlet)pour
permettre à la vapeur de pénétrer le tissu et relâcher les plis. Cela pourrait
êtreutileparticulièrementprèsdescouturesd’unvêtement.
5. Iln’estpasnécessairedeforcerlediffuseurdansletissu.Ilesthabituellement
sufsantdetoucherlematériellégèrement.Labrossequiaccompagne
lemodèleG4esttrèsutilepourrafraîchirlestissusavecpoil(velours,velours
côtelé,veloursépais)toutenprotégeantlepoildutissu.

1716
COMMENT DÉFROISSER CONTINUÉ…
6. Certainsvêtementssemblentmieuxsedéfroisseràpartirdel’intérieur.
7. Lesmagasinsdevêtementsreconnaissentlesbénécesd’avoirun
défroisseuràportéedelamainpourlesdernièresretouchesoffrantune
présentationparfaiteàtousleursvêtements.Bienquevouspouvez
rangerleG4/G4mavecdel’eaudansleréservoirentrelesusages,ilvaut
mieuxleviderpourunrangementprolongé.Lameilleurefaçonde
l’utiliserestd’imiterlesprofessionnels.Ledéfroisseurdevraitêtregardé
dansunendroitoùilserafaciled’accèsetoùvousl’utiliserezfréquem-
ment:pourcertainespersonnes,ceseraleursalledelavagesetpour
d’autres,leurchambreàcoucher.Puisqu’ilseréchauffetellement
rapidement,leG4/G4mestlasolutionidéalepourunvêtementqu’onne
peutportertantilestfroissé.Branchezledéfroisseur,mettez-leen
marcheetsoixantesecondesplustardilnesuftquedequelquespasses
aveclediffuseurpourêtreàvotremeilleur…commetoujours.
MODE D’EMPLOI
LeG4/G4mestfaciled’emploietsimpleàassembler.
1. Lestroistigesquisoutiennentlediffuseurdoiventêtrevisséesensemble.
Ensuite,placezlestigesassembléesdansledispositiflestenantenplace.
2. Attachezletuyauaucorpsdudéfroisseuràl’aidedelacléfournieet
serrezjusqu’àcequ’ilsoitbienajusté.
3. Lamêmeclépeutêtreutiliséepourajusterledispositiftenantl’ensemble
detiges.Lediffuseurdevapeurpeutêtreaccrochéàlapartiesupérieure
del’ensembledetigesjusqu’àsonutilisation.
4. Enlevezlebouchondubacd’eau.Remplissezlebacavecdel’eaudurobinet
oudel’eaudistillée;replacerlebouchonetinversezlebacenleplaçant
sur la base du défroisseur.
5. Assurez-voustoujoursqu’ilyadel’eaudanslebac.NEPERMETTEZPAS
AUDÉFROISSEURDEMANQUERD’EAU.
6. Mettezl’appareilenmarcheetattendezenviron60secondespourobtenir
de la vapeur.
7. Ilestpréférabledeviderl’eausaleduréservoirpériodiquementan
d’éviterlesdépôtsminéraux.
REMARQUE:Siunrinçagedudéfroisseurn’améliorepassaperformance,
l’appareilpeutnécessiterunnettoyageenprofondeur.Ceservicenedoitêtre
effectuéqueparlepersonneld’uncentredeserviceaprès-venteautorisé
par le fabricant ou la garantie ne sera plus valable.
DÉPANNAGE
N’utilisezjamaisledéfroisseursilecordonoulachedel’appareilestendommagé
ousil’appareilaétééchappéouendommagé.N’essayezjamaisdedémonter
ouderéparervous-mêmeledéfroisseurand’évitertoutrisquedechocélectrique.
Pourinspection,réparationouremplacement,veuillezapporterl’appareil
défectueuxàReliableCorporation(voirgarantie).
PROBLÈME
Ledéfroisseurnese
réchauffe pas.
L’appareilneproduit
pas de vapeur.
L’appareilproduitpeu
de vapeur et alterne
entrel’étatdemarche
(ON)etd’arrêt(OFF).
Levoyantdemiseen
circuitnes’illuminepas
lorsquel’interrupteur
est en position de
marche(ON).
Del’eaudégouttedu
diffuseur de vapeur.
SOLUTION
1. Branchezl’appareil.
Mettezl’appareilenmarche.
2. Mettezl’interrupteuren
positiond’arrêt(OFF).
Remplissezlebacd’eauet
mettez-leenplace.
Mettezl’appareilenmarche.
1. Mettezl’interrupteuren
positiond’arrêt(OFF).
Remplissezlebacd’eau
etmettez-leenplace.
Mettezl’appareilenmarche.
2. Remplacezl’élément
chauffant.
1. Jetezl’eausaleetnettoyez
l’unitéàgrandeeau.
2. Remplacez le thermostat.
1. Remplacezlapièce.
2. Remplacezlapièce.
3. Remplacezlapièce.
4. Essayez de brancher
l’appareildansuneprise
de courant différente.
1. Tenir le tuyau en position
verticale pour permettre
l’écoulementdanslabase
del’appareil.
CAUSE POSSIBLE
1. L’appareiln’estpasbranché
ouenpositiondemarche(ON).
2. L’arrêtautomatiques’est
déclenché.Lebacd’eau
estvideetleréservoirs’est
égoutté.
1. Leniveaud’eauesttropbas.
2. Ilestpossiblequel’élément
ne fonctionne pas.
1. L’appareilestsaleet
nécessite un nettoyage.
2. Lethermostatpeut
êtredéfectif.
1. L’interrupteurnefonctionne
pas.
2. Lecordonestendommagé.
3. Lelfusibleestdéfectueux.
4. Laprisedecourantn’estpeut-
êtrepasalimentéedecourant.
1. Delacondensations’est
forméeàl’intérieurdutuyau
à vapeur.

1918
G4 – LISTE DES PIÈCES
N° DE RÉF. NUMÉRO DE PIÈCE DESCRIPTION
1 HS-3 Boîtierextérieur
2 HS-9 Calotte
3 HS-10 Écroucannelépourboyau
4 HS-11 Canneluredeboyau
5 HS-12 Ressort
6 HS-14W Boyau
7 HS-20 Poignée–plaqueinférieure
8 HS-21 Poignée–plaquesupérieure
9 HS-22/23 Collecteurdevapeur
10 HS-32 Brosse
11 HS-19 Tirantdesuspension–supérieur
12 HS-18 Calotted’écrou
13 HS-17 Tirantdesuspension–médian
14 HS-16 Raccordleté
15 HS-24 Tirantdesuspension–inférieur
16 HS-13 Basedetirant
17 HS-29 Basedetirant–rondelle
18 HS-28 Basedetirant–Raccord
19 HS-8 Rondelle
20 GB818-85 Vis
21 HS-7 Calotted’élément
22 HS-2-0 Élémentchauffant
23 HS-1-0 Tubuluredesilicone
24 HS-4 Raccorddecoude
25 HS-SP Tricoise
26 HS-MAG Aimant
27 GB845-85 Vis
28 GB5285-85 Vis
29 HS-A-6 Roulette
30 HS-1 Plaquedefond
31 HS-2W Rondelleducordon
32 HS-A-3 Cordond’alimentation
33 HS-A-1 Interrupteur
34 HS-27W Plaquesignalétique
35 HS-25 Pied
36 GB818-85 Vis
37 HS-A-2 Thermostat
38 HS-A-5 Baguedeserrage
39 HS-A-4 Fusible
40 HS-5 Bouchondebouteille
41 HS-15 Bouteilled’eau
42 HS-4 Coude(identiqueàHS-24)
43,44 HS-CLIP Étrangleur
45 HS-SEAL Jointd’étanchéité
JEUX : NON ILLUSTRÉS
HHC Têteetmanetteenplastique–jeucomplet
HSHHC Têteetmanetteenplastiqueavecboyau–jeucomplet
HSMHHC Têtemétalliqueavecboyau–jeucomplet
HS-HR Tirantdesuspension–jeucomplet
G4
1
2
3
20
21
22
23
24
25
26
27
28
29
30
31
32
33
34
35
36
37
38
39
4
40
41
42
43
44
45
5
6
7
8
9
10
11
12
13
14
15
16
17
18
19

2120
G4M – LISTE DES PIÈCES
N° DE RÉF. NUMÉRO DE PIÈCE DESCRIPTION
1 HS-3 Boîtierextérieur
2 HS-9 Calotte
3 HS-10 Écroucannelépourboyau
4 HS-11 Canneluredeboyau
5 HS-12 Ressort
6 HS-14W Boyau
7-9,45,46 METALH Têtemétalliqueavecmanetteenbois
10 HS-19 Tirantdesuspension–supérieur
11 HS-18 Calotted’écrou
12 HS-17 Tirantdesuspension–médian
13 HS-16 Raccordleté
14 HS-24 Tirantdesuspension–inférieur
15 HS-13 Basedetirant
16 HS-29 Basedetirant–rondelle
17 HS-28 Basedetirant–Raccord
18 HS-8 Rondelle
19 GB818-85 Vis
20 HS-7 Calotted’élément
21 HS-2-0 Élémentchauffant
22 HS-1-0 Tubuluredesilicone
23 HS-4 Raccorddecoude
24 HS-SP Tricoise
25 HS-MAG Aimant
26 GB845-85 Vis
27 GB5285-85 Vis
28 HS-A-6 Roulette
29 HS-1 Plaquedefond
30 HS-2W Rondelleducordon
31 HS-A-3 Cordond’alimentation
32 HS-A-1 Interrupteur
33 HS-27W Plaquesignalétique
34 HS-25 Pied
35 GB818-85 Vis
36 HS-A-2 Thermostat
37 HS-A-5 Baguedeserrage
38 HS-A-4 Fusible
39 HS-5 Bouchondebouteille
40 HS-15 Bouteilled’eau
41 HS-4 Coude(identiqueàHS-24)
42,43 HS-CLIP Étrangleur
44 HS-SEAL Jointd’étanchéité
JEUX : NON ILLUSTRÉS
HHC Têteetmanetteenplastique–jeucomplet
HSHHC Têteetmanetteenplastiqueavecboyau–jeucomplet
HSMHHC Têtemétalliqueavecboyau–jeucomplet
HS-HR Tirantdesuspension–jeucomplet
G4m
1
2
3
20
21
22
23
2425
26
27
28
29
30
31
32
33
34
35
36
37
38
39
4
40
41
42
43
44
45
46
5
6
7
8
11
12
13
14
15
16
17
18
19
9
10

2322
GARANTIE LIMITÉE D’UN AN
Pourunepérioded’unanàpartirdeladated’achat,nousréparerons,sansfrais,tout
défautdematériauoudemain-d’œuvrequiparaîtdanslescomposantsmécaniques
ou électriques de tout produit de marque ReliableMC
,saufdanslescomposantssujets
àl’usure.
Listedescomposantssujetsàl’usure:
• Appareilsàvapeur:Tampondepresseetcouverture,jointsTeon®
,
semelleTeon®
,boyauxàvapeur-électriques
• Machinesàcoudre:Crochets,boucleurs,plaquedecouture,griffes
d’entraînement,aiguilles,disqued’embrayagedumoteur,balais,fusible
• Coupeusesd’étoffes:Lames,pierres,bandesd’affûtage,semelle
• Lampesàhalogène:Ampoules
GARANTIE LIMITÉE DE 90 JOURS SUR TOUTES LES PIÈCES ET LES RÉGLAGES
Pourunepériodede90jourssuivantladated’achat,nouseffectuerons,sansfrais,les
réglages et réparations requis sur votre produit ReliableMC
.
Le service en vertu de la garantie est offert en retournant votre produit, accompagné
de ce document de garantie et de la preuve d’achat, à votre centre de service après-
vente autorisé ReliableMC le plus proche.
Cette garantie limitée demeurera en vigueur pourvu que votre machine a été utilisée
auxnspourlesquelleselleaétéconçue,etpourvuqu’elleaitéténettoyéeet
entretenuedemanièreappropriéeetconformémentauxinstructionsfourniesdansle
guided’utilisation.
Votre détaillant autorisé (ou Reliable Corporation) ne sera pas responsable des
dommages si la machine a été réparée par un détaillant non autorisé.
Cesgarantiesvousconfèrentcertainsdroitsspéciquesetvouspourriezavoird’autres
droitsquivarientd’uneprovince/étatàl’autre.
Sivousavezdesquestionsconcernantcesgaranties,veuilleznousécrireà:
Reliable Corporation
100WingoldAvenue,Unit5
Toronto,Ontario
Canada M6B 4K7
www.reliablecorporation.com
GARANTIESURLESPRODUITSRELIABLE
RELIABLE PRODUCTS WARRANTY
LIMITED 1 YEAR WARRANTY
For a period of one year from date of purchase we will, free of charge, repair defects in material or workmanship
which appear in the mechanical or electrical parts of all Reliable™ brand products excluding all wear and tear com-
ponents.
Wear and Tear Component List:
• Steam Equipment: Press pad and cover, Teflon®seals, Teflon®shoe, steam-electric hoses
• Sewing Equipment: Hooks, loopers, stitch plates, feed dogs, needles, motor clutch disc, brushes, fuse
• Cloth Cutting Equipment: Blades, stones, sharpening bands, shoe
• Halogen Lights: Bulbs
LIMITED 90-DAY WARRANTY ON ALL PARTS AND ADJUSTMENTS
For a period of 90 days from date of purchase we will, free of charge, pro-vide required adjustments and repairs to
your Reliable™ product.
Warranty service is available by returning the product with this warranty document and proof of purchase to your
nearest authorized Reliable™ service center.
This limited warranty is in effect provided that your machine is used for normal purposes for which it was
intended, and is given reasonable good care and maintenance in accordance with the instructions contained
in the instruction booklet.
Your authorized dealer (or Reliable Corporation) will not be held responsible for damage if the machine has been
repaired by an unauthorized dealer.
These warranties give you specific legal rights and you may have other rights, which vary from province/state
to province/state.
If you have any questions regarding these warranties, you may write to:
Reliable Corporation
100 Wingold Avenue, Unit 5
Toronto, Ontario
Canada M6B 4K7
www.reliablecorporation.com
G4 Y G4M
MANUAL DE INSTRUCCIONES
ESPAÑOL

2524
Gracias por comprar el Vaporizador Profesional para Telas
G4/G4m de Reliable®
. Por favor siga las instrucciones
cuidadosamente. Con el cuidado y mantenimiento adecuado,
su vaporizador le proveerá servicio confiable durante años.
INSTRUCCIONES IMPORTANTES DE SEGURIDAD
Su Vaporizador Profesional para Telas G4/G4m está fabricado para uso profesional
y para el hogar. Por favor siga estas instrucciones básicas para cuidar su seguridad.
•Leatodaslasinstruccionesantesdeusarsuvaporizador.
•Sólouseelvaporizadorparaloqueestádiseñado.
•Paraevitarlesiones,cuandoelvaporizadorcomienceaemitirvapor,oriéntelo
endireccióncontrariaausted.
• Paraevitarchoqueseléctricos,nosumerjaelvaporizadorenaguaniotroslíquidos.
•Aldesconectareltomacorriente,jalesuavementedelenchufe(nojale
delcordón).
•Nopermitaqueelcordónhagacontactoconsuperciescalientes.Después
deusarlaunidad,esperequeseenfríecompletamenteantesdeguardarla.
•Cercióresequelaunidadestédesenchufadadeltomacorrientesiemprequela
llenedeagua,lavacíeonoestéenuso.
•Cercióresequeelinterruptorestéenposiciónde“Apagado”alenchufarodes-
enchufar la unidad del tomacorriente.
•Cercióresequelabotelladeaguaestéllenaantesdeencenderlaunidad.
• Noopereelvaporizadorsielcordónosuenchufeestuviesendañadosnidespués
quesehayacaídoodañado;porqueestoanularásugarantía.Pararepara-
ciones,comuníqueseconelestablecimientodondecomprólaunidad.
•Serequiereunasupervisiónestrechasiunniñousacualquiervaporizador
osihayniñoscercacuandoseusa.Nodesatiendaelvaporizadormientrasesté
enchufado a la corriente.
•Sedebetenercuidadocuandoelvaporizadorestéencendidoporquealgunas
de sus partes se calientan mucho. Tenga cuidado al invertir el vaporizador
porquepodríahaberaguacalienteenelreservorio.
•Nuncavaporicecercadelcuerpodeunapersonaporqueelvaporesextrema-
damente caliente.
•Sifuesenecesariousaruncordóndeextensión,sólouseunode15amperios
conconexiónatierra.
CARACTERÍSTICAS Y FUNCIONAMIENTO
•Capacidadpara3,8L(1Gal)deagua.
•Elementocalentadordebroncereforzado.
•MangueraSúper-Flex® para vapor.
•Labotelladeaguanosecaerádelvaporizador.
•Noesnecesariovaciarelvaporizadordespuésdecadauso.
•Dispositivodeapagadoautomáticoconfusibletérmico.
•Seguardaenposiciónverticalenunespaciopequeño.
•CabezalvaporizadordePVCconeldobledeespesorquelasotras
marcas (Modelo G4).
•Escobilladesmontable(ModeloG4).
•Cabezalaplicadordemetalconmangodemadera(ModeloG4).
•Ruedasparadesplazamientofácil.
CÓMO SE VAPORIZA
Losprofesionalesdedicadosalcuidadodelastelassabenyaprecianelvalordel
vaporparadesarrugarsuavementetodotipodetelas.Lavaporizaciónesrápida
ysegura,yseaplicaaunainnidaddetelascomoropa,tapices(automóvilesy
hogar),cortinasdemoda,sábanas,manteles,etc.SuvaporizadorReliableG4
yG4mestádiseñadoparaproveerlelamejorcalidaddevaporizaciónparaestas
tareas.Heaquíalgunosconsejos:
1. Esimportantemantenerlamangueradevaporenposiciónverticalparaque
lacondensaciónregresealtanquedelvaporizador.Sifuesenecesario
vaporizarenunaposiciónbaja,sesugierelevantarelcabezalaplicadorcon
frecuenciaparaextenderlamanguerahaciaarriba.
2. Podríaserútilcolocarprendaslargascomopantalonesoabrigosencolga-
dores en el canto superior o marco de una puerta (o repisa alta que pueda
acomodar el colgador).
3. Estolepermitirávaporizarhaciaarribayreducirlacondensaciónenla
manguera de vapor.
4. Estopuedeserútilparajalarsuavementelaparteinferiordelaprendapara
que el vapor penetre en la tela y deshaga las arrugas. Esto es especialmente
útilenlascosturasdelasprendas.
5. Noesnecesarioempujarelcabezalaplicadorcontralatela.Usualmente
sólosenecesitatocarlatelalevementeconelcabezalvaporizador.Paralas
telasconpelo(corduroy,terciopelo,velour)laescobillaqueseincluye
conelvaporizadormodeloG4esmuyútilpararefrescarlatelaalavezque
se protegen los pelos de la tela.

2726
CÓMO SE VAPORIZA CONTINUADO…
6. Algunasprendanreaccionanmejorsisevaporizandesdeelinterior.
7. Algunastiendasderopaconocenlaventajadedisponerdevaporizadores
en el piso de ventas para retoques rápidos que le devuelven la apariencia
denuevas.NoobstantequeelvaporizadorG4oelG4mpuedeguardarse
fácilmentecuandonoestéenuso,perodebedrenarseelaguasinoseva
usarporlargotiempo.Lamejorformaparausarelvaporizadorescomolos
profesionales,manteniéndoloenunlugarconvenientedondeseusamás
frecuentemente.Paraalgunaspersonasesosignicaenlalavandería,pero
paraotrospuedesereldormitorio.DebidoaqueelvaporizadorG4oel
G4msecalientarápidamente(menosdeunminuto)eslasoluciónperfecta
paradesarrugarblusasysuéteres.Enchufeelvaporizador,enciéndaloy
60segundosdespuéspaseelcabezaldelvaporizadorvariasvecesporla
prendaytendráunabuenaaparienciatodoeldía.
INSTRUCCIONES PARA EL USO
El vaporizador G4 y el G4m es fácil de usar y de armar.
1. Las3piezasdelsoportedelcabezalaplicadordebenunirseenroscándose.
Luegocoloqueelsoporteeneldispositivoquelomantieneenposición.
2. Usandolallaveprovista,instalelamangueraenelcuerpodelvaporizador
yajústela.
3. Lamismallavepuedeusarseparaajustareldispositivoquesujetael
soporte donde se coloca el cabezal (en la parte superior) hasta que esté
listo para usarse.
4. Destapelabotellaylléneladeaguaregulardelallaveodeaguadestilada,
tapelabotella,inviértalaycolóquelaenelcuerpodelvaporizador.
5. Siempreasegúresequelabotellacontengaagua.NOPERMITAQUEEL
VAPORIZADORSEQUEDESECO.
6. Enciendalaunidad,espereporsesentasegundosparaqueproduzcavapor.
7. Esbuenaideavaciarperiódicamenteelaguaviejadelvaporizadorpara
evitarlaformacióndesarro.
NOTA:Silavarlaunidadinternamentenomejorasurendimiento,elvaporizador
requiereunalimpiezamásprofundaquesólolapuedehaceruncentrodeservicio
autorizado,oseanularálagarantía.
DIAGNÓSTICO Y SOLUCIÓN DE PROBLEMAS
Noopereelvaporizadorsielcordónosuenchufeestuviesendañadosnidespués
quesehayacaídoodañado;porqueestoanularásugarantía.Paraevitarel
riesgodechoqueeléctrico,nointentedesarmarlaunidadporsucuenta;devué-
lvalaaReliableCorporationparasuinspección,reparaciónoreemplazo
(vealagarantía).
PROBLEMA
El vaporizador
no calienta.
Launidadno
produce vapor.
Launidadproduce
poco vapor y se apaga
y enciende.
Laluzdelinterruptor
no se enciende en
posicióndeencendido.
Gotea agua de
la boquilla.
SOLUCIÓN
1. Enchufe y encienda el
vaporizador.
2. Presione el interruptor a la
posicióndeapagado(OFF).
Llenelabotelladeagua
ycolóquelaensuposición.
Encienda la unidad.
1. Presione el interruptor a la
posicióndeapagado(OFF).
Llenelabotelladeagua
ycolóquelaensuposición.
Encienda la unidad.
2. Reemplace el elemento
calentador.
1. Vacíeelaguaviejaylavela
unidad internamente.
2. Reemplace el termostato.
1. Reemplazar la pieza.
2. Reemplazar la pieza.
3. Reemplazar la pieza.
4. Pruebe enchufar a otro
tomacorriente.
1. Sostenga la manguera
derecha hacia arriba
para que el agua drene de
regreso a la unidad.
CAUSAS POSIBLES
1. El vaporizador no está enchu-
fado o encendido.
2 El interruptor automático esta
activado.Labotelladeagua
estávacíayelreservorioseha
drenado.
1. Niveldeaguamuybajo.
2. Elelementocalentadorpodría
estar defectuoso.
1. Launidadestásuciay
requiere limpieza.
2. Eltermostatopodríaestar
defectuoso.
1. El interruptor está defectuoso.
2. Elcordónestádefectuoso.
3. El fusible está defectuoso.
4. El tomacorriente de la pared
podríanotenercorriente.
1. El vapor se ha condensado
dentro de la manguera.

2928
LISTA DE PARTES DEL G4
NO. DE REF. NÚMERO DE PARTE DESCRIPCIÓN
1 HS-3 Cubiertaexterior
2 HS-9 Tapa
3 HS-10 Tuercadelalengüetadelamanguera
4 HS-11 LengüetadelaManguera
5 HS-12 Resorte
6 HS-14W Manguera
7 HS-20 Parteinferiordelacubiertadelmango
8 HS-21 Partesuperiordelacubiertadelmango
9 HS-22/23 Cabezaldevapor
10 HS-32 Cepillo
11 HS-19 Partesuperiordelavarilladesoporte
12 HS-18 Tapadetuerca
13 HS-17 Partemediadelavarilladesoporte
14 HS-16 Conectorroscado
15 HS-24 Parteinferiordelavarilladesoporte
16 HS-13 Basedelavarilla
17 HS-29 Arandeladelabasedelavarilla
18 HS-28 Acopledelabasedelavarilla
19 HS-8 Arandela
20 GB818-85 Tornillo
21 HS-7 Tapadelelemento
22 HS-2-0 Elementocalefactor
23 HS-1-0 Tubodesilicona
24 HS-4 Conectorcodo
25 HS-SP Llave
26 HS-MAG Imán
27 GB845-85 Tornillo
28 GB5285-85 Tornillo
29 HS-A-6 Ruedita
30 HS-1 Placabase
31 HS-2W Cojinetedelcable
32 HS-A-3 CabledeAlimentación
33 HS-A-1 LlavedeEncendido
34 HS-27W Etiqueta
35 HS-25 Pata
36 GB818-85 Tornillo
37 HS-A-2 Termostato
38 HS-A-5 Ganchodesujeción
39 HS-A-4 Fusible
40 HS-5 Tapadelabotella
41 HS-15 Botelladeagua
42 HS-4 Codo(igualalHS-24)
43,44 HS-CLIP Gancho
45 HS-SEAL Bordedegoma
CONJUNTOS: NO SE MUESTRAN EN EL DIAGRAMA
HHC Cabezal y mango de plástico completos
HSHHC Cabezal y mango de plástico con manguera completos
HSMHHC Cabezal y mango de metal completos
HS-HR Varilladesoportecompleta
G4
1
2
3
20
21
22
23
24
25
26
27
28
29
30
31
32
33
34
35
36
37
38
39
4
40
41
42
43
44
45
5
6
7
8
9
10
11
12
13
14
15
16
17
18
19

3130
LISTA DE PARTES DEL G4M
NO. DE REF. NÚMERO DE PARTE DESCRIPCIÓN
1 HS-3 Cubiertaexterior
2 HS-9 Tapa
3 HS-10 Tuercadelalengüetadelamanguera
4 HS-11 LengüetadelaManguera
5 HS-12 Resorte
6 HS-14W Manguera
7-9,45,46 METALH Cabezalmetálicoconmangodemadera
10 HS-19 Partesuperiordelavarilladesoporte
11 HS-18 Tapadetuerca
12 HS-17 Partemediadelavarilladesoporte
13 HS-16 Conectorroscado
14 HS-24 Parteinferiordelavarilladesoporte
15 HS-13 Basedelavarilla
16 HS-29 Arandeladelabasedelavarilla
17 HS-28 Acopledelabasedelavarilla
18 HS-8 Arandela
19 GB818-85 Tornillo
20 HS-7 Tapadelelemento
21 HS-2-0 Elementocalefactor
22 HS-1-0 Tubodesilicona
23 HS-4 Conectorcodo
24 HS-SP Llave
25 HS-MAG Imán
26 GB845-85 Tornillo
27 GB5285-85 Tornillo
28 HS-A-6 Ruedita
29 HS-1 Placabase
30 HS-2W Cojinetedelcable
31 HS-A-3 CabledeAlimentación
32 HS-A-1 LlavedeEncendido
33 HS-27W Etiqueta
34 HS-25 Pata
35 GB818-85 Tornillo
36 HS-A-2 Termostato
37 HS-A-5 Ganchodesujeción
38 HS-A-4 Fusible
39 HS-5 Tapadelabotella
40 HS-15 Botelladeagua
41 HS-4 Codo(igualalHS-24)
42,43 HS-CLIP Gancho
44 HS-SEAL Bordedegoma
CONJUNTOS: NO SE MUESTRAN EN EL DIAGRAMA
HHC Cabezal y mango de plástico completos
HSHHC Cabezal y mango de plástico con manguera completos
HSMHHC Cabezal y mango de metal completos
HS-HR Varilladesoportecompleta
G4m
1
2
3
20
21
22
23
2425
26
27
28
29
30
31
32
33
34
35
36
37
38
39
4
40
41
42
43
44
45
46
5
6
7
8
11
12
13
14
15
16
17
18
19
9
10

32
GARANTÍA LIMITADA DE 1 AÑO
GarantizamostodoslosproductosdelamarcaReliable™porunañoapartirde
lafechadecompracontradefectosdematerialodefabricaciónacualquierpiezaque
gureenlalistaderepuestosmecánicosoeléctricos,exceptoalassujetasa
desgaste por el uso.
Listadepiezassujetasadesgasteporeluso:
• Equiposdevapor:Empaquedepresiónytapa,sellosdeTeón®
,
zapatadeTeón®
,manguerasdevaporycordoneseléctricos
• Equiposparacoser:Ganchos,lanzaderas,placasparapuntada,
elementosalimentadores,agujas,discodeembraguedel
motor,escobillasdecarbones,fusibles
• Equiposcortadoresdetelas:Cuchillas,piedras,bandas
aladoras,zapatas
• Luceshalógenas:Focos
GARANTÍA LIMITADA DE 90 DÍAS PARA TODAS LAS PIEZAS Y REGULACIONES
Duranteelperiodode90díasapartirdelafechadecompraharemoslasregulaciones
necesarias y reparaciones a su producto Reliable™ sin costo.
El servicio de garantía está disponible remitiendo el producto con este documento
de garantía y el comprobante de compra al servicentro más cercano autorizado por
Reliable™.
Estagarantíaseaplicasihausadosumáquinaparalosnesnormalesparalosque
estádiseñadayqueselehayadadouncuidadoymantenimientorazonablemente
bueno de acuerdo a su manual de instrucciones.
Sudistribuidorautorizado(oReliableCorp.)noseránresponsablespordaños
ni perjuicios si la máquina hubiese sido reparada por un distribuidor o servicentro
no autorizado.
Estasgarantíasleotorganderechosespecícosyustedpodríatenerotrosderechos
quevaríanentrelosdiferentesestadosoprovincias.
Sitienecualquierpreguntasobreestasgarantías,escríbanosa:
Reliable Corporation
100WingoldAvenue,Unit5
Toronto,Ontario
Canada M6B 4K7
www.reliablecorporation.com
GARANTÍADELOSPRODUCTOSRELIABLE
RELIABLE PRODUCTS WARRANTY
LIMITED 1 YEAR WARRANTY
For a period of one year from date of purchase we will, free of charge, repair defects in material or workmanship
which appear in the mechanical or electrical parts of all Reliable™ brand products excluding all wear and tear com-
ponents.
Wear and Tear Component List:
• Steam Equipment: Press pad and cover, Teflon®seals, Teflon®shoe, steam-electric hoses
• Sewing Equipment: Hooks, loopers, stitch plates, feed dogs, needles, motor clutch disc, brushes, fuse
• Cloth Cutting Equipment: Blades, stones, sharpening bands, shoe
• Halogen Lights: Bulbs
LIMITED 90-DAY WARRANTY ON ALL PARTS AND ADJUSTMENTS
For a period of 90 days from date of purchase we will, free of charge, pro-vide required adjustments and repairs to
your Reliable™ product.
Warranty service is available by returning the product with this warranty document and proof of purchase to your
nearest authorized Reliable™ service center.
This limited warranty is in effect provided that your machine is used for normal purposes for which it was
intended, and is given reasonable good care and maintenance in accordance with the instructions contained
in the instruction booklet.
Your authorized dealer (or Reliable Corporation) will not be held responsible for damage if the machine has been
repaired by an unauthorized dealer.
These warranties give you specific legal rights and you may have other rights, which vary from province/state
to province/state.
If you have any questions regarding these warranties, you may write to:
Reliable Corporation
100 Wingold Avenue, Unit 5
Toronto, Ontario
Canada M6B 4K7
www.reliablecorporation.com

-
 1
1
-
 2
2
-
 3
3
-
 4
4
-
 5
5
-
 6
6
-
 7
7
-
 8
8
-
 9
9
-
 10
10
-
 11
11
-
 12
12
-
 13
13
-
 14
14
-
 15
15
-
 16
16
-
 17
17
-
 18
18
-
 19
19


Reliable G4 Manual de usuario
- Categoría
- Limpiadores a vapor de ropa
- Tipo
- Manual de usuario
- Este manual también es adecuado para
en otros idiomas
- français: Reliable G4 Manuel utilisateur
- English: Reliable G4 User manual