AgfaPhoto Action Camera Manual de usuario
- Tipo
- Manual de usuario

Gebruikershandleiding te downloaden op /
Руководство пользователя для загрузки на /
www.gtcompany.fr/en/customer-support/
User manual
Manuel d’utilisation
Bedienungsanleitung
Manual de usuario
Manuale d’uso
Manual do usuário
Instrukcja obsługi
Felhasználói kézikönyv
Uživatelský manuál
Action Camera

EN
PRECAUTIONS
1. This action camera is a high-
precision product to be handled
with care, do not drop or
damage it in any way.
2. Keep the camera apart from
anything having strong
magnetism or emitting strong
radio waves. A strong magnetic
field could cause the product
to malfunction or damage the
image and sound quality.
3. Select well-known micro SD
card brand, basic cards do
not guarantee the proper
functioning of the camera.
4. Do not use micro SD card in or
near magnetic place to avoid
losing its data storage.
5. During the charging process,
if there is overheating, smoke,
or odor, plug out the USB cable
immediately and stop power
supply to avoid fire.
6. When charging, keep the
USB cable out of the reach of
children to avoid the risk of
suffocation or electric shock.
7. Keep the product in a cool and
dry place.
PRODUCT FEATURES
- Thanks to its waterproof case,
the camera is water-resistant up
to 30 meters depth.
- Real-time preview and
long-distance remote control
via Wi-Fi with a smartphone
or tablet.
- Easy battery removal and
replacement.
- Web camera function.
- Supports up to 32GB memory
cards.
- Multiple video recording
resolutions: 1080P (30fps) / 720P
(30fps) / VGA (30fps).
CAMERA OVERVIEW

EN
INSTRUCTIONS
1. Inserting a micro SD card
You cannot use the camera without
first inserting a micro SD card in the
corresponding slot on its left side.
Preferably choose a well-known
brand micro SD card with up to
32GB storage capacity having been
formatted on a computer before
use.
Note: basic memory cards do not
guarantee the proper functioning of
the camera.
2. Installing and removing the
battery
A. Pull the battery cover out.
B. In accordance with the direction
of the positive and negative
symbols marked on the battery,
insert the battery into the slot
with the correct polarity until it is
well seated.
C. A battery icon will show up at the
top right of the screen indicating
the charging level status.
Note: To remove the battery, pull its
slot cover out and gently extract it
by catching the little tab.
3. Battery charging
A. Plug in the camera with the USB
cable to a computer or a power
adapter for charging.
B. The camera can also be charged
in a car by plugging it into a USB
car charger.
Note: Photo and video shooting are
possible while camera charging.
4. Power on and off
A. To switch on the camera,
press the Power key for about
3 seconds until the screen
lights up.
B. To shut down the camera,
press the Power key for about
3 seconds until the screen
turns off.
5. Mode switching
Once the camera is on, short press
the Mode key (same the Power
one) to successively switch from a
mode to another: video / photo /
playback / setting menu.
5.1. Video mode
A. First press the Mode key
(same as the Power one) until
moving to video mode (first
mode to appear on the screen
as it is the default one).
B. Then press the OK key to
start recording and press it
again to stop.
C. The yellow spot icon in the
upper left of the screen will
blink yellow indicating that
recording is in progress.
5.2. Photo mode
A. First press the Mode key
(same as the Power one) until
moving to photo mode.
B. Then press the OK key to take
a picture.
5.3. Playback mode
A. First press the Mode key
(same as the Power one) until
moving to playback mode.
B. Press the Up/Down keys to
select a video or a photo.
C. Then press the OK key to play
or display the selected file in
full screen.

EN
5.4. Setting menu
A. First press the Mode key (same
as the Power one) until moving
to setting mode and access to
the setting menu.
B. Press the Up/Down keys to
select the setting you want to
modify.
C. Press the OK key to enter the
sub-menu.
D. Select one of the setting
options and press the OK key
again to confirm your choice.
6. Wi-Fi connection
The camera can be connected
in Wi-Fi to Android or iOS
smartphone or tablet by following
these steps:
A. First install the GoPlus Cam
application on your smartphone/
tablet via Google Play Store for
Android or App Store for iOS.
B. Turn on the camera and press
the Wi-Fi key (also the Up key).
C. The Wi-Fi logo will then appear
on the screen in blue with the
AGFA_xxxxxxxxxxxx SSID (Wi-Fi
name with a 12-digit random
serial number) and the PWA2
(password) 12345678.
D. Enter the Wi-Fi settings of
your smartphone/tablet and
search the camera Wi-Fi SSID to
connect it.
E. Open GoPlus Cam application
on your smartphone/tablet to
control the camera remotely
and download videos or photos
taken this way directly on your
device.
6.1. Wi-Fi SSID setting
A. First press the Mode key (same
as the Power one) until moving
to setting mode and access to
the setting menu.
B. Press the Down key until
selecting the Wi-Fi SSID setting
and then press the OK key to
show the name of the Wi-Fi
network.
C. When a letter/figure is in green,
it means you can change it by
scrolling through the different
characters with the Up/Down
keys.
D. Once the right character is
selected, press the OK key to
confirm your choice and move to
next character.
E. Finally, press twice the Mode key
to exit and return to video mode.
6.2. Wi-Fi password setting
A. First press the Mode key (same
as the Power one) until moving
to setting mode and access to
the setting menu.
B. Press the Down key until
selecting the Wi-Fi PASSWORD
setting and then press the OK
key to show the password of
the Wi-Fi network.
C. When a letter/figure is in green,
it means you can change it by
scrolling through the different
characters with the Up/Down
keys.
D. Once the right character is
selected, press the OK key to
confirm your choice and move to
next character.
E. Finally, press twice the Mode key
to exit and return to video mode.
6.3. Wi-Fi power off
Shortly press the Up key to turn
off the Wi-Fi connection.

EN
SPECIFICATIONS
LCD screen2.0 inches
LensA + grade high-resolution wide-angle
lens
Languages
English/French/German/Spanish/Italian/
Portuguese/Dutch/Polish/Czech/
Hungarian/Russian
Video resolution
1080FHD (1920 x 1080) 30fps
720P (1280 x 720) 30fps
MVGA (848 x 480) 30fps
Video format AVI
Photo format JPG
Photo resolution
12M (2032 x 3024)
10M (3648 x 2736)
8M (3264 x 2448)
5M (2592 x 1944)
3M (2048 x 1536)
2M (1920 x 1080)
1.3M (1280 x 960)
Memory card
Micro SDHC, Class 10 or above
Photo mode Single shot/self-timer
(3/5/10/20 seconds)
USB 2.0
Power supply3.7V rechargeable Li-ion battery
Dimensions59.27 x 41.13 x 29.28 mm
Note: Certain practices or environments may affect the proper operation
of the camera. Occasional breakdowns are so likely to occur after
sustained activity. If this happens, remove the battery and wait for it
to cool before reinserting it into the camera. The camera should reset
automatically after this handling.

FR
PRÉCAUTIONS
1. Cette caméra d’action est
un produit haute-précision à
manipuler avec précaution, à ne
pas laisser tomber et endommager
de quelque manière que ce soit.
2. Maintenez la caméra à l’écart
de tout objet ayant un fort
magnétisme ou émettant de
fortes ondes radio. Un champ
magnétique puissant pourrait
provoquer un dysfonctionnement
du produit ou altérer la qualité
d’image et de son.
3. Privilégiez une marque de carte
micro SD réputée, les cartes
basiques ne garantissent pas un
bon fonctionnement de la caméra.
4. Ne pas utiliser la carte micro
SD au sein ou près d’un endroit
disposant d’un fort magnétisme
par risque de perdre son stockage
de données.
5. En cas de surchauffe, de fumée
ou d’odeur suspecte pendant
le chargement de la caméra,
débranchez immédiatement le
câble USB et couper l’alimentation
pour éviter tout départ d’incendie.
6. Maintenez le câble USB hors
de portée des enfants lors du
chargement de la caméra pour
éviter tout risque d’étouffement,
de strangulation ou d’électrocution.
7. Conservez le produit dans un
endroit frais et sec.
CARACTÉRISTIQUES
PRODUIT
- Grâce à sa coque étanche,
la caméra est résistante à l’eau
jusqu’à 30 mètres de profondeur.
- Prévisualisation en temps réel
et contrôle à distance via Wi-Fi
avec un smartphone ou une
tablette.
- Retrait et remplacement de la
batterie en un tour de main.
- Fonction webcam.
- Prend en charge les cartes
mémoires jusqu’à 32GB.
- Multiples résolutions
d’enregistrement vidéo :
1080P (30fps) / 720P (30fps) /
VGA (30fps).
VUE D’ENSEMBLE DE LA CAMÉRA

FR
INSTRUCTIONS
1. Insertion d’une carte micro SD
Vous ne pouvez utiliser la caméra sans
avoir préalablement inséré une carte
micro SD dans la fente correspondante
sur son côté gauche. Préférez une
carte micro SD de marque reconnue
ayant une capacité de stockage allant
jusqu’à 32GB et ayant été formatée sur
un ordinateur avant toute utilisation.
Remarque : Les cartes mémoires
basiques ne garantissent pas le bon
fonctionnement de la caméra.
2. Installation et retrait de la
batterie
A. Retirez le couvercle de la batterie.
B. Conformément à la direction des
symboles positifs et négatifs
indiqués sur la batterie, insérez la
batterie dans la fente selon le bon
sens de polarité jusqu’à ce qu’elle
soit bien en place.
C. Une icône de batterie apparaîtra
en haut à droite de l’écran pour
indiquer le niveau de charge.
Remarque : Pour extraire la batterie,
enlever le couvercle et retirer-la
doucement en attrapant la petite
languette.
3. Chargement de la batterie
A. Branchez la caméra à un
ordinateur avec le câble USB ou
à un adaptateur secteur pour la
recharger.
B. La caméra peut également être
rechargée dans une voiture en la
branchant à un chargeur allume-
cigare USB.
Remarque : Il est possible de prendre
des photos et vidéos pendant le
chargement de l’appareil.
4. Mise en marche/arrêt
A. Pour allumer la caméra, appuyez
sur le bouton Marche/Arrêt
pendant environ 3 secondes
jusqu’à ce que l’écran s’allume.
B. Pour éteindre la caméra, appuyez
sur le bouton Marche/Arrêt pendant
environ 3 secondes jusqu’à ce
que l’écran s’éteigne.
5. Changement de mode
Une fois la caméra allumée, appuyez
brièvement sur le bouton Mode
(identique à Marche/Arrêt) pour
passer successivement d’un mode
à l’autre : vidéo / photo / lecture /
menu des réglages.
5.1. Mode vidéo
A. Appuyez tout d’abord sur le
bouton Mode (identique au bouton
Marche/Arrêt) jusqu’à ce que vous
passiez en mode vidéo (premier
mode à apparaître à l’écran car il
s’agit du mode par défaut).
B. Appuyez ensuite sur le bouton OK
pour commencer l’enregistrement
et appuyez à nouveau pour
l’arrêter.
C. L’icône du point jaune en haut
à gauche de l’écran clignotera
alors en jaune pour indiquer que
l’enregistrement est en cours.
5.2. Mode photo
A. Appuyez tout d’abord sur le
bouton Mode (identique au bouton
Marche/Arrêt) jusqu’à ce que vous
passiez en mode photo.
B. Appuyez ensuite sur le bouton
OK pour prendre une photo.
5.3. Mode lecture
A. Appuyez tout d’abord sur le
bouton Mode (identique au bouton
Marche/Arrêt) jusqu’à ce que vous
passiez en mode lecture.
B. Appuyez sur les boutons Haut/
Bas pour sélectionner une vidéo
ou photo.
C. Appuyez ensuite sur le bouton
OK pour lire ou afficher le fichier
sélectionné en plein écran

FR
5.4. Mode réglage
A. Appuyez tout d’abord sur le
bouton Mode (identique au bouton
Marche/Arrêt) jusqu’à ce que
vous passiez en mode réglage et
que vous accédiez au menu des
paramètres.
B. Appuyez sur les boutons Haut/Bas
pour sélectionner le paramètre à
modifier.
C. Appuyez sur le bouton OK pour
entrer dans le sous-menu.
D. Sélectionnez l’une des options du
réglage et appuyez à nouveau sur
le bouton OK pour confirmer votre
choix.
6. Connection Wi-Fi
La caméra peut être connectée
en Wi-Fi à un smartphone ou une
tablette Android ou iOS en suivant
ces étapes :
A. Installez tout d’abord l’application
GoPlus Cam
sur votre
smartphone/tablette via Google
Play Store pour Android ou l’App
Store pour iOS.
B. Allumez la caméra et appuyez sur
le bouton Wi-Fi (également bouton
Haut).
C. Le logo Wi-Fi apparaît alors à
l’écran en bleu avec le SSID AGFA_
xxxxxxxxxxxx (nom Wi-Fi avec un
numéro de série aléatoire à 12
chiffres) et le PWA2 (mot de passe)
12345678.
D. Entrez dans les paramètres Wi-Fi
de votre smartphone/tablette et
recherchez le SSID Wi-Fi de la
caméra pour la connecter.
E. Ouvrez l’application GoPlus Cam
sur votre smartphone/tablette
pour contrôler la caméra à distance
et télécharger des vidéos ou
photos prises de cette manière
directement sur votre appareil.
6.1. Réglage du SSID Wi-Fi
A. Appuyez tout d’abord sur le
bouton Mode (identique au bouton
Marche/Arrêt) jusqu’à ce que
vous passiez en mode réglage et
que vous accédiez au menu des
paramètres.
B. Appuyez sur le bouton Bas jusqu’à
la sélection du paramètre Wi-Fi SSID,
puis appuyez sur le bouton OK pour
afficher le nom du réseau Wi-Fi.
C. Lorsqu’une lettre/un chiffre est en
vert, cela signifie que vous pouvez
le modifier en faisant défiler les
différents caractères à l’aide des
boutons Haut/Bas.
D. Une fois le bon caractère
sélectionné, appuyez sur le bouton
OK pour confirmer votre choix et
passer au caractère suivant.
E. Enfin, appuyez deux fois sur le
bouton Mode pour quitter et revenir
au mode vidéo.
6.2. Réglage du mot de passe Wi-Fi
A. Appuyez tout d’abord sur le bouton
Mode (identique au bouton Marche/
Arrêt) jusqu’à ce que vous passiez
en mode réglage et que vous
accédiez au menu des paramètres.
B. Appuyez sur le bouton Bas jusqu’à
la sélection du paramètre MOT DE
PASSE Wi-Fi, puis appuyez sur le
bouton OK pour afficher le mot de
passe du réseau Wi-Fi.
C. Lorsqu’une lettre/un chiffre est en
vert, cela signifie que vous pouvez
le modifier en faisant défiler les
différents caractères à l’aide des
boutons Haut/Bas.
D. Une fois le bon caractère
sélectionné, appuyez sur le bouton
OK pour confirmer votre choix et
passer au caractère suivant.
E. Enfin, appuyez deux fois sur le
bouton Mode pour quitter et revenir
au mode vidéo.
6.3. Extinction du Wi-Fi
Appuyez brièvement sur la touche
Haut pour désactiver la connexion
Wi-Fi.

FR
CARACTÉRISTIQUES TECHNIQUES
Écran LCD 2.0 pouces
ObjectifGrand angle haute résolution de classe
A +
Langues
Anglais/Français/Allemand/Espagnol/
Italien/Portugais/Néerlandais/Polonais/
Tchèque/Hongrois/Russe
Résolution vidéo
1080FHD (1920 x 1080) 30fps
720P (1280 x 720) 30fps
MVGA (848 x 480) 30fps
Format video AVI
Format photoJPG
Résolution photo
12M (2032 x 3024)
10M (3648 x 2736)
8M (3264 x 2448)
5M (2592 x 1944)
3M (2048 x 1536)
2M (1920 x 1080)
1.3M (1280 x 960)
Carte mémoire Micro SDHC, Classe 10 ou supérieure
Mode photo Capture simple/retardateur (3/5/10/20
secondes)
USB 2.0
AlimentationBatterie Li-ion rechargeable 3.7V
Dimensions59.27 x 41.13 x 29.28 mm
Remarque : Certaines pratiques ou certains environnements peuvent
affecter le bon fonctionnement de l’appareil. Des pannes occasionnelles
sont ainsi susceptibles de se produire après une activité soutenue.
Si cela se produit, retirez la batterie et attendez qu’elle refroidisse avant
de la réinstaller dans la caméra. Celle-ci devrait automatiquement se
réinitialiser après cette manipulation.

DE
VORSICHTS-
MASSNAHMEN
1. Diese Action-Kamera ist ein
hochpräzises Produkt, das mit
Vorsicht behandelt werden darf.
Lassen Sie es nicht fallen und
beschädigen Sie es in keiner Weise.
2. Halten Sie die Kamera von allen
Objekten mit starkem Magnetismus
oder starken Radiowellen fern.
Ein starkes Magnetfeld könnte
zu Fehlfunktionen des Produkts
führen oder die Bild- und Tonqualität
beeinträchtigen.
3. Wählen Sie eine bekannte Mikro-
SD-Kartenmarke, Basiskarten
garantieren nicht die einwandfreie
Funktion der Kamera.
4. Verwenden Sie die Mikro-SD-Karte
nicht an oder in der Nähe eines
Ortes mit starkem Magnetismus,
da sie ihren Datenspeicher verlieren
kann.
5. Wenn es während des Ladevorgangs
der Kamera zu Überhitzung, Rauch
oder verdächtigem Geruch kommt,
ziehen Sie sofort das USB-Kabel
aus der Steckdose und schalten Sie
die Kamera aus, um die Entstehung
eines Feuers zu verhindern.
6. Bewahren Sie das USB-Kabel beim
Laden der Kamera außerhalb der
Reichweite von Kindern auf, um
Erstickungs-, Strangulations- oder
Stromschlaggefahr zu vermeiden.
7. Lagern Sie das Produkt an einem
kühlen, trockenen Ort.
PRODUKT-
SPEZIFIKATIONEN
- Dank des wasserdichten
Gehäuses ist die Kamera bis
zu einer Tiefe von 30 Metern
wasserdicht.
- Echtzeitvorschau und Fernsteuerung
über Wi-Fi mit einem Smartphone
oder Tablet.
- Einfaches Entfernen und Ersetzen
der Batterie.
- Webkamera-Funktion.
- Unterstützung von bis zu 32GB-
Speicherkarten.
- Mehrere Videoauflösungen: 1080P
(30fps) / 720P (30fps) / VGA (30fps).
ÜBERSICHT DER KAMERA

DE
ANWEISUNGEN
1. Einsetzung einer Mikro-SD-Karte
Sie können die Kamera nicht
verwenden, ohne zuvor eine Mikro-
SD-Karte in den entsprechenden
Steckplatz auf der linken Seite der
Kamera eingesetzt zu haben. Wählen
Sie vorzugsweise eine Mikro-SD-
Karte einer bekannten Marke mit bis
zu 32GB Speicherkapazität, die vor
der Verwendung auf einem Computer
formatiert wurde.
Hinweis: Basische Speicherkarten
garantieren nicht die ordnungsgemäße
Funktion der Kamera.
2. Einsetzung und Entfernung der
Batterie
A. Entfernen Sie die Batterieabdeckung.
B. Folgen Sie der Richtung der positiven
und negativen Symbole auf der
Batterie, um sie mit der richtigen
Richtung der Polarität in den Schlitz
einzusetzen, bis sie einrastet.
C. Oben rechts auf dem Bildschirm wird
ein Batteriesymbol erscheinen, das
den Ladezustand anzeigt.
Hinweis: Um die Batterie zu entfernen,
entfernen Sie die Abdeckung und
ziehen Sie die Batterie vorsichtig
heraus, indem Sie die kleine Lasche
greifen.
3. Aufladung der Batterie
A. Schließen Sie die Kamera mit dem
USB-Kabel an einen Computer oder
ein Netzteil zum Aufladen an.
B. Die Kamera kann auch in einem Auto
aufgeladen werden, indem sie an ein
USB-Autoladegerät angeschlossen
wird.
Hinweis: Es ist möglich, Bilder und
Videos aufzunehmen, während die
Kamera aufgeladen wird.
4. Ein-/Ausschaltung der Kamera
A. Um die Kamera einzuschalten,
halten Sie die Ein/Aus-Taste etwa 3
Sekunden lang gedrückt, bis sich der
Bildschirm einschaltet.
B. Um die Kamera auszuschalten,
halten Sie die Ein/Aus-Taste etwa
3 Sekunden lang gedrückt, bis sich
der Bildschirm ausschaltet.
5. Modus-Umschaltung
Wenn die Kamera eingeschaltet ist,
drücken Sie die Modus-Taste (wie
Ein/Aus-Taste), um zwischen den
folgenden Modi zu wechseln: Video /
Foto / Wiedergabe / Einstellungsmenü.
5.1. Video-Modus
A. Drücken Sie zuerst die Modus-Taste
(wie bei der Ein/Aus-Taste), bis
Sie in den Videomodus wechseln
(erster Modus, der auf dem
Bildschirm erscheint, da dies der
Standardmodus ist).
B. Drücken Sie dann die OK-Taste,
um eine Aufnahme zu starten, und
drücken Sie sie erneut, um sie zu
stoppen.
C. Das gelbe Symbol in derlinks oben
auf dem Bildschirmblinkt gelb
und zeigt damit an, dassdass die
Aufnahme läuft.
5.2. Foto-Modus
A. Drücken Sie zuerst die Modus-Taste
(wie bei der Ein/Aus-Taste), bis Sie
in den Foto-Modus wechseln.
B. Drücken Sie dann die OK-Taste,
um ein Bild aufzunehmen.
5.3. Wiedergabemodus
A. Drücken Sie zuerst die Modus-Taste
(wie bei der Ein/Aus-Taste), bis Sie
in den Wiedergabemodus wechseln.
B. Drücken Sie die Aufwärts-/Abwärts-
Tasten, um ein Video oder ein Foto
auszuwählen.
C. Drücken Sie dann die OK-Taste,
um die ausgewählte Datei im Vollbild
abzuspielen oder anzuzeigen.
5.4. Einstellungsmenü
A. Drücken Sie zuerst die Modus-
Taste (wie bei der Ein/Aus-Taste),
bis Sie in den Einstellungsmodus
und Zugang zum Einstellungsmenü
gelangen.

DE
B. Drücken Sie die Aufwärts-/
Abwärts-Tasten, um die
Einstellung auszuwählen, die Sie
ändern möchten.
C. Drücken Sie dann die OK-Taste,
um das Untermenü aufzurufen.
D. Wählen Sie eine der
Einstellungsoptionen und
drücken Sie die OK-Taste erneut,
um Ihre Wahl zu bestätigen.
6. Wi-Fi-Verbindung
Die Kamera kann über Wi-Fi
mit einem Android- oder iOS-
Smartphone oder Tablet verbunden
werden, indem Sie die folgenden
Schritte ausführen:
A. Installieren Sie zunächst
Die GoPlus Cam App auf Ihrem
Smartphone/Tablet über Google
Play Store für Android oder App
Store für iOS.
B. Schalten Sie die Kamera ein und
drücken Sie die Wi-Fi-Taste (wie
bei der Aufwärts-Taste).
C. Das Wi-Fi-Logo erscheint dann
auf dem Bildschirm in blau
mit der AGFA_xxxxxxxxxxxx
SSID (Wi-Fi-Name mit einer
12-stelligen zufälligen
Seriennummer) und dem PWA2
(Passwort) 12345678.
D. Geben Sie die Wi-Fi-Einstellungen
Ihres Smartphones/Tablets
ein und suchen Sie nach der
Wi-Fi-SSID der Kamera, um sie
anzuschließen.
E. Öffnen Sie die GoPlus Cam App
auf Ihrem Smartphone/Tablet, um
die Kamera fernzusteuern und
auf diese Weise aufgenommene
Videos oder Fotos direkt auf Ihr
Gerät herunterzuladen.
6.1. Wi-Fi-SSID-Einstellung
A. Drücken Sie zuerst die
Modus-Taste (wie bei der Ein/
Aus-Taste), bis Sie in den
Einstellungsmodus und Zugang
zum Einstellungsmenü gelangen.
B. Drücken Sie die Abwärts-Taste,
bis Sie die Wi-Fi-SSID-Einstellung
wählen, und drücken Sie dann
die OK-Taste, um den Namen des
Wi-Fi-Netzwerks anzuzeigen.
C. Wenn ein Buchstabe/Zahl grün
ist, bedeutet dies, dass Sie sie
ändern können, indem Sie mit den
Aufwärts-/Abwärts- Tasten durch
die verschiedenen Zeichen blättern
D. Sobald das richtige Zeichen
ausgewählt ist, drücken Sie die
OK-Taste, um Ihre Wahl zu
bestätigen und zum nächsten
Zeichen zu gehen.
E. Drücken Sie schließlich zweimal die
Modus-Taste, um zu verlassen und
zum Videomodus zurückzukehren.
6.2. Wi-Fi-Passwort-Einstellung
A. Drücken Sie zuerst die Modus-Taste
(wie bei der Ein/Aus-Taste), bis Sie in
den Einstellungsmodus und Zugang
zum Einstellungsmenü gelangen.
B. Drücken Sie die Abwärts-Taste,
bis Sie die Wi-Fi-Passwort-
Einstellung wählen, und drücken Sie
dann die OK-Taste, um das Passwort
des Wi-Fi-Netzwerks anzuzeigen.
C. Wenn ein Buchstabe/Zahl grün
ist, bedeutet dies, dass Sie sie
ändern können, indem Sie mit den
Aufwärts-/Abwärts- Tasten durch
die verschiedenen Zeichen blättern
D. Sobald das richtige Zeichen
ausgewählt ist, drücken Sie die
OK-Taste, um Ihre Wahl zu
bestätigen und zum nächsten
Zeichen zu gehen.
E. Drücken Sie schließlich zweimal die
Modus-Taste, um zu verlassen und
zum Videomodus zurückzukehren.
6.3. Wi-Fi-Abschaltung
Drücken Sie kurz die die Aufwärts-
Taste, um die Wi-Fi-Verbindung
abzuschalten.

DE
TECHNISCHE SPEZIFIKATIONEN
LCD-Bildschirm 2.0 Zoll
Objektiv Hochauflösendes Weitwinkelobjektiv
der Klasse A +
Sprachen
Englisch/Französisch/Deutsch/Spanisch/
Italienisch/Portugiesisch/Niederländisch/
Polnisch/Tschechisch/Ungarisch/
Russisch
Videoauflösung
1080FHD (1920 x 1080) 30fps
720P (1280 x 720) 30fps
MVGA (848 x 480) 30fps
Video-FormatAVI
Foto-Format JPG
Fotoauflösung
12M (2032 x 3024)
10M (3648 x 2736)
8M (3264 x 2448)
5M (2592 x 1944)
3M (2048 x 1536)
2M (1920 x 1080)
1.3M (1280 x 960)
SpeicherkarteMikro SDHC, Klasse 10 oder höher
Foto-modus Einzelbild/Selbstauslöser
(3/5/10/20 Sekunden)
USB 2.0
Netzteil 3,7 V wiederaufladbarer Li Ionen Akku
Dimensionen 59.27 x 41.13 x 29.28 mm
Hinweis: Bestimmte Praktiken oder Umgebungen können den
ordnungsgemäßen Betrieb der Kamera beeinträchtigen.
Gelegentliche Abstürze sind nach anhaltender Aktivität wahrscheinlich.
Entfernen Sie in diesem Fall die Batterie und warten Sie, bis sie abgekühlt
ist, bevor Sie sie wieder in die Kamera einsetzen.

ES
PRECAUCIONES
1. Esta cámara de acción es un
producto de alta precisión que
debe ser manejado con cuidado,
no lo dejes caer ni lo dañes de
ninguna manera.
2. Mantenga la cámara separada
de cualquier cosa que tenga un
fuerte magnetismo o que emita
fuertes ondas de radio. Un campo
magnético fuerte podría hacer que
el producto funcione mal o dañe la
calidad de la imagen y el sonido.
3. Seleccione una marca de
tarjeta micro SD conocida, las
tarjetas básicas no garantizan
el funcionamiento correcto de la
cámara.
4. No utilice la tarjeta micro SD en
o cerca de un lugar con un fuerte
magnetismo para evitar la pérdida
de su almacenamiento de datos.
5. En caso de sobrecalentamiento,
humo u olor sospechoso mientras
la cámara se está cargando,
desenchufe inmediatamente
el cable USB y apague la
alimentación para evitar que se
inicie un incendio.
6. Mantenga el cable USB fuera
del alcance de los niños cuando
cargue la cámara para evitar el
riesgo de asfixia, estrangulación o
electrocución.
7. Almacene el producto en un lugar
fresco y seco.
CARACTERÍSTICAS
DEL PRODUCTO
- Gracias a su carcasa resistente
al agua, la cámara es resistente
al agua hasta 30 metros de
profundidad.
- Vista previa en tiempo real y
control remoto de larga distancia
a través de Wi-Fi con un teléfono
inteligente o tableta.
- Fácil extracción y reemplazo de la
batería.
- Función de cámara web.
- Soporta tarjetas de memoria de
hasta 32GB.
- Múltiples resoluciones de grabación
de video: 1080P (30fps) /
720P (30fps) / VGA (30fps).
VISTA GENERAL DE LA CÁMARA

ES
INSTRUCCIONES
1. Insertar una tarjeta micro SD
No puede utilizar la cámara sin
insertar primero una tarjeta micro
SD en la ranura correspondiente
del lado izquierdo de la cámara.
Elija preferiblemente una tarjeta
micro SD de marca conocida con
una capacidad de almacenamiento
de hasta 32GB que haya sido
formateada en un ordenador antes
de su uso.
Nota: Las tarjetas de memoria
básicas no garantizan que la cámara
funcione correctamente.
2. Instalación y extracción de la
batería
A. Tire de la tapa de la batería.
B. De acuerdo con la dirección de
los símbolos positivos y negativos
marcados en la batería, inserte
la batería en la ranura con la
polaridad correcta hasta que se
asiente.
C. Aparecerá un icono de batería en
la esquina superior derecha de la
pantalla que indica el estado del
nivel de carga.
Nota: Para retirar la batería, extraiga
la tapa de la ranura y extráigala
suavemente la batería atrapando la
pequeña lengüeta.
3. Carga de la batería
A. Enchufe la cámara con el cable
USB a un ordenador o a un
adaptador de AC para cargarla.
B. La cámara también puede
cargarse en un automóvil
enchufándola a un cargador USB
para automóviles.
Nota: Es posible tomar fotos y
grabar videos mientras se carga la
cámara.
4. Encendido y apagado
A. Para encender la cámara, pulse
el botón de encendido/apagado
durante unos 3 segundos hasta
que la pantalla se ilumine.
B. Para apagar la cámara, mantenga
pulsado el botón de encendido/
apagado durante unos 3
segundos hasta que la pantalla
se apague.
5. Cambio de modo
Una vez que la cámara está
encendida, pulse el botón de
modo (igual que la de encendido/
apagado) para pasar sucesivamente
de un modo a otro: vídeo /
foto / reproducción / menú de
configuración.
5.1. Modo vídeo
A. Primero pulse el botón de modo
(igual que la de encendido/
apagado) hasta pasar al modo de
vídeo (primer modo que aparecerá
en la pantalla, ya que es el
predeterminado).
B. Luego pulse el botón OK para
comenzar a grabar y presiónelo
nuevamente para detener.
C. El ícono de punto amarillo en la
esquina superior izquierda de la
pantalla parpadeará en amarillo
para indicar que la grabación está
en progreso.
5.2. Modo de fotográfico
A. Primero pulse el botón de modo
(igual que la de encendido/
apagado) hasta pasar al modo de
fotográfico.
B. Luego pulse el botón OK para
tomar una foto.
5.3. Modo de reproducción
A. Primero pulse el botón de modo
(igual que la de encendido/
apagado) hasta pasar al modo de
reproducción.
B. Pulse los botones arriba/abajo
para seleccionar un video o una
foto.
C. Luego pulse el botón OK para
reproducir o mostrar el archivo
seleccionado en pantalla completa.

ES
5.4. Menú de configuración
A. Primero pulse el botón de modo
(igual que la de encendido/
apagado) hasta que pase al modo
de configuración y acceda al menú
de configuración.
B. Pulse los botones arriba/abajo para
seleccionar la configuración que
desea modificar.
C. Luego pulse el botón OK para
ingresar al submenú.
D. Seleccione una de las opciones
de configuración y pulse el botón
OK nuevamente para confirmar su
elección.
6. Conexión Wi-Fi
La cámara se puede conectar vía Wi-
Fi a un smartphone o tableta Android
o iOS siguiendo estos pasos:
A. Primero instala la aplicación GoPlus
Cam en tu smartphone/tableta a
través de Google Play Store para
Android o App Store para iOS.
B. Enciende la cámara y pulsa el botón
Wi-Fi (también el botón arriba).
C. El logotipo de Wi-Fi aparecerá en la
pantalla en azul con el SSID AGFA_
xxxxxxxxxxxx (nombre de Wi-Fi
con un número de serie aleatorio
a 12 dígitos) y PWA2 (contraseña)
12345678.
D. Introduce la configuración Wi-Fi
de tu smartphone/tableta y busca
el SSID Wi-Fi de la cámara para
conectarla.
E. Abre la aplicación GoPlus Cam en tu
smartphone/tablet para controlar
la cámara de forma remota y
descargar videos o fotos tomadas
de esta manera directamente en su
dispositivo.
6.1. Configuración de SSID de Wi-Fi
A. Primero pulse el botón de modo
(igual que la de encendido/
apagado) hasta que pase al modo
de configuración y acceda al menú
de configuración.
B. Pulse el botón abajo hasta
seleccionar la configuración de
SSID de Wi-Fi y luego pulse el
botón OK para mostrar el nombre
de la red Wi-Fi.
C. Cuando una letra/número está
en verde, significa que puede
cambiarla desplazándose por
los diferentes caracteres con los
botones arriba/abajo.
D. Una vez que se selecciona el
carácter correcto, pulse el botón OK
para confirmar su elección y pasar
al siguiente carácter.
E. Finalmente, pulse dos veces el
botón modo para salir y volver al
modo vídeo.
6.2. Configuración de contraseña
Wi-Fi
A. Primero pulse el botón de modo
(igual que la de encendido/
apagado) hasta que pase al modo
de configuración y acceda al menú
de configuración.
B. Pulse el botón abajo hasta
seleccionar la configuración de
CONTRASEÑA Wi-Fi y luego
pulse el botón OK para mostrar la
contraseña de la red Wi-Fi.
C. Cuando una letra/número está
en verde, significa que puede
cambiarla desplazándose por
los diferentes caracteres con los
botones arriba/abajo.
D. Una vez que se selecciona el
carácter correcto, pulse el botón OK
para confirmar su elección y pasar
al siguiente carácter.
E. Finalmente, pulse dos veces el
botón modo para salir y volver al
modo vídeo.
6.3. Desconectando Wi-Fi
Pulse brevemente el botón arriba para
desactivar la conexión Wi-Fi.

ES
ESPECIFICACIONES DE TÉCNICAS
Pantalla LCD 2.0 pulgadas
LenteLente gran angular de alta resolución de
grado A +
Idiomas
Inglés/Francés/Alemán/Español/Italiano/
Portugués/Neerlandés/Polaco/Húngaro/
Checo/Ruso
Resolución de video
1080FHD (1920 x 1080) 30fps
720P (1280 x 720) 30fps
MVGA (848 x 480) 30fps
Formato de video AVI
Formato de foto
JPG
Resolución de la foto
12M (2032 x 3024)
10M (3648 x 2736)
8M (3264 x 2448)
5M (2592 x 1944)
3M (2048 x 1536)
2M (1920 x 1080)
1.3M (1280 x 960)
Tarjeta de memoria Micro SDHC, clase 10 o superior
Modo foto Foto única/disparador automático
(3/5/10/20 segundos)
USB 2.0
Fuente de alimentación Batería recargable de iones de litio de
3,7 V
Dimensiones 59.27 x 41.13 x 29.28 mm
Nota: Ciertas prácticas o entornos pueden afectar el correcto
funcionamiento de la cámara. Es muy probable que se produzcan averías
ocasionales después de una actividad sostenida. Si esto sucede, retire la
batería y espere a que se enfríe antes de volver a insertarla en la cámara.
La cámara debería reiniciarse automáticamente después de este manejo.

IT
PRECAUZIONI
1. Questa action camera è un
prodotto di alta precisione da
maneggiare con cura, assicurati
di non farla cadere e di non
danneggiarla in alcun modo.
2. Tenere la action camera lontano
da tutto ciò che ha un forte
magnetismo o che emette forti
onde radio. Un forte campo
magnetico potrebbe causare il
malfunzionamento del prodotto o
danneggiare la qualità del suono e
dell’immagine.
3. Scegli marchi di micro SD
conosciuti, le schede di base non
garantiscono il funzionamento
della action camera.
4. Non utilizzare la scheda micro
SD vicino a un campo magnetico
per evitare di perdere i dati
memorizzati.
5. Durante il processo di carica, in
caso di surriscaldamento, fumo o
odore, scollega immediatamente
il cavo USB e interrompi
l’alimentazione per evitare incendi.
6. Durante la ricarica, tieni il cavo USB
fuori dalla portata dei bambini per
evitare il rischio di soffocamento o
di scosse elettriche.
7. Conserva il prodotto in un luogo
fresco e asciutto.
CARATTERISTICHE
DEL PRODOTTO
- Grazie alla sua custodia
impermeabile, la action camera è
resistente all’acqua fino a 30 metri
di profondità.
- Anteprima in tempo reale e
controllo remoto a distanza
via Wi-Fi con uno smartphone
o un tablet.
- Facile rimozione e sostituzione
della batteria.
- Funzione webcam.
- Supporta fino a 32GB di schede di
memoria.
- Risoluzioni multiple di
registrazione video: 1080P (30fps) /
720P (30fps) / VGA (30fps).
PANORAMICA DELLA ACTIONCAMERA

IT
ISTRUZIONI
1. Inserimento di una scheda
micro SD
Non è possibile utilizzare la action
camera senza prima inserire una scheda
micro SD nello slot corrispondente sul
lato sinistro. Preferisci una scheda
micro SD di marca riconosciuta con una
capacità di archiviazione fino a 32GB e
che è stata formattata su un computer
prima dell’uso.
Nota: Le schede di memoria di base non
garantiscono il corretto funzionamento
della action camera.
2. Installazione e rimozione della
batteria
A. Rimuovere il coperchio della batteria.
B. In conformità con la direzione
dei simboli positivi e negativi
contrassegnati sulla batteria, inserisci
la batteria nella fessura con la
polarità corretta fino a quando non è
ben posizionata.
C. Un’icona della batteria apparirà in alto
a destra dello schermo per indicare lo
stato del livello di carica.
Nota: Per rimuovere la batteria,
rimuovere il coperchio dello slot ed
estrarre delicatamente la batteria
afferrando la linguetta.
3. Ricarico della batteria
A. Collegare la action camera con il cavo
USB a un computer o un adattatore
di alimentazione per la ricarica.
B. La action camera può anche essere
caricata in un auto collegandolo a un
caricabatterie da auto USB.
Nota: Foto e riprese video sono possibili
durante la ricarica della fotocamera.
4. Accensione e spegnimento della
actioncamera
A. Per accendere la action camera,
premere il tasto di accensione/
spegnimento per circa 3 secondi fino
a quando lo schermo si illumina.
B. Per spegnere la action camera,
premere il tasto di accensione/
spegnimento per circa 3 secondi
fino allo spegnimento dello schermo.
5. Cambio di modalità
Una volta accesa la action camera,
premere brevemente il tasto
modalità (lo stesso del accensione/
spegnimento) per passare
successivamente da una modalità
all’altra: video / foto / riproduzione /
menu di impostazione.
5.1. Modalità video
A. Premere prima il tasto modalità (lo
stesso del accensione/spegnimento)
fino a passare alla modalità video
(prima modalità che appare sullo
schermo perché è la modalità
predefinita).
B. Premere quindi il tasto OK per
avviare la registrazione e premerlo
di nuovo per arrestarla.
C. L’icona del punto giallo nell’angolo
superiore sinistro dello schermo
lampeggerà in giallo per indicare che
la registrazione è in corso.
5.2. Modalità foto
A. Premere prima il tasto modalità (lo
stesso del accensione/spegnimento)
fino a passare alla modalità foto.
B. Poi premere il tasto OK per scattare
una foto.
5.3. Modalità riproduzione
A. Premere prima il tasto modalità (lo
stesso del accensione/spegnimento)
fino a passare alla modalità
riproduzione.
B. Premere i tasti su/giù per
selezionare un video o una foto.
C. Quindi premere il tasto OK per
riprodurre o visualizzare il file
selezionato a schermo intero.

IT
5.4. Menu di impostazione
A. Premere prima il tasto modalità
(lo stesso del accensione/
spegnimento) fino a passare
alla modalità di impostazione
e si accede al menu delle
impostazioni.
B. Premere i tasti su/giù per
selezionare l’impostazione che si
desidera modificare.
C. Premere il tasto OK per accedere
al sottomenu.
D. Selezionare una delle opzioni
di impostazione e premere
nuovamente il tasto OK per
confermare la scelta.
6. Connessione Wi-Fi
Questa action camera può essere
collegata tramite Wi-Fi agli
smartphone o ai tablet Android o
IOS seguendo questi passaggi:
A. Prima di tutto installa
l’applicazione GoPlus Cam
application sul tuo smartphone/
tablet tramite il Google Play Store
per Android o l’App Store per iOS.
B. Accendi la action camera e premi
il tasto Wi-Fi (anche il tasto su).
C. Il logo Wi-Fi apparirà quindi
sullo schermo in blu con l’SSID
AGFA_xxxxxxxxxxxx (nome Wi-Fi
con un numero di serie casuale
di 12 cifre) e la PWA2 (password)
12345678.
D. Inserisci le impostazioni Wi-Fi del
tuo smartphone/tablet e cerca
l’action camera Wi-Fi SSID per
collegarla.
E. Apri l’applicazione GoPlus Cam
sul tuo smartphone/tablet per
controllare la action camera
da remoto e scaricare video o
foto scattate in questo modo
direttamente sul tuo dispositivo.
6.1. Impostazione del SSID Wi-Fi
A. Premere prima il tasto modalità
(lo stesso del accensione/
spegnimento) fino a quando
non si passa alla modalità di
impostazione e si accede al menu
delle impostazioni.
B. Premere il tasto giù fino a
selezionare l’impostazione
dell’SSID Wi-Fi e poi premi il tasto
OK per visualizzare il nome della
rete Wi-Fi.
C. Quando una lettera/cifra è in
verde, significa che è possibile
modificarla facendo scorrere i
diversi caratteri con i tasti su/giù.
D. Una volta selezionato il carattere
giusto, premi il tasto OK per
confermare la scelta e passare al
carattere successivo.
E. Infine, premi due volte il tasto
modalità per uscire e tornare alla
modalità video.
6.2. Impostazione della password
Wi-Fi
A. Premere prima il tasto modalità
(lo stesso del accensione/
spegnimento) fino a quando
non si passa alla modalità di
impostazione e si accede al menu
delle impostazioni.
B. Premere il tasto giù fino a
selezionare l’impostazione della
PASSWORD Wi-Fi e poi premere
il tasto OK per visualizzare la
password della rete Wi-Fi.
C. Quando una lettera/cifra è in
verde, significa che è possibile
modificarla facendo scorrere i
diversi caratteri con i tasti su/giù.
D. Una volta selezionato il carattere
giusto, premi il tasto OK per
confermare la scelta e passare al
carattere successivo.
E. Infine, premi due volte il tasto
modalità per uscire e tornare alla
modalità video.
6.3. Disconnessione Wi-Fi
Premere brevemente il tasto su per
disattivare la connessione Wifi.

IT
ESPECIFICACIONES DE TÉCNICAS
Schermo LCD 2.0 pollici
Obiettivo Grandangolo ad alta risoluzione grado
A +
Lingue
Inglese/Francese/Tedesco/Spagnolo/
Italiano/Portoghese/Olandese/Polacco/
Ungherese/Ceco/Russo
Risoluzione video
1080FHD (1920 x 1080) 30fps
720P (1280 x 720) 30fps
MVGA (848 x 480) 30fps
Formato video
AVI
Formato foto JPG
Risoluzione fotografica
12M (2032 x 3024)
10M (3648 x 2736)
8M (3264 x 2448)
5M (2592 x 1944)
3M (2048 x 1536)
2M (1920 x 1080)
1.3M (1280 x 960)
Scheda di memoria Micro SDHC, classe 10 o superiore
Modalità di scatto Scatto singolo/autoscatto (3/5/10/20
secondi)
USB 2.0
Alimentazione elettrica Batteria ricaricabile agli ioni di litio
da 3,7V
Dimensioni59.27 x 41.13 x 29.28 mm
Nota: Alcune pratiche o ambienti potrebbero influire sul corretto
funzionamento della actioncamera. È probabile che si verifichino guasti
occasionali dopo un’attività prolungata. In tal caso, rimuovere la batteria e
attendere che si raffreddi prima di reinserirla nella actioncamera.
La actioncamera dovrebbe ripristinarsi automaticamente dopo questa
manipolazione.

PT
PRECAUÇÕES
1. Esta câmara desportiva é um
produto de alta precisão que deve
ser manuseado cuidadosamente,
evite deixá-lo cair ou danificá-lo.
2. Mantenha a câmara longe
de elementos que tenham
propriedades magnéticas intensas
ou que emitam ondas de radio
fortes. Um campo magnético forte
podería causar um funcionamento
defeituoso ou danificar a
qualidade de som e imagem.
3. Opte por utilizar marcas
reconhecidas de cartões Micro
SD, alguns cartões não garantem
um funcionamento adequado da
câmara.
4. Não utilize cartões Micro SD em
ou perto de zonas magnéticas
para evitar perder os dados
armazenados.
5. Durante o processo de carga, caso
se produza um sobreaquecimento,
fumo, ou cheiro, retire
imediatamente o cabo USB de
alimentação e interrompa o
carregamento para evitar um
incêndio.
6. Durante o carregamento,
mantenha o cabo USB longe do
alcance de crianças para evitar
risco de asfixia ou choques
elétricos.
7. Armazene o produto num lugar
fresco e seco.
CARACTERÍSTICAS
DO PRODUTO
- Graças à sua caixa estanque, a
câmara é à prova de água até 30
metros de profundidade.
- Pré-visualização em tempo real e
controlo remoto de longa distância
via Wi-Fi com um smartphone ou
tablet.
- Fácil remoção e substituição de
baterias.
- Função Web camera.
- Suporta cartões de memória até
32GB.
- Multiplas resoluções para gravação
de video: 1080P (30fps) / 720P
(30fps) / VGA (30fps).
PERSPETIVA GERAL DA CÂMARA

PT
INSTRUÇÕES
1. Insertar una tarjeta micro SD
Não poderá utilizar a câmara sem
introduzir primeiro um cartao micro
SD na ranhura localizada no lado
esquerdo da mesma. Selecione de
preferência uma marca reconhecida
de cartões micro SD com até 32GB
de capacidade de armazenamento,
formatando o cartao num
computador antes de o utilizar na
câmara.
Nota: Alguns cartões não garantem
um funcionamento adequado da
câmara.
2. Instalar e remover a bateria
A. Puxar a tampa da bateria para
fora.
B. De acordo com a direção dos
símbolos positivos e negativos
mostrados na bateria, insira
a bateria no compartimento
respeitando a polaridade correta
até que esteja sentada.
C. Um ícone de bateria aparecerá no
canto superior direito do ecrã para
indicar o nível de carga.
Nota: Para remover a bateria,
remover a tampa da ranhura e puxar
suavemente para fora a bateria,
puxando a pequena aba.
3. Carga de la batería
A. Conete a câmara a um
computador ou carregador com o
cabo USB para carregar a bateria.
B. A câmara também se pode
carregar num carro, conetando-a
a um carregador USB para
automóveis.
Nota: É possível fotografar e filmar
em vídeo enquanto se carrega a
câmara.
4. Ligar e desligar
A. Para ligar a câmara, pressione o
botão de alimentação durante
cerca de 3 segundos até o ecrán
se acender.
B. Para apagar a câmara, pressione
o botão de alimentação durante
cerca de 3 segundos até o ecrán
se apagar.
5. Mudança de modo
Com a câmara em funcionamento,
pressione o botão de modo (o
mesmo que o de alimentação) para
intercambiar entre modos: vídeo /
fotografia / reprodução /menu de
configurações.
5.1. Modo vídeo
A. Primeiro pressione o botão
de modo (o mesmo que o de
alimentação) até passar ao modo
vídeo (primeiro modo a aparecer
no ecrã, pois é o modo por
defeito).
B. Depois pressione o botão OK
para iniciar a gravação e prima
novamente para a parar.
C. O ícone da mancha amarelo no
canto superior esquerdo do ecrã
piscará a amarelo indicando que a
gravação está em curso.
5.2. Modo fotografia
A. Primeiro pressione o botão
de modo (o mesmo que o de
alimentação) até passar ao modo
fotografia.
B. Depois pressione o botão OK para
tirar uma fotografia.
5.3. Modo reprodução
A. Primeiro pressione o botão
de modo (o mesmo que o de
alimentação) até passar ao modo
reprodução.
B. Pressione os botões cima/baixo
para seleccionar um vídeo ou uma
fotografia.
C. Depois pressione o botão OK
para reproduzir ou exibir o ficheiro
seleccionado em ecrã inteiro.

PT
5.4. Menu de configurações
A. Primeiro pressione o botão
de modo (o mesmo que o de
alimentação) até passar ao modo
configurações e aceder ao menu
de configurações.
B. Pressione os botões cima/baixo
para selecionar a configuração que
você deseja modificar.
C. Depois pressione o botão OK para
entrar no submenu.
D. Seleccione uma das opções
de configuração e pressione
novamente o botão OK para
confirmar a sua escolha.
6. Conexão Wi-Fi
A câmara pode conetar-se por Wi-Fi
a um smartphone ou tablet Android
or iOS, através dos seguintes passos:
A. Primeiro, instale a aplicação
GoPlus Cam no seu smartphone/
tablet via Google Play Store para
Android ou App Store para iOS.
B. Ligue a câmara e pressione o
botão Wi-Fi (a mesma que o botão
baixo).
C. O logotipo Wi-Fi aparecerá então
no ecrã em azul com o SSID
AGFA_xxxxxxxxxxxx (nome Wi-Fi
com um número de série aleatório
de 12 dígitos) e o PWA2 (palavra-
passe) 12345678.
D. Introduza as configurações Wi-Fi
do seu smartphone/tabela e
procure o SSID Wi-Fi da câmara
para conetá-los.
E. Abra a aplicação GoPlus Cam
no seu smartphone/tablet para
controlar a câmara remotamente e
descarregar vídeos ou fotografias
tiradas desta forma directamente
no seu dispositivo.
6.1. Configuração de SSID Wi-Fi
A. Primeiro pressione o botão
de modo (o mesmo que o de
alimentação) até passar ao modo
configurações e aceder ao menu
de configurações.
B. Pressione o botão baixo até
seleccionar a configuração do SSID
Wi-Fi e depois pressione o botão
OK para mostrar o nome da rede
Wi-Fi.
C. Quando uma letra/um algarismo
está a verde, significa que pode
alterar este caractere ao percorrer
os diferentes caracteres da lista
com os botões cima/baixo.
D. Uma vez selecionar o caractere
certo, prima o botão OK para
confirmar a sua escolha e passar
para o próximo caractere.
E. Finalmente, prima duas vezes o
botão de modo para sair e voltar
ao modo vídeo.
6.2. Configuração de palavra-passe
Wi-Fi
A. Primeiro pressione o botão
de modo (o mesmo que o de
alimentação) até passar ao modo
configurações e aceder ao menu
de configurações.
B. Pressione o botão baixo até
seleccionar a configuração do
PALAVRA-PASSE Wi-Fi e depois
pressione o botão OK para mostrar
a palavra-passe da rede Wi-Fi.
C. Quando uma letra/um algarismo
está a verde, significa que pode
alterar este caractere ao percorrer
os diferentes caracteres da lista
com os botões cima/baixo.
D. Uma vez selecionar o caractere
certo, prima o botão OK para
confirmar a sua escolha e passar
para o próximo caractere.
E. Finalmente, prima duas vezes o
botão de modo para sair e voltar
ao modo vídeo.
6.3. Desconexão o Wi-Fi
Pressione brevemente o botão cima
para desligar a ligação Wi-Fi.

PT
ESPECIFICAÇÕES TÉCNICAS
Ecrã LCD 2.0 polegadas
LenteGrande angular de alta resolução classe
A +
Idiomas
Inglês/Francês/Alemão/Espanhol/
Italiano/Português/Holandês/Polonês/
Húngaro/Tcheco/Russo
Resolução de vídeo
1080FHD (1920 x 1080) 30fps
720P (1280 x 720) 30fps
MVGA (848 x 480) 30fps
Formato de vídeo
AVI
Formato da foto JPG
Resolução da foto
12M (2032 x 3024)
10M (3648 x 2736)
10M (3648 x 2736)
8M (3264 x 2448)
5M (2592 x 1944)
3M (2048 x 1536)
2M (1920 x 1080)
1.3M (1280 x 960)
Cartão de memóriaMicro SDHC, Classe 10 ou superior
Modo fotografia Fotografia única/auto-temporizador
(3/5/10/20 segundos)
USB 2.0
Fonte de alimentação Bateria de iões de lítio recarregável
de 3,7V
Dimensões 59.27 x 41.13 x 29.28 mm
Nota: Certas práticas ou ambientes podem afectar o bom funcionamento
do dispositivo. Podem ocorrer avarias ocasionais após uma actividade
sustentada. Se isto acontecer, remover a bateria e esperar que
arrefeça antes de a reinstalar na câmara. A câmara deve reiniciar se
automaticamente após esta operação.

PO
ŚRODKI
OSTROŻNOŚCI
1. Ta kamera sportowa to bardzo
precyzyjny produkt, z którym
należy obchodzić się ostrożnie, nie
upuszczać go ani w żaden sposób
go nie uszkadzać.
2. Trzymaj aparat z dala od
wszystkiego, co emituje silny
magnetyzm lub silne fale radiowe.
Silne pole magnetyczne może
spowodować nieprawidłowe
działanie produktu lub pogorszenie
jakości obrazu i dźwięku.
3. Wybierz znaną markę kart micro
SD, proste karty nie gwarantują
prawidłowego działania kamery.
4. Nie należy używać karty micro SD w
miejscu, w którym występuje pole
magnetyczne lub w jego pobliżu,
aby uniknąć utraty danych.
5. Jeśli podczas procesu ładowania
wystąpi przegrzanie, będzie
wydzielał się dym lub nieprzyjemny
zapach, należy natychmiast odłączyć
kabel USB i odłączyć zasilanie, aby
uniknąć pożaru.
6. Podczas ładowania należy trzymać
kabel USB poza zasięgiem dzieci,
aby uniknąć ryzyka uduszenia lub
porażenia prądem.
7. Produkt należy przechowywać w
chłodnym i suchym miejscu.
CECHY PRODUKTU
- Dzięki wodoszczelnej obudowie
kamera jest wodoodporna do
głębokości 30 metrów.
- Podgląd w czasie rzeczywistym
i zdalne sterowanie za
pośrednictwem sieci Wi-Fi za
pomocą smartfona lub tabletu.
- Łatwe wyjmowanie i wymiana
baterii.
- Funkcja kamery internetowej.
- Obsługa kart pamięci do 32GB.
- Możliwość nagrywania w wielu
rozdzielczościach: 1080P (30fps) /
720P (30fps) / VGA (30fps).
PRZEGLĄD KAMERY

PO
INSTRUKCJE
1. Wkładanie karty micro SD
Nie można korzystać z kamery bez
uprzedniego włożenia karty micro
SD do odpowiedniego gniazda
po lewej stronie. Najlepiej wybrać
kartę micro SD o pojemności do
32GB znanej marki, która przed
użyciem została sformatowana na
komputerze.
Uwaga: Proste karty pamięci nie
gwarantują prawidłowego działania
kamery.
2. Instalowanie i wyjmowanie
baterii
A. Wyciągnij pokrywę komory baterii.
B. Zwracając uwagę na symbole
plusa i minusa zaznaczone na
baterii, włóż baterię do komory,
aż zostanie dobrze osadzona,
zachowując prawidłową
polaryzację.
C. Ikona baterii pojawi się w prawym
górnym rogu ekranu, wskazując
poziom naładowania.
Uwaga: Aby wyjąć baterię, wyciągnij
pokrywę komory baterii i delikatnie
ją wyjmij, chwytając za małą
wypustkę.
3. Ładowanie baterii
A. W celu naładowania kamery
podłącz ją za pomocą kabla USB
do komputera lub zasilacza.
B. Kamerę można ładować także w
samochodzie, podłączając ją do
ładowarki samochodowej z USB.
Uwaga: Podczas ładowania kamery
można robić zdjęcia i nagrywać lmy.
4. Włączanie i wyłączanie
A. Aby włączyć kamerę, naciśnij
przycisk zasilania przez około 3
sekundy, aż zaświeci się ekran.
B. Aby wyłączyć kamerę, naciśnij
przycisk zasilania na około 3
sekundy, aż ekran się wyłączy.
5. Przełączanie trybów
Po włączeniu kamery naciśnij krótko
przycisk zasilania, aby kolejno
przełączać się z jednego trybu do
drugiego: wideo / fotografowanie /
odtwarzanie / menu ustawień.
5.1. Tryb wideo
A. Najpierw naciskaj przycisk trybu
(taki sam jak przycisk zasilania),
aż przejdziesz do trybu wideo
(pierwszy tryb, który pojawi się na
ekranie, jest trybem domyślnym).
B. Następnie naciśnij przycisk OK,
aby rozpocząć nagrywanie,
i naciśnij go ponownie, aby
zatrzymać.
C. Ikona żółtego punktu w
lewym górnym rogu ekranuw
lewym górnym rogu ekranu
będziemiga na żółto, wskazując,
żenagrywanie jest w toku.
5.2. Tryb fotografowania
A. Najpierw naciskaj przycisk
trybu (taki sam jak przycisk
zasilania), aż przejdziesz do trybu
fotografowania.
B. Następnie naciśnij przycisk OK,
aby zrobić zdjęcie.
5.3. Tryb odtwarzania
A. Najpierw naciskaj przycisk trybu
(taki sam jak przycisk zasilania), aż
przejdziesz do trybu odtwarzania.
B. Naciskaj klawisze w górę/w dół,
aby wybrać lm lub zdjęcie.
C. Następnie naciśnij przycisk OK,
aby odtworzyć lub wyświetlić
wybrany plik na pełnym ekranie.
5.4. Menu ustawień
A. Najpierw naciskaj przycisk trybu
(taki sam jak przycisk zasilania),
aż przejdziesz do trybu ustawień
i uzyskasz dostęp do menu
ustawień.
B. Naciskaj klawisze w górę/w dół,
aby wybrać ustawienie, które
chcesz zmodykować.

PO
C. Naciśnij przycisk OK, aby przejść
do podmenu.
D. Wybierz jedną z opcji ustawień i
naciśnij ponownie przycisk OK,
aby potwierdzić wybór.
6. Połączenie z siecią Wi-Fi
Kamerę można połączyć z
pośrednictwem sieci Wi-Fi ze
smartfonem lub tabletem z
systemem Android lub iOS,
wykonując następujące czynności:
A. Najpierw zainstaluj
aplikację
GoPlus Cam na smartfonie/
tablecie za pośrednictwem
sklepu Google Play w urządzeniu
z systemem Android lub sklepu
App Store w urządzeniu z
systemem iOS.
B. Włącz kamerę i naciśnij przycisk
Wi-Fi (także klawisz w górę).
C. Na ekranie pojawi się niebieskie
logo Wi-Fi z identykatorem SSID
AGFA_xxxxxxxxxxxx (nazwa sieci
Wi-Fi z 12-cyfrowym losowym
numerem seryjnym) i PWA2
(hasło) 12345678.
D. Wprowadź ustawienia Wi-Fi
smartfona/tabletu i wyszukaj
identykator SSID Wi-Fi kamery,
aby nawiązać połączenie.
E. Otwórz aplikację GoPlus Cam na
smartfonie/tablecie, aby zdalnie
sterować kamerą i pobierać lmy
lub zrobione zdjęcia bezpośrednio
na urządzenie.
6.1. Ustawianie identyfikatora
SSID sieci Wi-Fi
A. Najpierw naciskaj przycisk trybu
(taki sam jak przycisk zasilania),
aż przejdziesz do trybu ustawień
i uzyskasz dostęp do menu
ustawień.
B. Naciskaj przycisk w dół, aż
wybierzesz ustawienie SSID Wi-Fi,
a następnie naciśnij przycisk OK,
aby wyświetlić nazwę sieci Wi-Fi.
C. Gdy litera/gura jest w kolorze
zielonym,oznacza to, że można
ją zmienić poprzezprzewijanie
różnychznaków za pomocą
przycisków góra/dółprzycisków
góra/dół.
D. Po wybraniu właściwego
znaku naciśnij przycisk OK, aby
potwierdzić wybór i przejść do
następnego znaku.
E. Na koniec naciśnij dwukrotnie
przycisk trybu, aby wyjść i wrócić
do trybu wideo.
6.2. Ustawianie hasła Wi-Fi
A. Najpierw naciskaj przycisk trybu
(taki sam jak przycisk zasilania),
aż przejdziesz do trybu ustawień
i uzyskasz dostęp do menu
ustawień.
B. Naciskaj przycisk w dół, aż
wybierzesz ustawienie HASŁO
Wi-Fi, a następnie naciśnij przycisk
OK, aby wyświetlić hasło do sieci
Wi-Fi.
C. Gdy litera/gura jest w kolorze
zielonym,oznacza to, że można
ją zmienić poprzezprzewijanie
różnychznaków za pomocą
przycisków góra/dółprzycisków
góra/dół.
D. Po wybraniu właściwego
znaku naciśnij przycisk OK, aby
potwierdzić wybór i przejść do
następnego znaku.
E. Na koniec naciśnij dwukrotnie
przycisk trybu, aby wyjść i wrócić
do trybu wideo.
6.3. Wyłączanie połączenia z siecią
Wi-Fi
Naciśnij krótko przycisk w górę, aby
wyłączyć połączenie z siecią Wi-Fi.

PO
DANE TECHNICZNE
Ekran LCD 2.0-calowy
Obiektyw Wysokiej jakości szerokokątny obiektyw
klasy A+
Języki
Angielsku/Francusku/Niemiecku/
Hiszpańsku/Włosku/Portugalsku/
Niderlandzku/Polski/Węgiersku/
Czesku/Rosyjsku
Rozdzielczość wideo
1080FHD (1920 x 1080) 30FPS
720P (1280 x 720) 30FPS
MVGA (848 x 480) 30FPS
Format wideo AVI
Format zdjęć JPG
Rozdzielczość zdjęć
12M (2032 x 3024)
10M (3648 x 2736)
8M (3264 x 2448)
5M (2592 x 1944)
3M (2048 x 1536)
2M (1920 x 1080)
1.3
M
(1280 x 960)
Karta pamięci Micro SDHC, klasa 10 lub wyższa
Tryb fotografowania Pojedynczy strzał/samowyzwalacz
(3/5/10/20 sekund)
USB 2.0
Zasilacz Akumulator Li ion 3,7V
Wymiary 59.27 x 41.13 x 29.28 mm
Uwaga: Niektóre działania lub środowiska mogą mieć wpływ na prawidłowe
działanie kamery. Sporadyczne awarie mogą wystąpić po długotrwałej
aktywności. W takim wypadku wyjmij baterię i poczekaj, aż ostygnie,
zanim ponownie włożysz ją do kamery. Po wykonaniu tej czynności kamera
powinna automatycznie się zresetować.

HU
BIZTONSÁGI
UTASÍTÁSOK
1. Kezelje ezt az akciókamerát óvatosan,
ne ejtse le, és ügyeljen arra, hogy a
készülék ne sérüljön meg.
2. Tartsa a távol a kamerát erős
mágneses mezőtől és erős
rádióhullámokat kibocsátó
készülékektől. Az erős mágneses
mező hibás működést okozhat
vagy ronthatja a kép- és a
hangminőséget.
3. Használjon a készülékhez
megbízható micro SD kártya márkát,
mert az alapkártyák nem garantálják
a kamera megfelelő működését.
4. Az adatvesztés elkerülése érdekében
ne használja a micro SD kártyát
mágnes vagy mágneses mező
közelében.
5. Ha a töltés során túlmelegedést,
füstöt vagy szagot észlel, kérjük,
azonnal válassza le az USB-kábelt
és kapcsolja ki az áramforrást a
tűzveszély elkerülése érdekében.
6. A töltés alatt tartsa az USB-kábelt
gyermekektől távol a fulladásveszély
és az áramütés kockázatának
elkerülése érdekében.
7. Tárolja a terméket egy hűvös és
száraz helyen.
TERMÉKJELLEMZŐK
- A vízálló toknak köszönhetően
a kamera 30 méteres mélységig
védett a víztől.
- Valós idejű előnézet és a
hosszú hatótávú távezérlés
okostelefonnal vagy táblagéppel
Wi-Fi-n keresztül.
- Az akkumulátor egyszerűen
kivehető és cserélhető.
- Webkamera funkció.
- Max. 32GB-os memóriakártya
támogatás.
- Többféle videófelbontás:
1080P (30fps) / 720P (30fps) /
VGA (30fps).
A KAMERA ÁTTEKINTÉSE

HU
HASZNÁLATI
UTASÍTÁSOK
1. A micro SD-kártya behelyezése
A kamerát nem használhatja addig,
amíg a bal oldalán található foglalatba
nem helyez be egy megfelelő micro
SD-kártyát. Lehetőleg válasszon
megbízható márkájú micro SD-kártyát.
Ez legfeljebb 32GB kapacitású lehet,
és használat előtt egy számítógépen
formázni kell.
Megjegyzés: A nem márkás
memóriakártyákkal nem garantálható a
kamera megfelelő működése.
2. Az akkumulátor behelyezése és
eltávolítása
A. Húzza ki az akkumulátortartó fedelét.
B. Az akkumulátoron feltüntetett
pozitív és negatív jel gyelembe
vételével megfelelő polaritású
irányban helyezze be az
akkumulátort a helyére.
C. A képernyő jobb felső sarkában egy
akkumulátor ikon jelenik meg, és jelzi
a töltöttségi szint állapotát.
Megjegyzés: Az akkumulátor
eltávolításához húzza ki az
akkumulátortartó fedelét, majd
óvatosan, a kis fül segítségével távolítsa
el.
3. Az akkumulátor töltése
A. A töltéshez csatlakoztassa a kamerát
a számítógéphez vagy a hálózati
adapterhez az USB-kábellel.
B. A kamerát egy autóban is töltheti,
ha csatlakoztatja egy autós USB-
töltőhöz.
Megjegyzés: A kamera töltése
alatt is használható fényképek és
videófelvételek rögzítésére.
4. Be- és kikapcsolás
A. A kamera bekapcsolásához kb. 3
másodpercig tartsa lenyomva a
bekapcsológombot, amíg a kijelző
világítani kezd.
B. A kamera bekapcsolásához kb. 3
másodpercig tartsa lenyomva a
bekapcsológombot, amíg a kijelző
elsötétül.
5. Üzemmódok bekapcsolása
Miután a kamera bekapcsolódott,
az egyik módról a másikra történő
egymás utáni váltáshoz röviden nyomja
meg a bekapcsológombot : videó /
fényképezés / lejátszás / beállítás menü.
5.1. Videó üzemmód
A. Nyomja meg az üzemmód gombot
(megegyezik a bekapcsológombbal),
amíg a videó módhoz nem ér
(első üzemmódként jelenik
meg a képernyőn, mivel ez az
alapértelmezett üzemmód).
B. Majd videó rögzítésének
megkezdéséhez nyomja meg az OK
gombot, a befejezéshez nyomja meg
újból.
C. A sárga folt ikon aa képernyő bal
felső sarkábansárgán villog , jelezve ,
hogya felvétel folyamatban van.
5.2. Fényképezés üzemmód
A. Nyomja meg az üzemmód gombot
(megegyezik a bekapcsoló
gombbal), amíg a fényképezés
üzemmódhoz nem ér.
B. Majd fénykép készítéséhez nyomja
meg az OK gombot.
5.3. Visszajátszás menü
A. Nyomja meg az üzemmód gombot
(megegyezik a bekapcsoló
gombbal), amíg a lejátszás
üzemmódhoz nem ér.
B. Videó vagy fénykép kiválasztásához
nyomja meg a fel/le nyilakat.
C. Majd nyomja meg az OK gombot
a lejátszáshoz vagy a kiválasztott
fénykép teljes képernyőn történő
megjelenítéséhez.

HU
5.4. Beállítás menü
A. Nyomja meg az üzemmód gombot
(megegyezik a bekapcsoló gombbal),
amíg a beállítás üzemmódhoz nem
ér, amellyel hozzáférhet a beállítás
menühöz.
B. A menüben a fel/le nyilak
megnyomásával válassza ki a módosítani
kívánt beállítást.
C. Nyomja meg az OK gombot az almenübe
lépéshez.
D. Válassza ki valamelyik beállítási
lehetőséget, majd az OK gomb
újbóli megnyomásával erősítse meg
választását.
6. Wi-Fi kapcsolat
A kamera wikapcsolattal csatlakoztatható
Androidos vagy iOS okostelefonhoz
vagy táblagéphez az alábbi lépések
végrehajtásával:
A. Először telepítse a GoPlus Cam
alkalmazást az okostelefonjára/
táblagépére - Androidos készüléken a
Google Play Áruházból, iOS rendszerre az
App Store-ból.
B. Kapcsolja be a kamerát, és nyomja meg a
Wi-Fi gombot (ami egyben a fel gombot).
C. A Wi-Fi logó jelenik meg kék színnel
az AGFA_xxxxxxxxxxxx SSID-vel
(munkamenet-azonosító) (Wi-Fi neve
egy 12-jegyű véletlen sorozatszámmal)
együtt, valamint a PWA2 (jelszó)
12345678.
D. Adja meg a Wi-Fi beállításait az
okostelefonon/táblagépen, majd a
csatlakoztatáshoz keresse meg a kamera
Wi-Fi SSID azonosítóját.
E. Indítsa el a GoPlus Cam alkalmazást az
okostelefonján/táblagépén, hogy távolról
vezérelje a kamerát, és közvetlenül az
eszközére töltse le a rögzített videókat
vagy fényképeket.
6.1. A Wi-Fi SSID beállítása
A. Nyomja meg az üzemmód gombot
(megegyezik a bekapcsoló gombbal),
amíg a beállítás üzemmódhoz nem
ér, amellyel hozzáférhet a beállítás
menühöz.
B. Nyomja meg a lefelé nyilat
mindaddig, amíg a Wi-Fi SSID
beállításhoz nem ér, majd a Wi-Fi
hálózat nevének megjelenítéséhez
nyomja meg az OK gombot.
C. Ha egy betű/ábra zöld, ez azt jelenti,
hogy megváltoztathatja görgetve
a különböző karaktereket a
Fel/Le gombbal kulcsok.
D. Miután kiválasztotta a megfelelő
karaktert, nyomja meg az
OK gombot a kiválasztás
megerősítéséhez, és a következő
karakterre történő léptetéshez.
E. Végül a kilépéshez és a videó
üzemmódhoz történő visszatéréshez
nyomja meg kétszer az üzemmód
gombot.
6.2. A Wi-Fi jelszó beállítása
A. Nyomja meg az üzemmód gombot
(megegyezik a bekapcsoló
gombbal), amíg a beállítás
üzemmódhoz nem ér, amellyel
hozzáférhet a beállítás menühöz.
B. Nyomja meg a lefelé nyilat
mindaddig, amíg a Wi-Fi JELSZÓ
beállításhoz nem ér, majd
a Wi-Fi hálózat jelszavának
megjelenítéséhez nyomja meg az OK
gombot.
C. Ha egy betű/ábra zöld, ez azt jelenti,
hogy megváltoztathatja görgetve
a különböző karaktereket a
Fel/Le gombbal kulcsok.
D. Miután kiválasztotta a megfelelő
karaktert, nyomja meg az
OK gombot a kiválasztás
megerősítéséhez, és a következő
karakterre történő léptetéshez.
E. Végül a kilépéshez és a videó
üzemmódhoz történő visszatéréshez
nyomja meg kétszer az üzemmód
gombot.
6.3. A Wi-Fi kikapcsolása
A Wi-Fi kapcsolat kikapcsolásához
röviden nyomja meg a felfelé nyilat.

HU
MŰSZAKI ADATOK
LCD képernyő 2.0 hüvelykes
Lencse A+ minősítésű, magas felbontású, nagy
látószögő lencsék
Nyelvek Angol/Német/Spanyol/Olasz/Portugál/
Holland/Lengyel/Cseh/Orosz
Videó felbontás
1080FHD (1920 x 1080) 30fps
720P (1280 x 720) 30fps
MVGA (848 x 480) 30fps
Video formátum AVI
Fotó formátum JPG
Fotó felbontás
12M (2032 x 3024)
10M (3648 x 2736)
8M (3264 x 2448)
5M (2592 x 1944)
3M (2048 x 1536)
2M (1920 x 1080)
1.3
M
(1280 x 960)
Memóriakártya Micro SDHC, 10. osztály vagy annál
magasabb
Fotó mód Egyetlen lövés/önkioldó (3/5/10/20
másodperc)
USB 2.0
Tápegység 3,7 V-os újratölthető Li-ion akkumulátor
Méretek 59.27 x 41.13 x 29.28 mm
Megjegyzés: Bizonyos gyakorlatok vagy környezetek befolyásolhatják a
kamera megfelelő működését. Tartós használat esetén véletlenszerűen hibás
működés léphet fel. Ha ilyet tapasztal, vegye ki az akkumulátort, és várja meg,
amíg lehűl, mielőtt újból behelyezné a kamerába! Ezután az eljárás után a
kamerának automatikusan alaphelyzetbe kell váltania.

CZ
BEZPEČNOSTNÍ
OPATŘENÍ
1. Tato action camera je špičkovým
výrobkem přesného strojírenství;
zacházejte s ní opatrně, nenechejte
ji upadnout na zem, ani ji nijak
neničte.
2. Kameru udržujte v bezpečné
vzdálenosti od všeho, co je silně
magnetické nebo je zdrojem silných
radiových vln. Silné magnetické pole
by mohlo způsobit nefunkčnost
výrobku nebo poškodit kvalitu
obrazu a zvuku.
3. Používejte micro SD karty
renomovaných značek, neboť
obyčejné karty nejsou zárukou
řádného fungování kamery.
4. Abyste zabránili ztrátě dat z úložiště
micro SD karty, nepoužívejte tyto
karty na magnetickém místě ani v
jeho blízkosti.
5. Jestliže během nabíjení vnímáte
přehřívání, kouř či zápach,
předejděte požáru okamžitým
odpojením USB kabelu a zastavením
přívodu elektřiny.
6. Během nabíjení udržujte USB
kabel mimo dosah dětí, abyste
předešli riziku udušení nebo zásahu
elektrickým proudem.
7. Uchovávejte výrobek v chladu a
suchu.
FUNKCE PRODUKTU
- Díky vodotěsnému krytu je kamera
voděodolná do hloubky 30 metrů.
- Náhled v reálném čase a ovládání na
velkou vzdálenost prostřednictvím
Wi-Fi (chytrým mobilním telefonem
nebo tabletem).
- Snadné vyjmutí baterie a její výměna.
- Funkce webkamery.
- Podporuje paměťové karty o kapacitě
až 32GB.
- Nahrávání videa je možné v několika
rozlišeních.
PŘEHLED ÚDAJŮ O KAMEŘE

CZ
INSTRUKCE
1. Vložení micro SD karty
Kameru můžete začít používat
teprve poté, kdy poprvé vložíte
micro SD kartu do příslušného
slotu na levé straně. Doporučujeme
využívat micro SD karty
renomovaných značek, které mají
úložní kapacitu až 32GB a před
použitím byly zformátovány na
počítači.
Poznámka: Obyčejné paměťové
karty nezaručují řádnou funkčnost
kamery.
2. Instalace a vyjmutí baterie
A. Sejměte kryt baterie.
B. V souladu s označením kladného
a záporného pólu baterie, vložte
baterii do slotu, dodržte polaritu
a počkejte, až baterie dobře
zacvakne.
C. V pravém horním rohu se objeví
ikona baterie, která ukazuje
průběh nabíjení.
Poznámka: Chcete-li baterii
vyjmout, sundejte kryt příslušného
slotu a opatrně baterii vyjměte.
3. Dobíjení baterie
A. Chcete-li kameru dobíjet, připojte
ji USB kabelem k počítači nebo k
napájecímu adaptéru.
B. Kameru můžete dobíjet také
v autě, pokud ji připojíte do
příslušné USB nabíječky.
Poznámka: Přehrávání fotograí a
videa jsou možné i během dobíjení
kamery.
4. Zapnutí a vypnutí
A. Chcete-li kameru zapnout, držte
vypínač asi 3 sekundy a čekejte,
než se obrazovka rozsvítí.
B. Chcete-li kameru vypnout, držte
vypínač asi 3 sekundy a čekejte,
než obrazovka zhasne.
5. Přepínání režimu
Jestliže je kamera zapnutá, stiskněte
krátce vypínač a postupně můžete
přecházet z jednoho režimu do
jiného: video / foto / přehrávání /
nastavení.
5.1. Režim video
A. Nejprve stiskněte tlačítko režim
(stejné jako vypínač) a počkejte,
až kamera přejde do režimu
video (tento režim je výchozí, a
proto se na obrazovce objeví jako
první).
B. Nahrávání poté zahájíte tlačítkem
OK a opětovným stiskem jej
zastavíte.
C. Ikona žluté skvrny vv levém
horním rohu obrazovkyblikat
žlutě , což znamená , žeprobíhá
nahrávání.
5.2. Režim foto
A. Nejprve stiskněte tlačítko režim
(stejné jako vypínač) a počkejte,
až kamera přejde do režimu foto.
B. Poté můžete fotografovat
tlačítkem OK.
5.3. Režim přehrávání
A. Nejprve stiskněte tlačítko Mode
(stejné jako vypínač) a počkejte,
až kamera přejde do režimu
přehrávání.
B. Pomocí tlačítek nahoru/dolů
vyberte video nebo fotograi.
C. Poté stiskněte tlačítko OK a
zvolený soubor se přehraje nebo
zobrazí v celoobrazovkovém
režimu.
5.4. Režim nastavení
A. Nejprve stiskněte tlačítko režim
(stejné jako vypínač) a počkejte,
až kamera přejde do režimu
nastavení a zpřístupní se vám
menu nastavení.
B. Pomocí tlačítek nahoru/dolů
vyberte nastavení, které chcete
změnit.

CZ
C. Do podmenu se dostanete
stiskem tlačítka OK.
D. Vyberte jednu z možností
nastavení a opětovným stiskem
tlačítka OK vaši volbu potvrďte.
6. Wi-Fi připojení
Kameru můžete připojit k chytrému
mobilnímu telefonu (s Androidem
nebo iOS) nebo tabletu, budete-li
postupovat po následujících krocích:
A. Na svůj chytrý mobilní telefon/
tablet nejprve nainstalujte
aplikaci
GoPlus Cam
(na úložišti
Google Play Store najdete verzi
pro Android a na úložišti App
Store verzi pro iOS).
B. Zapněte kameru a stiskněte
tlačítko Wi-Fi (také tlačítko
nahoru).
C. Na obrazovce se objeví modré Wi-
Fi logo, text AGFA_xxxxxxxxxxxx
SSID (název Wi-Fi obsahující
12místné náhodné sériové číslo) a
PWA2 (heslo) 12345678.
D. Zadejte Wi-Fi nastavení vašeho
chytrého mobilního telefonu/
tabletu, vyhledejte Wi-Fi SSID
kamery a připojte se k ní.
E. Na svém chytrém mobilním
telefonu/tabletu otevřete aplikaci
„GoTrack“, což vám umožní
ovládat kameru na dálku a přímo
na vaše zařízení stahovat takto
pořízená videa či fotograe.
6.1. Nastavení Wi-Fi SSID
A. Nejprve stiskněte tlačítko režim
(stejné jako vypínač) a počkejte,
až kamera přejde do režimu
nastavení a zpřístupní se vám
menu nastavení.
B. Navigujte tlačítkem dolů, zvolte
nastavení Wi-Fi SSID a název Wi-Fi
sítě poté zobrazíte tlačítkem OK.
C. Když je písmeno číslo
zelené,znamená to, že jej
můžete změnitprocházením
různýchznaků pomocí tlačítek
nahoru dolůnahoru a dolů.
D. Jakmile označíte potřebné
písmeno, jeho zvolení potvrďte
tlačítkem OK a přesuňte se k
dalšímu písmenu.
E. Nakonec dvakrát stiskněte tlačítko
režim, čímž nastavení opustíte a
kamera přejde do režimu video.
6.2. Nastavení hesla pro Wi-Fi
A. Nejprve stiskněte tlačítko Mode
(stejné jako vypínač) a počkejte,
až kamera přejde do režimu
nastavení a zpřístupní se vám
menu nastavení.
B. Navigujte tlačítkem dolů, zvolte
nastavení Wi-Fi PASSWORD (heslo)
a heslo Wi-Fi sítě poté zobrazíte
tlačítkem OK.
C. Když je písmeno číslo
zelené,znamená to, že jej
můžete změnitprocházením
různýchznaků pomocí tlačítek
nahoru dolůnahoru a dolů.
D. Jakmile označíte potřebné
písmeno, jeho zvolení potvrďte
tlačítkem OK a přesuňte se k
dalšímu písmenu.
E. Nakonec dvakrát stiskněte tlačítko
režim, čímž nastavení opustíte a
kamera přejde do režimu video.
6.3. Vypnutí Wi-Fi
Chcete-li vypnout Wi-Fi, krátce
stiskněte tlačítko nahoru.

CZ
SPECIFIKACE
LCD obrazovka 2.0 palce
Objektiv Širokoúhlá čočka třídy A+ s vysokým
rozlišením
Jazyky
Anglický/Francouzský/Německý/
Španělský/Italský/Portugalský/Holandský/
Polský/ Maďarský/Český/Ruský
Rozlišení videa
1080FHD (1920 x 1080) 30fps
720P (1280 x 720) 30fps
MVGA (848 x 480) 30fps
Video formát AVI
Foto format
JPG
Rozlišení fotografie
12M (2032 x 3024)
10M (3648 x 2736)
8M (3264 x 2448)
5M (2592 x 1944)
3M (2048 x 1536)
2M (1920 x 1080)
1.3
M
(1280 x 960)
Paměťová karta Micro SDHC, třída 10 nebo vyšší
Foto režim Jeden výstřel/samospoušť
(3/5/10/20 sekund)
USB 2.0
Zdroj napájení 3,7V dobíjecí li ion baterie
Rozměry 59.27 x 41.13 x 29.28 mm
Poznámka: Řádné fungování kamery mohou ovlivnit určité postupy nebo
určitá prostředí. Je-li kamera používána velmi dlouho, může docházet k
příležitostným výpadkům. Pokud k tomu dojde, vyjměte baterii a počkejte
na její ochlazení, než ji opět vložíte do kamery. Poté by se kamera měla
automaticky resetovat.


AgfaPhoto is used under license of Agfa-Gevaert NV. For this product a sub-
license has been granted by AgfaPhoto Holding GmbH (www.agfaphoto.com).
Neither Agfa-Gevaert NV nor AgfaPhoto Holding GmbH manufacture this
product or provide any product warranty or support. For service, support and
warranty information, contact the distributor or manufacturer.
Product manufactured for and distributed by :
GT COMPANY - 5 rue de la Galmy - 77700 Chessy -
France - +33 (0) 1.61.10.09.25 - www.gtcompany.fr
1 year limited warranty / garantie limitée un an /
1 Jahr eingeschränkte Garantie / garantía limitada de 1 año /
garanzia limitada di 1 anno / garantia limitada de 1 ano /
roczna ograniczona gwarancja / 1 év korlátozott garancia /
omezená záruka 1 rok / 1 jaar beperkte garantie /
1 год ограниченной гарантии
Made in China
Notice of compliance for the European Union :
products bearing the CE mark comply with the
applicable European directives and associated
harmonised European standards.
Disposal of waste equipment by users in the
European Union : this symbol means that according
to local laws and regulations, it is prohibited to
dispose of this product with household waste.
Instead, it is your responsibility to protect the
environment and human health by handing over
your used device to a designated collection point
for the recycling of waste electrical and electronic
equipment. For more information about where you
can drop off your waste equipment for recycling,
please contact your local city office, your household
waste disposal service or the shop where you
purchased the product.
After sales service / service après vente /
Kundendienst / servicio postventa / serviço pós venda /
servizio post vendita / serviço pós venda /
serwis posprzedażowy / poprodejní servis /
értékesítés utáni szolgáltatás / dienst na verkoop /
послепродажное обслуживание :
@ : aftersaleservice@gtcompany.fr
Tél. : + 33 (0) 1.85.49.10.26

-
 1
1
-
 2
2
-
 3
3
-
 4
4
-
 5
5
-
 6
6
-
 7
7
-
 8
8
-
 9
9
-
 10
10
-
 11
11
-
 12
12
-
 13
13
-
 14
14
-
 15
15
-
 16
16
-
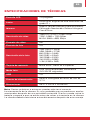 17
17
-
 18
18
-
 19
19
-
 20
20
-
 21
21
-
 22
22
-
 23
23
-
 24
24
-
 25
25
-
 26
26
-
 27
27
-
 28
28
-
 29
29
-
 30
30
-
 31
31
-
 32
32
-
 33
33
-
 34
34
-
 35
35
-
 36
36
-
 37
37
-
 38
38
-
 39
39
-
 40
40


AgfaPhoto Action Camera Manual de usuario
- Tipo
- Manual de usuario
en otros idiomas
- français: AgfaPhoto Action Camera Manuel utilisateur
- italiano: AgfaPhoto Action Camera Manuale utente
- português: AgfaPhoto Action Camera Manual do usuário
- slovenčina: AgfaPhoto Action Camera Používateľská príručka
- polski: AgfaPhoto Action Camera Instrukcja obsługi
Otros documentos
-
Midland H7 plus UHD Manual de usuario
-
Midland H9 WIFI Action Kamera, Ultra HD 4K El manual del propietario
-
Easypix GoXtreme Stage 2.5k Guía del usuario
-
-
-
National Geographic 9683500 El manual del propietario
-
AKASO V50 Pro SE Manual de usuario
-
 APEMAN A70 - Action camera El manual del propietario
-
Midland H9 PRO Instrucciones de operación
