
OPERATOR'S MANUAL
CRRFrSMFIN°
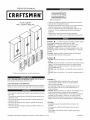
FLOOR CABINET
TRIO / LOCKER / SHELVES
* Product you purchased may vary from picture shown
CALL 1-800-469-4663 FOR SERVICE PARTS. Refer to Service
Parts Drawing for full listing of Service Parts.
LOCATING MODEL # INFORMATION
Model numbers and other information required for service parts is
located on a label on the interior right side of the top most drawer.
• The maximum weight for each shelf in a door should be no more
than 7 Ibs.
• The maximum weight for each half shelf in cabinet should be no
more than 50 Ibs.
• The maximum weight for each full shelf in cabinet should be no
more than 100 Ibs.
• The maximum weight for each drawer in cabinet should be no
more than 100 Ibs.
• The maximum product weight, including contents, should be no
more than 400 Ibs.
• Lubricate the slides with grease or equivalent, (twice yearly.)
• Lubricate lock with graphite, (yearly).
• Periodically the drawer fronts, drawer trim, and other surfaces
should be cleaned with a mild detergent and water.
• Auto wax will preserve the unit's luster finish. Apply the wax
as to a car. The wax will also help protect the unit against
scratches.
• Grease and oil can be removed with most standard
cleaning fluids. For safety, use a nonflammable cleaning fluid.
DANGER ,A is used to indicate a hazardous situation which,
if not avoided, wil.._Jresult in serious injury or death.
WARNING z_ indicates a hazardous situation which,
if not avoided, could result in serious injury or death.
CAUTION is used to indicate a hazardous situation which, if not
avoided, may result in minor injury, moderate injury, or property
damage.
CAUTION: Read and follow all Safety Rules and Operating
Instructions before first use of this product.
DANGER ,_
• DO NOT stand on this product. You may fall or cause product
to tip.
• DO NOT mount this product on a truck bed or any other moving
object. This may cause personal injury or product damage.
• DO NOT open more than one drawer. The product may be-
come unstable and tip.
• DO NOT step in the drawers. You may fall or cause product to
tip.
• DO NOT step on the shelves. You may fall or cause product to
tip.
WARNING
• Use appropriate safety equipment when using power
and hand tools. Failure to do so may cause personal
injury or product damage.
• Use adequate manpower when assembling and moving
this unit. Failure to do so may cause personal injury or
product damage.
• DO NOT alter this product in any manner. For example, do not
weld external Iockbars or attach electrical equipment.
• Keep the product on level surfaces. The product may become
unstable and tip if stored or moved on an uneven surface.
• Cabinet MUST be attached to a stud in a wood frame wall.
Failure to do so may cause personal injury or product damage
CAUTION
• Appropriately secure this product before moving it with
a forklift.
• The maximum weight for each drawer should never be
exceeded.
• Only transport this product empty. Properly secure when
transporting.
Distributed by Sears Brands Management Corporation, Hoffman Estates, IL 60179 F1999 REV A

TOOLS REQUIRED:
Drill
1/4" Driit Bit
1/8" Ddi[ Bit
5/32" Hex Key
HARDWARE INCLUDED:
[_ 1/4-20 3/4" Button Head Screw
X
(Qty: 3)
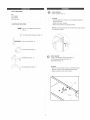
items Needed:
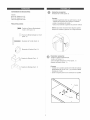
Screw Leveler (Qty: 4)
Process:
- Lay the cabinet on its back. Use packaging material to
protect the finish.
- Instatt (4) Screw Levelers.
Return the cabinet to its upright position.
NOTE: Some adjustments may be necessary after cabinet
is in desired location.
1/4-20 Serrated Ftange Nut (Qty: 3)
Screw Leveler (Qty: 4)
Snap Grommet (Qty: 2)
Shelf Bracket (Qty: 1)
items Needed:
1/4-20 x 3/4" Button Head Screw (Qty: 2)
1/4-20 Serrated Ftange Nut (Qty: 2)
Shelf Bracket (Qty: 1)
Mounting Bracket (Qty: 1)
PrOCeSS:
- Mount to unit using (2) 1/4-20 x 3/4" Button Head
Screws, and (2) 1/4-20 Serrated Flange Nuts.
Adjust bracket for tock cam to tatch.
o
Nut
_" Screw

ItemsNeeded:
1/4-20x3/4"ButtonHeadScrew(Qty:1)
1/4-20SerratedFlangeNut(Qty:1)
MountingBracket(Qty:1)
o _ _± o
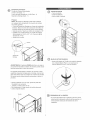
Q SHELF ADJUSTMENT
Empty shelf.
Remove fasteners.
Reattach shelf.
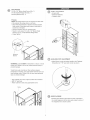
Process:
NOTE: Mounting bracket may be mounted on either side
of the cabinet. Mounting shown on left side.
Place Mounting Bracket in desired mounting location.
Mark center of mounting hole location, using slots in
bracket as a template.
Remove bracket. Drill 1/8" mounting hole.
- Mount to unit using (1) 1/4-20 x 3/4" Button Head
Screws, and (1) 1/4-20 Serrated Flange Nuts.
Finger tighten.
Nut
Mounting
Bracket
WARNING: Cabinet MUST be attached to a stud in a wood
frame wail. Failure to do so may cause personal injury or
product damage.
Wood frame wail, concrete or other surfaces require
hardware for mounting. Use appropriate hardware per your
local building codes. Failure to do so may cause personal
injury or product damage.
Atign cabinet with a stud. Adjust Leveter feet if needed.
Drill 1/8" pilot hole.
- Attach cabinet to stud using appropriate screw.
Screw
_,_ LEVELING FOOT ADJUSTMENT
Adjust Screw Leveler to desired position with Flathead
Screwdriver or 7/16" open end wrench as shown.
O DOOR CLOSURE
Ensuring the cabinet is level (front to back) will result in
the correct alignment of the doors and proper function of
the magnetic door closure system.

®
Product questions or probJems?
Get answers to questions, troubJeshoot probJems,
order parts, or scheduJe repair service.
Para respuestas a preguntas o probJemas, y ordenar piezas o pedir
servicio para Jareparaci6n de su equipo.
Tohelpushelpyou,registeryourproductatwww.craftsman.com/registration
Para poderte ayudar mejor, registra tu producto en www.craftsman.comiregistration
Join the Craftsman Club today!
www.craftsman.com/signu p
Receive exclusive member benefits including special pricing and offers, project sharing, expert
advice, and SHOP YOUR WAY REWARDS!
Como miembro exdusivo, redbe diversos benefidos como ofertas, predos espedaRes,
proyectos nuevos, consejos de expertos y nuestro programa de puntos SHOP YOUR
WAY REWARDS!
® Registered Trademark / TM Trademark of KCD IP, LLC in the United States, or Sears Brands, LLC in other countries
® Marca Registrada / TM Marca de Fabrica de KCD IP, LLC en Estados Unidos, o Sears Brands, LLC in otros paises

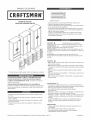
MANUAL DE USUARIO
®
q
GABINETE DE PISO
TRIOiCASlLLEROiESTANTES
Cojinetes de bolas
• Lubrique las gu{as con grasa o equivalente (dos veces por a_o).
• Lubrique la cerradura con grafito (anualmente).
• Limpie con detergente suave y agua los frontales y los bordes laterales
de los cajones y las demSs superficies.
• La cera para autom6viles preservar8 el acabado brilloso de la unidad.
Aplique la cera como Io har{a al carro. La cera tambi6n ayudar8 a pro-
teger la unidad contra raspones.
• La grasa y el aceite pueden retirarse con la mayor{a de los I{quidos
est_ndar para limpieza. Por razones de seguridad, utilice un I{quido
incombustible para limpieza.
PELIGRO _ se utiliza para indicar una situaci6n
peligrosa que, de no evitarse, resultar8 en lesiones graves o la muerte.
ADVERTENCIA A indica una situaci6n peligrosa que, de no
evitarse, podr{a producir lesiones graves o la muerte.
PREOAUOI6N se utiliza para indicar una situaci6n peligrosa que, de
no evitarse, puede derivar en lesiones leves o moderadas, o en da_o a la
propiedad.
ATENOION: Lea y siga todas las Normas de Seguridad y las
Instrucciones de Funcionamiento antes de utilizar por primera vez este
producto.
* El producto que compraste puede variar de la imagen que se muestra
EN ESTADOS UNtDOS LLAME AL 1o800-659o7084 PARA
PIEZAS DE REPUESTO. FUERA DE ESTADOS UNIDOS
LLAME A SU DISTRJBUIDOR LOCAL. Suministre el nQmero de
modelo al comunicarse.
UBICACION DE INFORMACION DEL NO. DE MODELO
El nQmero de modelo y demos informaci6n requerida para ias piezas de
servicio se encuentran en una etiqueta en el lado interior derecho de la
gaveta superior.
• El peso mSximo para cada estante en una puerta no debe ser mayor
a 3.17 kg.
• El peso m_ximo para cada medic estante en el gabinete no debe ser
mayor a 22.68 kg.
• El peso m_ximo para cada estante completo en el gabinete no debe
ser mayor a 45.36 kg.
• El peso m_ximo para cada caj6n en el gabinete no debe ser mayor
a 181.6 kg.
PELIGRO
• NO se ponga de pie sobre esta unidad. Puede caerse u ocasionar que
el producto se vuelque.
• NO montes este producto en la cama de un cami6n o sobre cualquier
otro objeto en movimiento. Esto puede causar lesiones fisicas o daSo al
producto.
• NO abra m_s de una gavet& El producto podr{a quedar inestable y
volcarse.
• NO utilice las gavetas como peldaSos. Puede caerse u ocasionar que
el producto se vuelque.
NO te pares sobre los estantes. Puedes caerte, Io que puede causar
lesiones fisicas.
ADVERTENClA Z_
• Usa equipo de seguddad adecuado al usar herramientas el6ctricas y
manuales. No hacedo puede causar lesiones fisicas o da_o al producto.
Busca la ayuda necesada al ensamblar y trasladar
esta unidad. No hacedo puede causar lesiones fisicas o
daSo al producto.
NO altere la unidad en modo alguno. Por ejemplo, no suelde las barras
de sujeci6n externas nile incorpore equipos el6ctricos.
Mantenga la unidad en superficies niveladas. La unidad puede tornarse
inestable y volcarse si se almacena o se moviliza en una superficie no
nivelada,
• El gabinete DEBE fijarse a una viga en una pared enmarcada con
mader& No hacerlo puede causar lesiones personales o daSo al
producto.
PRECAUCION
Asegura este producto debidamente antes de transportarlo con un
montacargas.
Nunca debe exceder el peso mSximo de cada gaveta.
$61o transporte esta unidad cuando est6 vac{a. AsegOrela
adecuadamente cuando la transporte.
Distribuido cerca Sears Brands Management Corporation, Hoffman Estates, IL 60179 F1999 REV A

HERRAMIENTAS NECESARIAS:
Tatadro
Broca de Tatadro de 1/4"
Broca de Tatadro de 1/8"
Ltave Hexagonal de 5/32"
PIEZAS INCLUIDAS:
_[]]_ Tomillo de Cabeza
Redondeada,
1/4-20 x 3/4" (Cant.: 3)
Elementos necesarios:
Nivetador de Tornitto (Cant: 4)
Proeeso:
- Acuesta el gabinete sobre su parte trasera. Usa et
material det empaque para proteger et acabado.
- Instata 4 nivetadores de tornillo.
Coloca nuevamente et gabinete en posiciOn vertical.
NOTA: Quiz_ sea necesado hacer algunos ajustes
despu6s de instatar et gabinete en et tugar deseado.
Tuerca de Brida Dentada de 1/4-20
(Cant.: 3)
Nivetador de Tornitto (Cant: 4)
Remache a PresiOn (Cant.: 2)
Soporte de Estante (Cant.: 1)
E_ementos necesados:
Tornillo de Cabeza Redondeada,
1/4-20 x 3/4" (Cant.: 1)
Tuerca de Brida Dentada de 1/4-20 (Cant.: 1)
Soporte de Estante (Cant.: 1)
Soporte de Montaje (Cant.: 1)
Proceso:
- Inst_talo en la unidad usando (2) Tornitto de Cabeza
Redondeada de 1/4-20 x 3/4", y (2) Tuerca de Brida
Dentada de 1/4-20.
Ajuste et soporte para teva de cerradura con pestitto.

Elementosnecesarios:
TornillodeCabezaRedondeada,
1/4-20x3/4"(Cant.:1)
TuercadeBridaDentadade1/4-20(Cant.:1)
SoportedeMontaje(Cant.:1)
Proceso:
NOTA: Et Soporte de Montaje puede estar instalado
en cualquier tado del gabinete. Se muestra eJmontaje
en et lado izquierdo.
Cotoca el Soporte de Montaje en et tugar de instataciOn
deseado. Marca el centro de ta ubicaciOn del orificio de
monta]e usando tas ranuras det soporte como ptantiHa.
Quita et soporte. Tatadra un orificio de montaje de 1/8".
Inst_talo en la unidad usando (1) Tornitto de Cabeza
Redondeada de 1/4-20 x 3/4", y (1) Tuerca de Brida
Dentada de 1/4-20.
Apneta con ta mano.
@
Ajuste del Estante
Vacia et estante.
Quita los fijadores.
Vuetve a fijar et estante.
Soporte de
Montaje
ADVERTENCJA: Et gabinete DEBE estar fijo a una viga en
una pared enmarcada de madera. No hacedo puede causar
tesiones personates o dados at producto.
Las paredes enmarcadas en madera, el concreto u otras
superficies requieren herrajes para et montaje. Usa los her-
rajes adecuados seg(_n tus cOdigos de construcciOn locales.
No hacedo puede causar tesiones personates o da_os at
producto.
AIinea el gabinete con una viga. Ajusta tas patas det
Nivelador si es necesano.
Tatadra un odficio piloto de 1/8".
Fi]a el gabinete a ta viga usando el tornitto adecuado.
Vuetve a fijar el estante.
fh_
_" Ajuste de la Pata Niveladora
A]usta et Nivetador de TorniIIo a la posiciOn deseada
con et DestorniIIador Piano o con una ttave de
extremo abierto de 7/16" como se muestra.
Tornillo
_ CERRADURA DE LA PUERTA
Si nivela adecuadamente et gabinete (de frente hacia
atr_s) tendr_ la atineaciOn correcta de las puertas y el
funcionamiento adecuado det sistema de cierre
magn6tico.

®
Product questions or probJems?
Get answers to questions, troubJeshoot probJems,
order parts, or scheduJe repair service.
Para respuestas a preguntas o probJemas, y ordenar piezas o pedir
servicio para Jareparaci6n de su equipo.
Tohelpushelpyou,registeryourproductatwww.craftsman.com/registration
Para poderte ayudar mejor, registra tu producto en www.craftsman.comiregistration
Join the Craftsman Club today!
www.craftsman.com/signu p
Receive exclusive member benefits including special pricing and offers, project sharing, expert
advice, and SHOP YOUR WAY REWARDS!
Como miembro exdusivo, redbe diversos benefidos como ofertas, predos espedaRes,
proyectos nuevos, consejos de expertos y nuestro programa de puntos SHOP YOUR
WAY REWARDS!
® Registered Trademark / TM Trademark of KCD IP, LLC in the United States, or Sears Brands, LLC in other countries
® Marca Registrada / TM Marca de Fabrica de KCD IP, LLC en Estados Unidos, o Sears Brands, LLC in otros paises
-
 1
1
-
 2
2
-
 3
3
-
 4
4
-
 5
5
-
 6
6
-
 7
7
-
 8
8


Craftsman 706466370 El manual del propietario
- Tipo
- El manual del propietario
en otros idiomas
- English: Craftsman 706466370 Owner's manual
Artículos relacionados
-
Craftsman CMST24800RB Guía de instalación
-
-
Craftsman 706105950 El manual del propietario
-
-
-
-
-
-
-