iLuv TimeShaker Micro Guía de inicio rápido
- Categoría
- Relojes de alarma
- Tipo
- Guía de inicio rápido
Este manual también es adecuado para


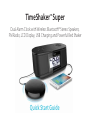
TimeShaker
TM
Super
Quick Start Guide
Dual Alarm Clock with Wireless Bluetooth® Stereo Speakers,
FM Radio, LCD Display, USB Charging and Powerful Bed Shaker

Welcome.
Thank you for your purchase.
Visit our website at www.iLuv.com or
support.iLuv.com for more information.

WHAT’S INCLUDED
3
5
7
9
27
41
43
CHARGING OTHER DEVICES
CONTROLS
11
13
USING THE 10LEVEL DIMMER
SETTING THE CLOCK/DATE
USING THE SHAKER
19
17
SETTING THE ALARM
SPECIFICATIONS
CONNECTING OTHER DEVICES
BATTERY BACKUP
44
WARRANTY
POWERING UP
2
35
39
USING THE SLEEP FUNCTION
BLUETOOTH
31FM RADIO
CONTENTS
Dual Alarm Clock with Wireless Bluetooth®
Stereo Speakers, FM Radio, LCD Display,
USB Charging and Powerful Bed Shaker

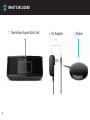
WHAT’S INCLUDED
3
TimeShaker Super Main Unit
1
AC Adapter2 Shaker3

4
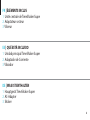
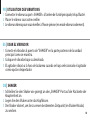
ES | QUÉ ESTÁ INCLUIDO
1 Unidad principal TimeShaker Super
2 Adaptador de Corriente
FR | ÉLÉMENTS INCLUS
1 Unité centrale de TimeShaker Super
2 Adaptateur secteur
1 Hauptgerät TimeShaker Super
2 AC-Adapter
3 Vibrador
3 Vibreur
3 Shaker
DE | WAS IST ENTHALTEN

5
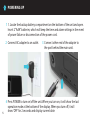
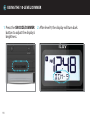
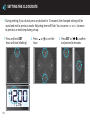
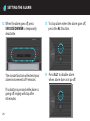
POWERING UP
Connect AC adapter to an outlet.
2
1. Locate the backup battery compartment on the bottom of the unit and open.
Insert 2 "AAA" batteries, which will keep the time and alarm settings in the event
of power failure or disconnection of the power cord.
1
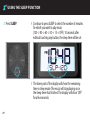
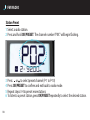
Press POWER to turn on/o the unit. When you turn on, it will show the last
operation mode at the bottom of the display. When you turn o, it will
show 'OFF' for 2 seconds and display current date.
4
3
Connect other end of the adapter to
the port behind the main unit.

6
ES | ENCENDERLO
1 Conecte el adaptador de corriente a una toma de corriente.
2 Conecte el otro extremo del adaptador al puerto situado en la parte posterior de la
unidad principal.
3 Pulse el botón “POWER” para encender o apagar la unidad. Al encenderse, mostrará
el último modo de funcionamiento en la parte inferior de la pantalla. Al apagarlo,
mostrará “OFF” durante 2 segundos y mostrará la fecha actual.
DE | EINSCHALTEN
1 AC-Adapter an eine Steckdose anschließen.
2 Das andere Ende des Adapters mit dem Port auf der Rückseite der Haupteinheit
verbinden.
3 Zum Ein-/Ausschalten auf POWER drücken. Nach dem Einschalten sehen Sie in der
Anzeige unten den letzten Betriebsmodus. Beim Ausschalten sehen Sie für 2
Sekunden „OFF“ und das aktuelle Datum.
FR | MISE SOUS TENSION
1 Branchez l’adaptateur secteur à une prise.
2 Branchez l’autres partie de l’adaptateur à l’entrée située à l’arrière de l’unité centrale.
3 Appuyez sur POWER pour allumer/éteindre l’appareil. Lorsque vous allumez l’appareil,
ce dernier indique la dernière fonction utilisée en bas de l’écran. Lorsque vous éteignez
l’appareil, il achera « OFF » pendant 2 seconde et indiquera la date actuelle sur l’écran.

7
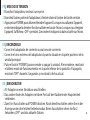
CHARGING OTHER DEVICES
To charge other devices, connect one end of USB charging cable (not included)
to the “Charge” port behind main unit.
Note: Charge out: 5V 1A (max)
2
1
Connect the other end to your device. Device will begin charging.

8
ES | CARGANDO OTROS DISPOSITIVOS
1 Para cargar otros dispositivos, conecte un extremo del cable de carga USB
(no incluido) al puerto “Charge” situado en la parte posterior de la unidad principal.
Nota: carga de salida 5V 1A (máximo)
2
Conecte el otro extremo a su dispositivo. El dispositivo comenzará a cargarse.
FR | CHARGEMENT D’AUTRES APPAREILS
1 Pour charger d’autres appareils, branchez un côté d’un câble de recharge USB
(non inclus) au port de « Charge » situé à l’arrière de l’unité principale.
Remarque : Tension de sortie : 5V 1A (max)
2
Branchez l’autre partie du câble à votre appareil. L’appareil commencera à se recharger.
1
Stecken Sie zum Laden anderer Geräte ein Ende des USB-Ladekabels (nicht im
Lieferumfang enthalten) in den Ladeport (“Charge”) auf der Rückseite des Hauptgeräts.
Hinweis: Ladeausgang: 5 V 1 A (max)
2
Verbinden Sie das andere Ende mit Ihrem Gerät. Der Ladevorgang wird gestartet.
DE | AUFLADEN ANDERER GERÄTE

9
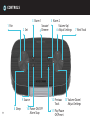
CONTROLS
Pair
1
Sleep
8
Source
9
Set
2
Alarm 1 Alarm 2
3
Snooze/
Dimmer
4
Power ON/OFF
Alarm Stop
10
Play/Pause
OK/Preset
11
Previous
Track
12
Volume Down/
Adjust Settings
13
5
Volume Up/
Adjust Settings
6
Next Track
7

10
FR | COMMANDES
1 Appariement
2 Conguration
3 Alarme 1
4 Mode Snooze/Niveaux d’intensité
5 Alarme 2
6
Augmentation du volume/Ajustement des paramètres
7 Piste suivante
8 Veille
9 Source
10 Allumer/éteindre, Arrêter l’alarme
11 Play/Pause, OK/Prérégler
12 Piste précédente
13 Baisser le volume/ Ajuster les paramètres
1 Emparejar
2 Establecer
3 Alarma 1
4 Repetición / Brillo
5 Alarma 2
6 Subir volumen / Ajustar conguración
7 Siguiente pista
8 Dormir
9 Fuente
10 Encender / Apagar / Detener Alarma
11 Reproducir / Pausa / OK / Preestablecer
12 Pista anterior
13 Reducir volumen / Ajustar conguración
ES | CONTROLES
DE | STEUERUNGEN
1 Koppeln
2 Einstellen
3 Alarm 1
4 Schlummerfunktion/ Dimmer
5 Alarm 2
6 Lauter stellen/Einstellungen anpassen
7 Nächster Titel
8 Schlafen
9 Musikquelle
10 Power ON/OFF, Wecker anhalten
11 Play/Pause, OK/Preset
12 Vorheriger Titel
13 Leiser stellen / Einstellungen anpassen

11
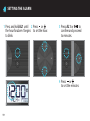
USING THE 10LEVEL DIMMER
Press the SNOOZE/DIMMER
button to adjust the display’s
brightness.
1
After level 9, the display will turn dark.
2

12
ES | USAR LA ATENUACIÓN DE 10 NIVELES
1 Pulse el botón SNOOZE/DIMMER para ajustar el brillo de la pantalla.
2 Tras el nivel 9, la pantalla se oscurecerá.
FR | UTILISATION DE 10 NIVEAUX D’INTENSITÉ
1 Appuyez sur le bouton de mode SNOOZE/DIMMER pour ajuster le niveau de
luminosité.
2 L’écran deviendra noir après le niveau 9.
1 Drücken Sie die SNOOZE / DIMMER-Taste, um die Helligkeit des Displays
einzustellen.
2 Nach Level 9 erlischt die Anzeige.
DE | 10LEVELDIMMER

SETTING THE CLOCK/DATE
13
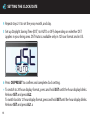
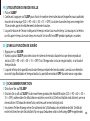
Press and hold SET
(hour will start blinking).
1
During setting, if you do not press any button for 10 seconds, the changed setting will be
saved and exit to previous mode. Adjusting item will ash. You can press << or >> to move
to previous or next step during set up.
*
Press or to set the
hour.
2
Press SET or to
conrm
and proceed to minutes.
3

14
Pendant le paramétrage, si vous n’appuyez sur aucun bouton pendant 10 secondes, les paramètres modiés
seront enregistrés et vous reviendrez au mode précédent. L’élément en cours de modication va clignoter.
Vous pouvez appuyer sur ou pour passer à l’élément suivant ou précédent durant le paramétrage.
*
FR | RÉGLAGE DE L’HEURE ET DE LA DATE
1 Appuyez et maintenez SET (l’heure commencera à clignoter).
2 Appuyez sur ou pour régler l’heure.
3
Appuyez sur SET ou pour conrmer et passer aux minutes.
Wenn Sie während der Einstellung eine Taste nicht für 10 Sekunden drücken, wird die geänderte Einstellung
gespeichert und Sie kehren in den vorherigen Modus zurück. Der eingestellte Wert blinkt. Während der
Einstellung können Sie durch Drücken auf oder zum vorherigen oder dem nächsten Schritt wechseln
*
DE | UHRZEIT/DATUM
1 Drücken und halten Sie die Taste SET. Die Stunde beginnt zu blinken.
2 Drücken Sie zum Einstellen der Stunde auf oder .
3
Drücken Sie zum Bestätigen auf SET oder und fahren Sie mit den Minuten fort.
Durante el ajuste, si no presiona ningún botón en 10 segundos, el ajuste cambiado se guardará y saldrá al
modo anterior. El elemento sobre el que se estén realizando ajustes parpadeará. Puede pulsar o para
moverse al paso anterior o siguiente durante el ajuste.
*
DE | CONFIGURANDO LA HORA/FECHA
1 Mantenga presionado “SET” (la hora comenzará a parpadear)
2 Presione o para establecer la hora.
3
Presione SET o para conrmar y pasar a los minutos

15
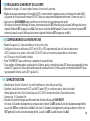
Repeat step 2-3 to set the year, month, and day.
4
Set up Daylight Saving Time (DST) to AUTO or OFF, depending on whether DST
applies in your living area. DST Auto is available only in 12 hour format and in US.
5
Press OK/PRESET to conrm and complete clock setting.
To switch to 24 hour display format, press and hold SET until the hour display blinks.
Release SET and press AL2.
To switch back to 12 hour display format, press and hold SET until the hour display blinks.
Release SET and press AL1.a
6
*
SETTING THE CLOCK/DATE

16
FR | RÉGLAGE DE L’HEURE ET DE LA DATE
4 Répétez les étapes 2-3 pour régler l’année, le mois et la journée.
5
Réglez un passage automatique à l’heure d’été (DST) si cette mention s’applique à vous en choisissant le mode AUTO,
ou ignorez-le en choisissant le mode OFF. DST Auto est uniquement disponible en format 12 heure et aux É-U.
6 Appuyez sur OK/DIMMER pour conrmer et terminer le paramétrage du réveil.
*
Pour passer au format d'achage 24 heures, maintenez la touche SET enfoncée jusqu'à ce que l'achage des heures
clignote. Relâchez SET et appuyez sur AL2. Pour revenir au format d'achage de 12 heures, maintenez la touche SET
enfoncée jusqu'à ce que l'achage des heures clignote. Relâchez SET et appuyez sur AL1.
DE | UHRZEIT/DATUM
4 Wiederholen Sie die Schritte 2–3 zum Einstellen von Jahr, Monat und Tag.
5 Schalten Sie die Sommerzeit (DST) auf AUTO oder OFF, je nachdem, ob es eine solche bei
Ihnen gibt oder nicht. Die Darstellung von DST AUTO entspricht dem US-amerikanischen
Format der 12-Stunden-Uhr.
6 Drücken Sie zum Bestätigen und Beenden der Zeiteinstellung auf OK/PRESET.
* Um zum 24 Stunden-Anzeigeformat umzuschalten, halten Sie SET gedrückt, bis die Stundenanzeige blinkt.
Lassen Sie SET los und drücken Sie AL2. Um zum 12 Stunden-Anzeigeformat zurückzuschalten, halten Sie
SET gedrückt, bis die Stundenanzeige blinkt. Lassen Sie SET los und drücken Sie AL1.
ES | CONFIGURANDO LA HORA/FECHA
4 Repetir los pasos 2 y 3 para establecer el año, mes y día.
5 Congure el Horario de Verano (DST) en AUTO o OFF, dependiendo de si el horario de verano
(DST) se aplica en su zona. La función DST AUTO sólo se encuentra disponible en el formato
de 12 horas y en los Estados Unidos.
6 Pulse “OK/PRESET” para conrmar y completar el ajuste del reloj.
* Para cambiar al formato de visualización de 24 horas, pulsa y mantén pulsado SET hasta que parpadee la hora.
Suelta SET y pulsa AL2. Para volver al formato de visualización de 12 horas, pulsa y mantén pulado SET hasta
que parpadee la hora. Suelta SET y pulsa AL1.

17
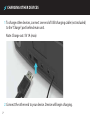
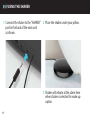
USING THE SHAKER
1
Connect the shaker to the “SHAKER”
port in the back of the main unit
as shown.
2
3
Place the shaker under your pillow.
Shaker will vibrate at the alarm time
when shaker is selected for wake up
option.

18
FR | UTILISATION DES VIBRATIONS
1
Connecter le vibreur au port « SHAKER » à l'arrière de l'unité principale, tel qu'illustré.
2
Placer le vibreur sous votre oreiller.
3
Le vibreur vibrera pour vous réveiller à l'heure prévue (en mode vibreur seulement).
ES | USAR EL VIBRADOR
1
Conecte el vibrador al puerto de "SHAKER" en la parte posterior de la unidad
principal como se muestra.
2
Coloque el vibrador bajo su almohada.
3
El agitador vibrará a la hora de la alarma cuando se haya seleccionado el agitador
como opción despertador.
DE | SHAKER
1
Schließen Sie den Shaker wie gezeigt an den „SHAKER“-Port auf der Rückseite der
Haupteinheit an.
2
Legen Sie den Shaker unter das Kopfkissen.
3
Der Shaker vibriert, um Sie zu einem bestimmten Zeitpunkt (im Shaker-Modus)
zu wecken.

Press AL 1 or to
conrm and proceed
to minutes.
3
SETTING THE ALARM
19
Press and hold AL1 until
the hour for alarm 1 begins
to blink.
1
Press or
to set the hour.
2
Press or
to set the minutes.
4

20
4 Appuyer sur ou pour régler les minutes.
3 Appuyer sur AL1 ou pour conrmer et poursuivre avec les minutes.
2 Appuyer sur ou pour régler l’heure.
FR | RÉGLAGE DE L’ALARME
1
Appuyer et maintenir enfoncé AL1 jusqu'à ce que l'heure du Réveil 1 se mette à clignoter.
3 Presione AL1 o para conrmar y proceder a los minutos.
2 Presione o para establecer la hora.
4 Presione o para establecer los minutos.
ES | CONFIGURAR LA ALARMA
1 Presione y mantenga AL1 hasta que la hora para la Alarma 1 empiece a parpadear.
3 Drücken Sie
AL1
oder zur Bestätigung und um zu den Minuten zu gelangen.
2 Drücken Sie oder , um die Stunde einzustellen.
4 Drücken Sie oder , um die Minuten einzustellen.
DE | EINSTELLEN DES ALARMS
1
Drücken und halten Sie AL1, bis die Stunde für den Alarm 1 zu blinken beginnt.

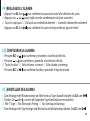
Press or to set one of the following days
combinations:
Press AL1 or to
conrm minutes and
proceed to days selection.
5
Press AL1 or to conrm days and proceed
to alarm type.
7
21
SETTING THE ALARM
All seven days
6
a)
Monday-Friday only
b)
Saturday and Sunday only
c)

5 Appuyer sur AL1 ou pour conrmer et poursuivre avec la la sélection des jours.
6 Drücken Sie oder , um eine der folgenden Tage-Kombinationen einzustellen:
7 Zum Bestätigen der Tage-Anzeige und Wechseln zum Weckalarmtyp drücken Sie AL1 oder .
5 Zum Bestätigen der Minutenanzeige und Wechseln zur Tage-Auswahl drücken Sie AL1 oder .
5 Presione AL1 o para conrmar y proceder a la selección del día.
b) Sólo de lunes a viernes
7 Presione AL1 o para conrmar los días y proceder al tipo de alarma.
6 Presione o para conrmar y proceder a la selección del día.
7 Appuyer sur AL1 ou pour conrmer les jours et de procéder au type de réveil.
6 Appuyer sur ou pour régler une des combinaisons de jours suivantes:
22
FR | RÉGLAGE DE L’ALARME
a) Tous les sept jours b) Du lundi au vendredi seulement c) Samedi et dimanche seulement
a) Todos los días c) Sólo sábado y domingo
ES | CONFIGURAR LA ALARMA
a) Alle 7 Tage
b) Nur Montag bis Freitag
c) Nur Samstag und Sonntag
DE | EINSTELLEN DES ALARMS

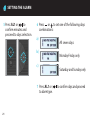
If Radio or Buzzer alarm is selected, press AL1
or to set up wake up alarm volume.
Flashing volume level will be shown at the
bottom of the display. Press or to set up
alarm volume (from V5 to V32).
9
If Shaker alarm is selected, press AL1 or
to set up vibration level. Lower part of the
display will show VIB-H or VIB-L for vibration
level. Press or to select the vibration
level.
10
23
SETTING THE ALARM
Press or to set one of the following
alarms/alarm mode combinations
(Note: device does not wake up
to Bluetooth):
Buzzer
FM Radio
Shaker
Shaker
+ Buzzer
Shaker
+ FM Radio
8
a)
Press OK/PRESET to conrm and complete
alarm setting.
11
Follow step 1-11 to set Alarm 2, replacing AL1
with AL2.
*
b)
c)
d)
e)

24
FR | RÉGLAGE DE L’ALARME
8 Appuyez sur – ou + pour choisir l’une des combinaisons d’alarmes/type d’alarme suivantes (Remarque : l’appareil ne
réveil pas avec le Bluetooth) :
9 Si l’alarme radio ou sonnerie est sélectionnée, appuyez sur AL1 ou pour régler le volume du réveil.
Le volume du réveil clignotera en bas de l’écran. Appuyez sur – ou + pour régler le volume de l’alarme (de V5 à V32).
10 Si le réveil par vibrations est sélectionné, appuyez sur AL1 ou pour choisir le niveau de vibration. Le bas de l’écran
achera VIB-H ou VIB-L pour indiquer le niveau de vibration. Appuyez sur - ou + pour choisir le niveau de vibration.
11 Appuyez sur OK/PRESET pour conrmer et terminer la conguration de l’alarme.
* Suivez les étapes 1-11 pour régler l’Alarme 2 en remplaçant AL1 par AL2.
a) Sonnerie b) Radio FM c) Vibreur d) Vibreur + sonnerie e) Vibreur + Radio FM
ES | CONFIGURAR LA ALARMA
8 Presione – o + para establecer una de las siguientes alarmas o combinaciones de alarmas
(Nota: el dispositivo no se activa por Bluetooth)
9 Si se selecciona Radio FM o Timbre, presione “AL1” o para establecer el volumen de la alarma. El nivel de volumen
parpadeante se mostrará en la parte inferior de la pantalla. Pulse – o + para establecer el volumen de la alarma (de V5 a V32).
10 Si selecciona Agitador, presione “AL1” o para establecer el nivel de vibración. La parte inferior de la pantalla
mostrará el nivel de vibración VIB-H o VIB-L. Presione – o + para seleccionar el nivel de vibración.
11 Pulse OK/PRESET para conrmar y completar los ajustes de alarma.
* Siga los pasos del 1 al 11 para establecer la Alarma 2, reemplazando “AL1” por “AL2”.
a) Timbre b) Radio FM c) Agitador d) Agitador + Timbre e) Agitador + Radio FM
DE | CONFIGURAR LA ALARMA
8 Drücken Sie zum Einstellen einer der folgenden Wecksignale/Kombinationen auf - oder +:
(Hinweis: Das Wecken wirkt sich nicht auf Bluetooth aus):
9 Drücken Sie bei einer Auswahl von Radio- oder Buzzeralarm auf AL1 oder , um die Lautstärke des Wecksignals einzustellen.
Die gewählte Lautstärke wird Ihnen durch ein Blinken in der Anzeige unten bestätigt. Drücken Sie zum Einstellen der Lautstärke
des Wecksignals (von V5 bis V32) auf - oder +.
10 Drücken Sie bei einer Auswahl des Vibratoralarms auf AL1 oder , um die Vibrationsstärke einzustellen. Im unteren Teil
der Anzeige sehen Sie entsprechend der Vibrationsstärke VIB-H oder VIB-L. Drücken Sie zum Einstellen der
Vibrationsstärke auf - oder +.
11 Drücken Sie zum Bestätigen und Beenden der Alarmeinstellung auf OK/PRESET.
* Folgen Sie zum Einstellen von Alarm 2 den Schritten 1–11, wobei Sie AL1 durch AL2 ersetzen.
a) Buzzer b) FM-Radio c) Vibratorpad d) Vibratorpad + Buzzer e) Vibratorpad + FM-Radio

25
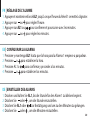
SETTING THE ALARM
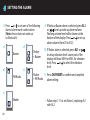
To stop alarm when the alarm goes o,
press the AL1 button.
13
When the alarm goes o, press
SNOOZE/DIMMER to temporarily
deactivate.
The snooze function will extend your
alarm in increments of 9 minutes.
If no button is pressed while alarm is
going o, ringing will stop after
60 minutes.
12
Press AL1 to disable alarm
when alarm does not go o.
14

26
12 Lorsque l’alarme se déclenche, Appuyez sur SNOOZE/DIMMER pour la désactiver
temporairement.
La fonction snooze repoussera votre alarme avec des intervalles de 9 minutes.
Si aucun bouton n’est enclenché lorsque l’alarme sonne, elle s’arrêtera au bout de 60 minutes.
13 Pour arrêter l’alarme lorsqu’elle sonne, appuyez sur le bouton AL1.
14 Appuyez sur AL1 pour désactiver l’alarme lorsque cette dernière n’est pas en train de sonner.
FR | RÉGLAGE DE L’ALARME
12 Cuando la alarma se apague, pulse “SNOOZE/DIMMER” para desactivarla temporalmente.
La función “snooze” ampliará la alarma en incrementos de 9 minutos.
Si no se pulsa ningún botón mientras la alarma está apagada, el timbre se detendrá tras
60 minutos.
13 Para detener la alarma cuando la alarma se apaga, pulse “AL1”.
14 Presione “AL1” para desactivar la alarma cuando la alarma no está apagada.
ES | CONFIGURAR LA ALARMA
12 Drücken Sie bei Ertönen des Alarms auf SNOOZE/DIMMER, um ihn vorübergehend
abzuschalten. Die Snooze-Funktion wird Sie in Intervallen von 9 Minuten an Ihre Weckzeit
erinnern. Wenn nach Ertönen des Alarms keine Taste gedrückt wird, endet das Signal nach
60 Minuten.
13 Drücken Sie bei Ertönen des Alarms auf AL1, um das Wecken zu beenden.
14 Drücken Sie auf AL1, um den Alarm abzuschalten, wenn er noch nicht ausgelöst worden ist.
DE | WECKER

27
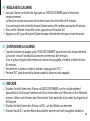
USING THE SLEEP FUNCTION
* Make sure that the unit is on (not on standby). Press to turn on.
Press SOURCE.
1
Continue to press SOURCE to select the source of
your music: (radio, aux-in port, Bluetooth).
2
a)
b)
c)
FM Radio
Bluetooth
AUX-IN

*Stellen Sie sicher, dass das Gerät eingeschaltet (nicht auf Standby) ist.
Drücken Sie , um das Gerät einzuschalten.
*Il faut s'assurer que l'unité est allumée (pas en veille). Appuyer sur pour allumer
le dispositif.
*Asegúrese de que la unidad está encendida (no en espera). Pulse para encender
la unidad.
28
FR | UTILISATION DU MODE VEILLE
1 Appuyer sur SOURCE.
a) Radio FM b) AUX-IN c) Bluetooth
a) Radio FM b) AUX-IN c) Bluetooth
a) Radio FM b) AUX-IN c) Bluetooth
2 Continuez à appuyer sur SOURCE pour sélectionner la source de votre musique
(radio FM, port AUX-In, Bluetooth).
ES | USAR LA FUNCIÓN DE SUEÑO
1 Pulse SOURCE.
2 Continúe pulsando SOURCE para seleccionar la fuente de la música (radio, puerto
auxiliar de entrada, Bluetooth).
DE | SCHLUMMERFUNKTION
1 Drücken Sie SOURCE.
2 lten Sie SOURCE gedrückt, um die Quelle der Musik (Radio, Aux-In-Anschluss,
Bluetooth) zu wählen.

29
USING THE SLEEP FUNCTION
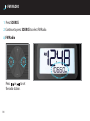
Continue to press SLEEP to select the number of minutes
for which you want to play music
(120 -> 90 -> 60 -> 30 -> 15 -> OFF). 10 seconds after
without touching any button, the sleep time will be set.
4
The lower part of the display will show the remaining
time in sleep mode. The music will stop playing once
the sleep timer has nished. The display will show 'OFF'
for a few seconds.
5
Press SLEEP.
3

30
FR | UTILISATION DU MODE VEILLE
3
Pulse SLEEP
4
Continuez à appuyer sur SLEEP pour choisir le nombre de minutes durant lesquelles vous souhaitez
écouter de la musique (120 -> 90 -> 60 -> 30 -> 15 -> OFF). La durée du mode sleep sera enregistrée
10 secondes après le relâchement de dernier bouton.
5
La partie basse de l’écran indiquera le temps restant au mode sleep. La musique s’arrêtera
une fois que le temps du mode sleep sera écoulé. L’écran achera OFF pendant quelques secondes.
ES | USAR LA FUNCIÓN DE SUEÑO
3
Appuyer sur SLEEP.
4
Vuelva a pulsar SLEEP para seleccionar el número de minutos durante los que desea reproducir
música (120 -> 90 -> 60 -> 30 -> 15 -> OFF). Tras 10 segundos sin tocar ningún botón, se activará el
temporizador.
5
La parte inferior de la pantalla mostrará el tiempo restante del modo sueño. La música se detendrá
una vez haya nalizado el temporizador. La pantalla mostrará OFF durante unos segundos.
3
Drücken Sie auf SLEEP
4
Drücken Sie so oft auf SLEEP, bis die von Ihnen gewünschte Anzahl Minuten (120 -> 90 -> 60 -> 30 ->
15 -> OFF), während der Sie Musik hören möchten, erreicht ist. Die Einschlafzeit wird aktiviert, wenn in
den nächsten 10 Sekunden keine Taste, welche auch immer, betätigt wird.
5
Im unteren Teil der Anzeige sehen Sie während des Schlafmodus die verbleibende Zeit. Die Musik
endet mit Erreichen der Einschlafzeit. Für ein paar Sekunden wird in die Anzeige OFF eingeblendet.
DE | SCHLUMMERFUNKTION

31
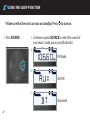
FM RADIO
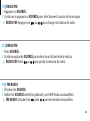
Press SOURCE.
Press or to set
the radio station.
1
Continue to press SOURCE to select FM Radio.
2
a) FM Radio

32
FR | RADIO FM
1
Appuyer sur SOURCE.
2
Continuer à appuyer sur SOURCE pour sélectionner la source de la musique
a) RADIO FM:
Appuyer sur ou pour changer de station de radio.
ES | RADIO FM
1
Pulse SOURCE.
2
Continúe pulsando SOURCE para seleccionar la fuente de la música
a) RADIO FM:
Pulse o para ajustar la emisora de radio.
DE | FMRADIO
1
Drücken Sie SOURCE.
2
Halten Sie SOURCE weiterhin gedrückt, um UKW-Radio auszuwählen.
a) FM-RADIO:
Drücken Sie oder , um den Sender einzustellen.

33
1
Station Preset
Select a radio station.
2
Press and hold OK/PRESET. The channel number "PXX" will begin ashing.
3
Press or to select preset channel (P-1 to P-10)
4
Press OK/PRESET to conrm and exit back to radio mode.
5
Repeat steps 3-4 to preset more stations
6
To listen to a preset station, press OK/PRESET repeatedly to select the desired station.
FM RADIO

34
1 Choisissez la station radio.
2
Appuyez et maintenez enfoncé OK/PRESET. Le numéro de la chaîne « PXX » commencera à clignoter.
3 Appuyez sur - ou + pour sélectionner la chaîne prédénie (P-1 à P-10)
4 Appuyez sur OK/PRESET pour conrmer et sortir du mode radio.
6 Pour écouter une station prédénie, appuyez sur OK/PRESET de manière répétitive an de sélectionner
la station de votre choix.
5 Répétez les étapes 3-4 pour prédénir plus de stations.
Prédénir de la station
FR | RADIO FM
1 Seleccione una emisora de radio.
2 Mantenga presionado “OK/PRESET”. El número de canal “PXX” comenzará a parpadear.
3 Pulse – o + para seleccionar un canal (P1 a P10)
4 Presione “OK/PRESET” para conrmar y volver al modo radio.
6 Para escuchar una emisora programada, pulse “OK/PRESET” de forma repetida para seleccionar la
emisora deseada.
5 Repetir los pasos 3 y 4 para programar más emisoras.
Programación de emisoras
ES | RADIO FM
1 Wählen Sie einen Radiosender.
2 Drücken und halten Sie OK/PRESET. Die Nummer des Sendekanals „PXX“ beginnt zu blinken.
3 Drücken Sie zum Ansteuern des voreingestellten Kanals (P-1 bis P-10) auf - oder +
4 Drücken Sie zum Bestätigen und Rückkehren zum Radiomodus auf OK/PRESET.
6 Drücken Sie zum Auswählen eines voreingestellten Senders wiederholt auf OK/PRESET.
5 Wiederholen Sie die Schritte 3–4 zum Einstellen zusätzlicher Sender
Sendervoreinstellung
DE | FM RADIO

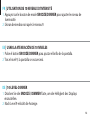
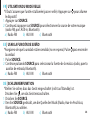
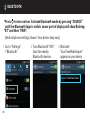
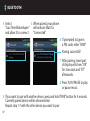
*Press to turn unit on. Activate Bluetooth mode by pressing “SOURCE”
until the Bluetooth logo is visible. Lower part of display will show ashing
"BT" and then "PAIR".
35
BLUETOOTH
Wait until
“iLuv TimeShakerSuper”
appears on your device
Turn Bluetooth "ON"/
Scan for nearby
Bluetooth devices
3
2
Go to "Settings"
/“Bluetooth”
1
(Android phone settings shown. Your device may vary).
iLuv TimeShakerSuper

36
*Appuyez sur pour allumer l’appareil. Activez le mode Bluetooth en appuyant sur « SOURCE »
jusqu’à ce que le logo Bluetooth soit visible. La partie basse de l’écran achera « BT » puis « PAIR ».
(Paramètres Android illustrés. Votre appareil peut être diérent de l’illustration).
FR | BLUETOOTH
1 Allez dans « Paramètres » / « Bluetooth »
2 Activez Bluetooth / Rechercher les périphériques à proximité.
3 Attendez jusqu'à ce que « iLuv TimeShakerSuper » apparaisse sur votre appareil.
*Presione para encender la unidad. Active el modo Bluetooth pulsando “SOURCE” hasta
que el logo de Bluetooth sea visible. La parte inferior de la pantalla mostrará “BT” y luego
“PAIR” parpadeando. (Conguración en dispositivo Android. Su dispositivo puede variar).
ES | BLUETOOTH
1 Vaya a “Ajustes”/”Bluetooth”
2 Active el Bluetooth / Buscar dispositivos Bluetooth cercanos
3 Espere hasta que “iLuv TimeShakerSuper” aparezca en su dispositivo
*Drücken Sie zum Einschalten auf . Drücken Sie zum Aktivieren des Bluetooth-Modus so
oft auf „SOURCE“, bis das Bluetooth-Logo erreicht ist. Im unteren Teil der Anzeige blinkt „BT“,
gefolgt von „PAIR“. (Unten sehen Sie die Einstellungen für Android. Die Einstellungen Ihres
Gerätes können von diesen abweichen.)
DE | BLUETOOTH
1 Gehen Sie zu „Settings“/“Bluetooth“
2 Setzen Sie Bluetooth für eine Suche nach benachbarten Bluetooth-Geräten auf „ON“
3 Warten Sie, bis auf Ihrem Gerät „iLuv TimeShakerSuper“ angezeigt wird

37
BLUETOOTH
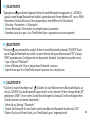
Select
“iLuv TimeShakerSuper”
and allow it to connect
4
If you want to pair with another device, press and hold "PAIR" button for 4 seconds.
Currently paired device will be disconnected.
Repeat step 1-7 with the other device you want to pair.
9
When paired, your phone
will indicate that it is
"Connected"
5
6
If prompted to type in
a PIN code, enter “0000”
7
After pairing, lower part
of display will show "OK"
for 2 seconds and "BT"
afterwards.
8
Press PLAY/PAUSE to play
or pause music.
Pairing successful!
iLuv TimeShakerSuper
iLuv TimeShakerSuper

38
If prompted to type in
a PIN code, enter “0000”
Press PLAY/PAUSE to play
or pause music.
FR | BLUETOOTH
4 Sélectionnez « iLuv TimeShakerSuper » et connectez-le
5 Une fois apparié, votre téléphone indiquera qu’il est « Connecté »
6 Si vous devez entrer un code PIN, entrez « 0000 » Appairage complété !!
7 Après l’appairage, la partie basse de l’écran achera « OK » pendant 2 secondes, puis « BT ».
8 Appuyez sur PLAY/PAUSE pour jouer ou arrêter de la musique.
9 Si vous souhaitez apparier un autre appareil, appuyez et gardez enfoncé le bouton « PAIR » pendant
4 secondes. L’appareil apparié actuellement sera déconnecté.
Répétez les étapes 1-7 avec l’autre appareil que vous souhaitez apparier.
ES | BLUETOOTH
4 Seleccione “iLuv TimeShakerSuper” y permita que se conecte
5 Una vez emparejado, su teléfono indicará que está “Conectado”
6 Si le pide que ingrese un código PIN, introduzca “0000” ¡Emparejado con éxito!
7 Après l’appairage, la partie basse de l’écran achera « OK » pendant 2 secondes, puis « BT ».
8 Pulse “PLAY/PAUSE” para reproducir o pausar música.
9 Si quiere emparejar con otro dispositivo, mantenga presionado el botón “PAIR” durante 4 segundos.
El dispositivo emparejado actualmente se desconectará.
Repita los pasos del 1 al 7 con el otro dispositivo que desee emparejar.
DE | BLUETOOTH
4 Wählen Sie „iLuv TimeShakerSuper“ und erlauben Sie die Kopplung
5 Gleich nach der Kopplung zeigt Ihr Mobiltelefon „Connected“ an
6 Geben Sie auf die Frage nach einer PIN die Nummer „0000“ ein Erfolgreiche Kopplung!
7 Nach der Kopplung sehen Sie im unteren Teil der Anzeige für 2 Sekunden „OK“, gefolgt von „BT“.
8 Drücken Sie zum Abspielen oder Anhalten der Musik auf PLAY/PAUSE.
9 Wenn Sie eine Kopplung mit einem anderen Gerät wünschen, dann drücken und halten Sie die „PAIR“
-Taste für 4 Sekunden. Das momentan gekoppelte Gerät wird abgehängt.
Wiederholen Sie die Schritte 1–7 mit dem anderen Gerät, das Sie koppeln möchten.

39
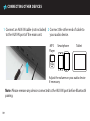
CONNECTING OTHER DEVICES
Connect an AUX-IN cable (not included)
to the AUX-IN port of the main unit.
1
Connect the other end of cable to
your audio device.
Adjust the volume on your audio device
if necessary.
Note: Please remove any device connected to the AUX-IN port before Bluetooth
pairing.
2
MP3
Player
Smartphone Tablet

40
FR | CONNECTION À D’AUTRES APPAREILS
1 Branchez un câble AUX-IN (non inclus) à l’entrée AUX-IN de l’unité principale.
2 Branchez l’autre partie du câble à votre appareil audio.
Ajustez le volume de votre appareil audio si nécessaire.
Remarque : veuillez retirer tout appareil connecté à l’entrée AUX-IN avant un appairage Bluetooth.
ES | CONECTANDO OTROS DISPOSITIVOS
1 Conecte un cable auxiliar (no incluido) al puerto AUX-IN de la unidad principal.
2 Conecte el otro extremo del cable a su dispositivo de audio.
Ajuste el volumen de su dispositivo de audio si es necesario.
Nota: por favor desconecte cualquier dispositivo conectado al puerto AUX-IN antes de emparejar mediante Bluetooth.
DE | ANSCHLUSS ANDERER GERÄTE
1 Schließen Sie ein AUX-IN-Kabel (nicht im Lieferumfang enthalten) an den AUX-IN-Port der Haupteinheit an.
2 Verbinden Sie das andere Ende des Kabels mit Ihrem
Stellen Sie, falls erforderlich, die Lautstärke Ihres Audio-Gerätes ein.
Hinweis: Entfernen Sie bitte vor der Bluetooth-Kopplung ein möglicherweise angeschlossenes Gerät vom AUX-IN-Port.

41
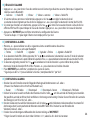
BATTERY BACKUP
2 AAA batteries ensure accurate time-keeping during a power failure or disconnection
of the power cord. When power is out, clock keeps running by backup batteries but no
LCD backlight or display will be on. Battery low icon on display indicates that the batteries
are close to dead. Please replace them with new ones.
· Backup info:
- Current radio station and Preset stations
- Alarms time/setting
- Clock

42
FR | PILES DE RÉSERVE
2 pile AAA assurent un achage exact de l’heure durant une coupure de courant ou un débranchement du
cordon d’alimentation. L’horloge continue de fonctionner pendant les coupures de courant en s’alimentant
grâce aux piles de réserve, mais il n’y aura pas de lumière LCD ou d’écran en marche. Un logo de pile sur l’écran
indique que les piles sont sur le point d’être déchargées. Veuillez les remplacer avec de nouvelles piles.
· Info sauvegardée :
- Station de ration actuelle et stations prédénies
- Heure/conguration de l’alarme
- Horloge
ES | BATERÍA DE RESERVA
2 baterías AAA garantizan un mantenimiento preciso de la hora durante un corte de corriente o una desconexión
del cable de alimentación. Cuando la alimentación esté desconectada, el reloj sigue funcionando con las baterías
de reserva pero no se encenderá la luz de fondo o la pantalla LCD. El icono de batería baja en la pantalla indica
que las baterías están casi agotadas. Por favor sustitúyalas por unas nuevas.
· Información de reserva:
- Emisora de radio actual y emisoras programadas
- Ajustes y hora de alarmas
- Reloj
DE | NOTSTROMVERSORGUNG
2 AAA-Batterien sorgen für eine genaue Zeitmessung bei Stromausfall oder Entfernen des Netzkabels. Bei
abgeschalteter Stromversorgung läuft die Uhr mithilfe der Batterien, wobei aber die LCD-Hintergrundbeleuchtung
und die Anzeige ausgeschaltet bleiben. Bei nahezu entladenen Batterien erscheint in der Anzeige ein entsprechendes
Symbol. Legen Sie dann bitte neue Batterien ein.
· Info bei Batteriebetrieb:
– Aktueller und voreingestellte Sender
– Weckzeit/Einstellung
– Uhrzeit

43
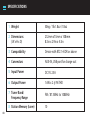
SPECIFICATIONS
Weight
Dimensions
Compatibility
Connectors
506g / 1lb 1.8oz / 18oz
212mm x73mm x 108mm
8.3in x 2.9in x 4.3in
(W x H x D)
Device with BT2.1+EDR or above
AUX-IN, USB port for charge out
DC 5V 2.5A
1.6W x 2 @1%THD
FM / 87.5MHz to 108MHz
10
1
2
3
4
5
Input Power
Output Power6
Tuner Band/
Frequency Range
7
Station Memory (tuner)
8

44
WARRANTY
ONE YEAR LIMITED WARRANTY | UNE GARANTIE LIMITEE D’AN
GARANTIA LIMITADA DE UM ANO | GARANTÍA LIMITADA DE UN AÑO
EINEM JAHR EINGESCHRÄNKTE GARANTIE | GARANZIA LIMITATA UN ANNO
1년 제한 보증 | 壹 年 有 限 保 證 | 一年有限保证
| 1 JAAR VOOR BEPERKTE GARANTIE
EUROPEAN UNION
TWO YEAR LIMITED WARRANTY | GARANTIE LIMITEE DE DEUX ANS
GARANTIA LIMITADA DE DOIS | GARANTÍA LIMITADA 2 AÑOS
ZWEI JAHREN EINGESCHRÄNKTE GARANTIE | GARANZIA LIMITATA DUE ANNI
2년 제한 보증 | 两年有限保证
| 2 JAAR VOOR BEPERKTE GARANTIE
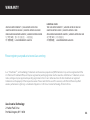
Please register your product at www.iLuv.com/reg
iLuv Creative Technology
2 Harbor Park Drive
Port Washington, NY 11050
iLuv®, TimeShaker
TM
, and GreeNology® trademarks are the exclusive properties of jWIN Electronics Corp. and are registered with the
U.S. Patent and Trademark Oce, and may be registered or pending registration in other countries. All other iLuv® trademarks, service
marks, and logos may be registered or pending registration in the U.S. or in other countries. All other trademarks or registered
trademarks are the property of their respective owners. Please note that the use of this accessory with iPod or iPhone may aect
wireless performance. Lightning is a trademark of Apple Inc. © 2014 iLuv Creative Technology. Printed in China.

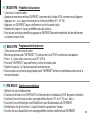
FCC Statement:
This device complies with part 15 of the FCC Rules. Operation is subject to the following two conditions: (1) This device may not cause
harmful interference, and (2) this device must accept any interference received, including interference that may cause undesired operation.
This equipment has been tested and found to comply with the limits for a Class B digital device, pursuant to part 15 of the FCC Rules.
These limits are designed to provide reasonable protection against harmful interference in a residential installation. This equipment
generates, uses and can radiate radio frequency energy and, if not installed and used in accordance with the instructions, may cause harmful
interference to radio communications. However, there is no guarantee that interference will not occur in a particular installation. If this
equipment does cause harmful interference to radio or television reception, which can be determined by turning the equipment o and
on, the user is encouraged to try to correct the interference by one or more of the following measures:
—Reorient or relocate the receiving antenna.
—Increase the separation between the equipment and receiver.
—Connect the equipment into an outlet on a circuit dierent from that to which the receiver is connected.
—Consult the dealer or an experienced radio/TV technician for help.
Caution: Any changes or modications not expressly approved by the party responsible
for compliance could void the user's authority to operate the equipment.

This product conforms to all applicable EU Directive requirements.
When this crossed-out wheeled bin symbol is attached to a product it means that the product is covered by
the European Directive 2002/96/EC (WEEE).
Please inform yourself about the local separate collection system for electrical and electronic products.
Please act according to your local rules and do not dispose of your old products with your normal household waste.
Correct disposal of your old product helps to prevent potential negative consequences for the environment
and human health.
IC Statement
This device complies with Part 15 of the FCC Rules and with RSS-210 of Industry Canada. Operation is subject to the following two conditions:
(1) this device may not cause harmful interference, and (2) this device must accept any interference received, including interference that may
cause undesired operation. Changes or modications to your device not expressly approved by the party responsible for compliance can void
the user’s authority to operate the equipment.
Cet appareil est conforme à la RSS-210 du réglement de la IC. Le fonctionnement est sujet aux deux conditions suivantes:
(1) Cet appareil ne peut causer d’interférences nuisi-bles
(2) Cet appareil reçoit toute interférence même les interférences qui peuvent occasioner unmauvais fonctionnement.
Les modications apportées à votre appareil et non expressément approuvés par la partie
responsable de la conformité peuvent annuler le droit de l'utilisateur à utiliser l'équipement.
-
 1
1
-
 2
2
-
 3
3
-
 4
4
-
 5
5
-
 6
6
-
 7
7
-
 8
8
-
 9
9
-
 10
10
-
 11
11
-
 12
12
-
 13
13
-
 14
14
-
 15
15
-
 16
16
-
 17
17
-
 18
18
-
 19
19
-
 20
20
-
 21
21
-
 22
22
-
 23
23
-
 24
24
-
 25
25
-
 26
26
-
 27
27
-
 28
28
-
 29
29
-
 30
30
-
 31
31
-
 32
32
-
 33
33
-
 34
34
-
 35
35
-
 36
36
-
 37
37
-
 38
38
-
 39
39
-
 40
40
-
 41
41
-
 42
42
-
 43
43
-
 44
44
-
 45
45
-
 46
46
-
 47
47
-
 48
48


iLuv TimeShaker Micro Guía de inicio rápido
- Categoría
- Relojes de alarma
- Tipo
- Guía de inicio rápido
- Este manual también es adecuado para
en otros idiomas
Artículos relacionados
-
iLuv Morning Call 2 Guía de inicio rápido
-
-
-
-
-
iLuv iMM178 Manual de usuario
-
-
iLuv Smart Shaker 3 Manual de usuario
-
-
Otros documentos
-
Retekess TR629 Manual de usuario
-
Philips AJ7040D Manual de usuario
-
-
Elta 4569 Manual de usuario
-
-
-
NGS Roller Clock Manual de usuario
-
Sytech SY-1029A Manual de usuario
-
-
Denver CRP-515 Manual de usuario