
Mod:ASD/50
Production code:F-50
05/2007

- 1 -
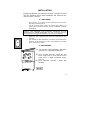
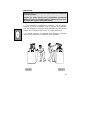
Estimado cliente:
Le felicito por su elección y le agradecemos
que se haya decidido por la compra de la máquina exprimidora
de cítricos Mod. F-50 ó F-50-A.
Estamos seguros que el producto que acaba
de recibir va ha satisfacer plenamente sus necesidades. Ha
sido construido con materiales de primera calidad y sometido a
un esmerado control, a lo largo de todo su proceso de
fabricación.
En estas páginas hallará las principales
características del producto y aquellas operaciones necesarias
que se debe realizar para el buen funcionamiento y
conservación del mismos.
Si precisa más información de nuestros
productos y sus aplicaciones, no dude en llamarnos y
solicitarnos cualquier tipo de información.
Lea ATENTAMENTE el siguiente manual y
siga fielmente sus recomendaciones. Estas advertencias están
hechas para un correcto uso de la máquina. Léalas antes de
instalarla o usarla.
Las decisiones y características que figuran en este documento
se dan a título informativo y no son de índole contractual. El
fabricante se reserva el derecho de efectuar, sin preaviso, todos
los cambios o mejoras que considere necesarios para garantizar
la calidad del producto.
E

- 2 -
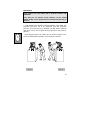
Dear client,
I congratulate you for your election and thank you
for buying the automatic juicer machine, F-50 or F-50-A Model.
We are sure that the product will satisfy your
necessities fully. It has been manufactured with first quality
materials and It has been subjected to a carefully control, along
the whole manufacturing process.
In these pages you will find the main
characteristics of the product and the necessary operations for
good working and its maintenance.
If you precise more information about our products
and their applications, do not hesitate to call us and request us
more information.
These warnings are in order to do a correct use of
the machine. Read them before installing or using it.
Read carefully this manual and follow its
recommendations accurately.
The descriptions and characteristic of this document are
informative and they aren’t contractual. The maker can
make, without notice, all changes or improvements that
maybe consider necessary to guarantee the quality
product.
GB

3
5
1
4
3
2
FRUCOSOL
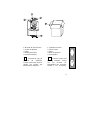
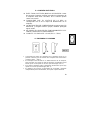
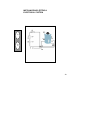
1. Manual de instrucciones
2. Cubos de plástico
3. Filtro
4. Rejilla posavasos
5.Caja de embalaje
) Conserve la caja y el
material de embalaje.
Pueden usarse de nuevo si
alguna vez tuviera que
transportar la máquina.
1. Operation manual
2. Plastic cubes
3. Filter
4. Base for glasses
5. Packing box
) Save the carton and
packing materials. These
can be re-used for
transporting the machine,
should it be necessary.
E
GB

4
1
7
F
R
U
C
O
S
O
L
c
F
R
U
C
O
S
O
L
c
13
3
4
5
6
8
9
10
11
2
4
3
2
1
INTERIOR CAJA
2,3,5
1
6
1
6
4
E
GB

5
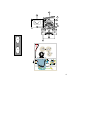
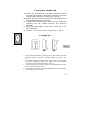
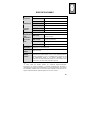
1. Rampa de alimentación 12. Cubos de plástico
2. Micro de seguridad 13. Carcasa frontal
3. Aros conductores 14. Motor Reductor
4. Huecos conjunto exprimidor 15. Engranajes dentados - 60
5. Tornillos de plástico 16. Engranajes dentados – 45
6. Cuchilla 17. Engranaje cónico - 29
7. Bolas conjunto exprimidor 18. Engranaje cónico - 14
8. Quita-cáscaras 19. Condensador
9. Filtro 20. Regleta
10. Embudo de filtración 21
. Interruptor de puesta en marcha
11. Rejilla posavasos 22. Porta Fusibles
1. Feed Ramp 12. Plastic cubes
2. Security Micro contact 13. Open protection cover
3. Guiding loops 14. Step-down motor
4. Hollow Items 15. Tooth gearing - 60
5. Plastic screw 16. Tooth gearing - 45
6. Cutting Blade 17. Conical gearing - 29
7. Squezeer Balls 18. Conical gearing - 14
8. Peel extractor 19. Condenser
9. Filter 20. Dip stick
10. Filter funnel 21.Start switch
11. Base for glasses 22.Fuse
E
GB

6
INDICE
CONTENTS
Presentación
Desembalaje
Denominación de los
componentes
Advertencias
Instalación
1.Desembalaje
2.Emplazamiento
3.Conexión eléctrica
4.Encendido y apagado
Uso
1.Llenado del serrín
2.Funcionamiento
Medidas de Precaución
Cambio de serrín vegetal
Mantenimiento por parte del
usuario
Anomalías de la secadora
Especificaciones
Célula de seguridad del
producto
Instrucciones para el transporte
Declaración de la “CE” de
conformidad
Presentation
Unpacking
Part names
Warning
Installation
1.Unpacking
2.Positioning
3.Electrical connection
4.On and off
Use
1.Refilling of sawdust
2.Operating
Cautions
Change of the vegetable
sawdust
User maintenance
Dryer-polisher for cutlery
trouble
Specifications
Security of the product
document
Moving Instructions
Conformity declaration “EC”
E
GB

7
ADVERTENCIAS
Lea todas las instrucciones antes de usar la máquina y guárdelas para
posteriores consultas. El fabricante declina toda responsabilidad de no
respetarse las normas del manual.
La presente máquina es una exprimidora automática para cítricos.
Esta máquina debe ser destinada solo para el uso para el cual ha sido
fabricada. Otro uso inapropiado sería peligroso. El fabricante no se
hace responsable por daños eventuales producidos por un uso
inapropiado.
Antes de instalar y usar la máquina se debe leer atentamente el
presente manual.
El fabricante podrá introducir cambios técnicos o estéticos sin previo
aviso.
WARNINGS
Read all instructions carefully before using de machine and keep them
for future reference. The maker declines all responsibility if the
standardises of manual are not respected.
The present machine is an automatic juicer machine for citric fruits.
This machine should be only used for the purpose for which it has
been designed. Any other use is inappropriate and therefore
dangerous. The manufacturer will not be responsible for any damages
caused by inappropriate use.
Before installing and using the machine read carefully this instruction
manual.
The maker will be able to introduce technical or aesthetic changes
without previous notice.
E
GB

8
INSTALACIÓN
La instalación incorrecta puede resultar en deterioro de la
máquina. Sírvase observar de lo siguiente durante la primera
instalación y siempre que reubique la máquina.
1.- DESEMBALAJE
) Colocar la caja sobre una superficie plana y con la flecha de
la caja señalando siempre hacia arriba.
) Cortar los flejes exteriores. Abrir la parte inferior donde se
encuentra apoyada la máquina y sacar la caja de cartón
tirando hacia arriba .
INSPECCIONE LA MÁQUINA POR SI HA SUFRIDO DAÑOS EN EL
TRANSPORTE O MANEJO INDEBIDO. Presentar una reclamación
antes de 24 horas a la empresa de transportes, si fuera necesario.
) Retirar los trozos de poli estireno que se encuentran
protegiendo a la máquina.
) Una vez realizadas estas operaciones, proceder a comprobar
que todos los elementos de la máquina se encuentran en la
posición correcta, según el apartado de “Denominación de los
Componentes”.
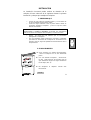
2.- EMPLAZAMIENTO
` Para asegurar un óptimo funcionamiento,
colocar la máquina en un sitio totalmente
plano.
` Una vez situada la máquina , desenroscar
las dos patas traseras de tal forma que los
ejes delanteros tengan una ligera inclinación
hacia abajo. (FIG. 0)
` No desplazar la máquina cuando este
funcionando.
E
FIG.
0

9
INSTALLATION
Improper installation may damage the dryer machine. Pleased
note the following during initial installation and whenever the
dryer machine is moved.
1.- UNPACKING
) Place the box on a plane surface and with the arrow of the
box always pointing out up.
) Cut the external strips. Open the inferior part where it is
leaning the machine and take out the cardboard container
throwing up.
INSPECT THE MACHINE FOR POSSIBLE DAMAGES IN THE
TRANSPORT OR UNDUE HANDLING. If it was necessary present a
reclamation 24 hour before immediately to the transport company.
) Retire the poli styrene pieces that are protecting to the
machine.
) One carried out this operations, proceed to check that all the
elements of the machine is in the correct position, according
to the “Part name” section.
2.- POSITIONING
` For assuring a good operation, place the
machine in a completely plane place.
` Once located machine, uncoil the two
back screw such a form that the front
axles have a slight inclination down.
(FIG. 0)
` Don’t Displace machine when this
working.
GB
FIG.
0

10
3.- CONEXIÓN ELÉCTRICA
 EVITE TODA PUESTA EN MARCHA ACCIDENTAL. Antes
de conectar el aparato, verificar que todos los elementos de
la máquina estén bien colocados, de lo contrario podría
causar una avería.
 COMPRUEBE QUE EL VOLTAJE DE LA RED se
corresponde con el de la chapa de identificación de la
máquina.
 LA INSTALACIÓN DE CONEXIÓN debe poseer protección
diferencial y magneto térmica propia; también protegida
aguas arriba.
 NO PONGA EL APARATO EN FUNCIONAMIENTO SI EL
CABLE O ENCHUFE ESTÁN DAÑADOS.
 CONECTE EL ENCHUFE a la red (220 V – 230 V)
4.- ENCENDIDO Y APAGADO
off on
• Compruebe que todos los elementos de la máquina están en su
posición correcta y que el enchufe de la máquina esta conectado a
la red de (220 V – 230 V).
• El interruptor esta situado en un lateral derecho de la maquina,
para proceder a la puesta en marcha presione el interruptor de tal
forma que el circulo quede en la zona que sobresalga. (FIG. 1)
• Para parar la máquina pulse el interruptor de tal forma que la raya
quede en la zona que sobresalga. (FIG. 1)
• El modelo F-50-A posee un interruptor de encendido y apagado
independiente para el alimentador, en la parte superior derecha.
E
FIG.
1

11
3.- ELECTRICAL CONNECTION
 AVOID ALL ACCIDENTAL GROUND STARTING. Before
connecting the machine, verify that all elements of machine
is good placed, otherwise it could cause a mishap.
 CHECK THAT VOLTEGE OF ELECTRIC NETWORK is the
same of identification foil of machine.
 CONNETION INSTALATION should possess differential
protection and own thermal magneto, also protected
upstream.
 NO START MACHINE IF ELECTRIC CABLE OR PLUG
ARE DAMAGED.
 CONECT PLUG to the electric network (220 V – 230 V)
4.- ON AND OFF
off on
• Check that all elements of machine are in good position and that
machine’s plug is connected to electric network of (220 V – 230
V).
• The switch is located in a right lateral of the machine, to proceed to
the ground starting you presses the switch such a form that the
circulate is in the area that stands out. (FIG. 1)
• For stop machine, presses the switch such a form that the line is in
the area that stands out. (FIG. 1)
• The model F-50-A have an independent start switch for the feeder,
at the right top of the machine.
GB
FIG.
1

12
USO
Antes de poner en servicio la máquina sigua cuidadosamente
estas indicaciones:
1) FUNCIONAMIENTO
Una vez realizada las operaciones de instalación y conexión
eléctrica. La máquina esta lista para el uso.
* Coloque cada uno de los cubos de plástico en los laterales y
un recipiente (vaso, jarra,...) en la rejilla posa vasos.
* Asegúrese que el interruptor principal esta en la posición de
APAGADO. Si se trata del modelo F-50-A compruebe que el
interruptor del alimentador también está apagado. Conecte el
enchufe de la máquina a la red eléctrica. (FIG. 2)
* Asegúrese que la carcasa está cerrada.
* Presione el interruptor en posición de ENCENDIDO. La
máquina comenzará a funcionar de inmediato. Si se trata del
modelo F-50-A usted deberá presionar el interruptor del
alimentador antes del principal para que la máquina comience
a funcionar.
* Coloque los cítricos en la rampa de alimentación.(FIG. 3)
Las máquinas están preparadas para exprimir tanto, naranjas,
como limones, limas, mandarinas, pomelos o toronjas, siempre
y cuando se estén respetando las dimensiones del diámetro
recomendado en cada uno de los modelos.
DIAMETROS RECOMENDADOS DE LOS CÍTRICOS
MODELO F-50
Todos los diámetros hasta un máximo 85 mm
MODELO F-50-A
Todos los diámetros hasta un máximo 80 mm
E

13
IMPORTANTE
No alimente nunca la máquina con cítricos congelados o
demasiado fríos. Esto produciría el mismo efecto que alimentarla
con bolas de metal.
Siempre que utilice limones para la exprimidora, previamente
deberá seccionar los laterales salientes, dándole de este modo
una forma más regular y redondeada al fruto.
* Tras comenzar a alimentar la máquina con los cítricos
realizará de forma automática todo el proceso de exprimido.
Una vez finalizado el exprimido usted obtendrá un zumo filtrado
y limpio en el recipiente que coloco en la rejilla posavasos.
* No olvide presionar el interruptor para apagar la máquina
una vez haya obtenido la cantidad de zumo deseada.
F
R
U
C
O
S
O
L
c
F
R
U
C
O
S
O
L
c
F
R
U
C
O
S
O
L
c
F
R
U
C
O
S
O
L
c
F
R
U
C
O
S
O
L
c
F
R
U
C
O
S
O
L
c
FRUCOSOL
FRUCOSOL
FIG.
2
FIG.
3
E

14
USE
Before start working, read carefully these indications:
1) OPERATION
Once the operation of installation and electrical connection are
carried out, the machine is prepared for use.
* Place each the plastic cubes in the laterals and a recipient
(glass, jar,...) in the base for glasses.
* Make sure that master switch is in OFF position. If it is the F-
50-A model, check that the feeder switch is also off. Connect
the plug of machine to the electrical net (FIG.2)
* Make sure that the cover is closed.
* Push ON switch . Machine will begin to work immediately. If it
is the model F-50-A press the feeder switch before the main
switch so that the machine begins to work.
* Place the citric fruits in the feeding ramp or feeder.(FIG.3)
The machines are prepared to squeeze, oranges, lemons,
limes, mandarins and grapefruits, provided you are respecting
the dimensions of recommended diameter in each models.
RECOMMENDED DIAMETER OF THE CITRIC FRUIT
MODEL F-50
All the size to 85 mm
MODEL F-50-A
All the size to 80 mm
GB

15
IMPORTANT
Never feed the machine with frozen or too cold citric fruits. This
would produce the same effect that to feed the machine with
metal balls.
Every time you use lemons for the squeezer, cut the salient
laterals, giving a more regular and more rounded form this way to
the fruit.
* After beginning to feed the machine with the citrus fruits, the
squeezer will carry out in an automatic form the squeezer
process. Once the process is finished, you will obtain a filtered
and clean juice in the recipient that you placed in the base for
glasses.
* Don’t forget to press the switch to turn off the machine once
you have obtained the quantity of juice that you wanted.
F
R
U
C
O
S
O
L
c
F
R
U
C
O
S
O
L
c
F
R
U
C
O
S
O
L
c
F
R
U
C
O
S
O
L
c
F
R
U
C
O
S
O
L
c
F
R
U
C
O
S
O
L
c
FRUCOSOL
FRUCOSOL
FIG.
2
FIG.
3
GB

16
2) LIMPIEZA DE LA MÁQUINA
La persona responsable de la máquina se encargará de tenerla
en perfectas condiciones sanitarias, teniendo especial atención
en los periodos de paro prolongado de la unidad. Para ello
llevará a cabo todas las limpiezas que sean necesarias,
evitando así cualquier riesgo de contaminación.
* DESMONTAJE DE LA MÁQUINA
- Asegurarse que el interruptor general esté en la posición de
parada.
- Desconectar el enchufe de la máquina de la red eléctrica.
- Extraer el filtro y los cubos contenedores de cáscaras.
- Abra la carcasa frontal y asegúrese que el mecanismo de
exprimido está desactivado.
- Retirar los quita-cáscaras de ambos lados.
- Desenroscar los cuatro tornillos del conjunto exprimidor.
- Extraer conjuntamente la bola y el hueco del lado derecho.
Realice la misma operación con el lado izquierdo.
- Póngase unos guantes protectores para prevenir cualquier
corte y quite la cuchilla tirando hacia arriba.
* Una vez desmontadas todas las piezas del equipo exprimidor
que estén en contacto con el zumo se debe proceder a su
limpieza.
La limpieza se puede realizar bien de forma manual o bien en
el lavavajillas. En ambos casos por cuestiones de higiene es
obligatorio usar un jabón neutro. Nunca emplear para su
limpieza productos abrasivos, disolventes, limpiadores de
metales, limpiadores de cristales o detergentes no diluidos.
E

17
Antes de poner las piezas del equipo exprimidor limpie la parte
frontal de la máquina y la carcasa para eliminar cualquier
residuo. Utilice una esponja húmeda en jabón neutro.
* MONTAJE DE LA MÁQUINA
Una vez completadas las anteriores operaciones se puede
proceder a montar de nuevo las piezas.
_ Antes de comenzar, comprobar que el cable de la máquina
se encuentre desconectado de la red eléctrica y el interruptor
en posición de apagado.
_ Coloque la cuchilla en la ranura central y asegúrese de que
la pieza hace tope. Por seguridad esta operación siempre se
debe realizar con unos guantes protectores puestos.
_ Emplace de nuevo la bola y el hueco, encajándolos de dos en
dos. Recuerde que el hueco esta en la parte superior y la bola
en la parte inferior; el diseño de la máquina impedirá cualquier
montaje incorrecto en este sentido.
_ Enrosque de nuevo los cuatro tornillos negros que sujetan el
conjunto exprimidor.
_ Coloque cada quita-cáscaras en su lateral. MUY
IMPORTATE: Estas piezas deben colocarse correctamente,
para hacerlo fíjese en el apartado de “Denominación de los
componentes” y a la pegatina indicadora de posicionamiento de
los quita-cáscaras.
_ Asegúrese que todos los componentes están bien colocados.
Proceda a cerrar la carcasa y compruebe que hace tope en el
interruptor de seguridad.
_ Con la máquina cerrada coloque el filtro limpio y los cubos
para recoger los desperdicios en los laterales de la máquina.
* Antes de volver a emplear la máquina, compruebe
cuidadosamente el perfecto funcionamiento de los dispositivos
de seguridad. Compruebe que las piezas móviles estén en
buen estado de funcionamiento, que no atasquen y que no
estén dañadas.
E

18
Todos los componentes deben estar montados adecuadamente
y cumplir los requisitos para garantizar el perfecto
funcionamiento del aparato.
* Se recomiendan dos limpiezas diarias como mínimo. Aparte
de esto se deberá limpiar y vaciar el filtro y los cubos de
desperdicios tantas veces como sea necesario. Estas
operaciones se realizarán siempre con la máquina apagada.
* LIMPIEZA DEL ALIMENTADOR PARA EL MOD. F-50-A. Se
recomienda una limpieza mínima por semana del alimentador
automático del modelo F-50-A.
_ Asegurarse que el interruptor general esta en la posición de
parada y desconectar el enchufe de la máquina de la red
eléctrica.
_ Suelte el tornillo negro de la parte superior.
_ Extraiga la plancha giratoria para poder efectuar la limpieza
correctamente.
_ Limpie el interior del alimentador y la plancha giratoria con un
paño húmedo con agua templada.
_ Proceda de nuevo a colocar a su posición original todas las
piezas.
Una dejadez en las operaciones de limpieza repercutirán de
forma directa en el aspecto exterior de la máquina y a su vez
en la imagen de su negocio. Si observa algún deterioro en
algún elemento de la máquina no dude en llamar a nuestro
servicio post-venta.
E

19
2) CLEANNING OF THE MACHINE
The person in charge of the machine will take charge to have it
under perfect sanitary conditions, paying special attention to
long stop-periods. You will carry out all the cleanings that are
necessary, avoiding any pollution risk this way.
* DISASSEMBLY OF THE MACHINE
- Make sure that the master switch is in OFF position .
- Disconnect the plug of the machine to the electric net.
- Extract the filter and the peel containers.
- Open the front cover and make sure that the squeezed
mechanism is not activated.
- Retire the peel extractor of the sides.
- Uncoil the four screws of the squeezed mechanism.
- Extract the ball and the hole in the right side jointly. Carries out
the same operation with the left side.
- Put on some protective gloves to prevent any cut and remove
the cutting blade pulling up.
* Once all the pieces of the squeezed mechanism that they are
in contact with the juice are dissembled you should proceed to
their cleaning.
The cleaning can be carried out manually or in the dishwasher.
In both cases for hygiene questions it is obligatory to use a
neuter soap. Never use for their cleaning abrasive, solvent
products, metal cleaners, glasses cleaners or detergents that
are not diluted.
Before putting the pieces of the squeezed mechanism clean the
front part of the machine and the cover to eliminate any residue.
Use a humid sponge in neuter soap.
GB

20
* ASSEMBLY OF THE MACHINE
Once the previous operations are completed you can proceed
to assemble the pieces again.
- Before beginning, check that the electric cable of the machine
is disconnected from the electric net and the switch is in off
position.
_ Place the cutting blade in the central groove and assure that
the piece makes ceiling. For security this operation should
always be carried out with protective gloves.
_ Put the ball and the hole again and insert them two by two.
Remember that the hole is in the upside and the ball in the
inferior part; the design of the machine it will prevent any
incorrect assembly in this sense.
_ Coils the four black screws that hold the squeezed
mechanism again.
_ Places each peel extractor in its lateral. VERY IMPORTANT:
These pieces should be placed correctly, to do it see the
section of “Part names” and the indicative sticker about
positioning of the peel extractors.
_ Makes sure that all the components are very placed. Proceed
to close the open protection cover and check that the cover
makes ceiling in the micro security contact.
_ With the machine closed place the clean filter and the cubes
to pick up the waste in the laterals of the machine.
* Before using the machine again, check carefully the perfect
operation of the safety devices. Check that the moving pieces
are in good conditions for working, that they don't block and that
they are not damaged.
All the components should be assembled appropriately and
have the requirements to guarantee the perfect operation of the
machine.
GB

21
* Two daily cleanings are recommended at least. Apart from this
you will clean and empty the filter and the cubes for waste so
many times like be necessary. These operations will always be
carried out with in off position.
* CLEANING FOR THE AUTOMATIC FEEDER OF THE MOD.
F-50-A.
At least a weekly cleaning of the feeder is recommended.
_ Make sure that the master switch is in OFF position and
disconnect the plug of the machine to the electric net.
_ Looses the black screw of the upside.
_ Extracts the revolving plate to be able to clean correctly.
_ Cleans the interior of the feeder and the revolving plate with a
damp cloth with warm water.
_ Proceed again to place in its original position all the pieces.
Any carelessness in the cleaning operations will have effects on
a direct form in the external aspect of the machine and in your
business image. If you see any deterioration in some element of
the machine don't hesitate to call to our post-sale service.
GB

22
MEDIDAS DE PRECAUCIÓN
Siga las instrucciones dadas a continuación para el uso de la
presente maquina exprimidora de cítricos:
TENGA EN CUENTA EL ENTORNO DE TRABAJO
• Coloque la exprimidora sobre una superficie firme y nivelada.
• No instale la exprimidora en un lugar húmedo o polvoriento.
• La máquina no esta pensada para trabajar en la intemperie, ni
para operar sin iluminación.
• No exponga la exprimidora a la lluvia.
• No utilice la exprimidora en la proximidad de líquidos o gases
inflamables.
• Mantenga el orden en su campo de trabajo, así evitará posibles
accidentes.
• Preste atención a la hora de trabajar con la máquina y obre con
sentido común.
NO DEBE SUMERGIR NI ROCIAR CON AGUA LA
MÁQUINA.
NO INTRODUCIR ANIMALES DENTRO DE LA MÁQUINA.
MANTENGA A LOS NIÑOS A DISTANCIA.
La máquina debe ser
manipulada por personal cualificado y debidamente formado. Sólo
debe ser manejada por personas adultas. No permita que los niños la
manejen o jueguen con ella. Tenga especial precaución cuando la
máquina esté encendida o la carcasa frontal abierta quedando a la
vista el equipo exprimidor.
PARA EVITAR EL PELIGRO DE ATRAPAMIENTO ENTRE
LAS BOLAS Y EL EXPULSOR DE PIELES, NO
INTRODUZCA NUNCA LA MANO POR LA PARTE INFERIOR
DE LOS LATERALES CON LA MÁQUINA EN MARCHA.
MANIPULE SIEMPRE LA CUCHILLA CON GUANTES PARA
EVITAR EL PELIGRO DE CORTE.
E

23
PROTÉJASE CONTRA LAS DESCARGAS ELÉCTRICAS.
Evite el contacto de la máquina con materiales de conducción
eléctrica. La máquina siempre ha de estar con un aislamiento de
protección en el contacto con otros materiales.
LAS OPERACIONES DE REGULACIÓN, REPARACIÓN,
CONSERVACIÓN Y LIMPIEZA DE LA MÁQUINA SE
EFECTÚAN CON LA MÁQUINA PARADA Y
DESCONECTADA DE LA CLAVIJA DE LA RED
. En caso de
no utilizar la máquina y antes de proceder al mantenimiento o a la
sustitución de una pieza, debe desconectarse la máquina de la red.
CABLE DE EMPALME PARA EXTERIORES.
Al exterior utilice
solamente cables de empalme homologados por la CE y
convenientemente marcados.
LAS REPARACIONES SOLAMENTE LAS PODRÁ
REALIZAR UN ESPECIALISTA.
Esta máquina eléctrica ha sido
fabricada cumplimentando todas las normas de seguridad que exigen
los organismos oficiales. Las reparaciones solamente las puede
realizar un especialita; En caso contrario se pueden provocar
accidentes al usuario.
CONTROLE SI SU APARATO TIENE DETERIOROS.
• Todos los componentes deben cumplir los requisitos y
homologaciones CE para garantizar el perfecto funcionamiento
del aparato.
• Toda pieza, interruptor o cable de alimentación, deteriorados
deberá ser cambiada o reparada de modo apropiado por un
taller del servicio post-venta o por personal cualificado para
evitar cualquier peligro.
NO EMPLEE MÁS QUE LOS ACCESORIOS Y LOS
DISPOSITIVOS ADAPTABLES MENCIONADOS EN LAS
INSTRUCCIONES, O QUE HAYAN SIDO RECOMENDADOS
POR EL FABRICANTE DE LA MÁQUINA.
La utilización de otros
accesorios, excepción hecha de aquellos recomendados en las
instrucciones, en el catálogo. O recomendados por el fabricante
pueden significar para usted un peligro de accidente: todos los
elementos de seguridad únicamente deben ser sustituidos por otros
E

24
equivalentes, homologados por la CE y estar siempre en perfecto
estado.
EVITE CUALQUIER RIESGO DE CONTAMINACIÓN
REALIZANDO UN MÍNIMO DE DOS LIMPIEZAS DIARIAS;
LIMPIE TODAS LAS PIEZAS Y PARTES INTERIORES
EFICAZMENTE CON JABÓN NEUTRO.
E

25
CAUTIONS
Follow the cautions bellow when using this automatic juicer
machines:
HAVE IN COUNTS THE WORK ENVIRONMENT
• Place the juicer on a firm, levelled surface.
• Do not install the juicer in a humid or dusty location.
• The juicer isn’t thought to work in the bleakness, neither to
operate without light.
• Do not expose the juicer to the rain.
• Do not use the juicer near liquids or inflammable gases.
• Maintain the order in your operating zone, this will avoid
possible accidents.
• Pay attention when working with the machine and work with
common sense.
DON’T SUBMERGE NEITHER DEW WITH WATER THE
MACHINE.
DON’T INTRODUCE ANIMALS INSIDE OF THE MACHINE.
MAINTAIN THE CHILDREN AT DISTANCE.
The machine should
be manipulated by qualified and properly formed staff. The machine
can be managed by adults. Don’t allow the children to use or play with
it. Have special caution when the machine is working or when the front
cover is open, being the squeezer inside at sight.
TO AVOID CATCH DANGER BETWEEN THE BALLS AND
THE PEELS EXTRACTOR, NEVER INTRODUCE YOUR
HAND IN THE INFERIOR PART OF THE LATERAL WITH
THE MACHINE IS WORKING.
ALWAYS MANIPULATE THE CUTTING BLADE WITH
GLOVES TO AVOID THE CUT DANGER.
PROTECT YOUSELF AGAINST ELECTRICAL SHOCKS.
Avoid of the machine with electric conduction materials. The machine
GB
GB

26
always has to be with electric conduction materials. The machine has
to be with a no conductor protection in contact with other materials.
THE REGULATION, CONSERVATION, REPAIR AND
CLEANNING OPERATIONS OF THE MACHINE ARE
CARRIED OUT WITH THE MACHINE STOPPED AND
DISCONNECTED FROM THE NET.
In you don’t use the machine
and before proceeding to the maintenance or the substitution of a
piece, the machine should be disconnected from the net.
CONNECTION CABLE FOR EXTERNAL. Only use marked
confirmed and meetly jumper leads.
THE REPAIRS WILL ONLY CARRIED OUT BY AN
SPECIALIST.
This electric machine has been manufactured
executing rules that official organisms demand. The repairs can only
carry out an specialist; Otherwise accidents can be caused.
CONTROL IF YOUR MACHINE IT HAS ANY
DETERIORATIONS.
• All the components should complete EC requirements and
approvals to guarantee the perfect working of the machine.
• All deteriorated piece, switch or feeding cable, will be changed
or repaired by a post-sale service workshop, or by qualified
staff to avoid any danger.
USE ONLY THE ACCESSORIES AND THE ADAPTIVE UNITS
MENTIONED IN THE BRIEFINGS, OR ANY THAT HAVE
BEEN RECOMMENDED BY THE MANUFACTURER OF THE
MACHINE.
The use of other accessories, except those
recommended in the briefings, in the catalogue, or recommended by
the manufacturer can be a danger or an accident for you. All the
security elements should be substituted only by other equivalents,
homologated by the EC and always be in perfect state.
AVOID ANY CONTAMINATION POLLUTION RISK
CARRYING OUT AT LEAST TWO DAILY CLEANINGS;
CLEAN ALL THE PIECES AND INSIDE PARTS EFFICIENTLY
WITH NEUTER SOAP.
GB

27
MANTENIMIENTO POR PARTE DEL USUSARIO
Un cuidado adecuado es esencial para alargar la vida de la
máquina.
Preocúpese de dedicar algunos minutos para limpiar con
regularidad la exprimidora.
Antes de proceder a la limpieza, asegúrese de desconectar el
interruptor y desenchufar el cable de alimentación de la toma
de corriente.
No use disolventes, benceno u otro productos volátiles para
limpiar el interior de la maquina. Use un paño húmedo con un
poco de jabón neutro y asegúrese de aclarar cualquier resto de
jabón que pudiera quedar.
Para limpiar el exterior puede utilizar un trapo y un limpia
cristales. El limpia cristales nunca debe entrar en contacto con
el interior o cualquiera de las piezas del quipo exprimidor.
Sigua fielmente todas las indicaciones del fabricante sobre la
instalación poniendo especial atención al apartado del
emplazamiento y funcionamiento.
E

28
USER MAINTENANCE
Proper care is essential in order to make the machine’s life
longer.
Be sure to take a few minutes to clean the juicer regularly.
Before cleaning, be sure to turn the power switch off and
remove the power cord from the outlet.
Don’t use thinner, benzene or other volatile cleaning agents for
cleaning the inside of the machine. Use a damp cloth with a bit
of neuter soap and make sure to clarify any rest of soap that
could still remain.
To clean the exterior you can use a cloth and a wipers liquid.
The wipers liquid cannot be in contact with the inside or the with
the pieces of the squeezed mechanism.
Follow faithfully all the indications of the manufactures about the
installation paying special attention to the positioning and
working section.
GB

29
INSTALACIÓN ELÉCTRICA
ELECTRICAL SYSTEM
E
GB

30
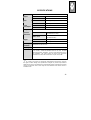
ESPECIFICACIONES
Tipo Máquina exprimidora de cítricos.
MOD. F-50: 20 – 25 frutas / min.
Producción
MOD. F-50-A: 20 – 25 frutas / min.
MOD. F-50: Cargando la rampa de alimentación Alimentación
MOD. F-50-A: Cargando la cesta del alimentador.
MOD. F-50: 150 W Consumo
eléctrico
MOD. F-50-A: 250 W
Voltaje 240-230-110 V / 50-60Hz
MOD. F-50:
735 mm x 260 mm x 430 mm
(Incluye rampa)
Dimensiones
de la
exprimidora
Al x F x An
MOD. F-50-A:
750 mm x 260 mm x 430 mm
(Incluye alimentador)
MOD. F-50: 30 Kilogramos Peso
MOD. F-50-A: 40 Kilogramos
Condiciones
ambientales
Temperatura: 10ºC hasta 30ºC
Humedad
relativa
20% hasta 85%
Nivel de
emisión
acústica
El nivel del ruido durante el funcionamiento de la máquina
exprimidora de cítricos MOD. F-50 Y F-50-A está dentro de los
límites permitidos por el R. D. 1316/89 sobre la protección de
los trabajadores frente a los riesgos derivados de la
exposición al ruido durante el trabajo. Su valor máximo esta
en 69,3 dB. y el valor medio equivale a 69,1dB.
)Como parte de nuestra política de constante perfeccionamiento,
FRUCOSOL se reserva el derecho a introducir modificaciones de diseño y
características sin previo aviso destinadas a la mejora del producto. Los valores
de rendimiento especificados son nominales para unidades de producción. En
algunas unidades pueden existir divergencias con estos valores
E

31
SPECIFICATIONS
Type Squeezer machine of citric fruits
MOD. F-50: 20-25 fruits/min Output
MOD. F-50-A: 20-25 fruits/min
MOD. F-50: Loading the ramp of feeder Feed
MOD.F-50-A: Loading the basket of the feeder.
MOD. F-50: 150 W Power
consumption
MOD. F-50-A: 250 W
Voltage 240-230 V / 50-60Hz
MOD.F-50:
735 mm x 260 mm x 430mm
(Included feed ramp)
Squeezer
dimensions
MOD.F-50-A:
750mm x 330mm x 430mm
(Included feeder)
MOD. F-50: 30 Kilograms Weight
MOD. F-50-A: 40 Kilograms
Operating
conditions
Temperature: 10ºC to 30ºC
Humidity 20% to 85%
Noise level The noise level during the operation of the machine the juicer
F-50 model is inside the allowed limits for the R.D. 1316/89
about the workers protection in front of the derivative risks to
the exhibition the noise during the work. Their maximum
rateable this in 69,3 dB and the half is equal to 69,3 dB.
)As a part of our policy of continuous improvement, FRUCOSOL reserves
the right to make design and specification changes for product improvement
without prior notice. The performance specification figures indicated are nominal
values of production units. There may be some deviation from these values in
individual units.
GB

32
INSTRUCCIONES PARA EL TRANSPORTE
MOVING INTRUCTIONS
Siga el método siguiente para
el transporte de la
exprimidora.
1. Desconmute el interruptor y
desenchufe el cable de la red.
2. Coloque un cubo
encajándolos uno encima de
otro.
3. Introduzca el filtro en el
interior de los cubos.
4. Coloque los cubos en la
parte superior en el hueco que
queda detrás de la rampa.
5. Forre el exterior de la
máquina con planchas de poli
estireno e introdúzcala en una
caja.
Sigua todas las medidas
indicadas para evitar daños
en el transporte
When moving this squeezer,
follow the procedure bellow.
1. Turn the power switch off
and disconnect the power
cord.
2. Place the cubes placing
them one above another.
3. Introduce the filter inside the
cubes.
4. Place the cubes in the
upside in the hole that is
behind the ramp.
5. Cover the exterior machine
with poli styrene plate and
introduce the juicer in a box.
Follow all rules to prevent
shipping damage.
E
GB

33
DECLARACIÓN “CE” DE CONFORMIDAD
FRUCOSOL
Polígono Industrial Tejerías, C/ San Lázaro, s/n
26500- Calahorra (La Rioja) ESPAÑA
DECLARA QUE EL DISEÑO Y FABRICACIÓN DE LA MÁQUINA:
Máquina:............................... MÁQUINA EXPRIMIDORA DE
CÍTRICOS
Modelo:.................................. F-50 ó F-50-A
Fabricante:............................ FRUCOSOL
Nº Serie:................................
Año de Construcción:............
ES CONFORME A LAS DISPOSICIONES DE:
- La Directiva sobre Maquinas: 89 / 392 / CEE.
- Las modificaciones a la Directiva: 91 / 368 / CEE, 93 / 68 / CEE
NORMAS DE REFERENCIA:
-Norma UNE-EN 292, de Abril de 1993, “Seguridad de las Máquinas, conceptos básicos,
principios generales para el diseño. Parte 1: Terminología básica, metodología”.
-Norma UNE-EN 292-2, de Abril de 1993, “Seguridad de las Máquinas. Conceptos básicos,
principios generales para el diseño. Parte 2: Requisitos generales”.
-Norma UNE-EN 292-2 /A1, “Seguridad de las Máquinas. Conceptos básicos, principios
generales para el diseño. Parte 2: Requisitos generales”.
-Equipo Eléctrico de máquinas UNE 60204.
-Norma UNE-EN 1050, “Seguridad de las Máquinas. Evaluación del riesgo”.
-Norma UNE-EN – 1088: 1996. “Seguridad de las máquinas. Dispositivos de
enclavamiento asociados a resguardos”.
-Norma UNE-EN 1672. “Maquinaría para el procesado de alimentos. Conceptos básicos.
Requisitos de higiene”.
FIRMADO:
Calahorra, .......de....................de 20....
E

34
CONFORMITY DECLARATION “CE”
FRUCOSOL
Polígono Industrial Tejerías, C/ San Lázaro, s/n
26500- Calahorra (La Rioja) ESPAÑA
DECLARES THAT DESIGN AND MANUFACTURE OF MACHINE:
Machine:............................... AUTOMATIC JUICER MACHINE
Model:................................... F-50 ó F-50-A
Maker:................................... FRUCOSOL
Nº Serie:................................
Construction year:……..........
IT IS ACCORDING TO THE DISPOSITIONS OF:
- Directive about machine: 89 / 392 / EEC.
- Modifications to the Directive: 91 / 368 / EEC, 93 / 68 / EEC.
REFERENCE STANDARDSES:
-Norma UNE-EN 292, April of 1993, “Security of machine, basic concepts, general
principles for the design” . Part 1: Basic terminology, methodology”.
-Norma UNE-EN 292-2, April of 1993, “Security of machine, basic concepts, general
principles for the design” . Part 2: General requirementses”.
-Norma UNE-EN 292-2 /A1, “Security of machine, basic concepts, general principles for
the design” . Part 2: General requirementses”.
-Electric equipment of machine UNE 60204.
-Norma UNE-EN 1050, “Security of machine. Evaluation of risk”.
-Norma UNE-EN – 1088: 1996. “Security of machine. Devices of location associated to
receipts”
--Norma UNE-EN 1672. "Machines for the transform of food. Basic concepts.
Requirementses of hygiene."
SIGNED:
Calahorra, .......de....................de 20.....
GB

35
RECUERDE QUE EL FABRICANTE DECLINA TODA RESPONSABILIDAD
DE NO RESPETARSE ESTAS NORMAS E INSTRUCCIONES. RECUERDE
QUE PUEDE CONSULTARNOS CUALQUIER DUDA QUE TENGA ACERCA
DE ELLAS EN NUESTRO SERVICIO POST-VENTA
REMEMBER THAT THE MAKER DECLINES ALL RESPONSIBILITY IF
THESE STANDARDSES AND BRIEFINGS ARE NOT RESPECTED.
REMEMBER THAT YOU CAN CONSULT US ANY DOUBT THAT HAVE
ABOUT THEM IN OUR POST-SALE SERVICE
-
 1
1
-
 2
2
-
 3
3
-
 4
4
-
 5
5
-
 6
6
-
 7
7
-
 8
8
-
 9
9
-
 10
10
-
 11
11
-
 12
12
-
 13
13
-
 14
14
-
 15
15
-
 16
16
-
 17
17
-
 18
18
-
 19
19
-
 20
20
-
 21
21
-
 22
22
-
 23
23
-
 24
24
-
 25
25
-
 26
26
-
 27
27
-
 28
28
-
 29
29
-
 30
30
-
 31
31
-
 32
32
-
 33
33
-
 34
34
-
 35
35
-
 36
36


Diamond F-50-A Manual de usuario
- Tipo
- Manual de usuario
- Este manual también es adecuado para
en otros idiomas
- English: Diamond F-50-A User manual
Otros documentos
-
Cecilware Zumex 250 Digital Instrucciones de operación
-
Cecilware Zumex Autoservicio Barra Instrucciones de operación
-
Zumex SPEED PRO Manual de usuario
-
 Zummo Z14 nature Manual de usuario
-
Better Chef 985116974M Guía del usuario
-
Cuisinart CCJ-500 El manual del propietario
-
Kenwood KM600 Manual de usuario
-
-
Robot Coupe R 301 Ultra Instrucciones de operación
-
Princess 201002 El manual del propietario
