National Geographic 9118002 El manual del propietario
- Categoría
- Microscopios
- Tipo
- El manual del propietario

Bedienungsanleitung
Operating instructions
Mode d’emploi
Handleiding
Istruzioni per l’uso
Instrucciones de uso
Руководство по эксплуатации
Instrukcja obsługi
DE
EN
FR
NL
IT
ES
RU
PL
Art.No.: 9118002
MIKROSKOP
MICROSCOPE
300X-1200X

2
(DE) WARNUNG:
ERSTICKUNGSGEFAHR! Dieses Produkt beinhaltet Kleinteile,
die von Kindern verschluckt werden können! Es besteht ERSTICKUNGSGEFAHR!
(EN) WARNING:
Choking hazard — This product contains small parts that could be swallowed by children.
This poses a choking hazard.
(FR) AVERTISSEMENT!
RISQUE D’ETOUFFEMENT! Ce produit contient des petites pièces, qui pourraient être
avalées par des enfants. Il y a un RISQUE D’ETOUFFEMENT.
(NL) WAARSCHUWING!
VERSTIKKINGSGEVAAR! Dit product bevat kleine onderdelen die door kinderen kunnen
worden ingeslikt! Er bestaat VERSTIKKINGSGEVAAR!
(IT) ATTENZIONE!
PERICOLO DI SOFFOCAMENTO! Il prodotto contiene piccoli particolari che potrebbero
venire ingoiati dai bambini! PERICOLO DI SOFFOCAMENTO!
(ES) ADVERTENCIA!
Hay RIESGO DE AXFISIA! Este producto contiene piezas pequeñas que un niño podría
tragarse. Hay RIESGO DE AXFISIA
(RU) Внимание!
опасность УДУШЕНИЯ! Данное устройство содержит мелкие детали, которые
дети могут проглотить. Существует опасность УДУШЕНИЯ!
NIEBEZPIECZEŃSTWO
UDUSZENIA SIĘ!
Dzieci powinny używać
urządzenia wyłącznie pod
nadzorem osoby dorosłej.
Materiały, z których
wykonano opakowanie
(worki plastikowe, gumki,
itd.), przechowywać w
miejscu niedostępnym
dla dzieci! Istnieje
NIEBEZPIECZEŃSTWO
UDUSZENIA SIĘ!
Bedienungsanleitung ������������������������������������������ 4
Operating instructions ���������������������������������������� 7
Mode d’emploi ���������������������������������������������������
10
H
andleiding ��������������������������������������������������������
13
Is
truzioni per l’uso ��������������������������������������������
16
Ins
trucciones de uso ����������������������������������������
19
Руководство по эксплуатации ���������������������� 22
Instrukcja obsługi ����������������������������������������������
25
PL
DE
EN
FR
NL
IT
ES
RU

DE
3
C
J
I
H
G
F
E
D
B
1!
1#
1$
1@
1)

4
Allgemeine Warnhinweise
• ERSTICKUNGSGEFAHR! Dieses Produkt beinhaltet Kleinteile, die von Kindern verschluckt
werden können! Es besteht ERSTICKUNGSGEFAHR!
• GEFAHR eines STROMSCHLAGS! Dieses Gerät beinhaltet Elektronikteile, die über eine
Stromquelle (Batterien) betrieben werden. Lassen Sie Kinder beim Umgang mit dem Gerät nie
unbeaufsichtigt! Die Nutzung darf nur, wie in der Anleitung beschrieben, erfolgen, andernfalls
besteht GEFAHR eines STROMSCHLAGS!
• BRAND-/EXPLOSIONSGEFAHR! Setzen Sie das Gerät keinen hohen Temperaturen aus.
Benutzen Sie nur die empfohlenen Batterien. Gerät und Batterien nicht kurzschließen oder ins
Feuer werfen! Durch übermäßige Hitze und unsachgemäße Handhabung können Kurzschlüsse,
Brände und sogar Explosionen ausgelöst werden!
• VERÄTZUNGSGEFAHR! Batterien gehören nicht in Kinderhände! Achten Sie beim Einlegen
der Batterie auf die richtige Polung. Ausgelaufene oder beschädigte Batterien verursachen
Verätzungen, wenn Sie mit der Haut in Berührung kommen. Benutzen Sie gegebenenfalls
geeignete Schutzhandschuhe.
• Bauen Sie das Gerät nicht auseinander! Wenden Sie sich im Falle eines Defekts an Ihren
Fachhändler. Er nimmt mit dem Service-Center Kontakt auf und kann das Gerät ggf. zwecks
Reparatur einschicken.
• Für die Arbeit mit diesem Gerät werden häufig scharfkantige und spitze Hilfsmittel eingesetzt.
Bewahren Sie deshalb dieses Gerät sowie alle Zubehörteile und Hilfsmittel an einem für Kinder
unzugänglichen Ort auf. Es besteht VERLETZUNGSGEFAHR!
Teileübersicht
1. Okular
2. Scharfeinstellungsrad
3. Revolverkopf mit Objektiven
4. Objekttisch
5. Spiegel
6. Elektrische Beleuchtung
7. Fuß mit Batteriehalterung
8. Gummifuß
9. Mikroskop-Arm
10. Dauerpräparate
11. Deckgläser
12. Sammelbehälter
13. Ersatzglühlampe
14. Mikroskop-Besteck
1� Was ist ein Mikroskop?
Das Mikroskop besteht aus zwei Linsen-Systemen: Dem Okular und dem Objektiv. Wir stellen
uns, damit es einfacher zu verstehen ist, diese Systeme als je eine Linse vor. In Wirklichkeit be-
stehen aber sowohl das Okular (1) als auch die Objektive im Revolver (3) aus mehreren Linsen.
Die untere Linse (Objektiv) vergrößert das Präparat (10) und es entsteht dabei eine vergrößerte
Abbildung dieses Präparates. Dieses Bild, welches man nicht sieht, wird von der zweiten Linse
(Okular, 1) nochmals vergrößert und dann siehst du das „Mikroskop-Bild“.

5
DE
2� Aufbau und Standort
Bevor du beginnst, wählst du einen geeigneten Standort zum Mikroskopieren aus. Zum einen
ist es wichtig, dass genügend Licht da ist, zum anderen empfiehlt es sich, das Mikroskop
auf eine stabile Unterlage zu stellen, da sich auf einem wackeligen Untergrund keine zufrieden
stellenden Ergebnisse erzielen lassen.
3� Normale Beobachtung
Für die normale Beobachtung stellst du das Mikroskop an einen hellen Platz (Fenster, Tischlam-
pe). Nimm dazu das Mikroskop aus der Verpackung und kippe den Mikroskop-Arm (9) in eine
für dich bequeme Beobachtungsposition.
Das Scharfeinstellungsrad (2) wird bis zum oberen Anschlag gedreht und der Objektiv-Revolver
(3) wird auf die kleinste Vergrößerung eingestellt.
Schau nun durch das Okular und stelle den Spiegel (5) so ein, dass du einen gleichmäßig hellen
Lichtkreis erhältst. Oder benutze die elektrische Beleuchtung (6). Zur Beleuchtung findest du
weitere Tipps im nächsten Abschnitt. Jetzt schiebst du ein Dauerpräparat (10) unter die Klem-
men auf dem Objekttisch (4), genau unter das Objektiv. Wenn du nun durch das Okular blickst,
siehst du das vergrößerte Präparat. Es ist vielleicht ein noch etwas verschwommenes Bild. Die
Bildschärfe wird durch langsames Drehen am Scharfeinstellungsrad (2) eingestellt. Nun kannst
du eine höhere Vergrößerung auswählen, indem du den Objektiv-Revolver drehst und auf ein
anderes Objektiv einstellst.
Bei veränderter Vergrößerung muss die Bildschärfe neu eingestellt werden und je höher die Ver-
größerung, desto mehr Licht wird für eine gute Bildausleuchtung benötigt.
TIPP: Vermeide bei der Spiegel-Ausrichtung den Einfall von direktem Sonnenlicht, da dieses
blendet und so kein klares Bild zu erhalten ist.
4� Betrachtung (Elektrische Beleuchtung)
Zur Beobachtung mit der elektrischen Beleuchtung (6) benötigst du die zwei 1,5 V Batterien vom
Typ AA, die in den Mikroskop-Fuß (7) eingesetzt werden. Nun entfernst du den Gummifuß (8) am
Mikroskop und setzt die Batterien gemäß der angezeigten +/- Angabe ein. Der Gummifuß wird
wieder aufgesetzt.
Die Beleuchtung wird eingeschaltet, indem du die Beleuchtung in Richtung des Objekttisches (4)
drehst. Schau durch das Okular und stelle jetzt die Beleuchtung so ein, dass du eine optimale
Bildhelligkeit erreichst. Jetzt kannst du auf die gleiche Weise wie unter Punkt 3 (Normale Beob-
achtung) beschrieben eine Beobachtung vornehmen.
Die Birne (Glühlampe) der elektrischen Beleuchtung kann ausgetauscht werden. Eine Ersatz-
glühlampe (13) ist dabei. Wenn du andere Glühlampen verwendest, beachte die maximale Watt-
zahl, die auf dem Lampenkörper angegeben ist.
TIPP: Je höher die eingestellte Vergrößerung, desto mehr Licht wird für eine gute Bildausleuch-
tung benötigt. Beginne deshalb deine Experimente immer mit einer kleinen Vergrößerung.

6
Hinweise zur Reinigung
• Trennen Sie das Gerät vor der Reinigung von der Stromquelle (Netzstecker ziehen oder
Batterien entfernen)!
• Reinigen Sie das Gerät nur äußerlich mit einem trockenen Tuch. Benutzen Sie keine
Reinigungsflüssigkeit, um Schäden an der Elektronik zu vermeiden.
• Schützen Sie das Gerät vor Staub und Feuchtigkeit!
• Entfernen Sie Batterien aus dem Gerät, wenn es längere Zeit nicht benutzt wird!
EG-Konformitätserklärung
Eine „Konformitätserklärung“ in Übereinstimmung mit den anwendbaren Richtlinien
und entsprechenden Normen ist von der Bresser GmbH erstellt worden. Der vollstän-
dige Text der EG-Konformitätserklärung ist unter der folgenden Internetadresse ver-
fügbar: www.bresser.de/download/9118002/CE/9118002_CE.pdf
Entsorgung
Entsorgen Sie die Verpackungsmaterialien sortenrein. Beachten Sie bitte bei der Entsor-
gung des Geräts die aktuellen gesetzlichen Bestimmungen. Informationen zur fachgerech-
ten Entsorgung erhalten Sie bei den kommunalen Entsorgungsdienstleistern oder dem Umwelt-
amt.
Werfen Sie Elektrogeräte nicht in den Hausmüll!
Gemäß der Europäischen Richtlinie 2002/96/EG über Elektro- und Elektronik-Altgeräte und
deren Umsetzung in nationales Recht müssen verbrauchte Elektrogeräte getrennt gesam-
melt und einer umweltgerechten Wiederverwertung zugeführt werden. Entladene Altbatterien und
Akkus müssen vom Verbraucher in Batteriesammelgefäßen entsorgt werden. Informationen zur
Entsorgung alter Geräte oder Batterien, die nach dem 01.06.2006 produziert wurden, erfahren
Sie beim kommunalen Entsorgungsdienstleister oder Umweltamt.
Batterien und Akkus dürfen nicht im Hausmüll entsorgt werden, sondern Sie sind zur Rück-
gabe gebrauchter Batterien und Akkus gesetzlich verpflichtet. Sie können die Batterien nach
Gebrauch entweder in unserer Verkaufsstelle oder in unmittelbarer Nähe (z.B. im Handel oder in
kommunalen Sammelstellen) unentgeltlich zurückgeben.
Batterien und Akkus sind mit einer durchgekreuzten Mülltonne sowie dem chemischen Symbol
des Schadstoffes bezeichnet.
Cd¹ Hg² Pb³
1
Batterie enthält Cadmium
2
Batterie enthält Quecksilber
3
Batterie enthält Blei
Garantie & Service
Die reguläre Garantiezeit beträgt 5 Jahre und beginnt am Tag des Kaufs. Die vollständigen Garan-
tiebedingungen sowie Informationen zu Garantiezeitverlängerung und Serviceleistungen können
Sie unter www.bresser.de/garantiebedingungen einsehen.

7
EN
General Warnings
• Choking hazard — This product contains small parts that could be swallowed by children. This
poses a choking hazard.
• Risk of electric shock — This device contains electronic components that operate via a power
source (power supply and/or batteries). Only use the device as described in the manual,
otherwise you run the risk of an electric shock.
• Risk of fire/explosion — Do not expose the device to high temperatures. Use only the
recommended batteries. Do not short-circuit the device or batteries, or throw them into a fire.
Excessive heat or improper handling could trigger a short-circuit, a fire or an explosion.
• Risk of chemical burn — Make sure you insert the batteries correctly. Empty or damaged
batteries could cause burns if they come into contact with the skin. If necessary, wear adequate
gloves for protection.
• Do not disassemble the device. In the event of a defect, please contact your dealer. The dealer
will contact the Service Centre and can send the device in to be repaired, if necessary.
• Tools with sharp edges are often used when working with this device. Because there is a risk
of injury from such tools, store this device and all tools and accessories in a location that is out
of the reach of children.
Parts overview
1. Eyepiece
2. Focus knob
3. Objective turret
4. Stage
5. Mirror
6. Electronic light source
7. Base with battery compartment
8. Rubber base
9. Microscope arm
10. Prepared slides
11. Cover plates
12. Reservoir
13. Replacement bulb
14. Microscope instruments
1� What is a microscope?
A microscope contains two lens systems: the eyepiece and the objective. We’re presenting
these systems as one lens each so that the concept is easier to understand. In reality, however,
the eyepiece (1) and the objective in the turret (3) are made up of multiple lenses.
The lower lens (objective) produces a magnified image of the prepared specimen (10). The
picture, which you can’t see, is magnified once more by the second lens (eyepiece, 1), which
you can see as the 'microscope picture'.

8
2� Assembly and location
Before you start, choose an ideal location for using your microscope. It’s important that you
choose a spot with enough light for normal observation. Furthermore, it is recommended that
you place the microscope on a stable surface, because a shaky surface will not lead to satis-
factory results.
3� Normal observation
For normal observation, place the microscope in a bright location (near a window or desk lamp,
for example). Remove the microscope from the package and tilt the microscope arm (9) so that
it’s in a comfortable viewing position for you.
Turn the focus knob (2) to the upper stop, and set the objective turret (3) to the lowest magnifi-
cation.
Now, take a look through the eyepiece and adjust the mirror (5) so that you see a uniform
bright circle of light. Or, you can use the electronic light source (6). You’ll find further tips about
the light source in the next section. Now, place a prepared slide (10) under the clips on the
stage (4), directly under the objective. When you take a look through the eyepiece, you can see
the magnified specimen. At this point, you still might see a slightly fuzzy picture. Adjust the im-
age sharpness by slowly turning the focus knob (2). You can now select a higher magnification
by turning the objective turret and selecting a different objective.
When you do so, note that the sharpness of the picture must be adjusted again for the higher
magnification. Also, the higher the magnification, the more light you will need for good illumina-
tion of the picture.
TIP: Avoid positioning the mirror so that it is exposed to direct sunlight, since it can cause a
glare, which won’t allow you to get a clear picture.
4� Observation (electronic light source)
To use the electronic light source (6), you need to install two 1.5 V AA batteries in the base of
the microscope (7). Remove the rubber base (8) on the microscope and insert the batteries ac-
cording to the displayed +/- information. Reattach the rubber base to the microscope.
You can turn on the light by rotating it in the direction of the stage (4). Take a look through the
eyepiece and adjust the light so that you get optimal picture brightness. Now you can observe
in the same way as described in the previous section.
The bulbs for the electronic light can be replaced. One replacement bulb (13) is included.
When you use another bulb, make sure to pay attention to the maximum wattage, which is dis-
played on the lamp body.
TIP: The higher the magnification you use the more light is required for a good illumination of
the picture. Therefore, always start your experiments with a low magnification.

9
EN
Notes on Cleaning
• Before cleaning the device, disconnect it from the power supply by removing the plug or
batteries.
• Only use a dry cloth to clean the exterior of the device. To avoid damaging the electronics, do
not use any cleaning fluid.
• Protect the device from dust and moisture.
• The batteries should be removed from the unit if it has not been used for a long time.
EC Declaration of Conformity
Bresser GmbH has issued a "Declaration of Conformity" in accordance with applica-
ble guidelines and corresponding standards. The full text of the EU declaration of
conformity is available at the following internet address:
www.bresser.de/download/9118002/CE/9118002_CE.pdf
Disposal
Dispose of the packaging materials properly, according to their type, such as paper or card-
board. Contact your local waste-disposal service or environmental authority for information
on the proper disposal.
Do not dispose of electronic devices in the household garbage!
As per Directive 2002/96/EC of the European Parliament on waste electrical and electronic
equipment and its adaptation into German law, used electronic devices must be collected
separately and recycled in an environmentally friendly manner.
Empty, old batteries must be disposed of at battery collection points by the consumer. You can
find out more information about the disposal of devices or batteries produced after 6 January
2006 from your local waste-disposal service or environmental authority.
In accordance with the regulations concerning batteries and rechargeable batteries, dispos-
ing of them in the normal household waste is explicitly forbidden. Please make sure to dis-
pose of your used batteries as required by law — at a local collection point or in the retail market.
Disposal in domestic waste violates the Battery Directive.
Batteries that contain toxins are marked with a sign and a chemical symbol.
Cd¹ Hg² Pb³
1
battery contains cadmium
2
battery contains mercury
3
battery contains lead
Warranty and Service
The regular guarantee period is 5 years and begins on the day of purchase. You can consult the
full guarantee terms as well as information on extending the guarantee period and details of our
services at www.bresser.de/warranty_terms.

10
Consignes générales de sécurité
• RISQUE D’ETOUFFEMENT! Ce produit contient des petites pièces, qui pourraient être avalées
par des enfants. Il y a un RISQUE D’ETOUFFEMENT.
• RISQUE D’ELECTROCUTION ! Cet appareil contient des pièces électroniques raccordées à
une source d’alimentation électrique (par bloc d’alimentation et/ou batteries). L’utilisation de
l’appareil doit se faire exclusivement comme décrit dans ce manuel, faute de quoi un RISQUE
d’ELECTROCUTION peut exister !
• RISQUE D’EXPLOSION / D’INCENDIE ! Ne pas exposer l’appareil à des températures trop
élevées. N’utilisez que les batteries conseillées. L’appareil et les batteries ne doivent pas être
court-circuitées ou jeter dans le feu ! Toute surchauffe ou manipulation inappropriée peut
déclencher courts-circuits, incendies voire conduire à des explosions !
• RISQUE DE BLESSURE ! En équipant l’appareil des batteries, il convient de veiller à ce que
la polarité des batteries soit correcte. Les batteries endommagées ou ayant coulées causent
des brûlures par acide, lorsque les acides qu’elles contiennent entrent en contact direct avec
la peau. Le cas échéant, il convient d’utiliser des gants de protection adaptés.
• Ne pas démonter l’appareil ! En cas de défaut, veuillez vous adresser à votre revendeur
spécialisé. Celui-ci prendra contact avec le service client pour, éventuellement, envoyer
l’appareil en réparation.
• L’utilisation de cet appareil exige souvent l’utilisation d’accessoires tranchants et/ou pointus.
Ainsi, il convient de conserver l’appareil et ses accessoires et produits à un endroit se trouvant
hors de la portée des enfants. RISQUES DE BLESSURES !
Vue d'ensemble des pièces
1. Oculaire
2. Molette de mise au point
3. Tourelle porte-objectifs
4. Platine avec pinces
5. Miroir
6. Eclairage électrique
7. Pied avec support piles
8. Pied en caoutchouc
9. Potence du microscope
10. Lames porte-objet
11. Lamelles
12. Récipient
13. Ampoule de rechange
14. Ustensiles pour microscope
1� Qu’est ce qu’un microscope ?
Le microscope est composé de deux lots de lentilles : l’oculaire et l’objectif. Pour simplifier, nous
allons considérer que chaque lot n’a qu’une seule lentille. En vérité, l’oculaire (1), tout comme les
objectifs sur la tourelle (3), sont des groupes de lentilles. La lentille inférieure (objectif) grossit
l’objet (10) et permet d’obtenir une reproduction agrandie de celui-ci. Cette image, qui n’est pas
encore visible, est à nouveau grossie par la seconde lentille (oculaire 1) et apparaît alors comme
«image microscopique».

11
FR
2� Montage et mise en place
Avant de commencer, cherche une place adaptée pour ton microscope. D’une part, il est
important que cet endroit soit bien éclairé. De plus, je te conseille de poser le microscope
sur un emplacement stable étant donné qu’il est impossible d’obtenir un bon résultat sur une
base qui bouge.
3� Observation normale
Pour une observation normale, tu dois poser ton microscope sur un emplacement bien éclairé
(près d’une fenêtre ou d’une lampe). Retire ton microscope de l’emballage et incline la potence
du microscope (9) pour que tu aies une position confortable lors des observations.
La molette de mise au point (2) doit être vissée jusqu’à sa butée supérieure et le porte-objectifs
réglé sur le plus petit grossissement.
Regarde à travers l’oculaire et positionne le miroir (5) de façon à obtenir un rond d’une clarté
régulière. Ou bien, utilise la lampe (6). En ce qui concerne la lampe, tu trouveras d’autres
conseils dans le chapitre suivant. Glisse maintenant une lamelle porte-objet (11) sous la pince
sur la platine (4) exactement au-dessous de l’objectif. Lorsque tu regardes à travers l’oculaire, tu
vois ton échantillon grossi. L’image est éventuellement encore floue. Le réglage de la netteté se
fait en tournant doucement la molette de mise au point (2). Maintenant, tu peux choisir un gros-
sissement plus important en tournant le porte-objectifs et en choisissant ainsi un autre objectif.
Après le changement du grossissement, tu dois à nouveau faire une mise au point et, plus le
grossissement est important, plus le besoin en lumière est important pour obtenir un bon éclai-
rage de l’échantillon.
Conseil : évite d’orienter le miroir vers les rayons du soleil, ils éblouissent et ne permettent pas
d’obtenir une image nette.
4� Observation (Eclairage électrique)
Pour l’observation avec l’éclairage électrique (6), tu as besoin de deux piles AA (1,5V) que tu
dois placer dans le pied du microscope (7). Retire le pied en caoutchouc (8) du microscope et
positionne les piles en respectant le + et le – comme indiqué. Ensuite, le pied en caoutchouc
doit être remis en place.
L’éclairage s’allume lorsque tu tournes la lampe en direction de la table des objectifs (4). Re-
garde à travers l’oculaire et règle l’éclairage de façon à obtenir une clarté optimale. Maintenant,
tu peux faire une observation de la même manière qu’indiqué dans le chapitre 1.3 (observation
normale). L’ampoule de l’éclairage électrique peut être changée. Une ampoule de rechange (13)
est comprise dans la boîte. Si tu utilises d’autres ampoules, tu dois respecter la puissance maxi-
male indiquée sur la douille de l’ampoule.
Conseil : plus le grossissement est important, plus le besoin en lumière est important pour
obtenir un bon éclairage de l’échantillon. Commence donc toujours tes expériences avec le plus
petit grossissement.

12
REMARQUE concernant le nettoyage
• Avant de nettoyer l’appareil, veuillez le couper de son alimentation électrique (tirez le câble
d’alimentation ou enlevez les batteries) !
• Ne nettoyez l’appareil que de l’extérieur en utilisant un chiffon sec. Ne pas utiliser de liquides
de nettoyage, afin d’éviter d’endommager les parties électroniques.
• Protégez l’appareil de la poussière et de l’humidité !
• Les batteries doivent être retirées de l’appareil lorsque celui-ci est destiné à ne pas être
utilisé un certain temps.
Déclaration de conformité CE
Bresser GmbH a émis une « déclaration de conformité » conformément aux lignes direc-
trices applicables et aux normes correspondantes. Le texte complet de la déclaration UE
de conformité est disponible a l’adresse internet suivante: www.bresser.de/down-
load/9118002/CE/9118002_CE.pdf
ELIMINATION
Eliminez l’emballage en triant les matériaux. Pour plus d’informations concernant les règles
applicables en matière d’élimination de ce type des produits, veuillez vous adresser aux ser-
vices communaux en charge de la gestion des déchets ou de l’environnement.
Ne jamais éliminer les appareils électriques avec les ordures ménagères !
Conformément à la directive européenne 2002/96/CE sur les appareils électriques et élec-
troniques et ses transpositions aux plans nationaux, les appareils électriques usés doivent
être collectés séparément et être recyclés dans le respect des réglementations en vigueur en
matière de protection de l’environnement.
Les batteries déchargées et les accumulateurs usés doivent être apportés par leurs utilisateurs
dans les points de collecte prévus à cet effet. Pour plus d’informations concernant les règles
applicables en matière d’élimination des batteries produites après la date du 01.06.2006, veuillez
vous adresser aux services communaux en charge de la gestion des déchets ou de l’environne-
ment.
En conformité avec les règlements concernant les piles et les piles rechargeables, jeter ces
produits avec les déchets ménagers normaux est strictement interdit. Veuillez à bien dépo-
ser vos piles usagées dans des lieux prévus à cet effet par la Loi, comme un point de collecte
locale ou dans un magasin de détail (une élimination de ces produits avec les déchets domes-
tiques constituerait une violation des directives sur les piles et batteries).
Les piles qui contiennent des toxines sont marquées avec un signe et un symbole chimique.
Cd¹ Hg² Pb³
1
pile contenant du cadmium
2
pile contenant du mercure
3
pile contenant du plomb
Garantie et Service
La durée normale de la garantie est de 5 ans à compter du jour de l’achat. Vous pouvez consulter
l’intégralité des conditions de garantie ainsi que les informations concernant la prolongation de
la garantie et les prestations de service sur www.bresser.de/warranty_terms.

13
NL
Algemene waarschuwingen
• VERSTIKKINGSGEVAAR! Dit product bevat kleine onderdelen die door kinderen kunnen
worden ingeslikt! Er bestaat VERSTIKKINGSGEVAAR!
• GEVAAR VOOR ELEKTRISCHE SCHOK! Dit toestel bevat elektronische onderdelen die
door een elektriciteitsbron (voeding en/of batterijen) worden gevoed. Het toestel mag alleen
gebruikt worden zoals in de handleiding wordt beschreven, anders bestaat er GEVAAR op een
STROOMSTOOT!
• BRAND-/EXPLOSIEGEVAAR! Stel het apparaat niet bloot aan hoge temperaturen. Gebruik
uitsluitend de aanbevolen batterijen. Sluit het apparaat en de batterijen niet kort en gooi deze
niet in het vuur! Te hoge temperaturen en ondeskundig gebruik kunnen leiden tot kortsluitingen,
branden en zelfs explosies!
• GEVAAR VOOR INBRANDEND ZUUR! Let bij het plaatsen van de batterijen op de juiste
richting van de polen. Lekkende of beschadigde batterijen veroorzaken irritaties wanneer
deze met de huid in aanraking komen. Gebruik in dat geval alleen hiervoor goedgekeurde
beschermingshandschoenen.
• Neem het toestel niet uit elkaar! Neem bij defecten a.u.b. contact op met de verkoper. Deze
zal contact opnemen met een servicecenter en kan het toestel indien nodig voor reparatie
terugsturen.
• Tijdens het gebruik van dit toestel worden regelmatig scherpe hulpmiddelen gebruikt. Bewaar
dit toestel en alle toebehoren en hulpmiddelen dus op een voor kinderen ontoegankelijke plaats.
Er bestaat GEVAAR VOOR VERWONDINGEN!
Onderdelen lijst
1. Oculair
2. Scherpteregeling
3. Revolverkop met objectieven
4. Objecttafel
5. Spiegel
6. Elektrische verlichting
7. Voet met batterijhouder
8. Rubberen voet
9. Microscoop-arm
10. Preparaten voor meermalig gebruik
11. Dekglaasjes
12. Container
13. Reservelampje
14. Microscoopbestek
1� Wat is een microscoop?
De microscoop bestaat uit twee lenssystemen: het oculair en het objectief. Om het gemakkelij-
ker te maken, stellen wij ons deze systemen elk als één lens voor. In werkelijkheid bestaan ech-
ter zowel het oculair (1) als de objectieven in de revolver (3) uit meerdere lenzen. De onderste
lens (het objectief) vergroot het preparaat (10) en er ontstaat een vergrote afbeelding van het
preparaat. Dit beeld, dat je niet ziet, wordt door de tweede lens (het oculair, (1) nog eens ver-
groot en dan zie je het „microscoop-beeld“.

14
2� Waar en hoe zet je de microscoop neer?
Voordat je begint, kies je een geschikte plaats uit, om met de microscoop te kunnen werken.
Aan de ene kant is het belangrijk dat er voldoende licht is. Verder adviseer ik, de microscoop
op een stabiele ondergrond neer te zetten, omdat je op een wiebelende ondergrond geen
goede resultaten kunt krijgen.
3� Normale observatie
Voor de normale observatie zet je de microscoop op een goed verlichte plaats (raam, bureau-
lamp). Neem de microscoop uit de verpakking en kantel de microscoop-arm (9) in een voor jou
gemakkelijke observatie-positie.
Draai de scherpteregeling (2) tot aan de bovenste aanslag en stel de objectiefrevolver (3) op de
kleinste vergroting in.
Kijk nu door het oculair en stel de spiegel (5) zo in, dat je een gelijkmatig verlichte kring van
licht krijgt. Of gebruik het lampje (6). Over het lampje wordt meer verteld in het stukje hierna.
Nu schuif je een duurzaam preparaat (10) onder de klemmen op de objecttafel (4), precies
onder het objectief. Wanneer je door het oculair kijkt, zie je nu het uitvergrote preparaat. Het
beeld zal eerst nog wazig zijn. De scherpte stel je in, door langzaam aan de scherpteregeling te
draaien. Nu kun je een hogere vergroting kiezen, doordat je aan de objectiefrevolver draait en
een ander objectief voor het oculair haalt.
Als je de vergrotingsfactor verandert, moet je ook de scherpte opnieuw instellen, en hoe hoger
de vergroting, hoe meer licht er nodig is om de afbeelding goed te kunnen bekijken.
TIP: Vermijd bij het uitrichten van de spiegel de inval van direct zonlicht, omdat dit verblind en
je zo geen goed beeld kunt krijgen.
4� Observatie (Elektrische verlichting)
Om met het elektrisch licht (6) te kunnen werken, heb je twee AA batterijen van 1,5 V nodig,
die in de voet van de microscoop (7) worden geplaatst. Verwijder de rubberen voet (8) van de
microscoop en plaats de batterijen volgens de +/- markering. Doe de rubberen voet weer op
zijn plaats.
De verlichting gaat aan, als je lamp in de richting van de objecttafel (4) draait. Kijk door het
oculair en stel de lamp zo in, dat je een optimaal verlicht beeld krijgt. Nu kun je op dezelfde
manier een observatie uitvoeren als onder punt 1.3 beschreven (Normale observatie).
De peer (gloeilamp) van de elektrische verlichting kan worden vervangen. Er zit ook een reser-
vepeertje (13) bij de set. Let bij de aankoop van nieuwe gloeilampen op het maximaal toege-
stane aantal Watt. Hoeveel dat is, staat op de gloeilamp zelf aangegeven.
TIP:
Hoe hoger de ingestelde vergrotingsfactor, des te meer licht er voor een goed belicht
beeld nodig is. Begin daarom altijd eerst met een geringe vergroting te experimenteren.
TIPS voor reiniging
• Koppel het toestel los van de stroomvoorziening (stekker uit het stopcontact halen en/of
batterijen verwijderen) voordat u het reinigt!
• Reinig het toestel alleen uitwendig met een droge doek. Gebruik geen vloeistoffen, om schade
aan de elektronica te vermeiden.
• Bescherm het toestel tegen stof en vocht!
• Verwijder de batterijen uit het toestel wanneer deze langere tijd niet gebruikt wordt.

15
NL
EC verklaring van overeenstemming
Een “conformiteitsverklaring” in overeenstemming met de van toepassing zijnde
richtlijnen en overeenkomstige normen is door Bresser GmbH afgegeven. Deze kan
elk moment op aanvraag worden ingezien. De volledige tekst van de EG-verklaring van
overeenstemming is beschikbaar op het volgende internetadres:
www.bresser.de/download/9118002/CE/9118002_CE.pdf
AFVAL
Scheid het verpakkingsmateriaal voordat u het weggooit. Informatie over het correct schei-
den en weggooien van afval kunt u bij uw gemeentelijke milieudienst inwinnen.
Gooi elektronische apparaten niet bij het huisvuil!
Volgens de Europese richtlijn 2002/96/EG over elektrische en elektronische apparaten en
de toepassing hiervan in nationale wetten moeten afgedankte elektrische apparaten ge-
scheiden worden ingezameld en op milieuvriendelijke wijze worden afgevoerd.
Lege batterijen en accu’s moeten door de gebruiker in een batterijenverzamelbak worden weg-
gegooid. Informatie over het weggooien van oude apparaten en batterijen, die na 01-06-2006 zijn
geproduceerd, kunt u bij uw gemeentelijke milieudienst inwinnen.
Batterijen en accu’s mogen niet worden weggegooid in de vuilnisbak. U bent wettelijk ver-
plicht om gebruikte batterijen in te leveren. U kunt de gebruikte batterijen in onze winkel of
in de onmiddellijke omgeving, bijv. bij gemeentelijke Inzamelpunten gratis inleveren.
Batterijen en accu’s zijn gemarkeerd met een doorgestreepte vuilnisbak en het chemische sym-
bool van de verontreinigingende stoffen.
Cd¹ Hg² Pb³
1
batterij bevat cadmium
2
batterij bevat kwik
3
accu bevat lood
Garantie & Service
De reguliere garantieperiode bedraagt 5 jaar en begint op de dag van aankoop. De volledige
garantievoorwaarden en informatie over de verlenging van de garantieperiode en servicediensten
kunt u bekijken op www.bresser.de/warranty_terms.

16
Avvertenze di sicurezza generali
• PERICOLO DI SOFFOCAMENTO! Il prodotto contiene piccoli particolari che potrebbero venire
ingoiati dai bambini! PERICOLO DI SOFFOCAMENTO!
• RISCHIO DI FOLGORAZIONE! Questo apparecchio contiene componenti elettronici azionati
da una sorgente di corrente (alimentatore e/o batterie). L’utilizzo deve avvenire soltanto
conformemente a quanto descritto nella guida, in caso contrario esiste il PERICOLO di
SCOSSA ELETTRICA!
• PERICOLO DI INCENDIO/ESPLOSIONE! Non esporre l’apparecchio a temperature elevate.
Utilizzare esclusivamente le batterie consigliate. Non cortocircuitare o buttare nel fuoco
l‘apparecchio e le batterie! Un surriscaldamento oppure un utilizzo non conforme può provocare
cortocircuiti, incendi e persino esplosioni!
• RISCHIO DI CORROSIONE! Per inserire le batterie rispettare la polarità indicata. Le batterie
scariche o danneggiate possono causare irritazioni se vengono a contatto con la pelle. Se
necessario indossare un paio di guanti di protezione adatto.
• Non smontare l’apparecchio! In caso di guasto, rivolgersi al proprio rivenditore specializzato.
Egli provvederà a contattare il centro di assistenza e se necessario a spedire l’apparecchio in
riparazione.
• Per l’utilizzo di questo apparecchio vengono spesso utilizzati strumenti appuntiti e affilati.
Pertanto, conservare l’apparecchio e tutti gli accessori e strumenti fuori dalla portata dei
bambini. PERICOLO DI LESIONE!
Sommario
1. Oculare
2. Ghiera della messa a fuoco
3. Torretta portaobiettivi con obiettivi
4. Tavolino portaoggetti
5. Specchio
6. Illuminazioni elettrica
7. Base con supporto per batterie
8. Piede in gomma
9. Braccio del microscopio
10. Vetrini preparati
11. Coprivetrini
12. Recipiente di raccolta
13. Lampadina ad incandescenza di ricambio
14. Set di attrezzi da microscopia
1� Che cos’è un microscopio?
Il microscopio consiste in due sistemi di lenti: l’oculare e l’obiettivo. Per semplificare la spiega-
zione supponiamo che entrambi questi sistemi siano costituiti da una lente sola. In realtà tanto
l’oculare (1) quanto gli obiettivi (2) nella torretta portaobiettivi (3) sono costituiti da più lenti. La
lente inferiore (obiettivo) ingrandisce il preparato (10) e si genera così un’immagine ingrandita
del preparato. Questa immagine, che in realtà non si vede, viene ulteriormente ingrandita da
una seconda lente (oculare, 1). Questa è quindi l’immagine che vedi al microscopio.

17
IT
2� Struttura e ubicazione
Prima di cominciare, scegli una posizione adatta per effettuare le tue osservazioni al mi-
croscopio. Da una parte, è importante che ci sia luce a sufficienza. Inoltre ti consigliamo di
posizionare il microscopio su un piano di appoggio stabile perché altrimenti eventuali movimen-
ti oscillatori potrebbero compromettere i risultati dell’osservazione.
3� Osservazione normale
Per effettuare una normale osservazione posiziona il microscopio in un posto luminoso (vicino
ad una finestra o ad una lampada da tavolo). Estrai il microscopio dall‘imballaggio e piega il
braccio del microscopio (9) fino a raggiungere una posizione che ti sia comoda.Gira verso
l’alto la ghiera di regolazione della messa a fuoco (2) fino all’arresto e regola la torretta portao-
biettivi (3) sull’ingrandimento minore.
Guarda attraverso l’oculare e regola lo specchio (5) in modo tale da ottenere un cerchio di
luce uniformemente luminoso oppure utilizza l’illuminazione elettrica (6) del microscopio. Su
questo argomento troverai ulteriori suggerimenti al capitolo successivo. Spingi un vetrino pre-
parato (10) sotto le clip del tavolino portaoggetti (4) e posizionalo esattamente sotto l’obiettivo.
Guardando attraverso l’oculare, vedrai il preparato ingrandito. L’immagine potrebbe non essere
ancora sufficientemente nitida. Per regolare la messa a fuoco gira lentamente la ghiera (2). Ora
puoi scegliere un ingrandimento maggiore, girando la torretta portaobiettivi e utilizzando un
altro obiettivo. Ricorda però che quando modifichi l’ingrandimento devi regolare nuovamente la
messa a fuoco e che quanto maggiore è l’ingrandimento, tanta più luce è necessaria per otte-
nere un‘immagine ben illuminata.
SUGGERIMENTO: Quando orienti lo specchio evita che la luce solare cada direttamente su di
esso, perché altrimenti si crea un riflesso che comprometterà la nitidezza dell’immagine.
4� Osservazione (Illuminazione elettrica)
Per effettuare osservazioni con l’illuminazione elettrica (6) hai bisogno di due batterie AA da
1,5 V che vanno inserite nella base del microscopio (7). Rimuovi il piede di gomma (8) dal mi-
croscopio e inserisci le batterie nel vano rispettando le polarità (+/-) indicate. Successivamente
rimetti il piede di gomma al suo posto.
Per accendere l’illuminazione girala verso il tavolino portaoggetti (4). Guarda attraverso l’ocula-
re e regola l’illuminazione in modo tale da raggiungere la luminosità ottimale. Ora, seguendo le
istruzioni riportate al punto 1.3 (Osservazione normale), puoi effettuare l’osservazione. La lam-
padina ad incandescenza dell’illuminazione elettrica può essere sostituita. In dotazione con il
microscopio troverai anche una lampadina di ricambio (13). Se utilizzi altre lampadine fa atten-
zione che il wattaggio stampigliato sul corpo della lampadina corrisponda a quello necessario.
SUGGERIMENTO: Quanto maggiore è l’ingrandimento impostato, tanta più luce è necessaria
affinché l’immagine sia ben illuminata. Inizia quindi sempre i tuoi esperimenti con un ingrandi-
mento basso.
NOTE per la pulizia
• Prima di procedere con la pulizia, staccare l’apparecchio dalla sorgente di corrente (staccare
il connettore oppure rimuovere le batterie)!
• Pulire l’apparecchio soltanto con un panno asciutto. Non utilizzare liquidi detergenti per evitare
danni ai componenti elettronici.

18
• Proteggere l’apparecchio dalla polvere e dall’umidità!
• Togliere le batterie dall’apparecchio nel caso non venga utilizzato per un periodo prolungato!
Dichiarazione di conformità CE
Bresser GmbH ha redatto una “dichiarazione di conformità” in linea con le disposizio-
ni applicabili e le rispettive norme. Su richiesta, è visionabile in qualsiasi momento. Il
testo integrale della dichiarazione di conformità CE è disponibile al seguente indirizzo
Internet: www.bresser.de/download/9118002/CE/9118002_CE.pdf
SMALTIMENTO
Smaltire i materiali di imballaggio in maniera differenziata. Le informazioni su uno smaltimen-
to conforme sono disponibili presso il servizio di smaltimento comunale o l’Agenzia per
l’ambiente locale.
Non smaltire gli apparecchi elettronici con i rifiuti domestici!
Secondo la Direttiva Europea 2002/96/CE riguardante gli apparecchi elettrici ed elettronici
usati e la sua applicazione nel diritto nazionale, gli apparecchi elettronici usati devono es-
sere raccolti in maniera differenziata e destinati al riciclaggio ecologico. Le batterie e gli accu-
mulatori scarichi devono essere smaltiti dall’utilizzatore negli appositi contenitori di raccolta. Le
informazioni degli apparecchi o delle batterie usate prodotte dopo il 01.06.2006 sono disponibili
presso il servizio di smaltimento o l’Agenzia per l’ambiente locale.
Le batterie normali e ricaricabili devono essere correttamente smaltiti come sta previsto
dalla legge. È possibile tornare batterie inutilizzati presso il punto di vendita o cedere in
centri di raccolta organizzati dai comuni per la raccolta gratuitamente.
Le batterie normali e ricaricabili sono contrassegnati con il simbolo corrispondente disposte per
lo smaltimento e il simbolo chimico della sostanza inquinante.
Cd¹ Hg² Pb³
1
Batteria contiene cadmio
2
Batteria contiene mercurio
3
Batteria contiene piombo
Garanzia e assistenza
La durata regolare della garanzia è di 5 anni e decorre dalla data dell‘acquisto. Le condizioni com-
plete di garanzia e le informazioni sull‘estensione di garanzia e i servizi di assistenza sono visibili al
sito www.bresser.de/warranty_terms.

19
ES
Advertencias de carácter general
• ¡Existe PELIGRO DE CEGUERA! No mire nunca directamente al sol o cerca de él con este
aparato. ¡Existe PELIGRO DE CEGUERA!
• ¡Existe PELIGRO DE ASFIXIA! Los niños solo deberían utilizar el aparato bajo supervisión.
Mantener los materiales de embalaje (bolsas de plástico, bandas de goma) alejadas del alcan-
ce de los niños. ¡Existe PELIGRO DE ASFIXIA!
•
¡PELIGRO DE INCENDIO! No exponer el aparato – especialmente las lentes – a la radiación directa
del sol. La concentración de la luz puede provocar incendios.
• No desmonte el aparato. En caso de que exista algún defecto, le rogamos que se ponga en
contacto con su distribuidor autorizado. Este se pondrá en contacto con el centro de servicio
técnico y, dado el caso, podrá enviarle el aparato para su reparación.
•
No exponga el aparato a altas temperaturas.
• La aparato están concebidos para el uso privado. Respete la privacidad de las personas de su
entorno – por ejemplo, no utilice este aparato para mirar en el interior de viviendas.
Resumen
1. Ocular
2. Tornillo micrométrico
3. Cabeza revólver con objetivos
4. Platina
5. Espejo
6. Iluminación eléctrica
7. Pie con soporte para las pilas
8. Pie de goma
9. Brazo de microscopio
10. Preparaciones permanentes
11. Cubiertas de cristal
12. Recipiente colector
13. Lámpara de repuesto
14. Instrumental de microscopio
1� ¿Qué es un microscopio?
El microscopio se compone de dos sistemas de lentes: el ocular y el objetivo. Para que sea más
fácil de entender, nos representamos estos sistemas como si cada uno fuera una lente. Sin embar-
go, tanto el ocular (1) como los objetivos que hay en el revólver (3) se componen de varias lentes.
La lente inferior (objetivo) aumenta la preparación (10), de modo que se genera una representa-
ción aumentada de dicha preparación. Esta imagen, que no se ve, vuelve a ser aumentada por la
segunda lente (ocular, 1), y es entonces cuando ves la «imagen de microscopio».
2� Montaje y lugar de observación
Antes de empezar debes elegir un lugar apropiado para practicar observaciones con tu micros-
copio. Por una parte, es importante que haya luz suficiente. Además te recomiendo que coloques
el microscopio sobre una base estable, ya que si el soporte se tambalea no se pueden obtener
resultados visuales satisfactorios.

20
3� Observación normal
Para la observación normal, debes colocar el microscopio en un lugar donde haya claridad (junto
una ventana o un flexo). Para ello, extrae el microscopio del embalaje e inclina el brazo del mi-
croscopio (9) hasta alcanzar una posición que te resulte cómoda. Gira el tornillo micrométrico (2)
hasta el tope superior y ajusta el revólver con objetivos (3) al aumento más pequeño. Mira ahora
por el ocular y ajusta el espejo (5) de manera que obtengas un círculo de luz con una claridad
uniforme. También puedes utilizar la lámpara (6). Encontrarás más consejos sobre la lámpara en
el siguiente apartado. Ahora debes introducir una preparación permanente (10) bajo las pinzas
que hay sobre la platina (4), justo debajo del objetivo. Si miras ahora por el ocular, podrás ver la
preparación aumentada. Quizá veas la imagen algo difusa todavía. Puedes ajustar la nitidez de
imagen girando lentamente el tornillo micrométrico (2). Ahora puedes seleccionar un aumento
mayor girando el revólver con objetivos y ajustando un objetivo distinto.
Al hacerlo, ten en cuenta que al modificar el aumento también es necesario ajustar de nuevo la
nitidez de imagen, y cuanto mayor sea el aumento, más luz se necesitará para que la imagen esté
bien iluminada.
CONSEJO: Al fijar la orientación del espejo, evita la entrada directa de la luz del sol, ya que des-
lumbra y no permite obtener una imagen nítida.
4� Observación (Iluminación eléctrica)
Para realizar observaciones con la iluminación eléctrica (6) necesitas las dos pilas AA de 1,5 V,
que se introducen en el pie (7) del microscopio. Tienes que retirar el pie de goma (8) existente en
el microscopio e introducir las pilas según la indicación +/- mostrada. A continuación, coloca de
nuevo el pie de goma.
La iluminación se enciende girándola en dirección a la platina (4). Mira por el ocular y ajusta la
iluminación de modo que obtengas una claridad de imagen óptima. Ahora puedes llevar a cabo
una observación del modo que se describe en el punto 1.3 (Observación normal).
La bombilla (lámpara) de la iluminación eléctrica puede recambiarse. Se incluye en el suministro
una lámpara de repuesto (13). Si utilizas otras lámparas, ten en cuenta el número máximo de va-
tios que se indica en el cuerpo de la misma.
CONSEJO: Cuanto mayor sea el aumento ajustado, mayor cantidad de luz se necesitará para que
la imagen tenga una buena iluminación. Por tanto, comienza tus experimentos siempre con un
aumento pequeño.
INSTRUCCIONES de limpieza
• Antes de limpiar el aparato, desconéctelo de la fuente de electricidad (desenchúfelo o quite
las pilas).
• Limpie solamente el exterior del aparato con un paño seco. No utilice productos de limpieza
para evitar daños en el sistema electrónico.
• ¡Proteja el aparato del polvo y la humedad!
• Se deben retirar las pilas del aparato si no se va a usar durante un periodo prolongado.

21
ES
Declaración de conformidad de la Unión Europea (CE)
Bresser GmbH ha emitido una "Declaración de conformidad" de acuerdo con las
directrices y normas correspondientes. El texto completo de la declaración de con-
formidad de la UE está disponible en la siguiente dirección de Internet:
www.bresser.de/download/9118002/CE/9118002_CE.pdf
ELIMINACIÓN
Elimine los materiales de embalaje separados por tipos. Obtendrá información sobre la
eliminación reglamentaria en los proveedores de servicios de eliminación municipales o en
la agencia de protección medioambiental.
¡No elimine los electrodomésticos junto con la basura doméstica! Conforme a la directiva
europea 2002/96/UE sobre aparatos eléctricos y electrónicos usados y a su aplicación en
la legislación nacional, los aparatos eléctricos usados se deben recoger por separado y
conducir a un reciclaje que no perjudique al medio ambiente. Las pilas y baterías descargadas
deben ser llevadas por los consumidores a recipientes de recogida para su eliminación. En los
proveedores de servicios de eliminación municipales o en la agencia de protección medioambi-
ental podrá obtener información sobre la eliminación de aparatos o pilas usados fabricados
después del 01-06-2006.
De acuerdo con la normativa en materia de pilas y baterías recargables, está explicitamente
prohibido depositarlas en la basura normal. Por favor, preste atención a lo que la normativa
obliga cuando usted quiera deshacerse de estos productos - sobre puntos de recogida munici-
pal o en el mercado minorista (disposición sobre violación de la Directiva en materia de los resi-
duos domésticos- pilas y baterías-).
Las pilas y baterías que contienen productos tóxicos están marcados con un signo y un símbolo
químico.
Cd¹ Hg² Pb³
1
pila que contiene cadmio
2
pila que contiene mercurio
3
pila que contiene plomo
Garantía y servicio
El período regular de garantía es 5 anos iniciándose en el día de la compra. Las condiciones de
garantía completas así como informaciones relativas a la ampliación de la garantía y los servicios
pueden encontrarse en www.bresser.de/warranty_terms.

22
Общие предупреждения
• ОПАСНОСТЬ УДУШЕНИЯ! Данное устройство содержит мелкие детали, которые дети
могут проглотить. Существует опасность УДУШЕНИЯ!
• ОПАСНОСТЬ ПОРАЖЕНИЯ ЭЛЕКТРОТОКОМ!
Данное устройство содержит электронные компоненты, приводимые в действие от
источника тока (сетевой адаптер и/или батарейки). Устройство следует использовать
только так, как указано в инструкции, иначе есть серьезный риск получить УДАР
ТОКОМ.
• ОПАСНОСТЬ ПОЖАРА / ВЗРЫВА! Не допускайте нагревания устройства до высокой
температуры. Используйте только рекомендованные батарейки. Не закорачивайте
устройство и батарейки, не бросайте их в огонь! Перегрев и неправильное обращение
могут стать причиной короткого замыкания, пожара и даже взрыва!
• ОПАСНОСТЬ ПОЛУЧЕНИЯ ОЖОГА! Исключите доступ детей к батарейкам! При
установке/замене батареек соблюдайте полярность. Вытекшие или поврежденные
батарейки вызывают раздражения при контакте с кожей. В случае необходимости
надевайте подходящие защитные перчатки.
• Никогда не разбирайте устройство. При возникновении неисправностей обратитесь
к дилеру. Он свяжется с нашим сервисным центром и при необходимости отправит
устройство в ремонт.
• При пользовании данным устройством может потребоваться применение
инструментов с острыми краями. Храните устройство, принадлежности и инструменты
в недоступном для детей месте. Существует риск получить ТРАВМУ!
Детали микроскопа
1. Окуляр
2. Ручка фокусировки
3. Револьверное устройство
4. Предметный столик
5. Зеркало
6. Подсветка
7. Основание микроскопа с батарейным отсеком
8. Резиновый чехол основания микроскопа
9. Штатив микроскопа
10. Готовые микропрепараты
11. Покровные стекла
12. Флаконы
13. Запасная лампочка
14. Инструменты для работы с препаратами
1. Что такое микроскоп?
Микроскоп – это оптическая система, состоящая, в свою очередь, из двух оптических
систем (окуляр и объектив). Для простоты понимания можно представить, что и
окуляр, и объектив состоят из одной линзы, но на самом деле в каждой из этих
деталей нескольких линз.

23
RU
Объектив в револьверном устройстве (3) увеличивает изображение
микропрепарата (10), а затем полученное изображение увеличивается еще раз в
окуляре (1). Следовательно, наблюдая микропрепарат в окуляр, вы видите дважды
увеличенное изображение этого микропрепарата.
2. Сборка и установка
Прежде чем приступить к наблюдениям, выберите подходящее место для микроскопа.
С одной стороны, в комнате должно быть достаточно света для обычных наблюдений.
Наконец, не стоит забывать, что микроскоп должен стоять на устойчивой и ровной
поверхности. Пожалуй, лучшим местом для размещения микроскопа будет стол у окна
со шторами.
3. Обычные наблюдения
Поставьте микроскоп в хорошо освещенное место, например, у окна или рядом с
настольной лампой. Наклоняя штатив (9), отрегулируйте положение окуляра так, чтобы
вам было удобно работать.
Выберите объектив (3) с наименьшим увеличением и поворачивайте ручки
фокусировки (2) до тех пор, пока оптическая трубка не будет на максимальном
расстоянии от предметного столика.
Направьте зеркало (5) в сторону окна или настольной лампы и посмотрите в окуляр (1)
– вы должны увидеть равномерно освещенный круг. При неравномерном освещении
отрегулируйте положение зеркала (5). Вы также можете использовать подсветку (6),
об этом подробно написано в следующем разделе. Положите готовый микропрепарат
(10) на предметный столик (4), прямо под объектив. Закрепите микропрепарат
зажимами. Если вы посмотрите в окуляр, то должны увидеть там увеличенное
изображение микропрепарата. Если изображение нечеткое, резкость можно легко
настроить, плавно поворачивая ручки фокусировки (2). Теперь вы можете выбрать
объектив с большим увеличением и рассмотреть микропрепарат в деталях.
Обратите внимание на то, что смена объектива приведет к потере резкости
изображения, и вам придется настроить фокус повторно. Также не забывайте, что на
большем увеличении потребуется больше света для освещения микропрепарата.
Примечание: Старайтесь не подставлять зеркало под прямые солнечные лучи, так как
блики от них не дадут вам получить четкого изображения микропрепарата.
4. Электрическое освещение
Чтобы воспользоваться электрической подсветкой (6), вам потребуются две батарейки
(1,5 В), которые необходимо установить в батарейный отсек в основании микроскопа
(7). Снимите резиновый чехол (8) и установите батарейки, соблюдая полярность (это
очень важно). Не забудьте надеть резиновый чехол на основание.
Чтобы включить освещение, переверните зеркало (5) так, чтобы лампочка смотрела
на предметный столик (4). Посмотрите в окуляр и отрегулируйте положение лампочки
так, чтобы поле зрения освещалось равномерно. Теперь можно приступать к
наблюдениям (процесс наблюдений подробно описан в предыдущем разделе).
Если установленная лампочка перегорит, ее легко можно заменить. В комплект
поставки входит одна запасная лампочка (13). При покупке дополнительной запасной
лампочки обратите внимание на ее мощность, чтобы не повредить систему освещения
микроскопа.

24
Примечание: Чем выше увеличение оптической системы, тем больше света требуется
для равномерного освещения микропрепарата. Всегда старайтесь начинать
наблюдения с меньшего увеличения.
СОВЕТЫ по уходу
• Перед чисткой отключите устройство от источника питания (выдерните штепсельную
вилку из розетки или выньте батарейки)!
• Протирайте поверхности устройства сухой салфеткой. Не используйте чистящую
жидкость, она может повредить электронные компоненты.
• Берегите устройство от пыли и влаги.
• Если устройство не будет использоваться в течение длительного времени, выньте из
него батарейки!
Сертификат соответствия ЕС
Bresser GmbH подтверждает соответствие данного изделия нормативным тре-
бованиям ЕС. С полным текстом Сертификата соответствия ЕС можно ознако-
миться по этой ссылке: www.bresser.de/download/9118002/CE/9118002_CE.pdf
УТИЛИЗАЦИЯ
Утилизируйте упаковку как предписано законом. При необходимости проконсуль-
тируйтесь с местными властями.
Не выбрасывайте электронные детали в обычный мусорный контейнер. Европей-
ская директива по утилизации электронного и электрического оборудования
2002/96/EU и соответствующие ей законы требуют отдельного сбора и переработ-
ки подобных устройств.
Использованные элементы питания следует утилизировать отдельно. Подробную ин-
формацию об утилизации электроники можно получить у местных властей.
Элементы питания не являются бытовыми отходами, поэтому в соответствии с за-
конодательными требованиями их необходимо сдавать в пункты приема использо-
ванных элементов питания. Вы можете бесплатно сдать использованные элементы
питания в нашем магазине или рядом с вами (например, в торговых точках или в пун-
ктах приема).
На элементах питания изображен перечеркнутый контейнер, а также указано содержа-
щееся ядовитое вещество.
Cd¹ Hg² Pb³
1
Элемент питания содержит кадмий
2
Элемент питания содержит ртуть
3
Элемент питания содержит свинец
Гарантия и обслуживание
Стандартный гарантийный срок составляет 5 года, начиная со дня покупки. Подробные условия
гарантии, информацию о расширенной гарантии и о наших сервисных центрах можно получить на
нашем сайте www.bresser.de/warranty_terms.

25
PL
Ogólne ostrzeżenia
• Dzieci powinny używać urządzenia wyłącznie pod nadzorem osoby dorosłej. Materiały, z których
wykonano opakowanie (worki plastikowe, gumki, itd.), przechowywać w miejscu niedostępnym
dla dzieci! Istnieje NIEBEZPIECZEŃSTWO UDUSZENIA SIĘ!
• NIEBEZPIECZEŃSTWO PORAŻENIA PRĄDEM! To urządzenie zawiera części elektroniczne,
które są zasilane prądem (baterie). Nigdy nie pozostawiać dzieci bez nadzoru podczas
używania urządzenia! Użytkowanie urządzenia może przebiegać wyłącznie w sposób opisany
w instrukcji, w przeciwnym razie zachodzi NIEBEZPIECZEŃSTWO PORAŻENIA PRĄDEM!
• NIEBEZPIECZEŃSTWO POŻARU / WYBUCHU! Nie narażać urządzenia na działanie wysokich
temperatur. Używać wyłącznie zalecanych baterii. Nie wywoływać zwarć urządzenia i baterii ani
nie wrzucać ich do ognia! Zbyt wysoka temperatura i niezgodne z przeznaczeniem użytkowanie
mogą spowodować zwarcia, pożary, a nawet wybuchy!
• NIEBEZPIECZEŃSTWO POPARZENIA CHEMICZNEGO! Baterie należy przechowywać poza
zasięgiem dzieci! Podczas wkładania baterii zależy zwrócić uwagę na właściwe położenie
biegunów. Kontakt wyczerpanych lub uszkodzonych baterii ze skórą powoduje poparzenia. W
razie potrzeby używać odpowiednich rękawic ochronnych.
• Nie rozmontowywać urządzenia! W przypadku usterki zwrócić się do profesjonalnego
sprzedawcy. On skontaktuje się z centrum obsługi i w razie potrzeby prześle urządzenie do
naprawy.
• Przy pracy z tym urządzeniem używa się często szpiczastych narzędzi o ostrych krawędziach.
Dlatego należy przechowywać urządzenie wraz ze wszystkimi akcesoriami i narzędziami w
miejscu niedostępnym dla dzieci. Istnieje NIEBEZPIECZEŃSTWO SKALECZENIA SIĘ!
Lista elementów
1. Okular
2. Pokrętło ostrości
3. Rewolwer
4. Stolik
5. Zwierciadło
6. Elektroniczne źródło światła
7. Podstawa z komorą baterii
8. Podstawa gumowa
9. Ramię mikroskopu
10. Preparaty
11. Osłony
12. Pojemnik
13. Zapasowa żarówka
14. Instrumenty mikroskopu
1� Czym jest mikroskop?
Mikroskop zawiera dwa układy soczewek: okular i obiektyw. Dla łatwiejszego zrozumienia kon-
cepcji przedstawiamy te układy jako jednosoczewkowe. Jednak w rzeczywistości zarówno okular
(1), jak i obiektyw w rewolwerze (3) składają się z wielu soczewek.
Dolna soczewka (obiektyw) wyświetla powiększony obraz preparatu (10). Obraz, który nie jest
widoczny dla użytkownika, powiększany jest ponownie przez drugą soczewkę (okular, 1) i wido-
czny jako „obraz mikroskopowy".

26
2� Montaż i umiejscowienie
Przed rozpoczęciem użytkowania należy wybrać dogodne miejsce do ustawienia mikroskopu.
Ważne, aby wybrane miejsce zapewniało dostateczną ilość światła do normalnej obserwacji. Po-
nadto zaleca się ustawienie mikroskopu na stabilnej powierzchni, ponieważ niestabilne podłoże
nie zapewnia zadowalających warunków obserwacji.
3� Normalna obserwacja
Dla celów normalnej obserwacji należy umieścić mikroskop w jasnym miejscu (np. w pobliżu
okna lub lampy biurkowej). Należy wyjąć mikroskop z opakowania, a następnie pochylić jego
ramię (9), ustawiając je w wygodnej dla siebie pozycji.
Obrócić pokrętło ostrości (2) do górnego ogranicznika i ustawić rewolwer (3) na najniższą
wartość powiększenia. Następnie spoglądając w okular wyregulować zwierciadło (5) tak, aby
widoczne było jednolite jasne kółko światła. Można oczywiście wykorzystać również elektronicz-
ne źródło światła (6). Bliższe informacje na temat źródła światła zawiera następny punkt. Teraz
można umieścić preparat na stoliku (4) bezpośrednio pod obiektywem. Obraz widziany przez
okular może być jeszcze nieco rozmyty, dlatego obracając powoli pokrętło ostrości (2) należy
wyregulować ostrość obrazu. W tym momencie można zwiększyć powiększenie poprzez obrót
rewolweru i wybór innego obiektywu.
W takim przypadku należy jednak pamiętać o konieczności ponownego ustawienia ostrości.
Wyższy stopień powiększenia wymaga również większej ilości światła dla zapewnienia dobrego
oświetlenia obrazu.
WSKAZÓWKA: Należy unikać takiego ustawiania zwierciadła, by światło słoneczne padało na nie
w sposób bezpośredni, ponieważ może to powodować oślepienie użytkownika, uniemożliwiające
wyraźne widzenie.
4� Obserwacja (elektroniczne źródło światła)
Aby uzyskać możliwość korzystania z elektronicznego źródła światła (6), należy w podstawie
mikroskopu (7) umieścić dwie baterie AA 1,5 V. W tym celu należy zdjąć gumową podstawę (8)
i włożyć baterie zgodnie z oznaczeniem biegunów (+/-), a następnie zamocować podstawę po-
nownie na swoim miejscu.
Oświetlenie włącza się obracając je w kierunku stolika (4). Spoglądając przez okular należy
wyregulować natężenie światła tak, aby uzyskać optymalną jasność obrazu. Obserwację można
wykonywać w sposób opisany powyżej.
Żarówki oświetlenia elektronicznego można w razie potrzeby wymieniać. Do zestawu dołączono
jedną zapasową żarówkę (13). W przypadku stosowania innej żarówki należy uwzględniać
maksymalną moc podaną na korpusie lampy.
WSKAZÓWKA: Wyższy stopień powiększenia wymaga większej ilości światła dla zapewnienia
dobrego oświetlenia obrazu. Dlatego badanie należy zawsze rozpoczynać od niskiego stopnia
powiększenia.

27
PL
WSKAZÓWKI dotyczące czyszczenia
• Przed rozpoczęciem czyszczenia należy odłączyć urządzenie od źródła prądu (odłączyć
zasilacz sieciowy albo wyjąć baterie)!
• Czyścić urządzenie tylko z zewnątrz, używając suchej szmatki. Nie używać płynów
czyszczących, aby nie spowodować uszkodzenia elementów elektronicznych.
• Chronić urządzenie przed kurzem i wilgocią!
• Jeżeli urządzenie przez dłuższy czas nie będzie używane, należy wyjąć z niego baterie.
Deklaracja zgodności WE
Bresser GmbH niniejszym oświadcza, że typ urządzenia radiowego < Artikelnummer >
jest zgodny z dyrektywą; 2014/30/UE. Pełny tekst deklaracji zgodności UE jest
dostępny pod następującym adresem internetowym:
www.bresser.de/download/9118002/CE/9118002_CE.pdf
UTYLIZACJA
Materiały, z których wykonano opakowanie, należy utylizować posortowane według rodzaju.
Informacje na temat właściwej utylizacji uzyskają Państwo w komunalnym przedsiębiorstwie
utylizacji odpadów lub w urzędzie ds. ochrony środowiska.
Nie wyrzucać urządzeń elektrycznych razem z odpadami z gospodarstwa domowego!
Zgodnie z Dyrektywą Europejską 2002/96/WE w sprawie zużytego sprzętu elektrycznego i
elektronicznego oraz przepisami prawa krajowego, które ją wdrażają, zużyte urządzenia ele-
ktryczne muszą być zbierane oddzielnie i utylizowane zgodnie z zasadami ochrony środowiska.
Baterie nie mogą być usuwane wraz z pozostałymi odpadami domowymi. Konsument jest
prawnie zobowiązany do oddawania baterii po zużyciu np do specjalnych kontenerów przez-
naczonych na baterie. Zużyte baterie należy wyrzucać z sposób nie zagrażający środowisku
naturalnemu i nie może być usuwane wraz z pozostałymi odpadami domowymi. Sprzedawca jest
prawnie zobowiązany do odebrania zużytych baterii.
Baterie zawierające szkodliwe substancje chemiczne są oznakowane znakiem "przekreślonego
kosza" i jednym z chemicznych symboli Cd (= bateria zawiera kadm), Hg (= bateria zawiera rtęć),
Pb (= bateria zawiera ołów).
Cd¹ Hg² Pb³
1
bateria zawiera kadm
2
bateria zawiera rtęć
3
bateria zawiera ołów
Gwarancja i serwis
Standardowy okres gwarancji wynosi 5 lata i rozpoczyna się z dniem dokonania zakupu. Wszel-
kie informacje dotyczące gwarancji jak również informacje na temat przedłużenia czasu gwaran-
cji i świadczeń serwisowych można znaleźć na stronie: www.bresser.de/warranty_terms.

Manual_9118002_Microscope_de-en-fr-nl-it-es-ru-pl_NGKIDS_v012021a
Bresser GmbH
Gutenbergstr. 2 · DE-46414 Rhede
www.bresser.de · info@bresser.de
© National Geographic Partners LLC. All rights reserved.
NATIONAL GEOGRAPHIC KIDS and Yellow Border Design are
trademarks of National Geographic Society, used under license.
Visit our website: kids.nationalgeographic.com
Irrtümer und technische Änderungen vorbehalten.
Errors and technical changes reserved.
Transcripción de documentos
MIKROSKOP MICROSCOPE 300X-1200X DE Bedienungsanleitung EN Operating instructions FR Mode d’emploi NL Handleiding IT Istruzioni per l’uso ES Instrucciones de uso RU Руководство по эксплуатации PL Instrukcja obsługi Art.No.: 9118002 (DE) WARNUNG: ERSTICKUNGSGEFAHR! Dieses Produkt beinhaltet Kleinteile, die von Kindern verschluckt werden können! Es besteht ERSTICKUNGSGEFAHR! (EN) WARNING: Choking hazard — This product contains small parts that could be swallowed by children. This poses a choking hazard. (FR) AVERTISSEMENT! RISQUE D’ETOUFFEMENT! Ce produit contient des petites pièces, qui pourraient être avalées par des enfants. Il y a un RISQUE D’ETOUFFEMENT. (NL) WAARSCHUWING! VERSTIKKINGSGEVAAR! Dit product bevat kleine onderdelen die door kinderen kunnen worden ingeslikt! Er bestaat VERSTIKKINGSGEVAAR! (IT) ATTENZIONE! PERICOLO DI SOFFOCAMENTO! Il prodotto contiene piccoli particolari che potrebbero venire ingoiati dai bambini! PERICOLO DI SOFFOCAMENTO! (ES) ADVERTENCIA! Hay RIESGO DE AXFISIA! Este producto contiene piezas pequeñas que un niño podría tragarse. Hay RIESGO DE AXFISIA (RU) Внимание! опасность УДУШЕНИЯ! Данное устройство содержит мелкие детали, которые дети могут проглотить. Существует опасность УДУШЕНИЯ! NIEBEZPIECZEŃSTWO UDUSZENIA SIĘ! Dzieci powinny używać urządzenia wyłącznie pod nadzorem osoby dorosłej. Materiały, z których wykonano opakowanie (worki plastikowe, gumki, itd.), przechowywać w miejscu niedostępnym dla dzieci! Istnieje NIEBEZPIECZEŃSTWO UDUSZENIA SIĘ! 2 DE Bedienungsanleitung ������������������������������������������ 4 EN Operating instructions ���������������������������������������� 7 FR Mode d’emploi.................................................... 10 NL Handleiding......................................................... 13 IT Istruzioni per l’uso............................................. 16 ES Instrucciones de uso......................................... 19 RU Руководство по эксплуатации ���������������������� 22 PL Instrukcja obsługi............................................... 25 DE B C D J E F G 1@ H I 1) 1# 1! 1$ 3 Allgemeine Warnhinweise • ERSTICKUNGSGEFAHR! Dieses Produkt beinhaltet Kleinteile, die von Kindern verschluckt werden können! Es besteht ERSTICKUNGSGEFAHR! • GEFAHR eines STROMSCHLAGS! Dieses Gerät beinhaltet Elektronikteile, die über eine Stromquelle (Batterien) betrieben werden. Lassen Sie Kinder beim Umgang mit dem Gerät nie unbeaufsichtigt! Die Nutzung darf nur, wie in der Anleitung beschrieben, erfolgen, andernfalls besteht GEFAHR eines STROMSCHLAGS! • BRAND-/EXPLOSIONSGEFAHR! Setzen Sie das Gerät keinen hohen Temperaturen aus. Benutzen Sie nur die empfohlenen Batterien. Gerät und Batterien nicht kurzschließen oder ins Feuer werfen! Durch übermäßige Hitze und unsachgemäße Handhabung können Kurzschlüsse, Brände und sogar Explosionen ausgelöst werden! • VERÄTZUNGSGEFAHR! Batterien gehören nicht in Kinderhände! Achten Sie beim Einlegen der Batterie auf die richtige Polung. Ausgelaufene oder beschädigte Batterien verursachen Verätzungen, wenn Sie mit der Haut in Berührung kommen. Benutzen Sie gegebenenfalls geeignete Schutzhandschuhe. • Bauen Sie das Gerät nicht auseinander! Wenden Sie sich im Falle eines Defekts an Ihren Fachhändler. Er nimmt mit dem Service-Center Kontakt auf und kann das Gerät ggf. zwecks Reparatur einschicken. • Für die Arbeit mit diesem Gerät werden häufig scharfkantige und spitze Hilfsmittel eingesetzt. Bewahren Sie deshalb dieses Gerät sowie alle Zubehörteile und Hilfsmittel an einem für Kinder unzugänglichen Ort auf. Es besteht VERLETZUNGSGEFAHR! Teileübersicht 1. 2. 3. 4. 5. 6. 7. 8. 9. 10. 11. 12. 13. 14. Okular Scharfeinstellungsrad Revolverkopf mit Objektiven Objekttisch Spiegel Elektrische Beleuchtung Fuß mit Batteriehalterung Gummifuß Mikroskop-Arm Dauerpräparate Deckgläser Sammelbehälter Ersatzglühlampe Mikroskop-Besteck 1. Was ist ein Mikroskop? Das Mikroskop besteht aus zwei Linsen-Systemen: Dem Okular und dem Objektiv. Wir stellen uns, damit es einfacher zu verstehen ist, diese Systeme als je eine Linse vor. In Wirklichkeit bestehen aber sowohl das Okular (1) als auch die Objektive im Revolver (3) aus mehreren Linsen. Die untere Linse (Objektiv) vergrößert das Präparat (10) und es entsteht dabei eine vergrößerte Abbildung dieses Präparates. Dieses Bild, welches man nicht sieht, wird von der zweiten Linse (Okular, 1) nochmals vergrößert und dann siehst du das „Mikroskop-Bild“. 4 DE 2. Aufbau und Standort Bevor du beginnst, wählst du einen geeigneten Standort zum Mikroskopieren aus. Zum einen ist es wichtig, dass genügend Licht da ist, zum anderen empfiehlt es sich, das Mikroskop auf eine stabile Unterlage zu stellen, da sich auf einem wackeligen Untergrund keine zufrieden stellenden Ergebnisse erzielen lassen. 3. Normale Beobachtung Für die normale Beobachtung stellst du das Mikroskop an einen hellen Platz (Fenster, Tischlampe). Nimm dazu das Mikroskop aus der Verpackung und kippe den Mikroskop-Arm (9) in eine für dich bequeme Beobachtungsposition. Das Scharfeinstellungsrad (2) wird bis zum oberen Anschlag gedreht und der Objektiv-Revolver (3) wird auf die kleinste Vergrößerung eingestellt. Schau nun durch das Okular und stelle den Spiegel (5) so ein, dass du einen gleichmäßig hellen Lichtkreis erhältst. Oder benutze die elektrische Beleuchtung (6). Zur Beleuchtung findest du weitere Tipps im nächsten Abschnitt. Jetzt schiebst du ein Dauerpräparat (10) unter die Klemmen auf dem Objekttisch (4), genau unter das Objektiv. Wenn du nun durch das Okular blickst, siehst du das vergrößerte Präparat. Es ist vielleicht ein noch etwas verschwommenes Bild. Die Bildschärfe wird durch langsames Drehen am Scharfeinstellungsrad (2) eingestellt. Nun kannst du eine höhere Vergrößerung auswählen, indem du den Objektiv-Revolver drehst und auf ein anderes Objektiv einstellst. Bei veränderter Vergrößerung muss die Bildschärfe neu eingestellt werden und je höher die Vergrößerung, desto mehr Licht wird für eine gute Bildausleuchtung benötigt. TIPP: Vermeide bei der Spiegel-Ausrichtung den Einfall von direktem Sonnenlicht, da dieses blendet und so kein klares Bild zu erhalten ist. 4. Betrachtung (Elektrische Beleuchtung) Zur Beobachtung mit der elektrischen Beleuchtung (6) benötigst du die zwei 1,5 V Batterien vom Typ AA, die in den Mikroskop-Fuß (7) eingesetzt werden. Nun entfernst du den Gummifuß (8) am Mikroskop und setzt die Batterien gemäß der angezeigten +/- Angabe ein. Der Gummifuß wird wieder aufgesetzt. Die Beleuchtung wird eingeschaltet, indem du die Beleuchtung in Richtung des Objekttisches (4) drehst. Schau durch das Okular und stelle jetzt die Beleuchtung so ein, dass du eine optimale Bildhelligkeit erreichst. Jetzt kannst du auf die gleiche Weise wie unter Punkt 3 (Normale Beobachtung) beschrieben eine Beobachtung vornehmen. Die Birne (Glühlampe) der elektrischen Beleuchtung kann ausgetauscht werden. Eine Ersatzglühlampe (13) ist dabei. Wenn du andere Glühlampen verwendest, beachte die maximale Wattzahl, die auf dem Lampenkörper angegeben ist. TIPP: Je höher die eingestellte Vergrößerung, desto mehr Licht wird für eine gute Bildausleuchtung benötigt. Beginne deshalb deine Experimente immer mit einer kleinen Vergrößerung. 5 Hinweise zur Reinigung • Trennen Sie das Gerät vor der Reinigung von der Stromquelle (Netzstecker ziehen oder Batterien entfernen)! • Reinigen Sie das Gerät nur äußerlich mit einem trockenen Tuch. Benutzen Sie keine Reinigungsflüssigkeit, um Schäden an der Elektronik zu vermeiden. • Schützen Sie das Gerät vor Staub und Feuchtigkeit! • Entfernen Sie Batterien aus dem Gerät, wenn es längere Zeit nicht benutzt wird! EG-Konformitätserklärung Eine „Konformitätserklärung“ in Übereinstimmung mit den anwendbaren Richtlinien und entsprechenden Normen ist von der Bresser GmbH erstellt worden. Der vollständige Text der EG-Konformitätserklärung ist unter der folgenden Internetadresse verfügbar: www.bresser.de/download/9118002/CE/9118002_CE.pdf Entsorgung Entsorgen Sie die Verpackungsmaterialien sortenrein. Beachten Sie bitte bei der Entsorgung des Geräts die aktuellen gesetzlichen Bestimmungen. Informationen zur fachgerechten Entsorgung erhalten Sie bei den kommunalen Entsorgungsdienstleistern oder dem Umweltamt. Werfen Sie Elektrogeräte nicht in den Hausmüll! Gemäß der Europäischen Richtlinie 2002/96/EG über Elektro- und Elektronik-Altgeräte und deren Umsetzung in nationales Recht müssen verbrauchte Elektrogeräte getrennt gesammelt und einer umweltgerechten Wiederverwertung zugeführt werden. Entladene Altbatterien und Akkus müssen vom Verbraucher in Batteriesammelgefäßen entsorgt werden. Informationen zur Entsorgung alter Geräte oder Batterien, die nach dem 01.06.2006 produziert wurden, erfahren Sie beim kommunalen Entsorgungsdienstleister oder Umweltamt. Batterien und Akkus dürfen nicht im Hausmüll entsorgt werden, sondern Sie sind zur Rückgabe gebrauchter Batterien und Akkus gesetzlich verpflichtet. Sie können die Batterien nach Gebrauch entweder in unserer Verkaufsstelle oder in unmittelbarer Nähe (z.B. im Handel oder in kommunalen Sammelstellen) unentgeltlich zurückgeben. Batterien und Akkus sind mit einer durchgekreuzten Mülltonne sowie dem chemischen Symbol des Schadstoffes bezeichnet. Batterie enthält Cadmium Batterie enthält Quecksilber 3 Batterie enthält Blei 1 2 Cd¹ Hg² Pb³ Garantie & Service Die reguläre Garantiezeit beträgt 5 Jahre und beginnt am Tag des Kaufs. Die vollständigen Garantiebedingungen sowie Informationen zu Garantiezeitverlängerung und Serviceleistungen können Sie unter www.bresser.de/garantiebedingungen einsehen. 6 EN General Warnings • Choking hazard — This product contains small parts that could be swallowed by children. This poses a choking hazard. • Risk of electric shock — This device contains electronic components that operate via a power source (power supply and/or batteries). Only use the device as described in the manual, otherwise you run the risk of an electric shock. • Risk of fire/explosion — Do not expose the device to high temperatures. Use only the recommended batteries. Do not short-circuit the device or batteries, or throw them into a fire. Excessive heat or improper handling could trigger a short-circuit, a fire or an explosion. • Risk of chemical burn — Make sure you insert the batteries correctly. Empty or damaged batteries could cause burns if they come into contact with the skin. If necessary, wear adequate gloves for protection. • Do not disassemble the device. In the event of a defect, please contact your dealer. The dealer will contact the Service Centre and can send the device in to be repaired, if necessary. • Tools with sharp edges are often used when working with this device. Because there is a risk of injury from such tools, store this device and all tools and accessories in a location that is out of the reach of children. Parts overview 1. 2. 3. 4. 5. 6. 7. 8. 9. 10. 11. 12. 13. 14. Eyepiece Focus knob Objective turret Stage Mirror Electronic light source Base with battery compartment Rubber base Microscope arm Prepared slides Cover plates Reservoir Replacement bulb Microscope instruments 1. What is a microscope? A microscope contains two lens systems: the eyepiece and the objective. We’re presenting these systems as one lens each so that the concept is easier to understand. In reality, however, the eyepiece (1) and the objective in the turret (3) are made up of multiple lenses. The lower lens (objective) produces a magnified image of the prepared specimen (10). The picture, which you can’t see, is magnified once more by the second lens (eyepiece, 1), which you can see as the 'microscope picture'. 7 2. Assembly and location Before you start, choose an ideal location for using your microscope. It’s important that you choose a spot with enough light for normal observation. Furthermore, it is recommended that you place the microscope on a stable surface, because a shaky surface will not lead to satisfactory results. 3. Normal observation For normal observation, place the microscope in a bright location (near a window or desk lamp, for example). Remove the microscope from the package and tilt the microscope arm (9) so that it’s in a comfortable viewing position for you. Turn the focus knob (2) to the upper stop, and set the objective turret (3) to the lowest magnification. Now, take a look through the eyepiece and adjust the mirror (5) so that you see a uniform bright circle of light. Or, you can use the electronic light source (6). You’ll find further tips about the light source in the next section. Now, place a prepared slide (10) under the clips on the stage (4), directly under the objective. When you take a look through the eyepiece, you can see the magnified specimen. At this point, you still might see a slightly fuzzy picture. Adjust the image sharpness by slowly turning the focus knob (2). You can now select a higher magnification by turning the objective turret and selecting a different objective. When you do so, note that the sharpness of the picture must be adjusted again for the higher magnification. Also, the higher the magnification, the more light you will need for good illumination of the picture. TIP: Avoid positioning the mirror so that it is exposed to direct sunlight, since it can cause a glare, which won’t allow you to get a clear picture. 4. Observation (electronic light source) To use the electronic light source (6), you need to install two 1.5 V AA batteries in the base of the microscope (7). Remove the rubber base (8) on the microscope and insert the batteries according to the displayed +/- information. Reattach the rubber base to the microscope. You can turn on the light by rotating it in the direction of the stage (4). Take a look through the eyepiece and adjust the light so that you get optimal picture brightness. Now you can observe in the same way as described in the previous section. The bulbs for the electronic light can be replaced. One replacement bulb (13) is included. When you use another bulb, make sure to pay attention to the maximum wattage, which is displayed on the lamp body. TIP: The higher the magnification you use the more light is required for a good illumination of the picture. Therefore, always start your experiments with a low magnification. 8 EN Notes on Cleaning • Before cleaning the device, disconnect it from the power supply by removing the plug or batteries. • Only use a dry cloth to clean the exterior of the device. To avoid damaging the electronics, do not use any cleaning fluid. • Protect the device from dust and moisture. • The batteries should be removed from the unit if it has not been used for a long time. EC Declaration of Conformity Bresser GmbH has issued a "Declaration of Conformity" in accordance with applicable guidelines and corresponding standards. The full text of the EU declaration of conformity is available at the following internet address: www.bresser.de/download/9118002/CE/9118002_CE.pdf Disposal Dispose of the packaging materials properly, according to their type, such as paper or cardboard. Contact your local waste-disposal service or environmental authority for information on the proper disposal. Do not dispose of electronic devices in the household garbage! As per Directive 2002/96/EC of the European Parliament on waste electrical and electronic equipment and its adaptation into German law, used electronic devices must be collected separately and recycled in an environmentally friendly manner. Empty, old batteries must be disposed of at battery collection points by the consumer. You can find out more information about the disposal of devices or batteries produced after 6 January 2006 from your local waste-disposal service or environmental authority. In accordance with the regulations concerning batteries and rechargeable batteries, disposing of them in the normal household waste is explicitly forbidden. Please make sure to dispose of your used batteries as required by law — at a local collection point or in the retail market. Disposal in domestic waste violates the Battery Directive. Batteries that contain toxins are marked with a sign and a chemical symbol. battery contains cadmium battery contains mercury 3 battery contains lead 1 2 Cd¹ Hg² Pb³ Warranty and Service The regular guarantee period is 5 years and begins on the day of purchase. You can consult the full guarantee terms as well as information on extending the guarantee period and details of our services at www.bresser.de/warranty_terms. 9 Consignes générales de sécurité • RISQUE D’ETOUFFEMENT! Ce produit contient des petites pièces, qui pourraient être avalées par des enfants. Il y a un RISQUE D’ETOUFFEMENT. • RISQUE D’ELECTROCUTION ! Cet appareil contient des pièces électroniques raccordées à une source d’alimentation électrique (par bloc d’alimentation et/ou batteries). L’utilisation de l’appareil doit se faire exclusivement comme décrit dans ce manuel, faute de quoi un RISQUE d’ELECTROCUTION peut exister ! • RISQUE D’EXPLOSION / D’INCENDIE ! Ne pas exposer l’appareil à des températures trop élevées. N’utilisez que les batteries conseillées. L’appareil et les batteries ne doivent pas être court-circuitées ou jeter dans le feu ! Toute surchauffe ou manipulation inappropriée peut déclencher courts-circuits, incendies voire conduire à des explosions ! • RISQUE DE BLESSURE ! En équipant l’appareil des batteries, il convient de veiller à ce que la polarité des batteries soit correcte. Les batteries endommagées ou ayant coulées causent des brûlures par acide, lorsque les acides qu’elles contiennent entrent en contact direct avec la peau. Le cas échéant, il convient d’utiliser des gants de protection adaptés. • Ne pas démonter l’appareil ! En cas de défaut, veuillez vous adresser à votre revendeur spécialisé. Celui-ci prendra contact avec le service client pour, éventuellement, envoyer l’appareil en réparation. • L’utilisation de cet appareil exige souvent l’utilisation d’accessoires tranchants et/ou pointus. Ainsi, il convient de conserver l’appareil et ses accessoires et produits à un endroit se trouvant hors de la portée des enfants. RISQUES DE BLESSURES ! Vue d'ensemble des pièces 1. 2. 3. 4. 5. 6. 7. 8. 9. 10. 11. 12. 13. 14. Oculaire Molette de mise au point Tourelle porte-objectifs Platine avec pinces Miroir Eclairage électrique Pied avec support piles Pied en caoutchouc Potence du microscope Lames porte-objet Lamelles Récipient Ampoule de rechange Ustensiles pour microscope 1. Qu’est ce qu’un microscope ? Le microscope est composé de deux lots de lentilles : l’oculaire et l’objectif. Pour simplifier, nous allons considérer que chaque lot n’a qu’une seule lentille. En vérité, l’oculaire (1), tout comme les objectifs sur la tourelle (3), sont des groupes de lentilles. La lentille inférieure (objectif) grossit l’objet (10) et permet d’obtenir une reproduction agrandie de celui-ci. Cette image, qui n’est pas encore visible, est à nouveau grossie par la seconde lentille (oculaire 1) et apparaît alors comme «image microscopique». 10 FR 2. Montage et mise en place Avant de commencer, cherche une place adaptée pour ton microscope. D’une part, il est important que cet endroit soit bien éclairé. De plus, je te conseille de poser le microscope sur un emplacement stable étant donné qu’il est impossible d’obtenir un bon résultat sur une base qui bouge. 3. Observation normale Pour une observation normale, tu dois poser ton microscope sur un emplacement bien éclairé (près d’une fenêtre ou d’une lampe). Retire ton microscope de l’emballage et incline la potence du microscope (9) pour que tu aies une position confortable lors des observations. La molette de mise au point (2) doit être vissée jusqu’à sa butée supérieure et le porte-objectifs réglé sur le plus petit grossissement. Regarde à travers l’oculaire et positionne le miroir (5) de façon à obtenir un rond d’une clarté régulière. Ou bien, utilise la lampe (6). En ce qui concerne la lampe, tu trouveras d’autres conseils dans le chapitre suivant. Glisse maintenant une lamelle porte-objet (11) sous la pince sur la platine (4) exactement au-dessous de l’objectif. Lorsque tu regardes à travers l’oculaire, tu vois ton échantillon grossi. L’image est éventuellement encore floue. Le réglage de la netteté se fait en tournant doucement la molette de mise au point (2). Maintenant, tu peux choisir un grossissement plus important en tournant le porte-objectifs et en choisissant ainsi un autre objectif. Après le changement du grossissement, tu dois à nouveau faire une mise au point et, plus le grossissement est important, plus le besoin en lumière est important pour obtenir un bon éclairage de l’échantillon. Conseil : évite d’orienter le miroir vers les rayons du soleil, ils éblouissent et ne permettent pas d’obtenir une image nette. 4. Observation (Eclairage électrique) Pour l’observation avec l’éclairage électrique (6), tu as besoin de deux piles AA (1,5V) que tu dois placer dans le pied du microscope (7). Retire le pied en caoutchouc (8) du microscope et positionne les piles en respectant le + et le – comme indiqué. Ensuite, le pied en caoutchouc doit être remis en place. L’éclairage s’allume lorsque tu tournes la lampe en direction de la table des objectifs (4). Regarde à travers l’oculaire et règle l’éclairage de façon à obtenir une clarté optimale. Maintenant, tu peux faire une observation de la même manière qu’indiqué dans le chapitre 1.3 (observation normale). L’ampoule de l’éclairage électrique peut être changée. Une ampoule de rechange (13) est comprise dans la boîte. Si tu utilises d’autres ampoules, tu dois respecter la puissance maximale indiquée sur la douille de l’ampoule. Conseil : plus le grossissement est important, plus le besoin en lumière est important pour obtenir un bon éclairage de l’échantillon. Commence donc toujours tes expériences avec le plus petit grossissement. 11 REMARQUE concernant le nettoyage • Avant de nettoyer l’appareil, veuillez le couper de son alimentation électrique (tirez le câble d’alimentation ou enlevez les batteries) ! • Ne nettoyez l’appareil que de l’extérieur en utilisant un chiffon sec. Ne pas utiliser de liquides de nettoyage, afin d’éviter d’endommager les parties électroniques. • Protégez l’appareil de la poussière et de l’humidité ! • Les batteries doivent être retirées de l’appareil lorsque celui-ci est destiné à ne pas être utilisé un certain temps. Déclaration de conformité CE Bresser GmbH a émis une « déclaration de conformité » conformément aux lignes directrices applicables et aux normes correspondantes. Le texte complet de la déclaration UE de conformité est disponible a l’adresse internet suivante: www.bresser.de/download/9118002/CE/9118002_CE.pdf ELIMINATION Eliminez l’emballage en triant les matériaux. Pour plus d’informations concernant les règles applicables en matière d’élimination de ce type des produits, veuillez vous adresser aux services communaux en charge de la gestion des déchets ou de l’environnement. Ne jamais éliminer les appareils électriques avec les ordures ménagères ! Conformément à la directive européenne 2002/96/CE sur les appareils électriques et électroniques et ses transpositions aux plans nationaux, les appareils électriques usés doivent être collectés séparément et être recyclés dans le respect des réglementations en vigueur en matière de protection de l’environnement. Les batteries déchargées et les accumulateurs usés doivent être apportés par leurs utilisateurs dans les points de collecte prévus à cet effet. Pour plus d’informations concernant les règles applicables en matière d’élimination des batteries produites après la date du 01.06.2006, veuillez vous adresser aux services communaux en charge de la gestion des déchets ou de l’environnement. En conformité avec les règlements concernant les piles et les piles rechargeables, jeter ces produits avec les déchets ménagers normaux est strictement interdit. Veuillez à bien déposer vos piles usagées dans des lieux prévus à cet effet par la Loi, comme un point de collecte locale ou dans un magasin de détail (une élimination de ces produits avec les déchets domestiques constituerait une violation des directives sur les piles et batteries). Les piles qui contiennent des toxines sont marquées avec un signe et un symbole chimique. pile contenant du cadmium pile contenant du mercure 3 pile contenant du plomb 1 2 Cd¹ Hg² Pb³ Garantie et Service La durée normale de la garantie est de 5 ans à compter du jour de l’achat. Vous pouvez consulter l’intégralité des conditions de garantie ainsi que les informations concernant la prolongation de la garantie et les prestations de service sur www.bresser.de/warranty_terms. 12 NL Algemene waarschuwingen • VERSTIKKINGSGEVAAR! Dit product bevat kleine onderdelen die door kinderen kunnen worden ingeslikt! Er bestaat VERSTIKKINGSGEVAAR! • GEVAAR VOOR ELEKTRISCHE SCHOK! Dit toestel bevat elektronische onderdelen die door een elektriciteitsbron (voeding en/of batterijen) worden gevoed. Het toestel mag alleen gebruikt worden zoals in de handleiding wordt beschreven, anders bestaat er GEVAAR op een STROOMSTOOT! • BRAND-/EXPLOSIEGEVAAR! Stel het apparaat niet bloot aan hoge temperaturen. Gebruik uitsluitend de aanbevolen batterijen. Sluit het apparaat en de batterijen niet kort en gooi deze niet in het vuur! Te hoge temperaturen en ondeskundig gebruik kunnen leiden tot kortsluitingen, branden en zelfs explosies! • GEVAAR VOOR INBRANDEND ZUUR! Let bij het plaatsen van de batterijen op de juiste richting van de polen. Lekkende of beschadigde batterijen veroorzaken irritaties wanneer deze met de huid in aanraking komen. Gebruik in dat geval alleen hiervoor goedgekeurde beschermingshandschoenen. • Neem het toestel niet uit elkaar! Neem bij defecten a.u.b. contact op met de verkoper. Deze zal contact opnemen met een servicecenter en kan het toestel indien nodig voor reparatie terugsturen. • Tijdens het gebruik van dit toestel worden regelmatig scherpe hulpmiddelen gebruikt. Bewaar dit toestel en alle toebehoren en hulpmiddelen dus op een voor kinderen ontoegankelijke plaats. Er bestaat GEVAAR VOOR VERWONDINGEN! Onderdelen lijst 1. 2. 3. 4. 5. 6. 7. 8. 9. 10. 11. 12. 13. 14. Oculair Scherpteregeling Revolverkop met objectieven Objecttafel Spiegel Elektrische verlichting Voet met batterijhouder Rubberen voet Microscoop-arm Preparaten voor meermalig gebruik Dekglaasjes Container Reservelampje Microscoopbestek 1. Wat is een microscoop? De microscoop bestaat uit twee lenssystemen: het oculair en het objectief. Om het gemakkelijker te maken, stellen wij ons deze systemen elk als één lens voor. In werkelijkheid bestaan echter zowel het oculair (1) als de objectieven in de revolver (3) uit meerdere lenzen. De onderste lens (het objectief) vergroot het preparaat (10) en er ontstaat een vergrote afbeelding van het preparaat. Dit beeld, dat je niet ziet, wordt door de tweede lens (het oculair, (1) nog eens vergroot en dan zie je het „microscoop-beeld“. 13 2. Waar en hoe zet je de microscoop neer? Voordat je begint, kies je een geschikte plaats uit, om met de microscoop te kunnen werken. Aan de ene kant is het belangrijk dat er voldoende licht is. Verder adviseer ik, de microscoop op een stabiele ondergrond neer te zetten, omdat je op een wiebelende ondergrond geen goede resultaten kunt krijgen. 3. Normale observatie Voor de normale observatie zet je de microscoop op een goed verlichte plaats (raam, bureaulamp). Neem de microscoop uit de verpakking en kantel de microscoop-arm (9) in een voor jou gemakkelijke observatie-positie. Draai de scherpteregeling (2) tot aan de bovenste aanslag en stel de objectiefrevolver (3) op de kleinste vergroting in. Kijk nu door het oculair en stel de spiegel (5) zo in, dat je een gelijkmatig verlichte kring van licht krijgt. Of gebruik het lampje (6). Over het lampje wordt meer verteld in het stukje hierna. Nu schuif je een duurzaam preparaat (10) onder de klemmen op de objecttafel (4), precies onder het objectief. Wanneer je door het oculair kijkt, zie je nu het uitvergrote preparaat. Het beeld zal eerst nog wazig zijn. De scherpte stel je in, door langzaam aan de scherpteregeling te draaien. Nu kun je een hogere vergroting kiezen, doordat je aan de objectiefrevolver draait en een ander objectief voor het oculair haalt. Als je de vergrotingsfactor verandert, moet je ook de scherpte opnieuw instellen, en hoe hoger de vergroting, hoe meer licht er nodig is om de afbeelding goed te kunnen bekijken. TIP: Vermijd bij het uitrichten van de spiegel de inval van direct zonlicht, omdat dit verblind en je zo geen goed beeld kunt krijgen. 4. Observatie (Elektrische verlichting) Om met het elektrisch licht (6) te kunnen werken, heb je twee AA batterijen van 1,5 V nodig, die in de voet van de microscoop (7) worden geplaatst. Verwijder de rubberen voet (8) van de microscoop en plaats de batterijen volgens de +/- markering. Doe de rubberen voet weer op zijn plaats. De verlichting gaat aan, als je lamp in de richting van de objecttafel (4) draait. Kijk door het oculair en stel de lamp zo in, dat je een optimaal verlicht beeld krijgt. Nu kun je op dezelfde manier een observatie uitvoeren als onder punt 1.3 beschreven (Normale observatie). De peer (gloeilamp) van de elektrische verlichting kan worden vervangen. Er zit ook een reservepeertje (13) bij de set. Let bij de aankoop van nieuwe gloeilampen op het maximaal toegestane aantal Watt. Hoeveel dat is, staat op de gloeilamp zelf aangegeven. TIP: Hoe hoger de ingestelde vergrotingsfactor, des te meer licht er voor een goed belicht beeld nodig is. Begin daarom altijd eerst met een geringe vergroting te experimenteren. TIPS voor reiniging • Koppel het toestel los van de stroomvoorziening (stekker uit het stopcontact halen en/of batterijen verwijderen) voordat u het reinigt! • Reinig het toestel alleen uitwendig met een droge doek. Gebruik geen vloeistoffen, om schade aan de elektronica te vermeiden. • Bescherm het toestel tegen stof en vocht! • Verwijder de batterijen uit het toestel wanneer deze langere tijd niet gebruikt wordt. 14 NL EC verklaring van overeenstemming Een “conformiteitsverklaring” in overeenstemming met de van toepassing zijnde richtlijnen en overeenkomstige normen is door Bresser GmbH afgegeven. Deze kan elk moment op aanvraag worden ingezien. De volledige tekst van de EG-verklaring van overeenstemming is beschikbaar op het volgende internetadres: www.bresser.de/download/9118002/CE/9118002_CE.pdf AFVAL Scheid het verpakkingsmateriaal voordat u het weggooit. Informatie over het correct scheiden en weggooien van afval kunt u bij uw gemeentelijke milieudienst inwinnen. Gooi elektronische apparaten niet bij het huisvuil! Volgens de Europese richtlijn 2002/96/EG over elektrische en elektronische apparaten en de toepassing hiervan in nationale wetten moeten afgedankte elektrische apparaten gescheiden worden ingezameld en op milieuvriendelijke wijze worden afgevoerd. Lege batterijen en accu’s moeten door de gebruiker in een batterijenverzamelbak worden weggegooid. Informatie over het weggooien van oude apparaten en batterijen, die na 01-06-2006 zijn geproduceerd, kunt u bij uw gemeentelijke milieudienst inwinnen. Batterijen en accu’s mogen niet worden weggegooid in de vuilnisbak. U bent wettelijk verplicht om gebruikte batterijen in te leveren. U kunt de gebruikte batterijen in onze winkel of in de onmiddellijke omgeving, bijv. bij gemeentelijke Inzamelpunten gratis inleveren. Batterijen en accu’s zijn gemarkeerd met een doorgestreepte vuilnisbak en het chemische symbool van de verontreinigingende stoffen. batterij bevat cadmium batterij bevat kwik 3 accu bevat lood 1 2 Cd¹ Hg² Pb³ Garantie & Service De reguliere garantieperiode bedraagt 5 jaar en begint op de dag van aankoop. De volledige garantievoorwaarden en informatie over de verlenging van de garantieperiode en servicediensten kunt u bekijken op www.bresser.de/warranty_terms. 15 Avvertenze di sicurezza generali • PERICOLO DI SOFFOCAMENTO! Il prodotto contiene piccoli particolari che potrebbero venire ingoiati dai bambini! PERICOLO DI SOFFOCAMENTO! • RISCHIO DI FOLGORAZIONE! Questo apparecchio contiene componenti elettronici azionati da una sorgente di corrente (alimentatore e/o batterie). L’utilizzo deve avvenire soltanto conformemente a quanto descritto nella guida, in caso contrario esiste il PERICOLO di SCOSSA ELETTRICA! • PERICOLO DI INCENDIO/ESPLOSIONE! Non esporre l’apparecchio a temperature elevate. Utilizzare esclusivamente le batterie consigliate. Non cortocircuitare o buttare nel fuoco l‘apparecchio e le batterie! Un surriscaldamento oppure un utilizzo non conforme può provocare cortocircuiti, incendi e persino esplosioni! • RISCHIO DI CORROSIONE! Per inserire le batterie rispettare la polarità indicata. Le batterie scariche o danneggiate possono causare irritazioni se vengono a contatto con la pelle. Se necessario indossare un paio di guanti di protezione adatto. • Non smontare l’apparecchio! In caso di guasto, rivolgersi al proprio rivenditore specializzato. Egli provvederà a contattare il centro di assistenza e se necessario a spedire l’apparecchio in riparazione. • Per l’utilizzo di questo apparecchio vengono spesso utilizzati strumenti appuntiti e affilati. Pertanto, conservare l’apparecchio e tutti gli accessori e strumenti fuori dalla portata dei bambini. PERICOLO DI LESIONE! Sommario 1. 2. 3. 4. 5. 6. 7. 8. 9. 10. 11. 12. 13. 14. Oculare Ghiera della messa a fuoco Torretta portaobiettivi con obiettivi Tavolino portaoggetti Specchio Illuminazioni elettrica Base con supporto per batterie Piede in gomma Braccio del microscopio Vetrini preparati Coprivetrini Recipiente di raccolta Lampadina ad incandescenza di ricambio Set di attrezzi da microscopia 1. Che cos’è un microscopio? Il microscopio consiste in due sistemi di lenti: l’oculare e l’obiettivo. Per semplificare la spiegazione supponiamo che entrambi questi sistemi siano costituiti da una lente sola. In realtà tanto l’oculare (1) quanto gli obiettivi (2) nella torretta portaobiettivi (3) sono costituiti da più lenti. La lente inferiore (obiettivo) ingrandisce il preparato (10) e si genera così un’immagine ingrandita del preparato. Questa immagine, che in realtà non si vede, viene ulteriormente ingrandita da una seconda lente (oculare, 1). Questa è quindi l’immagine che vedi al microscopio. 16 IT 2. Struttura e ubicazione Prima di cominciare, scegli una posizione adatta per effettuare le tue osservazioni al microscopio. Da una parte, è importante che ci sia luce a sufficienza. Inoltre ti consigliamo di posizionare il microscopio su un piano di appoggio stabile perché altrimenti eventuali movimenti oscillatori potrebbero compromettere i risultati dell’osservazione. 3. Osservazione normale Per effettuare una normale osservazione posiziona il microscopio in un posto luminoso (vicino ad una finestra o ad una lampada da tavolo). Estrai il microscopio dall‘imballaggio e piega il braccio del microscopio (9) fino a raggiungere una posizione che ti sia comoda.Gira verso l’alto la ghiera di regolazione della messa a fuoco (2) fino all’arresto e regola la torretta portaobiettivi (3) sull’ingrandimento minore. Guarda attraverso l’oculare e regola lo specchio (5) in modo tale da ottenere un cerchio di luce uniformemente luminoso oppure utilizza l’illuminazione elettrica (6) del microscopio. Su questo argomento troverai ulteriori suggerimenti al capitolo successivo. Spingi un vetrino preparato (10) sotto le clip del tavolino portaoggetti (4) e posizionalo esattamente sotto l’obiettivo. Guardando attraverso l’oculare, vedrai il preparato ingrandito. L’immagine potrebbe non essere ancora sufficientemente nitida. Per regolare la messa a fuoco gira lentamente la ghiera (2). Ora puoi scegliere un ingrandimento maggiore, girando la torretta portaobiettivi e utilizzando un altro obiettivo. Ricorda però che quando modifichi l’ingrandimento devi regolare nuovamente la messa a fuoco e che quanto maggiore è l’ingrandimento, tanta più luce è necessaria per ottenere un‘immagine ben illuminata. SUGGERIMENTO: Quando orienti lo specchio evita che la luce solare cada direttamente su di esso, perché altrimenti si crea un riflesso che comprometterà la nitidezza dell’immagine. 4. Osservazione (Illuminazione elettrica) Per effettuare osservazioni con l’illuminazione elettrica (6) hai bisogno di due batterie AA da 1,5 V che vanno inserite nella base del microscopio (7). Rimuovi il piede di gomma (8) dal microscopio e inserisci le batterie nel vano rispettando le polarità (+/-) indicate. Successivamente rimetti il piede di gomma al suo posto. Per accendere l’illuminazione girala verso il tavolino portaoggetti (4). Guarda attraverso l’oculare e regola l’illuminazione in modo tale da raggiungere la luminosità ottimale. Ora, seguendo le istruzioni riportate al punto 1.3 (Osservazione normale), puoi effettuare l’osservazione. La lampadina ad incandescenza dell’illuminazione elettrica può essere sostituita. In dotazione con il microscopio troverai anche una lampadina di ricambio (13). Se utilizzi altre lampadine fa attenzione che il wattaggio stampigliato sul corpo della lampadina corrisponda a quello necessario. SUGGERIMENTO: Quanto maggiore è l’ingrandimento impostato, tanta più luce è necessaria affinché l’immagine sia ben illuminata. Inizia quindi sempre i tuoi esperimenti con un ingrandimento basso. NOTE per la pulizia • Prima di procedere con la pulizia, staccare l’apparecchio dalla sorgente di corrente (staccare il connettore oppure rimuovere le batterie)! • Pulire l’apparecchio soltanto con un panno asciutto. Non utilizzare liquidi detergenti per evitare danni ai componenti elettronici. 17 • Proteggere l’apparecchio dalla polvere e dall’umidità! • Togliere le batterie dall’apparecchio nel caso non venga utilizzato per un periodo prolungato! Dichiarazione di conformità CE Bresser GmbH ha redatto una “dichiarazione di conformità” in linea con le disposizioni applicabili e le rispettive norme. Su richiesta, è visionabile in qualsiasi momento. Il testo integrale della dichiarazione di conformità CE è disponibile al seguente indirizzo Internet: www.bresser.de/download/9118002/CE/9118002_CE.pdf SMALTIMENTO Smaltire i materiali di imballaggio in maniera differenziata. Le informazioni su uno smaltimento conforme sono disponibili presso il servizio di smaltimento comunale o l’Agenzia per l’ambiente locale. Non smaltire gli apparecchi elettronici con i rifiuti domestici! Secondo la Direttiva Europea 2002/96/CE riguardante gli apparecchi elettrici ed elettronici usati e la sua applicazione nel diritto nazionale, gli apparecchi elettronici usati devono essere raccolti in maniera differenziata e destinati al riciclaggio ecologico. Le batterie e gli accumulatori scarichi devono essere smaltiti dall’utilizzatore negli appositi contenitori di raccolta. Le informazioni degli apparecchi o delle batterie usate prodotte dopo il 01.06.2006 sono disponibili presso il servizio di smaltimento o l’Agenzia per l’ambiente locale. Le batterie normali e ricaricabili devono essere correttamente smaltiti come sta previsto dalla legge. È possibile tornare batterie inutilizzati presso il punto di vendita o cedere in centri di raccolta organizzati dai comuni per la raccolta gratuitamente. Le batterie normali e ricaricabili sono contrassegnati con il simbolo corrispondente disposte per lo smaltimento e il simbolo chimico della sostanza inquinante. Batteria contiene cadmio Batteria contiene mercurio 3 Batteria contiene piombo 1 2 Cd¹ Hg² Pb³ Garanzia e assistenza La durata regolare della garanzia è di 5 anni e decorre dalla data dell‘acquisto. Le condizioni complete di garanzia e le informazioni sull‘estensione di garanzia e i servizi di assistenza sono visibili al sito www.bresser.de/warranty_terms. 18 ES Advertencias de carácter general • ¡Existe PELIGRO DE CEGUERA! No mire nunca directamente al sol o cerca de él con este aparato. ¡Existe PELIGRO DE CEGUERA! • ¡Existe PELIGRO DE ASFIXIA! Los niños solo deberían utilizar el aparato bajo supervisión. Mantener los materiales de embalaje (bolsas de plástico, bandas de goma) alejadas del alcance de los niños. ¡Existe PELIGRO DE ASFIXIA! • ¡PELIGRO DE INCENDIO! No exponer el aparato – especialmente las lentes – a la radiación directa del sol. La concentración de la luz puede provocar incendios. • No desmonte el aparato. En caso de que exista algún defecto, le rogamos que se ponga en contacto con su distribuidor autorizado. Este se pondrá en contacto con el centro de servicio técnico y, dado el caso, podrá enviarle el aparato para su reparación. • No exponga el aparato a altas temperaturas. • La aparato están concebidos para el uso privado. Respete la privacidad de las personas de su entorno – por ejemplo, no utilice este aparato para mirar en el interior de viviendas. Resumen 1. 2. 3. 4. 5. 6. 7. 8. 9. 10. 11. 12. 13. 14. Ocular Tornillo micrométrico Cabeza revólver con objetivos Platina Espejo Iluminación eléctrica Pie con soporte para las pilas Pie de goma Brazo de microscopio Preparaciones permanentes Cubiertas de cristal Recipiente colector Lámpara de repuesto Instrumental de microscopio 1. ¿Qué es un microscopio? El microscopio se compone de dos sistemas de lentes: el ocular y el objetivo. Para que sea más fácil de entender, nos representamos estos sistemas como si cada uno fuera una lente. Sin embargo, tanto el ocular (1) como los objetivos que hay en el revólver (3) se componen de varias lentes. La lente inferior (objetivo) aumenta la preparación (10), de modo que se genera una representación aumentada de dicha preparación. Esta imagen, que no se ve, vuelve a ser aumentada por la segunda lente (ocular, 1), y es entonces cuando ves la «imagen de microscopio». 2. Montaje y lugar de observación Antes de empezar debes elegir un lugar apropiado para practicar observaciones con tu microscopio. Por una parte, es importante que haya luz suficiente. Además te recomiendo que coloques el microscopio sobre una base estable, ya que si el soporte se tambalea no se pueden obtener resultados visuales satisfactorios. 19 3. Observación normal Para la observación normal, debes colocar el microscopio en un lugar donde haya claridad (junto una ventana o un flexo). Para ello, extrae el microscopio del embalaje e inclina el brazo del microscopio (9) hasta alcanzar una posición que te resulte cómoda. Gira el tornillo micrométrico (2) hasta el tope superior y ajusta el revólver con objetivos (3) al aumento más pequeño. Mira ahora por el ocular y ajusta el espejo (5) de manera que obtengas un círculo de luz con una claridad uniforme. También puedes utilizar la lámpara (6). Encontrarás más consejos sobre la lámpara en el siguiente apartado. Ahora debes introducir una preparación permanente (10) bajo las pinzas que hay sobre la platina (4), justo debajo del objetivo. Si miras ahora por el ocular, podrás ver la preparación aumentada. Quizá veas la imagen algo difusa todavía. Puedes ajustar la nitidez de imagen girando lentamente el tornillo micrométrico (2). Ahora puedes seleccionar un aumento mayor girando el revólver con objetivos y ajustando un objetivo distinto. Al hacerlo, ten en cuenta que al modificar el aumento también es necesario ajustar de nuevo la nitidez de imagen, y cuanto mayor sea el aumento, más luz se necesitará para que la imagen esté bien iluminada. CONSEJO: Al fijar la orientación del espejo, evita la entrada directa de la luz del sol, ya que deslumbra y no permite obtener una imagen nítida. 4. Observación (Iluminación eléctrica) Para realizar observaciones con la iluminación eléctrica (6) necesitas las dos pilas AA de 1,5 V, que se introducen en el pie (7) del microscopio. Tienes que retirar el pie de goma (8) existente en el microscopio e introducir las pilas según la indicación +/- mostrada. A continuación, coloca de nuevo el pie de goma. La iluminación se enciende girándola en dirección a la platina (4). Mira por el ocular y ajusta la iluminación de modo que obtengas una claridad de imagen óptima. Ahora puedes llevar a cabo una observación del modo que se describe en el punto 1.3 (Observación normal). La bombilla (lámpara) de la iluminación eléctrica puede recambiarse. Se incluye en el suministro una lámpara de repuesto (13). Si utilizas otras lámparas, ten en cuenta el número máximo de vatios que se indica en el cuerpo de la misma. CONSEJO: Cuanto mayor sea el aumento ajustado, mayor cantidad de luz se necesitará para que la imagen tenga una buena iluminación. Por tanto, comienza tus experimentos siempre con un aumento pequeño. INSTRUCCIONES de limpieza • Antes de limpiar el aparato, desconéctelo de la fuente de electricidad (desenchúfelo o quite las pilas). • Limpie solamente el exterior del aparato con un paño seco. No utilice productos de limpieza para evitar daños en el sistema electrónico. • ¡Proteja el aparato del polvo y la humedad! • Se deben retirar las pilas del aparato si no se va a usar durante un periodo prolongado. 20 ES Declaración de conformidad de la Unión Europea (CE) Bresser GmbH ha emitido una "Declaración de conformidad" de acuerdo con las directrices y normas correspondientes. El texto completo de la declaración de conformidad de la UE está disponible en la siguiente dirección de Internet: www.bresser.de/download/9118002/CE/9118002_CE.pdf ELIMINACIÓN Elimine los materiales de embalaje separados por tipos. Obtendrá información sobre la eliminación reglamentaria en los proveedores de servicios de eliminación municipales o en la agencia de protección medioambiental. ¡No elimine los electrodomésticos junto con la basura doméstica! Conforme a la directiva europea 2002/96/UE sobre aparatos eléctricos y electrónicos usados y a su aplicación en la legislación nacional, los aparatos eléctricos usados se deben recoger por separado y conducir a un reciclaje que no perjudique al medio ambiente. Las pilas y baterías descargadas deben ser llevadas por los consumidores a recipientes de recogida para su eliminación. En los proveedores de servicios de eliminación municipales o en la agencia de protección medioambiental podrá obtener información sobre la eliminación de aparatos o pilas usados fabricados después del 01-06-2006. De acuerdo con la normativa en materia de pilas y baterías recargables, está explicitamente prohibido depositarlas en la basura normal. Por favor, preste atención a lo que la normativa obliga cuando usted quiera deshacerse de estos productos - sobre puntos de recogida municipal o en el mercado minorista (disposición sobre violación de la Directiva en materia de los residuos domésticos- pilas y baterías-). Las pilas y baterías que contienen productos tóxicos están marcados con un signo y un símbolo químico. pila que contiene cadmio pila que contiene mercurio 3 pila que contiene plomo 1 2 Cd¹ Hg² Pb³ Garantía y servicio El período regular de garantía es 5 anos iniciándose en el día de la compra. Las condiciones de garantía completas así como informaciones relativas a la ampliación de la garantía y los servicios pueden encontrarse en www.bresser.de/warranty_terms. 21 Общие предупреждения • ОПАСНОСТЬ УДУШЕНИЯ! Данное устройство содержит мелкие детали, которые дети могут проглотить. Существует опасность УДУШЕНИЯ! • ОПАСНОСТЬ ПОРАЖЕНИЯ ЭЛЕКТРОТОКОМ! Данное устройство содержит электронные компоненты, приводимые в действие от источника тока (сетевой адаптер и/или батарейки). Устройство следует использовать только так, как указано в инструкции, иначе есть серьезный риск получить УДАР ТОКОМ. • ОПАСНОСТЬ ПОЖАРА / ВЗРЫВА! Не допускайте нагревания устройства до высокой температуры. Используйте только рекомендованные батарейки. Не закорачивайте устройство и батарейки, не бросайте их в огонь! Перегрев и неправильное обращение могут стать причиной короткого замыкания, пожара и даже взрыва! • ОПАСНОСТЬ ПОЛУЧЕНИЯ ОЖОГА! Исключите доступ детей к батарейкам! При установке/замене батареек соблюдайте полярность. Вытекшие или поврежденные батарейки вызывают раздражения при контакте с кожей. В случае необходимости надевайте подходящие защитные перчатки. • Никогда не разбирайте устройство. При возникновении неисправностей обратитесь к дилеру. Он свяжется с нашим сервисным центром и при необходимости отправит устройство в ремонт. • При пользовании данным устройством может потребоваться применение инструментов с острыми краями. Храните устройство, принадлежности и инструменты в недоступном для детей месте. Существует риск получить ТРАВМУ! Детали микроскопа 1. 2. 3. 4. 5. 6. 7. 8. 9. 10. 11. 12. 13. 14. Окуляр Ручка фокусировки Револьверное устройство Предметный столик Зеркало Подсветка Основание микроскопа с батарейным отсеком Резиновый чехол основания микроскопа Штатив микроскопа Готовые микропрепараты Покровные стекла Флаконы Запасная лампочка Инструменты для работы с препаратами 1. Что такое микроскоп? Микроскоп – это оптическая система, состоящая, в свою очередь, из двух оптических систем (окуляр и объектив). Для простоты понимания можно представить, что и окуляр, и объектив состоят из одной линзы, но на самом деле в каждой из этих деталей нескольких линз. 22 RU Объектив в револьверном устройстве (3) увеличивает изображение микропрепарата (10), а затем полученное изображение увеличивается еще раз в окуляре (1). Следовательно, наблюдая микропрепарат в окуляр, вы видите дважды увеличенное изображение этого микропрепарата. 2. Сборка и установка Прежде чем приступить к наблюдениям, выберите подходящее место для микроскопа. С одной стороны, в комнате должно быть достаточно света для обычных наблюдений. Наконец, не стоит забывать, что микроскоп должен стоять на устойчивой и ровной поверхности. Пожалуй, лучшим местом для размещения микроскопа будет стол у окна со шторами. 3. Обычные наблюдения Поставьте микроскоп в хорошо освещенное место, например, у окна или рядом с настольной лампой. Наклоняя штатив (9), отрегулируйте положение окуляра так, чтобы вам было удобно работать. Выберите объектив (3) с наименьшим увеличением и поворачивайте ручки фокусировки (2) до тех пор, пока оптическая трубка не будет на максимальном расстоянии от предметного столика. Направьте зеркало (5) в сторону окна или настольной лампы и посмотрите в окуляр (1) – вы должны увидеть равномерно освещенный круг. При неравномерном освещении отрегулируйте положение зеркала (5). Вы также можете использовать подсветку (6), об этом подробно написано в следующем разделе. Положите готовый микропрепарат (10) на предметный столик (4), прямо под объектив. Закрепите микропрепарат зажимами. Если вы посмотрите в окуляр, то должны увидеть там увеличенное изображение микропрепарата. Если изображение нечеткое, резкость можно легко настроить, плавно поворачивая ручки фокусировки (2). Теперь вы можете выбрать объектив с большим увеличением и рассмотреть микропрепарат в деталях. Обратите внимание на то, что смена объектива приведет к потере резкости изображения, и вам придется настроить фокус повторно. Также не забывайте, что на большем увеличении потребуется больше света для освещения микропрепарата. Примечание: Старайтесь не подставлять зеркало под прямые солнечные лучи, так как блики от них не дадут вам получить четкого изображения микропрепарата. 4. Электрическое освещение Чтобы воспользоваться электрической подсветкой (6), вам потребуются две батарейки (1,5 В), которые необходимо установить в батарейный отсек в основании микроскопа (7). Снимите резиновый чехол (8) и установите батарейки, соблюдая полярность (это очень важно). Не забудьте надеть резиновый чехол на основание. Чтобы включить освещение, переверните зеркало (5) так, чтобы лампочка смотрела на предметный столик (4). Посмотрите в окуляр и отрегулируйте положение лампочки так, чтобы поле зрения освещалось равномерно. Теперь можно приступать к наблюдениям (процесс наблюдений подробно описан в предыдущем разделе). Если установленная лампочка перегорит, ее легко можно заменить. В комплект поставки входит одна запасная лампочка (13). При покупке дополнительной запасной лампочки обратите внимание на ее мощность, чтобы не повредить систему освещения микроскопа. 23 Примечание: Чем выше увеличение оптической системы, тем больше света требуется для равномерного освещения микропрепарата. Всегда старайтесь начинать наблюдения с меньшего увеличения. СОВЕТЫ по уходу • Перед чисткой отключите устройство от источника питания (выдерните штепсельную вилку из розетки или выньте батарейки)! • Протирайте поверхности устройства сухой салфеткой. Не используйте чистящую жидкость, она может повредить электронные компоненты. • Берегите устройство от пыли и влаги. • Если устройство не будет использоваться в течение длительного времени, выньте из него батарейки! Сертификат соответствия ЕС Bresser GmbH подтверждает соответствие данного изделия нормативным требованиям ЕС. С полным текстом Сертификата соответствия ЕС можно ознакомиться по этой ссылке: www.bresser.de/download/9118002/CE/9118002_CE.pdf УТИЛИЗАЦИЯ Утилизируйте упаковку как предписано законом. При необходимости проконсультируйтесь с местными властями. Не выбрасывайте электронные детали в обычный мусорный контейнер. Европейская директива по утилизации электронного и электрического оборудования 2002/96/EU и соответствующие ей законы требуют отдельного сбора и переработки подобных устройств. Использованные элементы питания следует утилизировать отдельно. Подробную информацию об утилизации электроники можно получить у местных властей. Элементы питания не являются бытовыми отходами, поэтому в соответствии с законодательными требованиями их необходимо сдавать в пункты приема использованных элементов питания. Вы можете бесплатно сдать использованные элементы питания в нашем магазине или рядом с вами (например, в торговых точках или в пунктах приема). На элементах питания изображен перечеркнутый контейнер, а также указано содержащееся ядовитое вещество. Элемент питания содержит кадмий Элемент питания содержит ртуть 3 Элемент питания содержит свинец 1 2 Cd¹ Hg² Pb³ Гарантия и обслуживание Стандартный гарантийный срок составляет 5 года, начиная со дня покупки. Подробные условия гарантии, информацию о расширенной гарантии и о наших сервисных центрах можно получить на нашем сайте www.bresser.de/warranty_terms. 24 PL Ogólne ostrzeżenia • Dzieci powinny używać urządzenia wyłącznie pod nadzorem osoby dorosłej. Materiały, z których wykonano opakowanie (worki plastikowe, gumki, itd.), przechowywać w miejscu niedostępnym dla dzieci! Istnieje NIEBEZPIECZEŃSTWO UDUSZENIA SIĘ! • NIEBEZPIECZEŃSTWO PORAŻENIA PRĄDEM! To urządzenie zawiera części elektroniczne, które są zasilane prądem (baterie). Nigdy nie pozostawiać dzieci bez nadzoru podczas używania urządzenia! Użytkowanie urządzenia może przebiegać wyłącznie w sposób opisany w instrukcji, w przeciwnym razie zachodzi NIEBEZPIECZEŃSTWO PORAŻENIA PRĄDEM! • NIEBEZPIECZEŃSTWO POŻARU / WYBUCHU! Nie narażać urządzenia na działanie wysokich temperatur. Używać wyłącznie zalecanych baterii. Nie wywoływać zwarć urządzenia i baterii ani nie wrzucać ich do ognia! Zbyt wysoka temperatura i niezgodne z przeznaczeniem użytkowanie mogą spowodować zwarcia, pożary, a nawet wybuchy! • NIEBEZPIECZEŃSTWO POPARZENIA CHEMICZNEGO! Baterie należy przechowywać poza zasięgiem dzieci! Podczas wkładania baterii zależy zwrócić uwagę na właściwe położenie biegunów. Kontakt wyczerpanych lub uszkodzonych baterii ze skórą powoduje poparzenia. W razie potrzeby używać odpowiednich rękawic ochronnych. • Nie rozmontowywać urządzenia! W przypadku usterki zwrócić się do profesjonalnego sprzedawcy. On skontaktuje się z centrum obsługi i w razie potrzeby prześle urządzenie do naprawy. • Przy pracy z tym urządzeniem używa się często szpiczastych narzędzi o ostrych krawędziach. Dlatego należy przechowywać urządzenie wraz ze wszystkimi akcesoriami i narzędziami w miejscu niedostępnym dla dzieci. Istnieje NIEBEZPIECZEŃSTWO SKALECZENIA SIĘ! Lista elementów 1. 2. 3. 4. 5. 6. 7. 8. 9. 10. 11. 12. 13. 14. Okular Pokrętło ostrości Rewolwer Stolik Zwierciadło Elektroniczne źródło światła Podstawa z komorą baterii Podstawa gumowa Ramię mikroskopu Preparaty Osłony Pojemnik Zapasowa żarówka Instrumenty mikroskopu 1. Czym jest mikroskop? Mikroskop zawiera dwa układy soczewek: okular i obiektyw. Dla łatwiejszego zrozumienia koncepcji przedstawiamy te układy jako jednosoczewkowe. Jednak w rzeczywistości zarówno okular (1), jak i obiektyw w rewolwerze (3) składają się z wielu soczewek. Dolna soczewka (obiektyw) wyświetla powiększony obraz preparatu (10). Obraz, który nie jest widoczny dla użytkownika, powiększany jest ponownie przez drugą soczewkę (okular, 1) i widoczny jako „obraz mikroskopowy". 25 2. Montaż i umiejscowienie Przed rozpoczęciem użytkowania należy wybrać dogodne miejsce do ustawienia mikroskopu. Ważne, aby wybrane miejsce zapewniało dostateczną ilość światła do normalnej obserwacji. Ponadto zaleca się ustawienie mikroskopu na stabilnej powierzchni, ponieważ niestabilne podłoże nie zapewnia zadowalających warunków obserwacji. 3. Normalna obserwacja Dla celów normalnej obserwacji należy umieścić mikroskop w jasnym miejscu (np. w pobliżu okna lub lampy biurkowej). Należy wyjąć mikroskop z opakowania, a następnie pochylić jego ramię (9), ustawiając je w wygodnej dla siebie pozycji. Obrócić pokrętło ostrości (2) do górnego ogranicznika i ustawić rewolwer (3) na najniższą wartość powiększenia. Następnie spoglądając w okular wyregulować zwierciadło (5) tak, aby widoczne było jednolite jasne kółko światła. Można oczywiście wykorzystać również elektroniczne źródło światła (6). Bliższe informacje na temat źródła światła zawiera następny punkt. Teraz można umieścić preparat na stoliku (4) bezpośrednio pod obiektywem. Obraz widziany przez okular może być jeszcze nieco rozmyty, dlatego obracając powoli pokrętło ostrości (2) należy wyregulować ostrość obrazu. W tym momencie można zwiększyć powiększenie poprzez obrót rewolweru i wybór innego obiektywu. W takim przypadku należy jednak pamiętać o konieczności ponownego ustawienia ostrości. Wyższy stopień powiększenia wymaga również większej ilości światła dla zapewnienia dobrego oświetlenia obrazu. WSKAZÓWKA: Należy unikać takiego ustawiania zwierciadła, by światło słoneczne padało na nie w sposób bezpośredni, ponieważ może to powodować oślepienie użytkownika, uniemożliwiające wyraźne widzenie. 4. Obserwacja (elektroniczne źródło światła) Aby uzyskać możliwość korzystania z elektronicznego źródła światła (6), należy w podstawie mikroskopu (7) umieścić dwie baterie AA 1,5 V. W tym celu należy zdjąć gumową podstawę (8) i włożyć baterie zgodnie z oznaczeniem biegunów (+/-), a następnie zamocować podstawę ponownie na swoim miejscu. Oświetlenie włącza się obracając je w kierunku stolika (4). Spoglądając przez okular należy wyregulować natężenie światła tak, aby uzyskać optymalną jasność obrazu. Obserwację można wykonywać w sposób opisany powyżej. Żarówki oświetlenia elektronicznego można w razie potrzeby wymieniać. Do zestawu dołączono jedną zapasową żarówkę (13). W przypadku stosowania innej żarówki należy uwzględniać maksymalną moc podaną na korpusie lampy. WSKAZÓWKA: Wyższy stopień powiększenia wymaga większej ilości światła dla zapewnienia dobrego oświetlenia obrazu. Dlatego badanie należy zawsze rozpoczynać od niskiego stopnia powiększenia. 26 PL WSKAZÓWKI dotyczące czyszczenia • Przed rozpoczęciem czyszczenia należy odłączyć urządzenie od źródła prądu (odłączyć zasilacz sieciowy albo wyjąć baterie)! • Czyścić urządzenie tylko z zewnątrz, używając suchej szmatki. Nie używać płynów czyszczących, aby nie spowodować uszkodzenia elementów elektronicznych. • Chronić urządzenie przed kurzem i wilgocią! • Jeżeli urządzenie przez dłuższy czas nie będzie używane, należy wyjąć z niego baterie. Deklaracja zgodności WE Bresser GmbH niniejszym oświadcza, że typ urządzenia radiowego < Artikelnummer > jest zgodny z dyrektywą; 2014/30/UE. Pełny tekst deklaracji zgodności UE jest dostępny pod następującym adresem internetowym: www.bresser.de/download/9118002/CE/9118002_CE.pdf UTYLIZACJA Materiały, z których wykonano opakowanie, należy utylizować posortowane według rodzaju. Informacje na temat właściwej utylizacji uzyskają Państwo w komunalnym przedsiębiorstwie utylizacji odpadów lub w urzędzie ds. ochrony środowiska. Nie wyrzucać urządzeń elektrycznych razem z odpadami z gospodarstwa domowego! Zgodnie z Dyrektywą Europejską 2002/96/WE w sprawie zużytego sprzętu elektrycznego i elektronicznego oraz przepisami prawa krajowego, które ją wdrażają, zużyte urządzenia elektryczne muszą być zbierane oddzielnie i utylizowane zgodnie z zasadami ochrony środowiska. Baterie nie mogą być usuwane wraz z pozostałymi odpadami domowymi. Konsument jest prawnie zobowiązany do oddawania baterii po zużyciu np do specjalnych kontenerów przeznaczonych na baterie. Zużyte baterie należy wyrzucać z sposób nie zagrażający środowisku naturalnemu i nie może być usuwane wraz z pozostałymi odpadami domowymi. Sprzedawca jest prawnie zobowiązany do odebrania zużytych baterii. Baterie zawierające szkodliwe substancje chemiczne są oznakowane znakiem "przekreślonego kosza" i jednym z chemicznych symboli Cd (= bateria zawiera kadm), Hg (= bateria zawiera rtęć), Pb (= bateria zawiera ołów). bateria zawiera kadm bateria zawiera rtęć 3 bateria zawiera ołów 1 2 Cd¹ Hg² Pb³ Gwarancja i serwis Standardowy okres gwarancji wynosi 5 lata i rozpoczyna się z dniem dokonania zakupu. Wszelkie informacje dotyczące gwarancji jak również informacje na temat przedłużenia czasu gwarancji i świadczeń serwisowych można znaleźć na stronie: www.bresser.de/warranty_terms. 27 © National Geographic Partners LLC. All rights reserved. NATIONAL GEOGRAPHIC KIDS and Yellow Border Design are trademarks of National Geographic Society, used under license. Visit our website: kids.nationalgeographic.com Bresser GmbH Gutenbergstr. 2 · DE-46414 Rhede www.bresser.de · [email protected] Manual_9118002_Microscope_de-en-fr-nl-it-es-ru-pl_NGKIDS_v012021a Irrtümer und technische Änderungen vorbehalten. Errors and technical changes reserved.-
 1
1
-
 2
2
-
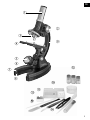 3
3
-
 4
4
-
 5
5
-
 6
6
-
 7
7
-
 8
8
-
 9
9
-
 10
10
-
 11
11
-
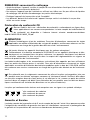 12
12
-
 13
13
-
 14
14
-
 15
15
-
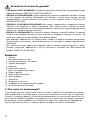 16
16
-
 17
17
-
 18
18
-
 19
19
-
 20
20
-
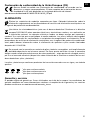 21
21
-
 22
22
-
 23
23
-
 24
24
-
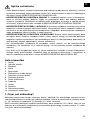 25
25
-
 26
26
-
 27
27
-
 28
28


National Geographic 9118002 El manual del propietario
- Categoría
- Microscopios
- Tipo
- El manual del propietario
En otros idiomas
- français: National Geographic 9118002 Le manuel du propriétaire
- italiano: National Geographic 9118002 Manuale del proprietario
- English: National Geographic 9118002 Owner's manual
- Deutsch: National Geographic 9118002 Bedienungsanleitung
- русский: National Geographic 9118002 Инструкция по применению
- Nederlands: National Geographic 9118002 de handleiding
- polski: National Geographic 9118002 Instrukcja obsługi
Documentos relacionados
-
National Geographic Microscope 300x-1200x incl. hardcase El manual del propietario
-
-
-
Bresser NATIONAL GEOGRAPHIC 91-07000 El manual del propietario
-
-
National Geographic 9130910 El manual del propietario
Otros documentos
-
Bresser Junior 8850900 El manual del propietario
-
-
-
Discovery Adventures 4420101 El manual del propietario
-
-
-
 Freek Vonk 9820301 El manual del propietario
-
-
-
