Haier GWT950AW El manual del propietario
- Categoría
- Lavadoras
- Tipo
- El manual del propietario
Este manual también es adecuado para

Top Load Clothes Washer
Machine a Laver
Lavadora de Ropa con Carga Superior
User Manual
Model # GWT950AW; GWT750AW
Guide de l’Utilisateur
Modéle # GWT950AW; GWT750AW
Manual del Usuario
Para Modelo de # GWT950AW; GWT750AW
Quality•Innovation•Style
Picture for illustration purposes only.
Actual model may vary per model purchased
Downloaded from www.Manualslib.com manuals search engine

IMPORTANT SAFETY INSTRUCTIONS
WARNING - To reduce the risk of fire, electric shock, or injury to persons
when using your appliance, follow the basic precautions, including the
following:
1. Read all of the instructions before using this appliance.
2.Usethisapplianceonlyforitsintendedpurposeasdescribedinthisusermanual.
3.Thiswashermustbeproperlyinstalledinaccordancewiththeinstallationinstructions
beforeitisused.
4.Unplugyourwasherbeforecleaning.
5.Neverunplugyourwasherbypullingonthepowercord.Alwaysgrasptheplug
firmlyandpullstraightoutfromtheoutlet.
6.Donotoperateyourwasherinthepresenceofexplosiveflames.
7.Donotusethewasherforcommercialclotheswashing.
8.Donottamperwithcontrols.
9.Donotallowchildrentoplayonorintheappliance.Closesupervisionofchildrenis
necessarywhentheapplianceisusednearchildren.
10.Washermustbegrounded,seegroundinginstructionsonpage4.
11.Undercertainconditions,hydrogengasmaybeproducedinahot-watersystemthat
hasnotbeenusedfor2weeksormoreHYDROGENGASISEXPLOSIVE.Ifthehot
watersystemhasnotbeenusedforsuchaperiod,beforeusingawashingmachine,
turnonallhot-waterfaucetsandletthewaterflowfromeachforseveralminutes.This
willreleaseanyaccumulatedhydrogengas.Asthegasisflammable,donotsmokeor
useanopenflameduringthistime.
12.Donotwasharticlesthathavebeenpreviouslycleanedin,washedin,soakedin,or
spottedwithgasoline,dry-cleaningsolventsorotherflammableorexplosivesubstances
tothewashwater.Thesesubstancesgiveoffvapoursthatcouldigniteorexplode.
13.Donotaddgasoline,dry-cleaningsolvens,orotherflammableorexplosivesubstances
towashwater.Thesesubstancesgiveoffvapoursthatcouldigniteorexplode.
14.Beforetheapplianceisremovedfromserviceordiscarded,removethedoor.
15.Donotreachintotheapplianceifthetuboragitatorismoving.
16.Donotinstallorstorethisappliancewhereitwillbeexposedtotheweather.
17.Donotrepairorreplaaceanypartoftheapplianceoratemptanyservicingunless
specificallyrecommendedintheuser-maintenanceinstructionsorinpublisheduser
repairinstructionsthatyouunderstandandhavetheskillstocarryout.
1
English
Downloaded from www.Manualslib.com manuals search engine

ThankyouforusingourHaier
product.Thiseasy-to-usemanual
willguideyouingettingthebest
useofyourwasher.
Remembertorecordthemodeland
serialnumber.Theyareonalabel
inbackofthewasher.
Modelnumber
Serialnumber
Dateofpurchase
Stapleyourreceipttoyourmanual.
Youwillneedittoobtainwarrantyservice.
English
English
SAVE THESE INSTRUCTIONS
DANGER
Risk of child entrapment. Before you throw away your old
washer, take off the door so that
children may not easily get trapped inside.
2
Downloaded from www.Manualslib.com manuals search engine

English
English
PAGE
SAFETY INSTRUCTIONS ............................................................... 1
ELECTRICAL CONNECTIONS......................................................... 4
INSTALLATION INSTRUCTIONS ................................................... 5
PARTS AND FEATURES ................................................................. 9
OPERATING INSTRUCTIONS .................................................10-18
GWT950AWControlPanel ............................................................ 10
GWT750AWControlPanel ............................................................ 12
LoadingtheWasher ....................................................................... 13
ProperUseofDetergent .................................................................. 13
FabricSoftener .............................................................................. 14
OperatingProcedure-GWT750AW ................................................ 14
OperatingProcedure-GWT950AW ................................................ 16
NormalOperatingSounds .............................................................. 18
CARE AND CLEANING GUIDE
....................................................... 18
CleaningandMaintenance ............................................................. 18
MovingandVacationing ................................................................ 18
StorageofyourWasher ................................................................. 18
TROUBLESHOOTING .................................................................. 19
WARRANTY................................................................................ 21
TABLE OF CONTENTS
3
Downloaded from www.Manualslib.com manuals search engine

X
GroundingInstructions
Thisappliancemustbegrounded.Intheeventofanelectricalshortcircuit,
groundingreducestheriskofelectricshockbyprovidinganescapewirefor
theelectricalcurrent.Thisapplianceisequippedwithacordhavingagrounding
wirewithagroundedplug.Theplugmustbeinsertedintoanoutletthatis
properlyinstalledandgrounded.
•Improperuseoftheplugcanresultinariskofelectricshock.
•Consultaqualifiedelectricianorservicepersonifthegrounding
instructionsarenotcompletelyunderstoodorifindoubtasto
whethertheapplianceisproperlygrounded.
WiringRequirements
•Thisappliancemustbepluggedintoatleasta15AMP110-120VOLT,
60HZGROUNDEDOUTLET.
NOTE:Whereastandardtwo-prongoutletis
encountered,itisthepersonal
responsibilityandobligationofthe
consumertohaveitreplacedwitha
properlygroundedthree-prongoutlet.
ExtensionCords:
Wedonotrecommendthatyouuseanextensioncord.
PowerInterruptions
Occasionally,theremaybepowerinterruptionsduetothunderstormsorother
causes.RemovethepowercordfromtheACoutletwhenapoweroutageoccurs.
Whenpowerhasbeenrestored,re-plugthepowercordtoACoutlet.Ifthe
outagelastsforaprolongedperiodoftime,cleanthewasherbeforeusingit
again.
English
English
ELECTRICAL CONNECTIONS
4
Downloaded from www.Manualslib.com manuals search engine


UnpackingYourWasher
•Removeallpackingmaterials.Thisincludesthefoambaseandalladhesive
tapeholdingthewasheraccessoriesinsideandoutside.
•Openthetoplidtoremovethedrumbrace.Pulltoremove.
NOTE:Savedrumbrace.Reinstallwhenmovingthewasher.
•Inspectandremoveanyremainsofpacking,tapeorprintedmaterialsbefore
usingthewasher.
WARNING:Toavoiddangerofsuffocation,keepplasticbagandother
packingmaterialawayfrombabiesandchildren.Donotusethisbagincribs,
carriagesandplaypens.Theplasticbagcouldblocknoseandmouth
andpreventbreathing.Thisbagisnotatoy.
LevelingYourWasher
•Yourwasherhas4levelinglegs;whicharelocatedonthefourbottomcorners.
Afterproperlyplacingyourwasherinitsfinalposition,youcanlevelyour
washer.
•Levelinglegscanbeadjustedbyturningthemcounterclockwisetoraiseyour
washerorturningthemclockwisetoloweryourwasher.
WARNING:Levelingofwasherisveryimportanttopreventvibrationduring
spin.
English
English
6
Downloaded from www.Manualslib.com manuals search engine

English
English
StepsforInstallation
• Selectasuitablelocationforthewasheronahardevensurfaceawayfrom
directsunlightorheatsourcee.g.radiators,baseboardheaters,cooking
appliancesetc.Anyfloorunevennessshouldbecorrectedwiththeleveling
legslocatedonthebottomcornersofthewasher.Thewashermustbeplaced
atroomtemperature.Youmustnotplacewasherwherethetemperatureisat
belowfreezing.
Installing Your Washer
Readinstallationinstructionscarefullybeforeinstallation.
CAUTION:If,aftercompletingthesesteps,youareunsurethatunitisproperly
installed,contactaqualifiedinstaller.Toensurethatyourwasheris
properlyinstalleditisrecommendedthatitbeinstalledbyacertified
installer.
1.Donotusewaterinlethoseswithoutaflatwasheroneachend.Thewasher
inthecouplinghastobeplacedfirmly.Flatwaterinlethosewashersare
preinstalledineachendofthewaterinlethoses.
NOTE:Youmayhavetouseplierstotightenthecoupling.
Donotovertightenbecauseyoumaycausedamagetothevalve.
2.Connectthehotandcoldwaterinlethosestothehotandcoldwaterfaucet.
7
Downloaded from www.Manualslib.com manuals search engine

3.Connecttheotherendofthehosestotheirrespectivewasherinletlocatedat
therearofthewasher.
NOTE:Hotwaterneedstobeatatemperatureofatleast120ºF-140ºF.(49ºC
-60ºC)forthesoaptodissolveandtoavoidsoapresidueremainingon
clothes.
4.Usingthedrainhoseclamp.Attachthedrainhosetotheunitasshownbelow.
Installthedrainhosehooktotheouterdrainhosetube.
5.Pluginthewashertoaregular120volt~60Hz,15ampoutlet.
Drainhosehook
Drainhoseclamp
Drainhosejoint
8
English English
Downloaded from www.Manualslib.com manuals search engine

1. TopLid
2. ControlPanel
3. Cabinet
4. LevelingLegs(4)
5. DoorSafetySwitch
6. LiquidBeachDispenser
7. FrontPanel
8. FabricSoftenerDispenser
9. OuterTubCover
10. BalanceRing
11. InnerTub
12. Paddle(ForGWT950Aonly)
13. Pulsator
14. DrainHoseConnection
15. PowerCord(120Volt/60Hz)
16. ColdWaterInletValue
17. HotWaterInletValve
18. BackCover
PARTS AND FEATURES
9
4
8
5
18
17
16
15
6
7
3
14
9
10
11
12
13
English English
Downloaded from www.Manualslib.com manuals search engine

English English
Cycles (1)
•HeavyDuty-Usethiscycleforheavilysoileddurablegarments.Alsothiscycle
couldbeusedfortowels,sportsgear,childrensclothes,etc.
•Normal-Usethiscyclefornormallysoiledcottonsandmixedfabricloads.
•Whites-Usethiscycleforwhiteandlightcoloredclothing.
•Colors-Usethiscycleforlightlysoiled,darkorhighlydyednaturalfabrics
suchascottonthatmaybesusceptibletodyeloss.
•Bulky-Usethiscycletowashlargeitemssuchascomforters,sleepingbags
andblankets
•PressFree-Usethiscycletowashloadsofno-ironfabricssuchassportsshirts,
blouses,casualbusinessclothes,permanentpressandblends.
•Delicate-Usethiscycletowashlightlysoiledgarmentsanddelicateclothes
thatneedgentlewashing.
•Quick-Usethiscycletowashsmall,lightlysoiledloadsthatareneededina
hurry.
•CustomCycle-Hereyoucouldcustomizeyourwash.Thiscyclemaintainsprior
settingsinmemory.
Select (2)
Hereincertaincyclesthewashprocesscouldbechangedperyourneeds.This
alsoshowsthecycleprocessofthewashload.
Extra Rinse (3)
• OnceacycleisselectedpresstheExtraRinsebuttontohave2ndRinseorSpin
ifyoudesire.
•IfwhitesorbulkycyclesareselectedanExtraRinsewillautomaticallybe
added.
Wash Speed / Spin Speed (4)
•Bypressingthisbuttonyoucouldselectwashorspinspeed.Fordelicateand
lacedfabricsaslowerspinspeedmaybechosen.
WARNING:Toreducetheriskoffire,electricshockorinjurytopersons,read
theIMPORTANTSAFETYINSTRUCTIONSbeforeoperatingthisappliance
Operating Instructions
1
2
3 4
5
6 7 8 9
10
11
10
GWT950AW
Downloaded from www.Manualslib.com manuals search engine

English English
Delay (5)
•Whennotactivated,thedisplayshowsacycles’remainingwashtime.
•WhenDelayStartisselected,theindicatorlightwilldisplayaminimumdelay
of2hours.Pushbuttononceforeveryadditional1hourdelayforupto24
hours.
Water Level (6)
•Waterlevelsmaybesetatthebeginningofthewashorinpausemode.
•DuringSoak,WashorRinse,pressthisbuttontomanuallyreplenishwater.
Releaseforthewatertostop.Functionautomaticallyisinactivewhenwater
reachestheoverflowprotectionlevel.
Signal (7)
•Signalvolumecanbeadjustedsoft–loudoroff.
Soil Level (8)
•Selectclothessoillevel.Thereare4levelstochoosefrom,ExtraHeavy,Heavy,
MediumandLight.
•Washcycleincreases2minutesforeachlevelincreased.Selectionshouldbe
basedonthesoillevelinclothes.Thedirtiertheclothestheheavierthelevel.
Temperature Wash / Rinse (9)
•Toselectinletwatertemperatureforwashandrinse.Selectionheremayvary
perthecyclechosen.Allselectionsarenotavailableinallcycles.
Off (10)
•IfwasherisONpushbuttononcetoshutoffthepower.
Start / Pause (11)
•Oncewasherispoweredandselectionsarechosen,pushthisbuttononceto
startthewash.
•Whileunitisworking,pushthisbuttononcetopauseit.
•Ifunitisinpausemode,pushthisbuttononcetoresumeoperation.
•If“Start/Pause”buttonispressedtostartthewash,thewasherwilldisplaythe
lastcycleset.Ifanybuttonexcept“Off”ispressedtostart,thewasherwillno
startintheHeavyDutycyclemode.
•IfStart/Pausebuttonisn’tpressedwithin5minutesafterpowering“On”the
unitwillautomaticallyswitchoffandreturntostandbymode.
11
Downloaded from www.Manualslib.com manuals search engine

English
English
12
GWT750AW
1 2 3 4 5
Temperature Wash / Rinse (1)
•Toselectinletwatertemperatureforwashandrinse.Selectionheremayvary
perthecyclechosen.Allselectionsarenotavialableinallcycles.
Select (2)
Hereincertaincyclesthewashprocesscouldbechangedperyourneeds.This
alsoshowsthecycleprocessofthewashload.
Cycles (3)
•HeavyDuty-Usethiscycleforheavilysoileddurablegarmets.Alsothiscycle
couldbeusedfortowels,sportsgear,childrensclothes,etc.
•Normal-Usethiscyclefornormallysoiledcottonsandmixedfabricloads.
•Whites-Usethiscycleforwhiteandlightcoloredclothing.
•Colors-Usethiscycleforlightlysoiled,darkorhighlydyednaturalfabrics
suchascottonthatmaybesusceptibletotodyeloss.
•Bulky-Usethiscycletowashlargeitemssuchascomforters,sleepingbags
andblankets
•Delicate-Usethiscycletowashlightlysoiledgarmentsanddelicateclothes
thatneedgentlewashing.
•Quick-Usethiscycletowashsmall,lightlysoiledloadsthatareneededina
hurry.
Water Level (4)
•Waterlevelsmaybesetatthebeginningofthewashorinpausemode.
•DuringSoak,WashorRinse,pressthisbuttontomanuallyreplenishwater.
Releaseforthewatertostop.Functionautomaticallyisinactivewhenwater
reachestheoverflowprotectionlevel.
Soil Level (5)
•Selectclothessoillevel.Thereare3levelstochoosefromHeavy,Mediumand
Light.
•Washcycleincreases2minutesforeachlevelincreased.Selectionshouldbe
basedonthesoillevelinclothes.Thedirtiertheclothestheheavierthelevel.
Downloaded from www.Manualslib.com manuals search engine

English
English
LoadingtheWasher
•Loadeachitemloosely.
•Separatethewhiteandcoloredclothes.Separateheavyclothesfromlight
clothes.
•Carefullycheckallpocketsandcuffsforsmallitems.Theycaneasilyslideinto
thetubandmaydamagethetub.
•Pre-treatallstainsandheavilysoiledareasforbestresults.
•Donotoverloadyourwasher.(Donotloadover18lbs.)
•Whenloadingwetitems,keepwaterlevelhighenoughsoitemscanfloat
easilyinthewater.
•Closethedoorproperlyafterloadingtheclothes.Ifyoukeepthelidup,the
washerwillnotstart.
ProperUseofDetergent
•Itisgoodwashingpracticetoaddthedetergenttothewaterbeforeyouadd
theclothessothatthedetergentcanworkeffectivelyonyourclothes.
• It is recommended to use HE (High Efficiency Detergent).
NOTE: Youcanuselessormoredetergentdependingonthesizeoftheload,
watertypeinyourlivingareawhetheritissoftorhardandwhetherthe
clothesareheavilysoiledorlightlysoiled.
BleachDispenser
•Bleachdispenserislocatedonfrontcornerundertheloadingdoor.
•Pourinrecommendedamountofbleachintodispenserduringthefirstwashfill.
NOTE:Useonlyliquidbleachindispenser.
WARNING:•Becarefulnottospillundilutedbleachonthewashercabinetor
yourclothes.Asitisastrongchemical,itmaydamageclothes
orfinishofthewasherifnotproperlydiluted.
•Usethemanufacturer’schart,onproductcontainerfor
recommendeduseofliquidorpowderbleach.
13
Downloaded from www.Manualslib.com manuals search engine

FabricSoftenerDispenser
•Pleasefollowsoftenerinstructionsfordoseusage.
•Pourinliquidfabricsoftenerintodispenserasrecommendedbythe
manufacturer.
•Donotoverfill.
•Thefabricsoftenerisdispensedinthefinalrinse.IfExtraRinseisselected(not
availableinallmodels)thefabricsoftenerwillbedispensedduringtheExtra
RinseCycle.
•Attheendofthecycle,asmallamountofwatermaybeleftinthedispenser.
Thisisnormal.
NOTE:Useonlyliquidfabricsoftenerinthisdispenser
WARNING:Neverpourfabricsoftenerdirectlyontoclothesbecauseitwillstain
yourclothesoryoumaygetspotsonyourclothes.
OperatingProcedure-GWT750AW
1. Switch on the power supply
2. Selection of Cycles
•Whenthewasherispoweredturnthecyclesdialtothedesiredprogram.
3. Select
•Incertaincyclesthewashprocesscanbechangedperyourneeds.
NOTE: Spinshallbeginaftersometimeevenifthereisnowaterinthetub.Do
notusePre-washprocessforwoolenarticles.Clothespronetofadeand
otherclothesshouldbewashedseparately.
English
English
14
Downloaded from www.Manualslib.com manuals search engine

English
English
4. Water Level
•AfterWashCycleSelection,PressthewaterlevelbuttontoSelecttheproper
waterlevelforwash.
5. Soil Level
•Selectdifferentsoillevelsbypressingthisbutton.
6. Temperature Wash/Rinse
•Pressthisbuttontochangeselectionbasedonclothesputinthewasher.
7. Start/Pause
•Pressthisbuttonwhenyouwantthemachinetostart.
•Duringoperation,pressthisbuttontopauseandpressitagaintoresume
operation.
NOTE: Openingthetoplidwillstopthemachineexceptduringwaterfillingor
draining.
15
Times of pressing Select
(Heavy Duty and Whites)
Selected Select
Applications
Operation (The “On” Indicator
represent the process to run)
Times of pressing Cycle
Select (Normal, Colors,
Bulky, Delicate and Quick)
0
1
2
3
4
5
5
0
1
2
3
4
Pre-wash, Wash,
Rinse, Spin
Wash,
Rinse, Spin
Wash
(Wash water
remains in the tub)
Wash, Rinse
(Rinse water
remains in the tub)
Rinse, Spin
Spin
(To spin after drain)
For heavily soiled
clothes shirt cus and
collars, rst Pre-wash
and then wash
Common clothes needing
wash, rinse & spin
Repeatedly use the
wash water
Repeatedly use the
rinse water
When rinse and spin
are needed after
hand wash
When only spin is needed
after hand wash
(rst drain and then spin)
Pre-wash
Rinse
Wash
Spin
Pre-wash
Rinse
Wash
Spin
Pre-wash
Rinse
Wash
Spin
Pre-wash
Rinse
Wash
Spin
Pre-wash
Rinse
Wash
Spin
Pre-wash
Rinse
Wash
Spin
Downloaded from www.Manualslib.com manuals search engine

NOTE: Totaltimemaybeaffectedbywaterinletanddraintime.Itmayalsobe
affectedbythewaterpressure.Normal,HeavyDutyandWhite
programscouldcombinetheprocessofPre-washduringwhichthe
washingmachinefirstPre-washforabout20-30minutes,withslight
pulsationafterwaterfillingandthenbeginstowash.
OperatingProcedure-GWT950AW
1. Press any button except “Off” button
•Ifyoupressthe“Start/Pause”buttontostart,thewasherwillruninthelast
cycleused.Ifyoupressanybuttonexcept“Off”tostart,thewasherwillrunthe
HeavyDutycycle.
•If“Start/Pause”buttonisn’tpressedwithin5minutesafterpowering“On”the
unitwillautomaticallyswitchoffandreturntostand-bymode.
•Thewasherwillalsoreturntostand-bymodeimmediatelyaftercompletionof
thewashprocess.
•Regardlessofsettings,bypressingthePowerOffbuttonallprogramswillstop
andtheunitwillenterstand-bymode.
•Thewasherhasintelligentwashresumption(CycleReset).Whenpoweris
interruptedatthepowersource,thewasherwillresumerunningwhereitleftoff
whenpowerisreturned.
2. Selection of Cycles
•WhenthewasherispoweredontheHeavyDutycycleisthedefaultcycle.If
anothercycleisdesiredpressthecyclebuttonforthedesiredprogram.
3. Select
•Oncethepowerisswitchedonthewashingmachinewillautomaticallyset
theHeavyDutycycle,whichwillPre-Wash,Wash,RinseandSpin.Ifother
selectioncombinationsaredesired,presstheSelectbuttontochoose.
NOTE: Spinshallbeginaftersometimeevenifthereisnowaterinthetub.Do
notusePre-washprocessforwoolenarticles.Clothespronetofadeand
otherclothesshouldbewashedseparately.
Times of pressing Select
(Heavy Duty and Whites)
Selected Select
Applications
Operation (The “On” Indicator
represent the process to run)
Times of pressing Cycle
Select (Normal, Colors,
Bulky, Delicate and Quick)
0
1
2
3
4
5
6
6
0
1
2
3
4
5
Pre-wash, Wash,
Rinse, Spin
Wash,
Rinse, Spin
Wash
(Wash water
remains in the tub)
Wash, Rinse
(Rinse water
remains in the tub)
Rinse, Spin
Spin
(To spin after drain)
Pre-wash, Soak,
Wash, Rinse, Spin
For heavily soiled
clothes shirt cus and
collars, rst Pre-wash
and then wash
Common clothes needing
wash, rinse & spin
Repeatedly use the
wash water
Repeatedly use the
rinse water
When rinse and spin
are needed after
hand wash
When only spin is needed
after hand wash
(rst drain and then spin)
For heavily soiled clothes,
shirt cus and collars,
rst Pre-wash and
then wash
Pre-wash
Rinse
Wash
Spin
Soak
Pre-wash
Rinse
Wash
Spin
Soak
Pre-wash
Rinse
Wash
Spin
Soak
Pre-wash
Rinse
Wash
Spin
Soak
Pre-wash
Rinse
Wash
Spin
Soak
Pre-wash
Rinse
Wash
Spin
Soak
Pre-wash
Rinse
Wash
Spin
Soak
English
English
16
Downloaded from www.Manualslib.com manuals search engine

4. Water Level
•AfterWashCycleSelection,PressthewaterlevelbuttontoSelecttheproper
waterlevelforwash.
5. Speed Wash/Spin
•OncethepowerisswitchedonthemachinewillautomaticallysettoNormal/
Fast.Pressbuttontochangeselection.
6. Soil Level
•Whenthewasherispoweredon,themachinewillautomaticallysetatHeavy
Duty.Selectdifferentsoillevelsbypressingthisbutton.
7. Temperature Wash/Rinse
•InitialsettingisWarm/Coldwhenwasherispoweredon.Pressthisbuttonto
changeselectionbasedonclothesputinthewasher.
8. Cycle Signal
•ThisissetatLowwhenwasherisstarted.Pressbuttontoadjust.
9. Delay Start
•TostartthewasheratalatertimepresstheDelayStartbuttonandsetthetime.
•Whenactivatedtheindicatordisplays2.Pushbuttononceforevery1hour
delayforupto24hours.
•PressstartbuttontoactivateDelayStart.
•Whenthedelaytimerstartstheprogramselectindicatorturnsoff.Theindicator
willdisplaytheremainingtimetoturnontheunit.Inthelowerrightcornerof
thedisplay,ablinkinglightwillindicatethatDelayStarthasbeenactivated.
•BypressingtheDelay/StartbuttontheselectedProcessprogramswillbe
displayed.Byalteringtherunningprogram,thewasherwillhavetobereset.
10. Start/Pause
•Pressthisbuttonwhenyouwantthemachinetostart.
•Duringoperation,pressthisbuttontopauseandpressitagaintoresume
operation.
NOTE: Openingthetoplidwillstopthemachineexceptduringwaterfillingor
draining.
NOTE: Totaltimemaybeaffectedbywaterinletanddraintime.Itmayalsobe
affectedbythewaterpressure.HeavyDutyandWhiteprograms
couldcombinetheprocessofPre-washduringwhichthewashing
machinefirstPre-washforabout20-30minutes,withslightpulsationafter
waterfillingandthenbeginstowash.
17
English
English
Downloaded from www.Manualslib.com manuals search engine

English
English
Warning:Alwaysunplugyourwashertoavoidelectricshockbeforecleaning.
Ignoringthiswarningmayresultindeathorinjury.Beforeusing
cleaningproducts,alwaysreadandfollowmanufacture’sinstructions
andwarningstoavoidpersonalinjuryorproductdamage.
Cleaning&Maintenance
•Useonlydamporsudsyclothforcleaningcontrolpanel.
•Toavoidanykindofdamagetocabinetfinish,wipewashercabinetas
needed.Ifyouspillliquid/powderedsoftener,bleachordetergentonthe
cabinet,wipecabinetimmediatelybecauseitcandamagethefinish.
•Donotuseanyabrasive,harshchemicals,ammonia,chlorinebleach,
concentrateddetergent,solventsormetalscouringpads.Someofthese
chemicalsmaydissolve,damageand/ordiscoloryourwasher.
•Removepinsorothersharpobjectsfromclothestopreventscratchingof
interiorparts.
• Leavelidopenafteryouaredonewashingtoallowinsideofwashertodry
andpreventbadodors.
Moving&Vacationing
•Turnoffwatersupplyfaucet’sanddisconnecthoses.Drainwaterfromall
hoses.Thiswillpreventfromdamagingduetowaterleakageifthehoses
accidentallygetrupturedortheybecomeloose.
•Disconnectelectricalplug.
•Dryinnerwashtub.Ifmovingwasher,disconnectdrainhose.
•Turnthelevelinglegsclockwiseallthewayin.
•Moveandstoreyourwasherinuprightpositiononly.
•Topreventmoldormildew,leavelidopensomoistureinsidemachinecan
evaporate.
StorageofYourWasherinColdEnvironment
•Thewashermustbestoredatroomtemperature.
•Ifyoujustgotdeliveryofawasherwhenoutsidetemperatureisbelow
freezing,donotoperateuntilwasherhaswarmedtoroomtemperature.
•Donoinstalloroperateyourwasherwhereroomtemperatureisbelow
freezing.
NormalOperatingSounds
The following sounds are normally heard during the operation of the washer:
•Tumblingsounds:Thisisnormalastheheavywetclothesinthewasherare
continuouslybeingtossedaround.
•Airrushingnoise:ThishappenswhenthewashertubspinsatveryhighRPM.
•WashandRinsecyclesgoingonandoffwillalsomakeclickingsounds.
CARE AND CLEANING GUIDE
Child Lock:Tolockthecontrolpanel,press“Delay”and“WaterLevel”button
togetherforapproximately3seconds.Tounlockpressagain.
18
Downloaded from www.Manualslib.com manuals search engine

English
English
WasherDoesNotOperate
•Checkifunitispluggedin.
•Checkiftheelectricalwallreceptacleisofpropervoltage.
•Checkifthecircuitbreakerneedstoberesetorifthefuseneedstobe
replaced.
•Checkifthewasherisoverloaded:loadmayneedtobere-balancedand
clothesmayneedtoberedistributed.
•Checkifthelidisopen.Youmayhavetoclosethelidproperly.
•Thewasherpausesinsomecycles.Thisisnormalindelicatecycle,whichhas
shortsoakperiodwhereyourclothesarebeingsoakedforveryshortperiod
oftime.Youwillnothearwasheroperationforthatperiodoftime.Whenthe
soaktimeisover,itwillstartautomatically.
ProblemswithWater
•Notenoughwatercomingout:Waterfaucetmayneedtobeturnedonfully.
Waterhosesmaybetangledup.Straightenuphoses.Checkwaterlevel
selection,itmayneedtobereadjusted.
•Watertemperatureisincorrect:Checkyourwaterheatertemperature.Hot
waterneedstobeatatemperatureatleast120ºF-140ºF(49ºC-60ºC).Check
tomakesuretheinlethosesareproperlyconnected.(e.g.hottohotandcold
tocold.
•Waterleaks:Thisisduetonotproperlyinstallingdrainhoseorfillhoses.Your
homedrainmaybecloggedorhavingconstantwasterpressure.Youmay
needtotightenhoses,checktheplumbingorcallaplumber.
•
Waterwillnotdrain:Thisisduetonotinstallingyourdrainhoseproperly.
Youmayneedtoconnectthedrainhoseproperly.Checkthepositionofthe
drainhose.Inordertodrainproperly,makesurethattopofdrainoutletisless
then4ft.(1.2m)abovethefloor.
TROUBLESHOOTING
19
Downloaded from www.Manualslib.com manuals search engine

English
English
WasherisMakingNoise
•Washermayneedtobereinstalled.(Checkwasherinstallationsection.)
•Washerloadmayneedtobere-balanced,astheloadmaybeuneven.
•Coins,loosechange,buttonsorotherheavyobjectscouldmakenoise(read
OperationGuide–NormalOperatingSounds.)
•SquealingSounds:Duetooverloadedwashtub.
•VibrationNoises:Duetonotlevelingwasherproperlyontheflooranduneven
distributionofclothesinthetub.
ProblemswithClothes
•Clothesaretoowrinkled:thisisduetoimpropersorting,overloadingand
washinginveryhotwaterrepeatedly.Avoidoverloadingandresortyour
load.Donotmixheavyclothessuchasworkclotheswithlightclothessuchas
blouses,lightshirtsanddelicateitems.Youmayneedtowashinwarmorcold
water.
•Havesoapresidue:detergentmaynotbedissolvinginwater.Checkwater
temperatureoryouneedtoadddetergentaswashtubisbeingfilledwith
waterbeforeyouloadyourclothestoavoidsoapresidueonclothes.
•Spotsorstainsonyourclothes:thisisduetoincorrectuseoffabricsoftener.
Youmayneedtoreadproperinstructionsonthecontainerandfollowproper
manufacturer’sdirectionsforusingthesoftener.
•Clothesaregrayedoryellowed:thisisduetonotpouringenoughdetergentfor
largeloads.Youmayhavetoaddmoredetergenttotheload.
•Clothesarerippedandhaveholes/excessivewearandtear:thisisdueto
sharpobjectssuchaspinsandbeltbucklesYouwillneedtoremovesmall
loosesharpobjects.Fastenbelts,zippers,metalsnapsetc.Checkifyouare
usingundilutedbleach.Neveraddundilutedbleachtowash.
Notes: GWT950AW Only
TroubleCodes Reason
LD Thedrainingdoesnotwork,orthespeedofdrainingistooslow
UL Thewasherisoutofbalance
LF Thewaterinlettimeexceedsthepresettime(40minutes)
E6 Thewaterlevelsensorfault-Callservice
F2 Wateroverflowprotection
20
Downloaded from www.Manualslib.com manuals search engine

English
English
In Home Service
Full ONE Year Warranty
For12monthsfromthedateoforiginal
retailpurchase,Haierwillrepairorreplace
anypartfreeofchargeincludinglaborthat
failsduetoadefectinmaterialsorwork-
manship.
Limited Warranty
Afteroneyearfromtheoriginalretail
purchasedate,Haierwillprovideapartat
nocost,asindicatedbelow,toreplacesaid
partasaresultofadefectinmaterialsor
workmanship.Haierissolelyresponsible
forthecostofthepart.Allothercostssuch
aslabor,tripcharge,etcaretheresponsibil-
ityoftheowner.
Second through Fifth Year
Haierwillprovidetheouterwashtuband
relatedoutertubassemblypartsshouldthe
partfailtoholdwater.
Second through Seventh Year
Haierwillprovidetheinnerstainlesssteel
washtubifdefectiveinmaterialorwork-
manship.
Note: Thiswarrantycommencesonthedate
theitemwaspurchasedandtheoriginal
purchasereceiptmustbepresentedtothe
authorizedservicerepresentativebefore
warrantyrepairsarerendered.
Exceptions: CommercialorRentalUse
Warranty
90 days labor from date of original purchase
90 days parts from date of original purchase
No other warranty applies
For Warranty Service
Contactyournearestauthorizedservice
center.Allservicemustbeperformedby
aHaierauthorizedservicecenter.Forthe
nameandtelephonenumberofthenearest
authorizedservicecenterpleasecall1-877-
337-3639.
Before calling please have available the following
information:
Modelnumberandserialnumberofyour
appliance.Thenameandaddressofthe
dealeryoupurchasedtheunitfromandthe
dateofpurchase.
Acleardescriptionoftheproblem.
Aproofofpurchase(salesreceipt).
This warranty covers appliances within the continen-
tal United States, Puerto Rico and Canada. What is
not covered by this warranty:
Replacementorrepairofhouseholdfuses,
circuitbreakers,wiringorplumbing.
Aproductwhoseoriginalserialnumberhas
beenremovedoraltered.
Anyservicechargesnotspecificallyidenti-
fiedasnormalsuchasnormalservicearea
orhours.
Damagetoclothing.
Damageincurredinshipping.
Damagecausedbyimproperinstallationor
maintenance.
Damagefrommisuse,abuseaccident,fire,
flood,oractsofnature.
Damagefromserviceotherthanan
authorizedHaierdealerorservicecenter.
Damagefromincorrectelectricalcurrent,
voltageorsupply.
Damageresultingfromanyproduct
modification,alterationoradjustmentnot
authorizedbyHaier.
Adjustmentofconsumeroperatedcontrols
asidentifiedintheowner’smanual.
Hoses,knobs,linttraysandallattachments,
accessoriesanddisposableparts.
Labor,servicetransportation,andshipping
chargesfortheremovalandreplacementof
defectivepartsbeyondtheinitial12-month
period.
Damagefromotherthannormalhousehold
use.
Anytransportationandshippingcharges.
THIS LIMITED WARRANTY IS GIVEN IN LIEU OF ALL
OTHER WARRANTIES, EXPRESSED OR, INCLUDING
THE WARRANTIES OF MERCHANTABILITY AND
FITNESS FOR A PARTICULAR PURPOSE
Theremedyprovidedinthiswarrantyis
exclusiveandisgrantedinlieuofallother
remedies.
Thiswarrantydoesnotcoverincidentalor
consequentialdamages,sotheabove
limitationsmaynotapplytoyou.Some
statesdonotallowlimitationsonhowlong
animpliedwarrantylasts,sotheabove
limitationsmaynotapplytoyou.
Thiswarrantygivesyouspecificlegalrights,
andyoumayhaveotherrights,whichvary,
fromstatetostate.
HaierAmerica
NewYork,NY10018
LIMITED WARRANTY
21
Downloaded from www.Manualslib.com manuals search engine

INSTRUCCIONES DE SEGURIDAD IMPORTANTES
ADVERTENCIA. Para reducir el riesgo de incendio, descarga eléctrica
o lesiones a las personas al usar el artefacto, siga las precauciones
básicas, incluyendo las siguientes:
1.Leatodaslasinstruccionesantesdeusarelartefacto.
2.Useesteartefactosóloconlospropósitosparalosquefuediseñado,segúnsedescribe
enestemanualparaelusuario.
3.Estalavadoradebeserinstaladacorrectamenteconformealasinstruccionesde
instalaciónantesdeutilizarla.
4.Desenchufelalavadoraantesdelimpiarla.
5.Nuncadesenchufesulavadorajalandodelcabledecorriente.Siempreagarrecon
firmezaelenchufeyjaledirectamentedeltomacorriente.
6.Noaccionelalavadoraenpresenciadehumosexplosivos.
7.Nouseestalavadoraconfinescomerciales.
8.Nomanipuleindebidamenteloscontroles.
9.Nopermitaquelosniñosjueguenarribaodentrodelartefacto.Esnecesariosupervisar
conatenciónalosniñoscuandoelartefactoseutilizacercadeellos.
10.Lalavadoradebecontarcondescargaatierra,consultelasinstruccionesdedescarga
atierraenlapágina46.
11.Endeterminadascondiciones,puedeproducirsegashidrógenoenunsistemade
aguacalientequenosehausadodurante2semanasomás.ELGASHIDRÓGENO
ESEXPLOSIVO.Sielsistemadeaguacalientenosehautilizadoduranteunperíodo
comoelindicado,antesdeusarlamáquinalavadoraabralosgrifosdeaguacaliente
ydejequeelaguafluyaporcadaunodeellosdurantevariosminutos.Deesta
maneraseliberaráelgashidrógenoquepuedahaberseacumulado.Comoelgases
inflamable,nofumeniuseunallamaabiertaduranteestetiempo.
12.Nolaveartículosquehansidolimpiados,lavados,remojadosomanchadoscon
gasolina,solventesparaellavadoensecouotrassustanciasexplosivasinflamables
enelaguadelavador.Estassustanciasdespidenvaporesquepuedenprenderse
fuegooexplotar.
13.Noagreguegasolina,solventesparaellavadoenseco,niotrassustanciasinflamables
oexplosivasalaguadelavado.Estassustanciasdespidenvaporesquepueden
prendersefuegooexplotar.
14.Antesdequeelartefactoquedefueradeserviciooseadescartado,quitelapuerta.
15.Nomanipuleelinteriordelartefactosilatinaoelagitadorestánenmovimiento.
16.Noinstaleniguardeesteartefactoenlugaresenlosquequedeexpuestoalas
inclemenciasdeltiempo.
17.Norepareoreemplaceningunapiezadelartefactoniintenteningúntipode
reparaciónamenosqueestérecomendadoespecíficamenteenlasinstruccionesde
reparaciónparaelusuariooenlasinstruccionespublicadasparalareparacióndelos
usuarios,lascualesdebeentenderydebetenerlahabilidadparallevarlasacabo.
Español
43
Downloaded from www.Manualslib.com manuals search engine

Graciasporusarnuestroproducto
Haier.Estemanualfácildeusarle
guiaráparaobtenerelmejoruso
posibledesulavadora.
Recuerdeanotarlosnúmerosde
modeloydeserie.Seencuentran
enunaetiquetaenlaparteposte-
riordelalavadora.
Númerodemodelo
Númerodeserie
Fechadecompra
Abrochesureciboalmanual.
Lonecesitaráparaobtenerelserviciodegarantía.
CONSERVE ESTAS INSTRUCCIONES
PELIGRO
Riesgo de que los niños queden atrapados. Antes de
deshacerse de su lavadora vieja, saque la puerta para
evitar que los niños puedan quedar atrapados fácilmente en
el interior.
Español
44
Downloaded from www.Manualslib.com manuals search engine

PÁGINA
INSTRUCCIONES DE SEGURIDAD IMPORTANTES ..................... 43
CONEXIONES ELÉCTRICAS......................................................... 46
INSTRUCCIONES DE INSTALACIÓN .......................................... 47
PIEZAS Y FUNCIONES ............................................................... 51
INSTRUCCIONES DE FUNCIONAMIENTO..............................52-60
GWT950AWPaneldecontrol ........................................................ 52
GWT750AWPaneldecontrol ........................................................ 54
Cargarlalavadora ........................................................................ 55
Usoadecuadodeldetergente.......................................................... 55
Suavizanteparalaropa ................................................................. 56
Funcionamiento-GWT750AW ....................................................... 56
Funcionamiento-GWT950AW ....................................................... 58
Sonidosnormalesdelfuncionamiento ............................................... 60
GUÍA DE CUIDADO Y LIMPIEZA
................................................... 60
Limpiezaymantenimiento ............................................................... 60
Mudanzasyvacaciones ................................................................. 60
Dóndeguardarlalavadora ............................................................ 60
DETECCIÓN Y SOLUCIÓN DE PROBLEMAS ............................... 61
GARANTÍA ................................................................................. 63
CONTENIDOS
Español
45
Downloaded from www.Manualslib.com manuals search engine

X
Instruccionesparalaconexiónatierra
•Elusoindebidodelenchufepuederepresentarunriesgodedescarga
eléctrica.
•Consulteaunelectricistaopersonaldereparacionescalificadosi
nocomprendecompletamentelasinstruccionesdepuestaatierraosi
noestásegurodesielartefactocuentaconlaconexiónatierra
apropiada.
Requisitosparalainstalacióneléctrica
•EsteaparatodebeenchufarseenunTOMACORRIENTEDEALMENOS15
AMPERES110-120VOLTIOS,60HZCONCONEXIÓNATIERRA.
NOTA: Cuandosecuentaconuntomacorrienteestándardepareddedo
agujeros,esresponsabilidadyobligaciónpersonaldelusuariore
plazarloporuntomacorrientedeparedcontresagujerosconla
adecuadaconexiónatierra.
Cablesdeprolongación:
Noserecomiendaelusodecablesdeprolongación.
Cortesdeenergía
Ocasionalmente,puedehabercortesdeenergíadebidoatormentaseléctricas
uotrascausas.Desenchufeelcabledealimentacióndeltomacorrientede
corrientealternacuandohayauncortedeenergía.Unavezqueserestablezca
laenergía,vuelvaaenchufarelcabledealimentacióneneltomacorrientede
corrientealterna.Sielcorteseextiendeduranteunperíodoprolongado,limpie
lalavadoraantesdeutilizarlanuevamente.
CONEXIONES ELÉCTRICAS
46
Esteartefactodebetenerconexiónatierra.Enelcasodeuncortocircuito
eléctrico,laconexiónatierrareduceelriesgodedescargaeléctricaal
proporcionaruncabledeescapeparalacorrienteeléctrica.Esteartefacto
estáequipadoconuncablequecuentaconconexiónatierraconunenchufe
atierra.Elenchufedebeinsertarseenuntomacorrientequeseencuentre
debidamenteinstaladoyconconexiónatierra.
Español
Español
Downloaded from www.Manualslib.com manuals search engine

Accesoriosqueseincluyen Cantidad
1.Manguerasdeentradade
aguacalienteyfría
2
2.Codoparalamanguerade
desagüe
1
3.Abrazaderaparala
mangueradedesagüe
1
4.Mangueradedesagüe 1
5.Guíadeusoyfuncion
miento(nosemuestra)
1
INSTRUCCIONES DE INSTALACIÓN
47
Español
Español
Downloaded from www.Manualslib.com manuals search engine

Desembalajedesulavadora
•Quitetodoslosmaterialesdeempaque.Estoincluyelabasedeespumaytoda
lacintaadhesivaquesostienelosaccesoriosdelalavadorapordentroypo
fuera.
•Abralatapasuperiorparaquitarlaabrazaderadeltambor.Jaleparaquit
rla.NOTA:Conservelaabrazaderadeltambor.Vuelvaainstalarlacuando
debamoverlalavadora.
•Reviseyquitelosrestosdeembalaje,cintaomaterialesimpresosantesdeusar
lalavadora.
ADVERTENCIA: Paraevitarriesgosdeasfixia,mantengalabolsadeplásticoy
losdemásmaterialesdeembalajelejosdebebésyniños.Noutiliceestabolsa
encunas,carritosnicorralitos.Labolsaplásticapuedebloquearelairequevaa
lanarizylabocaynopermitelarespiración.Estabolsanoesunjuguete.
Cómonivelarlalavadora
•Lalavadoratiene4patasniveladorasubicadasenlascuatroesquinasinf
ores.Despuésdecolocarcorrectamentelalavadoraensulugardefinitivo,
puedenivelarla.
•Laspatasniveladoraspuedenajustarsegirándolashacialaizquierdapara
subirlalavadorayhacialaderechaparabajarla.
ADVERTENCIA:Lanivelacióndelalavadoraesmuyimportanteparaevitarlas
vibracionesduranteelcentrifugado.
48
Pataajustable
Alto Bajo
Español
Español
Downloaded from www.Manualslib.com manuals search engine

Pasosparalainstalación
•Seleccioneunaubicaciónadecuadaparalalavadoraenunasuperficiedura
ypareja,lejosdelaluzdirectadelsolydelasfuentesdecalor,porejemplo
radiadores,zócalosradiantes,artefactosdecocina,etc.Cualquierdesnivelen
elpisodebesercorregidoconlaspatasniveladorasubicadasenlasesquinas
inferioresdelalavadora.Lalavadoradebeestarubicadaatemperatura
ambiente.Nodebecolocarlalavadoraenlugaresdondelatemperaturaesté
pordebajodelpuntodecongelación.
Cómo instalar la lavadora
Leaatentamentelasinstruccionesparalainstalaciónantesdelainstalación.
Precaución:Sidespuésdecompletarestospasosaúnnoestásegurode
queelartefactohayasidoinstaladocorrectamente,póngaseencontactocon
uninstaladorcalificado.Serecomiendaqueuntécnicocertificadoinstalela
lavadoraparaasegurarsedequelamismaestéinstaladacorrectamente.
1.Noutilicemanguerasdeentradadeaguaquenotenganunaarandelaplana
enunextremo.Laarandeladelaconexióndebeubicarseconfirmeza.Las
arandelasplanasenlamangueradeentradadeaguavieneninstaladasen
cadaextremodelasmanguerasdeentradadeagua.
NOTA: Esprobablequedebausarpinzasparaajustarlaconexión.Noajuste
demasiado,yaquesepuededañarlaválvula.
2.Conectelasmanguerasdeentradadeaguacalienteyfríaalgrifodeagua
calienteyfría.
49
Español
Español
Downloaded from www.Manualslib.com manuals search engine

3.Conecteelotroextremodelasmanguerasalaentradarespectivadela
lavadoraubicadaenlaparteposteriordelaunidad.
NOTA:Elaguacalientedebeestaraunatemperaturadealmenos120ºF–
140ºF.(49ºC-60ºC)paraqueeljabónsedisuelvayparaevitarquequeden
restosdejabónenlasprendas.
4.Conlaabrazaderaparalamangueradedesagüe,unalamanguerade
desagüealaunidadcomosemuestraacontinuación.Instaleelcododela
mangueradedesagüeenlatuberíadelamangueraexteriordedesagüe.
5.Enchufelalavadoraenuntomacorrientenormalde120voltios~60Hz,15
amperes.
Drainhosehook
Drainhoseclamp
Drainhosejoint
50
Codoparalamanguera
dedesagüe
Abrazaderaparala
mangueradedesagüe
Juntadelamanguera
dedesagüe
Español
Español
Downloaded from www.Manualslib.com manuals search engine

1.Tapasuperior
2.Paneldecontrol
3.Gabinete
4.Patasniveladoras(4)
5.Interruptordeseguridaddela
puerta
6.Compartimientoparaelblanqu
adorlíquido
7.Panelfrontal
8.Compartimientoparaelsuavizante
9.Tapaexternadelatina
10.Aroparaelequilibrio
11.Tinainterior
12.Paleta(únicamentepara
GWT950A)
13.Pulsador
14.Conexióndelamanguerade
desagüe
15.Cabledeenergía(120V/60Hz)
16.Válvuladeentradadeaguafría
17.Válvuladeentradadeaguacal
ente
18.Cubiertaposterior
PIEZAS Y FUNCIONES
51
4
8
5
18
17
16
15
6
7
3
14
9
10
11
12
13
Español
Español
Downloaded from www.Manualslib.com manuals search engine

Ciclos (1)
•Lavadoprofundo(HeavyDuty)-Useestecicloparalavarprendasresistentesy
muymanchadas.Esteciclotambiénpuedeusarseparalavartoallas,
vestimentadeportiva,ropadeniños,etc.
•Normal–Useestecicloparalavarcargasdealgodónconsuciedadnormaly
génerosmezclados.
•Prendasblancas(Whites)–Useestecicloparalavarprendasblancasyde
colorclaro.
•Colores(Colors)–Useestecicloparalavartelasnaturalesnomuymanchadas,
oscurasomuyteñidas,comoalgodónquepuedaperderelteñido.
•Prendasvoluminosas(Bulky)-Useestecicloparalavarartículosgrandes,tales
comoedredones,bolsasdedormirymantas.
•Sinplancha(PressFree)-Useestecicloparalavarcargascontelasquenose
planchan,talescomocamisetasdeportivas,blusas,prendasejecutivas
casuales,prendasconplanchadopermanenteymezclasdegéneros.
•Delicado(Delicate)-Useestecicloparalavarlasprendasnomuysuciasy
delicadasquenecesitenunlavadosuave.
•Rápido(Quick)-Useestecicloparalavarcargaspequeñasynomuysucias
quesenecesitenrápidamente.
•Ciclopersonalizado(CustomCycle)–Lepermitepersonalizarsulavado.Este
ciclomantienelasconfiguracionespreviasenlamemoria.
Selección (2)
•Aquí,endeterminadosciclos,elprocesodelavadopuedecambiarsesegún
susnecesidades.Estotambiénmuestraelprocesodelciclodelacargade
lavado.
Enjuague extra (Extra Rinse) (3)
•Unavezqueseseleccionaunciclo,oprimaEnjuagueextra(ExtraRinse)para
enjuagarporsegundavezocentrifugarsilodesea.
•Siseseleccionanlosciclosparalavadodeprendasblancasovoluminosas,
seagregaautomáticamenteunenjuagueextra.
Velocidad del lavado / Velocidad del centrifugado (4)
•Conestebotónpuedeseleccionarlavelocidaddelavadoocentrifugado.Enel
casodegénerosdelicadosoconencajespuedeelegirseunavelocidadde
centrifugadomásbaja.
ADVERTENCIA:Parareducirelriesgodeincendio,descargaeléctricao
lesionesalaspersonas,lealasINSTRUCCIONESIMPORTANTESDESEGURIDAD
antesusarelartefacto
INSTRUCCIONES DE FUNCIONAMIENTO
1
2
3 4
5
6 7 8 9
10
11
52
GWT950AW
Español
Español
Downloaded from www.Manualslib.com manuals search engine

Demora (5)
•Cuandonoestáactivado,elvisormuestraeltiempodelavadorestantedel
ciclo.
•CuandoseseleccionaComienzodemorado,laluzindicadora
muestraunademoramínimade2horas.Presioneelbotónunavezporca
horaadicionaldedemora,sepuedellegarhastalas24horas.
Nivel de agua (6)
•Sepuedenfijarlosnivelesdeaguaalcomienzodellavadooenpausa.
•DuranteelRemojo,LavadooEnjuague,presioneesbotónparavolverallenar
deaguamanualmente.Suelteparaquesedetengaelagua.Lafunciónsede
activaautomáticamentecuandoelaguallegaalniveldeproteccióncontra
desbordes.
Señal (7)
•Elvolumendelaseñalsepuederegularcomobajo,altooapagado.
Nivel de suciedad (8)
•Seleccioneelniveldesuciedaddelasprendas.Haycuatronivelesdelosque
elegir:Extraprofundo,Profundo,MedioySuave.
• Elciclodelavadoaumenta2minutosporcadanivelqueseaumenta.La
seleccióndebebasarseenelniveldesuciedaddelasprendas.Cuantomás
suciasestén,másprofundodebeserelniveldelavado.
Temperatura de lavado / enjuague (9)
•Paraseleccionarlatemperaturadeentradadeaguaparaellavadoyel
enjuague.Estaselecciónpuedevariarsegúnelcicloelegido.Notodaslas
seleccionesestándisponiblesentodoslosciclos.
Apagado (10)
•Silalavadoraestáencendida,presioneelbotónunavezparaapagarla.
Comenzar / Pausa (11)
•Unavezquelalavadoraestáencendidaysehanrealizadolasselecciones,
presioneestebotónunavezparacomenzarellavado.
•Cuandolaunidadestáfuncionando,presioneestebotónunavezparahacer
unapausa.
•Silaunidadestáenpausa,presioneestebotónparareanudarel
funcionamiento.
•SisepresionaComenzar/Pausa(Start/Pause)paraencenderlalavadora,se
mostrarálaúltimaconfiguracióndeciclo.Sisepresionacualquierbotón
exceptoApagado(Off)paraencenderlaunidad,lalavadoraseiniciaráenel
cicloLavadoprofundo.
•SinosepresionaComenzar/Pausa(Start/Pause)enloscincominutos
siguientesdespuésdeencenderlaunidad,éstaseapagaráautomáticamentey
volveráalmodoenespera.
53
Español
Español
GWT950AW
Configuraciones de ciclo prefijadas
Ciclos
Tiempo
(en minutos)
Temperatura de
lavado/enjuague
El nivel de
suciedad es
Normal
40’
Caliente/Frío
medio
Lavado profundo
50’
Caliente/Frío
pesado
Prendas blancas
51’
Caliente/Frío
pesado
Colores
40’
Frío/Frío
medio
Delicado
31’
Frío/Frío
leve
Lavado Rápido
27’
Caliente/Caliente
leve
Voluminoso
45’
Caliente/Frío
medio
Sin plancha
33’
Caliente/Frío
leve
Ciclo personalizado
Depende
Depende
Depende
Downloaded from www.Manualslib.com manuals search engine

GWT750AW
1 2 3 4 5
Temperatura de lavado / enjuague (1)
•Paraseleccionarlatemperaturadeentradadeaguaparaellavadoyel
enjuague.Estaselecciónpuedevariarsegúnelcicloelegido.Notodaslas
seleccionesestándisponiblesentodoslosciclos.
Selección (2)
•Aquí,endeterminadosciclos,elprocesodelavadopuedecambiarsesegúnsus
necesidades.Estotambiénmuestraelprocesodelciclodelacargadelavado.
Ciclos (3)
•Lavadoprofundo-Useestecicloparalavarprendasresistentesymuy
manchadas.Esteciclotambiénpuedeusarseparalavartoallas,vestimenta
deportiva,ropadeniños,etc.
•Normal–Useestecicloparalavarcargasdealgodónconsuciedadnormaly
génerosmezclados.
•Prendasblancas–Useestecicloparalavarprendasblancasydecolorclaro.
•Colores–Useestecicloparalavartelasnaturalesnomuymanchadas,
oscurasomuyteñidas,comoalgodónquepuedaperderelteñido.
•Prendasvoluminosas-Useestecicloparalavarartículosgrandes,tales
comoedredones,bolsasdedormirymantas.
•Delicado-Useestecicloparalavarlasprendasnomuysuciasydelicadasque
necesitenunlavadosuave.
•Rápido-Useestecicloparalavarcargaspequeñasynomuysucias
quesenecesitenrápidamente.
Nivel de agua (4)
•Sepuedenfijarlosnivelesdeaguaalcomienzodellavadooenpausa.
•DuranteelRemojo,LavadooEnjuague,presioneestebotónparavolvera
llenardeaguamanualmente.Suelteparaquesedetengaelagua.Lafunción
sedesactivaautomáticamentecuandoelaguallegaalniveldeprotección
contradesbordes.
Nivel de suciedad (5)
•Seleccioneelniveldesuciedaddelasprendas.Haytresnivelesdelosque
elegir:Profundo,MedioySuave.
•Elciclodelavadoaumenta2minutosporcadanivelqueseaumenta.La
seleccióndebebasarseenelniveldesuciedaddelasprendas.Cuantomás
suciasestén,másprofundodebeserelniveldelavado.
GWT750AW
Configuraciones de ciclo prefijadas
Ciclos
Tiempo
(en minutos)
Temperatura de
lavado/enjuague
El nivel de
suciedad es
Normal
40’
Caliente/Frío
medio
Lavado profundo
50’
Caliente/Frío
pesado
Prendas blancas
46’
Caliente/Frío
pesado
Colores
45’
Frío/Frío
medio
Delicado
31’
Frío/Frío
leve
Lavado Rápido
27’
Caliente/Caliente
leve
Centrifugado
únicamente
7’
/
/
Español
Español
54
Downloaded from www.Manualslib.com manuals search engine

Cargarlalavadora
•Carguecadaprendasinapretar.
•Separelasprendasblancasdelasdecolor.Separelastelaspesadasdelas
livianas.
•Reviseconcuidadotodoslosbolsillosydobladillosenbuscadeelementos
pequeños.Éstospuedendeslizarsefácilmentedentrodelatinaydañarla
•Trateconanterioridadlasmanchasylasáreasconmayorsuciedadpara
lograrmejoresresultados.
•Nosobrecarguesulavadora.(Nocarguemásde18libras.)
•Cuandocoloqueprendasmojadas,mantengaelniveldeagualo
suficientementealtocomoparaquepuedanflotarfácilmente.
•Cierrelapuertacorrectamentedespuésdecargarlasprendas.Sidejalatapa
subida,lalavadoranocomenzaráafuncionar.
Usoadecuadodeldetergente
•Esconvenienteagregareldetergentealaguaantesdeintroducirlaropapara
queéstepuedafuncionarconeficaciaenlasprendas.
•Serecomiendaelusodedetergentedealtaeficienciaparael
lavado.
NOTA:Puedeusarmásomenosdetergentesegúneltamañodelacarga,el
tipodeaguadelazonaenlaquevive,quepuedeserblandaodura,yla
suciedad
delasprendas.
Compartimientoparaelblanqueador
•Elcompartimientoparaelblanqueadorestáubicadoenelextremodelantero
debajodelapuertadecarga.
•Viertalacantidadrecomendadadeblanqueadorenelcompartimientodurante
elprimerciclodelavado.
NOTA: Usesóloblanqueadorlíquidoenelcompartimiento.
ADVERTENCIA:
• Tengacuidadodenoderramarblanqueadorsindiluirenelgabinetedela
lavadoraosobrelasprendas.Comoesunquímicofuerte,puedearruinarsus
prendasolaterminacióndelalavadorasinoestádiluidocorrectamente.
•Consulteelcuadrodelfabricanteenelenvasedelproductoparaconocerel
usorecomendadodellíquidoopolvoblanqueador.
55
Español
Español
Downloaded from www.Manualslib.com manuals search engine

Compartimientoparaelsuavizante
•Sigalasinstruccionesdelsuavizanteencuantoaladosisquedebeusarse.
•Viertasuavizantelíquidoparalaropaenelcompartimiento,comolo
recomiendaelfabricante.
•Nolleneenexceso.
•Elsuavizanteseliberaenelenjuaguefinal.Siseseleccionaelenjuagueextra
(nodisponibleentodoslosmodelos),elsuavizanteseliberaduranteelciclode
enjuagueextra.
•Alfinaldelciclo,puedequedarunapequeñacantidaddeaguaenel
compartimiento.Estoesnormal.
NOTA:Enestecompartimientouseúnicamentesuavizantelíquido.
ADVERTENCIA:Noviertanuncasuavizanteparalaropadirectamentesobre
lasprendas,yaquepuedemancharlasodejarlesmarcas.
Funcionamiento-GWT750AW
1. Encienda el suministro de energía
2. Selección de ciclos
•Cuandoseenciendelalavadora,gireeldialdeloscicloshastaelprograma
deseado.
3. Selección
•Endeterminadosciclos,elprocesodelavadopuedecambiarsesegúnsus
necesidades.
NOTA:
Elcentrifugadocomenzarádespuésdeuntiempoinclusosinohayaguaenla
tina.Noutiliceelprocesodeprelavadoparalosartículosdelana.Lasprendas
queprobablementedestiñandebenlavarseseparadamente.
56
Español
Español
Downloaded from www.Manualslib.com manuals search engine

4. Nivel de agua
•Despuésdelaseleccióndelciclodelavado,presioneelbotóndelnivelde
aguaparaseleccionarelniveldeaguaapropiadoparalavar.
5. Nivel de suciedad
•Seleccionelosdistintosnivelesdesuciedadpresionandoestebotón.
6. Temperatura de lavado/enjuague
•Presioneestebotónparacambiarlaselecciónsegúnlasprendasqueintrodujo
enlalavadora.
7. Comenzar/Pausa
•Presioneestebotóncuandodeseequeseenciendalamáquina.
•Duranteelfuncionamiento,presioneestebotónparahacerunapausa,y
vuelvaapresionarloparareanudarelfuncionamiento.
NOTA:
Lamáquinasedetendrásiseabrelatapasuperior,exceptoduranteelllenado
deaguaoeldesagüe.
NOTA: Laduracióntotalpuedeverseafectadaporeltiempoquellevala
entradayeldesagüedelagua.Tambiénpuedeverseafectadaporlapresión
delagua.LosprogramasNormal,ProfundoyPrendasBlancaspuedencombinar
elprocesodeprelavadoduranteelcuallamáquinalavadoraprimerorealizael
prelavadoduranteaproximadamente20ó30minutosconunalevepulsación
despuésdequesellenadeagua,yluegocomienzaellavado.
57
Veces que se oprime
Selección Lavado
profundo y Prendas blancas
Selección elegida
Usos
Operación (el indicador de encend
ido indica que el proceso
está en funcionamiento)
Veces que se oprime
Selección de ciclo
(Normal, Colores, Prendas
voluminosas, Delicado
y Rápido)
0
1
2
3
4
5
5
0
1
2
3
4
Prelavado, lavado,
enjuague, centrifugado
Lavado, enjuague,
centrifugado
Lavado (el agua del
lavado queda
en la tina)
Lavado, enjuague
(el agua del enjuague
queda en la tina)
Enjuague, centrifugado
Centrifugado
(para centrifugar después
de escurrir)
En el caso de las prendas
muy sucias, puños
y cuellos de camisas,
primero realice el prelavado
y luego el lavado
Prendas de uso diario que
deban lavarse, enjuagarse
y centrifugarse
Se usa varias veces
el agua de lavado
Se usa varias veces
el agua del enjuague
Cuando es necesario
enjuagar y centrifugar
después de lavar a mano
Cuando sólo es
necesario centrifugar
después de lavar a mano
(primero se escurre y
después se centrifuga)
Prelavado
enjuague
lavado
centrifugado
Prelavado
enjuague
lavado
centrifugado
Prelavado
enjuague
lavado
centrifugado
Prelavado
enjuague
lavado
centrifugado
Prelavado
enjuague
lavado
centrifugado
Prelavado
enjuague
lavado
centrifugado
Español
Español
Downloaded from www.Manualslib.com manuals search engine

Funcionamiento-GWT950AW
1. Presione cualquier botón, excepto el botón de Apagado
•Sipresionaelbotón“Comenzar/Pausa”(“Start/Pause”)paracomenzar
ellavado,lalavadorasepondráenfuncionamientoenelúltimociclo
utilizado.Sipresionacualquierbotón,exceptoeldeApagado(“Off”)para
comenzar,lalavadorafuncionaráenelcicloLavadoprofundo.
•Sinosepresiona“Comenzar/Pausa”(Start/Pause)enloscincominutos
siguientesdespuésdeencenderlaunidad,éstaseapagaráautomáticamentey
volveráalmodoenespera.
•Lalavadoratambiénvolveráalmodoenesperainmediatamentedespuésde
completadoelprocesodelavado.
•Independientementedelasconfiguraciones,cuandosepresionaelbotónde
apagado(Poweroff),todoslosprogramassedetienenylaunidadpasaal
modoenespera.
•Lalavadoratieneunareanudacióndelavadointeligente(reiniciodeciclo
Cuandoseinterrumpelaenergíadesdelafuentedeenergía,cuandola
energíavuelvelalavadorareanudasufuncionamientoapartirdelaposición
enquesedetuvo.
2. Selección de ciclos
•Cuandolalavadoraseenciende,elcicloLavadoprofundoeselciclo
predeterminado.Siesnecesariootrociclo,presioneelbotóndelciclodel
programadeseado.
3. Selección
•Cuandoseenciende,lalavadoracomienzaautomáticamenteconelciclo
delavadoprofundo,conelquerealizaráprelavado,lavado,enjuaguey
centrifugado.Sideseaotrascombinacionesdeopciones,presioneelbotón
Selecciónparaelegirlas.
NOTA: Elcentrifugadocomenzarádespuésdeuntiempoinclusosinohayagua
enlatina.Noutiliceelprocesodeprelavadoparalosartículosdelana.
Lasprendasqueprobablementedestiñandebenlavarseseparadamente.
58
Español
Español
Veces que se oprime
Selección Lavado
profundo y Prendas blancas
Selección elegida
Usos
Operación (el indicador de encend
ido indica que el proceso
está en funcionamiento)
Veces que se oprime
Selección de ciclo
(Normal, Colores, Prendas
voluminosas, Delicado
y Rápido)
0
1
2
3
4
5
6
6
0
1
2
3
4
5
Prelavado, lavado,
enjuague, centrifugado
Lavado, enjuague,
centrifugado
Lavado (el agua del
lavado queda
en la tina)
Lavado, enjuague
(el agua del enjuague
queda en la tina)
Enjuague, centrifugado
Centrifugado
(para centrifugar después
de escurrir)
Prelavado, remojo, lavado,
enjuague, centrifugado
En el caso de las prendas
muy sucias, puños
y cuellos de camisas,
primero realice el prelavado
y luego el lavado
Prendas de uso diario que
deban lavarse, enjuagarse
y centrifugarse
Se usa varias veces
el agua de lavado
Se usa varias veces
el agua del enjuague
Cuando es necesario
enjuagar y centrifugar
después de lavar a mano
Cuando sólo es
necesario centrifugar
después de lavar a mano
(primero se escurre y
después se centrifuga)
En el caso de las prendas
muy sucias, puños y cuellos
de camisas, primero realice
el prelavado
y luego el lavado
Prelavado
enjuague
lavado
centrifugado
remoje
remoje
remoje
remoje
remoje
remoje
remoje
Prelavado
enjuague
lavado
centrifugado
Prelavado
enjuague
lavado
centrifugado
Prelavado
enjuague
lavado
centrifugado
Prelavado
enjuague
lavado
centrifugado
Prelavado
enjuague
lavado
centrifugado
Prelavado
enjuague
lavado
centrifugado
Downloaded from www.Manualslib.com manuals search engine

Español
Español
4. Nivel de agua
•Despuésdelaseleccióndelciclodelavado,presioneelbotóndelnivelde
aguaparaseleccionarelniveldeaguaapropiadoparalavar.
5. Velocidad del lavado/Centrifugado
•Cuandoseenciende,lamáquinaautomáticamenteseconfiguraráenNormal
Rápido.Presioneestebotónparacambiarlaselección.
6. Nivel de suciedad
•Cuandoseenciendelalavadora,lamáquinaseconfiguraráautomáticamente
enlavadoprofundo.Seleccionelosdistintosnivelesdesuciedadpresionando
estebotón.
7. Temperatura de lavado/enjuague
•LaconfiguracióninicialesTibio/Frío(Warm/Cold)cuandoseenciendela
lavadora.Presioneestebotónparacambiarlaselecciónsegúnlasprendas
queintrodujoenlalavadora.
8. Señal del ciclo
•EstáconfiguradacomoBajacuandoseenciendelalavadora.Presioneeste
botónpararegularla.
9. Comienzo demorado
•Parainiciarlalavadoraenotromomento,presioneelbotónComienzo
demorado(DelayStart)yconfigurelahora.
•Cuandoseactiva,elindicadormuestra2.Presioneelbotónunavezporcada
1horadedemoraporhasta24horas.
•PresioneelbotónComenzar(Start)paraactivarelComienzodemorado.
•Cuandoeltemporizadordedemoraseinicia,elindicadordeselección
deprogramaseapaga.Elindicadormostraráeltiempoquerestahastaque
seenciendalaunidad.Enlaesquinainferiorderechadelvisor,unaluzque
parpadeaindicaráquesehaactivadoelComienzodemorado.
•CuandosepresionaelbotónComienzodemorado,semostrarán
losprogramasdeprocesoseleccionados.Sisecambiaelprogramaen
funcionamiento,lalavadoratendráquereiniciarse.
10. Comenzar/Pausa
•Presioneestebotóncuandodeseequeseenciendalamáquina.
•Duranteelfuncionamiento,presioneestebotónparahacerunapausa,y
vuelvaapresionarloparareanudarelfuncionamiento.
NOTA: Lamáquinasedetendrásiseabrelatapasuperior,exceptoduranteel
llenadodeaguaoeldesagüe.
NOTA: Laduracióntotalpuedeverseafectadaporeltiempoquellevala
entradayeldesagüedelagua.Tambiénpuedeverseafectadaporlapresióndel
agua.Losprogramasdelavadoprofundoyprendasblancaspuedencombinar
elprocesodeprelavadoduranteelcuallamáquinalavadoraprimerorealizael
prelavadoduranteaproximadamente20ó30minutosconunalevepulsación
despuésdequesellenadeagua,yluegocomienzaellavado.
59
Downloaded from www.Manualslib.com manuals search engine

Advertencia: Desenchufesiemprelalavadoraantesdelimpiarla
paraevitardescargaseléctricas.Ignorarestaadvertenciapuedeocasionar
lesionespersonalesolamuerte.Antesdeutilizarproductosdelimpieza,leay
sigasiemprelasinstruccionesdelfabricanteasícomotambiénlasadvertencias
paraevitarlesionespersonalesydañosalproducto.
Limpiezaymantenimiento
•Usesolamenteunpañohúmedooenjabonadoparalimpiarelpanelde
control.
•Paraevitarcualquierdañoalacabadodelgabinete,límpieloconunpaño
segúnseanecesario.Sisederramasuavizantelíquidooenpolvo,
blanqueadorodetergentesobreelgabinete,límpieloconunpaño
inmediatamenteyaquesepodríadañarelacabado.
•Nouseabrasivos,productosquímicosfuertes,amoníaco,blanqueadorcon
cloro,detergenteconcentrado,solventesoesponjasdemetaltexturizado
Algunosdeestosproductosquímicospuedendisolver,dañarodesteñirla
lavadora.
•Quitealfileresydemásobjetospuntiagudosdelaropaparaevitarquelas
piezasinternasserayen.
•Dejelatapaabiertadespuésdequeterminedelavarparapermitirquela
parteinteriordelalavadorasesequeyasíevitarlosmalosolores.
Mudanzasyvacaciones
•Cierrelosgrifosdeaguaydesconectelasmangueras.Elimineelaguade
todaslasmangueras.Deestamaneraevitaráeldañoocasionadoporlas
pérdidasdeaguasilasmanguerasserompenoseaflojanaccidentalmente.
•Desconecteelenchufeeléctrico.
•Sequelatinainteriordelavado.Sivaacambiarlalavadoradelugar,
desconectelamangueradedesagüe.
•Girecompletamentelaspatasniveladorashacialaderecha.
•Sólomuevayguardelalavadoraenposiciónvertical.
•Paraevitarelmohoylahumedad,dejelatapaabiertaparaquelahumedad
delinteriordelartefactoseevapore.
Guardadodesulavadoraenambientesfríos
•Lalavadoradebeestaratemperaturaambiente.
•Sirecibeestalavadoracuandolatemperaturaexteriorestábajoelpunto
decongelación,nolaaccionehastaquesehayacalentadoatemperatura
ambiente.
•Noinstalelalavadoranilapongaenfuncionamientoenlugaresdondela
temperaturaambienteestápordebajodelpuntodecongelación.
GUÍA DE CUIDADO Y LIMPIEZA
Bloqueo infantil:
• Parabloquearelpaneldecontrol,oprima“Comienzodemorado”y“Nivel
deagua”(WaterLevel)juntosduranteaproximadamente3segundos.Para
desbloquearlaunidad,oprimanuevamenteelbotón.
60
Español
Español
Sonidosnormalesdelfuncionamiento
Los siguientes sonidos se escuchan normalmente durante el funcionamiento de la
lavadora:
• Sonidos de golpes: Esto es normal cuando se sacudan de manera continua la
prendas completamente mojadas dentro de la lavadora.
• Ruido similar a una ráfaga de aire: Esto sucede cuando la tina de la lavadora
gira a muchas RPM (revoluciones por minuto).
• Cuando se encienden y se apagan los ciclos de Lavado y Enjuague también se
oyen sonidos similares a un clic.
Downloaded from www.Manualslib.com manuals search engine

Español
Español
Lalavadoranofunciona
•Compruebequeelaparatoestéconectado.
•Controlequeeltomacorrientedelaparedtengaelvoltajeadecuado.
•Controlesiesnecesarioreiniciarelinterruptorautomáticoosiesnecesario
cambiarelfusible.
•Controlequelalavadoranoestésobrecargada:Esprobablequetengaque
volverabalancearlacargayvolveradistribuirlaropa.
•Controlequelatapanoestéabierta.Esprobablequedebacerrarlatapa
correctamente.
•Lalavadorasedetieneenalgunosciclos.EsnormalenelcicloDelicado,que
tieneunperíodocortoderemojo,enelquelasprendasseremojandurante
unlapsocorto.Nooiráelfuncionamientodelalavadoraduranteeseperíodo
Cuandoseterminaeltiempoderemojo,comienzaautomáticamente.
Roblemasconelagua
•Nosalesuficienteagua:Puedeserquenecesiteabrirporcompletoelgrifo
delagua.Lasmanguerasdeaguapuedenestarenredadas.Estirela
manguera.Verifiqueelniveldeaguaseleccionado,esprobablequedeba
reajustarlo.
•Latemperaturadelaguanoeslacorrecta:Controlelatemperaturadel
dispositivoparacalentarelagua.Elaguacalientedebeestarauna
temperaturadealmenos120ºF–140ºF(49ºC–60ºC).Asegúresedeque
lasmanguerasdeentradaesténconectadascorrectamente.(lacalienteconla
calienteylafríaconlafría).
•Pérdidasdeagua:Estosedebealainstalaciónincorrectadelamanguera
dedesagüeolamangueradellenado.Eldesagüedesuhogarpuedeestar
tapadootenerpresióndeaguaconstante.Esprobablequetengaqueajustar
lasmangueras,revisarlastuberíasollamaralfontanero.
•Noseproduceeldesagüe:Estosedebealainstalaciónincorrectadela
mangueradedesagüe.Esprobablequedebaconectarlamanguerade
desagüecorrectamente.Reviselaposicióndelamangueradedesagüe.Para
queeldesagüeseacorrecto,asegúresedequelapartesuperiordelasalida
deldesagüeestéamenosde4pies(1,2m)porsobreelpiso.
DETECCIÓN Y SOLUCIÓN DE PROBLEMAS
61
Downloaded from www.Manualslib.com manuals search engine

Lalavadoraestáhaciendoruidos
•Esprobablequeseanecesariovolverainstalarlalavadora.(Consultela
seccióndeinstalacióndelalavadora).
•Esprobablequetengaquevolverabalancearlacargadelavado,yaque
puedeestardistribuidaenformadespareja.
•Esposiblequeelruidoseaocasionadopormonedas,botonesuotrosobjetos
pesados.(LealaGuíadeFuncionamiento–SonidosdeOperaciónNormales.)
•Sonidosdechirridos:Debidoalasobrecargadelatinadelavado.
•Ruidosdevibración:Debidoalanivelaciónincorrectadelalavadoraenel
pisoyaladistribucióndesparejadelaropaenlatina.
Problemasconlasprendas
•Lasprendasestándemasiadoarrugadas:sedebealaclasificaciónincorrect
delaropa,lasobrecargayellavadoconaguamuycalienterepetidasvece
Evitelassobrecargasyvuelvaaclasificarlacarga.Nomezcleprendaspe
dascomoropadetrabajoconprendaslivianascomoblusas,camisaslivianas
yotrasprendasdelicadas.Puedesernecesariolavarconaguatibiaofría.
•Quedanrestosdejabón:Esprobablequeeldetergentenoseestédisolviendo
enelagua.Reviselatemperaturadelaguaoagreguedetergentemientrasla
tinasellenadeaguaantesdecargarlasprendasparaevitarlosrestosde
jabónenlasprendas.
•Manchasensusprendas:Sedebenalusoincorrectodesuavizanteparala
ropa.Esprobablequedebaleerlasinstruccionesapropiadasdelenvasey
cumplirlasindicacionescorrectasdelfabricanteparaelusodelsuavizante.
•Lasprendasquedangrisáceasoamarillentas:estosedebeaquenoseintr
ducesuficientedetergenteenlascargasgrandes.Esprobablequedebaag
garmásdetergentealacarga.
•Lasprendasresultanrasgadasotienenagujeros;eldesgasteesexcesivo:esto
sedebealosobjetospuntiagudos,talescomoalfileresyhebillasdecinturó
Debesacarlosobjetospequeñosypuntiagudosqueesténsueltos.Ajusteci
turones,cierres,brochesdemetal,etc.Controlequeseestéutilizandobla
queadornodiluido.Nuncaagregueblanqueadornodiluidoallavado.
Notes: GWT950AW Only
62
Código del
problema
Motivo
LD
No funciona el desagüe o la velocidad
del desagüe es demasiado lenta
UL
La lavadora no está equilibrada
LF
El tiempo de entrada de agua supera el
tiempo configurado (40 minutos)
E6
Falla el sensor del nivel del agua. Llame
al servicio de reparaciones
F2
Protección contra desbordes de agua
Español
Español
Downloaded from www.Manualslib.com manuals search engine

Serviciotécnicoenelhogar
UNañoenterodeGARANTÍA
Durante12mesesapartirdelafecha
delacompraoriginal,Haierrepararáo
cambiarásincargocualquierpiezaque
falledebidoaundefectoenlosmateriales
oenlarealización,incluyendolamanode
obra.
Garantíalimitada
Despuésdeunañoapartirdelafecha
decompraminoristaoriginal,Haier
proporcionarálaspiezassincosto,como
seindicaacontinuación,parareemplazar
dichapiezaacausadedefectosenlos
materialesoenlarealización.Haieres
responsablesolamenteporelcostodela
pieza.Losdemáscostos,talescomomano
deobra,gastosporlosviajes,etc.,son
responsabilidaddelpropietario.
Segundoaquintoaño
Haierproporcionarálatinaexternaylas
piezasrelacionadasconelarmadodela
tinaexternaenelcasodequelapiezano
retengaelagua.
Segundoaséptimoaño
Haierproporcionarálatinainternade
aceroinoxidablesipresentaradefectosen
elmaterialoenlarealización.
Nota:Estagarantíacomienzaeldíadela
compradelartículo.Seledebepresentaral
representantedereparacionesautorizado
elrecibooriginaldelacompraantesde
realizarselasreparacionescubiertasporla
garantía.
Excepciones:Garantíaenusocomercialo
dealquiler
90díasdesdelafechaoriginaldecompra
paramanodeobra
90díasdesdelafechaoriginaldecompra
parapiezas
Noseaplicaningunaotragarantía
Paraserviciosdegarantía
Póngaseencontactoconelcentrode
reparacionesautorizadomáscercano.
Todoslosserviciosdebenserrealizados
porelcentrodereparacionesautorizado
deHaier.Parasaberelnombreyteléfono
delcentrodereparacionesautorizadomás
cercanollameal:1-877-337-3639.
Antesdellamar,porfavortengala
siguienteinformacióndisponible:
Númerodemodeloynúmerodeseriede
suartefacto.Elnombreydireccióndela
tiendadondecomprólaunidadylafecha
decompra.
Unadescripciónclaradelproblema.
Uncomprobantedecompra(recibodela
venta).
Estagarantíacubreartefactosdentrode
losEstadosUnidos,CanadáyPuerto
Rico.Noseencuentrancubiertosporesta
garantía:Cambiooreparacióndefusibles,
interruptoresautomáticos,cableadoo
tuberíasdelhogar.Unproductocuyo
númerodeseriehayasidoquitadoo
modificado.Losgastosporserviciosque
noseidentificanespecíficamentecomo
normales,talescomolazonanormalde
servicioolashorasnormales.Losdañosa
lasprendasLosdañosocurridosdurante
elenvío.Dañoscausadosporinstalación
ymantenimientoincorrectos.Dañospor
maluso,abuso,accidente,incendio,
inundaciónocasosdefuerzamayor.Daños
causadosporotrareparaciónquenosea
labrindadaporuncentrodereparaciones
ovendedorautorizadodeHaier.Daños
causadosporcorriente,voltajeosuministro
eléctricosincorrectos.Dañosprovocados
pormodificaciones,alteracionesoajustes
alproductonoautorizadosporHaier.
Elajustedeloscontrolesoperadospor
elusuariotalcomoseidentificaenel
manualdelusuario.Lasmangueras,
perillas,recipientesdepelusaytodos
loscomplementos,accesoriosypiezas
descartables.Losgastosdemanodeobra,
transporteparalareparaciónygastosde
envíoparalaremociónyelreemplazode
piezasdefectuosasdespuésdelperíodo
inicialde12meses.Dañoscausadospor
todoaquelloquenoseaelusonormal
hogareño.Cualquiergastodetransporteo
envío.
ESTA GARANTÍA LIMITADA SE
OTORGA EN LUGAR DE CUALQUIER
OTRA GARANTÍA, EXPRESADA
O IMPLÍCITA INCLUYENDO LAS
GARANTÍAS DE COMERCIABILIDAD
E IDONEIDAD PARA UN FIN
DETERMINADO.
Elrecursoprovistoenestagarantíaes
exclusivoyotorgadoenlugardecualquier
otrorecurso.
Estagarantíanocubredañosfortuitoso
consecuentes,demodoquelaslimitaciones
descritasanteriormentepuedennoaplicarse
asucaso.Algunosestadosnopermiten
limitacionesencuantoaladuraciónde
unagarantíaimplícita,demodoquelas
limitacionesdescritasanteriormentepueden
noaplicarseasucaso
Estagarantíaleconcedederechoslegales
específicos,yustedpuedetenerotros
derechos,quevaríandeunestadoaotro.
HaierAmerica,NuevaYork,NY10018
GARANTÍA LIMITADA
63
Español
Español
Downloaded from www.Manualslib.com manuals search engine

MadeinChina
FabriquéenChine
HechoenChina
HaierAmerica
NewYork,NY10018
PrintedinChina
GWT950AW,GWT750AW
Issued:JULY2008
IMPORTANT
DoNotReturnThisProductToTheStore
Ifyouhaveaproblemwiththisproduct,pleasecontactthe“HaierCustomerSatisfactionCenter”at
1-877-337-3639.
DATEDPROOFOFPURCHASEREQUIREDFORWARRANTYSERVICE
IMPORTANT
NepasRéexpédierceProduitauMagasin
Pourtoutproblèmeconcernantceproduit,veuillezcontacterleservicedes
consommateurs‘HaierCustomerSatisfactionCenter’au1-877-337-3639.
UNEPREUVED’ACHATDATEEESTREQUISEPOURBENEFICIERDELAGARANTIE.
IMPORTANTE
Noregreseesteproductoalatienda
Sitienealgúnproblemaconesteproducto,porfavorcontacteel“CentrodeServicioalConsumidorde
Haier”al1-877-337-3639(VálidosoloenE.U.A).
NECESITAUNAPRUEBADECOMPRAFECHADAPARAELSERVICIODELAGARANTIA
Part#WD-9999-57
Downloaded from www.Manualslib.com manuals search engine
-
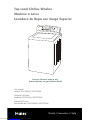 1
1
-
 2
2
-
 3
3
-
 4
4
-
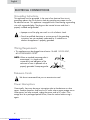 5
5
-
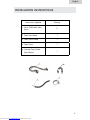 6
6
-
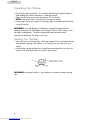 7
7
-
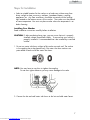 8
8
-
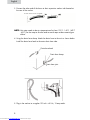 9
9
-
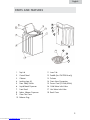 10
10
-
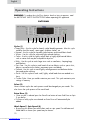 11
11
-
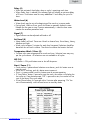 12
12
-
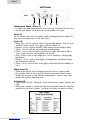 13
13
-
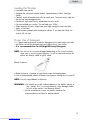 14
14
-
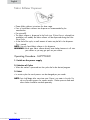 15
15
-
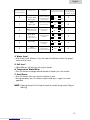 16
16
-
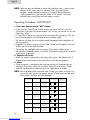 17
17
-
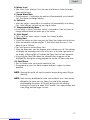 18
18
-
 19
19
-
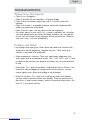 20
20
-
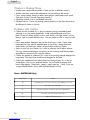 21
21
-
 22
22
-
 23
23
-
 24
24
-
 25
25
-
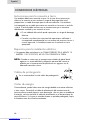 26
26
-
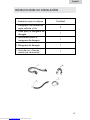 27
27
-
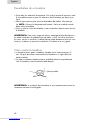 28
28
-
 29
29
-
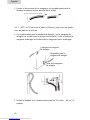 30
30
-
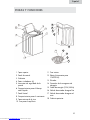 31
31
-
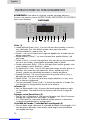 32
32
-
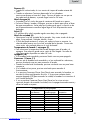 33
33
-
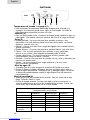 34
34
-
 35
35
-
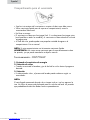 36
36
-
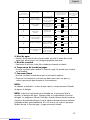 37
37
-
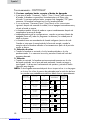 38
38
-
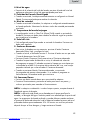 39
39
-
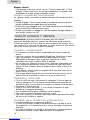 40
40
-
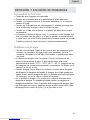 41
41
-
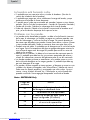 42
42
-
 43
43
-
 44
44


Haier GWT950AW El manual del propietario
- Categoría
- Lavadoras
- Tipo
- El manual del propietario
- Este manual también es adecuado para
en otros idiomas
- English: Haier GWT950AW Owner's manual
Artículos relacionados
-
Haier ESL-T21 Manual de usuario
-
-
-
-
Haier GWT800AW Manual de usuario
-
-
-
-
-