Brinkmann 125.16651900 El manual del propietario
- Categoría
- Barbacoas
- Tipo
- El manual del propietario
Este manual también es adecuado para

Use & Care Guide
4 Burner Gas Grill with Side
& Smoker Burner
Kenmore Elite Model Number: 125.16651900
Burner
US
ffl
U}
O
NOTICE TO INSTALLER"
LEAVETHESE INSTRUCTIONS WITHTHE GRILL
OWNER FOR FUTURE REFERENCE.
NOTICE TO CONSUMER"
RETAINTHIS OWNER'S MANUAL FOR FUTURE
REFERENCE.
Call us first if you have any problem with this product. We
can help you with questions about assembly and grill
operation or if there are damaged or missing parts when you
unpack this unit. Please call before returning to the store.
1-800-848-8915
8:30am-5:00pm CST, Mon thru Friday
140-9445-0
1008
Rev. 1
In the space below, record the model and serial
numbers and purchase date of your Outdoor Gas
Grill. You will find the model and serial numbers on
the back of the unit.
Model No.
Serial No.
Purchase Date
Keep this booklet and your Sears sales receipt in a safe
place for future reference.
Sears, Roebuck and Co., Hoffman Estates, IL 60179 U.S.A.
www.sears.com

Warranty Information ................................. 1
Important Safety Warnings .......................... 1-3
Product Features .................................... 3
Carton Contents .................................. 3-4
Assembly Instructions .............................. 5-6
Cylinder Specifications ................................ 8
Connecting the LP Tank ............................. 8-9
Leak Testing ..................................... 9-10
Pre-Start Check List ................................ 10
Lighting Procedures .............................. 10-11
Operating Instructions ............................. 12-13
Grill Cooking Tips ................................... 13
Temperature Chart .................................. 13
After Use Safety and Maintenance .................. 14-15
Troubleshooting .................................... 15
Wiring Diagram ..................................... 16
_lb DANGER: indicatesan imminently hazardous situation which, if
not avoided, will result in death or serious injury.
_, WARNING: Be alert to the possibility of serious bodily injury if the
instructions are not followed. Be sure to read and
carefully follow all of the messages.
_lb CAUTION: Indicates a potentially hazardous situation which, if not
avoided, may result in minor or moderate injury.
Kenmore Elite Two-Year Full Warranty
If this Kenmore Elite grill fails due to a defect in material
or workmanship within two years from the date of
purchase, call 1-800-4-MY-HOME® to arrange for free
repair (or replacement if repair proves impossible).
If any stainless steel burner in this grill ever rusts
through, call 1-800-4-MY-HOME® for a free
replacement burner. After the second year from the date
of purchase, you must pay the labor cost if you wish to
have the burner installed.
This warranty excludes igniter batteries and grill part
paint loss or surface rusting, which are either
expendable parts or conditions that can result from
normal use, accident or improper maintenance.
This warranty is void if this grill is ever used for
commercial or rental purposes.
This warranty gives you specific legal rights, and you
may also have other rights which vary from state to
state.
Sears, Roebuck and Co.,
Hoffman Estates, IL 60179
WE WANT YOU TO ASSEMBLE AND USE YOUR GRILL AS
SAFELY AS POSSIBLE.THE PURPOSE OF THIS SAFETY
ALERT SYMBOL A'L IS TO ATTRACT YOUR ATTENTION
TO POSSIBLE HAZARDS AS YOU ASSEMBLE AND USE
YOUR GRILL.
WHEN YOU SEE THE SAFETY ALERT SYMBOL _lb
PAY CLOSE ATTENTION TO THE INFORMATION WHICH
FOLLOWS!
_, READ ALL SAFETY WARNINGS AND
INSTRUCTIONS CAREFULLY BEFORE ASSEMBLING
AND OPERATING YOUR SMOKER.
If you smell gas:
1. Shut off gas to the appliance.
2. Extinguish any open flames.
3. Open lid.
4. If odor continues, keep away from
the appliance and immediately call
your fire department.
Failure to follow these instructions could
result in fire or explosion which could
cause property damage, personal injury or
death.
.
DO NOT store or use gasoline or other
flammable liquids or vapors in the
vicinity of this or other appliance.
.
An LP cylinder not connected for use
shall not be stored in the vicinity of this
or any other appliance.
Failure to follow these instructions could
result in fire or explosion which could cause
property damage, personal injury or death.
a) DO NOT store a spare LP gas cylinder
under or near this appliance.
b) Never fill the cylinder beyond
80% full.
c) If the information in (a) and (b) are
not followed exactly, a fire causing
death or serious injury may occur.

• Never use natural gas in a unit designed for
liquid propane gas.
• Never use charcoal or wood briquets in a gas
grill. Flavoring chips must be contained in a
metal smoking box to contain ash and
prevent fires.
• Leak test all connections before first use,
even if grill was purchased fully assembled
and after each tank refill.
• Never check for leaks using a match or open
flame.
ZLCAUTION: Strong odors, colds, sinus
congestion, etc. may prevent the
detection of propane. Use caution
and common sense when testing
for leaks.
• Always keep your gas grill free and clear of
gasoline, lighter fluid, paint thinner, or other
flammable vapors and liquids or combustible
materials.
• Always check the grill prior to each use as
indicated in the "Pre-Start Check List"
section of this manual.
• DO NOT obstruct the flow of combustion or
ventilation air.
• Keep children and pets away from hot grill.
DO NOT allow children to use or play near
this grill.
• DO NOT leave the grill unattended while in
use.
• DO NOT allow the gas hose to come in
contact with hot surfaces.
• DO NOT allow grease from drain hole to fall
on hose or valve regulator assembly.
• Keep any electrical supply cords away from
water or heated surfaces.
• Keep a fire extinguisher on hand acceptable
for use with gas products. Refer to your local
authority to determine proper size and type.
• For household use only. DO NOT use this
grill for anything other than its intended
purpose.
Visually check burner flames for proper
operation (see pictorial in "Lighting
Procedures"). Spiders or other insects can
nest in the burner causing gas blockage.
DO NOT use while under the influence of
drugs or alcohol.
Grill is hot when in use. To avoid burns:
• Wear protective gloves or oven mitts.
• DO NOT touch any hot grill surfaces.
• DO NOT wear loose clothing or allow
hair to come in contact with grill.
To protect against electric shock, do not
immerse cords, electric elements or plugs in
water or other liquid.
Unplug from the outlet when not in use and
before cleaning. Allow to cool before putting
on or taking off parts.
Do not operate any outdoor cooking gas
appliance with a damaged cord, plug, or after
the appliance malfunctions or has been
damaged in any manner. Contact the
manufacturer for repair.
Do not let the cord hang over the edge of a
table or touch hot surfaces.
• Do not use an outdoor cooking gas
appliance for purposes other than intended.
Use only a Ground Fault Interrupter (GFCI)
protected circuit with this outdoor cooking
gas appliance.
• Never remove the grounding plug or use with
an adapter of 2 prongs.
Use only extension cords with a 3 prong
grounding plug, rated for the power of the
equipment and approved for outdoor use
with a W-A marking.
A USE CAUTION AND COMMON SENSE WHEN
OPERATING YOUR GAS GRILL.
FAILURE TO ADHERE TO THE SAFETY
WARNINGS AND GUIDELINES IN THIS
MANUAL COULD RESULT IN SEVERE BODILY
INJURY OR PROPERTY DAMAGE.
SAVE THIS MANUAL FOR FUTURE
REFERENCE.
2

FOROUTDOORUSEONLY.DONOT
operate indoors or in an enclosed area
such as a garage,shed or breezeway.
Useyour grill OUTDOORSin awell
ventilatedspace awayfrom dwellings or
other buildings to preventdangers
associatedwith gas accumulationand toxic
vapors.Although minimum clearanceis
36 inches(91cm),we strongly recommend
that you do notoperatethis appliancewithin
10ft. (3.0 m) of any structure, combustible
material or extra LP gas cylinders not
attached to the appliance. Not adhering to
these clearances will prevent proper
ventilation and may increase the risk of a fire
and/or property damage, which could also
result in personal injury.
Maintain a minimum clearance of
36 inches (91 cm) between all sides
of grill, deck railings, walls or other
combustible material. DO NOT use grill
under overhead unprotected combustible
construction.
• LP GAS CYLINDER (NOTSUPPLIEDWITH
THIS GRILL).
• The LP cylinder is available for purchase at the
same location the grill was purchased
The LP (Liquid Propane) gas cylinder
specifically designed to be used with this grill
must have a 20 lb. (9.1 kg) capacity
incorporating a Type 1 cylinder valve and an
over-filling protection device (OPD).
This grill is designed to fit Worthington,
Manchester or SMPC brand 20 lb. (9.1 kg)
cylinders. Other brand DOT cylinders may fit
this grill if the cylinder has similar dimensions
of the top and bottom rings.
DO NOT connect this grill to an existing #510
POL cylinder valve with Left Hand threads. The
Type 1 valve can be identified with the large
external threads on the valve outlet.
DO NOT connect to a propane cylinder
exceeding this capacity.
DO NOT connect to a cylinder that uses any
other type of valve connection device.
INSTALLATION INFORMATION:
The installation of this appliance must be in
accordance with:
All applicable local codes, or in the absence of
local codes, either:
• National Fuel Gas Code - ANSI-Z223.1 NFPA 54
• Natural Gas and Propane Installation Code:
CAN/CGA B149.1
• Propane Installation Code: CAN/CGA B149.2
(Canada)
To check your local codes, see your local LP gas
dealer. This appliance is adjusted and shipped for use
with LP gas. If an external electrical source is utilized,
it must be electrically grounded in accordance with
local codes, or in the absence of local codes, with the
National Electrical Code, ANSI/NFPA 70, or the
Canadian Electrical Code, CSA 22.1 and a minimum
15 amp supply is needed.
Stainless Steel Wire
Warming Rack
Stainless Steel
Cooking
4 Stainless Steel
Burners
Smoker Burner
7,500 BTUs
Stainless Steel
Side Burner
3

Make sure you have all items listed under CARTON CONTENTS
and HARDWARE BAG CONTENTS before you begin the
assembly process.
Qty.
(_ 1 Grill Body Assembly
(_ 4 Heat Diffusers
(_) 1 Warming Rack
3 Cooking Grills
(_) 1 Side Table
(_) 1 Grease Tray
(_ 1 Grease Cup Bracket
(_) 1 Grease Cup
(_) 3 Smoker Cooking Grills
(_) 8 Support Racks
(_) 1 Wood Chip/Water Pan
(_) 1 Wood Chip/Water Pan Support
@ 1 Burner Grate
(_) 1 Smoker Grease Tray
/ / I
®
Inspect contents of the box to ensure all parts are included and undamaged.
If any parts are missing or damaged, call 1-800-848-8915.
4

Choose a good, cleared assembly area
and get a friend to help you put your grill
together. Lay cardboard down to protect
grill finish and assembly area.
,_, CAUTION:
Some parts may contain
sharp edges. Wear
protective gloves if
necessary.
Step 1
Place the heat diffusers on lower level of
grill body assembly directly above
burner. Place large cutout towards the
back of the grill.
Step 2
Place cooking grills on support ribs
directly above heat diffusers.
Step 3
Insert warming rack onto brackets so that
itsits above the cooking grills.
Step 4
Insert grease tray into opening on
backside of grill. Make sure to slide tray
onto tracks as illustrated.
Step 5
To assemble grease cup bracket, first
open the right door and insert the bracket
in the two slots on the left and right side of
square hole.
/ / 1 -_'-"Warming Rack
g Grills
Diffusers
,_:% //.4
f°%ll _ i ; _lJ
!
l
c
d
d

\
\
\
o
/
/
C77777777773
!
L i C777777777773
i
Step 6
Slide grease cup into grease cup bracket
located under grease tray on backside of
grill.
Step 7
Attach the left side table to the left
side of grill body. Place left side table
over bolts and slide down, then tighten
bolts securely.
Note: Refer to Parts Diagram on Page 4 to
assist you in the assembly of Step 8.
Step 8
Insert the support racks into the holes on
the inside walls of the smoker. Slide the
smoker cooking grills and wood
chip/water pan support onto the support
racks. Then put the wood chip/water pan
onto the wood chip/water pan support.
Place the grease tray into the smoker
chamber under the burner.
Step 9
Remove ignitercap and insertbattery with
positive end of battery toward igniter cap.
Replace igniter cap.
Step 10
Place side burner grate on top of side
burner.
6

Completed Assembly
@

When purchasing or exchanging a cylinder for your gas grill, it must
be constructed and marked in accordance with the specifications for
LP gas cylinders of the U.S. Department of Transportation (DOT) or
the National Standard of Canada, CAN/CSA-B339 Cylinders,
Spheres and Tubes for Transportation of Dangerous Goods; and
Commission, as applicable; and provided with a listed over-filling
prevention device (OPD), and provided with a cylinder connection
device compatible with the connection for outdoor cooking
appliances.
The cylinder must also be equipped with:
• A shut-off valve terminating in a Type 1 gas cylinder valve
outlet.
• A Type 1 valve that prevents gas flow until a positive seal
is obtained.
• An arrangement for vapor withdrawal.
• A collar to protect the cylinder shut-off valve.
• A safety relief device having direct communication with
the vapor space of the cylinder.
• A listed over-filling prevention device (OPD).
Turn off the cylinder valve when your grill is not in use.
• Handle the tank with care.
• Always secure the cylinder in an upright position.
• Never connect an unregulated LP gas cylinder to your
grill.
• DO NOT expose LP gas cylinders to excessive heat or
ignition sources.
• DO NOT store a spare LP gas cylinder under or near your
grill.
• Allow only qualified LP gas dealers to fill or repair your
LP gas cylinder.
• DO NOT allow the cylinder to be filled beyond 80%
capacity.
• Read and follow all warnings and instructions that are on
the cylinder and that accompany this product.
Never store a spare LP gas cylinder under or near your
grill. This could cause excess pressure to be expelled
through the vapor relief valve resulting in fire, explosion,
or severe personal injury including death.
Note: PROPANE GAS IS HEAVIER THAN AIR AND WILL
COLLECT IN LOW AREAS.PROPER VENTILATION
IS EXTREMELY IMPORTANT.
Keep the ventilation opening(s) of the LP gas cylinder
enclosure free and clear from obstructions and debris.
DO NOT insert any foreign objects into the valve outlet.
Damage to the back-check could result. A damaged
back-check can cause a leak, possibly resulting in
explosion, fire, severe bodily harm, or death.
FILLING THE LP GAS CYLINDER:
Allow only qualified LP gas dealers to properly fill or
repair your LP gas cylinder.
New tanks should be purged prior to filling; inform LP
gas dealer if you are using a new tank.
DO NOT allow the cylinder to be filled beyond 80%
capacity. Over-filled tanks can create a dangerous
condition. Over-filled tanks can build-up pressure and
cause the relief valve to expel propane gas vapors. The
vapor is combustible and if it comes in contact with a
spark source or flame an explosion causing severe
burns, bodily harm, or death could occur.
The 20 Ib LP cylinder used with this smoker must
conform to the following requirements.
Diameter- 12" (30.5cm)
Height 18" (45.7cm)
With a maximum capacity of 20 pounds. The gas
cylinder used must include a collar to protect the
cylinder valve. The cylinder supply system must be
arranged for vapor withdrawal.
Place dust cap on cylinder valve outlet whenever the
cylinder is not in use. Only install the type of dust cap
on the cylinder valve outlet that is provided with the
cylinder valve, other types of caps or plugs may result
in leakage of propane.
If you exchange a cylinder with a qualified exchange
program, be sure the cylinder has a Type 1 valve and an
over-filling prevention device (OPD).
INSTALLING THE LP GAS CYLINDER ONTO
THE GRILL:
1.
2.
3.
4.
5.
Check that the cylinder valve is closed by turning the knob
clockwise.
Open the right side door of your grill cabinet. Place the
cylinder into the tank holder in the bottom of cabinet.
Orient the cylinder such that the valve opening faces
forward, and so that the hose is not kinked or damaged.
Fully tighten the tank retention screw on the pull out tray to
secure tank.
Attach or detach regulator to the LP gas cylinder only when
cylinder is at rest in tank holder.
8

HOSE AND REGULATOR:
Your grill is equipped with a Type 1 connection device with the
following features:
1. The system will not allow gas flow from the cylinder until a
positive connection to the valve has been made.
Note: The cylinder valve must be turned off before any
connection is made or removed.
2. A thermal device that will shut off the gas flow if the device is
subject to temperatures above 240°F to 300°F (115°C to
150°C). If this should happen, remove the entire regulator
assembly and dispose of properly. In order to insure proper
operation, any replacement of the fuel tank regulator assembly
has to be done with parts authorized by the grill manufacturer.
The cause of the excessive heat should be determined and
corrected before using your grill again.
3. A regulator flow limiting device, when activated, restricts the
flow of gas to 10 cubic feet per hour. If the flow limiting device is
activated, perform Regulator Resetting Procedure.
REGULATOR RESETTING PROCEDURE:
1.
2.
Make sure that all burners are off. Turn off the cylinder valve
and disconnect regulator from LP gas tank. Wait approximately
two minutes.
Reattach regulator and slowly turn cylinder valve back on. The
flow limiting device will now be reset.
Never use your grill without leak testing all gas
connections and hoses. See the section on "Leak
Testing" in this manual for proper procedures.
The pressure regulator and hose assembly supplied
with your gas grill must be used.
DO NOT attempt to connect grill, as purchased for LP
(propane) gas, to any other fuel supply source such as
a natural gas line.
DO NOT use any other pressure regulator/hose
assembly other than the one supplied with your grill.
Replacement pressure regulator/hose assembly must
be done with identical replacement parts.
DO NOT attempt to adjust or repair the regulator. The
regulator is designed to operate at a maximum output
pressure of 11 inches of water column (2.74 kPa).
During assembly and/or replacement of the gas cylinder, keep the
gas supply hose free of kinks and/or damage.
Visually inspect the hose assembly prior to each use for evidence of
damage, excess wear, or deterioration. If found, replace the
assembly before using your grill. In order to insure proper operation,
any replacement of the hose assembly must be done with identical
replacement parts. Call 1-800-848-8915 for replacement parts.
CONNECTING HOSE AND REGULATOR
TO AN LP GAS CYLINDER
Ensure the tank valve is CLOSED prior to connecting
the LP gas cylinder to your grill. Turn the valve knob
clockwise to properly close the valve. Read and follow
all instructions and warnings on the supply hose safety
tags. Read and follow all warnings in this manual
concerning the safe use of LP gas cylinders and the
hose and regulator before connecting cylinder to grill.
Read and follow all warnings on the LP cylinder.
CONNECTING HOSE AND REGULATOR:
1.
2.
3.
4.
8.
6.
7.
Check that the cylinder valve is closed by turning the knob
clockwise.
Make sure that all burners are off.
Remove the protective plastic cap from the cylinder valve and the
connection device.
Hold regulator and insert the nipple of connection device into the
LP cylinder valve outlet. Ensure that the device is centered
properly.
Turn the large coupling nut clockwise by hand and tighten to a
full stop. Take care not to cross thread the coupling nut onto the
cylinder valve. Do not over-tighten the knob onto the valve. Do
not use tools to tighten connection.
Note: If you are unable to make the connection, repeat
Steps 4 and 5.
Check that the hose does not contain kinks, does not contact
sharp edges, and does not contact surfaces that may become
hot during use.
Leak check all fittings before lighting your grill. See section on
"Leak Testing" in this manual.
To prevent fire or explosion hazard:
• DO NOT smoke or permit ignition sources in the area
while conducting a leak test.
• Perform test OUTDOORS only in a well ventilated area.
• Never perform a leak test with a match or open flame.
• Never perform a leak test while the grill is in use or
while grill is still hot.
9

WHEN TO PERFORM A LEAK TEST:
• After assembling your grill and before lighting for the
first time, even if purchased fully assembled.
• Every time the LP gas cylinder is refilled or if any of the
gas components are replaced.
• Any time your grill has been moved.
• At least once per year or if your grill has not been used
for more than 60 days.
CHECKING FOR LEAKS:
After all connections are completed, check all connections and
fittings for leaks with a soap solution.
• With all valves closed, apply the leak check solution (50/50
mix of dishwashing detergent and water) to all gas carrying
connections, fittings and to tank seams.
• Open tank valve.
Presence of bubbles at areas of wet solution indicates a gas
leak. If leaks are detected or you smell or hear gas, shut off
the valve and repair the leak or replace the defective part. Do
not use the smoker until all leaks are corrected.
LP tanks are intended for operation in the upright position
only.
If the appliance is not in use, the gas must be turned off at
the supply cylinder and the cylinder should be disconnected
from the appliance.
Storage of the appliance indoors is only permissible if the
cylinder is disconnected and removed from the appliance.
Ensure that the grill is properly assembled.
Inspect the gas supply hose for burns, chaffing, kinks, and
proper routing before each use. If it is evident there is excessive
abrasion or wear, or the hose is cut, it must be replaced prior
the grill being used. In order to insure proper operation, any
replacement of the fuel tank regulator must be done with
identical replacement parts. Call 1-800-848-8915 for
replacement parts.
Leak check all gas connections and hose. See section on "Leak
Testing".
Make sure all electrical appliances are connected to grounded
power source.
Ensure that all electrical supply cords are properly grounded.
Keep any electrical supply cord and the fuel supply hose away
from any heated surfaces. Hose should be at least 3 inches
from hot surfaces.
Position your grill on level ground in a well ventilated location, a
safe distance from combustible materials, buildings and
overhangs.
Properly place the empty grease tray under the grease drain
hole in the bottom of the grill to catch grease during use.
DO NOT obstruct the flow of combustion and ventilation air.
Read, understand and follow all warnings and instructions
contained in this manual. DO NOT skip any of the warnings
and instructions contained in the preceding sections of this
manual.
Property damage, bodily harm, severe burns, and death
could result from failure to follow these safety steps. These
steps should be performed after the grill has been
assembled and prior to each use. DO NOT operate this grill
until you have read and understand ALL of the warnings
and instructions in this manual.
LIGHTING INSTRUCTIONS:
Follow the instructions exactly.
1. OPEN THE GRILL LID before attempting to light a
burner so that fumes do not accumulate inside the grill.
An explosion could occur if grill lid is closed.
2. Make sure that all burners are off.
3. Turn on the fuel supply by rotating the cylinder valve
knob counter-clockwise to full open.
4. DO NOT stand with head, body, or arms over the grill
when lighting.
10

Note: If burner does not light or flame is too low, you may
have spider or other insect blockage in burner, or the
flow limiting device has been activated. See "Burner
Assembly/Maintenance" under Proper Care and
Maintenance, or "Regulator Resetting Procedure" under
Connecting LP Cylinder and Hose/Regulator to Grill.
LIGHTING THE MAIN BURNERS:
1.
2.
3.
4.
Open lid before lighting burner.
Make sure all control knobs are in the "OFF" position.
Push and hold down any MAIN BURNER control knob and turn
to f "Hi" and you will hear a clicking sound as the burner is
being ignited. Once the burner lights, turn control knob to
desired setting.
If ignition does NOT occur in 5 seconds, turn control knob to
OFF, wait 5 minutes to allow gas to clear away and repeat
lighting procedure.
5. To light other burners, follow Step 3.
6. To turn off, turn each control knob clockwise until it locks in the
"OFF" position. This extinguishes the flame, but does not turn
off the gas flow from the cylinder. To stop gas flow, you must
turn the cylinder valve off.
MATCH LIGHTING THE MAIN BURNERS:
1.
2.
3.
4.
5.
6.
7.
Open lid before lighting.
Turn the burner control knobs to "OFF".
Place a paper match in the end of the matchlighter. Strike the
match and place through lighting hole in the left hand side of
the grill to approximately 1/2" (1 to 2 cm) from the burner.
Turn on the FAR LEFT burner control knob to the "Hi" position.
The burner should light within 5 seconds.
If the burner does not light, turn the control knob to "OFF" and
wait 5 minutes for gas to clear away and repeat lighting
procedure.
To light other burners, push and turn control knobs to "Hi" in
sequence from left to right. Follow Step 5.
If the burner does not light within the first few attempts of match
lighting, there is a problem with the gas supply. Turn off the gas
at the burner and cylinder. DO NOT attempt to operate the grill
until the problem is found and corrected. See "Troubleshooting"
section of this manual.
Note: If burner does not light or flame is too low, you may
have spider or other insect blockage in burner, or the
flow limiting device has been activated. See "Burner
Assembly/Maintenance" under Proper Care and
Maintenance, or "Regulator Resetting Procedure" under
Connecting LP Cylinder and Hose/Regulator to Grill.
LIGHTING THE SIDE BURNER:
1. Open lid before lighting side burner.
2. Make sure control knob is in the "OFF" position.
3. Push and hold down SIDE BURNER control knob and turn to
_" "Hi" and you will hear a clicking sound as the burner is being
ignited. Once the burner lights, turn control knob to desired
setting.
4. If ignition does NOT occur in 5 seconds, turn control knob to
"OFF", wait 5 minutes to allow gas to clear away and repeat
lighting procedure.
5. To turn off, turn control knob clockwise until it locks in the "OFF"
position.
11
MATCH LIGHTING THE SIDE BURNER:
1.
2.
3.
Open the lid to the burner before lighting.
Turn the burner control knob to "OFF".
Strike and carefully place a match approximately 1/2"
(1 to 2 cm) from the burner.
4. Turn the burner control knob to the "Hi" position. The burner
should light within 5 seconds.
5. If the burner does not light, turn the control knob to "OFF" and
wait 5 minutes for gas to clear away and repeat lighting
procedure.
6. If the burner does not light within the first few attempts of match
lighting, there is a problem with the gas supply. Turn off the gas
at the burner and cylinder. DO NOT attempt to operate the grill
until the problem is found and corrected. See "Troubleshooting"
section of this manual.
LIGHTING THE SMOKER:
1. Open door before lighting burner.
2. Make sure control knob is in the "OFF" position.
3. Push and hold down SMOKER BURNER control knob and turn
to _ "Hi" and you will hear a clicking sound as the burner is
being ignited. Once the burner lights, turn control knob to
desired setting.
4. If ignition does NOT occur in 5 seconds, turn control knob to
"OFF", wait 5 minutes to allow gas to clear away and repeat
lighting procedure.
5. To turn off, turn control knob clockwise until it locks in the "OFF"
position.
MATCH LIGHTING THE SMOKER:
1.
2.
3.
Open the door to the burner before lighting.
Turn the burner control knob to "OFF".
Strike and carefully place a match approximately 1/2" (1 to 2
cm) from the burner.
4. Turn the burner control knob to the "Hi" position. The burner
should light within 5 seconds.
5. If the burner does not light, turn the control knob to "OFF" and
wait 5 minutes for gas to clear away and repeat lighting
procedure.
6. If the burner does not light within the first few attempts of match
lighting, there is a problem with the gas supply. Turn off the gas
at the burner and cylinder. DO NOT attempt to operate the grill
until the problem is found and corrected. See "Troubleshooting"
section of this manual.
Note: Observe flame height when lit: Flame should be a Blue/
Yellow color between 1"-2" when burner is on "Hi".
TURNING OFF THE GRILL:
1. Turn off the cylinder valve.
2. Turn all burner knobs to OFE
Note: Turn off LP cylinder first to prevent gas from being
left in the system under pressure.
A'k CAUTION: The cylinder valve should always
be in the off, or closed, position / _ ,_
when the grill is not in us___
To turn off the cylinder valve, / _./ ....... _/
turn knob clockwise until it stops. \ ./

Never use Charcoal or Lighter Fluid inside your Gas Grill.
Read and follow all warnings and instructions contained in
the preceding sections of this manual.
BREAKING INYOUR GRILL:
• In manufacturing and preserving the components of your grill,
oil residue may be present on the burner and cooking surfaces
of your grill.
• Before cooking on your grill for the first time you should preheat
it for 15 minutes on "Hi" to burn off these residual oils.
PREHEATING THE GRILL:
Prior to use, it is recommended that you preheat your grill.
This ensures that the grilling surfaces are at the desired
temperatures to sear the food sugars when cooking. After
lighting your grill, set the main burner flame adjustment to the
"Hi" position for 10 to 15 minutes.
CONTROLLING FLARE-UPS:
Flare-ups are a part of cooking meats on a grill. This adds to
the unique flavor of cooking on a gas grill. Excessive flare-ups
can over-cook your food and cause a dangerous situation for
you and your grill. Excessive flare-ups result from the build-up
of grease in the bottom of your grill. If this should occur, DO
NOT pour water onto the flames. This can cause the grease to
splatter and could result in serious burns or bodily harm. If
grease fire occurs turn off the main burners until the grease
burns out. Use caution when opening the lid as sudden flare-
ups may occur.
DO NOT leave your grill unattended while in use.
• DO NOT move grill when in use.
• DO NOT use water to extinguish flare-ups.
• Have fire extinguisher readily accessible suitable for
use with gas appliances.
TO MINIMIZE FLARE-UPS:
• Trim excess fat from meats prior to cooking.
• Cook meats with high fat contents (chicken or pork) on Low
settings or indirectly.
• Ensure that your grill is on level ground and the grease is
allowed to evacuate the grill through the drain hole in the
bottom and into grease cup.
INDIRECT COOKING:
Indirect cooking is the process of cooking your food without
the heat source being directly under your food. You can sear
meats over a high flame on one side of the grill while slow
cooking a roast on the other (unlit) side of the grill.
THE INTERIOR LIGHT:
• The interior light provides outdoor lighting when operating
grill at night.
• The light can be operated from the push button light switch
located on the front control panel.
Note:
When replacing bulb,
unscrew lens and pull
old bulb straight out of
the bulb holder. Make
certain that "legs" on
new bulb are straight.
Insert "legs" into the
two holes in the bulb
holder. Gently push
bulb straight in until fully seated and centered. Replace lens
back on light. When replacing bulbs, never exceed 25 watt
bulbs. The preferred bulb is a standard 20-25 watt quartz bulb
available at most hardware stores.
THE SIDE BURNER"
• The side burner can be used to prepare side dishes such as
beans, potatoes, corn, or to warm sauces.
• The burner valve can be adjusted from high to low depending
upon your cooking demands.
• When using an AC current rotisserie, it must be
electrically grounded in accordance with local codes, or
in the absence of local codes:
• In the US: The National Electrical Code - ANSI-NFPA
No. 70 - Latest Edition
• In Canada: the Canadian Electrical Code - CSA C22.1
• The Rotisserie is equipped with a three pronged plug for
your protection against electrical shock. This plug
should be plugged directly into a properly grounded 3
prong receptacle. Never cut or remove the grounding
plug. Any extension cord must also have a 3 prong
receptacle.
• All electrical supply cords should be kept away from
water and any hot surfaces of the grill.
• Read instructions on lighting your grill to light the side
burner.
• Never close the side burner cover when the burner is lit.
Use a 10" diameter pot or smaller that does NOT have an
extended handle when cooking on the side burner.
Center pot over burner.
Use caution to avoid bumping grill, side burner or pot to
prevent pot from spilling contents possibly leading to
severe burns.
DO NOT use side burner to deep fry food in oil to avoid
dangers associated with oil igniting creating a very
dangerous situation.
12

USING THE SMOKER
In manufacturing and preserving the components of your smoker,
oil residue may be present on the burner and cooking surfaces of
your smoker.
Before cooking on your smoker for the first time you should preheat
it for 15 minutes on "Hi" to burn off these residual oils.
Never apply paint to the interior surface of your smoker. Paint toxins
may contaminate your food. However, if paint becomes necessary
after use, see the section in this manual concerning After Use
Safety and Maintenance.
ADDING WATER
Place the wood chip/water pan into the rack at the bottom of the
smoker. To add water before cooking, simply fill the wood chip/water
pan with water up to 1/2" (1.25 cm) below the rim. To add water
while the smoker is hot, DO NOT pull the wood chip/water pan pan
out beyond the rack.
Cooking Tip:
To make adding water easier and safer, use a clean watering
can with a long spout.
ADDING WOOD CHIPS
To add wood chips before cooking, simply fill the wood chip/water
pan with your choice of flavoring hardwood chips. The amount and
type of wood you use is entirely up to you. One full pan is typically
enough for several hours of smoking. Once the pan is filled, set the
pan in the smoker and cover with lid.
To add wood chips while cooking, we recommend using tongs or
long handled pliers to remove the pan lid and to place the pieces
into the wood chip pan without removing the pan. It is not
recommended to remove the wood chip/water pan while the smoker
is in operation.
A'_ CAUTION:
The wood chip/water pan and lid get very
hot. Avoid handling them while in use.
Always wear protective oven mitts when
handling hot components.
Water
Wood Chip Pan Lid
NO%&_V3
......................... S
Wood Chips
Cooking Tips - Flavoring wood:
• Small wood chips work best inside the wood chip box.
• Use dry hardwoods such as hickory, pecan, apple, cherry,
or mesquite.
• Most fruit or nut tree woods produce excellent smoke
flavoring.
• Do not use resinous woods such as pine or plywood.
These usually produce unpleasant flavoring.
• Let your taste be your guide - experiment with different
types and quantities of wood chunks, chips, or sticks.
You can even mix woods.
To produce more smoke and to prevent fast burning, pre-
soak the wood chips in a separate bowl of water for at
least 20 minutes, or wrap the chips in perforated
aluminum foil.
Most smoke flavoring occurs within the first hour of
cooking. Adding wood chips after the first hour is
typically not necessary unless extra smoke flavoring is
desired.
CLEANING
Always wash hands thoroughly with soap and hot water prior to
handling food and after handling raw meat, uncooked poultry or
seafood.
• When using a platter to carry raw meat, uncooked poultry or
seafood to the grill, make sure to wash the platter thoroughly
with soap and hot water before placing cooked foods back on
the platter, or use different platters for raw and cooked foods.
• Never use the same utensils when handling raw meat,
uncooked poultry or seafood unless you wash the utensils
thoroughly with soap and hot water.
• Never re-use marinade from raw meat or uncooked poultry on
foods that have been cooked and are ready to be served.
WARNING: To ensure that it is safe to eat,
food must be cooked to the minimum internal
temperatures listed in the table below.
USDA* Safe Minimum Internal Temperatures
Fish ............................ 145° F
Pork ............................ 160° F
Egg Dishes ...................... 160° F
Steaks and Roasts
of Beef, Veal or Lamb ............. 145° F
Ground Beef, Veal or Lamb ........ 160° F
Whole Poultry
(Turkey, Chicken, Duck, etc.) ....... 165° F
Ground or Pieces Poultry
(Chicken Breast, etc.) ............. 165° F
t 3 * United States Department of Agriculture

HELPFUL HINTS
• If you pre cook meat or poultry, do so immediately before
grilling
• Never defrost meat at room temperature or on a countertop
• Refrigerate leftovers within 2 hours of taking food off the grill
• For additional information, please phone the USDA toll free
Meat & Poultry Hotline at 8005354555
PROPER CARE AND MAINTENANCE:
• To protect your grill from excessive rust, the unit must be kept
clean and covered at all times when not in use.
• Wash cooking grills and heat diffusers with hot, soapy water,
rinse well and dry. Lightly coat cooking grill with vegetable oil or
vegetable oil spray.
Clean inside and outside of grill by wiping off with a damp cloth
Apply a light coat of vegetable oil or vegetable oil spray to the
interior surface to prevent rusting
The stainless steel exterior surface of your grill can be cleaned
with stainless steel cleaner
• Never apply paint to the interior surface Rust spots on the
interior surface can be buffed, cleaned then lightly coated with
vegetable oil or vegetable oil spray to minimize rusting
CLEANING AND MAINTENANCE:
For safe grilling and peak performance of your grill, perform all
Cleaning and Maintenance points in this list at least twice a
year or after extended periods of storage.
Keep the appliance free and clear of combustible materials,
gasoline and other flammable vapors and liquids.
Keep the ventilation openings of the cylinder enclosure free and
clear of debris.
• Visually check burner flames for proper operation (see pictorial
in Lighting Procedures) Spiders or other insects can nest in
the burner causing gas blockage
• Be sure to tighten up all hardware (nuts, bolts, screws, etc.) at
least twice per year.
,_ CAUTION! Some parts may contain sharp edges. Wear
protective gloves if necessary.
Remove the cooking grills, heat diffusers and burners from
inside your grill. Use a brush with hot water and detergent to
remove excess residue. NEVER use a commercial oven
cleaner. Rinse completely with water. Towel dry and replace all
components as described in the assembly instructions.
Protect all Electrical Equipment (Lights, Electrical Cord.),
Electrical Cord and Plug from water before cleaning the
appliance or grill. Do not immerse the electrical Equipment,
Electrical Cord or Plug in water or other liquid.
Do not use the electrical appliances for other than intended
use
Unplug the electrical cord from electrical outlets when not in
use If storing your grill outdoors, cover the grill with a grill cover
for protection from the weather
BURNER ASSEMBLY/MAINTENANCE
1.
2.
3.
4.
Although your burners are constructed of stainless steel, they
may corrode as a result of the extreme heat and acids from
cooking foods Regularly inspect the burners for cracks,
abnormal holes, and other signs of corrosion damage If found,
replace the burner
DO NOT obstruct the flow of combustion and ventilation air.
Burner tubes can become blocked by spiders and other insects
building their nests Blocked burner tubes can prevent gas flow
to the burners and could result in a burner tube fire or fire
beneath the grill To clean the Burner Assembly follow these
instructions to clean and/or replace parts of burner assembly or
if you have trouble igniting the grill
Turn gas off at control knobs and LP cylinder tank valve.
Remove cooking grills and heat diffusers
Remove M5 bolt and M5 nut from each burner foot
Carefully lift each crossover channel and up and away from
burners.
5. Carefully lift each burner up and away from valve openings.
6. Use a narrow bottle brush or a stiff wire bent into a small hook
to run through each burner tube and flame port several times.
7.
8.
9.
10.
11.
Note: Wear eye protection when performing procedure 7.
Use compressed air to blow into burner tube and out the flame
ports. Check each port to make sure air comes out each hole.
Wire brush entire outer surface of burner to remove food
residue and dirt.
Check burner for damage, if any large cracks or holes are found
replace burner.
IMPORTANT: Burner opening must slide over valve nozzle.
Carefully align crossover channels between burners and orient
burners CORRECTLY by aligning screw hole in burner to the
left as shown
Replace M6 bolt and M6 nut to each burner and crossover
channel
Note: Follow the "Gas Leak Testing" section of this manual.
Relight burners to verify proper operation.
12 Replace heat diffusers and cooking grills
Valve Nozzle
M6 Bolt
Debris '_
Cro_
M6 Nut
Burner Opening
t4

COOKING GRILLS
Clean with mild soap detergent and water. A brass bristled brush
or a nylon cleaning pad can be used to remove residue from the
stainless steel surfaces. Do not use steel wire bristles to clean the
cooking grills. Steel can cause the finish to chip or crack. DO NOT
use a commercial oven cleaner.
HEAT DIFFUSERS
Periodically, it may be necessary to inspect and clean the heat
distribution plate to prevent excess grease build-up. When the grill
is cold, remove the cooking grills. Inspect the heat diffusers and
replace if broken or damaged. Do not allow heat diffusers to
become damaged to the extent that they may fall through onto the
burners. Replace the heat diffusers and cooking grills and light the
burners. Operate the grill on "Hi" for 10 minutes to remove the
excess grease.
BEFORE STORING YOUR GRILL:
Ensure that the cylinder valve is fully closed.
Clean all surfaces.
Lightly coat the burners with cooking oil to prevent excess rusting.
If storing the grill indoors, disconnect the LP tank and leave the LP
tank OUTDOORS.
Place a protective cap cover on the LP tank and store the tank
outdoors in a well ventilated area out of direct sunlight.
• Clean burner prior to use after storing, at the beginning of grilling
season or after a period of one month not being used. Spiders and
insects like to build nests in burner tubes (especially during colder
months). These nests can cause fires in burner tubes or under grill.
• If storing the grill outdoors, cover the grill with a grill cover for
protection from the weather.
TRANSPORTING AND STORAGE:
Never move a grill when it is hot or when objects are on
the cooking surfaces.
• Make sure that cylinder valve is shut off. After moving
the grill check that all gas connections
are free of leaks. Refer to instructions for Leak Testing.
• DO NOT store a spare LP gas cylinder (filled or empty)
under or near the grill.
Never store flammable liquids or spray canisters under
or near the grill.
• DO NOT extinguish grease fires using water.
• If the outdoor cooking gas appliance is not in use, the
gas must be turned off at the supply cylinder.
Storage of an outdoor cooking gas appliance indoors is
permissible only if the cylinder is
disconnected and removed from the outdoor cooking
gas appliance.
Cylinders must be stored outdoors out of reach of
children and must not be stored in a
building, garage or any other enclosed area.
When removing the grill from storage, spider webs or
other debris may be blocking the burner. See "Burner
Assembly/Maintenance" under Proper Care and
Maintenance.
15
PROBLEM
Burner will
not light
Fire at
control
knob
Yellow
Flames
at burner
Flame blows
out on "LOW"
Burner does
not get hot
enough
Grill is
too hot
Electric light
fails to operate
CAUSE
1.Check LP cylinder fuel level.
2. Bad electrode spark. Check to see if
the grill will match light. Electrode or
collector may need adjustment.
3. Burner may not be properly seated.
4. Burner may be obstructed.
5. The cylinder valve may be closed.
6. Regulator is not properly seated on
cylinder valve.
1.Burner holes may be obstructed.
See section on "After Use Safety
and Maintenance".
2. Burner is improperly seated on
control valve.
3. Gas connections may be loose.
Leak Check and tighten all
connections.
1.Burner is obstructed. See Burner
Assembly/Maintenance in After Use
Safety and Maintenance section.
1.Burner holes may be obstructed.
See Burner Assembly/Maintenance
in After Use Safety and Maintenance
section.
2. Grill is not sufficiently preheated.
3. Burner is improperly seated on
control valve.
1.Flow control device has been
activated in regulator. See
Regulator Resetting Procedure
under Connecting LP Cylinder
and Hose/Regulator to Grill.
1. Excess grease build-up causing
grease fires.
2. Damaged or faulty regulator. Replace
with identical replacement parts.
3. Cook on a lower temperature setting.
1.Electrical cord not connected
to power outlet.
2. Light switch not turned on.
3. Bad bulb.
To order replacement parts,
call 1-800-848-8915

Electrical Wiring
Diagram
12V 20W
LAMP
on-off
transformer
electric plug
t6

Manual de uso y cuidado
US
®
Parrilla de 4 Quemadores con
Quemador Lateral y Ahumador
Numero de Modelo Kenmore Elite: 125.16651900
AVISO PARA EL INSTALADOR:
ENTREGUE ESTASINSTRUCCIONES AL PROPIETARIO
DE LA PARRILLA PARAREFERENCIA FUTURA.
AVISO PARA EL PROPIETARIO:
GUARDE ESTAS INSTRUCCIONES DE LA PARRILLA
PARAREFERENCIA FUTURA.
Llamenos primero si usted tiene cualquier problema con
este producto. Podemos ayudarle con preguntas sobre
asamblaje y la operacion de esta parrilla o con piezas
daSadas o que hacen falta cuando usted saque esta unidad
de su envase. Por favor Ilame antes de volver a la tienda
donde hizo la compra de este producto.
1-800-848-8915
8:30am-5:00pm CST, Lunes a Viernes
En el espacio abajo, registre el modelo y los
nt_meros de serie y la fecha de compra de su
Parrilla de Gas para uso al aire libre. Usted
encontrara el modelo y los nt_meros de serie en la
parte posterior de la unidad.
Num. de Modelo
Num. de Serie
Dia de Compra
Guarde esta manual y su recibo de venta de Sears en un
lugar seguro para referencia futura.
Sears, Roebuck and Co., Hoffman Estates, IL 60179 U.S.A. www.sears.com

Informaci6n de Garantia ............................. 18
Importantes Advertencias de Seguridad .............. 18-20
Caracteristicas del Producto .......................... 20
Contenido del Cart6n ............................... 21
Instrucciones de Asamblaje ....................... 22-24
Espicificaciones del Cilindro .......................... 25
Conectando el Tanque de Gas LP ................... 25-26
Pruebas de Detteccion de Fugas .................... 26-27
Lista de Verifcaci6n Preliminar al Encendido .............. 27
Instrucciones de Encendido ........................ 27-28
Instrucciones de Operaci6n ........................ 29-30
Recomendaciones para Cocinar ....................... 30
Tabla de Temperatura ............................... 30
Seguridad y Mantenimiento Despues del Uso ......... 31-32
Identificaci6n y Correcci6n de Problemas ................ 32
Esquema Electrico .................................. 33
A'_ PELIGRO:
A'_ ADVERTENCIA:
Lk, PRECAUCION:
Indicaunasituaci6npeligrosainminentelacual, si
no seevita,producira lesionesgravesoaun la
muerte.
Mantengasealertaa la posibilidadde lesiones
corporalesgravessi no sesiguenlas instrucciones.
Aseguresede leery seguircuidadosamentetodos
los mensajes.
Indicauna situaci6nposiblementepeligrosala cual,
si no seevita,puede producirlesiones menoreso
rnoderadas.
Garantfa Kenmore Elite de Dos Afios Completo
Si este producto falla debido a un defecto en material o a la
ejecuci6n en el plazo de un dos aSos a partir de la fecha de la
compra, Ilame al 1-800-4-MY-HOME® para hacer arreglos de
reparaci6n gratuita (o reemplazo si reparaci6n es imposible).
Si aherrumbra cualquier hornilla del acero inoxidable en esta
parrilla, Ilame al 1-800-4-MY-HOME® para un reemplazo
gratuito de una hornilla. Despues del segundo aSo a partir de
la fecha de la compra, usted debe pagar el coste laboral si
usted desea tener la hornilla instalada.
Esta garantia excluye baterias para el encendedor y pintura
descolorada o aherrumbrar superficial, que son piezas
consumibles o las condiciones que pueden resultar de uso
normal, de accidente o de mantenimiento incorrecto.
Esta garantia es anulada si esta parrilla se utiliza para los
prop6sitos comerciales o de alquiler.
Esta garantia le da derechos legales especificos, y usted
tambien puede tener otros derechos que varien por estado de
estado.
Sears, Roebuck and Co.,
Hoffman Estates, IL 60179
ES NUESTRO DESEO QUE ARMEY UTILICE SU PARRILLA
EN LA FORMA MAS SEGURA POSIBLE. EL PROPOSITO DE
ESTE S|MBOLO DE ALERTA DE SEGURIDAD _k
ES QUE USTED PRESTE ATENCION A LOS POSIBLES
PELIGROS CUANDO ARME Y UTILICE SU PARRILLA.
iCUANDO VEA ESTE S|MBOLO DE ALERTA DE SEGURIDAD
PRESTE ESPECIAL ATENCION A LA INFORMACION A
CONTINUACI6N!
A
LEA DETENIDAMENTE TODAS LAS ADVERTENCIAS DE
SEGURIDAD E INSTRUCCIONES ANTES DE ARMAR Y USAR
LA PARRILLA.
Si huele gas:
1. Apague el gas al artefacto.
2. Apague cualquier llama expuesta.
3. Abra latapa.
4. Si el olor persiste, subsistencia lejos de la
aplicaci6n y Ilame de inmediato a su
proveedor de gas o a los bomberos.
Se puede producir un incendio y causar lesiones
o hasta la muerte si no siguen estas
instrucciones de forma exacta.
1. No guarde ni use gasolina ni otros Ifquidos
inflamables con vapores en las cercanfas de
este o de ning_n otro artefacto.
.
Cualquier cilindro de propano Ifquido que no
est_ conectado para ser utilizado no debe ser
mantenido cerca de _ste o ning_n otro
artefacto.
Se puede producir un incendio y causar lesiones o
hasta la muerte si no siguen estas instrucciones
de forma exacta.
a) NO guarde un cilindrode gasde propano
Ifquido de reserva debajo o cerca de este
artefacto.
b) Nunca Ileneel cilindrom_s de 80%.
c) Si la informaci6n en (a) y (b) no se sigue
exactamente, se puede producirun incendioy
causar lesiones o hasta la muerte.
t8

• Nunca use gas natural en una unidad disehada para
gas de propano liquido.
Nunca use briquetas de carb6n en una parrilla de gas.
Los pedacitos de madera para dar sabor se deben
colocar en una cajita de fumar de metal para contener
la ceniza y para prevenir fuegos.
Realice una prueba de detecci6n de fugas en todas las
conexiones antes de usar la parrilla por primera vez,
a_n si compr6 la parrilla armada, y despu_s de cada
Ilenado del tanque.
fugas.
Xt,PRECAUClON:
Nunca use un cerillo o llama expuesta para detectar
Los olores fuertes, los resfrioso la
congesti6n nasal pueden impedir la
detecci6n de propano.Sea precavidoy
utilicesentido com_n cuando realice
pruebas de detecci6n de fugas.
Siempre mantenga la parrilla de gas alejada de la
gasolina, fluido de encendedor, diluyente de pintura u
otros vapores o liquidos inflamables o materiales
combustibles.
• Siempre revise la parrilla antes de cada uso, tal como
se indica en la secci6n "Lista de verificaci6n preliminar
al encendido" de este manual.
• NO obstruya el flujo del aire de combusti6n o
ventilaci6n.
Mantenga a los nihos y las mascotas alejados de la
parrilla caliente. NO permita que los nihos usen o
jueguen cerca de esta parrilla.
NO deje la parrilla desatendida mientras estb en uso.
NO permita que la manguera de gas haga contacto
con superficies calientes.
NO permita que la grasa del agujero de drenaje caiga
sobre la manguera o el conjunto del regulador de la
v_lvula.
Mantenga todos los cables de alimentaci6n el_ctrica
alejados del agua o superficies calientes.
Mantenga a mano un extinguidor de incendios
aceptable para usar con productos de gas. Consulte
con su autoridad local para determinar el tamaho y
tipo correctos.
Para uso dom_stico _nicamente. NO use esta parrilla
para ning_n prop6sito que no sea el previsto.
Observe las llamas de las hornillas para verificar
que est_n funcionando bien (consulte el dibujo en
"lnstalaci6n/Mantenimiento de las Hornillas" en la
secci6n de Cuidado y mantenimiento apropiados).
Las arahas y otros insectos pueden formar nidos
en la hornilla y bloquear el paso del gas.
19
NO use la parrilla bajo la influencia de alcohol o
drogas.
La parrilla est_ caliente cuando est_ en uso. Para evitar
las quemaduras:
• Use guantes protectores o guantes para el horno.
• NO toque ninguna superficie caliente de la parrilla.
• NO use ropa suelta ni permita que el cabello haga
contacto con la parrilla.
Para proteger contra descarga el_ctrica, no sumerja
las cuerdas, elementos el_ctricos ni enchufa el
agua o otro liquido.
Desenchufe del enchufe cuando no este en uso y
antes de limpiar. Permita refrescarse antes de poner
o de sacar piezas.
No funcione ninguna aplicaci6n de gas de cocinar
al aire libre con una cuerda dahada, enchufe, o
despu_s de los malfuncionamientos de la
aplicaci6n ni se ha da_ado de cualquier manera.
Entre en contacto con el fabricante para la
reparaci6n.
No deje la cuerda colgar sobre el borde de una
mesa o tocar superficies calientes.
No utilice una aplicaci6n de gas de cocinar al aire
libre para los prop6sitos con excepci6n de previsto.
Utilice solamente un circuito protegido de tierra del
interruptor de la averia (GFCI) con esta aplicaci6n
de gas de cocinar al aire libre.
Nunca quite el enchufe que pone a tierra o utilicelo
con un adaptador de 2 dientes.
Utilice solamente las cuerdas de extensi6n con un
diente 3 que pone a tierra el enchufe, clasificado
para la energia del equipo y aprobado para el uso al
aire libre con una marca de W-A.
Z_SEA PRECAVIDO Y UTILICE SENTIDO COMON
CUANDO OPERE LA PARRILLA DE GAS.
HACER CASO OMISO A LAS ADVERTENCIAS DE
SEGURIDAD E INSTRUCCIONES EN ESTE MANUAL
PUEDE PRODUCIR GRAVES LESIONES PERSONALES 0
DA_IOS MATERIALES.
GUARDE ESTE MANUAL PARA REFERENCIA FUTURA.

• PARAUSOEXTERIORUNICAMENTE.NO opere la
parrilla en areas interiores o en un area cerrada
como un garaje, cobertizo o pasadizo.
Use la parrilla AL AIRE LIBRE en un espacio bien
ventilado alejado de viviendas u otros edificios
para prevenir los peligros asociados con la
acumulaci6n de gas y los vapores t6xicos. Aunque
el espacio libre mJnimoson 36 pulgadas (91 cm), le
recomendamos ampliamente que no opere este
equipo a menos de 10 pies (3 m) de cualquier
estructura, material combustible o cilindros de gas
LP extra que no est_n conectados al equipo. No
adherirse a estas distancias prevendr_ ventilaci6n
apropiada y puede aumentar el riesgo de daSo de
fuego y/o a propiedad, que podria resultar tambi_n
en heridas personales.
Mantenga un espacio mJnimode 36 pulgadas
(91 cm) entre todos los costados de la parrilla,
barandas de terraza, paredes u otros materiales
combustibles. NO use la parrilla debajo de
construcciones combustibles elevadas
desprotegidas.
INFORMACION DE INSTALACION:
Este artefacto debe instalarse de acuerdo con:
Todos los c6digos locales relevantes o, si no
existen c6digos locales, ya sea:
• C6digo de Gas Combustible de EE.UU. ANSI
Z223.1 NFPA 54
• C6digo de instalaci6n de gas natural y
propano: CAN/CGA B149.1
• C6digo de instalaci6n de propano: CAN/CGA
B149.2 (CanadA)
Consulte con su distribuidor local de gas de
propano liquido o con la compaSia de gas natural
con respecto a los c6digos locales. Esta parrilla no
fue diseSada para conectarla a una linea de
suministro de gas natural. Si se utiliza una fuente
electrica externa, debe estar conectada a tierra de
acuerdo con los c6digos locales o, en caso que no
los haya, con el C6digo Electrico de EE.UU.,
ANSI/NFPA 70, o el C6digo Electrico Canadiense,
CSA 22.1. y un minimo de 15 amp es necesario.
CILINDRO DE GAS DE PROPANO
LIQUIDO (NO SE INCLUYE CON ESTA PARILLA)"
• Elcilindro de propano liquido puede comprarse en el
mismo lugar donde compr6 laparrilla.
Elcilindro de gas de propano liquido disehado
especJficamentepara usarse con esta parrilla debe
tener una capacidad de 20 libras (9,1 kg) e incorporar
una v_lvula de cilindro tipo 1 y un dispositivo de
protecci6n contra el Ilenadoexcesivo (OPD).
Esta parrilla esta diseSada para usarse con
Worthington, Manchester o marca SMPC 20
libras (9,1 kg) cilindros. Cilindros de diferentes
marcas DOT pueden utilizarse en esta parrilla si
el cilindro tiene las dimensiones semejantes de
la cima y anillos inferiores.
NO conecte esta parrilla a una v_lvula de
cilindro POL #510 existente con roscas
izquierdas. La v_lvula de tipo 1 puede
identificarse con las roscas externas grandes en
la salida de la v_lvula.
NO conecte un cilindro de propano que exceda
esta capacidad.
NO conecte la parrilla a un cilindro que utilice
cualquier otro tipo de dispositivo de conexi6n
de v_lvula.
Rejillas para Calentar
de Alambre de Acero
Inoxidable
Rejillas para
de Acero Inoxidablc
Quemador
Lateral de
Inoxidable
4 Quemadores de
Acero Inoxidable
Quemador del Ahumador
7,500 BTUs
2O

AsegtTrese de tener todas las piezas enumeradas bajo
"CONTENIDO DE LA CAJA DE CARTON" y CONTENIDO DE
LA BOLSA de ferreterfa antes de comenzar con el ensamblaje.
Cantidad
(_) 1 Montaje del Cuerpo de la Parrilla
(_) 4 Difusores de Calor
1 Rejilla para Calentar
(_) 3 Rejillas para Cocinar
(_ 1 Mesa Lateral
(_) 1 Bandeja para la Grasa
(_ 1 Soporte para el Recipiente para la Grasa
(_) 1 Recipiente para la Grasa
(_) 3 Rejillas para Cocinar del Ahumador
(_) 8 Estantes de Soporte
(_) 1 Bandeja para Astillas de Madera/Agua
(_) 1 Soporte de la Bandeja para Astillas de Madera/Agua
@ 1 Rejilla delQuemador
(_) 1 Bandeja para la Grasa del Ahumador
/ I I
®
Inspeccione el contenido de la caja para verificar que todas las partes esten incluidas e intactas.
Si algunas piezas hacen falta o daSadas, Ilame al 1-800-848-8915.
1!1

Elija un lugar adecuado y despejado
para armar la parrilla y p[dale a un
amigo que le ayude. Tienda cart6n sobre
el suelo para proteger el acabado de la
parrilla y el Area de armado.
,_ PRECAUClON: Algunas partes
pueden tener bordes
afilados. P6ngase
guantes de protecci6n
si es necesario.
Paso 1
Cloque los difusores de calor en la parte
inferior del montaje del cuerpo de la
parrilla, directamente sobre los
quemadores. Coloque el recorte grande
hacia la parte posterior de la parrilla.
Paso 2
Coloque las parrillas para cocinar sobre
las nervaduras de apoyo, directamente
sobre los difusores de calor.
Paso 3
Inserte el anaquel para calentar sobre los
soportes para que se asiente sobre las
parrillas para cocinar.
Paso 4
Inserte la bandeja de la grasa en la parte
posterior de la parrilla. AsegQrese de
deslizar la bandeja sobre los surcos, como
se ilustra.
Paso 5
Para ensamblar el soporte del recipiente
para la grasa, primero abra la puerta
derecha e inserte el soporte en las dos
ranuras de los laterales derecho e izquierdo
del orificio cuadrado.
/ / I
Rejillas para Cocinar
de
f°%,l _ i ; _u
!
l
c
(.-
22

Paso 6
Deslice el recipiente para la grasa dentro
del soporte para el recipiente para la
grasa ubicado debajo de la bandeja para
la grasa en la parte posterior de la parrilla.
Paso 7
Anexe la mesa lateral izquierda al lateral
izquierdo del cuerpo de la parrilla.
Coloque la mesa lateral izquierda sobre
los pernos y deslicela, luego ajuste los
pemos firmemente.
Nota: Remitase al Diagrama de las
Piezas en la Pfigina 4 para que Io
ayude a ensamblar el Paso 8.
Paso 8
Inserte los anaqueles de soporte dentro
de los orificios de las paredes internas del
ahumador. Deslice las parrillas para
cocinar del ahumador y el soporte de la
cacerola para el agua!astillas sobre los
anaqueles del soporte. Luego coloque la
cacerola para el agua!astillas sobre su
soporte. Coloque la bandeja de la grasa
en la cfimara del ahumador, debajo del
quemador.
Paso 9
Quite la tapa del encendedor e inserte la
bateria con el extremo positivo hacia la
tapa del encendedor. Vuelva a colocar la
tapa del encendedor.
Paso 10
Coloque la rejilla del quemador lateral
encima del quemador lateral.
23
\
\\
\
\
\\
_ F/ '_ 4/
J_fJ_///! / / /
C;2;:)
/
/
/
®W

Armada
@
@
24

Cuando compre o cambie un cilindro para la parrilla de gas, debe
estar construido y marcado de acuerdo con las especificaciones
para cilindros de gas de propano Ifquido del Departamento de
Transporte (DOT) de EE.UU. o la Norma Nacional de CanadA,
CAN/CSA-B339: Cilindros, esferas y tubos para el transporte de
artfculos peligrosos; y de la ComisiSn, segt3n corresponda; y debe
estar equipado con un dispositivo de protecciSn contra el Ilenado
excesivo (OPD) aprobado y con un dispositivo de conexiSn de
cilindro compatible con la conexiSn para artefactos para cocinar al
aire libre.
Adem_.s, el cilindro debe estar equipado con:
• Una v__lvula de cierre que termine en una salida de v__lvula
para cilindro de gas de Tipo 1.
• Una v__lvula de Tipo 1 que prevenga el flujo de gas hasta
que exista un sello positivo.
• Un mecanismo para extraer el vapor.
• Un collar para proteger la v__lvula de cierre del cilindro.
• Un dispositivo de alivio de seguridad comuncado
directamente con el espacio de vapor del cilindro.
• Un dispositivo de proecci6n contra el Ilenado excesivo
(OPCD) aprobado.
• Cierre la v_lvula del cilindro cuando no est_ usando la
parrilla.
• Maneje el tanque con cuidado.
• Siempre mantenga el cilindro en posicibn vertical.
• Nunca conecte un cilindro de gas de propano liquido no
regulado a la parrilla.
• NO exponga los cilindros de gas de propano liquido a
calor excesivo o a fuentes de encendido.
• NO guarde un cilindro de gas de propano liquido de
reserva debajo o cerca de la parrilla.
• $61o los distribuidores de gas de propano liquido
capacitados deben Ilenar o reparar su cilindro.
• NO permita que el cilindro sea Ilenado m_s del 80% de
su capacidad.
• Lea y siga todas las advertencias e instrucciones en el
cilindro y que acompa5an a este producto.
Nunca guarde un cilindro de gas de propano liquido de
reserva debajo o cerca de la parrilla. Esto puede causar
una descarga de presibn excesiva a trav_s de la v_lvula
de alivio de vapor y producir un incendio, explosibn o
lesiones personales graves, incluso la muerte.
Nota: EL GAS DE PROPANO ES M.&.SPESADO QUE
EL AIRE Y SE ACUMULARA EN AREAS
BAJAS. LA VENTILACION APROPIADA ES
EXTREMADAMENTE IMPORTANTE.
Mantenga el (los) orificio(s) de ventilacibn del gabinete
del cilindro de gas de propano liquido despejados y sin
obstrucciones o residuos.
NO inserte ningun objeto extraSo en la salida de la
v_lvula. Esto puede daSar el mecanismo de retencibn de
retroceso. Un mecanismo de retenci6n de retroceso
puede causar una fuga y posiblemente producir una
explosi6n, incendio, lesiones corporales graves o aun la
muerte.
25
LLENANDO DEL CILINDRO DE GAS DE
PROPANO LIQUIDO:
• S61o los distribuidores de gas de propano liquido
capacitados deben Ilenar o reparar su cilindro.
• Los tanques nuevos deben ser purgados antes de
Ilenarlos; digale al distribuidor de gas que est_ usando
un tanque nuevo.
• NO permita que el cilindro sea Ilenado m_s del 80% de
su capacidad. Los tanques Ilenados en exceso pueden
crear una condicibn peligrosa. Los tanques Ilenados en
exceso pueden acumular presibn y hacer que la v_lvula
de alivio expulse vapores de gas de propano. El vapor
es combustible y, si hace contacto con una fuente de
chispas o una llama, puede producirse una explosibn y
causar quemaduras graves, lesiones corporales o
hasta la muerte.
• Para usarse con este ahumador, el cilindro de 20 libras
de gas LP debe cumplir con los siguientes
requerimientos:
Di_metro: 12" (30.5 cm)
Altura: 18" (45.7 cm)
Capacidad m_xima de 20 libras. El cilindro de gas
utilizado debe incluir un collarin para proteger la v_lvula
del cilindro. El sistema suministrador del cilindro debe
estar diseRado para la recuperacibn de vapores.
• Coloque la tapa en la salida de la v31vula del cilindro
siempre que el cilindro no se use. SLIIo instale en la
salida de la v31vula del cilindro el tipo de tapa que se
haya suministrado con la v31vula del cilindro, los
dem3s tipos de tapas u obturadores pueden ocasionar
la fuga del propano.
Si cambia un cilindro en un programa de cambio
apropiado, verifique que el cilindro tenga una v_lvula
deTipo 1 y un dispositivo de proteccibn contra el
Ilenado excesivo (OPD).
INSTALACION DEL CILINDRO DE GAS DE
PROPANO LIQUIDO EN LA PARRILLA:
1. Verifique que la v_lvula del cilindro est_ cerrada girando la
perilla en sentido horario.
2. Abra la puerta derecha del gabinete de la parrilla.
Coloque el cilindro en el portatanque en el extremo
inferior del gabinete.
3. Situe el cilindro de manera que la abertura de la v_lvula
apunte hacia adelante y de modo que la manguera no est_
doblada o da_ada.
4. Apriete completamente el tornillo de la retencibn del tanque
en la bandeja del saque para asegurar el tanque.
5. Conecte o desconecte el regulador al cilindro de gas de
propano liquido s61o cuando el cilindro est_ asentado en
el portatanque.

MANGUERA Y REGULADOR:
Su parrilla esta equipa de un dispositivo con conexi6n de Tipo 1 con
las caracterfsticas siguientes:
1. El sistema no permitir__ que fluya gas desde el cilindro hasta que
haya una conexi6n positiva a la v__lvula.
Nota: La v__lvula del cilindro debe cerrarse antes de
conectar o desconectar.
2. Un dispositivo t_rmico cerrar__ el flujo de gas si se expone a
temperaturas de m__s de 240 °F a 300 °F (115 °C a 150 °C). Si
esto ocurre, retire el conjunto completo del regular y des_chelo
correctamente. Puede comprar un conjunto de regulador de
repuesto comunic__ndose con el servicio de atenci6n al cliente al
1-800-848-8915. Se debe determinar la causa del calor excesivo
y se debe corregir antes de usar la parrilla nuevamente.
3. Cuando est,_ activado, un dispositivo limitador de flujo del
regulador restringe el flujo de gas a 10 pies ctJbicos por hora. Si
el dispositivo limitador de flujo est,_ activado, aplique el
Procedimiento de Reposici6n del Regulador.
PROCEDIMIENTO DE REPOSICION DEL
REGULADOR:
1.
Gire las perillas de control de las hornillas a "OFF" (apagado),
apague la v__lvula del cilindro y desconecte el regulador del
tanque de gas de propano Ifquido. Espere aproximadamente dos
minutos.
2. Reconecte el regulador y gire lentamente la v__lvula del cilindro
para encenderla. Ahora el dispositivo limitador de flujo est,_
reposicionado.
Nuncause laparrillasin haberverificadoque nohayfugas en
lasconexionesy manguerasde gas. Consultelos
procedimientosapropiadosenlaseccibnde "Pruebas de
deteccibn de fugas" en este manual.
Sedebe utilizarel conjuntodel reguladorde presibny
manguerasuministradocon laparrillade gas.
NO intenteconectarla a ningunaotrafuente de suministrode
combustible, como porejemploa una lineade gasnatural.
NO useningt_notroconjunto de reguladorde
presibn/manguemque nosea elsuministradocon laparrilla.
El reemplazo del regulador de presibn/el montaje de
manguera se debe hacer con las piezas de recambio
id_nticas.
NO intenteajustaro repararelregulador.Elreguladorast_
diseSadoparaoperara unapresibnde salidam_ximade 11
pulgadasdecolumna de agua(2,74kPa).
Durante la instalaci6n y/o reemplazo del cilindro de gas, mantenga
la manguera de suministro sin dobleces ni da_os.
Inspeccione visualmente la manguera antes de cada uso para
detectar da_os, desgaste excesivo o deterioro. Si detecta da_os,
reemplace el conjunto antes de usar la parrilla. Para asegurar la
operaci6n apropiada, cualquier reemplazo del montaje de manguera
se debe hacer con las piezas de recambio id_nticas. Llame al
1-800-848-8915 para las piezas de recambio.
CONEXION DE LA MANGUERA Y REGULADOR
A UN CILINDRO DE GAS DE PROPANO
LJQUIDO
Verifiquequela v_lvuladeltanqueast_ CERRADAantesde
conectar el cilindrodegasde propanoliquidoa laparrilla.
Girelaperillade lav_lvulaen sentidohorarioparacerrarla
correctamente. Leay sigatodas lasinstruccionesy
advertenciasen lasetiquetasde seguridadde lamanguerade
suminislro.Leay sigatodaslas advertenciasen este manuel
con respectoal usosegurode los cilindrosde gas de propano
liquidoy de lamangueray reguladorantes de conectar el
dlindro alaparrilla.Leay sigatodas lasadvertenciasen el
dlindro de propanoliquido.
CONEXII3NDE LA MANGUERAY
REGULADOR:
1. Verifique que la v__lvula del cilindro est,_ cerrada girando la perilla
en sentido horario.
2. Verifique que las perillas de control de las hornillas de la parrilla
est__nen las posiciones OFF (de apagado).
3. Quite la tapa de protecci6n de pl__stico de la v__lvula del cilindro y
del dispositivo de conexi6n.
4. Sujete el regulador e inserte el niple del dispositivo de conexi6n
en la salida de la v__lvula del cilindro de propano Ifquido.
AsegtJrese de que el dispositivo est6 centrado correctamente.
5. Gire la tuerca de acoplamiento grande en sentido horario con la
mano y apri_tela por completo. Tenga cuidado de no estropear las
roscas de la tuerca de acoplamiento al instalarla en la v__lvula del
cilindro. No apriete excesivamente la perilla en la v__lvula. No
utilice herramientas para apretar la conexi6n.
Nota: Si no puede hacer la conexi6n, repita los Pasos 4 y 5.
6. AsegtJrese de que la manguera no est_ doblada, que no haga
contacto con bordes afilados o superficies que puedan calentarse
durante el uso.
7. Revise todos los accesorios para asegurar que no haya fugas
antes de encender la parrilla. Consulte la secci6n de "Pruebas de
detecci6n de fugas" en este manual.
Para impedir los peligros de incendio o explosibn:
• NO fume ni permita que haya fuentes de encendido en
el brea mientras realiza la prueba de deteccibn de
fugas.
• Realice la prueba AL AIRE LIBRE t_nicamente, en un
brea bien ventilada.
• Nunca realice una prueba para detectar fugas con un
cerillo o llama expuesta.
• Nunca realice una prueba para detectar fugas mientras
estb usando la parrilla o con la parrilla caliente.
26

CUANDO REALIZAR UNA PRUEBA DE
DETECCION DE FUGAS:
Despu_s de haber armado la parrilla y antes de
encenderla por primera vez, at_n cuando la haya
comprado totalmente armada.
Cada vez que se Ilene nuevamente el cilindro de gas de
propano 5quido o si se reemplaza alguno de los
componentes de gas.
Cada vez que haya movido la parrilla.
Por Io menos una vez al a_o si no ha usado la parrilla
mbs de 60 dias.
VERIFICACION DE AUSENCIA DE FUGAS:
Despu_s de que se terminen todas las conexiones, compruebe
todas las conexiones y guarniciones para saber si hay escapes
con una solucibn jabonosa.
Con todas las v_lvulas cerradas, aplice la solucibn del
escape de fugas (mezcla de detergente y de agua 50/50 ) a
todas las conexiones que Ilevaban el gas, guarniciones y a
las costuras del tanque.
• Abra la tapa.
La presencia de burbujas en areas donde aplic6 el agua
enjabonada indica una fuga de gas. Si detect6 fugas o huele
u oye gas, cierre la v_lvula y repare la fuga o reemplace la
pieza defectuosa. No use el ahumador hasta haber reparado
todas las fugas.
• Los tanques de gas LP estbn destinados a operarse en
posicibn vertical solamente.
• Cuando no use la unidad, debe apagar el gas del cilindro
suministrador. Adembs, debe desconectar el cilindro de la
unidad.
• La unidad podr_ almacenarse en el interior s61o si el cilindro
ha sido desconectado y desprendido de la unidad.
Si hace caso omiso a estos pasos de seguridad, se pueden
causar da_os materiales, lesiones corporales, quemaduras
graves o hasta la muerte. Estos pasos deben realizarse
despu_s de haber armado la parrilla y antes de cada uso.
NO opere esta parrilla hasta que haya leido y entendido
TODAS las advertencias e instrucciones en este manual.
AsegtJrese de que la parrilla est,_ armada correctamente.
Inspeccione la manguera de suministro de gas para detectar
quemaduras, rozaduras, dobleces y verificar la trayectoria
correcta antes de cada uso. Si hay evidencia de abrasi6n o
desgaste excesivo, o si la manguera est,_ cortada, debe
reemplazarse antes de usar la parrilla. Para asegurar la
operaci6n apropiada, cualquier reemplazo del regulador del
dep6sito de gasolina se debe hacer con las piezas de recambio
id_nticas. Llame al 1-800-848-8915 para las piezas de
recambio.
• Realice una prueba de detecci6n de fugas en todas las
conexiones yen la manguera de gas. Consulte la secci6n de
"Pruebas de detecci6n de fugas".
• AsegtJrese de que todos los cables de suministro el_ctrico
est_n adecuadamente conectados a tierra.
• Mantenga todos los cables de suministro el6ctrico y la
manguera de suministro de combustible alejados de cualquier
superficie calentada. La manguera debe estar a una distancia
minima de 3 pulgadas de las superficies calientes.
• SittJe la parrilla en un sitio con suelo nivelado y con buena
ventilaci6n, a una distancia segura de materiales combustibles,
edificios y salientes.
• Properly place the empty grease tray under the grease drain
hole in the bottom of the grill to catch grease during use.
• NO obstruya el flujo del aire de combusti6n y ventilaci6n.
Lea,entiendaysigatodas lasadvertenciase instrucdones
indicadasen estemanual.NOpase poralto ningunade las
advertenciaso instruccionesindicadasenlas secdones anteriores
de estemanual.
Siga las instrucciones al pie de la letra.
1,
2,
3,
ABRA LATAPA DE LA PARRILLAantes de tratarde
encenderuna hornilla para que no se acumulen vapores
dentrode la parrilla. Puede producirseuna explosibn si la
tapade la parrillano est_ abierta.
Verifiqueque todas las perillasde control de las hornillas y
lav_lvula del cilindro est_n en laposicibn OFF (apagado).
Abra el suministro de combustible girando la perillade la
v_lvuladel cilindro en sentido contrahorario a la posici6n
totalmenteabierta.
4. NO se pare con la cabeza,el cuerpo o los brazos sobre la
parrillacuando laencienda.
27

Nota: Si la hornilla no se enciende o la llama es muy baja, quiz__s
est_ bloqueada con un insecto o se haya activado el
dispositivo limitador de flujo. Consulte
"lnstalaci6n/Mantenimiento de las Hornillas" en la secci6n
Cuidado y mantenimiento apropiados o el "Procedimiento de
Reposici6n del Regulador" en la secci6n Conexi6n del cilindro
de propano Ifquido y de la manguera/regulador a la parrilla.
ENCENDIDO DE LAS HORNILLAS PRINClPALES:
1. Abra la tapa antes de encender la hornilla.
2.
3.
4.
5,
6.
Verifique que todas las perillas de control est_n en la posici6n "OFF"
(apagado).
Empuje y mantenga presionada la perilla de control de
cualquier QUEMADOR PRINCIPAL gir__ndola hasta f "Hi"
(Alto); escuchar__ un clic cuando se encienda el quemador. Una
vez encendido el quemador, gire la perilla del control a la
configuraci6n deseada.
Si la hornilla NO se enciende en 5 segundos, gire la perilla de control
a la posici6n "OFF" (apagado), espere 5 minutos para que se disipe el
gas y repita el procedimiento de encendio.
Para encender otras hornillas, Siga Paso 3.
Para apagar, gire cada perilla de control en sentido horario hasta que
se trabe en la posici6n "OFF' (de apagado). Esto extingue la llama,
pero no apaga el flujo de gas del cilindro. Para cortar flujo de
gas, usted debe apagar la v__lvula del cilindro.
ENCENDIDO DE LAS HORNILLAS PRINCIPALES
CON UN CERILLO:
1. Abra la tapa antes de encender la hornilla.
2. Veriflque que todas las perillas de control est_n en la posici6n "OFF"
(apagado).
3. Coloque un cerillo de papel en el extremo de encendedor con
cerillo. Prenda el cerillo y col6quelo a trav6s del agujero de
encendido en el lado izquierdo de la parrilla aproximadamente a
1/2" pulgada (1 a 2 cm) de la hornilla.
4. Gire la perilla de control de hornilla de EXTREMA IZQUlERDA a
"Hi" (llama fuerte). Hornilla debe encender en 5 segundos.
5. Si la hornilla no se enciende, gire la perilla de control a la posici6n
"OFF" (apagado) y espere 5 minutos para que se disipe el gas y
repita el procedimiento de encendido.
6. Para encender las dem__s hornillas, oprima y gire las perillas de
control a la posici6n "Hi" (llama fuerte) en secuencia de la izquierda
a la derecha.
7.
Si la hornilla no se enciende despu_s de varios intentos con un
cerillo, entonces hay un problema con el suministro de gas. Cierre
el gas en la hornilla y en el cilindro. NO trate de operar la parrilla
hasta haber encontrado y corregido el problema. Consulte la
secci6n de "ldentificaci6n y correcci6n de problemas" de este
manual.
Nota: Si la hornilla no se enciende o la llama es muy baja, quiz__s
est6 bloqueada con un insecto o se haya activado el
dispositivo limitador de flujo. Consulte
"lnstalaci6n/Mantenimiento de las Hornillas" en la secci6n
Cuidado y mantenimiento apropiados o el "Procedimiento de
Reposici6n del Regulador" en la secci6n Conexi6n del cilindro
de propano Ifquido y de la manguera/regulador a la parrilla.
ENCENDIDO DE LA HORNILLA LATERAL:
1. Abra la tapa antes de encender la hornilla lateral.
2.
3.
4.
5,
Verifique que la perilla de control est_ en la posici6n "OFF"
(apagado).
Empuje y mantenga presionada la perilla de control del
QUEMADOR LATERAL gir__ndola hasta f "Hi" (Alto); escuchar__
un clic cuando se encienda el quemador. Una vez encendido el
quemador, gire la perilla del control a la configuraci6n deseada.
Si la hornilla NO se enciende en 5 segundos, gire la perilla de
control a la posici6n "OFF" (apagado), espere 5 minutos para que
se disipe el gas y repita el procedimiento de encendido.
Para apagar, gire cada perilla de control en sentido horario hasta
que se trabe en la posici6n "OFF" (apagado).
ENCENDIDO DE LA HORNILLA LATERAL
CON UN CERILLO:
1. Abra la tapa de la hornilla lateral antes de encenderla.
2. Gire la perilla de control de la hornilla a la posici6n "OFF"
(apagado).
3. Prenda y coloque un cerillo aproximadamente a 1/2" pulgada
(1 a 2 cm) de la hornilla.
4. Gire la perilla de control de la hornilla lateral a la posici6n "Hi"
(llama fuerte). La hornilla debe encenderse en 5 segundos.
5. Si la hornilla no se enciende, gire la perilla de control a la
posici6n "OFF" (apagado) y espere 5 minutos para que se
disipe el gas y repita el procedimiento de encendido.
6. Si la hornilla no se enciende despu_s de varios intentos con
un cerillo, entonces hay un problema con el suministro de gas.
Cierre el gas en la hornilla y en el cilindro. NO trate de operar
la parrilla hasta haber encontrado y corregido el problema.
Consulte la secci6n de "ldentificaci6n y correcci6n de
problemas" de este manual.
ENCENDIDO DEL AHUMADOR:
1. Abra la tapa antes de encender del ahumador.
2. Verifique que todas las perillas de control est_n en la posici6n "OFF"
(apagado).
3. Empuje y mantenga presionada la perilla de control del
AHUMADO gir__ndola hasta _" "Hi" (Alto); escuchar__ un clic
cuando se encienda el quemador. Una vez encendido el
quemador, gire la perilla del control a la configuraci6n deseada.
4. Si la ignici6n no ocurre en 5 segundos, gire la perilla de control
a la posici6n "OFF" (apagado) y espere 5 minutos para que se
disipe el gas y repita el procedimiento de encendido.
5. Para apagar, gire cada perilla de control en sentido horario hasta
que se trabe en la posici6n "OFF" (apagado).
ENCENDIDO DEL AHUMADOR CON CERRILLO:
1. Abra la tapa antes de encender del ahumador.
2. Verifique que todas las perillas de control est_n en la posici6n "OFF"
(apagado).
3. Prenda y coloque un cerillo aproximadamente a 1/2" pulgada
(1 a 2 cm) de del ahumador.
4. Gire la perilla de control de del ahumadora a la posici6n "Hi"
(llama fuerte). El ahumador debe encenderse en 5 segundos.
5. Si el ahumador no se enciende, gire la perilla de control a la
posici6n "OFF" (apagado) y espere 5 minutos para que se
disipe el gas y repita el procedimiento de encendido.
6. Si el ahumador no se enciende despu_s de varios intentos con
un cerillo, entonces hay un problema con el suministro de gas.
Cierre el gas en el ahumador yen el cilindro. NO trate de
operar la parrilla hasta haber encontrado y corregido el
problema. Consulte la secci6n de "ldentificaci6n y correcci6n
de problemas" de este manual.
Nota: Observe Ilame: Llama deberia estar azul/amarillo entre
1"-2" cuando esta en "Hi" (llama fuerte).
APAGADO DE LA PARRILLA:
1. Cierre la v__lvula del cilindro.
2. Gire todas las perillas de control de las hornillas a la posici6n
"OFF" (apagado).
Nota: Apague el cilindro de propano Ifquido primero para
evitar que quede gas en el sistema bajo presi6n.
PRECAUCION:
La v__lvula del cilindro siempre / _\
debe estar en la posici6n de / _ _ _ \
apagado o cerrada cuando
laparrillanoest__enuso ___ /
Para cerrar la v__lvula del cilindro, gire la perilla/_-__2 _ _ /
en sentido horario hasta que se detenga. /
28

Nunca utilice el carbbn de lefia o un Ifquido m_s ligero
dentro de su parrilla del gas. Lea y siga todas las
advertencias e instrucciones contenidas en las secciones
precedentes de este manual.
COMO ESTRENAR SU PARRILLA:
• Debido al proceso de fabricaci6n y preservaci6n de los
componentes de la parrilla, puede haber residue de aceite
presente en la hornillas yen las superficies de cocci6n de la
parilla.
• Antes de cocinar por primera vez en la parrilla, precali_ntela
durante 15 minutes en "Hi" (llama fuerte) para quemar este
aceite residual.
COMO PRECALENTAR LA PARRILLA:
• Se recomienda que precaliente la parrilla antes de usarla. Esto
asegura que las superficies para cocinar est_n alas
temperaturas deseadas para dorar los aztJcares de los
alimentos cuando cocine. Despu_s de encender la parrilla,
coloque las perillas de control de las hornillas principales a la
posici6n "Hi" (llama fuerte) durante 10 a 15 minutes. Cierre la
cubierta durante el perfodo de precalentamiento.
COMO CONTROLAR LLAMARADAS:
Las Ilamaradas son parte de cocinar carnes en una parrilla de
gas. Esto agrega un sabor tJnico a los alimentos cocinados en
una parrilla de gas. Las Ilamaradas excesivas pueden cocinar
demasiado los alimentos y producir una situaci6n peligrosa
para usted y la parrilla. Las Ilamaradas excesivas son el
resultado de la acumulaci6n de grasa en la secci6n inferior de
la parrilla. Si esto ocurre, NO eche agua alas llamas. Esto
puede producir salpicaduras de grasa y causar quemaduras
graves o lesiones corporales. Si la grasa produce un incendio,
cierre la tapa y apague las hornillas principales hasta que la
grasa se queme. Tenga cuidado cuando abra la tapa ya
que se pueden producir Ilamaradas repentinas.
COCCION INDIRECTA:
La coccion indirecta es el proceso de cocinar sus alimentos sin
que la fuente de calor este directamente debajo de los
mismos. Puede dorar carnes sobre una llama fuerte en un lado
de la parrilla y cocinar lentamente un asado en el otro lado (sin
encender) de la parrilla.
NO deje la parrilla desatendida mientras est_ en uso.
NO mueva la parrilla cuando est_ en uso. Trabe las
ruedas en posicibn para estabilizar la parrilla.
NO utilice agua para apagar las Ilamaradas.
Tenga a mano un extinguidor de incendios adecuado
para usar con artefactos a gas.
29
PARA REDUCIR AL M[NIMO LAS
LLAMARADAS:
• Recorte el exceso de grasa de la carne antes de cocinarla.
• Cocine la carne con alto contenido de grasa (polio o puerco)
con llama suave o indirecta.
• Verifique que la parrilla est,_ sobre suelo nivelado y que la
grasa puede salir de la parrilla a trav_s del agujero de drenaje
en la secci6n inferior y acumularse en la gaveta para grasa.
LUZ INTERIOR:
• La luz interior proporciona la iluminaci6n al aire libre al funcionar la
parrilla en la noche.
• La luz se puede funcionar desde el interruptor de boton para la luz
situado en el panel de control delantero.
Nora:
AI substituir el bulbo,
desatornille el lente
y saque el bulbo
viejo del sostenedor
de bulbo. AsegtJrese
que las "piernas" en
nuevo bulbo sean
rectas. Inserte las
"piernas" en los dos agL eros en el sostenedor de bulbo.
Empuje suavemente el bulbo adentro hasta que est_
asentado completamente y centrado. Substituya el lente
sobre la luz. AI substituir bulbos, nunca exceda los
bulbos de 25 vatios. El bulbo preferido es almacenes de
un hardware disponibles de 20-25 vatios del bulbo
est__ndar del cuarzo a Io m__s.
LA HORNILLA LATERAL:
• La hornilla lateral puede usarse para preparar platillos de
acompafiamiento come frijoles, papas, mafz o para calentar
salsas.
• La v__lvula de la hornilla debe ajustarse de llama fuerte a llama
suave de acuerdo con sus exigencias de cocina.
• Cuando use un asador estilo rotisserie de corriente
alterna, debe estar conectado a tierra de acuerdo con los
cbdigos locales o, si no los hay:
• En EE.UU.: El Cbdigo El_ctrico de EE.UU. - ANSI-NFPA N°
70 - ultima edicibn
• En Canada: el Cbdigo El_ctrico Canadiense- CSA C22.1
• El asador estilo rotisserie est_ equipado con un enchufe
de tres clavijas para proteger al usuario contra el
electrochoque. Este enchufe debe conectarse
directamente a un recept_culo para tres clavijas
conectado correctamente a tierra. Nunca corte o quite el
enchufe de conexibn a tierra. Cualquier cable de
extensibn tambi_n debe tener un recept_culo para tres
clavijas.
• Todos los cables de suministro el_ctrico deben
mantenerse alejados del agua y de las superficies
calientes de la parrilla.
• Lea las instrucciones de encendido de la parrilla para
encender la hornilla lateral.
• Nunca cierre la tapa de la hornilla lateral cuando est_
encendida.
• Utilice una olla de 10 pulgadas de di_metro o m_s
pequefia SIN mango extendido cuando cocine en la
hornilla lateral. Centre la olla sobre la hornilla.
• Sea precavido para evitar chocar contra la parrilla, la
hornilla lateral o la olla para evitar derramar el contenido
de la olla y prevenir las quemaduras graves.
• NO utilice la hornilla lateral para freir alimentos en aceite,
evitando asi los peligros asociados con el encendido del
aceite y la creacibn de una situacibn peligrosa.

USANDO EL AHUMADOR
En la fabricaci6n y preservaci6n de los componentes de su
ahumador, el residue del aceite puede estar presente en la hornilla
y las superficies de su ahumador.
Antes de cocinar en su ahumador usted debe precalentarlo por
primera vez por 15 minutes en "Hi" para consumir el residue de los
aceites.
Nunca aplique la pintura a la superficie interior de su fumador. Las
toxinas de la pintura pueden contaminar su alimento. Sin embargo,
si la pintura se convierte en uso posterior necesario, vea la secci6n
en este manual Seguridad y Mantenimiento Despu_s del Uso.
COMO AGREGAR AGUA
Place la bandeja para astillas de madera/agua into the rack at the
bottom of the smoker. Si desea agregar agua antes del cocimiento,
simplemente Ilene la bandeja para astillas de madera/agua con
agua hasta 1" (2.5 cm) por debajo del borde. Para agregar agua si
el ahumador est,_ caliente, NO jale la bandeja para astillas de
madera/agua m__sall__de la rejilla.
Recomendaciones para el Cocimiento:
Para agregar el agua con m__s facilidad y sin peligro, use una
regadera con pit6n largo.
COMO AGREGAR LENA
Para agregar las astillas de madera antes del cocimiento,
simplemente Ilene la bandeja para astillas de madera/agua con sus
pedacitos de lena favoritos para darle sabor. Use la cantidad y el
tipo de lena que desee. Una bandeja Ilena es generalmente
suficiente para varias horas de ahumado. Una vez que la bandeja
est_ Ilena, coloque la cubierta encima de la bandeja y p6ngala en el
ahumador.
Para agregar pedacitos de lena durante el cocimiento,
recomendamos utilizar pinzas o alicates largos para quitar la
cubierta de la bandeja y colocar los pedacitos de lena en la bandeja
para astillas de madera sin quitarla. No recomendamos sacar la
bandeja mientras usa el ahumador.
_kPRECAUCION:
La bandeja para astillas de madera/agua
y su cubierta pueden calentarse mucho.
Procure no tocarlas durante el uso.
Siempre pbngase guantes gruesos de
cocina antes de tocar partes calientes.
Agua
Tapa de la Bandeja
para Astillas de Madera
NO%&_V3
......................... S
Astillas de Madera
Recomendaciones de cocimiento - LeSa para dar sabor:
Los pedacitos de leSa imparten mejor sabor si se dejan
dentro de la caja.
Use leSa seca de madera fina de nogal americano, pacana,
manzano, cerezo o mesquite.
La mayoria de la leSa de _rboles frutales o de nueces
imparten un excelente sabor ahumado.
No use madera con resina como la del pino o madera
laminada porque imparten mal sabor.
Guiese por su gusto, experimente con distintos tipos y
cantidades de trocitos, astillas o palitos de leSa. Incluso
puede mezclar varios tipos de leSa.
Para producir m_s humo y evitar un cocimiento r_pido,
remoje antes los pedacitos de leSa en un tazbn de agua
separado por 20 minutos como minimo o bien envuelva los
pedacitos en papel aluminio perforado.
La mayoria del sabor que imparte el humo ocurre en la
primera hora de cocimiento. Tipicamente, no es necesario
agregar m_s pedacitos de leSa despu_s a menos que se
desee un sabor ahumado m_s intenso.
LIMPIEZA
Siempre I__vese bien las manos con agua caliente y jab6n antes
de manipular alimentos y despu_s de tocar came, polio o
mariscos crudos.
• Cuando utilice una fuente para Ilevar came, polio o mariscos
crudos a la parrilla, asegtJrese de lavar bien la fuente con agua
caliente y jab6n antes de colocar alimentos cocidos en ella, o
utilice fuentes distintas para los alimentos crudos y cocidos.
• Nunca utilice los mismos utensilios para manipular carne cruda,
polio crude o mariscos, a menos que lOS lave bien con agua
caliente y jab6n.
• Nunca reutilice el adobo de la carneo polio crude en alimentos ya
cocidos y listos para servir.
ADVERTENCIA: Para asegurarse de que sea
seguro comer, el alimento se debe cocinar a
las temperaturas internas minimas enumeradas
en la tabla abajo.
Temperaturas Internas
Minimas Seguras de USDA*
Pescado ........................ 145° F
Cerdo .......................... 160° F
Platillos de Huevo ................ 160° F
Filetes y Carnes Asadas,
de Ternera o de Cordero ........... 145° F
Came IVlolida, Ternera o Cordero .... 160° F
Ayes
(Pavo, Polio, Pato, etc.) ............ 165° F
Came Picada y Productos IVlolidos
(Pechuga de Polio, etc.) ........... 165° F
* Ministerio de Agricultura de los Estados Unidos 30

RECOMENDACIONES OTILES
• Si precocina carneo polio, h__galo inmediatamente antes de
cocinarlo en la parrilla.
• Nunca descongele carne a la temperatura ambiente o sobre un
mostrador.
• Refrigere los restos a m__stardar 2 horas despu_s de haber
sacado la comida de la parrilla.
• Para mayor informaci6n, Ilame a la Linea de Informaci6n sobre
Carney Polio de USDA al ntJmero sin cargo 800-535-4555.
CUIDADOY MANTENIMEINTOAPROPIADO:
• Para proteger su parrilla contra la oxidaci6n excesiva, mant_ngala
limpia y cubierta todo el tiempo cuando
no la est_ usando.
Lave las rejillas para cocinar y los difusores de calor con agua
jabonosa caliente, enju__guelas bien y s_quelas. Aplique una capa
ligera de aceite vegetal liquido o en aerosol alas rejillas para
cocinar.
• Limpie el interior y exterior de la parrilla con un paso htJmedo.
Aplique una capa ligera de aceite vegetal liquido o en aerosol a la
superficie interior para impedir la oxidaci6n.
• Mantenga exterior de parrilla limpia utilizando producto de limpieza
para superficies de acero inoxidable.
• Nunca aplique pintura a la superficie interior. Las manchas de
oxidaci6n en la superficie interior pueden pulirse, limpiarse y luego
cubrirse con una capa ligera de aceite vegetal liquido o en aerosol
para reducir al minimo la oxidaci6n.
LIMPIEZA Y MANTENIMIENTO:
• Para el asado a la parilla seguro y el funcionamiento m__ximo de
su parrilla, realice todos los puntos de la limpieza y del
mantenimiento en esta lista por Io menos dos veces al aSo o
despu_s de periodos de almacenaje extendidos.
• Mantenga el artefacto alejado de materiales combustibles,
gasolina u otros vapores o liquidos inflamables.
• Mantenga los orificios de ventilaci6n del gabinete del cilindro sin
residuos.
Observe las llamas de las hornillas para verificar que est_n
funcionando bien (consulte el dibujo en "lnstrucciones de
Encendio"). Las araSas y otros insectos pueden formar nidos en
la hornilla y bloquear el paso del gas.
• AsegtJrese de apretar toda la tornilleria (tuercas, pernos,
tornillos, etc.) por Io menos dos veces por aSo.
PRECAUClON" Algunas partes pueden tener bordes afilados.
Use guantes de protecci6n si es necesario.
Retire las rejillas para cocinar, los difusores de calory las
hornillas del interior de la parrilla. Utilice un cepillo con agua
caliente y detergente para quitar el exceso de residuos. NUNCA
use un limpiahornos comercial. Enjuague bien con agua. Seque
con una toalla y reinstale todos los componentes en la forma
descrita en las instrucciones de armado.
Proteja todo el Equipo EI6ctrico (Luces, Cable El_ctrico), Cable
El_ctrico y Enchufe del agua antes de limpiar el electrodom_stico
o parrilla. No sumerja el Equipo EI6ctrico, Cable El_ctrico o
Enchufe en el agua ni en ningt3n otro Ifquido.
No utilice el electrodom_stico para otro uso distinto al que rue
diseSado.
• Desenchufe el cable el6ctrico del tomacorriente cuando no se use
el producto. Si guardara su parrilla en el exterior, ctJbrala con una
cubierta para parrillas para Iograr una mayor protecci6n clim__tica.
31
INSTALACI(SN/MANTENIMIENTODE LAS HORNILLAS
• Si bien las hornillas est__n fabricadas de acero Inoxidable,
pueden oxidarse debido al calor extremo y a los __cidos de los
alimentos. Inspeccione regularmente las hornillas para ver si
tienen agujeros anormales y otras seSales de daSos por
corrosi6n. Si detecta daSos, reemplace la hornilla.
NO obstruya el flujo del aire de combustibn y ventilacibn.
Las ara_as u otros insectos pueden hacer nidos y bloquear los
tubos de las hornillas. Los tubos bloqueados impiden que fluya
gas alas hornillas y puede producirse un incendio en el tubo o
debajo de la parrilla. Siga las instrucciones a continuaci6n para
limpiar el tubo y/o reemplazar partes de la hornilla, o si tiene
dificultad para encender la parrilla.
1. Apague el gas en las perillas de control yen la v__lvula del
tanque del cilindro de propano Ifquido.
2. Retire las rejillas para cocinar y los difusores de calor.
3. Retire el perno M6 y la tuerca M6 del "pie" de cada hornilla.
4. Levante cuidadosamente el canal de paso y retfrelo de las
hornillas.
5. Levante cuidadosamente cada hornilla y retfrela de las aberturas
de las v__lvulas.
6. Introduzca un cepillo angosto para botellas o un alambre doblado
en forma de gancho pequeSo en el tubo yen el orificio de la
llama de cada hornilla varias veces.
7,
Nota: Use protecci6n para los ojos cuando ejecute el
procedimiento 7.
Utilice aire comprimido para soplar el tubo de cada hornilla; el
aire debe salir por los orificios de las llamas. Verifique que salga
aire de cada orificio.
8,
9.
10.
11.
Limpie con un cepillo de alambre la superficie exterior completa
de la hornilla para quitar los restos de alimentos y residuos.
Revise la hornilla para detectar daSos; si nota grietas o agujeros
grandes, reemplace la hornilla.
MPORTANTE: La abertura de la hornilla debe deslizarse
sobre la boquilla de la v__lvula.
Alinee cuidadosamente los canales de cruce entre las hornillas
y oriente las hornillas CORRECTAMENTE alineando el agujero
del perno a la izquierda como ilustrado.
Instale nuevamente los pernos M6 bolt y las tuercas M6 pada
cada hornilla y canal de paso.
Nota: Siga la secci6n "Pruebas de Deteccion de Fugas" de
este manual. Vuelva a encender las hornillas para
verificar la operaci6n apropiada.
12. Reinstale los difusores de calory las rejillas para cocinar.
Boquilla de la Valvula
Perno M6
Residuo "_
2
Tuerca M6
Abertura de la Hornilla

REJILLAS PARA COClNAR
• Lfmpielas con agua y detergente de jab6n suave. Se puede usar
un cepillo con cerdas de lat6n o una esponja de limpieza de nil6n
para quitar los residuos de las superficies de acero inoxidable. No
use cerdas de acero para limpiar las parrillas. El acero puede
picar o agrietar el acabado. NO use un limpiahornos comercial.
DIFUSORES DE CALOR
• Puede ser necesario inspeccionar y limpiar peri6dicamente la
placa de distribuci6n de calor para evitar la acumulaci6n excesiva
de grasa. Retire la rejilla para cocinar cuando la parrilla est_ frfa.
Inspeccione los difusores de calory reempl__celas si est__n rotas o
daSadas. No permita que los difusores de calor se daSen hasta el
punto que puedan caerse sobre las hornillas. Reemplace los
difusores de calory las rejillas para cocinar y encienda las
hornillas. Haga funcionar la parilla en "Hi" (llama fuerte) durante
10 minutos para quitar el exceso de grasa.
ANTES DE GUARDAR LA PARRILLA:
• Verifique que la v__lvula del cilindro est,_ bien cerrada.
• Limpie todas las superficies.
• Aplique una capa ligera de aceite para cocinar alas hornillas para
evitar la oxidaci6n excesiva.
• Si va a guardar la parrilla en un Area interior, desconecte el
tanque de propano Ifquido y d_jelo AFUERA.
• Coloque una tapa de protecci6n sobre el tanque de propano
Ifquido y guarde el tanque afuera en un Area bien ventilada y
fuera de la luz directa del sol.
• Limpie la hornilla antes de usar despu_s del almacenaje, al
comienzo de la temporada de uso de la parrilla o si no usa la
parrilla por un mes. Las araSas y otros insectos pueden formar
nidos en los tubos de las hornillas (especialmente durante los
meses de frfo). Estos nidos pueden producir Ilamaradas en los
tubos de las hornillas o debajo de la parrilla.
• Si est,_ guardando la parrilla afuera, ct3brala con la cubierta para
protegerla del tiempo.
TRANSPORTE Y ALMACENAJE:
Nunca mueva una parrilla cuando est_ caliente o con
objetos sobre las superficies de coccibn.
Asegurese de que la v_lvula del cilindro est_ cerrada.
Despu_s de mover la parrilla,verifique que no haya fugas en
ninguna de las conexiones de gas. Consulte las
instrucciones para las Pruebas de deteccibn de fugas.
NO guarde un cilindro de gas de propano liquido de reserva
(lleno o vacio) debajo o cerca de la parrilla.
Nunca guarde liquidos inflamables o latas de aerosol debajo
o cerca de la parrilla.
NO apague incendios de grasa con agua.
Si el artefacto a gas para cocinar al aire libre no est_ en uso,
se debe apagar el gas en el cilindro desuministro.
Se permite guardar un artefacto a gas para cocinar al aire
libre en un _rea interior s61osi el cilindro se desconecta y
se retira del artefacto.
Los cilindros deben guardarse afuera, fuera del alcance de
los nifios y no en un _rea interior,garaje u otra _rea cerrada.
Podria haber nidos de arafias u otros residuos bloqueando
la hornilla cuando saque la parrilladel almacenaje. Consulte
"lnstalacibn/Mantenimiento de las Hornillas" en la seccibn
de Cuidado y mantenimiento apropiados.
PROBLEMA
La hornilla
no enciende
LLamas en la
periiia de control
Llamas amarillas
en la horniiia
La llama se apaga
en la posici6n
"LOW"
Burner does
not get hot
enough
La hornilla
no se calienta
Io suficiente
La luz
ei_ctrica faya
CAUSAS
1. Revise el nivel de combustible en el cilindro
de propane liquido.
2. Chispa de electrodo defectuosa. Vea si puede
encender la parrilla con un cerillo. Puede ser
necesario ajustar el electrode o colector.
3. Es posible que la hornilla no este bien
asentada.
4. Es posible que la hornilla est_ obstruida.
5. Es posible que la valvula del cilindro
este cerrada.
6. El regulador no esta asentado correctamente
sobre la v_.lvula del cilindro.
1. Es posible que los agujeros de la hornilla
esten obstruidos. Consulte
Instalaci6n/Mantenimiento de las Hornillas
en la seccion Seguridad y Mantenimiento
Despues del Use.
2. La hornilla esta asentada incorrectamente
sobre la v_.lvula de control.
3. Las conexiones de gas pueden estar
sueltas. Revise para verificar que no haya
fugas y ajuste todas las conexiones.
1. La hornilla esta obstruida. Consulte
Instalaci6n/Mantenimiento de las Hornillas
en la seccion Seguridad y Mantenimiento
Despues del Uso.
1. Es posible que los agujeros de la hornilla
esten obstruidos. Consulte
Instalaci6n/Mantenimiento de las Hornillas en
la seccion Seguridad y Mantenimiento
Despues del Uso.
2. La parrilla no se precalent6 Io suficiente.
3. La hornilla esta asentada incorrectamente
sobre la v_.lvula de control.
1. Se activ6 el dispositivo de control de flujo
en el regulador. Consulte el
Procedimiento de reposici6n del
regulador en la secci6n Conexi6n del
cilindro de propano Ifquido y de la
manguera / regulador a la parrilla.
1. Acumulaci6n excesiva de grasa produce
Ilamaradas.
2. Regulador da_ado o defectuoso.
Reemplacelo con partes autorizadas de
fabrica.
3. Cocine en una posici6n de temperatura m_.s
baja.
1. Cuerda el_ctrica no conectada con
el enchufe de energia.
2. Interrupter de luz no esta prendido.
3. Bulbo malo.
Para pedir piezas de recambio,
Ilame al 1-800-848-8915
32

Esquema El_ctrico
12V 20W
L: A,j
encendido-apagado
enchufe el_ctrico
t transformador
33

Your Home
For expert troubleshooting and home solutions advice:
www.managemyhome.com
For repair - in your home - of all major brand appliances,
lawn and garden equipment, or heating and cooling systems,
no matter who made it, no matter who sold it!
For the replacement parts, accessories and
owner's manuals that you need to do-it-yourself.
For Sears professional installation of home appliances
and items like garage door openers and water heaters.
1-800-4-MY-HOME ® (1-800-469-4663)
Call anytime, day or night (U.S.A. and Canada)
www.sears.com www.sears.ca
Our Home
For repair of carry-in items like vacuums, lawn equipment,
and electronics, call anytime for the location of your nearest
Sears Parts & Repair Service Center
1-800-488-1222 (U.S.A.) 1-800-469-4663 (Canada)
www.sears.com www.sears.ca
To purchase a protection agreement on a product serviced by Sears:
1-800-827-6655 (U.S.A.) 1-800-361-6665 (Canada)
Para pedir servicio de reparaci6n
a domicilio, y para ordenar piezas:
1-888-SU-HOGAR ®
(1-888-784-6427)
Au Canada pour service en fran(_ais:
1-800-LE-FOYER Mc
(1-800-533-6937)
www.sears.ca
TM SM
® Registered Trademark / Trademark / Service Mark of Sears Brands, LLC
rM
® Marca Registrada / Marca de Fabrica / SMMarca de Servicio de Sears Brands, LLC
MCMarque de commerce / MDMarque d6posee de Sears Brands, LLC © Sears Brands, LLC
-
 1
1
-
 2
2
-
 3
3
-
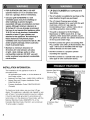 4
4
-
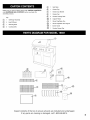 5
5
-
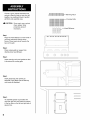 6
6
-
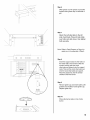 7
7
-
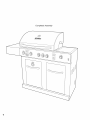 8
8
-
 9
9
-
 10
10
-
 11
11
-
 12
12
-
 13
13
-
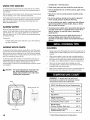 14
14
-
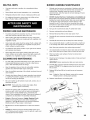 15
15
-
 16
16
-
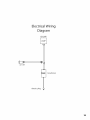 17
17
-
 18
18
-
 19
19
-
 20
20
-
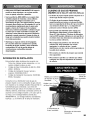 21
21
-
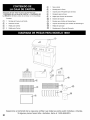 22
22
-
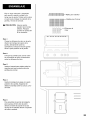 23
23
-
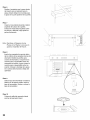 24
24
-
 25
25
-
 26
26
-
 27
27
-
 28
28
-
 29
29
-
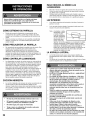 30
30
-
 31
31
-
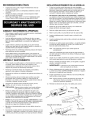 32
32
-
 33
33
-
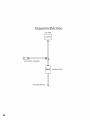 34
34
-
 35
35


Brinkmann 125.16651900 El manual del propietario
- Categoría
- Barbacoas
- Tipo
- El manual del propietario
- Este manual también es adecuado para
en otros idiomas
Artículos relacionados
Otros documentos
-
Sears 125.15884800 Manual de usuario
-
Kenmore 6 Burner Stainless Steel front Gas Grill With Smoker El manual del propietario
-
-
-
-
-