Lexar 128GB Echo SE El manual del propietario
- Tipo
- El manual del propietario

Echo Backup Software
Quick Start Guide

TABLE OF CONTENTS

INTRODUCTION
Whether you’re a business professional on the road, a student doing homework at a friend’s
house, or someone simply using a laptop in a café, it’s important to ensure the files on your
netbook or notebook are protected. Lexar
®
Echo portable backup drives provide a convenient
way to automatically back up your files on the go.
Thanks to Lexar Echo backup software functionality and its extremely easy-to-use interface,
saving and protecting valuable data (documents, presentations, photos, audio, video files, etc.)
is no longer a tedious task. Restoring data is just a click away.
Lexar Echo Backup Software Key Features
Incremental Backup
Unlike traditional backup software, Lexar Echo backup software provides you with an option to
store only new and modified files, thus reducing system overhead.
Versioning
Define the number of versions you want to keep, preserving multiple iterations of a file for later
use. At any moment, you can travel back in time to access a file’s previous version, and you’ll be
prevented from losing any data, even if a file was inadvertently modified or erased.
Live Backup
Leverage continuous data protection (CDP) technology to automatically detect changes to files
and back them up onto the storage device without user intervention. You won’t need to worry
about manually backing up data or scheduling it; Echo backup software will take care of it for
you 24/7.
Custom Configuration
Filter by file extension, date, or size. With numerous configuration options, Echo backup
software provides a flexible tool that allows you to easily choose the data you wish to backup.
Cross-Platform Support
Your data is seamlessly available whether you are using a Mac
®
or a PC system. Echo backup
software delivers the same powerful backup features and ease of use on both platforms for a
consistent experience.
System Requirements
Operating Systems:
•Windows
®
XP (Service Pack 2 is recommended)
•WindowsVista
®
•Windows7
•MacOSX10.5.x
•MacOSX10.6.x
Internet Browser Software:
•InternetExplorer
®
(version5.0andhigher)orMozilla
®
Firefox
®
version1.0andhigher
Hardware:
•AvailableUSBport
•Echobackupdrive
Lexar Echo Backup Software Quick Start Guide 1

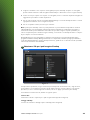
CREATE A BACKUP PLAN
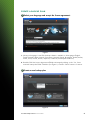
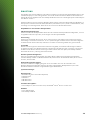
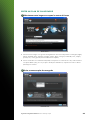
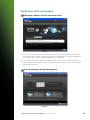
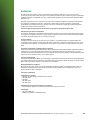
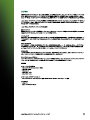
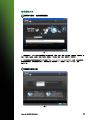
1 Select your language and accept the license agreement
1. Selectyourlanguage.LexarEchobackupsoftwareisavailablein18languages(English,
French,German,Italian,Spanish,Portuguese,Swedish,Danish,Norwegian,Dutch,Russian,
Czech, Polish, Turkish, Korean, Japanese, Traditional, and Simplified Chinese).
2. ReadtheEndUserLicenseAgreement(EULA)andacceptbyclickingonthe“Yes,Ihave
readandIaccepttheEULA”checkbox(seeFigure1).Clickthe“Next”buttontocontinue.
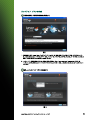
2 Create a new backup plan
Figure 1
Figure 2
Lexar Echo Backup Software Quick Start Guide 2

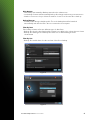
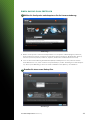
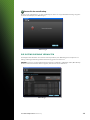
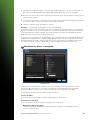
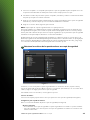
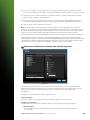
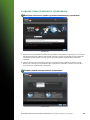
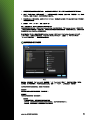
1. Select encrypted or non-encrypted for your backup plan. An encrypted plan provides
automatic128-bitAESencryptionofdataasitisbeingbackedup.
2. Enter a profile name. For an encrypted plan, enter and confirm the password. Enter a hint to
help with remembering the password.
3. ClickthecheckboxtoinstallBackupManagertoenableautomaticandcontinuousbackups
whenever the Echo drive is connected to the computer.
4. Clickthe“Next”buttontocontinue.
NOTE: The first backup plan created is the default profile. This can be changed by going to
BackupManagerunderDriveBackupSettings(seeFigure5)andselectinganotherprole
using the drop-down menu. You can select one default profile for every computer you back up,
allowing simple automated backup of multiple computers with the same Echo drive.
BackupManagercanbeuninstalledatanytimethroughtheWindowsStartMenu
(Programs>LexarEchoBackupManager>Uninstall).OnMaccomputers,useSpotlighttolocate
“LexarEchoBackupManager”,thenclickon“RevealinFinder”anddeletethelesyousee.
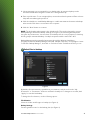
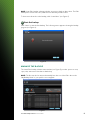
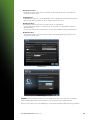
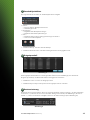
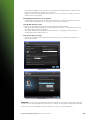
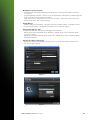
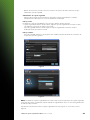
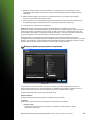
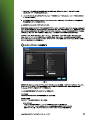
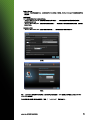
3 Select files to backup
Bydefault,alltextdocuments,spreadsheets,presentations,andphotosfromthe“My
Documents”or“Documents”folderareselectedforbackup.Ifnochangesareneeded,click
“Apply”tostarttherstbackup.
To change the file selections, use the following options:
File Selection:
Select the folders and file types to backup (see Figure 3).
Backup Settings:
Provides granular control on the backup plan (see Figure 4).
Figure 3
Lexar Echo Backup Software Quick Start Guide 3

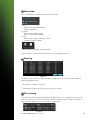
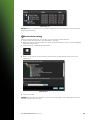
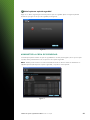
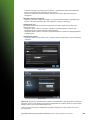
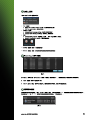
Main Options
- Startbackupautomatically—Backupstartswhenthesoftwareruns
- Live backup—Detect and automatically back up file changes without any user intervention
- Numberofversionstokeep—Selectthenumberofversionsofthesameletobackup
Backup Manager
- Default profile—Assign a default profile. This is the backup that will be launched
automatically each time the Echo drive is connected to the computer.
Filter By Date
Echo backup software offers two different types of date filters.
- Backuplesfromthelast—Backuplescreatedormodiedintheselectedperiodoftime
- Backuplesstartingfrom—Backuplescreatedormodiedstartingfromthe
selected date
Filter By Size
- Backuplessmallerthan—Setthesizelimitofthelestobackup
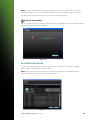
Figure 5
Figure 4
Lexar Echo Backup Software Quick Start Guide 4

NOTE: Lexar Echo backup software includes an option to back up data online. The Echo
backupdrivecomeswithafree,2GBaccountofferedbyDmaileronline.
Tolearnmoreabouttheonlinebackup,click“LearnMore”(seeFigure5).
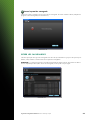
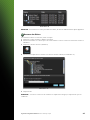
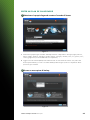
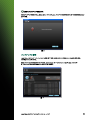
4 Start first backup
Click“Next”tostarttherstbackup.Thefollowingscreenappearsshowingthebackup
progress(seeFigure6):
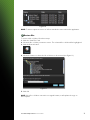
MANAGE THE BACKUP
The Lexar Echo backup software main interface (see Figure 7) provides options to view,
open, edit, and restore files that are backed up.
NOTE: The files can also be accessed manually from the root of the Echo drive in the
“MyBackupfolder”ifyourproleisnotencrypted.
Figure 6
Figure 7
Lexar Echo Backup Software Quick Start Guide 5

1 Main toolbar
These commands are available through the main toolbar.
• Files
o
Switch to another backup profile
o
Exit the application
• Settings
o
Access local backup settings
o
Access online backup settings
• Help
o
Access online support, FAQ and demos
o
Search for software update
• Backupbutton-Manuallystartthebackup
• Restorebutton-Restorethebackeduplestothedesignatedlocation
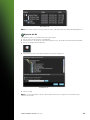
2 Event log
TheEventLogisfoundintheSummarytab(seeFigure8).Itlogseveryeventthatoccurred
during the backup process.
o
Clear button—Clear the event log
o
Export button—Export and save the event log to a *.txt file
3 File versioning
Toviewthelesthatarebackedup,clicktheViewFilestab.A“+”signappearsbeforethele
nameifmorethanoneversionofthesamelehasbeenbackedup(seeFigure9).Clickthe“+”
signtoviewthedifferentversionsofthele(seeFigure10).
Figure 8
Figure 9
Lexar Echo Backup Software Quick Start Guide 6

NOTE: To access a previous version of a file it must first be restored from the application.
4 Restore files
To restore a file or folder, follow these steps:
1. Clickthe“ViewFiles”tab.
2. Select the file or folder you want to restore. The selected file or folder will be highlighted.
3. Click the Restore button.
4. Selectthelocationtowheretheleorfolderistoberestored(seeFigure11).
5. ClickOK.
NOTE:Iftheleorfolderisrestoredtoitsoriginallocation,itwillreplacethecopyon
the computer.
Figure 11
Figure 10
Lexar Echo Backup Software Quick Start Guide 7

CONTACT INFORMATION
If you have questions, we are here to help
Please send us your questions at support@lexar.com
Getting more information
Product information: www.lexar.com/echo
Customer support and warranty information: www.lexar.com/support
Lexar Media, Inc.
47300BaysideParkway
Fremont,CA94538
Tel:(510)413-1275
Email: support@lexar.com
URL: www.lexar.com
7a.m.to5p.m.PST,MondaythroughFriday
Lexar Echo Backup Software Quick Start Guide 8

Kurzanleitung
Echo Backup-Software
Lexar Echo Backup-Software Kurzanleitung 9

EINLEITUNG
Gleichgültig ob Sie auf Geschäftsreise sind, Student sind und bei einem Freund Ihre Hausaufgaben machen oder
einfach Ihren Laptop in einem Café verwenden - der Schutz der Dateien auf Ihrem Netbook oder Notebook ist
wichtig. Mit unseren tragbaren Lexar
®
Echo Backup-Laufwerken können Sie unterwegs bequem Sicherheitskopien
Ihrer Dateien erstellen.
Dank der Funktionen unserer Lexar Echo Backup-Software und ihrer extrem benutzerfreundlichen Oberfläche, ist
das Speichern und Sichern wertvoller Daten (Dokumente, Präsentationen, Fotos, Audio- und Videodateien, usw.)
nicht länger eine mühselige Pflicht. Daten lassen sich mit nur einem Klick wiederherstellen.
Hauptfunktionen der Lexar Echo Backup-Software
Inkrementelle Datensicherung
Anders als traditionelle Backup-Software bietet Ihnen die Lexar Echo Backup-Software die Möglichkeit , nur neue
und geänderte Dateien zu speichern, und verringert somit den Systemaufwand.
Versionierung
Definieren Sie die Anzahl der Versionen, die Sie sichern möchten, und erhalten Sie Ihre Dateien zur weiteren
Verwendung in verschiedenen Iterationen. So ist es jederzeit möglich auf frühere Version Ihrer Datei zuzugreifen
und Datenverluste werden verhindert, selbst wenn eine Datei versehentlich geändert oder gelöscht wurde.
Live-Backup
Nutzen Sie Technologie zur kontinuierlichen Datensicherung (CDP), um automatisch Änderungen an Dateien
zu ermitteln und diese ohne Benutzerintervention auf dem Speichergerät zu sichern. Sie müssen sich nun keine
Gedanken mehr über die manuelle Sicherung von Daten machen oder diese planen; Echo Backup-Software
übernimmt dies für Sie - jeden Tag und rund um die Uhr.
Benutzerspezifische Konfiguration
Filtern Sie nach Dateierweiterung, Datum oder Größe. Mit ihren zahlreichen Konfigurationsmöglichkeiten
stellt Echo Backup-Software ein flexibles Hilfsmittel dar, mit dem Ihnen die Auswahl der Daten, die Sie sichern
möchten, erleichtert wird.
Plattformübergreifender Support
Ihre Daten sind nahtlos verfügbar, ganz gleich ob Sie einen Mac
®
oder einen PC verwenden. Echo
Backup-Software bietet auf beiden Systemen die selben leistungsstarken Backup-Funktionen, die selbe
Benutzerfreundlichkeit und damit ein gleichbleibend gutes Nutzererlebnis.
Systemanforderungen
Betriebssysteme:
• Windows
®
XP (Service Pack 2 wird empfohlen)
• WindowsVista
®
• Windows7
• MacOSX10.5.x
• MacOSX10.6.x
Internetbrowsersoftware:
• InternetExplorer
®
(Version5.0oderneuer)oderMozilla
®
Firefox
®
Version1.0oderneuer
Hardware:
• FreierUSB-Anschluss
• EchoBackup-Laufwerk
Lexar Echo Backup-Software Kurzanleitung 10

EINEN BACKUP-PLAN ERSTELLEN
1 Wählen Sie Ihre Sprache und akzeptieren Sie die Lizenzvereinbarung.
1. WählenSieIhreSprache.LexarEchoBackup-Softwareistin18Sprachenerhältlich(Englisch,Französisch,
Deutsch, Italienisch, Spanisch, Portugiesisch, Schwedisch, Dänisch, Norwegisch, Niederländisch, Russisch,
Tschechisch, Polnisch, Türkisch, Koreanisch, Japanisch, Traditionelles und Vereinfachtes Chinesisch).
2. Lesen Sie die Lizenzvereinbarung für Endbenutzer (EULA) und akzeptieren Sie diese, indem Sie auf das
Kontrollkästchen bei “Yes, I have read and I accept the EULA (Ja, ich habe die EULA gelesen und akzeptiere
sie)”klicken(sieheAbbildung1).KlickenSieaufdieSchaltäche“Next(Weiter)”,umfortzufahren.
2 Erstellen Sie einen neuen Backup-Plan.
Abbildung 1
Abbildung 2
Lexar Echo Backup-Software Kurzanleitung 11

1. WählenSieaus,obIhrBackup-Planverschlüsseltoderunverschlüsseltseinsoll.EinverschlüsselterPlan
führtbeiderSicherungIhrerDatenautomatischeine128-BitAES-Verschlüsselungdurch.
2. Geben Sie einen Profilnamen ein. Falls Sie den verschlüsselten Plan gewählt haben, geben Sie ein Passwort
ein und bestätigen Sie dieses. Geben Sie als Erinnerung an Ihr Passwort einen Hinweis ein.
3. Klicken Sie auf das Kontrollkästchen, um den Datensicherungsmanager zu installieren und die
automatische und fortlaufende Datensicherungen zu aktiveren, sobald das Echo Laufwerk am Computer
angeschlossen wird.
4. KlickenSieaufdieSchaltäche“Next(Weiter)”,umfortzufahren.
Hinweis: Der erste erstellte Backup-Plan ist das Standardprofil. Dies kann im Datensicherungsmanager unter
DatensicherungseinstellungendesLaufwerks(sieheAbbildung5)durchAuswahleinesanderenProlsim
Dropdown-Menü geändert werden. Sie können für jeden Computer, für den Sie eine Sicherung erstellen, ein
Standardprolauswählen.DiesermöglichtesIhnen,miteinunddemselbenEchoLaufwerkaufeinfacheWeise
eine Datensicherung für mehrere Computer zu erstellen.
DerBackup-ManagerkannjederzeitüberdasWindowsStartmenüdeinstalliertwerden(Programme>LexarEcho
Backup-Manager>Deinstallieren).AufMacComputernverwendenSie“LexarEchoBackupManager”,klicken
anschließend auf “Reveal in Finder” (Im Finder anzeigen) und löschen die dort angezeigten Dateien.
3 Wählen Sie Dateien zur Datensicherung aus.
In der Standardeinstellung sind alle Textdokumente, Arbeitsblätter, Präsentationen und Fotos aus den
Ordnern “My Documents (Meine Dokumente)” oder “Documents (Dokumente)” für die Datensicherung
ausgewählt. Falls keine Änderungen erforderlich sind, klicken Sie auf “Apply” um mit dem ersten
Backup zu beginnen.
Zur Änderung der Dateiauswahl verwenden Sie die folgenden Optionen:
Auswahl von Dateien:
WählenSiedieOrdnerundDateitypenaus,dieSiesichernmöchten(sieheAbbildung3).
Backup-Einstellungen:
Bietet Ihnen genaueste Kontrolle des Backup-Plans (siehe Abbildung 4).
Hauptoptionen
- Backup automatisch starten—Backup startet, wenn die Software ausgeführt wird.
- Live-Backup—ermittelt Änderungen an Dateien und sichert diese automatisch ohne jegliche
Abbildung 3
Lexar Echo Backup-Software Kurzanleitung 12

Benutzerintervention.
- Anzahl der zu speichernden Versionen—wählen Sie die Anzahl der Versionen einer Datei aus,
die gesichert werden sollen.
Backup-Manager
- Standardprofil—weisen Sie ein Standardprofil zu. Dies ist das Backup, das jedes Mal automatisch
startet, wenn das Echo Laufwerk an den Computer angeschlossen wird.
Nach Datum filtern
Echo Backup-Software bietet zwei verschiedene Arten von Datumsfiltern.
- Sicherung der letzten Dateien—sichert Dateien, die innerhalb eines ausgewählten Zeitraums
geändert wurden
- Sicherung von Dateien ab—sichert Dateien, die nach dem gewählten Datum geändert wurden
Nach Größe filtern
- Sicherung von Dateien, die kleiner sind als—gibt eine Größenbegrenzung für die Dateien an,
die gesichert werden sollen
HINWEIS: Lexar Echo Backup-Software bietet die Möglichkeit, Daten online zu sichern. Sie erhalten
das Echo Backup-Laufwerk mit einem 2GB Kontos, das von Dmailer online angeboten wird.
KlickenSieauf“Learnmore”(sieheAbbildung5),ummehrüberdasBackupDatensicherungzuerfahren.
Abbildung 5
Abbildung 4
Lexar Echo Backup-Software Kurzanleitung 13

4 Starten Sie das erste Backup.
KlickenSieauf“Next(Weiter)”,umdasersteBackupzustarten.DiefolgendeBildschirmanzeigezeigtden
FortschrittdesBackups(sieheAbbildung6):
DIE DATENSICHERUNG VERWALTEN
DieHauptbenutzeroberächederLexarEchoBackup-Software(sieheAbbildung7)bietetOptionenzur
Anzeige,Öffnung,BearbeitungundWiederherstellunggesicherterDateienan.
HINWEIS: Sie können aus dem Stammverzeichnis des Echo Laufwerks in “My Backup folder (Mein Backup-
Ordner)” auch manuell auf Ihre Dateien zugreifen, falls Ihr Profil unverschlüsselt ist.
Abbildung 6
Abbildung 7
Lexar Echo Backup-Software Kurzanleitung 14

1 Standard-Symbolleiste
Die folgenden Befehle sind über die Standard-Symbolleiste verfügbar.
• Dateien
o Zu einem anderen Backup-Profil wechseln
o Anwendung beenden
• Einstellungen
o Zugriff auf lokale Backup-Einstellungen
o Zugriff auf Online-Backup-Einstellungen
• Hilfe
o Zugriff auf Online-Support, häufig gestellte Fragen und Demos
o Suche nach Software-Updates
• SchaltächeBackup-manuellerStartdesBackups
• SchaltächeWiederherstellen-WiederherstellungderDateienamangegebenenOrt
2 Ereignisprotokoll
DasEreignisprotokollbendetsichinderRegisterkarteÜbersicht(sieheAbbildung8).Hierwerdenalle
Ereignisse protokolliert, die während des Datensicherungsprozesses auftreten.
o Schaltfläche Löschen—Löschen des Ereignisprotokolls
o Schaltfläche Export—Export und Speichern des Ereignisprotokolls als *.txt-Datei
3 Dateiversionierung
Zur Anzeige der gesicherten Dateien klicken Sie auf die Registerkarte “Dateien anzeigen”. Vor dem Dateinamen
erscheint ein “+”, falls mehr als eine Version derselben Datei gesichert wurde (siehe Abbildung 9). Klicken Sie
aufdas“+”,umdieverschiedenenverfügbarenVersionenderDateianzuzeigen(sieheAbbildung10).
Abbildung 8
Abbildung 9
Lexar Echo Backup-Software Kurzanleitung 15

HINWEIS: Um auf eine frühere Version einer Datei zuzugreifen, muss diese zunächst von der Anwendung
wiederhergestellt werden.
4 Dateiwiederherstellung
Führen Sie folgende Schritte aus, um eine Datei oder einen Ordner wiederherzustellen:
1. Klicken Sie auf die Registerkarte “View Files (Dateien anzeigen)”.
2. WählenSiedieDateioderdenOrdneraus,die/denSiewiederherstellenmöchten.Die/derausgewählte
Datei/Ordnerwirdmarkiert.
3. KlickenSieaufdieSchaltächeWiederherstellen.
4. WählenSiedenOrtaus,andemdieDateioderderOrdnerwiederhergestelltwerdensollen(siehe
Abbildung11).
5. Klicken Sie auf OK.
HINWEIS:FallsdieDateioderderOrdneranihrem/seinemursprünglichenOrtwiederhergestelltwerden,
wird die vorhandene Version ersetzt.
Abbildung 11
Abbildung 10
Lexar Echo Backup-Software Kurzanleitung 16

KONTAKTINFORMATIONEN
Falls Sie Fragen haben, helfen wir Ihnen gern.
Bitte senden Sie uns Ihre Fragen an support@lexar.com
Weitere Informationen
Produktinformationen:www.lexar.com/echo
KundendienstundGarantieinformationen:www.lexar.com/support
Lexar Media, Inc.
47300BaysideParkway
Fremont,CA94538,USA
Tel.:+1(510)413-1275
E-Mail: support@lexar.com
URL: www.lexar.com
7.00Uhrbis17.00UhrPST,MontagbisFreitag
Lexar Echo Backup-Software Kurzanleitung 17

Logiciel de
sauvegarde Echo
Guide de démarrage rapide
Logiciel de sauvegarde Lexar Echo Guide de démarrage rapide 18

INTRODUCTION
Que vous soyez un professionnel en déplacement, un étudiant faisant ses devoirs chez un ami ou simplement
quelqu’un utilisant un ordinateur portable dans un café, il est important de vous assurer que les fichiers de votre
portable ou miniportable sont protégés. Les lecteurs de sauvegarde portatifs Echo de Lexar
®
sont un moyen
pratique de sauvegarder automatiquement vos fichiers en déplacement.
Grâce aux fonctionnalités du logiciel de sauvegarde Echo de Lexar et à son interface extrêmement conviviale,
l’enregistrement et la protection des données importantes (documents, présentations, photos, fichiers audio et
vidéo, etc.) n’est plus une tâche fastidieuse. Il suffit désormais d’un seul clic pour restaurer des données.
Fonctionnalités principales du logiciel de sauvegarde Echo de Lexar
Sauvegarde incrémentielle
Contrairement aux logiciels de sauvegarde traditionnels, le logiciel de sauvegarde Echo de Lexar vous propose
une option pour stocker uniquement les fichiers nouveaux et modifiés, réduisant ainsi le taux d’utilisation du
système.
Contrôle des versions
Définissez le nombre de versions que vous voulez garder, et conservez ainsi plusieurs copies d’un fichier pour une
utilisation ultérieure. À tout moment, vous pouvez retourner dans le temps pour accéder à une version antérieure
d’un fichier, et vous ne risquez pas de perdre des données même si un fichier est modifié ou supprimé par
inadvertance.
Sauvegarde en direct
Utilisez la technologie de protection continue des données pour détecter automatiquement les modifications des
fichiers et les sauvegarder sur le dispositif de stockage, sans intervention de l’utilisateur. Vous n’aurez plus besoin
de sauvegarder manuellement des données ni de programmer des sauvegardes. Le logiciel de sauvegarde Echo
s’en occupe 24 heures sur 24, 7 jours sur 7.
Configuration personnalisée
Filtrez par extension de fichier, date ou taille. Avec plusieurs possibilités de configuration, le logiciel de
sauvegarde Echo est un outil flexible qui vous permet de choisir facilement les données que vous souhaitez
sauvegarder.
Support interplateforme
Vos données sont disponibles en continu, que vous utilisiez un Mac
®
ou un PC. Le logiciel de sauvegarde Echo
propose les mêmes fonctionnalités de sauvegarde avancées et une facilité d’utilisation sur les deux plateformes,
pour une expérience cohérente.
Configuration système
Systèmes d’exploitation :
• Windows
®
XP (Service Pack 2 est conseillé)
• WindowsVista
®
• Windows7
• MacOSX10.5.x
• MacOSX10.6.x
Navigateur Internet :
• InternetExplorer
®
(versions5.0etultérieures)ouMozilla®Firefox
®
(versions1.0etultérieures)
Matériel :
• PortUSBdisponible
• LecteurdesauvegardeEcho
Logiciel de sauvegarde Lexar Echo Guide de démarrage rapide 19

CRÉER UN PLAN DE SAUVEGARDE
1 Sélectionnez votre langue et acceptez le contrat de licence
1. Sélectionnezvotrelangue.LelogicieldesauvegardeEchodeLexarestdisponibleen18langues(anglais,
français, allemand, italien, espagnol, portugais, suédois, danois, norvégien, néerlandais, russe, tchèque,
polonais, turc, coréen, japonais, chinois traditionnel et simplifié).
2. Lisez le contrat de licence utilisateur final (CLUF) et acceptez-le en cochant la case « Yes, I have read and
IaccepttheEULA»(Oui,j’ailuetj’accepteleCLUF)(voirl’illustration1).Cliquezsurlebouton«Next»
(Suivant) pour continuer.
2 Créer un nouveau plan de sauvegarde
Illustration 1
Illustration 2
Logiciel de sauvegarde Lexar Echo Guide de démarrage rapide 20

1. Sélectionnez«Encrypted»(Crypté)ou«Non-Encrypted»(Non-crypté)pourvotreplandesauvegarde.Un
plancryptéfournitautomatiquementuncryptageAES128bitsdesdonnéeslorsdelasauvegarde.
2. Entrez un nom de profil. Pour un plan crypté, entrez et confirmez le mot de passe. Entrez un indice pour vous
souvenir du mot de passe.
3. Cochez la case pour installer le gestionnaire de sauvegarde, afin de permettre des sauvegardes automatiques
et continues à chaque fois que le lecteur Echo est raccordé à l’ordinateur.
4. Cliquezsurlebouton«Next»(Suivant)pourcontinuer.
Remarque : Le premier plan de sauvegarde créé est le profil par défaut.
Vous pouvez modifier cela en allant dans le gestionnaire de sauvegarde, dans les paramètres de sauvegarde du
lecteur(voirl’illustration5)etensélectionnantunautreproldanslemenudéroulant.Vouspouvezsélectionner
un profil par défaut pour chaque ordinateur que vous sauvegardez, permettant une sauvegarde automatisée
simple de plusieurs ordinateurs avec le même lecteur Echo.
LegestionnairedesauvegardepeutêtredésinstalléàtoutmomentàpartirdumenudedémarragedeWindows
(Programs(Touslesprogrammes)>LexarEchoBackupManager(GestionnairedesauvegardeEchodeLexar)>
Uninstall (Désinstaller)). Sur Mac, utilisez Spotlight pour localiser le gestionnaire de sauvegarde Echo de Lexar,
puis cliquez sur « Reveal in Finder » (Afficher dans le Finder) et supprimez les fichiers que vous voyez.
3 Sélectionnez les fichiers à sauvegarder
Par défaut, tous les fichiers texte, les feuilles de calcul, les présentations et les photos des dossiers « My
Documents » (Mes documents) ou « Documents » (Documents) sont sélectionnés pour être sauvegardés.
Si aucune modification n’est nécessaire, cliquez sur « Apply » pour lancer la première sauvegarde.
Pour modifier la sélection des fichiers, utilisez les options suivantes :
Selection de fichiers :
Sélectionnez les dossiers et les types de fichiers à sauvegarder (voir l’illustration 3).
Paramètres de la sauvegarde :
Fournit un contrôle modulaire sur le plan de sauvegarde (voir l’illustration 4).
Main Options (Options principales)
- Start backup automatically (Démarrer automatiquement la sauvegarde) : la sauvegarde commence
lorsque le logiciel est lancé
Illustration 3
Logiciel de sauvegarde Lexar Echo Guide de démarrage rapide 21

- Live backup (Sauvegarde en direct) : détecte et sauvegarde automatiquement les modifications des
fichiers de sauvegarde sans intervention de l’utilisateur
- Numberofversionstokeep(Nombredeversionsàconserver):sélectionnezlenombredeversions
du même fichier à sauvegarder
Backup Manager (Gestionnaire de sauvegarde)
- Default profile (Profil par défaut) : assigne un profil par défaut. C’est une sauvegarde qui sera lancée
automatiquement chaque fois que le lecteur Echo est raccordé à l’ordinateur.
Filter By Date (Filtrer par date)
Le logiciel de sauvegarde Echo propose deux types différents de filtres par date.
- Backuplesfromthelast(Sauvegarderleschiersdepuislesderniers):sauvegardeleschierscréés
ou modifiés dans la période sélectionnée
- Backuplesstartingfrom(Sauvegarderleschiersdepuisle):sauvegardedeschierscréésou
modifiés à partir d’une date sélectionnée
Filter By Size (Filtrer par taille)
- Backuplessmallerthan(Sauvegarderdeschierspluspetitsque):dénitlalimitedetailledes
fichiers à sauvegarder
REMARQUE : Le logiciel de sauvegarde Echo de Lexar comprend une option pour sauvegarder les données
en ligne. Le lecteur de sauvegarde Echo est fourni avec un compte en ligne gratuit de 2Go, offert par Dmailer
Pourensavoirplussurlasauvegardeenligne,cliquezsur«Learnmore»(voirl’illustration5).
Illustration 5
Illustration 4
Logiciel de sauvegarde Lexar Echo Guide de démarrage rapide 22

4 Lancer la première sauvegarde
Cliquezsur«Next»(Suivant)pourlancerlapremièresauvegarde.Lafenêtresuivantes’afche,indiquantla
progressiondelasauvegarde(voirl’illustration6):
GÉRER LES SAUVEGARDES
L’interface principale du logiciel de sauvegarde Echo de Lexar (voir l’illustration 7) propose des options pour
afficher, ouvrir, modifier et restaurer des fichiers ayant été sauvegardés.
REMARQUE : Les fichiers peuvent être accessibles manuellement depuis la racine du lecteur Echo dans le
dossier«MyBackupfolder»(Mondossierdesauvegarde)sivotreproln’estpascrypté.
Illustration 6
Illustration 7
Logiciel de sauvegarde Lexar Echo Guide de démarrage rapide 23

1 Barre d’outils principale
Ces commandes sont disponibles dans la barre d’outils principale.
• Files(Fichiers)
o Passer à un autre profil de sauvegarde
o Quitter l’application
• Settings(Paramètres)
o Accéder aux paramètres de sauvegarde locale
o Accéder aux paramètres de sauvegarde en ligne
• Help(Aide)
o Accéder au support en ligne, à la FAQ et aux démos
o Rechercher des mises à jour de logiciels
• Bouton«Backup»(Sauvegarder):lancemanuellementlasauvegarde
• Bouton«Restore»(Restaurer):restaureleschierssauvegardésàl’emplacementdésigné
2 Journal des événements
Lejournaldesévénementsestaccessibledepuisl’onglet«Summary»(Résumé)(voirl’illustration8).Ilenregistre
chaque événement survenant pendant le processus de sauvegarde.
o Bouton«Clear»(Effacer):supprimelechier-journaldesévénements
o Bouton«Export»(Exporter):exporteetenregistrelechier-journaldesévénementsdansunchier*.txt
3 Contrôle des versions des fichiers
Pourafcherleschierssauvegardés,cliquezsurl’onglet«ViewFiles»(Afcherleschiers).Unsigne«+»
apparaît devant le nom du fichier si plus d’une version du même fichier a été sauvegardée (voir l’illustration 9).
Cliquezsurlesigne«+»pourafcherlesdifférentesversionsduchier(voirl’illustration10).
Illustration 8
Illustration 9
Logiciel de sauvegarde Lexar Echo Guide de démarrage rapide 24

REMARQUE : Pour accéder à une version précédente d’un fichier, elle doit être d’abord restaurée depuis l’application.
4 Restaurer des fichiers
Pour restaurer un fichier ou un dossier, suivez ces étapes :
1. Cliquezsurl’onglet«ViewFiles»(Afcherleschiers).
2. Sélectionnez le fichier ou le dossier que vous voulez restaurer. Le fichier ou le dossier sélectionné sera mis en
surbrillance.
3. Cliquez sur le bouton « Restore » (Restaurer).
4. Sélectionnezl’emplacementoùlechierouledossierdoitêtrerestauré(voirl’illustration11).
5. CliquezsurOK.
REMARQUE : Si le fichier ou le dossier est restauré à son emplacement d’origine, il remplacera la copie sur
l’ordinateur.
Illustration 11
Illustration 10
Logiciel de sauvegarde Lexar Echo Guide de démarrage rapide 25

COORDONNÉES
Si vous avez des questions, nous sommes à votre disposition
Veuillez nous envoyer vos questions à support@lexar.com
Informations supplémentaires
Informationsproduit:www.lexar.com/echo
Assistanceclientèleetinformationssurlagarantie:www.lexar.com/support
Lexar Media, Inc.
47300BaysideParkway
Fremont,CA94538-USA
Tél:(510)413-1275
E-mail : support@lexar.com
URL:www.lexar.com
de7hà17hPST,dulundiauvendredi
Logiciel de sauvegarde Lexar Echo Guide de démarrage rapide 26

Guida rapida
Software di backup Echo
Software di backup Lexar Echo Guida rapida 27

INTRODUZIONE
È importante fare in modo che i file sul netbook o notebook siano sempre protetti, sia per un professionista in
viaggio come per uno studente che fa i compiti a casa di un amico o un semplice utente di un laptop in un caffè.
Le unità di backup portatili Lexar
®
Echo offrono una maniera comoda di realizzare automaticamente il backup dei
file mentre si è in viaggio.
Grazie alle funzionalità del software di backup Lexar Echo e alla sua interfaccia di facile utilizzo, salvare e
proteggere i dati più importanti (documenti, presentazioni, fotografie, file audio e video, ecc.) non è più
un’attività tediosa. Un semplice clic vi separa dal ripristino dei dati.
Funzioni chiave del software di backup Lexar Echo
Backup incrementale
A differenza dei software di backup tradizionali, Lexar Echo offre l’opzione di memorizzare solo i file nuovi e
modificati, riducendo l’overhead del sistema.
Versioning
Definite il numero di versioni da conservare, preservando più iterazioni di un file da utilizzare successivamente.
In qualsiasi momento è possibile tornare indietro nel tempo per accedere alla versione precedente di un file,
prevenendo qualsiasi perdita di dati anche se il file è stato inavvertitamente modificato o cancellato.
Live Backup
Utilizzate la tecnologia CDP (Continuous Data Protection - protezione continua dei dati) per rilevare
automaticamente le modifiche ai file e eseguirne il backup sul dispositivo di storage, senza interventi da
parte dell’utente. Non dovrete preoccuparvi di pianificare l’esecuzione del backup dei dati, né di eseguirlo
manualmente; il software di backup Echo se ne occuperà per voi.
Configurazione personalizzata
Filtraggio dei file per estensione, data o dimensioni. Con diverse opzioni di configurazione, il software di backup
Echo è uno strumento flessibile che consente di scegliere con facilità i dati per i quali eseguire il backup.
Supporto multi-piattaforma
I vostri dati sono disponibili senza soluzione di continuità, sia utilizzando un Mac
®
che un PC. Il software di backup
Echo offre le stesse potenti caratteristiche e la stessa facilità di utilizzo su entrambe le piattaforme, garantendo
un’esperienza coerente.
Requisiti di sistema.
Sistemi operativi:
• Windows
®
XP (si raccomanda la Service Pack 2)
• WindowsVista
®
• Windows7
• MacOSX10.5.x
• MacOSX10.6.x
Browser Internet
• InternetExplorer
®
(versione5.0esuccessive)oMozilla
®
Firefox
®
versione1.0esuccessive
Hardware:
• PostaUSBdisponibile
• UnitàdibackupEcho
Software di backup Lexar Echo Guida rapida 28

CRÉER UN PLAN DE SAUVEGARDE
1 Selezionare la propria lingua ed accettare l’accordo di licenza
1. Selezionarelaproprialingua.IlsoftwaredibackupLexarEchoèdisponibilein18lingue(inglese,francese,
tedesco, italiano, spagnolo, portoghese, svedese, danese, norvegese, olandese, russo, ceco, polacco, turco,
coreano, giapponese, cinese sia tradizionale che semplificato).
2. Leggere l’accordo di licenza (EULA) ed accettarlo facendo clic sulla casella di controllo “Yes, I have read
andIaccepttheEULA”(sì,holettoeaccettatol’EULA)(vederelaFigura1).Fareclicsulpulsante“Next”
(successivo) per continuare.
2 Creare un nuovo piano di backup
Figura 1
Figura 2
Software di backup Lexar Echo Guida rapida 29

1. Scegliere se utilizzare o meno l’opzione di crittografia per il piano di backup. Un piano con crittografia
prevedel’utilizzoautomaticodellacrittograaa128bitAESperidatimentrenevieneeseguitoilbackup.
2. Inserire un nome per il profilo. Per un piano con crittografia, inserire e confermare la password. Digitare un
suggerimento per aiutare a ricordare la password.
3. FareclicsullacaselladicontrolloperinstallareBackupManagereconsentirebackupautomaticiecontinui
ogniqualvolta l’unità Echo viene collegata al computer.
4. Fare clic sul pulsante “Next” (successivo) per continuare.
Nota: Il primo piano di backup creato è il profilo predefinito. Si può modificare tal impostazione tornando
aBackupManager,sottoDriveBackupSettings(impostazionidibackupperl’unità)(vederelaFigura5)e
selezionando un altro profilo utilizzando il menu a discesa. È possibile scegliere un profilo predefinito per
ciascun computer del quale si desidera eseguire il backup, consentendo così il backup automatico e semplice
di più computer con la stessa unità Echo.
BackupManagerpuòesseredisinstallatoinqualsiasimomentotramiteilmenuStartdiWindows(Tuttii
programmi>LexarEchoBackupManager>Uninstall).SuicomputerMac,utilizzareSpotlightperindividuare
“LexarEchoBackupManager”(gestionebackupLexarEcho),quindifareclicsu“RevealinFinder”(visualizza
nella ricerca) ed eliminare i file visualizzati..
3 Selezionare i file per i quali eseguire il backup
Per impostazione predefinita, vengono selezionati per il backup tutti i documenti di testo, i fogli di calcolo,
le presentazioni e le fotografie presenti nella cartella “My Documents” (i miei documenti) o “Documents”
(documenti). Se non è necessario apportare modifiche, fare clic su “Apply” per avviare il primo backup.
Per modificare la selezione dei file, utilizzare le seguenti opzioni:
Selezione File:
Selezionare le cartelle e i tipi di file per i quali eseguire il backup (vedere la Figura 3).
Settaggi di Backup:
Consente di controllare in dettaglio il piano di backup (vedere la Figura 4).
Figura 3
Software di backup Lexar Echo Guida rapida 30

Main Options (opzioni principali)
- Start backup automatically (avvia backup automaticamente) —Il backup parte quando il software è
in esecuzione
- Livebackup(backupindiretta)—Rilevaeesegueautomaticamenteilbackupdellemodicheapportate
ai file, senza alcun intervento da parte dell’utente
- Number of versions to keep (numero di versioni da conservare) —Selezionare il numero di versioni
dello stesso file per le quali eseguire il backup
Backup Manager
- Default profile (profilo predefinito) —Assegnare un profilo predefinito. Questo è il backup che verrà
lanciato automaticamente ogni qualvolta l’unità Echo viene collegata al computer.
Filter By Date (filtra per data)
Il software di backup Echo offre due tipi di filtraggio in base alla data.
- Backuplesfromthelast(backupdeiledell’ultimo)—Backupdeilecreatiomodicatidurante
il periodo selezionato
- Backuplesstartingfrom(backupdeileapartireda)—Backupdeilecreatiomodicatiapartire
dalla data selezionata
Filter By Size (filtra per dimensioni)
- Backuplessmallerthan(backupdeilepiùpiccolidi)—Impostaillimitedimensionaleperile
per i quali eseguire il backup
Figura 5
Figura 4
Software di backup Lexar Echo Guida rapida 31

NOTA: Il software di backup Lexar Echo include un’opzione che prevede il backup dei dati on-line. L’unità di
backupEchoincludeunaccounton-lineda2GBdautilizzarecomeprovaper30giorni,offertodaDmailer.
Persapernedipiùsulbackupon-line,fareclicsu“Learnmore”(vederelaFigura5).
4 Avvio del primo backup
Fareclicsu“Next”(successivo)peravviareilprimobackup.Vienevisualizzatalaseguenteschermata,chemostra
l’avanzamentodelbackup(vederelaFigura6).
GESTIONE DEL BACKUP
L’interfacciaprincipaledelsoftwaredibackupLexarEcho(vederelaFigura7)offreopzionipervisualizzare,
aprire, modificare e ripristinare i file inclusi nel backup.
NOTA:Èinoltrepossibileaccederemanualmenteailedallarootdell’unitàEchoin“MyBackupfolder”
(la mia cartella di backup), se il profilo non include la crittografia.
Figura 6
Figura 7
Software di backup Lexar Echo Guida rapida 32

1 Barra degli strumenti principale
I seguenti comandi sono disponibili tramite la barra degli strumenti principale.
• Files(le)
o Passare a un altro profilo di backup
o Uscire dall’applicazione.
• Settings(impostazioni)
o Accesso alle impostazioni di backup locale
o Accesso alle impostazioni di backup on-line
• Help(guida)
o Accesso al supporto on-line, alle FAQ e alle demo.
o Ricercadegliaggiornamentialsoftware
• PulsanteBackup-Avviomanualedelbackup
• PulsanteRestore(ripristino)-Ripristinodeileinclusinelbackupnellaposizioneprescelta
2 Registro eventi
IlregistroeventièdisponibilenellaschedaSummary(riepilogo)(vederelaFigura8).Vengonoregistratituttigli
eventi verificatisi durante il processo di backup.
o Pulsante Clear (azzera) - Azzeramento del registro eventi
o Pulsante Export (esporta) - Esportazione e salvataggio del registro eventi in un file *.txt
3 Controllo della versione dei file
Pervisualizzareileperiqualièstatoeseguitoilbackup,fareclicsullaschedaViewFiles(visualizzale).Un
segno “+” viene visualizzato prima del nome file, se è stato eseguito il backup di più versioni dello stesso file
(vederelaFigura9).Fareclicsulsegno“+”pervisualizzarelediverseversionidelle(vederelaFigura10)
Figura 8
Figura 9
Software di backup Lexar Echo Guida rapida 33

NOTA: Per accedere a una versione precedente di un file, essa deve prima essere ripristinata dall’applicazione.
4 Ripristino dei file
Per ripristinare un file o una cartella, attenersi ai seguenti passi:
1. Fareclicsullascheda“ViewFiles”(visualizzale).
2. Selezionare il file o la cartella che si desidera ripristinare. Il file o la cartella selezionata risulterà evidenziata.
3. FareclicsulpulsanteRestore(ripristino).
4. Selezionarelaposizionenellaqualeripristinareille(vederelaFigura11).
5. FareclicsuOK.
NOTA: Se si procede al ripristino del file o della cartella nella posizione originale, verrà sostituita la copia
esistente sul computer.
Illustration 11
Illustration 10
Software di backup Lexar Echo Guida rapida 34

INFORMAZIONI DI CONTATTO
Se avete domande da porre, siamo qui per aiutarvi.
Inviate le vostre domande all’indirizzo support@lexar.com
Come ottenere maggiori informazioni
Informazioni sul prodotto: www.lexar.com/echo
Assistenza clienti e informazioni sulla garanzia: www.lexar.com/support
Lexar Media, Inc.
47300BaysideParkway
Fremont,CA94538
Tel:(510)413-1275
Posta elettronica: support@lexar.com
URL:www.lexar.com
dalle07.00alle17:00orasolaredelpacico,dallunedìalvenerdì
Software di backup Lexar Echo Guida rapida 35

Software de copia de
seguridad Echo
Guía de inicio rápido
Software de copia de seguridad Lexar Echo Guía de inicio rápido 36

INTRODUCCIÓN
Independientemente de si es un profesional en viaje de negocios, un estudiante haciendo las tareas escolares en
la casa de un amigo o cualquiera usando un portátil en una cafetería, es importante garantizar que los archivos
de su netbook o portátil estén protegidos. Las unidades de copia de seguridad portátiles Echo de Lexar
®
son una
forma cómoda de hacer una copia de seguridad automática de sus archivos en cualquier lugar.
Gracias a la funcionalidad del software de copia de seguridad Echo de Lexar y a su interfaz sumamente fácil de
usar, guardar y proteger datos valiosos (documentos, presentaciones, fotos, archivos de audio y vídeo, etc.) ya no
es una tarea aburrida. Podrá restaurar los datos con solo un clic.
Funciones clave del software de copia de seguridad Echo de Lexar
Copia de seguridad incremental
A diferencia del software de copia de seguridad tradicional, Echo de Lexar le ofrece la opción de almacenar
solamente los archivos nuevos y modificados, lo que reduce la ocupación del sistema.
Versiones
Defina el número de versiones que quiere guardar, conservando múltiples repeticiones de un archivo para usarlas
más tarde. Puede viajar en el tiempo en cualquier momento para acceder a la versión anterior de un archivo, y así
evitar perder ningún dato, incluso si modifica o borra accidentalmente el archivo.
Copia de seguridad en vivo
Aproveche al máximo la tecnología de protección de datos continua (CDP) para detectar automáticamente
cambios en los archivos y hacer una copia de seguridad en el dispositivo de almacenamiento sin la intervención
del usuario. No tendrá que preocuparse de hacer una copia manual de los datos, ni de programarla; el software
de copia de seguridad Echo se encargará de ello por usted las 24 horas del día, los 7 días de la semana.
Configuración personalizada
Filtre por extensión de archivo, fecha o tamaño. Con sus numerosas opciones de configuración, el software de
copia de seguridad Echo es una herramienta flexible que le permite elegir fácilmente los datos de los que desea
hacer una copia de seguridad.
Soporte entre plataformas
Sus datos están siempre disponibles sin problemas, independientemente de si está usando un PC o un Mac
®
. El
software de copia de seguridad Echo ofrece las mismas potentes funciones de copia de seguridad y facilidad de
uso en ambas plataformas, para que su experiencia con él sea siempre la misma.
Requisitos del sistema
Sistemas operativos:
• Windows
®
XP (Se recomienda Service Pack 2)
• WindowsVista
®
• Windows7
• MacOSX10.5.x
• MacOSX10.6.x
Software de navegador de Internet:
• InternetExplorer
®
(versión5.0ysuperiores)oMozilla
®
Firefox
®
versión1.0ysuperiores
Hardware:
• PuertoUSBdisponible
• UnidaddecopiadeseguridadEcho
Software de copia de seguridad Lexar Echo Guía de inicio rápido 37

CREE UN PLAN DE COPIA DE SEGURIDAD
1 Seleccione su idioma y acepte el contrato de licencia
1. Seleccionesuidioma.ElsoftwaredecopiadeseguridadEchodeLexarestádisponibleen18idiomas
(inglés, francés, alemán, italiano, español, portugués, sueco, danés, noruego, holandés, ruso, checo, polaco,
turco, coreano, japonés y chino tradicional y simplificado).
2. Leaelcontratodelicenciaparaelusuarional(EULA)yacéptelohaciendoclicenlacasilla“Yes,Ihave
readandIaccepttheEULA”(Sí,heleídoyaceptoelEULA)(vealaFigura1).Hagaclicenelbotón“Next”
(Siguiente) para continuar.
2 Cree un nuevo plan de copia de seguridad
Figura 1
Figura 2
Software de copia de seguridad Lexar Echo Guía de inicio rápido 38

1. Seleccioneencriptadoonoencriptadoparasuplandecopiadeseguridad.Unplanencriptadoofreceuna
encriptaciónautomáticaAESde128bitparalosdatosalmisotiempoquehacelacopia.
2. Introduzca un nombre de perfil. Para los planes encriptados, introduzca y confirme la contraseña. Introduzca
una pista que le ayude a recordar la contraseña.
3. HagaclicenlacasillaparainstalarelAdministradordecopiadeseguridadquerealicecopiasdeseguridad
automáticas y continuas siempre que esté conectada la unidad Echo al ordenador.
4. Hagaclicenelbotón“Next”(Siguiente)paracontinuar.
NOTA: El primer plan de copia de seguridad creado es el perfil por defecto.
Esto puede cambiarse en el Administrador de copia de seguridad de Configuraciones de la unidad de copia
deseguridad(vealaFigura5)seleccionadootroperldelmenúdesplegable.Puedeseleccionarunperlpor
defecto para cada ordenador del que realice una copia de seguridad, lo que le permitirá la copia de seguridad
automática sencilla para múltiples ordenadores con la misma unidad Echo.
El Administrador de copia de seguridad puede desinstalarse en cualquier momento en el menú de Inicio de
Windows(Programas>LexarEchoBackupManager>Desinstalar).ParalosordenadoresMac,useSpotlightpara
ubicar“LexarEchoBackupManager”(AdministradordecopiadeseguridaddeEchodeLexar),yluegohaga
clicen“RevealinFinder”(Mostrarenbuscador)paraborrarlosarchivosquevea.
3 Seleccione los archivos de los que desea hacer una copia de seguridad
Por defecto, se seleccionan para la copia de seguridad todos los documentos de texto, hojas de cálculo y
fotosdelacarpeta“Mydocuments”(Misdocumentos)o“Documents”(Documentos).Sinoesnecesariohacer
cambios,hagaclicen“Apply”parainiciarlacopiadeseguridad.
Para cambiar la selección de archivos, use las siguientes opciones:
Seleccion de archivo:
Seleccione las carpetas y tipos de archivo de los que quiere hacer una copia de seguridad (vea la Figura 3).
Configuracion para respaldo de archivos:
Ofreceuncontrolmásdetalladodelplandecopiadeseguridad(vealaFigura4).
Opciones principales
- Inicio automático de la copia de seguridad: la copia de seguridad se inicia cuando se ejecuta el software
- Copia de seguridad en vivo: detecta y hace una copia de seguridad de los cambios en los archivos sin la
intervención del usuario
Figura 3
Software de copia de seguridad Lexar Echo Guía de inicio rápido 39

- Número de versiones a conservar: seleccione el número de versiones del mismo archivo de las que
realizará una copia de seguridad
Administrador de copia de seguridad
- Perfil por defecto:asigne un perfil por defecto. Ésta será la copia de seguridad que se realizará
automáticamente cada vez que se conecte la unidad Echo al ordenador..
Filtro por fecha
El software de copia de seguridad Echo ofrece dos tipos distintos de filtros de fecha.
- Copia de seguridad de archivos desde el último: haga una copia de seguridad de los archivos creados
o modificados en el período de tiempo seleccionado
- Copia de seguridad de archivos desde: haga una copia de seguridad de los archivos creados o
modificados desde la fecha seleccionada
Filtro por tamaño
- Copia de seguridad de archivos más pequeños que: establezca el límite de tamaño de los archivos de
los que hace copia de seguridad
NOTA: El software de copia de seguridad Echo de Lexar incluye una opción para hacer una copia de seguridad
en Internet de los datos. La unidad de copia de respaldo de seguridad Echo viene con una cuenta gratuita online
de2GBofrecidaporDmailer.
ParaobtenermásinformaciónsobrelacopiadeseguridadenInternet,hagaclicen“Learnmore”(veala
Figura5).
Figura 5
Figura 4
Software de copia de seguridad Lexar Echo Guía de inicio rápido 40

4 Inicie la primera copia de seguridad
Hagaclicen“Next”(Siguiente)parainiciarlaprimeracopiadeseguridad.Aparecelasiguientepantalla
mostrandoelprogresodelacopiadeseguridad(vealaFigura6):
ADMINISTRE LA COPIA DE SEGURIDAD
La interfaz principal del software de copia de seguridad Echo de Lexar (vea la Figura 7) ofrece opciones para
ver, abrir, editar y restaurar archivos de los que tiene una copia de seguridad.
NOTA: También puede acceder a los archivos manualmente desde el directorio raíz de la unidad Echo en
“MyBackupfolder”(Micarpetadecopiadeseguridad),sisuperlnoestáencriptado.
Figura 6
Figura 7
Software de copia de seguridad Lexar Echo Guía de inicio rápido 41

1 Barra de herramientas principal
Estos comandos están disponibles en la barra de herramientas.
• Archivos
o Cambie a otro perfil de copia de seguridad.
o Salga de la aplicación
• Conguraciones
o Acceda a las configuraciones de copia de seguridad local
o Acceda a las configuraciones de copia de seguridad en Internet
• Ayuda
o Acceda a asistencia en Internet, Preguntas frecuentes y demostraciones.
o Búsquedadeactualizacionesdelsoftware
• Botóndecopiadeseguridad:inicielacopiadeseguridadmanualmente
• Botónderestauración:restaurelosarchivosdelosquesehizocopiadeseguridadenlaubicacióndesignada
2 Registro de acontecimientos
Elregistrodeacontecimientosseencuentraenlachaderesumen(vealaFigura8).Registratodo
acontecimiento que se produzca durante el proceso de copia de seguridad.
o Botónborrar:borreelregistrodeacontecimientos
o Botónexportar:exporteyguardeelregistrodeacontecimientosenunarchivo*.txt
3 Versiones de los archivos
Paraverlosarchivosdelosquesehizocopiadeseguridad,hagaclicenlachaVerarchivos.Apareceráunsigno
“+”delantedelnombredelarchivosiseharealizadounacopiadeseguridaddemásdeunaversión(veala
Figura9).Hagaclicenelsigno“+”paraverlasdiferentesversionesdelarchivo(Figura10).
Figura 8
Figura 9
Software de copia de seguridad Lexar Echo Guía de inicio rápido 42

NOTA: Para acceder a una versión anterior de un archivo, debe restaurarse desde la aplicación.
4 Restaurar archivos
Para restaurar un archivo o carpeta, siga estos pasos:
1. Hagaclicenlacha“Viewles”(Verarchivos).
2. Seleccione el archivo o la carpeta que quiere restaurar. Se resaltará el archivo o carpeta seleccionado.
3. HagaclicenelbotónRestaurar.
4. Seleccionelaubicaciónadondesedeberestaurarelarchivoolacarpeta(vealaFigura11).
5. HagaclicenOK.
NOTA: Si se restaura el archivo o carpeta a su ubicación original, reemplazará la copia del ordenador.
Figura 11
Figura 10
Software de copia de seguridad Lexar Echo Guía de inicio rápido 43

INFORMACIÓN DE CONTACTO
Si tiene preguntas, estamos aquí para ayudarle
Envíenos sus preguntas a support@lexar.com
Obtener más información
Información del producto: www.lexar.com/echo
Asistencia al cliente e información de garantía: www.lexar.com/support
Lexar Media, Inc.
47300BaysideParkway
Fremont,CA94538EE.UU.
Tel.:+1(510)413-1275
Correo electrónico: support@lexar.com
URL:www.lexar.com
7a.m.a5p.m.horadelPacíco,delunesaviernes
Software de copia de seguridad Lexar Echo Guía de inicio rápido 44

Software de cópia de
segurança Echo
Manual de iniciação rápida
Software de cópia de segurança Lexar Echo Manual de iniciação rápida 45

INTRODUCÇÃO
Quer seja um profissional de negócios em viagem, ou um estudante a fazer os trabalhos de casa em casa de um
amigo, ou simplesmente alguém a utilizar um computador portátil num café, é importante assegurar a protecção
dos ficheiros no seu computador portátil ou netbook. As unidades portáteis de cópia de segurança Echo da
Lexar
®
oferecem uma forma prática de fazer cópias de segurança automaticamente enquanto viaja.
Graças à funcionalidade do software de cópia de segurança Echo da Lexar e da sua interface, bastante fácil de
utilizar, guardar e proteger dados importantes (documentos, apresentações, fotografias, ficheiros de áudio, vídeo,
etc.) deixou de ser uma tarefa aborrecida. O restauro de dados está a apenas um clique de distância.
Funcionalidades da tecla do software de cópia de segurança Echo da Lexar
Cópia de segurança incremental
Ao contrário do software tradicional de cópia de segurança, o software de cópia de segurança Echo da Lexar
oferece-lhe a opção de guardar apenas ficheiros novos e modificados, reduzindo assim o overhead do sistema.
Controlo de versões
Define o número de versões que pretende guardar, guardando várias iterações de um ficheiro para utilizações
futuras. Sempre que desejar, pode voltar atrás no tempo e aceder à versão anterior de um ficheiro e evitar a
perda de quaisquer dados, mesmo que um ficheiro tenha sido inadvertidamente alterado ou apagado.
Cópia de segurança automática (Live Backup)
Aproveita a tecnologia de protecção contínua de dados (CDP) para detectar automaticamente alterações feitas
nos ficheiros e efectua uma cópia de segurança dos mesmos para um dispositivo de armazenamento, sem
intervenção do utilizador. Não vei ter de se preocupar em efectuar cópias de segurança manualmente ou em ter
de as agendar; o software de cópia de segurança Echo trata disso por si todos dias, a toda a hora.
Configuração personalizada
Filtre por tamanho, data ou extensão de um ficheiro. Com várias opções de configuração, o software de cópia
de segurança Echo oferece uma ferramente flexível que lhe permite escolher com facilidade os dados aos quais
pretende efectuar uma cópia de segurança.
Suporte entre plataformas (Cross-Platform support)
Os seus dados estão sempre disponíveis quer esteja a utilizar um sistema Mac
®
ou PC. O software de cópia de
segurança Echo oferece as mesmas funcionalidades poderosas e uma fácil utilização em ambas as plataformas,
garantindo-lhe uma experiência consistente.
Requisitos de sistema
Sistemas operativos:
• Windows
®
XP (é recomendado o Service Pack 2)
• WindowsVista
®
• Windows7
• MacOSX10.5.x
• MacOSX10.6.x
Software de pesquisa na Internet:
• InternetExplorer
®
(versão5.0esuperior)ouMozilla
®
Firefox
®
versão1.0esuperior
Hardware:
• PortaUSBdisponível
• UnidadedecópiadesegurançaEcho
Software de cópia de segurança Lexar Echo Manual de iniciação rápida 46

CRÉER UN PLAN DE SAUVEGARDE
1 Seleccione o idioma e aceite o contrato de licença
1. Seleccioneoidioma.OsoftwaredecópiadesegurançaEchodaLexarestádisponívelem18idiomas
(inglês,francês,alemão,iItaliano,espanhol,português,sueco,dinamarquês,norueguês,holandês,russo,
checo, polaco, turco, coreano, japonês, chinês tradicional e simplificado).
2. Leiaocontratodelicençadoutilizadornal(EULA)eaceite-oclicandonacaixadevericação“Yes,I
havereadandIaccepttheEULA”(Sim,lieaceitooEULA)(consulteaFigura1).Cliquenobotão“Next”
(Seguinte) para continuar.
2 Criar um novo plano de cópia de segurança
Figura 1
Figura 2
Software de cópia de segurança Lexar Echo Manual de iniciação rápida 47

1. Seleccioneencriptadoounãoencriptado,paraoseuplanodecópiadesegurança.Umplanoencriptado
ofereceumaencriptação,AESde128bits,dosdados,àmedidaqueacópiadesegurançavaisendoefectuada.
2. Introduzaumnomedeperl.Paraumplanoencriptado,introduzaeconrmeapalavra-passe.Introduza
algo que o ajude a lembrar-se da palavra-passe.
3. CliquenacaixadevericaçãoparainstalaroGestordecópiasdesegurança(BackupManager)paraque
possa realizar cópias de segurança contínuas sempre que a unidade Echo esteja ligada ao computador.
4. Cliquenobotão“Next”(Seguinte)paracontinuar.
Nota:Oprimeiroplanodecópiadesegurançacriadoéindicadocomooperlpredenido.Istopodeser
alterado,seforaoGestordecópiasdesegurança(BackupManager)abaixodeDeniçõesdaunidadedecópia
desegurança(DriveBackupSettings)(consulteaFigura5)eseleccionaroutroperlnomenudelistapendente.
Pode seleccionar um perfil predefinido para cada computador onde efectuar uma cópia de segurança,
permitindo uma cópia de segurança automatizada e simples de vários computadores com a mesma unidade Echo.
PodedesinstalaroGestordecópiasdesegurança(BackupManager)semprequedesejar,atravésdoMenu
IniciardoWindows(TodososProgramas>LexarEchoBackupManager>Uninstall).EmcomputadoresMac,utilize
oSpotlightparalocalizar“LexarEchoBackupManager”(GestordecópiadesegurançaEchodaLexar),clique
depoisem“RevealinFinder”(Mostrarnolocalizador)eapagueoscheirosqueencontrar.
3 Seleccionar os ficheiros para efectuar uma cópia de segurança
Por predefinição, todos os documentos de texto, folhas de cálculo, apresentações e fotografias das pastas
“MyDocuments”(Osmeusdocumentos)ou“Documents”(Documentos)sãoseleccionadosparaacópiade
segurança.Senãoforprecisoefectuaralterações,cliqueem“Apply”parainiciaraprimeiracópia
de segurança.
Para alterar a selecção de ficheiros, utilize as seguintes opções:
Seleção de arquivo:
Seleccione as pastas e os tipos de ficheiros para a cópia de segurança (consulte a Figura 3).
Configurações de backup:
Proporciona-lhe um controlo pormenorizado do plano de cópia de segurança (consulte a figura 4).
Opções principais
- Inícioautomáticodacópiadesegurança—Acópiadesegurançaéiniciadaquandoosoftware
for executado
Figura 3
Software de cópia de segurança Lexar Echo Manual de iniciação rápida 48

- Cópiadesegurançaautomática(Livebackup)—Detectaeefectuaautomaticamenteumacópia
de segurança das alterações feitas nos ficheiros, sem intervenção do utilizador
- Númerodeversõesaguardar—Seleccioneonúmerodeversõesdomesmocheiroquepretende
efectuar uma cópia de segurança.
Gestor de cópias de segurança (Backup Manager)
- Perlpredenido—Atribuaumperlpredenido.Estaéacópiadesegurançaqueseráexecutada
automaticamente sempre que a unidade Echo estiver ligada ao computador.
Filtrar por data
O software de cópia de segurança Echo oferece dois tipos diferentes de filtros por data.
- Efectuarcópiadesegurançaapartirdoúltimo—Efectueumacópiadesegurançadecheiroscriados
ou modificados no espaço de tempo seleccionado
- Efectuarcópiadesegurançaacomeçarapartirde—Efectueumacópiadesegurançadecheiros
criados ou modificados, começando pela data seleccionada
Filtrar por tamanho
- Efectuarcópiadesegurançadecheirosmaispequenosdoque—Denaotamanholimitedos
ficheiros para a cópia de segurança
Nota: O software de cópia de segurança Echo da Lexar inclui uma opção que permite efectuar cópias de
segurançadedadosonline.AunidadedebackupEchovemcomumacontagrátisde2GBqueéoferecida
pela Dmailer Online.
Parasabermaissobreascópiasdesegurançaonline,cliqueem“Learnmore”(consulteagura5).
Figura 5
Figura 4
Software de cópia de segurança Lexar Echo Manual de iniciação rápida 49

4 Iniciar a primeira cópia de segurança
Cliqueem“Next”(Seguinte)paradarinícioàprimeiracópiadesegurança.Apareceoseguinteecrã,quelhe
mostraoprogressodacópiadesegurança(consulteagura6):
GERIR A CÓPIA DE SEGURANÇA
AinterfaceprincipaldosoftwaredecópiadesegurançaEchodaLexar(consulteagura7)ofereceopções
para ver, abrir, editar e restaurar ficheiros aos quais foi efectuada uma cópia de segurança.
NOTA: Os ficheiros podem também ser acedidos manualmente a partir da raiz da unidade Echo na
“MyBackupfolder”(Minhapastadecópiasdesegurança),istoseoseuperlnãoforencriptado.
Figura 6
Figura 7
Software de cópia de segurança Lexar Echo Manual de iniciação rápida 50

1 Barra de ferramentas principal
Os seguintes comandos encontram-se disponíveis na barra de ferramentas principal.
• Files(Ficheiros)
o Alternar para outro perfil de cópia de segurança
o Sair da aplicação
• Settings(Denições)
o Acesso às definições da cópia de segurança local
o Acesso ás definições da cópia de segurança online
• Help(Ajuda)
o Acesso ao serviço de apoio online, FAQ e demos.
o Procurar actualizações de software
• BotãoBackup(Cópiadesegurança)-Iniciamanualmenteacópiadesegurança
• BotãoRestore(Restaurar)-Restauraoscheiros,aosquaisfoiefectuadaumacópiadesegurança,para
o local designado
2 Registo de eventos
Oregistodeeventosencontra-senoseparadorResumo(consulteaFigura8).Registaqualquereventoque
tenha ocorrido durante o processamento da cópia de segurança.
o BotãoClear(Limpar)—Oregistodeeventoscaemvazio
o BotãoExport(Exportar)—Efectuaaexportaçãoeguardaoregistodeeventosnumcheiro*.txt
3 Contrôle des versions des fichiers
Paraveroscheirosaosquaisfoiefectuadaumacópiadesegurança,cliquenoseparadorVercheiros.Aparece
umsinal“+”antesdonomedocheirosetiversidoefectuadaumacópiadesegurançaaumaoumaisversões
dessemesmocheiro(consulteaFigura9).Cliquenosinal“+”paraverasdiferentesversõesdocheiro
(consulteagura10).
Figura 8
Figura 9
Software de cópia de segurança Lexar Echo Manual de iniciação rápida 51

NOTA: Para aceder a uma versão anterior de um ficheiro, este tem primeiro de ser restaurado pela aplicação.
4 Restaurar ficheiros
Para restaurar um ficheiro ou uma pasta, siga os seguintes passos:
1. cliquenoseparador“ViewFiles”(Vercheiros).
2. Seleccione o ficheiro ou a pasta que pretende restaurar. O ficheiro ou a pasta será seleccionado(a).
3. CliquenobotãoRestore(Restaurar).
4. Seleccioneolocalparaondepretendequeocheiroouapastasejarestaurado(a)(consulteaFigura11).
5. Clique em OK.
NOTA: Se o ficheiro ou a pasta for restaurado(a) para o seu local original, irá substituir a cópia no computador.
Figura 11
Figura 10
Software de cópia de segurança Lexar Echo Manual de iniciação rápida 52

CONTACTOS
Se tiver questões, estamos aqui para o ajudar
Envie-nos as suas questões para support@lexar.com
Para obter mais informações
Informaçõessobreoproduto:www.lexar.com/echo
Serviçodeapoioaoclienteeinformaçõessobreagarantia:www.lexar.com/support
Lexar Media, Inc.
47300BaysideParkway
Fremont,CA94538
Tel:(510)413-1275
E-mail: support@lexar.com
URL:www.lexar.com
das07hàs17hHorapadrãodoPacíco,desegundaasexta-feira
Software de cópia de segurança Lexar Echo Manual de iniciação rápida 53

Программное обеспечение для
резервного копирования Echo
Краткое руководство пользователя
Программное обеспечение для резервного копирования Lexar Echo Краткое руководство пользователя 54

ВВЕДЕНИЕ
Если Вы бизнесмен в дороге, студент, который выполняет домашнее задание в гостях у друга или просто
используете ноутбук кафе, важно обеспечить защиту файлов на вашем ноутбуке и самого ноутбука. Портативные
драйверы резервного копирования Lexar
®
Echo предоставляют удобный способ автоматически копировать Ваши
файлы на ходу.
Благодаря функциональности и невероятно простому в использовании интерфейсу программного обеспечения
для резервного копирования Lexar Echo, сохранение и защита важных данных (документов, презентаций,
фотографий, аудио и видео файлов итд.) больше не является утомительным трудом. Восстановление данных
требует всего одного нажатия кнопки мыши.
Основные функции программного обеспечения для резервного копирования Echo Lexar
Инкрементное резервное копирование
В отличии от традиционного программного обеспечение для резервного копирования программное обеспечение
для резервного копирования Lexar Echo предоставляет возможность хранить только новые и измененные файлы,
тем самым уменьшая издержки за счет системных операций.
Контроль версий
Определите количество версий, которые Вы хотите сохранить, оставляя многократные итерации файла для
дальнейшего использования. В любой момент Вы можете совершить путешествие во времени и получить доступ
к предыдущей версии файла, что предотвращает потерю данных, даже если Вы случайно изменили или стерли
файл.
Резервное копирование в режиме реального времени
Технология повышения бесперебойной защиты данных (CDP) автоматически обнаруживает изменения в файлах
и копирует их на устройства памяти без вмешательства пользователя. Вам не нужно беспокоиться о ручном
копировании данных или планировании этого. Программное обеспечение для резервного копирования Echo будет
заботиться об этом за Вас 24 часа в сутки 7 дней в неделю.
Заказная конфигурация
Фильтрация по расширению файла, дате или размеру. При помощи многочисленных возможностей конфигурации
программное обеспечение для резервного копирования Echo предоставляет гибкий инструмент, который позволит
Вам с легкостью выбирать данные, которые Вы хотите скопировать.
Межплатформенная поддержка
Ваши данные доступны для Вас при использовании ПК или компьютера Mac
®
. Программное обеспечение для
резервного копирования Echo предоставляет одинаковые функции эффективного копирования и простоту в
использовании на обеих платформах.
Системные требования
Операционные системы:
• Windows
®
XP (рекомендуется наличие Service Pack 2)
• Windows Vista
®
• Windows 7
• Mac OSX 10.5.x
• Mac OSX 10.5.x
Программное обеспечение просмотра сети интернет:
• Internet Explorer
®
(версия 5.0 и выше) или Mozilla
®
Firefox
®
версия 1.0 и выше
Аппаратура:
• Доступный USB-порт
• Привод для резервного копирования Echo
Программное обеспечение для резервного копирования Lexar Echo Краткое руководство пользователя 55

СОЗДАНИЕ ПЛАНА РЕЗЕРВНОГО КОПИРОВАНИЯ
1 Выберите свой язык и примите условия лицензионного соглашения
1. Выберите свой язык Программное обеспечение для резервного копирования Lexar Echo доступно на 18 языках
(английский, французский, немецкий, итальянский, испанский, португальский, шведский, датский, норвежский,
голландский, русский, чешский, польский, турецкий, японский, корейский, традиционный и упрощенный
китайский).
2. Прочтите Лицензионное соглашение для конечного пользователя (EULA) и примите соглашение, отметив
флажок “Yes, I have read and I accept the EULA (Да, я ознакомился и соглашаюсь с EULA)” (см. Рисунок №1).
Чтобы продолжить, нажмите кнопку “Next (Далее)”.
2 Создайте новый план резервного копирования
Рисунок №1
Рисунок №2
Программное обеспечение для резервного копирования Lexar Echo Краткое руководство пользователя 56

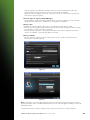
1. Для Вашего плана резервного копирования выберите “с кодированием” или “без кодирования”. План с
кодированием предоставляет автоматическое 128-битовое AES кодирование данных во время резервного
копирования.
2. Введите название профиля. В случае плана с кодированием введите и подтвердите пароль. Введите
подсказку, которая поможет Вам запомнить пароль.
3. Отметьте флажок для установки Менеджера резервного копирования, который обеспечит автоматическое и
бесперебойное резервное копирование всегда, когда привод Echo подключен к компьютеру.
4. Чтобы продолжить, нажмите кнопку “Next (Далее)”.
Примечание: Первый созданный план резервного копирования является профилем по умолчанию.
Вы можете это изменить в разделе Менеджер резервного копирования, который находится в закладке Настройки
привода для резервного копирования (см. Рисунок №5), выбрав другой профиль в раскрывающемся меню. Вы
можете выбрать один профиль по умолчанию для каждого компьютера, что позволит совершить автоматическое
резервное копирование нескольких компьютеров при помощи одного и того же привода Echo.
Менеджер резервного копирования можно деинсталлировать в любое время через меню Пуск Windows
(Программы>Lexar Echo Менеджер резервного копирования>Отмена установки). На компьютерах Mac используйте
Spotlight, чтобы обнаружить “Lexar Echo Backup Manager (Менеджер резервного копирования Lexar Echo)”. Затем
нажмите “Reveal in Finder (Покажите в Искателе )” и сотрите файлы, которые Вы видите.
3 Выберите файлы для резервного копирования
По умолчанию все текстовые документы, электронные таблицы, презентации и фотографии из папки “My
Documents (Мои документы)” или “Documents (Документы)” выбираются для резервного копирования. Если не
требуются какие-либо изменения, для начала первого резервного копирования нажмите “Apply”.
Изменить выбор файлов можно при помощи следующих опций:
Выделение файла:
Выберите папки и виды файлов для резервного копирования (см. Рисунок №3).
установки:
Предоставляет детальный контроль плана резервного копирования (см. Рисунок №4).
Основные опции
- Автоматическое начало резервного копирования - Копирование начинается вместе с работой
программного обеспечения
Рисунок №3
Программное обеспечение для резервного копирования Lexar Echo Краткое руководство пользователя 57

- Резервное копирование в режиме реального времени - Автоматическое обнаружение изменений в
файлах и копирование их без вмешательства пользователя.
- Количество сохраняемых версий - Выберите количество версий одного файла для резервного
копирования.
Менеджер резервного копирования
- Профиль по умолчанию —Присвоить профиль по умолчанию. Данное резервное копирование будет
начинаться автоматически каждый раз, когда привод Echo подключен к компьютеру.
Фильтрация по дате
Программное обеспечение для резервного копирования Echo предоставляет два различных типа
фильтрации по дате.
- Скопировать файлы, начиная с последнего—Резервное копирование файлов, созданных или
модифицированных в течение выбранного периода времени
- Скопировать файлы, начиная с—Резервное копирование файлов, созданных или модифицированных
с выбранной даты.
Фильтрация по размеру
- Скопировать файлы, которые меньше чем - Установите предел размера файлов, которые необходимо
скопировать.
Примечание: Программное обеспечение для резервного копирования Echo Lexar предоставляет возможность
копировать данные он-лайн. Привод для резервного копирования Echo поставляется вместе с использования
объемом в 2GB, которую предоставляет Dmailer online.
Чтобы получить дополнительную информацию о резервном копировании он-лайн, нажмите “Learn more”
(см. Рисунок №5).
Рисунок №5
Рисунок №4
Программное обеспечение для резервного копирования Lexar Echo Краткое руководство пользователя 58

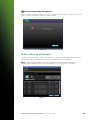
4 Начало первого резервного копирования
Чтобы начать первое резервное копирование, нажмите кнопку “Next (Далее)”. На экране появится следующее
окошко, показывающее процесс резервного копирования (см. Рисунок №6).
УПРАВЛЕНИЕ РЕЗЕРВНЫМ КОПИРОВАНИЕМ
Основной интерфейс программного обеспечения для резервного копирования Echo Lexar (см. Рисунок №7)
предоставляет возможность просматривать, открывать, редактировать и восстанавливать скопированные файлы.
ПРИМЕЧАНИЕ: Если Ваш профиль не закодирован, имеется также ручной доступ к файлам через корневую
директорию привода Echo в папке “My Backup folder (Моя папка резервного копирования)”.
Рисунок №6
Рисунок №7
Программное обеспечение для резервного копирования Lexar Echo Краткое руководство пользователя 59

1 Основная панель инструментов
Эти команды доступны через основную панель инструментов.
• Файлы
o
Переключиться на другой профиль резервного копирования
o
Выход из приложения.
• Настройки
o
Доступ к локальным настройкам резервного копирования
o
Доступ к он-лайн настройкам резервного копирования
• Помощь
o
Доступ к он-лайн поддержке, часто задаваемым вопросам и демо-версиям.
o
Поиск обновлений программного обеспечения
• Кнопка Резервное копирование - Начать резервное копирование вручную
• Кнопка Восстановление - Восстановление скопированных файлов в указанное место
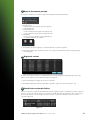
2 Протокол событий
Протокол событий можно найти в закладке Краткий отчет (см. Рисунок №8). В нем записывается каждое
событие, произошедшее во время процесса резервного копирования.
o
Кнопка сброса - Очищает протокол событий
o
Кнопка экспортирования - Экспортирует и сохраняет протокол событий в файл *.txt
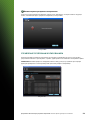
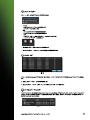
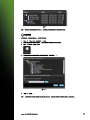
3 Контроль версий файла
Чтобы просмотреть скопированные файлы, выберите закладку Просмотр файлов. Символ “+” появляется перед
именем файла, если было скопировано несколько версий одного файла (см. Рисунок №9). Нажмите на символ “+”,
чтобы просмотреть различные версии файла (см. Рисунок №10).
Рисунок №8
Рисунок №9
Программное обеспечение для резервного копирования Lexar Echo Краткое руководство пользователя 60

ПРИМЕЧАНИЕ: Чтобы была доступна предыдущая версия файла, необходимо восстановить его из приложения.
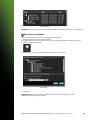
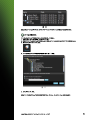
4 Восстановление файлов
Чтобы восстановить файл или папку, следуйте следующим инструкциям:
1. Выберите закладку “View Files (Просмотр файлов)”.
2. Выберите файл или папку, которую Вы хотите восстановить. Выбранный файл или папка будет выделен.
3. Нажмите кнопку Восстановление.
4. Выберите место, куда будет восстановлен файл или папка (см. Рисунок №11).
5. Нажмите ОК.
ПРИМЕЧАНИЕ: Если файл или папка восстанавливается в изначальное расположение, то копия,
сохраненная на компьютере, будет заменена
Рисунок №11
Рисунок №10
Программное обеспечение для резервного копирования Lexar Echo Краткое руководство пользователя 61

КОНТАКТНАЯ ИНФОРМАЦИЯ
Если у Вас есть вопросы, мы Вам поможем!
Пожалуйста, присылайте Ваши вопросы на support@lexar.com
Получение дополнительной информации
Информация о продукте: www.lexar.com/echo
Клиентская поддержка и информация о гарантии: www.lexar.com/support
Lexar Media, Inc.
47300 Bayside Parkway
Fremont, CA 94538
Тел: (510) 413-1275
Email: support@lexar.com
URL: www.lexar.com
с 7:00 до 17:00 по тихоокеанскому времени с понедельника по пятницу
Программное обеспечение для резервного копирования Lexar Echo Краткое руководство пользователя 62


図 9

図 11


-
 1
1
-
 2
2
-
 3
3
-
 4
4
-
 5
5
-
 6
6
-
 7
7
-
 8
8
-
 9
9
-
 10
10
-
 11
11
-
 12
12
-
 13
13
-
 14
14
-
 15
15
-
 16
16
-
 17
17
-
 18
18
-
 19
19
-
 20
20
-
 21
21
-
 22
22
-
 23
23
-
 24
24
-
 25
25
-
 26
26
-
 27
27
-
 28
28
-
 29
29
-
 30
30
-
 31
31
-
 32
32
-
 33
33
-
 34
34
-
 35
35
-
 36
36
-
 37
37
-
 38
38
-
 39
39
-
 40
40
-
 41
41
-
 42
42
-
 43
43
-
 44
44
-
 45
45
-
 46
46
-
 47
47
-
 48
48
-
 49
49
-
 50
50
-
 51
51
-
 52
52
-
 53
53
-
 54
54
-
 55
55
-
 56
56
-
 57
57
-
 58
58
-
 59
59
-
 60
60
-
 61
61
-
 62
62
-
 63
63
-
 64
64
-
 65
65
-
 66
66
-
 67
67
-
 68
68
-
 69
69
-
 70
70
-
 71
71
-
 72
72
-
 73
73
-
 74
74
-
 75
75
-
 76
76
-
 77
77
-
 78
78
-
 79
79
-
 80
80
-
 81
81
-
 82
82
-
 83
83
-
 84
84
-
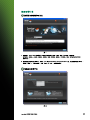 85
85
-
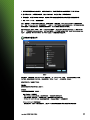 86
86
-
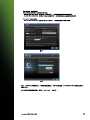 87
87
-
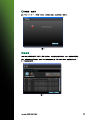 88
88
-
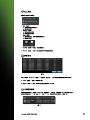 89
89
-
 90
90
-
 91
91
-
 92
92
-
 93
93
-
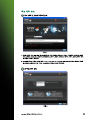 94
94
-
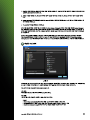 95
95
-
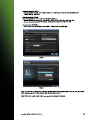 96
96
-
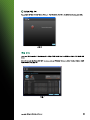 97
97
-
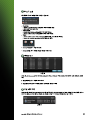 98
98
-
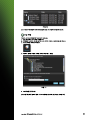 99
99
-
 100
100


Lexar 128GB Echo SE El manual del propietario
- Tipo
- El manual del propietario
en otros idiomas
- français: Lexar 128GB Echo SE Le manuel du propriétaire
- italiano: Lexar 128GB Echo SE Manuale del proprietario
- Deutsch: Lexar 128GB Echo SE Bedienungsanleitung
- português: Lexar 128GB Echo SE Manual do proprietário
Artículos relacionados
-
Lexar MEDIAMOVE El manual del propietario
-
-
-
-
-
-
-
Lexar Professional USB 3.0 Manual de usuario
-
-
Otros documentos
-
Buffalo HD-PCTU3 MINISTATION USB 3.0 El manual del propietario
-
-
-
Seagate STAK200 Guía del usuario
-
 Lexar Media LDP-400 Manual de usuario
-
Approx appDSHDD Manual de usuario
-
Blackmagic Video Assist Manual de usuario
-
