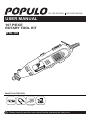
populo POPULO Rotary Tool Kit Manual de usuario
- Categoría
- Herramientas eléctricas
- Tipo
- Manual de usuario
Este manual también es adecuado para

Please carefully read this user manual before operating the rotary tool.
BY THE PEOPLE FOR THE PEOPLE
USER MANUAL
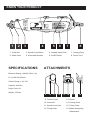
107 PIECE
ROTARY TOOL KIT
107 PC ACCS
WHAT'S IN THE BOX
RTK-107
FLEXIBLE SHAFT BLADE SHARPENING
ATTACHMENT
CUTTING GUIDE

ELECTRICAL SAFETY WARNINGS
GENERAL POWER TOOL SAFETY WARNINGS
WARNING! When using mains powered tools, basic safety precautions
should always be followed to reduce the risk of fire, electric shock,
personal injury and material damage.
WARNING! Read all safety warnings and all instructions. Failure to
follow the warnings and instructions may result in electric shock,
fire and/or serious injury.
Save all warnings and instructions for future reference. The term “power tool” in the warnings refers to your mains operated (corded) power
tool or battery operated (cordless) power tool.
1. Work area safety
1.1 Keep work area clean and well lit. Cluttered or dark areas invite accidents.
1.2 Do not operate power tools in explosive atmosphere, such as in the presence of flammable liquids, gases or dust. Power tools create
sparks which may ignite the dust or fumes.
1.3 Keep children and by standers at a safe distance while operating a power tool. Getting distracted while using the tool may lead to injury
for the operator or bystanders if not exercising proper safety.
2. Electrical safety
2.1 Power tool plugs must match the outlet. Never modify the plug in any way. Do not use any adapter plugs with earthed (grounded) power
tools. Unmodified plugs and matching outlets will reduce risk of electric shock.
2.2 Avoid bodily contact with earthed or grounded surfaces, such as pipes, radiators, ranges and refrigerators. There is an increased risk of
electric shock if your body is earthed or grounded.
2.3 Do not expose power tools to rain or wet conditions. Water entering a power tool will increase the risk of electric shock.
2.4 Do not abuse the cord. Never use the cord for carrying, pulling or unplugging the power tool. Keep cord away from heat, oil, sharp edges
or moving parts. Damaged or entangled cords increase the risk of electric shock.
2.5 When operating a power tool outdoors, use an extension cord suitable for outdoor use. Use of a cord suitable for outdoor use reduces the
risk of electric shock.
2.6 If operating a power tool in a damp location is unavoidable, use a ground fault circuit interrupter (GFCI) protected supply with a rated
leakage current of 30 mA or less. Use of a GFCI reduces the risk of electric shock.
3. Personal safety
3.1 Always be sure to pay close attention to what you are doing when operating a power tool. Do not use a power tool when you are tired or
under the influence of drugs, alcohol or medication. A moment of inattention while operating power tools may result in serious personal injury.
3.2 Use personal protective equipment. Always wear eye protection. Under the appropriate condition, protective equipment such as a dust
mask, non-skid safety shoes, hard hat, or hearing protection can reduce personal injuries.
3.3 Prevent unintentional starting. Make sure the switch is in the off-position before picking up or carrying the tool or connecting the unit to a
power source/battery pack. Carrying power tools with your finger on the switch or energizing power tools that have the switch on may lead to
accidents.
3.4 Remove any adjusting key or wrench before turning the power tool on. A wrench or a key left attached to a rotating part of the power tool
may result in personal injury.
3.5 Do not over reach. Keep proper footing and balance at all times. This enables better control of the power tool in unexpected situations.
Volts
120V
Ampere
More
Than
Rating
Not More
Than
Total length of cord in feet
AWG
25 50 100 150
0
6
10
12
6
10
12
16
18
18
16
14
16
16
16
12
16
14
14
14
12
12
Not recommended
Using an extension lead
Always use an approved extension lead suitable for the power input of this tool. Before use, inspect the
extension lead for signs of damage, wear and aging. Replace the extension lead if damaged or
defective. When using an extension lead on a reel, always unwind the lead completely. Use of an
extension lead not suitable for the power input of the tool or which is damaged or defective may result in
a risk of fire and electric shock.
Before operating the unit, carefully read the entire manual and be certain you know how to switch the unit off in case of an emergency.
Be sure to save these instructions and any other documents supplied with this unit for future reference.
The electric motor has been designed for 120V 60Hz only. Always check that the power supply corresponds to the voltage on the rating
plate.
Note: The supply of 120V 60Hz on Populo tools are interchangeable for use in the United States and Canada.
Note: The power outlet used for the power tools must be protected by a 30mA ground fault circuit interrupter or earth leakage circuit
breaker. If the supply cord is damaged, it must be replaced by an electrician or a power tool repairer in order to avoid a hazard.
Note: Double insulation does not take the place of normal safety precautions when operating this tool. The insulation system is added to
prevent against potential injury should an electrical failure occur within the tool.

This appliance should only be used by able-bodied individuals. Younger persons should only use the tool when supervised by a responsible
person who can ensure the tool is being used safely. Young children should not be allowed to use the tool - it is not a toy!
ROTARY TOOL SAFETY WARNINGS
3.6 Dress properly. Do not wear loose clothing or jewelry. Keep your hair, clothing and gloves away from moving parts. Loose clothes, jewelry
or long hair, can get caught in moving parts resulting in serious injury.
3.7 If devices are provided for the connection of dust extraction and collection facilities, ensure these are connected and properly used.
4. Power tool use and care
4.1 Do not force the power tool. Use the correct power tool for your application. The correct power tool will do a better and safer job when
used for its designed purpose.
4.2 Do not use the power tool if the on/off switch is malfunctioning. Any power tool that cannot be controlled with the switch is dangerous and
must be repaired.
4.3 Disconnect the plug from the power source and/or the battery pack from the power tool before making any adjustments, changing
accessories, or storing power tools. This helps reduce the risk of starting the power tool accidentally.
4.4 Store idle power tools out of the reach of children. Do not allow persons unfamiliar with the power tool to operate it without first reading
these instructions. Power tools are dangerous in the hands of untrained users.
4.5 Properly maintain power tools. Check for misalignment or binding of moving parts, breakage of parts and any other condition that may
affect the power tool’s operation. If damaged, have the power tool repaired before use. Many accidents are caused by poorly maintained
power tools.
4.6 Keep cutting tools sharp and clean. Properly maintained cutting tools with sharp cutting edges are less likely to bind and are easier to
control.
4.7 Use the power tool, accessories, and tool bits, etc. by following these instructions, taking into account the working conditions and the work
to be performed. Use of the power tool for operations different from those intended could create a hazardous situation.
5. Service
5.1 Have your power tool serviced by a qualified repair person using only identical replacement parts.This will ensure that the power tool is
properly and safely maintained.
5.2 If the supply cord is damaged, it must be replaced by the manufacturer, its service agent or similarly qualified persons to prevent any
potential hazard.
WARNING! Safety warnings common for grinding, sanding, wire brush-
ing, polishing or abrasive cutting-off operations.
illustrations and specifications provided with this power tool. Failure to follow all instructions listed below may result in electric shock,
fire and/or serious injury.
be attached to your power tool, it does not assure safe operation.
than their rated speed can break and fly apart.
accessories cannot be adequately guarded or controlled.
accessory must fit the locating diameter of the flange. Accessories that do not match the mounting hardware of the power tool will run out
of balance, vibrate excessively and may cause loss of control.
backing pad for cracks/tears or excess wear, wire brush for loose or cracked wires.) If power tool or accessory is dropped, inspect for
damage or install an undamaged accessory. After inspecting and installing an accessory, position yourself and any standers away from the
plane of the rotating accessory and run the power tool at maximum no load speed for one minute. Use caution as damaged accessories will
normally break apart during this testing.
dust mask, hearing protectors, gloves and workshop apron capable of stopping small abrasive or workpiece fragments. The eye protection
must be capable of stopping flying debris generated by various operations. The dust mask or respirator must be capable of filtrating
particles generated by your operation. Prolonged exposure to high intensity noise may cause hearing loss.
Fragments of workpiece or of a broken accessory may become airborne and cause injury beyond immediate area of operation.
contact hidden wiring or its own cord. If the cutting accessory comes into contact with a live wire, it may cause exposed metal parts of the
power tool to become live too, resulting in electric shock to the operator.
the spinning accessory resulting in potential injury.
power tool out from your control.

accessory into your body.
metal may cause electrical hazards.
Kickback and Related Warnings
causes rapid stalling of the rotating accessory which, in turn, causes the uncontrolled power tool to be forced in the direction opposite of the
accessory’s rotation at the point of the binding.
into the surface of the material causing the wheel to climb out or kick out. The wheel may either jump toward or away from the operator,
depending on the direction of the wheel’s movement at the point of pinching. Abrasive wheels may also break under these conditions.
1. Kickback is the result of power tool misuse and/or incorrect operating procedures or conditions and can be
avoided by taking proper precautions as outlined below.
1.1 Maintain a firm grip on the power tool and position your body and arm to allow you to resist kickback forces. Always use auxiliary handle, if
provided, for maximum control over kickback or torque reaction during start-up. The operator can control torque reactions or kickback forces, if
proper precautions are taken.
1.2 Never place your hand near the rotating accessory since the accessory may kickback over your hand.
1.3 Do not position your body in the area where power tool will move if kickback occurs. Kickback will propel the tool in the opposite direction
to the wheel’s movement at the point of snagging.
1.4 Use special care when working corners, sharp edges, etc. Avoid bouncing and snagging the accessory. Corners, sharp edges or bouncing
have a tendency to snag the rotating accessory and may result in loss of control or kickback.
1.5 Do not attach a saw chain woodcarving blade or toothed saw blade to the tool as such blades create frequent kickback and loss of control.
2. Safety warnings specific for grinding and abrasive cutting-off operations:
2.1 Use only wheel types that are recommended for your power tool and the specific guard designed for the selected wheel. Wheels for which
the power tool was not designed for cannot be adequately guarded and are unsafe.
2.2 The grinding surface of center depressed wheels must be mounted below the plane of the guard lip. An improperly mounted wheel that
projects through the plane of the guard lip cannot be adequately protected.
2.3 Wheels must be used only for recommended applications. (For example, do not grind with the side of cut-off wheel. Abrasive cut-off
wheels are intended for peripheral grinding, side forces applied to these wheels may cause them to shatter.)
2.4 Always use undamaged wheel flanges that are of correct size and shape for your selected wheel. Proper wheel flanges support the wheel
thus reducing the possibility of wheel breakage. Flanges for cut-off wheels may be different from grinding wheel flanges.
2.5 Do not use worn down wheels from larger power tools. A wheel intended for larger power tool is not suitable for the higher speed of a
smaller tool and may burst.
3. Additional safety warnings specific for abrasive cutting-off operations:
3.1 Do not “jam” the cut-off wheel or apply excessive pressure. Do not attempt to make an excessive depth of cut. Over stressing the wheel
increases the loading and susceptibility to twisting or binding of the wheel in the cut and the possibility of kickback or wheel breakage.
3.2 Do not position your body in line with and behind the rotating wheel. When the wheel, at the point of operation, is moving away from your
body, the possible kickback may propel the spinning wheel and the power tool directly at you.
3.3 When wheel is binding or when interrupting a cut for any reason, switch off the power tool and hold the power tool motionless until the
wheel comes to a complete stop. Never attempt to remove the cut-off wheel from the cut while the wheel is in motion, otherwise kickback may
occur. Investigate and take corrective action to eliminate the cause of wheel binding.
3.4 Do not restart the cutting operation in the workpiece. Let the wheel reach full speed and carefully re-enter the cut. The wheel may bind,
walk up or kickback if the power tool is restarted in the workpiece.
3.5 Support panels or any oversized workpiece to minimize the risk of wheel pinching and kickback. Large workpieces tend to sag under their
own weight. Supports must be placed under the workpiece near the line of cut and near the edge of the workpiece on both sides of the wheel.
3.6 Use extra caution when making a “pocket cut” into existing walls or other blind areas. The protruding wheel may cut gas or water pipes,
electrical wiring or objects that can cause kickback.
4. Safety warnings specific for sanding operations:
4.1 Do not use excessively oversized sanding disc paper. Follow the manufacturer's recommendations when selecting sanding paper. Larger
sanding paper extending beyond the sanding pad presents a laceration hazard and may cause snagging, tearing of the disc or kickback.
5. Safety warnings specific for polishing operations:
5.1 Do not allow any loose portion of the polishing bonnet or its attachment strings to spin freely. Tuck away or trim any loose attachment
strings. Loose and spinning attachment strings can entangle your fingers or snag on the workpiece.
6. Safety warnings specific for wire brushing operations:
6.1 Be aware that wire bristles are thrown by the brush even during ordinary operation. Do not overstress the wires by applying excessive
load to the brush. Exercise caution as, the wire bristles can easily penetrate light clothing and/or skin.
6.2 If the use of a guard is recommended for wire brushing, do not allow any interference of the wire wheel or brush with the guard. Wire
wheel or brush may expand in diameter due to work load and centrifugal forces.
6.3 Direct the discharge of the spinning wire brush away from you. Wear safety gloves and proper clothing as small particles and tiny wire
fragments may discharge at high velocity when using these brushes and can penetrate your skin.

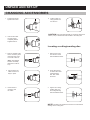
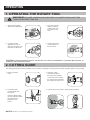
KNOW YOUR PRODUCT
1. Collet Nut
2. Shaft Collar
3. Spindle Lock Button
4. Accessible Brushes
5. Variable Speed Dial
6. On/Off Switch
7.
Hanging Ring
8.
Power Cord
9.
Flexible Shaft
10. Collet Nut
11. Spindle Lock Hole
12.
Fitting Collar
13. Screw
14.
Cutting Guide
15.
Fitting Collar
16.
Blade Sharpening
Attachment
1 2 3 5 6 7 84
ATTACHMENTS
12
1110
9
13
14 15 16
SPECIFICATIONS
Electrical Rating: 120VAC 60Hz 1.0A
: 10,000-32,000/min
Collect Range: 1/16"-1/8"
Power Cord: 6ft.
Weight: 3.59Lbs

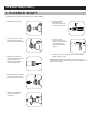
UNPACK AND SET-UP
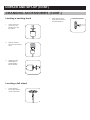
CHANGING ACCESSORIES
1
Press and hold the
spindle
lock button.
3 Select a suitable collet
for the accessory to be
used and insert, then
cover with collet nut.
(Note: The shipped
machine is already
fitted with a collet of
1/8”)
4 Lightly tighten the
collet nut so that it
stays in place.
2 Unscrew the collet
nut and remove
completely with the
supplied wrench.
Locating a cutting/sanding disc
3 Tighten the cutting/
sanding disc onto
the cutting/sanding
mandrel with the wrench.
1 Remove the screw
from the end of the
mandrel with the wrench.
NOTE: DO NOT over tighten the screw as it could result in
damage to the cutting disc.
6 Tighten collet nut
using spindle lock
and wrench.
2 Fit the fibre flange
on either side of the
cutting/sanding
disc, then insert
the screw.
5 Insert shank of
accessory into
the collet.
CAUTION: It is recommended that no accessory larger than
35mm (1.37”) in diameter should be fitted to the rotary tool.

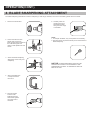
UNPACK AND SET-UP (CONT.)
CHANGING ACCESSORIES (CONT.)
3
Locating a sanding band
1 Loosen the screw
on the top of the
sanding drum with
the wrench.
2 Slide the sanding
band onto the sanding
drum.
Tighten the screw
with the wrench
until the sanding
band is secured.
Locating a felt wheel
1 Screw mandrel
end to align with the
center of felt wheel
2.
Apply slight pressure
and screw into place in
clockwise direction.

UNPACK AND SET-UP (CONT.)
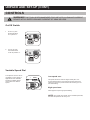
CONTROLS
1 To turn on, push
the On/Off switch
to on position “I”.
2 To turn off, push
the On/Off switch
to the off position “0”.
On/Off Switch
The speed of the tool can be
regulated to suit a variety of
applications and materials.
Rotate the variable speed
dial to select the desired
speed.
Low speed use:
This speed would be used for fragile model parts. It is
recommended that the various shape grinding stones be
used at low speed to prevent them from becoming too hot
and deteriorating.
High speed use:
Glass projects require high speed drilling.
Variable Speed Dial
NOTE: The higher the number on the variable speed dial,
the faster the speed of the rotary tool.
WARNING! THE TOOL IS RECOMMENDED FOR USE WITH A LEAKAGE CURRENT
DEVICE WITH A RATED LEAKAGE CURRENT OF 30MA OR LESS.

OPERATION
1. OPERATING THE ROTARY TOOL
2. CUTTING GUIDE
1 Select the appropriate
speed for the application.
2 For high precision
applications, such as
engraving or milling, hold
the rotary tool like a pen.
4 Gently apply the tip
of the accessory to
the work piece.
3
For heavy work like
cutting or grinding,
hold the rotary tool
in the palm of your
hand.
NOTICE: Always cut in clockwise direction.
The cutting guide allows for sturdy controlled cuts in a variety of materials, including drywall, laminate, fiberglass, plastic and vinyl siding.
WARNING! BE SURE WORKPLACE IS SECURELY CLAMPED DOWN AND THEN
TURN THE ROTARY TOOL ON.
1 Remove the shaft
collar.
2 Loosen the collet
nut with spindle lock
and wrench.
Insert the drill bit shank
into the collet then tighten
the collet nut with
spindle lock and
wrench.
3 Screw the cutting
guide fitting collar on
the rotary tool competely.
Loosen the screw to adjust
the cutting depth as desired,
then tighten the screw to fix.
4 Hold the rotary tool to start to cutting (as shown below).
CAUTION: PLACING EXCESSIVE LOAD ON THE ROTARY TOOL WHILE IT IS RUNNING AT LOW SPEED MAY CAUSE IT TO
OVERHEAT AND THE MOTOR TO FAIL.

OPERATION(CONT.)
3. FLEXIBLE SHAFT
8 Pull out the lock pin competely from the hole of sleeve
before starting to work.
Hold the sleeve on
the flexible shaft,
then insert the lock pin
into the hole of sleeve.
6
7 Loosen the collet
nut on the side of the
sleeve, then insert shank
of the accessory into
collet then tighten the
collet nut.
5 Screw the flexible shaft
fitting collar onto the
rotary tool.
1 Remove the shaft collar.
2 Loosen the collet nut with
wrench after pressing the
spindle lock button and hold.
Insert the flexible inner shaft
into the collet then tighten
the collet nut with the wrench.
4
Raise the handle end of
the flexible shaft and shake
gently until the inner
flexible shaft protrudes
from the fitting collar.
3
The flexible shaft is used for extra length control and fine detailing.
NOTE: Before inserting the lock pin into the hole of sleeve,
please ensure the hole on inner movement shaft is aligned with
the hole of the sleeve.

OPERATION(CONT.)
The blade sharpening attachment is used for sharpening a wide range of blades, such as a mover blade, garden shovel or shears.
4. BLADE SHARPENING ATTACHMENT
4 Secure the blade with
a clamp and switch
the tool on.
6 Carefully lower the
grinding stone onto
the blade and slide
along the entire edge
of the blade.
NOTE:
1. To sharpen the blade, only a few passes are necessary.
2. Grinding stones (as pictured below) are recommended for
blade sharpening.
3 Screw the blade sharpening
attachment on the rotary tool
completely.
Remove the shaft collar.1
5 Rest the angled
surface of the
blade sharpening
attachment against
the under side of
the blade.
2 Loosen the collet nut with
spindle lock and wrench.
Insert grinding stone shank into
the collet then tighten the
collet nut with spindle lock and
wrench.
NOTICE: PLACING EXCESSIVE LOAD ON THE
ROTARY TOOL WHILE IT IS RUNNING AT LOW
SPEEDS MAY CAUSE IT TO OVERHEAT AND THE
MOTOR TO FAIL.

NOTE: THE SHANK OF ALL ACCESSORIES INCLUDED IN THIS KIT ARE 1/8”.
ACCESSORY GUIDE
Collet
1/8” x 1
(fitted on the tool)
3/32” x 1
different shank sizes to your rotary tool.
Mandrel
x 1
Screw Mandrel x 1
A shank which screws into the felt
polishing tip and wheels.
Sanding Drum
x 1
A shank used with sanding bands.
Sanding Bands
x 4
x 8
x 68
Shapes wood, smooths fiberglass, sands
inside curves and other difficult to reach areas.
Fiberglass Cutting
Wheels
Thin discs of emery or fiberglass used for slicing
and cutting applications. Use them for cutting
off frozen bolt heads and nuts, etc.
Sanding Discs
Diamond-Coated Bits
x 2
Made for intricate work on ceramics, wood
carvings, jewelry and scrimshaw. Available
in a wide variety of shapes and sizes.
SANDING ACCESSORIES
CUTTING ACCESSORIES
TYPE
Wrench
x 1
Used to fasten accessories to the mandrels.
Thin discs of sandpaper used for sanding.
Dressing Stone
x1
Stone Grinding Bits
x 12
Suitable for various kinds of grinding and
sharpening applications. Available in a
wide range of sizes and shapes - round,
GRINDING ACCESSORIES
High-Speed Steel
Drill Bits
x 2
x 4
MISCELLANEOUS
Felt Wheels
POLISHING ACCESSORIES
APPLICATIONSQTY/ SIZES INCLUDED
Grinding accessories after they have been
used.
Used to drill through all types of plastic
and wood.
Used for bringing metal surfaces to
a smooth finish. Use with polishing
compound to bring a high shine to the
finish.
A mandrel is a shank to which polishing
accessories, cutting wheels and sanding
discs can be fitted.

MAINTENANCE
CLEANING AND STORING
Carbon Brushes
When the carbon brushes wear out, the rotary tool will spark and/
or stop. Carbon brushes are a wearing component of the rotary
tool therefore not covered under warranty.
Continuing to use the rotary tool when
carbon brushes need to be replaced
may cause permanent damage to the
rotary tool. Carbon brushes will wear
out after much use. When they need to
be replaced, be sure to take the rotary tool
to an electrician or a power tool repairer. Replace
both carbon brushes at the same time or contact Populo customer
service if you have any servicing questions.
Accessories
All accessories can be kept in the plastic accessory
container for convenient storage or transport.
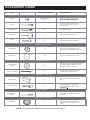
TROUBLESHOOTING
Trouble
Tool will not
turn on
Tool will not
vary speed
Shaft on the
rotary tool will
not lock
Tool is
overheating
Cannot loosen or
tighten collet nut
on the flexible
shaft
Bits or collet no
longer tighten/
loosen
Excessive
sparking visible
through the
housing air vents
or failing to
operate.
Tool makes a
squealing and
whistling sound.
Faulty bearing
assembly or fan is
broken.
Entire armature and
bearing assembly
need to be replaced
immediately.
Carbon brushes
worn out.
Replace with new
carbon brushes.
Collet flexibility
Collet nut worn out
Bits shank worn out
Replace with new
collet, collet nut or
bits.
Driving spindle
may not be locked
completely by lock
pin
Ensure that the
driving spindle on
the flexible shaft is
locked by inserting
lock pin through.
Switch does not
engage
Faulty power cord
Faulty electronic
assembly
Speed adjust dial
loose or faulty
electronic assembly
Faulty shaft lock
button
Ventilation slots
are covered
Overuse or over
pressure onto
rotary tool
Check that the
switch is properly
engaging the
electronic assembly.
Immediately replace
the power cord by
an electrician or
professional power
tool repairer.
Replace the entire
electronic assembly.
Replace the entire
electronic assembly.
If the shaft rotates
even when the shaft
lock is pressed, the
button will need be
replaced.
Clean the vents,
ensure that they are
not covered by dust,
dirt etc.
During use, make
sure to pause
occasionally to
reduce temperature
(especially working
at low speed
condition).
Apply proper
pressure when using
tool according to its
rating.
Possible Cause Remedy
Keep the vents of the rotary tool clean at all times. If
possible, prevent foreign matter from entering the vents. After
each use, blow air through the rotary tool housing to ensure it
is free from all dust particles which may build up. Build up of
dust particles may cause the rotary tool to overheat and fail. If
the enclosure of the rotary tool requires cleaning, do not use
solvents but a moist soft cloth only. Never let any liquid get
inside the rotary tool. Never immerse any part of the rotary
tool into a liquid. If the supply cord is damaged, it must be
replaced by the manufacturer, its service agent or similarly
qualified persons to prevent any potential hazard.

www.populotools.com
WARRANTY
YOUR PRODUCT IS GUARANTEED FOR A MAXIMUM PERIOD OF 24 MONTHS FROM THE ORIGI-
NAL DATE OF PURCHASE AND IS INTENDED FOR DIY (DO IT YOURSELF) USE ONLY.
Warranty excludes consumable parts, (For example, bearings and O-rings, etc.)
30-DAY MONEY BACK GUARANTY
Within the first 30 days of purchase, you are allowed to return your product for a full refund.
30 DAYS TO 90 DAYS (3 MONTHS)
A defective unit will be replaced with a new one in accordance with the terms of this warranty, due to
manufacturing fault.
90 DAYS TO 24 MONTHS
Up to 24 months after purchase, we will provide speedy and effective online service.
WARNING
The following actions will result in the warranty becoming void.
alterations.
ANY QUESTIONS, PLEASE CONTACT OUR CUSTOMER SERVICE CENTER:
TO ENSURE THE QUICKEST RESPONSE POSSIBLE, PLEASE HAVE THE MODEL NUMBER AND
DATE OF PURCHASE AVAILABLE SO OUR CUSTOMER SERVICE REPRESENTATIVE CAN ANSWER
ANY QUESTIONS YOU MAY HAVE RELATING TO THE WARRANTY POLICY OR PROCEDURE.
HANGZHOU AVANT GLOBE ECOMMERCE CO., LTD
3F, Bldg 9, Xixi Xintiandi Commercial Center, Wenyi West
Road, Hangzhou, Zhengjiang, P. R. China. 310012

Por favor lea atentamente este manual del usuario antes de usar la herramienta rotativa.
POR LA GENTE PARA LA GENTE
MANUAL DEL USUARIO
107 PIEZAS
KIT DE HERRAMIENTA ROTATIVA
ACCESORIOS DE
107 PIEZAS
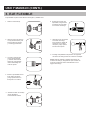
LO QUE HAY EN LA CAJA
RTK-107
FLEXIBLE ROTATIVA
ACCESORIO
PARA AFILAR
GUÍA DE CORTE

ADVERTENCIAS DE SEGURIDAD ELÉCTRICA
ADVERTENCIAS GENERALES DE SEGURIDAD
¡ADVERTENCIA! Al utilizar herramientas eléctricas, tome precauciones
básicas de seguridad, incluyendo lo siguiente, siempre se deben seguir
para reducir el riesgo de incendio, descarga eléctrica, lesiones
personales y daños materiales.
¡ADVERTENCIA! Lea todas las advertencias de seguridad y todas las
instrucciones. No seguir las advertencias e instrucciones puede provocar
una descarga eléctrica, fuego o lesiones graves.
Guarde todas las advertencias e instrucciones para referencia futura. El término "herramienta eléctrica" en las advertencias se refiere a su
herramienta eléctrica accionada por la red (con cable) o herramienta eléctrica que funciona con batería (sin cable).
1. Seguridad en el área de trabajo
1.1 Mantenga el área de trabajo limpia y bien iluminada. Las áreas desordenadas u oscuras provocan accidentes.
1.2 No utilice herramientas eléctricas en ambientes explosivos, como en presencia de líquidos, gases o polvo inflamable. Las herramientas
eléctricas crean chispas que pueden encender polvo o los humos.
1.3 Mantenga a los niños y otras personas alejados mientras opera una herramienta eléctrica. Distracciones pueden hacer perder el control.
2. Seguridad eléctrica
2.1 Los enchufes de la herramienta eléctrica deben coincidir con la salida. Nunca modifique el enchufe de ninguna manera. No use enchufes
adaptadores con herramientas eléctricas conectadas a tierra. Los enchufes no modificados reducirán el riesgo de descarga eléctrica.
2.2 Evite el contacto del cuerpo con zonas puestas a tierra, como tuberías, radiadores, estufas y refrigeradores. Existe un mayor riesgo de
descarga eléctrica si su cuerpo está conectado a tierra.
2.3 No exponga las herramientas eléctricas a la lluvia o condiciones húmedas. El agua que ingresa a una herramienta eléctrica aumentará el
riesgo de descarga eléctrica.
2.4 No abuse del cable. Nunca use el cable para mover, halar o desenchufar la herramienta eléctrica. Mantenga el cable alejado del calor,
aceite, bordes afilados o partes móviles. Los cables dañados o enredados aumentan el riesgo de descarga eléctrica.
2.5 Cuando utilice una herramienta eléctrica en exteriores, use un cable de extensión adecuado para exteriores. Un cable adecuado para
exteriores reduce el riesgo de descarga eléctrica.
2.6 Si no puede evitar el uso de una herramienta eléctrica en un lugar húmedo, utilice una fuente de protección con interruptor de circuito de
falla a tierra (GFCI) con una corriente de fuga nominal de 30 mA o menos. El uso de un GFCI reduce el riesgo de descarga eléctrica.
3. Seguridad personal
3.1 Manténgase alerta, observe lo que está haciendo y use el sentido común cuando utilice una herramienta eléctrica. No use una
herramienta eléctrica mientras esté cansado o bajo influencia de drogas, alcohol o medicamentos.
Un momento de falta de atención mientras opera las herramientas eléctricas puede ocasionar lesiones personales graves.
3.2 Usar equipo de protección personal. Siempre use protección para los ojos. Los equipos de protección, como máscaras antipolvo, calzado
de seguridad antideslizante, casco o protección para los oídos, usados para condiciones adecuadas reducirán las lesiones personales.
3.3 Prevenir el arranque involuntario. Asegúrese de que el interruptor esté en la posición de apagado antes de conectarlo a la fuente de
alimentación y / o al paquete de baterías, al levantar o transportar la herramienta. Llevar herramientas eléctricas con el dedo puesto en el
interruptor o conectar las herramientas eléctricas que tienen el interruptor encendido provoca accidentes.
3.4 Retire cualquier llave de ajuste o llave inglesa de encender la herramienta eléctrica. Una llave inglesa o llave dejada puesta a una parte
giratoria de la herramienta eléctrica puede ocasionar lesiones personales.
3.5 No se exceda. Mantenga la postura y el equilibrio en todo momento. Esto permitirá un mejor control de la herramienta eléctrica en
situaciones inesperadas.
Voltios
120V
Amperios
más de
No debe
superar
más de
Longitud total del cordón en pies
AWG
25 50 100 150
0
6
10
12
6
10
12
16
18
18
16
14
16
16
16
12
16
14
14
14
12
12
No recomendado
Usando un cable de extensión
Utilice siempre un cable de extensión aprobado y adecuado para la entrada de potencia de esta
herramienta. Antes del uso, inspeccione el cable de extensión para detectar signos de daños, desgaste
y envejecimiento. Reemplace el cable de extensión si está dañado o defectuoso. Cuando utilice un
cable de extensión en un carrete, desenrolle siempre el cable por completo. El uso de un cable de
extensión que no sea adecuado para la entrada de corriente o que esté dañado o defectuoso puede
ocasionar riesgo de incendio y descarga eléctrica.
Lea todo el manual detenidamente y asegúrese de saber cómo apagar la herramienta en caso de emergencia antes de utilizarla.
Guarde estas instrucciones y otros documentos suministrados con esta herramienta para futuras consultas. El motor eléctrico fue diseñado
para 120V 60Hz solamente. Siempre verifique que la fuente de alimentación corresponda a la tensión en la placa de características.
Nota: El suministro de 120V 60Hz en las herramientas Populo es intercambiable para los Estados Unidos y Canadá.
Nota: La toma de corriente utilizada para las herramientas eléctricas debe estar protegida por un interruptor de circuito de falla a tierra de
30 mA o un disyuntor de fuga a tierra.
Si el cable de alimentación está dañado, debe ser reemplazado por un electricista para evitar cualquier peligro.
Nota: El doble aislamiento no reemplaza las precauciones de seguridad normales al operar esta herramienta. El sistema de aislamiento
es para una mayor protección contra lesiones resultantes de una posible falla de aislamiento eléctrico dentro de la herramienta.

Este aparato no debe ser utilizado por personas jóvenes o enfermas, a menos que una persona responsable supervice y garantice seguridad
en el uso del equipo. Los niños pequeños deben ser supervisados para asegurarse de que NO jueguen con el aparato.
ADVERTENCIAS DE SEGURIDAD DE LA HERRAMIENTA ROTATIVA
3.6 Vistase apropiadamente. No use ropa suelta o joyas. Mantenga el cabello, la ropa y guantes alejados de las piezas móviles. La ropa
suelta, las joyas o el pelo largo pueden quedar atrapados en las piezas móviles.
3.7 Si se proporcionan dispositivos para la conexión de la extracción y recolección de polvo, asegúrese que estén conectados y sean
utilizados correctamente. El uso de recolección de polvo puede reducir los riesgos relacionados con el polvo.
4. Uso y cuidado de la herramienta eléctrica
4.1 No fuerce la herramienta eléctrica. Use la herramienta eléctrica correcta para su uso. La herramienta eléctrica correcta hará el trabajo
mejor y más seguro a la velocidad para la que fue diseñada.
4.2 No use la herramienta eléctrica si el interruptor no la enciende y apaga. Si no funciona su interruptor es peligrosa y debe repararse.
4.3 Desconecte el enchufe de la fuente de alimentación y / o del paquete de baterías de la herramienta eléctrica antes de realizar cualquier
ajuste, cambiar accesorios o almacenar herramientas eléctricas. Estas medidas preventivas de seguridad reducen el riesgo de empezar
usando la herramienta eléctrica accidentalmente.
4.4 Guarde las herramientas eléctricas inactivas fuera del alcance de los niños. No permita que personas no familiarizadas con la
herramienta eléctrica o estas instrucciones le den uso. Las herramientas eléctricas son peligrosas en manos de usuarios no entrenados.
4.5 Mantenimiento. Revise si hay desalineación o atascamiento de piezas móviles, roturas de piezas y cualquier otra condición que pueda
afectar el funcionamiento de la herramienta eléctrica. Si está dañado, haga reparar la herramienta eléctrica antes de usarla. Muchos
accidentes son causados por falta de mantenimiento.
4.6 Mantenga las herramientas de corte afiladas y limpias. Las herramientas de corte correctamente mantenidas con bordes de corte
afilados tienen menos probabilidades de unirse y son más fáciles de controlar.
4.7 Utilice la herramienta eléctrica, los accesorios, las brocas, etc. de acuerdo con estas instrucciones, tome en cuenta las condiciones de
trabajo y el trabajo a realizar. Usar la herramienta eléctrica en prácticas diferentes a las previstas podría ocasionar una situación peligrosa.
5. Servicio
5.1 Haga reparar su herramienta eléctrica por un técnico de reparación calificado que utilice solo piezas de repuesto idénticas. Esto
asegurará que se mantenga la seguridad de la herramienta eléctrica.
5.2 Si el cable de corriente está dañado, el fabricante, su agente de servicio o personas calificadas deben reemplazarlo para evitar peligro.
¡ADVERTENCIA! Advertencias de seguridad comunes para operaciones
de amolado, lijado, cepillado de alambre, pulido o corte abrasivo.
corte. Lea todas las advertencias de seguridad, instrucciones, ilustraciones y especificaciones proporcionadas con esta herramienta
eléctrica. El incumplimiento de todas las instrucciones a continuación puede provocar una descarga eléctrica, fuego y/o lesiones graves.
accesorio puede conectarse a su herramienta eléctrica, no garantiza un uso seguro.
pueden romperse y/o separarse si se abusa de la velocidad.
no pueden ser protegidos o controlados adecuadamente si tienen un tamaño incorrecto.
el orificio del eje del accesorio debe ajustarse al diámetro de la brida. Los accesorios que no coincidan con el equipo de montaje de la
herramienta eléctrica perderán equilibrio, vibrarán excesivamente y pueden causar pérdida de control.
de respaldo busque grietas, rasgaduras o desgaste excesivo, revise alambres sueltos o agrietados en el cepillo de alambre. Si se cae la
herramienta eléctrica o un accesorio, vea si se dañó. Instale uno sin daños. Después de revisar e instalar un accesorio
giratorio, aléjese del mismo y haga funcionar la herramienta eléctrica a la velocidad máxima durante un minuto. Los accesorios dañados
normalmente se romperán durante este tiempo de prueba.
antipolvo, protectores auditivos, guantes y un delantal de taller capaz de detener pequeños fragmentos que se desprendan. La protección
para los ojos debe ser capaz de detener astillas voladoras generadas por el trabajo. La máscara de polvo o el respirador deben ser
capaces de filtrar las partículas generadas. La exposición prolongada a ruidos de alta intensidad puede causar pérdida de audición.
protección personal. Los fragmentos de la pieza de trabajo o de un accesorio roto pueden salir volando y causar lesiones incluso más
allá de donde se está trabajando.
en contacto con cables ocultos o con su propio cable. Si este accesorio toca un cable "activo" puede hacer que las partes metálicas de
la herramienta eléctrica se activen y podría provocar una descarga eléctrica al operador.
arrastrado hacia el accesorio giratorio.
superficie y poner la herramienta eléctrica fuera de control.

y hacer daño a su cuerpo.
la acumulación excesiva de metal en polvo puede causar riesgos eléctricos.
Rebote y advertencias relacionadas
engancha. El pellizco o enganche provoca un bloqueo rápido del accesorio giratorio y hace que la herramienta eléctrica se fuerce en la
dirección opuesta a la rotación del accesorio.
excavar en la superficie del material haciendo que la rueda salga disparada. Esta puede saltar hacia o desde el trabajador, dependiendo de la
dirección del movimiento de la rueda en el punto del pellizco. Las ruedas abrasivas también pueden romperse en estas condiciones.
1. El rebote es el resultado de un mal uso de la herramienta eléctrica y / o de condiciones de uso incorrectos y se
puede evitar tomando las precauciones adecuadas que se detallan a continuación.
1.1 Mantenga un agarre firme de la herramienta eléctrica, coloque su cuerpo y brazo para que pueda resistir la fuerza del rebote. Utilice
siempre una manija auxiliar, si la tiene, para obtener un control máximo sobre el rebote o una reacción de torsión durante el arranque. El
usuario puede controlar las reacciones de torsión o las fuerzas de rebote, si se toman las precauciones adecuadas.
1.2 Nunca coloque la mano cerca del accesorio giratorio. El accesorio puede rebotar sobre su mano.
1.3 No coloque su cuerpo en el área donde se moverá la herramienta eléctrica si se produce rebote. El rebote impulsará la herramienta en
dirección opuesta al movimiento de la rueda en el punto de enganche.
1.4 Tenga especial cuidado cuando trabaje en esquinas, bordes afilados, etc. Evite rebotes y enganches. Las esquinas, los bordes filosos o
duros tienden a enganchar el accesorio giratorio y ocasiona pérdida de control o rebote.
1.5 No coloque una hoja para cortar en madera ni una hoja de sierra dentada. Tales cuchillas crean rebotes frecuentes y pérdida de control.
2. Advertencias de seguridad específicas para usos de amolado y corte abrasivo:
2.1 Use solo los tipos de ruedas que se recomiendan para su herramienta eléctrica y la protección específica diseñada para la rueda
seleccionada. Las ruedas para las cuales no se diseñó la herramienta eléctrica no son seguras.
2.2 La superficie de trituración de las ruedas con depresión central debe montarse debajo del plano del labio protector. Una rueda montada
incorrectamente que se proyecta a través del plano del labio protector no puede protegerse adecuadamente.
2.3 Las ruedas deben usarse solo para las aplicaciones recomendadas. Por ejemplo: no muela con el lado de la rueda de corte. Las ruedas
de corte abrasivas están diseñadas para el rectificado periférico, las fuerzas laterales aplicadas a estas ruedas pueden hacer que se rompan.
2.4 Siempre use bridas de rueda no dañadas que sean del tamaño y forma correctos para su rueda seleccionada. Las bridas adecuadas de
la rueda soportan la rueda reduciendo así la posibilidad de rotura de la rueda. Las bridas para las ruedas de corte pueden ser diferentes de
las bridas de las muelas abrasivas.
2.5 No use ruedas desgastadas de herramientas eléctricas más grandes. La rueda destinada a herramienta eléctrica más grande no es
adecuada para la velocidad más alta de una herramienta más pequeña y puede reventar.
3. Advertencias de seguridad adicionales específicas para operaciones de corte abrasivo:
3.1 No "atasque" la rueda de corte ni aplique una presión excesiva. No intente hacer una profundidad de corte excesiva. Si se sobrecarga la
rueda, reduce la torsión y provoca el atascamiento de la rueda en el corte y la posibilidad de un rebote o rotura de la rueda.
3.2 No coloque su cuerpo en línea con y detrás de la rueda giratoria. Cuando la rueda se aleja de su cuerpo, el rebote puede impulsar la
rueda giratoria y la herramienta eléctrica directamente hacia usted.
3.3 Cuando la rueda se está atascando o deja de cortar por algún motivo, apague la herramienta eléctrica y manténgala inmóvil hasta que la
rueda se detenga por completo. Nunca intente quitar la rueda de corte mientras la rueda está en movimiento, de lo contrario podría rebotar.
Investigue y tome medidas correctas para eliminar la causa del atascamiento de la rueda.
3.4 No haga un reinicio de corte en la pieza de trabajo. Deje que la rueda alcance la velocidad máxima y vuelva a introducir cuidadosamente
el corte. La rueda puede atascarse, subir o retroceder si reanuda el uso en la pieza de trabajo.
3.5 Use paneles de soporte o cualquier pieza de trabajo que ayude a minimizar el riesgo de pellizco y rebote de la rueda. Las piezas de
trabajo grandes tienden a torcerse por su propio peso. Los soportes deben colocarse debajo de la pieza de trabajo cerca de la línea de corte
y cerca del borde de la pieza de trabajo en ambos lados de la rueda.
3.6 Tenga mucho cuidado al hacer un "corte cuadrado" en paredes existentes u otras áreas ciegas. La rueda que sobresale puede cortar
tuberías de gas o agua, cables eléctricos u objetos que pueden causar rebote.
4. Advertencias de seguridad específicas para operaciones de lijado:
4.1 No utilice un papel de lijado excesivamente grande. Siga las recomendaciones del fabricante al seleccionar papel de lijar. El papel de lijar
más grande que se extiende más allá de la almohadilla presenta un peligro de laceración y puede provocar enganches, rasgaduras o rebote.
5. Advertencias de seguridad específicas para operaciones de pulido:
5.1 No permita que ninguna porción suelta del bonete de pulido o sus cuerdas de fijación giren libremente. Oculte o recorte cualquier cuerda
de atadura suelta. Las cuerdas de fijación flojas y giratorias pueden enredar sus dedos o engancharse en la pieza de trabajo.
6. Advertencias de seguridad específicas para usos de cepillado de alambre:
6.1 Tenga en cuenta que las cerdas de alambre son arrojadas por el cepillo incluso durante el funcionamiento normal. No fuerce excesiva-
mente los alambres aplicando una carga excesiva al cepillo. Las cerdas de alambre pueden penetrar fácilmente la ropa y / o la piel liviana.
6.2 Si se recomienda el uso de un protector para el cepillado con alambre, no permita ninguna interferencia de la rueda o el cepillo con el
protector. La rueda de alambre o el cepillo pueden expandirse en diámetro debido a la carga de trabajo y las fuerzas centrífugas.
6.3 Dirija la fuerza del cepillo de alambre giratorio lejos de usted. Las partículas pequeñas y pequeños fragmentos de alambre se pueden
desprender a alta velocidad durante el uso de estos cepillos y pueden quedar incrustados en la piel.

CONOZCA SU PRODUCTO
1. Tuerca de Sujeción
2. Collar del Eje
3. Botón de Bloqueo del Eje
4. Cepillos Accesibles
5. Selector de Velocidad
6. Interruptor
7. Anillo Colgante
8. Cable de Corriente
9. Eje Flexible
10. Tuerca de Sujeción
11. Agujero de Bloqueo
12. Collar de Montaje
13. Tornillo
14. Guía de Corte
15. Collar de la Guía
16. Accesorio para
Afilar Cuchillas
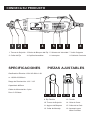
1 2 3 5 6 7 84
PIEZAS AJUSTABLES
12
1110
9
13 14 15 16
SPECIFICACIONES
Clasificación Eléctrica: 120V AC 60Hz 1.0A
n: 10,000-32,000/min
Rango de Recolección: 1/16 "-1/8"
Cable de Alimentación: 6 pies
Peso: 3.59 libras

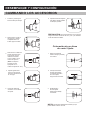
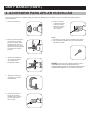
DESEMPAQUE Y CONFIGURACIÓN
CAMBIANDO LOS ACCESORIOS
1
Presione y sostenga el
botón de bloqueo del eje.
3
Seleccione el collarín de
ajuste adecuado para
el accesorio que se
utilizará e insertelo.
Luego cubralo con la
tuerca de sujeción.
(Nota: la máquina
enviada ya está
equipada con un
collarín de ajuste de 1/8 ")
4 Apriete ligeramente
la tuerca de sujeción
para que permanezca
en su lugar.
2 Desenrosque la tuerca
de sujeción y retírela
completamente con
la llave proporcionada.
Colocación de un disco
de corte / lijado
3 Apriete el disco
de corte / lijado
sobre el eje (mandril)
con la llave.
1 Retire el tornillo del
extremo del eje (mandril)
con la llave.
NOTA: NO apriete demasiado el tornillo ya que
podría dañar el disco de corte.
6 Apriete la tuerca de sujeción
del collarín usando el botón
de bloqueo y la llave.
2 Coloque las bridas
de fibra (arandelas)
a cada lado del disco
de corte / lijado,
luego inserte el tornillo.
5 Inserte la varilla del
accesorio en el collarín
de ajuste.
PRECAUCIÓN: Se recomienda que no se coloque
ningún accesorio de más de 35 mm (1,37 ") de diámetro
en la herramienta rotativa.

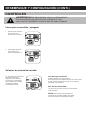
DESEMPAQUE Y CONFIGURACIÓN (CONTI.)
CAMBIANDO LOS ACCESORIOS (CONTI.)
3
Colocando una banda de lijado
1 Afloje el tornillo
en la parte superior
del tambor de lijado
con la llave.
2 Deslice la banda
de lijado sobre
el tambor de lijado.
Apriete el tornillo
con la llave hasta que
la banda de lijar
quede asegurada.
Colocando una rueda de fieltro
1 El extremo del eje
del tornillo se alinea
con el centro de
la rueda de fieltro.
2.
Aplique presión levemente
y atorníllelo en el sentido
de las agujas del reloj.

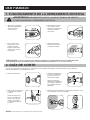
DESEMPAQUE Y CONFIGURACIÓN (CONTI.)
CONTROLES
1 Para encender, presione
el interruptor en la
posición de encendido "I".
2 Para apagar, presione
el interruptor en la
posición de apagado "0".
Interruptor encendido / apagado
La velocidad de la herramienta
se puede regular para
adaptarse a una variedad
de accesorios y materiales.
Gire el selector de velocidad
variable para obtener
la velocidad deseada.
Uso de baja velocidad:
Se aplica para usar en partes frágiles.
Se recomienda que las piedras de moler de varias formas
se usen a baja velocidad para evitar que se calienten
demasiado y se deterioren.
Uso de alta velocidad:
Los proyectos con vidrio requieren una perforación
a alta velocidad.
Selector de velocidad variable
NOTA: Cuanto mayor sea el número en
el selector de velocidad variable, más rápida
será la velocidad de la herramienta rotativa.
¡ADVERTENCIA! SE RECOMIENDA USAR LA HERRAMIENTA
CON UN DISPOSITIVO DE FUGAS DE CORRIENTE CON
UNA FUGA DE CORRIENTE CLASIFICADA DE 30MA O MENOS.

USO Y MANEJO
1. FUNCIONAMIENTO DE LA HERRAMIENTA ROTATIVA
2. GUÍA DE CORTE
1 Seleccione la velocidad
adecuada dependiendo
del uso que hará
y del accesorio.
2 Para accesorios de
alta precisión, como
grabado o fresado,
sujete la herramienta
rotativa como si fuera
un bolígrafo.
4 Aplique suavemente
la punta del accesorio
a la pieza de trabajo.
3
Para trabajos pesados
como cortar o moler,
sostenga la herramienta
rotativa en la palma
de su mano.
AVISO: Corte siempre en el sentido de las agujas del reloj.
La guía de corte permite cortes robustos y controlados en una variedad de materiales, incluidos paneles de yeso, laminado,
fibra de vidrio, plástico y revestimientos de vinilo.
¡ADVERTENCIA!
Y LUEGO ENCIENDA LA HERRAMIENTA ROTATIVA.
1 Retire el collar del eje.
2 Afloje la tuerca de sujeción
con el botón de bloqueo
y la llave.
Inserte la espiga de la
broca en el collarín de
ajuste y luego apriete
la tuerca de sujeción
con el botón de bloqueo
y la llave.
3 Atornille completamente
el collar de montaje de
la guía de corte en la
herramienta rotativa.
Afloje el tornillo para
ajustar la profundidad de
corte según lo deseado,
luego apriete el tornillo
para fijarlo.
4 Sostenga bien la herramienta rotativa para comenzar a cortar,
hay un ejemplo en las fotos de abajo.
PRECAUCIÓN: LA COLOCACIÓN DE UNA CARGA EXCESIVA EN LA HERRAMIENTA ROTATIVA MIENTRAS ESTÁ
FUNCIONANDO A BAJA VELOCIDAD PUEDE CAUSAR SOBRECALENTAMIENTO Y FALLO EN EL MOTOR.

USO Y MANEJO (CONTI.)
3. EJE FLEXIBLE
8 Extraiga completamente el pasador de seguridad
del orificio del mango antes de comenzar a trabajar.
Sostenga el mango del
eje flexible, luego inserte
el pasador de seguridad
en el orificio del mango.
6
7 Afloje la tuerca de sujeción
en el lado del mango,
luego inserte la varilla del
accesorio en el collarín
de ajuste y luego apriete
la tuerca de sujeción.
5 Atornille el collar de montaje
del eje flexible en
la herramienta rotativa.
1 Retire el collar del eje.
2 Afloje la tuerca de sujeción
con ayuda de la llave y del
botón de bloqueo del eje
y mantenga presionado.
Inserte el eje flexible interno
en el collarín de ajuste
y luego apriete la tuerca
de sujeción con la llave.
4
Levante el extremo del
mango del eje flexible
y muévalo suavemente
hasta que el eje flexible
interior sobresalga del
collar de ajuste.
3
El eje flexible es para control adicional de longitud y detalles finos.
NOTA: Antes de insertar el pasador de bloqueo en
el orificio del mango, asegúrese de que el orificio en
el eje de movimiento interior esté alineado con el
agujero del mango.

USO Y MANEJO (CONTI.)
El accesorio de afilado de cuchillas se utiliza para afilar una amplia gama de cuchillas, como una cuchilla normal, pala de jardín o
tijeras podadoras.
4. ACCESORIO PARA AFILAR CUCHILLAS
4 Asegure la cuchilla con
una prensa y encienda
la herramienta.
6 Baje con cuidado
la piedra de amolar
sobre la cuchilla y
deslícela a lo largo
de todo el borde
de la cuchilla.
NOTA:
1. Para afilar la cuchilla, solo se necesitan pocos pasos.
2. Use las siguientes piedras de moler recomendadas
para afilar cuchillas.
3 Atornille completamente
el accesorio de afilado
de cuchillas en la
herramienta rotativa.
Retire el collar del eje.1
5 Apoye la superficie en
ángulo del accesorio
de afilado de la cuchilla
contra el lado inferior
de la cuchilla.
2 Afloje la tuerca de sujeción
con el botón de bloqueo
y la llave. Inserte la varilla
de la piedra de moler en
el collarín de ajuste y luego
apriete la tuerca de sujeción
con el botón de bloqueo
y la llave.
AVISO: COLOCAR UNA CARGA EXCESIVA EN LA
HERRAMIENTA ROTATIVA MIENTRAS ESTÁ
SOBRECALENTAMIENTO Y FALLO EN EL MOTOR.

NOTA: LA MEDIDA DE TODOS LOS ACCESORIOS INCLUIDOS EN ESTE KIT ES DE 1/8 ".
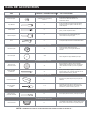
GUÍA DE ACCESORIOS
Collarín de Ajuste
1/8” x 1
(instalado en la herramienta)
3/32” x 1
Eje o Mandril
x 1
Tornillo Mandril x 1
Tambor de Lijado
x 1
Banda de Lijado
x 4
x 8
x 68
Disco de Corte
de Fibra de Vidrio
Disco de Lijado
Broca Revestida
de Diamante
x 2
ACCESORIOS DE CORTE
TIPO
Llave
x 1
Se usa para sujetar accesorios en la herramienta rotativa.
Discos delgados de papel utilizados para lijar.
Piedra Rectificadora
x1
Broca de Piedra
de Moler
x 12
ACCESORIOS DE MOLER
Broca de Acero
para Alta Velocidad
x 2
x 4
Se usa para perforar madera y todo tipo de material.
ACCESORIO DIVERSO
Discos de Fieltro
Utilizados para pulir superficies irregulares
y anguladas. Puede usarse en resina, metal, piedra,
vidrio y mármol. Suele usarse con pasta para pulir.
ACCESORIOS DE PULIDO
USO Y APLICACIÓNCANTIDAD / TAMAÑOS INCLUIDOS
Se usa para adaptar una variedad de
accesorios con diferentes tamaños a la
herramienta rotativa.
Un eje o mandril es un mango al que se pueden
acoplar accesorios de pulido, ruedas de corte y
ruedas de lijado.
Este accesorio es un mandril con tornillo en la
punta y ruedas de pulido de fieltro.
Este accesorio es un mandril utilizado para
colocar tambores de lija de papel.
Forma la madera, alisa fibra de vidrio,
contornea curvas y otros lugares difíciles de
alcanzar.
Discos delgados de fibra de vidrio esmerilado
utilizados para aplicaciones de corte. Úselos para
cortar cabezas de tornillos y tuercas congelados,
etc.
Hecho para el trabajo complejo en cerámica,
madera, tallas, joyas y grabado. Disponible en una
amplia variedad de formas y tamaños.
Accesorios de pulido después de que hayan sido
utilizados.
Adecuado para varios tipos de aplicaciones de
afilado y afilado. Disponible en una amplia gama
de tamaños y formas: redonda, plana, etc.

MANTENIMIENTO
LIMPIEZA Y ALMACENAMIENTO
Mantenga las pestañas de ventilación de la herramienta rotativa
limpias en todo momento, si es posible, evitar que entren
materiales extraños. Después cada uso, sople aire a través de la ‘
carcasa de la herramienta rotativa para asegurarse de que esté
libre de todas las partículas de polvo que puedan acumularse.
La acumulación de polvo puede hacer que la herramienta rotativa
se sobrecaliente y falle. Si la carcasa de la herramienta rotativa
requiere limpieza, no use solventes, use solo un paño suave y
húmedo. Nunca permita que ningún líquido entre dentro de
la herramienta. Nunca sumerja ninguna parte de la herramienta
rotativa en un líquido. Si es necesario reemplazar el cable de
corriente, hágalo por medio del fabricante o su agente para evitar
un riesgo de seguridad.
Escobillas de carbón
Cuando las escobillas de carbón se desgastan,
la herramienta rotativa se encenderá y / o se detendrá.
Las escobillas de carbón son un
componente de desgaste de la
herramienta rotativa, por lo tanto,
no están cubiertas por la garantía.
Continuar utilizando la herramienta rotativa
cuando las escobillas de carbón
necesitan ser reemplazadas puede causar
daños permanentes a la herramienta rotativa.
Las escobillas de carbón se desgastarán después de
muchos usos, pero cuando sea necesario cambiar las
escobillas de carbón, lleve la herramienta rotatoria a
un electricista o un reparador de herramientas eléctricas,
reemplace ambas escobillas de carbón al mismo tiempo
o comuníquese con el servicio al cliente de Populo.
Accessories
Todos los accesorios se pueden almacenar en
el contenedor de accesorios de plástico para un
almacenamiento o transporte conveniente.
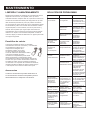
SOLUCIÓN DE PROBLEMAS
Problema
La herramienta
no enciende.
La herramienta
no varía
la velocidad.
El eje en la
herramienta
rotativa
no se bloquea.
La herramienta
se está
sobrecalentando.
No se puede
aflojar ni apretar
la tuerca de
sujeción en
el eje flexible.
Las brocas o
el collar ya no se
tensan / sueltan.
Excesivas chispas
visibles a través
de las rejillas de
ventilación de la
carcasa o
falla el uso.
La herramienta
emite un chillido
y un silbido.
Conjunto de
cojinete defectuoso
o Ventilador roto.
Todo el armazón y el
conjunto de cojinete
deben ser
reemplazados a
la vez.
Escobillas de
carbón
desgastadas.
Reemplace con
nuevas escobillas
de carbón.
Flexibilidad de
collarín, tuerca
desgastada, varilla
desgastada.
Reemplace con un
nuevo collarín,
tuerca de collar
o brocas.
El eje de
accionamiento no
puede bloquearse
por completo con
un pasador de
bloqueo.
Asegúrese de que el
eje de accionamiento
del eje flexible esté
bloqueado insertando
el pasador
de bloqueo.
El interruptor
no engancha.
Cable de
alimentación
defectuoso.
Montaje electrónico
defectuoso.
Selector de
velocidad suelto
o montaje
defectuoso.
Botón de bloqueo
del eje defectuoso.
Las ranuras de
ventilación están
cubiertas.
Uso o presión
excesivos en la
herramienta rotativa.
Verifique que el
interruptor encaje
correctamente en el
conjunto electrónico.
Reemplace de
inmediato el cable
de corriente con un
electricista o
reparador.
Reemplace en su
totalidad el
ensamblaje
electrónico.
Reemplace en su
totalidad el
ensamblaje
electrónico.
Si el eje gira incluso
cuando se presiona
el bloqueo del eje,
será necesario
reemplazar el botón.
Limpie las rejillas de
ventilación,
asegúrese de que no
estén cubiertas por
polvo, suciedad, etc.
Asegúrese de pausar
ocasionalmente
durante el uso para
reducir la temperatura.
Especialmente
trabajando en
condiciones de baja
velocidad. Aplique
una presión adecuada
sobre la herramienta
durante el uso.
Posible causa Solución

www.populotools.com
HANGZHOU AVANT GLOBE ECOMMERCE CO., LTD
3F, Bldg 9, Xixi Xintiandi Commercial Center, Wenyi West
Road, Hangzhou, Zhengjiang, P. R. China. 310012
GARANTÍA
SU PRODUCTO ESTÁ GARANTIZADO POR UN PERÍODO MÁXIMO DE 24 MESES A PARTIR DE LA
FECHA DE COMPRA ORIGINAL Y ESTÁ DESTINADO PARA USO PERSONAL (HÁGALO USTED
MISMO) SOLAMENTE.
La garantía excluye las piezas consumibles, por ejemplo: cojinetes, arandelas.
GARANTÍA DE 30 DÍAS EN DEVOLUCIÓN DEL DINERO
Con los primeros días de su compra, puede devolver su producto para obtener un reembolso completo.
30 DÍAS A 90 DÍAS (3 MESES)
El quipo defectuoso será reemplazado por uno nuevo de acuerdo con los términos de esta garantía,
debido a un error de fabricación.
90 DÍAS A 24 MESES
Con 24 meses, brindaremos un servicio posventa en línea rápido y efectivo a partir de su compra.
¡ADVERTENCIA!
Las siguientes acciones darán como resultado la anulación de la garantía.
la herramienta.
alteraciones.
CUALQUIER PREGUNTA, COMUNÍQUESE CON NUESTRO SERVICIO AL CLIENTE
PARA OBTENER UNA RESPUESTA RÁPIDA, TENGA DISPONIBLE EL NÚMERO DE
MODELO Y LA FECHA DE COMPRA. NUESTRO REPRESENTANTE DE SERVICIO AL
CLIENTE RESPONDERÁ CUALQUIER PREGUNTA QUE PUEDA TENER RELACIONADA
CON LA POLÍTICA O PROCEDIMIENTO DE LA GARANTÍA.
-
 1
1
-
 2
2
-
 3
3
-
 4
4
-
 5
5
-
 6
6
-
 7
7
-
 8
8
-
 9
9
-
 10
10
-
 11
11
-
 12
12
-
 13
13
-
 14
14
-
 15
15
-
 16
16
-
 17
17
-
 18
18
-
 19
19
-
 20
20
-
 21
21
-
 22
22
-
 23
23
-
 24
24
-
 25
25
-
 26
26
-
 27
27
-
 28
28


populo POPULO Rotary Tool Kit Manual de usuario
- Categoría
- Herramientas eléctricas
- Tipo
- Manual de usuario
- Este manual también es adecuado para
en otros idiomas
Otros documentos
-
Arrow ROT3200K-A Manual de usuario
-
Milwaukee 2460-20 Manual de usuario
-
 HART HPRL01 El manual del propietario
-
Ryobi PBLRT01B El manual del propietario
-
Ryobi RRT100 El manual del propietario
-
-
 TECCPO TDRT03P Manual de usuario
-
-
Hitachi GP 2S2 Manual de usuario
-
Dremel 4300-9/64 Manual de usuario

